49-5000468 Rev. 0 12-19 GEA
Owner’s Manual and
Installation Instruction
Manual del propietario y
instrucciones de instalación
QPCA09
QPCA10
QPCA12
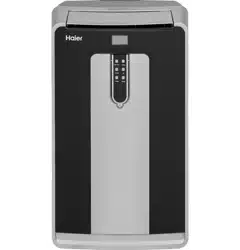
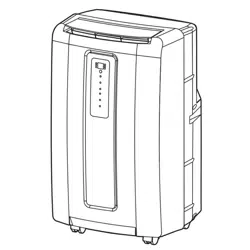
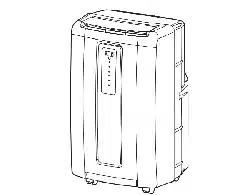
Design may vary by model number. El diseño puede variar según
el número de modelo
Portable Air Conditioner
Accondicionadores De Aire Para Sala

2 49-5000468 Rev. 0
ENGLISH

49-5000468 Rev. 0 3
ENGLISH
TABLE OF CONTENTS
RECORD KEEPING
Thank you for purchasing this Haier product. This user manual
will help you get the best performance from your new air
conditioner.
Para referencia futura, registre el modelo y el número de serie
ubicados en el deshumidificador y la fecha de compra.
Staple your proof of purchase to this manual to aid in
obtaining warranty service if needed.
____________________________________________________
Model number
____________________________________________________
Serial number
____________________________________________________
Date of purchase
HAIER WEBSITE
Have a question or need assistance with your appliance? Try the Haier Website 24 hours a day, any day of the year! You
can also shop for more great Haier products and take advantage of all our on-line support services designed for your
convenience. In the US: Haierappliances.com
IMPORTANT SAFETY INFORMATION .............................................................................. 4
CONTROLS .......................................................................................................5
CARE AND CLEANING ............................................................................................ 8
INSTALLATION INSTRUCTIONS ................................................................................. 10
TROUBLESHOOTING ........................................................................................... 14
WIFI SETUP ..................................................................................................... 15
LIMITED WARRANTY .............................................................................................16
4 49-5000468 Rev. 0
ENGLISH
IMPORTANT SAFETY INSTRUCTIONS
WARNING
To reduce the risk of fire, electrical
shock, injury to persons, or damage when using the air
conditioner, follow basic precautions, including the
following:
• Read all of the instructions before using this appliance.
• Plug into a grounded 3 prong outlet.
• Do not remove ground prong.
• Do not use an adapter.
• Do not use an extension cord.
• Do not operate the air conditioner if it has a damaged
cord or plug, if it is not working properly, or if it has been
damaged or dropped.
• The air conditioner should be serviced only by qualified
service personnel. Call an authorized service company
for examination, repair, or adjustment.
• Disconnect power before servicing.
• Disconnect power before cleaning.
NOTE: Turning off power by pressing the Power button
does NOT disconnect the appliance from the power
supply.
• Do not install or use the air conditioner in any area where
the atmosphere contains combustible gases or where
the atmosphere is contaminated. Avoid any chemicals
coming in contact with your air conditioner.
• Do not store anything directly on top of the air
conditioner.
• Use two or more people to move and install air
conditioner.
• Never operate the air conditioner without the filters in
place.
• Do not use the air conditioner near a bathtub, shower or
wash basin or other wet area.
SAFETY INFORMATION
IMPORTANT SAFETY INFORMATION
READ ALL INSTRUCTIONS BEFORE USING THE APPLIANCE
READ AND SAVE THESE INSTRUCTIONS

49-5000468 Rev. 0 5
ENGLISH
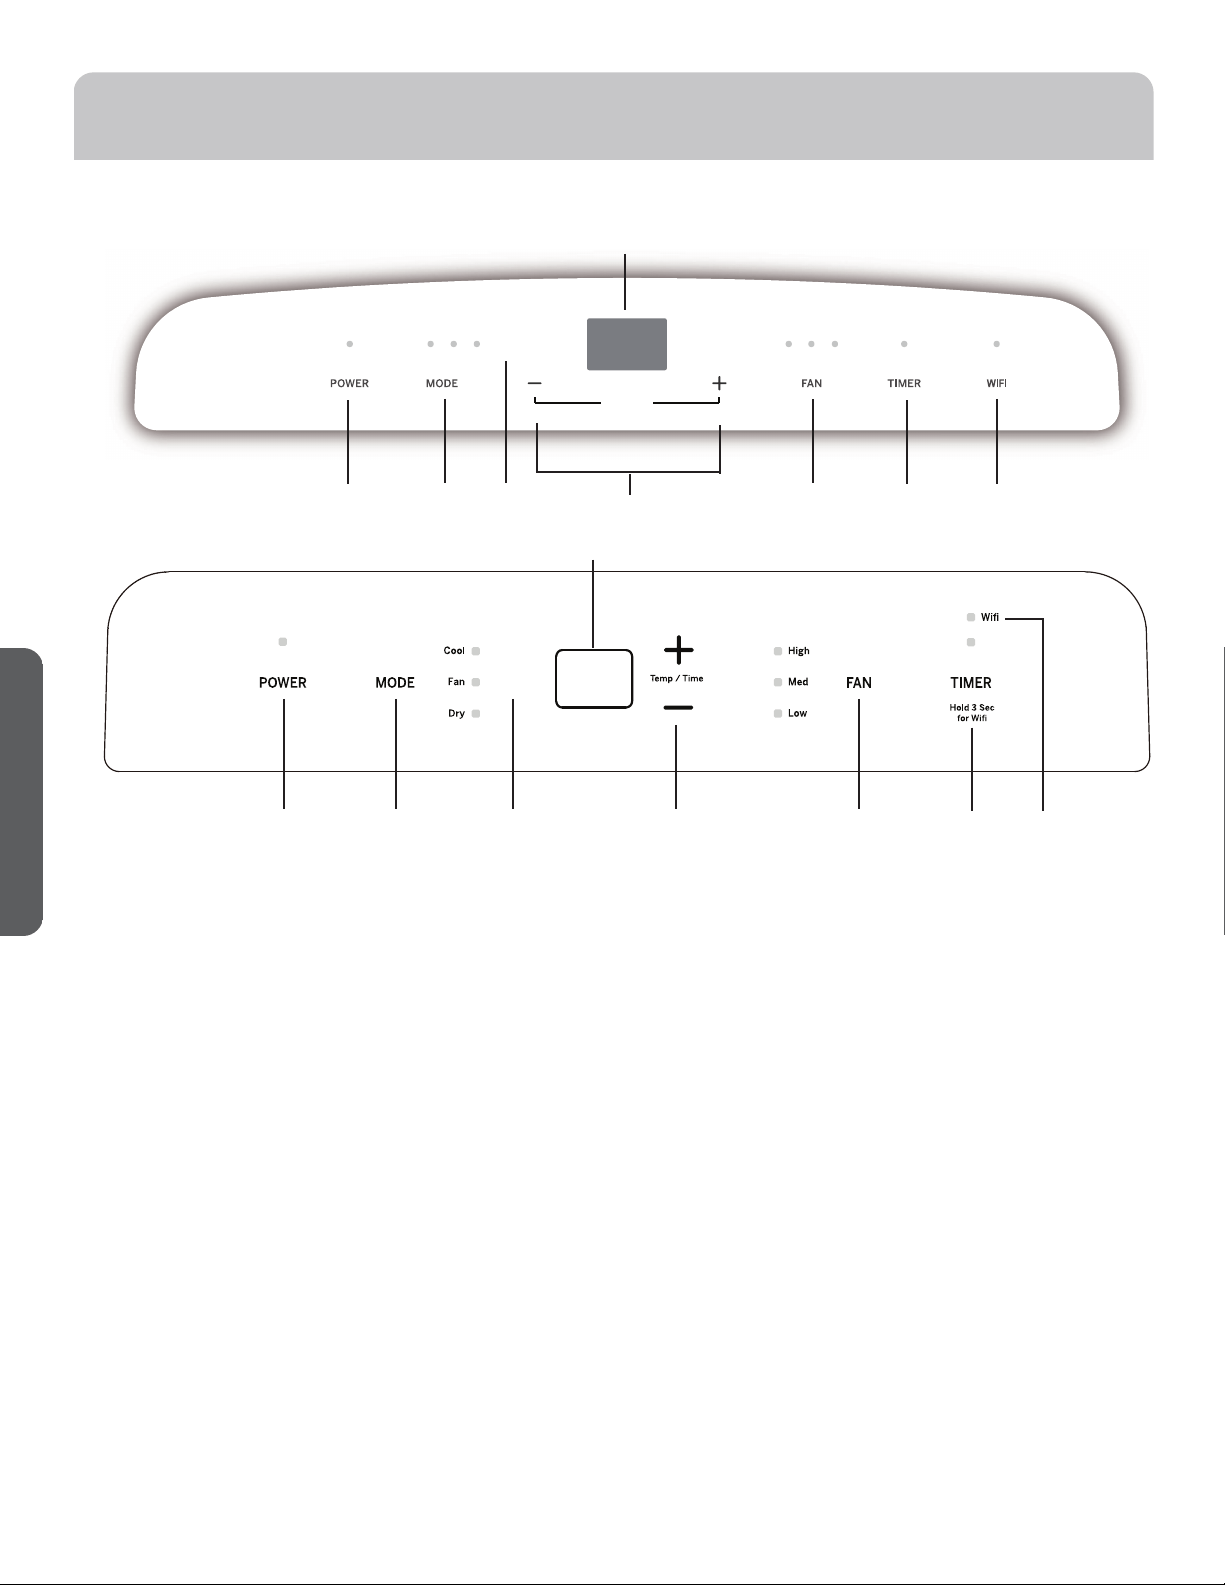
Features and appearance will vary.
Lights next to the touch pads on the air conditioner control panel indicate the selected settings.
Controls
A. CONTROL PANEL DISPLAY
Displays the Set Temperature in degrees Fahrenheit or
degrees Celsius, or the hours remaining in a Time Delay. The
corresponding indicator light will illuminate.
B. Power Button
Turns ON/OFF power to the air conditioner.
NOTE: Turning off power by pressing the Power button does NOT
disconnect the appliance from the power supply.
• Press the Power button. The Power indicator will illuminate.
C. Mode Button
Press the Mode button to toggle among the operating options.
The corresponding indicator will illuminate:
Cool – Cools the room to the set temperature
Dry – Reduces the humidity in the room
Fan – Circulates the air in the room without cooling.
D. Remote Control Signal Receiving Window
Aim the Remote Control at this window so the Control will receive
the signal.
E. Up and Down Arrow Buttons
Adjusts the Temperature or Hours in Time Delay.
To Set the Temperature:
The temperature can be set between 61ºF and 89ºF (17ºC and 30º
C) when the air conditioner is in Cool mode.
1. Press the Mode button until the Cool mode is selected.
2. Press the Up Arrow or Down Arrow buttons to select the
Temperature.
NOTE: The temperature cannot be set when the air conditioner is
in either Fan or Dry mode.
F. Fan Speed Button
The fan speed can be adjusted from Low speed, Medium speed, to
High speed when the air conditioner is either in Cool or Fan mode.
NOTE: The fan speed cannot be adjusted when the unit is in Dry
mode.
• Press the Fan Speed button to toggle among the three speeds.
The corresponding fan speed indicator will illuminate.
G. Timer Button
Program a time from (1-hour to 24-hours) for the air conditioner
to turn Off or On. When a Time Delay is programmed, the Timer
indicator light will illuminate.
While the air conditioner is operating:
1. Press the Timer button.
2. Press the Up/Down arrow buttons to select the number of hours
you want the air conditioner to continue to operate before turning
Off.
NOTE: Wait approximately 5 seconds for the Turn-Off time to be
saved.
While the air conditioner is off:
1. Press the Timer button.
2. Press the Up/Down arrow buttons to select the number of hours
you want the air conditioner to remain off before turning On.
NOTE: Wait approximately 5 seconds for the Turn-On time to be
saved.
To cancel the timer:
• Press the Timer button once, the hours remaining will flash, press
the timer button again and the timer will be canceled.
H. WiFi Connect Pad (on some Models)
1. Connect your air conditioner to WiFi router.
2. Press and hold the timer button for 3 seconds to connect the
app or disconnect the app.
Refer to the “WiFi Set up” section for more information.
Temp / Time
HighMedLowCool Fan Dry
GF
E
DCB
A
H
(on some models)
CONTROLS
A
FEDCB
G H

6 49-5000468 Rev. 0
ENGLISH
Cool Mode
Use the COOL mode for cooling.
To set the COOL mode:
1. Press the MODE pad until the COOL indicator light is lit.
2. Press the FANóäç÷òöè÷ÑÒÐÑÖÎÍÒÞÖòõÕØàéäñ
speed.
3. Press + or - to set the desired temperature between 61°F
and 89°F in 1°F increments.
After settings have been made, the display will change back
to show the room temperature.
The temperature control is used to maintain the room
temperature. The compressor will cycle on and off to keep
the room at the set level of comfort. Set the temperature
control at a lower number and the indoor air will become
cooler. Set the temperature control at a higher number
and the indoor air will become warmer. NOTE: If the air
conditioner is off and is then turned on while set to COOL,
it will take approximately 3 minutes for the compressor to
start and cooling to begin.
Cooling Descriptions
For Normal Cooling—Select the COOL mode and HIGH,
MEDIUM, or LOW fan speed with a middle set temperature.
For Maximum Cooling—Select the COOL mode
and HIGH fan speed with a lower set temperature.
For Quieter & Nighttime Cooling—Select the COOL mode
and LOW fan speed with a middle set temperature.
NOTE: If you switch from COOL or DRY mode setting to
OFF, wait 3 minutes before restarting.
DRY Mode—Dehumidification
Use the DRY mode to provide dehumidification only. The
fan will run at a fixed speed at this setting, so a fan speed
cannot be set. Keep windows and doors closed for the best
dehumidifying effects.
To set the DRY mode:
•Press the MODE pad until the DRY indicator light is lit.
Òñ÷ëèÍÛâðòçèäöè÷÷èðóèõä÷øõèúìïïñò÷åèçìöóïäüèç
Êé÷èõÍÛâðòçèëäöåèèñöè÷÷ëèçìöóïäüúìïïæëäñêèåäæî÷ò
show the room temperature.
NOTE: Òéüòøöúì÷æëéõòðäÍÛâöè÷÷ìñê÷òØÏÏòõ÷òäéäñ
setting, wait at least 3 minutes before switching back to a
ÍÛâöè÷÷ìñê
FAN Mode
Use the FAN mode to provide air circulation and filtering
without cooling.
To set the FAN mode:
• Press the FAN pad until the desired indicator light for high,
medium, or low fan speed is lit.
Since fan only settings do not provide cooling, a set
÷èðóèõä÷øõèúìïïñò÷åèçìöóïäüèçÊé÷èõÏÊ×öóèèçëäö
been set, the display will change back to show the room
temperature.
The exhaust hose and window kit do not need to be installed
when operating in fan mode.”
HEAT Mode
Use the Heat mode at Low, Med, High or Auto Fan Speed
for heating. Use the Temperature Increase (+) /Decrease (-)
pads to set the desired temperature between 61°F and 86°F
in 1°F increments.
An electronic thermostat is used to maintain the room
temperature. The heater will cycle on and off to keep the
room at the set level of comfort.
Power Outage Recovery Feature
In the case of a power outage or interruption, the unit will
automatically re-start in the settings last used after the
power is restored.
NOTE: If the TIMER was set before the power outage, it will
need to be reset after power is restored.
The display will always default to show the room temperature.
When the air conditioner is turned on, it will automatically start in the last mode and fan settings selected.
CONTROLS
49-5000468 Rev. 0 7
ENGLISH
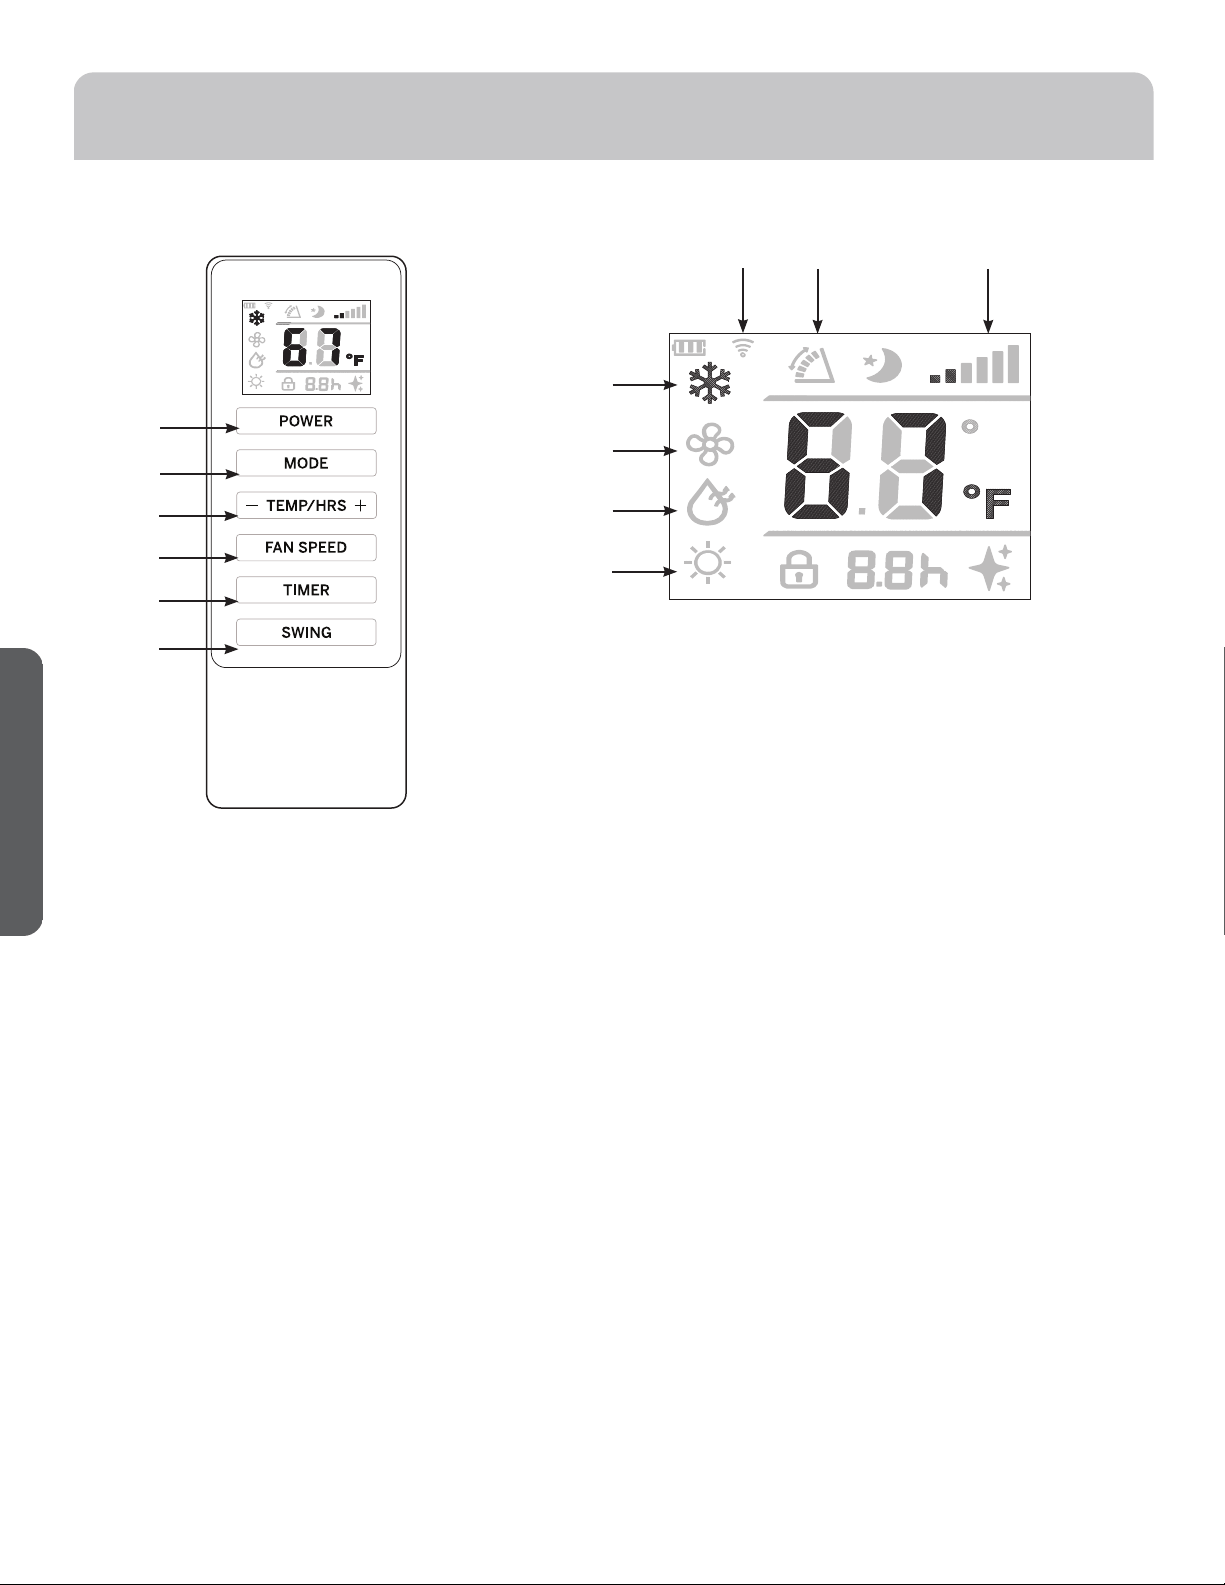
Features and appearance may vary.
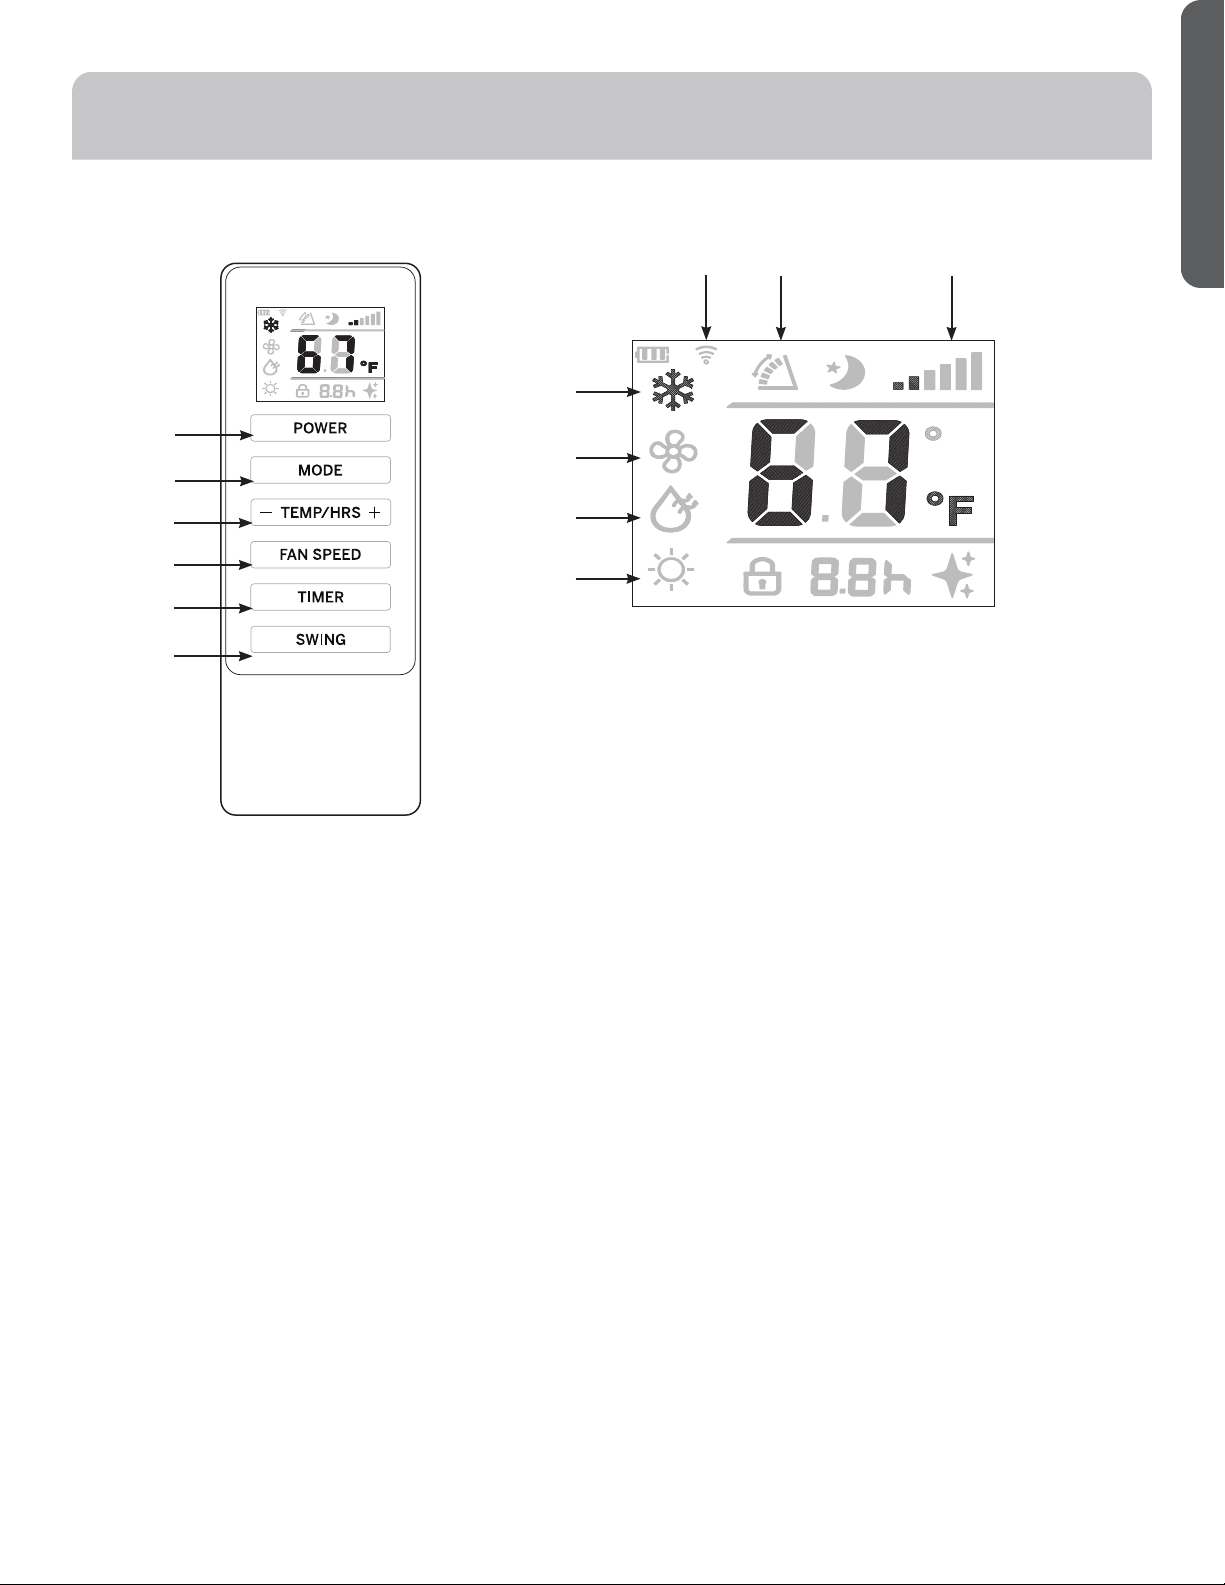
Icons on the remote control indicate the selected settings
ć
C
A
B
C
D
E
F
REMOTE CONTROL
1. Insert the two batteries (provided).
2. Aim the remote control at the signal receiver on the
control panel to operate the air conditioner.
A. Power
Turns ON/OFF power to the air conditioner.
NOTE: Turning off power by pressing the Power button does
NOT disconnect the appliance from the power supply.
• Press the Power button. The Power indicator will illuminate.
B. Mode
Press the Mode button to toggle among the operating
options. The corresponding indicator will illuminate:
Heat (on some models) - Heats the room to the set
temperature
Cool – Cools the room to the set temperature
DRY – Reduces the humidity in the room
Fan – Circulates the air in the room without cooling
C. Temperature
Adjusts the Temperature or Hours in Time Delay.
To Set the Temperature:
The temperature can be set between 61ºF and 89ºF (17ºC
and 30º C) when the air conditioner is in Cool mode.
1. Press the Mode button until the Cool mode is selected.
2. Press the Up Arrow or Down Arrow buttons to select the
Temperature.
NOTE: The temperature cannot be set when the air
conditioner is in either Fan or DRY mode.
NOTE: The Up Arrow and Down Arrow buttons, when pressed
at the same time, allow you to select between displaying
the temperature in ºC or ºF. The corresponding indicator will
illuminate.
D. Fan Speed
The fan speed can be adjusted from Low, Medium, to High
speed when the air conditioner is in operation.
NOTE: The fan speed cannot be adjusted when the unit is in
DRY mode.
• Press the Fan Speed button to toggle among the three speeds.
The corresponding fan speed indicator will illuminate.
E. Timer
Program a time from (1-hour to 24-hours) for the air conditioner
to turn Off or On. When a Time Delay is programmed, the
Timer indicator light will illuminate.
F. Swing Button
The louvers on your portable air conditioner will open
automatically (do not pry them open or push them shut).
Use the Swing Button on your remote to adjust the louvers
in the position you would like them to be in, or to operate in
Swing mode the louvers will continue to move up and down.
Cool
WiFi
Swing Fan Speed
Fan
Dry
Heat
CONTROLS
8 49-5000468 Rev. 0
ENGLISH
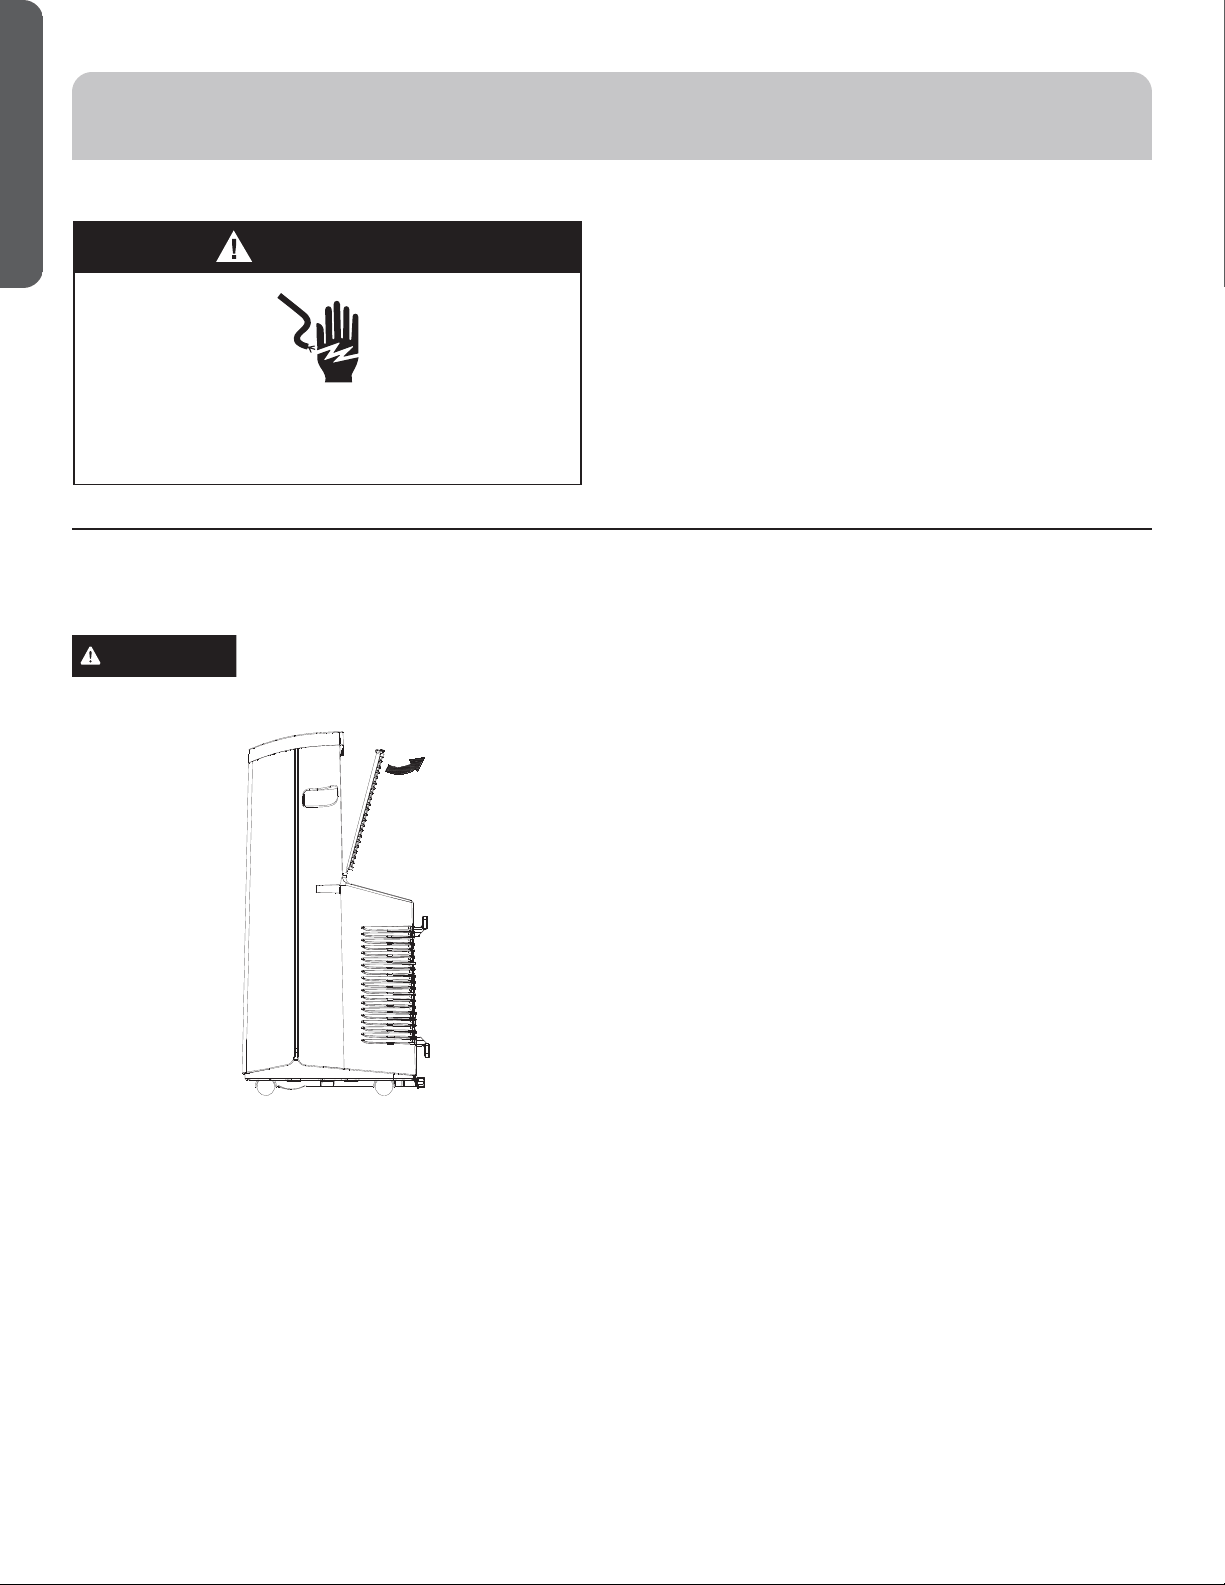
Air Filter
The air filters should be cleaned at least every two weeks for
your unit to operate at optimum efficiency.
CAUTION
DO NOT operate the air conditioner
without a filter because dirt and lint will clog it and reduce
performance.
To remove:
1. Unplug or disconnect power.
2. Pull to remove upper filter panel.
3. Wash or vacuum the dust from the air filters.
NOTE: If washed, gently shake the filter to remove the
excess water and dust particles trapped in the filter.
4. Reinstall the filters.
5. Plug in or reconnect power.
CLEANING
1. Unplug or disconnect power.
2. Use only a soft cloth dampened with water to clean the
cabinet.
NOTE:
•
Do not use a liquid or spray cleaner to clean the air
conditioner.
•
DO NOT use chemicals, abrasives, ammonia, chlorine
bleach, concentrated detergents, solvents or scouring
pads. Some of these chemicals/items may damage and/
or discolor your air conditioner.
3. Dry thoroughly with a soft cloth.
4. Plug in or reconnect power.
WARNING
Electrical Shock Hazard
Disconnect power before cleaning.
Failure to do so can result in death or electrical shock.
CARE AND CLEANING
49-5000468 Rev. 0 9
ENGLISH
How to Insert the Batteries in the Remote Control
1. Remove the battery cover by sliding it according to the
arrow direction.
2. Insert new batteries, making sure that the (+) and (–) of
battery are installed correctly.
3. Reattach the cover by sliding it back into position.
NOTES:
• Use 2 “AAA” (1.5 volt) alkaline batteries. Do not use
rechargeable batteries.
• Remove the batteries from the remote control if the
system is not going to be used for a long time.
• Do not mix old and new batteries. Do not mix alkaline,
standard (carbon-zinc) or rechargeable (ni-cad, ni-mh, etc)
batteries.
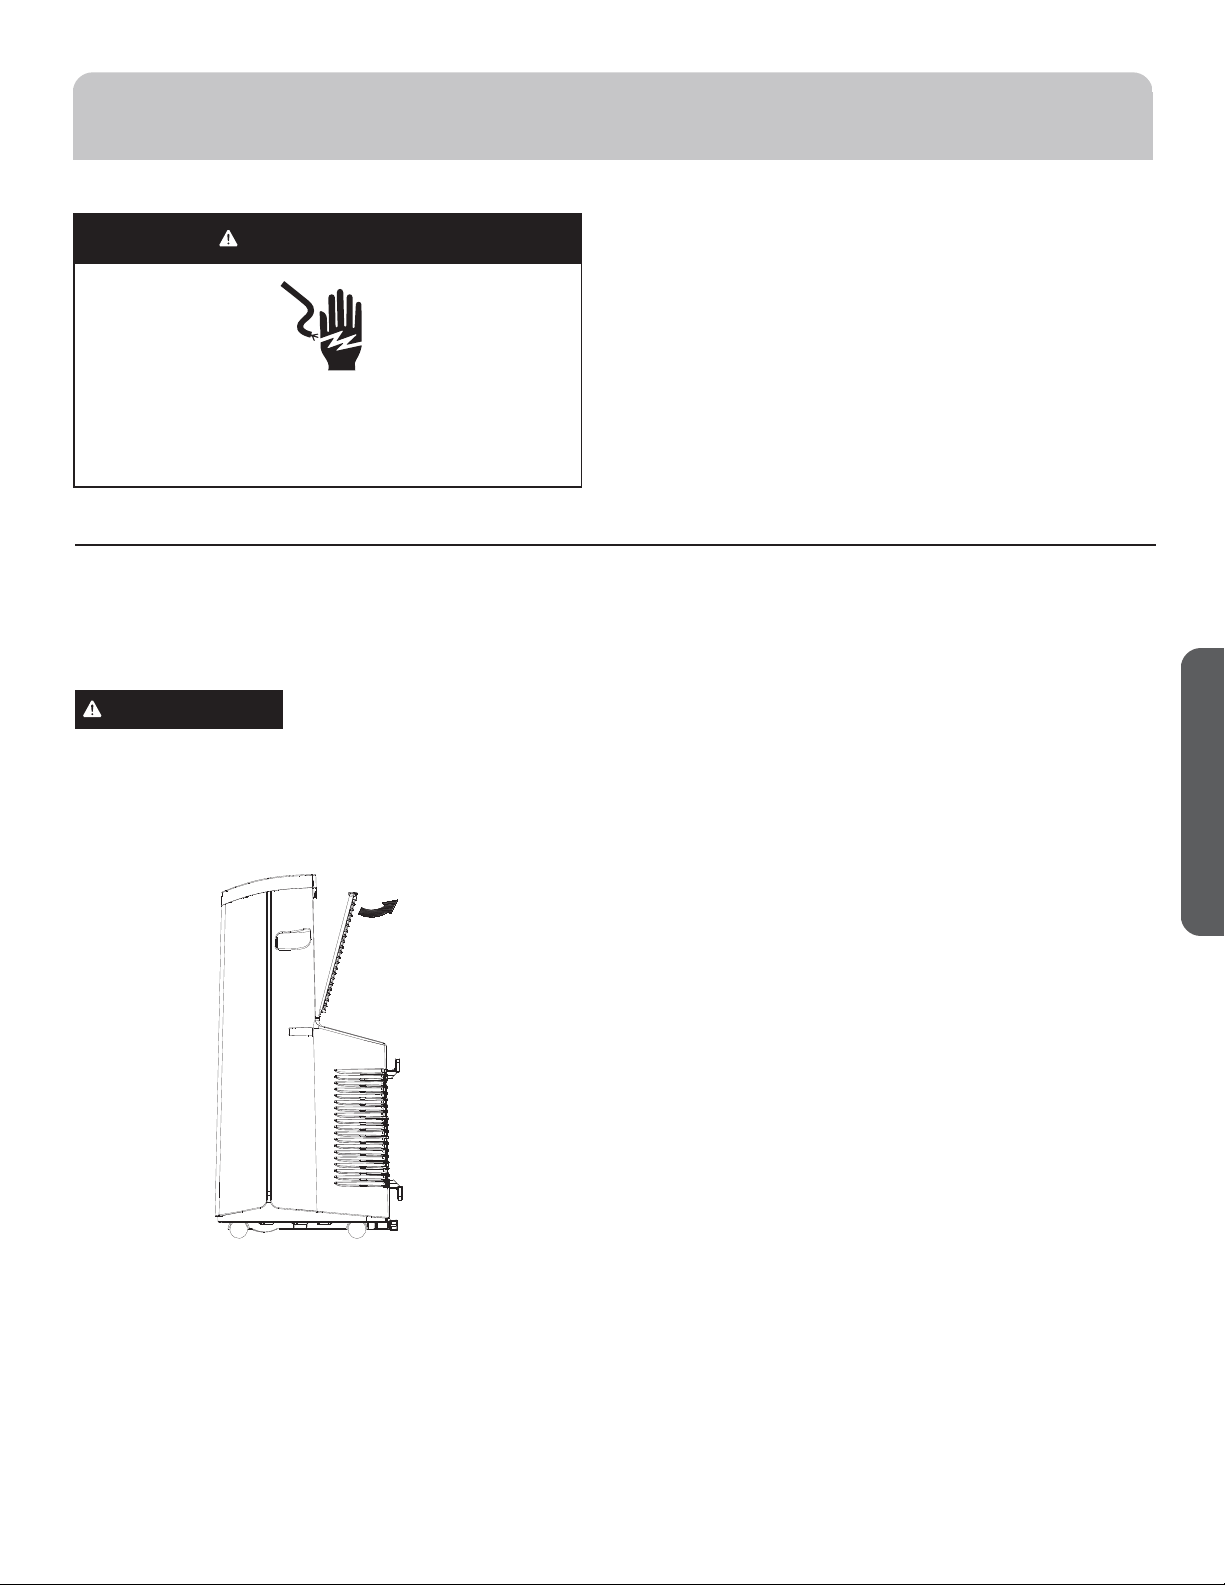
Storage
If the unit is not being used for a long period of time:
To Empty the Internal Water Tank:
1. Unplug or disconnect power.
2. Drain the water from the water tank. (See “Internal Water
Tank section” above.)
3. Use the original packaging to repack the unit to avoid a
buildup of dust or dirt.
4. Store the air conditioner in a cool, dry location.
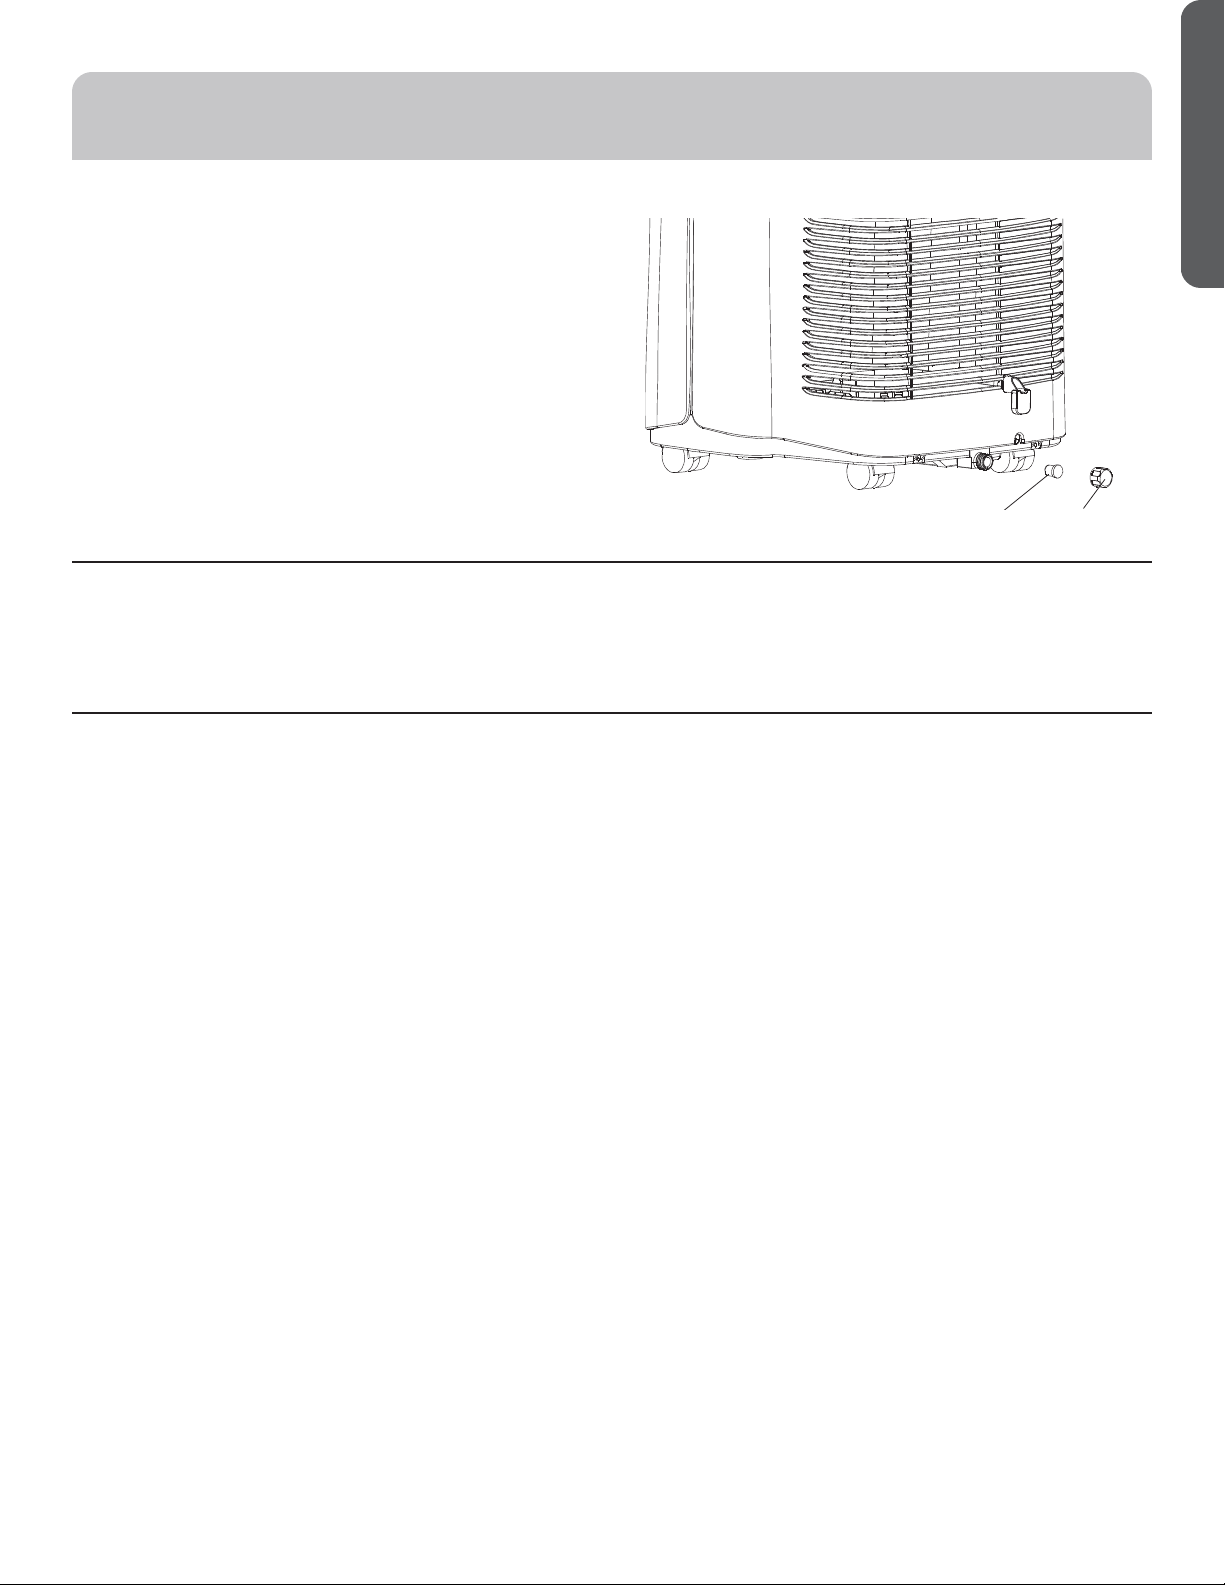
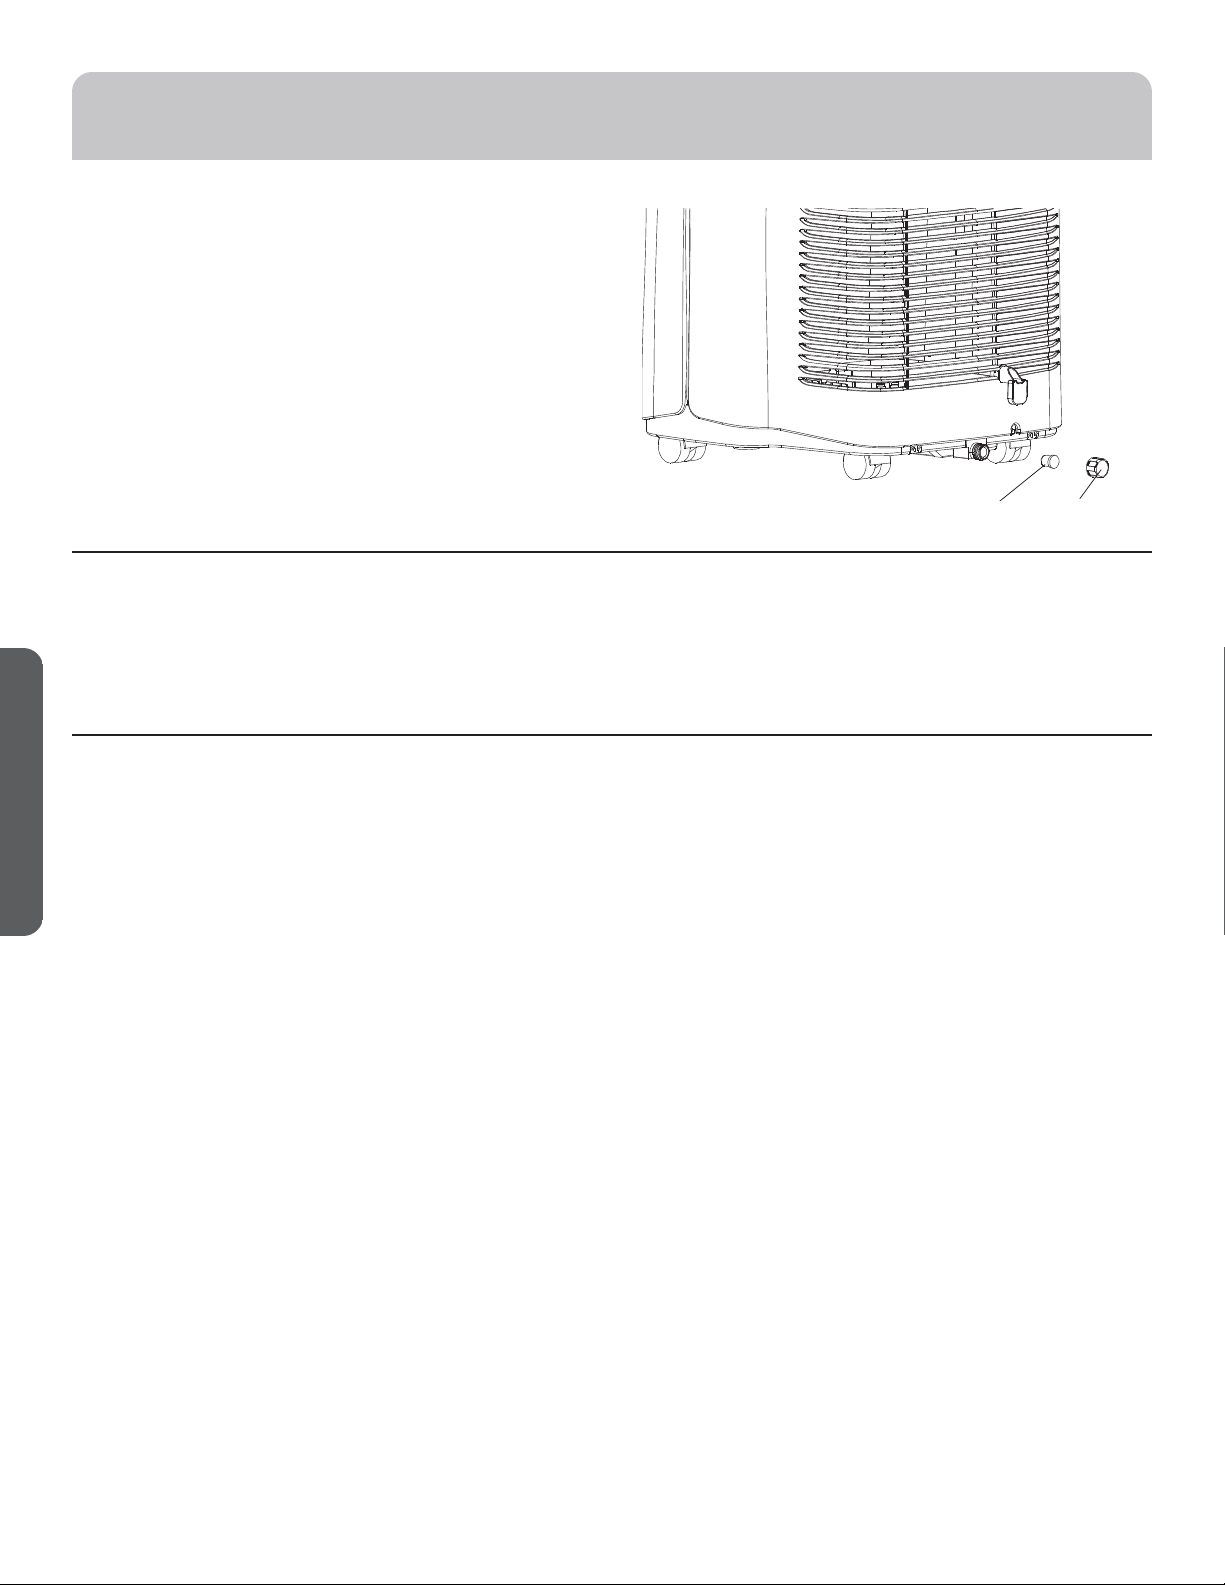
Internal Water Tank
The Water Full indicator (“FL” on the control panel display)
illuminates when the internal water tank has filled with
condensed water.
To Empty the Internal Water Tank:
1. Unplug or disconnect power.
2. Place a shallow 1 quart or larger pan (not included) below
the lower drain located on the back (near the bottom) of
the air conditioner.
3. Remove the cap and the rubber plug and drain the water
tank.
4. Re-insert the drain plug and screw the cap snugly into
place.
5. Plug in or reconnect power.
water plug Drain cap
CARE AND CLEANING
10 49-5000468 Rev. 0
ENGLISH
LOCATION REQUIREMENTS
• Place the air conditioner on a flat, level surface in a
location that is at least 30” (76.2 cm) from any wall.
NOTE: A minimum clearance of 30” (76.2 cm) from the
air conditioner to the wall must be maintained to ensure
proper airflow.
• Maintain a minimum 30” (76.2 cm) clearance around the
air conditioner to not block airflow.
• Keep the air conditioner free of any obstructions such
as drapes, curtains, blinds, etc.
• The exhaust hose should be free of any obstructions.
• Do not place the air conditioner on an unstable or raised
surface because it could fall and cause damage or injury.
•
Do not place the air conditioner in direct sunlight or near
a heat source such as baseboard heaters, stoves, etc.
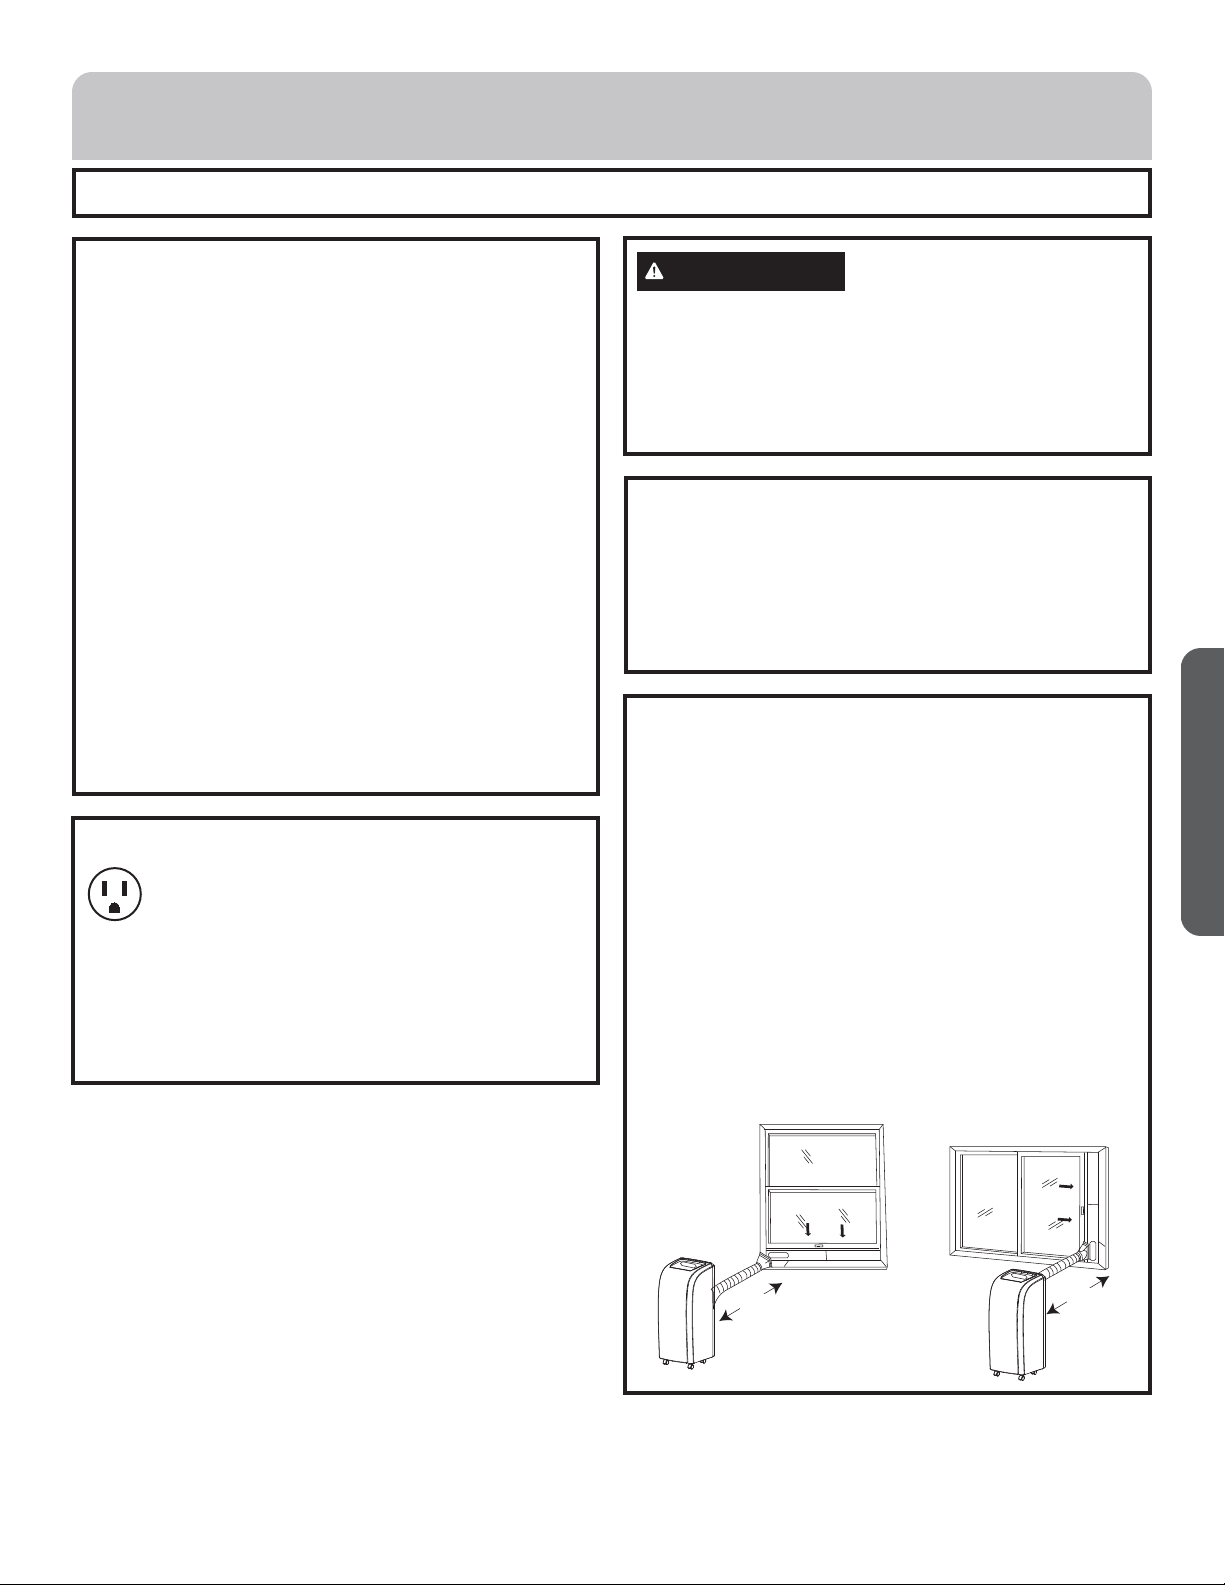
• The window panel can be installed in a window with a
minimum 20” (55.88 cm) to a maximum 46” (121.92)
opening.
20"
(55.88 cm)
20"
BEFORE YOU BEGIN
Read these instructions completely and carefully.
• IMPORTANT — Save these instructions for local
inspector’s use.
• IMPORTANT — Observe all governing codes and
ordinances.
• Note to Installer – Be sure to leave these instructions
with the Consumer.
• Note to Consumer – Keep these instructions for future
reference.
• Skill level – Installation of this appliance requires basic
mechanical skills.
• Completion time – Approximately 1 hour
• We recommend that two people install this product.
• Proper installation is the responsibility of the installer.
• Product failure due to improper installation is not
covered under the Warranty.
• You MUST use all supplied parts and use proper
installation procedures as described in these
instructions when installing this air conditioner.
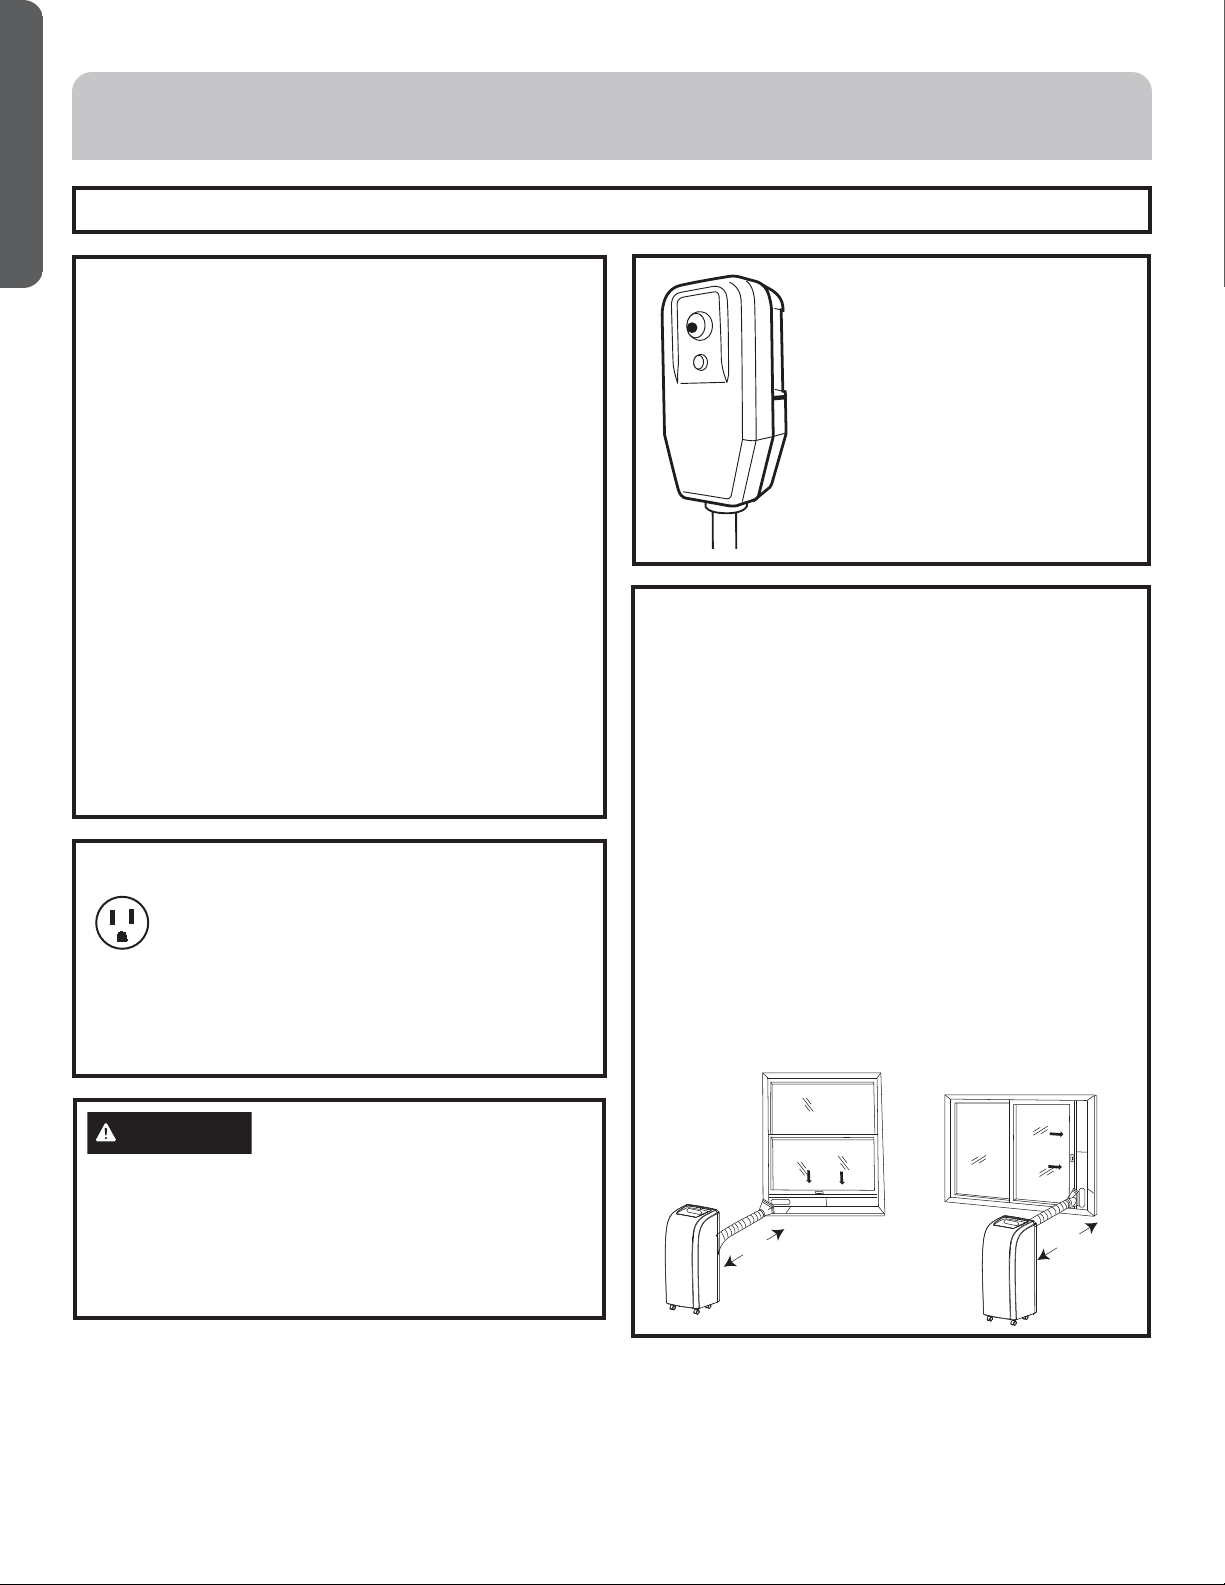
CAUTION
Do not, under any circumstances, cut or remove the third
(ground) prong from the power cord.
Do not change the plug on the power cord of this air
conditioner.
Aluminium house wiring may present special problems—
consult a qualified electrician.
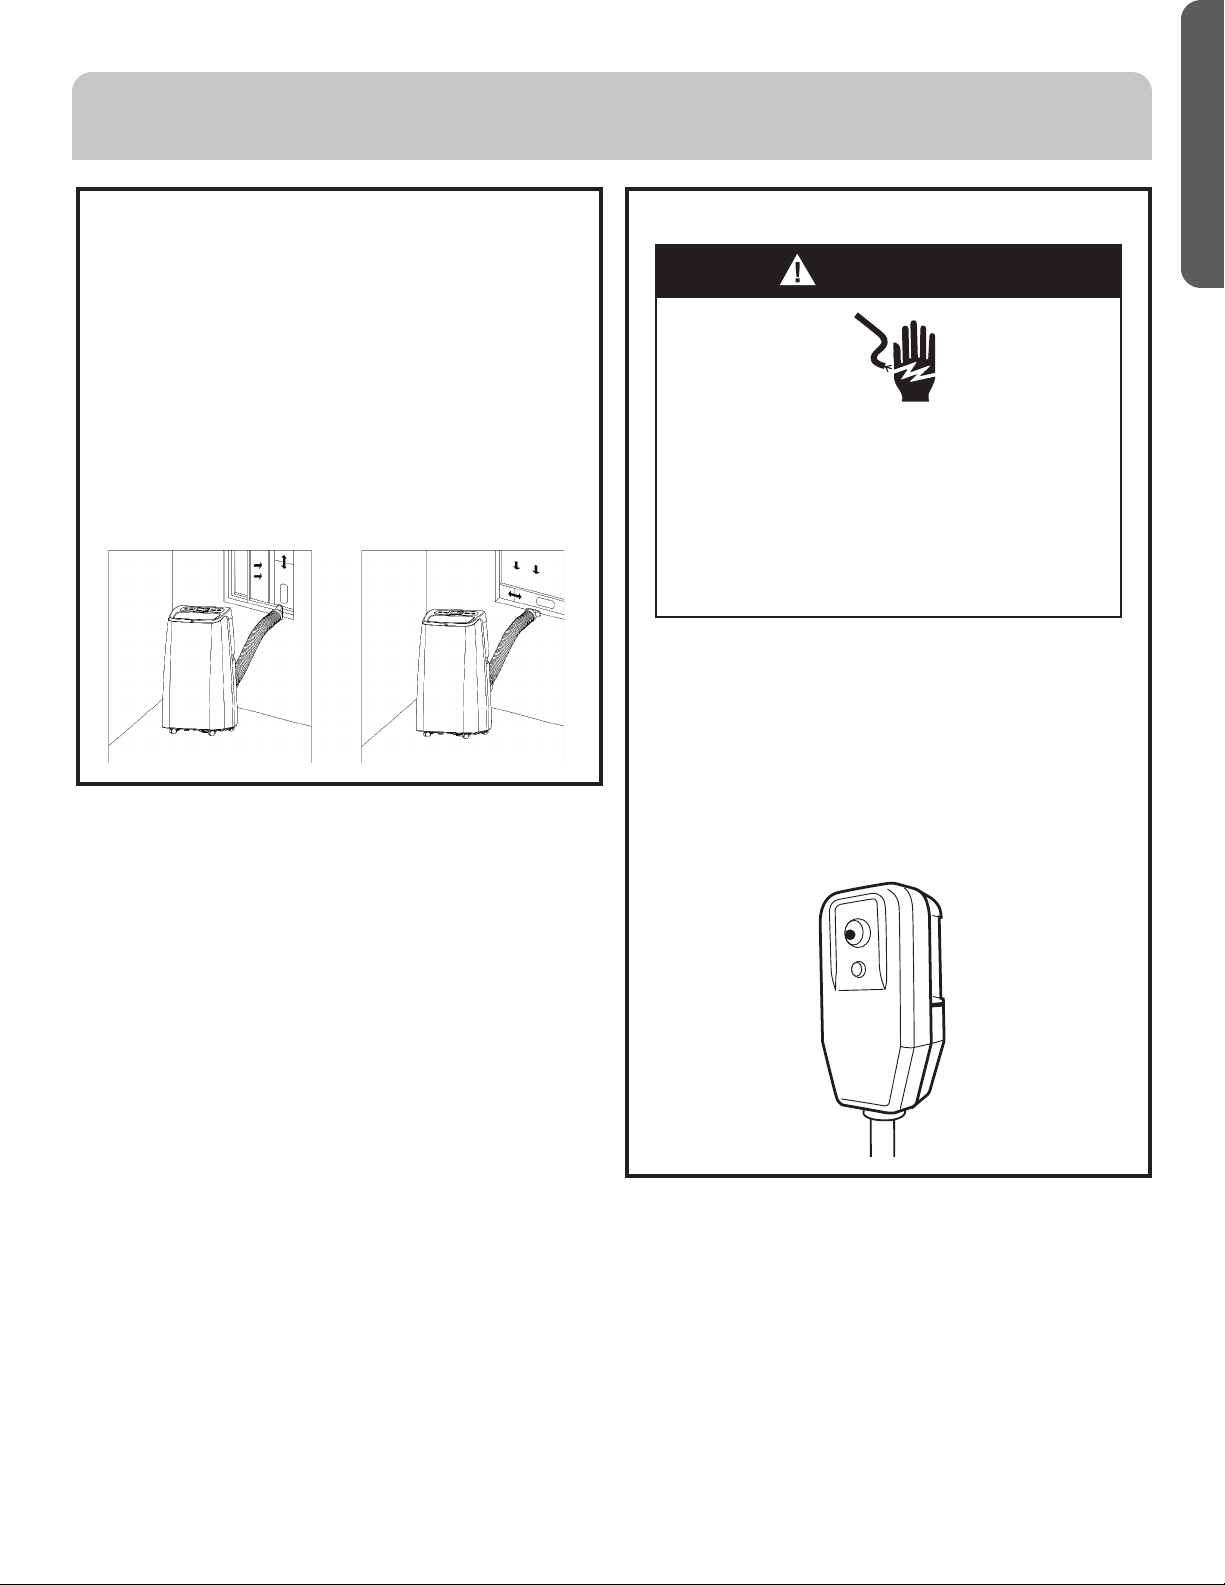
Power cord includes a current
interrupter device. A test and reset
button is provided on the plug case.
The device should be tested on
a periodic basis by first pressing
÷ëèÝÎÜÝåø÷÷òñäñç÷ëèñ÷ëè
ÛÎÜÎÝåø÷÷òñúëìïèóïøêêèçìñ÷ò÷ëè
òø÷ïè÷Òé÷ëèÝÎÜÝåø÷÷òñçòèöñò÷
÷õìóòõìé÷ëèÛÎÜÎÝåø÷÷òñúìïïñò÷
stay engaged, discontinue use of the
air conditioner and contact a qualified
service technician.
RESET
TEST
ÎÕÎÌÝÛÒÌÊÕÛÎÚÞÒÛÎÖÎ×ÝÜ
Some models require a 115/120-volt AC,
60-Hz grounded outlet protected with a 15-amp
time-delay fuse or circuit breaker.
The 3-prong grounding plug minimizes the possibility of
electric shock hazard. If the wall outlet you plan to use is
only a 2-prong outlet, it is your responsibility to have it
replaced with a properly grounded 3-prong wall outlet.
Questions? visit our Website at: haierappliances.com.
INSTALLATION INSTRUCTIONS
49-5000468 Rev. 0 11
ENGLISH
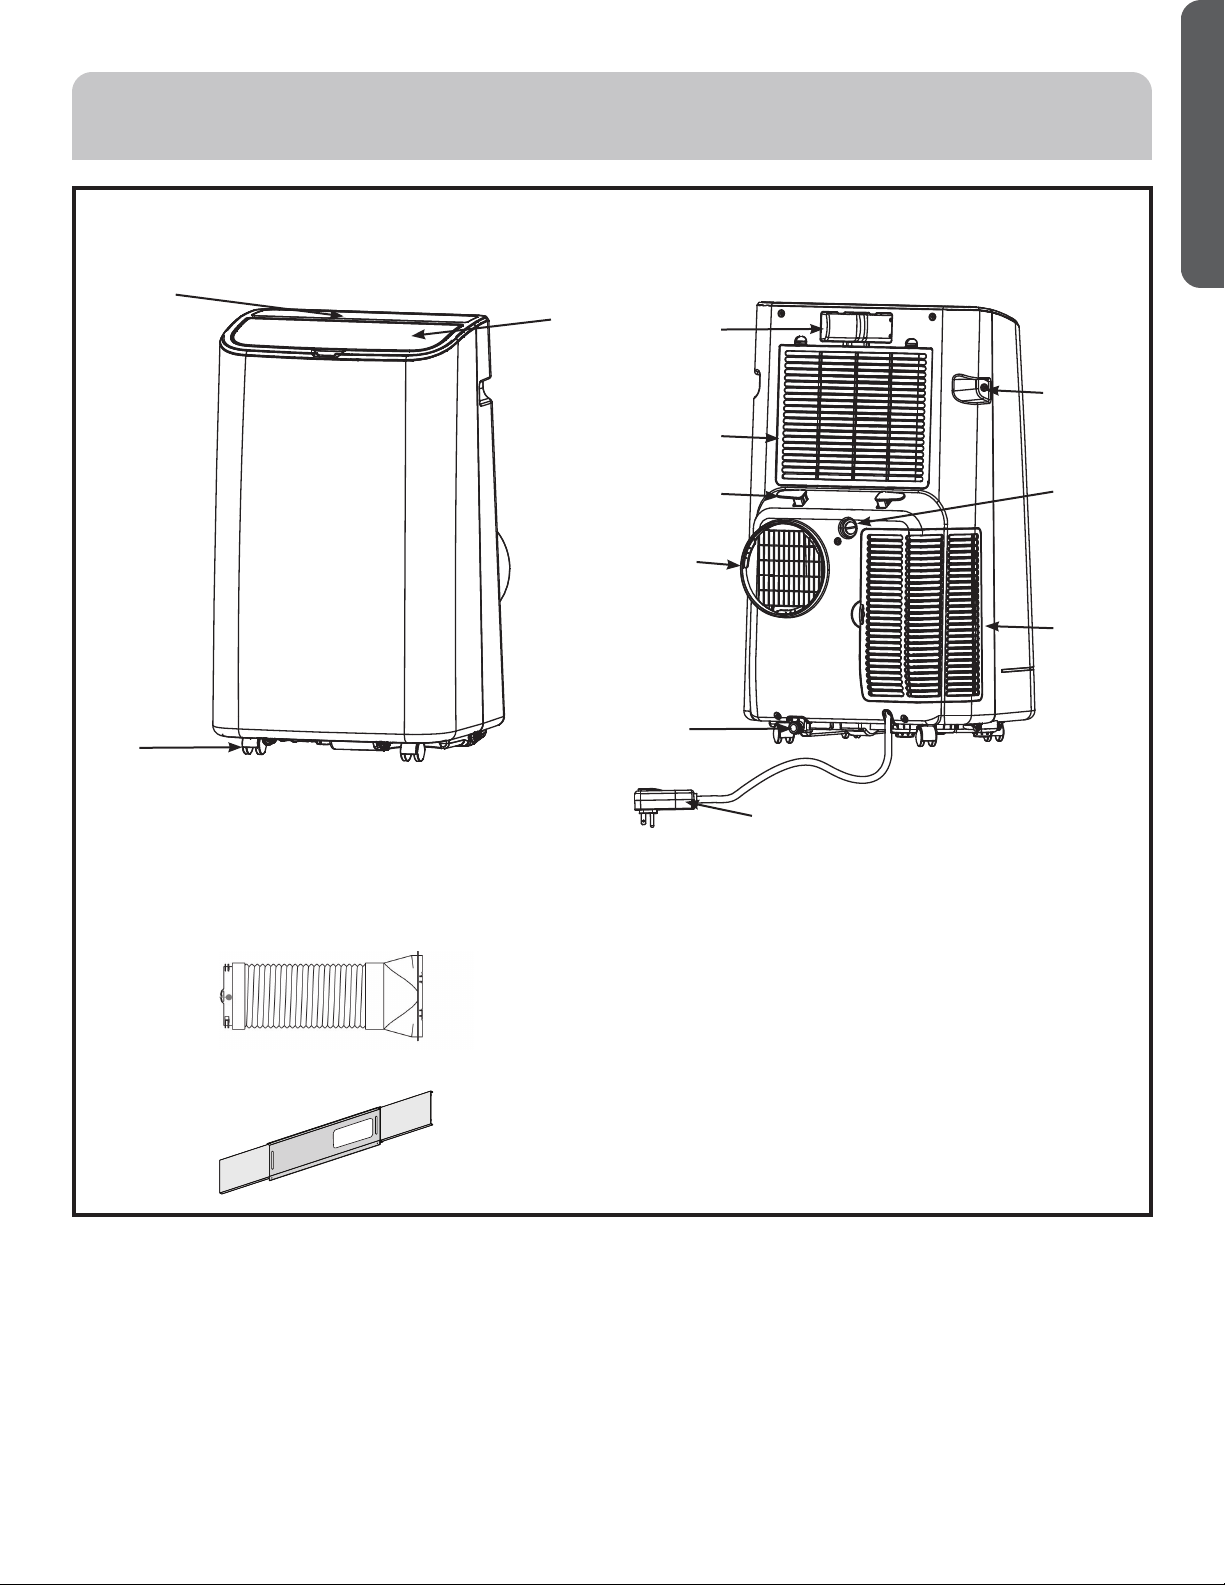
1. Control Panel
2. Swing Air Louvers
3. Casters
4. Exhaust hose assembly
5. Window sealing plate assembly
6. Remote Control
7. Filter Panel
8. Power Cord Hook (2)
9. Handle (2)
10. Air Vent - exhaust
11. Continuous Drainage hole
12. Air inlet grille
13. Drainage hole
14. Power Cord and plug
1
3
6
7
9
11
12
14
13
8
10
2
PARTS INCLUDED
(Appearance may vary)
INSTALLATION INSTRUCTIONS
12 49-5000468 Rev. 0
ENGLISH
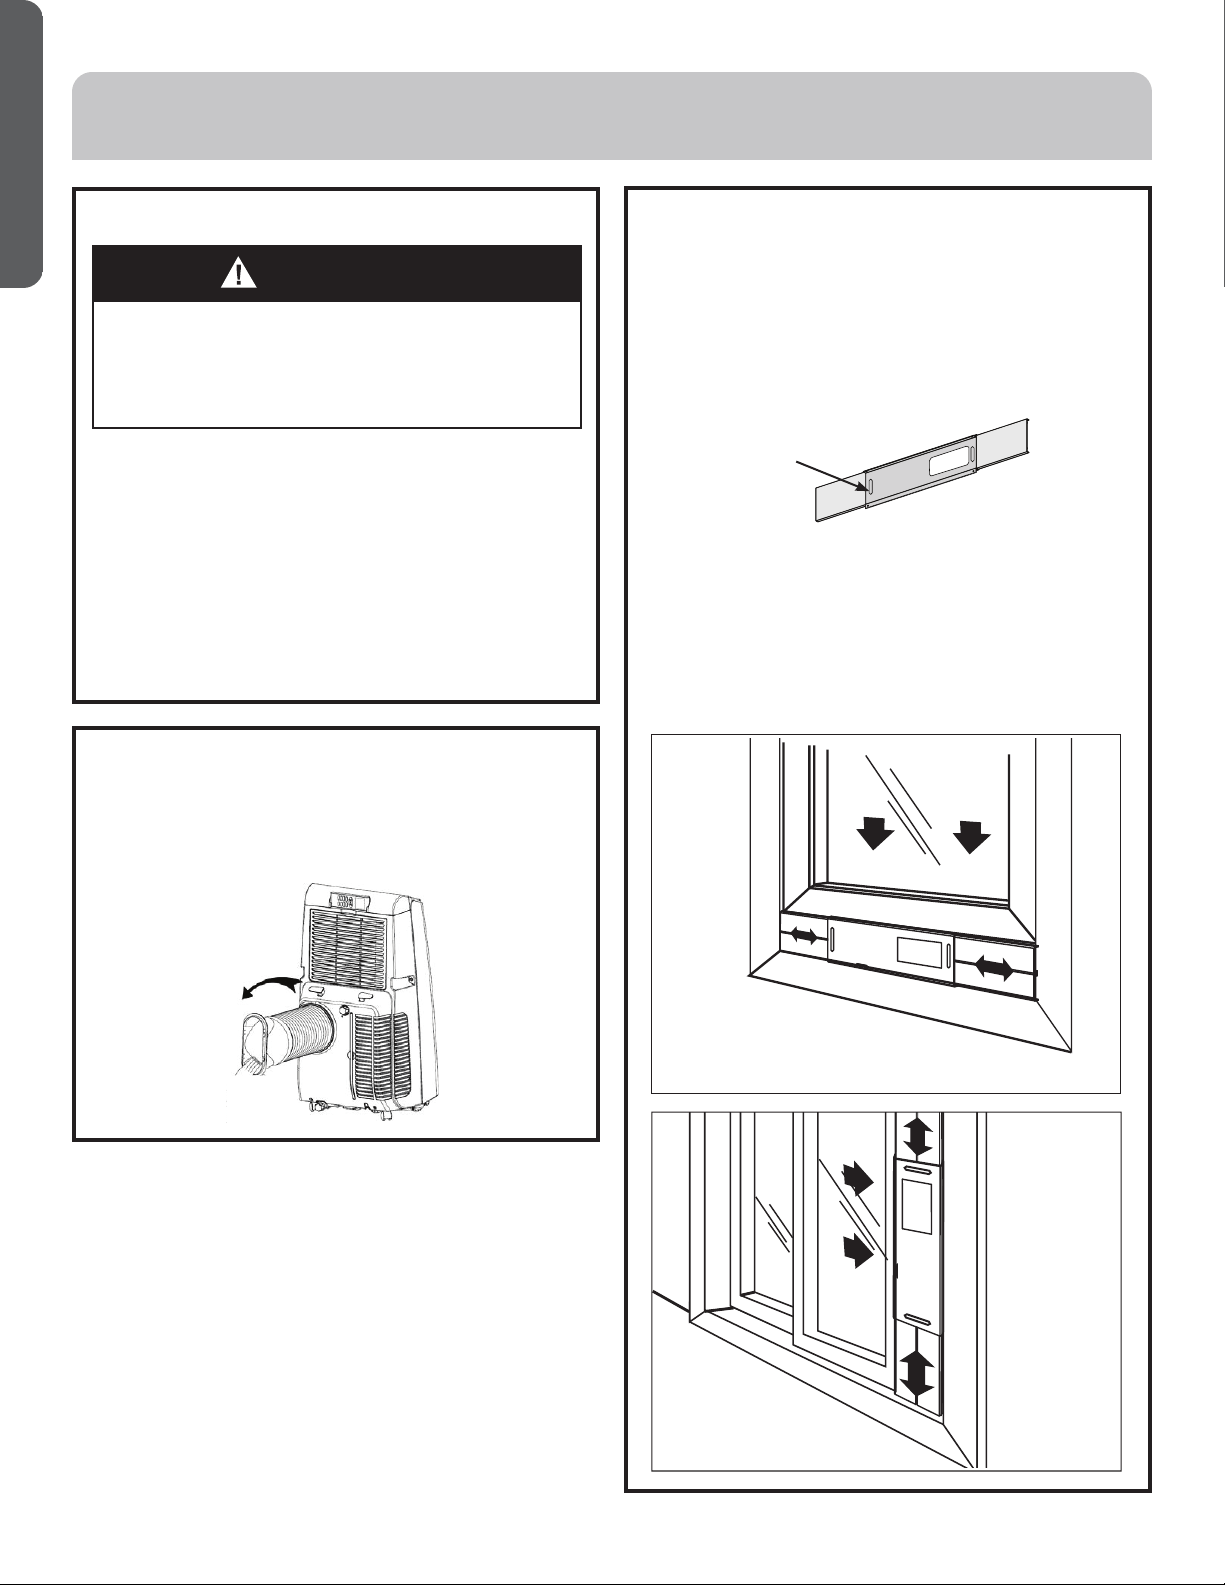
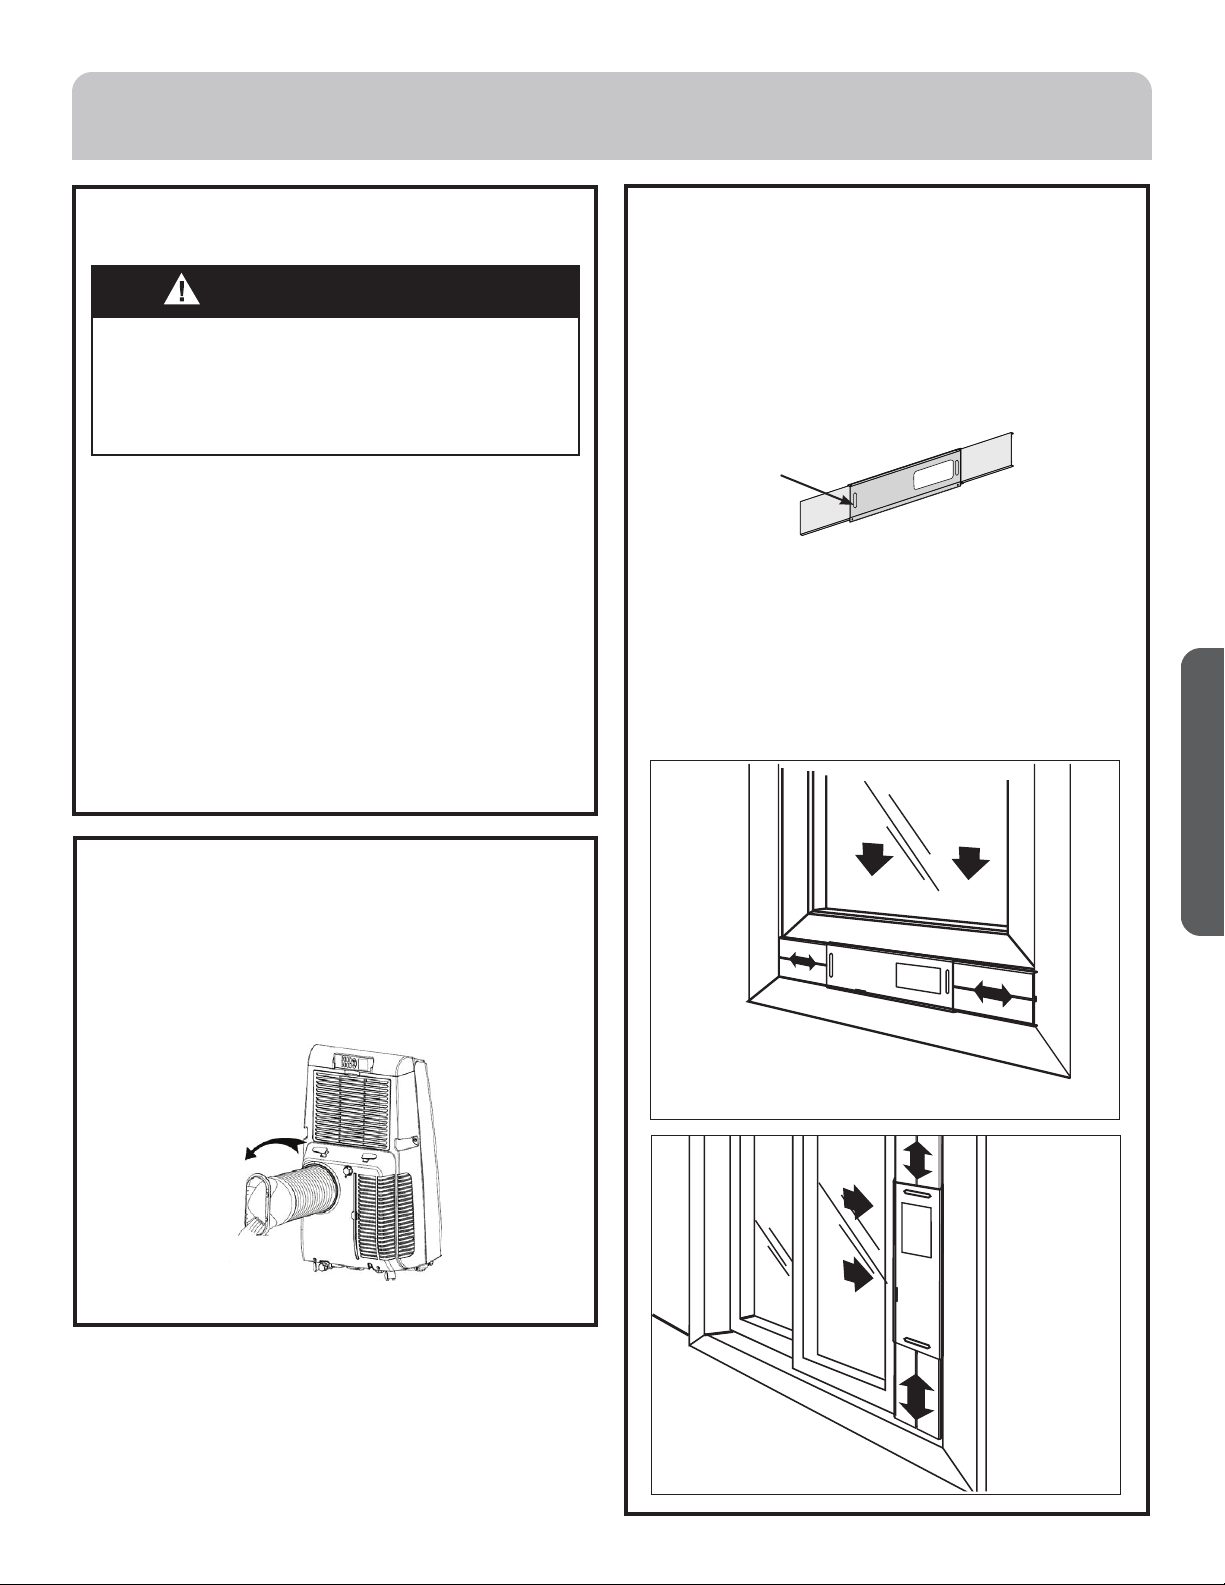
2. INSTALL EXHAUST HOSE
ASSEMBLY TO BACK OF UNIT
Install the exhaust hose assembly by screwing the hose
counterclockwise into the exhaust port on the back of
the Air Conditioner.
1. UNPACK AIR CONDITIONER
• Remove packaging materials. Save the carton and the
foam packaging for storing the air conditioner when
not in use.
NOTE: There are NO packing materials inside the air
conditioner to remove—Do Not open the cabinet.
• Properly dispose of/recycle all packing material.
• Handle the air conditioner gently.
• Keep the air conditioner upright and level. Do not set
the air conditioner on its side, front, back or upside
down.
WARNING
Excessive Weight Hazard
Use two or more people to move and install air
conditioner.
Failure to do so can result in back or other injury.
3. INSTALL WINDOW PANELS
A. Measure the window opening. For a 20”
opening, use just the middle panel of the
Window Kit with the opening for the Exhaust
Hose Adapter. For openings from 20” to 33”,
insert one side panel to the middle panel, for
openings from 33” to 46”, insert both side
panels.
B. Place the Window Kit into the window opening
(the Cam Locks should be towards you) and
slide the side panels (if being used) outward to
fill the opening. Lock the panels in place with
the Cam Locks. Apply the foam seals to the
top, bottom and ends to provide the best seal.
Slide the window shut against the Window Kit.
Indoor
Indoor
Cam lock
INSTALLATION INSTRUCTIONS
49-5000468 Rev. 0 13
ENGLISH
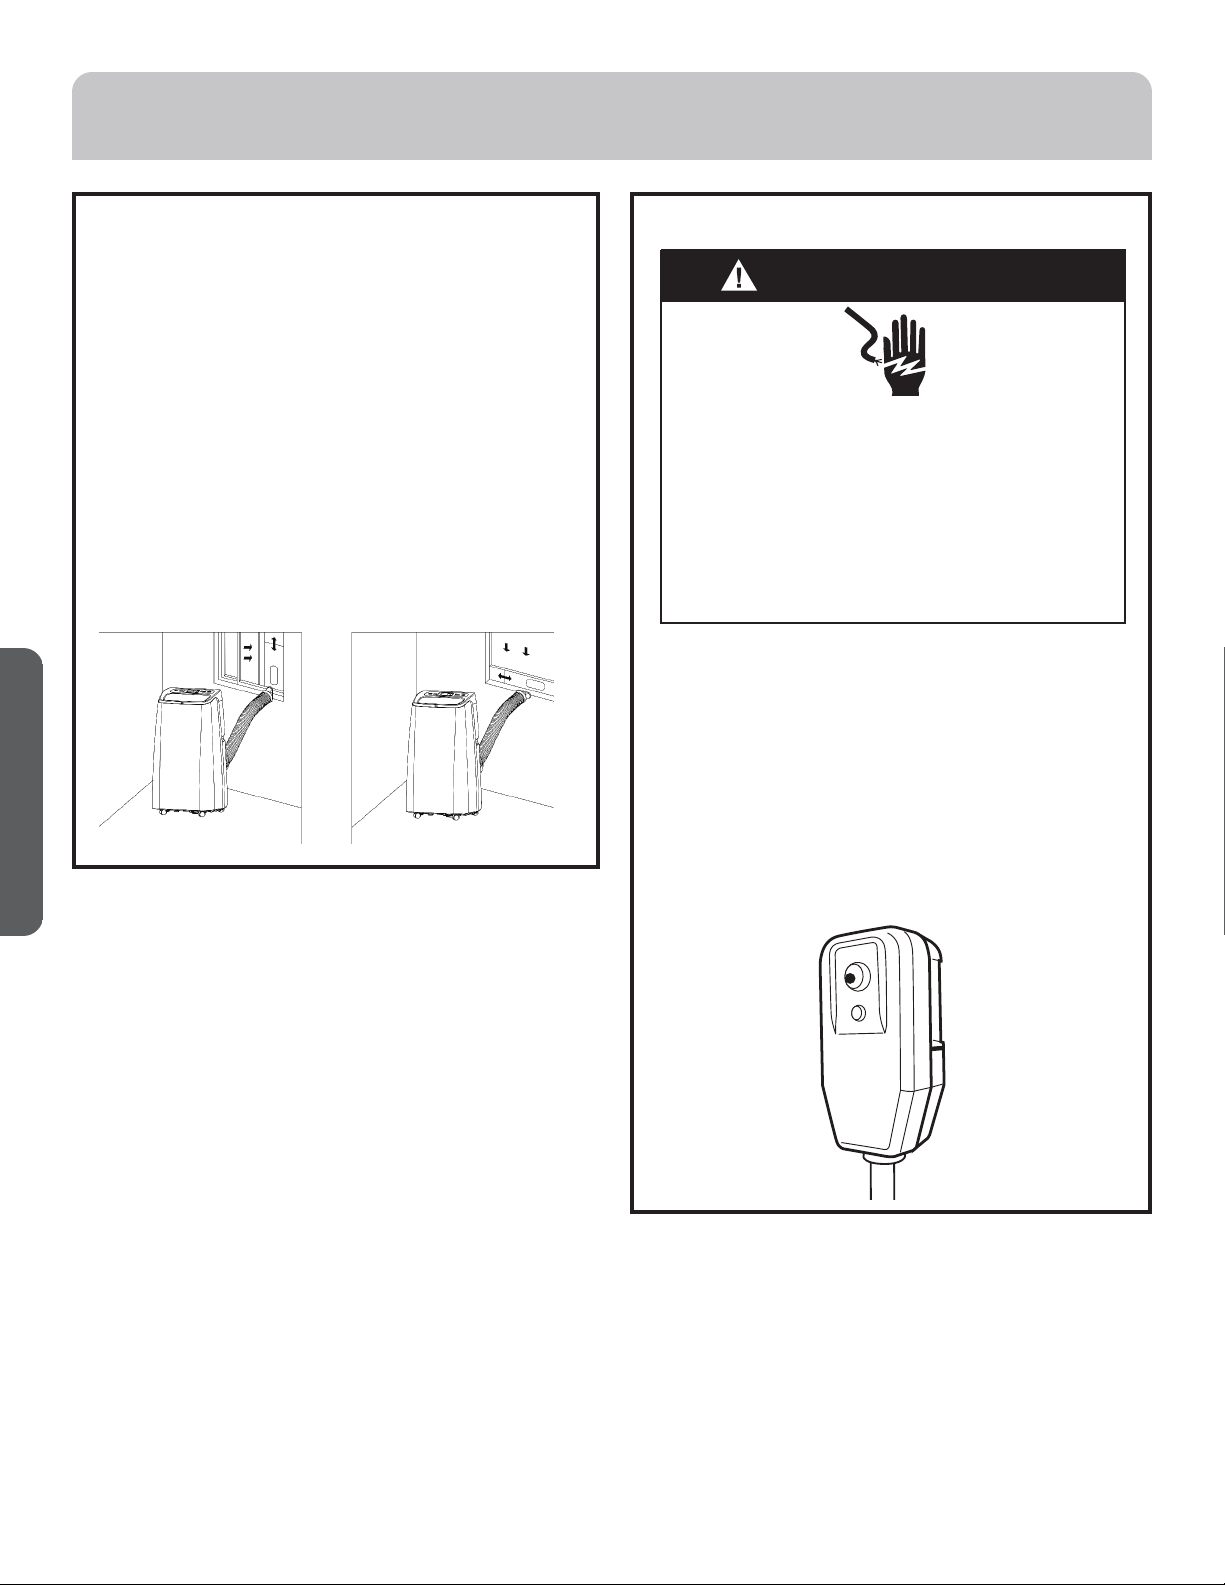
4. CONNECT EXHAUST HOSE TO THE
WINDOW PANEL
Place the Air Conditioner close to the window ensuring
there is at least 20” of clearance from the wall and
any other obstructions. Extend the hose so that it
reaches the Window Kit. Insert the Exhaust Hose
Adapter into the opening in the Window Kit and slide
it into the locking position. Ensure that the hose runs
straight to the window with no excess extension.
Important: The Air Conditioner must be vented to the
outside. Do not use a longer hose or extend the hose
included with the Air Conditioner or the unit will not
cool properly and will overheat.
5. COMPLETE INSTALLATION
A. Plug the power cord into a grounded 3 prong
outlet.
B. Press the Reset button on the plug to ensure
the safety plug is providing power to the Air
Conditioner.
C. Allow 20” of clearance around the Air
Conditioner for proper air circulation
D. When removing the Air Conditioner, be sure to
remove the Window Kit.
WARNING
Electrical Shock Hazard
Plug into a grounded 3 prong outlet.
Do not remove the ground prong from the power
cord plug.
Do not use an adapter.
Do not use an extension cord.
Failure to do so can result in death, fire or
electrical shock.
RESET
TEST
INSTALLATION INSTRUCTIONS
14 49-5000468 Rev. 0
ENGLISH
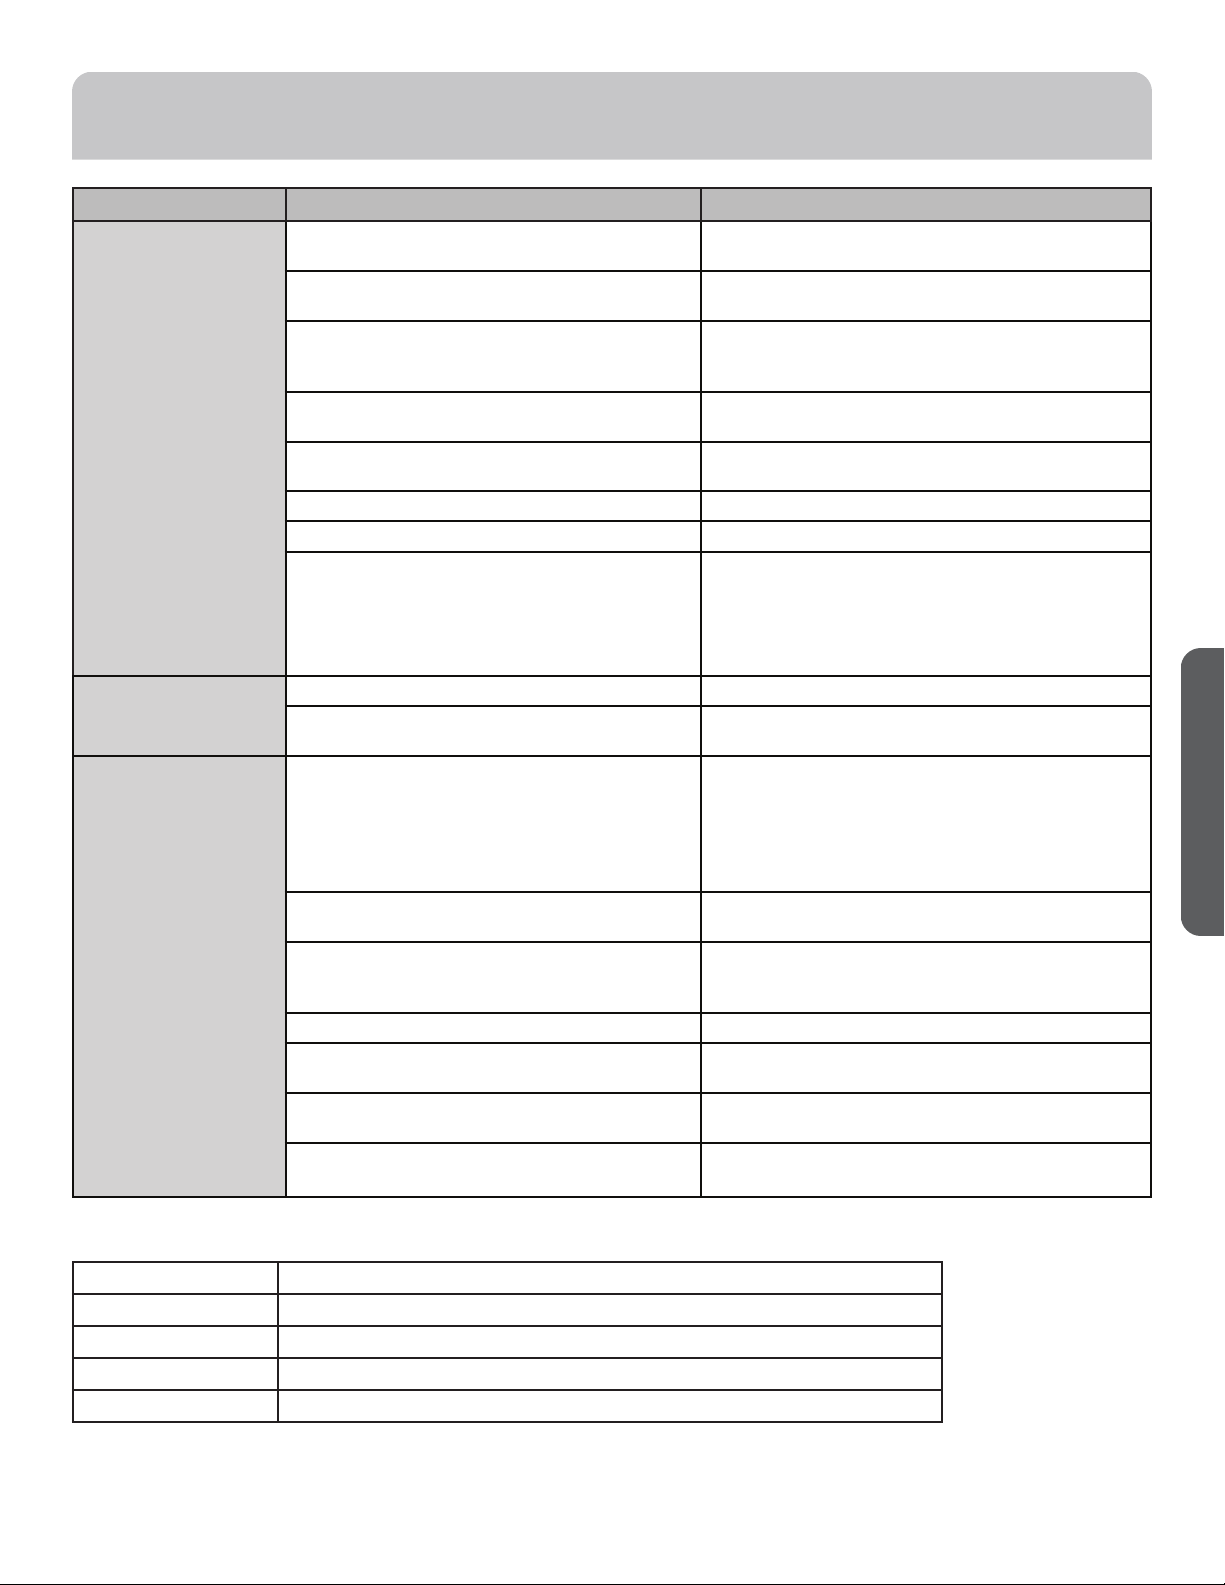
Problem Possible Causes Solution
Unit does not start or
operate
Power supply cord is not plugged into an
outlet.
Plug the power cord into a grounded 3 prong
outlet.
Power supply cord has tripped. Press and release the RESET button on the power
supply cord.
The Power button has not been pressed. Press the Power button on the Control Panel or
Remote Control to turn ON the air conditioner.
There is no power to the electrical outlet. Plug a working lamp into the outlet to check for
power.
A household fuse has blown or a circuit
breaker has tripped.
Replace the fuse or reset the circuit breaker.
The control was programmed for a Time
Delay.
Cancel the Time Delay. See “Control Panel.”
The batteries in the remote control are dead. Replace the batteries.
The internal water tank is full.
NOTE: The air conditioner automatically
turns off, and the Water Full indicator
illuminates to alert you of this condition.
Empty the water tank. See “Air Conditioner
Care.”
Remote control is not
working
Batteries are dead. Replace the batteries.
Batteries are installed incorrectly. Make sure the batteries are inserted in the
correct position.
Air conditioner is
working but the room
is not cooling.
The room temperature is hot.
NOTE: On extremely hot and humid days,the
air conditioner will take longer to cool the
room.
Allow time for the room to cool when you first
turn on the unit.
Make sure the air conditioner has an adequate
BTU rating for the size of the room being cooled.
The control is set incorrectly to Fan or DRY
mode.
Set the Mode to Cool and the Fan Speed to High.
Airflow is restricted. Remove any obstacles to the airflow and redirect
airflow for uniform cooling.
Temperature set too high. Lower the set temperature.
Air filters are dirty or restricted. Clean the air filter. See “Air Conditioner Care.”
Air conditioner installed incorrectly Check the exhaust hose and window panel for
proper installation.
Doors and windows are open. Close the doors and windows to the room being
cooled to prevent cooled air from escaping.
Error Codes
Error Codes Meaning
E1 Abnormal sense of coil pipe sensor
E2 Abnormal sense of room temperature sensor
E4 Anti-frozen protection
FL Full water
TROUBLESHOOTING TIPS
49-5000468 Rev. 0 15
ENGLISH
REGULATORY INFORMATION
FCC/IC Compliance Statement:
This device complies with Part 15 of the FCC Rules. Operation is
subject to the following two conditions:
1. This device may not cause harmful interference.
2. This device must accept any interference received, including
interference that may cause undesired operation.
This equipment has been tested and found to comply with the limits
for a Class B digital device, pursuant to Part 15 of the FCC Rules.
These limits are designed to provide reasonable protection against
harmful interference in a residential installation. This equipment
generates uses and can radiate radio frequency energy and, if not
installed and used in accordance with the instructions, may cause
harmful interference to radio communications. However, there
is no guarantee that interference will not occur in a particular
installation. If this equipment does cause harmful interference to
radio or television reception, which can be determined by turning the
equipment off and on, the user is encouraged to try to correct the
interference by one or more of the following measures:
• Reorient or relocate the receiving antenna.
• Increase the separation between the equipment and receiver.
• Connect the equipment into an outlet on a circuit different from
that to which the receiver is connected.
• Consult the dealer or an experienced radio/television technician
for help.
Labelling: Changes or modifications to this unit not expressly
approved by the manufacturer could void the user’s authority to
operate the equipment.
*Select Models Only
This product has WiFi capability and requires Internet connectivity
and a wireless router to enable interconnection with an Energy
Management System, and/or with other external devices, systems
or applications.
Use of the Works with Apple HomeKit™ logo means that an
electronic accessory has been designed to connect specifically to
iPod touch
®
, iPhone
®
, or iPad
®
, respectively, and has been certified
by the developer to meet Apple
®
performance standards. Apple is
not responsible for the operation of this device or its compliance
with safety and regulatory standards.
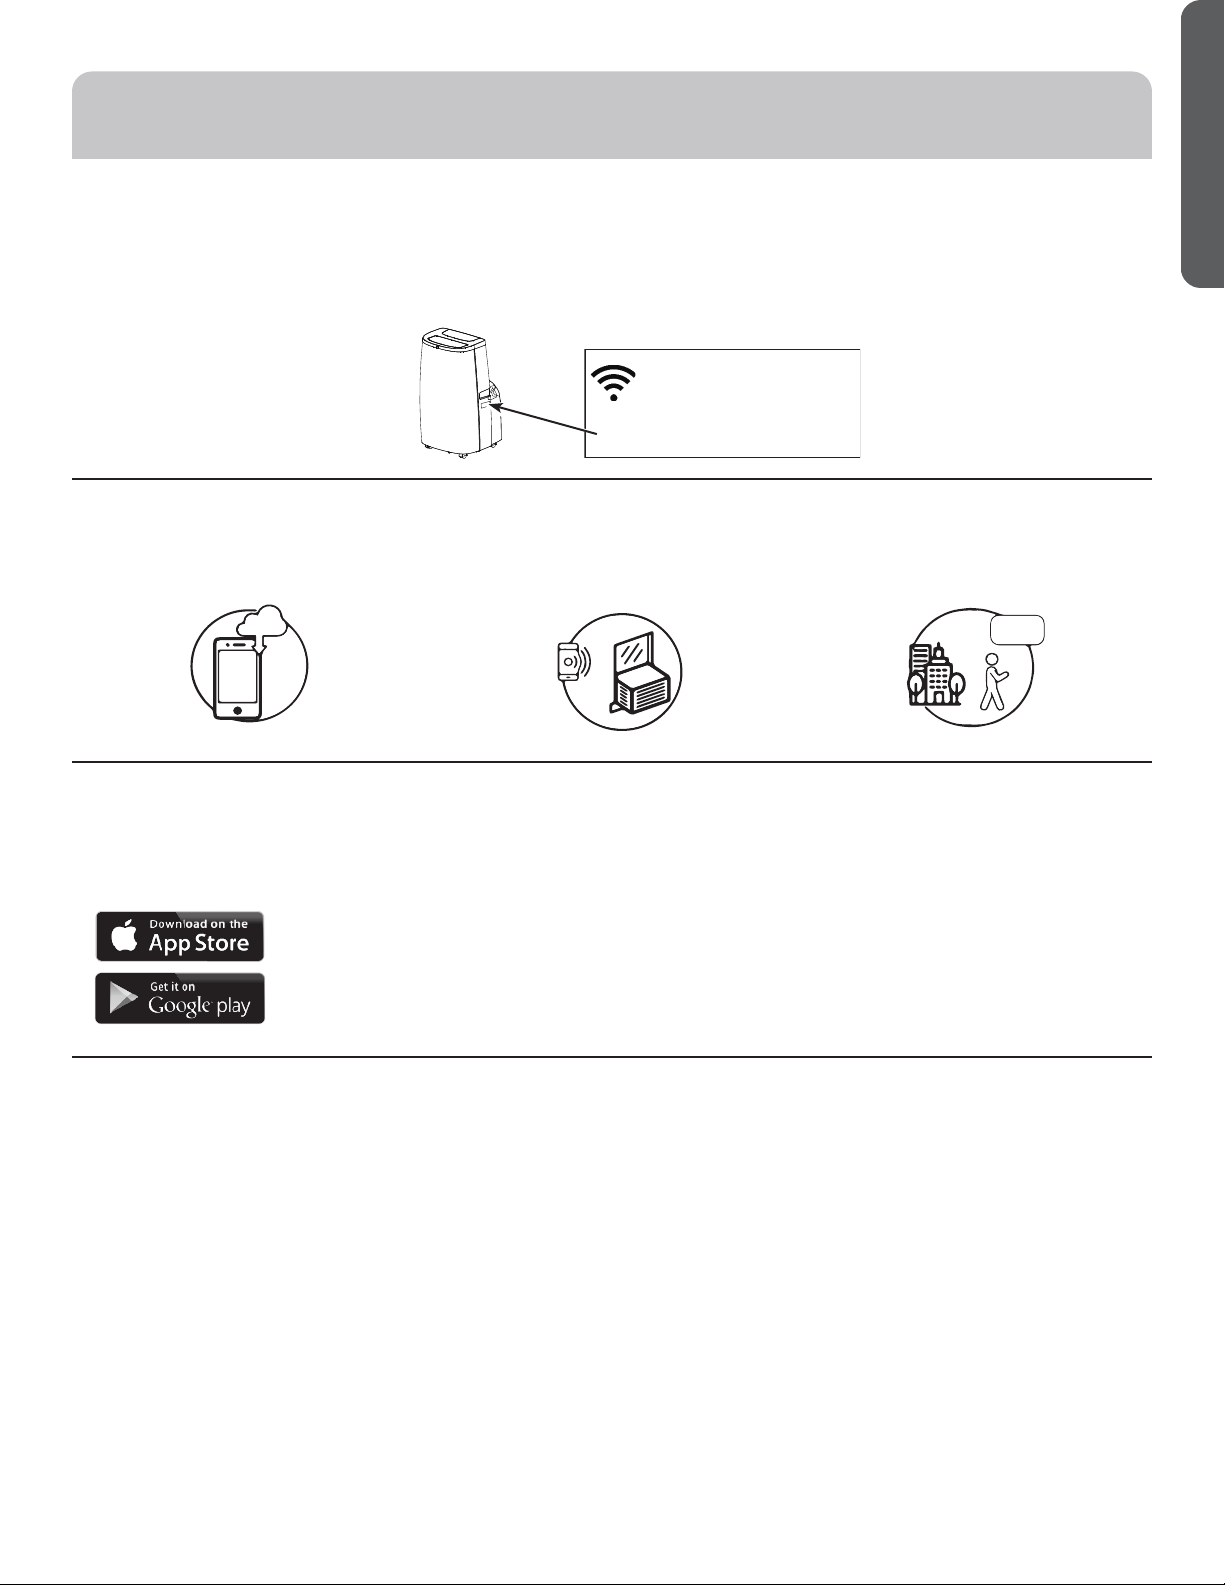
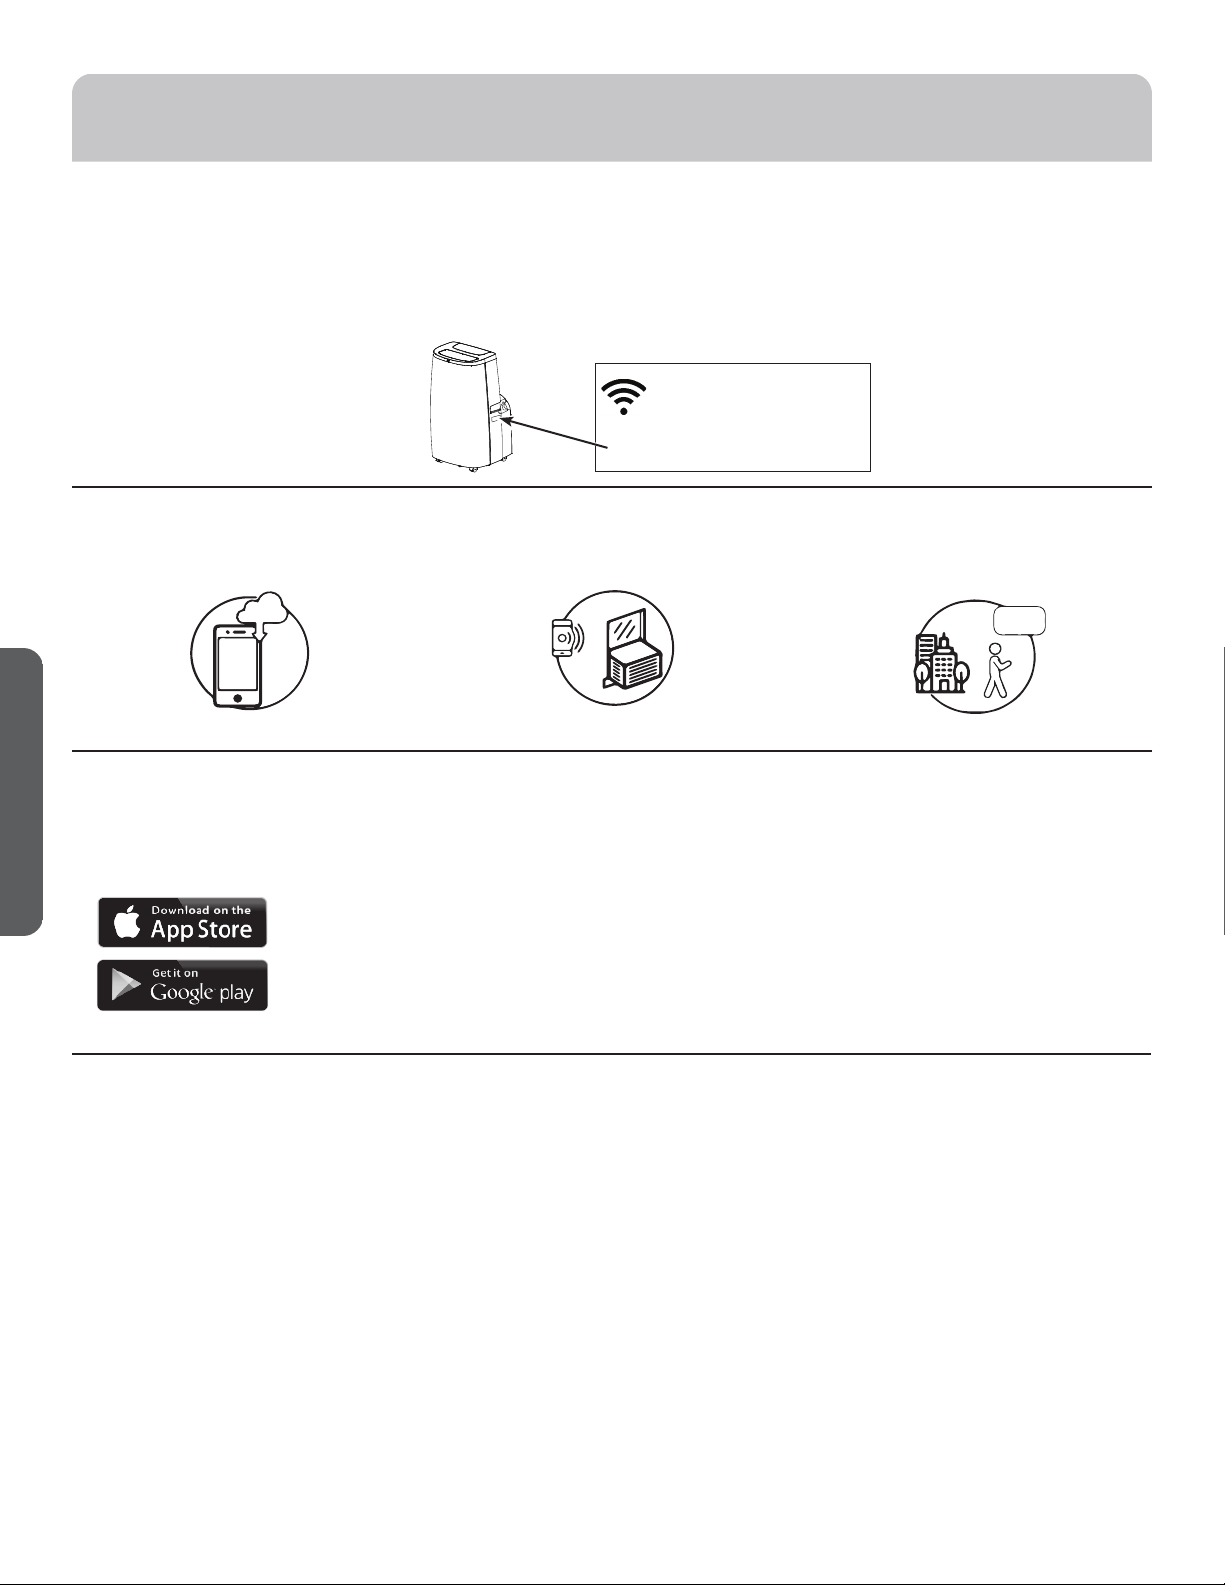
How it Works
Download the Haier Home App
Use the app to connect your room air
conditioner to WiFi
Once connected, use the app to turn
down your air conditioner as you leave
work.
CHANGE TEMP
TO 65
Haier Appliances WiFi Connect (for customers in the United States)
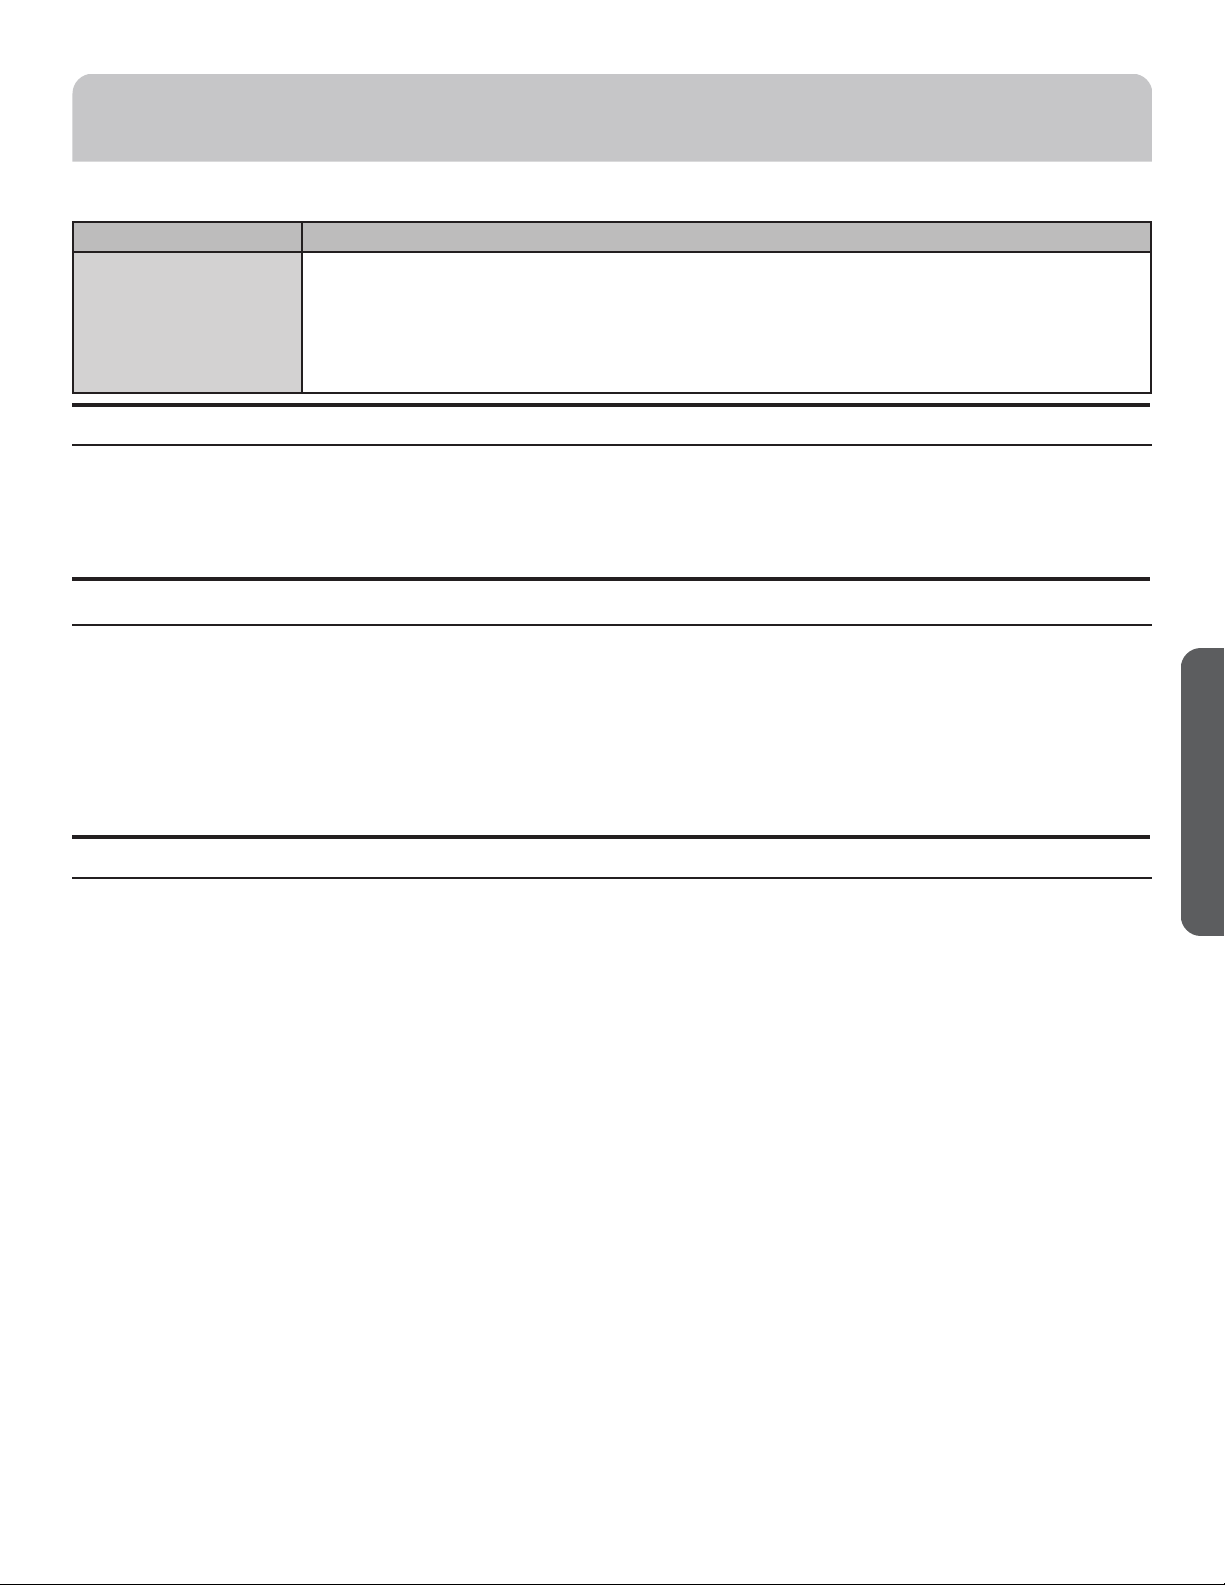
Haier Appliances WiFi Connect Enabled*. If your Air Conditioner (AC) has a Connected Appliance Information label
located on the outside as shown below, your AC is Haier Appliances WiFi Connect Enabled. A WiFi
communication card is built
into the product allowing it to communicate with your smart phone for remote monitoring, control and notifications. Please visit
haierappliances.com/connect to learn more about connected appliance features, and to learn what connected appliance apps
will work with your smart phone.
Network: GE_MODULE_XXXX
PASSWORD: XXXXXXXX
MAC ID: XX-XX-XX-XX-XX-XX
CONTAINS FCCID: ZKJ-WCATA006
CONTAINS IC:
100229A-WCATA006
165D1656P001
WIFI SETUP (on some models)
Getting Started
To connect your room air conditioner, you’ll need the Haier
Appliances App. The app will walk you through the connection
process. Download the app from iTunes or Google Play.
All connected appliance data is held in strict accordance with
the Haier Appliances Connected Data Privacy Policy. Visit
geappliances.com/privacy/privacy_policy_connected to
view this policy.
Questions about WiFi Connect
Get answers you need about setting up WiFi appliances and
connecting to your home network in our support articles.
Visit products.geappliances.com/appliance/gea-support-
search-content to view WiFi connect room air conditioner
support articles.

16 49-5000468 Rev. 0
ENGLISH
Staple your receipt here. Proof of the original purchase date is
needed to obtain service under the warranty.
EXCLUSION OF IMPLIED WARRANTIES - Your sole and exclusive remedy is product repair as provided in this Limited
Warranty. Any implied warranties, including the implied warranties of merchantability or fitness for a particular purpose,
are limited to one year or the shortest period allowed by law.
For US Customers: This limited warranty is extended to the original purchaser and any succeeding owner for products
purchased for home use within the USA. If the product is located in an area where service by a Haier Appliances Authorized
Servicer is not available, you may be responsible for a trip charge or you may be required to bring the product to an
Authorized Haier Appliances Service location for service. In Alaska, the limited warranty excludes the cost of shipping or
service calls to your home.
Some states do not allow the exclusion or limitation of incidental or consequential damages. This limited warranty gives
you specific legal rights, and you may also have other rights which vary from state to state. To know what your legal rights
are, consult your local or state consumer affairs office or your state’s Attorney General.
Warrantor US:
GE Appliances, a Haier company
Louisville, KY 40225
• Customer instruction. This owner’s manual provides
information regarding operating instructions and user
controls.
• Improper installation. If you have an installation problem,
or if the air conditioner is of improper capacity, contact
your dealer or installer. You are responsible for providing
adequate electrical connecting facilities.
• Failure of the product resulting from modifications to the
product or due to unreasonable use including failure to
provide reasonable and necessary maintenance.
• Replacement of house fuses or resetting of circuit
breakers.
• Failure due to corrosion on models not corrosion-
protected.
• Damage to the product caused by improper power
supply voltage, accident, fire, floods or acts of God.
• Incidental or consequential damage caused by possible
defects with this air conditioner.
• Damage caused after delivery.
What Will Not Cover:
For The Period Of: Haier Appliances Will Replace:
One Year
From the date of the
original purchase
Replacement, repair, or refund of the original retail price for any product which fails due to a
defect in materials or workmanship. If the unit is exchanged, the replacement unit is warranted
for the remainder of your product’s original one-year warranty period. Haier Appliances will, at its
sole discretion, replace the product with a product of the same or comparable functionality and
quality or refund the original retail price.
• Properly pack your unit. We recommend using the original
carton and packing materials.
• Return the product to the retail location where it was
purchased.
• Include in the package a copy of the sales receipt or other
evidence of date of original purchase. Also print your name
and address and a description of the defect.
In Order to Make a Warranty Claim During the First 90 Days from the Date of Original Purchase:
• Locate your original sales receipt and make a note of your
model and serial number.
• Visit haierappliances.com to initiate the product
replacement process.
• You will be asked to provide your name, address, date of
purchase, model and serial number.
• Haier Appliances will arrange for a carton to be sent to your
home to recover the product.
• Please return all requested materials (postage pre-paid)
in the carton provided. Please include a description of the
defect.
• You should receive your replacement product or refund
within 7 to 10 business days after your package is received.
In Order to Make a Warranty Claim During the Remainder of the One-Year Warranty:
LIMITED WARRANTY

49-5000468 Rev. 0 17
ESPAÑOL
ÍNDICE
SITIO WEB DE HAIER
¿Desea realizar una consulta o necesita ayuda con su electrodoméstico? ¡Intente a través del Sitio Web de Haier las 24 horas del día,
cualquier día del año! Usted también puede comprar más electrodomésticos maravillosos de Haier y aprovechar todos nuestros servicios
de soporte a través de Internet, diseñados para su conveniencia. En EE.UU.: Haierappliances.com
INFORMACIÓN A TENER EN CUENTA
Le agradecemos la compra de este producto de marca Haier. Este
manual del usuario lo ayudará a obtener el mejor rendimiento de su
nuevo accondicionadores de aire.
Para referencia futura, registre el modelo y número de serie ubicados
en el frente, detrás del cajón de almacenamiento de la cocina, y la
fecha de compra.
Engrape la prueba de compra a este manual para asistirle cuando
necesite obtener servicio bajo la garantía.
__________________________________________________________
Número de modelo
__________________________________________________________
Número de serie
__________________________________________________________
Fecha de compra
INFORMACIÓN IMPORTANTE DE SEGURIDAD .................................................................... 19
PANEL DE CONTROL .............................................................................................20
CUIDADO Y LIMPIEZA ........................................................................................... 22
INSTRUCCIONES DE INSTALACIÓN .............................................................................. 25
SOLUCIÓN DE PROBLEMAS ......................................................................................29
CONFIGURACIÓN WIFI ...........................................................................................30
GARANTÍA LIMITADA ............................................................................................31

18 49-5000468 Rev. 0
ESPAÑOL
49-5000468 Rev. 0 19
ESPAÑOL
INSTRUCCIONES IMPORTANTES DE SEGURIDAD
ADVERTENCIA
Para reducir el riesgo de incendio,
choque eléctrico, lesiones a personas o daños al utilizar el
acondicionador de aire, siga precauciones básicas, incluyendo las
siguientes:
• Lea todas las instrucciones antes de usar este electrodoméstico.
• Conecte a un contacto de pared de conexión a tierra de 3
terminales.
• No quite el terminal de conexión a tierra.
• No use un adaptador.
• No use un cable eléctrico de extensión.
• No ponga a funcionar el acondicionador de aire si tiene un cable o
enchufe dañado, si no funciona correctamente o si se ha dañado
o caído.
• El acondicionador de aire solo debe ser reparado por personal
de servicio competente. Llame a la compañía de servicio técnico
autorizada para su inspección, reparación o ajuste.
• Desconecte el suministro de energía antes de darle
servicio técnico.
• Desconecte el suministro de energía antes de limpiarlo.
NOTA: Si apaga la unidad presionando el botón Power
(Encendido), esto NO desconecta el electrodoméstico del
suministro de energía.
• No instale ni utilice el acondicionador de aire en áreas donde la
atmósfera contenga gases combustibles o donde la atmósfera
esté contaminada. Evite que cualquier producto químico entre en
contacto con el acondicionador de aire.
• No almacene nada directamente encima del acondicionador de
aire.
• Con la ayuda de dos o más personas, mueva e instale el
acondicionador de aire.
• Nunca haga funcionar el acondicionador de aire si los filtros de
aire no están colocados en su lugar.
• No utilice el acondicionado de aire cerca de una tina, ducha o
lavabo ni otra zona húmeda.
INFORMACIÓN IMPORTANTE DE SEGURIDAD
LEA Y GUARDE ESTAS INSTRUCCIONES
20 49-5000468 Rev. 0
ESPAÑOL
Las luces al lado de las teclas de toque en el panel de control del acondicionador de aire indicarán los ajustes seleccionados.
Las funciones y el aspecto pueden variar.
Controles
A. PANTALLA DEL PANEL DE CONTROL
Muestra la temperatura fijada en grados Fahrenheit o grados centígrados,
o las horas restantes de un tiempo diferido. La luz indicadora
correspondiente se encenderá.
B. BOTÓN POWER (ENCENDIDO)
ENCIENDE/APAGA el acondicionador de aire.
NOTA: Si apaga la unidad presionando el botón Power (Encendido), esto
NO desconecta el electrodoméstico del suministro de energía.
• Presione el botón Power (Encendido). La luz indicadora de Power
(Encendido) se iluminará.
C. BOTÓN MODE (MODO)
Presione el botón Mode (Modo) para alternar entre las opciones de
operación. El indicador correspondiente se iluminará:
Heat (Calor) (en algunos modelos) - Calienta la habitación a la
temperatura establecida
Cool (Enfriamiento): enfría la habitación a la temperatura jada
ECO (Ahorro de Energía) – Hace que el ventilador realice ciclos para
refrigerar de forma económica.
Dehum (Deshumidificar): reduce la humedad en la habitación
Fan (Ventilador): hace circular el aire de la habitación sin enfriar
D. VENTANA DE SEÑAL DEL CONTROL REMOTO
Dirija el control remoto hacia esta ventana para que el control reciba la
señal.
E. BOTONES CON FLECHAS HACIA ARRIBA
Y HACIA ABAJO
Ajustan la temperatura o las horas del tiempo diferido.
Para jar la temperatura:
La temperatura puede fijarse entre 62 ºF y 86 ºF (17 ºC y 30 ºC) cuando el
acondicionador de aire está en modo Cool (Enfriamiento).
1. Presione el botón Mode (Modo) hasta que se seleccione el modo Cool
(Enfriamiento).
2. Presione los botones con las flechas hacia arriba o hacia abajo para
seleccionar la temperatura.
NOTA: La temperatura no se puede fijar si el acondicionador de aire está
en el modo Fan (Ventilador) o Dehum (Deshumidificar).
NOTA: Los botones con las flechas hacia arriba y hacia abajo, cuando se
los presiona al mismo tiempo, le permiten seleccionar entre mostrar la
temperatura en ºC o ºF. El indicador correspondiente se iluminará.
F. BOTÓN FAN SPEED (VELOCIDAD DEL VENTILADOR) La velocidad
del ventilador se puede regular desde velocidad Low (Baja) a High (Alta)
cuando el acondicionador de aire está en funcionamiento.
NOTA: La velocidad del ventilador no se puede regular cuando la unidad
está en modo Dehum (Deshumidicar).
• Presione el botón Fan Speed (Velocidad del ventilador) para alternar
entre las dos velocidades. El indicador de velocidad del ventilador
correspondiente se iluminará.
G. BOTÓN TIMER (TEMPORIZADOR)
Programe un tiempo desde (1 hora a 24 horas) para que el acondicionador
de aire se apague o se encienda. Cuando se programa un tiempo diferido,
la luz indicadora de Timer (Temporizador) se iluminará.
Mientras el acondicionador de aire está funcionando:
1. Presione el botón Timer (Temporizador).
2. Presione los botones con flecha hacia arriba/abajo para seleccionar
el número de horas que desea que el acondicionador de aire continúe
funcionando antes de apagarse.
NOTA: Espere unos 5 segundos para que se guarde la hora en que se
apagará.
Mientras el acondicionador de aire está apagado:
1. Presione el botón Timer (Temporizador).
2. Presione los botones con flecha hacia arriba/abajo para seleccionar el
número de horas que desea que el acondicionador de aire permanezca
apagado antes de encenderse.
NOTA: Espere unos 5 segundos para que se guarde la hora en que se
encenderá.
Para cancelar el temporizador:
• Presione el botón Timer (Temporizador) una vez, las horas restantes
destellarán, presione el botón Timer (Temporizador) de nuevo y el
temporizador se cancelará.
H. Tecla de WiFi Connect (en algunos modelos)
1. Conecte su acondicionador de aire al enrutador WiFi.
2. Mantenga presionado el botón del temporizador por 3 segundos para
conectar o desconectar la aplicación.
Para más información, consulte la sección de “Configuración del WiFi”.
CONTROLES
Temp / Time
HighMedLowCool Fan Dry
GF
E
DCB
A
H
(
algunos modelos
)
A
FEDCB
G
H

49-5000468 Rev. 0 21
ESPAÑOL
Modo de Refrigeración
Use el modo COOL (Refrigeración) para enfriar.
Para configurar el modo COOL (Refrigeración):
1. Presione la tecla MODE (Modo) hasta que la luz indicadora de COOL
(Refrigeración) esté encendida.
2. Presione la tecla FAN (Ventilador) para configurar la velocidad del
ventilador en HIGH (Alto) o LOW (Bajo).
3. Presione + o – para configurar la temperatura deseada entre 61°F y 89°F
por incrementos de 1°F.
Una vez aplicadas las configuraciones, la pantalla volverá a mostrar la
temperatura ambiente.
El control de temperatura se usa para mantener la temperatura del
ambiente. El compresor realizará el ciclo de encendido y apagado para
mantener la sala en el nivel de confort configurado. Configure el control de
temperatura en un número más bajo, y el aire interior comenzará a ser más
frío. Configure el control de temperatura en un número más alto, y el aire
interior comenzará a ser más caliente.
NOTA: Si el acondicionador de aire está apagado y luego es encendido en la
configuración COOL (Refrigeración), pasarán aproximadamente 3 minutos
hasta que el compresor se inicie y comience la refrigeración.
Descripciones de Refrigeración
Para un Enfriamiento Normal—Seleccione el modo COOL (Refrigeración)
y la velocidad del ventilador en HIGH (Alto) o MEDIUM (Medio) con una
temperatura en la configuración intermedia.
Para un Enfriamiento Máximo—Seleccione el modo COOL (Refrigeración)
y la velocidad del ventilador en HIGH (Alto) con una temperatura en una
configuración baja.
Para un Enfriamiento Más Suave y Nocturno—Seleccione el modo
COOL (Refrigeración) y la velocidad del ventilador en LOW (Bajo) con una
temperatura en la configuración intermedia.
NOTA: Si pasa de la configuración del modo COOL (Refrigeración) o DRY
(Seco) a OFF (Apagado), espere 3 minutos antes de realizar el reinicio.
Modo DRY (Seco) - Deshumidificación
Use el modo DRY (Seco) sólo para aplicar la deshumidificación. El ventilador
funcionará en una velocidad fija en esta configuración, de modo que no será
posible configurar la velocidad de la ventilación. Mantenga las ventanas y
puertas cerradas para lograr los mejores efectos de deshumidificación.
Para configurar el modo DRY (Seco):
•Presione la tecla MODE (Modo) hasta que la luz indicadora de DRY (Seco)
esté encendida
En el modo DRY (Seco), no se mostrará una temperatura configurada.
Una vez configurado el modo DRY (Seco), la pantalla volverá a mostrar la
temperatura ambiente.
NOTA: Si pasa de una configuración de DRY (Seco) a OFF (Apagado) o a
una configuración del ventilador, espere por los menos 3 minutos antes de
volver a pasar a una configuración de DRY (Seco).
Si usará la unidad en el modo DRY (Seco) como deshumidificador durante un
período de tiempo prolongado:
1 . Desenchufe el cable de corriente.
2. Conecte una manguera de drenaje (no incluida) al puerto de drenaje
central (consulte la página 9, drenaje superior nº 8) y una manguera
principal al drenaje del piso.
3. Vuelva a conectar el cable de corriente y presione la tecla MODE (Modo)
hasta que la luz indicadora de DRY (Seco) esté encendida.
Modo de Ventilación
Use el modo FAN (Ventilación) para brindar circulación de aire y filtrar sin
refrigerar.
Para configurar el modo FAN (Ventilación):
• Presione la tecla FAN (Ventilación) hasta que la luz indicadora deseada de
velocidad en HIGH (Alto), MEDIUM (Medio), o LOW (Bajo) esté encendida.
Debido a que las configuraciones de sólo ventilador no brindan refrigeración,
no será exhibida una temperatura configurada. Una vez configurada la
velocidad de FAN (Ventilación), la pantalla volverá a mostrar la temperatura
ambiente.
Función de Recuperación por Corte de Suministro
En caso de corte de suministro o interrupción, la unidad se reiniciará de
forma automática en las configuraciones usadas por última vez una vez
restablecido el servicio.
NOTA: Si TIMER (Temporizador) fue configurado antes del corte de
corriente, será necesario reiniciar el mismo una vez restablecido el servicio.
La pantalla siempre mostrará la temperatura del ambiente por omisión.
Cuando el acondicionador de aire sea encendido, se iniciará de forma automática en las configuraciones de modo y ventilación que fueron usadas por última
vez.
CONTROLES
22 49-5000468 Rev. 0
ESPAÑOL
Las luces al lado de las teclas de toque en el panel de control del acondicionador de aire indicarán los ajustes seleccionados.
Las funciones y el aspecto pueden variar.
ć
C
A
B
C
D
E
F
CONTROL REMOTO
1. Inserte las dos baterías (incluidas).
2. Apunte el control remoto al receptor de señal en el panel de
control para operar el aire acondicionado.
A. Botón Power (Encendido)
ENCIENDE/APAGA el acondicionador de aire.
NOTA: Si apaga la unidad presionando el botón Power
(Encendido), esto NO desconecta el electrodoméstico del
suministro de energía.
• Presione el botón Power (Encendido). La luz indicadora de Power
(Encendido) se iluminará.
B. Botón Mode (Modo)
Presione el botón Mode (Modo) para alternar entre las opciones
de operación. El indicador correspondiente se iluminará:
Heat (Calor) (en algunos modelos) - Calienta la habitación a la
temperatura establecida
Cool (Enfriamiento): enfría la habitación a la temperatura jada
DRY (Deshumidificar): reduce la humedad en la habitación
Fan (Ventilador): hace circular el aire de la habitación sin enfriar.
C. Botones Con Flechas Hacia Arriba Y Hacia Abajo
Ajustan la temperatura o las horas del tiempo diferido.
Para jar la temperatura:
La temperatura puede fijarse entre 62 ºF y 86 ºF (17 ºC y
30 ºC) cuando el acondicionador de aire está en modo Cool
(Enfriamiento).
1. Presione el botón Mode (Modo) hasta que se seleccione el
modo Cool (Enfriamiento).
2. Presione los botones con las flechas hacia arriba o hacia abajo
para seleccionar la temperatura.
NOTA: La temperatura no se puede fijar si el acondicionador de
aire está en el modo Fan (Ventilador) o DRY (Deshumidificar).
NOTA: Los botones con las flechas hacia arriba y hacia
abajo, cuando se los presiona al mismo tiempo, le permiten
seleccionar entre mostrar la temperatura en ºC o ºF. El indicador
correspondiente se iluminará.
D. Botón Fan Speed (Velocidad Del Ventilador)
La velocidad del ventilador se puede regular desde velocidad
Low (Baja) a High (Alta) cuando el acondicionador de aire está en
funcionamiento.
NOTA: La velocidad del ventilador no se puede regular cuando la
unidad está en modo DRY (Deshumidicar).
• Presione el botón Fan Speed (Velocidad del ventilador) para
alternar entre las dos velocidades. El indicador de velocidad del
ventilador correspondiente se iluminará.
E. Timer
Programe un tiempo desde (1 hora a 24 horas) para que el
acondicionador de aire se apague o se encienda. Cuando
se programa un tiempo diferido, la luz indicadora de Timer
(Temporizador) se iluminará.
F. Botón de Balanceo
Las celosías de su acondicionador portátil se abrirán de forma
automática (no las abra con fuerza ni haga presión para cerrarlas).
Use el Botón de Balanceo de su control remoto para ajustar las
celosías en la posición que desee que se encuentren; o para
un funcionamiento en el modo Swing (Balanceo), las celosías
continuarán el movimiento hacia arriba y abajo.
Enfriamiento
WiFi Balanceo Velocidad Del Ventilador
Ventilador
Deshumidificar
Calor
CONTROLES
49-5000468 Rev. 0 23
ESPAÑOL
FILTROS DE AIRE
Los filtros de aire deben limpiarse al menos una vez a la
semana para garantizar que la unidad funcione con una
eficiencia óptima.
PRECAUCIÓN
No opere el acondicionador de aire
si los filtros de aire no están en su
lugar.
Para eliminar:
1. Desenchufe o desconecte el suministro de energía.
2. Jale de las lenguajes para deslizar los filtros de la parte.
Posterior del acondicionador de zona.
NOTA: Los filtros secundarios están disponibles una vez que
se muestran los filtros principales.
3. Lava o chupa el polvo de los filtros de aire.
NOTA: Si se lava, agite el filtro para eliminar el exceso de
partículas de polvo atrapadas en el filtro.
4. Vuelva ha instalado los filtros.
5. Enchufe o vuelva a conectar el suministro de energía.
LIMPIEZA
1. Desenchufe o desconecte el suministro de energía.
2. Útil solamente un paño dulce humedecido con agua para
limpiar el gabinete.
NOTA:
• No use un limpiador líquido o con rociador para limpiar el
acondicionador de aire.
• No usar productos químicos, abrasivos, amoníaco,
blanqueador con cloro, detergentes concentrados,
solventes o estropajos de metal. Algunos de estos
artículos / productos químicos pueden dañar y / o
decolorar su acondicionador de aire.
3. Ve bien con un paño dulce.
4. Enchufe o vuelva a conectar el suministro de energía.
Riesgo de descarga eléctrica
Desconecte la fuente de alimentación antes de limpiar.
El incumplimiento de estas instrucciones puede
provocar la muerte o una descarga eléctrica.
ADVERTENCIA
CUIDADO Y LIMPIEZA
24 49-5000468 Rev. 0
ESPAÑOL
TANQUE DE AGUA INTERIOR
El indicador de agua llena se ilumina cuando el tanque de agua
interno está lleno de agua de condensación.
Vaciar el depósito de agua interno:
1. Desconecte o desconecte la fuente de alimentación
eléctrica.
2. Coloque un recipiente hueco con una capacidad mínima
de 1 cuarto (no incluido) debajo de la piscina de drenaje
inferior en la parte posterior del acondicionador de aire
(cerca de la parte inferior).
3. Retire la tapa y el tapón de goma y drene el tanque de agua.
4. Vuelva a instalar el tapón de drenaje y apriete firmemente
la tapa.
5. Conecte el dispositivo o vuelva a conectar la fuente de
alimentación.
CÓMO INSERTAR LAS PILAS EN EL CONTROL REMOTO
1. Retire la cubierta de la pila deslizándola de acuerdo con la
dirección de la flecha.
2. Inserte pilas nuevas cerciorándose de que los polos positivos (+) y
negativos (–) están orientados correctamente.
3. Coloque la cubierta otra vez deslizándola en su lugar.
NOTAS:
• Use 2 pilas alcalinas “AAA” de 1,5 voltios. No use pilas recargables.
• Retire las pilas del control remoto si no va a usar el sistema por un
período prolongado.
• No mezcle baterías nuevas y viejas. No mezcle baterías alcalinas,
estándar (carbono-cinc) orecargables (ni-cad,ni-mh,etc.
RANGEMENT
Durante largos periodos de infantilización del dispositivo:
1.
Desconecte o desconecte la fuente de alimentación
eléctrica.
2.
Drene el agua del tanque de agua. Consulte Mantenimiento
de la acondicionador de aire.
3.
Coloque la unidad en su embalaje original para evitar la
acumulación de polvo o suciedad.
4. Guarde el aire acondicionado en un lugar fresco y seco.
Tapón de agua
Tapa del drenaje
CUIDADO Y LIMPIEZA
49-5000468 Rev. 0 25
ESPAÑOL
REQUISITOS DE UBICACIÓN
• Coloque el acondicionador de aire sobre una supercie plana y
nivelada en una ubicación que esté al menos a 20” (51 cm) de la
pared.
NOTA: La distancia recomendada de la ventana para un
rendimiento óptimo es de 30 “(76 cm).
• Mantenga un espacio libre mínimo de 20” (51 cm) alrededor del
acondicionador de aire para no bloquear el flujo de aire.
• Mantenga el acondicionador de aire libre de obstrucciones
como cortinas con pliegues, cortinas, persianas, etc.
• La manguera de escape debe estar libre de cualquier
obstrucción.
• No coloque el acondicionador de aire en una supercie inestable
o elevada, ya que podría caerse y provocar daños o lesiones.
• No exponga el acondicionador de aire a la luz directa del sol o
cerca una fuente de calor como zócalos radiantes, estufas, etc.
• El panel de la ventana puede instalarse en una ventana con una
abertura mínima de 22” (55.88 cm) hasta un máximo de 48”
(121.92 cm).
Ê×ÝÎÜÍÎÒ×ÒÌÒÊÛ
Lea estas instrucciones completa y cuidadosamente.
• IMPORTANTE — Guarde estas instrucciones para
uso del inspector local.
• IMPORTANTE — Observe todos los códigos y
órdenes de ley.
• Nota al instalador – Asegúrese de dejar estas instrucciones
con el consumidor.
• Nota al consumidor – Conserve estas instrucciones para
referencia futura.
• Nivel de destreza – La instalación de este aparato requiere de
destrezas mecánicas básicas.
• Tiempo de ejecución – Aprox. 1 hora
• Recomendamos dos personas para la instalación de este
producto.
• La instalación apropiada es la responsabilidad del instalador.
• La falla del producto debido a una instalación inadecuada no
está cubierta por la garantía.
• Cuando instale este acondicionador de aire, DEBE usar todas
las piezas suministradas y usar procedimientos adecuados de
instalación.
PRECAUCIÓN
Bajo ninguna circunstancia corte o remueva la tercera púa
(conexión a tierra) del cable eléctrico.
No cambie el enchufe en el cable eléctrico de este
acondicionador de aire.
Los cables caseros de aluminio podrían presentar problemas
especiales. Consulte a un técnico electricista calificado.Urnit,
El cable de alimentación incluye un dispositivo para interrupción
de corriente. Se incluye un botón de prueba y de reinicio
en el dispositivo. El dispositivo debe ponerse a prueba
periódicamente: primero se presiona el botón de TEST (prueba)
y luego RESET (reinicio) mientras se encuentra enchufado al
tomacorriente. Si el botón TEST no se dispara o si el botón
RESET no queda enganchado, deje de utilizar el acondicionador
de aire y comuníquese con un técnico calificado.
REQUISITOS ELÉCTRICOS
Algunos modelos requieren tomacorrientes de 115/120
voltios de corriente alterna y 60 Hz conectados a tierra,
protegidos con un fusible de dilatación de tiempo de 15
amperios o un cortacircuitos.
El enchufe de tres púas con conexión a tierra minimiza la
posibilidad de descargas eléctricas. Si el tomacorriente de la
pared que usted planea usar solamente tiene 2 tomas, es su
responsabilidad hacer que un técnico lo reemplace por uno de
tres tomas con conexión a tierra.
¿Preguntas? Visite nuestro Sitio Web en: haierappliances.com
INSTRUCCIONES DE INSTALACIÓN
20"
(55.88 cm)
20"

26 49-5000468 Rev. 0
ESPAÑOL
1. Panel de Control
2. Celosías del Balanceo de Aire
3. Ventilación de aire a través de las paletas de balan-
ceo
4. Ensamble de la manguera de salida
5. Ensamble de la Placa de Apoyo en Ventanas
6. Control Remoto
7. Panel del Filtro
8. Gancho del Cable de Corriente (2)
9. Manija (2)
10. Ventilación de Aire - salida
11. Agujero de Desagüe Continuo
12. Rejilla de Entrada de Aire
13. Agujero de drenaje
14. Cable y enchufe de corriente
1
3
6
7
9
11
12
14
13
8
10
2
ÙÊÛÝÎÜÒ×ÌÕÞÒÍÊÜ
(Apariencia puede variar)
INSTRUCCIONES DE INSTALACIÓN
49-5000468 Rev. 0 27
ESPAÑOL
2. INSTALE EL ENSAMBLE DE LA
MANGUERA DE SALIDA EN LA
PARTE TRASERA DE LA UNIDAD
Instale el ensamble de la manguera de salida
desenroscando la manguera en dirección antihoraria
en el puerto de salida sobre la parte trasera del
acondicionador de aire.
1. DESEMBALE EL ACONDICIONADOR
DE AIRE
• Retire los materiales del embalaje. Conserve el
cartón y el embalaje de gomaespuma para guardar
el acondicionador de aire cuando no se encuentre en
uso.
NOTA: NO hay materiales de embalaje dentro del
acondicionador de aire que sean necesarios retirar
- No abra el gabinete.
• Descarte de forma adecuada/ recicle todos los
materiales de embalaje.
• Manipule el acondicionador de aire de forma suave.
• Mantenga el acondicionador de aire erguido y
nivelado. No ubique el acondicionador de aire sobre su
lateral, frente, parte trasera o dado vuelta.
ADVERTENCIA
Riesgo de Peso Excesivo
Cuente con la ayuda de dos o más personas para
trasladar e instalar el acondicionador de aire.
Si esto no se cumple se podrán producir lesiones en la
espalda u otras heridas.
3. INSTALE LOS PANELES DE LA
VENTANA
A. Mida la abertura de la ventana. En una abertura de
20” use sólo el panel intermedio del Kit de Ventana
con la abertura para el Adaptador de la Manguera de
Salida. Para aberturas de 20” a 33”, inserte un panel
lateral en el panel intermedio; para aberturas de 33”
a 46”, inserte ambos paneles laterales.
B. Coloque el Kit de Ventana en la abertura de la ventana
(las Tuercas de Fijación deberán mirar hacia usted)
y deslice los paneles laterales (si son usados) hacia
afuera para llenar la abertura. Bloquee los paneles en
su posición con las Tuercas de Fijación. Aplique los
sellados de gomaespuma sobre las partes superior,
trasera y extremos, a fin de brindar el mejor sellado.
Deslice el cierre de la ventana contra el Kit de
Ventana.
interior
interior
bloqueo de leva
INSTRUCCIONES DE INSTALACIÓN
28 49-5000468 Rev. 0
ESPAÑOL
4. CONECTE LA MANGUERA DE
SALIDA AL PANEL DE LA VENTANA
Coloque el acondicionador de aire cerca de la ventana,
asegurándose de contar por lo menos con 20” de
espacio desde la pared hasta cualquier otra obstrucción.
Extienda la manguera de modo que llegue hasta el Kit de
Ventana. Inserte el Adaptador de la Manguera de Salida
en la abertura del Kit de Ventana y deslice el mismo
hasta la posición de bloqueo. Asegúrese de que la
manguera sea conducida directamente hasta la ventana
sin extensiones excesivas. Importante: La ventilación
del acondicionador de aire deberá estar dirigida hacia
la parte exterior. No utilice una manguera más larga ni
extienda la manguera incluida con el acondicionador de
aire, ya que la unidad no enfriará de forma adecuada y se
sobrecalentará.
5. COMPLETE LA INSTALACIÓN
A. Enchufe el cable de corriente en un tomacorriente
con conexión a tierra de 3 patas.
B. Presione el botón Reset (Reiniciar) del cable de
corriente para asegurarse de que el enchufe
de seguridad está enviando corriente al
acondicionador de aire.
C. Deje 20” de espacio alrededor del acondicionador
de aire para una correcta circulación de aire.
D. Al retirar el acondicionador de aire, asegúrese de
retirar el Kit de Ventana.
ADVERTENCIA
Riesgo de Descarga Eléctrica
Enchufe en un tomacorriente con conexión a
tierra de 3 cables.
No retire la clavija de conexión a tierra del
enchufe del cable de corriente.
No use un adaptador.
No use un prolongador.
Si no se cumple con esto, se podrá producir la
muerte, incendio o descarga eléctrica.
RESET
TEST
INSTRUCCIONES DE INSTALACIÓN
49-5000468 Rev. 0 29
ESPAÑOL
Problema Causas posibles Qué hacer
La unidad no se pone
en marcha ni funciona
El cable de suministro de energía no está
enchufado en un toma corriente.
Conecte el cable eléctrico a un toma corriente de
3 terminales con conexión a tierra.
El cable de suministro de energía se ha disparado. Presione y libere RESET (Restablecer) en el cable de
suministro de energía.
El botón Power (Encendido) no se ha presionado. Presione el botón Power (Encendido) en el panel
de control o el control remoto para ENCENDER el
acondicionador de aire.
El toma corriente eléctrico no recibe suministro
eléctrico.
Enchufe una lámpara de trabajo en el toma corriente
para verificar si hay energía.
Se ha fundido un fusible de la casa o se ha
disparado un cortacircuitos.
Reemplace el fusible o reposicione el cortacircuitos.
El control fue programado para un tiempo diferido. Cancele el tiempo diferido. Vea “Panel de control”.
Las pilas del control remoto están agotadas. Reemplace las pilas.
El tanque de agua interno está lleno.
NOTA: El acondicionador de aire se apaga
automáticamente y el indicador Water Full
(Máximo nivel de agua) se ilumina para avisarle de
este estado.
Vacíe el tanque de agua. Vea “Cuidado del
acondicionador de aire”.
El control remoto no
funciona
Las pilas están agotadas. Reemplace las pilas.
Las pilas están insertadas de forma incorrecta. Asegúrese de que las pilas se inserten en la posición
correcta.
El acondicionador de aire
está funcionando, perola
habitación no se enfría.
La temperatura de la habitación está caliente.
NOTA: En días muy calurosos y húmedos,el
acondicionador de aire necesitará más tiempo para
enfriar la habitación.
Dé tiempo para que la habitación se enfríe cuando
enciende la unidad por primera vez.
Asegúrese de que el acondicionador de aire tenga una
categoría de BTU (Unidad Térmica
Británica) adecuada para el tamaño de la habitación
que desea enfriar.
El control se ha fijado incorrectamente en modo
Fan (Ventilador) o Dry (Seco).
Fije el modo Cool (Enfriamiento) y la velocidad del
ventilador en High (Alta).
El flujo de aire ha disminuido. Quite los obstáculos que bloquean el flujo de aire y
redirija el flujo de aire para lograr un enfriamiento
uniforme.
La temperatura está fijada demasiada alta. Baje la temperatura fijada.
Los filtros de aire están sucios u obstruidos. Limpie el filtro de aire. Vea “Cuidado del
acondicionador de aire”.
El acondicionador de aire se ha instalado
incorrectamente.
Verifique que la manguera de escape y el panel de la
ventana estén correctamente instalados.
Las puertas y las ventanas están abiertas. Cierre las puertas y las ventanas de la habitación que
desea enfriar para evitar que el aire enfriado se escape.
Códigos de Error
Códigos de Error ÜìêñìĤæäçò
E1 Sensación atípica por parte del sensor de la tubería de la bobina
E2 Sensación atípica del sensor de temperatura de la sala
E4 Protección anticongelamiento
FL Llenado completo de agua
SOLUCIÓN DE PROBLEMAS
30 49-5000468 Rev. 0
ESPAÑOL
INFORMACIÓN REGULATORIA
Declaración de Cumplimiento con FCC/IC:
1. Este dispositivo no podrá causar interferencias perjudiciales.
2. Este dispositivo debe aceptar cualquier interferencia recibida, incluidas las
interferencias que puedan provocar un funcionamiento no deseado.
Este equipo fue probado y cumple con los límites establecidos para un
dispositivo digital de clase B, según la parte 15 de la Normativa de la FCC.
Estos límites fueron diseñados para brindar una protección razonable contra
interferencias nocivas en una instalación residencial. Este equipo genera,
usa y puede emitir energía de radiofrecuencia y, si no se instala y utiliza de
acuerdo con las instrucciones, puede ocasionar interferencias perjudiciales
sobre las comunicaciones radiales. Sin embargo, no se garantiza que no
se presenten interferencias en una instalación en particular. Si este equipo
provoca interferencias perjudiciales para la recepción de radio o televisión,
lo que puede comprobar encendiendo y apagando el equipo, se aconseja
al usuario que intente corregir la interferencia a través de una o más de las
siguientes medidas:
• Reoriente o reubique la antena receptora.
• Aumente la separación entre el equipo y el receptor.
• Conecte el equipo a un tomacorriente de un circuito diferente al
tomacorriente al cual se encuentra conectado el receptor.
• Para solicitar ayuda, consulte al comerciante minorista o a un técnico
experimentado de radio/ televisión.
Etiqueta: Las modificaciones sobre esta unidad no aprobadas
expresamente por parte del fabricante podrían anular la autoridad del
usuario para utilizar el equipo.
*Modelos Selectos Únicamente
Este producto tiene capacidad Wi-Fi y requiere conectividad a Internet y
un enrutador inalámbrico para permitir la interconexión con un Sistema
de administración de energía y / o con otros dispositivos, sistemas o
aplicaciones externos.
El uso de Works con el logotipo de Apple HomeKit ™ significa que un
accesorio electrónico se ha diseñado para conectarse específicamente
con iPod touch®, iPhone® o iPad®, respectivamente, y el desarrollador
ha certificado que cumple con los estándares de rendimiento de Apple®.
Apple no es responsable del funcionamiento de este dispositivo ni de su
cumplimiento de las normas de seguridad y reglamentarias.
Cómo Funciona
Descargue la Aplicación de Haier Appliances
Use la aplicación para conectar su acondicionador
de aire para sala al WiFi
Una vez conectada, use la aplicación para apagar su
acondicionador de aire al salir del trabajo.
CHANGE TEMP
TO 65
Puesta en marcha
A fin de conectar su acondicionador de aire para sala, necesitará la Aplicación
de Haier Appliances. La aplicación lo guiará a través del proceso de conexión.
Descargue la aplicación de iTunes o Google Play.
Los datos de todos los electrodomésticos conectados son
guardados en estricto cumplimiento con la Política de Privacidad
de Datos de Conexión de Haier Appliances. Para acceder a esta política,
visite geappliances.com/privacy/privacy_policy_connected.
Preguntas acerca de WiFi Connect
Acceda a respuestas necesarias sobre la configuración de electrodomésticos
con WiFi y la conexión a su red hogareña a través de nuestros artículos de
soporte.
Para acceder a los artículos de soporte la conexión wifi del acondicionador
de aire para sala, visite products.geappliances.com/appliance/gea-support-
search-content.
Haier Appliances WiFi Connect (Conexión WiFi de Haier Appliances)
(Para clientes en Estados Unidos)
Haier Appliances WiFi Connected Habilitado* Si su acondicionador de aire posee una etiqueta de Información del Electrodoméstico Conectado
ubicada en la parte externa como se muestra a continuación, su acondicionador de aire cuenta con Haier WiFi Connect Habilitado. Una tarjeta
de comunicación de WiFi está incorporada en el producto, permitiendo la comunicación del mismo con su teléfono inteligente para el monitoreo
remoto, control y notificaciones. Para aprender más sobre las funciones del electrodoméstico conectado, y para saber qué aplicaciones de
electrodomésticos conectados funcionarán con su teléfono inteligente, visite www.Haierappliances.com/connect.
Network: GE_MODULE_XXXX
PASSWORD: XXXXXXXX
MAC ID: XX-XX-XX-XX-XX-XX
CONTAINS FCCID: ZKJ-WCATA006
CONTAINS IC:
100229A-WCATA006
165D1656P001
CONFIGURACIÓN WIFI
49-5000468 Rev. 0 31
ESPAÑOL
GARANTÍA LIMITADA
Grape aquí su recibo.
Se requiere facilitar prueba de la fecha de compra original para hacer un reclamo de garantía.
EXCLUSIÓN DE GARANTÍAS IMPLÍCITAS—Su única y exclusiva alternativa es la reparación del producto, como
se indica en la Garantía Limitada. Las garantías implícitas, incluyendo garantías implícitas de comerciabilidad o
conveniencia sobre un propósito particular, se limitan a un año o al período más corto permitido por la ley.
Para Clientes de EE.UU: Esta garantía limitada se extiende al comprador original y a cualquier dueño subsiguiente de
productos comprados para uso hogareño dentro de EE.UU. Si el producto está en un área donde no se encuentra disponible
un Proveedor Autorizado del Servicio Técnico de Haier Appliances, usted será responsable por el costo de un viaje o se podrá
requerir que traiga el producto a una ubicación del Servicio Técnico de Haier Appliances Autorizado para recibir el servicio. En
Alaska, la garantía limitada excluye el costo de envío o llamadas del servicio técnico a su hogar.
Algunos estados no permiten la exclusión o limitación de daños fortuitos o consecuentes. Esta garantía limitada le da derechos
legales específicos y es posible que tenga otros derechos legales que varían entre un estado y otro. Para conocer cuáles son
sus derechos legales, consulte a la oficina de asuntos del consumidor local o estatal o al Fiscal de su estado.
Garante en EE.UU:
GE Appliances, a Haier company
Louisville, KY 40225
Ŷ,QVWUXFFLyQDOFOLHQWH(VWHPDQXDOGHOSURSLHWDULR
EULQGDLQIRUPDFLyQUHODFLRQDGDFRQLQVWUXFFLRQHVGH
IXQFLRQDPLHQWR\FRQWUROHVGHOXVXDULR
Ŷ,QVWDODFLyQLQDGHFXDGD6LWLHQHXQSUREOHPDGH
LQVWDODFLyQRHODFRQGLFLRQDGRUGHDLUHQRSRVHHOD
FDSDFLGDGDGHFXDGDFRQWDFWHDVXYHQGHGRUPLQRULVWD
RLQVWDODGRU8VWHGHVUHVSRQVDEOHGHEULQGDU
LQVWDODFLRQHVGHFRQH[LyQHOpFWULFDDGHFXDGDV
Ŷ)DOODGHOSURGXFWRFRPRUHVXOWDGRGHPRGLILFDFLRQHV
VREUHHOPLVPRRGHELGRDXQXVRLUUD]RQDEOH
LQFOX\HQGRODIDOWDGHPDQWHQLPLHQWRUD]RQDEOHR
QHFHVDULR
Ŷ5HHPSOD]RGHIXVLEOHVGHOKRJDURUHLQLFLRGH
GLV\XQWRUHV
Ŷ)DOODVFRPRFRQVHFXHQFLDGHFRUURVLyQHQPRGHORV
VLQSURWHFFLyQFRQWUDpVWD
Ŷ'DxRVRFDVLRQDGRVVREUHHOSURGXFWRSRUQLYHOGH
VXPLQLVWURGHYROWDMHLQDGHFXDGRDFFLGHQWHLQFHQGLR
LQXQGDFLRQHVRFDWiVWURIHVQDWXUDOHV
Ŷ'DxRVFRQVHFXHQWHVRLQFLGHQWDOHVFDXVDGRVSRU
SRVLEOHVGHIHFWRVGHODFRQGLFLRQDGRUGHDLUH
Ŷ'DxRFDXVDGRGHVSXpVGHODHQWUHJD
4Xp1R6HUi&XELHUWR
3RUHO3HUtRGRGH 5HHPSOD]DUHPRV
Un Año
Desde la fecha de la
compra original
5HHPSOD]RUHSDUDFLyQRUHHPEROVRdel costo minorista original de cualquier producto
que falle debido a un defecto en los materiales o la fabricación. Si la unidad es cambiada, la
unidad de reemplazo posee garantía por el resto del período de la garantía original de un año
sobre su producto. Haier Appliances reemplazará, a su exclusivo criterio, el producto por otro
de la misma o de una funcionalidad y calidad comparable o hará un reembolso por el precio
minorista original.
Ŷ(PEDOHODXQLGDGFRUUHFWDPHQWH/HUHFRPHQGDPRV
XVDUODFDMDGHFDUWyQ\ORVPDWHULDOHVGHHPEDODMH
RULJLQDOHV
Ŷ(QWUHJXHHOSURGXFWRHQODXELFDFLyQGHOYHQGHGRU
PLQRULVWDGRQGHIXHDGTXLULGR
Ŷ,QFOX\DHQHOSDTXHWHXQDFRSLDGHOUHFHSWRUGHOD
YHQWDXRWURFRPSUREDQWHGHODIHFKDGHFRPSUD
RULJLQDO7DPELpQHVFULEDVXQRPEUH\GRPLFLOLR\XQD
GHVFULSFLyQGHOGHIHFWR
$)LQGH5HDOL]DUXQ5HFODPRGHOD*DUDQWtD'XUDQWHHO3HUtRGRGH'HYROXFLyQ3HUPLWLGRSRUHO9HQGHGRU0LQRULVWD
Ŷ8ELTXHVXUHFLERGHYHQWDRULJLQDO\KDJDXQDQRWDGH
VXPRGHOR\Q~PHURGHVHULH
Ŷ 9LVLWH6LWLR:HEHQKDLHUDSSOLDQFHVFRPpara iniciar el
SURFHVRGHUHHPSOD]RGHOSURGXFWR
Ŷ6HVROLFLWDUiVXQRPEUHGRPLFLOLRIHFKDGHFRPSUD\
Q~PHURVGHPRGHOR\VHULH
Ŷ+DLHU$SSOLDQFHVKDUiDUUHJORVSDUDTXHVHHQYtHXQD
FDMDGHFDUWyQDVXKRJDUSDUDUHFXSHUDUHOSURGXFWR
Ŷ Por favor entregue todos los materiales solicitados (envío
postal prepago) en la caja de cartón provista. Por favor
incluya una descripción del defecto.
Ŷ'HEHUtDUHFLELUHOSURGXFWRGHUHHPSOD]RRXQ
UHHPEROVRHQWUHORV\GtDVKiELOHVXQDYH]TXH
KD\DPRVUHFLELGRVXSDTXHWH
$)LQGH5HDOL]DUXQ5HFODPRVREUHOD*DUDQWtD'XUDQWHHO5HVWRGHOD*DUDQWtDGHXQ$xR

32 49-5000468 Rev. 0
ESPAÑOL
Impreso en ChinaImpreso en China
IMPORTANT
Do Not Return This Product To The Store
If you have a problem with this product, please call 1-877-337-3639 for the name and telephone number of the
nearest authorized service center.
DATED PROOF OF PURCHASE REQUIRED FOR WARRANTY SERVICE
IMPORTANTE
No regrese este producto a la tienda
Si tiene un problema con este producto, por favor comuníquese al 1-877-337-3639 para solicitar el
nombre y número telefónico del centro de servicio al cliente autorizado más cercano.
NECESITA UNA PRUEBA DE COMPRA FECHADA, NÚMERO DE MODELO
Y DE SERIE PARA EL SERVICIO DE LA GARANTÍA