Loading ...
Loading ...
Loading ...

7
ENGLISH
Adjusting the Pressure Setting
You can adjust the pressure setting on your Water
Flosser by pressing the mode button on the handle.
Start with the lowest setting and increase to your liking.
Recommended Technique
Lean low over sink and place tip in mouth. Aim the tip toward gumline,
and turn the unit ON (I).
For best results, start with the back teeth and work toward the front teeth.
Glide tip along gumline and pause briefly between teeth. Continue until you
have cleaned the inside and outside of both the upper and lower teeth.
Direct the jet stream at a 90-degree angle to
your gumline. Slightly close lips to avoid
splashing but allow water to flow freely from
mouth into the sink.
Keep unit upright during use for best results.
When Finished
Turn the unit off. Empty any liquid
left in the reservoir.
If desired, the reservoir may be
removed from the power handle by
sliding the reservoir release latch to
the unlock position(1) and then sliding the
reservoir down towards the base of
the unit(2).
Charging Unit Prior to First Use
Plug the power cord into the wall and place the magnetic
charger on the front of the unit for approximately 4
hours (see image). The charge indicator on the handle
will flash when charging and will stay on continuously
when the unit is fully charged. A full charge will last for
approximately 1 week of typical use. When the batteries
are in need of charging (approximately 30% charge
left) the charge indicator light will blink 8 times quickly
after use to indicate that you should recharge the unit. A
complete recharge will take 3-4 hours. If you use your
Water Flosser once a day or less, it is recommended you charge it once a
week. If you use it twice a day or more, charge the unit more frequently.
Filling the Reservoir
Remove the magnetic charger from the unit
prior to filling reservoir and product use. Lift
flip top on reservoir and fill the reservoir with
lukewarm water.
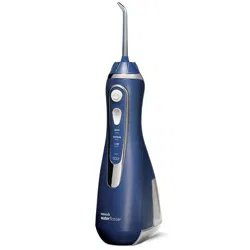
Inserting and Remove Tips
Insert tip into the center of the knob at the top of the Water
Flosser handle. Press firmly until the tip clicks into place.
To remove the tip from the handle, press the tip eject
button and pull tip from the handle.
CAUTION: Do not press tip eject button while unit
is running.
GETTING STARTED
Tip
Eject
Button
MODE
HIGH
LOW
MEDIUM
Pressure
Setting
Reservoir
Release Latch
1.
2.
MODE
HIGH
LOW
MEDIUM
Loading ...
Loading ...
Loading ...