Contents
Page
2-3
4-5
6-7
8-10
11-12
16-17
18
19-26
27
28
For your safety, please be sure to follow
these instructions
From installing to running your refrigerator
Using each compartment
How to Use the Operation Panel
Automatic Ice-Maker
13-15
Energy Saving Mode/Performing
Temperature Adjustment/Rapid Cool
How to remove and clean accessories
How to maintain your automatic ice-maker
Other Issues/Troubleshooting
Accessories
MEMO
Refrigerator
/
Sliding case
/
Vegetable and Freezer Compartments
Before useOperationCleaning
MODEL
MR-LX630EM
Refrigerator-Freezer
OPERATING INSTRUCTIONS
Non-Freon Refrigerators
This refrigerator uses non-Freon refrigerant (isobutane) and non-Freon foam insulation (cyclopentane).
These materials are harmless to the environment and do not affect the ozone layer and global warming.
Please read this manual carefully and follow the information contained within. In particular, be sure to read the safety precautions before using this refrigerator.
Be sure to receive your copy of the warranty from the retailer and confirm that the purchase date and retailer name are written on the warranty.
Store this operating instructions manual and the warranty in a safe place.
This refrigerator was manufactured for refrigerating and freezing of foods in general households. For commercial use, please use a commercial refrigerator-freezer.
The principal plastic components indicate the material name to facilitate recycling.
It is strongly recommended to use only lukewarm water and a soft cloth when cleaning.
Cleaning agents can cause cracking to the plastic components of your refrigerator.
Cleaning Instruction - Important!
The types of danger that can result from improper
handling are explained in the sections below.
ٹ
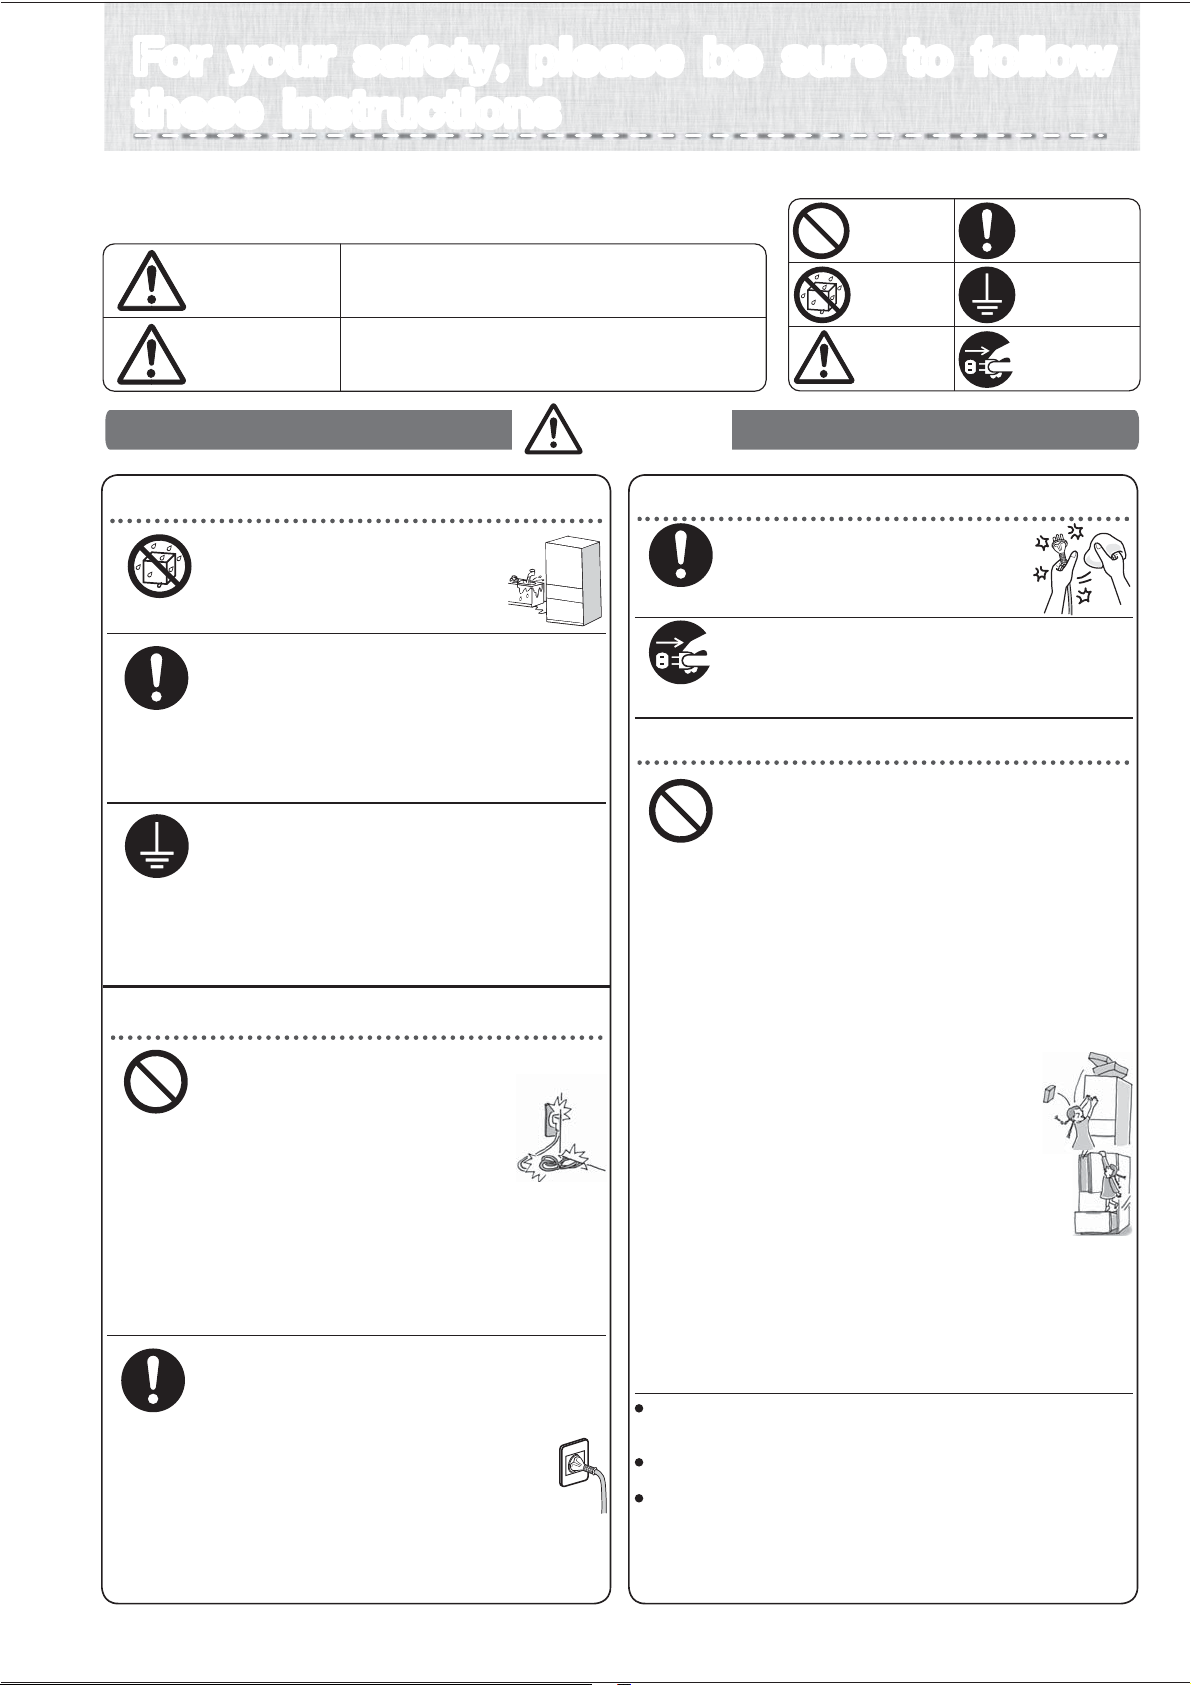
The symbols illustrated below have
the following meanings.
Mishandling can lead to serious injury
or death.
Mishandling can lead to bodily injury or
loss of home and household contents.
Do not do
Do not get
wet
Caution
Always connect
an earth wire
Always unplug
electrical plug
from socket
Always follow
instructions
Do not install in an outdoor area
where water can get on it or
where there is a lot of moisture.
➡ Page 4
Due to insulation failure, it may cause
an electric shock or fire.
Remove dust from the electrical
plug.
Not doing so can cause a fire
from insulation failure.
Allow some space around the refrigerator.
If the refrigerant (gas) leaks, it can remain in
the area and there’s a risk that it may cause
a fire or explosion.
➡ Page 4
To be prepared for an earthquake, affix to
a strong wall or column.
Not doing so may cause injuries from
the refrigerator toppling over.
➡ Page 5
Attach ground wire and earth leakage breakers
when used in a humid or moist area.
It may cause electric shock when electric leakage.
And the following ground connection may
cause electric shock, explosion and fire.
・
・
Water pipe/gas pipe.
Telephone ground lines and lightning rod.
(Please consult with the shop).
➡ Page 4
When installing your unit
About the electrical outlet and electrical plug
About the electrical outlet and electrical plug
Do not push the electrical plug with
the back of the refrigerator.
Do not damage the electrical cord.
If the plug is pressed by the refrigerator,
or if the cord is bent, bundled, or a
heavy object is placed on it, it can
cause an electric shock or a fire.
Using them can result in an electric shock or injury.
Do not use damaged cords or plugs or loose outlets.
Do not remove the electrical plug by pulling the cord.
The cord can become damaged and can cause
an electric shock or a fire.
Do not plug or unplug the electrical plug with wet hands.
It can cause an electric shock.
Using an extention cord or plugging in too many power cords
into the outlet can cause heat buildup or a fire.
➡ Page 4
Use a dedicated outlet for the power supply that meets
the rating specified on the rating label. (The rating label is
located on the door-liner of the refrigerator compartment.)
If it is plugged with the cord facing upward, extra pressure
gets exerted on it which can cause it to heat up or ignite.
Keep the electrical plug cord facing
downwards and insert the plug in fully.
If the power cord is damaged call Mitsubishi Electric
Service Centre for a technician to replace power cord.
The power cord should be designed for this model.
If the power cord is damaged.
Warning
When replacing the interior refrigerator
light or when taking care of the unit,
pull out the electrical plug.
Not doing so can result in an electric shock
or injury.
For your safety, please be sure to follow
these instructions
For your safety, please be sure to follow
these instructions
About using your refrigerator
Do not damage the refrigerant circuit (piping)
of the refrigerator; do not drive in screws.
Because a flammable refrigerant (gas) is used,
there is the danger of igniting or explosion.
Do not use electrical products inside
the refrigerator unit.
If the refrigerant (gas) is leaking inside the unit,
there is a risk that a spark from the electrical product’s
contact can be a source for ignition or explosion.
Do not store volatile products that can easily ignite.
Benzine, cosmetics and hair styling products can
be the cause for igniting fires and explosion.
Do not store pharmaceuticals or scientific test material.
Anything that needs strict supervision must not
be stored in a home-use refrigerator.
Do not place items on top of the refrigerator.
Items may drop from opening and
closing the door and can cause injury.
Do not hang on the door or door handle, and
do not get on compartment drawer-type doors.
The refrigerator can topple over causing injury.
Do not add a strong impact on the
glass shelf.
The glass will broke and it may cause injury.
Do not put your hands in the mechanical part of the
automatic ice-maker (the upper part of the ice storage box).
Doing so will cause injury.
Do not use flammable sprays nearby.
A spark from the electrical contact can ignite and cause a fire.
Do not do
Always follow
instructions
Always follow
instructions
Do not get wet
Always connect
an earth wire
Do not do
Always follow
instructions
Warning
Caution
This appliance is not intended for use by young children or infirm
persons unless they have been adequately supervised by a responsible
person to ensure that they can use the appliance safely.
Young children should be supervised to ensure that they
do not play with the appliance.
This appliance is not intended for use by persons (including children)
with reduced physical, sensory or mental capabilities, or lack
of experience and knowledge, unless they have been given
supervision or instruction concerning use of the appliance by
a person responsible for their safety. Children should be
supervised to ensure that they do not play with the appliance.
Always unplug electrical
plug from socket
2
Before use Operation Cleaning When in trouble
Caution
Warning
When something abnormal or unusual
occurs, turn off immediately and consult with
“the store where you purchased the unit” or
with a “Mitsubishi Electric repair counter.”
Do not use in a shed or a garage.
If small animals damage the wiring,
it can cause an electric shock or a fire.
Do not put any vessels, jars, etc. that
contain water on top of the refrigerator.
If water gets onto electrical parts, it will cause
an electric shock or a fire.
If you sense a gas leakage, do not touch the refrigerator.
Open the window and ventilate the room.
About using your refrigerator
About Malfunctions / Long Term Care
Do not take apart, repair or convert.
Do not continue to use with damaged parts.
This can cause injury, an electric shock or
a fire.
If the refrigerant circuit (piping) is
damaged, do not touch the refrigerator,
open the window and ventilate the room.
If you will not be using the refrigerator for a long
period of time, after pulling out the electrical
plug, open the door and let the interior dry out.
If it is not dried adequately, the cooling unit may
corrode causing the refrigerant (gas) to leak which
can then cause the danger of ignition or explosion.
If it continues to run in an abnormal state,
it can cause an electrical shock or a fire.
If something abnormal occurs (such as a
burning smell), pull out the electrical plug
and stop the refrigerator from running.
It is dangerous if the child gets shut inside.
If there is a possible danger of a child
getting trapped inside while the refrigerator
is not in use, please pull off the door seal.
Always follow
instructions
Do not do
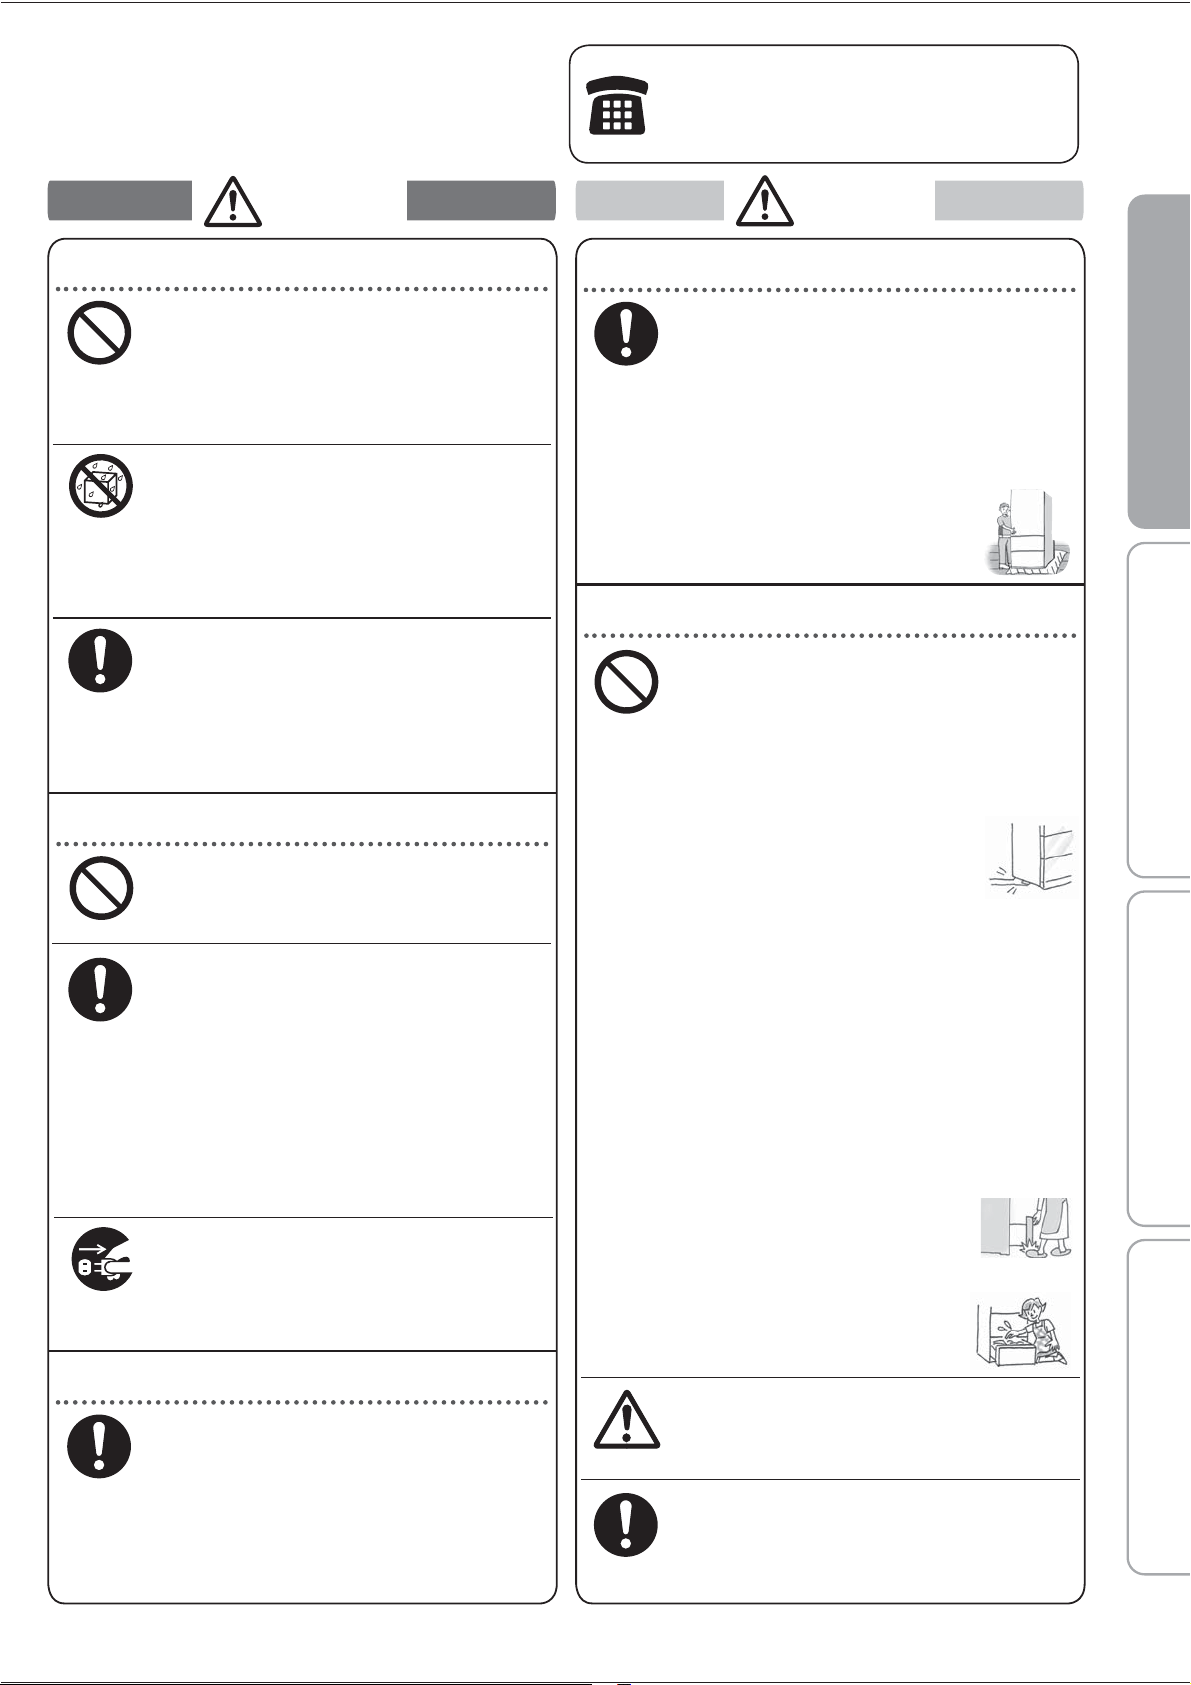
Install on a strong level floor and adjust
the adjustable legs to fix firmly.
The refrigerator may move and cause injury.
➡ Page 4〜5
When carrying, use the handles made for
carrying.
If other parts are held while carrying,
it can cause injury.
Be careful not to damage the floor
or injure yourself when moving
the refrigerator.
Lay a protective sheet on the floor
and move the refrigerator slowly.
➡ Page 21
Installing and Transporting
About using your refrigerator
If insufficiently attached, it may fall out
and may cause injury.
Make sure that glass shelves or
pockets are attached properly.
Always follow
instructions
Do not do
Do not encapsulate refrigerant other than
our specification.
It may cause rupture, explosion, fire, etc.
when using, repairing, disposal, etc.
Do not do
Do not get wet
Do not wash with water or spill liquid
food items on the unit.
If water and food liquids get on the unit, it can cause an
electric shock or a fire. If that happens, dry off immediately.
A spark from the electrical contact can cause
an explosion or a fire.
The door or furniture may be damaged and
cause any injury.
When the doors are opened or closed,
beware not to hit any furniture.
When the refrigerant circuit is damaged,
please consult the store in which the unit
was purchased.
Always follow
instructions
Always unplug
electrical plug
from socket
When Recycling
If it is neglected and refrigerant (gas) leaks, ignition or
an explosion may be caused due to heat from a fire.
When disposing of the unit, transfer it to the
store that you purchased it or to the municipality.
Do not force food items into the refrigerator.
Do not use force to pull out shelves.
Food items may fall out, causing injury.
Do not store bottles in the freezer
compartment.
If the center freezes and bottles crack,
it will cause injury.
Do not place your hands or feet
under the refrigerator.
You can get injured from something
such as the steel plate.
Do not eat food that has a bad smell
or is discoloured.
Doing so may cause food poisoning or other
illnesses.
Observe the following when opening and
closing the doors.
• Do not open or close the doors when
another person is touching the refrigerator.
• Do not put your fingers on the top edge
of a drawer type door while closing it.
•
Do not open or close the doors with excessive
force. (Food may fall out and cause injury.)
• Be careful not to trap your fingers or
any other part of your body.
• Be careful not hit a part of your body.
• Do not trap your feet with the
bottom drawer. (Danger of your
toes caught by the drawer.)
Not doing this may cause injury.
Do not touch foods or containers
in the freezer compartment
with wet hands.
Doing so can cause freezer burn.
Built-up frost may cause injury when removing.
Please take care when removing ice
from the ice box.
Caution
Always follow
instructions
Always follow
instructions
3
From installing to running your refrigeratorFrom installing to running your refrigerator
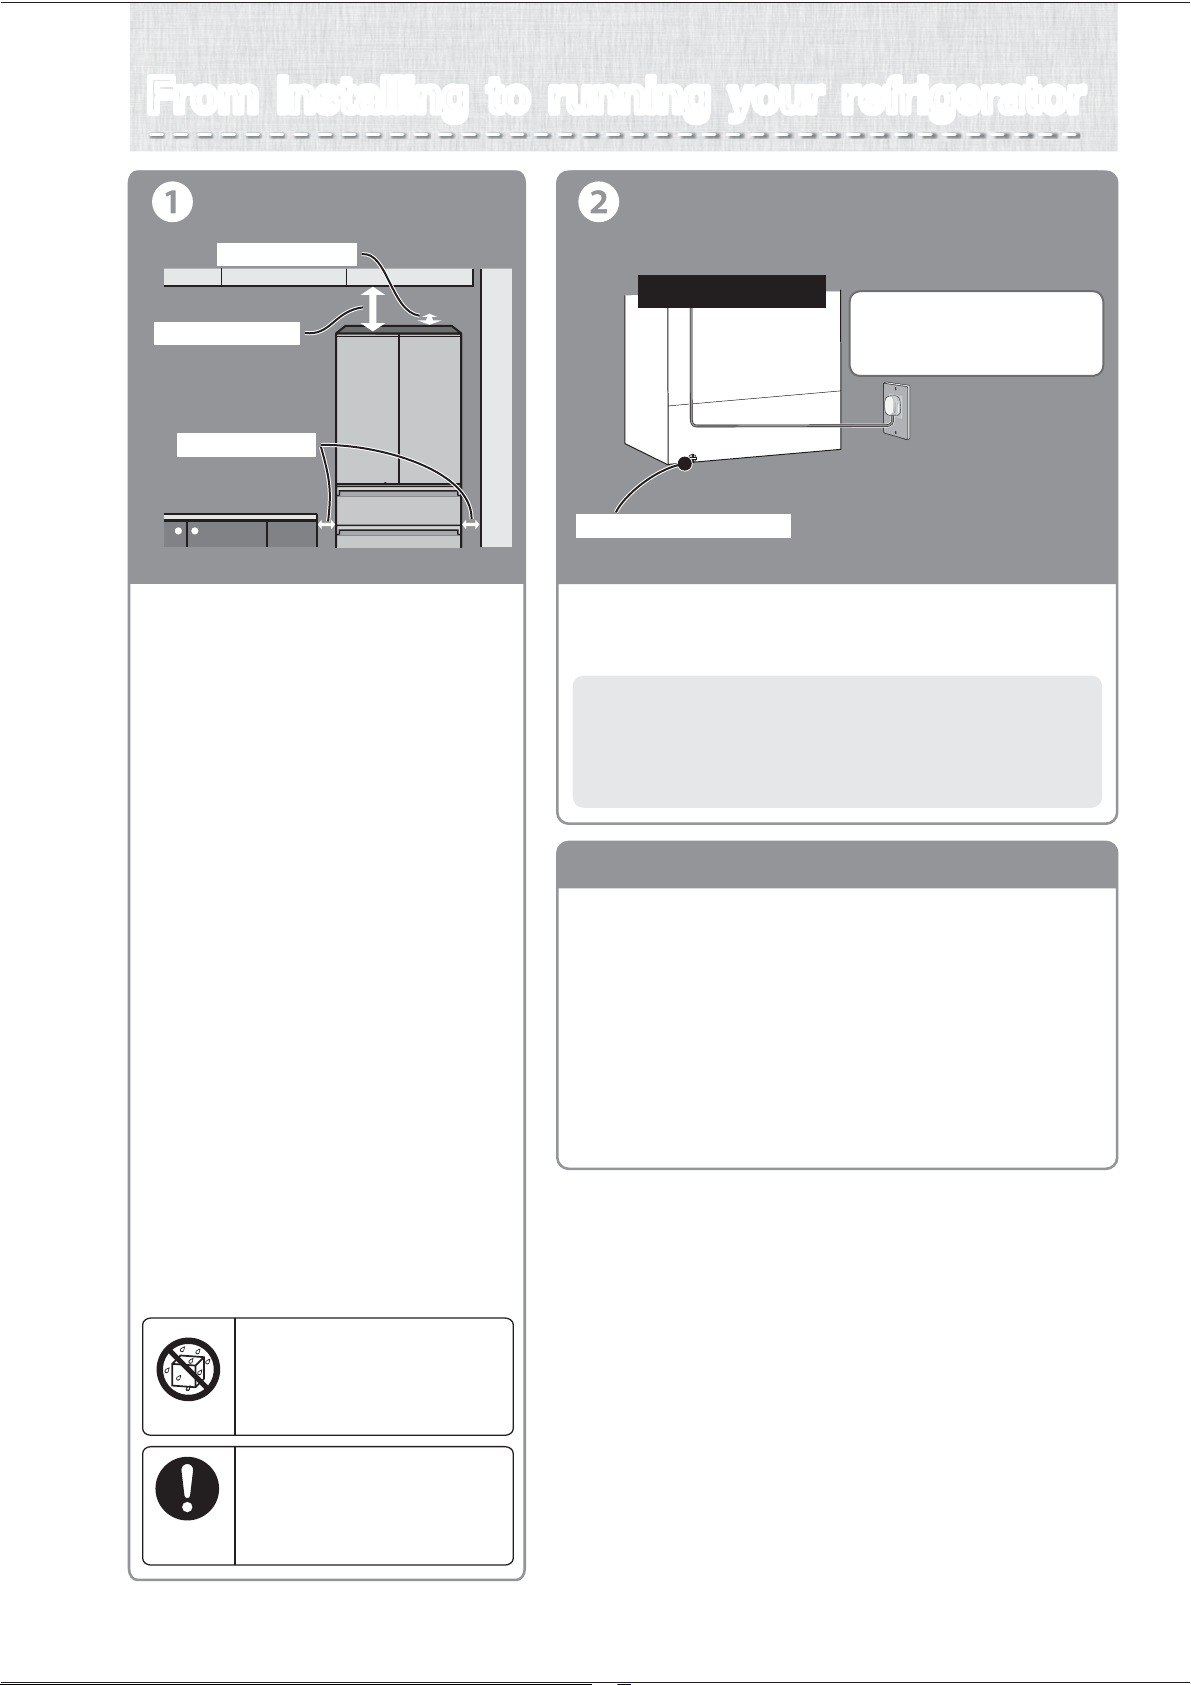
Where to install your fridge
●
Install in a place where there is no direct
sunlight or heat, and with good ventilation.
This protects against a decrease in cooling power
and saves on electricity bills.
● Install in a place with low humidity.
This prevents rust, electric shock or fires from
occurring.
● Install on a solid and level floor.
This prevents vibrations, noise, and partially
open doors or doors left ajar.
Prevent changes or discoloring by its
mass or heat.
※ If the refrigerator adjustment feet sink easily
into the flooring material, please lay a strong
board on top of the flooring.
● Install away from other appliances.
This prevents noise or image disturbances to
the television, etc.
● Leave a space of more than 2 cm to
the left and right, and more than 10 cm
from the ceiling, and more than 5 cm
from the back.
This is to allow heat to escape from the top,
the back and sides.
※ If refrigerator is too near to the wall,
it will cause the sound.
Please care to remove the dust within the gap.
Installation
Do not install in an outdoor area
where water can get on it or
where there is a lot of moisture.
Due to insulation failure, it may
cause an electric shock or fire.
Do not get wet
Allow some space around
the refrigerator.
If the refrigerant (gas) leaks, it can
remain in the area and there’s a risk
that it may cause a fire or explosion.
Always follow
instructions
Turning on the power
●
Turn on the power of the refrigerator as soon as possible.
The refrigerator will not be damaged even if you turn on the power
immediately after the installation.
Use a dedicated outlet for the
power supply that meets the
rating specified on the rating label.
To get the refrigerator
cooled down faster, plug
it in right after installing.
Lower back section
3 cm. or more
10 cm. or more
Earth screw connection
5 cm. or more
Remove the energy label carefully. A glue residue may remain,
particularly if the label has been in place for a long period of time.
Apply either Eucalyptus or Tea Tree oil directly on any residue.
Do not allow the oil to run or drip onto plastic parts as it may
cause the plastic to degrade and potentially crack over time.
Allow the oil to sit for approximately 1-2 minutes, or until the
glue residue has softened.
Wipe off with a damp cloth.
If any residue remains, repeat the above process.
Rinse with clear water.
Dry thoroughly.
●
●
●
●
●
●
●
●
How to remove the energy label
4
Before use Operation Cleaning When in trouble
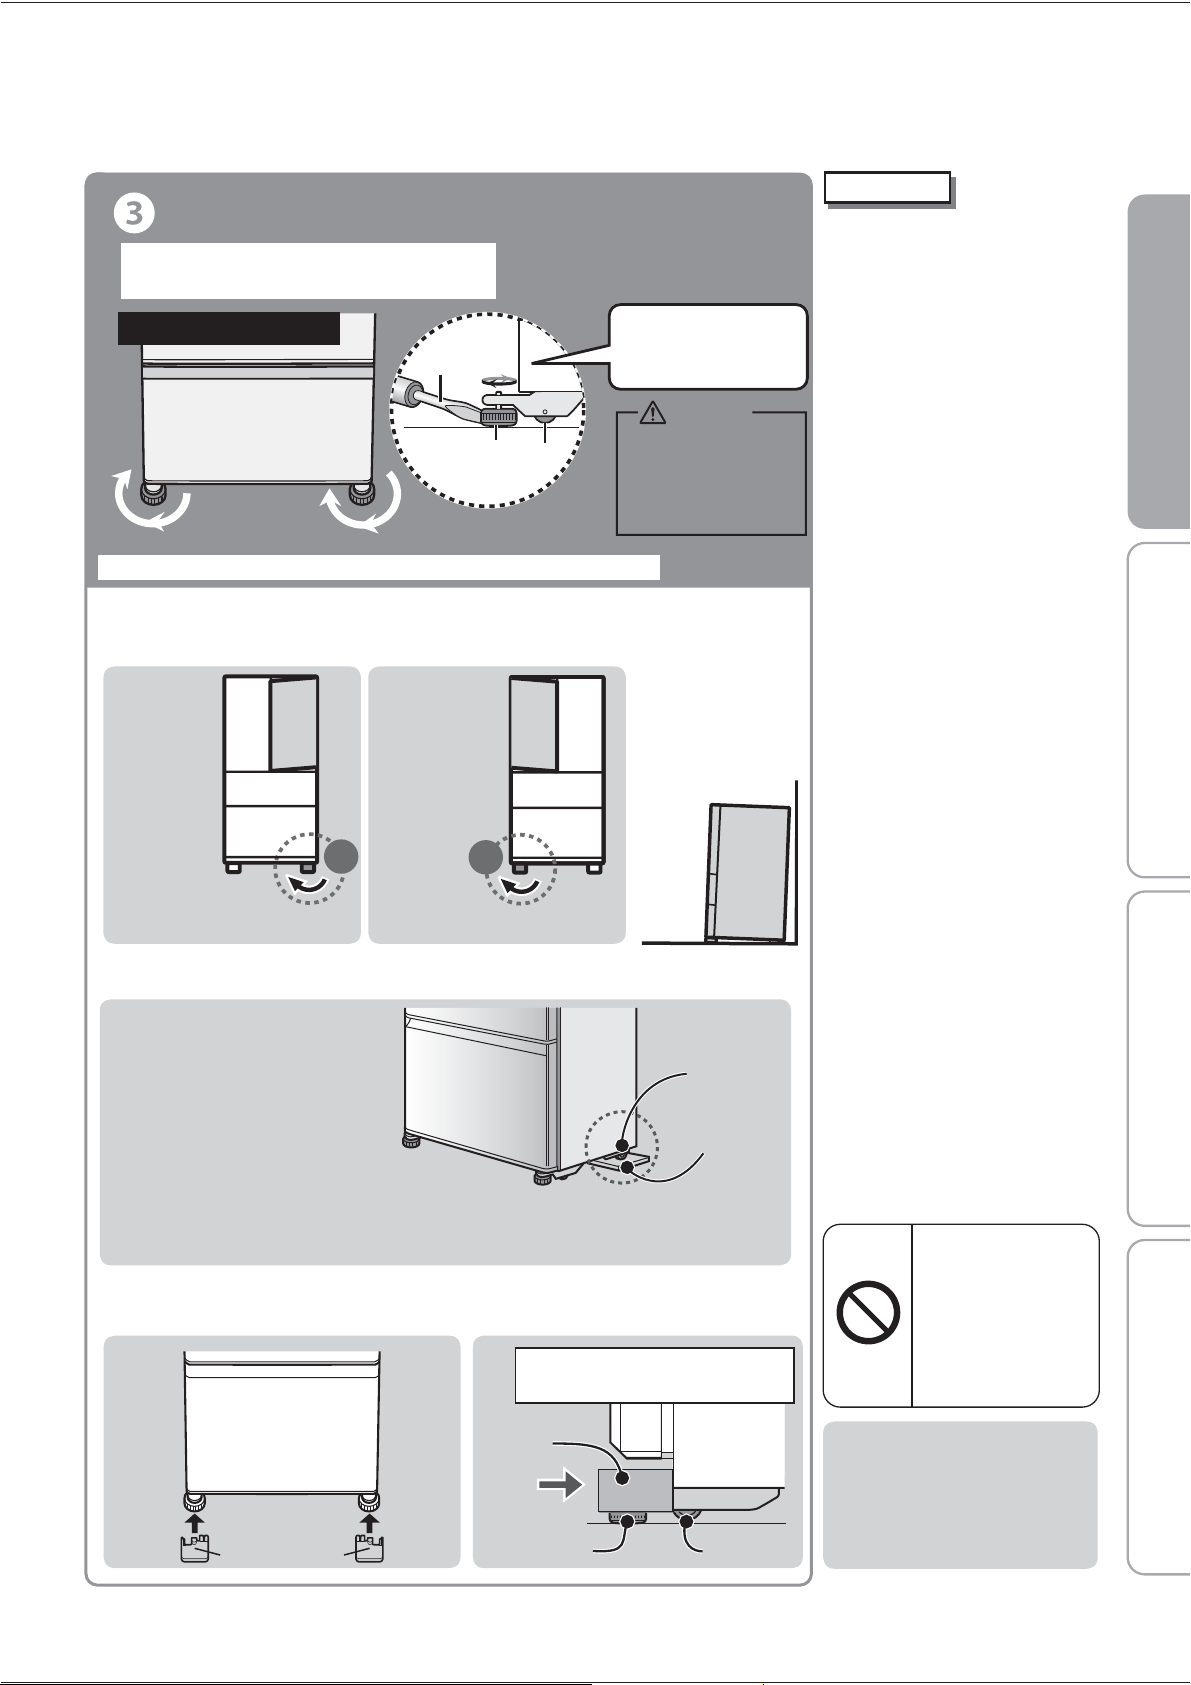
Support cover
Adjustment and affixing
● Please fix the tilt by adjusting the legs.
Please adjust the adjustable leg as the following picture to level the refrigerator.
Refrigerator/front lower
If the left side
of the door
is sagging
If the right side
of the door
is sagging
Raise the right side Raise the left side
Left
Right
Keep the front at a slightly
higher angle. This makes
closing the door easier
and prevents the door
from partially opening.
※After several days from installing, it may sink to the floor by weight.
Please re-adjust the adjustable legs again.
When the tilt cannot be corrected
with the adjustable legs.
If installed in a corner of a room,
there are times when one side of
the back legs sinks into the floor.
When that happens, please make
adjustments in the rear with
caster support (separately sold)
or a strong board underneath
(normally, the thickness of the
board should be 2 – 3 mm.)
For the caster support, please contact
to the shop where you purchased.
Model No.: MRPR-03CS
Rear support
Caster support
or strong board
● After adjusting please insert the toe grille.
(Toe grille included in the refrigerator)
Toe grille
Please insert in parallel until
the cover hit in depth.
Adjustable leg
Caster
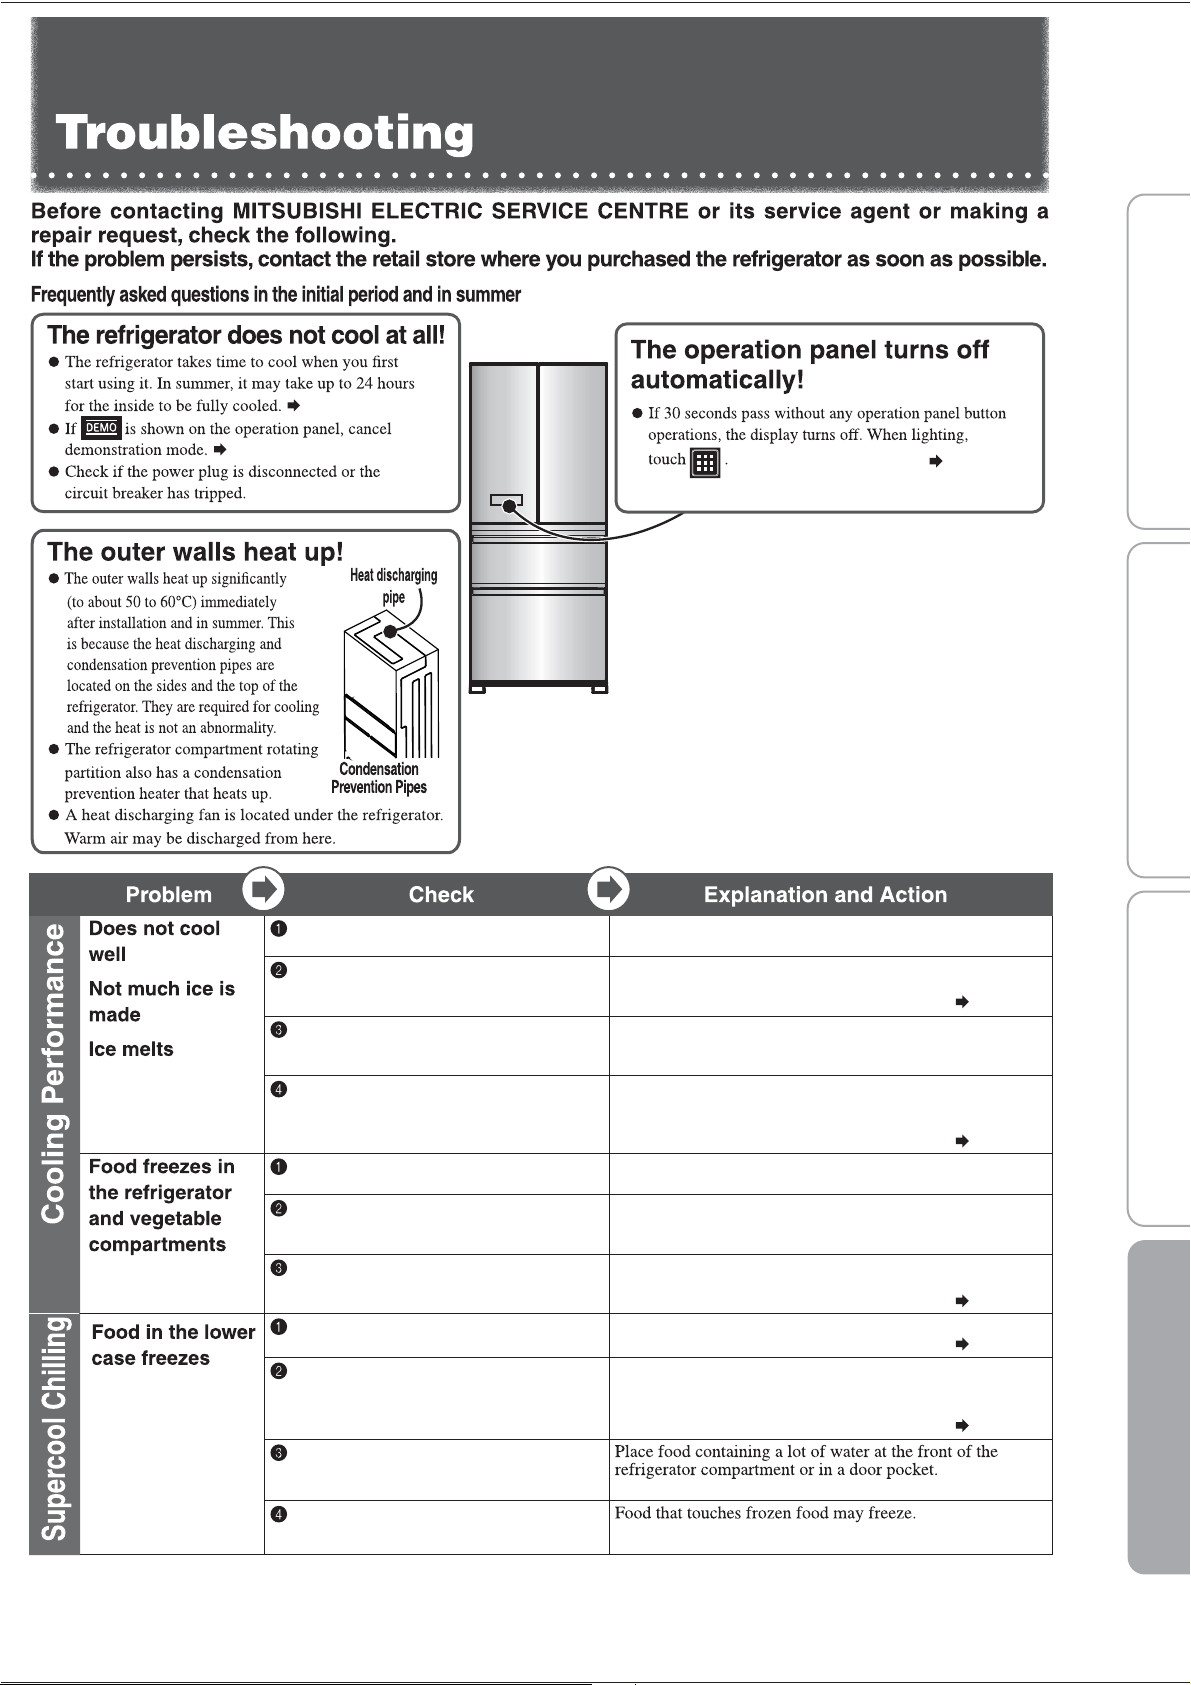
Start using
●
It takes time to cool down.
• Put in warm food items or ice
cream after the refrigerator has
been adequately cooled down.
• Keep opening and closing of
the door for to a minimum,
and open in a short time.
• In the summer, it will take
approx. 24 hours to make
the first batch of ice.
● It may smell of plastic.
•
The smell will gradually disappear.
Please ensure that the room
is adequately ventilated.
●
When the refrigerator is in cooling
mode the following may occur
(also occurs during summer).
• The side will be hot to radiate
outside of the refrigerator for cooling.
• Operating noise may be loud
due to the compressor running
at a high speed operation.
Because a flammable
refrigerant (gas) is used,
there is the danger of
igniting or explosion.
Do not damage the
refrigerant circuit (piping)
of the refrigerator;
do not drive in screws.
Do not do
Use in hot spring areas
Corrosion control treatment must be
applied for the refrigerant circuit (pipe)
due to generation of corrosive gases.
Contact the retail store where you
purchased the refrigerator.
(to provide half-opened
door/noise/move/vibrate)
※Before adjusting, please pull the leg cover to the front and remove it.
Turn the adjustable legs to get
them to touch the floor, then affix.
5
If the supports are not
adjusted properly, the
refrigerator may move
and cause injury.
Caution
Insert the blade of the screwdriver
Turn the adjustable supports
in the arrow direction until
they touch the floor.
Adjustable
support
Flat-blade
screwdriver
Caster
6
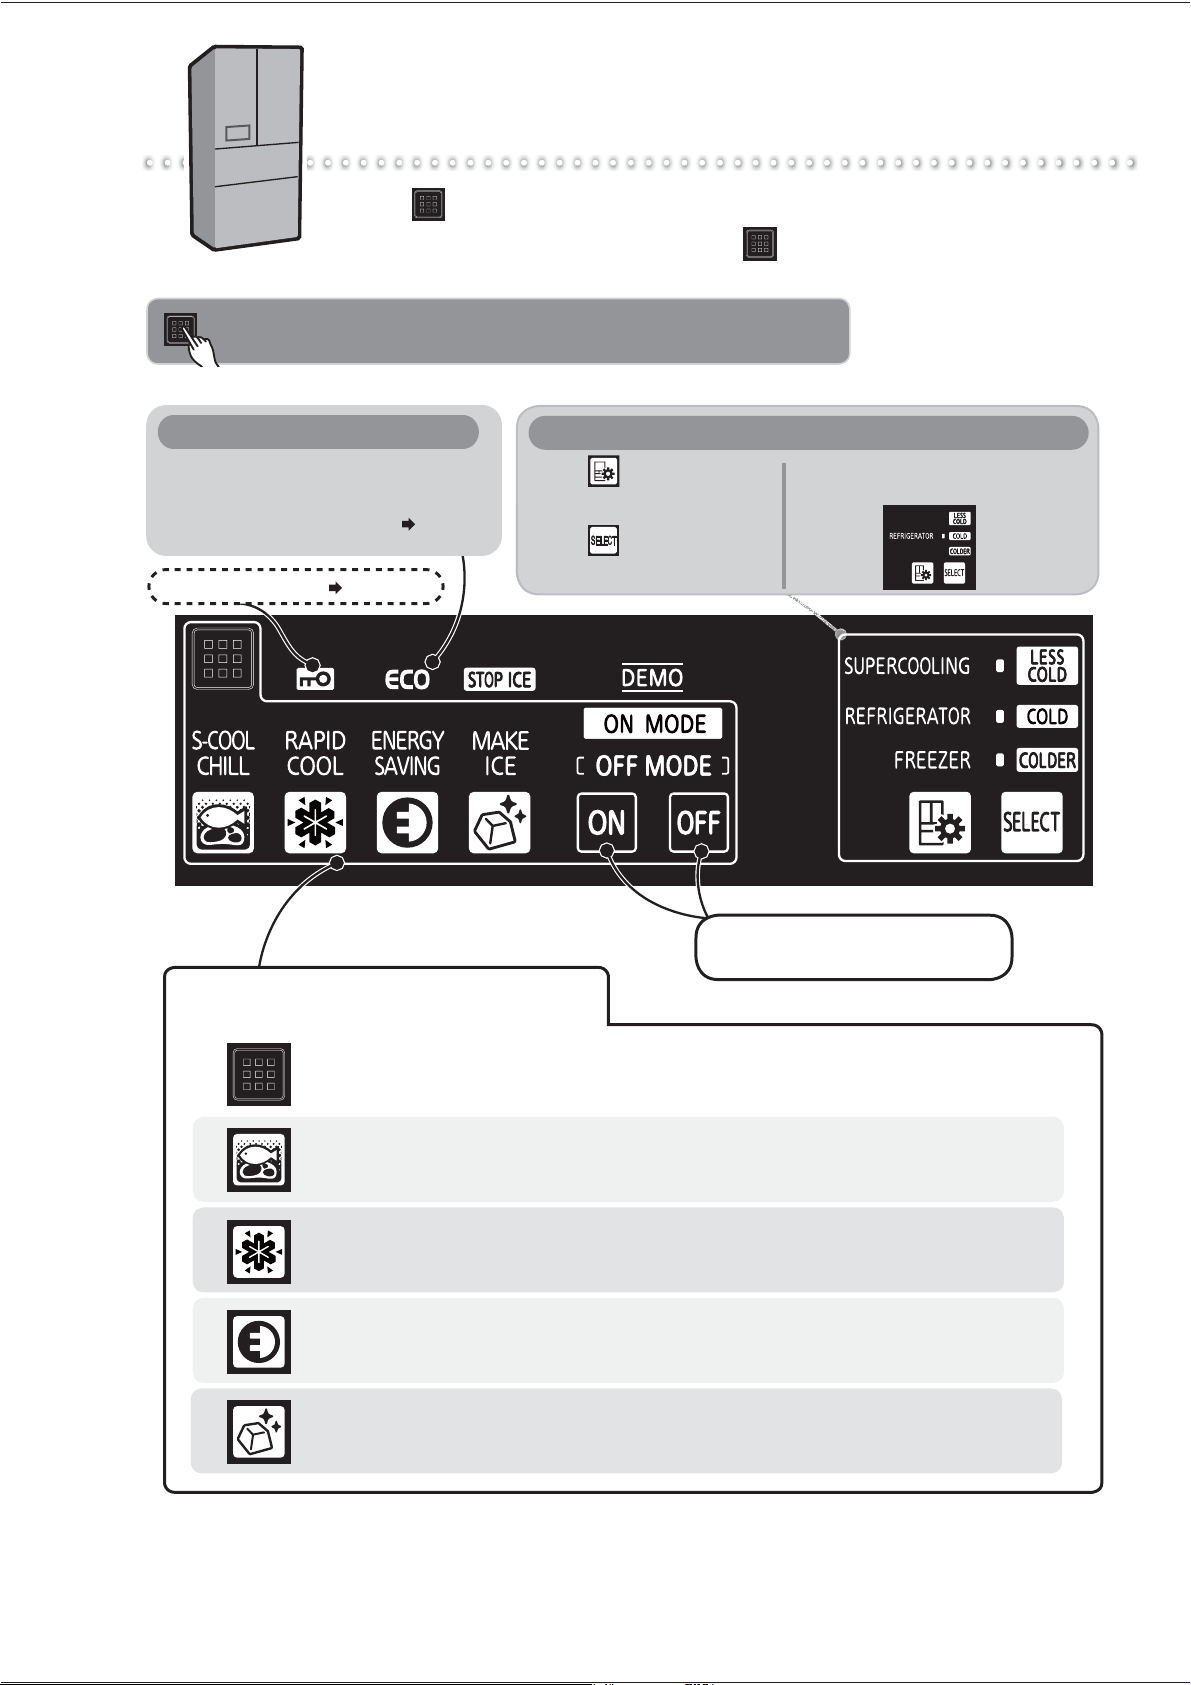
Touching will cause the operable icons to light up.
To save power, all displays other than are usually turned off (it turns
off if there is no operation for about 30 seconds).
How to Use the Operation Panel
When operating, be sure to touch the buttons with your fingers.
Touch to go to
compartment selection;
Touch to go to various
settings.
Detail Setting
Example: When setting the
refrigerator compartment to "COLD"
When ENERGY SAVING is set, and the
refrigerator is running efficiently,
ECO icon mark will light up. Page 13
ECO icon
Child Safety Lock Page 20
If you touch the operation panel, icons will be displayed. You can
select the setting that you prefer.
Ice making
To start or stop ice making
Touch an icon to display its setting details.
Rapid cool
To protect a large amount of the food's freshness
Supercool Chilling
To preserve meat or fish below freezing
Energy Saving Mode
To successfully save power
When turning ON or OFF settings,
touch one of these.
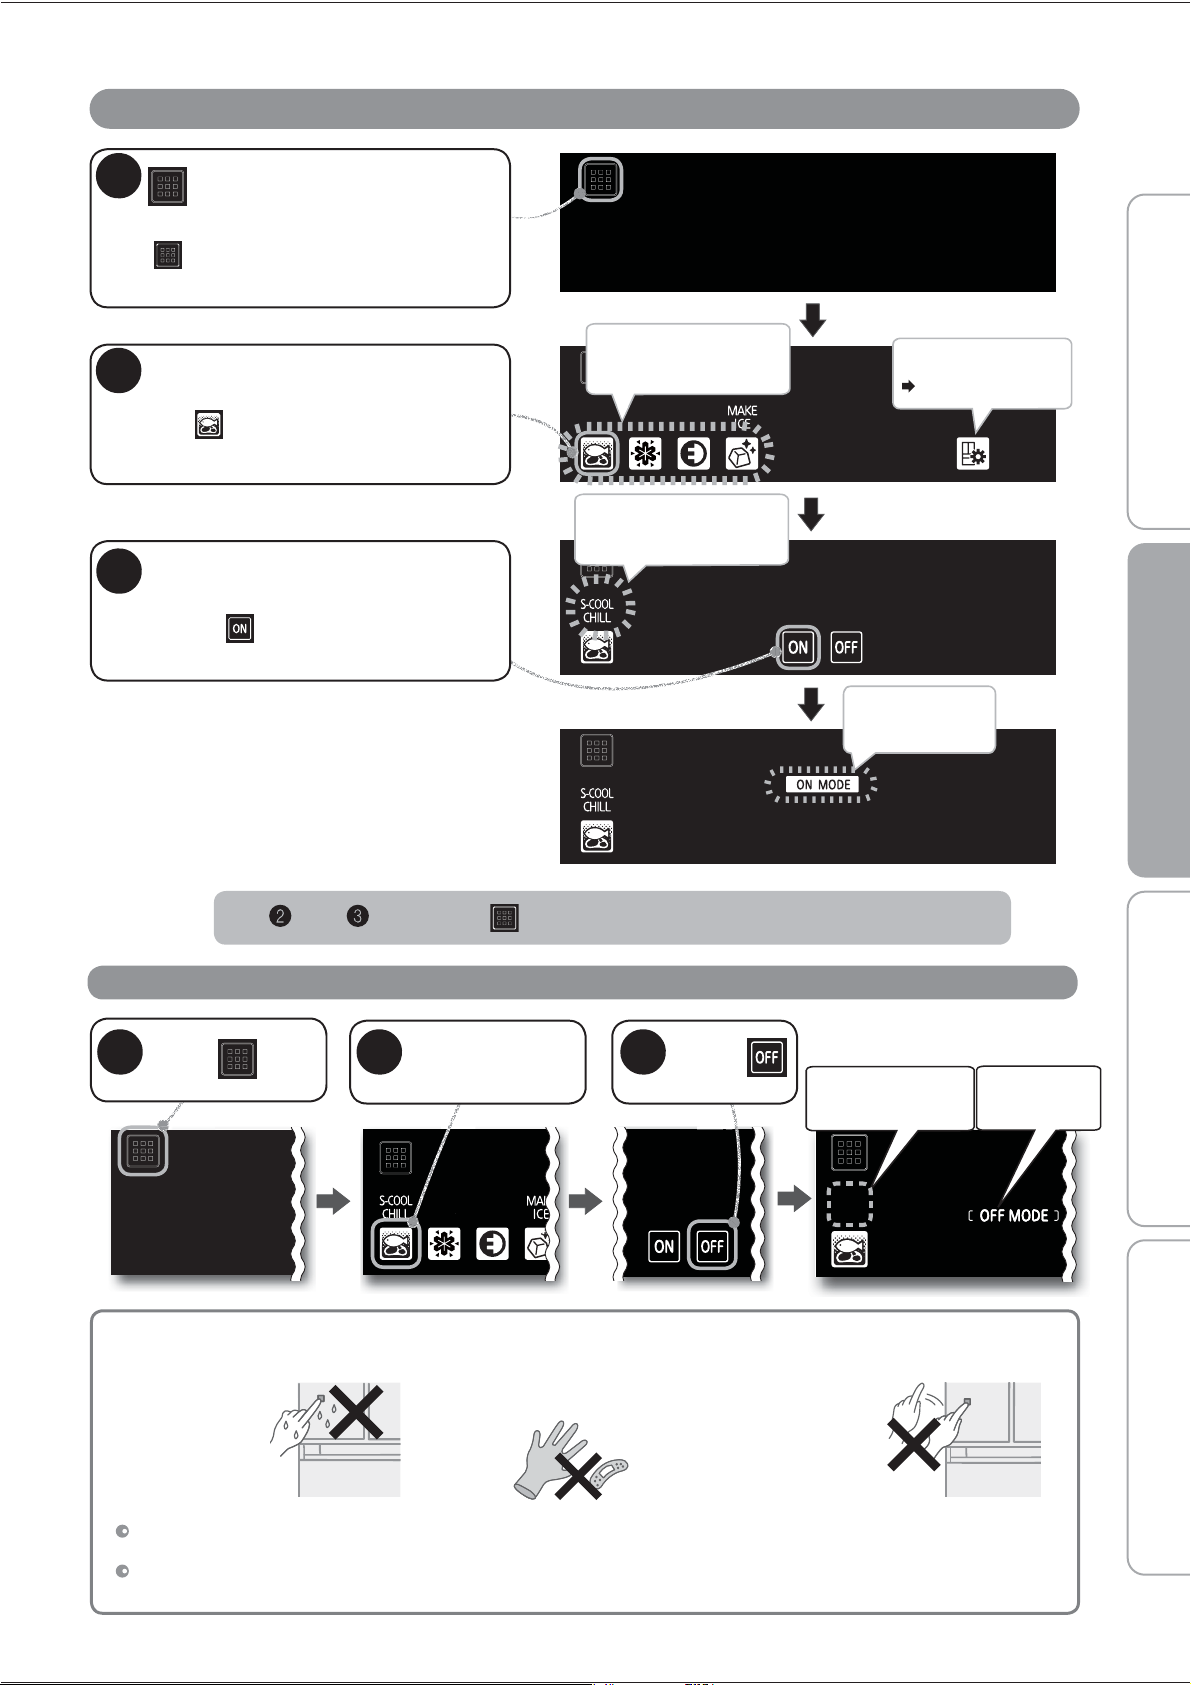
Operation Example (When Setting Supercool Chilling)
To Cancel the Setting/Cancel in the Middle
In and , touching
returns the display to the previous state.
In the following cases, the display may not change even when you touch it.
Wipe the moisture and dirt off your fingers.
Perform operations with your hands. After you have touched an icon, confirm that the display has changed before touching again.
The response may vary, depending on the surrounding temperature, humidity, the health condition of the person who operates it,
and the operating condition of neighboring electric appliances.
Detail Setting
Pages 19 - 25
When you keep the door of the refrigerator open,
touch for about 1 second. (until the buzzer
sounds once)
1
Touch
Touch
Operable icons light
up.
The operation
panel or your
fingers are wet
or dirty.
The interval between
touches is too short.
(Pressing repeatedly
may cause a
misdetection)
It lights up for 5
seconds after
setting.
3
The text above the
touched icon lights up.
The text above the
icon will disappear.
[OFF MODE]
will light up.
Touch the icon
to cancel
2
Touch
1
You are wearing gloves or
have sticking plaster on your
finger.
Touch the icon to set
Here touch .
2
3
Confirm the setting details
and compartment, then
touch .
Before use Operation Cleaning When in trouble
7
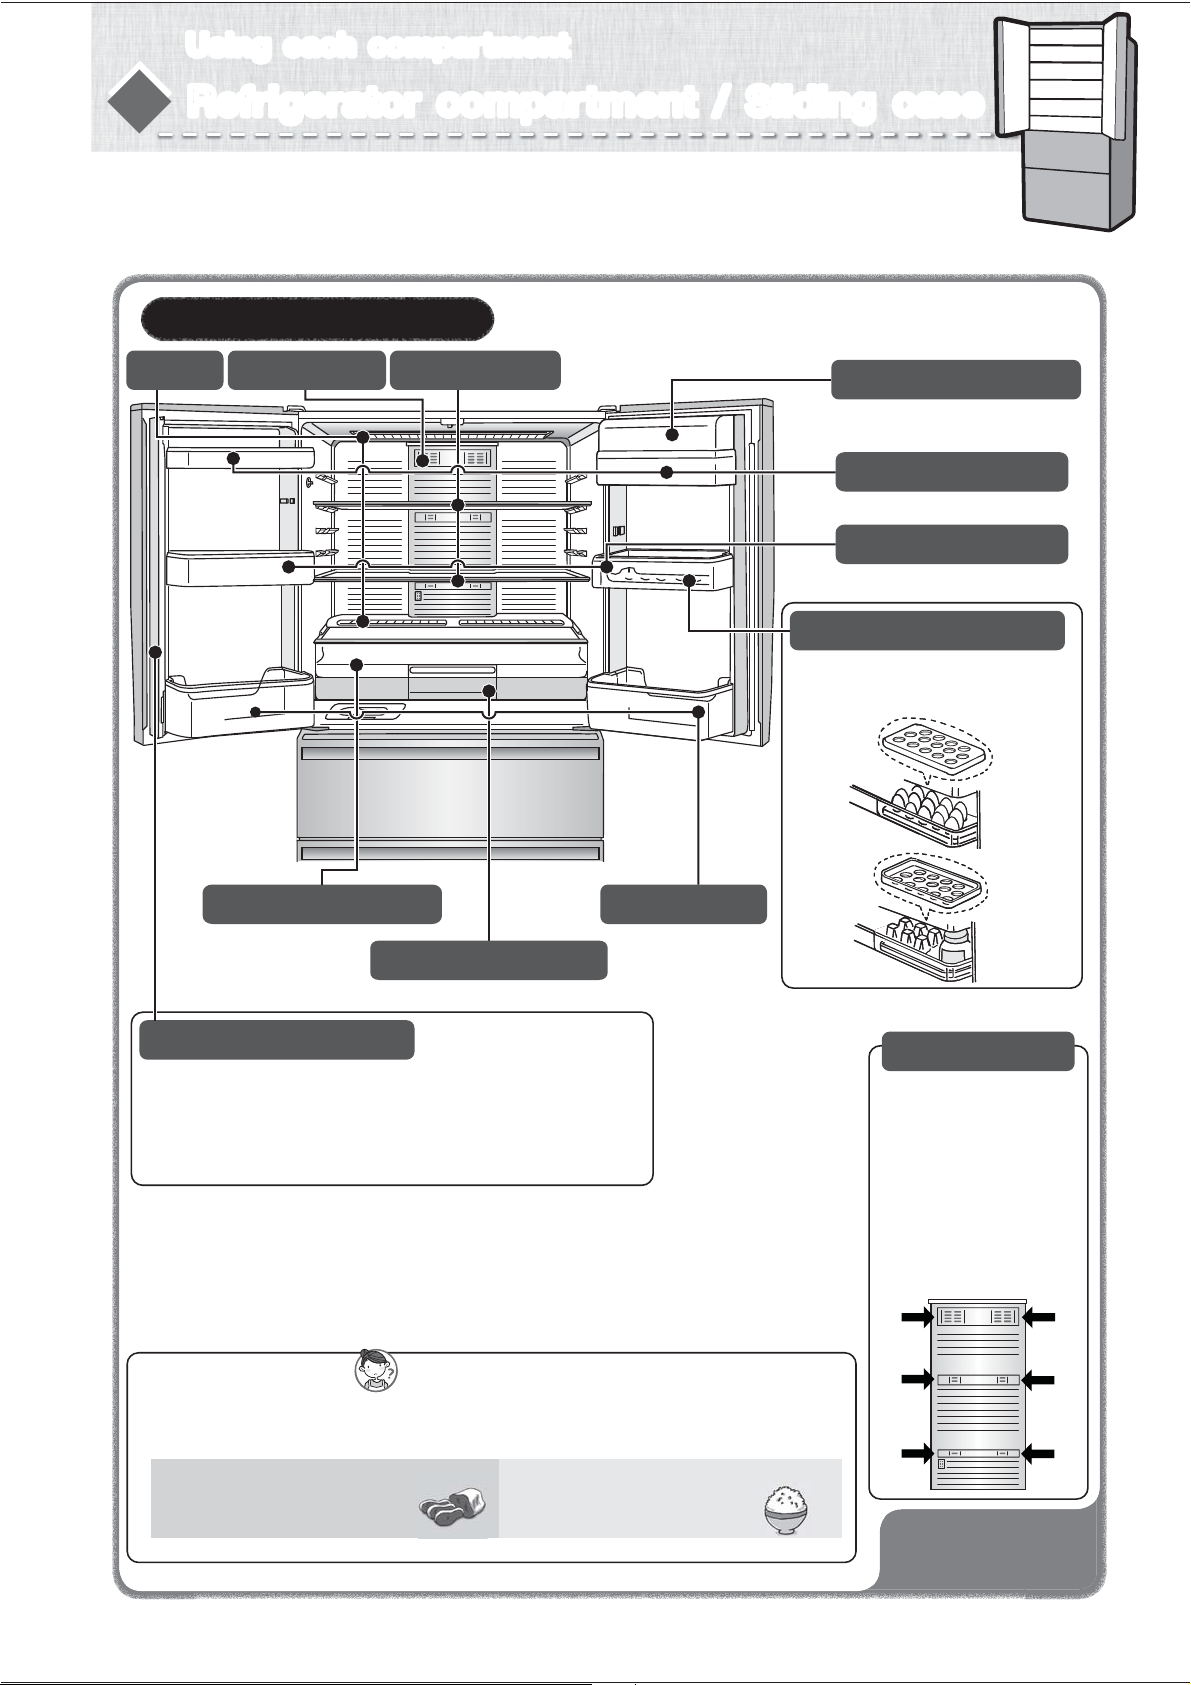
Free pocket (large)
Capsule door pocket
Free pocket (small)
Sliding case (upper)
Sliding case (lower)
Bottle pocket
Refrigerator Approx.0℃〜6℃
Adjustable shelf
LED light
Air blowing outlet
Free egg tray
It’s an egg case and a small items tray.
By turning the egg case upside-down,
it converts into a small items tray.
Door alarm will inform
when the door is left open.
➡
Page 20
Air blowing outlet
Food items with a lot of
moisture may freeze if put
near air blowing outlet.
(Especially canned beer
or carbonated drink,
there is a risk of rupture
when freezing.)
Insert drinks or immediately used foods in refrigerator compartment.
Sliding case can store meats, fish, dairy products, processed foods,
etc. at a lower temperature than the refrigerator compartment.
Using each compartment
How to remove shelf, pocket, case ➡ Page 17
Air blowing outlet
8
To prevent odors?
We recommend you wrap or store the foods in airtight
containers.
Kimchi, dumplings, sardine
(seafood), beef, etc.
Foods with strong odor
Rice, potato salad, etc.
Foods that easy to absorb odor
Rotating Partition
Open and close the doors slowly.
If you open or close the doors with force, the rotating partition may
open to the front.
Return the partition to its regular position before closing the door.
(Otherwise it may be damaged.)
Refrigerator compartment / Sliding caseRefrigerator compartment / Sliding case
9
Do not leave food hanging over shelves or pockets.
Do not place bottles that cannot fit all the way to the bottom of the bottle pocket.
Do not attach a case that you purchased separately onto the outside of a pocket.
Do not heat the glass surfaces of the glass shelves or place hot objects on them.
Do not close the door while food is in front of the upper case or the lower case.
Fully stow away the cases. Otherwise they may keep a door ajar and reduce the cooling performance, or food may fall and cause damage to a case.
Do not pile food to the top. Leave a gap so that cold air can fiow to the ceiling and between food.
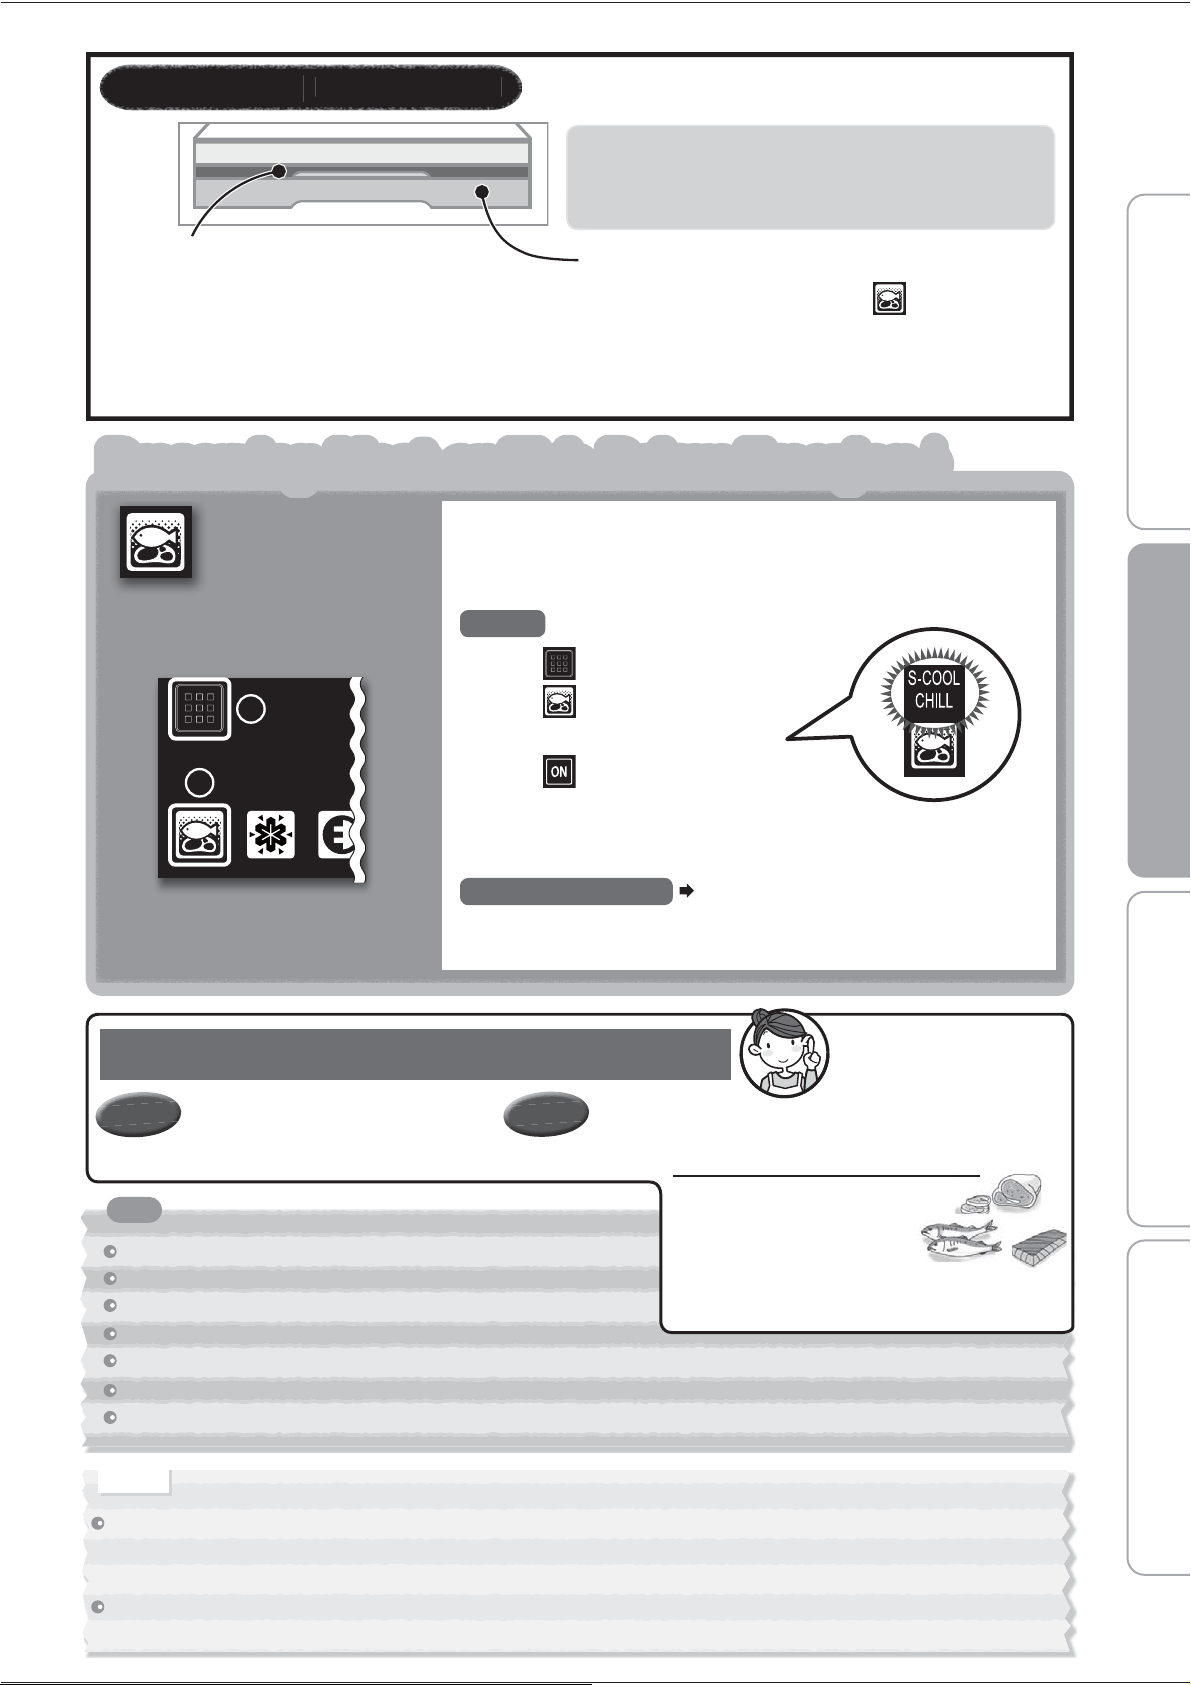
Preserving Meat or Fish Below Freezing
♪
Supercool
Chilling
Supercool Chilling stores and preserves meat or fish for a longer
time at a temperature lower than the refrigerator compartment or
upper case without freezing them.
Once it has been set, Supercool Chilling will be the default
setting until it is disabled.
1 Touch on the operation panel
2 Touch
The text above the icon will light up.
3
Touch
The settings are finished.
It doesn't matter whether you put food in before or after the
settings.
To cancel the setting
Page 7
To Set
Meat and fish last longer and are fresher than in
the refrigerator compartment or upper case!
Supercool Chilling Is Very Useful
Estimated Preservation Period
Meat..........Up to about 7 days
Fish............Up to about 5 days
3 days
Because the food doesn't
freeze, the fresh flavor lasts
longer!
Keep
fresh
Tastes
good
freshness of food before storing it and the using condition
of the refrigerator.
Notice
Because sliding cases cannot guarantee the quality of foods that easily freeze (such as tofu, konjac, raw eggs, vegetables, etc.),
storing such foods is not suitable. Depending on the type and amount of food, as well as its condition at the time it is placed in the
refrigerator, food may freeze.
The temperature of the lower case (when Supercool Chilling is set) may exceed 0 ™C depending on the time of door opening/closing
and the amount of food.
Sliding Case(Upper)
(About
0 ™C to 3 ™C)
• Processed food such as sausage, ham and dairy
products can be preserved.
• Do not store food that is easily frozen.
• The temperature cannot be adjusted.
At the time of purchase, the lower case is not set
to Supercool Chilling.
When setting Supercool Chilling, use the
following settings.
• Food will not freeze, even below the freezing point (about
-
3 ™C to 0 ™C)
• The freshness of meat and fish can be prolonged without
freezing.
Sliding Cases About -3 ™C t o 3 ™C
Sliding Case(Lower)
Supercool Chilling can be set with
.
Tips
Before use Operation Cleaning When in trouble
1
2
* If you disable the setting, the lower case can be used in the same
way as the upper case.
* The preservation period will differ according to the
Sashimi (Block)........ Up to about
Sliding Cases
A
bout -3
™C
t o 3
™C
Sliding Cases About -3 ™C t o 3 ™C

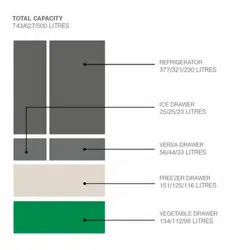
Vegetable compartmentVegetable compartment
Freezer compartment
Freezer compartment
You can store frozen food, ice cream, bread, meat, fish, etc.
Please insert fruit, vegetables and drinks.
If you wrap fruit and vegetables, they will stay fresh longer.
Approx.3℃〜9℃
Approx.-21℃〜-17℃
●
When closing the door, food can get in the way causing
the door not to close properly. This can cause frost to form
in the inside, or improper freezing, and will cause a malfunction.
● This may damage food and the freezing case, as well as
the automatic ice-maker.
Door
Maximum level for storing foods
Maximum level for storing foods
Freezing Case (upper)
Freezing Case (lower)
Put foods in the Freezing Case to below the embossed line level seen at the front.
For smaller items that get damaged easily such as
tomatoes and fruit.
The LED light with specially selected light spectrum
installed in the Vegetable compartment can increase
the Vitamin C and preserve freshness in green vegetables
by introducing photosynthesis process.
Door alarm will inform
when the door is left open.
➡ Page 20
※For the temperatures indicated, the freezer and refrigerator compartments were adjusted at the “Normal” position,
with an ambient temperature of 30
o
C, with refrigerator doors closed and containing no food; after the temperature
stabilized, the temperature criteria was measured toward the lower-mid interior of the refrigerator.
Vegetables Case
Sliding Case
Freezing Case (upper)
Freezing Case (lower)
Ice Storage Container
LED light in the vegetable compartment
●
●
It can damage food items or damage the sliding case.
If the sliding case is taken out and used separately, the vegetable compartment will become dry.
Do not put tall items in the sliding case.
Please note
●
●
With exposure to the LED light, photosynthesis process for green vegetables will be enabled, the effect will depends on the initial freshness of the vegetables stored.
Do not use any sharp objects to scratch or adjust the LED light to prevent damage which may affect its normal operation and effectiveness.
●
If the LED light is damaged or not operating, do not adjust or repair, please seek technical assistance from the authorized service center.
● Store vegetables using transparent containers or wrappings to enable exposure to the LED light.
Suggestions
Notice
10
Before use Operation Cleaning When in trouble
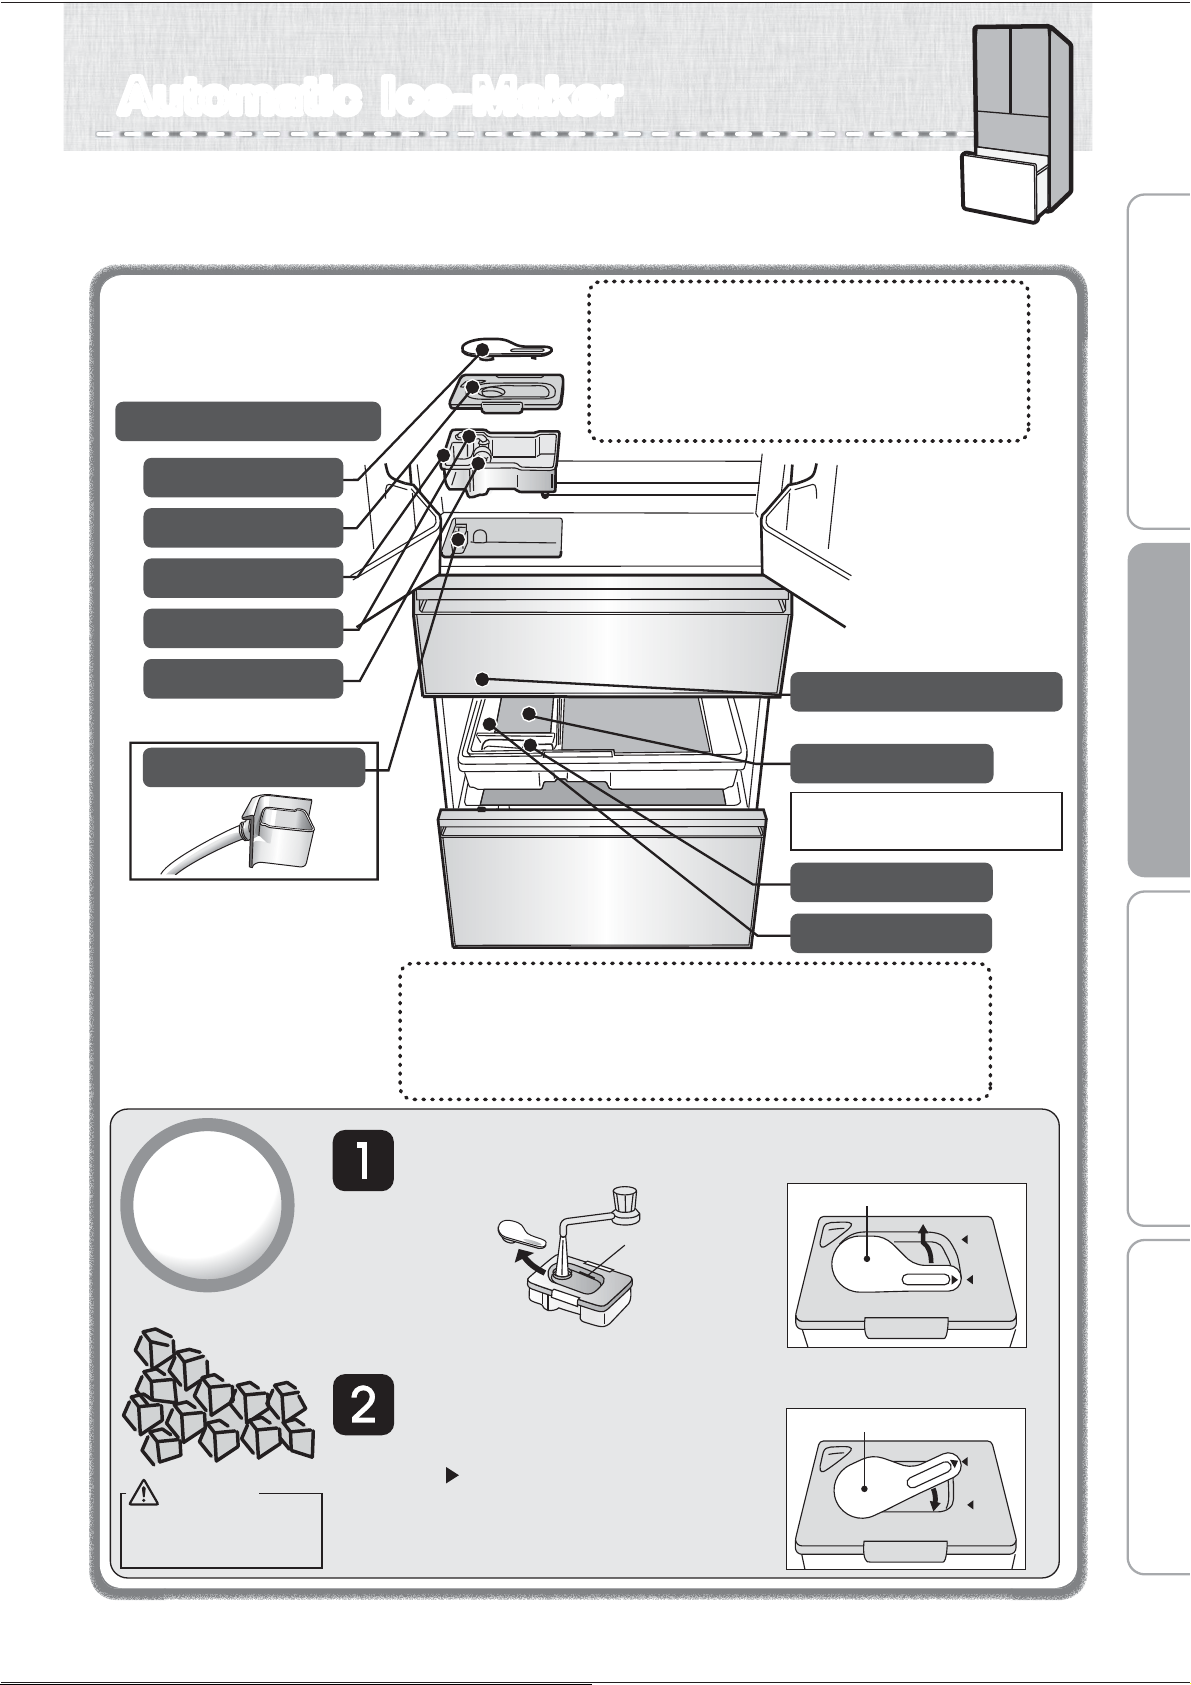
You can make ice cubes by puting water in the water supply tank of the
refrigerator compartment. Please do periodically maintain to make a good ice cube
by cleaning. Please drain the water in the water supply tank when you do not make ice.
Automatic Ice-MakerAutomatic Ice-Maker
Water supply Tank Approx. 1.1 L.
About the first batches of ice.
Please discard the first 2 - 3 batches of ice
(approx. 30 cubes) made at the very beginning.
Also, discard ice that isn’t used in over 1 week.
There may be times when there may be dust
or an odor on them.
Water to Use for Your Auto Ice-Maker.
We recommend that you use water such as tap
water which contains less bacteria.
If you use mineral water or water from a filtering machine,
please increase the number of cleaning times, and be sure
to clean it thoroughly.
➡ Page 18
Take out the water supply
tank, remove the tank plug,
and fill with water.
Put the tank plug on the water supply
tank, carry carefully without tilting it,
and return to its original position.
●
●
●
When carrying the water supply tank, make sure
that the “ ” symbol is in the closed position.
If the tank is tilted, water will spill out.
If the water supply tank is not properly in position,
ice cannot be made. Make sure that there is
nothing blocking the tank receiving area.
How to
make ice
Tank Plug
Water Supply Pipe
Purification Filter
Water Supply Pump
Pipe
Ice Storage Box
Ice Server
Ice-Maker Tray (in freezer compartment)
Noise Reduction Mat
Reduces noise of dropping ice
Do not remove.
(Do not remove.)
Tank Lid
Fill water to the
“full line” mark.
Tank plug
OPEN
CLOSED
Tank plug
OPEN
CLOSED
How to remove the tank plug.
Turn to the “Open” position and lift off.
How to put in the tank plug.
Warning
Fill with potable
water only.
11
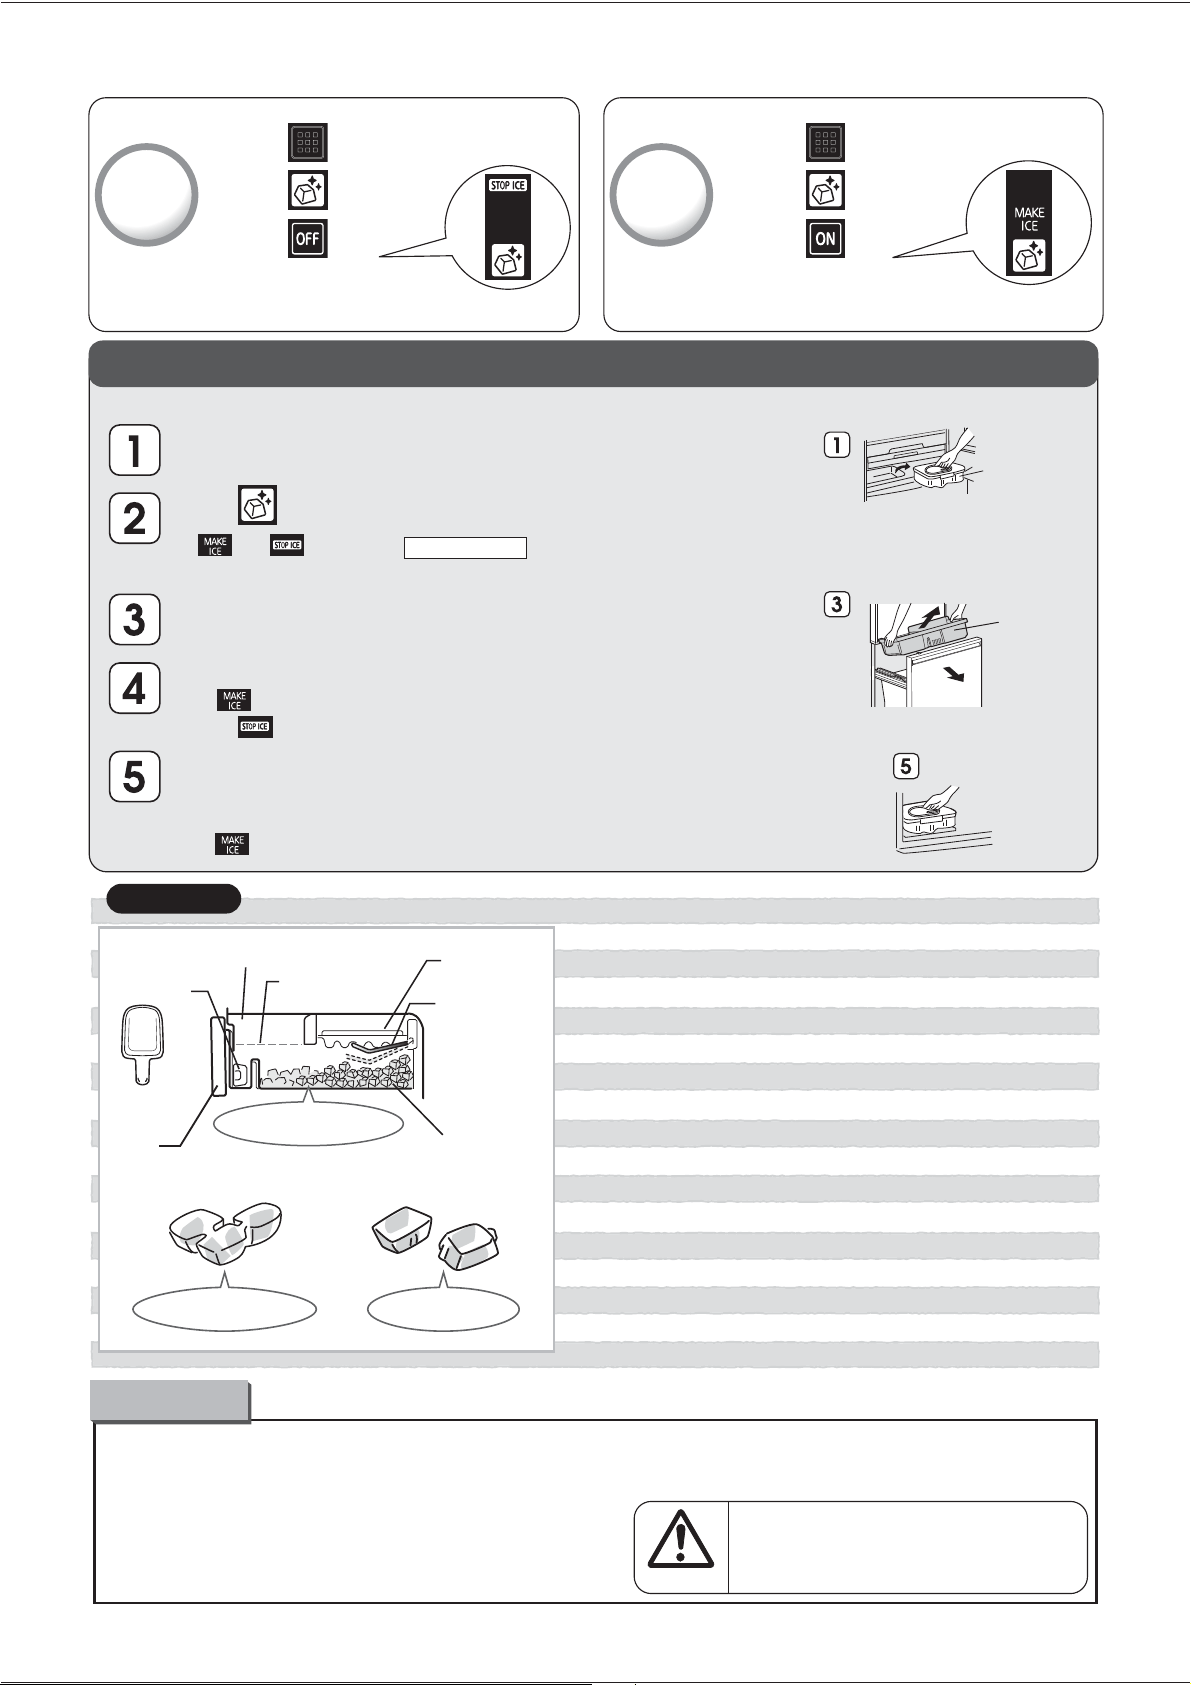
To stop
ice-making
To restart
ice-making
Water supply tank
Put the water supply
tank back in place.
Take out the freezing case (upper) and the ice storage box.
And discard water or ice.
● Do not put the food items when making ice.
Please gently close the door of freezing compartment.
Ice cube may get dirty.
Do not insert water over full water mark in water supply tank.
Water channel in the ice tray may freeze, ice cube may
connect together, and convex may come out, if insert
water over the mark or pour water by kettle.
● Please do not store anything above the level on the side
of the freezing case (upper).
(The door may half-open and it may cause failure/damage).
●
Do not insert any drinks such as hot water, juice, tea, soft drink, etc.
other than water in water supply tank (heatproof temperature 60
o
C).
It may cause failure.
●
Ice-making will stop when the amount of storage ice is given quantity.
Ice cube will flat when it thick some, please insert ice server
horizontally in front side of ice storage corner as the left figure.
●
●
Maximum level for
storing foods
Ice tray
Detection Lever
(Detects volume
of ice stored.)
Ice server
Door
Ice storage box
Freezing Case (upper)
Take out the water supply tank,
close the freezer door.
●
Ice made with water containing a lot of mineral substances
such as mineral water, can cause to ice to form with a white
sediment (white crystals). These are only mineral substances
that have become crystallized. It is harmless.
●
If ice is stored for a long period of time, the
ice cubes may cling together or become smaller.
(This is known as the phenomenon of sublimation.)
About the ice
●
Ice-making may take longer with frequent
opening/closing of the door, or depending
on the ambient temperature.
It may cause injuries.
Please pay enough attention
when crush the ice which stuck
in ice storage corner.
Caution
① Touch on the operation panel
Touch
Touch
②
③
①
Touch on the operation panel
Touch
Touch
②
③
STOP ICE will light up
The setting is finished
When you will not make ice for a long time
※
Also do this when moving or transporting unit.
Empty the ice-making tray by taking out the ice or by forcing water to go into the ice storage box.
Press for about 5 seconds.
(Press until it makes a beeping sound.)
●
●
and will blink for about 1 minute.
(It drops down the ice-making tray's water or ice.)
When the light stops blinking, it will return to the previous indication.
Stop making ice.
● If light is on, to do ice-making stop proceedure and check to confirm
that light is on.
Wash with water, dry, and put back in place: the water supply tank (water supply pump,
pipe, water filter), freezing case (upper), ice storage box and the noise reduction mat.
➡ Page 18
To restart ice-making, to do ice-making restart proceedure and check to confirm
that light is on.
Freezing case
(upper)
Keep ice at an even level
The ice cubes connected Protrusion on the ice
Please note
MAKE ICE will light up
The setting is finished
12
1
2
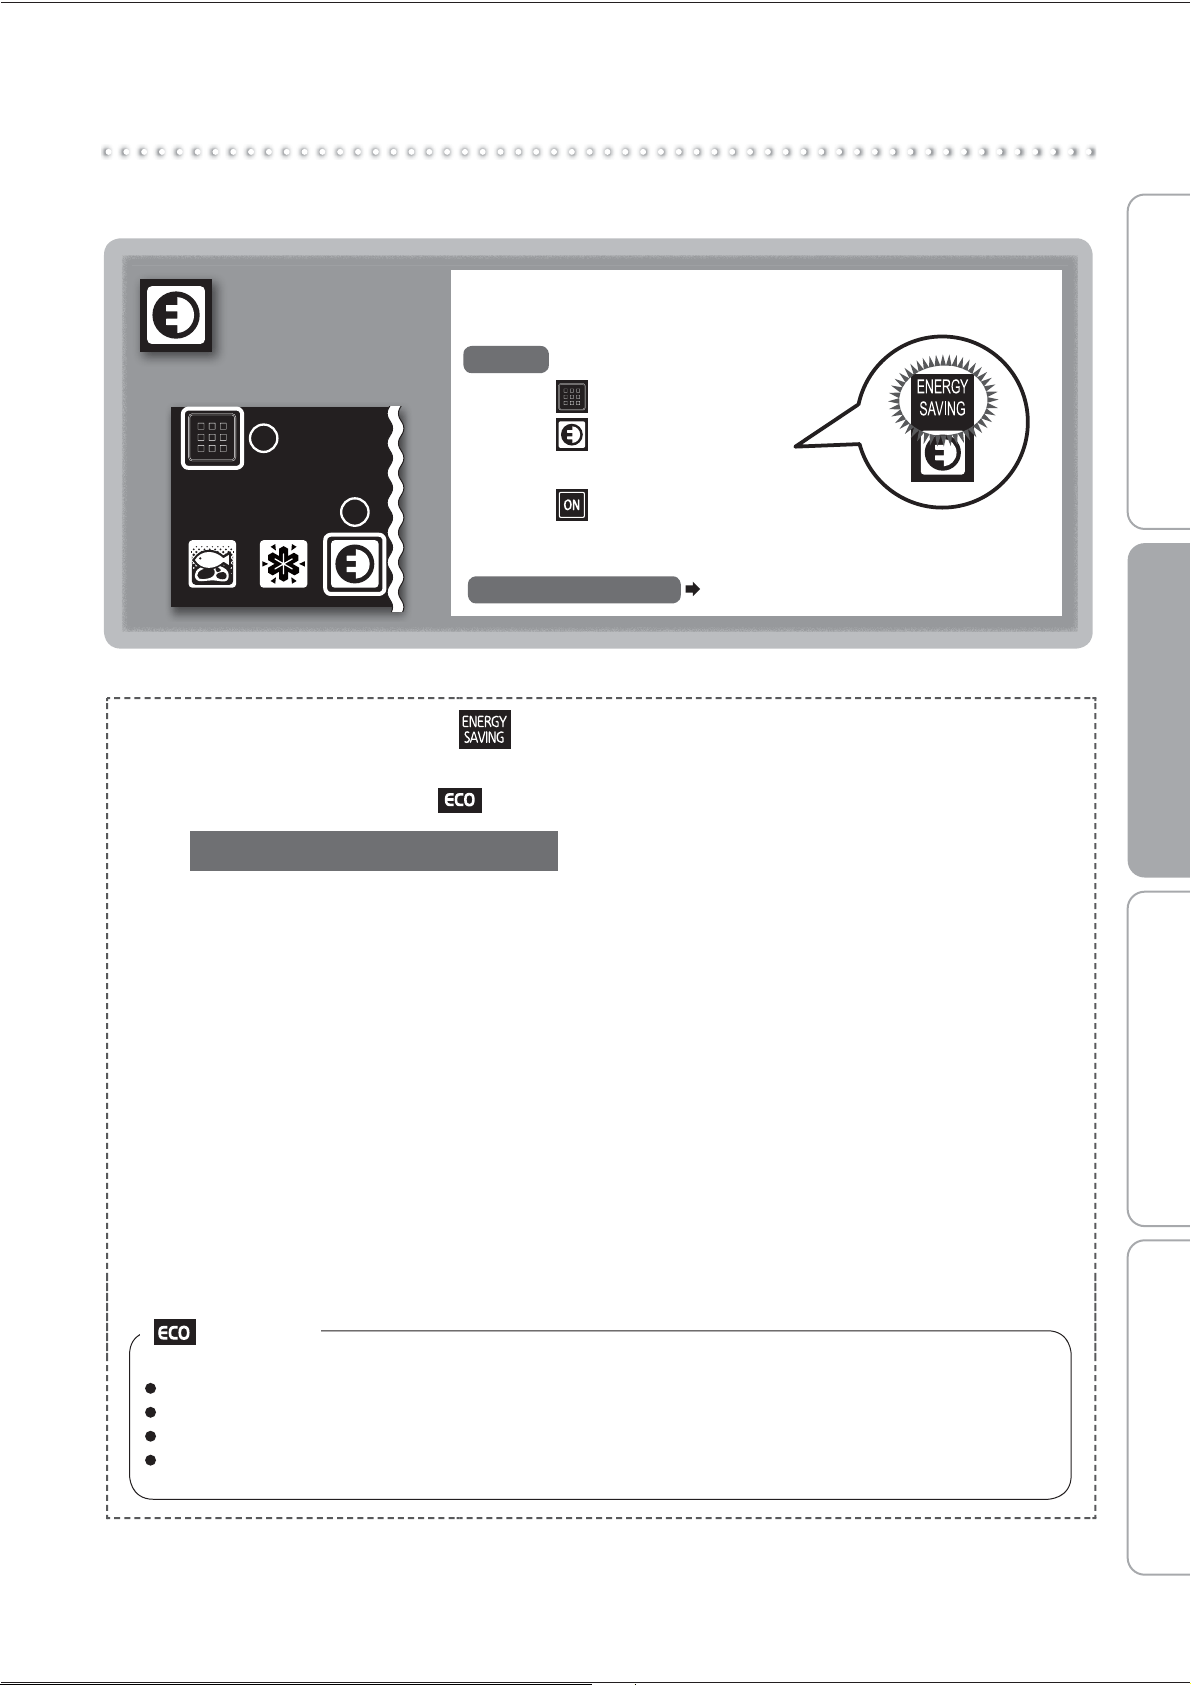
An appropriate timing is selected for each compartment and
the energy saving mode is performed automatically with a
slightly high temperature setting.
To Set
1 Touch on the operation panel
2 Touch
The text above the icon will light up.
3
Touch
The settings are finished.
To cancel the setting
Page 7
Energy
Saving
Mode
Energy Saving Mode
This mode learns each family's method of use and operates with the optimal state for each
compartment.
Lights-Out
In the following cases, energy saving mode will be cancelled and the light will turn off.
When the doors are frequently opened and closed
When Rapid Cool is operating
After defrosting
When set to Supercool Chilling.
(After the freezer compartment is sufficiently cold and stable, energy saving mode will automatically restart.)
Tips for using the refrigerator wisely
Temperature settings
Setting each compartment to a relatively low
If Energy Saving Mode is set, is displayed.
If switched to power saving operation while
Energy Saving Mode is set, is displayed.
operation reduces the consumption of electricity.
Opening and closing compartment doors
The refrigerator consumes more electricity if you
open and close the compartment doors frequently
or leave the doors open for a long time.
Energy Saving Mode
In this mode, the refrigerator automatically operates
in an energy saving fashion when the temperatures
are stable in the compartments. The refrigerator is
not set in this mode when newly installed.
Storing foods
Do not stuff the compartments with too much food
or do not place foods in manner to cover the cold
air outlets. Or else, cold air does not flow through
optimally in the compartments,causing the foods
to take time getting cool or frozen and increase
electric power consumption.
Before use Operation Cleaning When in trouble
13
Th
e tem
p
eratures
d
escr
ib
e
d
h
ere
are
m
easure
d
in
th
e
l
o
wer
centre
of
t
he
r
e
f
ri
g
erator
af
ter t
he
tem
p
eratur
e
h
a
s
s
ta
bili
ze
d
wh
e
n
the
surroun
di
n
g
tem
p
erature
is
3
0
™C
a
n
d
t
he
doo
r
s
a
r
e
closed
w
i
t
hou
t
a
n
y
f
ood inside. The temperature
f
iuctuates with
f
actors such as
f
ood storage conditions and h
o
w
o
f
ten the doors are opened and closed
.
B
efore and after defrostin
g
, the temperature inside the refri
g
erator may drop or rise temporaril
y
.
y
y
Wh
en
f
ood
f
reezes
in
t
he
refrigerator
g
compartment
o
r
l
o
wer case,
s
e
t
the
refrigerator
temperature
setting
g
t
o
CO
LD - LE
SS
CO
LD an
d
t
h
e
l
ower
case temperature settin
g
(
when
S
upercool
C
hillin
g
is set
)
to LE
SS
CO
LD.
Notice
Detail Setting
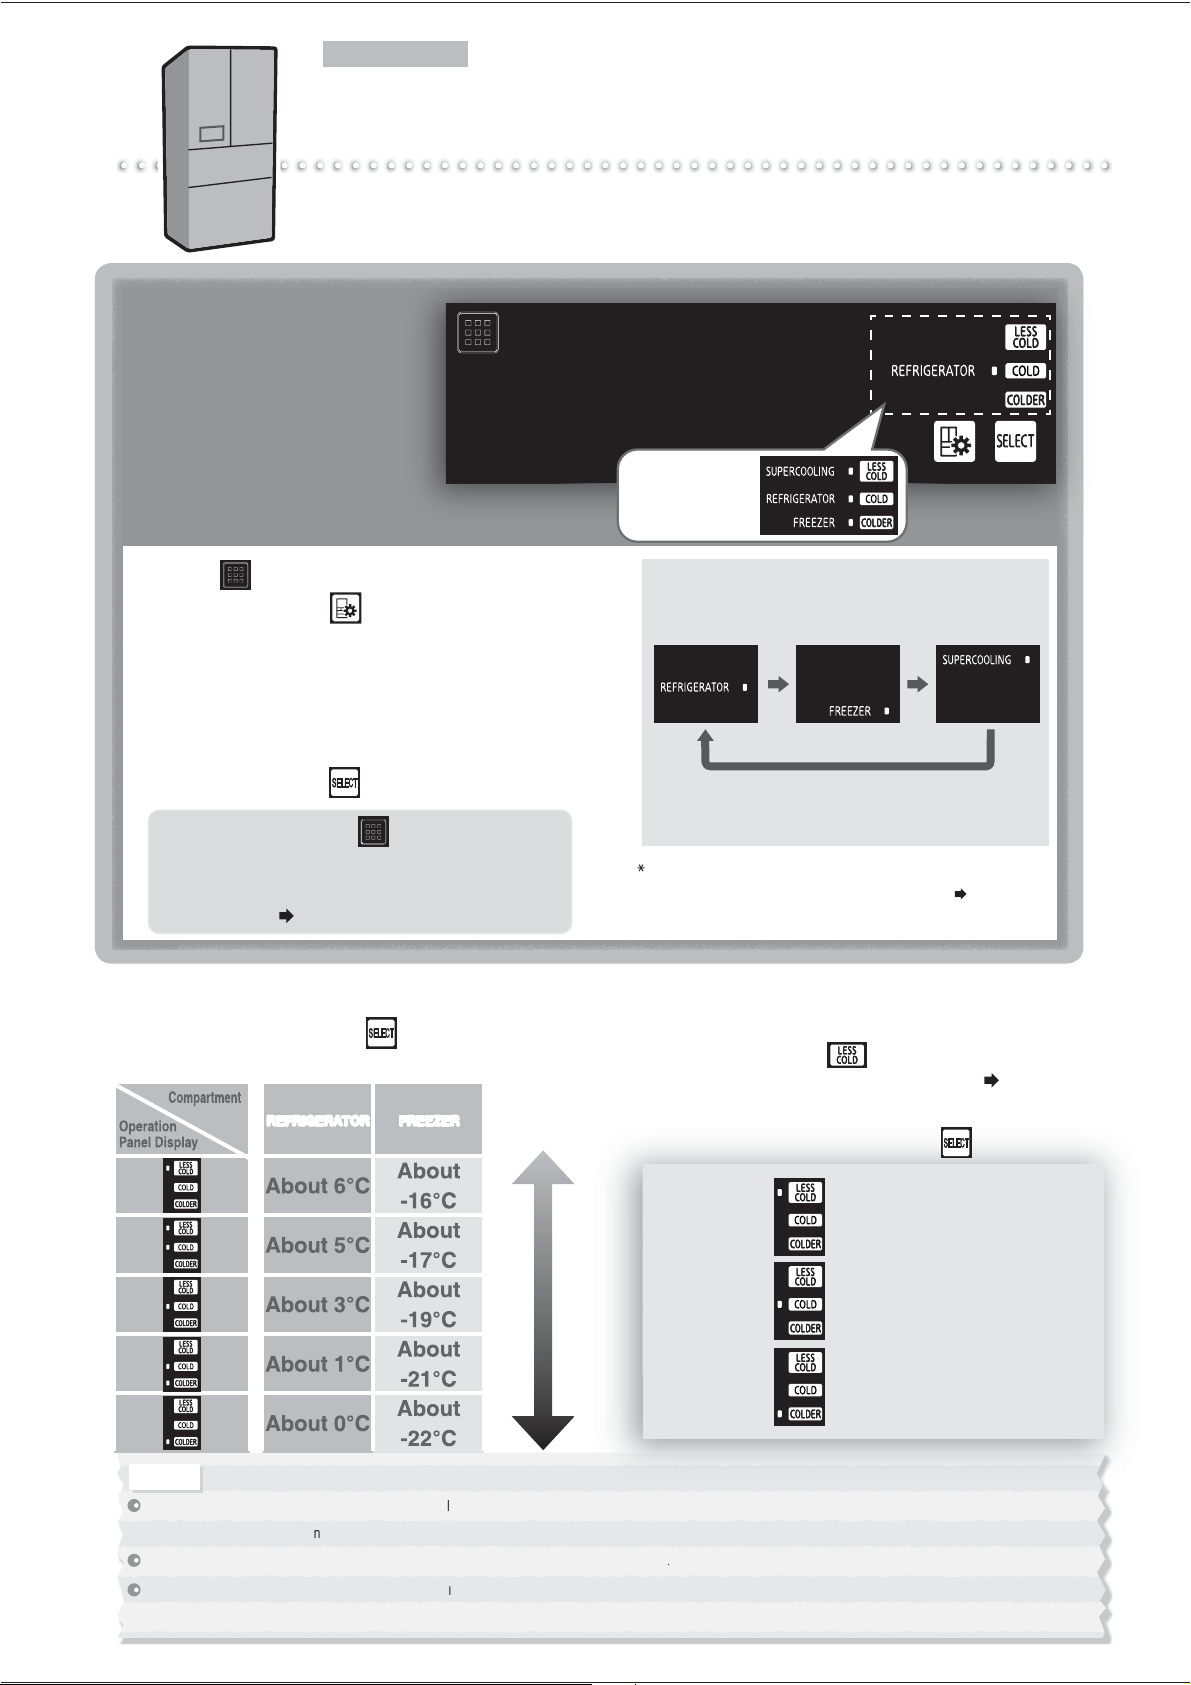
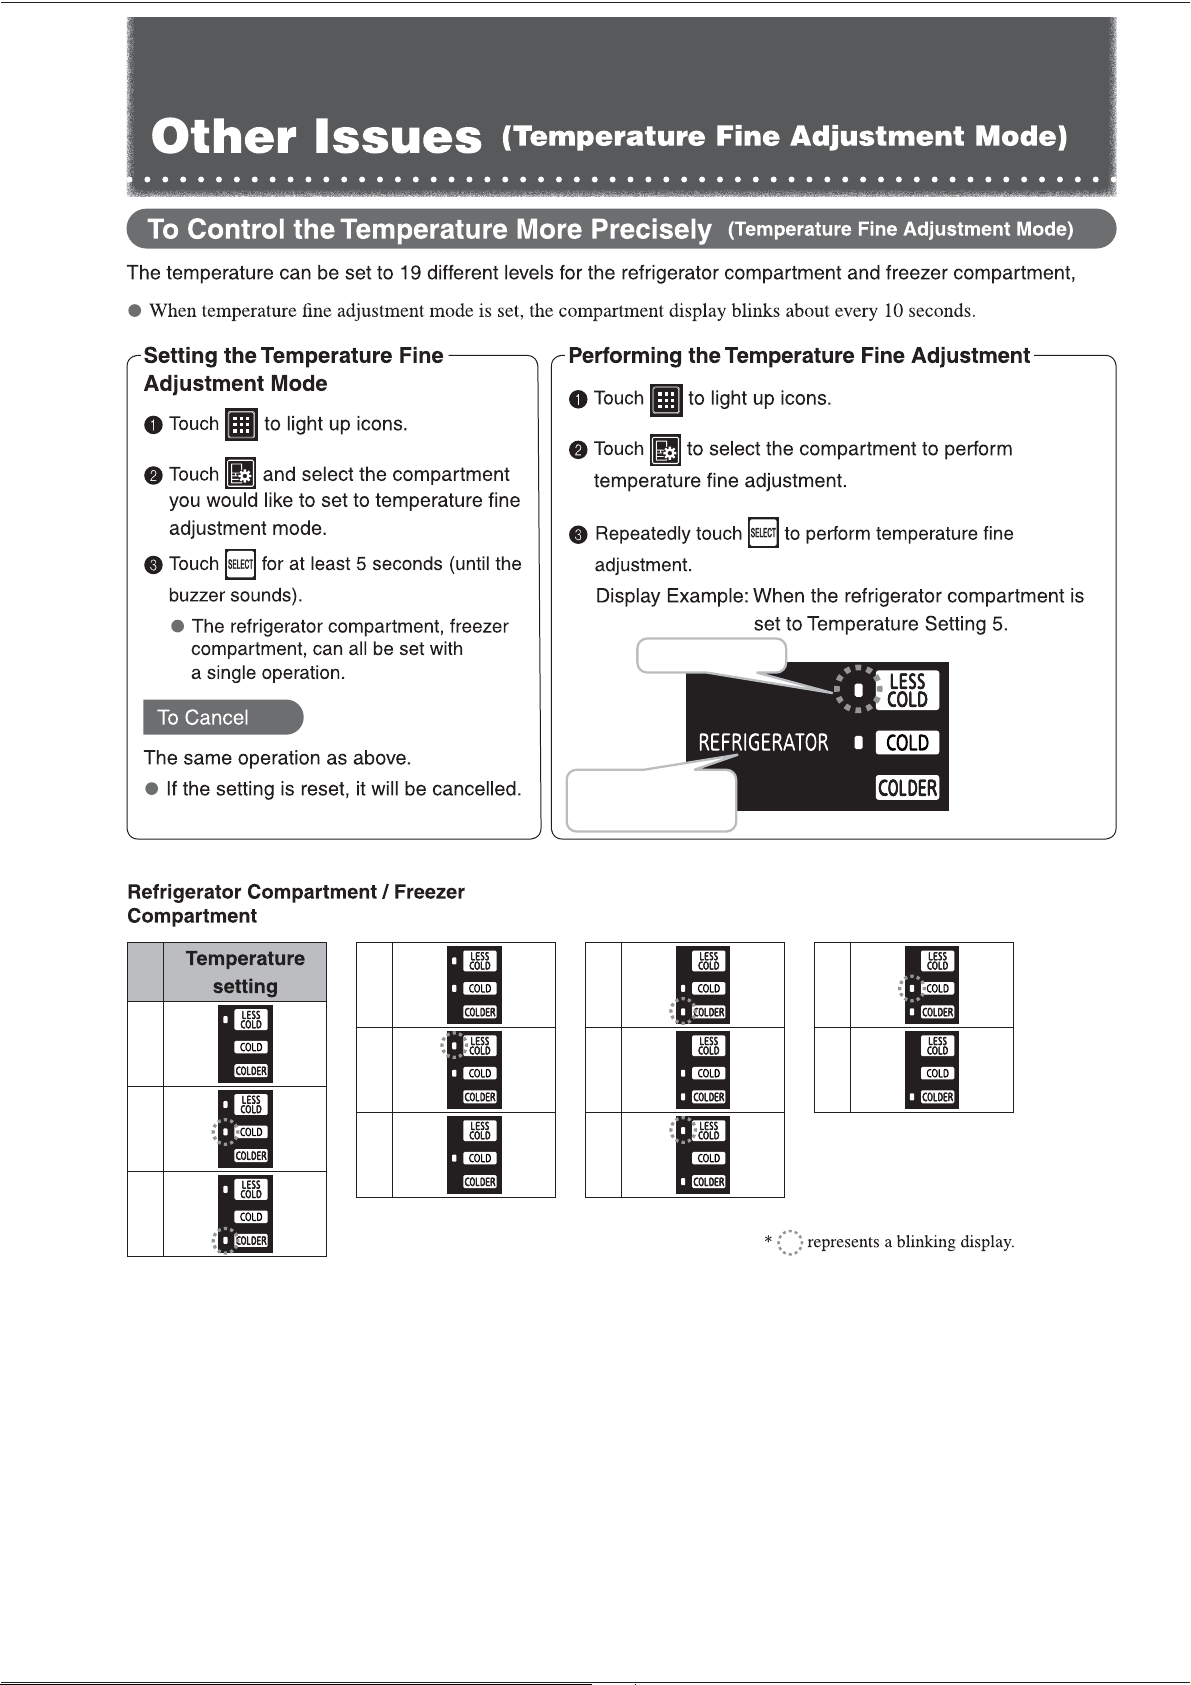
Performing Temperature Adjustment
The temperature of each compartment can be adjusted.
Use the refrigerator and freezer to "COLD" usually.
Temperature Adjustment
At the time of purchase, the
settings are as follows.
Refrigerator and Freezer
Compartments
……"COLD"
The set temperature
and compartment
lights up.
1
Can only be selected when Supercool Chilling is set.
1
Touch
on the operation panel
2
Repeatedly touch to light up the compartment
that you want to set the temperature for.
The display changes in the order shown in the right each
time the button is touched.
When a compartment is displayed, that compartment's
temperature setting will also be displayed.
3
Repeatedly touch to set the temperature.
In 2 and 3, touching or not
performing any operations for about 30
seconds will return the display to its
initial state.
Page 6
Page 9
When food freezes
When the surrounding
temperature is 5 ™C or less
Normally
When the Sliding Case(lower)
does not cool well
Refrigerator/Freezer Compartment Temperature
The display changes each time is touched
and the temperature can be set to 5 different levels.
Sliding Case(lower)(When Supercool Chilling is set)
Temperature
Can be adjusted to only when Supercool
Chilling is set.
Page 9
Make this setting when food freezes.
The display changes each time is touched.
High Average Low
REFRIGERATOR FREEZER
1
4
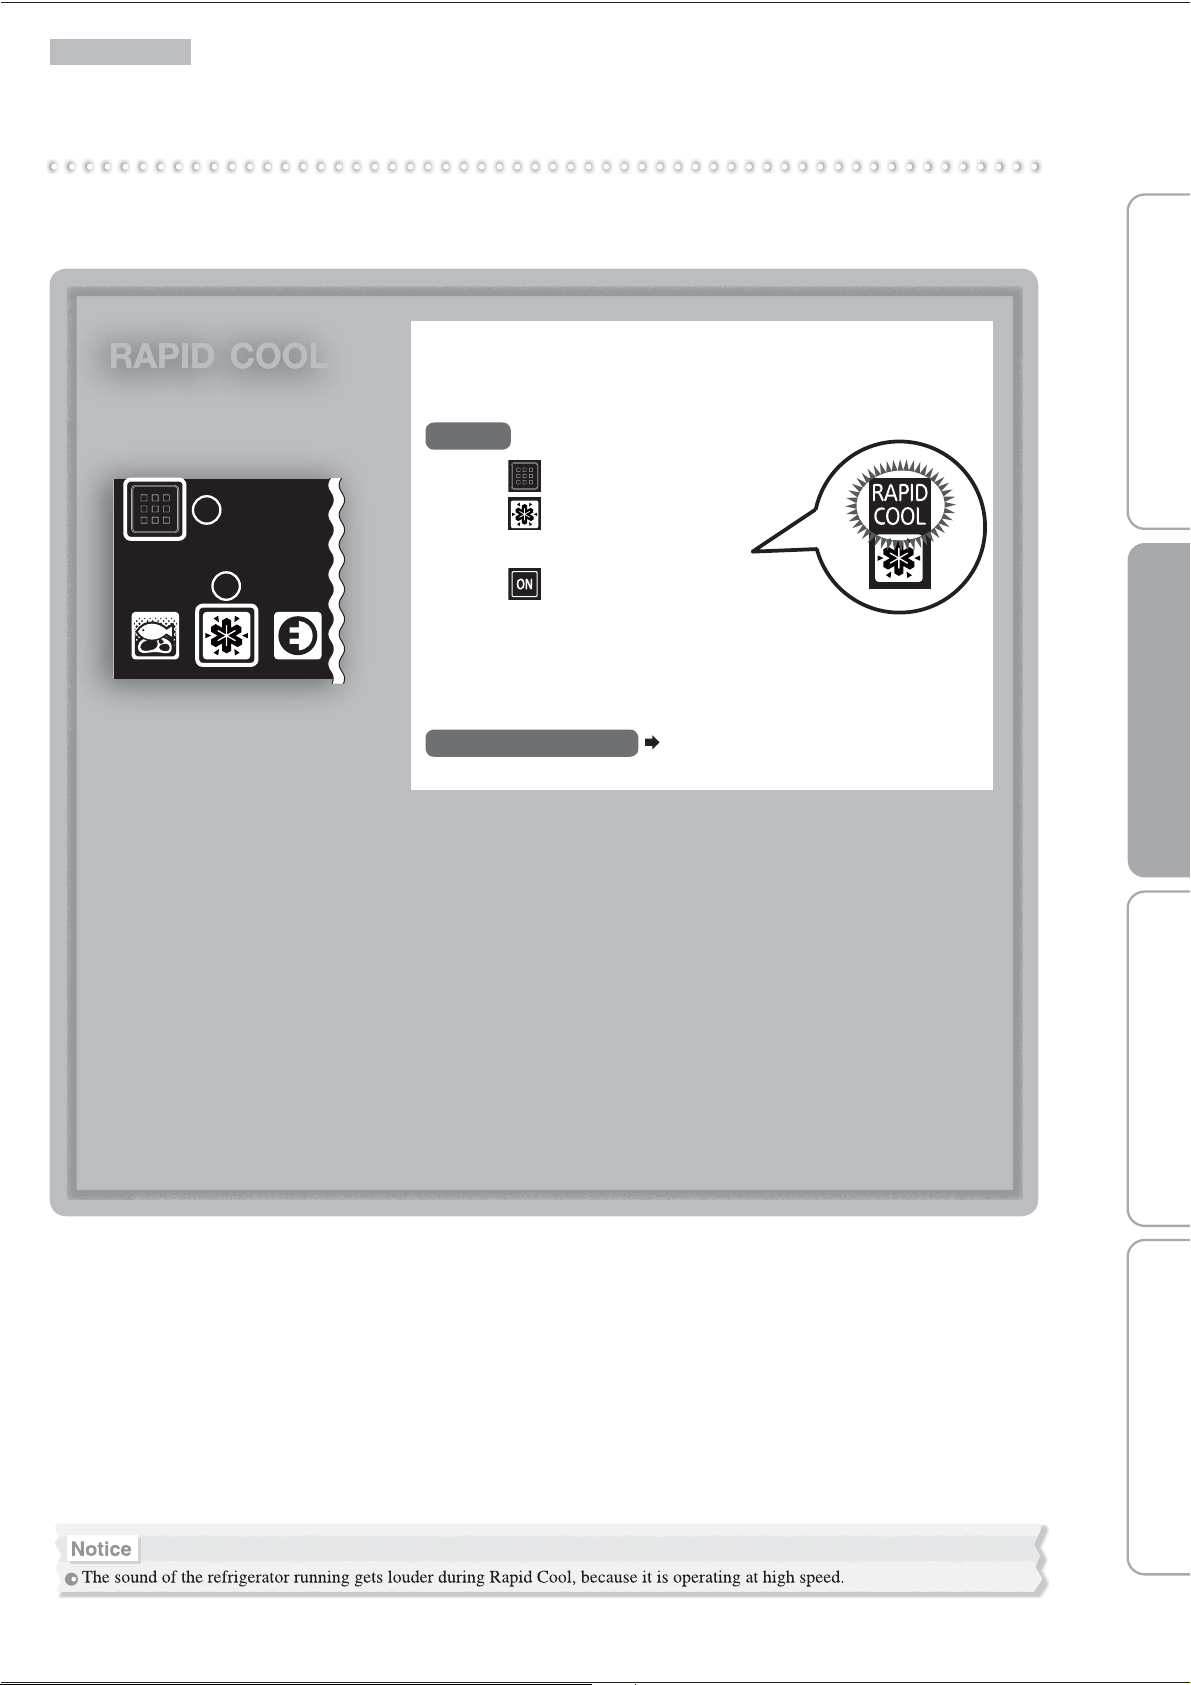
Rapid Cool
Detail Setting
When storing a large amount of food, protect the food's freshness by rapidly cooling it.
RAPID COOL
Swiftly cool compartments (Refrigerator and Freezer)
when their doors are opened and closed
1 Touch on the operation panel
2 Touch
The text above the icon will light up.
3
Touch
The settings are finished.
This ends automatically about 2 hours after setting.
It doesn't matter whether you put food in before or after the
settings.
To cancel the setting
Page 7
To Set
1
2
15
Before use Operation Cleaning When in trouble
Dust
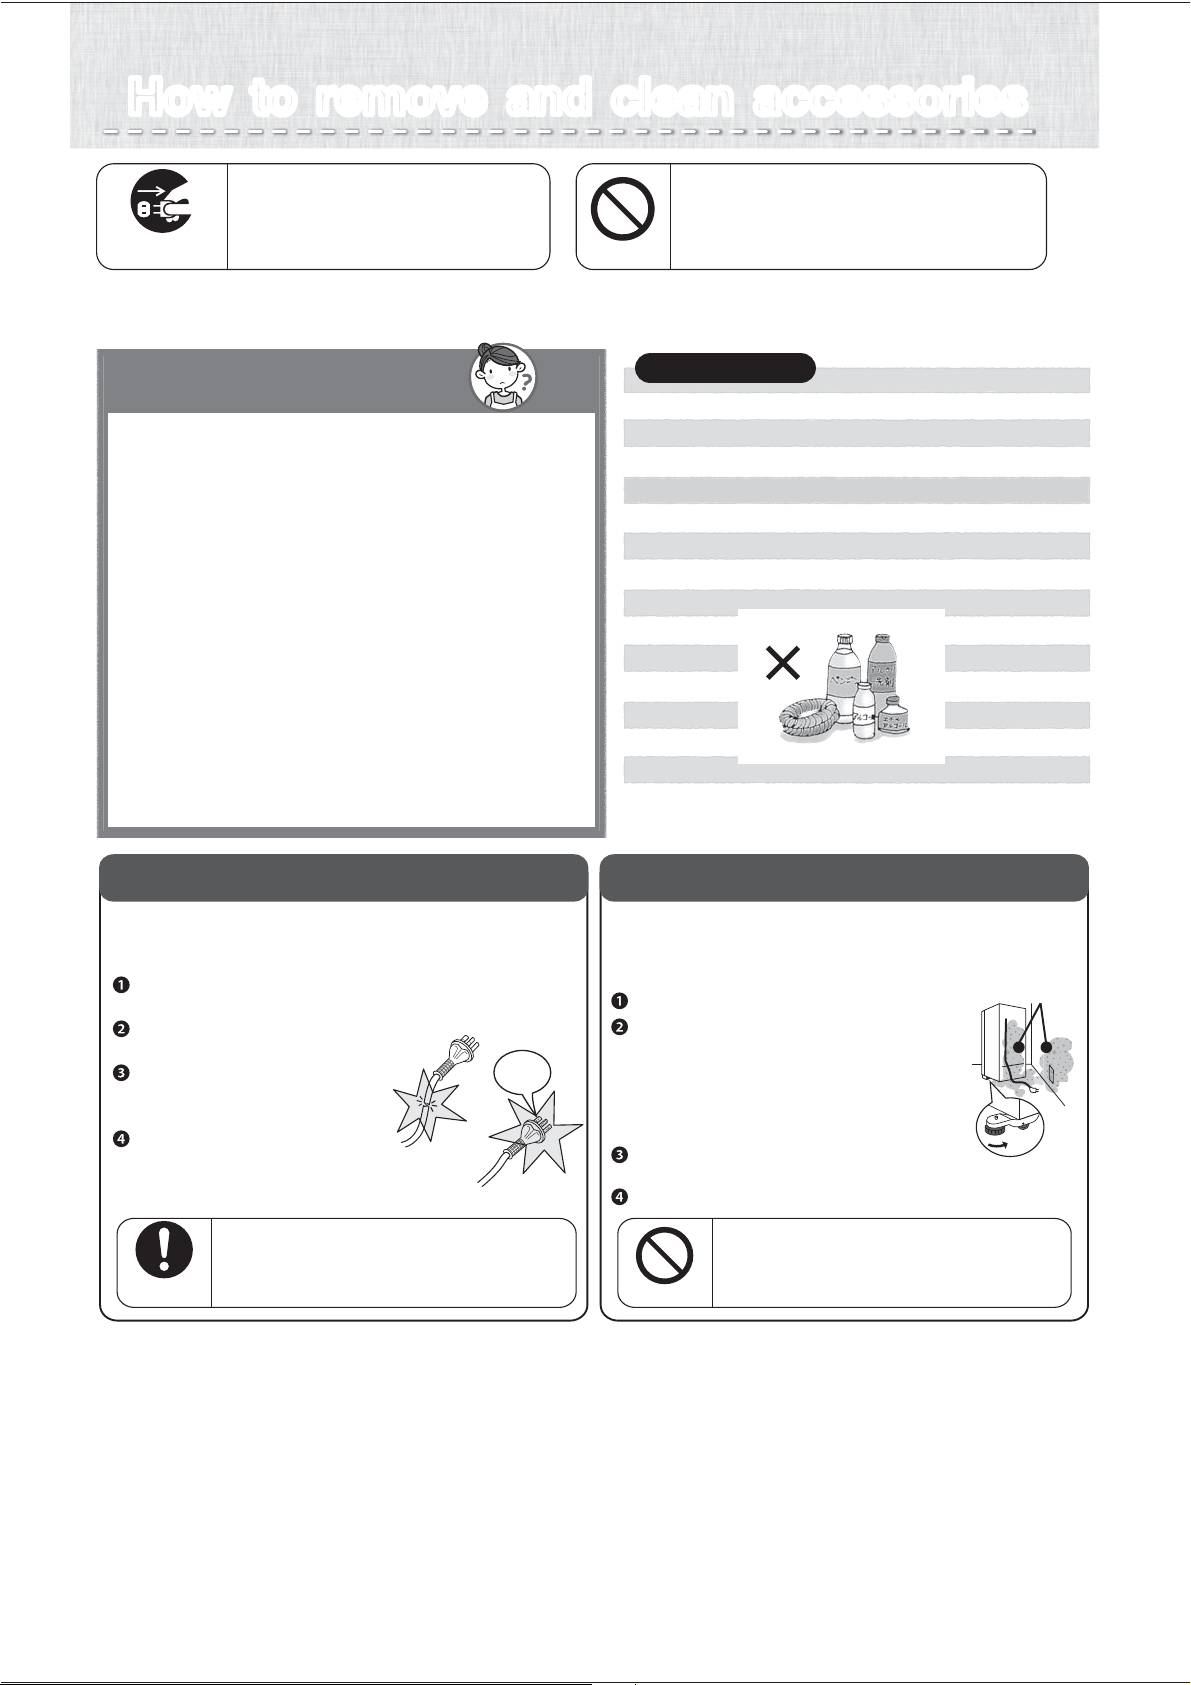
How to remove and clean accessoriesHow to remove and clean accessories
This can cause injury, an electric shock
or a fire.
Do not take apart, repair or convert.
Do not continue to use with damaged parts.
Do not do
If it is not unplugged, it will
cause an electric shock.
Unplug the electrical plug.
Always unplug electrical
plug from socket
※ Wait 10 minutes or more before you replug the electrical plug into the outlet. If you plug it in
immediately after unplugging it, the refrigerator will not run.
How to maintain Q&A
Q. If dirt is noticed.
A.
Please wipe as soon as possible.
●
●
●
●
Wipe with a soft towel soaked in warm water.
For hard to remove dirt, please use a kitchen
detergent (neutral type) and wipe off with water.
Wipe off oil stain or citrus juice immediately.
Door packing may cause damage or cold air
leakage if you leave the dirt. Please wipe off
the moisture with dry towel after wipe off with
soft and soak towel.
Q.
Can the shelf, case and pocket be removed?
A. For removable parts,
please see
➡Page 17
● Do not use the following items.
Alkalinity or alkalescent kitchen detergent, polishing
powder, soap powder, alcohol, benzine, thinner,
petroleum, acid, scrub brush, hot water, etc.
Plastic parts (door handle, cap, case, etc.)
will crack, and glass shelf or painted surface may
damage or rust.
Power Plug
For safety, please periodically check
the power plug and cords.
Unplug the electrical plug from
the outlet and inspect.
Is there any damage or abnormal
heat coming from the plug or cord?
Wipe away dust from the plug
and around the plug area with
a dry cloth.
Insert the electrical plug fully
into the outlet.
Change
Maintain
Wipe out the dust in power plug
periodically.
It may cause fire or insulation failure.
Refrigerator rear side and floor
Dust and dirt can accumulate in the ventilation
space behind the refrigerator. Please clean
periodically for energy saving purposes.
Remove the toe grille.
We recommend laying out protective
material on the floor to prevent
the floor from being damaged.
Also, be careful not to injure yourself.
Turn the adjustable supports to raise them
from the floor,and pull out the refrigerator.
Remove the dust from the rear panels,
walls and floor, and wipe off any dirt.
Check for water dripping on the floor.
Do not put your hands or feet
under the refrigerator.
It may cause injury.
Do not do
Always follow
instructions
Soot and dust
Please take heed
16
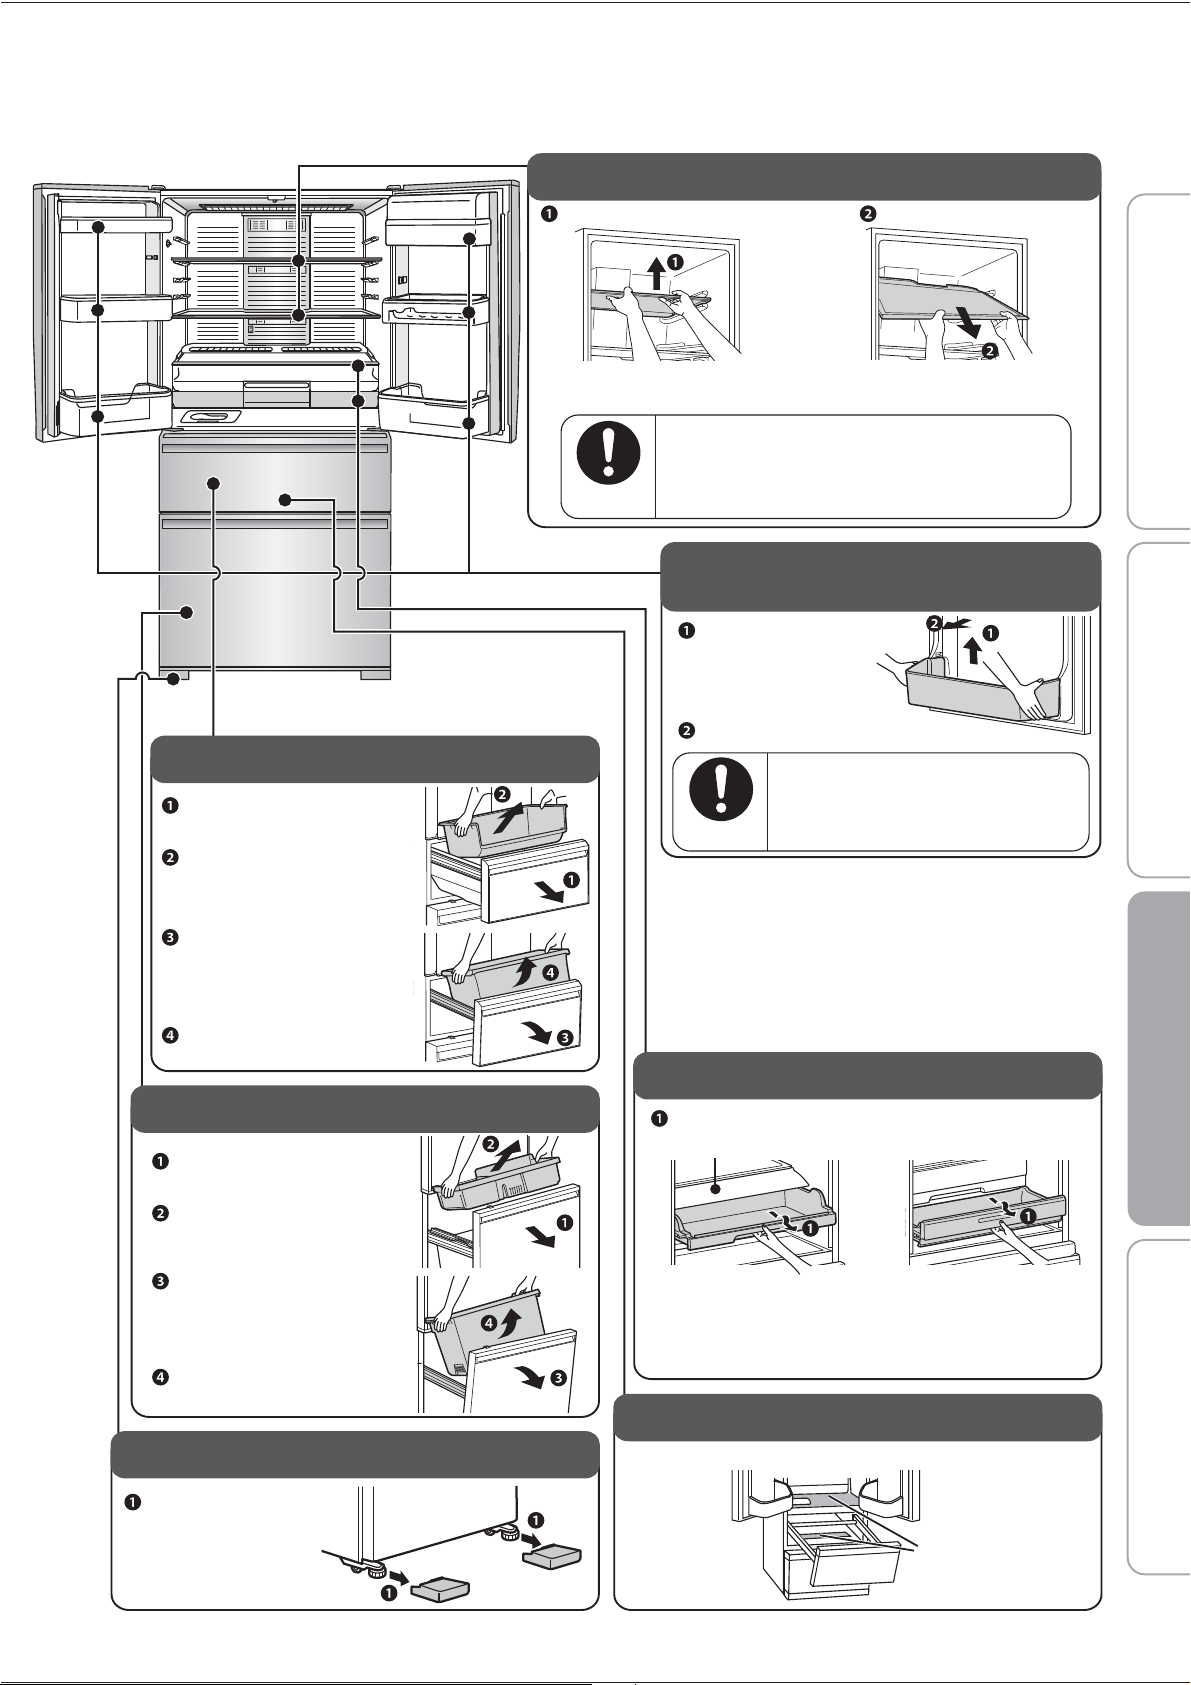
Use reverse procedures to put accessories back in place.
Freezer Compartment
Open the drawer-door fully.
Lift up the freezing case
(upper) towards you.
Lift up the freezing case
(lower) towards you.
Take out the freezing case
(upper), and while slightly
lifting up the door draw
out and tilt downwards.
Vegetable Compartment
Open the drawer-door
fully.
Lift out the case.
Lift out the case.
Take out the small vegetables
case. While lifting the
drawer-door slightly,
draw out and tilt downward.
Glass shelf
Lift up the front side by both hands.
※
If forcefully pulled outward damage may occur to door side.
Please slowly pull and take out.
Pull forward and take out.
If the glass is not attached properly, it will out
and falls which may cause injury.
To ensure that glass side is attached
or removed.
Always follow
instructions
Sliding case (upper), (lower)
※
※
Pull forward.
Wide chilled case lid cannot be removed.
If difficult to take out, please remove wide chilled
case after removing the bottle pocket.
Free pocket (large), (small) /
Bottle pocket /Capsule door pocket
※
Lift upward holding right
and left sides.
The piece is
attached quite firmly.
Draw forward to remove.
Bottle pocket
It may fall if not attached properly,
and may cause injury.
Make sure that you removed
and attached properly.
Always follow
instructions
Sliding case lid
Sliding case (upper) Sliding case (lower)
Liquid-Catching Indentations
Wipe away any dirt, liquid or condensation.
Liquid catchers
Adjustable Leg cover
Remove by pulling
forward on
both sides.
Before use Operation Cleaning When in trouble
17
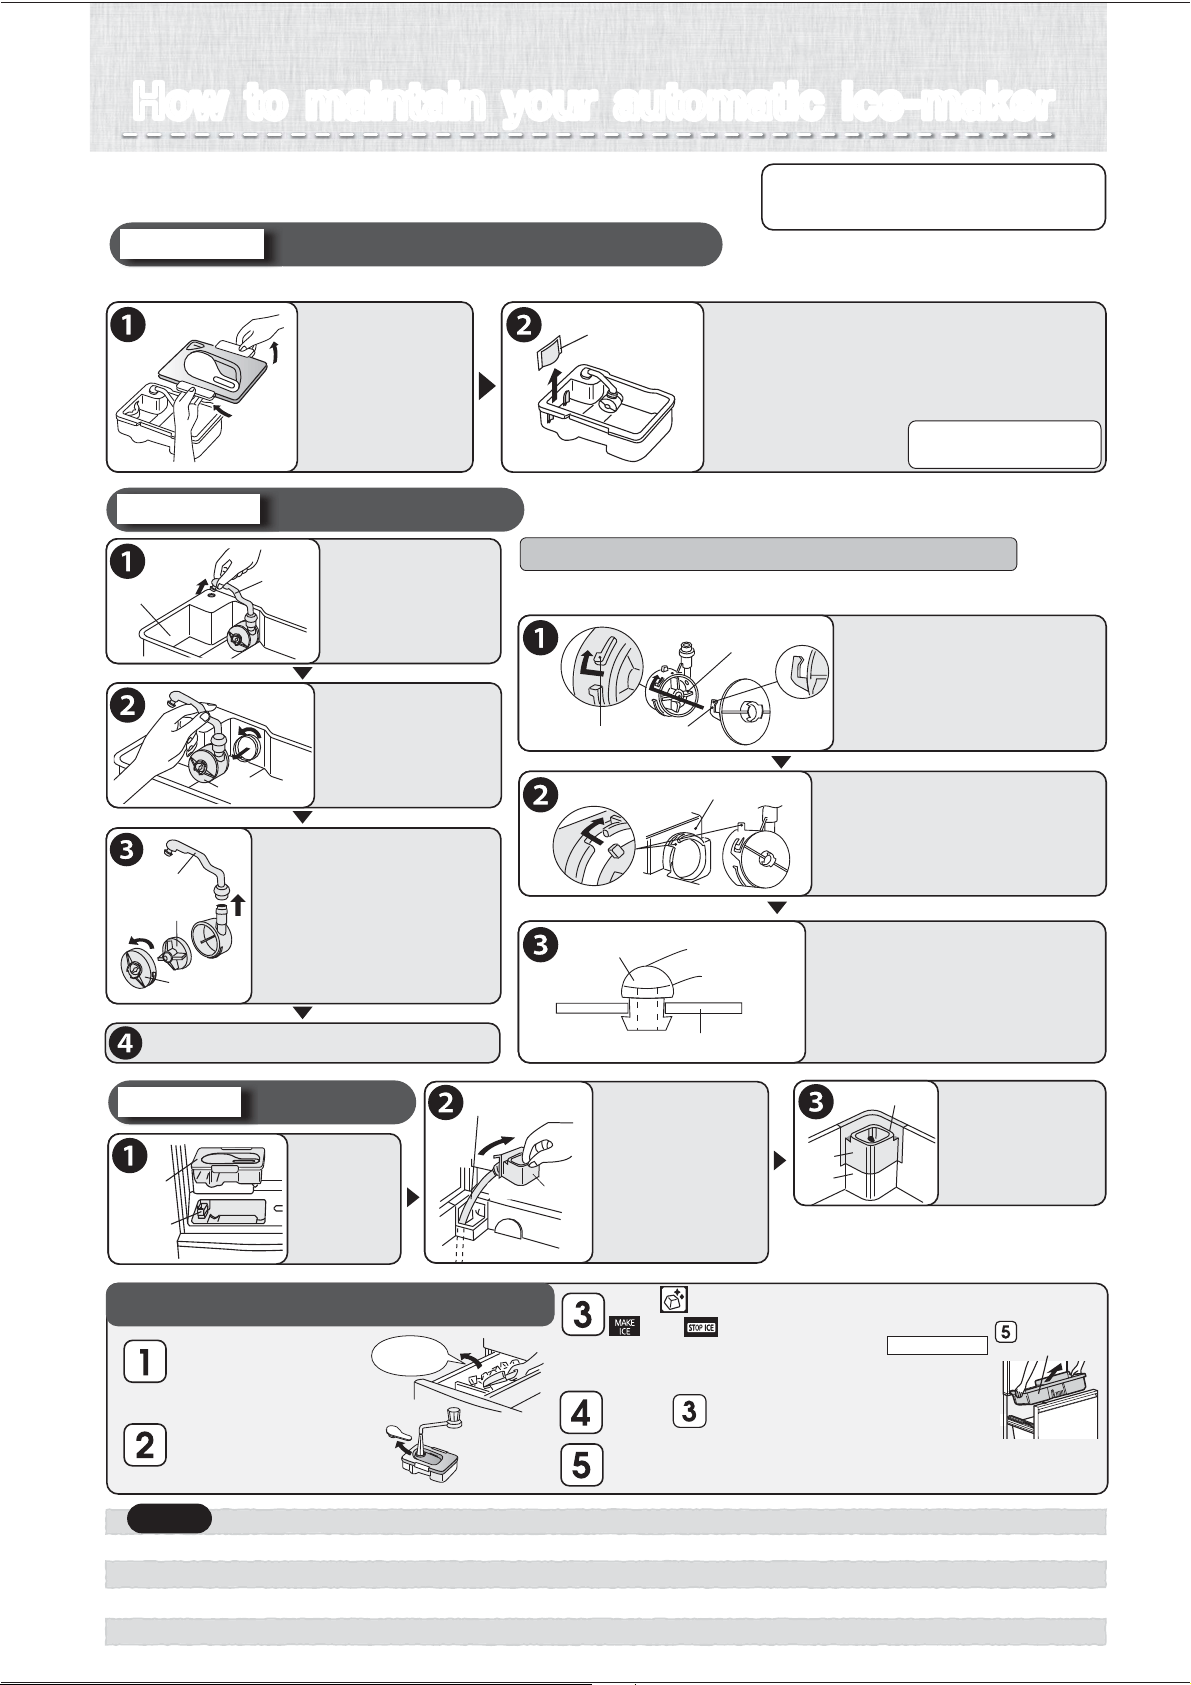
How to maintain your automatic ice-makerHow to maintain your automatic ice-maker
Please periodically clean to prevent the occurrence of water
scale, mold, etc. Please remove water when not making ice.
Take out
ice cubes.
●
●
●
●
Do not use washing agents such as kitchen detergents, benzene or bleach to clean the water filter. It will cause ice to have an odor.
If you use a bleach to clean your water supply tank or lid, please follow product directions carefully.
Assemble the water supply pump properly and firmly. If it is not assembled properly, it may not make ice or it may make a loud sound.
Please attach the lid of water supply tank securely. If the lid is not attached properly, the lid may be out and the water supply tank will fall.
Take ice out of the
ice storage container,
close the freezer door.
Fill water supply tank
with water, put back
in original position.
Touch for about 5 seconds.
and will blink for about 1 minute.
●
●
The stop ice-maker light (red) will blink for about 1 minute.
(It rinses the ice-maker tray with water from the water supply tank.)
When light stops blinking, it will return to the previous indication.
Repeat 2 or 3 times.
Remove the Freezing Case (upper) discard water and ice.
Do not throw out noise reduction mat (same as p.11)
Freezing Case
(upper)
※
Do not use a dishwasher or dryer
because it may cause deformation.
For once-a-week
If mold forms easily in the certain types of water, clean about 2 or 3 times a week.
Water supply tank / Purification filter
Take off the lid
and wash with
water.
(Temperature
tolerance
approx 60
o
C)
Purification filter
Remove and wash with water.
Normally, it does not need replacing.
Please replace for the following reasons:
●
●
●
If something other than water was put in
and the opening got blocked.
If it is damaged.
If mold, etc. is forming.
Water supply pump
For once-a-month
Turn the pump
and take out.
Take out the pipe,
Turn the cap and remove,
Take out the impeller
and wash with water.
Water tank
Pipe
Water supply pump
Impeller※
Pipe
Cap
Water supply pipe
For once-a-month
Take out
the water
supply tank.
Water supply
tank
Water supply
pipe
Take out the
water supply pipe
and wash with
running water.
Water receptacleWater receptacle
Hose part
The water receptacle
and hose part
cannot be removed.
Return back to
original positions.
Facet A
Facet B
Water supply pipe
Make sure to insert the water
supply pipe properly so that
there’s no difference in surface
level between facet A and facet B is.
Return the water supply tank and, if does not
sit in properly, re-set the water supply pipe.
If removal or assembly are not done correctly,
a problem such as a water leakage will occur.
If it is not assembled properly, it may not make ice or it may make
a loud sound. Please check on the following.
The claw on the cap ( )
is turned to put onto the
protruding part ( ) of
the water supply pump.
①
②
②
①
Impeller
Turn
Turn
Water supply tank
※Check to make sure that
the impeller is inside.
Attach the water supply
pump properly to the
water supply tank by
turning and attaching.
Insert the pipe into the
water supply tank opening,
Connect the pipe to the
water supply pump.
※
Check to make sure that there are no substances
at the connection point of the two pipes.
Water supply tank
Pipe
Remove it from
tank.
※
The impeller is made with a
magnetic material. Clean thoroughly
with water, making sure there
are no substances on it.
Cleaning the ice-making tray (rinsing)
Pointers for assembling the water supply pump
To buy another filter, please
inquire at the store where
you bought your unit.
Return parts by following the reverse procedure.
Notice
18
Other Issues
(Power Outages, Child Safety Lock, Setting Reset, When Lights Up)
Power Outages
Minimize the frequency of opening the doors, and avoid adding more food.
Operation panel settings other than the temperature settings may change. Check the settings. (Child Safety
Lock, etc.)
To Prevent Accidental Button Operation
(Child Safety Lock)
Locks the operation panel to prevent accidental icon operation by children.
Touch for about 5 seconds or more when the door is closed (until the buzzer sounds).
lights up when the setting is finished.
Setting cannot be changed during Child Safety Lock.
To Cancel
Again, touch for about 5 seconds or more when the door is closed (until the buzzer sounds).
goes off when the setting is cancelled.
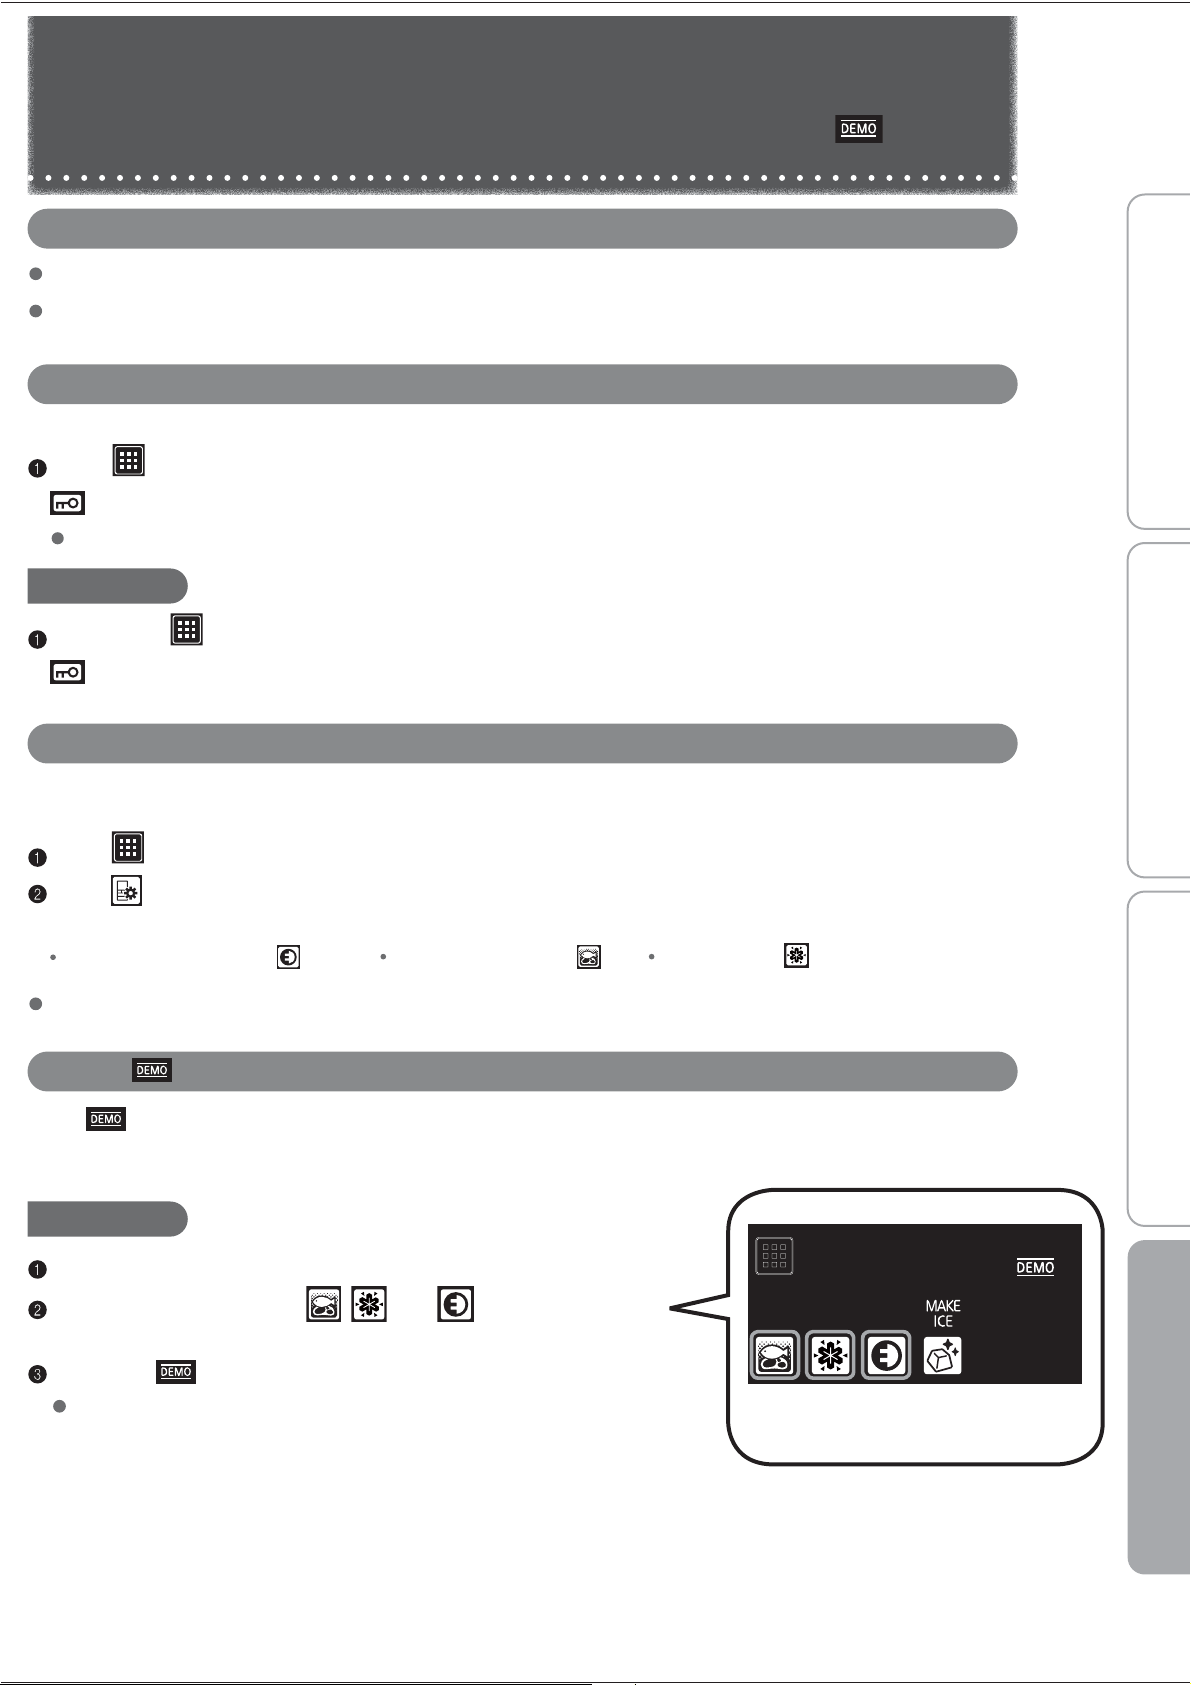
To Reset Settings
Returns the settings to their initial conditions (at the time of purchase), for example if you have forgotten the
settings.
Touch to light up an icon.
Touch for about 10 seconds (until the buzzer sounds twice).
The following settings will be reset.
Energy Saving Mode
Supercool Chilling
Rapid Cool
The “ICE STOP” setting for ice making will not be reset.
When Lights Up
When lights up, the refrigerator is in demonstration mode. The refrigerator does not cool in this mode.
Contact the retail store where you purchased the refrigerator, or cancel the demonstration operation with the
following procedure.
To Cancel
Keep the doors of the freezer compartment open.
s
,serp dna snoci eht pu thgiL , and at the same time for
at least 5 seconds.
Check that is turned off.
The demonstration mode was not cancelled if it lights up.
Before use Operation Cleaning When in trouble
Touch until the buzzer sounds
19
18
Clean the auto ice-maker Pages 18
noise reduction mat.
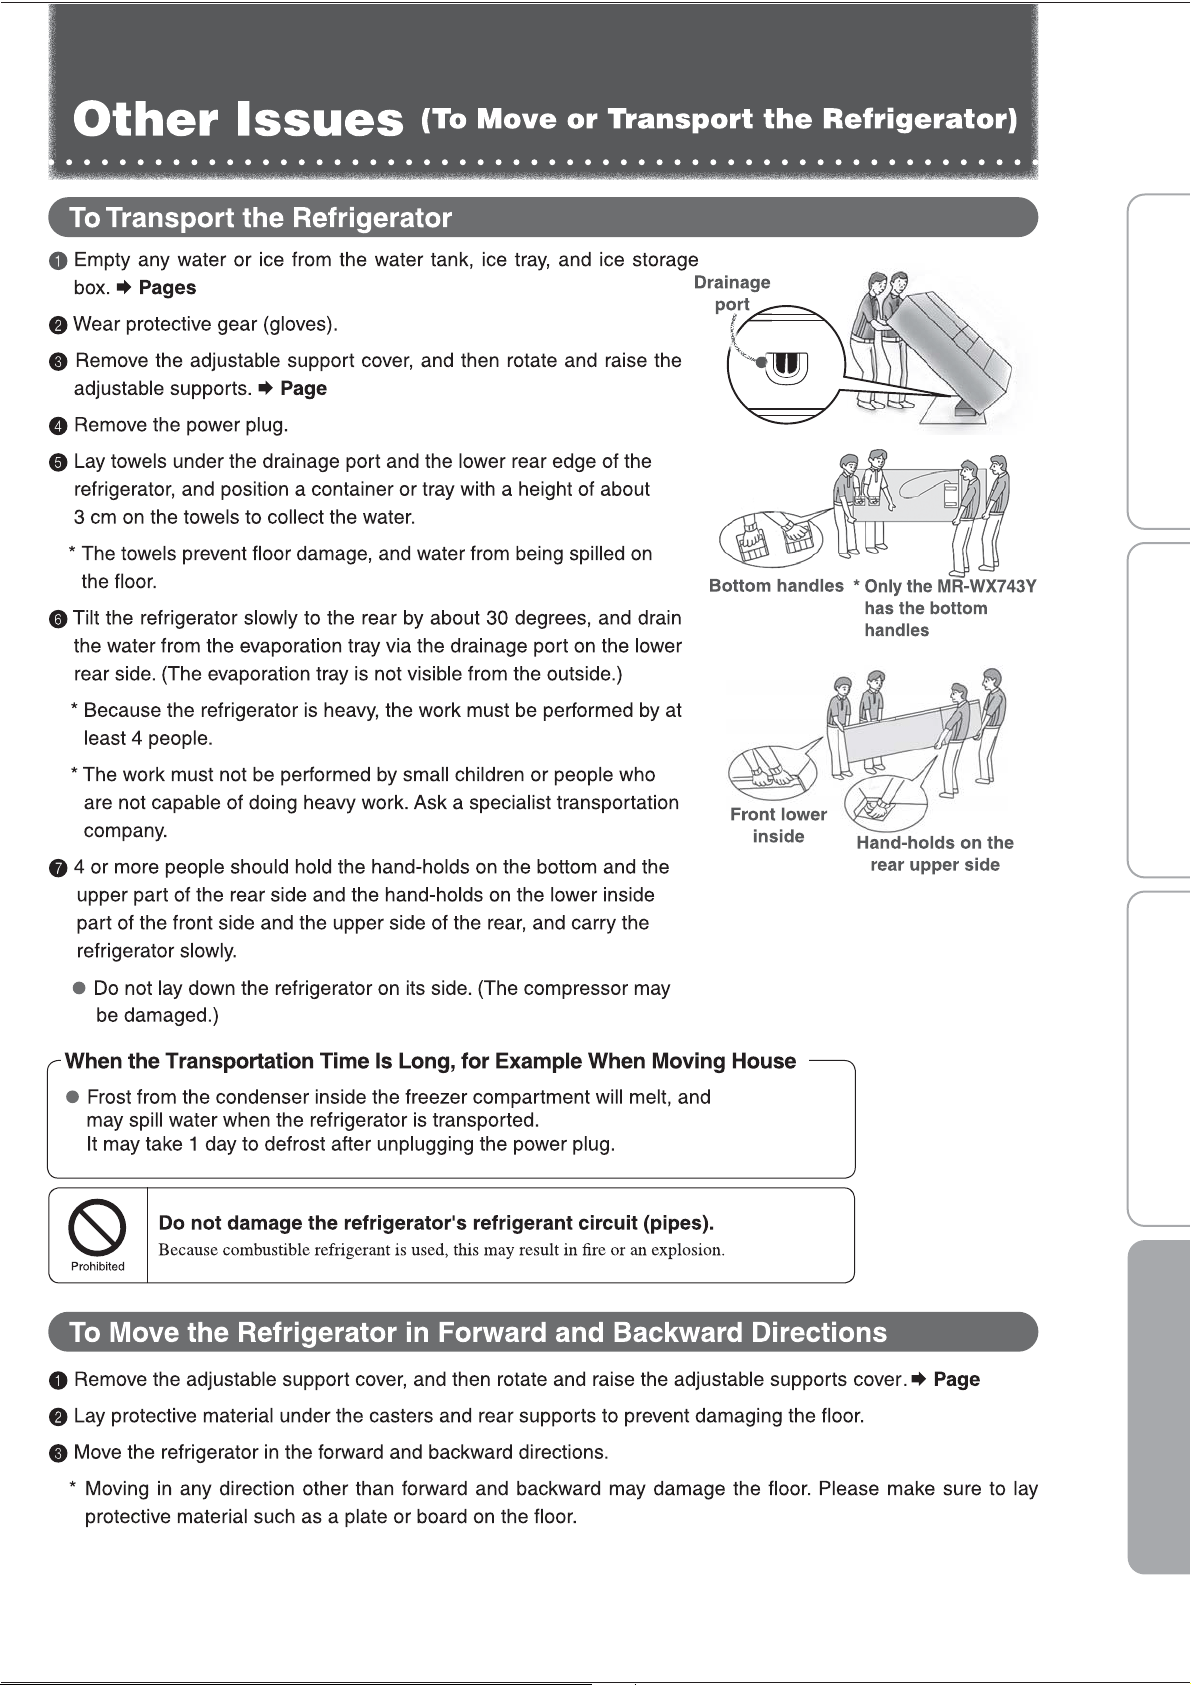
Other Issues
(Door Alarm, Mark, When Not Using the Refrigerator for a Long Time)
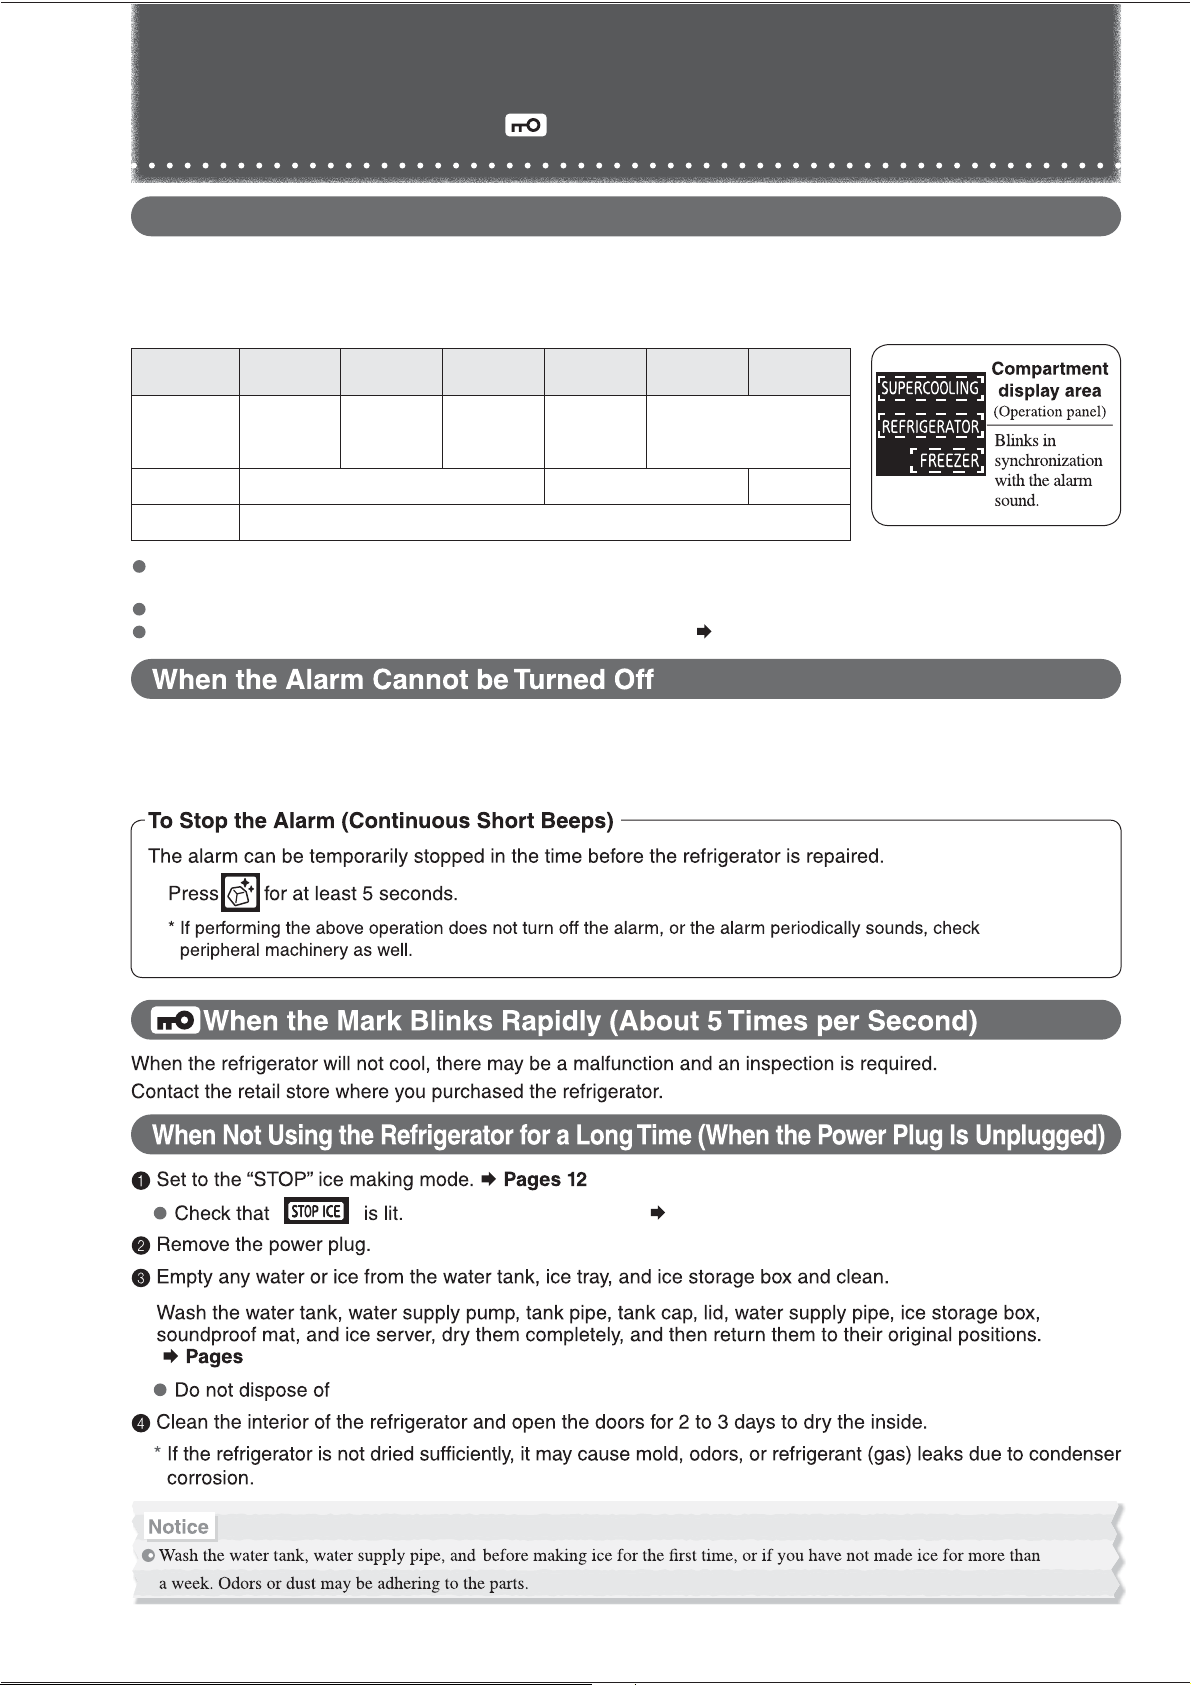
When the Door Alarm Sounds and the Interior Light of the Refrigerator Compartment Blinks
(Door Alarm)
The door alarm (with alarm sound, interior light, and compartment display) is activated when a door is open for 1 minute or
longer.
The pattern of the door alarm sound and the action of the interior light and compartment display area are as follows
depending on how long the door has been left open.
Time for which the
door left open
1 minute 2 minutes 3 minutes 4 minutes
5 minutes
or longer
60 minutes
or longer
Alarm sound
Interior light
Compartment display area
4 short beeps,
then
2 beeps
4 short beeps,
then 3 long
beeps
4 short beeps,
then 4 long
beeps
After 4 short beeps,
Continuous long
beeps
Continuous short beeps
On
Blinks twice per minute Off
The compartment display area will blink in synchronization with the alarm sound
Check that the doors are not left ajar or do not have any food trapped (the
packing, the back of the drawer cases). (Check at least once a month.)
Refrigerator and Freezer doors have an opening and closing sensor.
Check the refrigerator compartment door rotating partition.
Page 8
Check that there are no gaps between the door.
When the alarm cannot be turned off, there may be a malfunction and an inspection is required.
Contact the retail store where you purchased the refrigerator.
20
18
5
5
Before use Operation Cleaning When in trouble
21
1
2
3
4
5
6
7
8
9
10
11
“LESS COLD” blinks
REFRIGERATOR blinks
about every 10 seconds
22
Page 6
Page 5
Page 19
Page 14
Page 14
Page 14
Page 14
Page 4
Set to “COLD or COLDER” or
tothesetting of yourliking.
Is the flow of cold air being blocked?
Are the doors being opened frequently,
or left ajar? Is food blocking them?
Make space between foods and remove any food that
is sticking out of shelves or touching the ceiling of the
drawers. Avoid opening and shutting the door for a while.
Is heat discharging being blocked?
Check if there is no gap around the
refrigerator and the refrigerator is
exposed to direct sunlight.
Is the temperature on the operation
panel set to “COLDER”?
Check that there is enough space around the refrigerator
and that it is properly installed.
Set the temperature to “COLD”. Also, the temperature with
each setting may temporarily decrease.
Is the refrigerator compartment's
temperature set to “COLDER”?
Set the temperature of the refrigerator compartment to
"COLD" or "LESS COLD"or set the temperature of the
lower case (when Supercool Chilling is set) to
"LESS COLD".
Set the temperature of the lower case (when Supercool
Chilling is set) to "LESS COLD".
Food in the refrigerator compartment or vegetable compartment
may freeze. Freezing is less likely when the temperature
settings are set to "LESS COLD".
Has enough time passed after
installation?
It takes 4 to 5 hours for the refrigerator to cool, and may
take 24 hours in summer to fully cool.
Is the temperature setting set to “LESS COLD”?
Is the compartment set to Power Save
Mode?
Place drinks and food containing a lot of water, such as
tofu, vegetables and fruits, at the front of the shelf or in a
door pocket.
Is food with a lot of moisture stored at
the rear of the shelf?
Is the surrounding temperature 5 ™C or
less?
Is the surrounding temperature 5 ™C or
less?
Have you placed easily frozen food
containing a considerable amount of
moisture in the compartment?
Are you piling frozen food onto other
food?
23
Before use Operation Cleaning When in trouble
Problem
Check
Explanation and Action
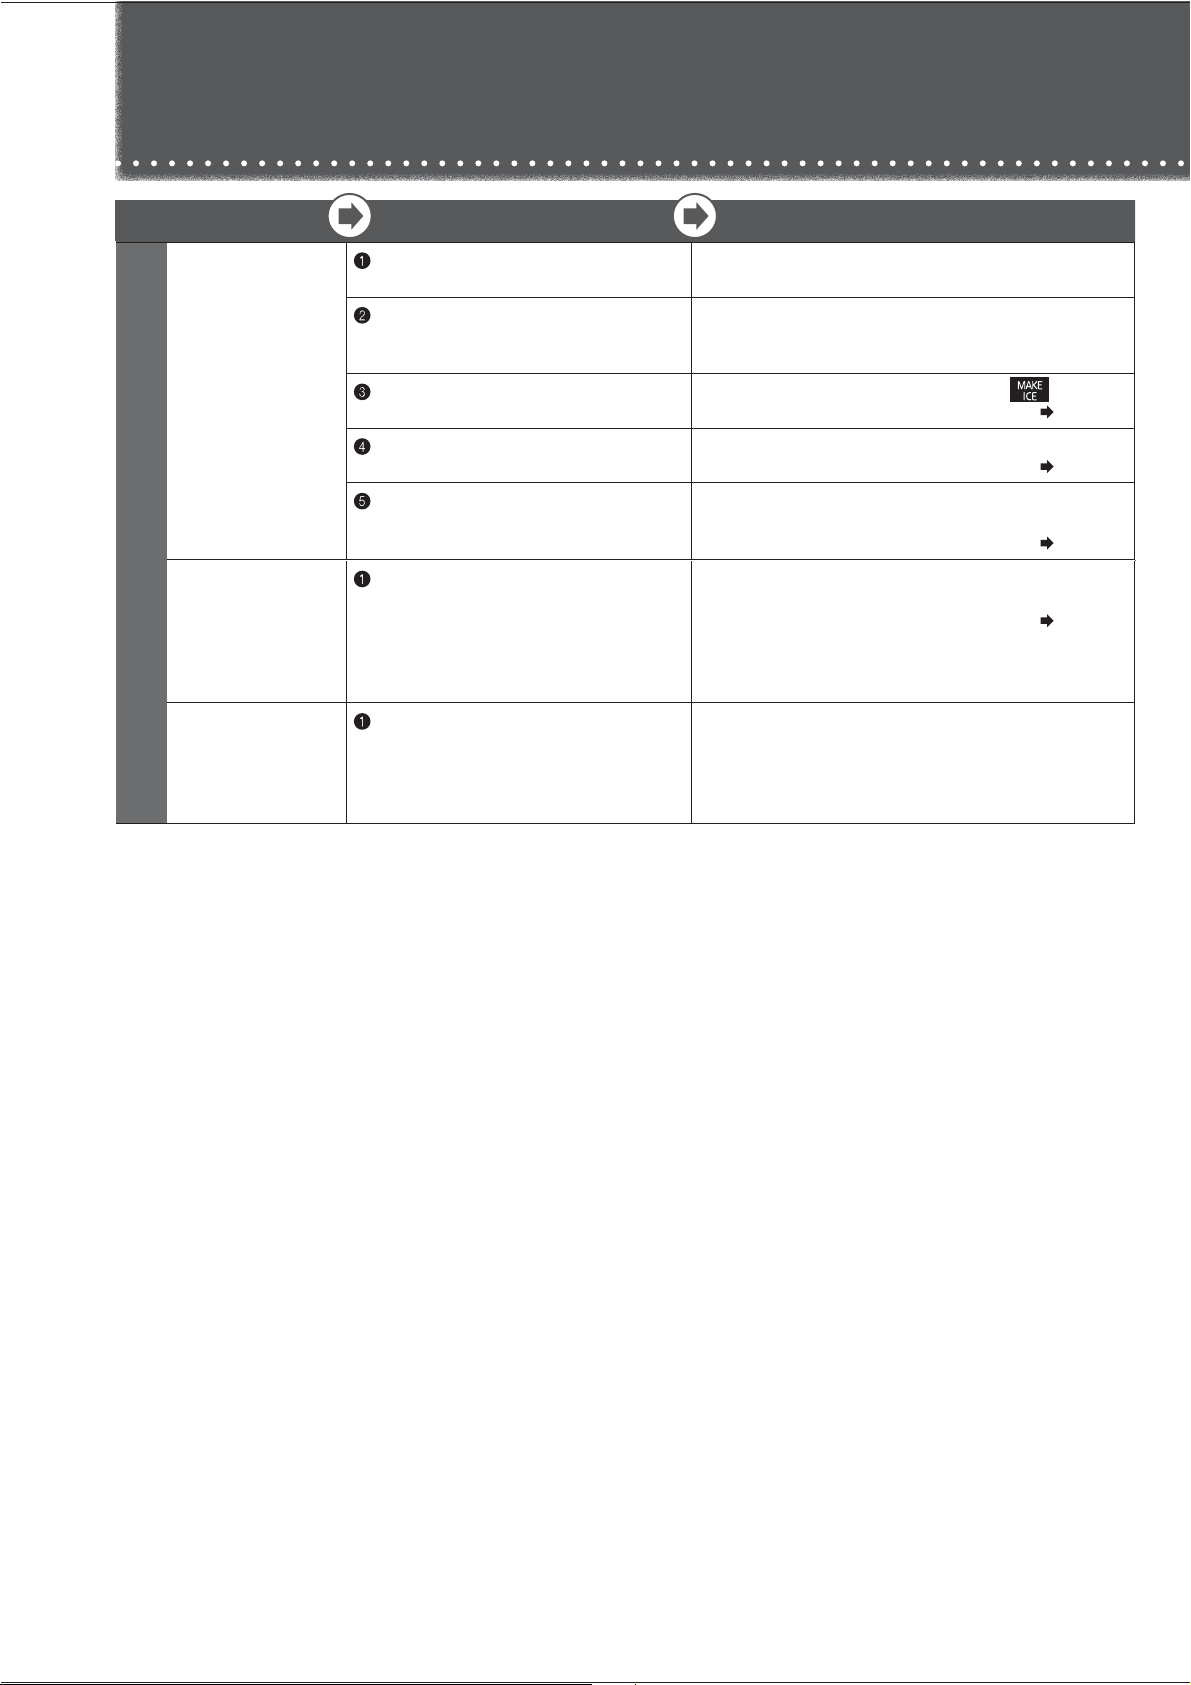
Cannot make ice
Water in the tank
stays at the
same level
1
Has enough time passed after installation?
It takes 4 to 5 hours for the refrigerator to cool, and 24 hours
or more in summer to make ice.
2
Has food, the ice server, or another object
been left in the ice storage box?
Also, has the ice been leveled?
Remove food or other objects from the ice storage box. The
ice storage box is judged to be full of ice. Also, spread the
ice out flat all the way to the front.
2
Is the ice making setting for the ice
making compartment set to “STOP ICE”?
Set the ice making compartment's setting to .
Page 12
5
Is the water supply pipe installed correctly
in the tank holder area?
Remove any foreign objects creating gaps and install the pipe
so that it is not loose.
Page 18
6
Are the water supply pump and tank pipe
installed correctly onto the water tank?
Check that they are correctly installed. In particular, ensure
that the opening of the tank pipe inside the tank is installed
firmly to the tank.
Page 18
Automatic Ice Making
Troubleshooting
(Continued)
Water tank
or water supply
pipe freezes
1
Are the water supply pipe and water tank
installed to the refrigerator without any
gaps?
Additionally, is the tank pipe installed to the
water tank without any internal gaps?
Check the installation around the water tank. If there are gaps,
the cold air may escape and water may freeze.
Page 18
Ice is small or
joined together
1
Has ice been stored inside the ice storage
box for a long time?
Ice stored inside the ice storage box for a long time may
shrink or join together (due to a phenomenon called
sublimation).
When not using ice, it is recommended that you remove the
water and stop the ice making.
24
Problem
Check
Explanation and Action
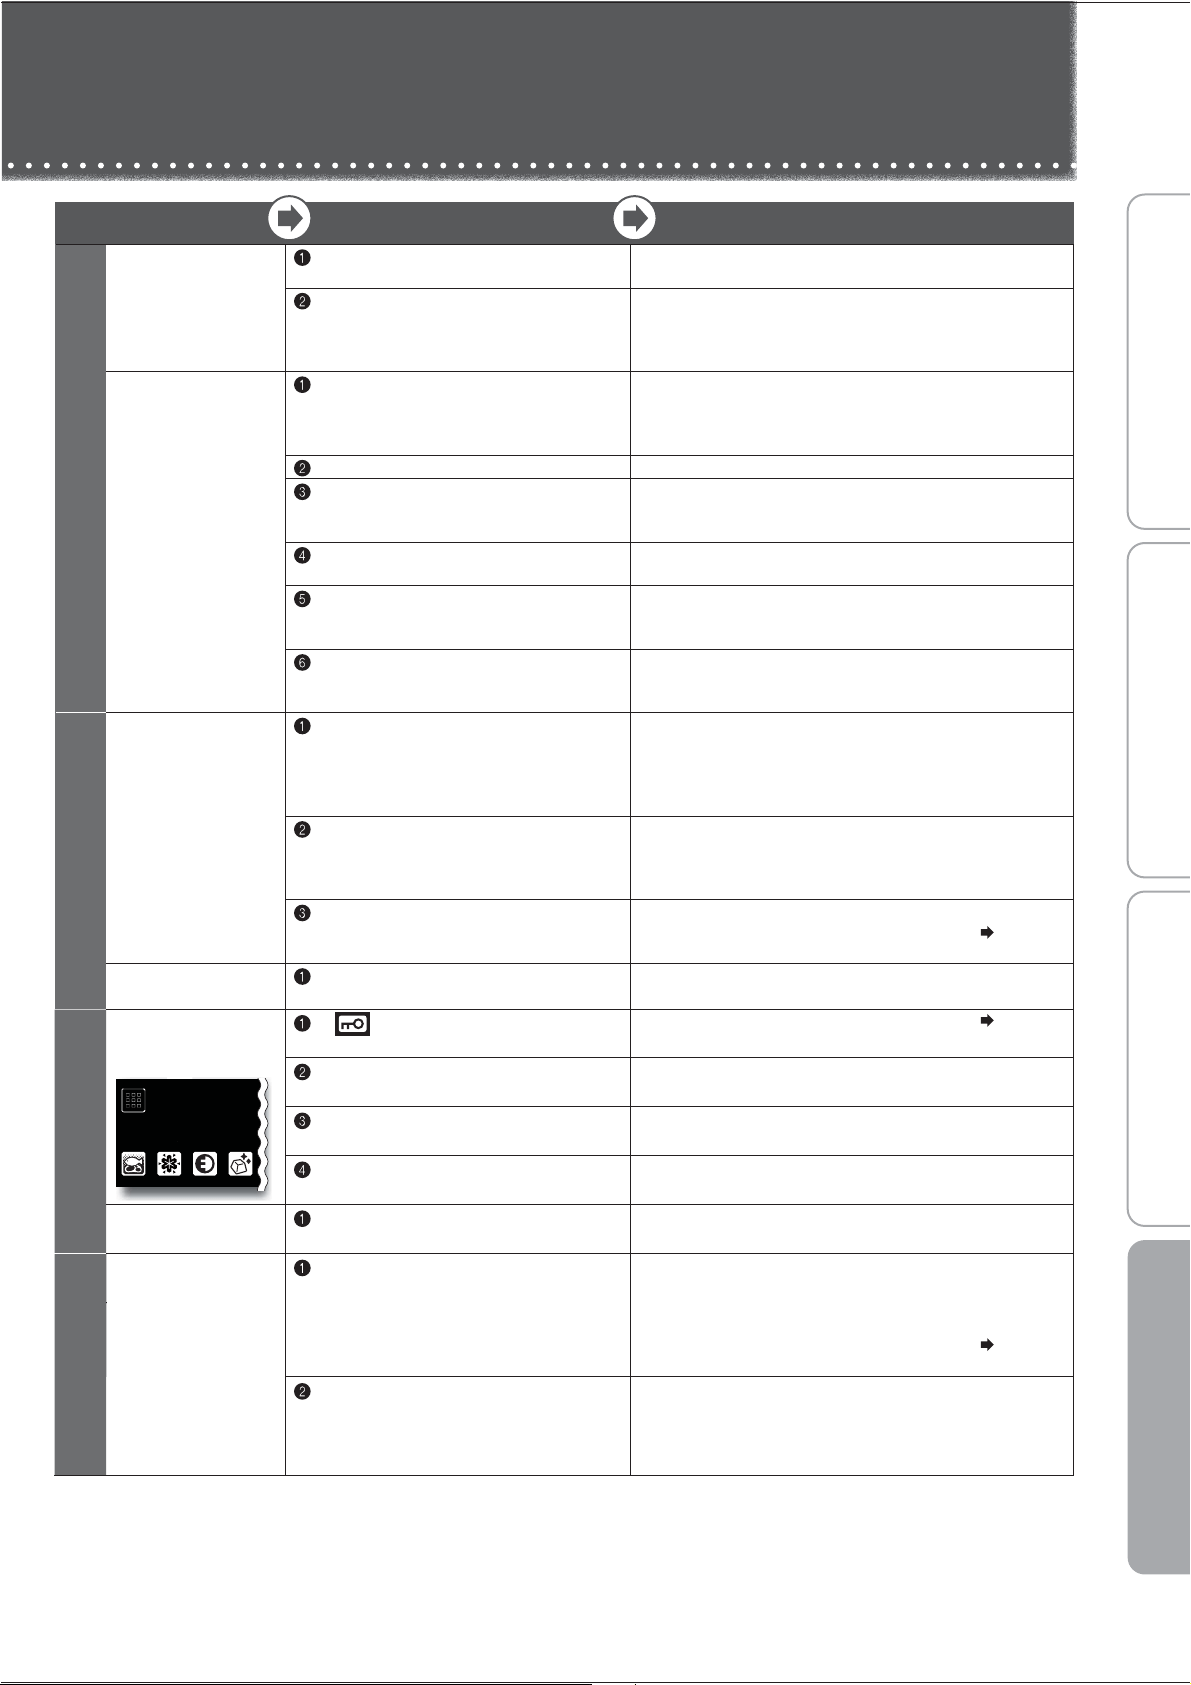
1
There is a
rattling sound
1
Are any nearby objects in contact with
the refrigerator?
Leave space around the refrigerator. When objects or walls
are in contact with the refrigerator, sounds may be heard.
2
Make sure that the water tank and water
supply pipe are properly installed.
Push in the water tank until it touches the rear side. If it is out
of position, the sound of the water supply pipe can grow loud.
If there are any gaps or looseness, the water may freeze,
causing sounds to be heard.
Loud noises
Worrisome
noises (Noises
described on the
right are normal)
1
The noise gets louder suddenly
or the tone changes.
Immediately after beginning use, when the weather is hot,
when the doors are frequently opened and closed, and in
similar situations, the refrigerator switches to high-speed
operation and cools with high power.
2
A whistling sound is made after closing a door.
This is the sound of the cooling fan motor starting.
3
A whipping or dripping sound is sometimes
heard from inside the refrigerator after
a door is opened.
This is the creaking sound as warm air enters and expands
the plastic.
4
Sometimes the sound of flowing or boiling
water can be heard.
This is the sound of the refrigerant (gas) flowing.
5
A rattling or squeaking sound is made
sometimes (every 1 to 2 hours).
This is the sound of the autom atic ice maker. Even when there is
no water in the water tank, the automatic ice maker and pump make
a sound about every 100 minutes.
6
After turning on the power, a thumping or
creaking sound may be heard in the ice
making “STOP ICE” mode (every 1 to 2 hours).
This is the sound of the operation check. The check is
performed even in the “STOP ICE” ice making mode.
Doors do not
close
Doors open
easily
1
Is a door making contact with food or a
case? Is too much food packed inside?
Store food so that the door does not make contact with the
food when closed. In the refrigerator compartment, store food
on the shelves and in the drawer doors store food so that it
does not make contact with the ceiling when doors are shut
and opened.
2
Has food fallen behind a case in a drawer
door, or is the power cord or another object
trapped between the refrigerator and
a door?
Remove any objects. Make sure that the door does not trap
objects such as food, power cords or plastic bags.
3
Is the refrigerator installed stably?
Are the adjustable supports making contact
with the floor?
Lower the adjustable supports to raise the front side slightly
and make the doors easier to close.
The alarm
will sound
1
Check if the doors are closed.
Refer to “When the door alarm sounds” and “When the
alarm cannot be turned off”.
Page 5
SoundDoor
Before use Operation Cleaning When in trouble
The operation
panel does not
respond
1
Is lit?
Cancel the Child Safety Lock.
Page 19
2
Are the user's fingers or the operation panel
wet or dirty?
Wipe off the moisture and dirt on the operation panel and
fingers.
4
Are you repeatedly touching it?
Let your flnger off the operation panel once and then touch
it again. It will respond when you let you finger off.
5
Are seals and tapes put on the operation
panel?
Remove the seals and tapes.
Reacts without a
touch
1
Are there any towels, plastic bags,
papers, etc. over the operation panel?
Remove the towel, plastic bag, paper, etc.
Condensation
forms on the
outer walls
and inside the
refrigerator
Frost forms
in the freezer
compartment
Water drips onto
the floor
1
Are the doors being opened frequently,
or are there any gaps?
Close the doors so that there are no gaps.
When moisture in the air cools, it forms frost or condensation.
When there is high humidity, condensation or frost will form
even in very small gaps.
Regarding the Vegetable Compartment
Page 10
2
Is the humidity high, for example is it
raining?
Condensation may form temporarily. Wipe off with a dry cloth.
Condensation may cause frost to form in the freezer
compartment. Please minimize the time when doors are kept
open.
Operation Panel
Condensation/ Frost
Troubleshooting
(Continued)
25
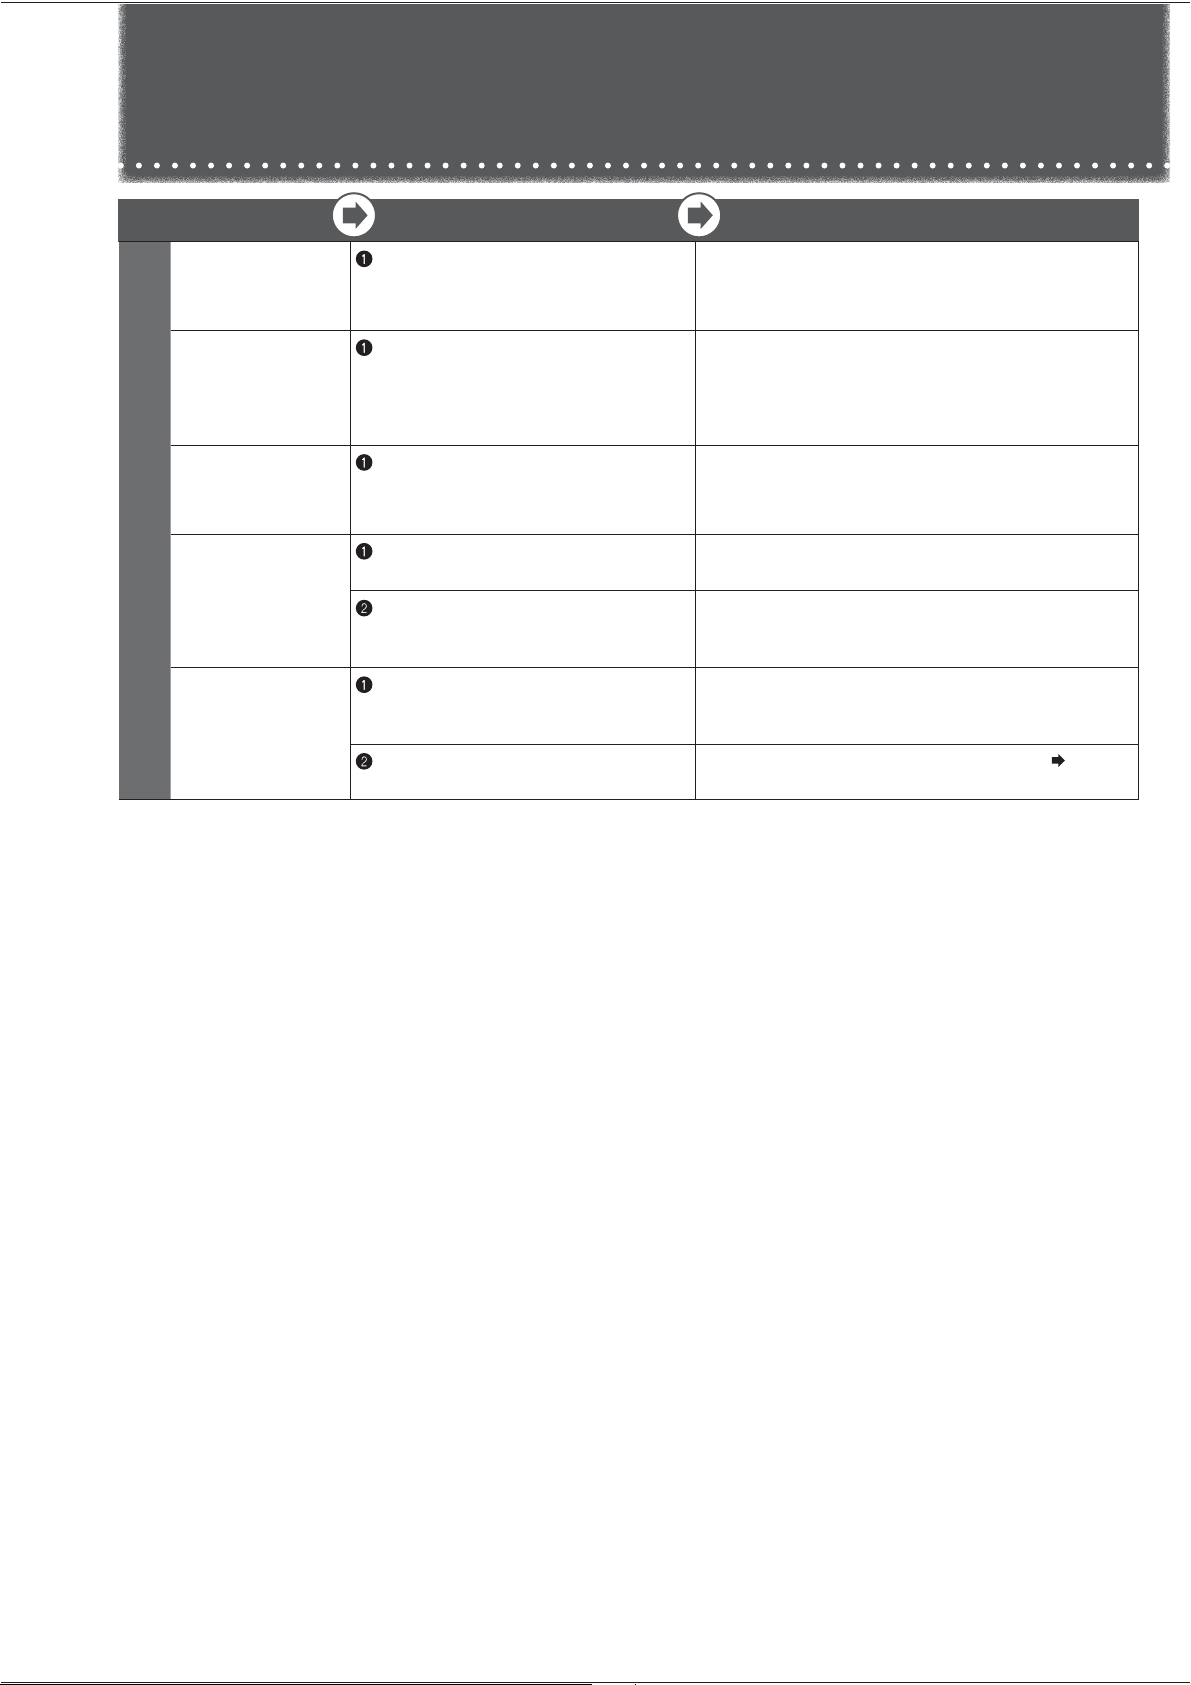
Problem
Check
Explanation and Action
1
There are lines
like scratches on
the clear parts
1
Is it a thin line without level difference on
its both sides?
This is a mark created at the time the plastic is molded. It is
created at the joint where resin flows. This is not a flaw.
There are holes
in the door and
the refrigerator
walls
1
Are there small holes in the door or in the
refrigerator walls?
These are holes that let air escape for the injection of foam
heat insulating materials in the manufacturing process.
These are not flaws or abnormalities.
The surface of
the sides or
doors is warped
1
Does the light reflected on the surface
appear distorted?
Warping and surface waviness occurs in the manufacturing
process. When light hits the surface, it may appear warped,
but this is not an abnormality.
Noise interferes
with televisions
or other devices
1
Is the refrigerator installed near an
electronic device such as a television?
Install the refrigerator away from electronic devices such as
televisions.
2
Is the power to the refrigerator supplied
from a socket near the entry hole of the
antenna cable?
Use separate power. When using a 2 pin plug, use
grounding.
There is a
bothersome
smell (Food / Ice)
1
Have you placed food with strong odor
inside the refrigerator without sealing it
in a container?
Store food with strong odor in packaging.
The odor may not be removed with a deodorizing apparatus.
2
Do you periodically clean the water tank?
Clean periodically.
Page 18
Others
Troubleshooting
(Continued)
26
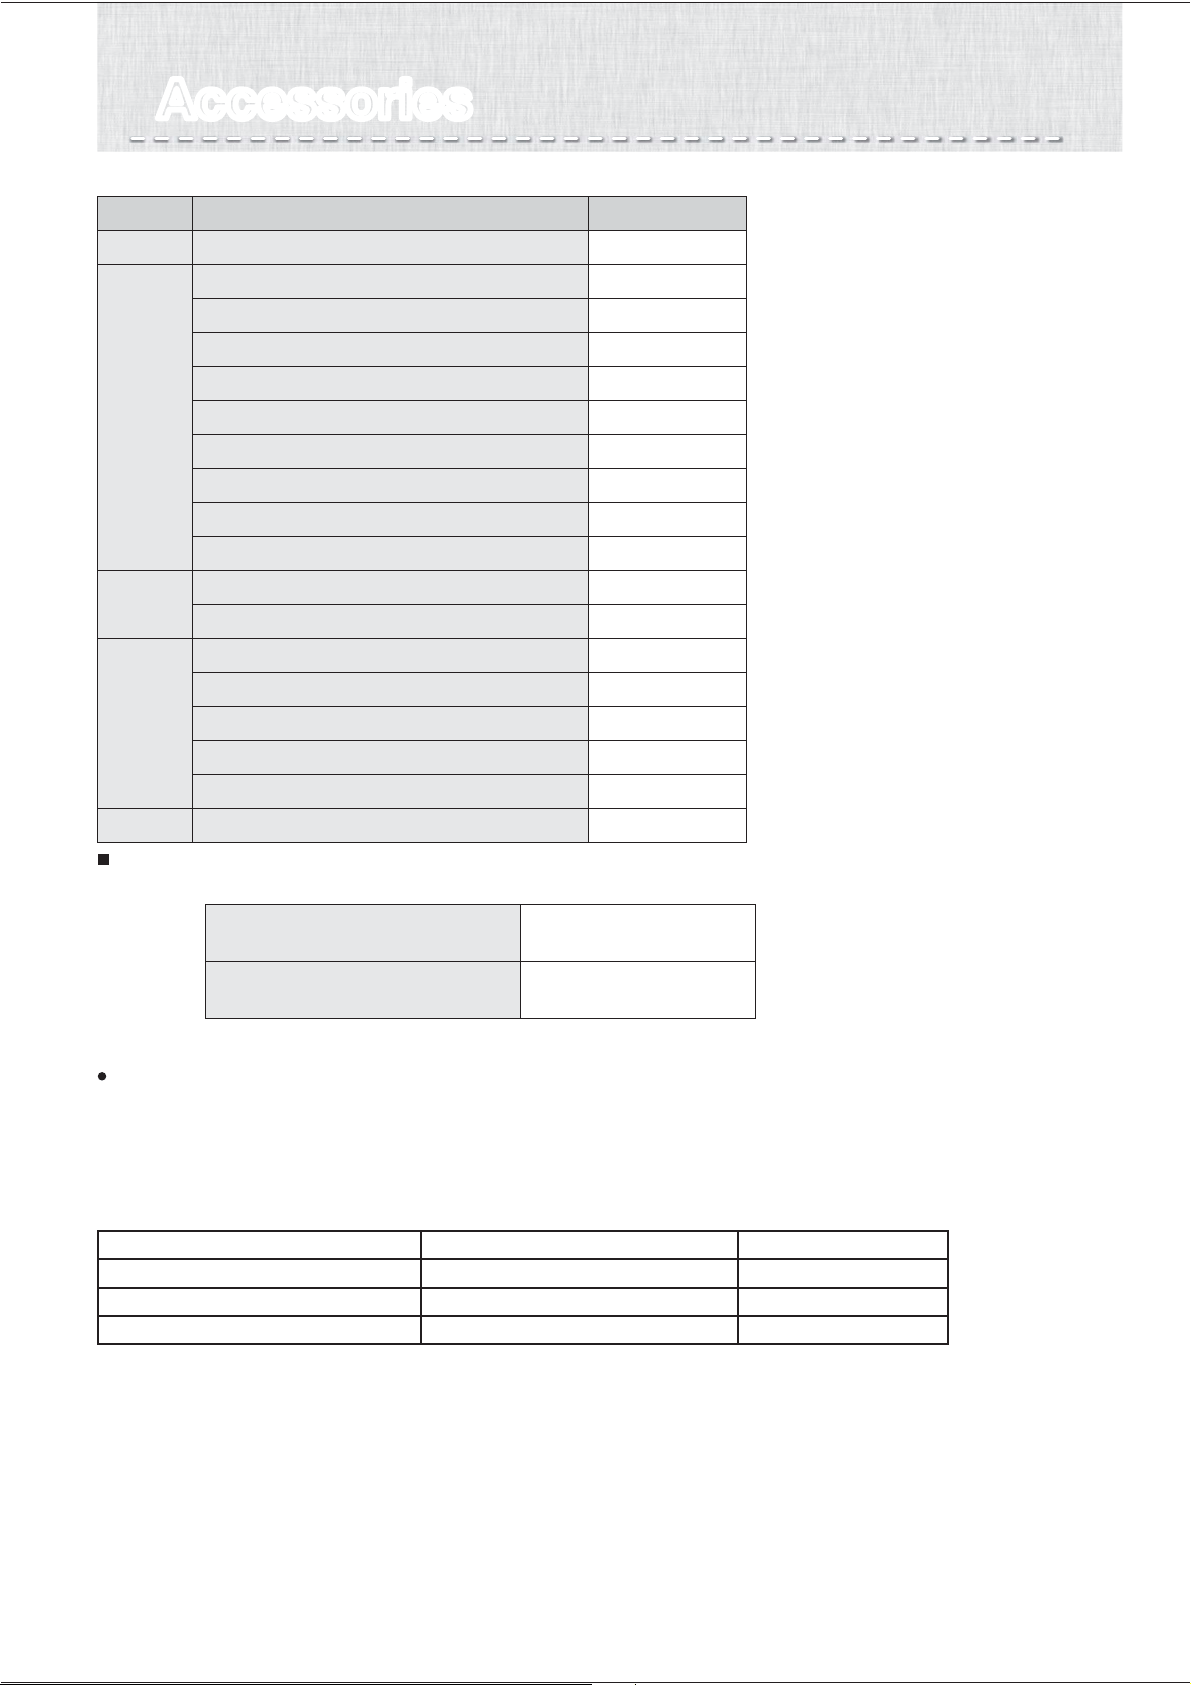
AccessoriesAccessories
Refrigerator compartment
Vegetable
compartment
Freezer
compartment
Accessories
Model name
Quantity
MR-LX630EM
Glass shelf
Sliding case (upper)
Sliding case (lower)
Water supply tank (including purification filter)
Free pocket (large)
Free pocket (small)
Free egg tray
Bottle pocket
Capsule door pocket
Vegetable case
Sliding case
Freezing case (upper)
Freezing case (lower)
Ice case
Noise reduction mat
Ice server
Leg support cover (Right and Left)
2
1
1
1
2
2
1
2
1
1
1
1
1
1
1
1
1
MODEL NAME COUNTRY NAME
MR-LX630EM-A AUSTRALIA / NEW ZEALAND
This appliance is designed for use in Australia and New Zealand only and cannot be used in any other country.
No service is available outside of Australia and New Zealand."
CAUTION
1. This appliance is designed for use in ambient temperature listed below.
The internal temperatures could be affected by such factors as the location of the refrigerating appliance, ambient
temperature and the frequency of door opening, and, if appropriate, a warning that the setting of any temperature
control device might have to be varied to allow for these factors.
2. A rise in temperature of the frozen food during manual defrosting, maintenance or cleaning could shorten the storage life.
3. Food to be frozen is not to be placed in direct contact with food in storage and, if appropriate, that it could be necessary
to reduce the quantity to be frozen if freezing every day is anticipated.
4. The electrical power failure for 1-2 hour will only slightly affect the inside temperature. However, opening and closing the
door results in temperature loss. In case there is more than 24 hours electrical power failure, the food should be taken
out from the fridge.
5. In case you are leaving or there is no food in the fridge for more than 3 weeks, The fridge should be unplugged and
cleaned.
MODEL NAME AMBIENT TEMPERATURE RANGE CLIMATIC CLASS
MR-LX630EM-A 16
o
C ~ 43
o
C T
When you hear noise from the lower rear of the refrigerator
Part of the cooling system is the compressor, which operating, does create a more noticeable increase in noise level.
This is normal. However, if the noise is quite loud, this could be because the refrigerator is not installed correctly on
a hard level surface, or there may be a problem that may need service.
27

MEMOMEMO
28
NZ79C688H01
The appliance is not intended for use by young
children or infirm persons without supervision.
Young children should be supervised to ensure
that they do not play with the appliance.
WARNING - Do not use mechanical devices
or other means to accelerate the defrosting
process, other than those recommended by the
manufacturer.
WARNING - Do not use electrical appliances
inside the food storage compartments of
the appliance, unless they are of the type
recommended by the manufacturer.
WARNING - Just in case of having damaged the
refrigerant circuit, do not use electric items or fire
equipments near by, and open the window to
ventilate the room. And contact the retail store
at which you purchased it or the following
MITSUBISHI SERVICE CENTER.
The refrigerator contains flammable refrigerant
(R600a: iso-butane).
The refrigeration system behind and inside the
refrigerator contains refrigerant.
Do not allow any sharp objects to come into
contact with the refrigeration system.
Do not block the openings on the circumstances
of the refrigerator.
The user manual should be handed over to any
person who would use or handle the refrigerator
whenever the refrigerator would be transferred to
another location and delivered to a recycling plant.
This refrigerator uses flammable foaming gas for
insulation.
Please deliver the unit to specialized industrial
waste dealer when you do away it.
Please follow the rules in your country.
SOLE AGENT in Australia
MITSUBISHI ELECTRIC AUSTRALIA PTY LTD.
(Incorporated in New South Wales) ABN 58 001 215 792
Wellington Office (Head Office)
1 Parliament Street Lower Hutt PO Box 30772 Phone: (04) 560 9147, Fax: (04) 560 9133
Auckland Office
Unit 1, 4 Walls Road Penrose PO Box 12726 Phone: (09) 526 9347, Fax: (09) 526 9348
Christchurch Office
44 Halwyn Drive Hornby PO Box 16904 Phone: (03) 341 2837, Fax: (03) 341 2838
SOLE AGENT in New Zealand
BLACK DIAMOND TECHNOLOGIES LIMITED (BDT)
348 Victoria Road, Rydalmere NSW 2116
For more information and support contact
www.mitsubishielectric.com.au
Call 1300 651 808
If an abnormality or malfunction occurs, stop operation immediately and contact the retail store where
you purchased the refrigerator or MITSUBISHI ELECTRIC SERVICE CENTRE or its service agent.
R600a Refrigerant Warning
NOTE: MITSUBISHI ELECTRIC AUSTRALIA PTY LTD. DO NOT ALLOW SERVICE
TO THE REFRIGERATION CIRCUIT OF THIS APPLIANCE.
This appliance contains a small quantity of R600a refrigerant which is flammable.
During transportation and installation, ensure that the tubing of the refrigerant circuit is not damaged.
Leaking refrigerant can ignite and may damage the eyes.
In the event any damage does occur, avoid exposure to open fires and any device which creates a spark.
Disconnect the appliance from the mains power.
Thoroughly ventilate the room in which the appliance is located for several minutes.
Notify Mitsubishi Electric Australia Pty Ltd. for necessary action and advice.
The room for installing the appliance must be at least 1 cubic metre per 8 grams of refrigerant.
The refrigerant quantity contained in this appliance is noted on the Rating Label of the appliance.
If your Mitsubishi Electric Refrigerator should require service, please contact Mitsubishi Electric Australia
Pty Ltd see back page of this user manual for contact details.
●
●
●
●
●
●
●
●