Loading ...
Loading ...
5
If you are only using the Wired
Connection method, please proceed
to section J
For WiFi connection method set-up,
proceed to section I
If your Hub is NOT Online after this step, please double-
check your cable connections. Check LED indicators on the
Ethernet jack on your Hub (refer to section C). There
should be similar LED activity on your router or switch
(refer to router/switch documentation)
2
The green power indicator should
flash:
3
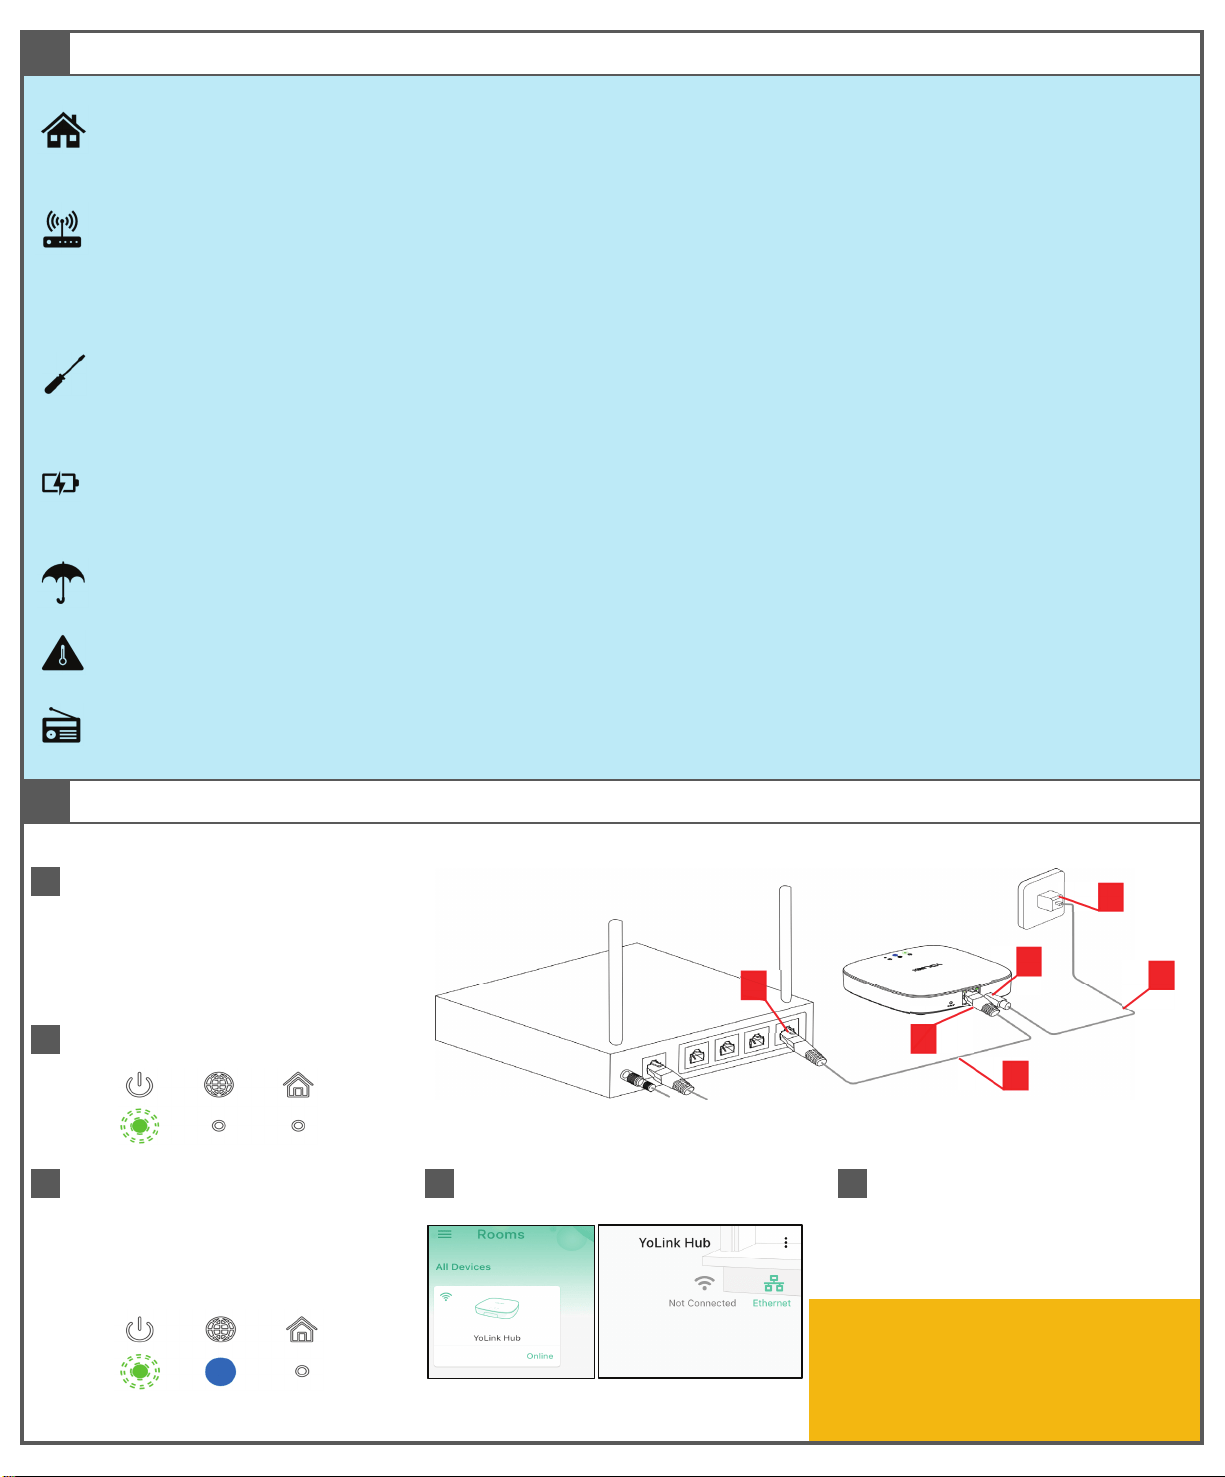
Using the supplied Ethernet patch cord
(D), connect one end (E) to the Hub, and
the other end (F) to an open port on your
router or switch. The blue Internet
indicator should turn on:
4
The Hub is now shown to be Online,
Ethernet icon illuminated
Do not place your Hub near sources of heat that may damage your Hub, such as space heaters, radiators, stoves, and even home
entertainment & audio amplifiers. If it gets hot or very warm, this is not a good location for your Hub.
Avoid placing your Hub inside or near metal or sources of radio or electromagnetic energy or interference. Do not place your Hub under
or on top of your Wi-Fi router, satellites or equipment.
H
Power-Up & Connect to Network (Wired & WiFi Internet Connection)
1
As shown, power up the Hub by
connecting one end the USB cable (A) to
the power jack (B) on the Hub, and the
other end to the power adapter (C),
plugged into an outlet
G
Installation Considerations
Please consider where you will install your Hub. Whether you plan to use a wired or WiFi internet connection, your Hub should be plugged in
to your network switch or router for the initial set-up. This will be the permanent installation if you're only using the wired method and the
permanent or temporary connection (for express set-up) if using the WiFi method.
Due to the industry-leading long-range of YoLink's LoRa-based wireless communication technology, most customers will experience no
issues whatsoever with system signal strength, no matter where they place their Hub in their home or business. Generally, most place their
Hub next to their router, which is often a convenient location, with open Ethernet ports. Larger homes or applications requiring coverage to
out-buildings and more remote outdoor areas may require alternative placement or additional Hubs, for optimal coverage.
You may wish to set-up your Hub at a temporary location, until you are ready to put it in its permanent location, and that is OK. This may
be at the router/switch/satelite or at a desk, as long as your Ethernet cord can reach (or perhaps your home or business has in-wall data
jacks), Plan to use the included Ethernet cable (sometimes referred to as a "patch cord") to connect your Hub to your network equipment.
Or, if you need lengths longer than 3 feet, longer cords are readily available where computer accessories are sold. Your Hub may be shelf-
or countertop- or wall-mounted. If wall-mounting, utilize the mounting slot on the back of the Hub, and hang the Hub from a screw or
nail in the wall. Mounting it in a vertical or horizontal position will not impact the operation of Hub.
For systems with critical equipment monitoring and control, a UPS or other form of back-up power for the Hub is recommended. Your
router, your internet service provider's equipment and additional network equipment for the Hub's internet connection must also be on back-
up power. Your internet service may already be protected against power outages by your internet service provider.
Your Hub wants to be indoors, clean and dry! Please refer to the specifications section for additional environmental limitations for your Hub.
Installing and using your Hub outside of the environmental limitations may damage your Hub and is likely to void the manufacturer warranty.
C
D
E
F
A
B
Loading ...
Loading ...
Loading ...