
10036166 10036167 10036168 10036169
St. Gallen II
Uhrenbeweger
Watch Winder
Estuche giratorio para relojes
Tourne-montre
Caricatore Orologio


3
DE
Sehr geehrter Kunde,
wir gratulieren Ihnen zum Erwerb Ihres Gerätes. Lesen Sie
die folgenden Hinweise sorgfältig durch und befolgen Sie
diese, um möglichen Schäden vorzubeugen. Für Schäden,
die durch Missachtung der Hinweise und unsachgemäßen
Gebrauch entstehen, übernehmen wir keine Haftung. Scannen
Sie den folgenden QR-Code, um Zugriff auf die aktuellste
Bedienungsanleitung und weitere Informationen rund um das
Produkt zu erhalten.
INHALTSVERZEICHNIS
Sicherheitshinweise4
Geräteübersicht4
Bedienung5
Programme6
Hinweise zur Entsorgung6
TECHNISCHE DATEN
Artikelnummer
10036166, 10036167, 10036168,
10036169
Stromversorgung 220-240 V ~ 50/60 Hz
HERSTELLER
Chal-Tec GmbH, Wallstraße 16, 10179 Berlin, Deutschland.
English 7
Français 11
Español 15
Italiano 19

4
DE
SICHERHEITSHINWEISE
• Lesen Sie alle Anweisungen sorgfältig durch und bewahren Sie die Anleitung zum
späteren Nachschlagen an einem sicheren Ort auf.
• Verwenden Sie nur den mitgelieferten Netzadapter.
• Wenn Sie das Gerät längere Zeit nicht benutzen, schalten Sie es aus.
• Entfernen Sie das Netzteil, wenn Sie den Uhrenbeweger nicht verwenden.
• Stellen Sie sicher, dass der Uhrenbeweger ausgeschaltet ist, bevor Sie versuchen,
den Uhrenhalter herauszuziehen.
• Schalten Sie das Gerät immer aus, bevor Sie Uhren einsetzen oder herausnehmen.
• Schütteln Sie den Uhrenbeweger nicht, wenn er in Betrieb ist.
• Nehmen Sie die Uhr nicht heraus, wenn sich der Uhrenbeweger dreht.
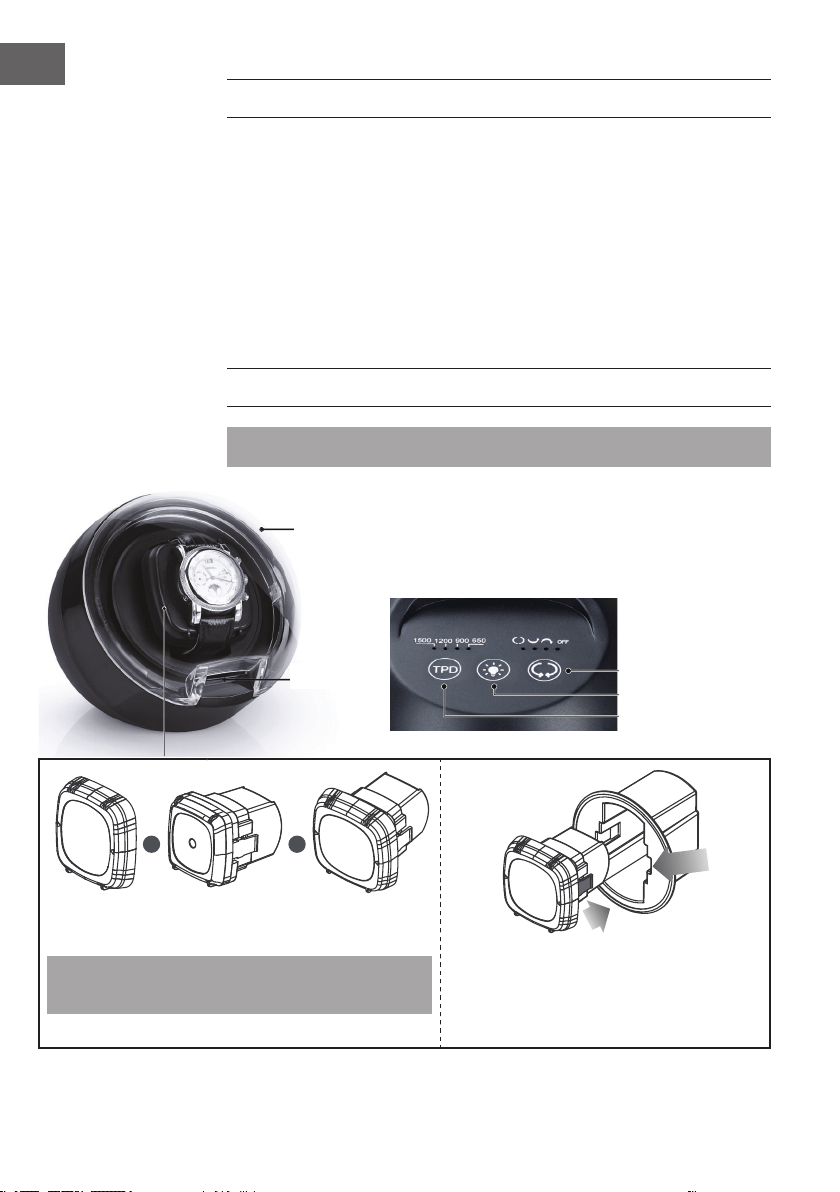
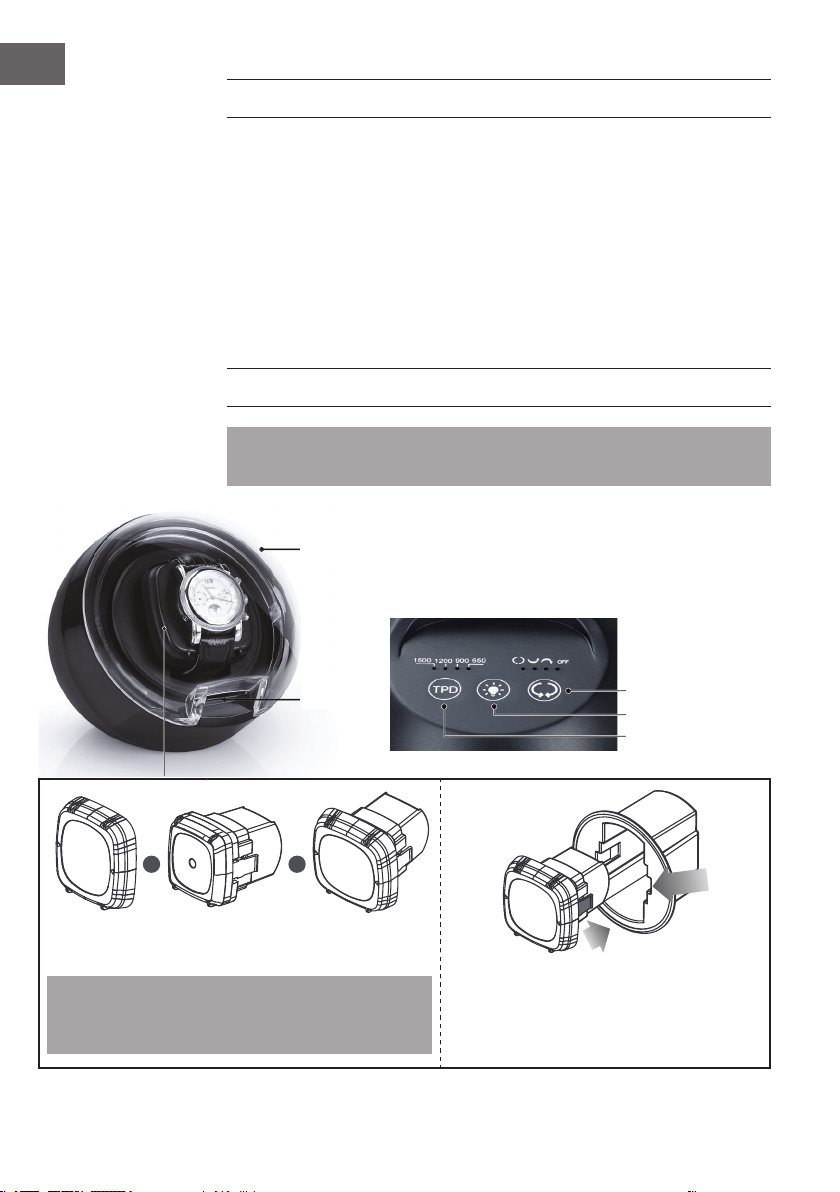
GERÄTEÜBERSICHT
Hinweis: Der Anschluss für das Netzteil bendet sich auf der Rückseite des Geräts.
Cover
LED light
TPD switch
Rotation switch
LED touch button
+ =
Halter-
Verlängerung
Uhrenhalter Verstellbarer
Uhrenhalter
Stecken Sie bei der Verwendung größerer Armbanduhren
die Uhrenhalterverlängerung auf den Uhrenhalter.
Setzen Sie den Uhrenhalter in den Uhrenbeweger
ein. Drücken Sie, bis Sie ein „KLICK“ hören, d.h.,
dass er sicher im Uhrenbeweger sitzt.
Abdeckung
LED-Licht
Rotationstaste
LED-Touch-Taste
TPD-Taste

5
DE
BEDIENUNG
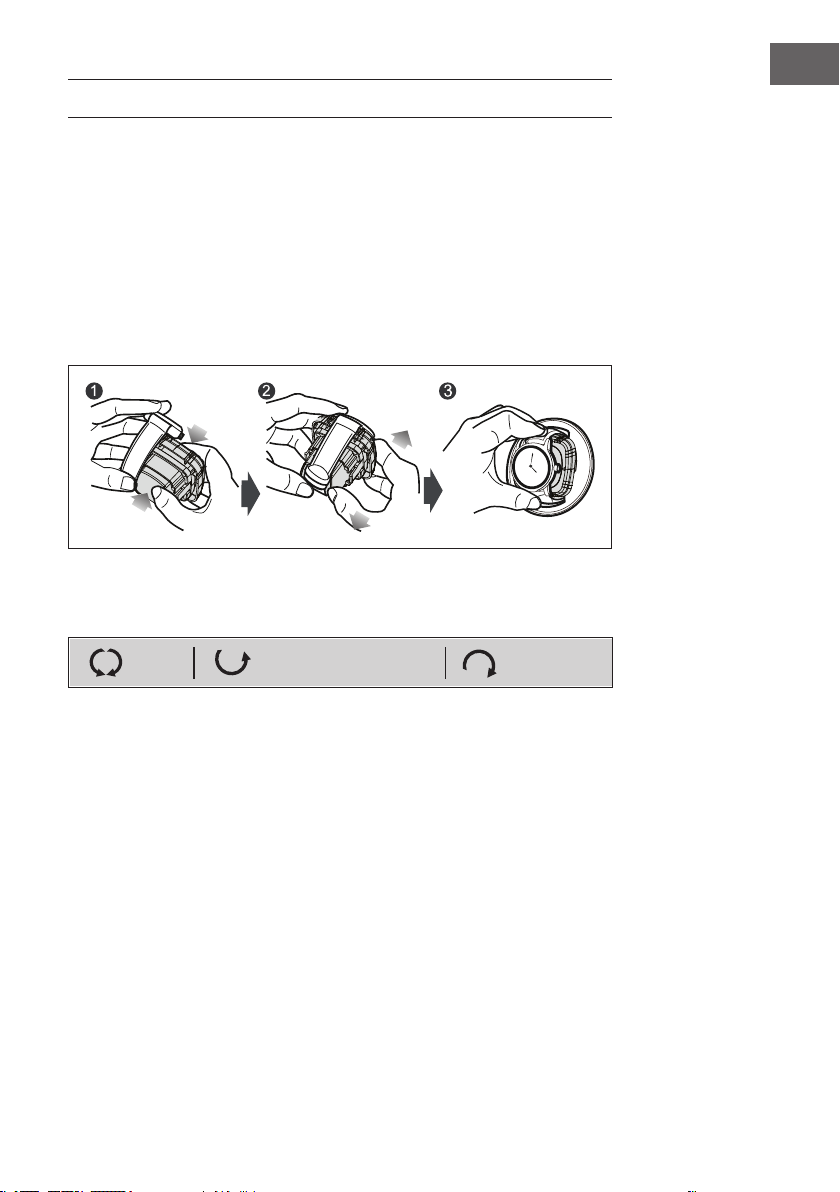
• Stecken Sie das Netzteil in den Netzteil-Anschluss und stecken Sie den Stecker in
die Steckdose.
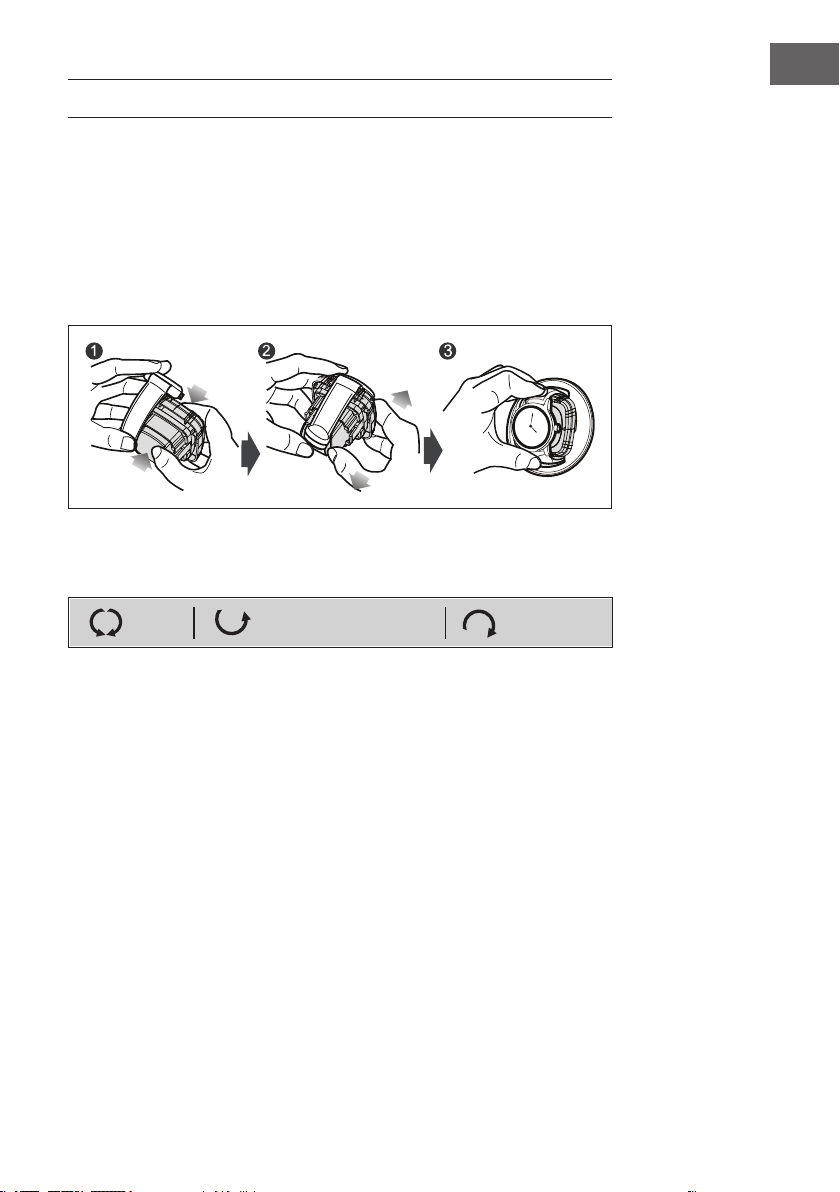
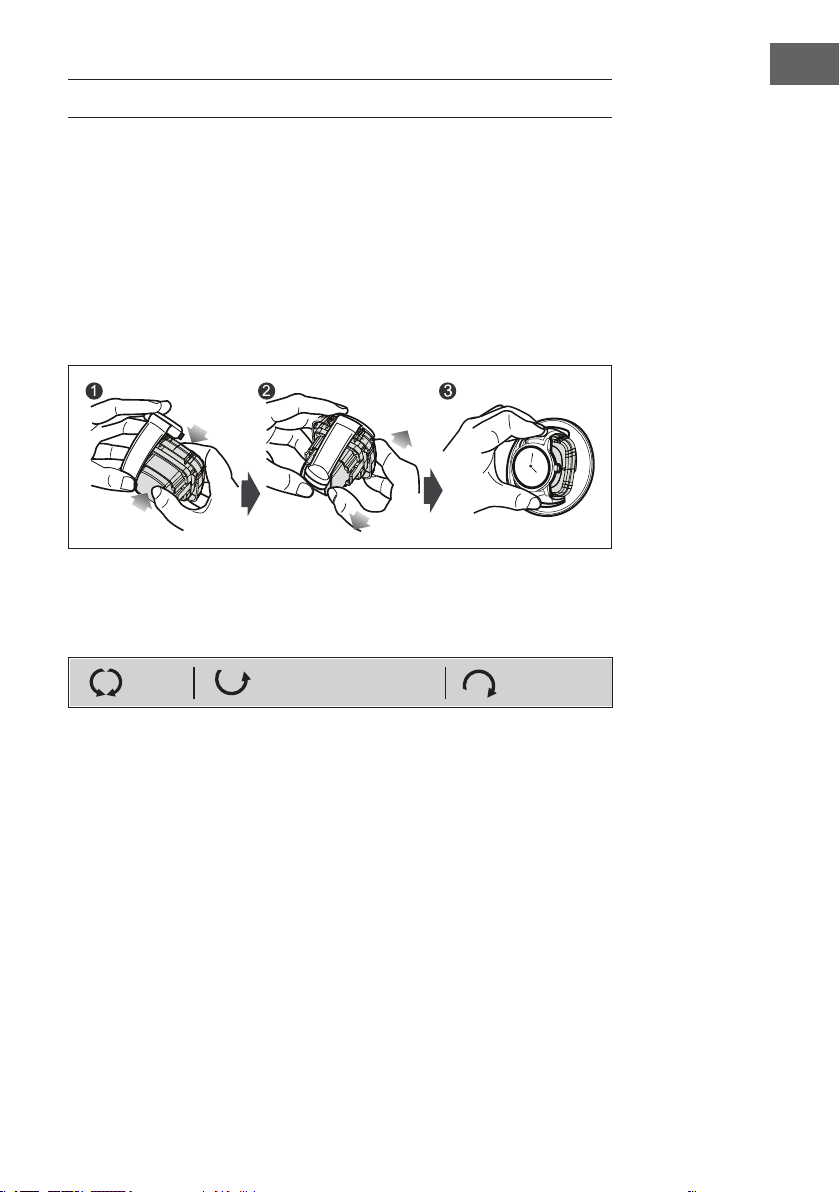
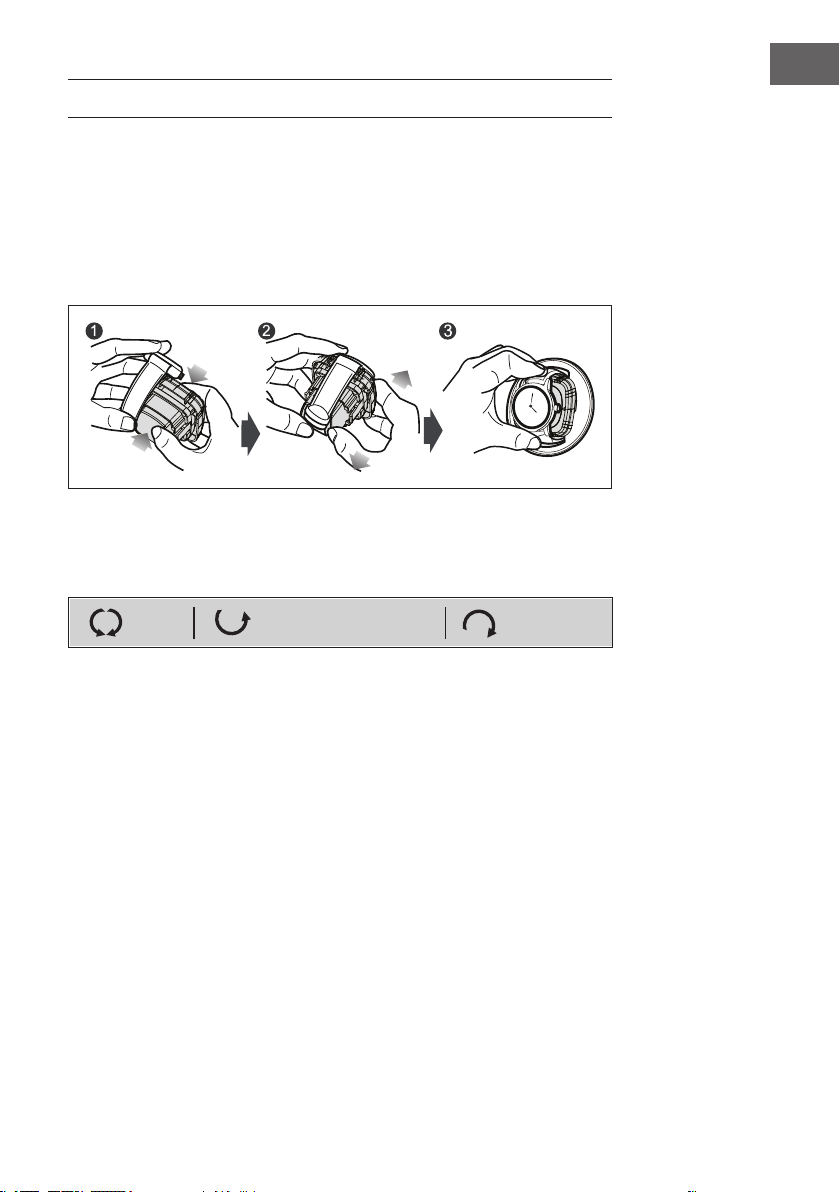
• Öffnen Sie die Frontabdeckung und halten Sie den Uhrenhalter mit Zeigenger
und Daumen an den beiden mit zwei Pfeilen markierten Seiten der Halterung fest.
Ziehen Sie den Uhrenhalter mit etwas Kraft heraus.
• Setzen Sie die Uhr auf den Halter, indem Sie die Feder auf der Rückseite des
Halters eindrücken, dann legen Sie die Uhr um den Halter und lassen die Feder los.
• Sobald die Uhr auf dem Halter sitzt, setzen Sie den Halter wieder in den
Uhrenbeweger ein. Drücken Sie, bis Sie ein Klicken hören, d.h. die Uhr sitzt sicher
im Uhrenbeweger.
• Drücken Sie die Rotationstaste, um die Aufzugsrichtung im Uhrzeigersinn
(Clockwise), gegen den Uhrzeigersinn (Counterclockwise) oder Auto (in beide
Richtungen) auszuwählen.
Counterclo ckwiseAuto Clockw ise
• Drücken Sie die TPD-Touch-Taste, um die gewünschten Umdrehungen pro Tag (TPD)
auszuwählen.

6
DE
PROGRAMME
Programm A
650
Umdrehungen
pro Tag
7 Minuten (50 Umdrehungen) Betriebsphase /
104 Minuten Ruhephase, dann Wiederholung.
Programm B
900
Umdrehungen
pro Tag
7 Minuten (50 Umdrehungen) Betriebsphase /
73 Minuten Ruhephase, dann Wiederholung.
Programm C
120 0
Umdrehungen
pro Tag
7 Minuten (50 Umdrehungen) Betriebsphase /
53Minuten Ruhephase, dann Wiederholung.
Programm D
1500
Umdrehungen
pro Tag
7 Minuten (50 Umdrehungen) Betriebsphase /
41 Minuten Ruhephase, dann Wiederholung.
HINWEISE ZUR ENTSORGUNG
Bendet sich die linke Abbildung (durchgestrichene Mülltonne
auf Rädern) auf dem Produkt, gilt die Europäische Richtlinie
2012/19/EU. Diese Produkte dürfen nicht mit dem normalen
Hausmüll entsorgt werden. Informieren Sie sich über die
örtlichen Regelungen zur getrennten Sammlung elektrischer
und elektronischer Gerätschaften. Richten Sie sich nach
den örtlichen Regelungen und entsorgen Sie Altgeräte nicht
über den Hausmüll. Durch die regelkonforme Entsorgung
der Altgeräte werden Umwelt und die Gesundheit Ihrer
Mitmenschen vor möglichen negativen Konsequenzen
geschützt. Materialrecycling hilft, den Verbrauch von
Rohstoffen zu verringern.

7
DE
Dear Customer,
Congratulations on purchasing this device. Please read the
following instructions carefully and follow them to prevent
possible damages. We assume no liability for damage caused
by disregard of the instructions and improper use. Scan the QR
code to get access to the latest user manual and more product
information.
CONTENTS
Safety Instructions8
Product Overview8
Operation9
Programs10
Hints on Disposal10
TECHNICAL DATA
Item number
10036166, 10036167, 10036168,
10036169
Power supply 220-240 V ~ 50/60 Hz
PRODUCER
Chal-Tec GmbH, Wallstraße 16, 10179 Berlin, Germany.

8
EN
SAFETY INSTRUCTIONS
• Read all instructions carefully and keep the manual in a safe place for future
reference.
• Only use the AC power adaptor supplied.
• If you do not use this product for a long time, please switch off the unit.
• Remove the adapter when the winder is not in use.
• Make sure the watch winder is switched off before attempting to pull out the watch
holder.
• Always turn off the power when inserting or removing watches.
• Do not shake the watch winder when the winder is in operation.
• Do not remove the watch when the watch winder is rotating.
PRODUCT OVERVIEW
Note: The power supply connector is located on the back of the unit.
Cover
LED light
TPD switch
Rotation switch
LED touch button
+ =
Holder extender watch holder Adjustable watch
holder
Put the watch holder extender on the watch holder for
larger size wrist watch.
Place the watch holder into the winder. Push until
you hear a “CLICK“ signifying that it is securely in
the winder.
9
EN
OPERATION
• Insert the adapter into the adapter port and plug it into the electrical outlet.
• Open the front cover, then use your index nger and thumb to hold the watch
holder from the two sides of the holder hitch marked with two arrows. With some
force, pull out the watch holder.
• Place the watch on the holder by pushing in the spring on the back of the holder,
then put your watch around the holder and let go of the spring.
• Once the watch is on the holder, place the holder back into the winder. Push until
you hear a click signifying that it is securely in the winder.
• Press the Rotation touch button to select the winding direction Clockwise,
Counterclockwise or Auto (both directions).
Counterclo ckwiseAuto Clockw ise
• Press the TPD touch button to select the desired turns per day (TPD).

10
EN
PROGRAMS
Program A
650
turns per day
Rotate 7 minutes (50 turns), rest 104 minutes
and then repeat.
Program B
900
turns per day
Rotate 7 minutes (50 turns), rest 73 minutes and
then repeat.
Program C
120 0
turns per day
Rotate 7 minutes (50 turns), rest 53 minutes and
then repeat.
Program D
1500
turns per day
Rotate 7 minutes (50 turns), rest 41 minutes and
then repeat.
HINTS ON DISPOSAL
According to the European waste regulation 2012/19/EU this
symbol on the product or on its packaging indicates that this
product may not be treated as household waste. Instead it should
be taken to the appropriate collection point for the recycling of
electrical and electronic equipment. By ensuring this product is
disposed of correctly, you will help prevent potential negative
consequences for the environment and human health, which
could otherwise be caused by inappropriate waste handling of
this product. For more detailed information about recycling of
this product, please contact your local council or your household
waste disposal service.

11
FR
Chère cliente, cher client,
Toutes nos félicitations pour l’acquisition de ce nouvel appareil.
Veuillez lire attentivement et respecter les instructions de ce mode
d’emploi an d’éviter d’éventuels dommages. Nous ne saurions
être tenus pour responsables des dommages dus au non-respect
des consignes et à la mauvaise utilisation de l’appareil. Scannez
le QR-Code pour obtenir la dernière version du mode d‘emploi
et des informations supplémentaires concernant le produit.
SOMMAIRE
Consignes de sécurité 12
Aperçu de l‘appareil 12
Utilisation 13
Programmes 14
Informations sur le recyclage 14
FICHE TECHNIQUE
Numéro d'article
10036166, 10036167, 10036168,
10036169
Alimentation 220-240 V ~ 50/60 Hz
FABRICANT
Chal-Tec GmbH, Wallstraße 16, 10179 Berlin, Allemagne
12
FR
CONSIGNES DE SÉCURITÉ
• Lisez attentivement toutes les instructions et conservez-les en lieu sûr pour référence
future.
• Utilisez uniquement l‘adaptateur secteur fourni.
• Si vous n‘utilisez pas l‘appareil pendant une longue période, éteignez-le.
• Retirez l‘adaptateur secteur lorsque vous n‘utilisez pas le remontoir de montre.
• Assurez-vous que le remontoir de la montre est éteint avant d‘essayer de retirer le
support de la montre.
• Éteignez toujours l‘appareil avant d‘insérer ou de retirer des montres.
• Ne secouez pas le remontoir de montre lorsqu‘il est en cours d‘utilisation.
• Ne retirez pas la montre pendant que le remontoir tourne.
APERÇU DE L‘APPAREIL
Remarque : La prise du bloc d‘alimentation se trouve à l‘arrière de l‘appareil.
Cover
LED light
TPD switch
Rotation switch
LED touch button
+ =
Extension du
support
Porte-montre Porte-montres
réglable
Lorsque vous utilisez des montres de grande taille, xez la
rallonge du support de la montre au support de la montre.
Insérez le support de la montre dans le remontoir
de la montre. Appuyez jusqu‘à ce que vous
entendiez un „CLIC“, c‘est-à-dire jusqu‘à ce qu‘il
soit bien en place dans le remontoir de la montre.
Éclairage LED
Couvercle
Touche rotation
Touche éclairage LED
Touche TPJ
13
FR
UTILISATION
• Branchez le bloc d‘alimentation dans sa prise et insérez la che dans la prise de
secteur.
• Ouvrez le couvercle avant et tenez le support de la montre avec votre index et
votre pouce sur les deux côtés du support marqués de deux èches. Retirez le
support de la montre en insistant un peu.
• Placez la montre sur le support en appuyant sur le ressort à l‘arrière du support,
puis placez la montre autour du support et relâchez le ressort.
• Une fois la montre sur le support, remettez le support dans le remontoir. Appuyez
jusqu‘à ce que vous entendiez un clic indiquant que la montre tient fermement dans
le remontoir.
• Appuyez sur la touche de rotation pour sélectionner le sens horaire, antihoraire ou
automatique (les deux sens).
Counterclo ckwiseAuto Clockw ise
• Appuyez sur la touche de rotation pour sélectionner le sens horaire, antihoraire ou
automatique (les deux sens).
14
FR
PROGRAMMES
Programme A
650 tours par
jour
7 minutes (50 tours) / 104 minutes de repos,
puis répétition.
Programme B
900 tours par
jour
7 minutes (50 tours) / 73 minutes de repos,
puis répétition.
Programme C
1200 tours par
jour
7 minutes (50 tours) / 53 minutes de repos,
puis répétition.
Programme D
1500 tours par
jour
7 minutes (50 tours) / 41 minutes de repos,
puis répétition.
INFORMATIONS SUR LE RECYCLAGE
Vous trouverez sur le produit l’image ci-contre (une poubelle
sur roues, barrée d‘une croix), ce qui indique que le produit
se trouve soumis à la directive européenne 2012/19/UE.
Renseignez-vous sur les dispositions en vigueur dans
votre région concernant la collecte séparée des appareils
électriques et électroniques. Respectez-les et ne jetez pas
les appareils usagés avec les ordures ménagères. La mise
en rebut correcte du produit usagé permet de préserver
l’environnement et la santé. Le recyclage des matériaux
contribue à la préservation des ressources naturelles.
15
ES
Estimado cliente,
Le felicitamos por la adquisición de este producto. Lea
atentamente las siguientes instrucciones y sígalas para evitar
posibles daños. No asumimos ninguna responsabilidad por los
daños causados por el incumplimiento de las instrucciones y el
uso inadecuado. Escanee el siguiente código QR para obtener
acceso a la última guía del usuario y más información sobre el
producto.
ÍNDICE
Instrucciones de seguridad 16
Descripción del dispositivo 16
Funcionamiento 17
Programas 18
Retirada del aparato 18
DATOS TÉCNICOS
Número de artículo
10036166, 10036167, 10036168,
10036169
Fuente de alimentación 220-240 V ~ 50/60 Hz
FABRICANTE
Chal-Tec GmbH, Wallstraße 16, 10179 Berlin, Alemania
16
ES
INSTRUCCIONES DE SEGURIDAD
• Lea atentamente todas las instrucciones y guárdelas en un lugar seguro para
futuras consultas.
• Utilice únicamente el adaptador de CA suministrado.
• Si no vas a utilizar el aparato durante mucho tiempo, apáguelo.
• Retire el adaptador de corriente cuando no utilice el cargador de relojes.
• Asegúrese de que la bobina del reloj está desconectada antes de intentar sacar el
soporte del reloj.
• Desconecte siempre la alimentación antes de introducir o extraer los relojes.
• No agite el cargador de relojes cuando esté en funcionamiento.
• No quite el reloj cuando el cargador esté girando.
DESCRIPCIÓN DEL DISPOSITIVO
Nota: El conector de la fuente de alimentación se encuentra en la parte posterior de
la unidad.
Cover
LED light
TPD switch
Rotation switch
LED touch button
+ =
Ampliación del
soporte
Soporte Soporte ajustable
del reloj
Cuando utilice relojes de pulsera de mayor tamaño, inserte
la extensión del soporte para relojes en el soporte para
relojes.
Inserte el soporte del reloj en el cargador del
reloj. Presione hasta que oiga un „CLIC“, es
decir, que está bien asentado en el cargador
del reloj.
Botón de rotación
Tecla digital del LED
Tecla TPD
Tapa
Luz LED
17
ES
FUNCIONAMIENTO
• Enchufe el adaptador de CA en el conector del adaptador e inserte el enchufe en
la toma de corriente.
• Abra la tapa frontal y sujete el soporte del reloj con el dedo índice y el pulgar en
los dos lados del soporte marcados con dos echas. Saque el soporte del reloj con
un poco de fuerza.
• Coloque el reloj en el soporte presionando el resorte de la parte posterior, luego
coloque el reloj alrededor del soporte y suelte el resorte.
• Una vez que el reloj esté en el soporte, vuelva a colocarlo en el cargador de
relojes. Presione hasta que oiga un clic, que quiere decir que el reloj está bien
asentado en el cargador.
• Pulse el botón de rotación para seleccionar la dirección de bobinado en el sentido
de las agujas del reloj, en el sentido contrario a las agujas del reloj o en el sentido
automático (ambas direcciones).
Counterclo ckwiseAuto Clockw ise
• Pulse el botón táctil TPD para seleccionar las revoluciones por día (TPD) deseadas.
18
ES
PROGRAMAS
Programa A
650
revoluciones
por día
7 minutos (50 revoluciones) fase de
funcionamiento / 104 minutos fase de
descanso, luego repetir.
Programa B
900
revoluciones
por día
7 minutos (50 revoluciones) fase de
funcionamiento / 73 minutos fase de descanso,
luego repetir.
Programa C
1200
revoluciones
por día
7 minutos (50 revoluciones) fase de
funcionamiento / 53 minutos fase de descanso,
luego repetir.
Programa D
1500
revoluciones
por día
7 minutos (50 revoluciones) fase de
funcionamiento / 41 minutos fase de descanso,
luego repetir.
RETIRADA DEL APARATO
Si el aparato lleva adherida la ilustración de la izquierda (el
contenedor de basura tachado) entonces rige la normativa
europea, directiva 2012/19/UE. Este producto no debe
arrojarse a un contenedor de basura común. Infórmese sobre
las leyes territoriales que regulan la recogida separada
de aparatos eléctricos y electrónicos. Respete las leyes
territoriales y no arroje aparatos viejos al cubo de la basura
doméstica. Una retirada de aparatos conforme a las leyes,
contribuye a proteger el medio ambiente y a las personas a
su alrededor frente a posibles consecuencias perjudiciales
para la salud. El reciclaje ayuda a reducir el consumo de
materias primas.

19
IT
Gentile cliente,
La ringraziamo per aver acquistato il dispositivo. La preghiamo
di leggere attentamente le seguenti istruzioni per l’uso e di
seguirle per evitare possibili danni. Non ci assumiamo alcuna
responsabilità per danni scaturiti da una mancata osservazione
delle avvertenze di sicurezza e da un uso improprio del
dispositivo. Scansionare il codice QR seguente, per accedere
al manuale d’uso più attuale e per ricevere informazioni sul
prodotto.
INDICE
Avvertenze di sicurezza20
Descrizione del prodotto20
Utilizzo21
Programmi22
Smaltimento22
DATI TECNICI
Numero articolo
10036166, 10036167, 10036168,
10036169
Alimentazione 220-240 V ~ 50/60 Hz
PRODUTTORE
Chal-Tec GmbH, Wallstraße 16, 10179 Berlino, Germania.

20
IT
AVVERTENZE DI SICUREZZA
• Leggere attentamente tutte le istruzioni e conservare il manuale d’uso per una futura
consultazione in un luogo sicuro.
• Utilizzare solo l’adattatore di rete incluso nella fornitura.
• Spegnere il dispositivo se non lo si usa per un periodo di tempo prolungato.
• Rimuovere l’alimentatore se non si usa il caricatore.
• Assicurarsi che il caricatore sia spento prima di provare a estrarre il supporto.
• Spegnere sempre il dispositivo prima di inserire o togliere gli orologi.
• Non scuotere il caricatore quando è in funzione.
• Non togliere l’orologio quando il caricatore gira.
DESCRIZIONE DEL PRODOTTO
Nota: la presa dell’alimentatore si trova sul retro del dispositivo.
Cover
LED light
TPD switch
Rotation switch
LED touch button
+ =
Attacco
estensore
Supporto Supporto regolabile
Inserire l’attacco estensore sul supporto quando si usano
orologi grandi.
Inserire il supporto nel caricatore e spingere
nché fa click. Ciò signica che il supporto è
ssato bene nel caricatore
Tasto di rotazione
Tasto touch a LED
Tasto TPD
Copertura
Luce a LED
21
IT
UTILIZZO
• Inserire l’alimentatore nella porta dell’adattatore e la spina nella presa.
• Aprire la copertura frontale e tenere il supporto con l’indice e il pollice da entrambi
i lati contrassegnati con due frecce. Estrarre il supporto con decisione.
• Inserire l’orologio sul supporto spingendo la molla situata sul lato posteriore.
Sistemare l’orologio attorno al supporto e lasciar andare la molla.
• Non appena l’orologio si trova sul supporto, reinserire quest’ultimo nel caricatore.
Spingere nché fa click. Ciò signica che il supporto è ssato bene nel caricatore.
• Premere il pulsante di rotazione per selezionare la direzione di carica in senso
orario (Clockwise), antiorario (Counterclockwise) oppure automatica (in entrambe
le direzioni).
Counterclo ckwiseAuto Clockw ise
• Premere il pulsante touch TPD per selezionare la quantità di giri giornalieri (TPD).

22
IT
PROGRAMMI
Programma A
650 giri al
giorno
7 minuti (50 giri) di fase operativa / 104 minuti
di fase di riposo, ripetizione.
Programma B
900 giri al
giorno
7 minuti (50 giri) di fase operativa / 73 minuti
di fase di riposo, ripetizione.
Programma C
1200 giri al
giorno
7 minuti (50 giri) di fase operativa / 53 minuti
di fase di riposo, ripetizione.
Programma D
1500 giri al
giorno
7 minuti (50 giri) di fase operativa / 41 minuti
di fase di riposo, ripetizione.
SMALTIMENTO
Se sul prodotto è presente la gura a sinistra (il cassonetto mobile
sbarrato), si applica la direttiva europea 2012/19/UE.
Questi prodotti non possono essere smaltiti con i riuti
normali. Informarsi sulle disposizioni vigenti sulla raccolta
separata di dispositivi elettrici ed elettronici. Non smaltire
i vecchi dispositivi con i riuti domestici. Grazie al corretto
smaltimento dei vecchi dispositivi si proteggono il pianeta e
la salute delle persone da possibili conseguenze negative.
Il riciclo di materiali aiuta a diminuire il consumo di materie
prime.