
www.CookWithKenyon.com
SilKEN
®
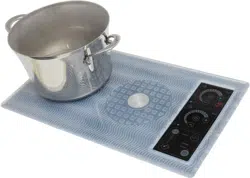
2 INDUCTION COOKTOP
OWNERS MANUAL
Part # 145089
Created: April 2, 2014
Revised: October 2, 2014

Table of Contents
Section Page
Safety Guidelines ...........................................................................................................................
Product Specications ..................................................................................................................
Installation Guide
Step # 1 - Unpacking the Cooktop ........................................................................................
Step # 2 - Checking the Electrical Supply Requirements .......................................................
Step # 3 - Countertop Preparation ........................................................................................
Step # 4 - Installing the Cooktop ...........................................................................................
Step # 5 - Electrical Connection ............................................................................................
Step # 6 - Final Preparations Prior to Use ...........................................................................
Operation of SilKEN
®
Induction Cooktop
Induction Cooking .................................................................................................................
Cookware ..............................................................................................................................
BenetsofInductionCooking...............................................................................................
InductionCooktopControlSafetyLockFeature..................................................................
Power Up the Cooktop ........................................................................................................
HotSurfaceIndicator..........................................................................................................
Induction Cooktop Cooking Options- Heating Level or Cooking Temperature ....................
Heat Level Cooking Mode ...................................................................................................
Temperature Cooking Mode ................................................................................................
Changing Temperature Units ...............................................................................................
Automatic Power Sharing ....................................................................................................
Cooktop Timer Options- Kitchen Timer and Cooking Timer ................................................
Cleaning ...............................................................................................................................
Maintenance ........................................................................................................................
Error Code Readout ..............................................................................................................
Troubleshooting Index .........................................................................................................
Warranty Information ..................................................................................................................
3
7
8
9
9
11
12
12
13
13
13
14
14
14
15
15
16
16
16
17
18
18
19
19
20
Kenyon International, Inc.
8 Heritage Park Road
P.O. Box 925
Clinton, CT 06413 USA
Phone: 860-664-4906
www.CookWithKenyon.com
SAFETY GUIDELINES
Please read these instructions in their entirety before
installation and use. The following information applies to all
KENYON Electric Cooktops.
This cooktop, like all appliances, has the potential to create safety problems
through careless and improper use. Please observe all of the following safety
precautions.
Proper Installation.
Besureyourapplianceisproperlyinstalledandgroundedbyaqualiedtechnician.
Never use your appliance for warming or heating the room.
CAUTION
Do not leave children alone.
Childrenshouldneverbeleftaloneorunattendedintheareawheretheapplianceisinuse.They
shouldneverbeallowedtositorstandonanypartoftheappliance.Donotletchildrenplaywith
cooktop.Donotstoreitemsofinteresttoachildincabinetsabovethecooktop,children
climbing on the cooktop to reach such items could be seriously injured.
Wear proper clothing/apparel.
Loosettingorhanginggarmentsshouldneverbewornwhileusingtheappliance.Fabricor
otherammablematerialsmaycontacthotsurfacesduringoperationandmayigniteandresultin
personal injury.
User Servicing
Donotrepairorreplaceanypartoftheappliance.Ifserviceeverbecomesnecessary,this
appliance should be serviced by AUTHORIZED PERSONNEL ONLY or call KENYON Customer
Care at (860)664-4906.
Storage in or on Appliance
Flammablematerialsshouldnotbestoredabove,underornearsurfacecookingunits.
Keep ammable materials away from cooktop.
Do not store plastic material (such as plastic utensils) in storage areas beneath cooktop.
Plastic items with low melting temperatures should not be stored under/over or near the cooktop.
Do not use water on grease res.
Smotherreorameorusedrychemicalorfoam-typeextinguisher.
3

Use only dry potholders.
Moistordamppotholdersonhotsurfacesmayresultinburnsfromsteam.Donotletpotholders
touchtheinductionelementsontheappliance.Donotuseatowelorotherbulkyclothinplaceof
a potholder.
Do not cook on broken cooktop.
Ifcooktopshouldbreak,cleaningsolutionsandspilloversmaypenetratethebrokencooktopand
createariskofelectricshock.ContactanauthorizedservicecenterorKENYONCustomerCare
immediately at (860) 664-4906.
Clean cooktop with caution.
Donotcleanthecooktopwhileitisstillhot.Ifawetspongeorclothisusedtowipespillsona
hotcookingsurface,becarefultoavoidsteamburns.Somecleanersproducenoxiousfumesif
appliedtoahotsurface.Readthecleanerlabelfordetailspriortousing.
Use proper pan size.
Thisapplianceisequippedwithoneormoresurfaceunitsofdifferentsize.Selectcookware
havingatbottomslargeenoughtoactivatetheinductionunit.Properrelationshipofcookware
toburnersizewillalsoimproveefciency.
Never Leave Surface Units Unattended at High Heat Settings.
Boilover may cause smoking and greasy spillovers may ignite.
Utensil Handles Should be Turned Inward and Not Extend Over Adjacent Surface Units.
Toreducetheriskofburns,ignitionofammablematerials,andspillageduetounintentional
contactwiththeutensil,thehandleofautensilshouldbepositionedsothatitisturnedinward,
anddoesnotextendoveradjacentsurfaceunits.
Never heat an empty pan.
It may damage the cooktop or cookware and overheat the unit.
Do not use aluminum foil on the surface of the cooktop.
Cookware should always be dry.
Donotheatcookwarewithexcesswaterdropletsontheoutsideofthepan.Thedropletsmay
begin to boil and splatter.
DO NOT TOUCH SURFACE UNITS OR AREAS NEAR UNITS.
Surfaceunitsmaybehoteventhoughtheyaredarkincolor.Areasnearsurfacemaybecome
hotenoughtocauseburns.Duringandafteruse,donottouch,orletclothingorotherammable
materialscontactsurfaceunitsorareasnearunitsuntiltheyhavehadsufcienttimetocool.
Amongtheseareasaretheinductionelementsandsurroundingglasssurface.
DO NOT DISCARD THESE INSTRUCTIONS, KEEP THEM
WITH THE KENYON SilKEN
®
INDUCTION COOKTOP FOR
FUTURE REFERENCE.
4
Installation adéquate.
Assurez-vous que votre appareil soit correctement installé et mis à la terre par un technicien qualié.
N’utilisez jamais cet appareil pour le chauffage domestique.
ATTENTION
Ne pas laisser sans surveillance en présence d’enfants.
Les jeunes enfants ne devraient jamais être laissés sans surveillance dans la pièce où cet appareil est utilisé. Ils ne
devraient jamais être autorisés à s’asseoir ou monter sur toute partie de l’appareil. Ne laissez pas les enfants jouer
avec la table de cuisson. Ne gardez pas d’articles pouvant intéresser les enfants dans les éléments de rangement
au-dessus de la table de cuisson. Les enfants qui monteraient sur la table de cuisson pour atteindre de tels objets
pourraient se blesser gravement.
Portez des vêtements appropriés.
Des vêtements amples et des accessoires suspendus ne devraient jamais être portés en cuisinant. Les tissus ou au-
tres matériaux inammables pourraient entrer en contact avec les surfaces chaudes et s’enammer, pouvant causer
des blessures.
Réparation
Ne remplacez ni ne réparez aucune pièce de l’appareil. Si une réparation s’avérait nécessaire,assurez-vous qu’elle
soit effectuée par du PERSONNEL AUTORISÉ SEULEMENT ou contactez le service d’assistance à la clientèle
KENYON au 860-664-4906.
Rangement à l’intérieur ou au-dessus de l’appareil
Ne rangez jamais de matériaux inammables au-dessus, en-dessous ou près des unités de cuisson.
Gardez toute matière inammable loin de la table de cuisson.
Ne rangez pas d’objets en plastique tels des ustensiles en plastique sous la table de cuisson.
Les articles en plastique qui fondent à basse température ne devraient pas être rangés en-dessous ni au-dessus de
la table de cuisson.
Ne jamais arroser d’eau un feu de graisses.
Étouffez le feu ou les ammes ou utilisez un extincteur à poudre chimique sèche ou à mousse.
N’utilisez que des poignées isolantes sèches.
La vapeur produite par des poignées mouillées ou humides pourrait causer des brûlures. Ne laissez pas les poi-
gnées entrer en contact avec les surfaces chauffantes de l’appareil. N’utilisez pas de serviette ou de linge épais en
guise de poignées isolantes.
Ne cuisinez jamais sur une table de cuisson endommagée.
Les tables de cuisson brisées ou ssurées pourraient laisser pénétrer les déversements ou solutions nettoyantes
créant un danger de court-circuit ou d’électrocution. Communiquez immédiatement avec un centre de service auto-
risé ou avec le Service d’assistance à la clientèle de KENYON au 860-664-4906.
Faites attention lors du nettoyage de la table de cuisson.
Ne nettoyez pas la table de cuisson encore chaude. Si vous utilisez une éponge ou un linge humide pour essuyer les
déversements sur la surface de cuisson chaude, faites attention aux brûlures de vapeur. Certains produits nettoyants
produisent des émanations nocives lorsqu’ils sont appliqués sur une surface chaude. Lisez l’étiquette du produit net-
toyant avant de l’utiliser.
CONSIGNES DE SÉCURITÉ
Veuillez lire la totalité de ces instructions avant d’installer ou d’utiliser cet appareil. Les informations
suivantes s’appliquent à toutes les tables de cuisson électriques KENYON.
5

Utilisez une poêle de format approprié.
Cette table de cuisson comprend un ou plusieurs éléments chauffants de diamètres différents. Choisissez des
ustensiles à fond plat de diamètre sufsant pour recouvrir toute la surface de l’élément chauffant. L’utilisation
d’ustensiles correspondant au diamètre de l’élément augmentera le rendement de l’appareil.
Ne laissez jamais sans supervision la table de cuisson réglée à chaleur élevée.
Les débordements dégagent des fumées et les substances grasses peuvent s’enammer.
Les poignées des ustensiles de cuisine devraient être tournées vers l’intérieur sans se trouver au-dessus
des surfaces chauffantes adjacentes.
Pour réduire le danger de brûlures, d’allumage de matières inammables et de déversements dusà un contact acci-
dentel avec l’ustensile, les poignées des ustensiles de cuisine devraient être tournées vers l’intérieur sans se trouver
au-dessus des surfaces chauffantes adjacentes.
Ne faites jamais chauffer une poêle vide.
Cela pourrait endommager l’ustensile ou la table de cuisson et faire surchauffer l’unité.
N’utilisez pas de papier aluminium sur la surface de la table de cuisson.
N’utilisez que des ustensiles de cuisine secs.
Ne chauffez pas d’ustensiles de cuisine avec des gouttes d’eau sur l’extérieur de la poêle. Les gouttelettes pour-
raient devenir chaudes et éclabousser.
NE TOUCHEZ PAS L’UNITÉ DE CUISSON NI LA SURFACE ENVIRONNANTE.
Les surfaces de cuisson peuvent être chaudes même si elles sont de couleur sombre. Les surfaces environnantes
peuvent être assez chaudes pour causer des brûlures. Pendant et après l’utilisation, ne touchez pas et ne laissez
entrer en contact aucun vêtement ou matériau inammable avec l’unité de cuisson ou sa surface environnante avant
qu’elles aient refroidi. Les éléments d’induction et la surface en vitre font partie de ces surfaces environnantes.
NE JETEZ PAS CE MANUEL, CONSERVEZ-LE PRÈS DE VOTRE TABLE DE CUISSON
KENYON SilKEN
®
POUR RÉFÉRENCE FUTURE.
6
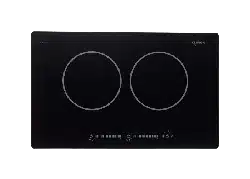
SilKEN
®
Induction Series Cooktop
PRODUCT SPECIFICATIONS
B81321 - 120V AC - two 6.5” (165mm) @ 1300 watts, maximum load 1800 watts combined
B81331 - 240V AC - two 6.5” (165mm) @ 1300 watts, maximum load 1800 watts combined
B81325 - 120V AC - two 6.5” (165mm) @ 1300 watts, maximum load 1800 watts combined
B81335 - 240V AC - two 6.5” (165mm) @ 1300 watts, maximum load 1800 watts combined
Overall dimensions: 21” x 12” x 3.10”
533.4mm x 304.8mm x 78.74mm
Cutout dimensions: 20” x 10.75” with 1/4” radius
508mm x 273.05mm with 6.4mm radius
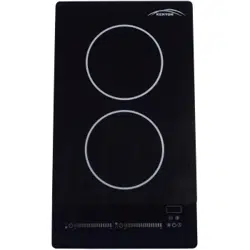
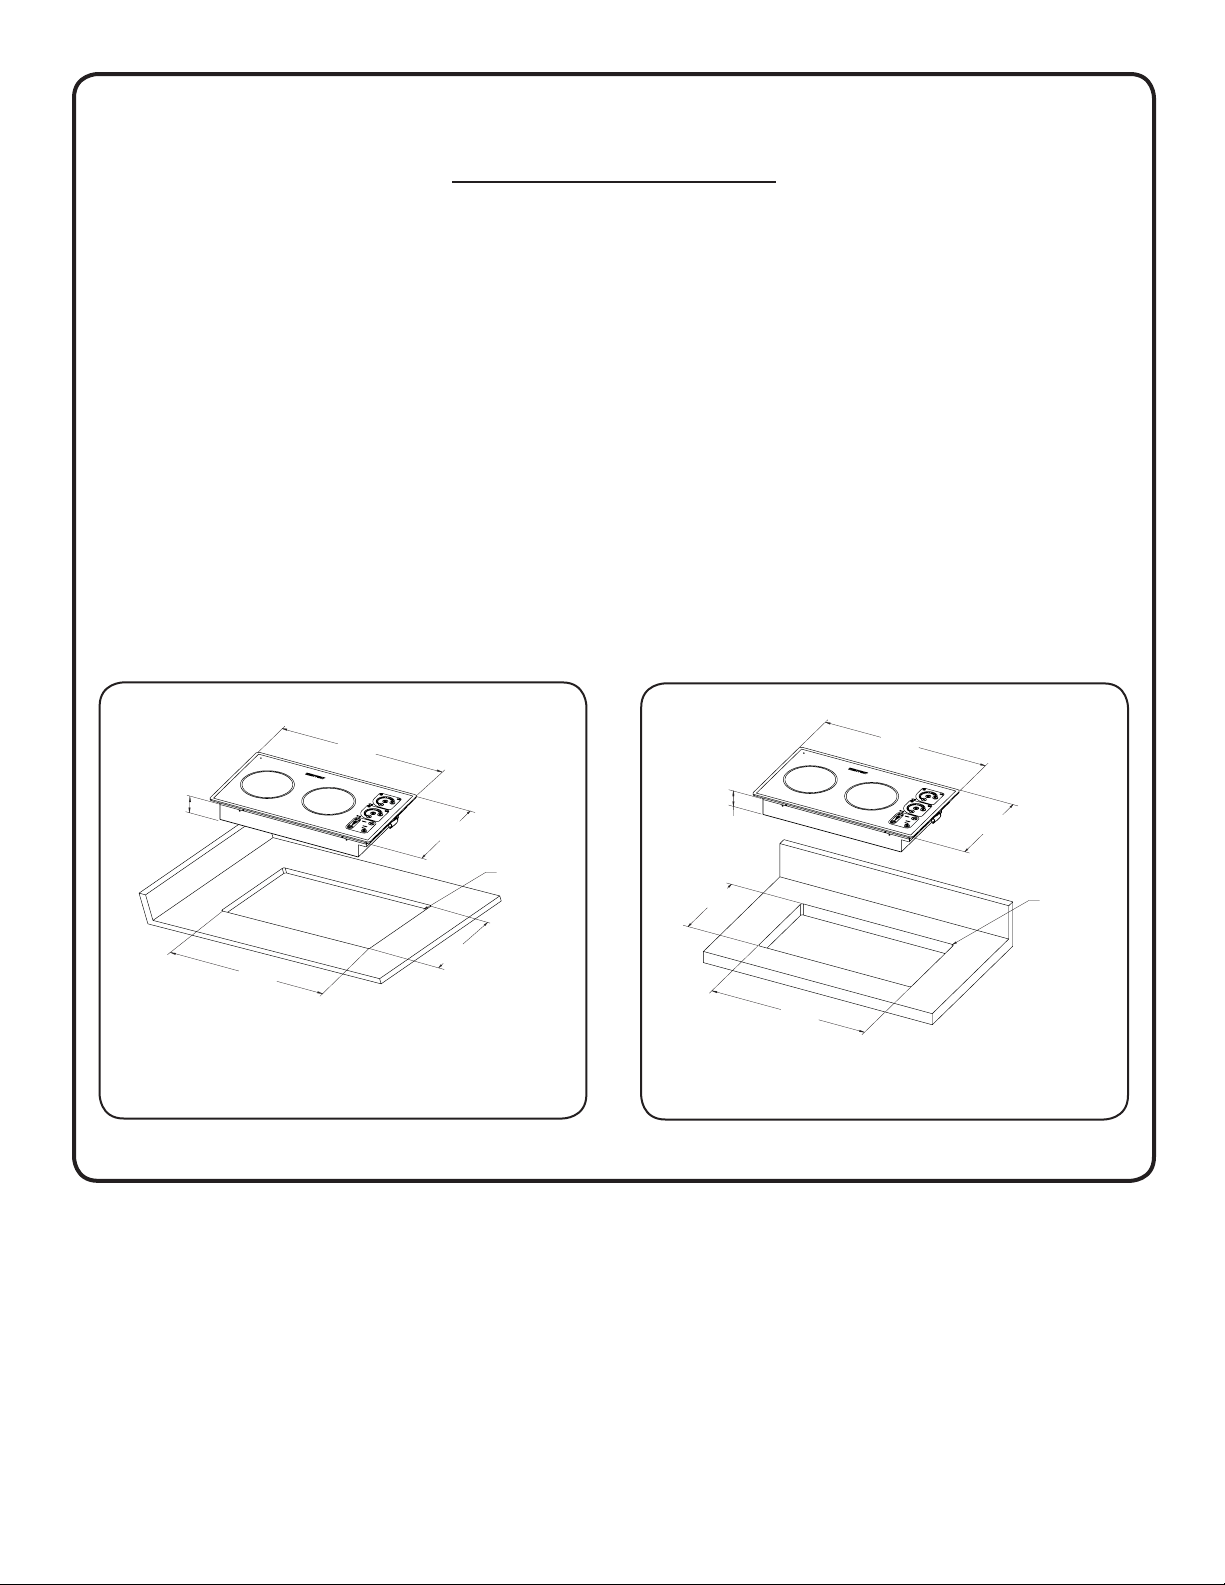
Portrait Models B81321 & B81331
20.00in
[508mm]
10.75in
[273mm]
12.00in
[305mm]
21.00in
[533mm]
ROUNDED CORNERS
4 PLACES
R.25in
[6mm]
2.94in
[75mm]
1
2
3
4
5
6
7
8
8
7
6
5
4
3
2
1
Landscape Models B81325 & B81335
7
20.00in
[508mm]
10.75in
[273mm]
12.00in
[305mm]
21.00in
[533mm]
ROUNDED CORNERS
4 PLACES
R.25in
[6mm]
2.94in
[75mm]
1
2
3
4
5
6
7
8
8
7
6
5
4
3
2
1
8
INSTALLATION GUIDE
Important: Do not remove the clear plastic covering lm on the
ceramic glass until cooktop is ready to be used.
Important : Ne retirez pas la pellicule plastique transparente de la surface vitrocéramique
avant que la table de cuisson soit prête à être utilisée
!
Important: Save this document for review by local inspector.
Important : Conservez ce document aux ns d'examen par l'inspecteur local.
Important: This appliance must be properly installed and grounded
by a qualied technician.
Important : Cet appareil doit être installé correctement et mis à la terre par un technicien qualié.
!
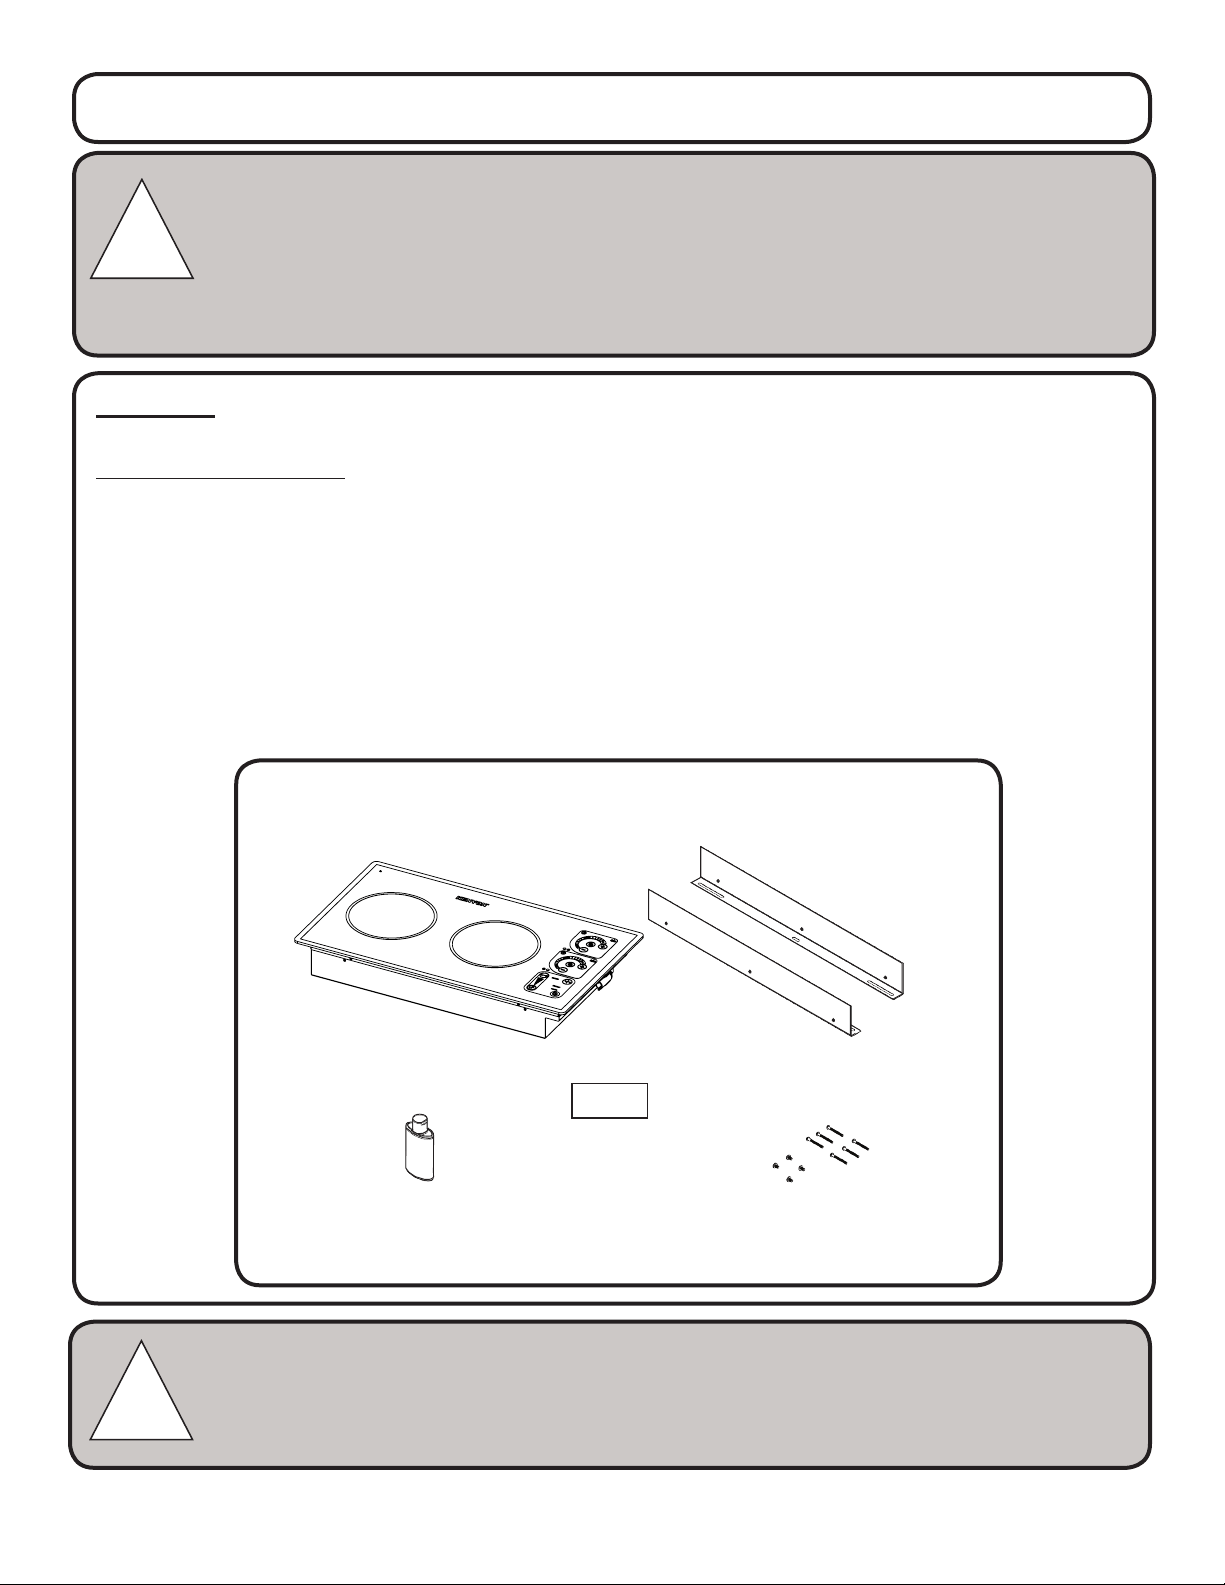
STEP # 1
Unpacking the Cooktop
Carefullyunpackthecooktopfromitsshippingcontainer.Ifpossible,retaintheoriginalshipping
cartonandprotectivepackagingintheeventtheuniteverhastobereturnedforservice.
Verifyandidentifythepackagecontents.Thefollowingitemsshouldbeincludedinthecarton.If
anycomponentsaremissingordamaged,callKENYONimmediately.
SilKEN
®
2 Induction Cooktop • (2) Mounting brackets
(1) Package of mounting screws • (1) Ceramic cooktop cleaner • (1) Magnet
SilKEN
®
2 Induction Cooktop
Mounting Brackets
Cerama Bryte
Ceramic Cooktop Cleaner
Mounting Screws Package
1
2
3
4
5
6
7
8
8
7
6
5
4
3
2
1
Magnet
9
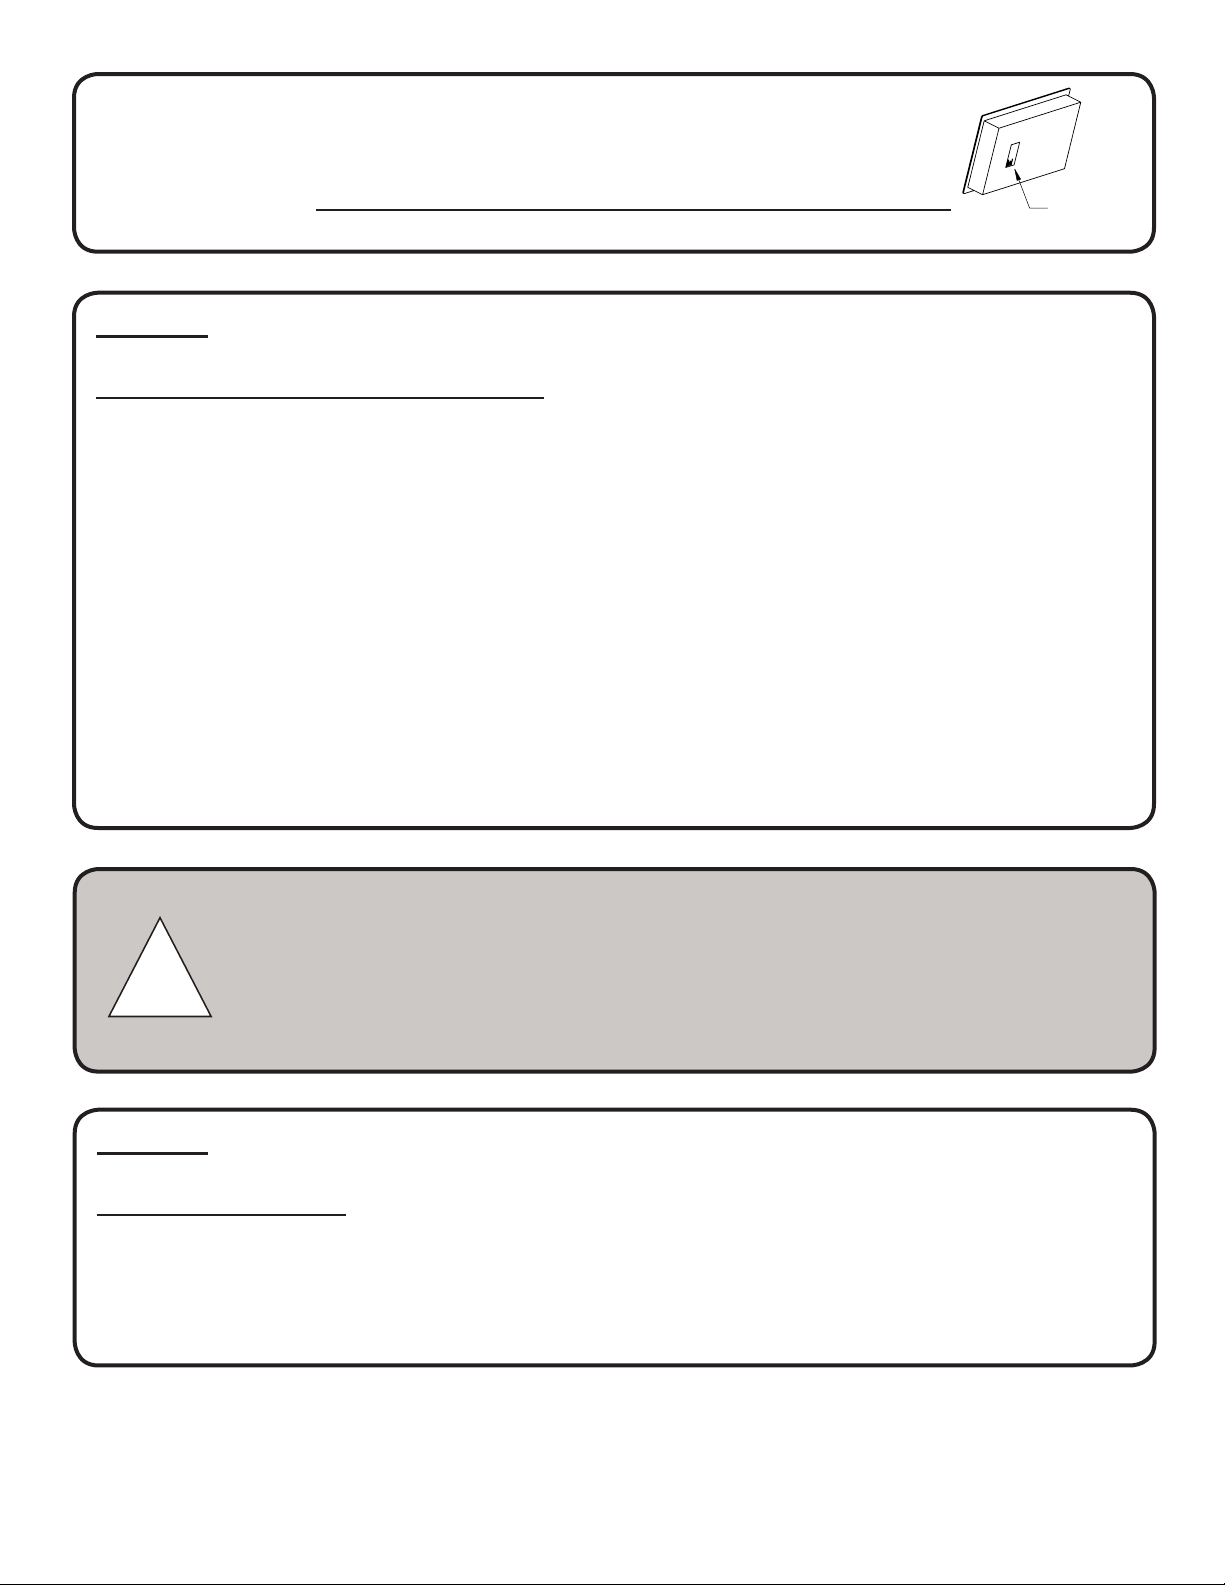
For future reference, please record the serial number of your
cooktop here:
STEP #2
Check the Electrical Supply Requirements
This product must be installed in accordance with national, state and local electric codes. The
followingtableprovidesthecorrectvoltage,amperageandfrequencythatmustbesuppliedtothe
cooktop.
Thesupplymustbefromanindividualgroundedcircuitthatisprotectedbyacircuitbreakerand
ratedperthespecicationsforthevariousmodelsasshowninthetableabove.
Max Connected Required Power Minimum
Kenyon Part # Model # Load Supply Input Wire Size
B81321 IND2BTL 1800Watts 120VAC/20A/50/60Hz #14AWG
B81331 IND2BTL 1800Watts 240VAC/10A/50/60Hz #14AWG
B81325 IND2BTL 1800Watts 120VAC/20A/50/60Hz #14AWG
B81335 IND2BTL 1800Watts 240VAC/10A/50/60Hz #14AWG
STEP #3
Countertop Preparation
Please read this section prior to making cutout for cooktop.
Itisimportanttoplanaheadforinstallationofthecooktop,keepingthefollowingdimensionsin
mind(pleaserefertoFigureA).
Warning: If the electric power supply does not meet the product
specications, consult with a licensed electrician before proceeding
with installation.
Avertissement : Si l’alimentation électrique ne répond pas aux exigences des spécications
techniques du produit, consultez un électricien agréé avant de procéder à l’installation.
!
Name Plate
Label Location

10
A-13inchesmaximumdepthofoverheadcabinets
B-36inchesisminimumheightofcountertopaboveoor
C-Theminimumatcountertopsurfacethatthecooktopwillrest
upon must be equal to or greater than the overall cooktop
dimensions(refertothefollowingpageforoverallcooktop
dimensions).
D-30inchesminimumclearancebetweenthetopofthecooking
surfaceandthebottomofanunprotectedwoodormetalcabinetor
24inchminimumclearancewhenthebottomofthewoodormetal
cabinetisprotectedbynotlessthan1/4-inch-thickameretardant
millboardcoveredwithnotlessthanNo.28MSGsheetsteel,
0.015-inch-think stainless steel, 0.024-inch-thick aluminum or
0.020-inch-thick-copper.
E-1-inchminimumfrombacksplashofcountertoptoedgeofglass
(refertothefollowingpageforoverallcooktopdimensions).
FOR INSTALLATIONS IN CANADA: “Do Not Install Closer Than 1/2 Inch
(12mm)FromAnyAdjacentSurface”,andNE PAS INSTALLER A’MDINS DE 12MM
DETOUTE SURFACE ADJACENTE.
Warning: To eliminate the risk of burns by reaching over heated
surface units, cabinet storage space located above surface units
should be avoided. If cabinet storage is to be provided, the risk can
be reduced by installing a range hood that projects horizontally a
minimum of 5” beyond the bottom of the cabinets.
Avertissement : Pour éliminer les risques de brûlures lorsque quelqu'un tente d'accéder à
l'espace au-dessus de la surface de cuisson, évitez d'y installer toute armoire de rangement.
Si une armoire de rangement y est installée, les risques peuvent être réduits en installant une
hotte qui dépasse horizontalement d'au moins 10 cm (5 po) la partie inférieure des armoires.
!
Beforemakingthecountertopcutout,checkforclearance.Checktoseeifthecooktopwillclear
thefrontandsidewallsofthebasecabinet.Itisalsoimportanttoprovideenoughventilation.
Fig. A
Fig. B
Adequateventilationofthespacebelowthe
countertop must be provided to ensure
properoperationoftheinductioncooktop.
Theunitemploysaninternalfancooling
system that requires adequate air exchange
toenableittorunefciently.Heat
transferredfromthebottomoftheunit
during operation will overheat an improperly
ventilated area.
2 INCH (51mm) MINIMUM
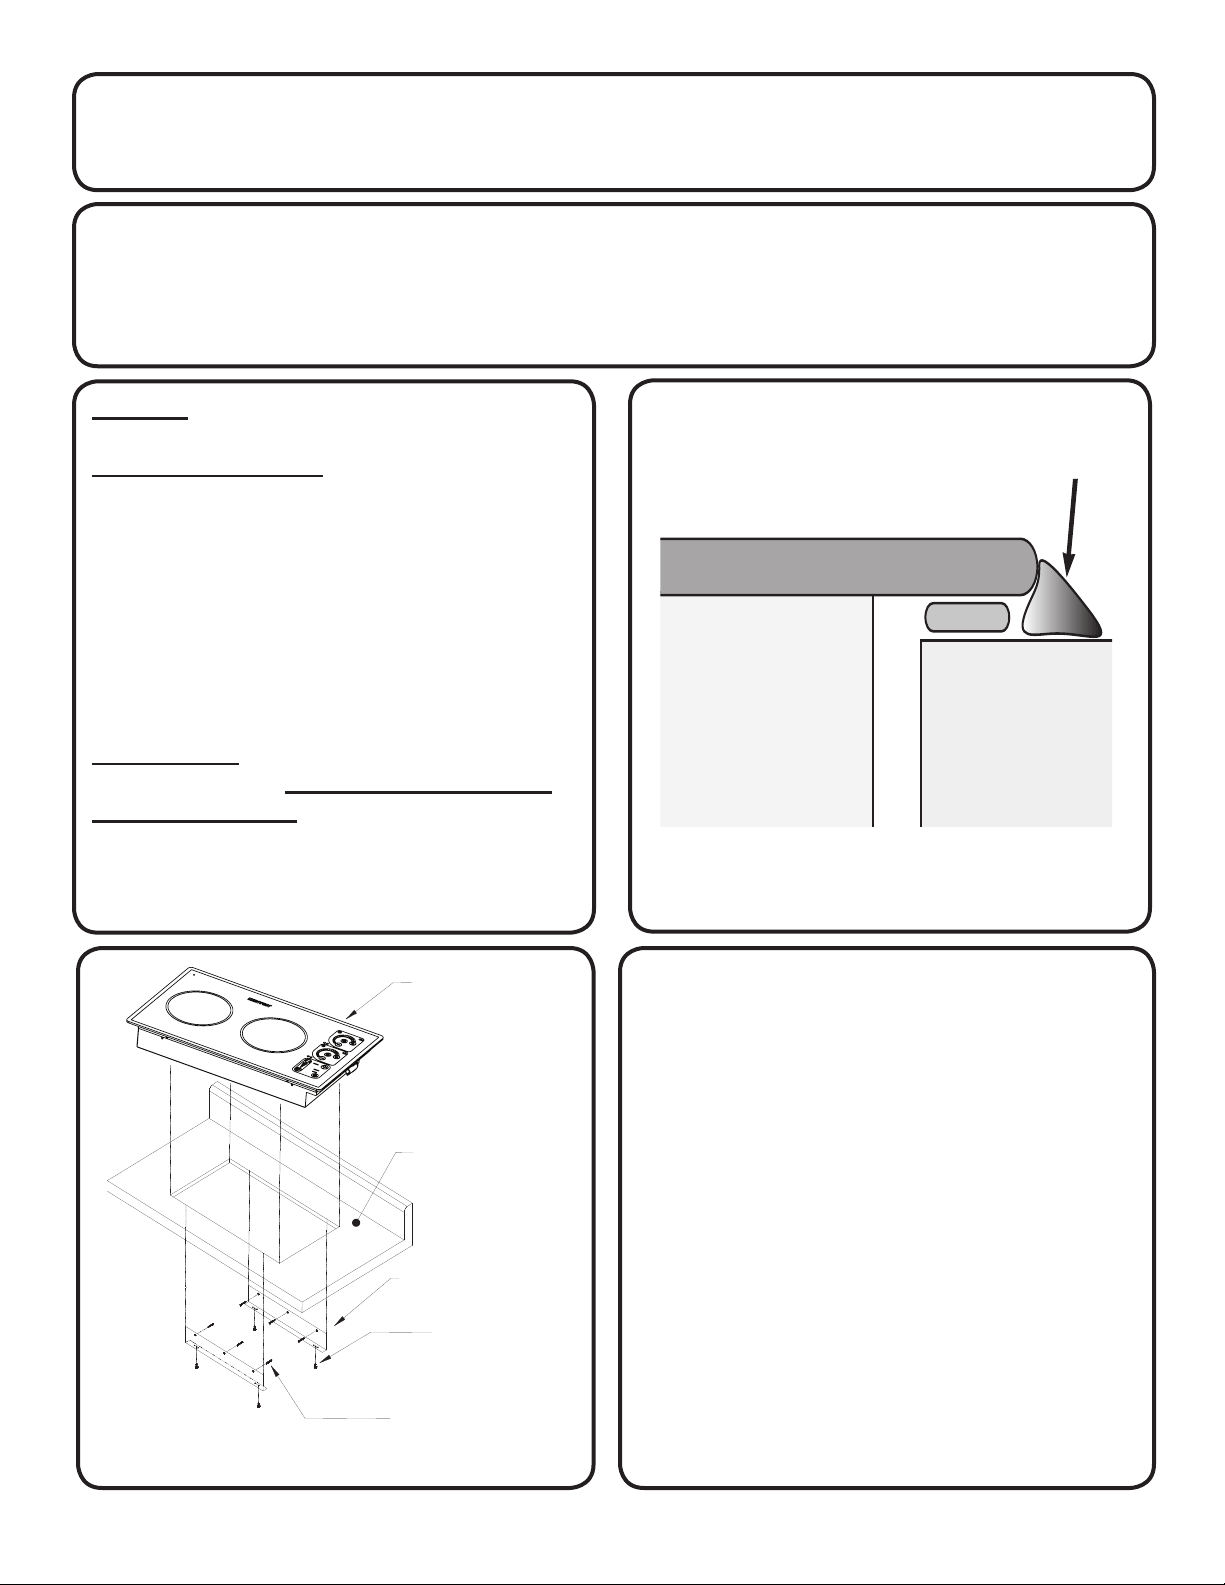
Allowa2”minimumclearancebetweenthebottomofthemetalpanofthecooktopandany
combustiblesurfacelocatedbelow,ie:theupperedgeofadrawerinstalledbelowthecooktop
(seeFig.B).Failuretoprovideproperclearanceandventilationmayresultinarehazard.
11
NOTE:
When making countertop cutout, radiusthecornerofthecutout(1/4”radiusistypical).Thiswill
preventcrackingofthecountertop.Followthecountertopmanufacturer’sinstructionsregarding
theminimumcornerradiusandreinforcementofcorners.
STEP #4
Installing the Cooktop
The cooktop is supplied with two metal
mounting brackets. These brackets are
designedtoholdthecooktoprmlyinplace.
Thecooktopdoesnothaveametalframe
and should be sealed to the countertop. Use
a soft bedding compound that will
prevent damage if later removal for
service is necessary. We recommend a
nonadhesive type of sealant, such as
plumber’s putty, maximum compressed
thickness of 1/16”.
silicone to seal the
glass edge if desired
countertop
glass panel
putty
SilKEN® 2 COOKTOP
# 8 X 1/4" SCREW
# 6 X 1 1/4" S/S SCREW
MOUNTING BRACKET
COUNTER SURFACE
Fig. C
Attach the two mounting brackets as shown
(see Fig. C)totheinsideverticalsurfaceofthe
cutout. The brackets are to be mounted on
opposing sides. Center the bracket in the
opening, ush with the countertop and
securewith#6self-tappingscrewsthatare
provided. Position the cooktop in the cutout
openingandpressrmlyonallsidestosealthe
glass into the bedding compound. Secure the
cooktoptothebracketsfromunderneathwith
the small sheet metal screws that are supplied.
BE CAREFUL NOT TO
OVERTIGHTEN THE SCREWS.
12
STEP #5
Electrical Connection
Beforeproceedingfurther,verifythatthepowersupplyisdisconnected.Verifythatthe
appropriateelectricalsupplyrequirementshavebeenmet.Pleaserefertothetableonpage7
forappropriateelectricalrequirements.Thecooktopissuppliedwitha55-inchlong
conduitforaconnectiontoanaccessiblejunctionbox.The240Vconduitconsistsofthree
insulated wires. There are two insulated hot lead conductors (red and black) and one insulated
groundconductor(green).The120Vconduitconsistsofthreeinsulatedwires.Thereisthe
hot lead conductor (black), the neutral conductor (white) and one insulated ground conductor
(green).
Attach conductor wires to electrical service in accordance with national, state and local
electric codes.
Warning - Grounding
The entire appliance must be grounded at all times when the
electrical power supply is on. Do not ground the appliance with the
neutral house supply wire (white). A separate ground must be used.
Avertissement – Mise à la terre L'appareil doit être mis à la terre en permanence lorsque
l'alimentation électrique est en marche. N'utilisez pas le l de neutre (blanc) de l’installation
résidentielle pour mettre l'appareil à la terre. Un l de mise à la terre séparé doit être utilisé.
!
STEP #6
Final Preparations Prior to Use
Removetheplasticlmfromthecooktop.Cleanthecooktopbeforeyouuseitforthersttime.
A thorough cleaning with a recommended cooktop cleaner (Cerama Bryte Ceramic Cooktop
Cleaner)willprovideaclean,shinycoatingonthecooktopsurface.
Thenextsectionofthemanualcoverscooktopuse,maintenanceandserviceinformation.
Please keep these instructions with the
KENYON cooktop for future reference.
13
OPERATION
READ SAFETY INSTRUCTIONS BEFORE OPERATING YOUR APPLIANCE
ThecookingsurfaceareasofyourSilKEN
®
2inductioncooktopareidentiedbypermanent
patterns in the cooktop. The appliance is easy to maintain and easy to clean. Keeping the
cooktopintopperformancecanbeachievedbyfollowingthesimpleguidelinesforuseand
cleaning below:
INDUCTION COOKING
In induction cooking, when a cast iron pan, or any pan that has steel in it, is placed above the
inductionzonethegeneratorundertheglassproducesamagneticeldthatinstantlygenerates
heat in the steel. Induction cooking will not work with aluminum, copper or glass pots.
COOKWARE
Inductiononlyworkswithcookwaremadeofferrousmetals-metalstowhichmagnetswillstick
such as cast iron and magnetic stainless steel, and will not work with aluminum or other metals.
TotestyourcookwareforinductioncookingsimplyplaceyourKenyonmagnetonthebottomof
thepotorpanandseeifitsticks.Ifthemagnetdoesnotsticktoyourcookwareitwillnotwork.
Usecookwarethatwillttheburnersizeandhasaatbottom.Byusingcookwarewiththe
correctdiameter,youshouldachievemaximumheatingefciencywiththeshortestpossible
boiling times.
Becertainthatboththecooktoppanelandthebottomofyourpotsandpansarecleananddry
beforeuse.Bydoingso,youwillhelppreventscratchesandstains.
BENEFITS OF INDUCTION COOKING
Oncetheappropriatecookwareisplacedonthesurfaceandturnedon,heatisimmediately
generated. The SilKEN
®
2inductioncooktopwillheatupto25%to50%fasteranddistributeheat
moreevenlythanradiantstovetops,andoffersquick,netemperatureadjustment.
Bywayofbackground,inductioncookingisthemostenergyefcientmethodofcooking.The
magneticenergyisdirectlysuppliedtothecookwareso85%to90%oftheelectricalpower
applied to the cooktop is used to generate heat in the cooking vessel.
The SilKEN
®
2inductioncooktopprovidesspillretentionbutifaspilloroverowdoesoccurthe
surfaceofthecooktopremainsrelativelycoolandtheexcessliquidshouldnotstick.Howeverif
youcookwithoutthesiliconematwaituntilthesurfacehascooledbeforeyouattempttoclean
theglasssurface.
14
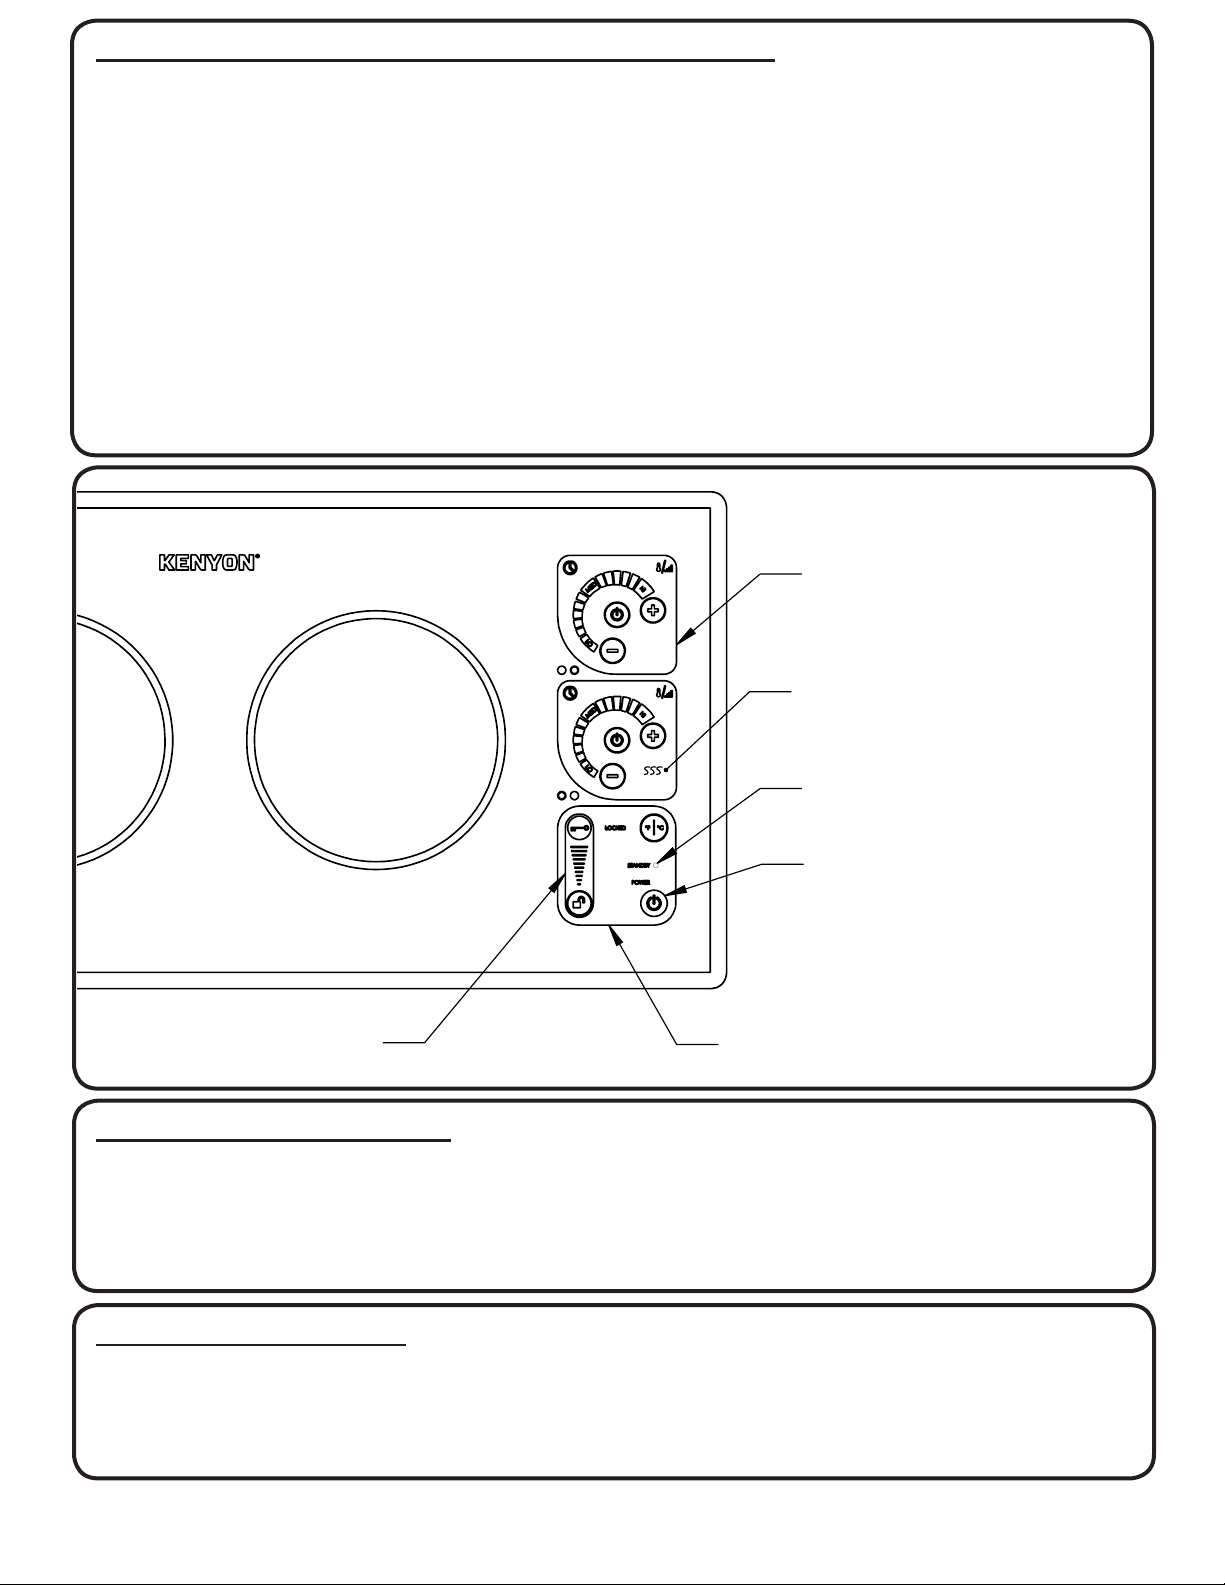
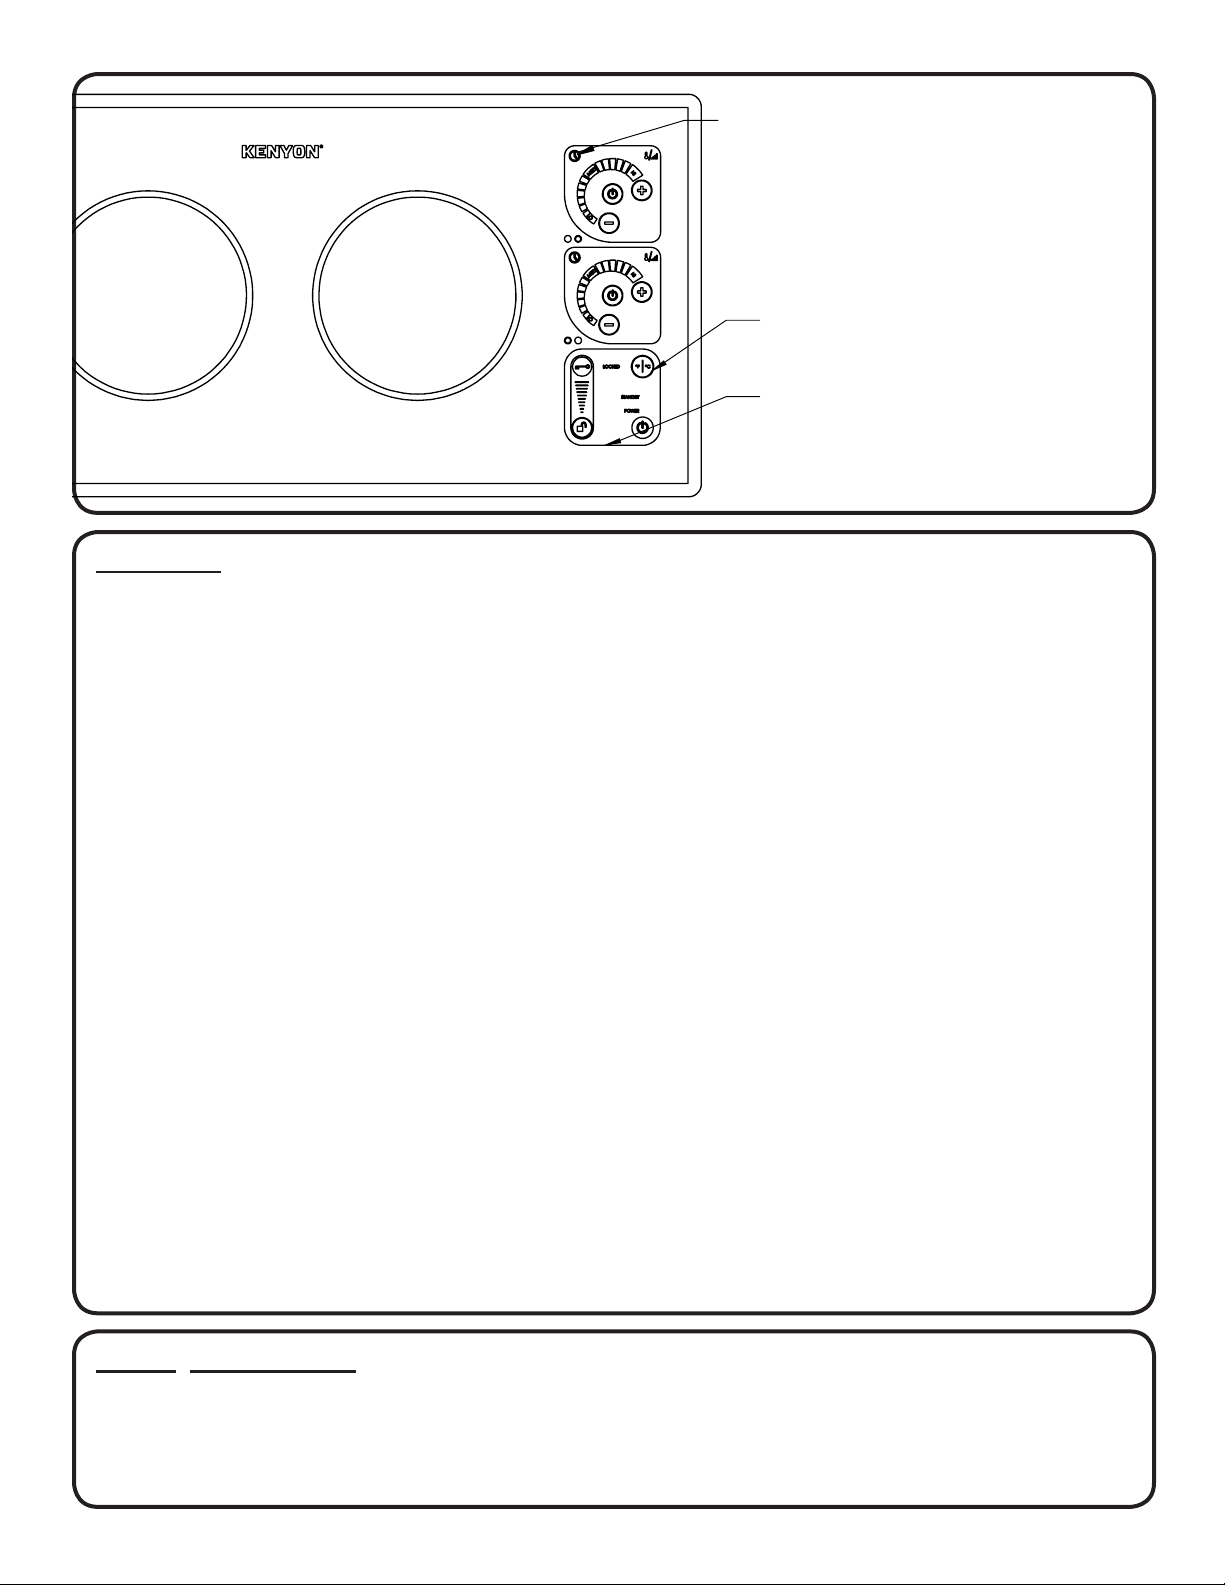
INDUCTION COOKTOP CONTROL SAFETY LOCK FEATURE
WhentheLOCKLEDisilluminatedinthemainpowercontrolframe,thecooktoptouchcontrol
powersettingscan’tbeadjustedfromthecurrentsetting.Pressingeitherthezonepowerbutton
orthemasterpowerbuttonhowever,canturnoffthecooktop.TheLEDarclightarraywillno
longerilluminatewheninthelockmode.Thelockfeaturecanbeactivatedatanytimeasasafety
measure,whethertheunitpowerisonoroff.WhentheunithaspowertheSTANDBYlightwill
illuminate.RefertoFigureD.
Tounlockthecooktop,swipetheLOCKfeaturewithyourngertipalongthegradientsurface,
fromtheLOCKtotheUNLOCKpositionasindicatedbythekeyandopenpadlockgraphicsor
touchandholdtheUNLOCKgraphicfor3seconds.
ToLOCKthecooktop,swipefromtheUNLOCKtotheLOCKpositionortouchandholdtheLOCK
buttonfor3seconds.
POWERING UP THE COOKTOP
Withtheunitunlocked,touchthePOWERbuttoninthemaincontrolframe.Activateeitherburner
byholdingtheburnerpowerbuttonintheburnercontrolframefor1/2secondandchoosinga
cookingoptionbelow.Ifaburnerisnotactivatedwithin15seconds,thecooktopwillde-powerby
itself.
HOT SURFACE INDICATOR
Ahotsurfaceindicatorlightwillilluminateinthegraphictouchcontrolframewhentheglass
surfacereachesatemperaturethatistoohotforsafehandling.Theareasoutsideofthecontrol
framesshouldnotbetoucheduntilthehotindicatorlampshutsoff.Atthatpoint,theremainderof
theglasssurfaceissafeforhandlingandcleaning.
MAIN POWER
CONTROL FRAME
LOCK FEATURE
STANDBY LIGHT
POWER BUTTON
MAIN POWER AND SAFETY LOCK
HOT SURFACE INDICATOR
BURNER CONTROL
FRAME
HEATING LEVEL
CONTROL SWEEP
+ BUTTON
- BUTTON
BURNER CONTROL FRAME
HEATING LEVEL COOKING MODE
16 LED LIGHT ARRAY
TEMPERATURE COOKING
MODE BUTTON
COOKING TEMPERATURE
READOUT
+ BUTTON
- BUTTON
BURNER CONTROL
FRAME
TEMPERATURE COOKING MODE
TEMPERATURE UNITS AND TIMERS
TEMPERATURE UNIT
SELECTOR BUTTON
MAIN POWER
CONTROL FRAME
KITCHEN AND
COOKING TIMER
6
5
4
2
HOT SURFACE INDICATOR
Fig. D
15
INDUCTION COOKTOP COOKING OPTIONS- HEATING LEVEL OR
COOKING TEMPERATURE
The induction cooktop burners can be independently operated by either a heating level ranging
fromlowtohigh,orbysettingaspeciccookingtemperature.
Powersharingbetweenburnerswilltakeeffectwhenbothburnersareused.RefertothePower
Sharingsectionofthismanualonpage15.
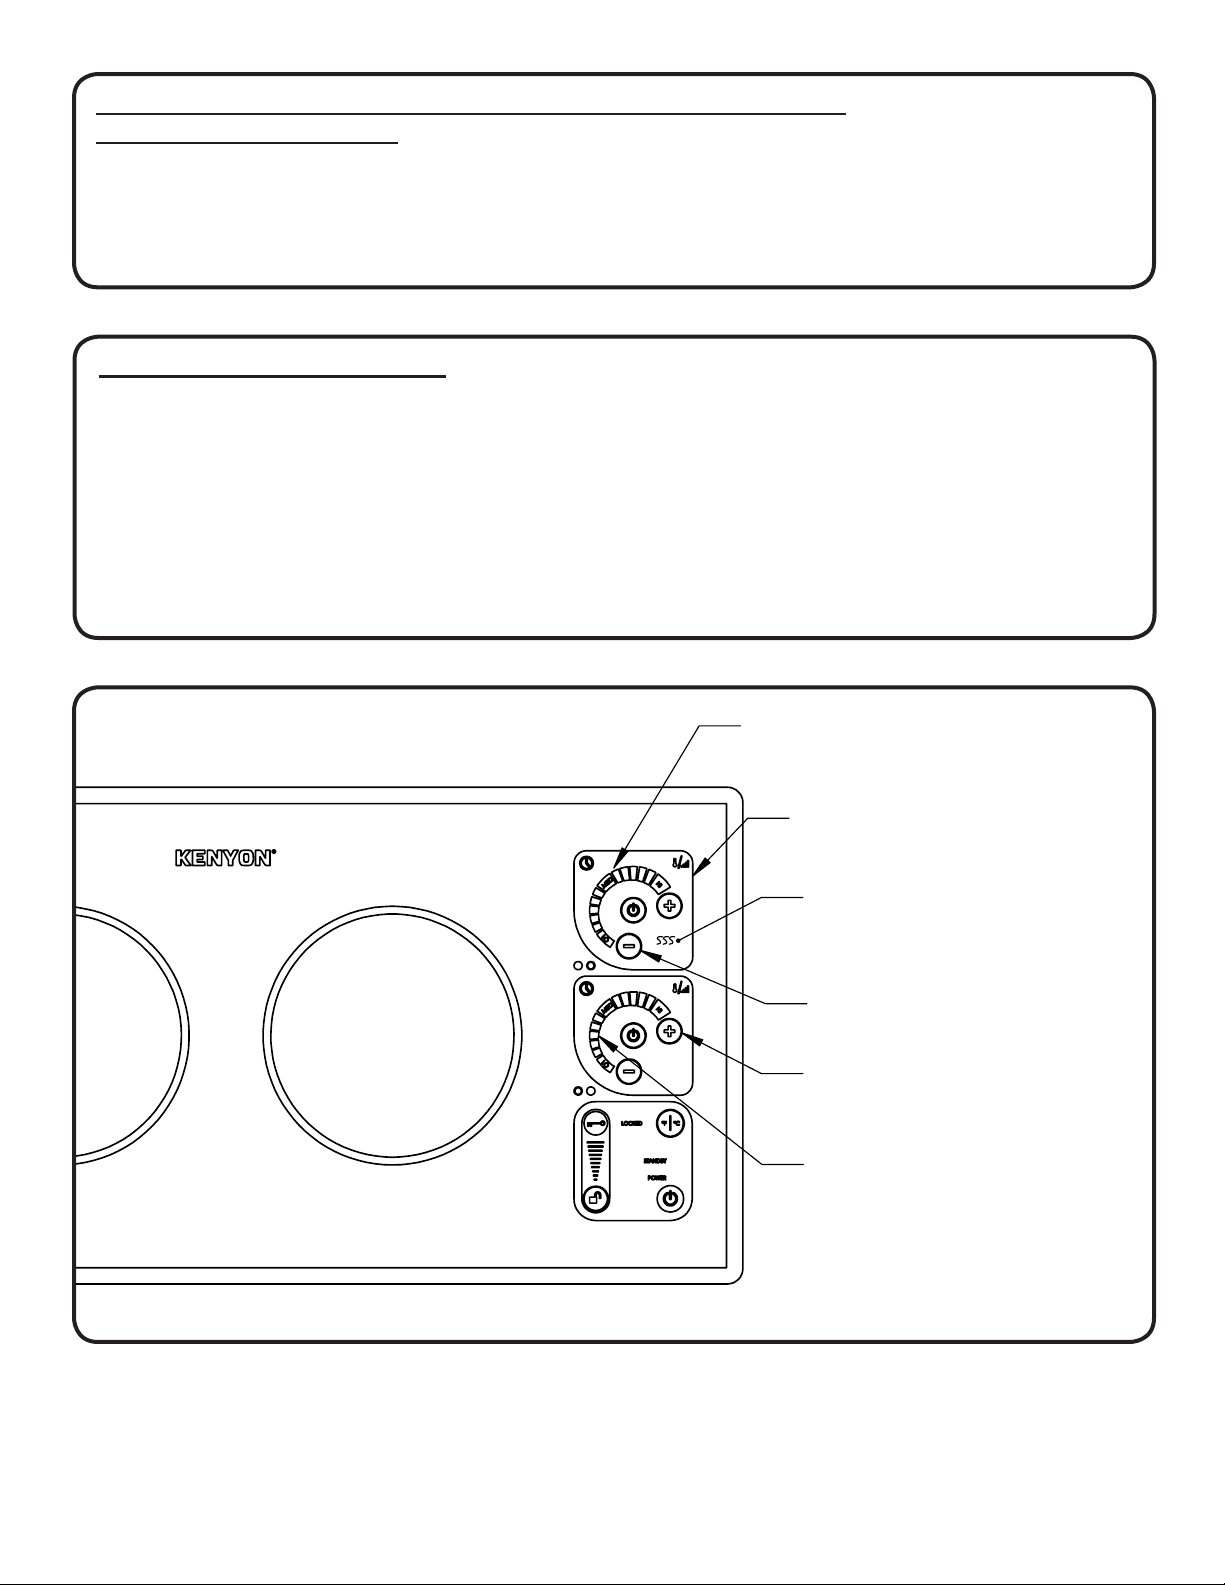
HEAT LEVEL COOKING MODE
Withtheunitpoweronandtheburnerpoweredup,swipeyourngeralongthetemperature
controlarcandreleaseatthedesiredsetting.ThesettingsrangefromLOW-MED-HIGHin16
increments, as indicated by the LED light array that illuminates along the control sweep. Also, the
arc + and – signs can be toggled to select the desired heat level. The LED light array will indicate
theselectedsetting.RefertoFigureE.
Thedefaultheatleveluponstartingeitherburneris0.Iftheburnerissetorremainsat0for15
secondsofinactivity,theburnerwillde-power.
MAIN POWER
CONTROL FRAME
LOCK FEATURE
STANDBY LIGHT
POWER BUTTON
MAIN POWER AND SAFETY LOCK
HOT SURFACE INDICATOR
BURNER CONTROL
FRAME
HEATING LEVEL
CONTROL SWEEP
+ BUTTON
- BUTTON
BURNER CONTROL FRAME
HEATING LEVEL COOKING MODE
16 LED LIGHT ARRAY
TEMPERATURE COOKING
MODE BUTTON
COOKING TEMPERATURE
READOUT
+ BUTTON
- BUTTON
BURNER CONTROL
FRAME
TEMPERATURE COOKING MODE
TEMPERATURE UNITS AND TIMERS
TEMPERATURE UNIT
SELECTOR BUTTON
MAIN POWER
CONTROL FRAME
KITCHEN AND
COOKING TIMER
6
5
4
2
HOT SURFACE INDICATOR
Fig. E
TEMPERATURE COOKING MODE
Select the temperature cooking mode by touching the thermometer/gradient graphic within the
chosenburnercontrolframe.
Selectthedesiredcookingtemperature,rangingfrom150°to450°F(65°to232°C),in10°F
(12°C)increments.Theselectioncanbemadebypressing+or–buttonsforeachincrement
change,orswipingthearc.Theselectedcookingtemperaturevaluewillilluminateandashin
thecontrolframewhiletheselectionisinprogress.Thevaluewillashuntilthetemperatureis
reached.Afterthetemperaturehasbeenreachedthevaluewillilluminatesteady,andthe
cookingtemperaturewillremainsetunlessitischanged.Thedefaulttemperaturesettingis
always150°F(65°C)uponstartupintemperaturecookingmode.RefertoFigureF.
16
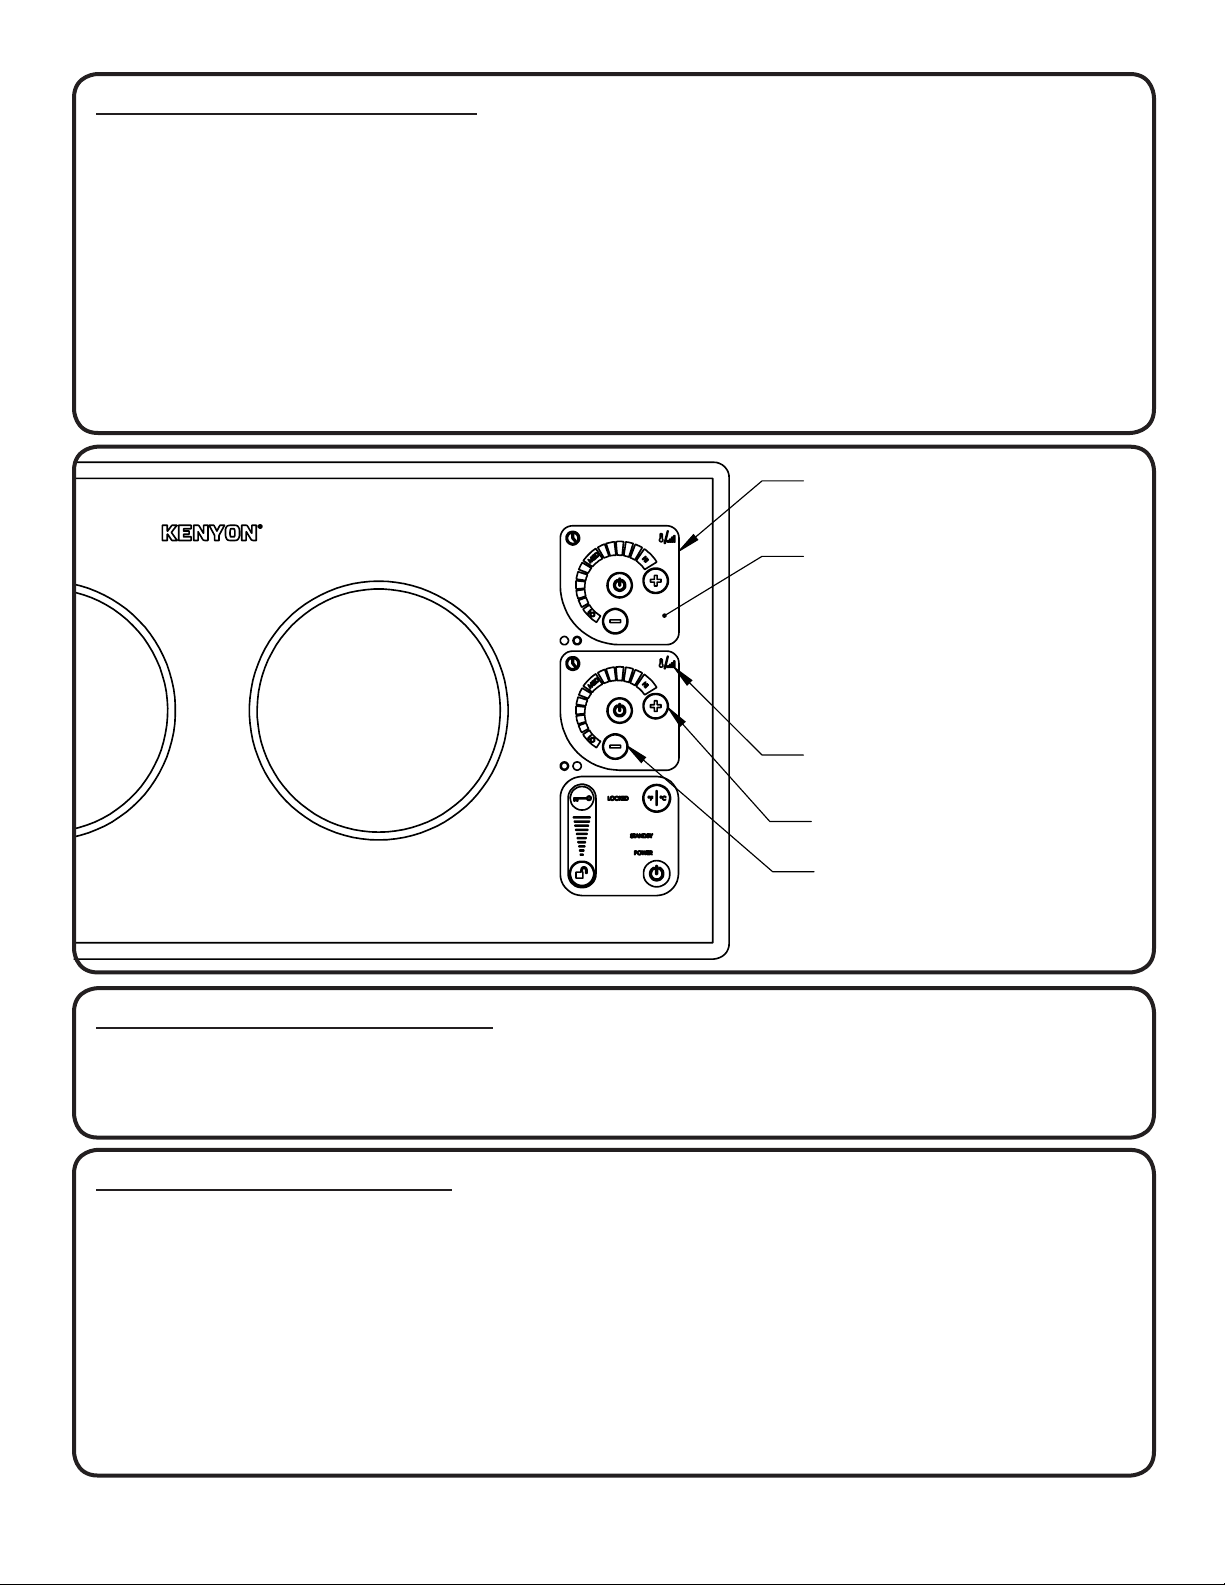
CHANGING TEMPERATURE UNITS
ThetemperatureunitscanbechangedfromFahrenheittoCelsiusbytouchingthe°F/°Cbuttonin
themainpowercontrolframe.Allactiveburnerswillchangeaccordingly.Thechosendefaultunits
willremainwitheveryuseunlesschanged.RefertoFigureG.
AUTOMATIC POWER SHARING
Eachburnerhasacapacityof1300watts,butthecombinedwattageofbothactivatedburners
will not exceed 1800 watts.
Toensurethattheinductioncooktoppowerusagedoesnotexceedthe1800wattlimitforsafe
operation,thepowerofthepreviouslysetburnerwillautomaticallydecreasewhenanotherburner
isactivatedandsettouseanamountofpowerthatmayamountto1800wattscombined(full
power).Thechangeinpowersettingwillbeevidentbyaashingdisplaywithinthepreviouslyset
burnercontrolframe.Intemperaturemode,“fullpower”willnotexceedthedifferencebetween
1300wattsandthepowerusageoftheotherburner.
MAIN POWER
CONTROL FRAME
LOCK FEATURE
STANDBY LIGHT
POWER BUTTON
MAIN POWER AND SAFETY LOCK
HOT SURFACE INDICATOR
BURNER CONTROL
FRAME
HEATING LEVEL
CONTROL SWEEP
+ BUTTON
- BUTTON
BURNER CONTROL FRAME
HEATING LEVEL COOKING MODE
16 LED LIGHT ARRAY
TEMPERATURE COOKING
MODE BUTTON
COOKING TEMPERATURE
READOUT
+ BUTTON
- BUTTON
BURNER CONTROL
FRAME
TEMPERATURE COOKING MODE
TEMPERATURE UNITS AND TIMERS
TEMPERATURE UNIT
SELECTOR BUTTON
MAIN POWER
CONTROL FRAME
KITCHEN AND
COOKING TIMER
6
5
4
2
HOT SURFACE INDICATOR
Fig. F

17
COOKTOP TIMER OPTIONS- KITCHEN TIMER AND COOKING TIMER
Kitchen Timer
Thekitchentimerisageneraltimerthathasmanyusesaroundthekitchen,independentof
cooking activity on the induction cooktop.
Activatethemainpowerandtouchthetimerclockgraphicwithineitherburnercontrolframe.Set
the desired time duration by touching the + and – buttons, holding the button to increase or
decreasethesetting.RefertoFigureG.Abeepwillsoundatthestartofthesettingandtheset
timewilldisplayinthecontrolfame.Thetimeincrementswillrunfrom1-10minutesin1minute
increments, and then change to 5 minute increments. The time reading will speed up as the touch
isheld.Touchthetimerbuttonagaintostart.Ifnotimeisset,thetimerwilldeactivateafter20
seconds.
As the set time elapses, the display will show the time remaining in minutes until it reaches one
minute,afterwhichthedisplaychangestosecondsremainingtozero.Thedisplaywillashand
adoublebeepalarmwillsoundeveryvesecondsuntilthepowerbuttonistouchedorafter3
minutes,theashingdisplayandalarmwilldeactivate.
Cooking Timer
Eachburnerhasitsowncookingtimerthatcanbeactivatedtoshuttheburneroffattheendof
the set time.
Atanytimeduringcookingforeachburner,setthedesiredtimedurationbytouchingthe+and
–buttons,holdingthebuttontoincreaseordecreasethesetting.RefertoFigureG.Abeepwill
soundatthestartofthesettingandthesettimewilldisplayinthecontrolfame.Thetime
incrementswillrunfrom1-10minutesin1minuteincrements,andthenchangeto5minute
increments. The time reading will speed up as the touch is held. Touch the timer button to start.
Ifnotimeisset,thetimerwilldeactivateafter20secondsandnormalcookingwillresume.
As the set time elapses, the display will show the time remaining in minutes until it reaches one
minute,afterwhichthedisplaychangestosecondsremainingtozero.Theburnerwill
automaticallyshut-offandstopcookingattheendofthesettime.Thedisplaywillashanda
singlebeepalarmwillsoundeveryvesecondsuntilthepowerbuttonistouched,within30
seconds.After30secondsofnoactivityafterthetimehaselapsed,theunitwillpoweroffandthe
hot indicator light will remain illuminated until the unit has cooled.
CLEANING
TohelpensurethattheKENYONcooktopstaysclean,followtheseeasy-caretips:
LockthecooktopbeforecleaningbyswipingfromtheLOCKtotheUNLOCKpositionortouch
andholdtheLOCKbuttonfor3seconds.
Alwaysremovefoodspills,greasespattersandmetalrub-offfromcookware.Arazorblade
scraper or the equivalent works well to remove spillovers.
Cleanthecooktopwithapapertoweloraclean,softclothandarecommendedcleaner.After
cleaning, always wipe the cooktop with a clean, damp cloth to avoid cooked-on cleaner residue.
Wipe the cooktop dry.
Donotuseadishtowelorspongetowipeoffthecooktopasalmmaybeleftbythedetergent
andmaycausediscolorationofthecooktopsurface.
Avoidabrasivescouringcleanersofanykind.Alsoavoidusingplastic,nylonormetalcleaning
pads. They may scratch or melt onto the cooktop.
Avoidchemicalcleanerssuchaschlorinebleach,ammonia,hydrouoricacidorchemicaloven
cleaners.Theycanetchordiscolorthesurface.
Donotletanythingthatmelts-plastic,aluminumfoil,sugar,etc.comeintocontactwiththe
cooktopsurfacewhenitishot.Shouldsomethingmeltontothesurface,immediately move it to a
coolareaofthecooktopwitharazorbladescraperandthenremoveitfromthecooktopassoon
as possible.
SilKEN
®
2 Maintenance
The Kenyon induction cooktop is a sealed unit that does not require regular maintenance. Please
followouroperatinginstructionsasmentionedabove.IfyourSilKEN
®
2 requires service, this
mustbepreformedbyAuthorized Personnel only. Please call Kenyon Customer Care at
860-664-4906.
18
Fig.G
MAIN POWER
CONTROL FRAME
LOCK FEATURE
STANDBY LIGHT
POWER BUTTON
MAIN POWER AND SAFETY LOCK
HOT SURFACE INDICATOR
BURNER CONTROL
FRAME
HEATING LEVEL
CONTROL SWEEP
+ BUTTON
- BUTTON
BURNER CONTROL FRAME
HEATING LEVEL COOKING MODE
16 LED LIGHT ARRAY
TEMPERATURE COOKING
MODE BUTTON
COOKING TEMPERATURE
READOUT
+ BUTTON
- BUTTON
BURNER CONTROL
FRAME
TEMPERATURE COOKING MODE
TEMPERATURE UNITS AND TIMERS
TEMPERATURE UNIT
SELECTOR BUTTON
MAIN POWER
CONTROL FRAME
KITCHEN AND
COOKING TIMER
6
5
4
2
HOT SURFACE INDICATOR
19
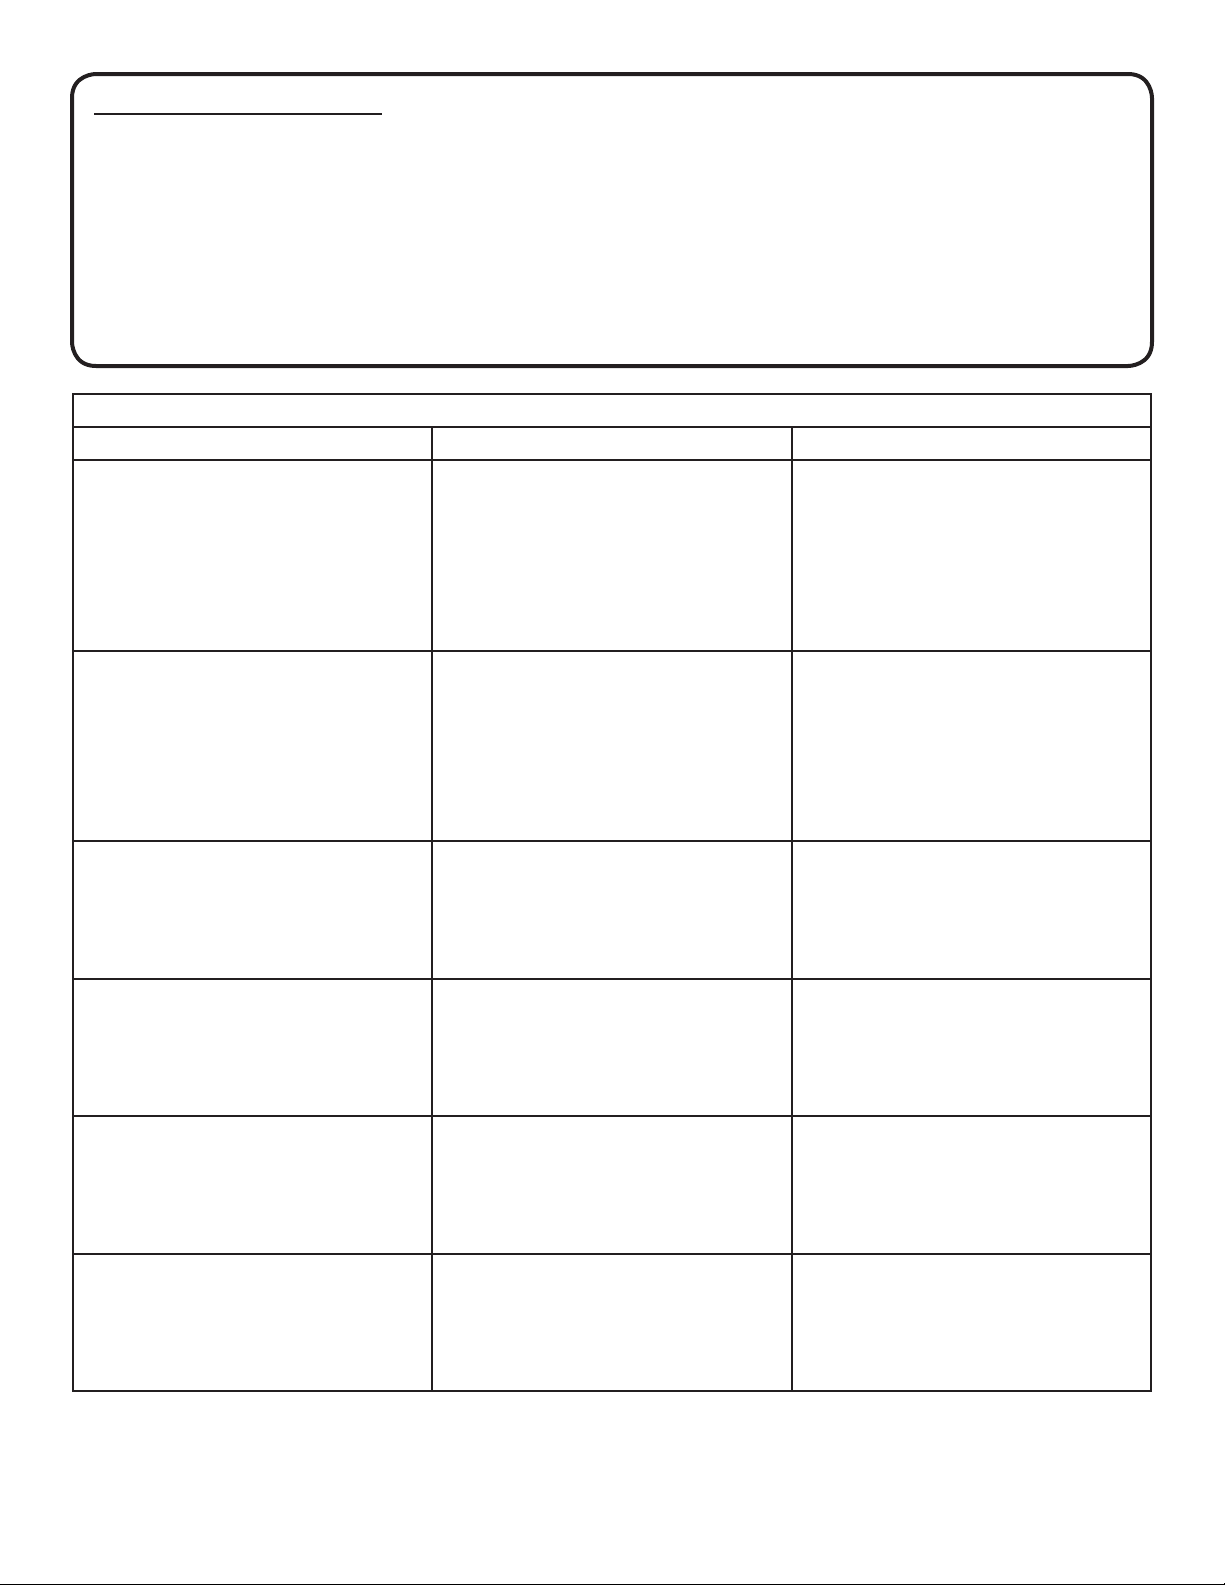
ERROR CODE READOUT
In the event that the SilKEN
®
2 Induction Cooktop is not operating correctly, the control readout
willdisplayanerrorcodethatwillidentifytheproblem.Ifanerrorcodeisshownonthedisplay,
identifythecodeintheSilkEN
®
2 Induction Cooktop Troubleshooting Index below and take action
as noted. De-power and re-start the unit to clear the display. Allow the unit to cool as necessary.
Lockoutthemainpowersupplytotheunitbyclosingthebreakerbeforeperforminganywiring
operations.Iftheproblempersists,pleasecallKenyonCustomercareat860-664-4906,M-F,
8AM – 5PM EST or email at [email protected].
ERROR CODE DESCRIPTION ACTION TO REMEDY ERROR
E01 INCORRECTOPERATING
VOLTAGE-LINEVOLTAGE
LOWER THAN SPECIFIED
OR INTERNAL ELECTRONIC
CONTROL ISSUE
ENSURE THAT THE ELECTRICAL
HOOKUPVOLTAGETOTHE
UNITS IS CORRECT. REFER TO
THE IDENTIFICATION LABEL
AFFIXED TO THE UNDERSIDE
OF THE UNIT. IF CORRECT,
CALL CUSTOMER CARE
E02 INCORRECTOPERATING
VOLTAGE-LINEVOLTAGE
HIGHERTHANSPECIFIED
OR INTERNAL ELECTRONIC
CONTROL ISSUE
ENSURE THAT THE ELECTRICAL
HOOKUPVOLTAGETOTHE
UNITS IS CORRECT. REFER TO
THE IDENTIFICATION LABEL
AFFIXED TO THE UNDERSIDE
OF THE UNIT. IF CORRECT,
CALL CUSTOMER CARE
E03
E04
UNITOPERATINGATHIGH
TEMPERATURE
ALLOW UNIT TO COOL. ENSURE
CORRECTCOOKINGUTENSIL
TYPEISUSED.LOWER
THECOOKINGLEVELOR
TEMPERATURESETTING.
E05 NO POT ON BURNER ALLOW UNIT TO COOL. PLACE
COOKINGVESSELWITH
FOOD PLACED WITHIN ONTO
COOKTOPBEFORETURNING
ON THE BURNER.
E06
E07
E08
E09
INTERNAL ELECTRONIC
CONTROL ISSUE
REFERTOKENYONCUSTOMER
CARE
E10 MORE THAN TWO INDIVIDUAL
CONTROL FUNCTIONS
ACTIVATED FOR THREE
SECONDS, UNIT
DE-POWERED
RE-POWER UNIT AND
COMMAND ONE CONTROL
INPUT AT A TIME
SILKEN
®
2 INDUCTION COOKTOP TROUBLESHOOTING INDEX

Warranty
KenyonInternational,Inc(the“Company”)warrantsitsproductsinnormalusagetobefreeofdefectsin
materials and workmanship subject to the conditions and limitations below.
Anypart,whichprovestobedefectiveinnormalusageduringthewarrantyperiodwillberepairedorreplaced
by the Company.
ThiswarrantycoverscertainproductsbuiltbytheCompanyandissubjecttothefollowingconditionsand
limitations:
1. TheCompany’sliabilityshallbelimitedtorepairorreplacement(choiceofremedyatCompany’s
option)ofgoodsorpartsasmaybedefectiveinmaterialsorworkmanship.Thisliabilityislimitedto
threeyearsfromthedateoforiginalinstallationor42monthsfrominvoicedate,whichevercomesrst;
this warranty covers parts and labor at approved Company rates, $75 per hour.
2. Determinationofsuitabilityoftheproductfortheusecontemplatedbythebuyeristhesole
responsibilityoftheBuyerandtheCompanyshallhavenoresponsibilityinconnectionwithsuch
suitability.
3. TheCompanyshallnotbeliableforanydamageresultingfrom:
•failuresduetouseoftheproductinapplicationsforwhichtheyarenotintended;
•failuresduetocorrosion,wearandtear,abuseorimproperinstallationormaintenance.
4. TheCompanyshallberesponsibleforgroundshippingchargestothelocationoftheappliance(home)
within the Continental United States and Canada. Any duties, express or special shipping charges are
attheexpenseoftheBuyer.
5. AlllaborallowedbytheCompanyunderthiswarrantymustbeperformedbyanAuthorizedKenyon
InternationalServiceCenter,unlessotherwisespeciedinwritingbytheCompany.
6. Thiswarrantydoesnotcoverthecostofrepairorreplacementduetodamageofanyglasssurface,
cooking grates or cooking griddles.
THEREARENOOTHERWARRANTIESOFMERCHANTABILITY,FITNESSFORPURPOSEORANY
OTHERKIND,EXPRESSEDORIMPLIEDANDNONESHALLBEIMPLIEDBYLAW.Thedurationofany
suchwarrantiesthatareneverthelessimpliedbylawforthebenetofaconsumer,shallbelimitedtoaperiod
ofthreeyearsfromoriginalpurchasebytheuser.Somecountriesdonotallowlimitationsonhowlongan
implied warranty lasts, so this limitation may not apply to you.
THECOMPANYSHALLNOTBELIABLEFORCONSEQUENTIALORINCIDENTALDAMAGESARISING
FROMTHEBREACHOFTHISWARRANTY,WHETHEREXPRESSED,IMPLIEDORSTATUTORY.Some
countriesorstatesdonotallowexclusionorlimitationofconsequentialorincidentaldamagessothislimitation
or exclusion may not apply to you.
THISWARRANTYGIVESYOUSPECIFICLEGALRIGHTSANDYOUMAYALSOHAVEOTHERLEGAL
RIGHTSTHATMAYVARYFROMCOUNTRYTOCOUNTRYANDSTATETOSTATE.
Kenyon International, Inc.
P.O. Box 925 • 8 Heritage Park Road • Clinton, CT 06413 USA
Phone (860) 664-4906 FAX: (860) 664-4907