Loading ...
Loading ...
Loading ...
Changing Door Hinge Location
The door of the refrigerator can be hinged on either side so that the direction they open in can be
chosen to suit the place of installation. Refer to the disassembly diagram and change the door
hinges according to the following steps:
1. Remove the hinge cap by twisting it off.
2. Remove the upper hexagonal head screws.
The freezer door can now be removed.
3. Remove the middle hexagonal head screws. The
refrigerator door can now be removed.
4. Remove the right side leg, attach it to the other side hole
which is positioned symmetrically.
5. Remove the left side leg, attach it to the other side hole
which was positioned symmetrically.
6. Attach the bottom hinge symmetrically to the other side of
the cabinet.
7. Remove the upper hinge plug buttons and insert them in the
holes from which the screws were removed in Step 2.
8. Remove the middle hinge plastic cover and remount it to
cover the holes from which the screws were removed in
Step 3.
9. Remove the door plug button from the top of each door
using a screwdriver and insert in the hole on the opposite
side of each door.
10. Attach the refrigerator door to the bottom hinge.
11. Rotate the middle hinge 180 degrees. Attach it to the
refrigerator door and secure it with a screw. (Do not
tighten the screw completely.)
12. Attach the upper hinge to the freezer door. Attach the
freezer to the middle hinge and use the screw to attach
the upper hinge. (Do not tighten the screw completely.)
13. The direction in which the doors open has now been
changed; however, the following points should be
checked:
A) Make sure both doors are on straight.
B) Make sure that there is no space between the door
gasket and the refrigerator unit itself when the doors
are closed.
C) Make sure that the gasket on the hinged side is not
caught between the door and the unit when the door
is opened or closed. (If the door is forced closed
when the gasket is caught, the gasket may be
damaged.)
14. After making sure that the doors are installed correctly,
tighten all the screws holding the hinges. If they are not
tightened, the doors may slip out of position or there
may be an opening between the doors and the cabinet.
15. For models with senior living handles, remove the
screws holding the handle on the door. Remove plastic
pins from the other side of the door and insert them into
the holes where the screws were removed. Re-install
the handle using the same screws that were removed
from the door handles.
Cleaning and Maintenance
Your refrigerator does not require any maintenance.
Turn off your refrigerator and remove all food, shelves, trays, etc. Wash the
interior liner with a solution of two tablespoons of baking soda and a quart of
warm water. Then, rinse and wipe it out. Do not use soaps, detergents,
scouring powders, spray cleaners or the like for cleaning the interior liner.
It may cause odors in the refrigerator compartment.
Wash the ice cube trays, drip tray and shelves in a mild detergent solution and
dry with a soft cloth. Normal appliance spray cleaners may be used for the
exterior only.
Use only mild soap and water to clean the door gasket.
Never use acid, chemical thinners, gasoline, benzene or the like to clean any
part of the refrigerator. Boiling water and benzene may deform or damage the
plastic parts.
Cleaning the Evaporating Tray
Since dust accumulated on the evaporating tray
will decrease the evaporation efficiency, remove
the tray to clean.
The evaporating tray is set on the back of the
refrigerator. To remove tray, remove screws and
pull tray away from the unit. After cleaning make
sure to put the tray securely back in place
otherwise defrosted water may spill or the
evaporation process may be hindered.
Hot-Line
With the refrigerator/freezer in operation, it is possible that the
cabinet will feel warm at the front edges. This does not
indicate trouble. It is attributable to the hot gas line design.
This prevents moisture from accumulating and has nothing to
do with the storage temperature inside.
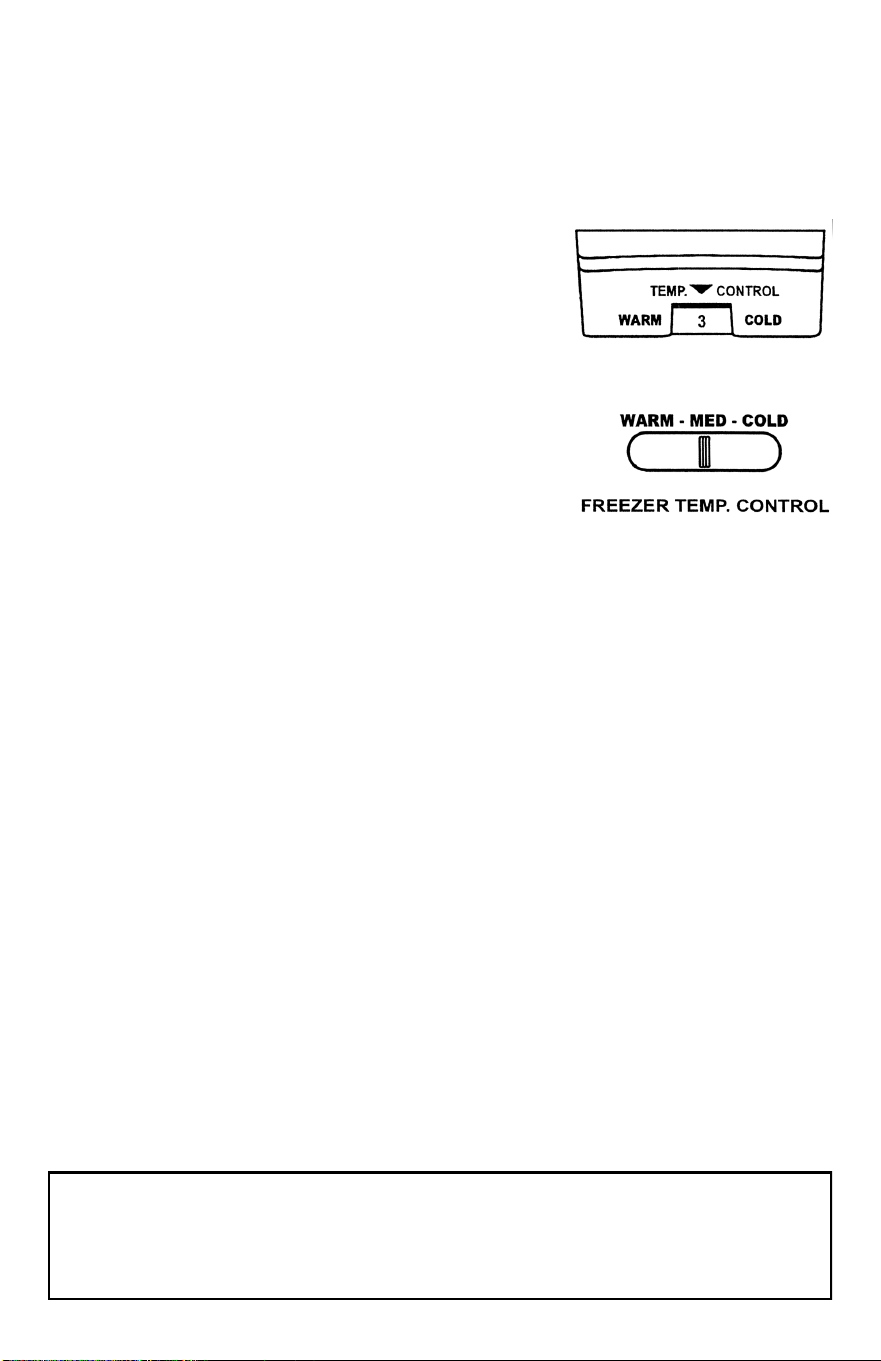
Temperature Control
You can control the temperature inside your refrigerator by turning the
temperature control dial. Higher numbers mean greater cooling power; smaller
numbers mean less cooling power.
Refrigerator
Set the temperature control dial to 3 for optimum
refrigeration effects under normal conditions.
Set the temperature control dial to MAX only when
rapid cooling in your refrigerator is necessary. Be
sure to set it back to 3 later on.
Freezer
For ordinary use, set the temperature control in the
MED position. For rapid freezing of foodstuffs or to
make ice cubes in a hurry, set the knob to the
COLD position. Do not forget to set the
temperature control back to MED once the rapid freezing process has been
completed.
Important
Do not operate your refrigerator for more than six hours at a stretch with the
temperature control dial set to 5 or MAX. At this setting, the compressor
will run continuously. Consequently, foodstuffs stored in the refrigerator
compartment will be frozen and frost will form on the cooling (evaporator)
unit.
At the control dial setting of 1, the freezer compartment temperature will not
remain at a sufficiently low level for ice cream and frozen foods.
ATTENTION
If the unit is turned off or unplugged, YOU MUST ALLOW THREE (3) MINUTES
BEFORE RESTARTING OR REPLUGGING THE UNIT. The unit will not start if you
attempt to restart it in less than three (3) minutes.
WARNING:
Do not route high-voltage electrical cords
underneath the hinge clip. Only use the clip
to cover low-voltage electrical cords.
Installing the Hinge Clip
① ② ⑫
⑦
⑧
⑪
③
ⓞ
⑥
④
⑤
⑤
ⓞ
⑨
ⓞ
⑨
ⓞ
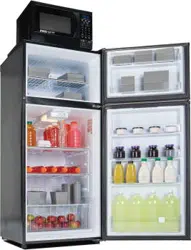
Where to Place Your MicroFridge® with Safe Plug®
1. This product is designed for free-standing installation only.
2. Select a location with a strong level floor. If the floor is not quite level, adjust the
height of the front legs accordingly. Do not place
anything under either one of the front legs or the
rear of the unit.
3. A minimum of 2 inches of clearance must be
provided between the rear condenser and the wall.
Providing greater rear wall clearance when space
allows in order to improve air circulation is
recommended; in addition, leave unobstructed
space above the refrigerator and both sides.
4. Avoid any direct sunlight and heat. Direct sunlight
may affect the enamel coating. Heat sources nearby
will cause higher electricity consumption.
5. Avoid very moist places. Too much moisture in the
air will cause frost to form very quickly on the
evaporator and the refrigerator will have to be defrosted more frequently.
6. Your refrigerator is equipped with a three-prong plug and is grounded to
eliminate electrical hazards. In order to make it more effective, it must be plugged
into a grounded electrical outlet.
7. Plug your refrigerator into the back of the microwave.
Test Run Your Refrigerator
Before using your refrigerator, clean it and test run it to see if it is operating
properly. If it is not, then check your electrical source. If you cannot locate the
source of the problem, contact your dealer.
1. Set the temperature control knob to the “OFF” position and then plug the AC
cord into an electrical outlet of 115 volt, 60Hz. The compressor motor should
not run.
2. Set the temperature control knob to the “MAX” position and let the
refrigerator operate for 20 minutes. The freezer should get slightly frosted
and the motor should run smoothly with a soft hum.
3. Rotate the temperature control knob counter-clockwise toward the “MIN”
position. Before the pointer of the temperature control knob reaches the
“MIN” position, the compressor motor should turn off.
Sound of Flowing Is Noticeable
This sound is caused by the refrigerant flowing into the refrigerating device. It
does not denote a malfunction.
How to Remove Ice Cubes from the Tray
The ice cube tray is flexible. Twist the tray to remove the
ice cubes. If the ice cube tray is frozen hard to the surface,
do not use a knife or other metal instrument to remove it
Loading ...
Loading ...
Loading ...