Loading ...
Loading ...
Loading ...
6 7
4. Add distilled water in each cell until battery acid reaches level specified by battery manufacturer.
This helps purge excessive gas from cells. Do not overfill. For a battery without cell caps
(maintenance free), carefully follow manufacturer’s charging instructions.
5. Study all battery manufacturer’s specific precautions, such as removing or not removing cell caps
while charging, and recommended rates of charge.
Charger Location
• Locate charger as far away from battery as cables permit.
• Never place charger directly above battery being charged; gases from battery will corrode and
damage charger.
• Never allow battery acid to drip on charger.
• Never operate charger in a closed-in area or restrict ventilation in any way.
• Marine batteries must be removed and charged on shore.
• Do not set a battery on top of charger.
OPERATING INSTRUCTIONS
Charging Using the Supplied Battery Clips
WARNING: A spark near the battery may cause an explosion. To reduce the risk of a spark near
the battery, position AC and DC cords away from hood, door, or moving engine parts.
1. Insert the double barrel tip of the battery clamp cable into the double barrel tip of the battery
charger cable (male-to-female and female-to-male). Then plug the battery charger’s power cord into
an AC outlet. The power LED will light blue to indicate that the charger is plugged in and ready.
Note:
If the Power LED does not come on, check connection with the AC outlet. Make sure the AC outlet is functional.
2. Check polarity of battery posts. Positive (POS, P, +) battery post usually has larger diameter than
negative (NEG, N, –) post.
3. Determine which post of battery is grounded (connected) to the chassis. If negative post is
grounded to chassis (as in most vehicles), see 4. If positive post is grounded to the chassis, see 5.
4. For negative-grounded vehicle, connect positive (red) clamp from battery charger to positive
(POS, P, +) ungrounded post of battery. Connect negative (black) clamp to vehicle chassis or
engine block away from battery. Do not connect clip to carburetor, fuel lines, or sheet-metal body
parts. Connect to heavy gauge metal part of the frame or engine block.
5. For positive-grounded vehicle, connect negative (black) clamp from battery charger to negative
(NEG, N, –) ungrounded post of battery. Connect positive (red) clamp to vehicle chassis or engine
block away from battery. Do-not connect clip to carburetor, fuel lines or sheet-metal body parts.
Connect to a heavy gauge metal part of the frame or engine block.
6. When the unit is properly connected and charging, the battery charging LED ( ) will light yellow
to indicate the battery is charging.
Notes:
If the Charging LED did not come on, check the connection to the battery. If the clamps are properly connected, the battery may
be in fault condition. Manufacturer suggests to have the battery tested by a qualified battery service technician.
If the clamps are incorrectly connected with regard to polarity, the reverse polarity/fault LED ( ) will light. Unplug the charger;
then remove the clamps. Reconnect the clamps properly.
7. When the charging complete LED ( ) lights green, the battery is fully charged.
When disconnecting charger, disconnect AC cord, remove clamp from vehicle chassis, and then
remove clamp from battery terminal.
Charging Using the 12 Volt DC Accessory Plug
CAUTION: TO REDUCE THE RISK OF PROPERTY DAMAGE: Make sure that the vehicle’s accessory
outlet is clean and free of debris before connecting the unit.
1. Insert the double barrel tip of the 12 volt DC accessory plug cable into the double barrel tip of the
battery charger cable (male-to-female and female-to-male). Then plug the battery charger’s power
cord into an AC outlet. The power LED will light blue to indicate that the charger is plugged in and
ready.
Note:
If the Power LED does not come on, check connection with the AC outlet. Make sure the AC outlet is functional.
2. Insert the grooved tip of the 12 volt DC accessory plug into the vehicle’s 12 volt DC accessory
outlet. Rotate the adapter slightly to make sure there is good contact.
3. When the unit is properly connected and charging, the battery charging LED ( ) will light yellow
to indicate the battery is charging.
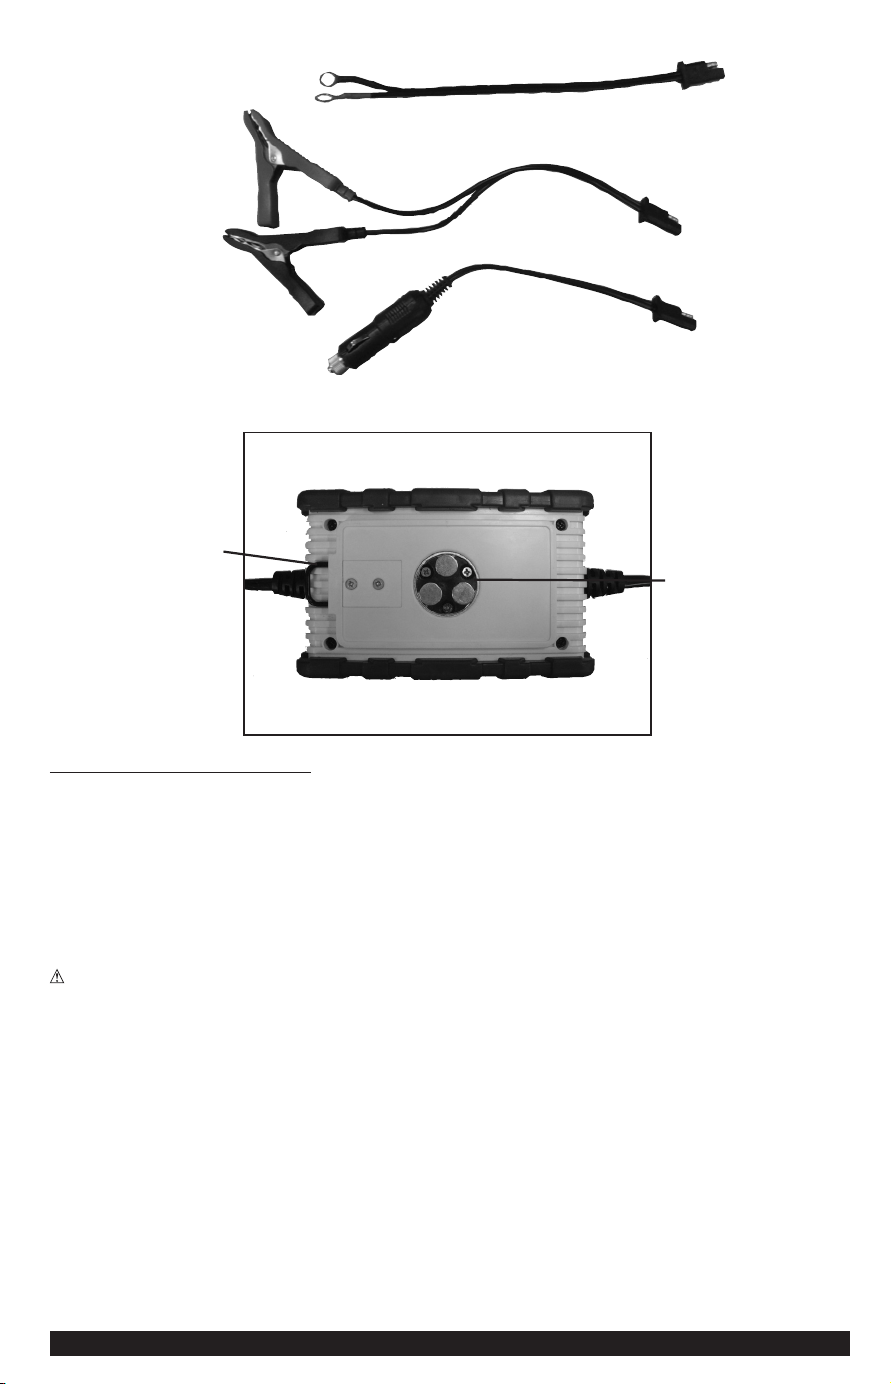
BATTERY
CLIPS
DC ACCESSORY
PLUG
BATTERY TERMINAL
RINGS
HANGING HOOK
MAGNETIC DISCS
(exposed to show
detail)
BACK OF UNIT
SETTING UP THE UNIT
Ensure that all installation and operating instructions and safety precautions are understood and
carefully followed by anyone installing or using the battery charger. Follow the steps outlined in the
“Important Safety Instructions” section of this manual.
To Mount the Unit Using the Magnetic Discs:
The magnetic discs in the bottom of the unit allow you to position the battery charger on any flat,
secure metallic surface.
To Mount the Unit Using the Hanging Hook:
The hanging hook allows you to position the battery charger for convenient, hands-free operation.
CAUTION: TO REDUCE THE RISK OF PRODUCT DAMAGE:
• When the charger is hung by the hanging hook or attached using the magnetic discs, do not shake
the charger or object that it is hanging from or attached to. Do not hang the charger from or attach
the charger to any electrical wires or anything that it is not secure.
• Only use the hanging hook or magnet discs for hanging or positioning the charger. The hanging hook
and magnetic discs are not intended to support additional weight. Do not attach or hang anything
additional to the charger or risk of breakage may occur.
Preparing to Charge
1. Remove battery completely from boat/airplane or any confined area before charging.
2. If it is necessary to remove battery from vehicle to charge, or to clean terminals, always remove
grounded terminal from battery first. Make sure all accessories in the vehicle are off, so as not to
cause an arc.
3. Clean battery terminals, taking care to avoid getting corrosive material in eyes.
BC2WBD_ManualENSP_071514.indd 6-7 7/15/2014 10:19:52 AM
Loading ...
Loading ...
Loading ...