If you have any problems or questions, visit us at www.whirlpool.com.
若您有任何疑問或問題,請造訪網站: www.whirlpool.com.tw。
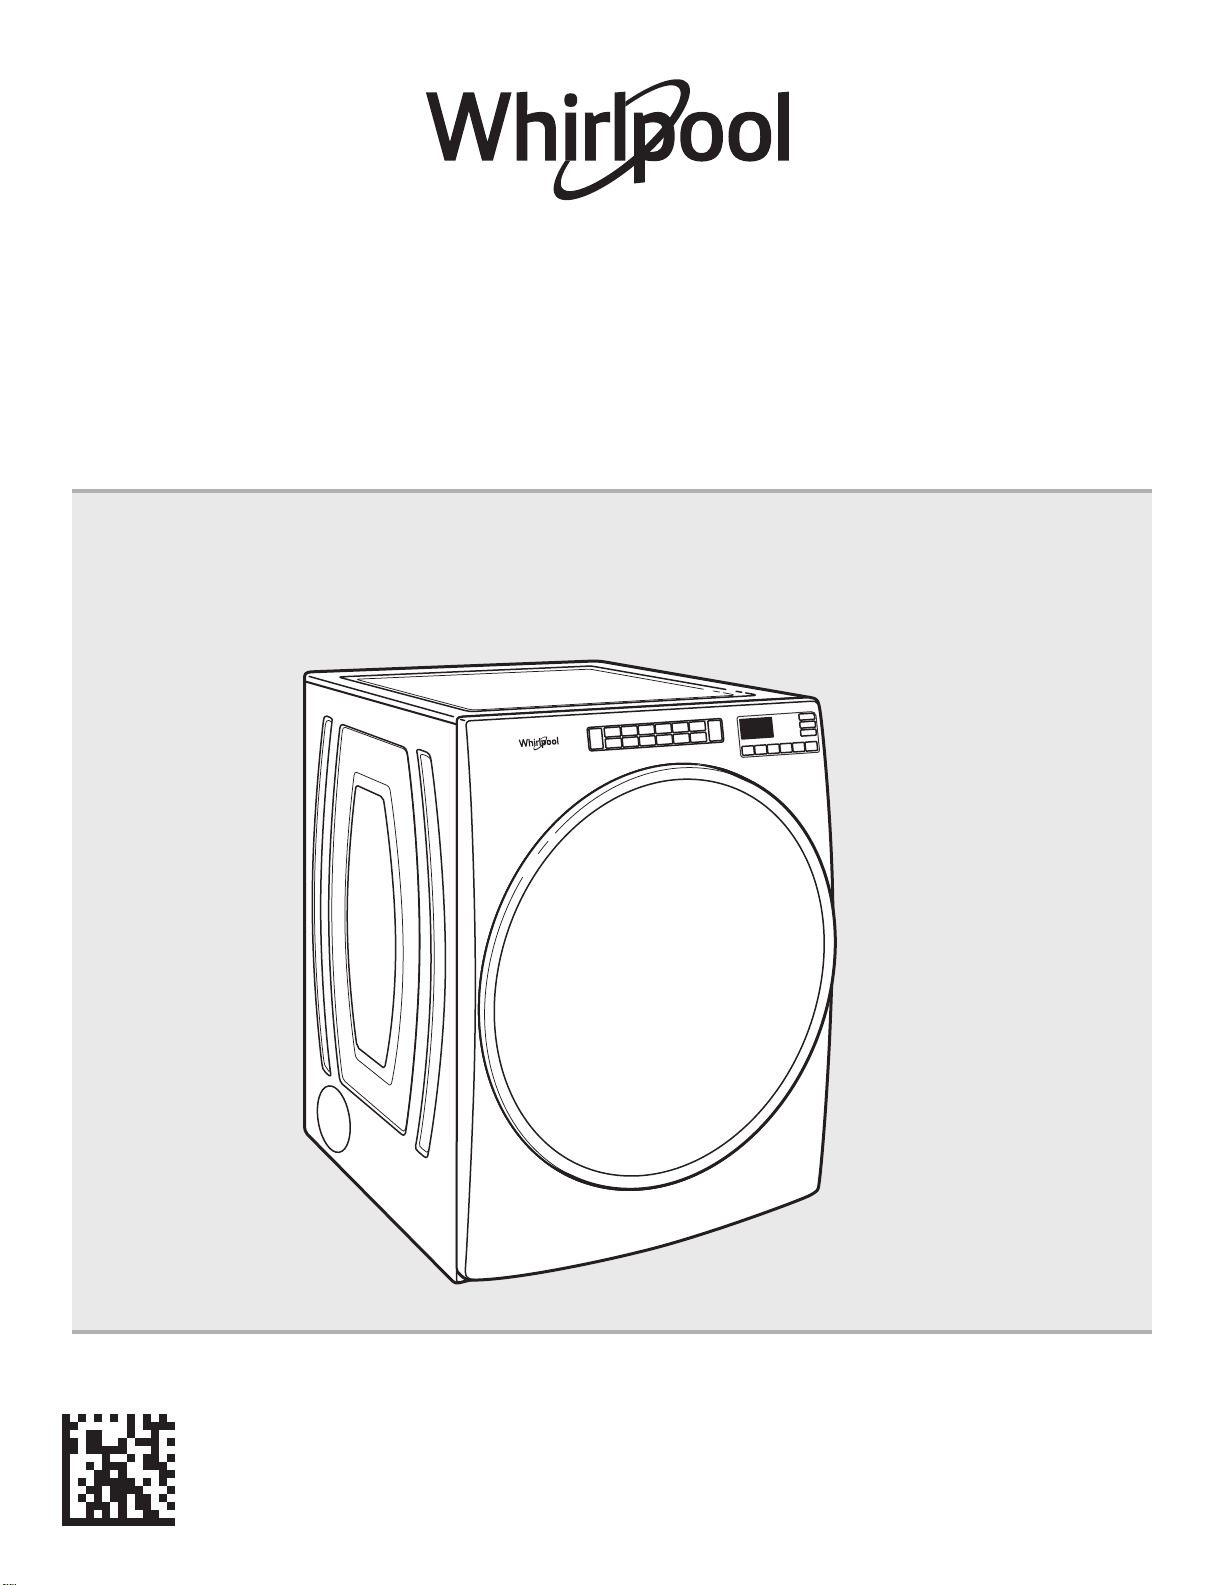
Use and Care Guide
使用保養指南
Electronic/ Gas Dryer
電力型/瓦斯型乾衣機
W11307137A
Model number: 8TWED5620HW/8TWGD5620HW/8TWGD6622HW
適用型號 : 8TWED5620HW/8TWGD5620HW/8TWGD6622HW
2
Table of Contents
產品規格 .................................................................................................19
乾衣機安全 .............................................................................. 19
配件 ........................................................................................ 22
檢查排氣系統確認排氣良好 .................................................... 23
控制面板和功能 ...................................................................... 24
行程指南 ................................................................................. 26
使用乾衣機 .............................................................................. 28
更多功能 ................................................................................. 30
乾衣機保養 .............................................................................. 31
故障排除 ................................................................................. 33
目錄
PRODUCT SPECIFICATIONS ...................................................2
DRYER SAFETY .......................................................................3
ACCESSORIES ........................................................................5
CHECK YOUR VENT SYSTEM FOR GOOD AIRFLOW ............6
CONTROL PANEL AND FEATURES ......................................... 7
CYCLE GUIDE .......................................................................... 9
USING YOUR DRYER ............................................................11
ADDITIONAL FEATURES ........................................................13
DRYER CARE .........................................................................14
TROUBLESHOOTING ............................................................16
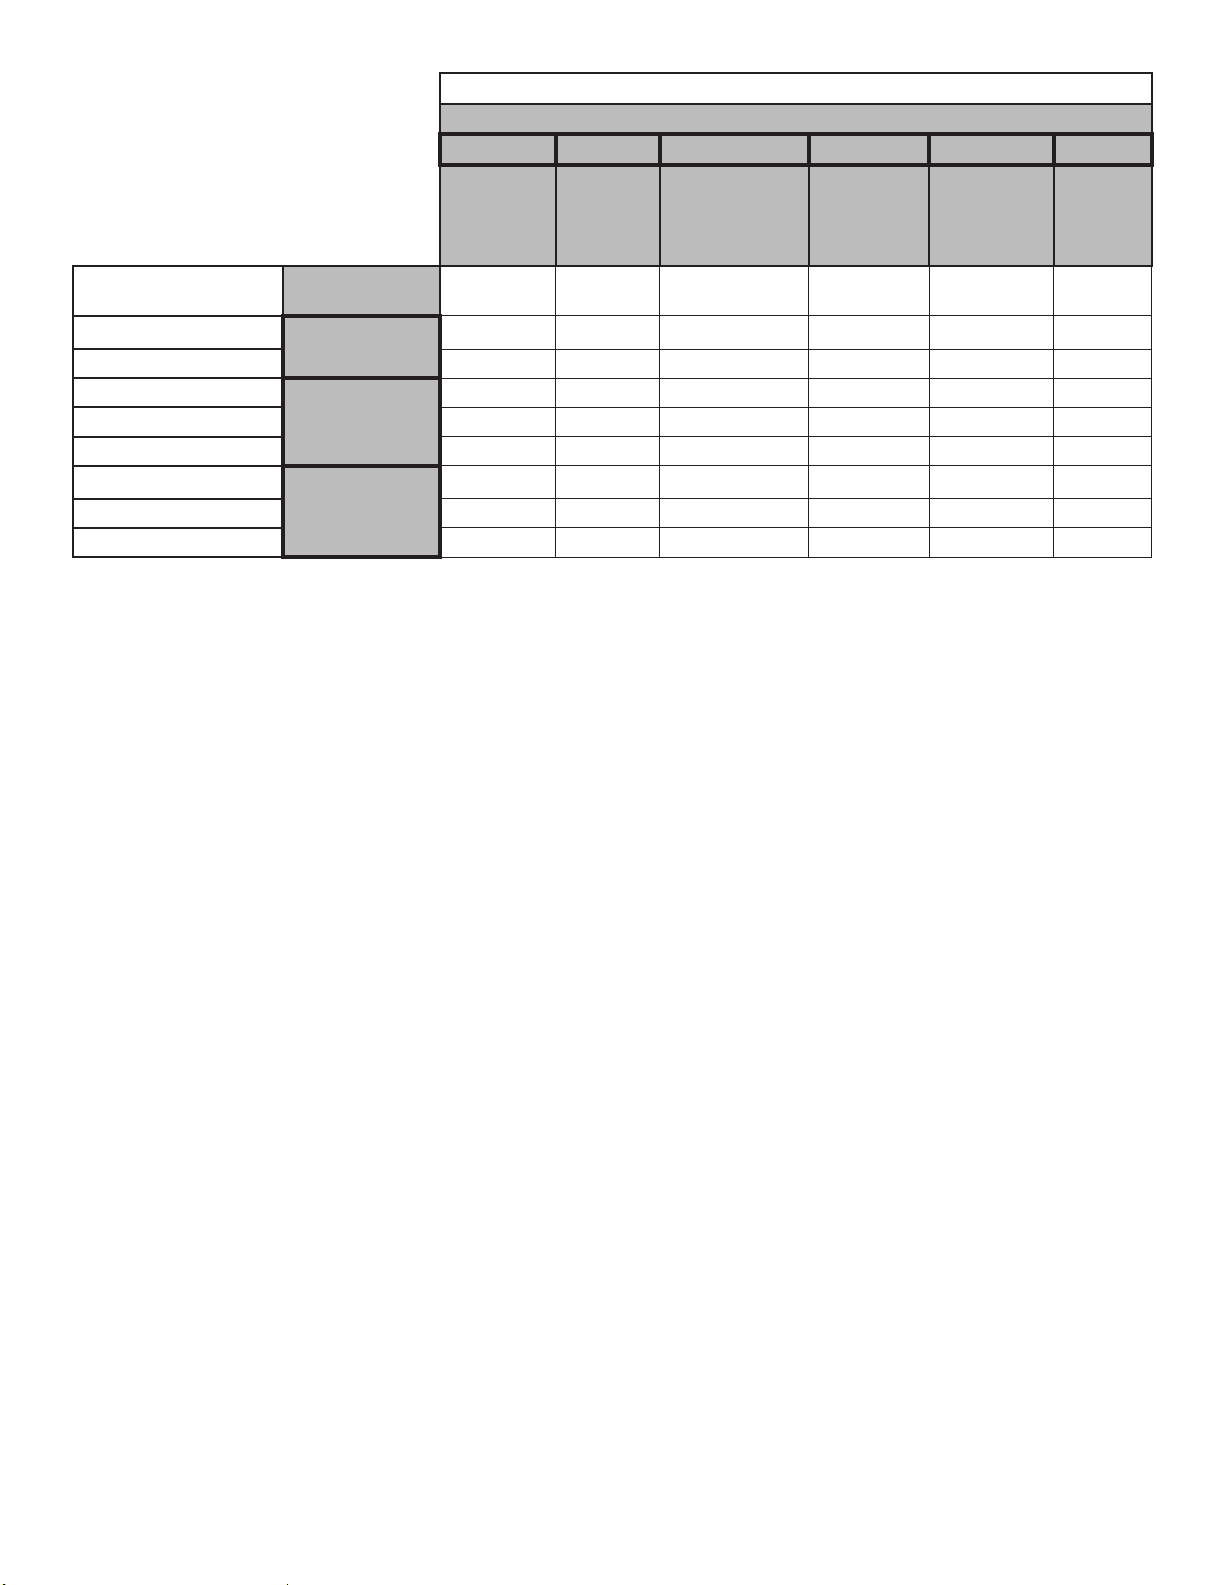
PRODUCT SPECIFICATIONS
Model Number
8TWED5620HW 8TWGD5620HW 8TWGD6622HW
Product Name
Electric Dryer Gas Dryer Gas Dryer
Rated Voltage
240 V 120 V 120 V
Rated Frequency
60 Hz 60 Hz 60 Hz
Rated Current
24 A 6 A 6 A
Dry Linen Capacity
15 kg 16 kg 16 kg
Rated Capacity
7.4 kg 7.4 kg 7.4 kg
Weight
66 kg 69 kg 69 kg
Dimension
968 x 686 x 787 mm 968 x 686 x 787 mm 968 x 686 x 787 mm
For RoHs information, please visit official website.
www.whirlpool.com.tw
These units are sold in multiple regions with different requirements for measuring capacity.
Dry Linen Capacity: A weight measure in load size that reflects the volumetric size of the dryer drum.
Rated Capacity: The capacity measure that represents the maximum capacity of dry linens and textiles which the manufacturer
declares can be treated in a specific cycle.
Taiwan Whirlpool Corporation
Customer Service phone number : 0800 258 558
Official Website : www.whirlpool.com.tw
3
DRYER SAFETY

4
This appliance is not intended for use by persons
(including children) with reduced physical, sensory or
mental capabilities, or lack of experience and knowledge,
unless they have been given supervision or instruction
concerning use of the appliance by a person responsible
for their safety.
That adequate ventilation has to be provided to avoid
the back flow of gasses into the room from appliances
burning other fuels, including open fires.
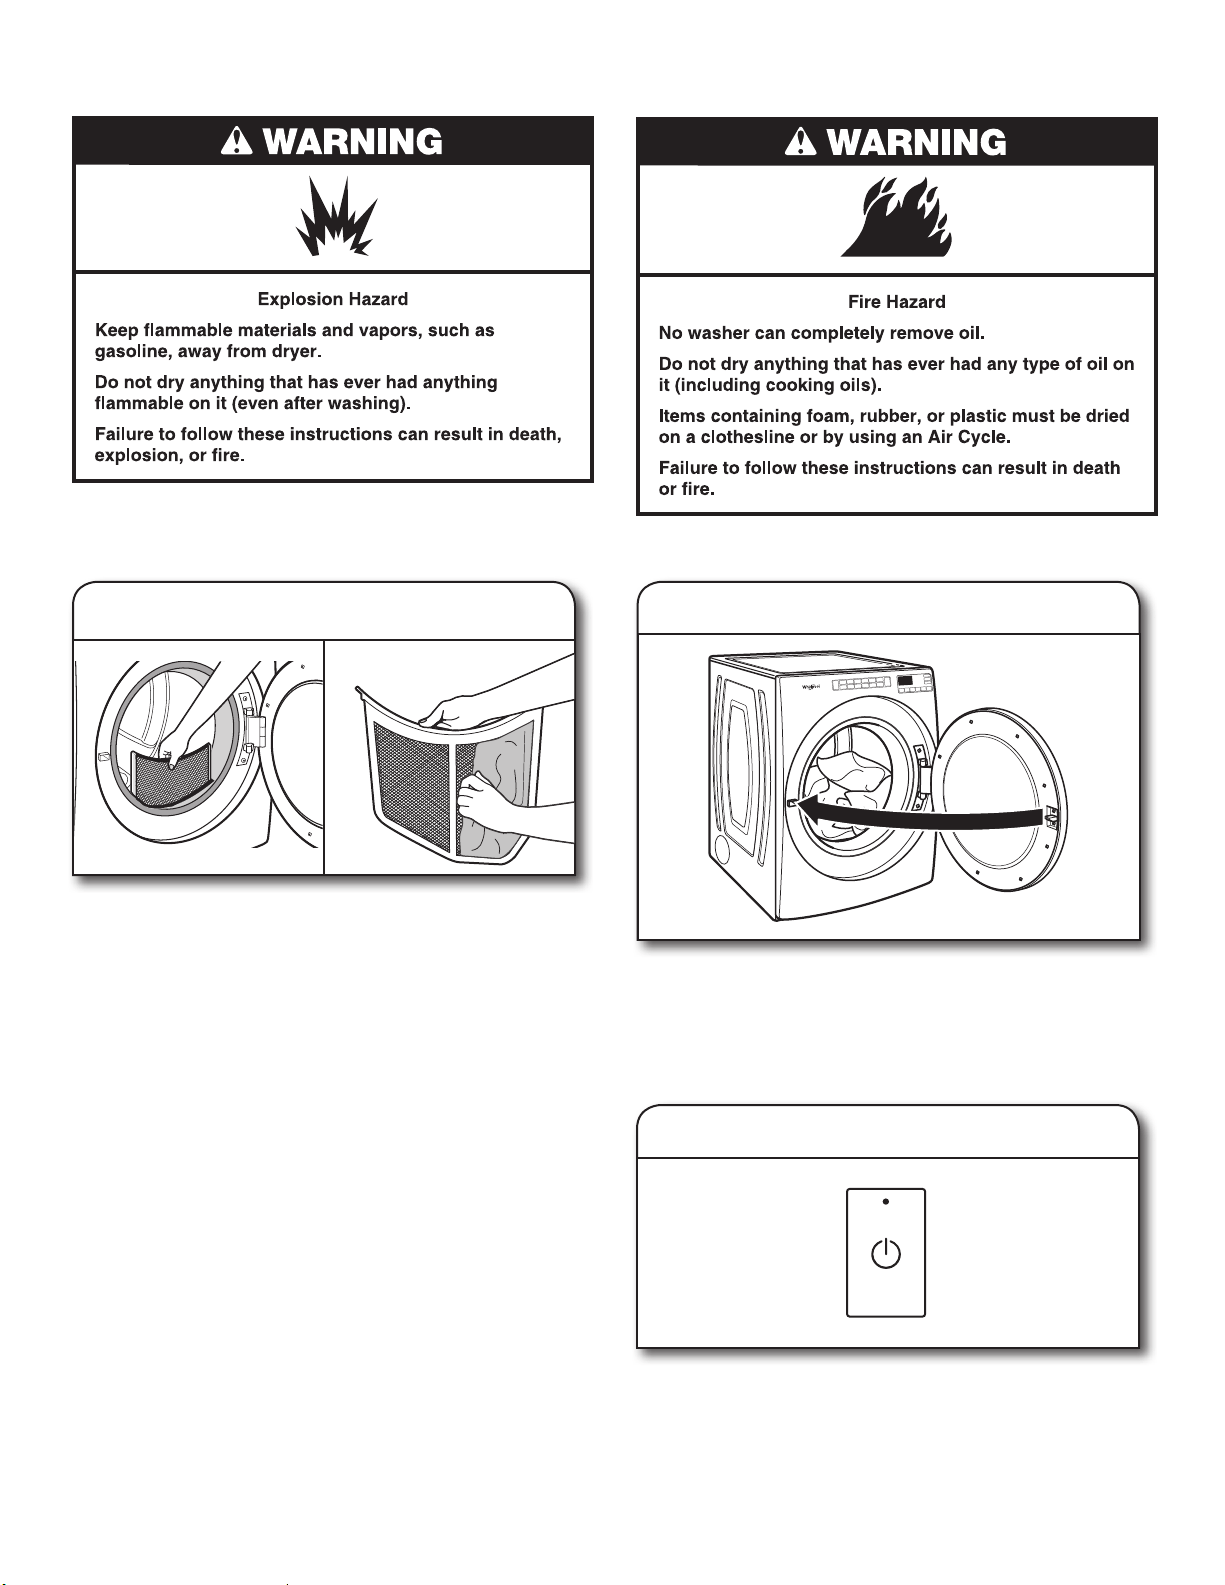
Do not dry unwashed items in the tumble dryer.
Items that have been soiled with substances such as
cooking oil, acetone, alcohol, petrol, kerosene, spot
removers, turpentine, waxes and wax removers should
be washed in hot water with an extra amount of detergent
before being dried in the tumble dryer.
Remove all objects from pockets such as lighters and
matches.
That exhaust air must not be discharged into a flue which used
for exhausting fumes from appliances burning gas other fuel.
That the appliance must not be installed behind a lockable door,
a sliding door or a door with a hinge on the opposite side to that
of the tumble dryer, in such a way that a full opening of the
tumble dryer door is restricted.
If the power supply cord damaged, it must replaced by
manufacturer or its service agent or similarly qualified
person in order to avoid a hazard.
Items such as foam rubber (latex foam), shower caps,
waterproof textiles, rubber backed articles and clothes or
pillows fitted with foam rubber pads should not be dried in
the tumble dryer.
-This is the “Read the instructions” symbol.
DRYER SAFETY
5
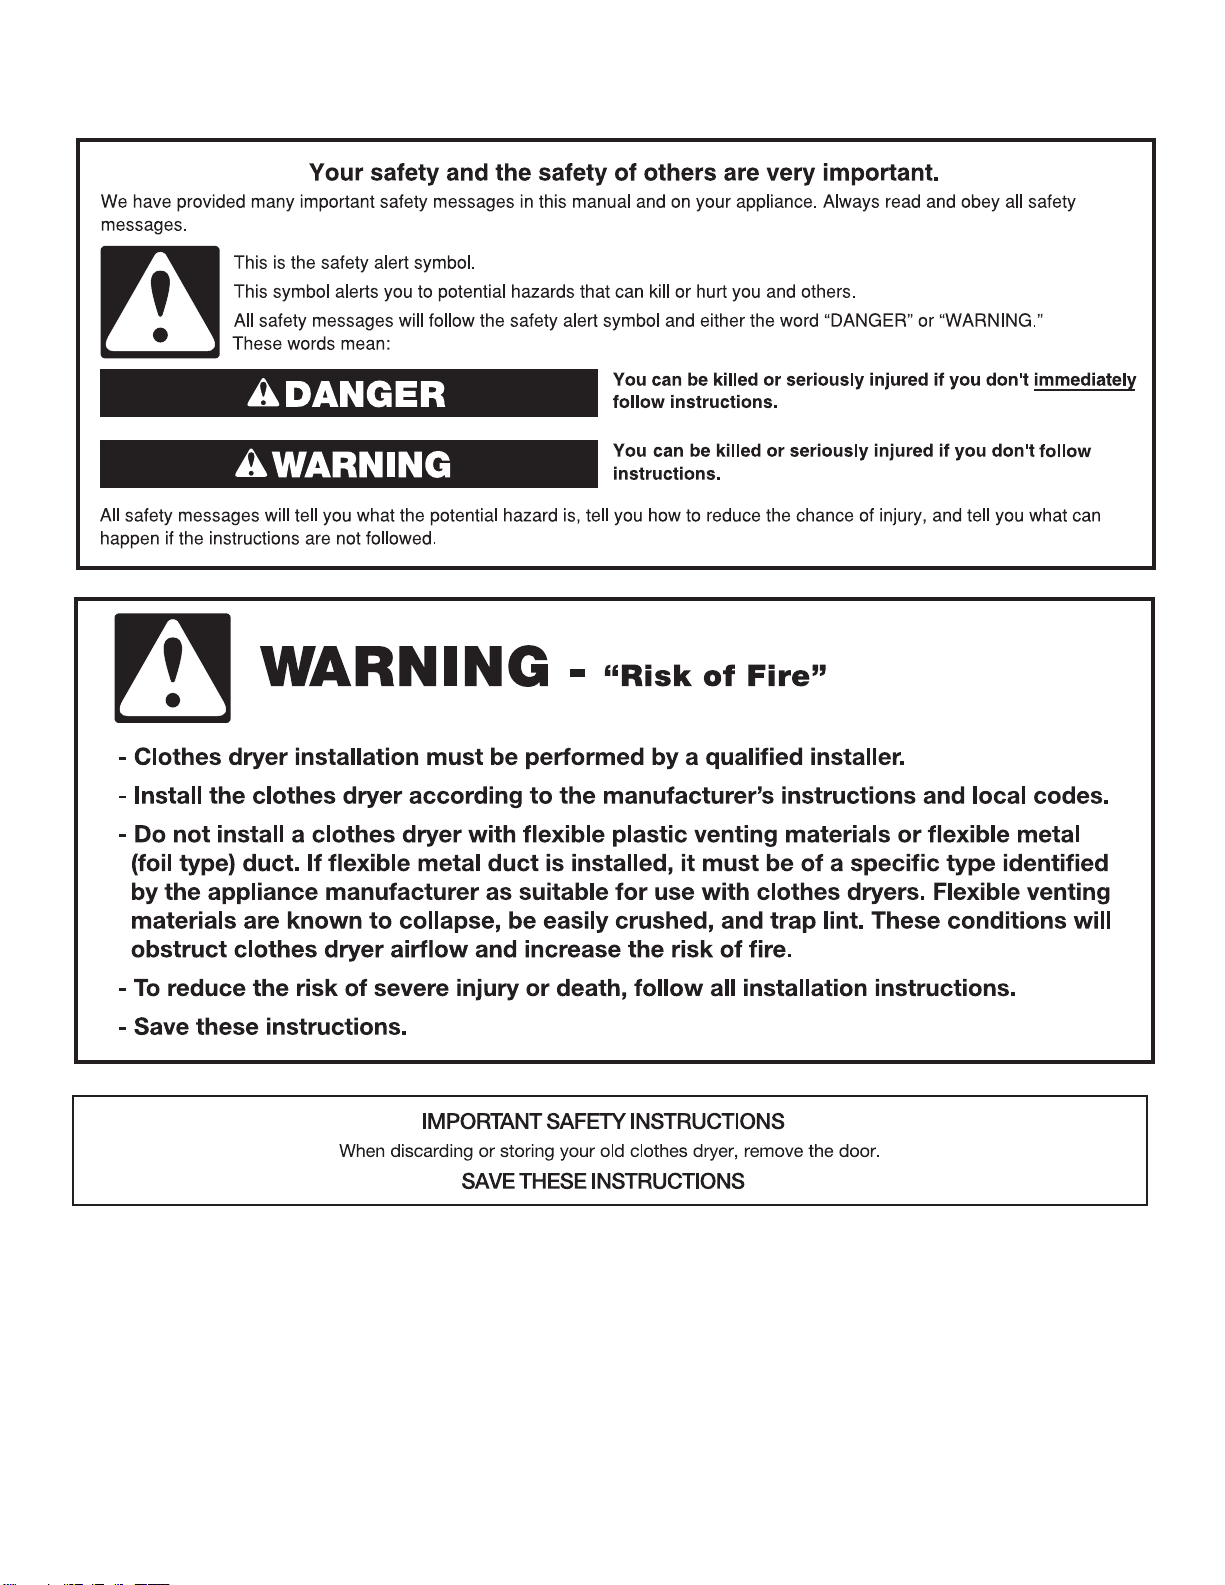
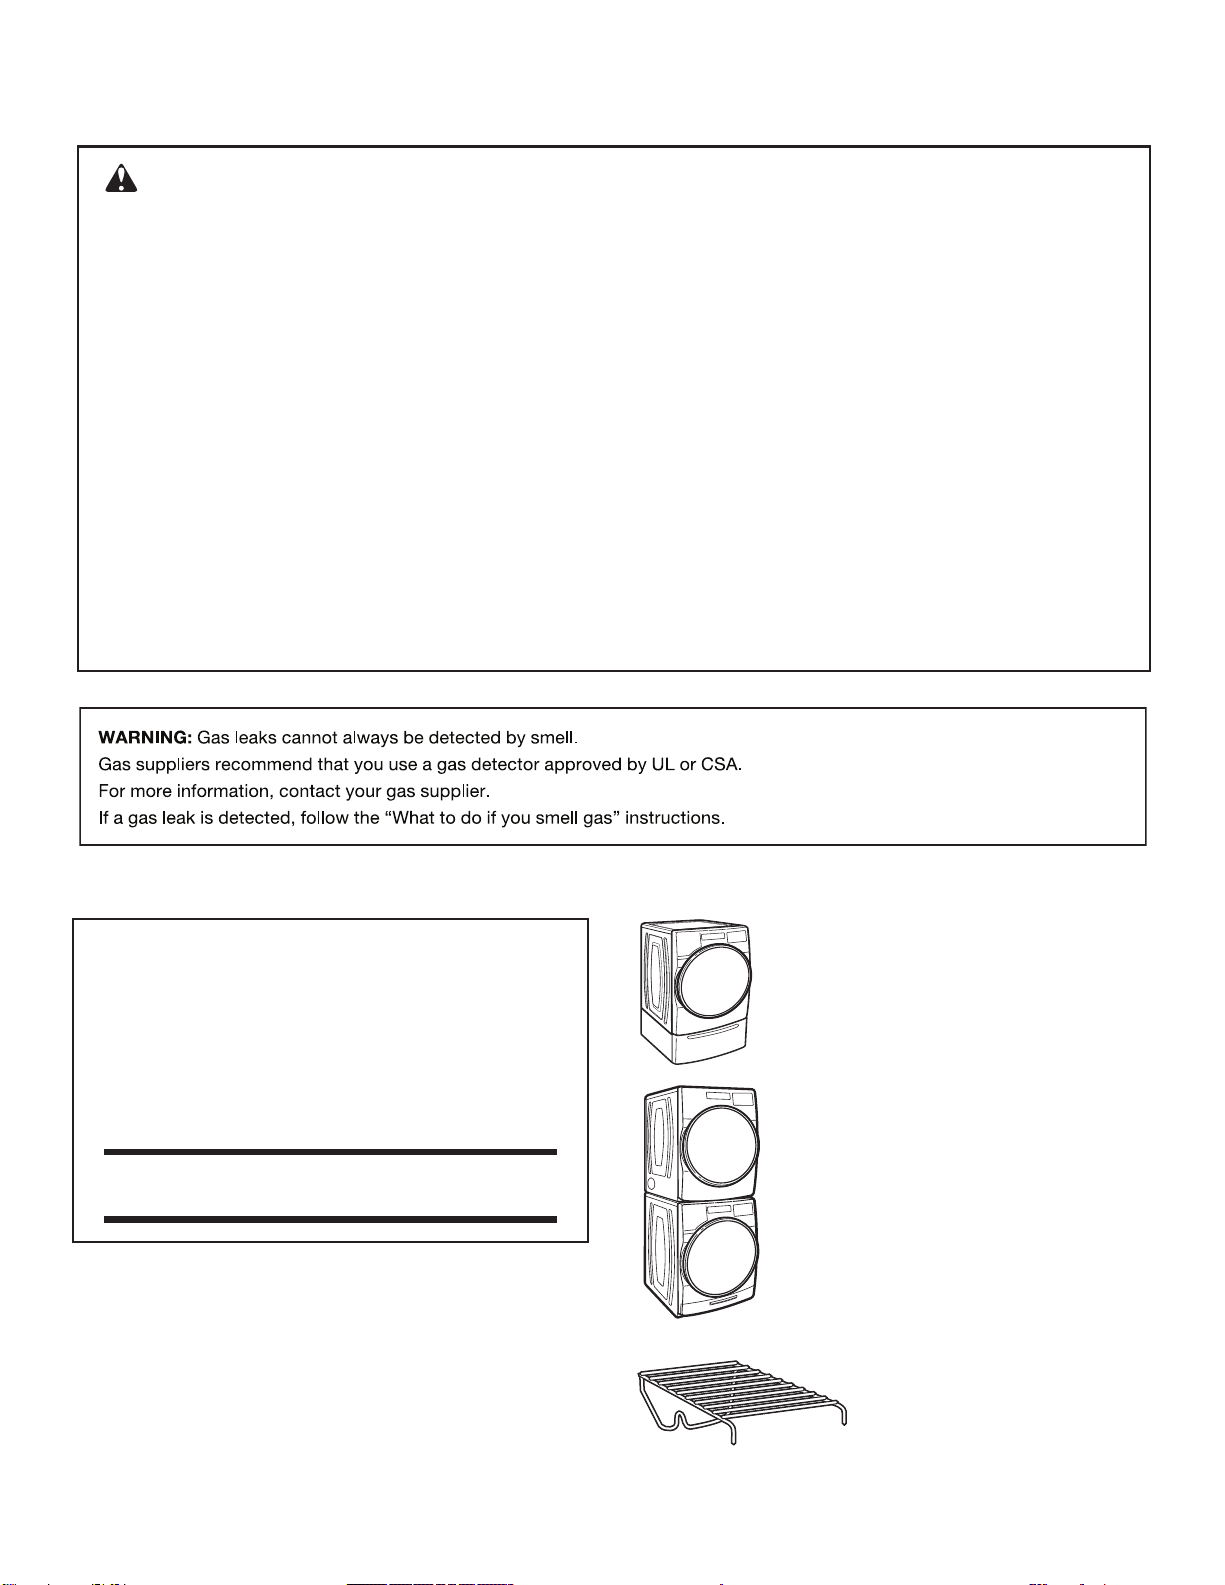
WARNING:
FIRE OR EXPLOSION HAZARD
Failure to follow safety warnings exactly could result in serious injury, death, or property
damage.
Do not store or use gasoline or other ammable vapors and liquids in the vicinity of this
or any other appliance.
–
–
WHAT TO DO IF YOU SMELL GAS:
•
Do not try to light any appliance.
•
Do not touch any electrical switch; do not use any phone in your building.
•
Immediately call your gas supplier from a neighbor’s phone. Follow the gas supplier’s
instructions.
•
If you cannot reach your gas supplier, call the re department.
–
Installation and service must be performed by a qualied installer, service agency, or
the gas supplier.
•
Clear the room, building, or area of all occupants.
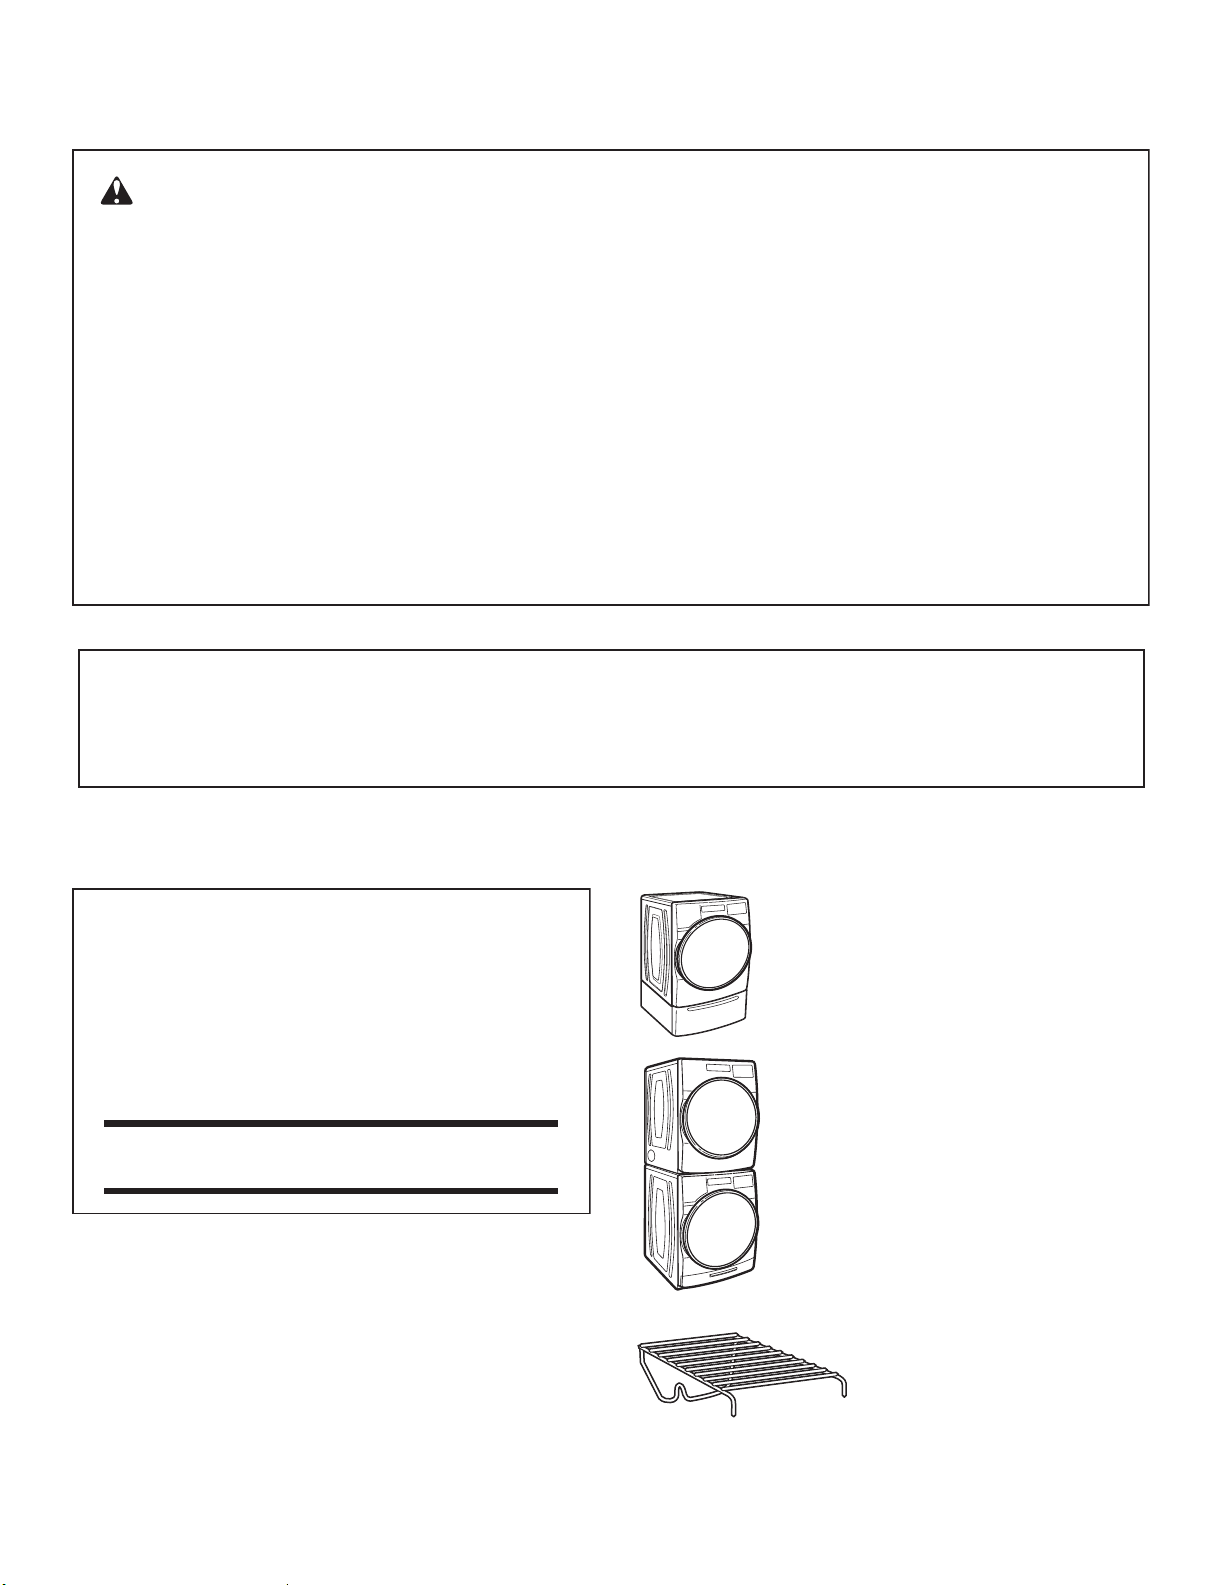
ACCESSORIES
INSTALLATION & MAINTENANCE
ACCESSORIES
FACTORY CERTIFIED PARTS – these three
words represent quality parts and accessories
designed specically for your appliance.
Time tested engineering that meets
our strict quality specications.
FACTORY CERTIFIED PARTS
Accessories designed for your appliance:
Customize your new washer and dryer with the following
genuine Whirlpool accessories. For more information on
options and ordering, call 0800-258-558 or visit us at:
www.whirlpool.com.tw.
Stack Kit
If space is at a premium, the stack kit
allows the dryer to be installed on top of the
washer.
15" Pedestal
Color-matched pedestals raise the washer and
dryer to a more comfortable working height. The
large drawer provides convenient storage.
Drying Rack
The Drying Rack provides a
stationary drying surface for items
such as sweaters and tennis
shoes. See the “Additional
features” section for more
information.
DRYER SAFETY
6
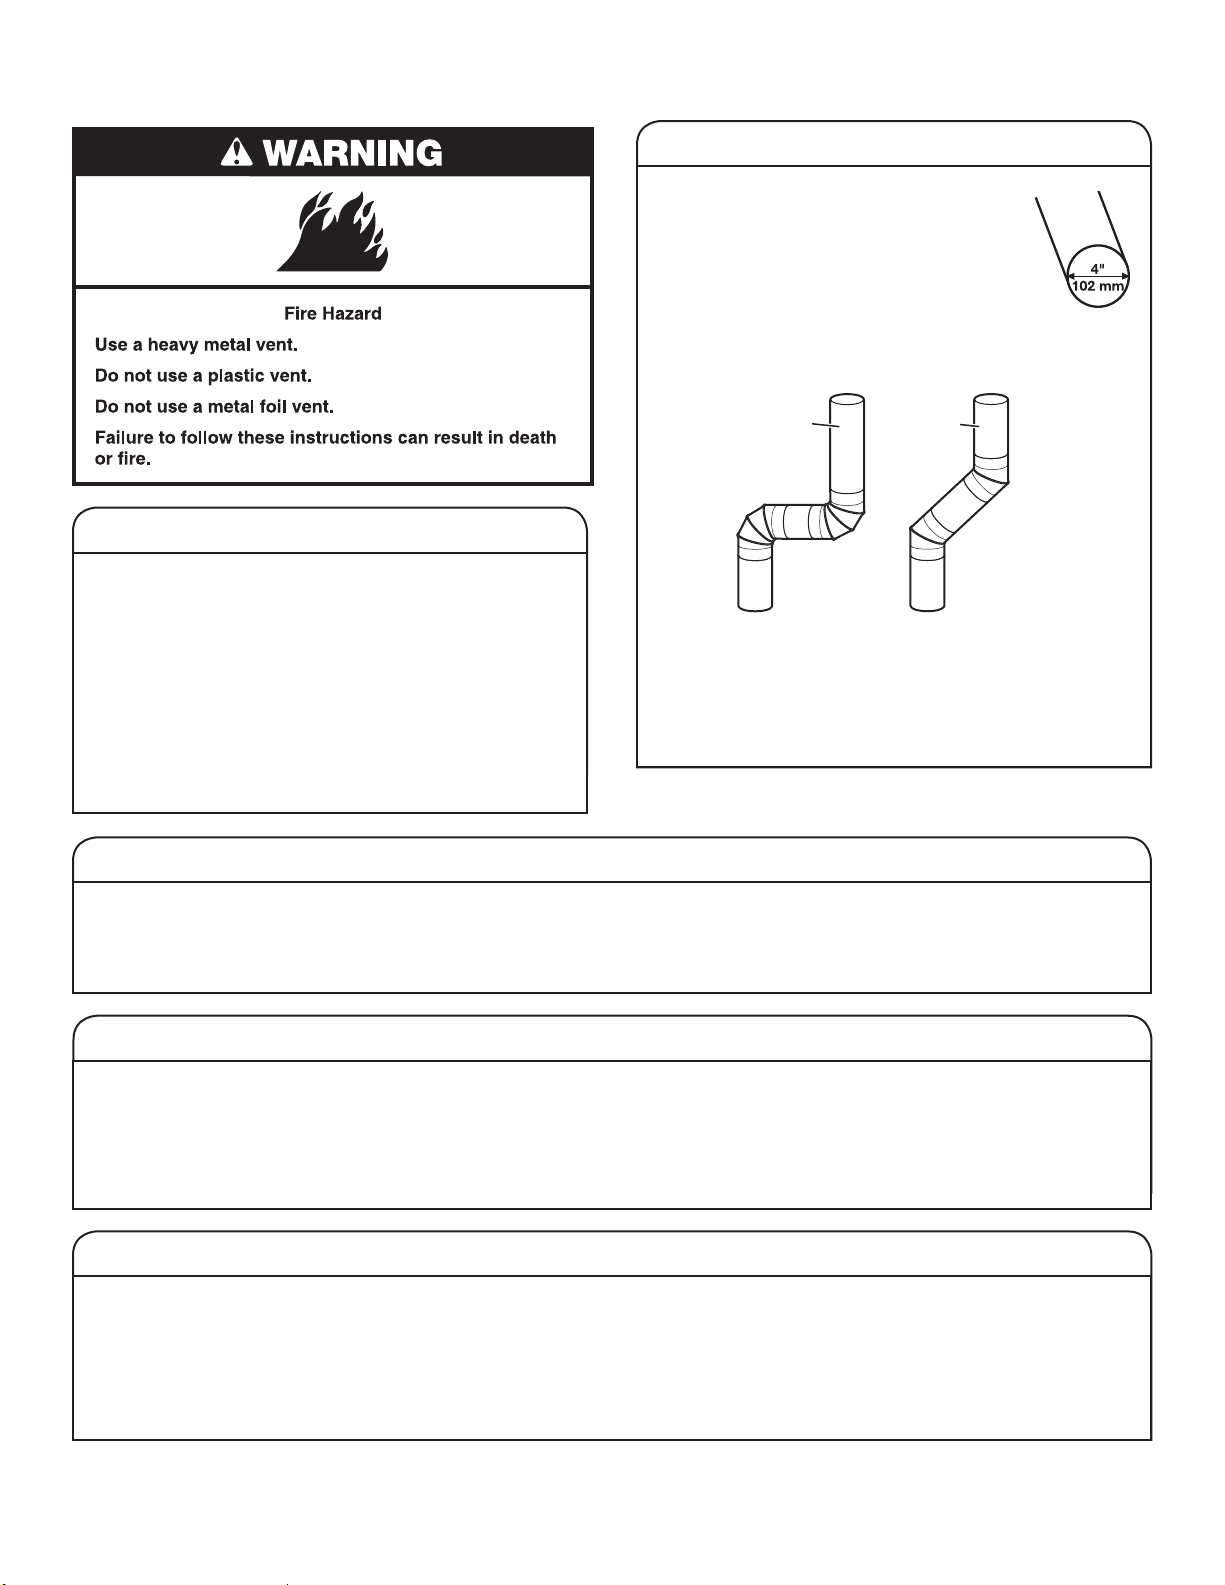
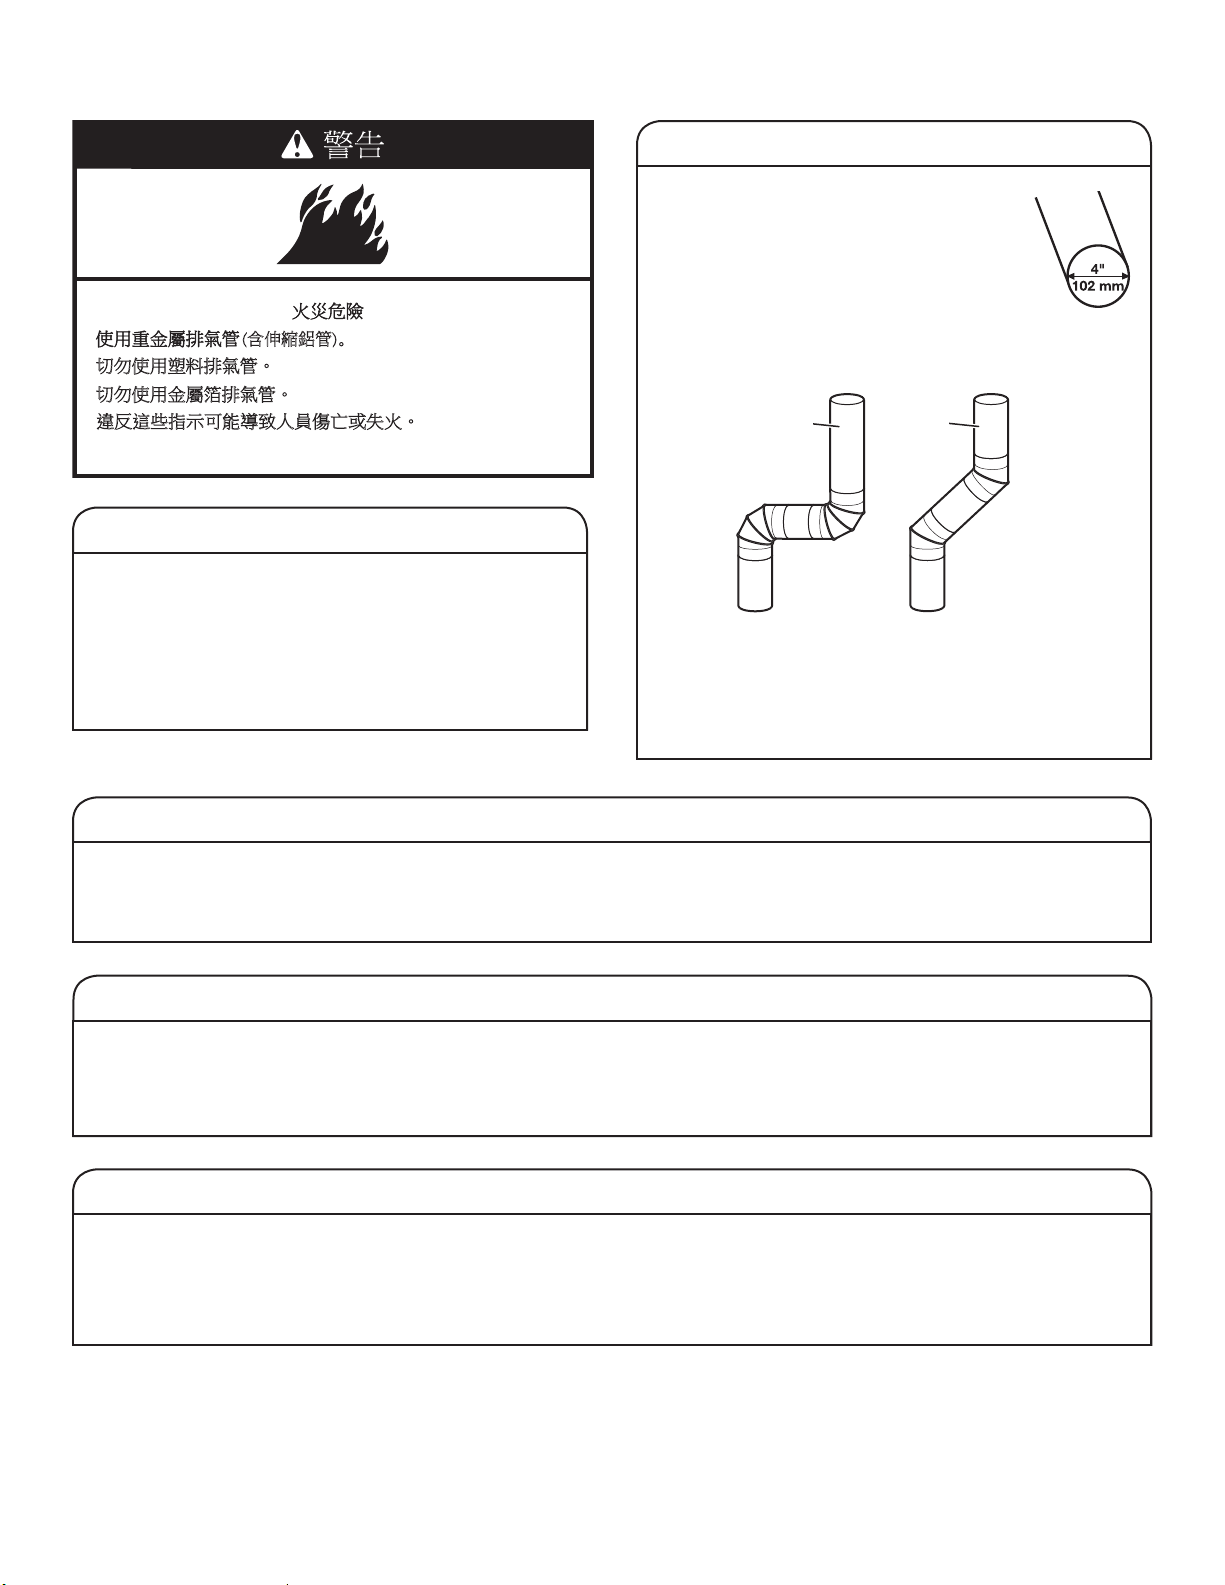
CHECK YOUR VENT SYSTEM FOR GOOD AIRFLOW
Good airow
Maintaining good airow
■
Cleaning your lint screen before each load.
■
Replace plastic or foil vent material
with 4" (102 mm) diameter heavy, rigid
vent material.
Good
Better
■
Use the shortest length of vent possible.
■
Use no more than four 90° elbows in a vent system;
each bend and curve reduces airow.
■
Remove lint and debris from the exhaust hood.
■
Remove lint from the entire length of the vent system
at least every 2 years. When cleaning is complete, be
sure to follow the Installation Instructions supplied with
your dryer for nal product check.
■
Clear away items from the front of the dryer.
Use automatic cycles for better fabric care and energy savings
Using automatic (not timed) cycles, the drying air temperature and moisture levels are sensed in the load. This sensing process
occurs throughout the entire drying cycle and turns off once the load reaches your selected dryness level. Using the NORMAL
dryness level provides the optimal energy savings.
When using Timed Dry/Quick Dry, the dryer runs for the amount of time you select, which could result in shrinkage, wrinkling,
and static due to over-drying. Use Timed Dry for the occasional damp load that needs a little more drying time or when using
the drying rack.
Tips for getting the best performance from your steam dryer (on some models)
■
Results may vary depending on fabric. 100% cotton
garments with wrinkle-free nish may yield better results
than those without. 100% cotton items may require
additional touching up after cycles that use steam.
■
Use of fabric softener sheet is not recommended with
cycles that use steam. It may cause temporary staining
on clothes.
■
Cycles that use steam are not recommended for items that
have been starched. Wash any starched or new garments
prior to using a cycle that uses steam.
■
The Steam Refresh Cycle is best for smoothing out wrinkles
and reducing odors from loads consisting of dry items of
wrinkle-free cotton, cotton-polyester blend, common knits,
and synthetics.
Along with heat, dryers require good airow to efciently
dry laundry. Proper venting will reduce your drying times
and improve your energy savings. See the Installation
Instructions.
The venting system attached to the dryer plays a big
role in good airow. Blocked or crushed vents as well
as improper venting installation will reduce airow and
dryer performance.
Service calls caused by improper venting are not covered
by the warranty and will be paid by the customer, regardless
of who installed the dryer. To clean or repair venting, contact
a venting specialist.
EcoBoost option
The EcoBoost option will default on only for the Regular/Normal cycle and is only available on that cycle.
This option allows you to increase your energy savings by using a slightly lower heat level. The EcoBoost option will increase
drying times by approximately 40 minutes, which will be reected on the LED Display. If optimal time is desired, touch ECOBOOST
to turn off this option.
7
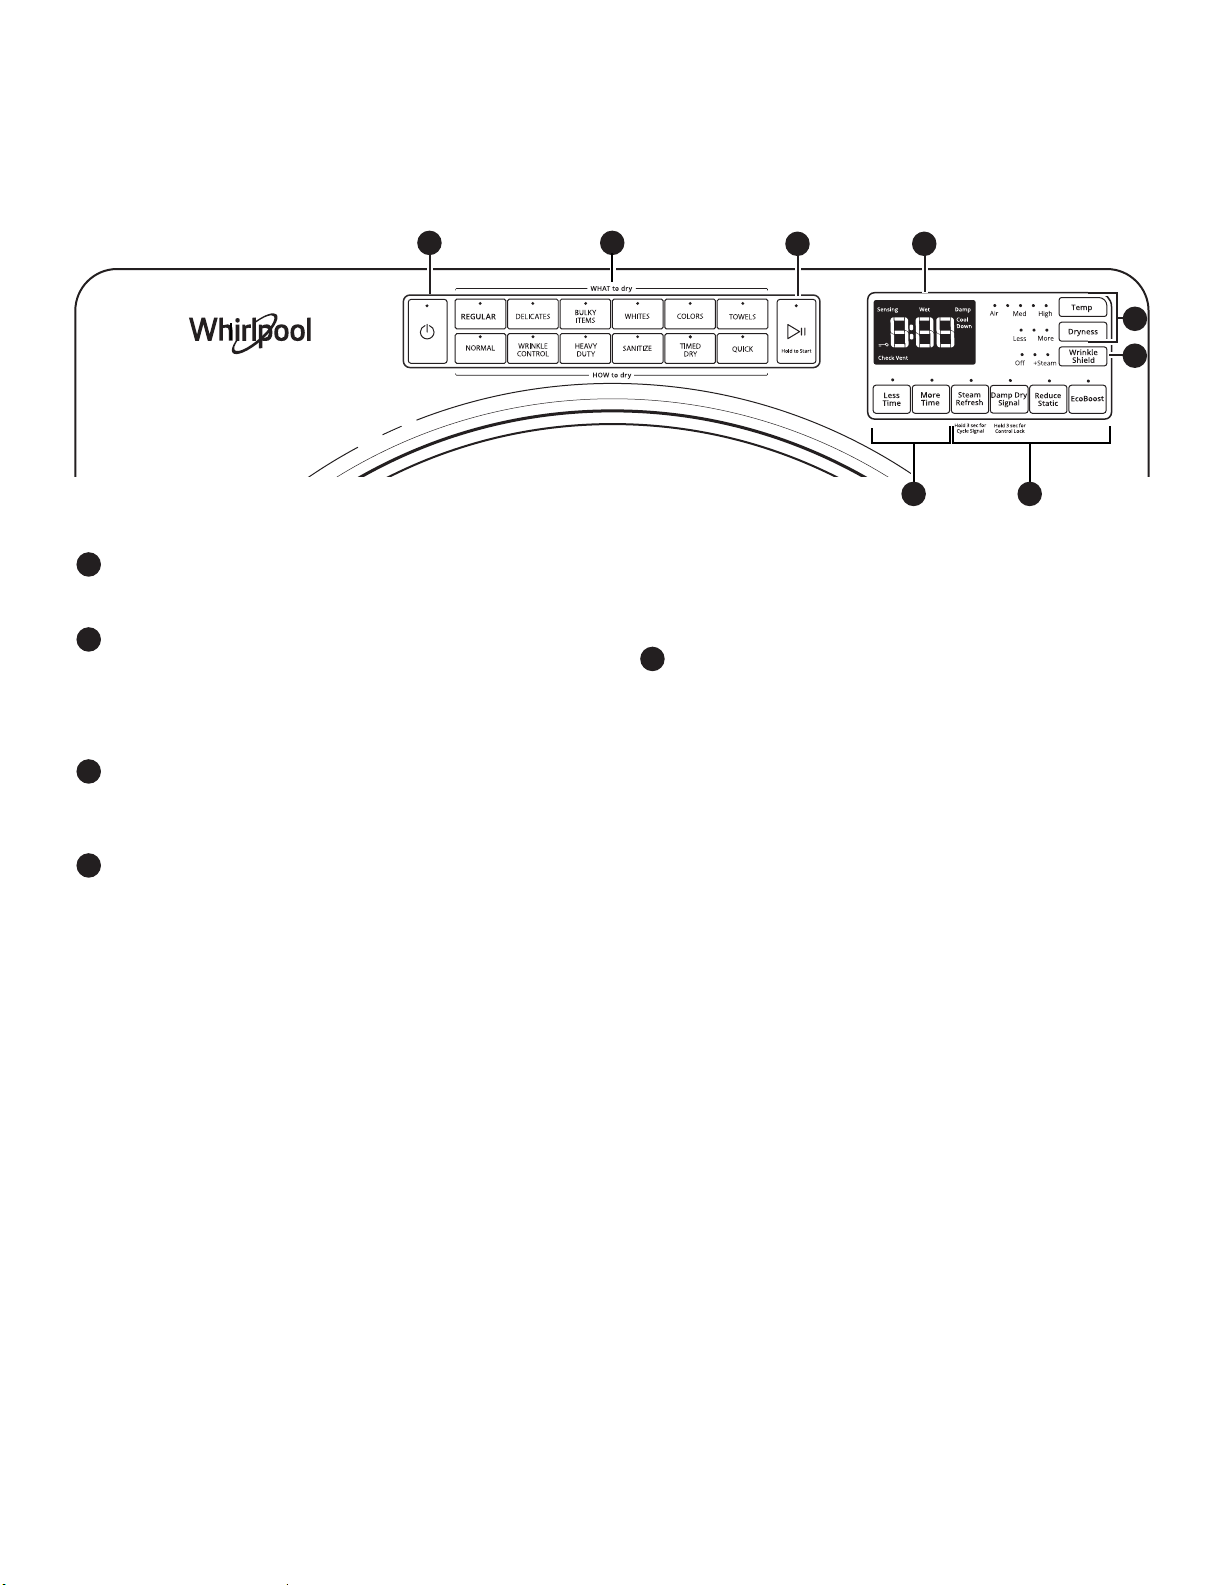
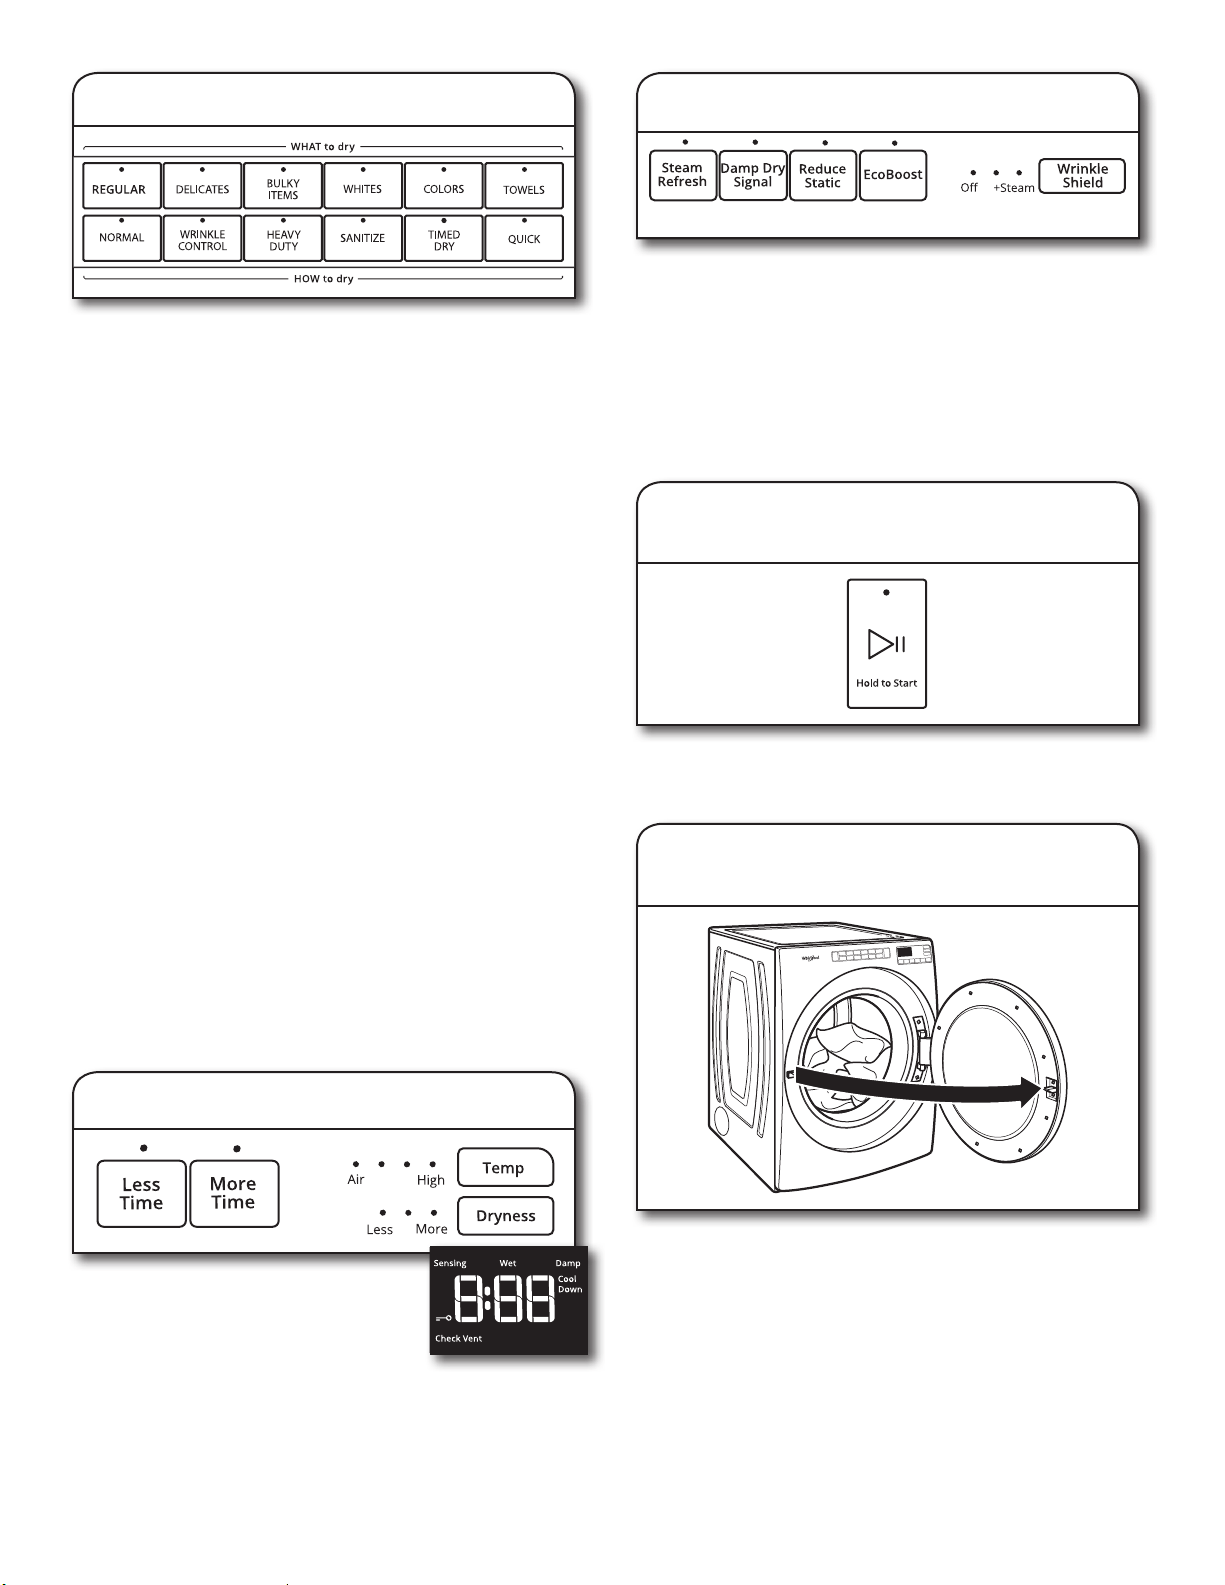
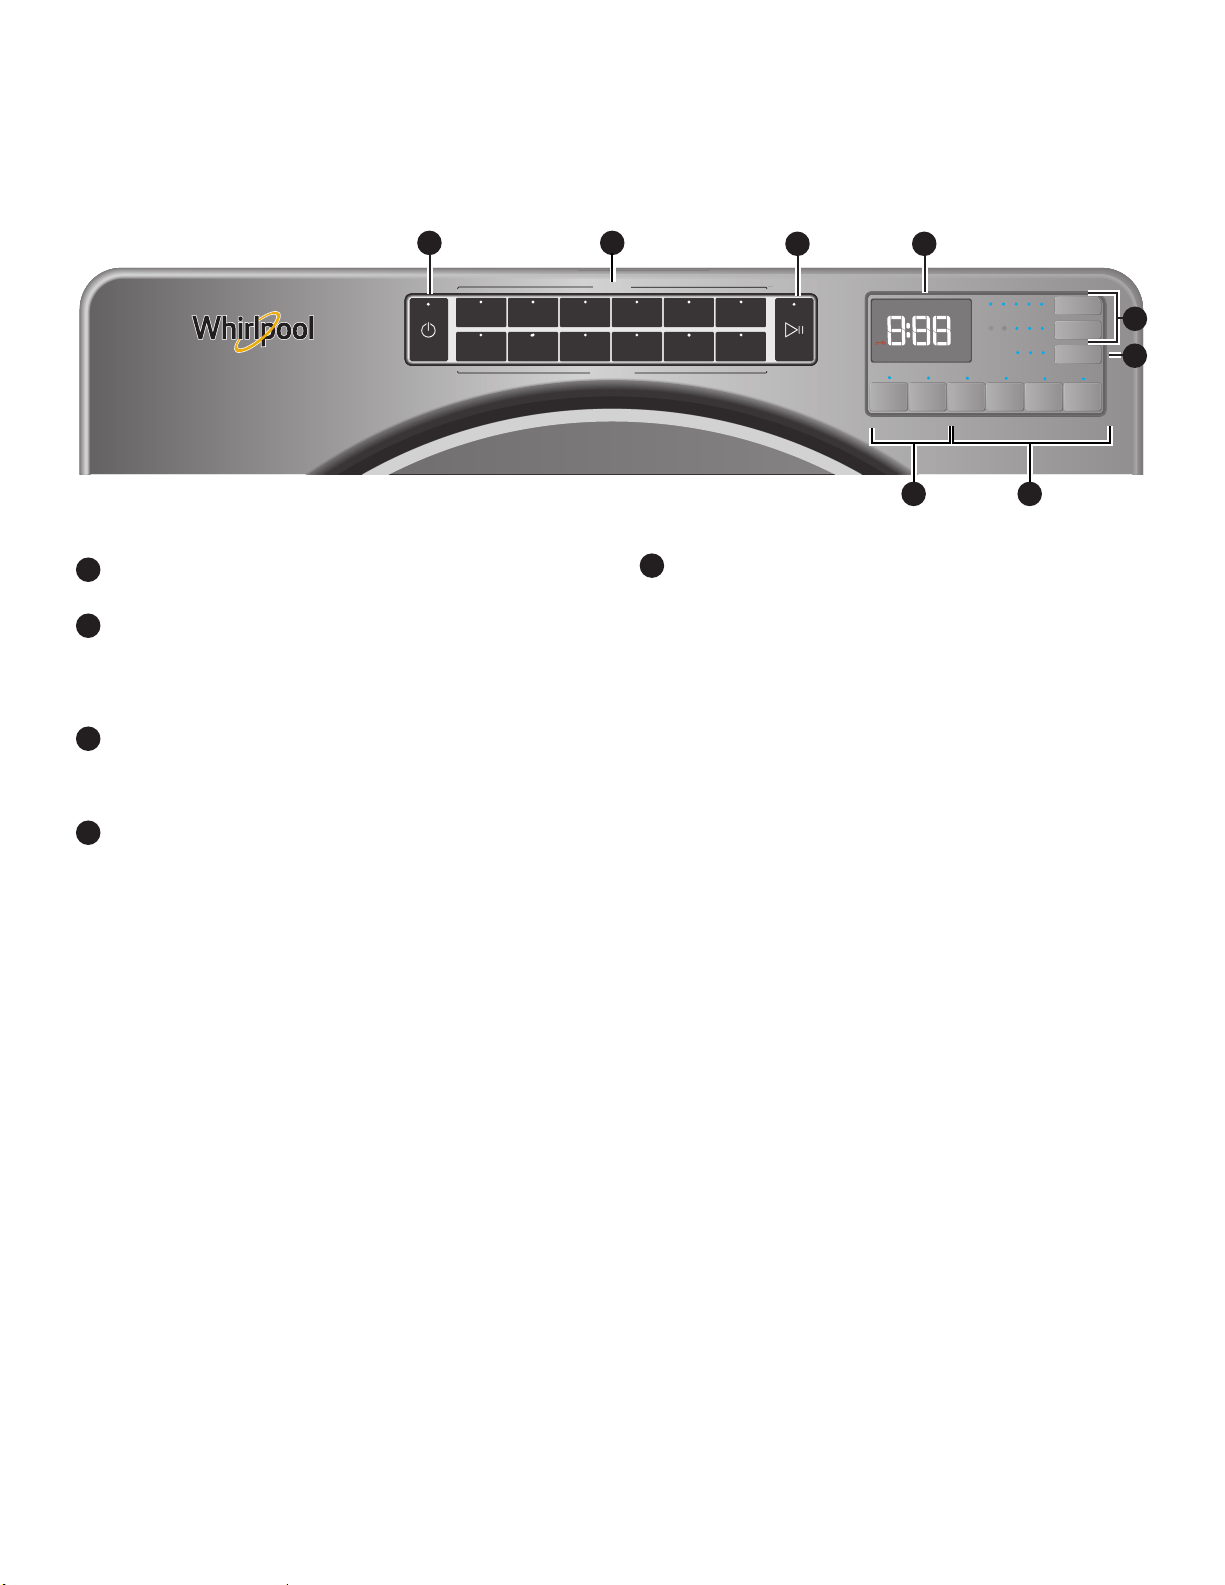
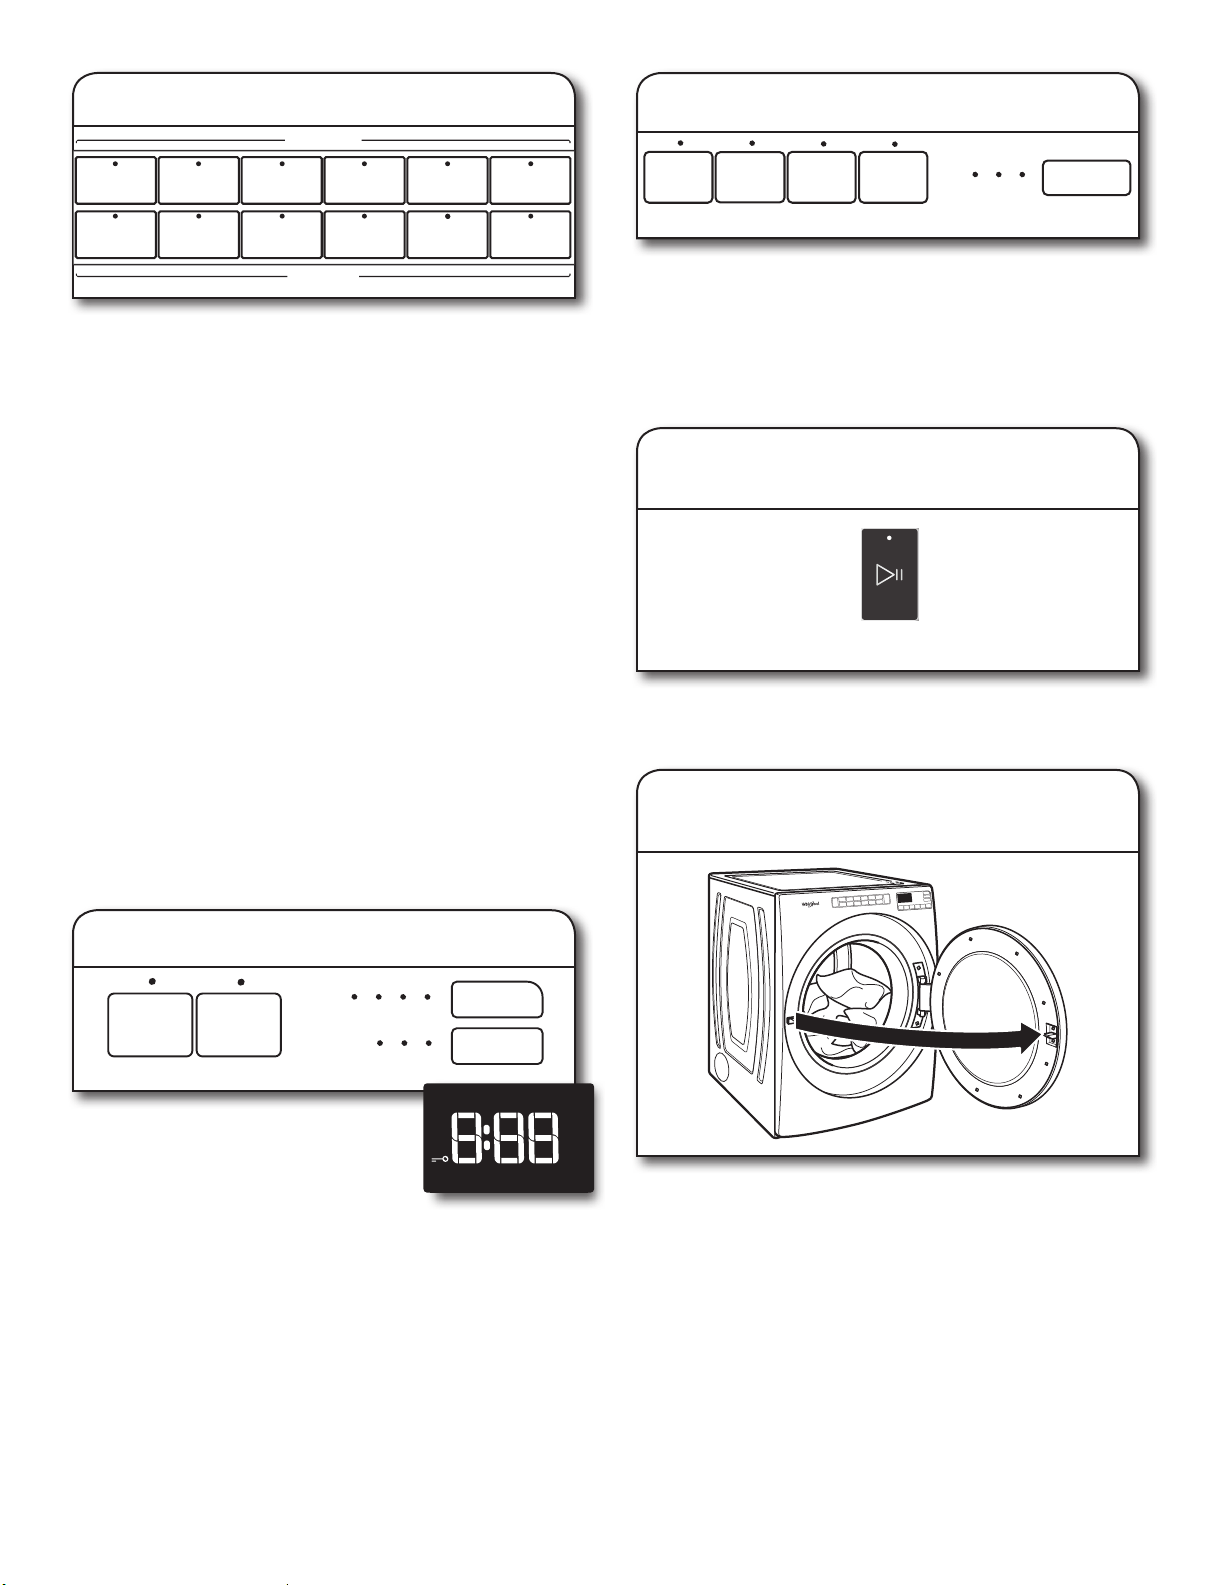
CONTROL PANEL AND FEATURES
POWER
Touch to turn the dryer on and off. Touch to stop/cancel
a cycle at any time.
WHAT TO DRY/HOW TO DRY
Once a “What to Dry” is selected, the dryer automatically
selects the recommended or last-used “How to Dry”
option, as well as the recommended/last-used modiers.
Both the “How to Dry” and modiers can be changed if
desired. See the “Cycle Guide” for details.
START/PAUSE
Touch and hold until LED counts down “3-2-1” and the
dryer starts; then let go to start a cycle, or touch once
while a cycle is in process to pause it.
MODIFIERS
Use to select available modiers for your dryer. Not all
cycles and options are available on all models.
Temp
When using Timed Dry/Quick Cycle, you may select
a dry temperature based on the type of load you are
drying. Use the warmest setting that is safe for the
garments in the load. Follow garment label instructions.
NOTE: Automatic Cycles will give you up to four
temperatures to adjust, depending on the model and
the “What to Dry” or “How to Dry” selections that have
been made.
Dryness
You may adjust the Dryness on Automatic Cycles
(except for the Sanitize cycle), if desired.
NOTE: Dryness is for use with Automatic Cycles only.
1
2
3
4
Not all features and cycles are available on all models.
More Time/Less Time Timed Dry Adjust
Touch MORE TIME or LESS TIME with the Timed Dry/
Quick cycle to increase or decrease the length of the
cycle.
OPTIONS
Use to select available options for your dryer. Not all
cycles and options are available on all models.
Wrinkle Shield
Option
If you will be unable to remove a load immediately,
touch WRINKLE SHIELD to add up to 150 minutes of
periodic tumbling to help reduce wrinkling. You may
select the “+ Steam” setting (on some models) to add
a short steam cycle after 60 minutes to help smooth
out wrinkles.
NOTE: If you open the dryer door prior to the end
of the Wrinkle Shield option, the dryer will go into
standby.
Steam Refresh (steam models only)
This cycle is best for reducing wrinkles and odors
from dry items. Cycle time will increase, depending
on number of items. This is an independent cycle that
cannot be combined with any other cycle.
Cycle Signal
Use this option to turn the signal indicating the end
of a drying cycle to low, medium, high, or off. The
volume you select here will also be applied to the
Damp Dry Signal.
NOTE: You may also turn off the tones that sound
when a feature, setting, or option is touched. Touch
and hold CYCLE SIGNAL for about 3 seconds to turn
sounds to low, medium, high, or off.
5
NOTE: The control panel features a sensitive surface that responds to a light touch of your nger. To ensure your selections are
registered, touch the control panel with your ngertip, not your ngernail. When selecting a setting or option, simply touch the
appropriate button.
STEAM MODELS
1
2
3 6
4
5
4
5
8
Damp Dry Signal
Touch to turn the Damp Dry Signal on or off. When
selected, a series of beeps will sound when the load
is damp, but not completely dry. This will allow you to
take clothes out of the load that do not need to dry
completely. This option is available on some cycles.
The Damp Dry signal is selected as a default for the
Bulky Items/Normal, Bulky Items/Wrinkle Control,
and Bulky Items/Heavy Duty cycles, as a reminder
to manually reposition bulky loads midway through
the cycle.
Reduce Static (on some models)
Touch to add the Reduce Static option to selected
Automatic cycles. The dryer will automatically tumble,
pause, and introduce a small amount of moisture
into the load to help reduce static. This option adds
approximately 3 minutes to the total cycle time.
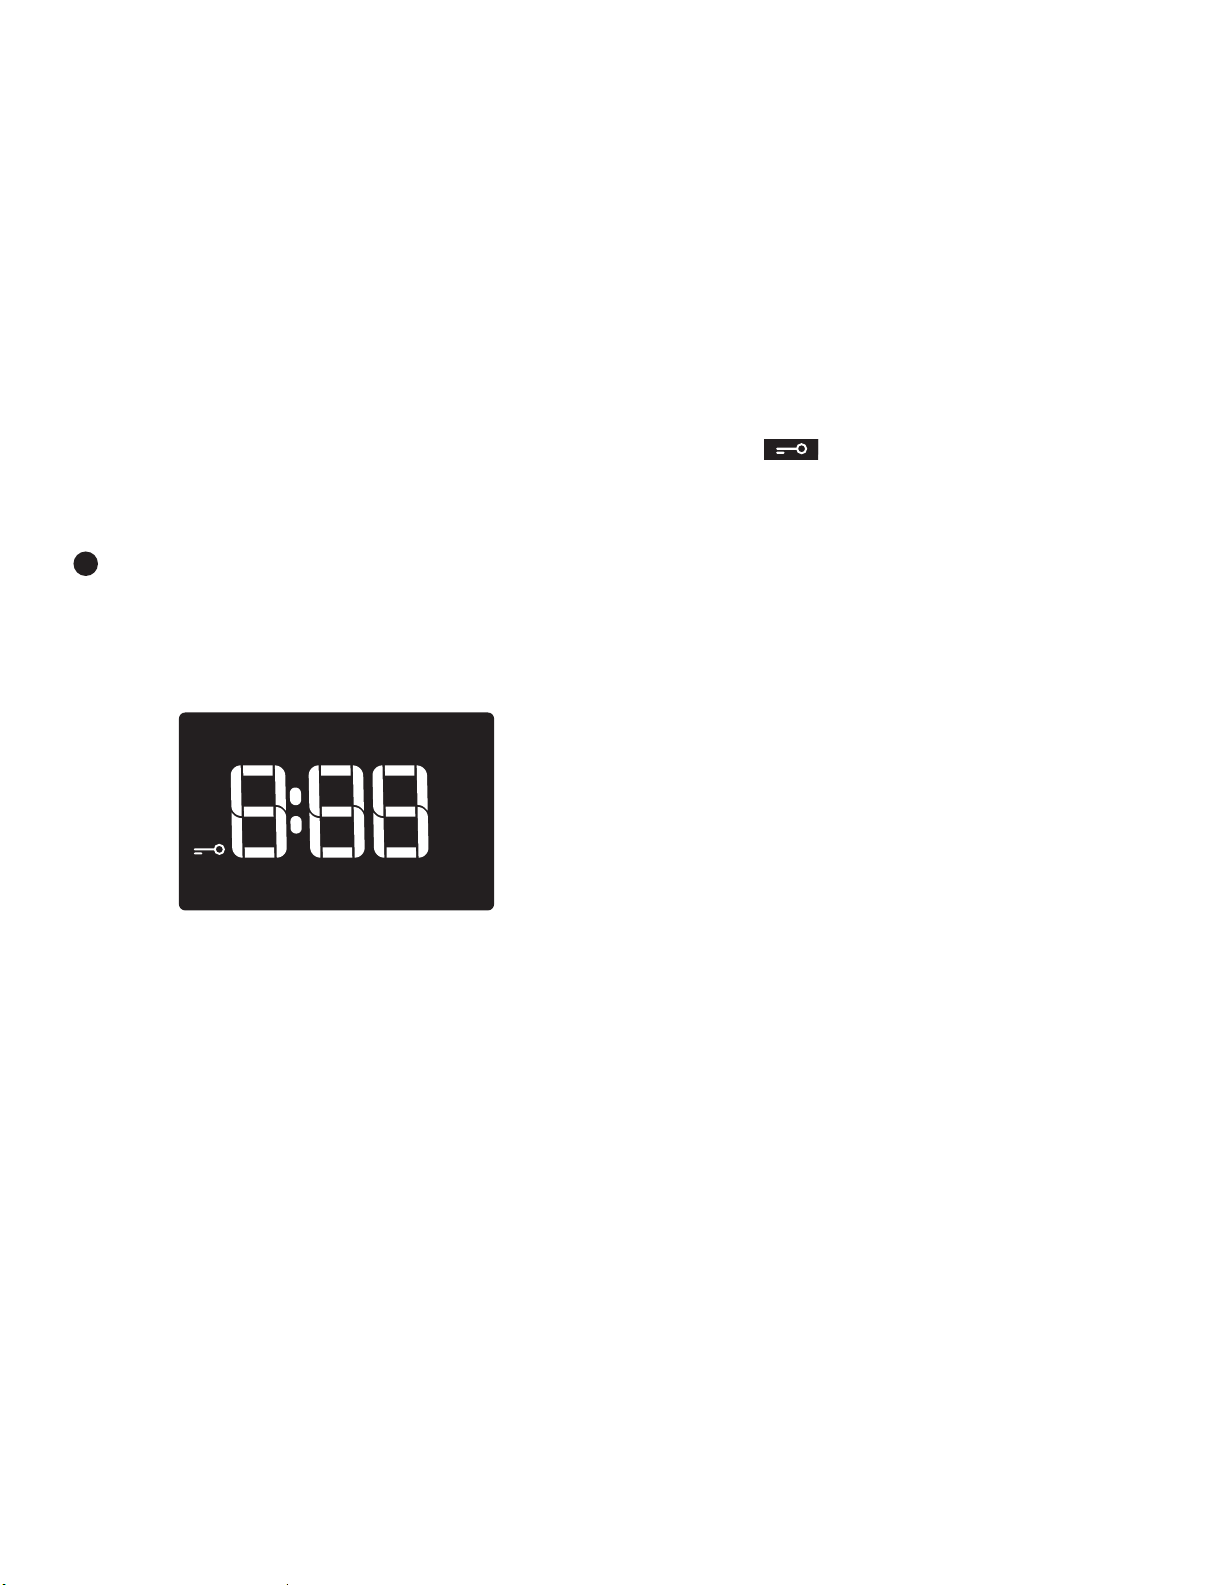
Control Lock
Use this option to lock the controls of the dryer
and avoid an accidental change in cycle options
or preferences during a drying cycle.
Touch and hold CONTROL LOCK or DAMP DRY
SIGNAL (depending on the model) for 3 seconds to
lock or unlock the controls of the dryer. During this
time, the LED Display will count down “3-2-1.”
Once the controls are locked, the LED Display
will display “Loc.”
NOTE: The Control Lock function may be enabled
when recovering from a power failure. To unlock the
control, touch and hold CONTROL LOCK or DAMP
DRY SIGNAL (depending on the model) for at least
3 seconds.
EcoBoost
Option
The EcoBoost option will default on only for the
Regular/Normal cycle and is only available on
that cycle. This option allows you to increase your
energy savings by using a slightly lower heat level.
The EcoBoost option will increase drying times by
approximately 40 minutes, which will be reected
on the LED Display. If optimal time is desired, touch
ECOBOOST to turn off this option.
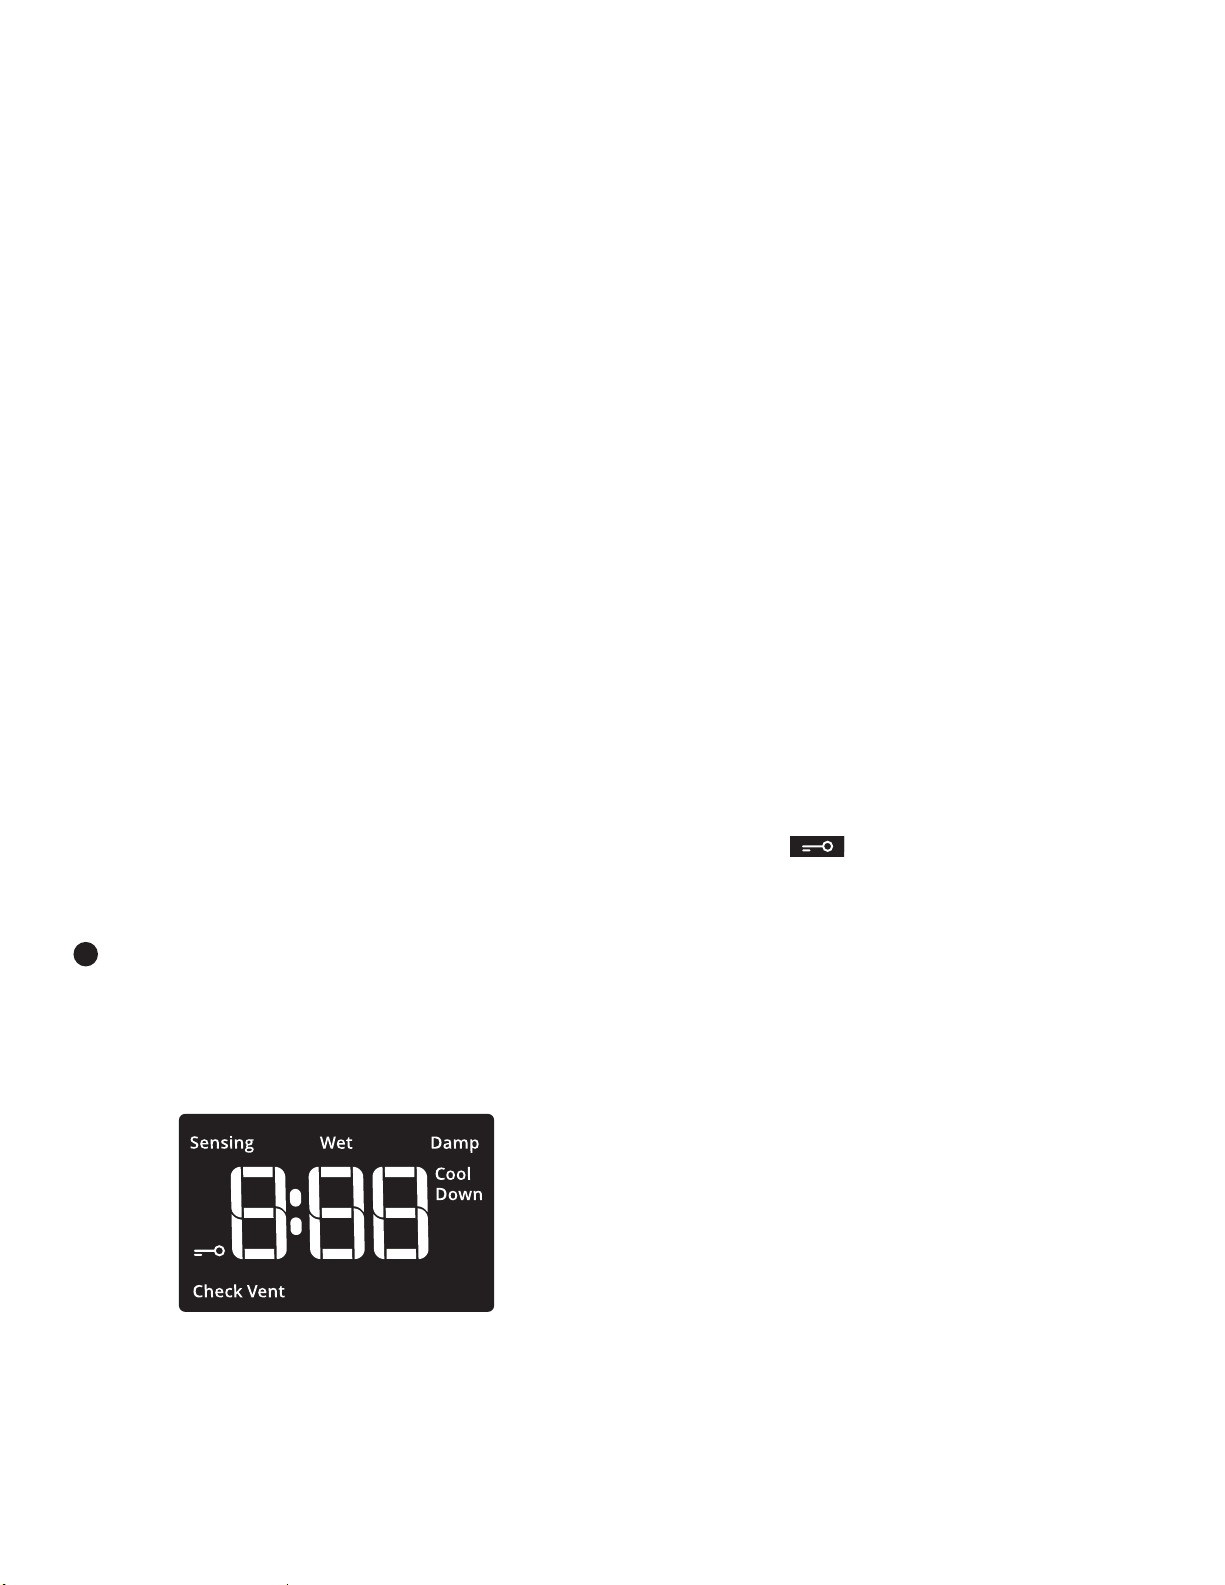
LED DISPLAY
When you select a cycle, its default settings will light up
and the Estimated Time Remaining (for Automatic Cycles)
will vary depending on “What to Dry” and “How to Dry”
selections, or actual time remaining for Timed Dry cycles
(for Manual Cycles) will be displayed.
CYCLE STATUS INDICATORS
The Cycle Status Indicators show the progress of a cycle.
Not all indicators are available on all models.
Sensing
The Sensing indicator will light periodically during Sensor
Cycles to indicate that the moisture sensor on the dryer is
operating. This indicator will not light during Timed Cycles
or options such as Wrinkle Shield.
6
Wet
The load is still wet and/or the cycle just started.
Damp
This indicator shows that the load is partially dried and
items that you may wish to hang up or iron while still
damp may be removed.
Cool Down
The dryer has nished drying with heat and is now
tumbling the load without heat to cool it down.
Check Vent
The Check Vent indicator is a feature available for
Automatic cycles only. This indicator will show the status
of airow through the dryer and the dryer vent system
for the dryer’s life. During the sensing phase at the
beginning of the cycle, the Check Vent light will come on
if a blocked vent or low airow issue is detected. This light
will stay on for the entire cycle. Should the Check Vent
light illuminate, refer to the “Troubleshooting” section
for potential solutions to the issue.
The light will be cleared upon completion of the cycle,
touching Power, or opening the door. The Check Vent light
will continue to illuminate during the cycle unless the root
cause is resolved.
REMEMBER: The dryer will continue to operate even
while the indicator is lit, but poor airow can impact dry
times and overall performance. For more information on
maintaining good airow, see “Check Your Vent System
for Good Airow.”
NOTE: If there are other error issues during a cycle,
the Check Vent indicator will not light up. See the
“Troubleshooting” section.
End
This will indicate that the selected cycle has ended
and the load may be removed from the dryer. If Wrinkle
Shield has been selected, the dryer may continue to
tumble the load, even if “End” is displayed.
Control Lock
This will illuminate once the controls are locked.
Appearance may vary.
9
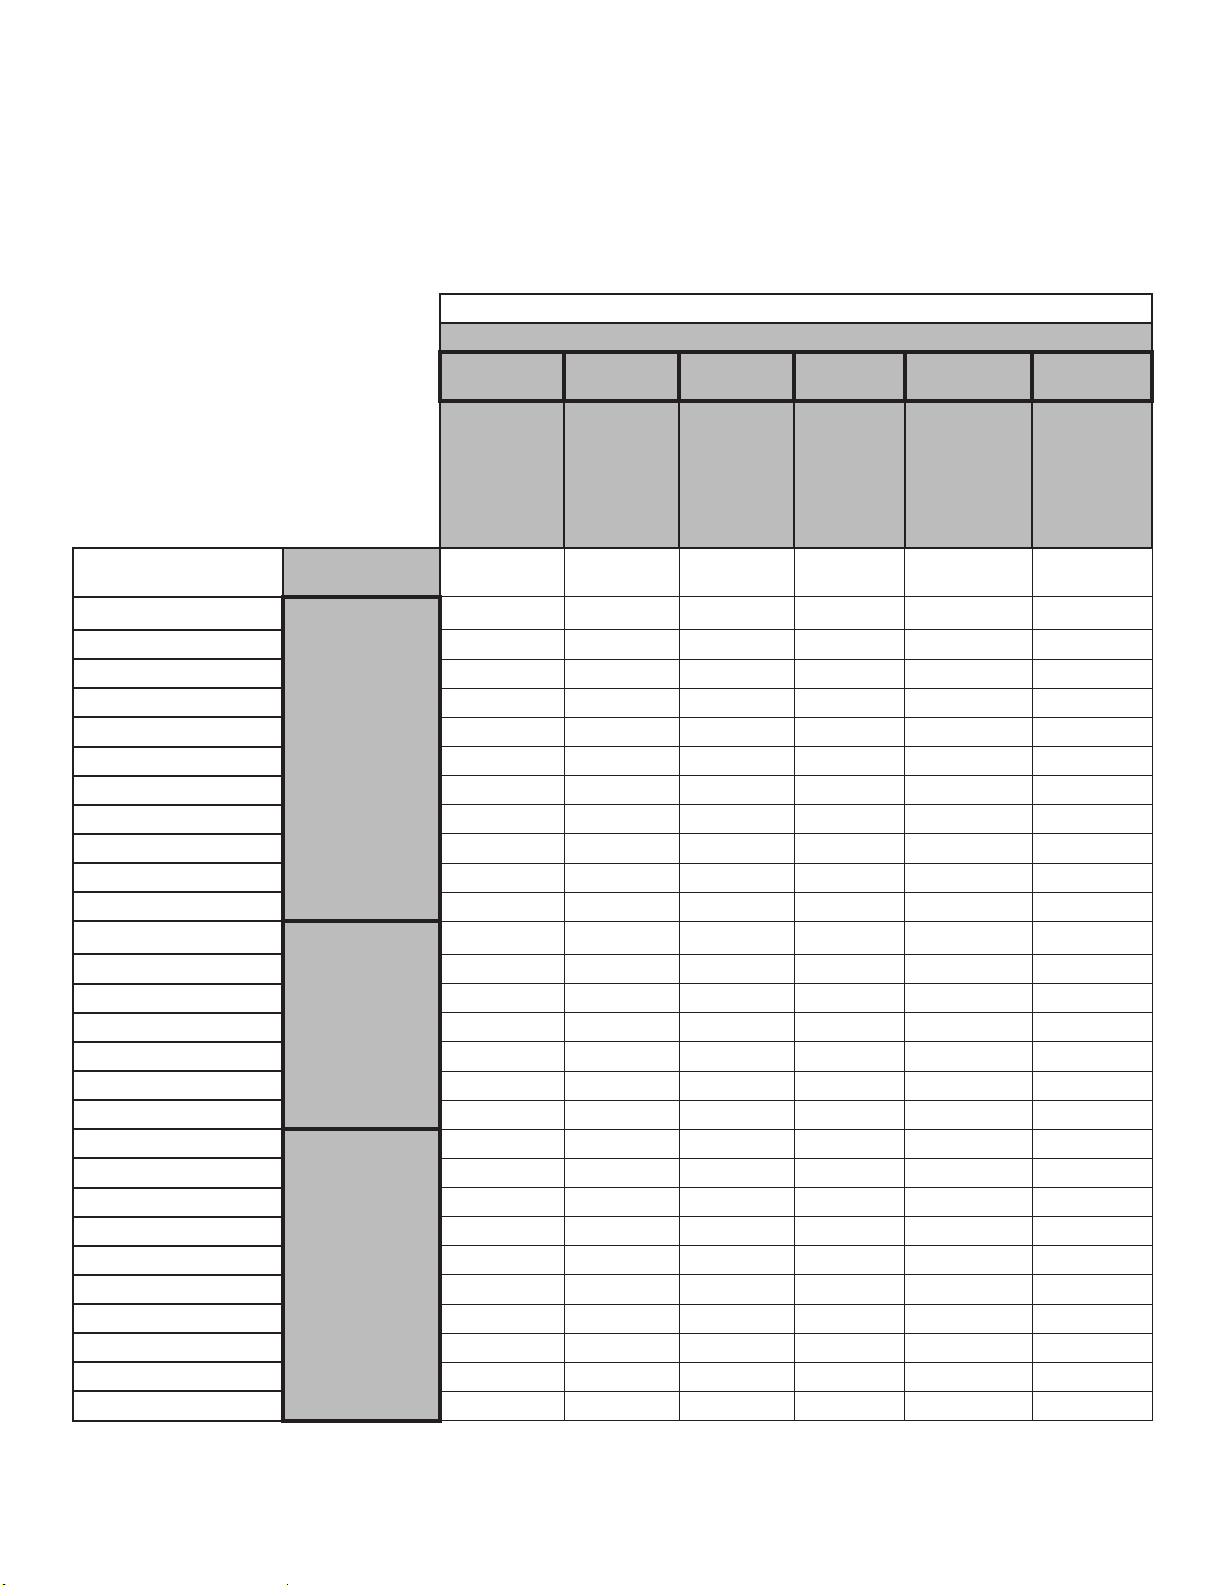
CYCLE GUIDE
How do you want to dry?
“How to Dry” Cycle Selection
Normal Wrinkle
Control
Heavy Duty
Sanitize*
Timed Dry Quick
Regular
Automatic
Sensor Cycle
stops when
dryness level
is reached.
High Heat
longer cycle
Automatic
Sensor Cycle
stops when
dryness level
is reached.
Hot High
Heat
Used to
kill 99.9%
of three
common
bacteria.
Set amount
of dry time
Dryer runs for
the amount of
time selected.
Set amount
of dry time
Dryer runs for
the amount of
time selected.
What do you
want to dry?
“What to Dry”
Cycle Selection
Baby Clothes
Regular
R
Pajamas
R
Handkerchiefs
a R
T-Shirts
R
Sweatshirts
a R
Jeans
a R
Cotton Drapes
R
Machine Wash Curtains
R
Tablecloth
R a
Business Casual
R
No-Iron Fabrics
R
Bras
Delicates
a R
Fabric Shower Curtain
R
Lingerie
a R
Sheers
R
Undergarments
a R
Wool
R
Dress Shirts/Pants
a R
Blankets
Bulky Items
R a
Fabric Rugs
R
Heavy Drapes
a R
Coats and Jackets
a R
Comforters
R a
Pet Bedding
a R
Pillows - Fiber Fill
a R
Sheets
R a
Sleeping Bags
R
Stuffed Animals
R
Your dryer has a unique user interface to help you select the best cycle you need for your load. The “What to Dry” “How to Dry” layout
guides you to the optimal cycle in two easy steps:
1. First determine what items are in the load that you are trying to dry. Use that to guide your “What to Dry” selection.
2. Then determine how you want the dryer to dry them by selecting the appropriate “How to Dry” selection. Modiers are preset for the
items being dried, but can be changed if desired.
To get the most energy savings and enhanced fabric care from your dryer, use the Automatic cycles. These cycles measure the drying
air temperature and moisture levels to turn the dryer off once the load reaches the selected dryness level. Dryer performance and
results may vary with service voltage less than 240.
For best fabric care, choose the cycle that
best ts the load being dried.
R – Recommended Cycle
a – Alternate Cycle
Blank – Cycle is available but not optimal.
* Extended high-heat drying cycle intended to help sanitize items such as sheets and towels. This cycle is not recommended for all
fabrics. For best results, this cycle should be run to completion to ensure sanitization and do not interrupt cycle.
10
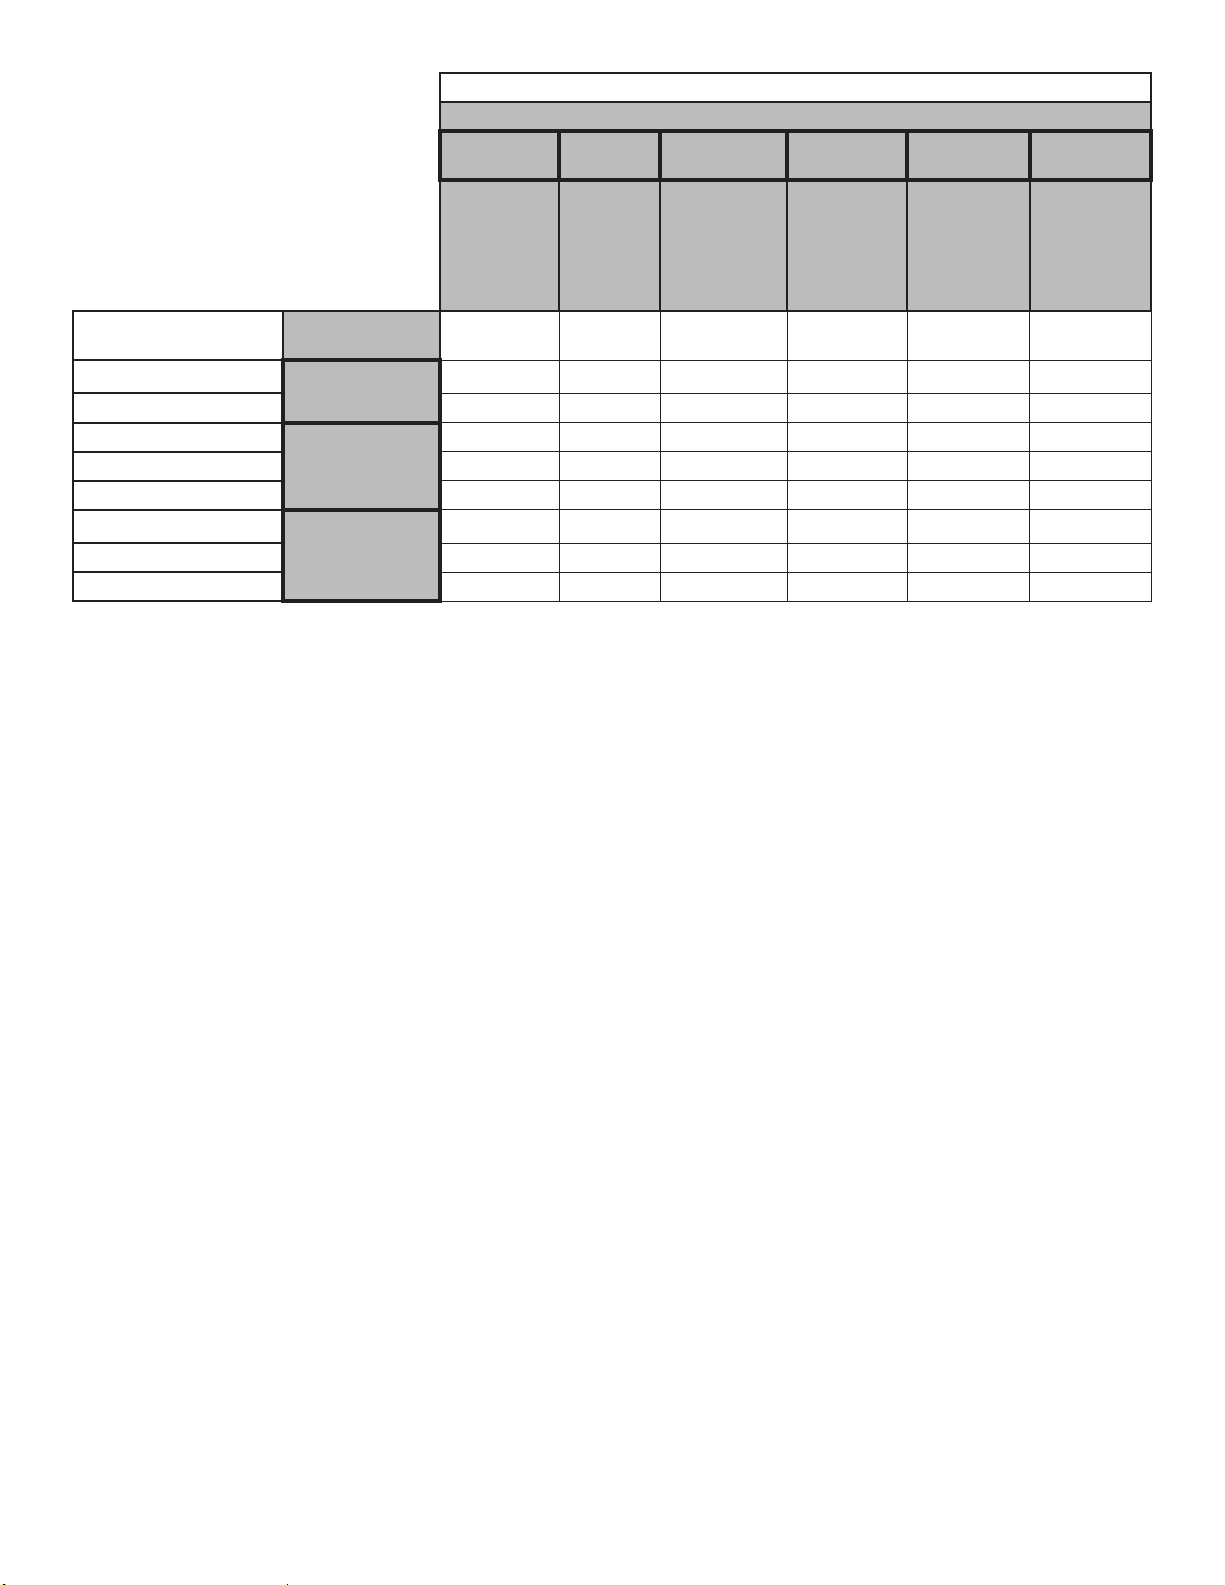
How do you want to dry?
“How to Dry” Cycle Selection
Normal Wrinkle
Control
Heavy Duty
Sanitize*
Timed Dry Quick
Regular
Automatic
Sensor Cycle
stops when
dryness level
is reached.
High Heat
longer cycle
Automatic
Sensor Cycle
stops when
dryness level
is reached.
Hot High Heat
Used to kill
99.9% of
three common
bacteria.
Set amount of
dry time
Dryer runs for
the amount of
time selected.
Set amount of
dry time
Dryer runs for
the amount of
time selected.
What do you
want to dry?
“What to Dry”
Cycle Selection
Cotton Undergarments
Whites
R a
White Napkins
R a
Athletic
Colors
R a
Performance Wear
R a
Colored Napkins
R a
Dish Cloths
Towels
a R a
Towels
a R a
Non-Rubber Lined Rugs
R
For best fabric care, choose the cycle that
best ts the load being dried.
R – Recommended Cycle
a – Alternate Cycle
Blank – Cycle is available but not optimal.
* Extended high-heat drying cycle intended to help sanitize items such as sheets and towels. This cycle is not recommended for all
fabrics. For best results, this cycle should be run to completion to ensure sanitization and do not interrupt cycle.
NOTE: Government energy certications for this model were based on the Regular + Normal Cycle, Highest Temperature Setting,
Normal Dryness Level, EcoBoost On. The as-shipped defaults were the same as the Government Energy Certication Settings except
the default Temperature Setting of Medium was adjusted to the Highest Temperature Setting.
11
3.
Touch POWER
Touch POWER to turn on the dryer.
USING YOUR DRYER
1.
Clean the lint screen
Clean the lint screen before each load. Pull the lint screen
straight up. Roll lint off the screen with your ngers. Do
not rinse or wash screen to remove lint. Wet lint is hard
to remove. Push the lint screen rmly back into place.
For additional cleaning information, see “Dryer Care.”
2.
Load the dryer
Open the door by pulling on the handle. Place laundry in the
dryer. Add a dryer sheet to wet load, if desired. Close the door.
IMPORTANT: Do not tightly pack the dryer. Items need
to tumble freely. Tightly packing can lead to poor drying
performance and may increase wrinkling and tangling.
WARNING: To reduce the risk of re, electric shock, or injury
to persons, read the Important Safety Instructions before
operating this appliance.
12
4.
Select type of load to dry
First select a cycle from the “What to Dry” (Automatic cycles)
options; then select a “How to Dry” option to get the best
combination cycle available for the type of items you are
going to dry. You may also select the Sanitize cycle for a long,
high-heat cycle which has been proven to reduce household
bacteria. The Sanitize cycle overrides previous selections and
cannot be modied. See “Cycle Guide” for cycle details. Not
all cycles are available on all models.
Automatic Cycles:
You can select a different dryness level, depending on your
load. Touch DRYNESS to scroll to Less to More. Selecting
Less to More automatically adjusts the dryness level at which
the dryer will shut off. Dryness level can be changed in the rst
5-8 minutes of the cycle.
Automatic Cycles give the best drying in the shortest time.
Drying time varies based on fabric type, load size, and
dryness setting.
NOTE: Automatic Cycles will give you up to four temperatures
to adjust, depending on the model and the “What to Dry” or
“How to Dry” selections that have been made.
TIMED DRY Cycle:
When you select Timed Dry/Quick, the default time appears
in the display. Touch MORE TIME or LESS TIME to increase
or decrease the time in 5-minute increments.
The default temperature may be changed by touching Temp
until the desired dry temperature is lit.
Steam Refresh Cycles (on some models):
Select Steam Refresh to reduce odors and light wrinkles in
dry loads consisting of wrinkle-free cotton, cotton-polyester
blends, common knits, and synthetics. If you will be unable
to remove a load immediately, touch WRINKLE SHIELD to add
up to 150 minutes of periodic tumbling. You may select the
+ Steam setting to add a short steam cycle after 60 minutes to
help smooth out wrinkles.
7.
Touch and hold START/PAUSE
to begin cycle
To begin the cycle, touch and hold START/PAUSE until the
display counts down “3-2-1” and the dryer starts.
8. Remove garments promptly
after cycle is nished
Promptly remove garments after cycle has completed
to reduce wrinkling.
5.
Adjust cycle modiers, if desired
You may adjust different settings,
depending on what you are drying and
how you are going to dry the item. Use Air
Dry for items like feather pillows, plastic
shower curtains, rubber-backed rugs
and mats and vinyl tablecloths.
NOTE: Not all options and modiers
are available with all cycles. Not all cycles
are on all models.
6.
Select any additional options
Add additional options such as Reduce Static, Wrinkle Shield,
and/or EcoBoost (on some models) by touching that option. If
you will be unable to remove the load promptly, select Wrinkle
Shield before touching START/PAUSE. You may select the
“+ Steam” setting (on some models) to add a short steam
cycle after 60 minutes to help smooth out wrinkles.
NOTE: Not all options and settings are available with all
cycles.
Steam Model shown.
13
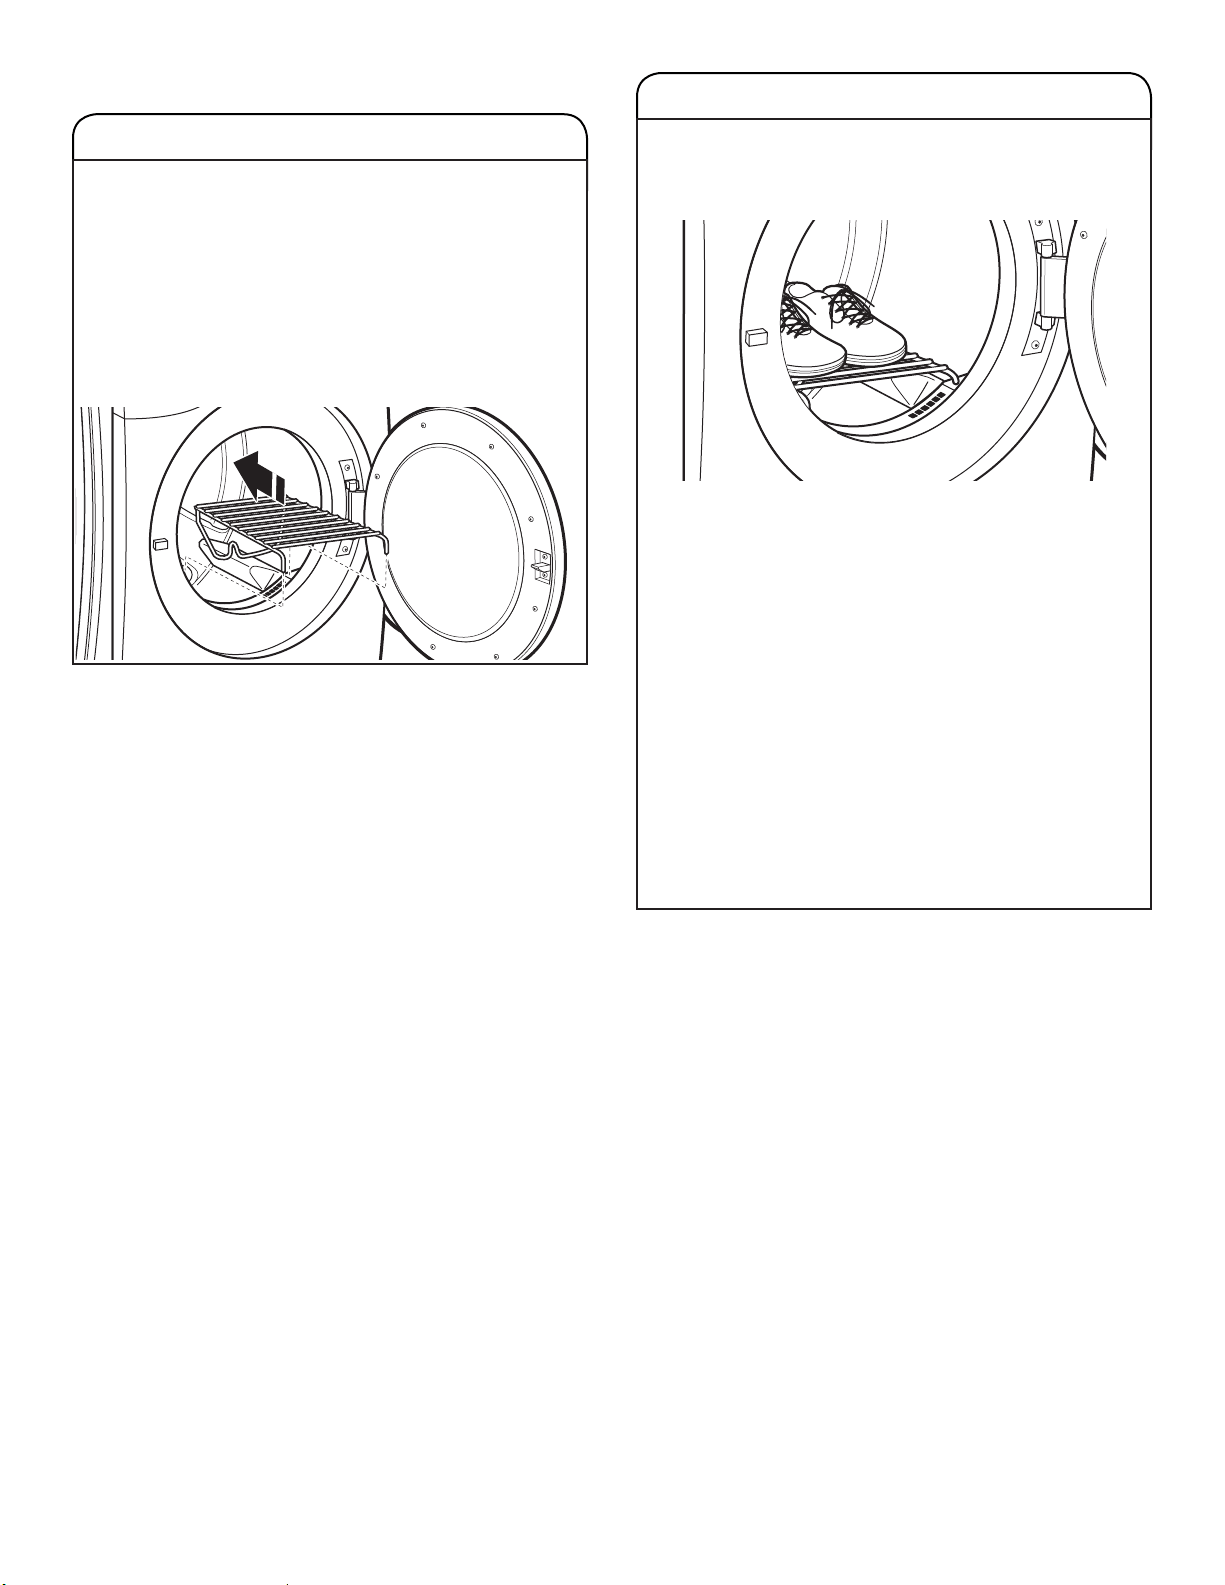
ADDITIONAL FEATURES
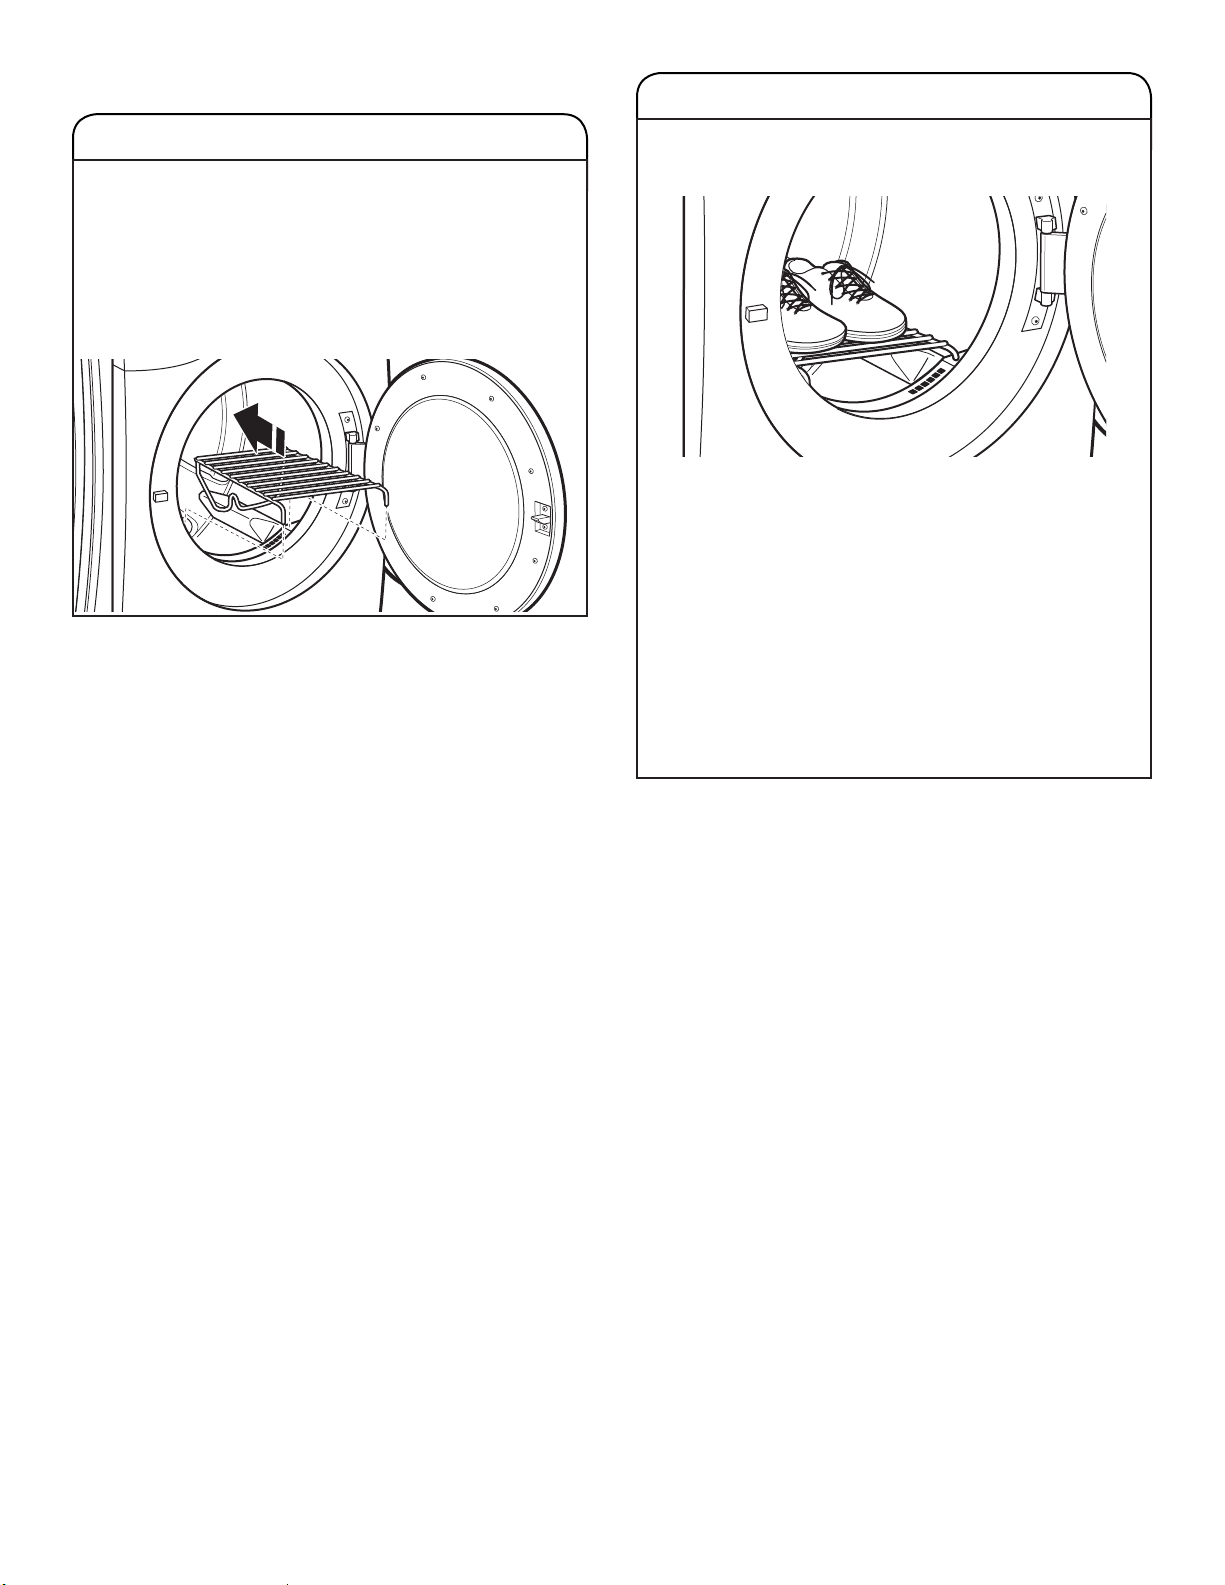
USING THE DRYING RACK (some models)
Use the Drying Rack for items that you do not want to
tumble dry, such as sweaters and tennis shoes. When
you use the drying rack, the drum continues to turn,
but the rack remains stationary.
The drying rack is intended for use with the Manual Dry/
Timed Dry cycles only. The drying rack cannot be used
with Automatic cycles.
To use the drying rack:
IMPORTANT: Do not remove the lint screen.
1. Open dryer door.
USING THE DRYING RACK (cont.)
2. Align the two hooks on the front of the drying rack
with the holes in the dryer door opening and press
down fully into holes. Rest the rear support on the
dryer back ledge.
3. Place wet items on top of the drying rack. Allow space
around items for air to circulate. The drying rack does
not move, but the drum will rotate; be sure to leave
adequate clearance between items and the inside of
the dryer drum. Make sure items do not hang over the
edges or between drying rack grille.
4. Close the door.
5. Select a Timed Dry/Air Only, or Low Temperature cycle.
Items containing foam, rubber, or plastic must be dried
on a clothesline or by using the Air Only setting.
6. When the cycle is selected, the Estimated Time
Remaining display shows the default time. You can
change the actual time in the cycle by increasing or
decreasing the cycle time.
7. Start the dryer.
NOTE: Check the lint screen and remove any lint
accumulated from items dried on the drying rack
after the cycle is nished.

14
CLEANING THE LINT SCREEN
Every load cleaning
The lint screen is located in the door opening of the dryer.
The control panel has an indicator light “Check Lint” to
remind you to clean the lint screen after each load. A
screen blocked by lint can increase drying time.
To clean:
1. Pull the lint screen straight up. Roll lint off the screen
with your ngers. Do not rinse or wash screen to remove
lint. Wet lint is hard to remove.
2. Push rmly back into place.
IMPORTANT:
■
Do not run the dryer with the lint screen loose,
damaged, blocked, or missing. Doing so can cause
overheating and damage to both the dryer and fabrics.
■
If lint falls off the screen into the dryer during removal,
check the exhaust hood and remove the lint. See
“Venting Requirements” in the Installation Instructions.
As-needed cleaning
Laundry detergent and fabric softener residue can build
up on the lint screen. This buildup can cause longer
drying times for your clothes, or cause the dryer to stop
before your load is completely dry. The screen is probably
clogged if lint falls off while the screen is in the dryer.
Clean the lint screen with a nylon brush every 6 months,
or more frequently, if it becomes clogged due to a residue
buildup.
To wash:
1. Roll lint off the screen with your ngers.
2. Wet both sides of lint screen with hot water.
3. Wet a nylon brush with hot water and liquid detergent.
Scrub lint screen with the brush to remove residue
buildup.
4. Rinse screen with hot water.
5. Thoroughly dry lint screen with a clean towel.
Reinstall screen in dryer.
DRYER CARE
CLEANING THE DRYER LOCATION
Keep dryer area clear and free from items that would
block the airow for proper dryer operation. This includes
clearing piles of laundry in front of the dryer.
CLEANING THE DRYER INTERIOR
To clean dryer drum
1. Use a mild hand dish detergent mixed at a low
concentration with very warm water, and rub with
a soft cloth.
2. Rinse well with a wet sponge or towel.
3. Tumble a load of clean clothes or towels to dry drum
OR
Use a microber cloth and hot water in a spray bottle
to clean the drum and a second microber towel to dry.
NOTE: Garments that contain unstable dyes, such as
denim blue jeans or brightly colored cotton items, may
discolor the rear of the dryer interior. These stains are
not harmful to your dryer and will not stain future loads
of clothes. Dry unstable dye items inside out to avoid
transfer of dye.
REMOVING ACCUMULATED LINT
From Inside the Dryer Cabinet
Lint should be removed every 2 years, or more often,
depending on dryer usage. Cleaning should be done by a
qualied appliance servicer or ventilation system cleaner.
From the Exhaust Vent
Lint should be removed every 2 years, or more often,
depending on dryer usage.

15
SPECIAL INSTRUCTIONS
FOR STEAM MODELS
Water Inlet Hose
Replace inlet hose and hose screen after 5 years of use
to reduce the risk of hose failure. Periodically inspect and
replace inlet hose if bulges, kinks, cuts, wear, or leaks
are found.
When replacing your inlet hose, record the date
of replacement.
To Winterize the Dryer
1. Unplug dryer or disconnect power.
2. Shut off water faucet.
3. Disconnect water inlet hose from faucet and drain.
To Use the Dryer Again
1. Flush water pipes. Reconnect water inlet hose to faucet.
Turn on water faucet.
2. Plug in dryer or reconnect power as described in the
Installation Instructions.
NON-USE, STORAGE, AND MOVING CARE
Steam models only: Install and store your dryer where it
will not freeze. Because some water may stay in the hose,
freezing can damage your dryer. If storing or moving your
dryer during freezing weather, winterize it.
Non-Use or Storage Care
Operate your dryer only when you are at home. If you will
be on vacation or not using your dryer for an extended
period of time, you should:
1. Unplug dryer or disconnect power.
2. Clean lint screen. See “Cleaning the Lint Screen.”
3. Turn off the water supply to the dryer. This helps to
avoid unintended ooding (due to a water pressure
surge) while you are away.
Moving Care
For power supply cord-connected dryers:
1. Unplug the power supply cord.
2. Gas models only: Close shut-off valve in gas supply line.
3. Gas models only: Disconnect gas supply line pipe and
remove ttings attached to dryer pipe.
4. Gas models only: Cap the open fuel supply line.
5. Steam models only: Shut off water faucet.
6. Disconnect the water inlet hose from faucet, then drain
the hose. Transport hose separately.
7. Make sure leveling legs are secure in dryer base.
8. Use tape to secure dryer door.
For direct-wired dryers:
1. Disconnect power.
2. Disconnect wiring.
3. Steam models only: Shut off water faucet.
4. Steam models only: Disconnect the water inlet hose from
faucet; then drain the hose. Transport hose separately.
5. Make sure leveling legs are secure in dryer base.
6. Use tape to secure dryer door.
Reinstalling the Dryer
Follow the Installation Instructions to locate, level, and
connect the dryer.
16
TROUBLESHOOTING
If you experience Possible Causes Solution
Dryer Operation
Dryer will not run Door not closed completely. Make sure the dryer door is closed completely.
Start/Pause touched with
ngernail.
Touch START/PAUSE with pad of nger.
Household fuse is blown or circuit
breaker has tripped.
There may be two household fuses or circuit breakers for the
dryer. Check that both fuses are intact and tight, or that both
circuit breakers have not tripped. Replace the fuses or reset
the circuit breaker. If the problem continues, call an electrician.
Incorrect power supply. Electric dryers require 240 V power supply. Check with a
qualied electrician.
Wrong type of fuse. Use a time-delay fuse.
Dryer will not turn off Dryer door was opened prior to the
end of the Wrinkle Shield option.
If you open the dryer door prior to the end of the Wrinkle Shield
option, the dryer will go into Pause mode. You will need to touch
Power to turn off or touch Start/Pause to continue Wrinkle Shield
option.
Dryer will not heat Household fuse is blown or circuit
breaker has tripped.
The drum may be turning, but you may not have heat. Electric
dryers use two household fuses or circuit breakers. Replace the
fuses or reset the circuit breaker. If the problem continues, call
an electrician.
Incorrect power supply. Electric dryers require 240 V power supply. Check with a
qualied electrician.
Supply line valve not open. For gas dryers, make sure that the valve on the gas supply line
is open.
Unusual Noise
Humming or whining
noise with Steam cycle
selected (on some
models)
Water pump or water inlet valve
(depending on model) on dryer is
running.
The water pump on the dryer is used during the Steam function.
If the dryer has just been installed or unused for an extended
period, the pump may be louder and run longer. This is normal.
NOTE: The valve may make this noise even with no water line
connected.
Thumping noise Dryer hasn’t been used in a while. This is normal. The thumping sound should diminish after a few
minutes of use.
Rattling or vibrating noise A small object caught between the
edges of dryer drum.
Check the front and rear edges of the drum for small objects.
Clean out pockets before laundering.
Dryer isn’t properly leveled. The dryer may vibrate if not properly installed. See the
Installation Instructions. All four dryer feet should be in rm
contact with the oor.
Clothing is balled up in dryer. When balled up, the load will bounce, causing the dryer to
vibrate. Separate the load items and restart the dryer.
Clicking noise Gas valve operating. On gas dryers, you may hear the gas valve clicking as it opens
and closes. This is normal.
Dryer Results
Drying times are too
long and clothes are
not getting dry
Lint screen is clogged with lint. Clean lint screen before each load.
EcoBoost option is on. For optimal dry times, turn off the EcoBoost option.
The exhaust vent or outside exhaust
hood is clogged with lint, restricting
air movement.
Run the dryer for 5–10 minutes. Hold your hand under the
outside exhaust hood to check air movement. If you do not feel
air movement, clean exhaust system of lint or replace exhaust
vent with heavy metal or exible metal vent. See the Installation
Instructions.
The exhaust vent is not the correct
length.
Check that the exhaust vent is not too long or has too
many turns. Long venting will increase drying times.
See the Installation Instructions.
The exhaust vent diameter is not the
correct size.
Use 4" (102 mm) diameter vent material.
First try the solutions suggested here or visit our website at www.whirlpool.com/owners
for assistance and to possibly avoid a service call.
17
TROUBLESHOOTING
If you experience Possible Causes Solution
Dryer Results (cont.)
Drying times are too
long and clothes are not
getting dry (cont.)
The dryer is not level. Clothes not contacting the moisture sensors during Automatic
cycles. See “Level Dryer” in the Installation Instructions.
The Air Only temperature setting has
been selected.
Select the correct temperature for the types of garments being
dried. See “Cycle Guide.”
The load is too large and heavy to dry
quickly.
Separate the load to tumble freely.
Fabric softener sheets are blocking
the grille.
The air outlet grille is just inside the door, behind the lint screen.
Check that it is not blocked by a fabric softener sheet.
Use only one fabric softener sheet, and use it only once.
The dryer is located in a room with
temperature below 45ºF (7ºC).
Proper operation of dryer cycles requires temperatures above
45ºF (7ºC).
The dryer is located in a closet. Closet doors must have ventilation openings at the top and
bottom of the door. The front of the dryer requires a minimum of
1" (25 mm) of airspace, and, for most installations, the rear of the
dryer requires 5" (127 mm). See the Installation Instructions.
Cycle time is too short The load may not be contacting the
sensor strips on Automatic Cycles.
Level the dryer. See the Installation Instructions. All four dryer
feet should be in rm contact with the oor.
Steam models only: Clothes are
coming out of the Steam Refresh
cycle with damp or wet spots.
Under certain environmental or installation conditions, you may
experience underdrying.
The automatic cycle is ending early. Change the dryness level setting on Automatic Cycles.
Increasing or decreasing the dryness level will change the
amount of drying time in a cycle.
Lint on load Lint screen is clogged with lint. Clean lint screen before each load.
Stains on load Improper use of fabric softener. Add dryer fabric softener sheets at the beginning of the cycle.
Fabric softener sheets added to a partially dried load can stain
your garments. Do not use fabric softener sheets with steam
cycles.
Stains on drum Loose dyes in clothes. Drum stains are caused by dyes in clothing (usually blue jeans).
These will not transfer to other clothing.
Loads are wrinkled The load was not removed from dryer
at the end of the cycle.
Steam models only: Select Steam Refresh cycle to tumble
the load with water and heat. This cycle is best for smoothing
out wrinkles and reducing odors from dry loads consisting of
wrinkle-free cotton, cotton-polyester blends, common knits,
and synthetics.
NOTE: Refer to garment care label instructions. Dry-clean-only
garments are not recommended.
The dryer was tightly packed. Dry smaller loads that can tumble freely. Results may also vary
depending on fabric type.
Steam models only: For steam
cycles, the water is not properly
connected with the dryer.
Steam models only: Make sure water is connected to the dryer.
Check that water inlet hose is connected to both the faucet
and dryer’s water inlet valve. Check that the water supply is
turned on.
Odors Recent painting, staining, or
varnishing in the area where your
dryer is located.
Ventilate the area. When the odors or fumes are gone from the
area, rewash and dry the clothing.
First try the solutions suggested here or visit our website at www.whirlpool.com/owners
for assistance and to possibly avoid a service call.

18
TROUBLESHOOTING
If you experience Possible Causes Solution
Dryer Results (cont.)
Odors (cont.) Steam models only: For steam
cycles, the water is not properly
connected with the dryer.
Make sure water is connected to the dryer. Check that water
inlet hose is connected to both the faucet and dryer’s water inlet
valve. Check that the water supply is turned on.
Odors are left in garments after
wearing.
To remove odors left in garments after wearing, select Steam
Refresh. This cycle is best for reducing wrinkles and odors from
dry loads consisting of wrinkle-free cotton, cotton-polyester
blends, common knits, and synthetics.
Load too hot Load removed before cooldown
portion of cycle complete.
Allow the dryer to complete the cooldown portion of the cycle
before removing the load.
Using Timed Dry cycle with a high
temperature setting.
Select an Automatic Cycle with a lower heat setting to avoid
overdrying the load.
Dryer Displaying Code Message or Indicator Is Lit
“PF” (power failure) The drying cycle has been interrupted
by a power failure.
Touch POWER to clear the display.
“L2” Diagnostic Code
(low or no line voltage
condition)
There may be a problem with your
home power supply, keeping the
dryer’s heater from turning on.
The dryer will continue to run when this diagnostic code is
present. Touch any pad to clear the code from the display and
return to the estimated time remaining.
NOTE: This error will only show during the initial installation.
Try the following:
•
Check to see if a household fuse has blown or circuit breaker
has tripped. Electric dryers use two household fuses or
breakers. Replace the fuse or reset the circuit breaker.
•
Conrm that the power cord is properly installed. Refer to
the Installation Instructions for details.
•
Select a Timed Dry heated cycle, and restart the dryer.
If the message persists, consult a qualied electrician.
“F# E#” (F1 E1, F3 E1,
etc.) variable service
codes.
The dryer is in need of service. If a code beginning with an “F” appears in the display, alternating
between F# and E#, the dryer control has detected a problem
that requires service. Call for service.
Check Vent indicator is lit The lint screen or vent is clogged;
the vent is crushed or kinked or has
too many turns.
The dryer will continue to run when this indicator is lit. Try the
following:
• Clean lint screen.
• Check to see if the vent run from the dryer to the wall is
crushed or kinked.
• Conrm that the vent run from the dryer to the wall is free of
lint and debris.
• Conrm that the exterior vent exhaust hood is free of lint and
debris.
• Conrm that your vent system falls within the recommended
run length and number of elbows for the type of vent you
are using. Refer to “Plan Vent System” in the Installation
Instructions for details.
• Select a Timed Dry heated cycle, and restart the dryer.
• If the indicator remains lit, have your entire home venting
run cleaned.
“Loc” The Control Lock is enabled. Touch and hold CONTROL LOCK or DAMP DRY SIGNAL
(depending on the model) for 3 seconds to unlock the controls
of the dryer. During this time, the LED Display will count down
“3-2-1.” When the Control Lock is disabled, the LED Display
will clear.
First try the solutions suggested here or visit our website at www.whirlpool.com/owners
for assistance and to possibly avoid a service call.
19
台灣惠而浦股份有限公司
消費者免付費服務專線:0800 258 558
消費者服務信箱:[email protected]
官網:www.whirlpool.com.tw
產品規格
型號
8TWED5620HW 8TWGD5620HW 8TWGD6622HW
產品名稱 電動乾衣機 瓦斯型乾衣機 瓦斯型乾衣機
額定電壓
240 V 120 V 120 V
額定頻率
60 Hz 60 Hz 60 Hz
額定電流
24 A 6 A 6 A
最大乾衣量 (乾燥衣物)
15 公斤 16 公斤 16 公斤
IEC容量 7.4 公斤 7.4 公斤 7.4 公斤
重量
66 公斤 69 公斤 69 公斤
機體尺寸
968 x 686 x 787 公釐 968 x 686 x 787 公釐 968 x 686 x 787 公釐
如需查詢 RoHs 資訊,請瀏覽官方網站。
www.whirlpool.com.tw
這些產品都在不同地區販售,各有不同的測量容量規定。
最大乾衣量 (乾燥衣物):根據台灣CNS規範,乾燥衣物量的重量測量值,代表乾衣機滾筒的容積。
IEC容量:根據國際IEC規範,容量測量值代表
製造商宣稱最適特定行程烘乾衣物和紡織品的最大容量。
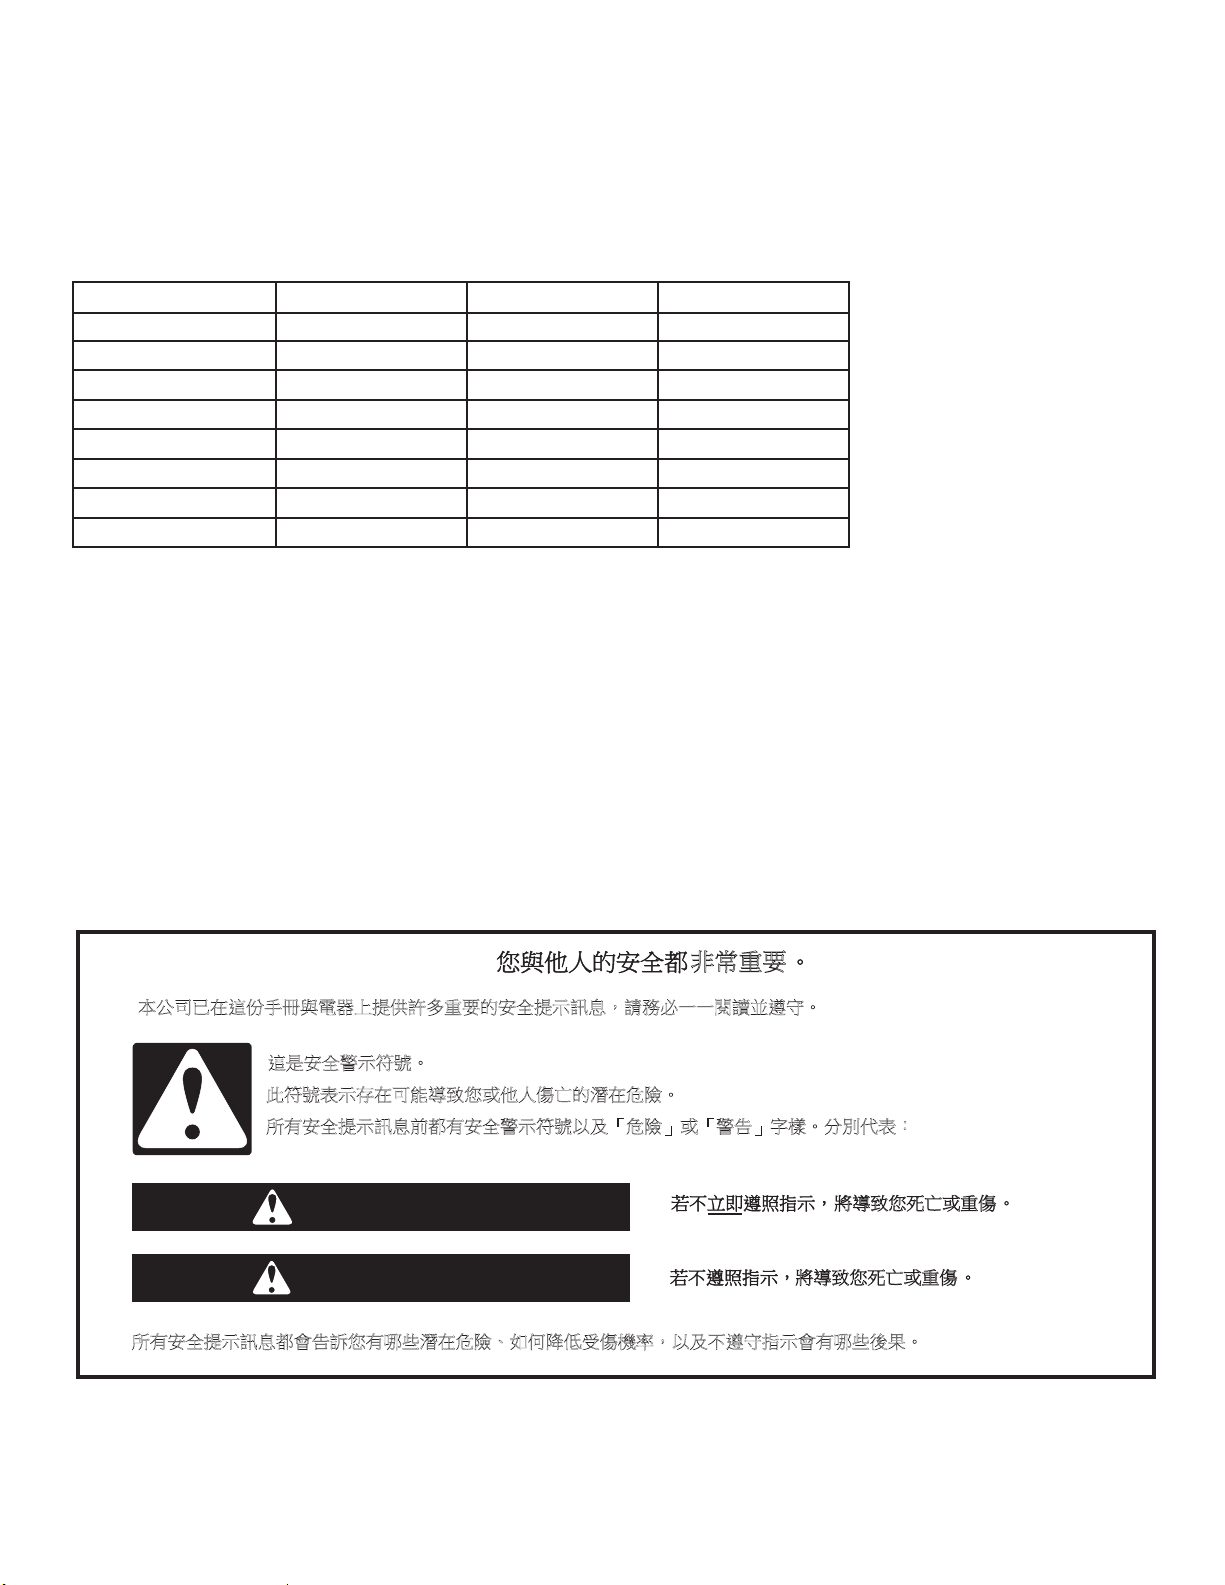
㛔℔⎠⛐忁ấㇳℲ冯暣☐ᶲ㍸ὃ姙⣂慵天䘬⬱ℐ㍸䣢妲〗炻婳⊁⽭ᶨᶨ教嬨思⬰ˤ
忁㗗⬱ℐ嬎䣢䫎嘇ˤ
㬌䫎嘇堐䣢⬀⛐⎗傥⮶农ぐㆾṾṢ ṉ䘬㼃⛐⌙晒ˤ
㚱⬱ℐ㍸䣢妲〗⇵悥㚱⬱ℐ嬎䣢䫎嘇ẍ⍲ˬ⌙晒˭ㆾˬ嬎⏲˭⫿㧋ˤ↮⇍ẋ堐烉
危險
警告
㚱⬱ℐ㍸䣢妲〗悥㚫⏲姜ぐ㚱⒒ṃ㼃⛐⌙晒ˣ⤪ỽ旵Ỷ⍿ 㨇䌯炻ẍ⍲ᶵ思⬰㊯䣢㚫㚱⒒ṃ⼴㝄ˤ
朆ⷠ慵天
⮯⮶农ぐ㬣ṉㆾ慵
⮯⮶农ぐ㬣ṉㆾ慵
乾衣機安全
20
乾衣機安全
資格
製造商指定且適用乾衣機的類型
棉絮
重要安全說明
當要丟棄或存放舊的衣物乾衣機時,請把門蓋拆下。
請妥善保存上述安全說明
21
嬎⏲烉ἧ䓐Ḧ堋㨇㗪炻䁢旵Ỷ䀓䀥ˣ妠暣ㆾṢ⒉ ṉ桐晒炻婳思⬰ẍᶳ➢㛔枸旚㍒㕥炻⊭㊔烉!
⛐ἧ䓐Ḧ堋㨇⇵炻婳娛教㚱㊯䣢ˤ
ᶵ天㈲㱦㝻䂡婧䓐㱡䘬堋䈑㓦ℍḦ堋㨇ℏˤ
㱦㝻䂡婧䓐㱡䘬堋䈑炻⎗傥㚫Ὣㆸ⊾⬠⍵
ㅱ炻⺽崟堋䈑崟䀓ˤ㺦䫺Ḧ堋㨇Ḧ堋埴䦳
㚨⼴ᶨᾳ昶㭝ᶵἄ≈䅙)⅟⌣昶㭝*炻ẍ旵Ỷ
性⛐Ḧ堋埴䦳䳸㜇⇵ 㬊㺦䫺Ḧ堋㨇炻
⍿㰉㝻堋䈑䘬䀓䀥桐晒ˤ
嬎⏲烉性⛐Ḧ堋埴䦳䳸㜇⇵⮯㺦䫺Ḧ堋㨇斄
㨇炻昌朆彭忇⍾↢㚱堋䈑㓌攳㔋䅙ˤ
↯⊧䂀Ḧ㚦䴻䓐㰥㱡ˣḦ㲿∹ㆾ℞Ṿ㖻䅫ˣ
㖻䆮䈑岒㶭㻼ˣ㰾㲿ˣ㴠㲉ㆾ㱦㝻䘬堋䈑ˤ
⚈䁢忁ṃ䈑岒䘬呠㰥⎗傥㚫崟䀓ㆾ䆮䁠ˤ
↯⊧嬻䪍⛐Ḧ堋㨇ᶲㆾℏ悐䍑侵ˤ⤪㚱暨
天⛐䪍旬役ἧ䓐Ḧ堋㨇㗪炻⊁⽭⮵䪍♜
≈䚋䭉ˤ
⛐ 䓐ㆾ㡬Ḧ堋㨇⇵炻婳㈲㨇攨⽆㨇幓ᶲ㉮ᶳˤ
⛐Ḧ堋㨇㺦䫺㳣≽㗪炻↯⊧㈲幓橼悐ỵỠℍ㨇ℏˤ
䦣昌㚱⛐堋䈑⎋堳䘬䈑⑩炻⤪ㇻ䀓㨇䀓㞜ˤ
ᶵ⼿㌺㯋军䓐㕤䅫䅺䒎㕗ㆾ℞Ṿ䅫㕁☐℟䘬⺊㯋䭉ˤ
暣☐ᶵ⼿⬱墅⛐⎗挾ỷ䘬攨ˣ⎗㹹≽䘬攨ㆾ
側⼴㚱攨拲䘬⼴朊炻⛐㬌ね⼊ᶳ炻㚫旸⇞ỷ
Ḧ堋㨇⬴ℐㇻ攳ˤ
劍暣㸸䶂㎵⢆㗪炻!⽭枰䓙墥忈⺈⓮ㆾ℞㚵⊁
嗽ㆾ℟㚱䚠斄屯㟤䘬Ṣ⒉≈ẍ㚜㎃ẍ性⌙晒ˤ
ᶵ⼿㈲Ḧ堋㨇⬱墅ㆾ⬀㓦⛐曚⣑ỵ伖ˤ
ᶵ⼿㑭冒㚜㓡㍏⇞☐ˤ
ᶵ⼿䵕ᾖㆾ㚜㎃Ḧ堋㨇䘬ảỽ悐ẞ炻ㆾ忚埴
ảỽ䵕ᾖ▿娎炻昌朆㛔ἧ䓐ᾅ梲ㇳℲㆾ⌘⇟
䓐㇞䵕ᾖ婒㖶㚱⮰攨⺢嬘炻ᶼぐ㚱傥≃䎮
妋➟埴ˤ
昌朆思䄏堋䈑㝼庇∹ㆾ䓊⑩䘬墥忈⺈⓮⺢
嬘炻⏎⇯ᶵ⼿ἧ䓐堋䈑㝼庇∹ㆾ䓊⑩⍣昌朄
暣ˤ
媠⤪䘤㲉㨉先)ḛ先䘤㲉*ˣ㴜ⷥˣ旚㯜㡱
䴖ˣ㨉先⸽䘬䈑橼堋㚵ㆾ⬱墅䘤㲉㨉先㜧
䘬㜽柕ᶵ⼿㓦ℍḦ堋㨇䂀Ḧˤ
㛔暣☐ᶵ枸㛇ὃ䓇䎮ˣデ䞍ˣ⽫㘢傥≃ˣ䴻
槿ㆾ䞍嬀ᶵ嵛ἧ䓐侭)⊭⏓⬑䪍*ἧ䓐炻昌
朆⛐⮵℞屈㚱⬱ℐ屔ả䘬Ṣ⒉䚋嬟ㆾ㊯⮶
ᶳ⬱ℐἧ䓐ˤ
ㅱ㍸ὃ嵛⣈䘬忂桐ẍ性暣☐䅫䅺℞Ṿ䅫㕁
䘬㯋橼)⊭㊔攳䀓*⚆㳩⇘攻ˤ
ᶵ⎗⛐Ḧ堋㨇ℏ䂀Ḧ㛒㲿䘬堋䈑ˤ
塓䂡梒㱡ˣ愖ˣ惺䱦ˣ㰥㱡ˣ䄌㱡ˣ⍣㰁
∹ˣ㜦愗ˣ冀⍣冀∹䫱㰁㝻忶䘬堋䈑炻⛐
㓦ℍḦ堋㨇忚埴䂀Ḧ⇵炻枰ẍ䅙㯜㏕惵⣏慷
䘬㲿堋䰱㲿忶ˤ
㭷㫉䂀堋⇵⼴炻⽭暨㶭㻼䴐㮃忶㾦䵚ˤ
ᾅ㊩㌺㯋⎋㨇☐␐怲⋨➇Ḧ㶐炻䡢ᾅ䃉㡱
䴖ˣ䀘⠝冯㰉❊➮䧵ˤ
Ḧ堋㨇冯㌺㯋䭉ℏ悐⽭枰䓙䫎⎰屯㟤䘬䵕ᾖ
Ṣ⒉⭂㛇㶭㻼ˤ
婳⍫教㍍⛘⬱墅婒㖶䘬ˬ暣㸸天㯪˭䪈䭨ˤ
- 㬌䫎嘇㗗煖婳䞼嬨婒㖶ȿシ⿅ˤ
!!!!婳⥍┬ᾅ⬀ᶲ徘⬱ℐ婒㖶
乾衣機安全
22
配件
請利用下列惠而浦原廠配件訂製您的洗衣機與乾衣機。
更多配件選擇和訂購相關資訊,請致電:0800-258-558,
請造訪網站:www.whirlpool.com.tw
堆疊配件
若有空間考量,堆疊配件可讓您把乾衣機安裝
在洗衣機的上方。
15" 底座
搭配洗衣機和乾衣機顏色的底座,能將機器升高
至更舒適的工作高度。大型抽屜可提供方便的貯
存空間。
烘乾架
烘乾架提供類似毛衣或網球鞋等物
品專用的固定烘乾平面。欲知更多
詳情,請參閱「更多功能」部份。
安裝和保養配件
專為此款乾衣機設計的配件:
原廠認證零件
原廠認證零件-
這代表專為此款乾衣機設計的高品質零件與配件。
通過時間考驗的工程符合我們嚴格的品質規範。
警告:瓦斯洩漏並非總是可以透過氣味察覺到。
瓦斯公司建議您使用 UL 或 CSA 核准的瓦斯偵測器。
欲知更多資訊,請聯絡您的瓦斯公司。
若偵測到瓦斯洩漏,遵循「聞到瓦斯味的處理方法」之指示說明。
警告:
火災或爆炸危險
若未確切遵循安全警告可能導致重傷、死亡或資產毀損。
–
–
不得在此電器或任何其他電器附近存放或使用汽油或其他可燃氣體和液體。
聞到瓦斯味的處理方法
:
–
必須由合格安裝公司、服務代理商或瓦斯公司進行安裝和維修。
•
不得嘗試點燃任何電器。
•
不得觸碰任何電氣開關、不得使用大樓內任何電話。
•
撤離房間、建築物或區域內的所有住戶。
•
立即借用鄰居電話,致電您的瓦斯公司。遵循瓦斯公司的指示說明。
•
若您無法聯絡瓦斯公司,致電消防局。
乾衣機安全
23
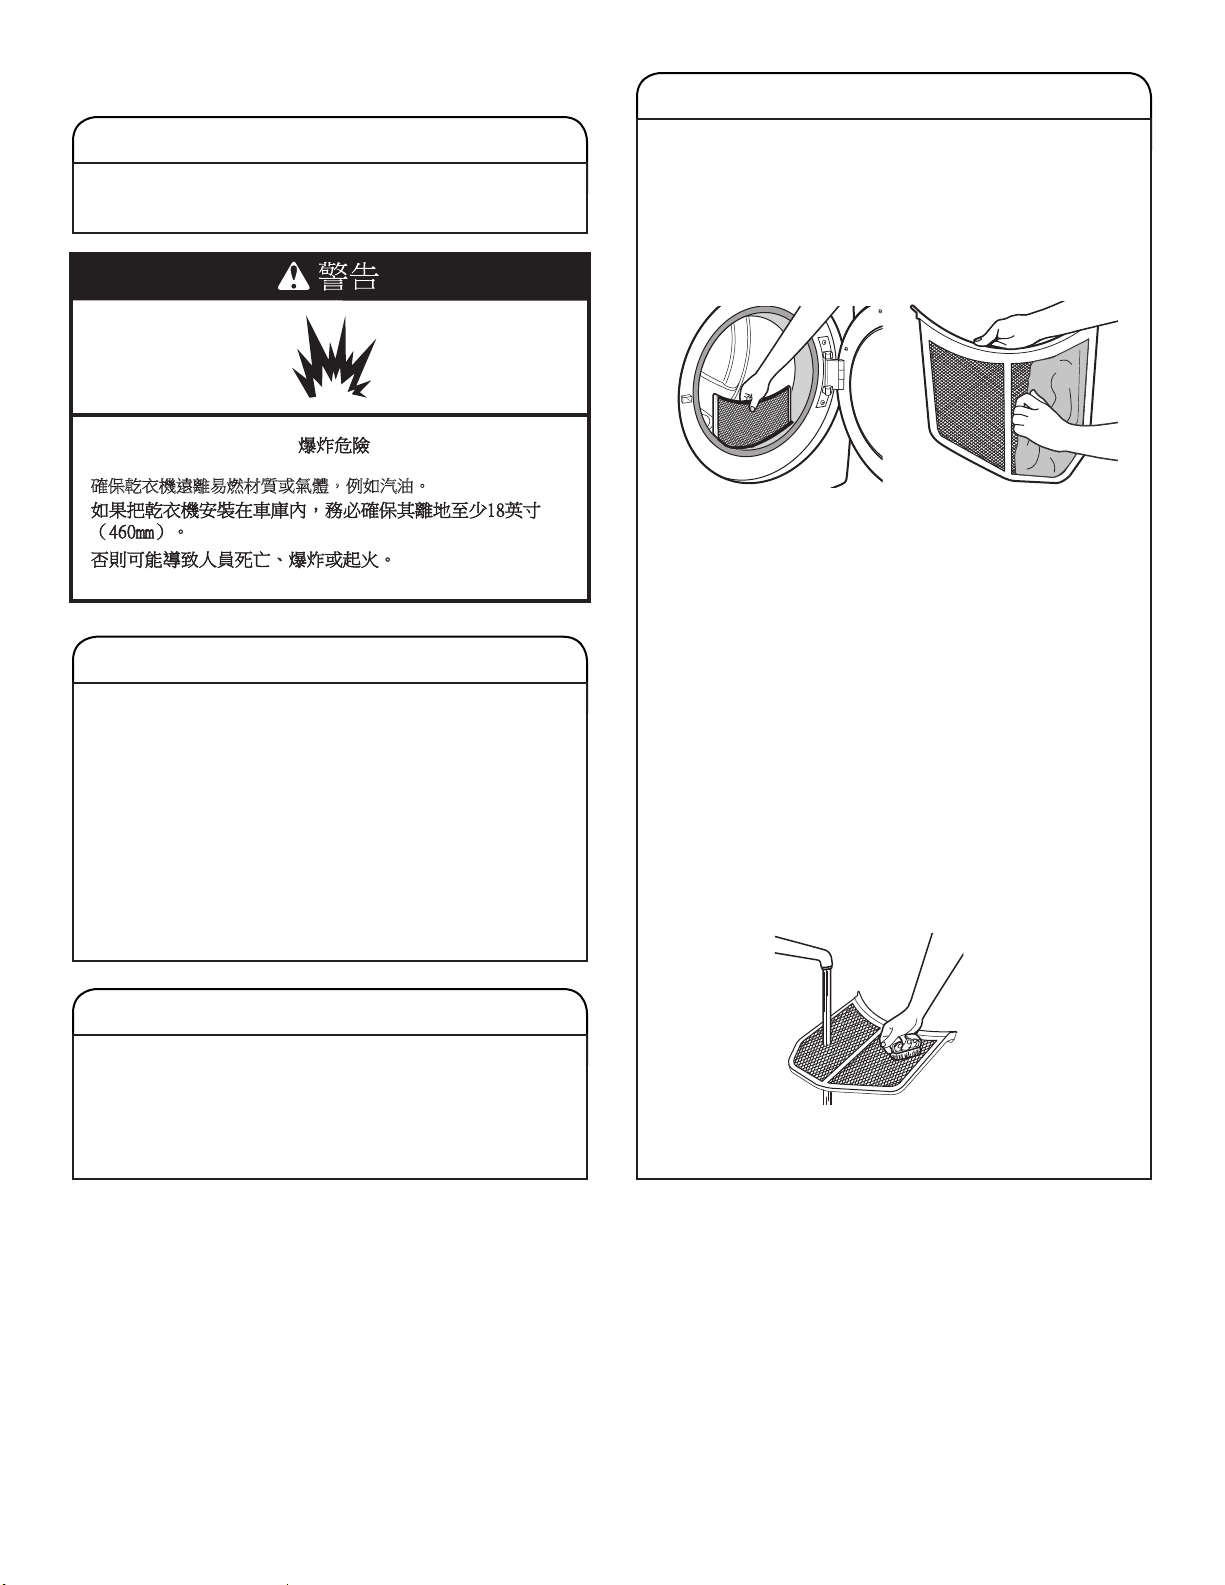
檢查排氣系統確認排氣良好
良好的排氣
維持良好的氣流
■
每次裝載衣物前,必須清潔棉絮濾網。
■
用直徑 4" (102 mm) 的重型堅固排氣管取
代塑膠或鋁箔排氣管。
好
更好
■
儘量使用最短的排氣管。
■
請勿使用超過 4 個 90° 的彎管;每一個彎管或弧度都會阻
礙氣流。
■
清除排氣罩上的棉絮和殘留物。
■
至少每 2 年清除整個排氣系統內的棉絮一次。完成清潔
後,務必遵照乾衣機隨附的「安裝說明」,進行最後的
產品檢查。
■
移除乾衣機正面的物品。
使用「自動烘乾行程」,達成更佳衣物保護和節能效果。
使用「自動乾衣行程」(不定時),會偵測乾衣空氣的溫度與衣物上的濕度,在乾衣行程中不斷地偵測,直到衣物達到選擇的衣物乾度
才會停止。使用 「正常」乾度的行程,可取得最佳的節能效果。
使用「定時烘乾/快速烘乾」時,乾衣機將按您選擇的時間長度運行,此舉可能因為過度烘乾而導致衣物縮小、變皺,以及產生靜電。
建議需要較長時間或使用烘乾架時,才使用 「定時烘乾」行程。
取得最佳蒸氣烘乾效能之提示 (限特定機型)
■
乾衣效果將因衣料而有所不同,有防皺處理的全棉衣物將較未
作防皺處理者為佳。使用蒸氣行程後,100%全棉衣物可能仍
需要熨燙。
■
使用蒸氣行程時不建議放入柔衣紙一起烘乾,可能會使衣物沾
上暫時性汙跡。
■
上過漿的衣物,建議您不要使用蒸氣行程進行乾衣。將上過漿
或新買的衣物先洗滌後,再使用蒸氣行程進行乾衣。
■
「蒸氣清新」行程對於免燙棉質衣物、棉纖混紡、一般針織衣
料和合成纖維等質料之除皺和除異味的效果最佳。
乾衣機同時需要熱力和良好氣流,才能有效烘乾衣物。正常排
氣能減少烘乾時間並增進省電效能。請參閱「安裝說明」。
連接乾衣機的排氣系統對於良好氣流非常重要。排氣管堵塞
或碎裂,以及排氣管安裝不良都將降低氣流和乾衣機效能。
排氣不良的服務不屬於保固的範圍,必須由消費者支付檢修
費用,與安裝該乾衣機之人員無關。欲清洗或修理排氣管,
請聯絡排氣系統專業人員。
EcoBoost 「節能」選項
僅能在「標準/一般」行程預設 EcoBoost 「節能」選項,且僅適用於該行程。
此選項使用略為調低的熱度,提升節能效率。EcoBoost 「節能」選項將增加烘乾時間約 40 分鐘,並會顯示於 LED 螢幕上。若
要達到最佳時間效率,觸碰 ECOBOOST 「節能」,關閉此選項。
↯⊧ἧ䓐⟹㕁㌺㯋䭉ˤ
↯⊧ἧ䓐慹Ⱄ䬼㌺㯋䭉ˤ
忽⍵忁ṃ㊯䣢⎗傥⮶农Ṣ⒉ ṉㆾ⣙䀓ˤ
(含伸縮鋁管)
ˤ
24
烘乾方式
一般
標準
電源
細緻
防皺
大物件
厚重/衣量多
白色
消毒殺菌
花色
定時
毛巾
快烘
啟動/暫停
(按壓)
偵測
減少時間 增加時間 蒸氣清新 微乾響鈴 除靜電 節能
烘衣溫度
衣物乾度
除皺防護
檢查排風管
濕 微乾
冷卻
冷風 中 高
微 強
關 開 +蒸氣
待烘衣料
完成響鈴
(長按3秒)
按鍵鎖
(長按3秒)
控制面板和功能
「電源」
觸碰以啟動和關閉乾衣機。觸碰以隨時停止/取消行程。
「待烘衣料/烘乾方式」
選擇「待烘衣料」後,乾衣機將自動選擇建議或上次使用的
「烘乾方式」選項,以及建議/上次使用的調整選項。可按您
的意願變更 「烘乾方式」和調整選項。詳情請參閱「行程說
明」。
「啟動/暫停」
長按直到 LED 以「3-2-1」的方式倒數計時且乾衣機開始運
行;放開按鍵啟動行程,或在行程進行期間觸碰按鍵以暫
停。
「調整選項」
用以選擇乾衣機適用之調整選項。並非所有機種都提供所有
行程和功能。
「溫度」
使用「定時烘乾/快烘行程」時,可選擇您正在烘乾的衣
物類型,選擇烘乾溫度。使用最低溫的設定,對衣服最安
全。遵循衣服上的洗標說明。
備註:「自動烘乾行程」可提供 4種溫度選擇,根據乾衣
機種和已設定的 「待烘衣料」和「烘乾方式」而定。
「乾度」
可按意願調整 「自動烘乾行程」上的 「乾度」「「消毒
殺菌行程」除外」。
備註:僅「自動烘乾行程」提供 「乾度」。
調整 「增加時間/減少時間」的「定時烘乾」
使用 「定時烘乾/快烘行程」時,觸碰「增加時間」或「
減少時間」按鍵以調整行程時間。
1
2
3
4
並非所有機種都提供所有功能和行程。
功能選項
用以選擇乾衣機適用功能。並非所有機種都提供所有行程
和功能。
「除皺防護」選項
若無法立即取出衣物,觸碰 「除皺防護鍵」 ,增加最
多 150 分鐘的定時滾動時間,幫助除皺。可選擇「+ 蒸
氣」設定部份機種於 60 分鐘後新增短暫的蒸氣行程,
有助撫平皺褶。
備註:若 「除皺防護」選項結束前直接開啟乾衣機
門,乾衣機將進入待機模式。
「蒸氣清新」(僅蒸氣機種)
此行程用於乾燥衣物除皺及除異味為最佳。視衣物量而
定,行程時間將增加。此為獨立行程,無法和任何其他
行程合併。
「完成響鈴」
用此選項選擇行程結束響鈴的音量為低、中、高或關
閉。在此選擇的音量也同時適用於「微乾響鈴」。
備註:也可關閉觸碰功能、設定或選項時發出的聲音。
長按 「完成響鈴」約 3 秒,設定音量為低、中、高或
關閉。
「微乾響鈴」
觸碰以開啟和關閉 「微乾響鈴」。選擇此功能後,若
衣物微乾卻未完全烘乾,將響起一連串的嗶聲。此時
您可取出無須完全烘乾的衣服。僅在部份行程提供此選
項。「大物件/標準」、「大物件/除皺」和「大物件/厚
重/衣量多」行程都已預設 「微乾響鈴」,以提醒您行
程中途須手動重新擺放大物件衣物。
5
備註:控制面板具有靈敏的表面,因此只要以手指輕輕觸壓即會反應。為確保已記錄您的選擇,請用指尖而非指甲觸壓控制面板。
選擇特定設定或功能時,只要觸碰對應的按鈕即可。
蒸氣機種
1
2
3 6
4
5
4
5
25
「除靜電」 (部分機種)
觸碰以便在「自動乾衣行程」中新增 「除靜電」功能。
乾衣機將自動滾動、暫停並在衣物中導入少量的濕度,
以減少靜電。本選項約需在總行程時間中增加約 3 分
鐘。
「控制鎖」
用此選項鎖定乾衣機的控制鍵,避免烘乾行程期間誤觸
行程選項或偏好而變更了原設定。
長按「控制鎖」或 「微乾響鈴」「視機種而定」 3 秒,
以鎖定或解鎖乾衣機的控制鍵。此時 LED 螢幕將以
「3-2-1」的方式倒數計時。鎖定控制鍵後,LED 螢幕將
顯示「Loc」。
備註:「控制鎖」的功能在停電覆電後會啟用。欲解鎖
控制,長按 「控制鎖」或「微乾響鈴」「視機種而定」
至少 3 秒。
「節能」選項
僅能在 「標準/一般」行程預設 「節能」選項,且僅適
用於該行程。此選項使用略為調低的熱度,提升節能效
率。「節能」選項將增加烘乾時間約 40 分鐘,並將顯
示在 LED 螢幕上。欲獲得最佳時間,觸碰 「節能」,
關閉此選項。
LED 螢幕
選擇特定行程時,預設設定將亮起且將顯示「預計剩餘時
間」 「針對 「自動烘乾行程」」。此功能將視「待烘衣
料」和 「烘乾方式」選擇,或「定時烘乾」的實際剩餘時
間「針對「手動設定行程」」而有所不同。
「行程狀態指示燈」
「行程狀態指示燈」顯示行程進度。並非所有機種都提供指
示燈。
「偵測」
「偵測」指示燈將於「偵測行程」中定時亮起,顯示乾衣機
正在進行濕度偵測。。此指示燈不會在 「定時行程」或其
他功能選項中亮起,如 「除皺防護」選項。
「溼」
衣物仍潮濕及/或行程才剛開始。
「微乾」
此指示燈顯示衣物已部份乾燥且您也許想要吊掛或熨燙衣物
以排除水份。
「冷卻」
乾衣機已完成加熱烘乾,且目前使用不加熱的方式滾動衣
物,讓它們降溫。
「檢查排氣管」
「檢查排氣管」指示燈僅適用於 「自動烘乾行程」的功
6
偵測
檢查排風管
濕
微乾
冷卻
能。此指示燈顯示乾衣機的氣流狀態,以及乾衣機之排氣系
統使用壽命。在行程開始時的偵測階段,若偵測到排氣管堵
塞或低氣流問題,將亮起 「檢查排氣管」指示燈。指示燈
將於整個行程中亮起。一旦發現 「檢查排氣管」指示燈亮
起,請參閱「故障排除」章節,了解可能的解決方法。
行程完成、觸碰 「電源」或打開乾衣機門後,燈會熄滅。
除非已解決根本問題,否則 「檢查排氣管」指示燈將持續
亮起。
記得:即使指示燈亮起,乾衣機仍持續運轉,但氣流不佳會
影響烘乾時間和整體的烘乾效能。欲知更多維護良好氣流的
資訊,請參閱「檢查排氣系統確認排氣良好」
備註:若行程期間還有其他錯誤問題,「檢查排氣管」指示
燈將不會亮起。請參閱「故障排除」章節。
結束
這將說明所選行程已結束,且衣物可能已取出。
若已選擇 「除皺防護」,乾衣機可能會持續滾動衣物,即
使面板顯示 「結束」。
「控制鎖」
一旦所有控制都已鎖定,將亮燈。

26
行程指南
想要如何烘乾衣物?
「烘乾方式」行程選擇
「標準」
「防皺」
「厚重/衣量多」
「消毒殺菌*」
「定時烘乾」 「快烘」
標準
達到乾度之
後,「自動偵
測行程」將停
止。
較長時間的「高
溫」行程
達到乾度之後,
「自動偵測行程」
將停止。
熱高溫
可殺死
99.9%
的三種常見細
菌。
設定烘乾時間
長度
乾衣機將按所選
時間長度運作。
設定烘乾時
間長度
乾衣機將按
所選時間長
度運作。
您想要烘乾什麼? 「待烘衣料」
行程選擇
嬰兒衣服
標準
R
睡衣
R
手帕
a R
T 恤
R
運動衣
a R
牛仔褲
a R
棉質窗簾
R
可用機器洗的窗簾
R
桌布
R a
商務便服
R
免熨衣料
R
胸罩
細緻
a R
布料浴簾
R
女用內衣褲
a R
薄紗
R
貼身襯衣
a R
羊毛
R
襯衫/褲子
a R
毯子
大物件
R a
布料地毯
R
厚重窗簾
a R
外套和夾克
a R
蓋被
R a
寵物床墊
a R
枕頭 - 纖維填料
a R
床單
R a
睡袋
R
填充動物玩偶
R
您的乾衣機配備獨特的使用者介面,協助您為衣物選擇最佳行程。「待烘衣料」和 「烘乾方式」介面指引您如何以兩個步驟選擇最佳行
程:
1.首先判定要烘乾衣物的類別。用此指引您作出 「待烘衣料」選擇。
2.接著決定如何使用適當的 「烘乾方式」選項,選擇乾衣機應如何烘乾衣物。已為待烘乾物件預設 「調整選項」設定,但可按意願進行改
變。
為取得最佳節能和提升乾衣機的衣料保養效能,請使用 「自動烘乾行程」。這些行程會偵測衣物的濕度或空氣溫度,並在衣物達到選擇的
設定乾度時自動停機。若電壓低於 240,則乾衣機的效能和烘乾結果也許有所不同。
為獲得衣料最佳保護,選擇最適用於衣物的
烘乾行程。
R – 建議行程
a – 替代行程
空白 - 可用的行程,但非最佳選項。
*「延長高溫烘乾行程」目的是協助消毒物件,例如:床單和毛巾。不建議對所有衣料進行此行程。為達成最佳成果,必須運行完整行
程以確保消毒,且不得中斷行程。
27
想要如何烘乾衣物?
How to Dry 「烘乾方式」行程選擇
「標準」 「防皺﹑」 「厚重/衣量多」
「消毒殺菌*」
「定時烘乾」
「快烘」
標準
達到乾度之
後,「自動偵
測行程」將停
止。
較長時間的「高
溫」行程
達到乾度之後,「
自動偵測行程」將
停止。
熱高溫
可殺死
99.9%
的三種常見細
菌。
設定烘乾時間
長度
乾衣機將按所
選時間長度運
作。
設定烘乾時
間長度
乾衣機將按
所選時間長
度運作。
您想要烘乾什麼? 「待烘衣料」
行程選擇
棉質內襯衣
白色衣物
R a
白色餐巾
R a
運動衣物
花色衣物
R a
功能性衣物
R a
有色餐巾
R a
擦碗布
毛巾
a R a
毛巾
a R a
非橡膠襯墊地毯
R
為獲得衣料最佳保護,選擇最適用於衣物的
烘乾行程。
R – 建議行程
a – 替代行程
空白 - 可用的行程,但非最佳選項。
*「延長高溫烘乾行程」目的是協助消毒物件,例如:床單和毛巾。不建議對所有衣料進行此行程。
為達成最佳成果,必須運行完整行程以確保消毒,且不得中斷行程。
備註:此機種的政府能源證書是根據 「一般+標準行程」、「最高溫度設定」、「一般乾度」、「節能開啟」而定。除非預設為「中度」
的溫度設定調整至「最高」溫度設定,否則原廠出貨預設值是和政府能源證書相同。
28
3.
觸碰 POWER 「電源」
觸碰「電源」,開啟乾衣機。
使用乾衣機
1.
清潔棉絮濾網
每次烘乾衣物前,必須清潔棉絮濾網。拉出棉絮濾網。以手指
把棉絮從過濾網上捲起。請勿以清洗或洗滌方式清除棉絮。潮
溼棉絮更難以清除。把棉絮濾網牢牢推回原位。
欲知更多清潔資訊,請參閱「乾衣機保養」。
2.
將衣物裝入乾衣機。
拉開門把,打開乾衣機門。把衣物放進乾衣機。如有需要,可加
入除靜電紙。關上乾衣機門。
重要:切勿烘過量的衣物,衣物必須能在桶內自由翻滾。過載乾
衣會導致乾衣效果不佳、增加衣物的皺褶及打結。
警告:為降低火災、觸電、人員傷害風險,在操作電器前,請閱
讀「重要安全說明」。
29
4.
選擇需要烘乾的衣物類型
首先從 「待烘衣料」「「自動烘乾行程」」選項中選擇一個行
程,然後選擇 「烘乾方式」選項,針對您要烘乾的物件類型,
取得最佳的行程組合。您也許還想選擇 「消毒殺菌行程」。此
長時間高溫行程經證明能減少居家細菌。「消毒殺菌行程」會覆
蓋之前的選擇,且無法修改。行程詳情請參閱「行程說明」。並
非所有機種都提供所有行程。
「自動烘乾行程」:
視您的衣物而定,可選擇不同的乾度。觸碰 「衣物乾度」,捲
動選擇 Less「微」至「強」。選擇「微」至「強」自動調整烘
乾程度,且乾衣機達到此程度時將自動關閉。在行程進行的前
5-8 分鐘可變更衣物乾度。
「自動烘乾行程」能在最短時間內帶來最佳烘乾效果。
烘乾時間視衣物類型、衣物量和烘乾設定而有所不同。
備註:「自動烘乾行程」可提供時 4 種溫度選擇,根據乾衣機
種和已設定的 「待烘衣料」和 「烘乾方式」而定。
「定時烘乾行程」:
選擇「定時烘乾/快烘」後,將顯示預設時間。觸碰 「增加時
間」或 「減少時間」,以 5 分鐘為單位,增加或減少時間。
觸碰 (溫度) 變更預設溫度,直到達到所想的烘乾溫度。
「蒸氣清新行程」「部份機種上」:
選擇蒸氣清新,可減少乾燥衣物上的氣味與皺摺,適用於免燙棉
質、棉纖混紡、一般針織或合成纖維。若無法立即取出衣物,
觸碰 「除皺防護」,可增加最多 150 分鐘的定時滾動時間。可
選擇 「+ 蒸氣」設定,於 60 分鐘後新增短暫的蒸氣行程,有助
撫平皺褶。
7.
長按 「啟動/暫停」,開始行程
欲開始行程,長按 「啟動/暫停」,直到顯示開始以「3-2-1」的
方式倒數計時,乾衣機開始運行。
8. 行程結束後立即取出衣物
行程完成後立即取出衣物能減少皺褶。
減少時間
增加時間
冷風 高
微 強
烘衣溫度
衣物乾度
5.
如有需要,可更改行程 「調整選項」
視您正在烘乾的衣物,以及使用的烘乾方法
而定,可調整不同設定。若為羽絨枕、塑
膠浴簾、背部為橡膠的毯子或墊子,以及
PVC塑膠桌布,使用 「冷風」。
備註:並非所有行程都提供所有功能和 「調整選項」。並非所有
機種都提供所有行程。
6.
選擇附加功能選項。
在「部份機種上」觸碰並選擇:「除靜電」、
「除皺防護」及/或 「節能」的選項。若無法立即取出衣物,觸
碰 「啟動/暫停」前可選擇 「除皺防護」。可選擇 「+ 蒸氣」
設定部份機種於 60 分鐘後新增短暫的蒸氣行程,有助撫平皺
褶。
備註:並非所有行程都提供所有選項和設定。
蒸氣清新 微乾響鈴 除靜電 節能
除皺防護
+蒸氣
關
待烘衣料
烘乾方式
一般
標準
細緻
防皺
大物件
厚重/衣量多
白色
消毒殺菌
花色
定時
毛巾
快烘
偵測
檢查排風管
濕
微乾
冷卻
顯示 Steam Model 「蒸氣機種」。
一般
標準
細緻
防皺
大物件
厚重/衣量多
白色
消毒殺菌
花色
定時
毛巾
快烘
啟動/暫停
(按壓)
偵測
減少時間 增加時間 蒸氣清新 微乾響鈴 除靜電 節能
烘衣溫度
衣物乾度
除皺防護
檢查排風管
濕 微乾
冷卻
冷風 中 高
微 強
關 開+蒸氣
30
更多功能
使用「烘乾架」「部份機種」
用烘乾架烘乾不想滾動烘乾的衣物,例如:毛衣和網球鞋。
使用烘乾架時,滾筒將持續轉動,但架子靜止不動。
烘乾架僅供 「手動烘乾/定時烘乾行程」使用。「自動烘乾
行程」不能使用烘乾架。
使用烘乾架:
重要事項:不得取出棉絮濾網。
1. 開啟乾衣機門。
使用烘乾架「續上頁」
2. 將烘乾架正面的兩個鉤子對準乾衣機門開口的洞,然後把
鉤子全部壓進洞裡。將背面支架靠在乾衣機背板的凸出支
撐台上。
3. 把潮濕衣物放在烘乾架上方。物件之間保留空間,讓空氣
循環。烘乾架不會移動,但滾筒會旋轉。確定衣物和乾衣
機滾筒內部之間保留足夠的空間。確定衣物不會吊掛在烘
乾架旁邊或網架上。
4. 關上乾衣機門。
5. 選擇「定時烘乾/冷風」,或 「低溫行程」。含有泡棉、
橡膠或塑料的衣物,必須懸掛晾乾,或使用 「冷風」設
定進行烘乾。
6. 選擇行程後,「預計剩餘時間」將顯示預設時間。您可增
加或減少行程時間,變更行程的實際時間。
7. 啟動乾衣機。
備註:檢查棉絮濾網,且在完成行程後,檢查烘乾架上的衣
物並移除任何累積在其上的已乾棉絮。
31
清潔棉絮濾網
每次使用時的清潔
棉絮濾網位於乾衣機的開門處。操作面板上有「檢查棉絮」
指示燈,提醒您於每次烘乾衣物後都需要清潔棉絮濾網。
如過濾網被棉絮堵塞,將會延長乾衣時間。
清潔步驟:
1. 拉出棉絮濾網。以手指把棉絮從過濾網上捲起。請勿以清
洗或洗滌方式清除棉絮。潮溼棉絮更難以清除。
2. 將棉絮濾網確實裝回定位。
重要事項:
■
切勿在棉絮濾網鬆弛、受損、堵塞或缺失的情況下運行乾
衣機。這樣做會導致過熱,損壞乾衣機與衣物。
■
若清除時棉絮從過濾網掉落至乾衣機,檢查排氣罩並清除
棉絮。
請參閱「安裝說明」中的「排氣要求」。
視需要的清潔
洗衣劑與衣物柔軟劑殘留物可能會積聚在棉絮濾網上。這些
殘留物會延長乾衣時間,或導致乾衣機在衣物完全乾燥前停
機。如果過濾網仍放在乾衣機裡時有棉絮從濾網上掉落,可
能是由於過濾網堵塞所致。
每隔 6 個月用尼龍刷清潔棉絮濾網,如果因殘留物導致棉絮
濾網堵塞,則應更頻繁清潔。
清洗步驟:
1. 以手指把棉絮從過濾網上捲起。
2. 用熱水沾濕棉絮濾網的兩側。
3. 以尼龍刷沾上熱水與液體清潔劑,刷洗棉絮濾網,清除殘
留物。
4. 以熱水沖洗過濾網。
5.
以乾淨毛巾徹底擦乾棉絮濾網。重新將濾網裝進乾衣機內。
乾衣機保養
清潔乾衣機之擺放位置
保持乾衣機所在範圍無雜物,或任何可能堵塞氣流的物品,
以確保乾衣機正確運作。其中包括:清理放在乾衣機前面的
成堆衣物。
清潔乾衣機內部
清潔乾衣機滾筒步驟
1. 用低濃度的溫和手洗洗滌劑混合溫熱水,再用軟布擦洗。
2. 用濕海綿或毛巾徹底沖洗。
3. 放入乾淨的衣物或毛巾,啟動乾衣機烘乾內筒。
或
使用超細纖維布,並在噴瓶裝滿熱水,清洗滾筒,再用另
一條超細纖維布拭乾。
備註:含有易褪色染料的衣物,例如藍色牛仔褲或鮮豔色彩
的棉質衣物,可能會使乾衣機的內筒後方染色。這些污漬對
乾衣機無害,也不會污染其他衣物。請將易褪色的衣物翻面
烘乾,以防止染色。
清除積聚棉絮
從乾衣機機體內部
必須每隔2年或更頻繁地清潔棉絮,視乾衣機使用情況而定。
必須由合格的家電維修人員或排氣系統清潔人員進行清潔。
從排氣管
必須每隔2年或更頻繁地清潔棉絮,視乾衣機使用情況而定。
䡢ᾅḦ堋㨇怈暊㖻䅫㛸岒ㆾ㯋橼炻ἳ⤪㰥㱡ˤ

32
蒸氣機種的特別說明
進水管
使用乾衣機 5 年後更換進水管和水龍頭過濾網,以降低水
管故障的風險。定期檢查並更換進水管,若發現突起物、扭
結、割痕、磨損或漏水情況。
記錄更換進水管的時間。
乾衣機的禦寒措施
1. 拔下乾衣機的插頭,或切斷電源。
2. 關閉水龍頭。
3. 中斷水龍頭和排水渠的進水管連接。
再次使用乾衣機
1. 沖洗水管。將進水管重新連接至水龍頭。
開啟水龍頭。
2. 遵循「安裝說明」,插入乾衣機的插頭,或重接電源。
不使用、存放和搬運保養
僅蒸氣機種:在乾衣機不會結冰的環境下安裝和存放機器。
由於管內可能殘存水份,水結冰後可能會損壞乾衣機。若在
結冰天氣下存放或搬運乾衣機,做好禦寒措施。
不使用或存放保養
只可在您在家時運行乾衣機。如果您將要出門度假,或長期
不使用乾衣機,則應:
1. 拔下乾衣機的插頭,或切斷電源。
2. 清潔棉絮濾網。請參閱「清潔棉絮濾網」。
3. 關閉連接至乾衣機的水源。可避免您不在家時「因水壓上
升」而導致淹水意外。
搬運保養
針對電線連接的乾衣機:
1. 拔除電源線。
2. 僅瓦斯型機種:關閉瓦斯供應管線上的停止閥。
3. 僅瓦斯型機種:中斷瓦斯管的連接,並取下連接至乾衣機
的管子接頭。
4. 僅瓦斯型機種:覆蓋開放式燃料供應管線。
5. 僅蒸氣機種:關閉水龍頭。
6. 中斷水龍頭和進水管的連接,然後排乾水管內的水。
獨立運送水管。
7. 確保水平支腳已固定在乾衣機底座。
8. 使用膠帶固定乾衣機門。
直接配線之乾衣機:
1. 中斷電源。
2. 中斷接線。
3. 僅蒸氣機種:關閉水龍頭。
4. 僅蒸氣機種:中斷水龍頭和進水管的連接,然後排乾水管
內的水。獨立運送水管。
5. 確保水平支腳已固定在乾衣機底座。
6. 使用膠帶固定乾衣機門。
重新安裝乾衣機
遵循「安裝說明」擺放、調水平以及接裝乾衣機。
觸電危險
維修前請切斷電源。
操作前請裝回所有零件和面板。
如不遵照上述指示,可能導致人員傷亡或觸電。
警告

33
故障排除
如果您經歷了 可能原因 解決方案
乾衣機運行
乾衣機不運行 乾衣機門關不緊。 請確保乾衣機門已關緊。
用指甲觸碰「啟動/暫停」。
用手指觸碰「啟動/暫停」。
家用保險絲熔斷,或斷路器跳閘。 乾衣機也許有兩個家用保險絲或斷路器。檢查確保保險絲完好緊
鎖、斷路器未跳閘。更換保險絲,或重設斷路器。若問題持續,請
致電電工。
電源不正確。
電力型乾衣機要求 240 伏特的電源。請合格的電工檢查。
保險絲類型錯誤。 使用延時保險絲。
乾衣機無法關閉。 「除皺防護」選項結束前,乾衣機門
已打開。
若在 「除皺防護」選項結束前打開乾衣機門,乾衣機將進入 「暫
停」模式。您需要觸碰 「電源」關閉,或觸碰「啟動/暫停」,繼
續 「除皺防護」選項。
乾衣機無法加熱 家用保險絲熔斷,或斷路器跳閘。 滾筒也許還在轉動,但卻無法加熱。電力型乾衣機使用兩個家用保
險絲或斷路器。更換保險絲,或重設斷路器。若問題持續,請致
電電工。
電源不正確。
電力乾衣機要求 240 伏特的電源。請合格的電工檢查。
瓦斯供應閥門未開啟。 針對瓦斯型乾衣機,確定已打開瓦斯線的閥門。
不尋常噪音
所選「蒸氣」行程發出嗡
嗡或嗚嗚聲 (部份機種)
乾衣機的水幫浦或進水閥「視機種而
定」正在運行。
乾衣機執行「蒸氣」功能時使用水幫浦。若剛安裝或未使用乾衣機
一段時間,幫浦的聲音可能會比較大,而且運行比較久。這是正常
現象。備註:即使沒有連接水管,閥門也可能會發出這樣的聲音。
巨大噪音 乾衣機有一段時間沒有使用。 這是正常現象。巨大噪音在使用數分鐘後會減弱。
發出連續短促的喀嗒聲或
振動聲響
小物件卡在乾衣機滾筒邊緣。
檢查乾衣機滾筒前後邊緣是否有小物件。在洗衣前請先將口袋掏空。
乾衣機未放平。 如果乾衣機安裝不妥當,可能會振動。請參閱「安裝說明」。四個
乾衣機腳輪必須確實接觸地面。
衣物在乾衣機內糾結成團。 如果衣物糾結成團,會發生彈跳,導致乾衣機振動。分開衣物,重
啟乾衣機。
發出喀嗒聲 瓦斯閥正在運作。 瓦斯型乾衣機可能在啟動和停止後聽到瓦斯閥發出喀嗒聲。這是正
常現象。
乾衣機效果
烘乾時間太長,而且沒有
徹底烘乾衣服
棉絮濾網已被棉絮堵塞。
每次烘乾衣物前,必須清潔棉絮濾網。
已開啟 「節能」選項。 為取得最佳烘乾時間,關閉 「節能」選項。
排氣管或外部排氣罩被棉絮堵塞,限
制空氣流通。
運行乾衣機 5-10分鐘。把手放在外部排氣罩下,檢查空氣流通情
況。如果您感覺不到氣流,請清潔排氣系統的棉絮,或更換重金屬
或可伸縮金屬排氣管。請參閱「安裝說明」。
排氣管長度不正確。
檢查排氣管是否太長,或轉彎太多。長的排氣管會延長乾衣時間。
請參閱「安裝說明」。
排氣管直徑尺寸不正確。
使用直徑為 4” (102 mm) 的排氣管。
首先,請嘗試此處的建議辦法,或造訪我們的網站: https://producthelp.whirlpool.com/
尋求協助,也許就能避免致電要求服務維修。
台灣地區用戶可造訪: http://www.whirlpool.com.tw,以尋求協助。
34
故障排除
如果您經歷了 可能原因 解決方案
乾衣機結果「續上頁」
烘乾時間太長,而且沒有
徹底烘乾衣服「續上頁」
乾衣機未水平擺放。 在自動烘乾行程中,衣物並未接觸到濕度偵測器。請參閱「安裝說
明」中的「放平乾衣機」。
選擇了「冷風」的溫度設定。 選擇適合待烘衣料的正確溫度。請參閱「行程說明」。
衣物太大太重,難以快速乾衣。 請分開衣物,以便自由翻轉。
衣物柔軟紙阻塞排風柵欄。 排風柵欄位於門的內側,棉絮濾網的後方。請確認未被衣物柔軟
紙堵塞。
只使用一片柔軟紙,且只用一次。
乾衣機放置在室溫低於 45ºF (7ºC) 的
房間。
乾衣機的正常運行需於室溫高於 45ºF (7ºC)。
乾衣機放置在壁櫥內。
壁櫥門上方與下方必須有通風口。乾衣機前方至少應有 1”
(25mm) 的空間,在大多數的安裝情況下,乾衣機後方應保有 5"
(127 mm) 的空間。請參閱「安裝說明」。
行程時間太短
在 「自動乾衣行程」中,衣物可能沒
有接觸到濕度偵測器。。
調整乾衣機水平。請參閱「安裝說明」。四個乾衣機腳輪必須確實
接觸地面。
僅蒸氣機種:用 「蒸氣清新行程」烘
乾的衣物,帶有微濕或潮濕的水漬
在某些環境或安裝情況下,您可能會碰到烘不夠乾的狀況。
「自動乾衣行程」過早結束。 更換「自動乾衣行程」的衣物乾度設定。
提高或降低衣物乾度,將會改變行程的乾衣時間總量。
衣物上沾有棉絮 棉絮濾網已被棉絮堵塞。 每次烘乾衣物前,必須清潔棉絮濾網。
衣物沾染污漬 不當使用衣物柔軟劑。 在行程開始時加入乾衣機衣物柔軟紙。衣物柔軟紙若加入部分乾燥
的衣物,則會使衣物染色。蒸氣行程不得使用衣物柔軟紙。
滾筒上有污漬 衣物褪色。 滾筒污漬來自衣物染料 (部份機種)。這些污漬不會沾染其他衣物。
衣物皺褶 衣物在行程結束後未立即取出。
僅蒸氣機種:選擇 「蒸氣清新行程」,用水和熱度翻轉衣物。此
行程最適用於烘乾免燙棉質、棉和聚酯混紡、和常見針織物和合成
纖維的乾燥衣物,以撫平皺褶和清除異味。
備註:請參閱衣物保養標籤說明。不建議用此行程烘乾只可乾洗
的衣服。
乾衣機完全塞滿。 減少衣物裝載量,讓衣物充分滾動。效果也可能視布料類型而有
所不同。
僅蒸氣機種:針對蒸氣行程,乾衣機
未妥善連接水源。
僅蒸氣機種:確定乾衣機已接水。檢查確認進水管是否已連接水龍
頭和乾衣機的進水閥上。確認水源的閥門是否已開啟。
異味 乾衣機所在環境近期進行過油漆、著
色、上漆。
請將該區域進行通風。當該區域的異味或煙霧散去之後,重新清洗
和烘乾衣物。
首先,請嘗試此處的建議辦法,或造訪我們的網站:https://producthelp.whirlpool.com/
尋求協助,也許就能避免致電要求服務維修。
台灣地區用戶可造訪: http://www.whirlpool.com.tw,以尋求協助。
35
故障排除
如果您經歷了 可能原因 解決方案
乾衣機結果「續上頁」
異味「續上頁」 僅蒸氣機種:針對蒸氣行程,乾衣機
未妥善連接水源。
確定乾衣機已接水、檢查進水管是否已連接水龍頭和乾衣機的進水
閥上、確認水源的閥門是否已開啟。
穿過的衣物仍殘留異味。 欲清除穿過的衣物所殘留之異味,請選用「蒸氣清新」行程。此行
程最適用於免燙的棉質衣物、棉和聚酯混紡、普通針織物和合成纖
維衣物,以撫平起皺和清除異味。
衣物太熱
行程的降溫程序尚未完成就把衣物取出。
讓乾衣機完成行程的降溫程序,再把衣物取出。
以高溫設定運行「定時烘乾行程」。 請選較低的溫度設定運行「自動烘乾行程」,避免過度烘乾衣物。
乾衣機顯示之代碼訊息或指示燈亮起
「PF」「停電」
烘乾行程因停電而中斷。 觸壓「電源」鍵重新啟動乾衣機。
「L2」故障診斷代碼
「電壓太低或無電進入」
家中的電源供應可能有問題,避免將
乾衣機的加熱器開啟。
出現此診斷代碼時,乾衣機仍將繼續運轉。請觸壓任一按鍵,清除
螢幕上的診斷代碼,並恢復顯示預計剩餘時間。
備註:此故障只會在初次安裝時出現。
請嘗試下列方法:
•
檢查家中保險絲是否熔斷或斷路器跳閘。電力型乾衣機使用兩個
家用保險絲或斷路器。重新安裝保險絲,或重設斷路器。
•
請確認電源線已正確地安裝。詳情請參閱「安裝說明」。
•
選擇「定時烘乾」行程,然後重新啟動乾衣機。
若訊息持續,洽詢合格電工。
「F# E#」「F1 E1、 F3
E1 等」各種不同的維修
代碼。
乾衣機需要維修。
若顯示畫面出現以「F」開頭的代碼,而代碼介於 F# 和 E# 之間,
表示乾衣機控制面板偵測到需要維修的問題,請電洽服務中心。
「檢查排氣管」指示燈
亮起
棉絮濾網或排氣管堵塞、排氣管被擠
壓或打結,或有太多彎曲處。
此指示燈亮起時,乾衣機仍將繼續運轉。請嘗試下列方法:
• 清潔棉絮濾網。
• 檢查從乾衣機連接至牆面的排氣管是否被擠壓或打結。
• 確認從乾衣機連接至牆面的排氣管未帶有棉絮和碎屑。
• 確認排氣罩外部未帶有棉絮和碎屑。
• 確認您的排氣系統的長度,以及所用排氣管類型的曲面數處於建
議範圍內。詳情請參閱安裝說明書中的「規劃排氣系統」章節。
• 選擇 「定時烘乾」行程,然後重新啟動乾衣機。
• 若指示燈持續亮起,清潔家中的排氣管系統。
「Loc」或「Lc」 已啟用 「控制鎖」。 長按「控制鎖」或「微乾響鈴」「視機種而定」 3 秒,以解鎖乾
衣機的控制鍵。此時 LED 螢幕將以「3-2-1」的方式倒數計時。解
除 「控制鎖」後, LED 螢幕將熄滅。
首先,請嘗試此處的建議辦法,或造訪我們的網站:https://producthelp.whirlpool.com/
尋求協助,也許就能避免致電要求服務維修。
台灣地區用戶可造訪: http://www.whirlpool.com.tw,以尋求協助。

W11307137A
03/19
©2019 All rights reserved.
版權所有。