
Use and Care Manual
INDOOR PRESERVATION
Refrigerators and Freezers
KRP / KRB / KRC / KFC
READ THESE INSTRUCTIONS CAREFULLY AND COMPLETELY
BEFORE INSTALLING OR USING YOUR APPLIANCE TO REDUC
E
THE RISK OF FIRE, BURN HAZARD, OR OTHER INJURY. KEEP
THIS MANUAL FOR FUTURE REFERENCE.
Do not store or use gasoline or other flammable vapors and liquids in the vicinity of
this or any other appliance.
Installation and service must be performed by a qualified installer or service agency.
DO NOT REPAIR, REPLACE OR REMOVE ANY PART OF THE APPLIANCE UNLESS
SPECIFICALLY RECOMMENDED IN THE MANUAL. IMPROPER INSTALLATION,
SERVICE OR MAINTENANCE CAN CAUSE INJURY OR PROPERTY DAMAGE. REFER
TO THIS MANUAL FOR GUIDANCE. ALL OTHER SERVICING SHOULD BE DONE BY A
QUALIFIED TECHNICIAN.
INSTALLER: LEAVE THIS MANUAL WITH THE OWNER OF THE APPLIANCE.
HOMEOWNER: RETAIN THIS MANUAL FOR FUTURE REFERENCE.
IF THE INFORMATION IN THIS MANUAL IS NOT FOLLOWED
EXACTLY, A FIRE OR EXPLOSION MAY RESULT CAUSING PROPERTY
DAMAGE, PERSONAL INJURY, OR DEATH.
SAFETY DEFINITIONS
THIS INDICATES THAT DEATH OR SERIOUS INJURY MAY
OCCUR AS A RESULT OF NOT OBSERVING THIS WARNING
THIS INDICATES THAT MINOR OR MODERATE INJURY MAY
OCCUR AS A RESULT OF NOT OBSERVING THIS WARNING.
THIS INDICATES THAT DAMAGE TO THE APPLIANCE OR
PROPERTY MAY OCCUR AS A RESULT OF NOT OBSERVING
THIS WARNING.
Message from Hestan:
Hestan’s award-winning culinary innovations and purpose-built features
reinvented the restaurant kitchen and redefined culinary experience in some
of America’s most acclaimed restaurants. Hestan now takes this performance
from the back of the house and puts it front and center in yours. Thoughtfully
designed and meticulously built, Hestan will serve you beautifully for years to
come.
Hestan is the only residential brand born from the dreams and demands of
professional chefs. From ranges to refrigeration, every detail is designed to
deliver the performance and reliability expected in a restaurant – now available
for you.
We appreciate you choosing Hestan, and we promise to deliver the very best to
you.
Welcome to Hestan
©2019 Hestan Commercial Corporation
1
EN

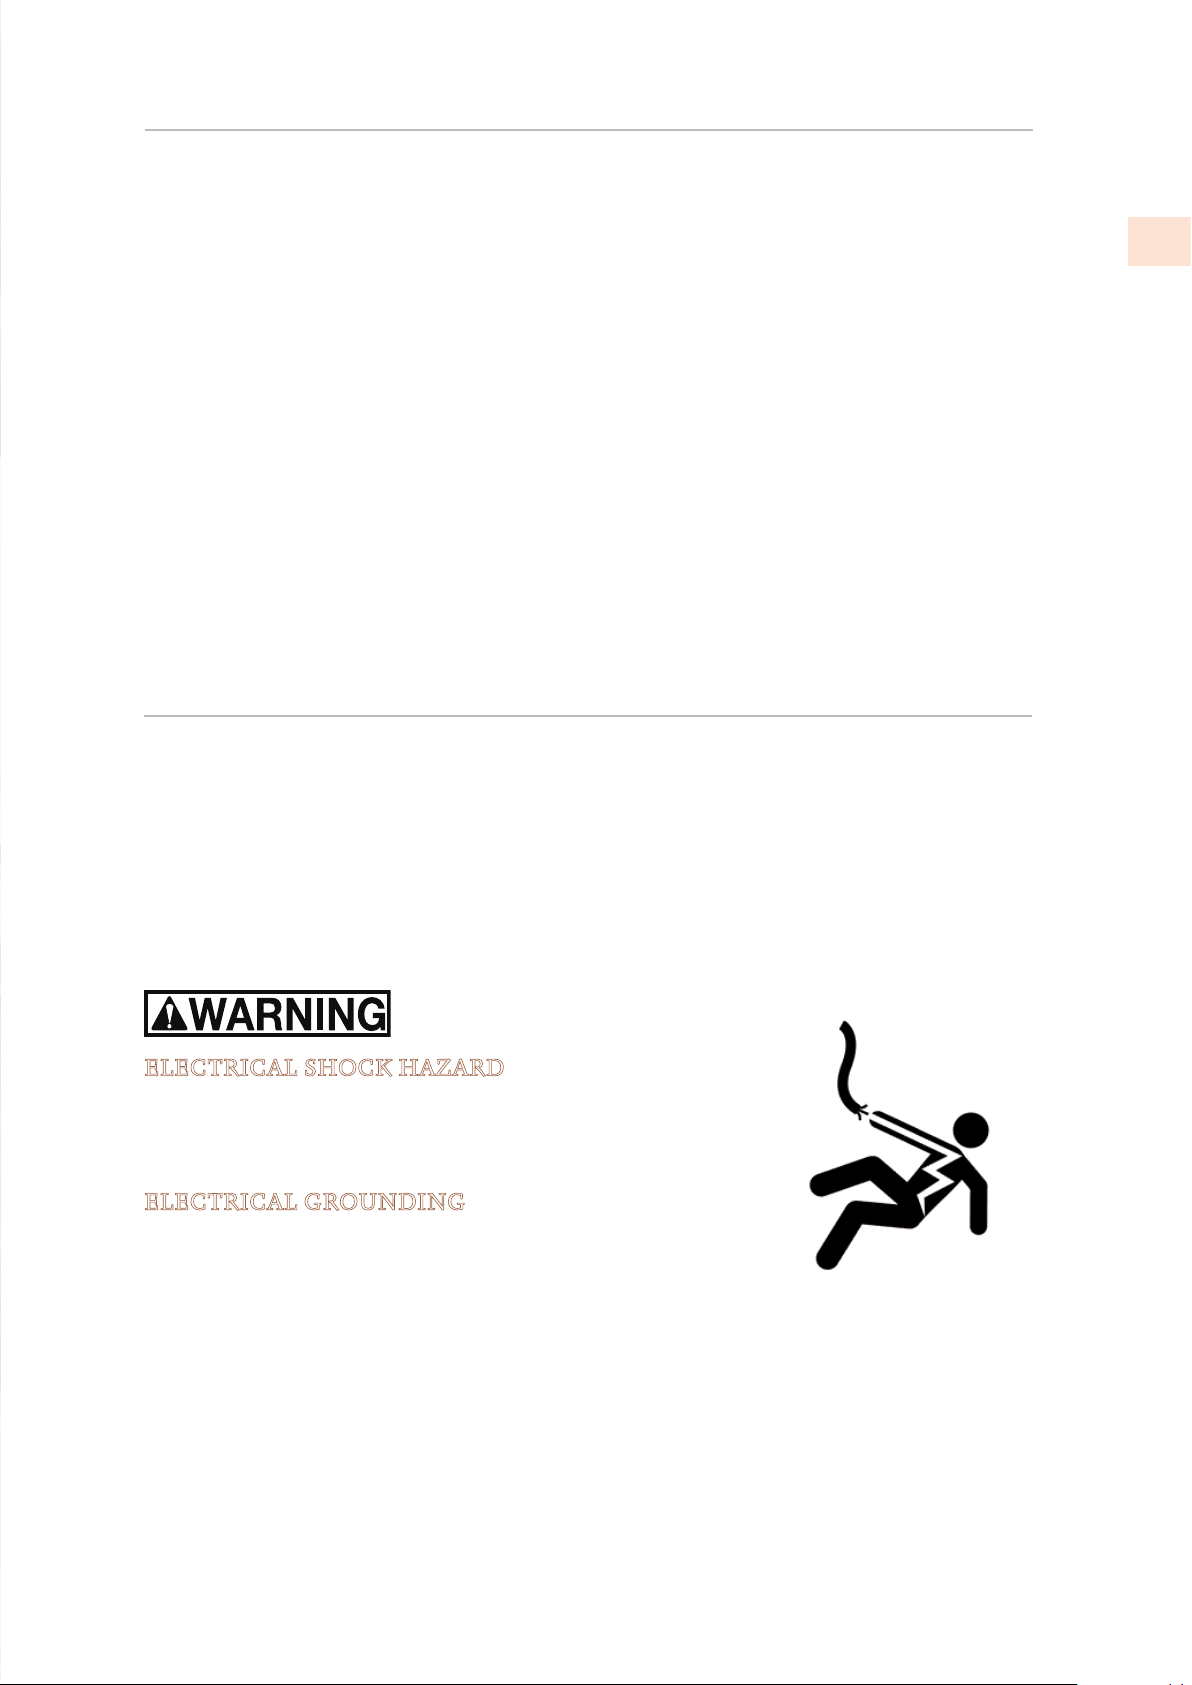
TABLE OF CONTENTS
3 SAFETY PRECAUTIONS - BEFORE YOU BEGIN
6 MODEL NUMBERS
7 RATING LABEL
7 REGULATORY / CODE REQUIREMENTS
8 GETTING TO KNOW YOUR APPLIANCE
12 CONTROLS AND OPERATION
21 INTERNAL LAYOUT
25 FOOD PRESERVATION
28 CARE AND CLEANING
29 TROUBLESHOOTING
32 MAP OF FUNCTIONS AND SETTINGS
34 PARTS / SERVICE
35 LIMITED WARRANTY
SAFETY PRECAUTIONS - BEFORE YOU BEGIN
When properly cared for, your Hestan appliance will provide safe, reliable service for many
years. When using this appliance, basic safety practices must be followed as outlined below.
IMPORTANT: Save these instructions for the local Utility Inspector’s use.
INSTALLER: Please leave these instructions with the owner.
OWNER: Please retain these instructions for future reference.
This appliance is NOT designed for installation in manufactured (mobile) homes or recreational
park trailers. Do NOT install this appliance outdoors.
ELECTRICAL SHOCK HAZARD
Disconnect power before installing or servicing appliance. Failure
to do so can result in death or electrical shock.
ELECTRICAL GROUNDING
• This appliance must be grounded. Grounding reduces the
risk of electric shock in the event of a short circuit. Read the
ELECTRICAL CONNECTIONS section of the Installation
Manual for complete instructions.
• DO NOT ground to a gas pipe.
• DO NOT use an extension cord with this appliance.
• DO NOT have a fuse in the NEUTRAL or GROUNDING circuit. A fuse in the NEUTRAL or
GROUNDING circuit could result in an electrical shock.
©2019 Hestan Commercial Corporation
3
EN
GENERAL SAFETY PRECAUTIONS
If this appliance is replacing an existing appliance which must be removed or
disposed of, make sure that it does not become a dangerous trap for children
by cutting its power supply cable and rendering it impossible to close the door.
Use the same caution at the end of the lifespan of the new appliance.
This appliance is designed to refrigerate beverages and foods and is intended for
domestic use.
The appliance must be installed by following the instructions in the Installation
Guide. Particular care should be taken not to obstruct the vent openings of the
appliance and of the built-in units.
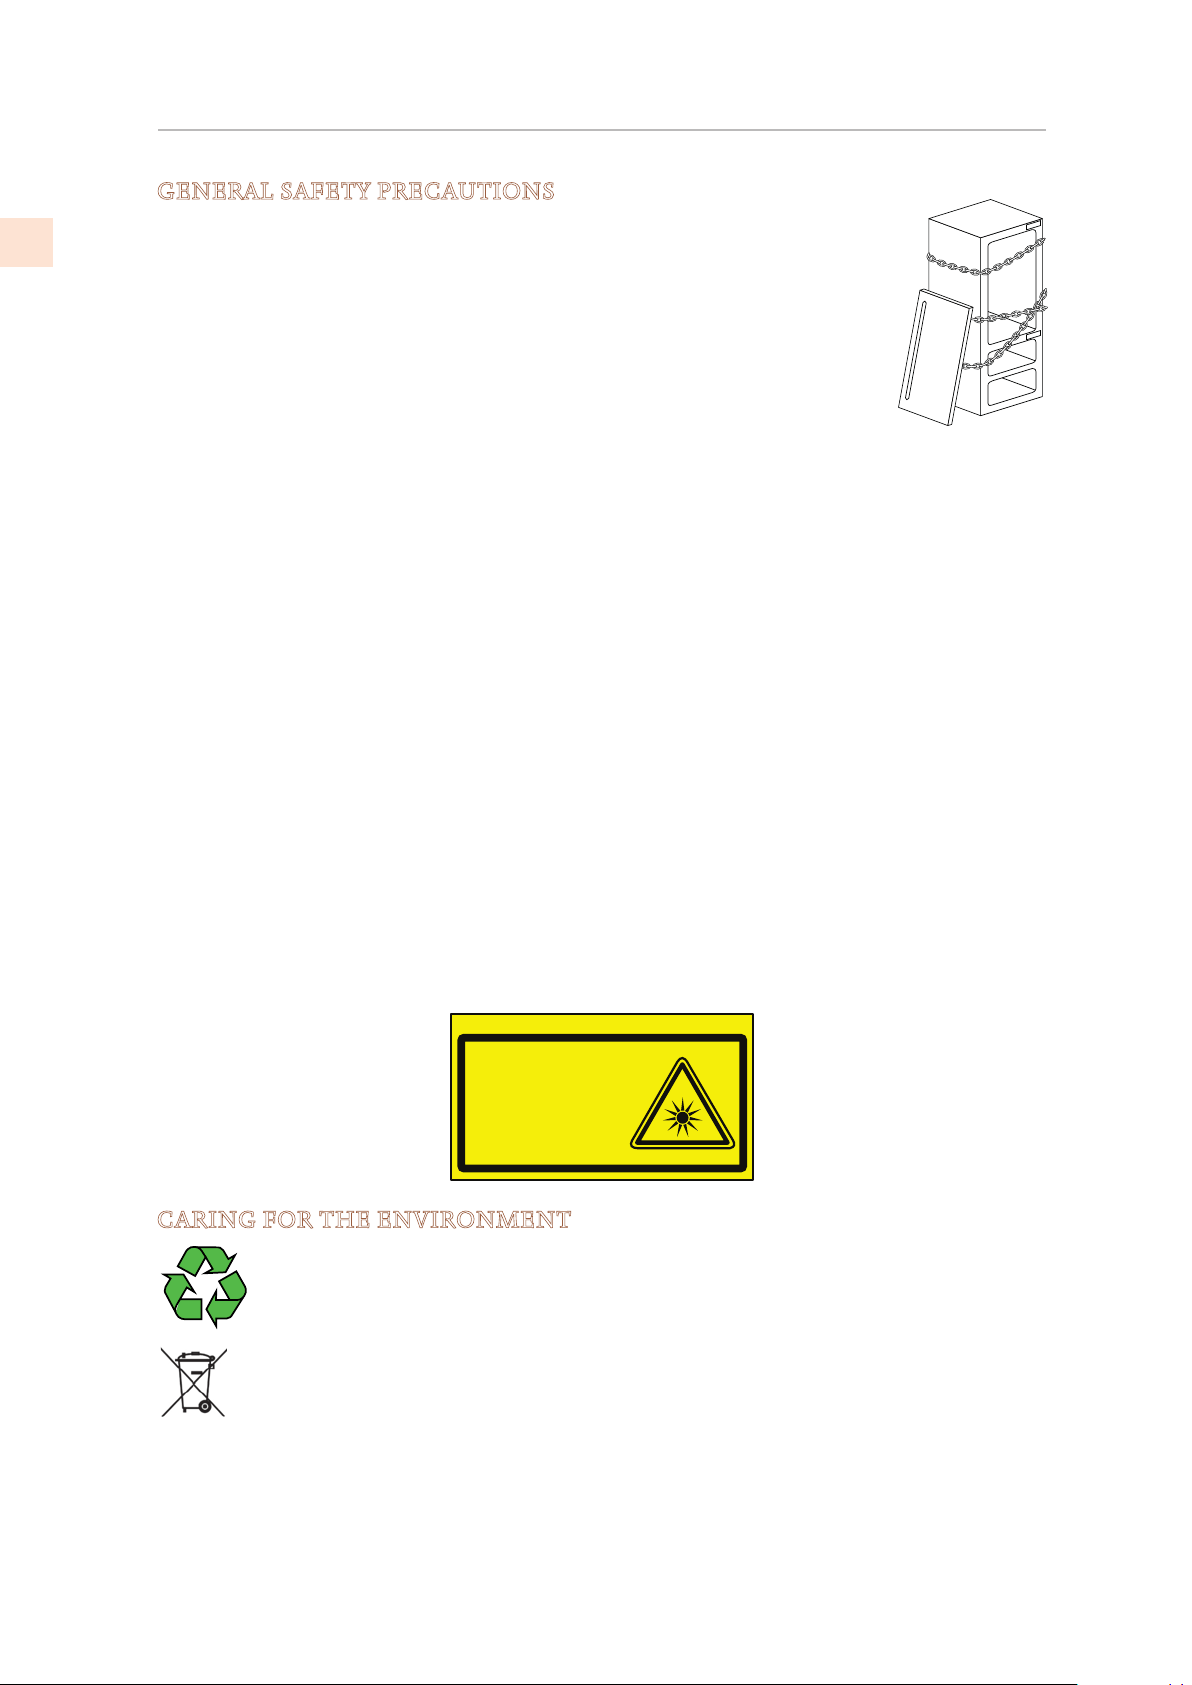
The appliance features a concentrated lighting system with LED lamps. Do not stare into these
lamps when they are on to avoid possible eyesight damage.
This warning is also contained on the label attached to the inside of the refrigerator door.
When the freezer is functioning do not touch the inner stainless steel surfaces with wet or
damp hands, since skin may stick to the very cold surfaces.
Do not use any type of electrical equipment inside of the food conservation compartments.
When positioning the shelves, do not place fingers in the shelf slide guides.
Do not position containers of flammable liquids near the appliance.
Completely switch off the appliance and unplug the power supply cable during cleaning
operations.
The packaging parts can be dangerous for children: do not allow children to play with the
plastic bags, plastic film or Styrofoam.
Any repairs must be performed by a qualified Hestan Service technician.
This appliance is not intended for use by persons (including children) with reduced physical,
sensory or lack of experience and knowledge unless they have been given supervision or
instruction concerning use of the appliance by a person responsible for their safety. Children
should be supervised to ensure that they do not play with the appliance.
CARING FOR THE ENVIRONMENT
Pay special attention to correct disposal procedure for all the packaging materials.
The appliance must not be disposed of with urban waste. Contact local waste
disposal centers on how to dispose of recyclable waste.
Prior to disposal, cut the power supply cord and make it impossible to close the
door, as stated in “GENERAL SAFETY PRECAUTIONS” above. During disposal,
avoid damage to the electronics.
The appliance does not contain hazardous substances for the atmospheric ozone layer, neither
in the electronics nor in the insulation.
B09001301
Product tested in accordante with EN62471
Risk Group 2
PRUDENZA:
NON FISSARE LA LAMPADA IN FUNZIONE.
PUÒ ESSERE DANNOSO PER GLI OCCHI.
CAUTION:
DO NOT STARE AT OPERATING LAMP.
MAY BE HARMFUL TO THE EYES.
SAFETY PRECAUTIONS - BEFORE YOU BEGIN
(CONT.)
©2019 Hestan Commercial Corporation
4
EN
SAFETY PRECAUTIONS - BEFORE YOU BEGIN
(CONT.)
CLEANING AND MAINTENANCE OF THE ICE DISPENSER
Failure to properly sanitize the ice maker system can compromise the hygienic safety of the
water dispensed. Always follow sanitization instructions.
When using the appliance for the first time and every time the filter is changed, it is
recommended to let the water flow in the circuit using the “Manual Cleaning” function and
discard the ice produced in the first 24 hours. See “ACTIVATING THE ICE MAKER” on page
13.
Clean the ice bucket or drawer regularly using only drinking water.
The filter must be changed when indicated on the control panel or when the ice/water
dispenser has not been used for more than 30 days.
With each filter replacement, sanitize the ice and/or water distribution system using a food
grade disinfectant (with sodium hypochlorite), which does not alter the characteristics of the
materials. Run the “Manual Cleaning” function so that at least 1/2 gallon of water has come
through into the catch pan before use.
Only original spare parts supplied by the manufacturer should be used when replacing
components in the ice and water dispenser.
Any work on the appliance must be carried out by a qualified technician.
USING THE CONTROL MENUS
Depending on the appliance model, there may be one or two control panels, with various
controls available. Up/Down arrows
are provided to directly adjust temperatures in the
various cooling/refrigeration/freezer zones. When two panels are present, only the main
panel has the
and buttons.
Many features and settings are only accessible through the control menus. Here are the basics:
1) Touch the key to activate the interactive menu system.
If the display shows “KEYPAD LOCKED”, touch the
and Down key for several
seconds. (See “UNLOCKING THE KEYPAD” on page 14)
• Either set of the up/down buttons will move the menu selections. The active selection
is always shown in the display.
2) Use the Up/Down buttons to show a selection, then touch the button to activate it.
• You may need to use the up/down buttons again to get to a final selection. When
turning selections ON or OFF, you will have to actually follow down to that ON or OFF
and touch
to confirm it.
3) To go back out of the menu, touch the button as needed.
See also: “SPECIAL SETTINGS AND FUNCTIONS” on page 14.
©2019 Hestan Commercial Corporation
5
EN
MODEL NUMBERS
REFRIGERATION MODELS
Model No. Description
KRPR36 Bottom Mount Refrigerator, Top Compressor, Pro, Right Hinged, 36"
KRPL36 Bottom Mount Refrigerator, Top Compressor, Pro, Left Hinged, 36"
KRPR36-XX Bottom Mount Refrigerator, Top Compressor, Pro, Color, Right Hinged, 36"
KRPL36-XX Bottom Mount Refrigerator, Top Compressor, Pro, Color, Left Hinged, 36"
KRBR36 Bottom Mount Refrigerator, Bottom Compressor, Right Hinged, 36"
KRBL36 Bottom Mount Refrigerator, Bottom Compressor, Left Hinged, 36"
KRBR36-OV Bottom Mount Refrigerator, Bottom Compressor, Overlay, Right Hinged, 36"
KRBL36-OV Bottom Mount Refrigerator, Bottom Compressor, Overlay, Left Hinged, 36"
KRBR36-XX Bottom Mount Refrigerator, Bottom Compressor, Color, Right Hinged, 36"
KRBL36-XX Bottom Mount Refrigerator, Bottom Compressor, Color, Left Hinged, 36"
KRCR24 Refrigerator Column, Right Hinged, 24"
KRCL24 Refrigerator Column, Left Hinged, 24"
KRCR24-OV Refrigerator Column, Overlay, Right Hinged, 24"
KRCL24-OV Refrigerator Column, Overlay, Left Hinged, 24"
KRCR24-XX Refrigerator Column, Color, Right Hinged, 24"
KRCL24-XX Refrigerator Column, Color, Left Hinged, 24"
KRCR30 Refrigerator Column, Right Hinged, 30"
KRCL30 Refrigerator Column, Left Hinged, 30"
KRCR30-OV Refrigerator Column, Overlay, Right Hinged, 30"
KRCL30-OV Refrigerator Column, Overlay, Left Hinged, 30"
KRCR30-XX Refrigerator Column, Color, Right Hinged, 30"
KRCL30-XX Refrigerator Column, Color, Left Hinged, 30"
Model No. Description
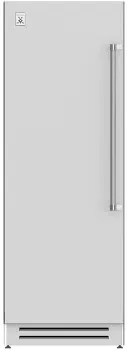
KFCR24 Freezer Column, Right Hinged, 24"
KFCL24 Freezer Column, Left Hinged, 24"
KFCR24-OV Freezer Column, Overlay, Right Hinged, 24"
KFCL24-OV Freezer Column, Overlay, Left Hinged, 24"
KFCR24-XX Freezer Column, Color, Right Hinged, 24"
KFCL24-XX Freezer Column, Color, Left Hinged, 24"
KFCR30 Freezer Column, Right Hinged, 30"
KFCL30 Freezer Column, Left Hinged, 30"
KFCR30-OV Freezer Column, Overlay, Right Hinged, 30"
KFCL30-OV Freezer Column, Overlay, Left Hinged, 30"
KFCR30-XX Freezer Column, Color, Right Hinged, 30"
KFCL30-XX Freezer Column, Color, Left Hinged, 30"
FREEZER MODELS
©2019 Hestan Commercial Corporation
6
EN
RATING LABEL
The rating label contains important information about your Hestan appliance such as the model
and serial number and electrical rating.
The rating label is located on the inside wall of the refrigerator.
TYPICAL RATING LABEL
REGULATORY / CODE REQUIREMENTS
Installation of this refrigeration appliance must be made in accordance with local codes. In the
absence of local codes, this unit should be installed in accordance with the National Electrical
Code and local codes.
This appliance must be electrically grounded in accordance with local codes or in the absence
of local codes with the National Electrical Code ANSI/NFPA 70, or Canadian Electrical code
CSA C22.1.
ozFridge Gas Fill Charge
Quantité de Gaz Réfrigerateur
Freezer Gas Fill Charge
Quantité de Gaz Congélateur
Total Absorbed Current
Courant Absorbée Totale
Voltage
Tension
Frequency
Frequence
Refrigerant Gas Type
Type de Gaz Rèfrigerant
MODEL
Made in Italy
CODE
SER.NO./N° SERIE
ETL LISTED
CONFORMS TO
ANSI/UL STD 250
CERTIFIED TO CAN/CSA
STD C22.2 NO.63
A
V
Hz
HESTAN COMMERCIAL CORP.
ANAHEIM, CA - USA
KRP36
7
0
1
115
60
R134a
FI24RC-RO
F20160725000001
©2019 Hestan Commercial Corporation
7
EN
GETTING TO KNOW YOUR APPLIANCE
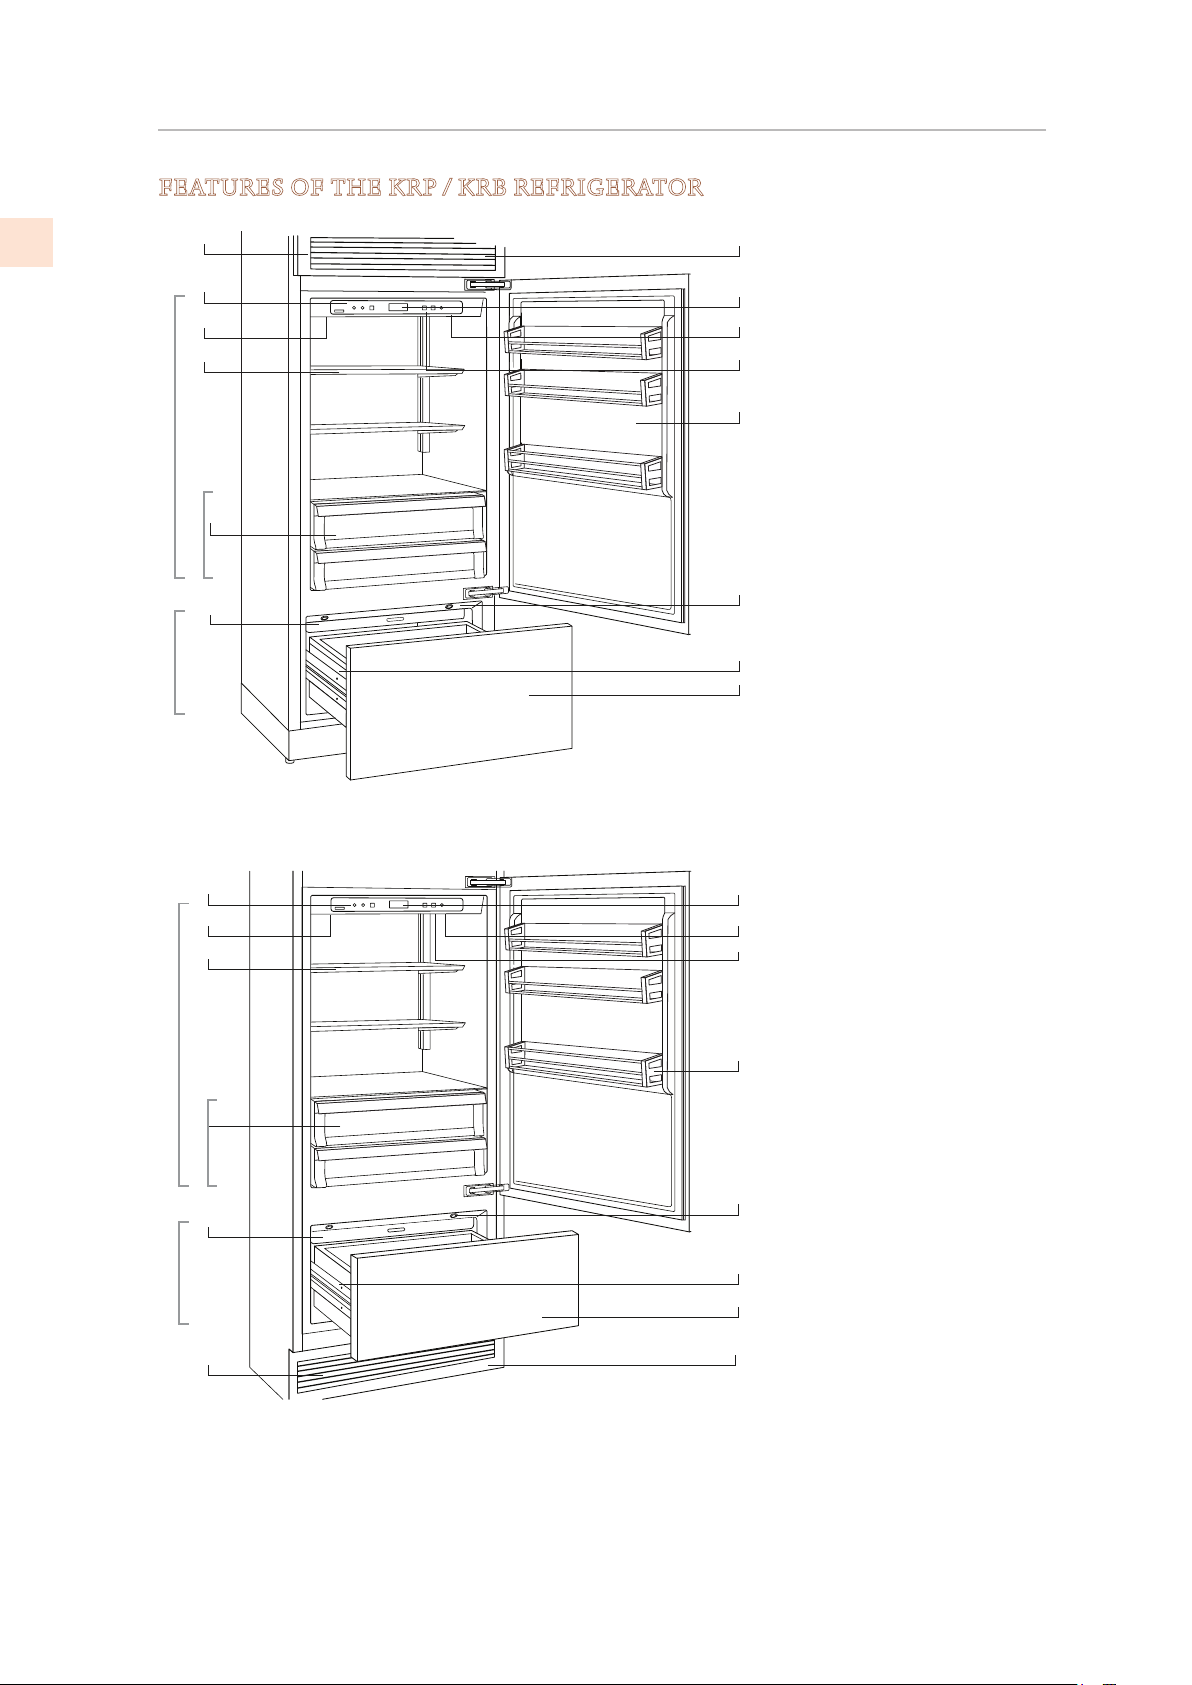
FEATURES OF THE KRP / KRB REFRIGERATOR
1
8
9
10
11
12
13
14
2
3
4
5
6
8
9
10
11
12
13
14
2
3
4
5
6
1
KRP Models
KRB Models
7
7
Stainless steel grille,
aluminum trim
Control panel with display
Water Filter
Patented shelf positioning
system
“Low Temp” crisper
compartments
Automatic ice maker
Dual refrigeration system
Temperature display
Sound signals
Holiday function
Adjustable door shelves
LED lighting - multiple
locations in each compartment
Automatic drawer closing
system
FreshZone/freezer
compartment. When the
appliance is first turned on
the FreshZone/freezer
compartment is set to the
freezer mode. It can be
transformed into a
refrigerator or ExtendFresh
compartment.
2
3
4
5
6
7
8
9
10
11
12
13
14
1
Fresh Zone
Fridge
Low Temp
Low Temp
Fresh Zone
Fridge
©2019 Hestan Commercial Corporation
8
EN
GETTING TO KNOW YOUR APPLIANCE
(CONT.)
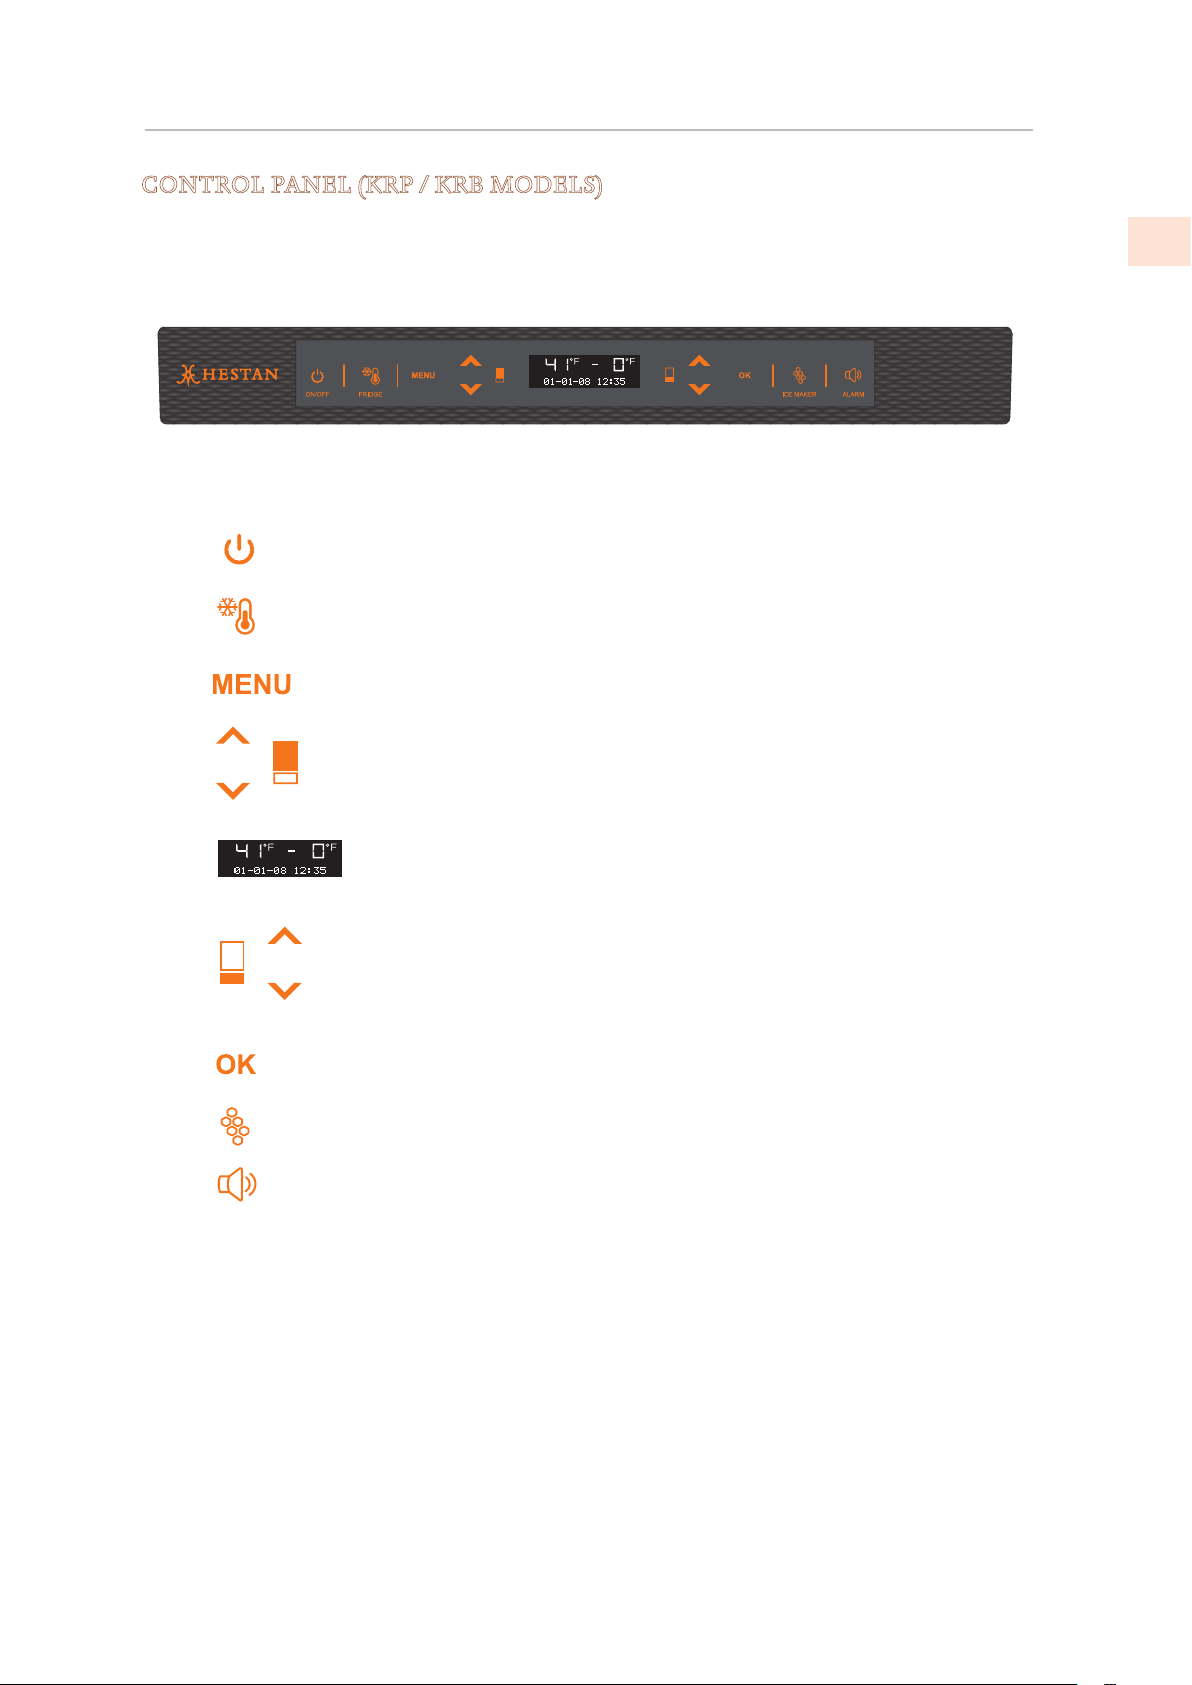
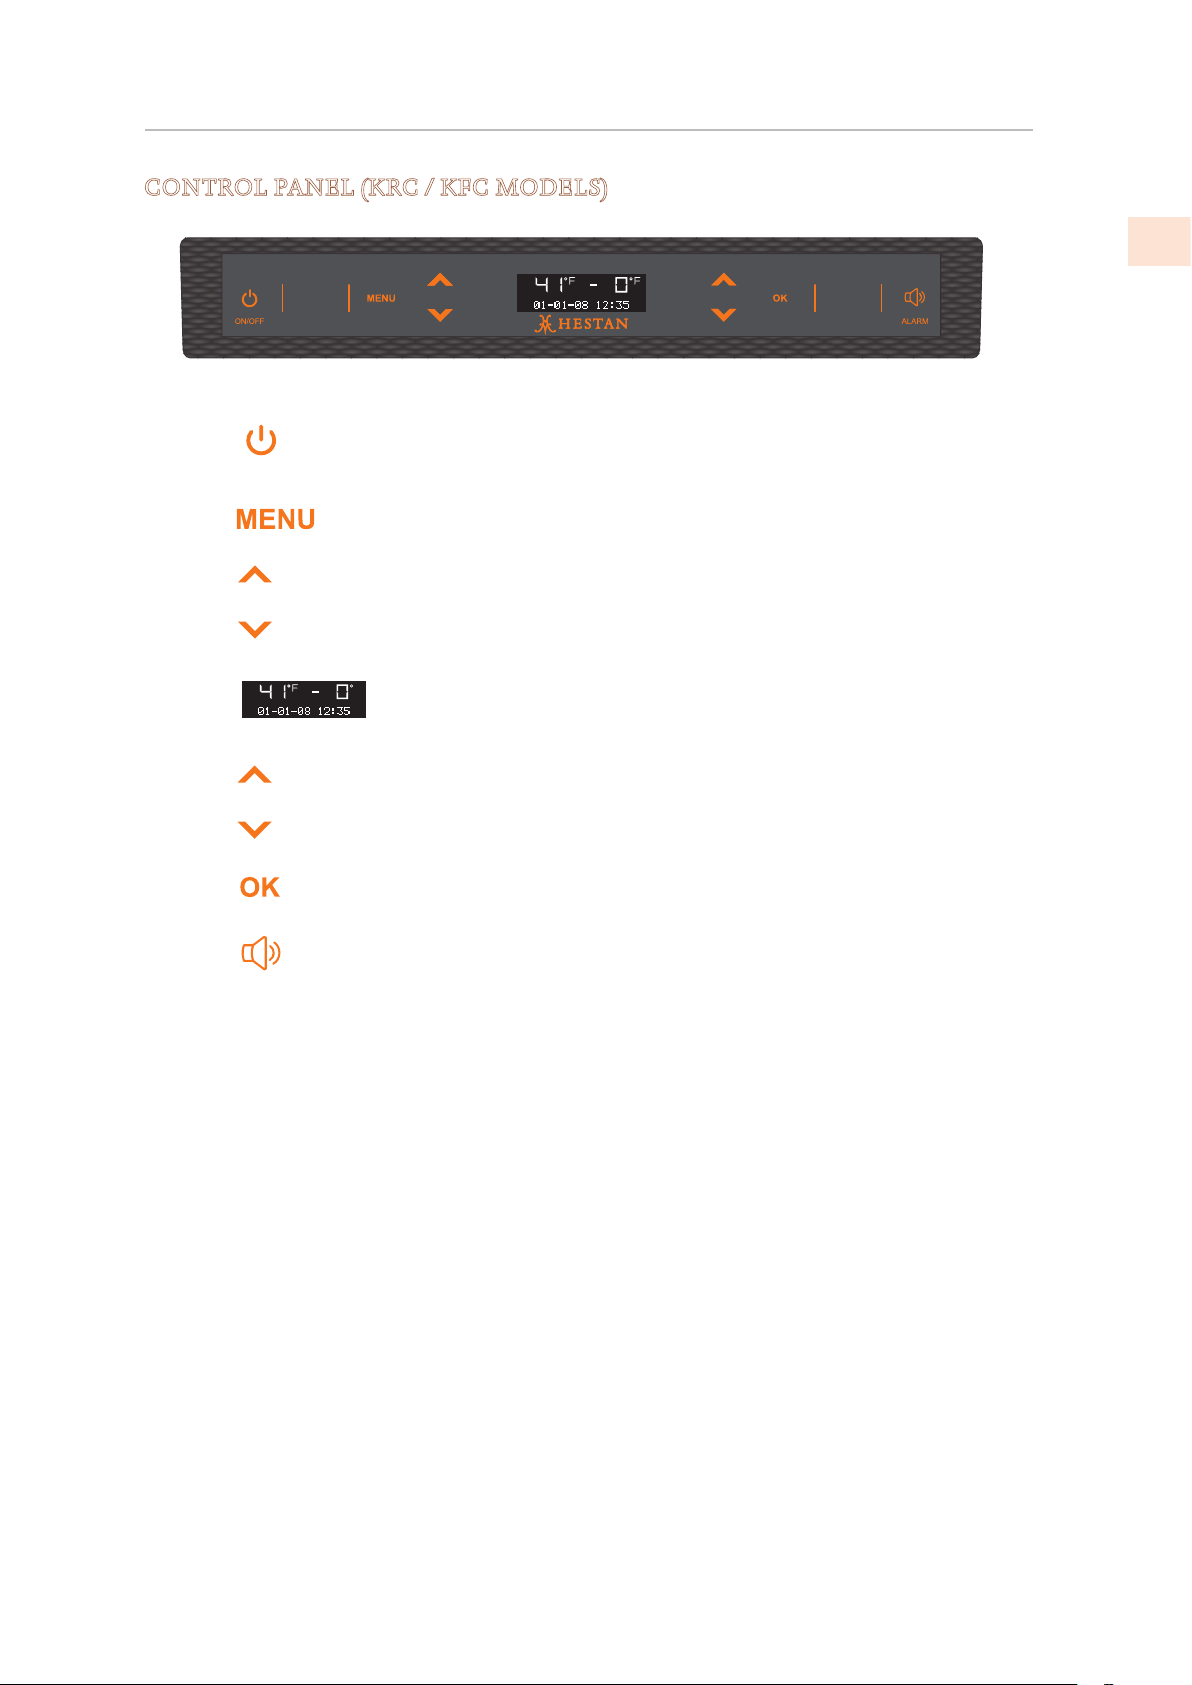
CONTROL PANEL (KRP / KRB MODELS)
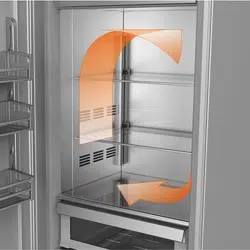
The electronic control system on your Hestan refrigerator maintains constant temperature
in both compartments and displays the measured temperature on the control panel. It also
allows the user to personalize settings of the various functions and provides alerts should a
malfunction occur.
Switches the appliance (all compartments) between
ON and Stand by (Touch for three seconds).
Allows you to switch off the refrigerator
compartment (Touch for three seconds).
Allows access to the control panel menu to change
the appliance’s various settings.
Up/Down - refrigerator: Adjust refrigerator
temperature setting or to navigate through the
control panel menu.
Shows the temperature of the refrigerator and
freezer (FreshZone) compartments, the date and
time, control panel menu and visual messages.
Up/Down - freezer (FreshZone): Adjust freezer
(FreshZone) temperature setting or to navigate
through the control panel menu.
Tap to confirm selections made in the control panel
menu.
Tap to turn the ice maker on or off.
Flashes to signal user alerts such as door being left
open in combination with a warning tone. Tap this
key to deactivate the warning tone.
1
2
3
4
5
6
7
8
9
On/Off
Fridge
Menu
Up/Down
Fridge
Display
Up/Down
Freezer
(FreshZone)
Ok
Ice maker
Alarm
1 2 3 4 5 6 7 8 9
©2019 Hestan Commercial Corporation
9
EN
GETTING TO KNOW YOUR APPLIANCE
(CONT.)
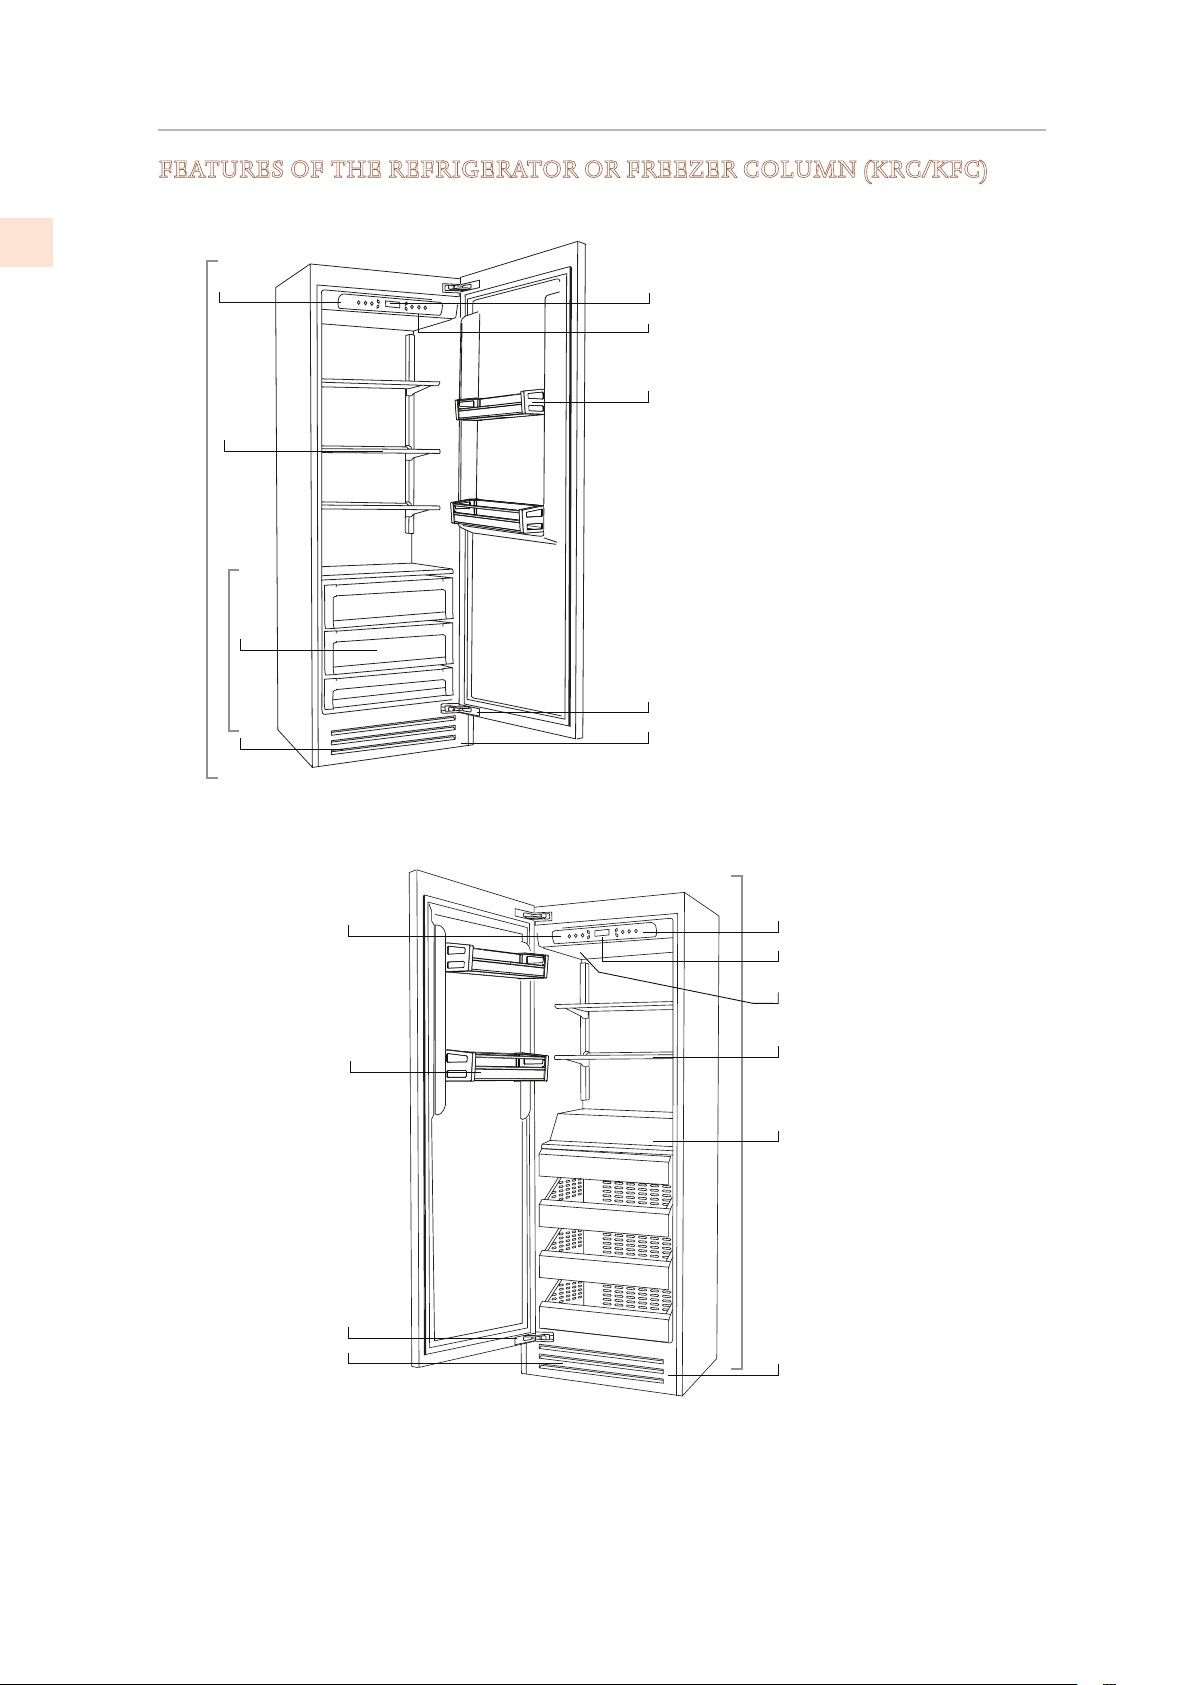
FEATURES OF THE REFRIGERATOR OR FREEZER COLUMN (KRC/KFC)
KRC Models
KFC Models
7
8
9
10
2
3
6
4
1
7
9
3
5
8
1
2
6
10
11
1
2
3
4
5
6
7
8
9
10
11
Fridge
Low Temp
Freezer
Automatic door closing
system
LED lighting, multiple
locations
Stainless steel grille,
aluminum trim
Control panel with display
Patented shelf positioning
system
“Low Temp” crisper
compartments
Automatic ice maker
Refrigeration system
Temperature display
Sound signals
Adjustable door shelves
©2019 Hestan Commercial Corporation
10
EN
GETTING TO KNOW YOUR APPLIANCE
(CONT.)
CONTROL PANEL (KRC / KFC MODELS)
Switches the appliance between ON and Stand
by (Press for three seconds).
Allows access to the control panel menu to
change the appliance’s various settings.
Up/Down - Adjust the temperature setting or to
navigate through the control panel menu.
(KRC/KFC has only one temperature zone.)
Display: Shows the temperature of the
compartment, the date and time, control panel
menu and various other messages.*
Up/Down - Adjust the temperature setting or to
navigate through the control panel menu.
(KRC/KFC has only one temperature zone.)
Press to confirm selections made in the control
panel menu.
Flashes to signal user alerts such as door being
left open in combination with a warning tone.
Tap this key to deactivate the warning tone.
On/Off
Menu
Up/Down
Display
Up/Down
OK
Alarm
1 2 3 4 5 6 7
1
2
3
4
5
6
7
©2019 Hestan Commercial Corporation
11
EN
CONTROLS AND OPERATION
TURNING THE APPLIANCE ON AND OFF
FIRST STARTUP
When the appliance is connected to the electrical power supply but has not yet been switched
on, the display shows the message
.
This is a safety message to warn that the appliance is connected to the main power and the
control panel is off.
To switch the appliance on, press the On/Off button for three seconds.
SWITCHING OFF THE REFRIGERATOR AND FRESH ZONE COMPARTMENTS
When the appliance is first turned on the lower compartment is set to the “freezer” mode.
Once the appliance has started up, the freezer remains always on and can be switched off only
by switching off the complete appliance.
To power off, press On/Off
for three seconds.
RESTARTING
Use the same buttons to restart.
The freezer compartment always stays on and cannot be switched off except by completely
switching off the appliance by pressing the On/ Off
button for three seconds.
SWITCHING OFF FOR LONG PERIODS
During long absence periods it is recommended to switch off the refrigerator by pressing the
On/Off button for three seconds and disconnecting the electrical plug or the appropriate
circuit breaker.
Completely empty the refrigerator, clean and dry it and leave the door and drawer partially
open to prevent unpleasant odors.
If at the first startup the Standby message does not appear, but another message appears, it
means that the appliance has already started the cooling process.
If any alarms are sounding, touch the Alarm button to silence them, and let the appliance
run until the set temperature is reached.
During the first startup, it will not be possible to use the Menu to modify the factory settings
until the preset temperature has been reached.
Each time the appliance is switched on it goes through a self diagnosis procedure lasting three
minutes before completely starting up.
If only the refrigerator or wine compartment is turned off, the specific fan will continue to
operate to prevent the formation of unpleasant odors and mold.
Before turning off the appliance for a long period of time, remove all of the items inside and
leave the door and drawer open to prevent the formation of unpleasant odors and mold.
©2019 Hestan Commercial Corporation
12
EN
CONTROLS AND OPERATION
(CONT.)
ADJUSTING THE TEMPERATURE SETTINGS
Each model has been carefully tested before leaving the factory and is adjusted to ensure
high performance and low consumption. Usually, it is not necessary to modify the settings.
Nevertheless, according to special needs, it is possible to modify the set temperatures within a
certain range. The “recommended” settings below are also the factory presets for each of the
zones and modes.
To adjust the temperature use the Up/Down buttons
for that zone. Upon touching these
buttons the newly set temperature will appear in the display. To modify this temperature, use
the buttons until reaching the desired temperature. After several seconds of showing the new
set temperature, the display will resume showing actual temperature.
Refrigeration Compartment
and FreshZone/Freezer
drawer set as refrigeration
From 34°F to 46°F [+1°C to +7°C], the recommended
temperature setting is 39°F [+4°C].
FreshZone/Freezer drawer
set as ExtendFresh
28°F to 36°F [−2°C to +2°C]
Recommended temperature setting is 32°F [
0°C]
Freezer Compartment and
FreshZone/Freezer drawer
set as freezer
From 9°F to −11°F [−13°C to −23°C], the recommended
temperature setting is
0°F [−18°C].
The actual temperature can vary from the set temperature following frequent openings of the
doors or insertion of room temperature foods or large quantities of foods.
6 to 12 hours may be necessary to reach the selected temperature.
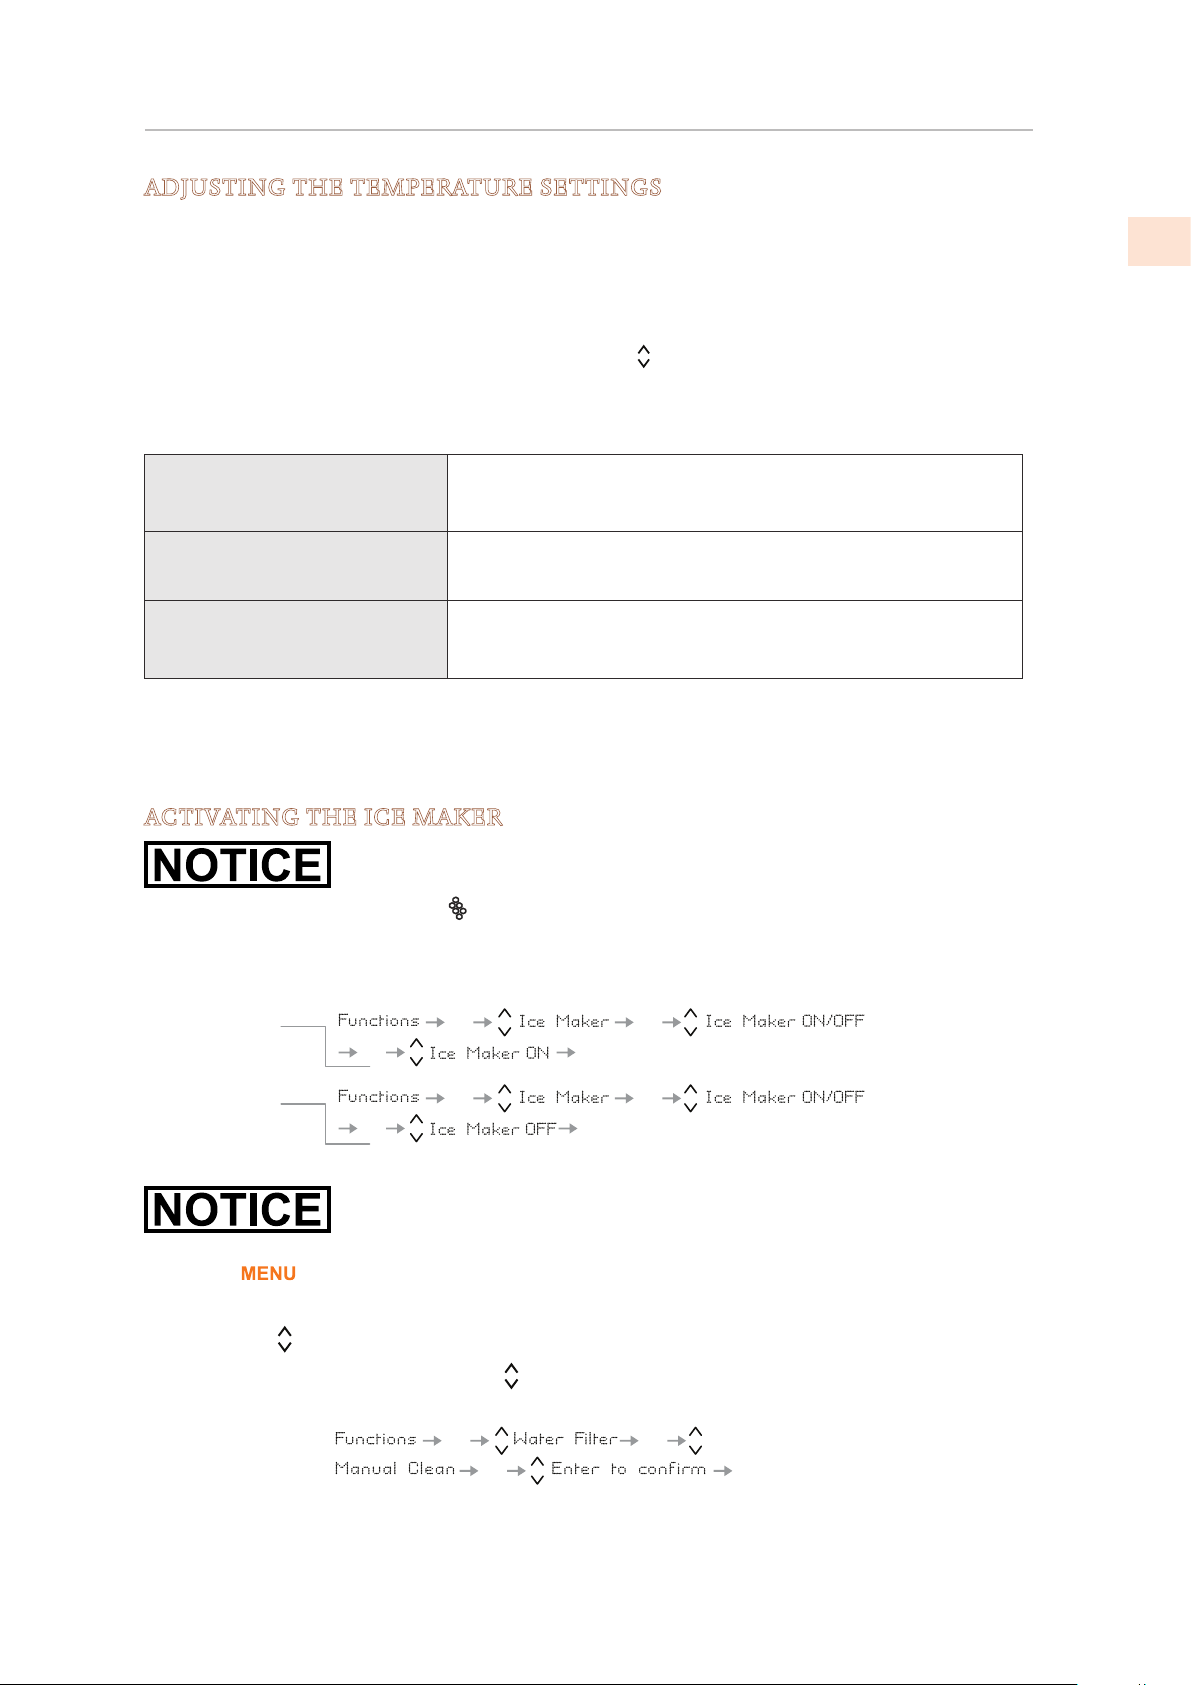
ACTIVATING THE ICE MAKER
Do not perform a Manual Clean or activate the Ice Maker until the water
line is properly connected and water is turned on to the appliance.
KRB/KRP: The Ice Maker button
located on the main control panel turns the automatic ice
maker ON/OFF. The button is illuminated when the ice maker is functioning.
Other Models: The ice maker is activated or deactivated using the menus:
An initial flush of the water circuit should be performed before
activating the Ice Maker for the first time. This is done using the Manual
Clean function as follows.
Touch the
button to activate the interactive menu.
The active menu item is shown at the bottom of the display. If “Functions” isn’t showing, use
the Up/Down
buttons to show the various choices until “Functions” is shown.
• In the instruction below, when the symbol is shown, that means “use the Up/Down
button to display the following item”.
See “WATER FILTER MANAGEMENT” on page 18 for more information.
OK
OK
OKOK
OK
OK
OKOK
Turn icemaker ON
Turn icemaker OFF
OK
OK
OKOK
©2019 Hestan Commercial Corporation
13
EN
SPECIAL SETTINGS AND FUNCTIONS
The appliance can be configured to suit various needs through its settings, such as its operating
modes, display language, and information display. Special functions are provided to meet
various short term needs, such as parties or vacations.
The Settings and Functions are accessed on the main display by pressing the
button.
The Up/Down buttons display options which can be selected by pressing the button. The
Up/Down buttons
scroll through the selected function or setting sub-menus if applicable,
activating or deactivating by pressing the button.
Once a setting or function is confirmed, the display will automatically step back to the previous
menu to allow selection of other functions. In many cases it is possible to return to the
previous selection through the
button.
The language of the messages appearing on the display can be changed by operating as follows:
Enter the Menu by pressing the
button, select Settings via the Up/Down buttons and
confirm via . Then select the Language function and the desired language.
See also: “USING THE CONTROL MENUS” on page 5.
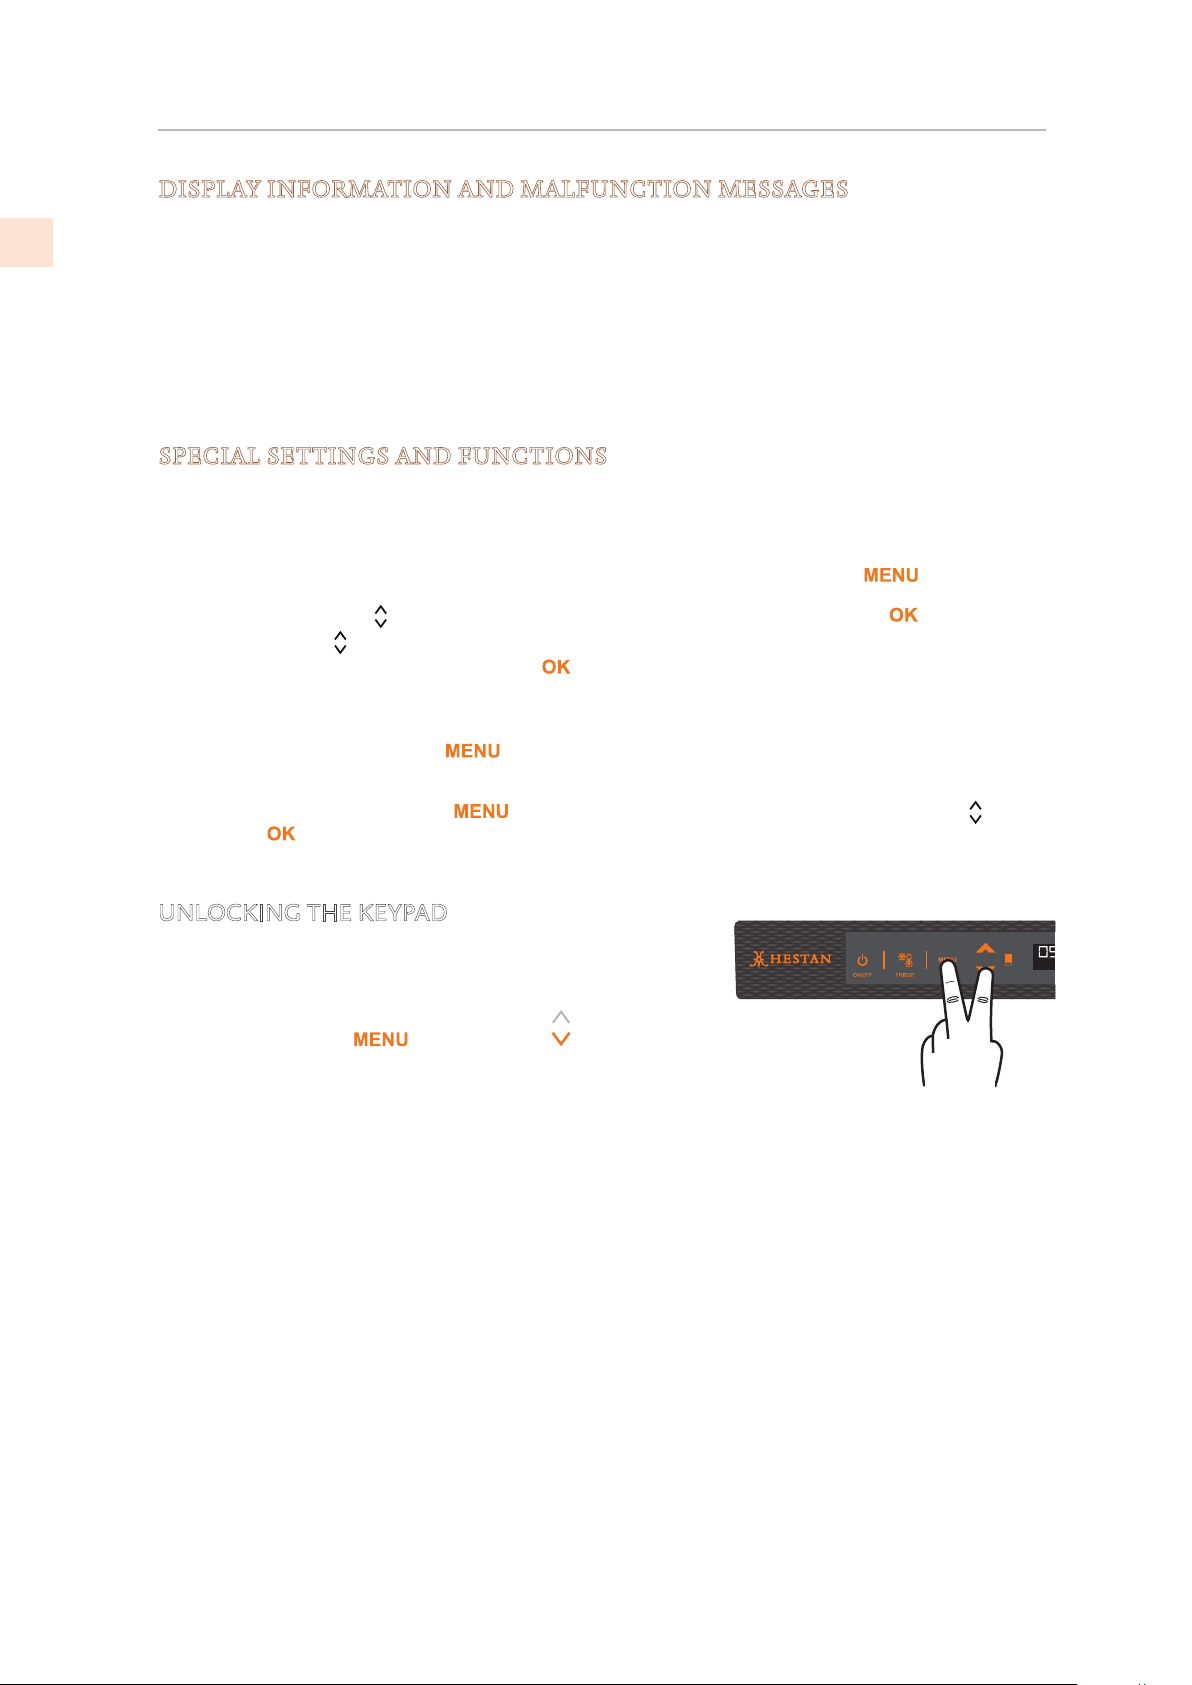
UNLOCKING THE KEYPAD
The keypad automatically locks after a while if not being
used. When it is locked, any touch of the keypad will display
“KEYPAD LOCKED’.
To unlock, touch the
key and Down key together
for several seconds, until the message “KEYPAD
UNLOCKED” shows on the display.
CONTROLS AND OPERATION
(CONT.)
DISPLAY INFORMATION AND MALFUNCTION MESSAGES
An integrated control system provides information through light signals or text messages
visualized on the display.
The information signal is always visualized with a steady text message, while a malfunction
signal is visualized with blinking text. The sound signal that accompanies some malfunction
signals can be deactivated by pressing the Alarm button on the main control panel.
The list of malfunction signals is located at the back of this manual.
©2019 Hestan Commercial Corporation
14
EN
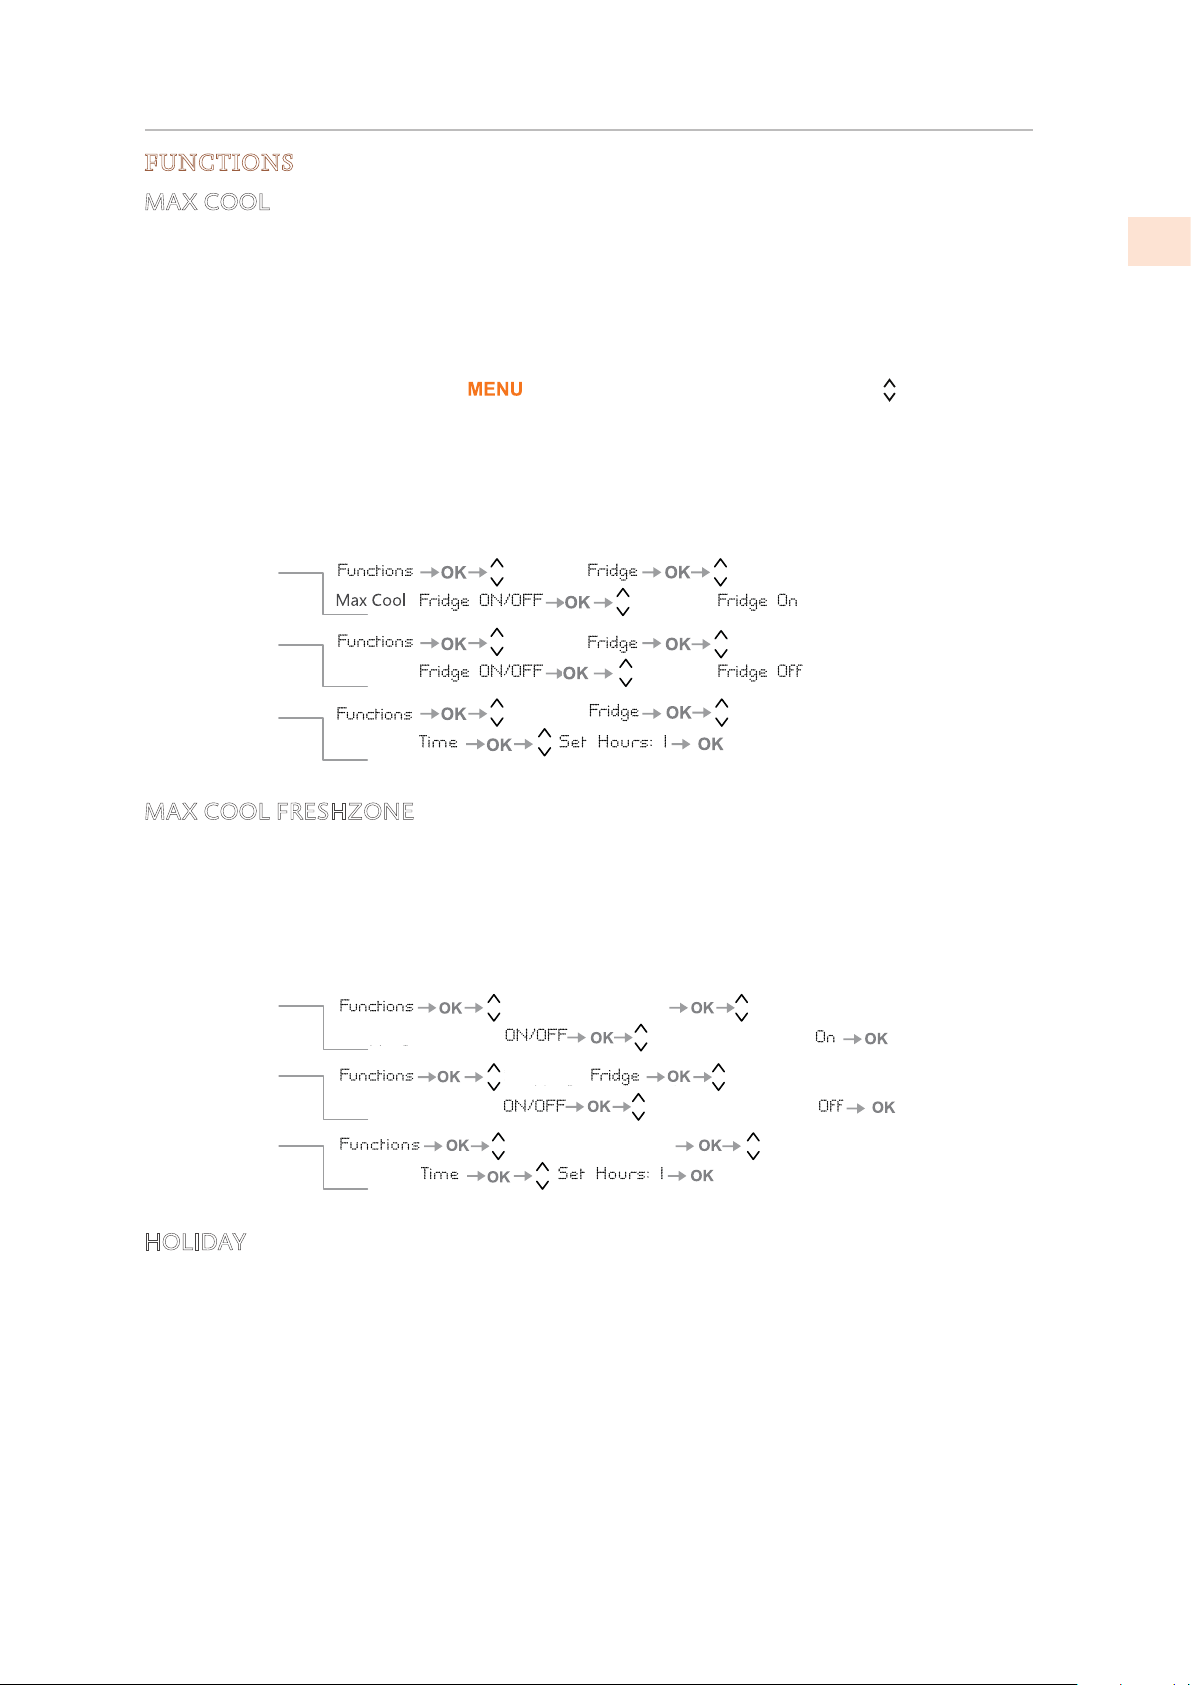
FUNCTIONS
MAX COOL
The Max Cool Mode prepares the cooling, Fridge and FreshZone compartments for the
introduction of fresh food or other items which may have warmed during transport. The more
quickly an item can be cooled or frozen the better it will be preserved.
This mode can also be effective at maintaining compartment temperatures while entertaining
when higher than average door and drawer openings are anticipated.
To use special functions, select the
button and use the Up/Down buttons .
The Max Cool function lowers the refrigerator temperature to 35.6°F [+2°C] for 12 hours,
permitting more rapid cooling of food that has just been placed in. Once the 12 hours have
expired, the function deactivates automatically, returning to the previously set temperature.
You can set a 1-12 hour delay before the function starts. If a power outage occurs while
MaxCool is active, the appliance resumes normal operation when power returns.
MAX COOL FRESHZONE
This function should be activated at least 24 hours before inserting room temperature items
into the freezer, or several hours before placing into the freezer previously frozen items which
have been subject to a slight temperature rise. When activated, the appliance will operate in
MaxCool for 56 hours and then return to usual operation. You can set the function to start
after a delay of 1-12 hours. If a power outage occurs while MaxCool is active, the appliance
resumes normal operation when power returns.
HOLIDAY
This function (recommended in case of prolonged absences since it allows considerable energy
savings) brings the refrigerator compartment temperature to 57.2°F [+14°C]. It is possible
to program the duration, or it can be manually deactivated upon returning after a period of
absence. This function remains active even if during the period of absence there is a prolonged
interruption of electrical power. It is possible to program a period from 1 to 90 days.
Max Cool
Max Cool
Max Cool
Max Cool
Max Cool
Max Cool
Max Cool
HHooww ttoo aaccttiivvaattee
HHooww ttoo ddeeaaccttiivvaattee
Setting a delayed
start
Max Cool
FreshZone
Max Cool
Max Cool
FreshZone
Max Cool
FreshZone
Max Cool
Max Cool
FreshZone
Max Cool
FreshZone
Max Cool
FreshZone
HHooww ttoo aaccttiivvaattee
HHooww ttoo ddeeaaccttiivvaattee
Setting a delayed
start
CONTROLS AND OPERATION
(CONT.)
©2019 Hestan Commercial Corporation
15
EN
CONTROLS AND OPERATION
(CONT.)
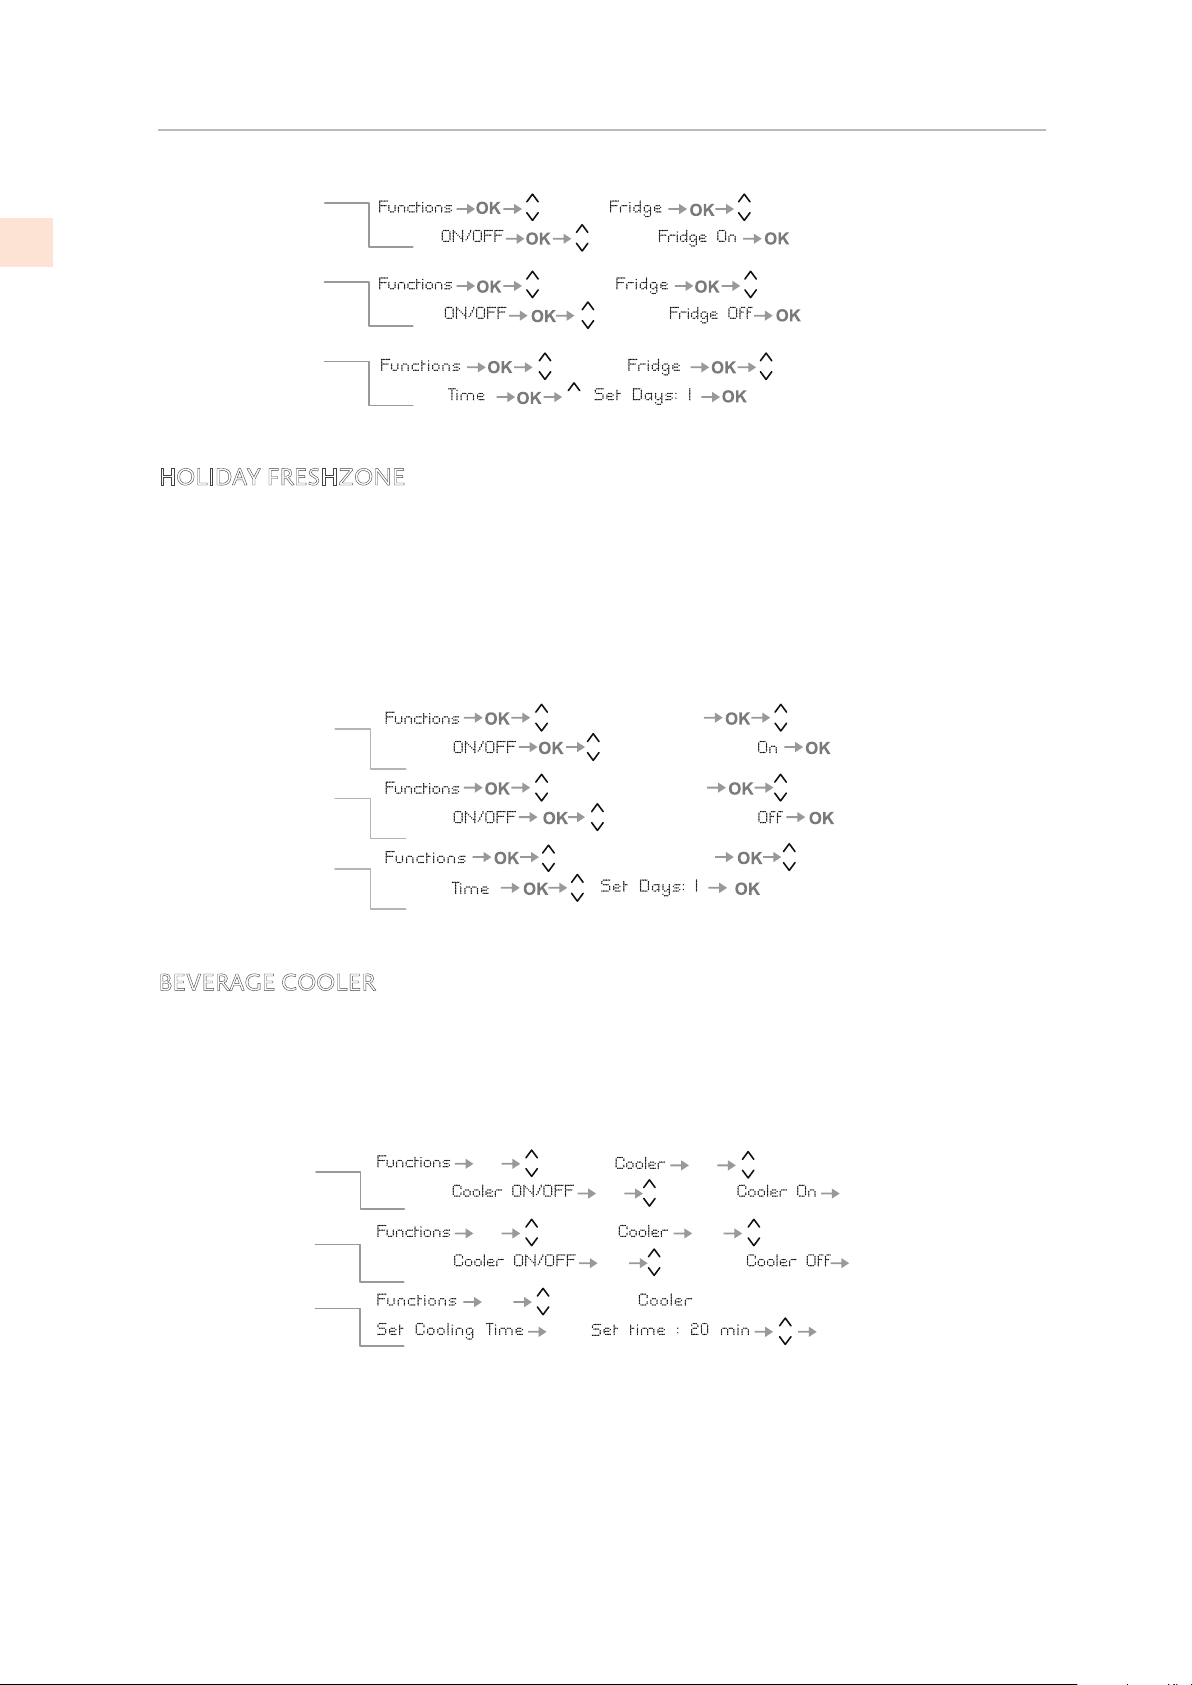
HOLIDAY FRESHZONE
It is possible to program the function with a delay of 1 to 12 hours, and a duration of 1 to 90
days. This function (recommended in case of prolonged absences since it allows considerable
energy savings) brings the FreshZone/freezer compartment temperature to 46.4°F [8°C]. It is
possible to program the duration, or it can be manually deactivated upon reentry after a period
of absence.
This function remains active even if during the period of absence there is a prolonged
interruption of electrical power.
BEVERAGE COOLER
This function can be activated when it is necessary to cool off beverages quickly, by placing
them inside the freezer compartment.
It is possible to select a duration of 1 to 45 minutes. A sound signal will indicate when the
optimal temperature has been reached. After removing the beverages, deactivate the sound
signal by pressing the Alarm button.
Holiday
Holiday
Holiday
Holiday
Holiday
Holiday
Holiday
Holiday
HHooww ttoo aaccttiivvaattee
HHooww ttoo ddeeaaccttiivvaattee
uuppoonn rreettuurrnn
HHooww ttoo pprrooggrraamm
tthhee dduurraattiioonn
Holiday Holiday
Holiday
Holiday
Holiday
HolidayHoliday
Holiday
FreshZone
FreshZone
FreshZone
FreshZone
FreshZone
HHooww ttoo aaccttiivvaattee
HHooww ttoo ddeeaaccttiivvaattee
uuppoonn rreettuurrnn
HHooww ttoo pprrooggrraamm
tthhee dduurraattiioonn
How to activate
How to
deactivate
How to program
the duration
OK
OK
OK
OK
OK
OK
OK
OK
OK
OK
OK
OK
Beverage
BeverageBeverage
Beverage
Beverage
Beverage
Beverage
OK
©2019 Hestan Commercial Corporation
16
EN
CONTROLS AND OPERATION
(CONT.)
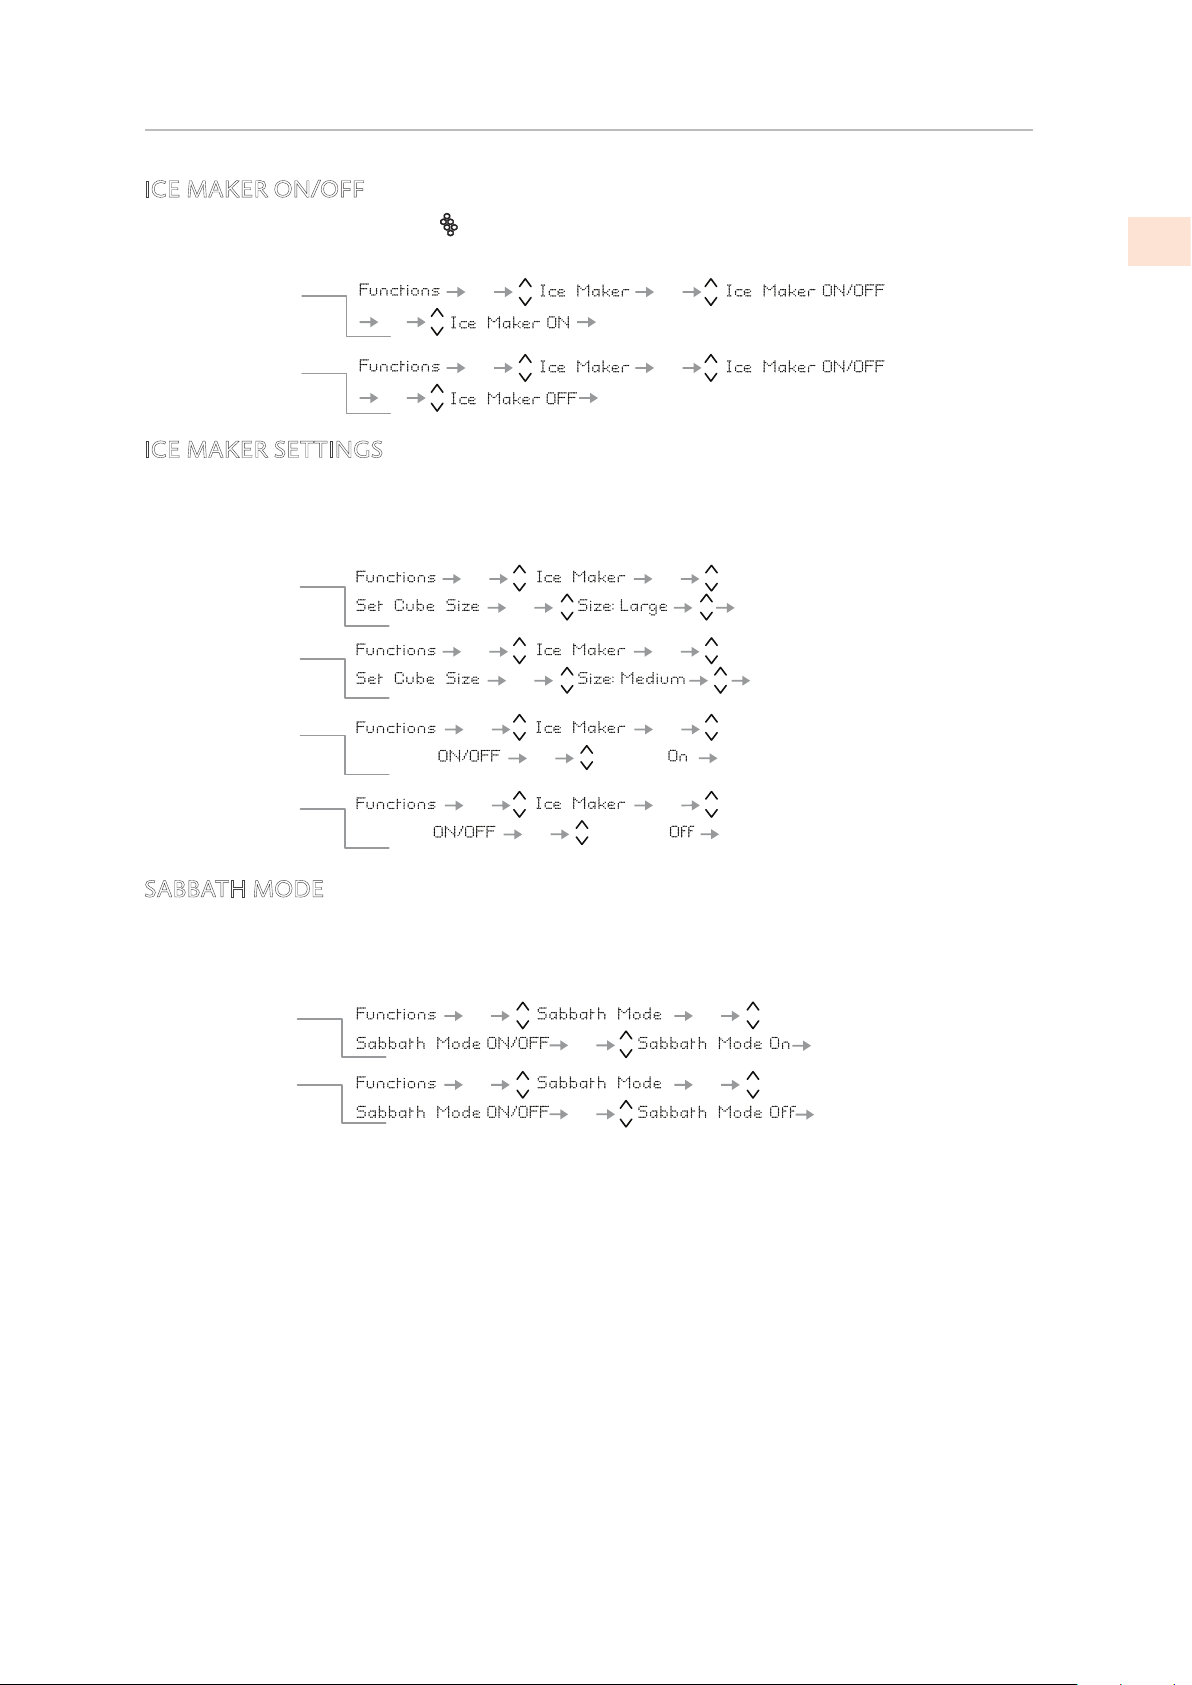
ICE MAKER ON/OFF
Certain models do not have the (Ice Maker) button on the control panel, and the ice maker
may be turned ON/OFF using menu functions.
ICE MAKER SETTINGS
The Ice Maker function permits selecting the size of the ice cubes, by choosing between Large
(base setting) or Medium, and activation of the Fast Ice function, which increases the quantity
of produced ice. The Fast Ice function deactivates automatically after 24 hours.
SABBATH MODE
The function makes it possible to comply to certain religious observances requiring that the
operation of the appliance is not affected by the opening or closing of the doors (the
thermostatic control, the inner lighting and the ice maker are deactivated).
When you activate Sabbath Mode, the interior lights will deactivate, and the display will show
“Sabbath Mode ON”. When you turn Sabbath Mode off, the appliance will return to normal
operation, except that menus will not be available for several minutes.
OK
OK
OKOK
OK
OK
OKOK
Turn icemaker ON
Turn icemaker OFF
OK
OKOK
OK
OKOK
OK
OK
OK
OK
OK OK
OK
OK
OK
OK
OK
Fast Ice Fast Ice
Fast Ice
Fast Ice
How to set cube
size to large
HHooww ttoo aaccttiivvaattee tthhee
FFaasstt IIccee ffuunnccttiioonn
HHooww ttoo ddeeaaccttiivvaattee
FFaasstt IIccee
OK
How to set cube
size to medium
OK
OK
OK
OK
OK
OK
OK
OK
OK
OK
HHooww ttoo aaccttiivvaattee
HHooww ttoo ddeeaaccttiivvaattee
©2019 Hestan Commercial Corporation
17
EN
CONTROLS AND OPERATION
(CONT.)
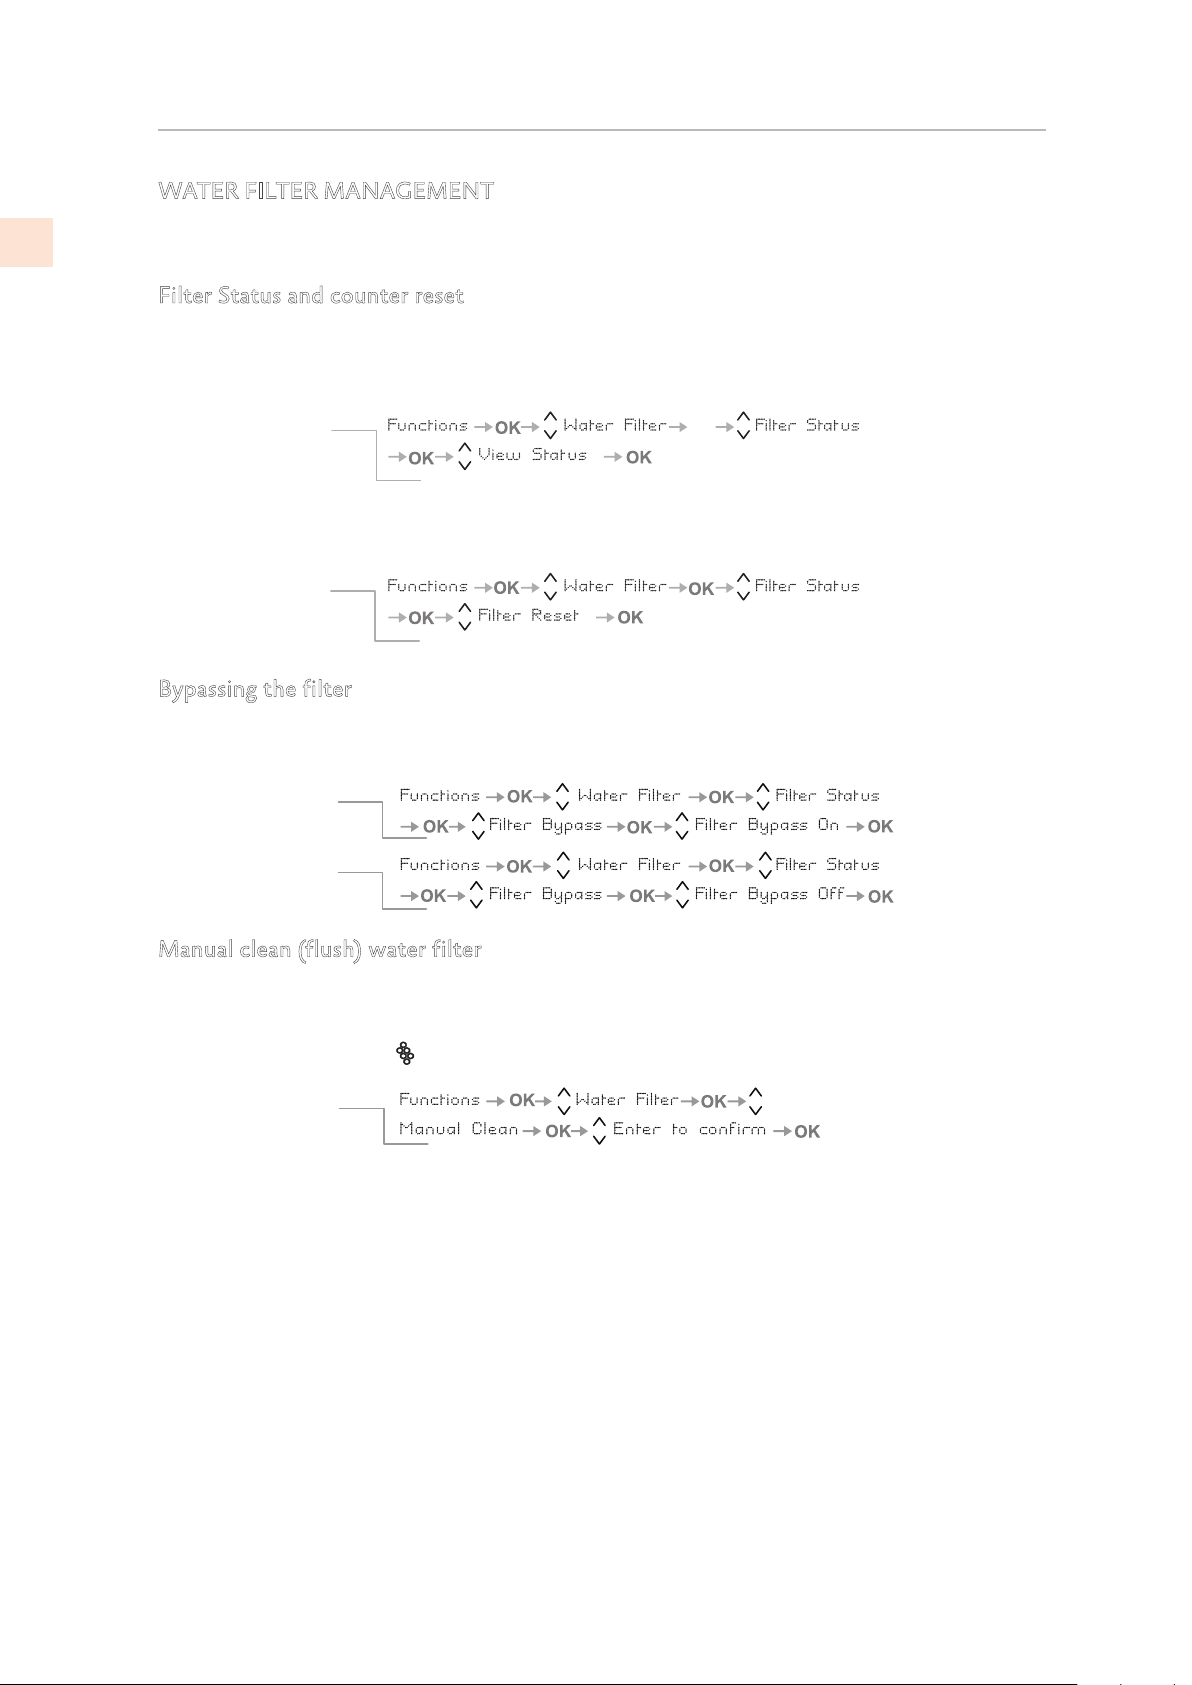
WATER FILTER MANAGEMENT
The following functions display filter life, permit bypassing the filter, and provide manual
flush/clean of the filter and ice maker.
Filter Status and counter reset
Functions to view remaining life and to reset counter after changing filter cartridge.
Bypassing the filter
The included filter can be bypassed when excellent quality water is available from he home
water system.
Manual clean (flush) water filter
If ice production has been disabled or unused for a long period it is recommended to perform a
Manual Clean function to flush out water which has sat in the system during this period.
Repeat the operation until the water is clean. Before proceeding it is important to turn off the
ice maker by pressing the
button or using the menu. (See previous page.)
Correctly position the ice tray or another suitable container under the ice maker to collect
water, then close the drawer. At the end of the operation, wash the tray.
OK
View Status
Resetting filter
How to set the filtered
water meter to zero
How to check the
status of the filter
The View Status function displays the remaining life of the filter.
The Reset Filter function sets the filter usage counter to zero.
Do this when replacing the filter cartridge.
How to activate
How to de-activate
filter bypass
filter bypass
How to manually
clean the filter
©2019 Hestan Commercial Corporation
18
EN
CONTROLS AND OPERATION
(CONT.)
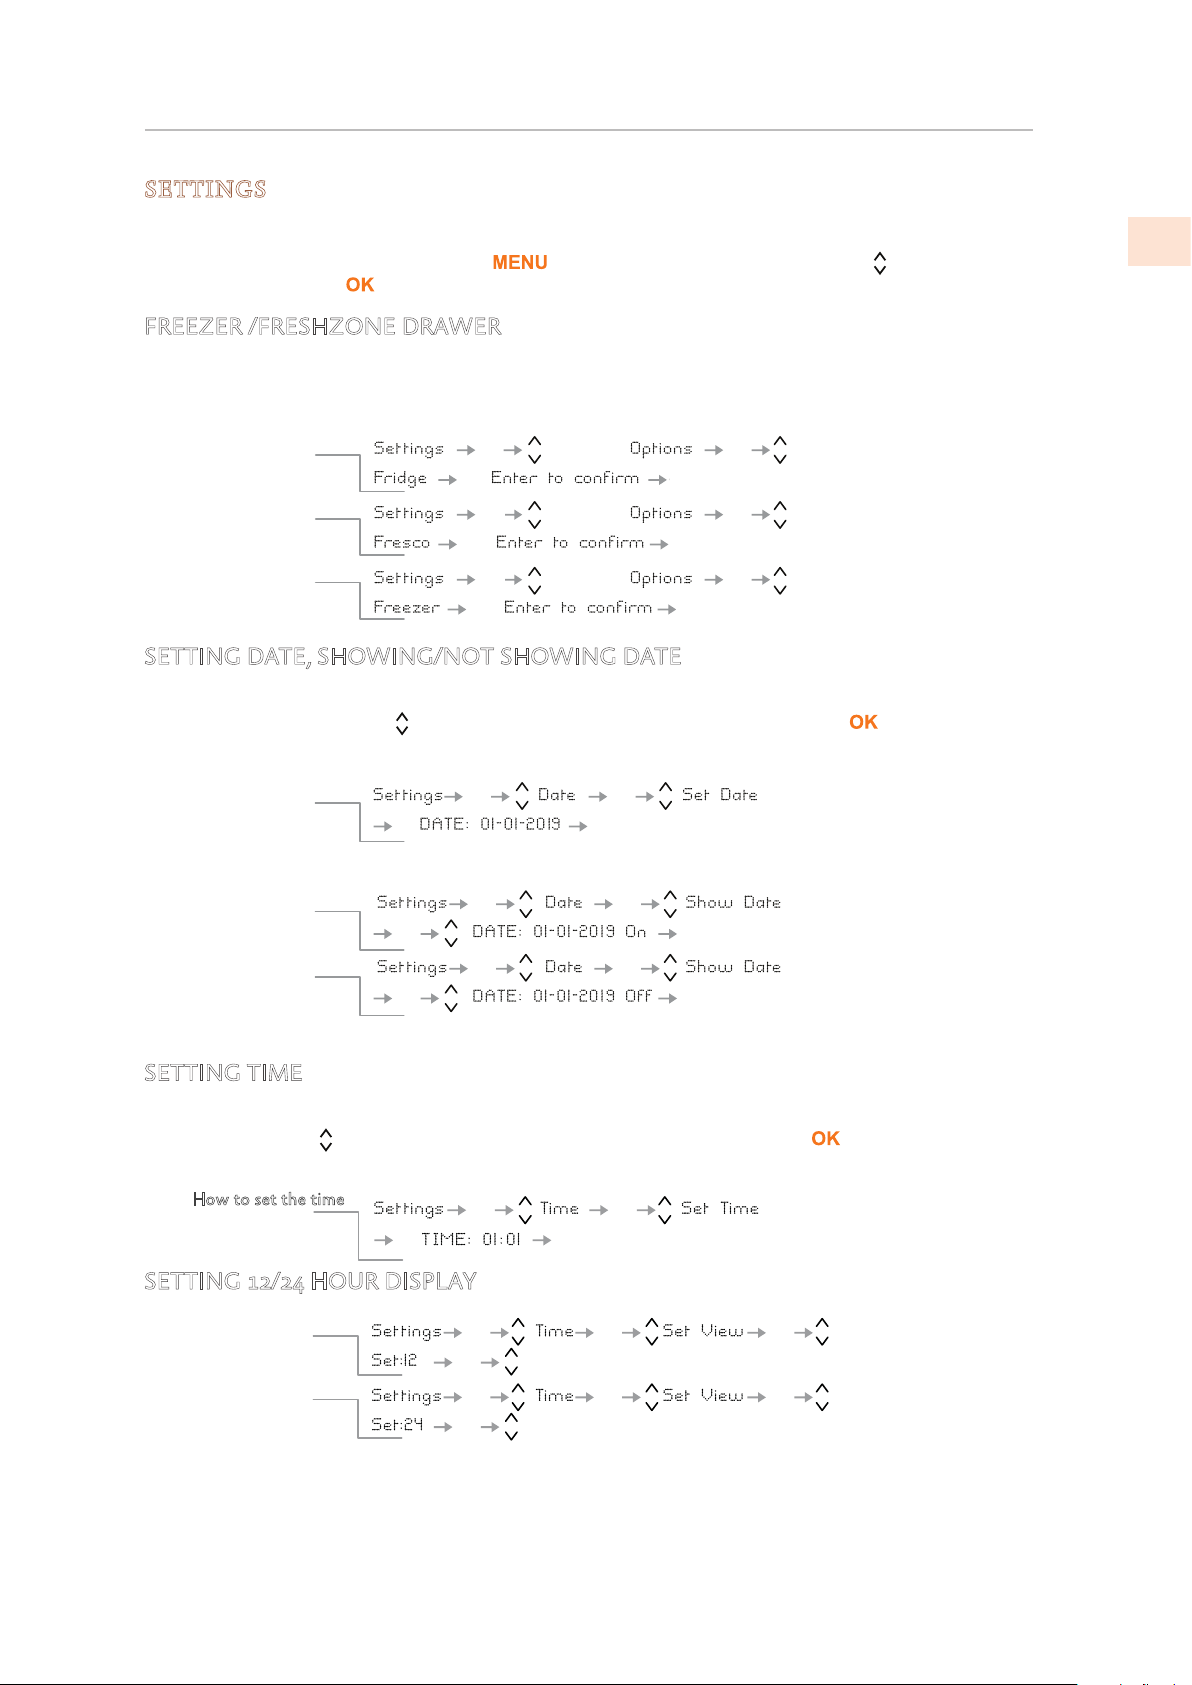
SETTINGS
The following settings control operation modes, information display, and so on.
To view or change settings, select the button, use the Up/Down buttons to select
SETTINGS, and press .
FREEZER /FRESHZONE DRAWER
SETTING DATE, SHOWING/NOT SHOWING DATE
The display will show the date in the format dd:mm:yy (day:month:year), the day will blink.
Use the Up/Down buttons
to modify the setting, confirm the setting with to move to the
next setting. Once the year is confirmed, the date will be set.
SETTING TIME
The display shows the hours and minutes in the format hh:mm and with hh: blinking. Use the
Up/Down buttons
to modify the setting and then confirm by pressing to go on to the
next setting. Once the minutes are confirmed, the time will be set.
SETTING 12/24 HOUR DISPLAY
How to set it for
Fridge mode
How to set it for
ExtendFresh mode
How to revert to
Freezer mode
OK
OK
OK
OK
OK
OK
OK
OK
OKOK
OK OK
FreshZone
FreshZone
FreshZone
The freezer compartment can, if required, be converted
.edom gnitarepo hserFdnetxE ro noitaregirfer ot
Freezer/ExtendFresh
Options
OK
OK
OK
OK
OK
OK
OK
OK
OK
OK
OK
OK
Showing Date
To display date
To set the date
Use this function to have the date show or not show on the display.
To not display date
OK
OK
OK
OK
How to set the time
OK
OK
OK
OK
OK
OK
OK
OK
How to set the
display for 24 h
How to set the
display for 12 h
©2019 Hestan Commercial Corporation
19
EN
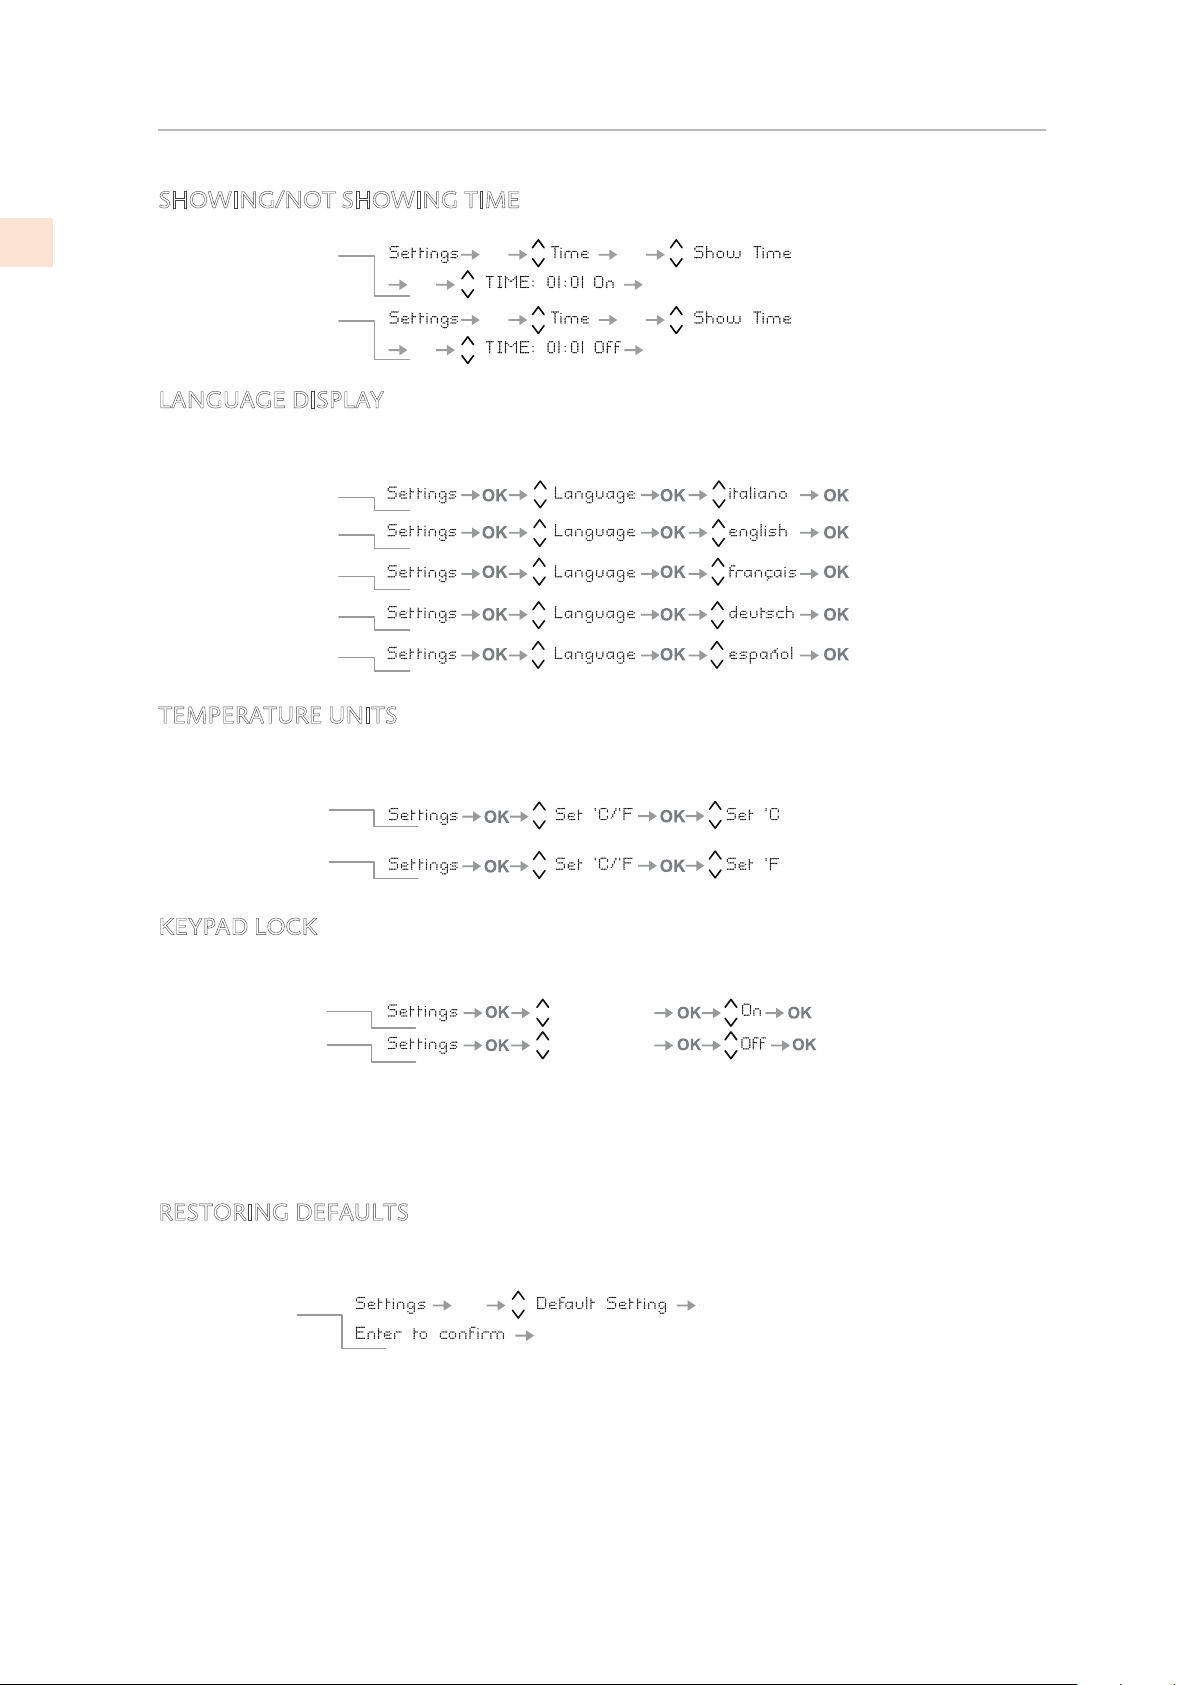
SHOWING/NOT SHOWING TIME
LANGUAGE DISPLAY
Select the language used for all prompts and messages.
TEMPERATURE UNITS
Select Centigrade or Fahrenheit units for temperature setting values and display.
KEYPAD LOCK
Enable/disable the keypad self-locking feature.
ON: The keypad locks after not being used for several minutes.
OFF: The keypad does not self-lock.
RESTORING DEFAULTS
This restores the factory-configured basic settings by canceling the changes made thereafter.
ATTENTION: If the default settings are restored, the default mode of the freezer/ExtendFresh
compartment is freezer mode.
If it was previously being used in refrigerator or Fresco mode be sure to set it back to your
desired setting.
OK
OK
OK
OK
OK
OK
OK
OK
HHooww ttoo aaccttiivvaattee tthhee
ttiimmee ddiissppllaayy
HHooww ttoo ddeeaaccttiivvaattee
IIttaalliiaann
EEnngglliisshh
FFrreenncchh
GGeerrmmaann
SSppaanniisshh
Set temperature
in Centigrade
Set temperature
in Fahrenheit
Keypad lock
Keypad lock
HHooww ttoo aaccttiivvaattee
HHooww ttoo ddeeaaccttiivvaattee
OK
OK
OK
How to reset
default settings
CONTROLS AND OPERATION
(CONT.)
©2019 Hestan Commercial Corporation
20
EN
INTERNAL LAYOUT
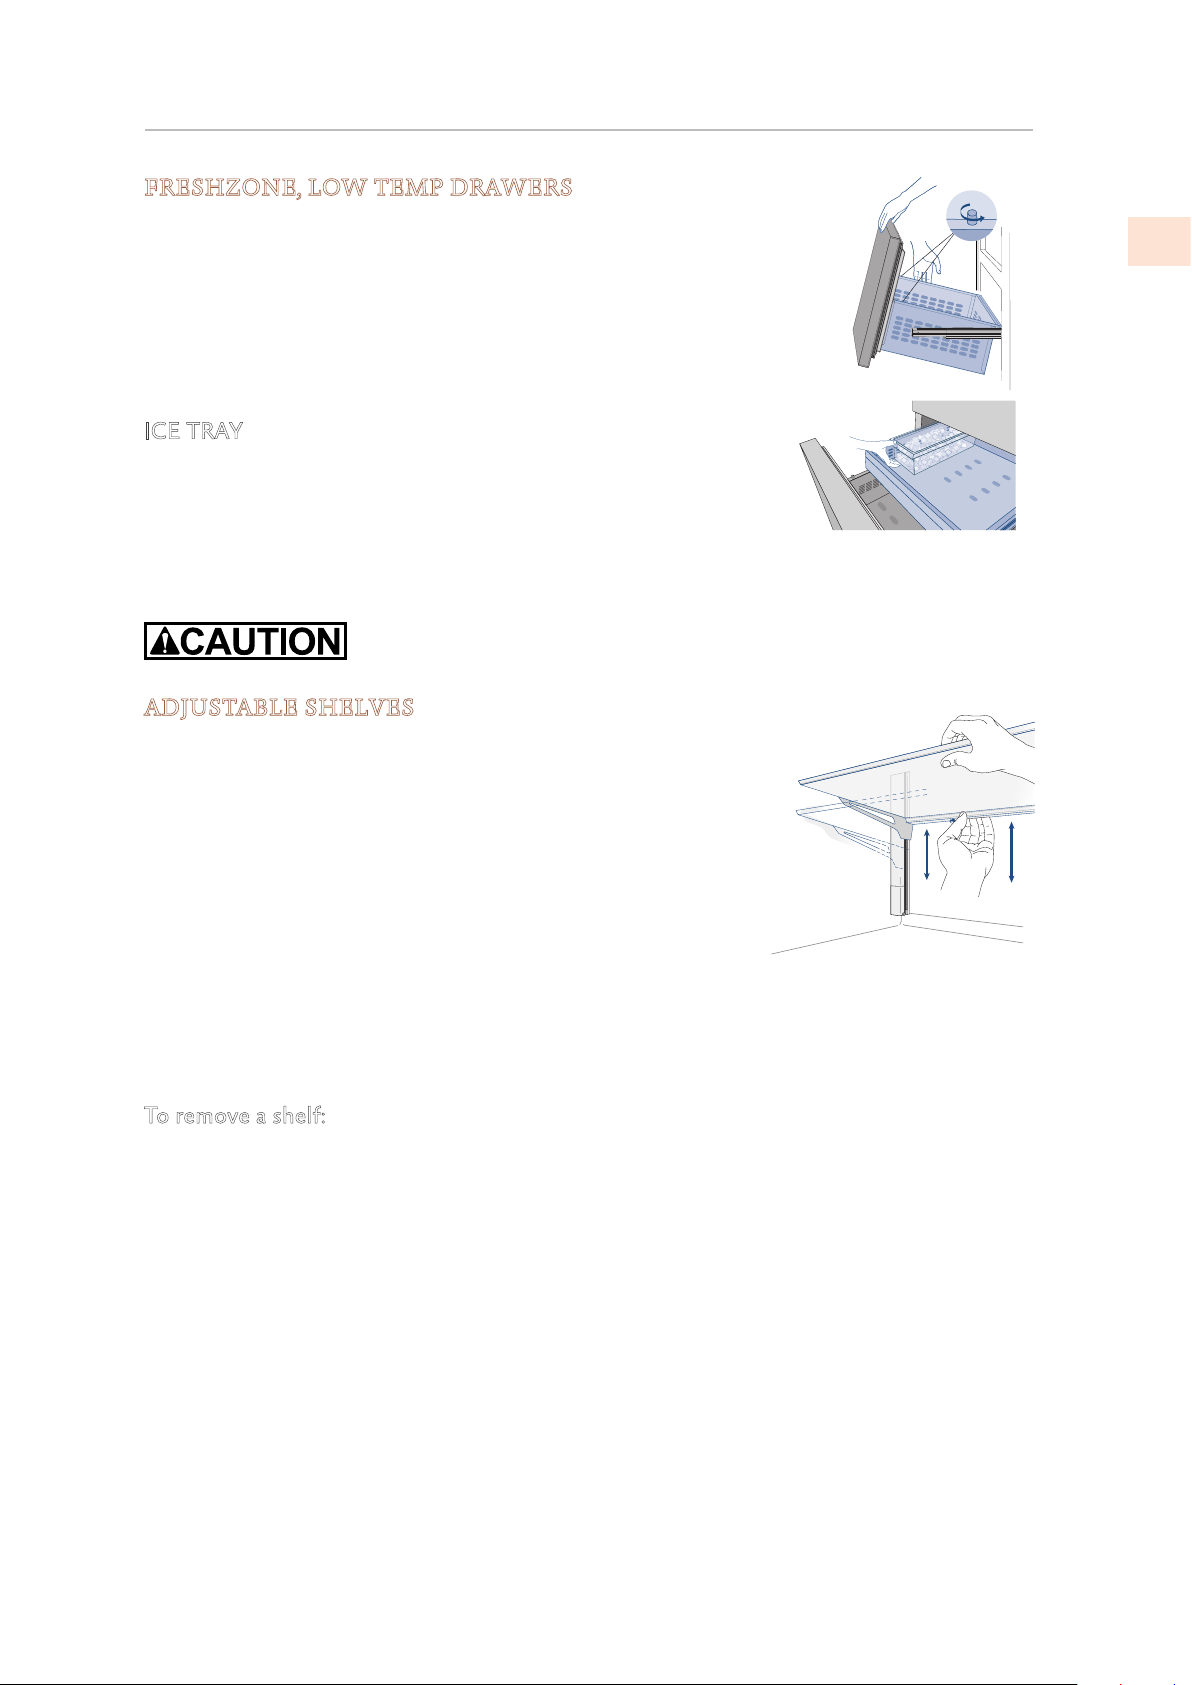
FRESHZONE, LOW TEMP DRAWERS
The FreshZone drawer is held to the slide guides by a thumbscrew on
each side. Release the thumbscrews to remove the drawer.
To remove the inner drawer unscrew and remove its thumbscrews.
When replacing the drawer, make certain the back of the drawer
engages under the clips on the slide guides. Once the drawer is
properly in position, reinstall the thumb screws as they are necessary
to keep the drawer in place.
ICE TRAY
The ice tray is located in the upper drawer of the freezer
compartment.
After removal, make sure to reposition it correctly - small protrusions
from the bottom of the ice bin should align with holes in the upper
freezer drawer.
Do not place hands or fingers near the ice maker when it is functioning.
ADJUSTABLE SHELVES
It is recommended that the shelves be emptied prior to adjusting
the position. The shelves are able to slide up and down and can
be easily re-positioned by the user as follows:
1) Slightly loosen the small locking knob (located under the
shelf on the left side at the back) by turning it counter-
clockwise.
2) Support the back of the shelf and tilt it upward at the front.
This will allow you to raise or lower the shelf to the desired
position.
3) Once in position, lower the front of the shelf and tighten the locking knob.
• The locking knob keeps the shelf locked safely in position. If the locking knob is loose, the
shelf could slide down if it were raised or tilted upward at the front.
To remove a shelf:
1) Remove the top cap of the left and right side ladder
2) Tilting the front of the shelf upward, slide the shelf to the top to remove.
• It is not necessary to remove the shelves for cleaning.
©2019 Hestan Commercial Corporation
21
EN

INTERNAL LAYOUT
(CONT.)
DOOR BINS
The door bins are adjusted by lifting the bin upward and sliding
into the desired position. The lower door bin has a retaining
support to keep taller items from falling out. The upper door
bins do not have the support and are meant for storage of
shorter items.
The door bins are easily removable for cleaning. To remove a
door bin from the door, remove the top cap of the left and right
side ladder then slide the bin upward and out.
USING THE ICE MAKER
To activate the ice maker after installation of the appliance, press the Ice Maker button
(KRB, KRP) or by the menu. (See “ICE MAKER ON/OFF” and “ICE MAKER SETTINGS” on
page 17.)
Please note that 12 to 24 hours are necessary before ice production may begin. The production
is 10 cubes per cycle, approximately 10 cycles in 24 hours.
The yield depends on the temperature set in the freezer, the room temperature and the
frequency of door opening. If the appliance is operating without being connected to the water
system, make sure that the ice maker is deactivated by pressing the button
or the menus.
The ice maker produces ice until the ice tray is full and will automatically stop once the
maximum level is reached.
With the Fast Ice function, it is possible to increase the quantity of ice produced in 24 hours,
while the Set Cube Size function permits selection of the size of the produced ice cubes.
At factory default settings the ice maker can produce approx. 100 ice cubes within 24 hours.
If the ice is not used frequently, it is advisable to empty the ice bin once every 8-10 days.
It is normal that some ice cubes stick to one another. If the ice is not frequently used, the older
cubes can become opaque, will have an odd flavor and become smaller.
The ice maker automatically deactivates if and when the Holiday function is activated.
When the ice maker is started for the first time, it is recommended to dispose of the first full
bin of ice.
If the equipment has been switched off for a month or more, it is recommended to perform a
manual cleaning cycle.
©2019 Hestan Commercial Corporation
22
EN
KRB/KRP models: The ice maker will only produce ice with the Fresh Zone compartment set to
Freezer Mode.
All models: The ice maker will continue to operate even when the ice bin is not in position.
If the ice cubes have
an unusual odor
Ice is a porous material which can absorb odors from the environment. Ice
cubes which have been in the ice cube container for a long time may absorb
odors, stick together and slowly become smaller. We recommend that old ice
cubes not be used.
Other means of preventing odors:
The ice cube container should be cleaned occasionally with warm water. Make
sure that you switch off the ice maker before clearing the container. Rinse out
and wipe dry.
Check the contents of the freezer for spoiled or out-of-date food. All odorous
foods should be wrapped thoroughly or stored in airtight containers to prevent
the build-up of odors.
The water filter may have to be replaced in some models.
In some cases the quality of the water connection in the house should be
checked.
Identifying usual and
unusual noises
Grumbling: The refrigeration unit is running. The recirculated air system fan is
running.
Bubbling, humming or gurgling noises: refrigerant is flowing through the coolant
lines.
Clicking: motor is switching on or off. Solenoid valve on the water connection
is opening/closing.
Rumbling: ice cubes are falling into the ice cube container.
Note: the appliance is powered by two independent compressors. It is therefore
normal to always have one of two compressors in operation.
Do not place any bottles or food for rapid cooling in the ice cube
container. The ice maker may become blocked and be damaged.
INTERNAL LAYOUT
(CONT.)
©2019 Hestan Commercial Corporation
23
EN
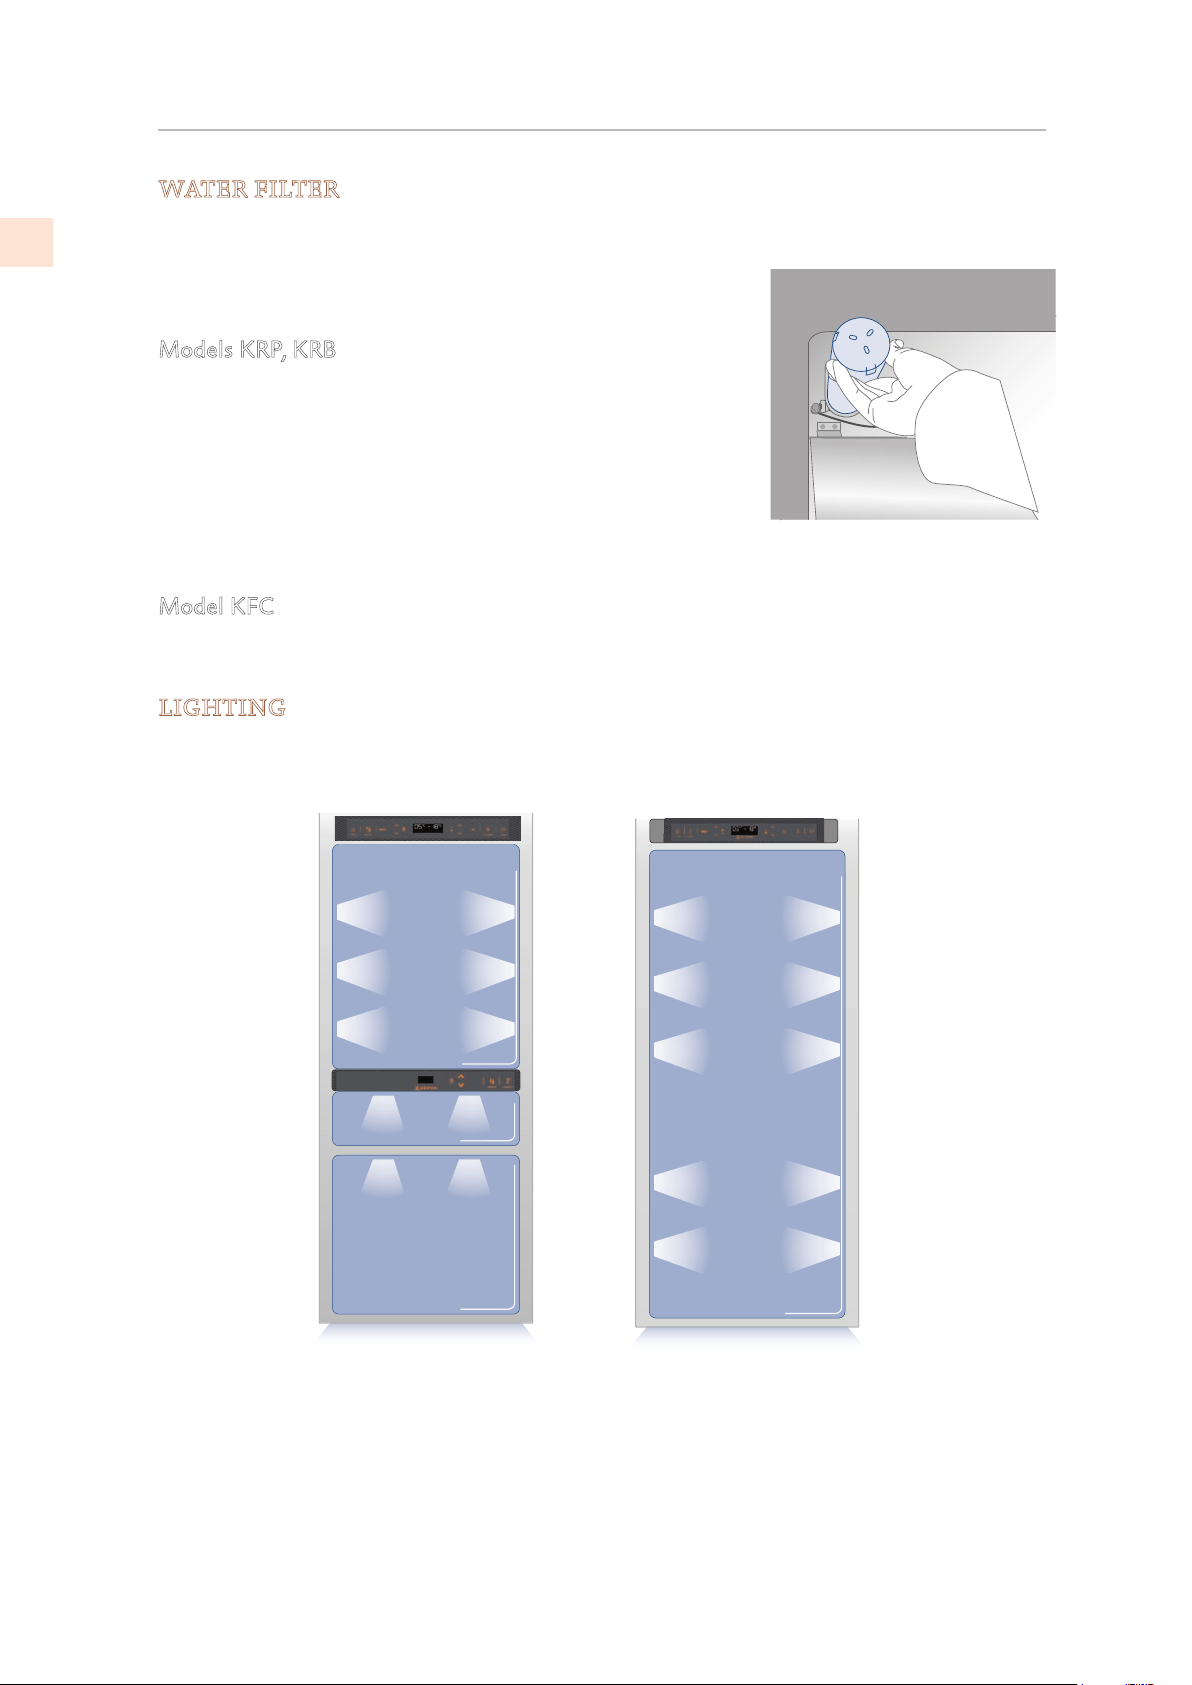
WATER FILTER
The Water Filter makes available high-quality water for the production of ice cubes. It
provides up to 1056 gallons [4000 liters] of water for a maximum time of 12 months.
When the filter has nearly expired the message “Replace Filter
Cartridge” will appear on the display.
Models KRP, KRB
The filter is located inside the refrigerator compartment, above
the top glass panel. Prior to changing the filter, switch off the
ice maker by pressing the Ice Maker button.
Open the top glass panel and carefully rotate the filter cartridge
for a quarter rotation in a counter clockwise direction until it
detaches from its housing. It is normal for a small quantity of
water to come out. Remove the cap of the new cartridge and insert it into the housing by
gently rotating it for a quarter rotation in a clockwise direction until it locks into place.
Model KFC
The filter is located outside or the unit, placed and mounted by the installer in the cabinetry.
The same filter cartridge is used as in the KRP/KRB above, and is replaced in the same manner.
LIGHTING
Lighting is provided using LED strips and spots to completely illuminate the interior.
In case of malfunction or failure, contact Hestan for service.
I
C
E
MA
K
E
R
E
N
T
E
R
F
R
I
D
G
E
U
N
IT
C
R
IS
P
E
R
INTERNAL LAYOUT
(CONT.)
©2019 Hestan Commercial Corporation
24
EN
FOOD PRESERVATION
Your refrigerator is designed to ensure precise, constant temperatures and appropriate
humidity levels in all compartments.
In addition, the refrigeration system ensures that frozen foods and ice do not absorb the odor
of fresh foods and that the humidity in the refrigerator does not freeze and build up frost.
Nevertheless, to properly preserve all of your foods, it is not enough to have an excellent
refrigerator. It is also necessary to know the rules for correct food preservation.
Do bear in mind that all foods will inevitably change their characteristics over the passage
of time. This change begins long before the food is consumed, since foods contain micro
organisms which multiply and can cause deterioration. This process occurs more rapidly due to
improper handling, preservation temperatures and humidity levels.
It is therefore recommended to follow the directions presented below which will permit using
your refrigerator/freezer in the most effective and safe manner to keep your foods in the best
way for as long as possible.
Periodically check that all foods are in a perfect state of preservation. It is usually quite clear
when a food item is deteriorated, due to mold, unpleasant odor and an unpleasant aspect.
Nevertheless, there are cases in which these conditions are not so evident. If you believe that
a food item was kept for an excessive period of time and may be deteriorated, do not consume
this item or even taste it, even if it seems to still be healthy, since the bacteria that cause
deterioration of food can also cause poisoning and illness.
When in doubt, throw the food away.
POWER INTERRUPTIONS
After a prolonged interruption of electrical power, once the electrical power is reactivated,
an audible signal will indicate if the temperature has raised above normal levels. In addition
to this the display will show for one minute the highest temperature detected inside the
compartments, to allow the user to decide how to better use the food items.
After one minute the display will resume normal operation, while the Alarm button
will
continue to blink.
Press the Alarm button to display the highest recorded temperatures.
Low Temp
Freezer
[-13° to -23 °C]
from 9°F to -11°F
Low Temp
Fridge
from 34°F to 46°F
[+1° to +7 °C]
Freezer
[ -13° to -23 °C]
from 9°F to -11°F
Fridge
from 34°F to 46°F
[+1° to +7 °C]
©2019 Hestan Commercial Corporation
25
EN
FOOD PRESERVATION
(CONT.)
WHEN BUYING GROCERIES
Always take the following precautions:
• Place any packages of raw meat, fish or poultry in plastic bags so that they do not drip on
other foods.
• Purchase meat, poultry and fish last. Do not leave your groceries in a warm car after
shopping. Keep a freezer bag in your car and use it in case of very high temperatures or
long trips.
• Check the production dates and “best before” times on foods to be sure that they are fresh.
• Be very careful when buying fresh foods, and only buy a quantity that can be consumed
during your planned preservation period.
• When possible, let warm foods adjust to room temperature for up to two hours before
placing them in the refrigerator, unless you have activated the MaxCool function before.
PRECAUTIONS
Check the refrigeration temperature of the various compartments on the control panel:
The refrigerator temperature must be 45°F [+8°C] or lower and the freezer temperature must
be
0°F [−18°C]
Follow the recommendations regarding the preservation times and temperatures indicated in
the tables to follow.
Keep raw meat, fish and poultry separate from other foods and avoid any possible drippings.
WHEN PLACING FOODS IN
When placing your meat, fish or poultry in the refrigerator, leave them in their original
packaging, unless the packaging is ripped or punctured. Repeated handling could introduce
bacteria into these foods.
To keep food in the freezer, it is a good idea to use freezer containers.
Label and date the packages
Be careful to correctly position the food items on the shelves in a way that does not obstruct
the air circulation vents inside the compartment.
HUMIDITY AND CONDENSATION
When a high level of humidity is present either in the environment or in the foods placed in
the ExtendFresh drawers, the bottom of the ExtendFresh compartment might be covered with
some water or ice (if the temperature is set between 32°F and 28°F [
0°C and −2°C] ).
Such condition is normal and it is due to the high humidity levels of the ExtendFresh
compartment; high humidity together with low temperatures is what guarantees a longer
preservation of foods.
Water or ice can disappear on its own if the air humidity level should lower; it is also possible
to remove the water with a towel. If a thin layer of ice has formed, set the temperature of the
ExtendFresh compartment to 35°F [+2°C] and after one day remove the water with a towel.
If the layer of ice is thicker, it might be necessary to shut off the ExtendFresh compartment for
one day in order to melt it.
©2019 Hestan Commercial Corporation
26
EN
FOOD PRESERVATION
(CONT.)
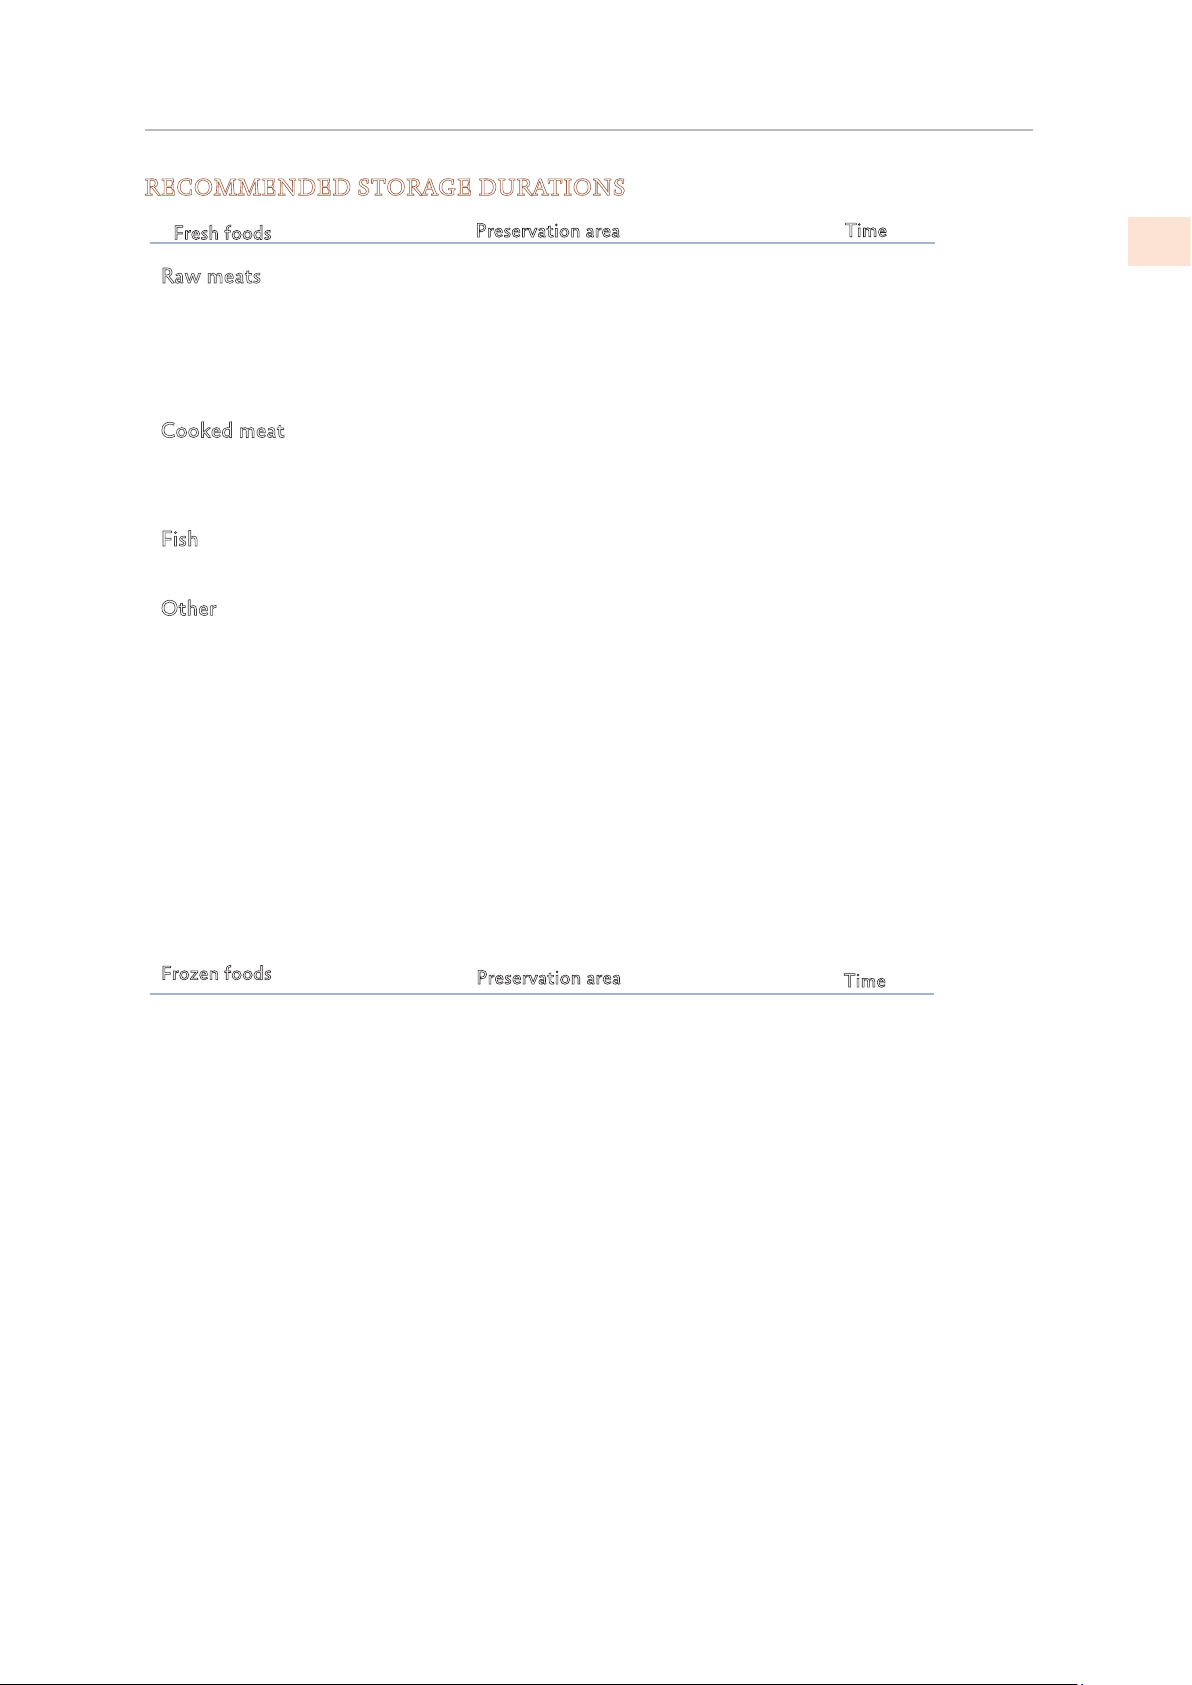
RECOMMENDED STORAGE DURATIONS
Fresh foods
P
reservation area
T
ime
Raw meats
Large cuts
Beef steaks, poultry and wild
game Ground meat
Carpaccio
Cooked meat
Boiled meat and roasted meat
Meat sauce
Fish
Raw and cooked fish
Other
Soups and broths
Pasta
Opened cold cuts
Fresh cheeses
Well sealed aged cheeses
Eggs (fresh and unwashed)
Opened cans
Raw vegetables (in perforated
bags)
Frozen foods
ExtendFresh
Compartment
ExtendFresh
Compartment
ExtendFresh
Compartment
ExtendFresh
Refrigerator
Compartment
Refrigerator
Compartment
ExtendFresh
Compartment
Compartment
Refrigerator
ExtendFresh
mtrapmoC ent
Refrigerator
ExtendFresh
Compartment
Preservation area
Refrigerator
Refrigerator
Refrigerator
ExtendFresh
4 days
3 days
1-2 days
Immediately
2 days
6 days
2 days
2 days
2
days
3
days
2-3 days
Several months
2 weeks
2-3 days
1 week
Time
Beef, veal, lamb and goat meat
Beef, veal, lamb and goat meat
Ground beef
Pork
Pork
Ground pork
Meat leftovers
Whole chicken and turkey
Goose, duck and pheasant
Fish
Shellfish
Cooked food
Freezer Compartment
Freezer Compartment
Freezer Compartment
Freezer Compartment
Freezer Compartment
Freezer Compartment
Freezer Compartment
Freezer Compartment
Freezer Compartment
Freezer Compartment
Freezer Compartment
Freezer Compartment
Freezer Co
mpartment
Freezer Compartment
Freezer Compartment
)skaets( 6-12 months
(Meat with bone) 4-6 months
1-2 months
shtnom 6-4 )senob tuohtiW(
shtnom 3-2 )senob htiW(
1-2 months
2-3 months
8-12 months
4-8 months
1-2 months
2-3 months
1-2 months
8-12 months
6-12 months
Vegetables
Fruit
Desserts and cakes
2-3 months
Compartment
Compartment
Compartment
Compartment
Compartment
Compartment
©2019 Hestan Commercial Corporation
27
EN

CARE AND CLEANING
To clean the parts made of steel use a microfiber cloth and the sponge provided in the kit with
the appliance. Always use the cloth and sponge in the direction of the steel’s satin finish.
Every now and then, to polish the steel, wipe with a slightly damp microfiber cloth.
Do not use the sponge on aluminum parts, such as the handles and the profiles of the glass
shelves.
You should use special care to keep the ventilation openings in the appliance or in the cabinet
that houses it free of obstructions.
Scrupulously follow the detailed directions that can be found in the provided kit and never
use abrasive or metallic products which could scratch and damage the satin finishing on the
appliance permanently.
Before performing any sort of cleaning, disconnect the appliance from the electrical power
supply.
Be careful not to damage the refrigerant circuit in any way.
CLEANING THE CONDENSER AND GRILL
Ventilation Grill
A ventilation grill is located either at the top of the
appliance or at the bottom according to the model type.
To clean it, use a vacuum cleaner with a soft brush
attachment at maximum power, sweeping it along the
vent slits.
In case of significant dust build up, the ventilation grill
can be opened or removed for more complete cleaning
and to clean the condenser.
Condenser
The condenser is located behind the ventilation grill.
Switch off the appliance by pressing the On/Off button
on the main control panel for about 3 seconds.
Wait about 30 minutes, until the finned condenser cools
down to room temperature.
On models with ventilation at the base, remove the grill
at the bottom (magnetically attached) and take it off.
On models with ventilation at the top, lift the grill as
shown in the picture. Thoroughly clean the grill and the
condenser fins by means of a vacuum cleaner with soft
brush attachment. Clean any dust build up thoroughly as
shown in the picture, taking care not to damage the fins.
Start up the appliance again, by pressing the On/Off
button
on the control panel.
Clean the internal and removable parts by washing them
with a solution of lukewarm water, a small amount of dishwashing detergent.
Rinse and dry right away.
Do not use mechanical devices or other methods to speed up defrosting.
Do not bring cold glass parts into contact with boiling water. Do not
wash any parts of the refrigerator in a dishwashing machine since this
could damage or irreparably deform the parts.
The edges of the condenser are
sharp, therefore use adequate
protection for the hands and arms
when cleaning the condenser.
Do not use water on the electrical
parts, lights and control panel.
©2019 Hestan Commercial Corporation
28
EN
TROUBLESHOOTING
TROUBLESHOOTING GUIDE
If you notice malfunctions in your appliance, use this guide before calling for service. This
guide can help you personally resolve the problem or could provide important information to
be conveyed to the service technician to ensure rapid and effective repair.
Malfunction message
A malfunction is usually indicated by a message on the display.
Problems that cannot be solved by the user are signaled through a malfunction code.
The refrigerator or the freezer does not work
Is the appliance connected to the electrical power supply? Is electrical power available at the
electricity socket?
Is the On/Off (Power) button
activated? Is the unit in ‘Demo’ Mode?
The refrigerator or the freezer is warmer than usual
Does the display show a malfunction code?
Is the temperature adjusted correctly?
Were the doors or drawers open for a long period of time? Were large quantities of food
recently inserted?
Is the unit in ‘Demo’ Mode?
The appliance keeps running for a long time
Bear in mind that during very hot weather and with very high temperatures in the room it is
normal that the compressor remains on for prolonged periods of time.
Were the doors or drawers open for a long period of time? Were large quantities of food
recently inserted?
Check that the doors are closed and that the food or containers do not obstruct the perfect
closure of the door.
Is one or more compartments in Max Cool Mode?
If you hear unusual noises
It is normal to hear noises from the ventilators or compressors during operation or during the
defrost phase.
Noise could be more marked depending on the position of the appliance and the surrounding
environment.
Condensation inside and outside of the refrigerator
If the climate is very humid, the formation of condensation is normal. Opening the door or
drawers for prolonged periods of time can contribute to the formation of condensation.
In any case, make sure that the doors are always perfectly closed.
Ice or frost build up inside the refrigerator or freezer
Did you leave the doors open for a long period of time? Do the doors close perfectly?
If the doors do not close perfectly, contact your installer.
©2019 Hestan Commercial Corporation
29
EN
TROUBLESHOOTING
(CONT.)
Unpleasant odors inside the refrigerator
Clean the appliance completely according to the instructions.
Hermetically cover all the food. Do not conserve food for prolonged periods of time.
The doors are difficult to open
The appliance is designed to ensure a fully hermetic closure. When the door is closed, a
vacuum condition can occur: in this case it is necessary to wait a few seconds until the pressure
balances before opening the door.
Appliance is cooling but lights and display are not working
Check to see if the appliance was accidentally placed into Sabbath Mode
The Ice Maker does not work
Make sure that the Ice Maker is on (Ice Maker button on). To switch on the Ice Maker press
the button or use the menu. See “ACTIVATING THE ICE MAKER” on page 13.
Make sure that the appliance is connected to the water supply.
The Ice Maker does not produce sufficient amounts of ice
On average, the Ice Maker produces approximately 10 cubes of ice every two and half hours.
The ice cubes freeze into one block
If the ice is not used frequently, it is possible that blocks of ice may form. It is recommended
to remove the block of ice cubes and then let the Ice Maker fill the ice tray again.
The ice has an unusual flavor or color
When the Ice Maker is started for the first time, it is recommended to empty the first full tray
of ice cubes.
If the refrigerator was switched off for more than one month or if the cartridge was not
changed for more than six months, it could be necessary to replace the filter cartridge.
Contact a plumber or a water treatment expert to make sure that the problem is not due to the
water supply.
If the unit you purchased was used as a showroom model, it may be in a special energy-
saving mode called Demo Mode where the appliance appears to be operating (lights
work and false temperatures are displayed) but no cooling actually takes place. If you
suspect your appliance is in Demo Mode please contact your point of purchase for
assistance with disabling this feature.
©2019 Hestan Commercial Corporation
30
EN
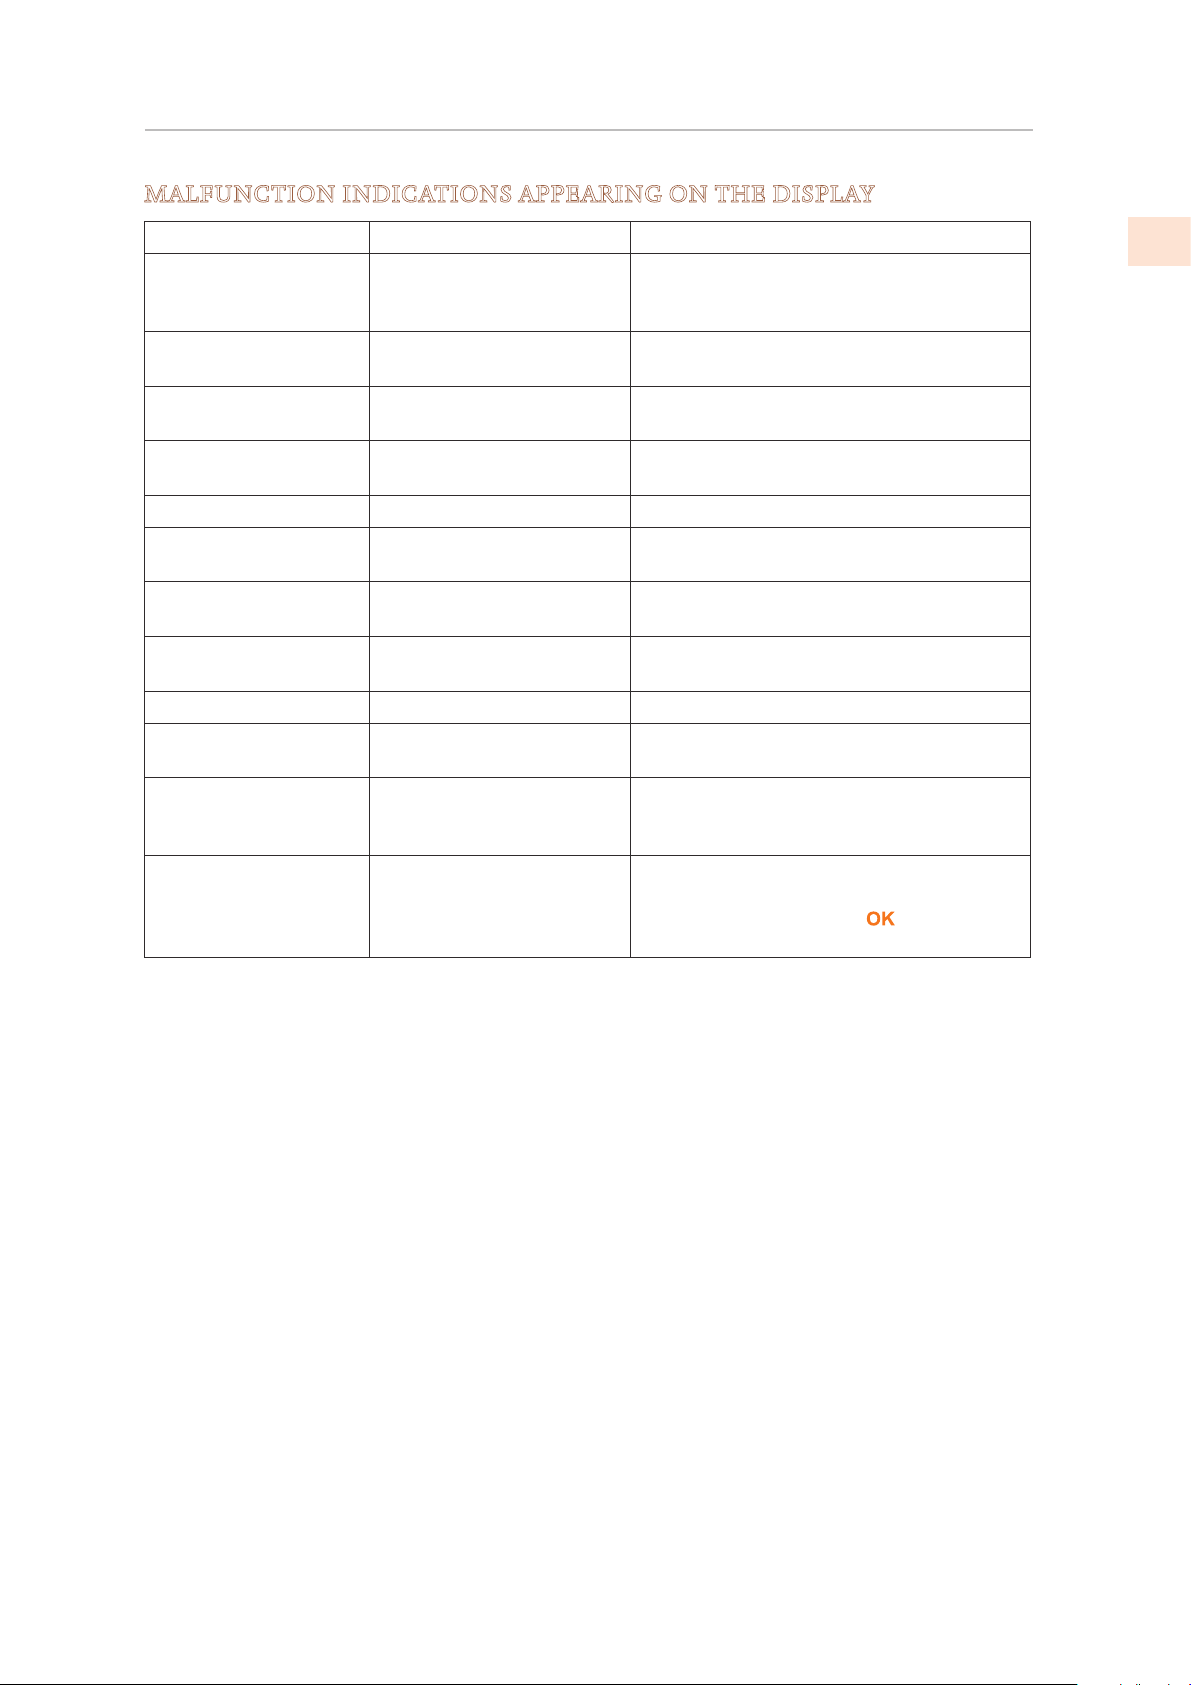
MALFUNCTION INDICATIONS APPEARING ON THE DISPLAY
Display message More Malfunction description
Power Failure!! Prolonged interruption
of electrical power
The appliance resumes work
automatically, the display shows the
warmest temperatures achieved
Door Fridge OPEN Fridge door open The message appears after few minutes
from the door opening
FreshZone OPEN Freezer drawer open The message appears after few minutes
from the drawer opening
Replace filter Replace filter cartridge Message appears when only 30% of
filter capacity is left
Fridge too warm Fridge too warm See Troubleshooting Guide
Fridge too cold Fridge too cold Wait for 12 hours: if malfunction
persists call Customer Care for advice
Fresco too warm ExtendFresh
Compartment too warm
See Troubleshooting Guide
Fresco too cold ExtendFresh
Compartment too cold
Wait for 12 hours: if malfunction
persists call Customer Care for advice
FreshZone too warm Freezer too warm See Troubleshooting Guide
FreshZone too cold Freezer too cold Wait for 12 hours: if malfunction
persists call Customer Care for advice
Error Code… Functional problems Call Customer Care who may help you
to solve the problem or put you in
contact with the nearest Service Agent
Check condenser Check Condenser Every 6 months the display shows the
message “Check Cond”. After cleaning
the condenser, press the
button for 5
seconds to reset the notification.
TROUBLESHOOTING
(CONT.)
©2019 Hestan Commercial Corporation
31
EN
DATE: 01-01-2019
TE: 01-01-2019
On
DATE: 01-01-2019 Off
TIME: 01:01
TIME: 01:01 On
TIME: 01:01 Off
Set: 24
Set: 12
Freezer
Fresco
Enter to Confirm
Set Date
On
Set Time
Italiano
Français
English
Set °C
Fridge
Show Date
Off
Set View
Show Time
Deutsch
Español
Set °F
FreshZone Options
Default Setting
Date
Keypad lock
Time
Language
Set °C/°F
DA
SETTINGS
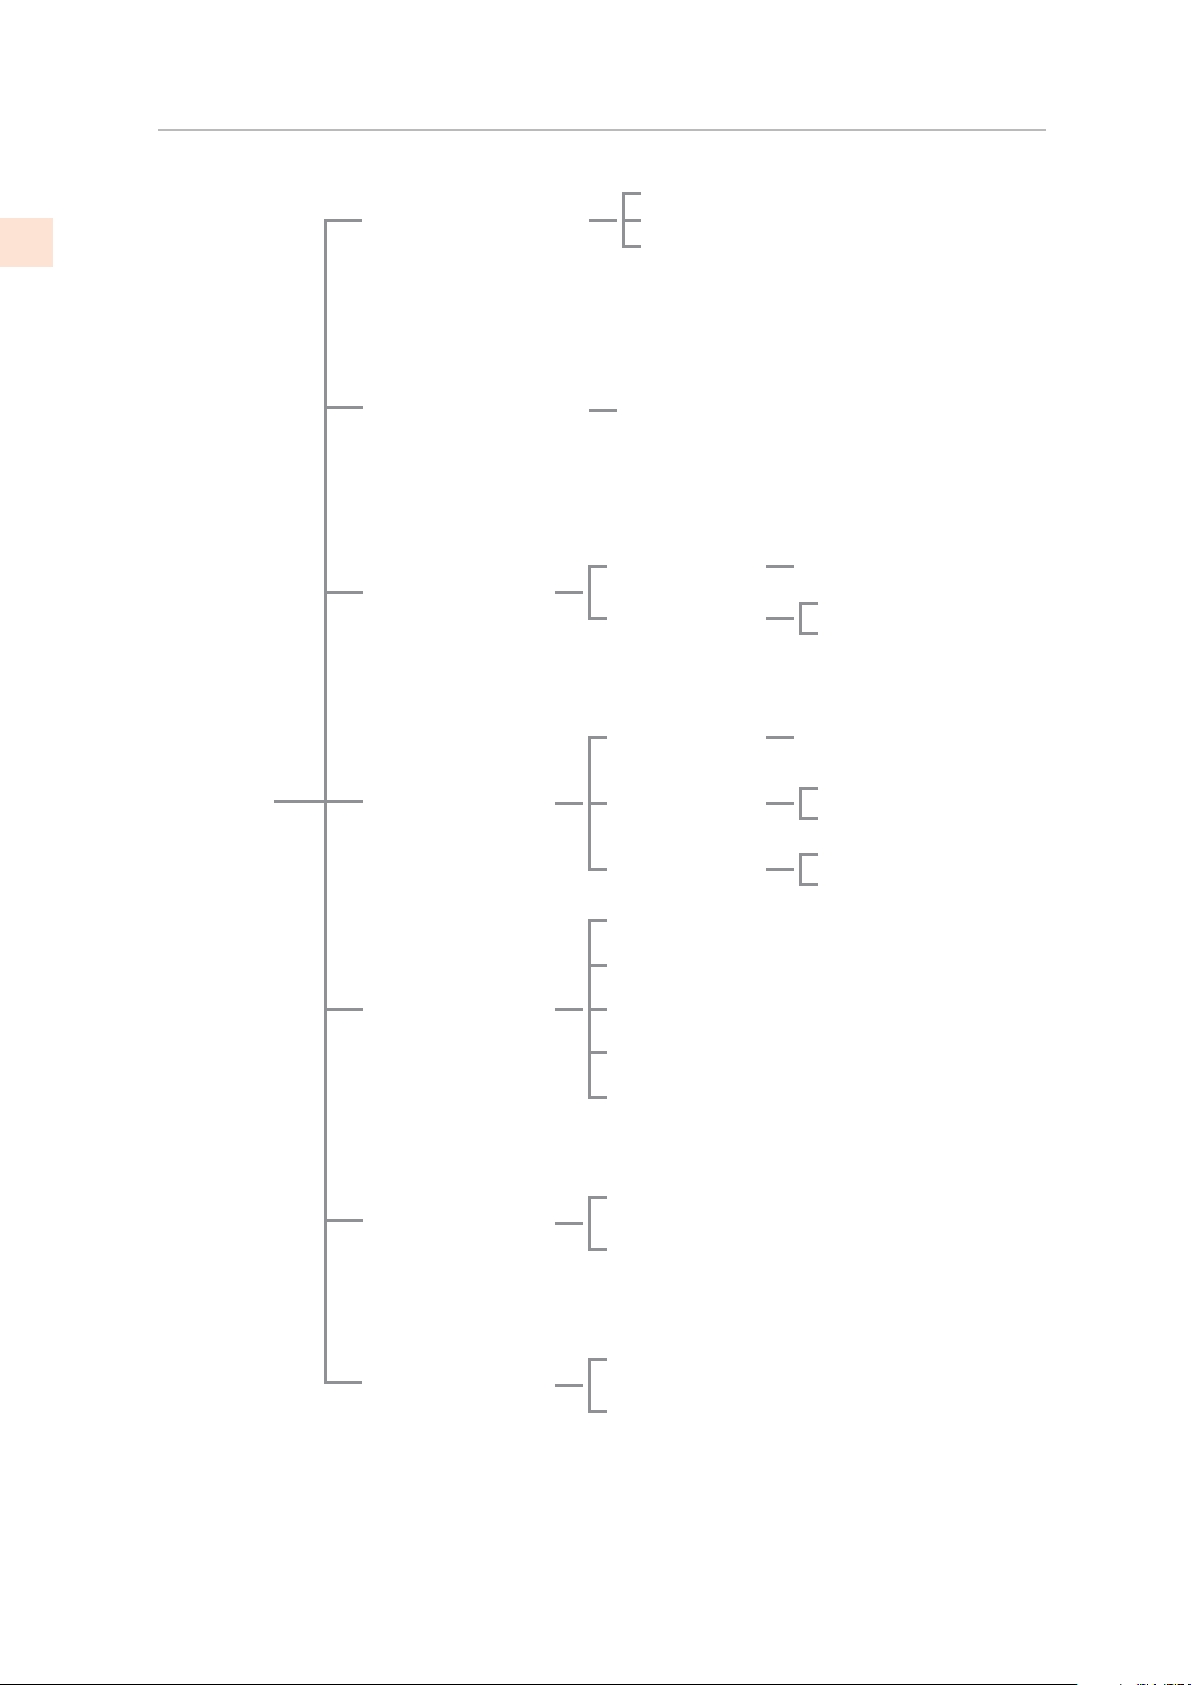
MAP OF FUNCTIONS AND SETTINGS
©2019 Hestan Commercial Corporation
32
EN
MAP OF FUNCTIONS AND SETTINGS
(CONT.)
MaxCool Fridge
MaxCool FreshZone
Holiday Fridge
Holiday FreshZone
Beverage
Ice Maker
Set Sabbath Mode
Water Filter
MaxCool ON/OFF
MaxCool Time
ON/OFF
Time
MaxCool ON/OFF
MaxCool Time
ON/OFF
Time
Set Cooling Time
Cooler ON/OFF
Set Cube Size
Super Ice ON/OFF
Sabbath Mode
Sabbath Mode
Status Filter
Manual Clean
FUNCTIONS
Holiday
Holiday
Holiday
Holiday
Cooler
MaxCool
MaxCool
Set Hours: 1
Holiday
Holiday
Set Hours: 1
MaxCool
MaxCool
Set Hours: 1
Holiday
Holiday
Set Hours: 1
Set Time: 20 min
Beverage
Beverage
Size: LARGE
Super Ice Off
Super Ice On
View Status
Reset Filter
Fridge Off
Fridge On
Fridge Off
Fridge On
FreshZone
Off
FreshZone On
FreshZone Off
FreshZone On
Cooler Off
Cooler On
Off
On
Bypass Filter
Bypass Filter Off
Bypass Filter On
Ice Maker ON/OFF
Ice Maker Off
Ice Maker On
©2019 Hestan Commercial Corporation
33
EN
SERVICE
All warranty and non-warranty repairs should be performed by qualified service personnel. To
locate an authorized service agent in your area, contact your Hestan dealer, local representative,
or the manufacturer. Before you call, please have the model number and serial number
information ready.
Hestan Commercial Corporation
3375 E. La Palma Avenue
Anaheim, CA 92806
(888) 905-7463
PARTS LIST
Please visit the Hestan website to access the parts list for your Hestan Indoor product:
www.hestanhome.com.
PARTS / SERVICE
SERVICE DATA RECORD
The location of the serial tag on the product can be seen when the refrigerator door is opened.
It is located on either the left or right side depending on the specific model.
Now is a good time to write this information in the space below provided. Keep your invoice
for warranty validation.
Model Number _________________________________
Serial Number __________________________________
Date of Installation or Occupancy __________________
©2019 Hestan Commercial Corporation
34
EN
LIMITED WARRANTY
WHAT THIS LIMITED WARRANTY COVERS:
Hestan Commercial Corporation (“HCC”) warrants to the original consumer purchaser of a
Hestan Indoor Cooling product (the “Product”) from an HCC authorized dealer that the Product
is free from defective materials or workmanship for a period of two (2) years from the date
of original retail purchase or closing date for new construction, whichever period is longer
(“Limited Warranty Period”). HCC agrees to repair or replace, at HCC’s sole option, any part
or component of the Product that fails due to defective materials or workmanship during the
Limited Warranty Period. This Limited Warranty is not transferable and does not extend to
anyone beyond the original consumer purchaser (“Purchaser”). This Limited Warranty is valid
only on Products purchased and received from an HCC authorized dealer in the fifty United
States, the District of Columbia and Canada. This Limited Warranty applies only to Products in
non-commercial use and does not extend to Products used in commercial applications.
HOW TO OBTAIN WARRANTY SERVICE:
If the Product fails during the Limited Warranty Period for reasons covered by this Limited
Warranty, the Purchaser must immediately contact the dealer from whom the Product was
purchased or HCC at 888.905.7463.
Purchaser is responsible for making the Product reasonably accessible for service or for paying
the cost to make the Product reasonably accessible for service. Service is to be provided during
normal business hours of the authorized Hestan Commercial Service Provider. To the extent
Purchaser requests service outside of the normal business hours of the authorized Hestan
Commercial Service Provider, Purchaser will pay the difference between regular rates and
overtime or premium rates. Purchaser is required to pay all travel costs for travel beyond 50
miles (one way) from the nearest authorized Hestan Commercial Service Provider.
EXTENSIONS TO TWO YEAR LIMITED WARRANTY PERIOD:
In addition to the Two-Year Limited Warranty, the following components have extended
warranty coverage as specifically set forth below:
The Product’s compressor, condenser, evaporator, drier and all connecting tubing (where
applicable are warranted to be free from defects in material and workmanship under normal
non-commercial use and service for a period of five (5) years of the original Purchaser. This
excludes surface corrosion, scratches, and discoloration which may occur during normal use
and is limited to replacement of the defective part(s), including labor, shipping and handling, as
applicable.
The Product’s compressor, condenser, evaporator, drier and all connecting tubing (where
applicable) are warranted to be free from defects in material and workmanship under normal
non-commercial use and service for a period of twelve (12) years of the original Purchaser. This
excludes surface corrosion, scratches, and discoloration which may occur during normal use
and is limited to replacement of the defective part(s), with the Purchaser paying all other costs,
including labor, shipping and handling, as applicable.
WHAT THIS LIMITED WARRANTY DOES NOT COVER:
This Limited Warranty does not cover and HCC will not be responsible for and will not pay
for: damage to or defects in any Product not purchased from an HCC authorized dealer; color
variations in color finishes or other cosmetic damage; failure or damage from abuse, misuse,
accident, re, natural disaster, commercial use of the Product, or loss of electrical power or gas
supply to the Product; damage from alteration, improper installation, or improper operation
of the Product; damage from improper or unauthorized repair or replacement of any part or
component of the Product; damage from service by someone other than an authorized agent or
©2019 Hestan Commercial Corporation
35
EN
LIMITED WARRANTY
(Cont.)
representative of the Hestan Commercial Service Network; normal wear and tear; damage from
exposure of the Product to a corrosive atmosphere containing chlorine, fluorine, or any other
damaging chemicals; damage resulting from the failure to provide normal care and maintenance
to the Product; damage HCC was not notified of within the Limited Warranty Period; and
incidental and consequential damages caused by any defective material or workmanship.
ARBITRATION:
This Limited Warranty is governed by the Federal Arbitration Act. Any dispute between
Purchaser and HCC regarding or related to the Product or to this Limited Warranty shall be
resolved by binding arbitration only on an individual basis with Purchaser. Arbitration will be
conducted by the American Arbitration Association (“AAA”) in accordance with its Consumer
Arbitration Rules or by JAMS. The arbitration hearing shall be before one arbitrator appointed
by the AAA or JAMS. The arbitrator shall not conduct class arbitration and Purchaser shall not
bring any claims against HCC in a representative capacity on behalf of others.
LIMITATION OF LIABILITY:
This Limited Warranty is the final, complete and exclusive agreement between HCC and
Purchaser regarding the Product.
THERE ARE NO EXPRESS WARRANTIES OTHER THAN THOSE LISTED AND DESCRIBED
ABOVE. NO WARRANTIES WHETHER EXPRESS OR IMPLIED, INCLUDING, BUT NOT
LIMITED TO, ANY IMPLIED WARRANTIES OF MERCHANTABILITY OR FITNESS FOR A
PARTICULAR PURPOSE SHALL APPLY AFTER THE LIMITED WARRANTY PERIOD STATED
ABOVE. NO OTHER EXPRESS WARRANTY OR GUARANTY GIVEN BY ANY PERSON,
FIRM OR CORPORATION WITH RESPECT TO THIS PRODUCT SHALL BE BINDING ON
HCC. HCC ASSUMES NO RESPONSIBILITY THAT THE PRODUCT WILL BE FIT FOR
ANY PARTICULAR PURPOSE, EXCEPT AS OTHERWISE PROVIDED BY APPLICABLE
LAW. HCC SHALL NOT BE LIABLE FOR LOSS OF REVENUE OR PROFITS, FAILURE TO
REALIZE SAVINGS OR OTHER BENEFITS, OR ANY OTHER SPECIAL, INCIDENTAL OR
CONSEQUENTIAL DAMAGES CAUSED BY THE USE, MISUSE OR INABILITY TO USE THE
PRODUCT, REGARDLESS OF THE LEGAL THEORY ON WHICH THE CLAIM IS BASED,
AND EVEN IF HCC HAS BEEN ADVISED OF THE POSSIBILITY OF SUCH DAMAGES. NO
RECOVERY OF ANY KIND AGAINST HCC SHALL BE GREATER IN AMOUNT THAN THE
PURCHASE PRICE OF THE PRODUCT. WITHOUT LIMITING THE FOREGOING, YOU
ASSUME ALL RISK AND LIABILITY FOR LOSS, DAMAGE OR INJURY TO YOU AND YOUR
PROPERTY AND TO OTHERS AND THEIR PROPERTY ARISING OUT OF THE USE, MISUSE
OR INABILITY TO USE THE PRODUCT NOT CAUSED DIRECTLY BY THE NEGLIGENCE OF
HCC. THIS LIMITED WARRANTY STATES YOUR EXCLUSIVE REMEDY.
No oral or written representation or commitment given by anyone, including but not limited
to, an employee representative or agent of HCC will create a warranty or in any way increase
the scope of this express Limited Two Year Warranty. If there is any inconsistency between
this Limited Warranty and any other agreement or statement included with or relating to the
Product, this Limited Warranty shall govern. If any provision of this Limited Warranty is found
invalid or unenforceable, it shall be deemed modified to the minimum extent necessary to make
it enforceable and the remainder of the Limited Warranty shall remain valid and enforceable
according to its terms.
INTERACTION OF LAWS WITH THIS LIMITED WARRANTY:
Some states, provinces or territories may not allow limitations on how long an implied
warranty lasts or the exclusion or limitation of incidental or consequential damages, so the
above limitations or exclusions may not apply to you. Some states, provinces or territories may
©2019 Hestan Commercial Corporation
36
EN

LIMITED WARRANTY
(Cont.)
provide for additional warranty rights and remedies, and the provisions contained in this Limited
Warranty are not intended to limit, modify, take away from, disclaim or exclude any mandatory
warranty requirements provided by states, provinces or territories, including certain implied
warranties. This warranty gives you specific legal rights, and you may also have other rights
which vary depending on location.
Any questions about this Limited Warranty may be directed to:
Hestan Commercial Corporation at (888) 905-7463
©2019 Hestan Commercial Corporation
37
EN
DÉFINITIONS DE SÉCURITÉ
CECI INDIQUE QUE L’INOBSERVATION DE CET AVERTISSEMENT
PEUT ENTRAÎNER DES BLESSURES GRAVES VOIRE MORTELLES.
LISEZ ATTENTIVEMENT ET COMPLÈTEMENT CES INSTRUCTIONS
AVANT D’INSTALLER OU D’UTILISER VOTRE APPAREIL AFIN DE
RÉDUIRE LES RISQUES D’INCENDIE, DE BRÛLURE OU D’AUTRES
BLESSURES. CONSERVER CE MANUEL POUR RÉFÉRENCE FUTURE.
INSTALLATEUR: LAISSER CE MANUEL AVEC LE PROPRIÉTAIRE DE
L’APPAREIL.
PROPRIÉTAIRE: CONSERVEZ CE MANUEL POUR RÉFÉRENCE FUTURE.
Ne pas entreposer ou utiliser d’essence ou tout autre liquide ou gaz inflammable à
proximité de cet appareil ou de tout autre appareil.
L’installation et le service doivent être effectués par un installateur qualifié ou une
agence de service.
NE PAS RÉPARER, REMPLACER OU ENLEVER TOUTE PIÈCE DE L’APPAREIL,
SAUF SI SPÉCIFIQUEMENT RECOMMANDÉ DANS LES MANUELS. UNE
INSTALLATION, UN ENTRETIEN OU UNE MAINTENANCE INCORRECTS
PEUT ENTRAÎNER DES BLESSURES OU DES DOMMAGES MATÉRIELS.
CONSULTEZ CE MANUEL DE L’ORIENTATION. TOUS LES AUTRES SERVICES
DEVRAIENT ÊTRE EFFECTUÉS PAR UN TECHNICIEN DE SERVICE HESTAN
AUTORISÉ.
LE NON-RESPECT À LA LETTRE DE CES INSTRUCTIONS PEUT
CAUSER UN INCENDIE OU UNE EXPLOSION, QUI POURRAIT
ENTRAÎNER DES DOMMAGES MATÉRIELS, DES BLESSURES OU
LA MORT.
CECI INDIQUE QUE L’INOBSERVATION DE CET AVERTISSEMENT
PEUT ENTRAÎNER DES BLESSURES MINEURES OU MODÉRÉES.
CECI INDIQUE QUE L’INOBSERVATION DE CET AVERTISSEMENT
PEUT ENTRAÎNER DES DOMMAGES DE L’APPAREIL OU DES
DÉGÂTS MATÉRIELS.
©2019 Hestan Commercial Corporation
1
FR
Un message de Hestan
Les innovations culinaires primées de Hestan et les caractéristiques spéciales ont
réinventé la cuisine du restaurant et redéfini l’expérience culinaire dans certains
des restaurants les plus acclamés de l’Amérique. Hestan prend maintenant cette
performance à l’arrière de la maison et la met au centre de la vôtre. Pensé et
méticuleusement conçu, Hestan vous servira magnifiquement pour les années à
venir.
Hestan est la seule marque résidentielle née des rêves et des exigences des chefs
professionnels. De la cuisinière à la réfrigération, chaque détail est conçu pour
offrir la performance et la fiabilité attendues dans un restaurant - maintenant
disponible pour vous.
Nous apprécions que vous ayez choisi Hestan, et nous nous engageons à vous
offrir le meilleur.
Bienvenue à Hestan

©2019 Hestan Commercial Corporation
3
FR
S’il est bien entretenu, cet appariel Hestan procurera un service sûr et fiable pendant de
nombreuses années. Lorsqu’on se sert de cet appareil, les pratiques élémentaires suivantes en
matière de sécurité doivent être adoptées.
IMPORTANT: Conservez ces instructions pour l’utilisation locale des services publics.
INSTALLATEUR: Veuillez laisser ces instructions d’installation avec le propriétaire.
PROPRIÉTAIRE: Veuillez conserver ces instructions d’installation pour référence
future.
Cette appareil est conçue pour un usage domestique uniquement. Elle ne l’est PAS pour être
installée dans des maisons préfabriquées (mobiles) ou dans des véhicules récréatifs. N’installez
PAS cette appareil à l’extérieur.
PRÉCAUTIONS DE SÉCURITÉ - AVANT DE COMMENCER
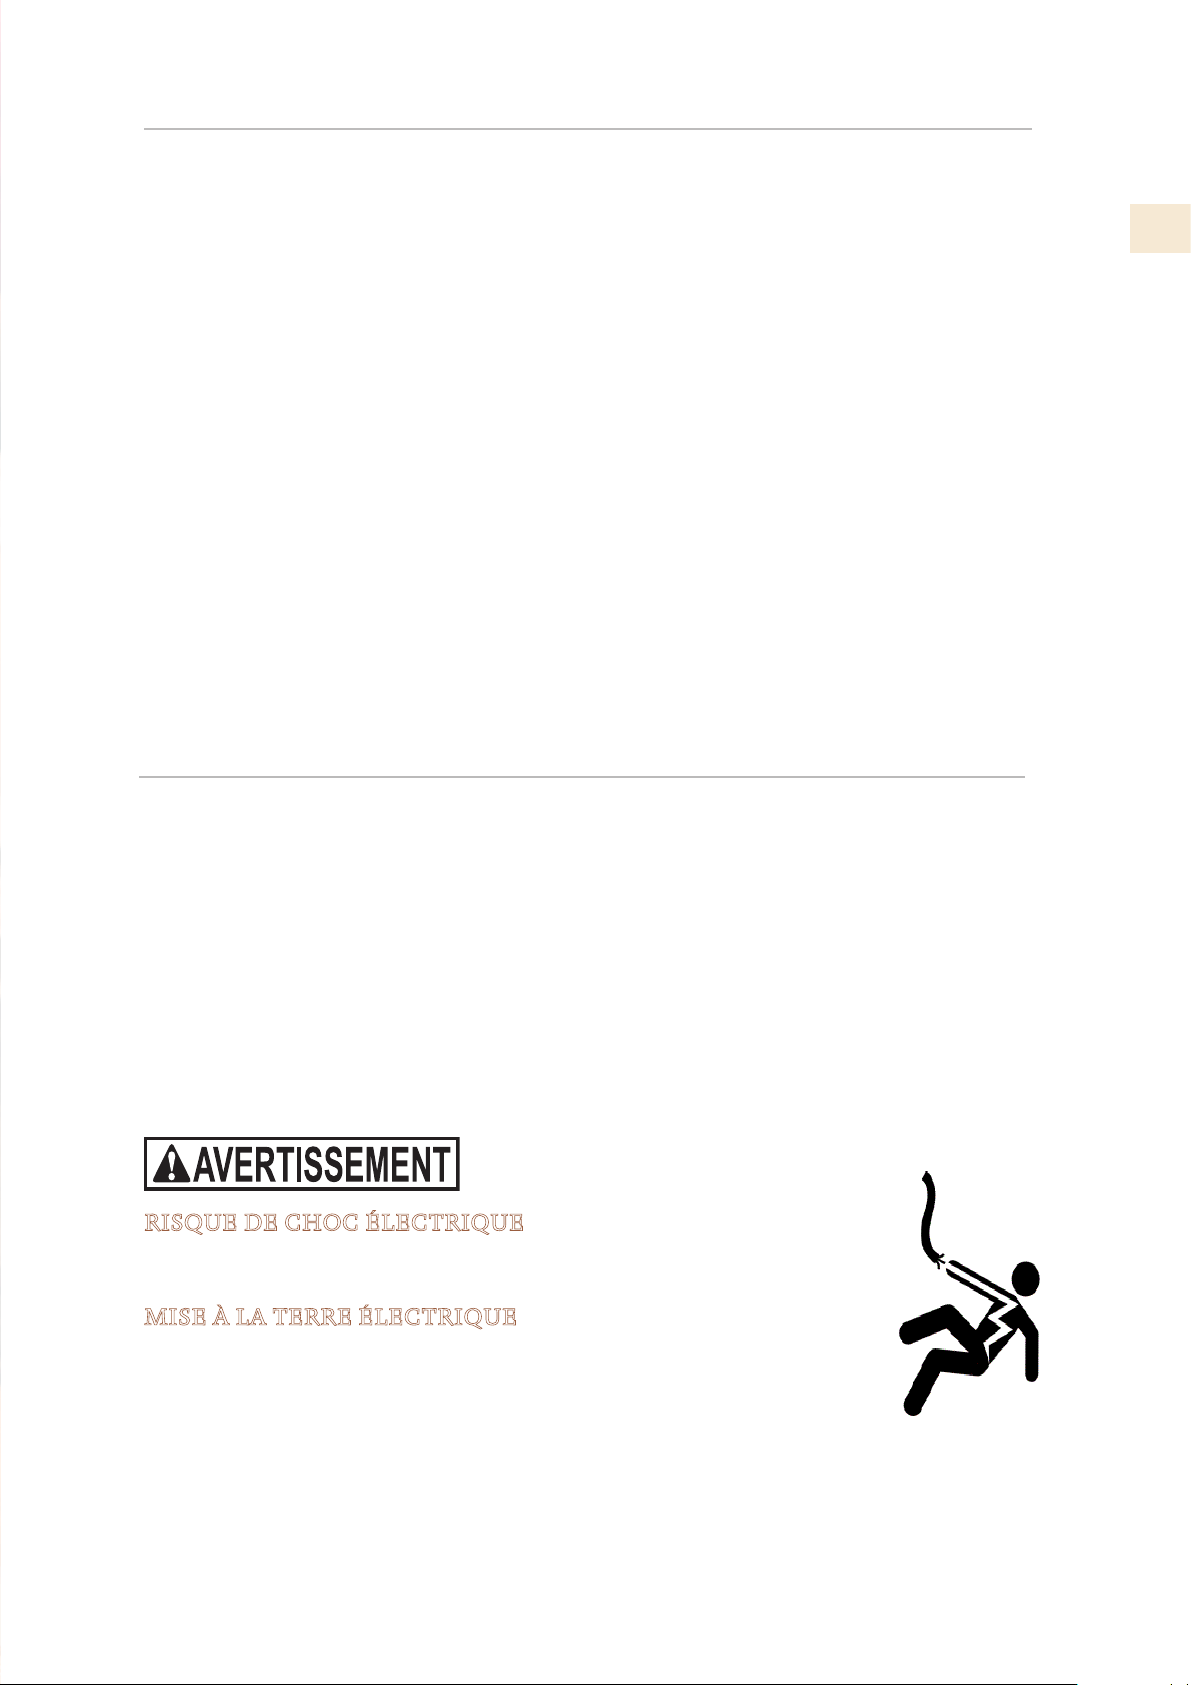
RISQUE DE CHOC ÉLECTRIQUE
Débranchez l’alimentation avant d’installer ou d’entretenir l’appareil. Ne pas
le faire peut entraîner la mort ou un choc électrique.
MISE À LA TERRE ÉLECTRIQUE
Cet appareil doit être mis à la terre. La mise à la terre réduit le risque de
choc électrique en cas de court-circuit. Lisez la section CONNEXIONS
ÉLECTRIQUES du manuel d’installation pour des instructions complètes.
NE PAS mettre à la terre un tuyau de gaz.
NE PAS utiliser de rallonge avec cet appareil.
NE PAS avoir de fusible dans le circuit NEUTRE ou MISE À LA TERRE. Un fusible dans le
circuit NEUTRE ou MISE À LA TERRE pourrait provoquer un choc électrique.
TABLES DES MATIERES
3 PRÉCAUTIONS DE SÉCURITÉ - AVANT DE COMMENCER
6 NUMÉROS DE MODÈLE
7 PLAQUE SIGNALÉTIQUE
7 EXIGENCES RÉGLEMENTAIRES / CODE
8 APPRENDRE À CONNAÎTRE VOTRE APPAREIL
11 CONTRÔLES ET FONCTIONNEMENT
20 DISPOSITION INTERNE
23 LA CONSERVATION DES ALIMENTS
27 ENTRETIEN ET NETTOYAGE
28 DÉPANNAGE
31 PLAN DU MENÙ
33 PIÈCES / SERVICE
33 GARANTIE LIMITÉE
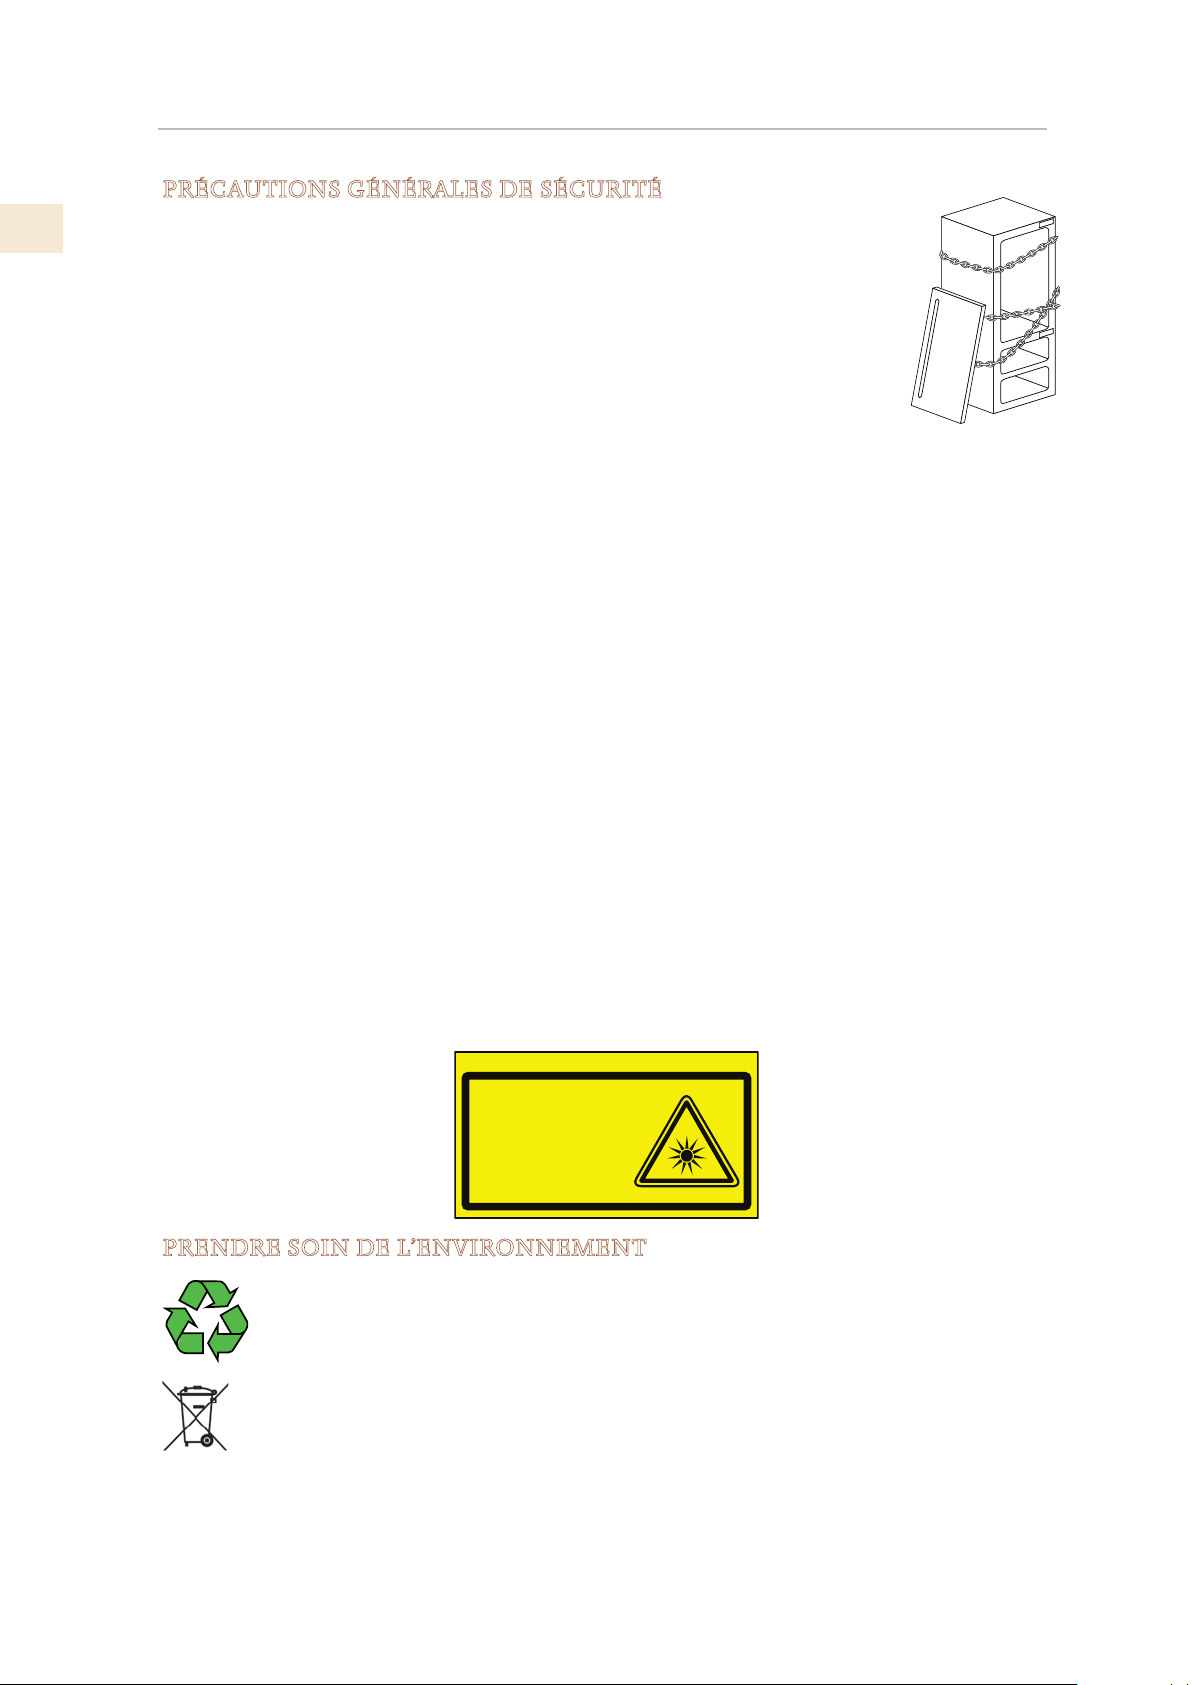
FR
©2019 Hestan Commercial Corporation
4
PRÉCAUTIONS DE SÉCURITÉ - AVANT DE COMMENCER
(SUITE)
PRÉCAUTIONS GÉNÉRALES DE SÉCURITÉ
Si cet appareil remplace un appareil existant qui doit être enlevé ou éliminé,
assurez-vous qu’il ne devienne pas un piège dangereux pour les enfants en
coupant le câble d’alimentation et en rendant impossible la fermeture de la
porte. Utilisez la même prudence à la fin de la durée de vie du nouvel appareil.
Cet appareil est conçu pour réfrigérer les boissons et les aliments et est destiné
à un usage domestique.
L’appareil doit être installé en suivant les instructions du Guide d’Installation.
En veillant particulièrement à ne pas obstruer les ouvertures d’aération de
l’appareil et des unités encastrées.
L’appareil dispose d’un système d’éclairage concentré avec des lampes à LED. Ne regardez pas
dans ces lampes quand elles sont allumées pour éviter des dommages possibles à la vue.
Cet avertissement est également contenu sur l’étiquette attachée à l’intérieur de la porte du
réfrigérateur.
Lorsque le congélateur fonctionne, ne touchez pas les surfaces intérieures en acier inoxydable
avec les mains mouillées ou humides, car la peau risque de coller aux surfaces très froides.
N’utilisez aucun type de matériel électrique à l’intérieur des compartiments de conservation des
aliments.
Lors du positionnement des étagères, ne placez pas vos doigts dans les guides de glissière.
Ne placez pas de récipients contenant des liquides inflammables à proximité de l’appareil.
Éteignez complètement l’appareil et débranchez le câble d’alimentation pendant les opérations
de nettoyage.
Les pièces d’emballage peuvent être dangereuses pour les enfants: ne laissez pas les enfants
jouer avec les sacs en plastique, le film plastique ou le styrofoam.
Toute réparation doit être effectuée par un technicien qualifié Hestan.
Cet appareil n’est pas destiné à être utilisé par des personnes (y compris des enfants) ayant une
déficience physique, sensorielle ou manquant d’expérience et de connaissances, à moins qu’une
personne responsable de leur sécurité ne leur ait donné des instructions ou des conseils
concernant son utilisation. Les enfants doivent être surveillés pour s’assurer qu’ils ne jouent pas
avec l’appareil.
PRENDRE SOIN DE L’ENVIRONNEMENT
L’appareil ne doit pas être éliminé avec les déchets urbains. Contactez les centres
d’élimination des déchets locaux pour savoir comment éliminer les déchets
recyclables.
Avant la mise au rebut, débranchez le cordon d’alimentation et empêchez la
porte de se fermer, comme indiqué dans la section «PRÉCAUTIONS GÉNÉRALES
DE SÉCURITÉ». Lors de l’élimination, évitez d’endommager les composants
électroniques.
L’appareil ne contient pas de substances dangereuses pour la couche d’ozone
atmosphérique, ni dans les composants électroniques ni dans l’isolant.
B09001301
Product tested in accordante with EN62471
Risk Group 2
PRUDENZA:
NON FISSARE LA LAMPADA IN FUNZIONE.
PUÒ ESSERE DANNOSO PER GLI OCCHI.
CAUTION:
DO NOT STARE AT OPERATING LAMP.
MAY BE HARMFUL TO THE EYES.
NETTOYAGE ET ENTRETIEN DU DISTRIBUTEUR DE GLACE
Le fait de ne pas désinfecter correctement le système de fabrication de glace peut compromettre
la sécurité en matière d’hygiène de l’eau distribuée. Suivez toujours les instructions de
désinfection.
Lors de la première utilisation de l’appareil et à chaque changement de filtre, il est recommandé
de laisser l’eau couler dans le circuit à l’aide de la fonction «Nettoyage Manuel» et d’éliminer la
glace produite au cours des 24 premières heures. Voir «ACTIVER LE FABRICANT DE GLACE» à
la page 13.
Nettoyez régulièrement le seau à glace ou le tiroir en utilisant uniquement de l’eau potable.
Le filtre doit être remplacé lorsque cela est indiqué sur le panneau de commande ou lorsque le
distributeur de glace / eau n’a pas été utilisé pendant plus de 30 jours.
À chaque remplacement du filtre, désinfectez le système de distribution d’eau et de glace en
utilisant un désinfectant de qualité alimentaire (avec de l’hypochlorite de sodium), qui n’altère
pas les caractéristiques des matériaux. Exécutez la fonction «Nettoyage Manuel» de manière à
ce qu’au moins 1/2 gallon d’eau soit passé dans le bac de récupération avant utilisation.
Seules les pièces de rechange d’origine fournies par le fabricant doivent être utilisées lors du
remplacement de composants dans le distributeur de glace et d’eau.
Tout travail sur l’appareil doit être effectué par un technicien qualifié.
UTILISATION DES MENUS DE COMMANDE
Selon le modèle de l’appareil, il peut y avoir un ou deux panneaux de commande, avec
différentes commandes disponibles. Des flèches Haut / Bas
permettent d’ajuster directement
les températures dans les différentes zones de refroidissement / réfrigération / congélation.
Lorsque deux panneaux sont présents, seul le panneau principal comporte les boutons
et
.
De nombreuses fonctions et paramètres ne sont accessibles qu’au travers des menus de contrôle.
Voici les bases:
1) Appuyez sur la touche pour activer le système de menu interactif.
Si l’écran affiche «KEYPAD LOCKED», appuyez sur les touches
et Bas pendant
plusieurs secondes. (Voir «DÉVERROUILLAGE DU CLAVIER» à la page 14.)
* Les deux boutons Haut / Bas déplacent les sélections de menu. La sélection active est
toujours affichée à l’écran.
2) Utilisez les boutons Haut / Bas pour afficher une sélection, puis appuyez sur le bouton
pour l’activer.
* Vous devrez peut-être utiliser les boutons Haut / Bas à nouveau pour arriver à une
sélection finale. Lorsque vous activez ou désactivez les sélections, vous devrez en faire le
suivi et appuyer sur
pour le confirmer.
3) Pour sortir du menu, touchez le bouton selon vos besoins.
Voir aussu: «PARAMÈTRES SPÉCIAUX ET FONCTIONS» à la page 13.
©2019 Hestan Commercial Corporation
5
FR
PRÉCAUTIONS DE SÉCURITÉ - AVANT DE COMMENCER
(SUITE)
FR
©2019 Hestan Commercial Corporation
6
NUMÉROS DE MODÈLE
MODÈLES DE RÉFRIGÉRATION
No Modèle
Description
No Modèle
Description
KRPR36 Réfrigérateur à congélateur inférieur, compresseur supérieur, Pro, charnière à droite, 36"
KRPL36
Réfrigérateur à congélateur inférieur , compresseur supérieur, Pro, charnière à gauche, 36"
KRPR36-XX Réfrigérateur à congélateur inférieur, compresseur supérieur, Pro, couleur, charnière à droite, 36"
KRPL36-XX Réfrigérateur à congélateur inférieur, compresseur supérieur, Pro, couleur, charnière à gauche, 36"
KRBR36 Réfrigérateur à congélateur inférieur, compresseur inférieur, charnière à droite, 36"
Réfrigérateur à congélateur inférieur, compresseur inférieur, charnière à droite, 36"
KRBL36
KRBR36-OV Réfrigérateur à congélateur inférieur, compresseur inférieur, recouvrement, charnière à droite, 36”
KRBL36-OV Réfrigérateur à congélateur inférieur, compresseur inférieur, recouvrement, charnière à gauche, 36”
KRBR36-XX Réfrigérateur à congélateur inférieur, compresseur inférieur, couleur, charnière à droite, 36"
KRBL36-XX Réfrigérateur à congélateur inférieur, compresseur inférieur, couleur, charnière à gauche, 36"
KRCR24 Colonne de réfrigérateur, charnière à droite, 24"
KRCL24 Colonne de réfrigérateur, charnière à gauche, 24"
KRCR24-OV Colonne de réfrigérateur, recouvrement, charnière à droite, 24"
KRCL24-OV Colonne de réfrigérateur, recouvrement, charnière à gauche, 24"
KRCR24-XX Colonne de réfrigérateur, couleur, charnière à droite, 24"
KRCL24-XX Colonne de réfrigérateur, couleur, charnière à gauche, 24"
KRCR30 Colonne de réfrigérateur, charnière à droite, 30"
KRCL30 Colonne de réfrigérateur, charnière à gauche, 30"
KRCR30-OV Colonne de réfrigérateur, recouvrement, charnière à droite, 30"
KRCL30-OV Colonne de réfrigérateur, recouvrement, charnière à gauche, 30"
KRCR30-XX Colonne de réfrigérateur, couleur, charnière à droite, 30"
KRCL30-XX Colonne de réfrigérateur, couleur, charnière à gauche, 30"
KFCR24 Colonne de congélateur, charnière à droite, 24"
KFCL24 Colonne de congélateur, charnière à gauche, 24"
KFCR24-OV Colonne de congélateur, recouvrement, charnière à droite, 24”
KFCL24-OV Colonne de congélateur, recouvrement, charnière à gauche, 24"
KFCR24-XX Colonne de congélateur, couleur, charnière à droite, 24"
KFCL24-XX Colonne de congélateur, couleur, charnière à gauche, 24"
KFCR30 Colonne de congélateur, charnière à droite, 30"
KFCL30 Colonne de congélateur, charnière à gauche, 30"
KFCR30-OV Colonne de congélateur, recouvrement, charnière à droite, 30”
KFCL30-OV Colonne de congélateur, recouvrement, charnière à gauche, 30”
KFCR30-XX Colonne de congélateur, couleur, charnière à droite, 30"
KFCL30-XX Colonne de congélateur, couleur, charnière à gauche, 30"
MODÈLES DE CONGÉLATEUR
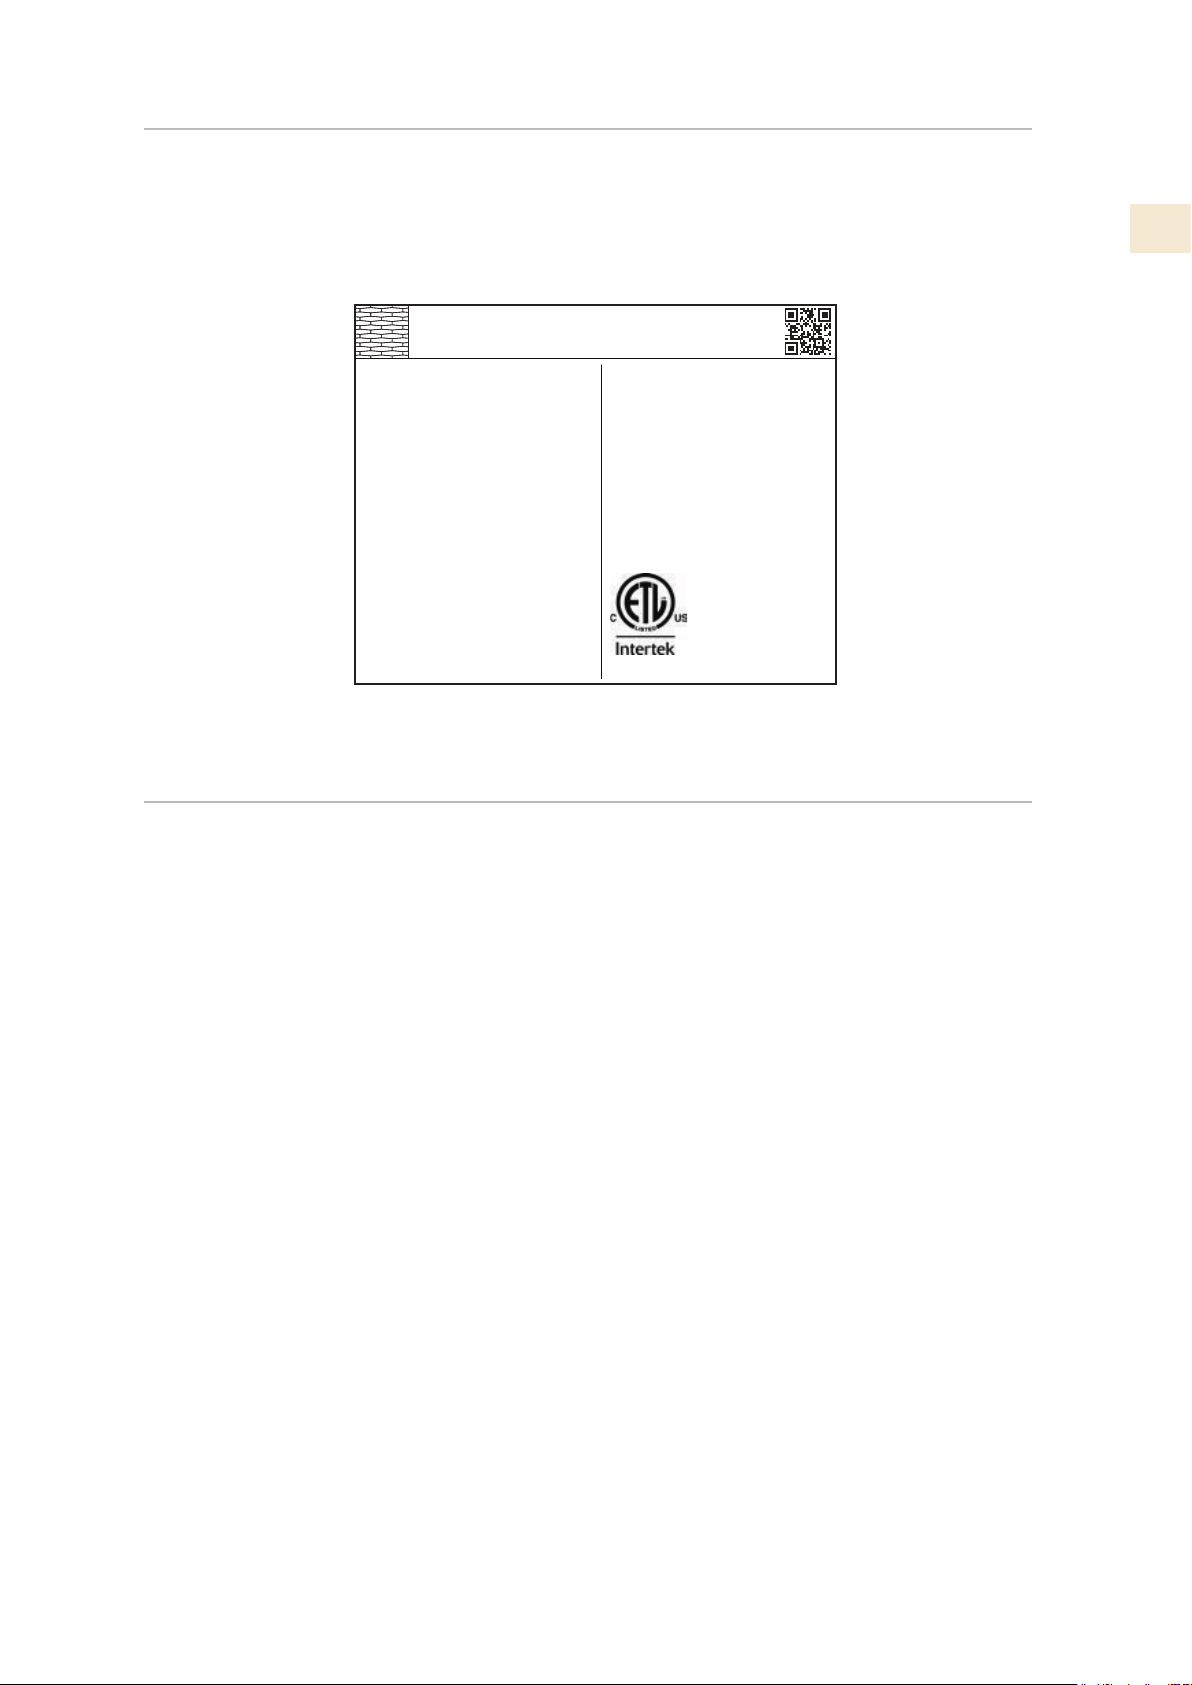
©2019 Hestan Commercial Corporation
7
FR
PLAQUE SIGNALÉTIQUE
La plaque signalétique fournit des informations importantes sur cet appareil Hestan, telles que
les numéros de série et de modèle, ainsi que les caractéristiques électriques.
La plaque signalétique se trouve sur la paroi intérieure de l’appareil.
EXIGENCES RÉGLEMENTAIRES / CODE
L’installation de cet appareil de réfrigération doit être faite conformément aux codes locaux. En
l’absence de codes locaux, cette unité doit être installée conformément à la norme code et codes
locaux.
Cet appareil doit être mis à la terre conformément aux codes locaux ou, en l’absence de des
codes locaux avec le National Electrical Code ANSI/NFPA 70, ou Canadian Electrical code
CSAC22.1.
ozFridge Gas Fill Charge
Quantité de Gaz Réfrigerateur
Freezer Gas Fill Charge
Quantité de Gaz Congélateur
Total Absorbed Current
Courant Absorbée Totale
Voltage
Tension
Frequency
Frequence
Refrigerant Gas Type
Type de Gaz Rèfrigerant
MODEL
Made in Italy
CODE
SER.NO./N° SERIE
ETL LISTED
CONFORMS TO
ANSI/UL STD 250
CERTIFIED TO CAN/CSA
STD C22.2 NO.63
A
V
Hz
HESTAN COMMERCIAL CORP.
ANAHEIM, CA - USA
KRP36
7
0
1
115
60
R134a
FI24RC-RO
F20160725000001
PLAQUE SIGNALÉTIQUE TYPIQUE
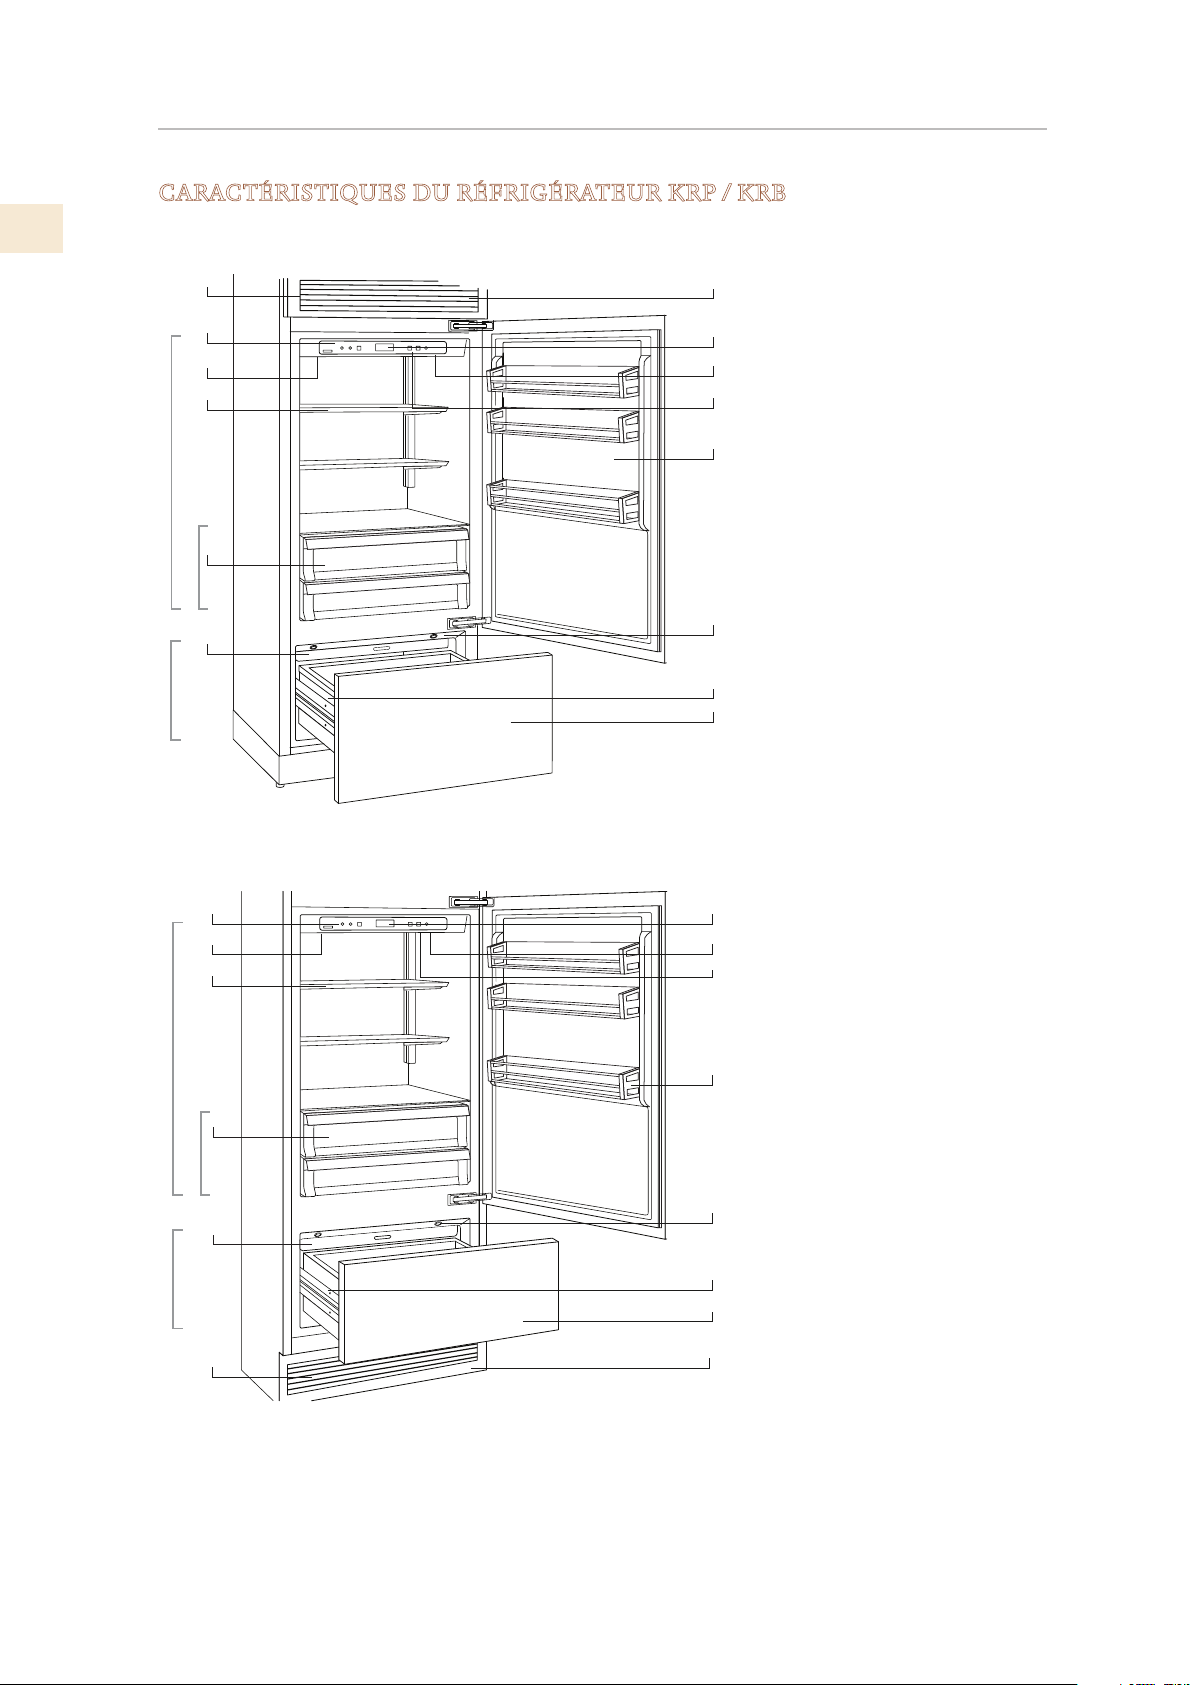
FR
©2019 Hestan Commercial Corporation
8
APPRENDRE À CONNAÎTRE VOTRE APPAREIL
CARACTÉRISTIQUES DU RÉFRIGÉRATEUR KRP / KRB
1
8
9
10
11
12
13
14
2
3
4
5
6
8
9
10
11
12
13
14
2
3
4
5
6
1
Modèles KRP
Modèles KRB
1
2
3
4
5
6
7
8
9
10
11
12
13
14
7
7
Grille en acier inoxydable,
garniture en aluminium
Panneau de commande
avec affichage
Filtre à eau
Système de positionnement
d'étagère breveté
Compartiments à légumes
«Basse température»
Machine à glaçons
automatique
Système de réfrigération
double
Affichage de la température
Signaux sonores
Fonction de vacances
Étagères réglables
Eclairage LED - multiple
emplacements dans chaque
compartiment
Système de fermeture
automatique des tiroirs
FreshZone / compartiment
congélateur. Lors de la
première mise en marche de
l'appareil, le compartiment
Zone Fraîche/ congélateur est
réglé sur le mode congélateur.
Il peut être transformé en
réfrigérateur ou compartiment
ExtendFresh (fresco).
Zone Fraîche
Frigo
Basse température
Basse température
Zone Fraîche
Frigo
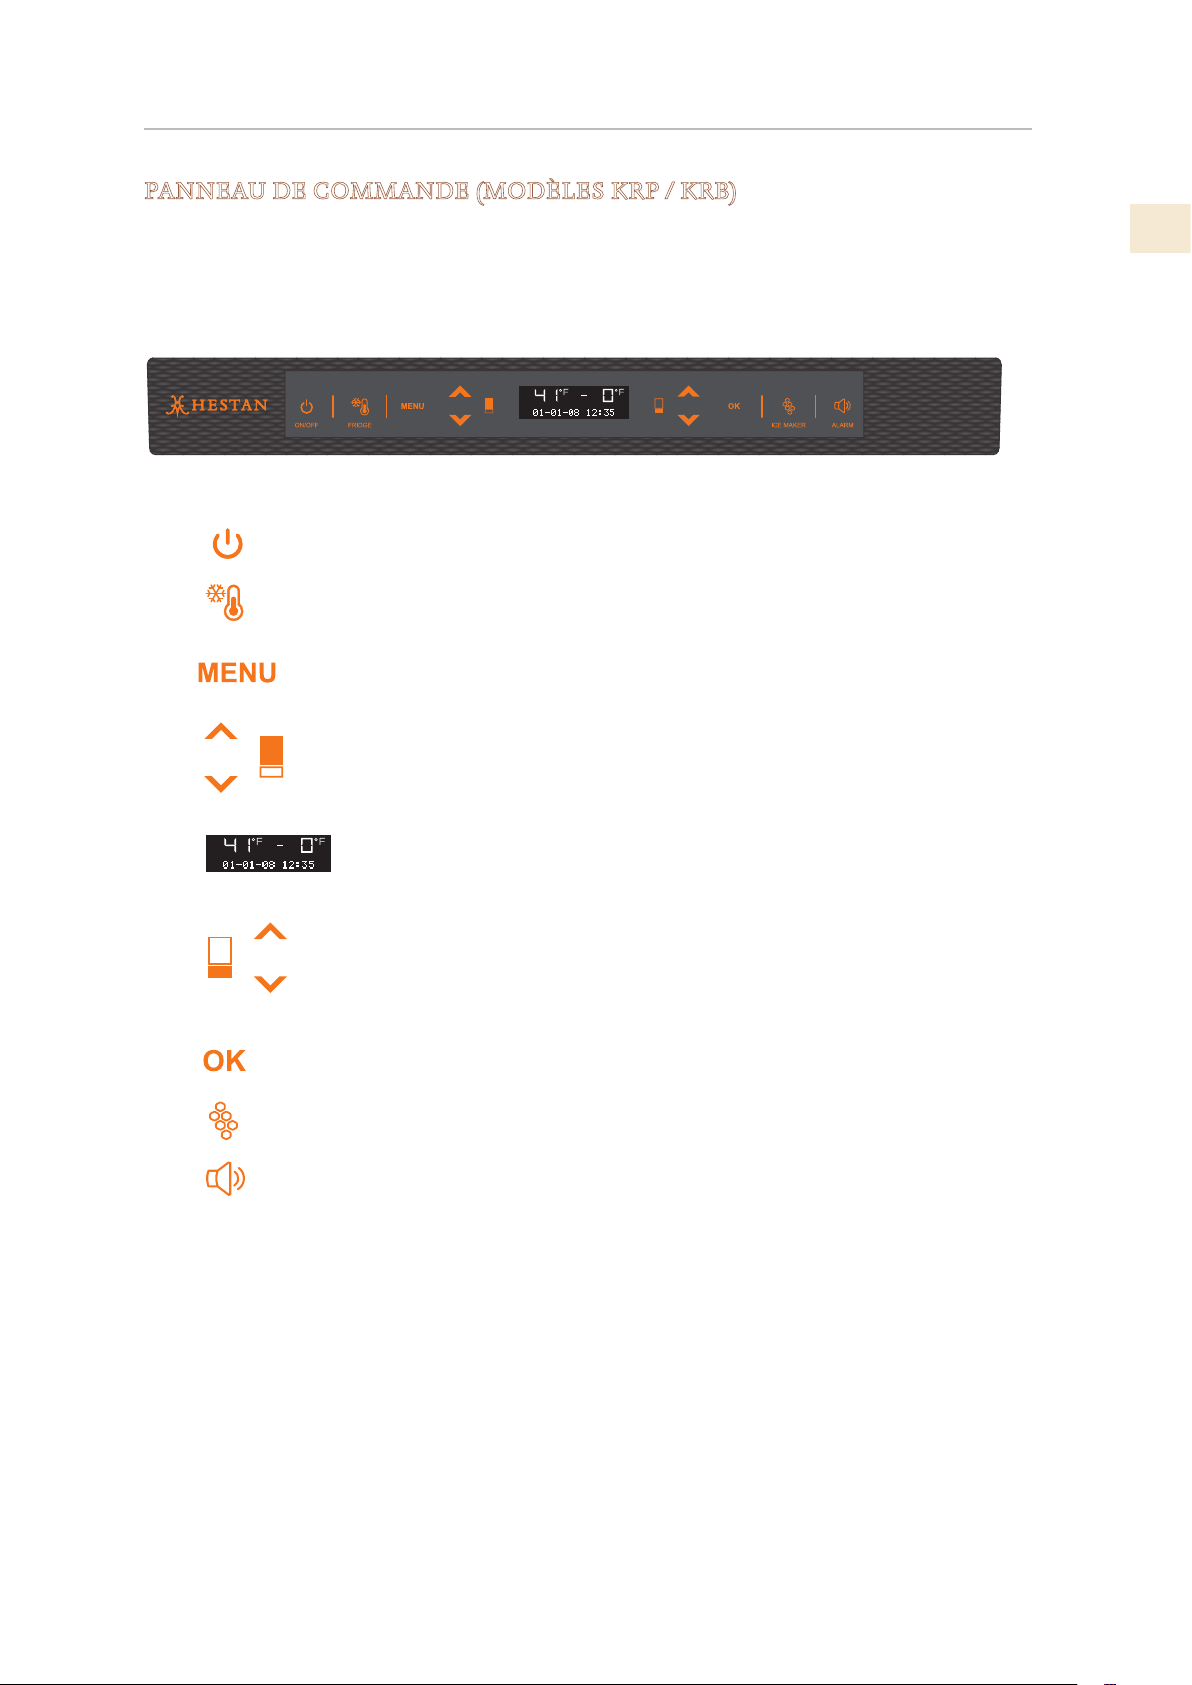
©2019 Hestan Commercial Corporation
9
FR
APPRENDRE À CONNAÎTRE VOTRE APPAREIL
(SUITE)
PANNEAU DE COMMANDE (MODÈLES KRP / KRB)
Commute l'appareil (tous les compartiments) entre Allumer
et Mode veille (appuyez pendant 3 secondes).
Vous permet d'éteindre le compartiment réfrigérateur et
laissez le compartiment congélateur FreshZone allumé
3 secondes).
Permet d'accéder au menu du panneau de contrôle pour
changer appareils divers paramètres.
Réfrigérateur: appuyez sur le réfrigérateur vers le haut et
vers le bas touches, pour modifier la température du
réfrigérateur ou pour naviguer dans le menu du panneau de
contrôle.
Affiche la température du réfrigérateur et du congélateur
compartiments, la date et l'heure, le menu du panneau de
commande et divers autres messages.
Congélateur (Zone Fraîche): appuyez sur le haut et le bas du
congélateur touches, pour changer les touches du
compartiment congélateur (Zone Fraîche) changer le réglage
de la température.
Appuyez sur pour confirmer les sélections effectuées dans le
menu du panneau de commande.
Appuyez pour activer ou désactiver la machine à glaçons.
Clignote pour signaler les alertes de l'utilisateur, par exemple
si la porte reste ouverte combinaison avec une tonalité
d'avertissement. Appuyez sur cette touche pour désactiver la
tonalité d'avertissement.
Le système de contrôle électronique de votre réfrigérateur Hestan maintient une température
constante dans les deux compartiments et affiche la température mesurée sur le panneau de
commande. Cela permet également à l'utilisateur personnaliser les paramètres des différentes
fonctions et fournir des alertes en cas de dysfonctionnement.
Allumé /
éteint
Frigo
Menu
Haut/Bas
Frigo
Affichage
Haut/Bas
Congélateur
Zone Fraîche)
OK
Machine à
glaçons
Alarme
(
1 2 3 4 5 6 7 8 9
1
2
3
4
5
6
7
8
9
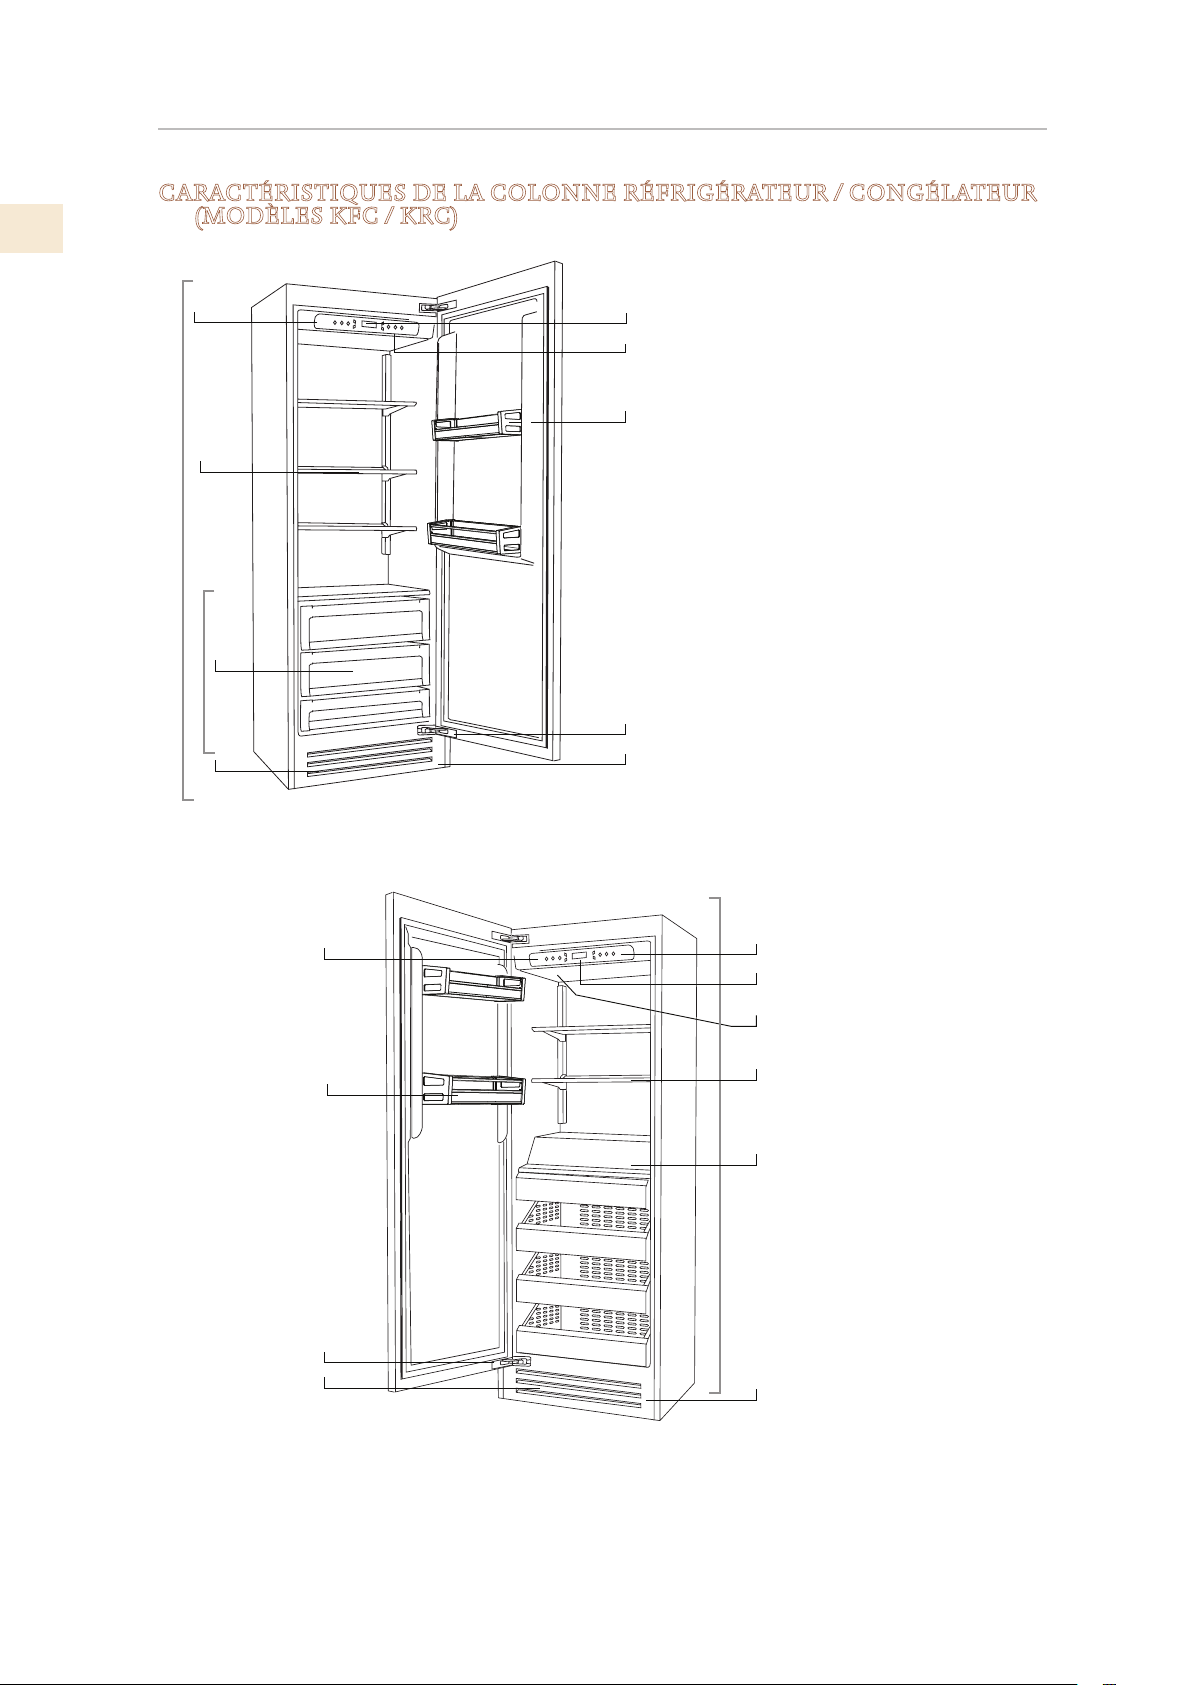
FR
©2019 Hestan Commercial Corporation
10
APPRENDRE À CONNAÎTRE VOTRE APPAREIL
(SUITE)
CARACTÉRISTIQUES DE LA COLONNE RÉFRIGÉRATEUR / CONGÉLATEUR
(MODÈLES KFC / KRC)
2
5
6
7
8
9
10
11
Modèles KRC
7
8
9
10
2
3
6
4
Basse température
Frigo
1
7
9
3
5
8
1
2
6
10
Congélateur
11
Grille en acier inoxydable,
garniture en aluminium
Panneau de commande
avec
affichage
Système de positionnement
Compartiments à légumes
«Basse température»
Machine à glaçons
automatique
Système de réfrigération
double
Affichage de la température
Signaux sonores
Fonction de vacances
Étagères réglables
Eclairage LED - multiple
emplacements dans chaque
compartiment
4
3
1
Modèles KFC
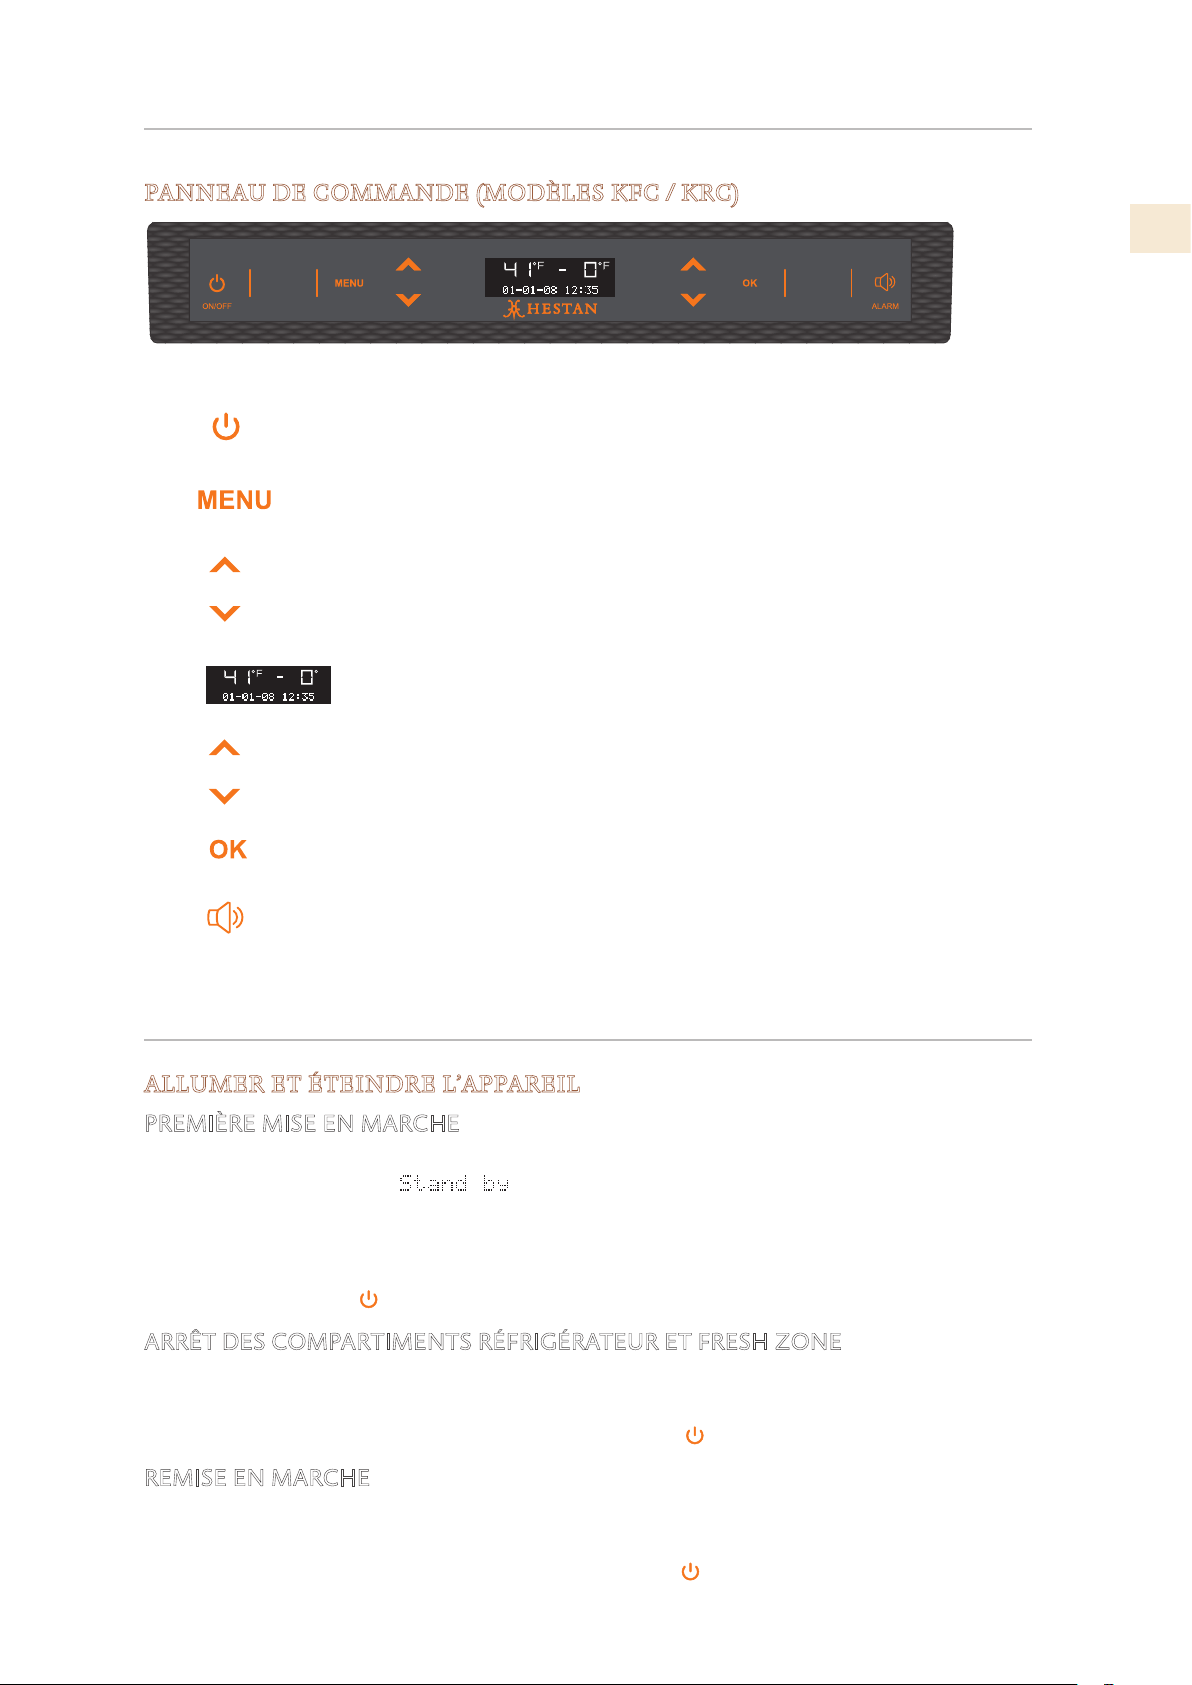
©2019 Hestan Commercial Corporation
11
FR
APPRENDRE À CONNAÎTRE VOTRE APPAREIL
(SUITE)
PANNEAU DE COMMANDE (MODÈLES KFC / KRC)
Commute l'appareil (tous les compartiments) entre veille et
actif (appuyez pendant 3 secondes).
Permet d'accéder au menu du panneau de contrôle pour
changer appareils divers paramètres.
Réfrigérateur: appuyez sur le réfrigérateur vers le haut et
vers le bas touches, pour modifier la température du
réfrigérateur ou pour naviguer dans le menu du panneau de
contrôle.
Affiche la température du réfrigérateur et du congélateur
compartiments, la date et l'heure, le menu du panneau de
commande et divers autres messages.
Appuyez sur le congélateur Haut et Bas touches, pour
modifier la température du réfrigérateur ou pour naviguer
dans le menu du panneau de contrôle.
Appuyez sur pour confirmer les sélections effectuées dans
le menu du panneau de commande.
Clignote pour signaler les alertes de l'utilisateur, par
exemple si la porte reste ouverte combinaison avec une
tonalité d'avertissement. Appuyez sur cette touche pour
désactiver la tonalité d'avertissement.
Allumé /
éteint
Menu
Haut/Bas
Réfrigérateur
Affichage
Haut/Bas
Congélateur
OK
Alarm
1
2
3
4
5
6
7
1 2 3 4 5 6 7
CONTRÔLES ET FONCTIONNEMENT
ALLUMER ET ÉTEINDRE L’APPAREIL
PREMIÈRE MISE EN MARCHE
Lorsque l’appareil est branché au réseau électrique mais n’a pas encore été mis en marche, sur
l’écran s’affiche le message
.
Ceci est un message de sécurité pour avertir que l’appareil est allumé alors que tous les boutons
du panneau sont éteints.
Pour mettre en marche tous les compartiments de l’appareil, appuyer pendant 3 secondes sur la
touche Allumé /éteint.
ARRÊT DES COMPARTIMENTS RÉFRIGÉRATEUR ET FRESH ZONE
Appuyer de nouveau sur les mêmes touches pour la remise en marche. Le compartiment
Congélateur reste allumé et ne peut être éteint qu’en arrêtant complètement l’appareil.
Appuyer pendant 3 secondes sur la touche Allumé /éteint.
REMISE EN MARCHE
Appuyer de nouveau sur les mêmes touches pour la remise en marche. Le compartiment
Congélateur reste allumé et ne peut être éteint qu’en arrêtant complètement l’appareil.
Appuyer pendant 3 secondes sur la touche Allumé /éteint .
FR
©2019 Hestan Commercial Corporation
12
ARRÊT PENDANT DE LONGUES PÉRIODES
Durant de très longues périodes d’absence, il est conseillé d’arrêter le réfrigérateur en appuyant
sur la touche Allumé /éteint
pendant 3 secondes et en débranchant la fiche ou en appuyant
sur l’interrupteur omnipo laire qui l’alimente.
Le vider complètement, le nettoyer et l’essuyer et laisser les portes et les bacs partiellement
ouverts afin d’éviter la formation de mauvaises odeurs
Si, au premier démarrage, le message de veille ne s’affiche pas, mais qu’un autre message
apparaît, cela signifie que l’appliance a déjà commencé le processus de refroidissement.
Si des alarmes retentissent, appuyez sur le bouton Alarme
pour les désactiver et laissez
l’appareil fonctionner jusqu’à ce que la température définie soit atteinte.
Lors du premier démarrage, il ne sera pas possible d’utiliser le menu pour modifier les réglages
d’usine tant que la température prédéfinie n’aura pas été atteinte.
Chaque fois que l’appareil est allumé, il effectue une procédure d’autodiagnostic de trois
minutes avant de démarrer complètement.
Si seul le réfrigérateur ou le compartiment à vin est éteint, le ventilateur de ce compartiment
continuera de fonctionner pour empêcher la formation d’odeurs désagréables et de moisissures.
Avant d’éteindre l’appareil pour une longue période, retirez tous les éléments à l’intérieur
et laissez la porte et le tiroir ouverts pour éviter la formation d’odeurs désagréables et de
moisissures.
AJUSTER LES RÉGLAGES DE TEMPÉRATURE
Chaque modèle a été soigneusement testé avant de quitter l’usine et est ajusté pour garantir
des performances élevées et une faible consommation. Généralement, il n’est pas nécessaire
de modifier les paramètres. Néanmoins, en fonction des besoins spécifiques, il est possible de
modifier les températures de consigne dans une certaine plage. Les réglages «recommandés» ci-
dessous sont également les préréglages d’usine pour chacune des zones et modes.
Pour régler la température, utilisez les boutons Haut / Bas
de cette zone. En touchant
ces boutons, la température nouvellement réglée apparaîtra à l’écran. Pour modifier cette
température, utilisez les boutons jusqu’à atteindre la température désirée. Après quelques
secondes d’affichage de la nouvelle température définie, l’affichage reprendra pour indiquer la
température réelle.
Compartiment de réfrigération et
tiroir FreshZone / Freezer en tant
que réfrigération
De 34°F à 46°F [+1°C à +7°C], le réglage de température
recommandé est de 39°F [+4°C].
Tiroir ExtendFresh ou ensemble
FreshZone / Freezer en tant que
FreshZone
28°F à 36°F [−2°C à +2°C]
Le réglage de température recommandé est de 32°F [
0°C]
Compartiment congélateur et
tiroir FreshZone / Freezer en tant
que congélateur
De 9°F à −11°F [−13°C à −23°C], le réglage de température
recommandé est de
0°F [−18°C].
La température réelle peut varier de la température définie à la suite d’ouvertures fréquentes
des portes ou d’insertion d’aliments à température ambiante ou de grandes quantités d’aliments.
6 à 12 heures peuvent être nécessaires pour atteindre la température sélectionnée.
CONTRÔLES ET FONCTIONNEMENT
(SUITE)
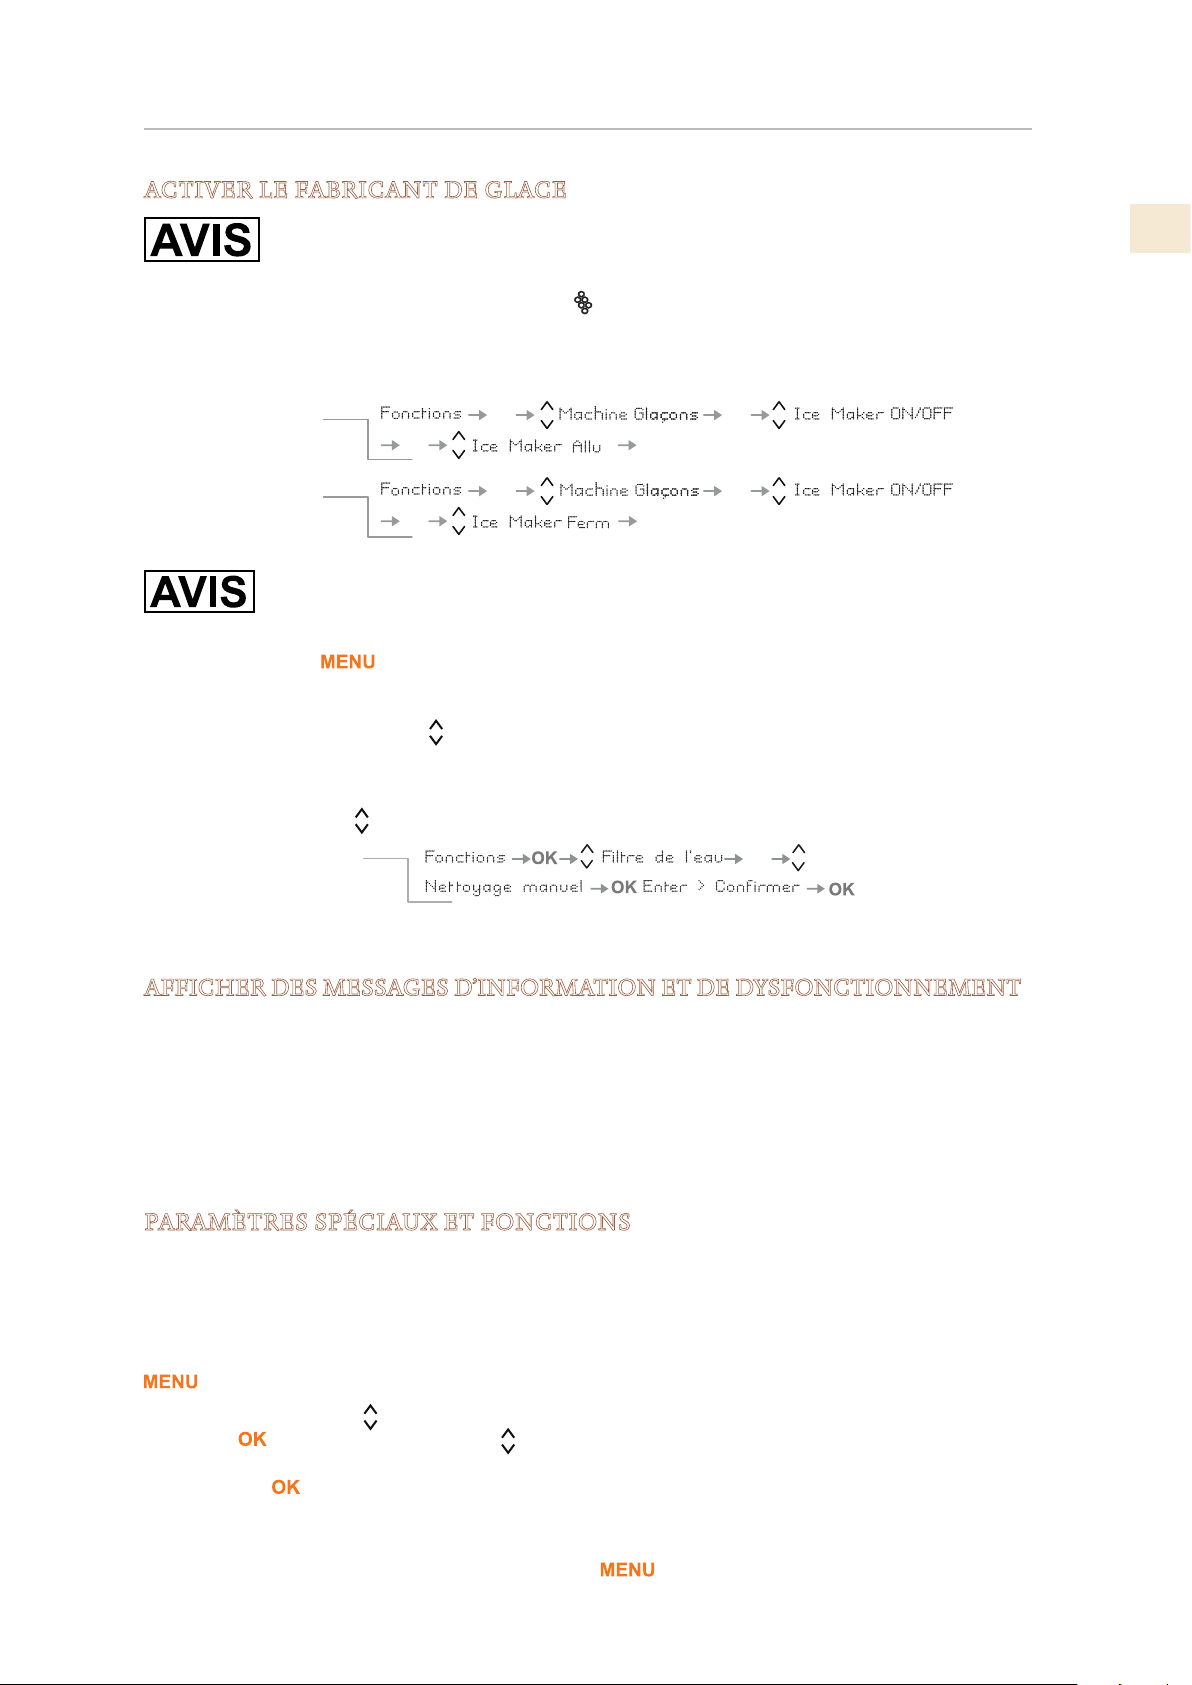
©2019 Hestan Commercial Corporation
13
FR
ACTIVER LE FABRICANT DE GLACE
N’effectuez pas de nettoyage manuel ou d’activation de la machine à glaçons
avant que la conduite d’eau ne soit correctement raccordée et que l’eau soit
alimentée à l’appareil.
KRB / KRP: Le bouton de la machine à glaçons situé sur le panneau de commande principal
active ou désactive la machine à glaçons automatique. Le bouton est allumé lorsque la machine
à glaçons fonctionne.
Autres modèles: utilisez le menu:
Un prélavage du circuit d’eau doit être effectué avant d’activer la machine à
glaçons pour la première fois. Ceci est effectué à l’aide de la fonction
Nettoyage Manuel.
Touchez le bouton pour activer le menu interactif.
L’élément de menu actif est affiché en bas de l’écran. Si «Functions» n’est pas affiché,
utilisez les boutons Haut / Bas
pour afficher les différents choix jusqu’à ce que «Fonctions»
apparaisse.
• Dans les instructions ci-dessous, lorsque le symbole est affiché, cela signifie «utilisez le
bouton Haut / Bas
pour afficher l’élément suivant».
Voir aussi «GESTION DU FILTRE À EAU» à la page 17.
AFFICHER DES MESSAGES D’INFORMATION ET DE DYSFONCTIONNEMENT
Un système de contrôle intégré fournit des informations par le biais de signaux lumineux ou de
messages textuels visualisés à l’écran.
Le signal d’information est toujours visualisé avec un message texte fixe, tandis qu’un signal
de dysfonctionnement est visualisé avec un texte clignotant. Le signal sonore qui accompagne
certains signaux de dysfonctionnement peut être désactivé en appuyant sur le bouton Alarm du
panneau de commande principal.
La liste des signaux de dysfonctionnement se trouve à la fin de ce manuel.
PARAMÈTRES SPÉCIAUX ET FONCTIONS
L’appareil peut être configurée pour répondre à divers besoins grâce à ses paramètres, tels
que ses modes de fonctionnement, sa langue d’affichage et son affichage d’informations. Des
fonctions spéciales sont prévues pour répondre à divers besoins à court terme, tels que des fêtes
ou des vacances.
Les réglages et fonctions sont accessibles sur l’affichage principal en appuyant sur la touche
.
Les boutons Haut / Bas affichent des options qui peuvent être sélectionnées en appuyant sur
le bouton . Les boutons Haut / Bas permettent de faire défiler les fonctions ou les sous-
menus de réglage sélectionnés, le cas échéant, en les activant ou en les désactivant en appuyant
sur le bouton
.
Une fois le réglage ou la fonction confirmé, l’affichage revient automatiquement au menu
précédent pour permettre la sélection d’autres fonctions. Dans de nombreux cas, il est possible
de revenir à la sélection précédente via le bouton
.
OK
OK
OKOK
OK
OK
OKOK
Allumer la
machine à glaçons
Éteindre la
machine à glaçons
OK
Comment effectuer le
nettoyage manuel du
filtre
CONTRÔLES ET FONCTIONNEMENT
(SUITE)
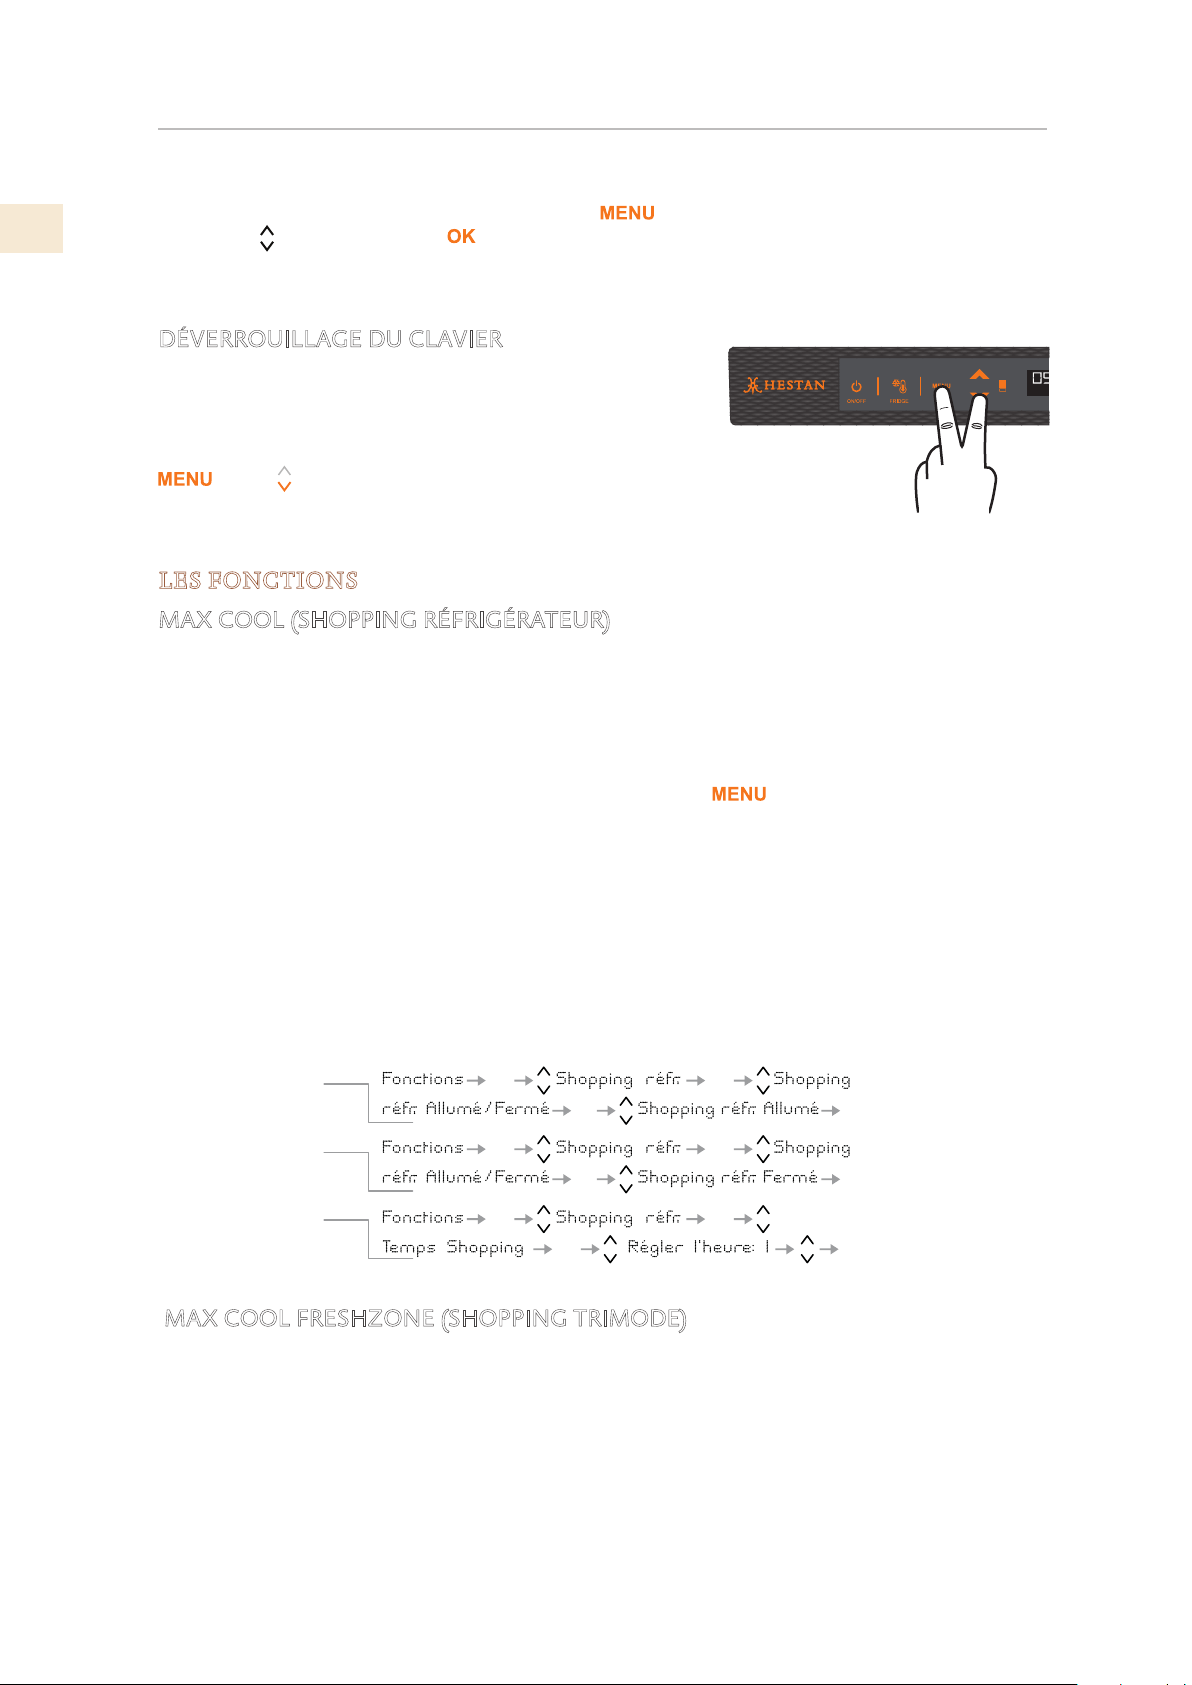
FR
©2019 Hestan Commercial Corporation
14
La langue des messages apparaissant à l’écran peut être modifiée en procédant comme suit:
Entrez dans le Menu en appuyant sur le bouton
, sélectionnez RÉGLAGES via les boutons
Haut / Bas et confirmez avec . Sélectionnez ensuite la fonction Langue et la langue
souhaitée.
Voir aussi: «UTILISATION DES MENUS DE COMMANDE» à la page 5.
DÉVERROUILLAGE DU CLAVIER
Le clavier se verrouille automatiquement après un certain
temps s’il n’est pas utilisé. Lorsqu’il est verrouillé, chaque
pression sur le clavier affichera «CLAVIER VERROUILLÉ».
Pour déverrouiller, appuyez simultanément sur les touches
et Bas pendant plusieurs secondes, jusqu’à ce que
le message «CLAVIER DÉVERROUILLÉ» s’affiche.
LES FONCTIONS
MAX COOL (SHOPPING RÉFRIGÉRATEUR)
Le mode Max Cool prépare les compartiments de refroidissement, Fridge et FreshZone à
l’introduction d’aliments frais ou d’autres articles ayant chauffé pendant le transport. Plus un
article peut être refroidi ou congelé rapidement, mieux il sera conservé.
Ce mode peut également être efficace pour maintenir la température du compartiment tout en
divertissant lorsque des ouvertures supérieures à la moyenne sont prévues.
Pour utiliser des fonctions spéciales, sélectionnez le bouton
et utilisez le boutons Haut /
Bas.
La fonction Max Cool abaisse la température du réfrigérateur à 35,6 °F [+2 °C] pendant 12
heures, ce qui permet de refroidir plus rapidement les aliments que vous venez de placer.
Une fois les 12 heures écoulées, la fonction se désactive automatiquement pour revenir à la
température précédemment réglée.
Vous pouvez définir un délai de 1 à 12 heures avant le démarrage de la fonction. Si une panne de
courant survient alors que MaxCool est actif, l’appliance reprend son fonctionnement normal au
retour du courant.
MAX COOL FRESHZONE (SHOPPING TRIMODE)
Cette fonction doit être activée au moins 24 heures avant d’insérer des articles à la température
ambiante dans le congélateur ou plusieurs heures avant de les placer dans le congélateur. Les
articles précédemment congelés et soumis à une légère élévation de température.
Lorsqu’il est activé, l’appareil fonctionnera en mode de magasinage pendant 56 heures, puis
reviendra au fonctionnement normal. Vous pouvez configurer la fonction pour qu’elle démarre
après un délai de 1 à 12 heures. Si une panne de courant survient alors que le mode MaxCool est
actif, l’appareil reprend son fonctionnement normal lorsque l’alimentation est rétablie.
OK
OK
OK
OK
OK
OK
OK
OK
OK OK
OK
OK
Comment activer
Pour désactiver
Pour commencer
après un délai
CONTRÔLES ET FONCTIONNEMENT
(SUITE)
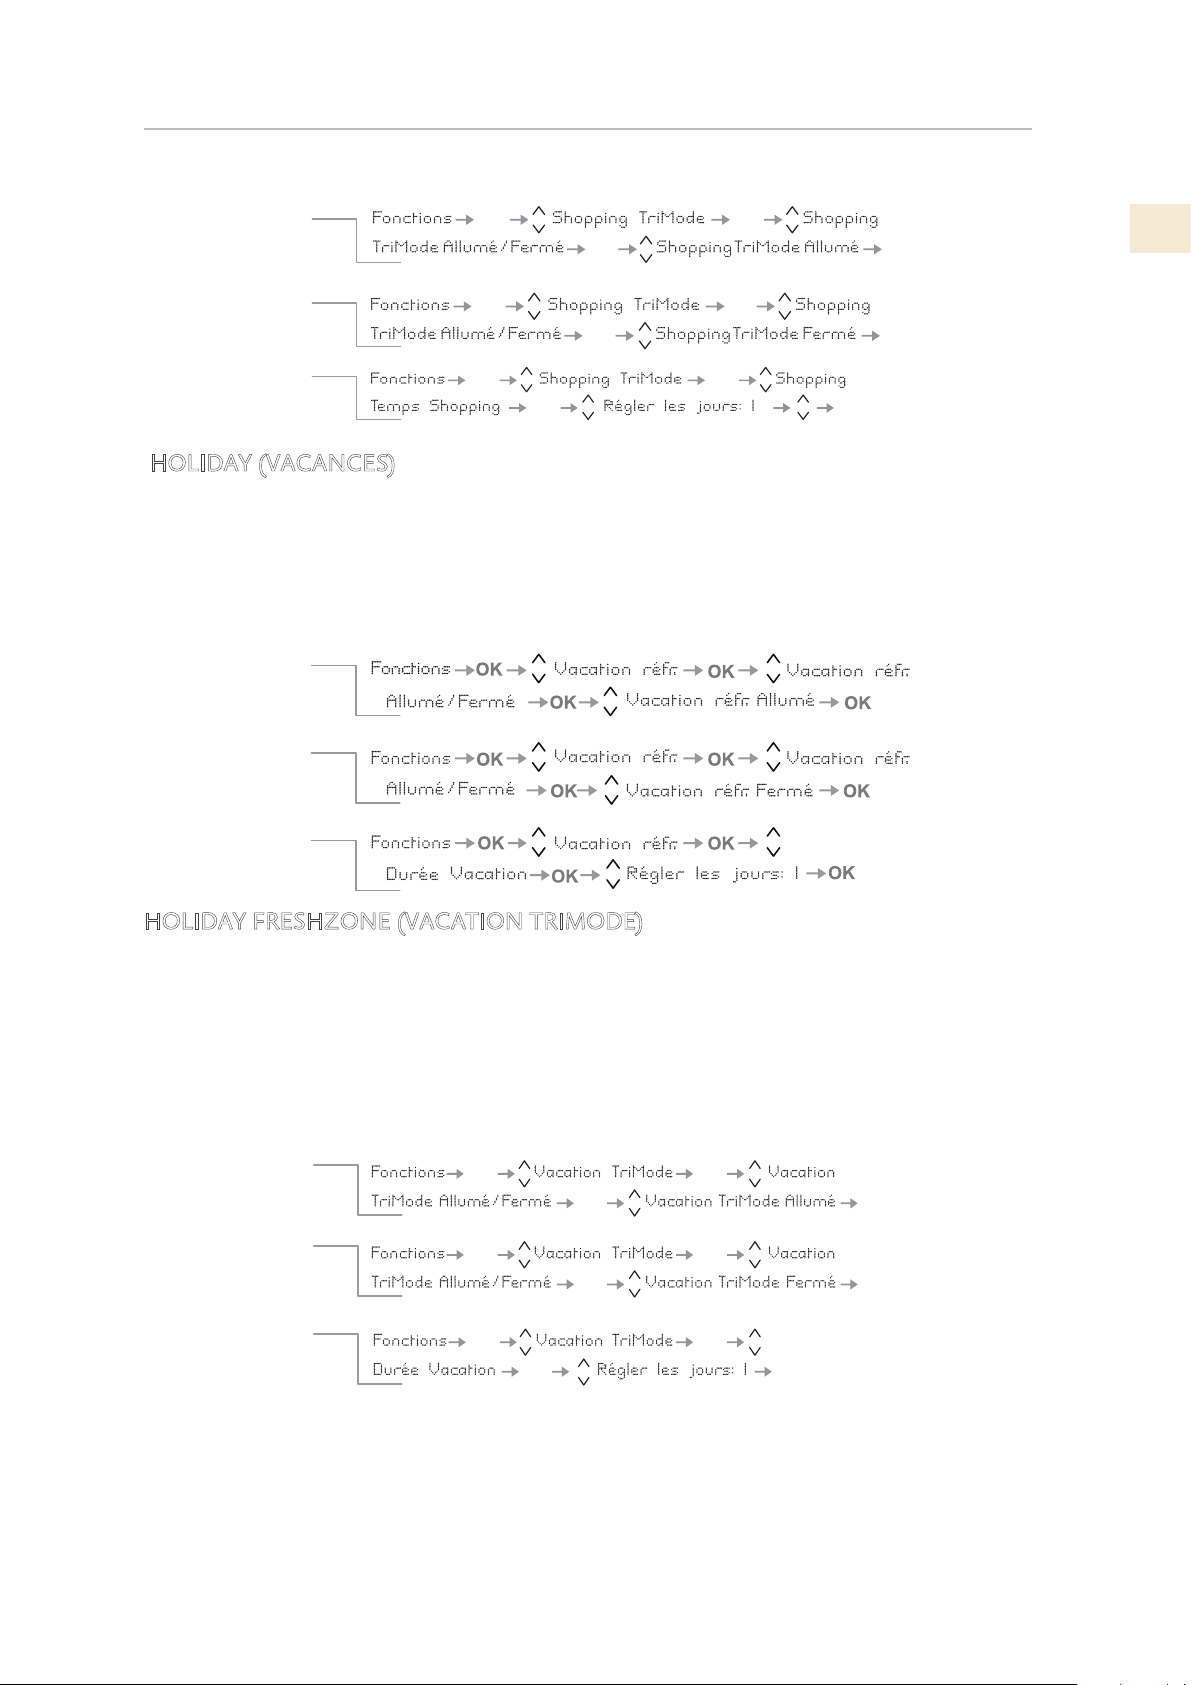
©2019 Hestan Commercial Corporation
15
FR
HOLIDAY (VACANCES)
La fonction (recommandée en cas d’absences prolongées car elle permet une importante
économie d’énergie) amène la température du compartiment réfrigérateur à 57.2°F [+14°C]. Il
est possible d’en programmer la durée, mais peut également être désactivée manuellement après
une longue période d’absence. La fonction reste active même si durant la période d’absence se
vérifie une interruption pro longée du courant. Il est possible de programmer une période allant
de 1 à 90 jours.
HOLIDAY FRESHZONE (VACATION TRIMODE)
Il est possible de programmer la fonction avec un délai de 1 à 12 heures et une durée de 1
à 90 jours. Cette fonction (recommandée en cas d’absences prolongées car elle permet des
économies d’énergie considérables) ramène la température du compartiment FreshZone /
congélateur à une température de 46,4 °F [+8 °C]. Il est possible de programmer la durée ou de la
désactiver manuellement lors d’une nouvelle entrée après une période d’absence.
Cette fonction reste active même si, pendant la période d’absence, il y a une interruption
prolongée de l’alimentation électrique.
Pour désactiver
Pour commencer
après un délai
Comment activer
OK
OK
OK
OK
OK
OK
OK
OK
OK
OK OK
OK
Comment activer
Pour désactiver au
retour des vacances
Pour programmer la
durée
OK
Pour désactiver au
retour des vacances
Comment activer
Pour programmer la
durée
OK OK
OK
OK
OK
OK
OK OK
OK
OK
O
K
CONTRÔLES ET FONCTIONNEMENT
(SUITE)
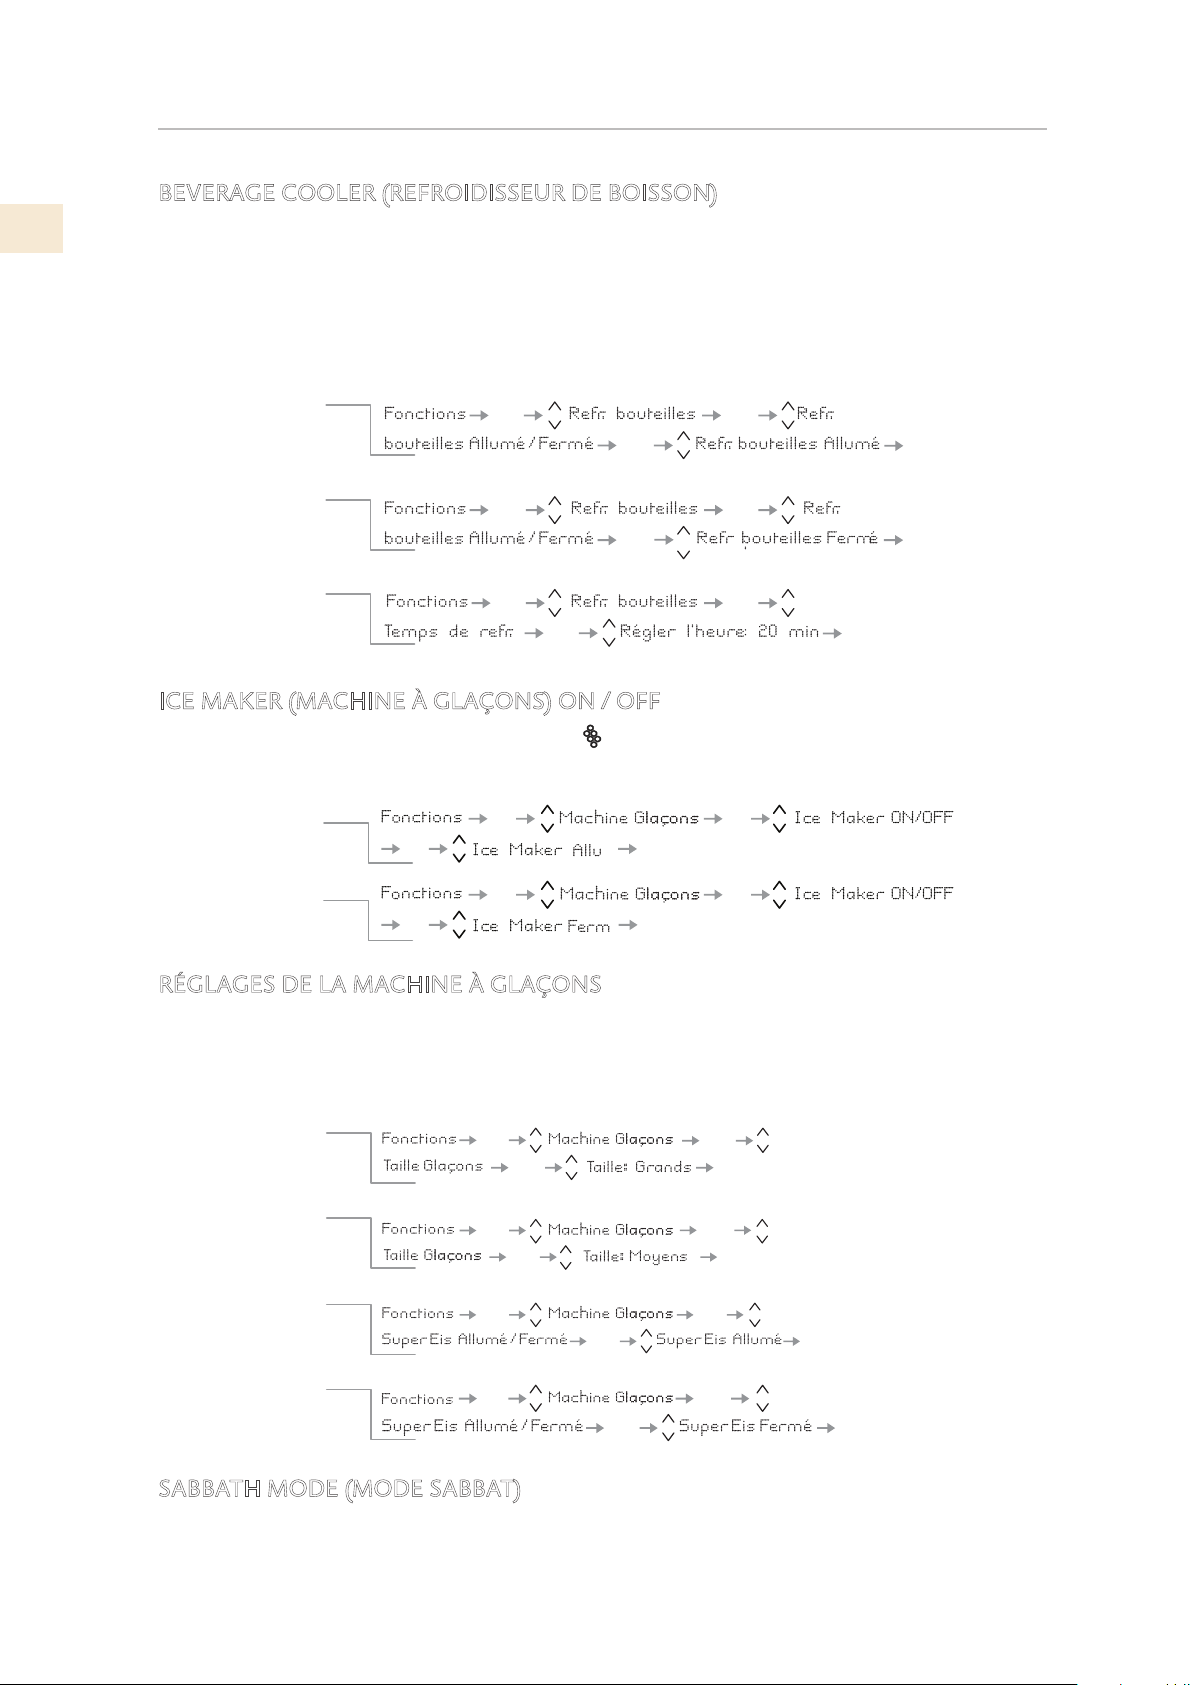
FR
©2019 Hestan Commercial Corporation
16
BEVERAGE COOLER (REFROIDISSEUR DE BOISSON)
Cette fonction peut être activée lorsqu’il est nécessaire de refroidir rapidement les boissons en
les plaçant à l’intérieur du compartiment congélateur.
Il est possible de choisir une durée de 1 à 45 minutes. Un signal sonore indiquera que la
température optimale a été atteinte. Après avoir retiré les boissons, désactivez le signal sonore
en appuyant sur le bouton Alarme.
ICE MAKER (MACHINE À GLAÇONS) ON / OFF
Certains modèles ne disposent pas du bouton (Machine à glaçons) sur le panneau de
commande et la machine à glaçons peut être activée ou désactivée à l’aide des fonctions du
menu.
RÉGLAGES DE LA MACHINE À GLAÇONS
La fonction Ice Maker permet de sélectionner la taille des glaçons, en choisissant entre Large
(réglage de base) ou Moyen, et d’activer la fonction Fast Ice, qui augmente la quantité de glace
produite. La fonction Fast Ice se désactive automatiquement après 24 heures.
SABBATH MODE (MODE SABBAT)
La fonction permet de respecter certaines obligations religieuses imposant que le
fonctionnement de l’appareil ne soit pas affecté par l’ouverture ou la fermeture des portes (la
commande thermostatique, l’éclairage intérieur et la machine à glaçons sont désactivés).
OKOK
OK
OK
OK
OK OK
OK
OK
OK
OK
O
K
Pour désactiver
Comment activer
Pour programmer la
durée
OK
OK
OKOK
OK
OK
OKOK
Allumer la
machine à glaçons
Éteindre la
machine à glaçons
OK
OK
OK
OK
OK OK
OK
OK
OK
OK
OK OK
OK
OK
OK
OK
Pour obtenir de
petits glaçons
Pour obtenir de
grands glaçons
Comment activer la
fonction SuperIce
Comment désactiver
la fonction SuperIce
CONTRÔLES ET FONCTIONNEMENT
(SUITE)
©2019 Hestan Commercial Corporation
17
FR
Lorsque vous activez le mode sabbat, l’éclairage intérieur se désactive et l’écran affiche «Mode
sabbat activé». Lorsque vous désactivez le mode Sabbat, l’appareil reprend son fonctionnement
normal, à l’exception des menus qui ne seront pas disponibles pendant plusieurs minutes.
GESTION DU FILTRE À EAU
Les fonctions suivantes affichent la durée de vie du filtre, permettent de contourner le filtre et
fournissent un rinçage / nettoyage manuel du filtre et de la machine à glace.
Etat du Filtre et réinitialisation du compteur
Pour afficher la durée de vie restante et réinitialiser le compteur après avoir changé la cartouche
filtrante.
Dérivation du Filtre
Cette fonction est activée lorsqu’il n’est pas nécessaire de filtrer l’eau, car la qualité de l’eau de
l’installation hydraulique domestique est déjà excellente.
Rinçage Manuel
Si la machine à glaçons est éteinte ou n’est pas utilisée pendant une longue période, il est
conseillé d’effectuer une fonction de rinçage manuel pour éliminer l’eau qui a été contenue dans
le système pendant cette période. Répétez jusqu’à ce que l’eau soit claire. Avant de continuer, il
est important d’éteindre la machine à glace en appuyant sur le bouton
ou en utilisant le menu.
(Voir page précédente.)
Positionnez correctement le bac à glaçons ou un autre récipient approprié sous la machine à
glaçons pour recueillir l’eau, puis fermez le tiroir. À la fin de l’opération, lavez le plateau.
OK
OK
OK
OK
OK
OK
OK
OK
Comment désactiver
Comment activer
OK
Vérifier l'état du
filtre à eau
Réinitialiser le compteur
de durée de vie du filtre
Comment régler le
compteur d'eau filtrée à
zéro
Comment vérifier l'état
du filtre
La fonction Réinitialiser le filtre met le compteur d'utilisation du filtre à
zéro. Faites ceci lors du remplacement de la cartouche filtrante.
La fonction État Filtre affiche la durée de vie restante du filtre.
Comment désactiver le
Bypass du filtre
Comment activer le
Bypass du filtre
OK
Comment effectuer le
nettoyage manuel du
filtre
CONTRÔLES ET FONCTIONNEMENT
(SUITE)
FR
©2019 Hestan Commercial Corporation
18
SETTINGS (RÉGLAGES)
Les paramètres suivants contrôlent les modes de fonctionnement, l’affichage d’informations, etc.
Pour afficher ou modifier les paramètres, sélectionnez le bouton
, utilisez les boutons Haut
/ Bas pour sélectionnez RÉGLAGES via les boutons Haut / Bas et confirmez avec .
CONGÉLATEUR / TIROIR FRESHZONE
RÉGLER LA DATE, MONTRER / NON MONTRER LA DATE
L’affichage indique la date au format jj: mm: aa (jour: mois: année), le jour clignote.
Utilisez les boutons Haut / Bas
pour modifier le paramètre, confirmez-le avec pour passer
au paramètre suivant. Une fois l’année confirmée, la date sera fixée.
RÉGLAGE DE L’HEURE
L’affichage indique les heures et les minutes au format hh: mm et avec hh: clignotant. Utilisez
les boutons Haut / Bas
pour modifier le paramètre, puis confirmez en appuyant sur pour
passer au paramètre suivant. Une fois les minutes confirmées, l’heure sera réglée.
RÉGLLAGE DE L’AFFICHAGE À 12/24 HEURES
OK
OK
OK
OK
OK
OK
OK
OK
OK
OK
OK
OK
OK
Options de tiroir de
congélateur / ExtendFresh
Comment le configurer
pour le mode Fridge
Comment le configurer
pour le mode ExtendFresh
Comment revenir en
mode congélateur
Le compartiment congélateur peut, si nécessaire, être
converti en mode de fonctionnement réfrigération ou
ExtendFresh.
OK
OK
OK OK
OK
OK
OK
OK OK
OK
OK
OK
OK
Montrer la date
Comment
configurer la date
Comment
activer la date
Comment
désactiver la date
En utilisant cette fonction, il est possible de désactiver
/ activer la date affichée à l’écran.
OK
OK
OK
OK
OK
Comment régler l'heure
OK
OK
OK
OK
OK
OK
OK
OK
Régler l’affichage
Sur 12 heures
Régler l’affichage
Sur 24 heures
CONTRÔLES ET FONCTIONNEMENT
(SUITE)
©2019 Hestan Commercial Corporation
19
FR
POUR AFFICHER OU NE PAS AFFICHER L’HEURE
AFFICHAGE DE LA LANGUE
La fonction permet de choisir la langue dans laquelle sont visualisés les messages à l’écran.
UNITÉS DE TEMPÉRATURE
Sélectionnez Centigrade ou Fahrenheit pour les valeurs de réglage de la température et
l’affichage.
VERROUILLAGE DU CLAVIER
ON: le clavier se verrouille après plusieurs minutes d’inutilisation.
OFF: Le clavier ne se verrouille pas automatiquement.
RESTAURATION DES PARAMÈTRES PAR DÉFAUT
Ceci restaure les paramètres de base configurés en usine en annulant les modifications apportées
par la suite.
ATTENTION: Si les paramètres par défaut sont restaurés, le mode par défaut du compartiment
congélateur / FreshZone est le mode congélateur.
Si vous l’utilisiez auparavant en mode réfrigérateur ou en mode Fresco, veillez à le réinitialiser au
réglage souhaité.
Comment activer
l’heure permanente
Comment désactiver
l’heure permanente
Anglais
Français
Allemand
Espanol
Italien
CCoommmmeenntt rréégglleerr llaa
tteemmppéérraattuurree eenn CCeellssiiuuss
CCoommmmeenntt rréégglleerr llaa
eemmppéérraattuurree eenn ddeeggrrééss
FFaahhrreennhheeiitt
tt
Blocage Clavier
Blocage Clavier
Blocage clavier
Avec cette fonction il est possible d’activer/désactiver le blocage de le clavier.
C
Comment activer
oommmmeenntt ddééssaaccttiivveerr
OK
OK
OK
Pour rétablir les
réglages de base
CONTRÔLES ET FONCTIONNEMENT
(SUITE)
FR
©2019 Hestan Commercial Corporation
20
DISPOSITION INTERNE
TIROIRS À LA FRESHZONE, BASSE TEMPERATURE
Chaque tiroir est maintenu aux guides coulissants par une vis à
serrage de chaque côté. Relâchez la vis pour retirer le tiroir.
Pour retirer le tiroir FreshZone interne, dévissez et retirez les vis à
serrage.
Lors du remplacement du tiroir, assurez-vous que l’arrière du tiroir
s’engage sous les clips des guides coulissants. Une fois le tiroir en
place, réinstallez les vis à serrage car elles sont nécessaires pour
maintenir en place.
LE BAC À GLAÇONS
Le bac à glaçons est situé dans le tiroir supérieur du compartiment
congélateur.
Après le retrait, assurez-vous de le repositionner correctement - les
petites saillies du fond du bac à glaçons doivent être alignées sur les
trous du tiroir supérieur du congélateur.
Ne placez pas vos mains ou vos doigts près de la machine à glaçons lorsque celle-ci fonctionne.
ÉTAGÈRES RÉGLABLES
Il est recommandé de vider les étagères avant de régler la
position. Les étagères peuvent glisser de haut en bas et peuvent
être facilement repositionnées par l’utilisateur comme suit:
1) Desserrez légèrement le petit bouton de verrouillage (situé
sous la tablette, à gauche à l’arrière) en le tournant dans le
sens anti-horaire.
2) Soutenez l’arrière de l’étagère et inclinez-la vers le haut à
l’avant. Cela vous permettra de lever ou d’abaisser l’étagère à
la position souhaitée.
3) Une fois en position, abaissez l’avant de l’étagère et serrez le
bouton de verrouillage.
• Le bouton de verrouillage maintient la tablette verrouillée en toute sécurité. Si le bouton
de verrouillage est desserré, la tablette pourrait glisser vers le bas si elle était levée ou
inclinée vers le haut à l’avant.
Pour retirer une étagère:
1) Il est nécessaire de retirer les capuchons supérieurs des échelles gauche et droite.
2) Puis en inclinant l’avant de l’étagère vers le haut et en la faisant glisser vers le haut.
• Il n’est pas nécessaire de retirer les étagères pour le nettoyage.
BACS DE PORTE
Les bacs de porte sont ajustés en soulevant le bac et en le glissant
dans la position souhaitée. La corbeille inférieure de la porte a
un support de retenue pour empêcher les articles plus grands
de tomber. Les bacs de la porte supérieure ne disposent pas du
support et sont destinés à stocker des articles plus courts.
Les bacs de porte sont facilement amovibles pour le nettoyage.
Pour retirer un bac de la porte, retirez les capuchons supérieurs
des échelles gauche et droite, puis faites-le glisser vers le haut et
vers l’extérieur.
©2019 Hestan Commercial Corporation
21
FR
DISPOSITION INTERNE
(SUITE)
UTILISATION LA MACHINE À GLAÇONS
Pour activer la machine à glaçons après l’installation de l’appareil, appuyez sur le bouton (modèles
KRB, KRP) ou en utilisant le menu (autres modèles). Voir «RÉGLAGES DE LA MACHINE À
GLAÇONS» à la page 16.
Veuillez noter que 12 à 24 heures sont nécessaires avant que la production de glace puisse
commencer. La production est de 10 cubes par cycle en environ 10 cycles en 24 heures.
Le rendement dépend de la température réglée dans le congélateur, de la température ambiante
et de la fréquence d’ouverture de la porte. Si l’appareil fonctionne sans être raccordé au système
d’alimentation en eau, assurez-vous que la machine à glaçons est désactivée en appuyant sur le
bouton
(modèles KRB, KRP) ou en utilisant le menu (autres modèles).
La machine à glaçons produit de la glace jusqu’à ce que le bac à glaçons soit plein et s’arrête
automatiquement une fois le niveau maximum atteint.
Avec la fonction Fast Ice, il est possible d’augmenter la quantité de glace produite en 24 heures,
tandis que la fonction Set Cube Size permet de sélectionner la taille des glaçons produits.
Aux réglages d’usine, la machine à glaçons peut produire env. 100 glaçons dans les 24 heures.
Si la glace n’est pas utilisée fréquemment, il est conseillé de vider le bac à glace une
fois tous les 8 à 10 jours.
Il est normal que des glaçons se collent les uns aux autres. Si la glace n’est pas fréquemment utilisée,
les plus vieux cubes peuvent devenir opaques, avoir un goût désagréable et devenir plus petits.
La machine à glaçons se désactive automatiquement si et quand la fonction Vacances est activée.
Lorsque la machine à glaçons est démarrée pour la première fois, il est recommandé de jeter le
premier bac rempli de glaçons.
Si l’équipement est éteint depuis un mois ou plus, il est recommandé d’effectuer un cycle de
nettoyage à l’eau.
Modèles KRB / KRP: La machine à glaçons ne produira de la glace que si le compartiment Fresh Zone
est réglé sur le mode congélateur.
Tous les modèles: La machine à glaçons continuera à fonctionner même lorsque le bac à glaçons n’est
pas en place.
Les glaçons ont-
ils une odeur
inhabituelle?
La glace est un matériau poreux capable d’absorber les odeurs de l’environnement.
Les glaçons qui sont dans le bac à glaçons depuis longtemps peuvent absorber les
odeurs, rester collés et devenir plus petits. Nous recommandons de ne pas utiliser de
vieux glaçons.
Autres moyens de prévention des odeurs:
Le bac à glaçons doit être nettoyé occasionnellement avec de l’eau tiède. Assurez-
vous d’éteindre la machine à glaçons avant de vider le récipient. Rincer et essuyer.
Vérifiez le contenu du congélateur pour voir si des aliments sont gâtés ou périmés.
Tous les aliments odorants doivent être soigneusement emballés ou stockés dans des
récipients hermétiques pour éviter l’accumulation d’odeurs.
Il est possible que le filtre à eau doive être remplacé dans certains modèles.
Dans certains cas, la qualité de la connexion d’eau dans la maison devrait être
vérifiée.
Bruits de
fonctionnement,
sons normaux
Grommelant: l’unité de réfrigération est en marche. Le ventilateur du système d’air
recyclé est en marche.
Bulles, bourdonnements ou gargouillis: le réfrigérant circule dans les conduites de
refroidissement.
En cliquant: le moteur est allumé ou éteint. L’électrovanne sur le raccordement d’eau
est en train de s’ouvrir / se fermer.
Grondement: des glaçons tombent dans le bac à glaçons.
Remarque: l’appareil est alimenté par deux compresseurs indépendants. Il est donc
normal d’avoir toujours l’un des deux compresseurs en fonctionnement.
Ne placez pas de bouteilles ni d’aliments à refroidissement rapide dans le bac à glaçons.
La machine à glaçons peut être bloquée et endommagée.
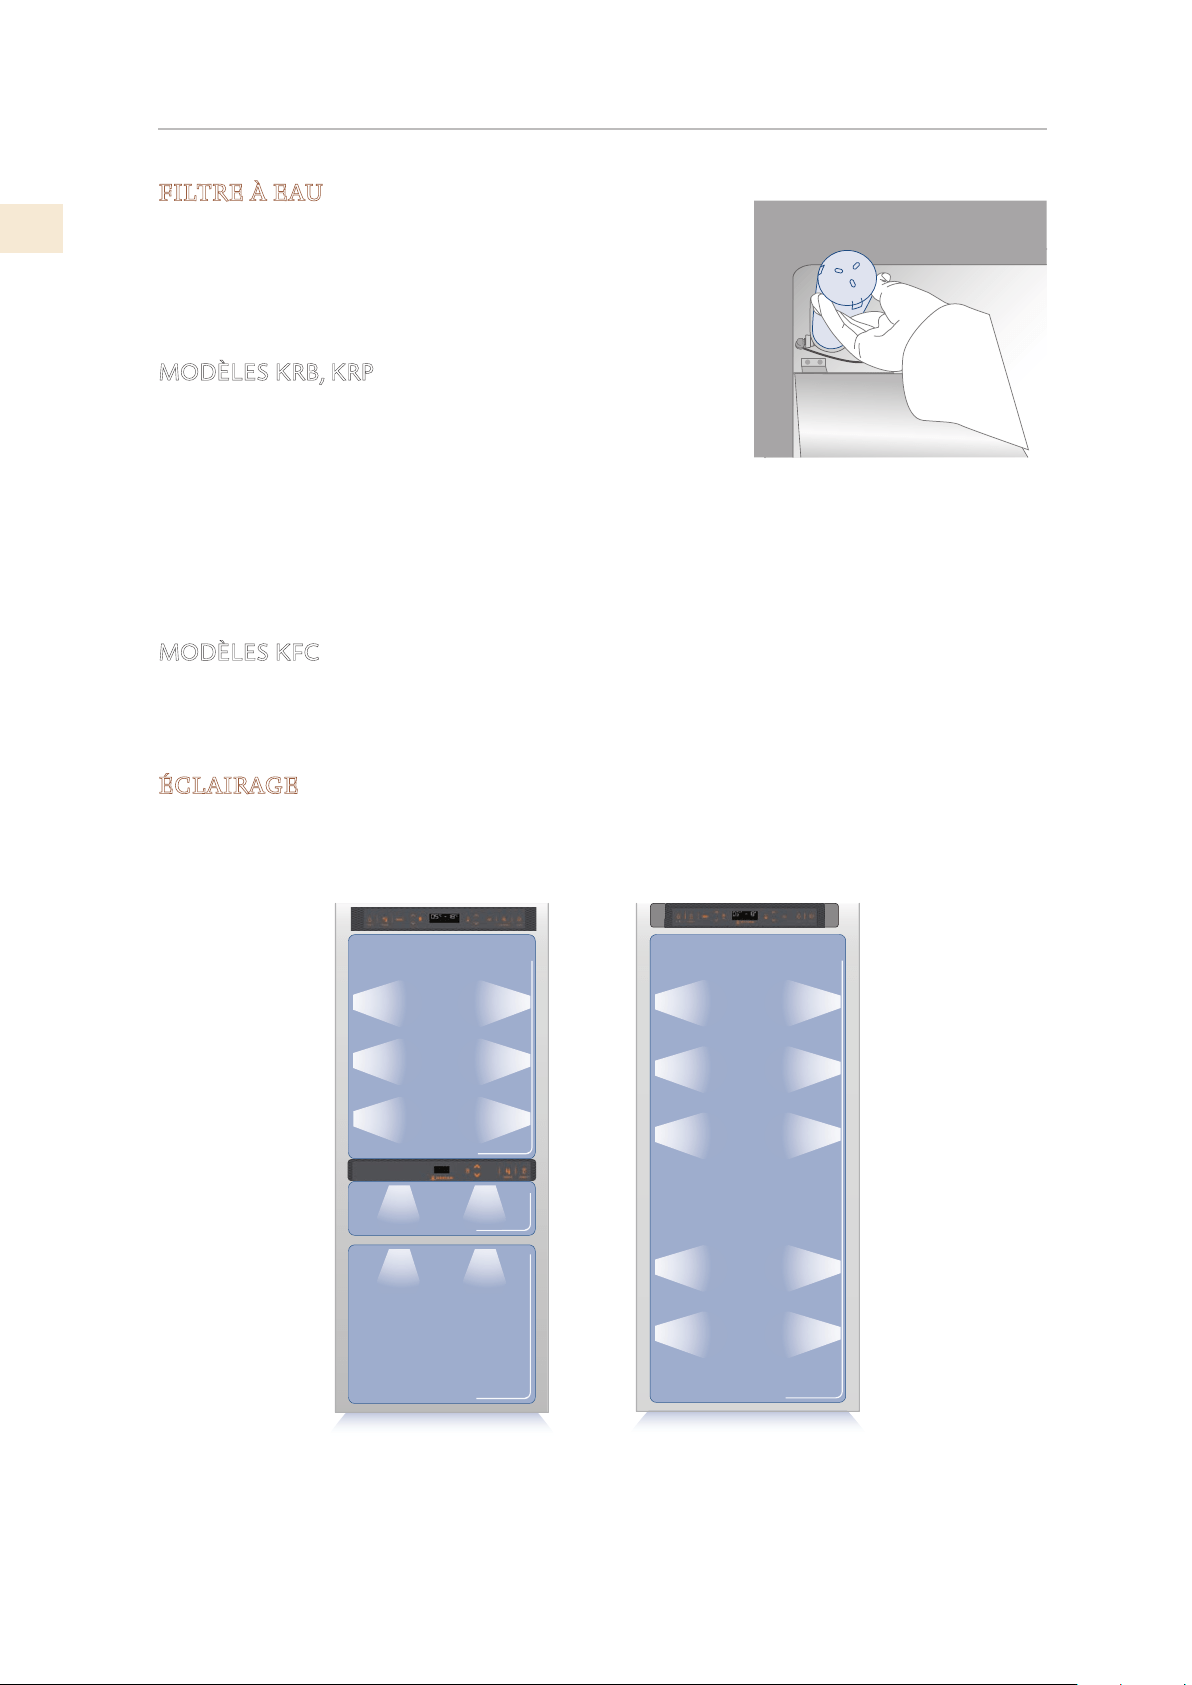
FR
©2019 Hestan Commercial Corporation
22
DISPOSITION INTERNE
(SUITE)
FILTRE À EAU
Le filtre à eau fournit une eau de haute qualité pour la
production de glaçons. Il fournit jusqu’à 1056 gallons [4000
litres] d’eau pour une durée maximale de 12 mois.
Lorsque le filtre a presque expiré, le message «Remplacer la
cartouche filtrante» apparaît à l’écran.
MODÈLES KRB, KRP
Le filtre est situé dans le compartiment réfrigérateur, au-
dessus du panneau de verre supérieur. Avant de changer le
filtre, éteignez la machine à glaçons en appuyant sur le bouton
Machine à glaçons.
Ouvrez le panneau de verre supérieur et faites tourner la cartouche filtrante avec précaution
d’un quart de tour dans le sens anti-horaire jusqu’à ce qu’elle se détache de son logement. Il
est normal qu’une petite quantité d’eau sorte. Retirez le capuchon de la nouvelle cartouche
et insérez-la dans le boîtier en la tournant doucement d’un quart de tour dans le sens horaire
jusqu’à ce qu’elle s’enclenche.
MODÈLES KFC
Le filtre est situé à l’extérieur ou dans l’unité, placé et monté par l’installateur dans l’armoire.
La même cartouche filtrante est utilisée que dans le KRP / KRB ci-dessus et est remplacée de la
même manière.
ÉCLAIRAGE
L’éclairage est fourni à l’aide de bandes et de spots LED pour illuminer complètement l’intérieur.
En cas de dysfonctionnement ou de panne, contactez Hestan pour réparation.
.
I
C
E
MA
K
E
R
E
N
T
E
R
F
R
I
D
G
E
U
N
IT
C
R
IS
P
E
R
©2019 Hestan Commercial Corporation
23
FR
LA CONSERVATION DES ALIMENTS
Votre réfrigérateur est conçu pour garantir des températures précises et constantes ainsi que des
taux d’humidité appropriés dans tous les compartiments.
En outre, le système de réfrigération garantit que les aliments surgelés et la glace ne absorbent
pas l’odeur des aliments frais et que l’humidité du réfrigérateur ne gèle pas et ne forme pas de
givre.
Néanmoins, pour bien conserver tous vos aliments, il ne suffit pas d’avoir un excellent
réfrigérateur. Il est également nécessaire de connaître les règles pour conserver correctement les
aliments.
N’oubliez pas que tous les aliments vont inévitablement changer de caractéristiques avec
le temps. Ce changement commence bien avant la consommation des aliments, car ceux-ci
contiennent des micro-organismes qui se multiplient et peuvent provoquer une détérioration.
Ce processus se produit plus rapidement en raison d’une mauvaise manipulation, des
températures de conservation et des taux d’humidité.
Il est donc recommandé de suivre les instructions présentées ci-dessous, qui permettront
d’utiliser votre réfrigérateur / congélateur de la manière la plus efficace et la plus sûre pour
conserver vos aliments de la meilleure façon possible le plus longtemps possible.
Vérifiez périodiquement que tous les aliments sont en parfait état de conservation. Il est
généralement évident qu’un produit alimentaire est détérioré en raison de la moisissure, d’une
odeur désagréable et d’un aspect désagréable. Néanmoins, il existe des cas dans lesquels ces
conditions ne sont pas si évidentes. Si vous pensez qu’un produit alimentaire a été conservé
pendant une période excessive et peut être détérioré, ne le consommez pas et ne le goûtez
même pas, même s’il semble être toujours en bonne santé, car les bactéries responsables de la
dégradation des aliments empoisonnement et maladie
En cas de doute, jetez la nourriture.
COUPURES DE COURANT
Après une interruption prolongée de l’alimentation électrique, une fois que l’alimentation
électrique est réactivée, un signal sonore indique si la température a dépassé les niveaux
normaux. En plus de cela, l’écran affiche pendant une minute la température la plus élevée
détectée à l’intérieur des compartiments, afin de permettre à l’utilisateur de décider de la
meilleure utilisation des aliments.
Après une minute, l’affichage reprendra son fonctionnement normal, tandis que le bouton
Alarme
continuera à clignoter.
Appuyez sur le bouton Alarm pour afficher les températures les plus élevées enregistrées.
Basse Température
Réfrigérateur
de +1° à +7 °C
[de 34°F à 46°F]
Congélateur
de -13° à -23 °C
[de 9°F à -11°F]
de +1° à +7 °C
[de 34°F à 46°F]
Réfrigérateur
Basse température
Congélateur
de -13° à -23 °C
[de 9°F à -11°F]
FR
©2019 Hestan Commercial Corporation
24
LA CONSERVATION DES ALIMENTS
(SUITE)
LORS DE L’ÉPICERIE
Prenez toujours les précautions suivantes:
• Placez tous les emballages de viande, de poisson ou de volaille crus dans des sacs en
plastique afin qu’ils ne s’égouttent pas sur d’autres aliments.
• Achetez la viande, la volaille et le poisson en dernier. Ne laissez pas vos courses dans une
voiture chaude après vos achats. Conservez un sac de congélation dans votre voiture et
utilisez-le en cas de températures très élevées ou de longs trajets.
• Vérifiez les dates de production et les heures de péremption des aliments pour vous assurer
qu’ils sont frais.
• Faites très attention lorsque vous achetez des aliments frais et achetez uniquement une
quantité pouvant être consommée pendant votre période de conservation planifiée.
• Lorsque cela est possible, laissez les aliments chauds s’adapter à la température de la pièce
pendant deux heures au maximum avant de les placer au réfrigérateur, à moins que vous
n’ayez activé la fonction MaxCool auparavant.
PRÉCAUTIONS
Vérifiez la température de réfrigération des différents compartiments du panneau de commande:
La température du réfrigérateur doit être inférieure ou égale à 45°F [+8° C] et la température du
congélateur doit être égale à 0° F [−18° C].
Suivez les recommandations concernant les temps de conservation et les températures indiquées
dans les tableaux à suivre.
Conservez la viande, le poisson et la volaille crus à l’écart des autres aliments et évitez toute
perte de jus.
LORSQUE VOUS PLACEZ DES ALIMENTS DANS
Lors de la mise au réfrigérateur de votre viande, de votre poisson ou de votre volaille, laissez-
les dans leur emballage d’origine, à moins que l’emballage ne soit déchiré ou perforé. Des
manipulations répétées pourraient introduire des bactéries dans ces aliments.
Pour conserver les aliments au congélateur, il est conseillé d’utiliser des récipients de
congélation.
Étiqueter et dater les colis
Veillez à positionner correctement les aliments sur les étagères de manière à ne pas obstruer les
orifices de circulation d’air à l’intérieur du compartiment.
HUMIDITÉ ET CONDENSATION
Lorsqu’un taux d’humidité élevé est présent dans l’environnement ou dans les aliments placés
dans les tiroirs ExtendFresh, le fond du compartiment ExtendFresh peut être recouvert d’eau ou
de glace (si la température est réglée entre 32° F et 28° F [
0° C et −2° C] ).
Cette condition est normale et est due au taux d’humidité élevé du compartiment ExtendFresh;
Une humidité élevée associée à des températures basses est ce qui garantit une conservation
plus longue des aliments.
L’eau ou la glace peuvent disparaître d’elles-mêmes si le taux d’humidité de l’air devait baisser.
il est également possible de retirer l’eau avec une serviette. Si une fine couche de glace s’est
formée, réglez la température du compartiment ExtendFresh sur 35° F [+
2 ° C] et au bout d’une
journée, retirez l’eau à l’aide d’une serviette.
Si la couche de glace est plus épaisse, il peut être nécessaire de fermer le compartiment
ExtendFresh pendant une journée pour le faire fondre.
©2019 Hestan Commercial Corporation
25
FR
LA CONSERVATION DES ALIMENTS
(SUITE)
DURÉE DE STOCKAGE RECOMMANDÉE
Viandes crues
Gros morceau
Steaks, volaille et gibier
Viande hachée
Carpaccio
4 jours
3 jours
1-2 jours
Tout de suite
Viandes cuites
Bouillies et rôties
Ragoût de viande
Compartiment Réfrigérateur
2 jours
Compartiment Réfrigérateur
6 jours
Poisson
Poisson cru et cuit
Compartiment ExtendFresh
2 jours
Autre
Soupes, soupe aux légumes et bouillon
Pâtes
Compartiment Réfrigérateur
Compartiment Réfrigérateur
2 jours
2 jours
Charcuterie ouverte
Compartiment ExtendFresh
3 jours
Fromages frais
Fromages secs bien protégés
Compartiment ExtendFresh
Compartiment Réfrigérateur
2-3 jours
Quelques
mois
OEufs (frais et non lavés) Compartiment Réfrigérateur 2 semaines
Boîte ouverte Compartiment Réfrigérateur 2-3 jours
Légumes crus (dans des sachets perforés)
Compartiment ExtendFresh
1 semaine
ALIMENTS FRAIS ZONE DE CONSERVATION TEMPS
Compartiment ExtendFresh
Compartiment ExtendFresh
Compartiment ExtendFresh
Compartiment ExtendFresh

FR
©2019 Hestan Commercial Corporation
26
LA CONSERVATION DES ALIMENTS
(SUITE)
ALIMENTS CONGELÉS ZONE DE CONSERVATION TEMPS
Viandes de boeuf, d’agneau et
de chevreau
Compartiment Congélateur (steaks)
6-12 mois
Viandes de boeuf, d’agneau et
de chevreau
Compartiment Congélateur
(viandes avec os) 4-6 mois
Viande de boeuf hachée Compartiment Congélateur
1-2 mois
Viandes de porc Compartiment Congélateur (sans os)
4-6 mois
Viandes de porc
Compartiment Congélateur (avec os)
2-3 mois
Viande de porc hachée
Compartiment Congélateur
Restes de viande
Poule et dinde entiers
Oie, canard et pintade
8-12 mois
4-8 mois
Poisson
Crustacés
Aliments cuits 1-2 mois
Légumes
Fruits
Gâteaux et tartes
8-12 mois
6-12 mois
2-3 mois
1-2 mois
2-3 mois
1-2 mois
2-3 mois
Compartiment Congélateur
Compartiment Congélateur
Compartiment Congélateur
Compartiment Congélateur
Compartiment Congélateur
Compartiment Congélateur
Compartiment Congélateur
Compartiment Congélateur
Compartiment Congélateur
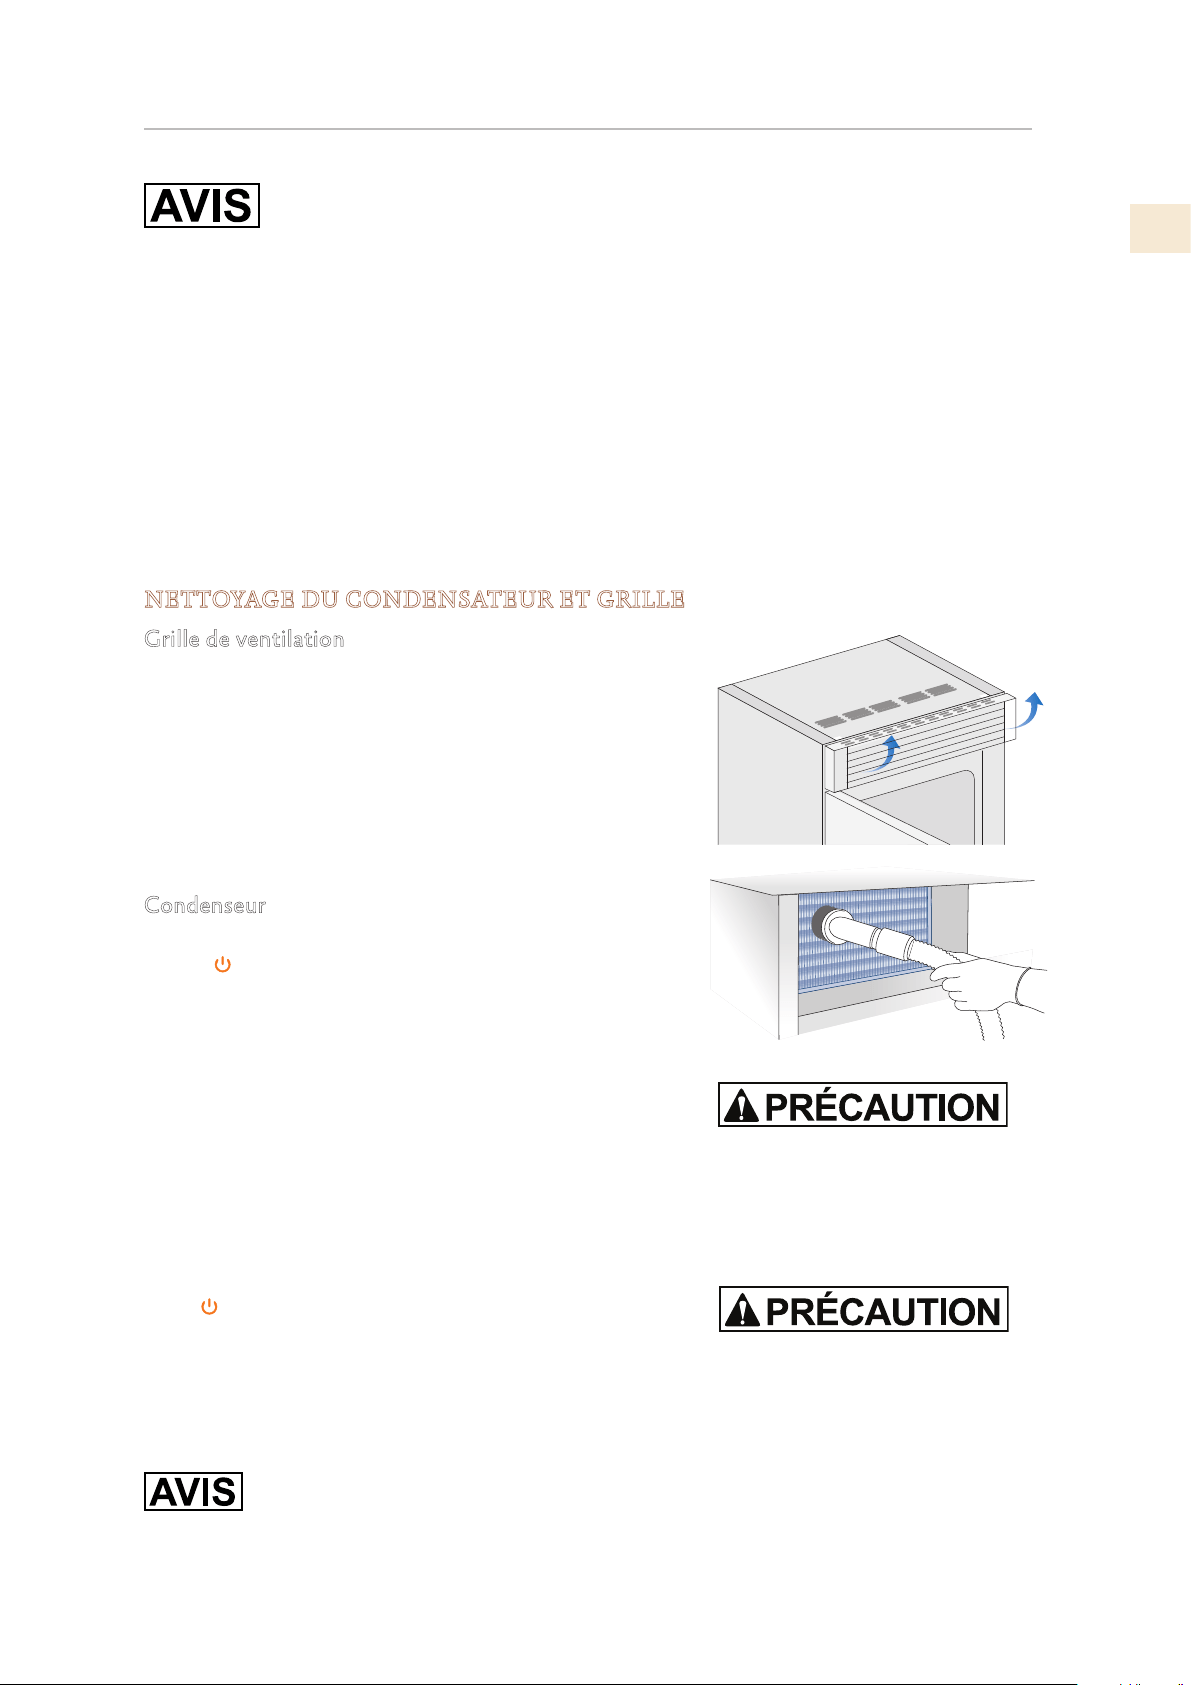
©2019 Hestan Commercial Corporation
27
FR
ENTRETIEN ET NETTOYAGE
Pour nettoyer les pièces en acier, utilisez un chiffon en microfibre et l’éponge
fournie dans le kit avec l’appareil. Toujours utiliser le chiffon et l’éponge dans le
sens de la finition satinée de l’acier.
De temps en temps, pour polir l’acier, essuyez-le avec un chiffon en microfibre légèrement
humide.
N’utilisez pas l’éponge sur des pièces en aluminium, telles que les poignées et les profils des
étagères en verre.
Vous devez faire particulièrement attention à ne pas obstruer les orifices de ventilation de
l’appareil ou du boîtier qui le contient.
Suivez scrupuleusement les instructions détaillées contenues dans le kit fourni et n’utilisez
jamais de produits abrasifs ou métalliques qui risqueraient de rayer de manière permanente le
fini satiné de l’appareil.
Avant de procéder à tout type de nettoyage, débranchez l’appareil de l’alimentation électrique.
Veillez à ne pas endommager le circuit de réfrigérant de quelque manière que ce soit.
NETTOYAGE DU CONDENSATEUR ET GRILLE
Grille de ventilation
Une grille de ventilation est située en haut ou en bas de
l’appareil, selon le type de modèle.
Pour le nettoyer, utilisez un aspirateur avec une brosse
souple à la puissance maximale, en le balayant le long des
fentes de ventilation.
En cas d’accumulation importante de poussière, la grille de
ventilation peut être ouverte ou retirée pour un nettoyage
plus complet et pour nettoyer le condenseur.
Condenseur
Éteignez l’appareil en appuyant sur le bouton Marche
/ Arrêt
du panneau de commande principal pendant
environ 3 secondes.
Attendez environ 30 minutes, le temps que le condenseur à
ailettes refroidisse à la température ambiante.
Sur les modèles avec ventilation à la base, retirez le gril
au bas (attaché magnétiquement) et retirez-le. Sur les
modèles avec ventilation en haut, soulevez le gril comme
indiqué sur la photo. Nettoyez soigneusement le gril et les
ailettes du condenseur à l’aide d’un aspirateur muni d’une
brosse souple. Nettoyez soigneusement toute poussière
accumulée, comme indiqué sur la photo, en veillant à ne pas
endommager les ailettes.
Redémarrez l’appareil en appuyant sur le bouton Marche /
Arrêt
du panneau de commande.
Nettoyez les parties internes et amovibles en les lavant avec
une solution d’eau tiède et une petite quantité de détergent
à vaisselle.
Rincez et séchez immédiatement.
N’utilisez pas d’appareils mécaniques ou d’autres méthodes pour accélérer le dégivrage.
Ne mettez pas les parties en verre froides en contact avec de l’eau bouillante. Ne lavez aucune
pièce du réfrigérateur dans un lave-vaisselle, car cela pourrait l’endommager ou le déformer de
manière irréversible.
Les bords du condenseur sont
coupants, utilisez donc une
protection adéquate des mains et
des bras lors du nettoyage du
condenseur.
N'utilisez pas d'eau sur les pièces
électriques, les lumières et le
panneau de commande.
FR
©2019 Hestan Commercial Corporation
28
DÉPANNAGE
GUIDE DES SOLUTIONS AUX PROBLÈMES
En cas d’anomalies de fonctionnement de l’appareil, utiliser ce guide avant d’appeler le service
d’assistance. Celui-ci aidera à résoudre personnellement le problème ou fournira d’importantes
informations à transférer au service d’assistance afin d’assurer un service plus rapide et efficace.
Messages sur l’écran
Les problèmes de fonctionnement sont en général indiqués sur l’écran.
Les problèmes qui ne peuvent pas être résolus par l’usager sont signalés moyennant un code de
panne.
Le Réfrigérateur ou le Congélateur ne fonctionnent pas
L’appareil est branché au réseau d’alimentation électrique ? Le courant arrive à la prise
d’alimentation ?
la bouton Allumé / Éteint
est activée ? L’appareil est en mode ‘Demo’?
Le Réfrigérateur ou le Congélateur est plus chaud que la normale
L’écran signale un code de panne ?
La température est réglé correctement ?
Les portes ou les bacs sont resté ouverts longtemps ? Ont été récemment introduites de
grandes quantités d’aliments ?
L’appareil est en mode ‘Demo’?
L’appareil fonctionne pendant une longue période de temps
Durant les chaudes journées et avec des températures élevées dans la pièce, il est normal que le
compresseur fonctionne de manière prolongée.
Les portes ou les bacs sont restés ouverts longtemps ? Ont été récemment introduites de
grandes quantités d’aliments ?
Contrôler que les portes soient bien fermées et que les aliments ou les récipients n’empêchent
pas leur parfaite fermeture.
Est un ou plusieurs compartiments en mode MaxCool?
Perception de bruits étranges
Il est normal que soient perçus des bruits liés au fonctionnement des ventilateurs ou des
compresseurs ou durant la phase de dégivrage.
Le bruit peut également être plus accentué en fonction du positionnement de l’appareil et de
l’espace environnant.
Formation de condensation à l’intérieur et à l’extérieur du réfrigérateur
Si le climat est très humide, l’apparition d’un peu de condensation est normale. L’ouverture de
la porte ou des bacs de manière prolongée peut contribuer à la formation de condensation.
Veiller dans tous les cas à ce que les portes soient toujours parfaitement fermées.
Le Réfrigérateur ou Congélateur présente du givre ou de la glace
Les portes sont restées ouvertes longtemps ? Les portes ne se ferment par parfaitement ?
Si les portes ne se ferment pas parfaitement, contacter l’installateur.
©2019 Hestan Commercial Corporation
29
FR
DÉPANNAGE
(SUITE)
Apparition de mauvaises odeurs à l’intérieur
Nettoyer entièrement l’appareil en suivant les instructions.
Couvrir hermétiquement tous les aliments. Ne pas conserver de manière prolongée les aliments.
La porte s’ouvre avec difficulté
L’appareil a été conçu pour en permettre la fermeture hermétique. Lors -que la porte est
fermée, il est possible que se vérifie une situation de vide: dans ce cas, il est nécessaire
d’attendre quelques secondes pour que la pression se rééquilibre, avant d’ouvrir la porte.
Appareil se refroidit mais les lumières et l’affichage ne fonctionnent pas
Vérifiez si l’appareil a été accidentellement placé dans le mode Sabbat.
Le machine de glacons ne fonctionne pas
Veiller à ce que la machine à glaçons soit allumé (touche Ice Maker allumée). Pour l’allumer,
appuyer sur la bouton rouge ou utilisez le menu. Voir «ACTIVER LE FABRICANT DE GLACE» à
la page 13.
Veiller à ce que l’appareil soit raccordé à l’installation hydraulique.
Le machine de glacons ne produit pas de grandes quantités de glace
En moyenne, la production de glace est d’environ 10 glaçons toutes les deux heures.
La glace se congèle en bloc
Si la glace n’est pas fréquemment utilisée, il est possible qu’elle se congè-le en blocs. Il est
conseillé d’éliminer le bloc de glaçons et de laisser que le bac se remplisse de nouveau. Lorsque
l’Appareil à glaçons est utilisé pour la première fois, il est conseillé de vider le contenu du bac
lors de son premier remplissage.
La glace a une saveur ou une couleur insolite
Lorsque la machine à glaçons est démarrée pour la première fois, il est recommandé de vider le
premier plateau rempli de glaçons.
Si le réfrigérateur a été éteint pendant plus d’un mois ou si la cartouche n’a pas été remplacée
pendant plus de six mois, il pourrait être nécessaire de remplacer la cartouche filtrante.
Contactez un plombier ou un expert en traitement de l’eau pour vous assurer que le problème
n’est pas dû à l’approvisionnement en eau.
Si l’appareil a été acheté a été utilisé comme un modèle d’exposition, peut être dans
un mode d’économie d’énergie spécial appelé Mode Démo dans lequel le dispositif
semble fonctionner (lampes de travail et affiche des températures faux), mais pas
de refroidissement est vraiment. Si vous pensez que votre équipement est en Mode
Démo, s’il vous plaît contactez votre revendeur pour l’assistance à la désactivation de
cette fonction.
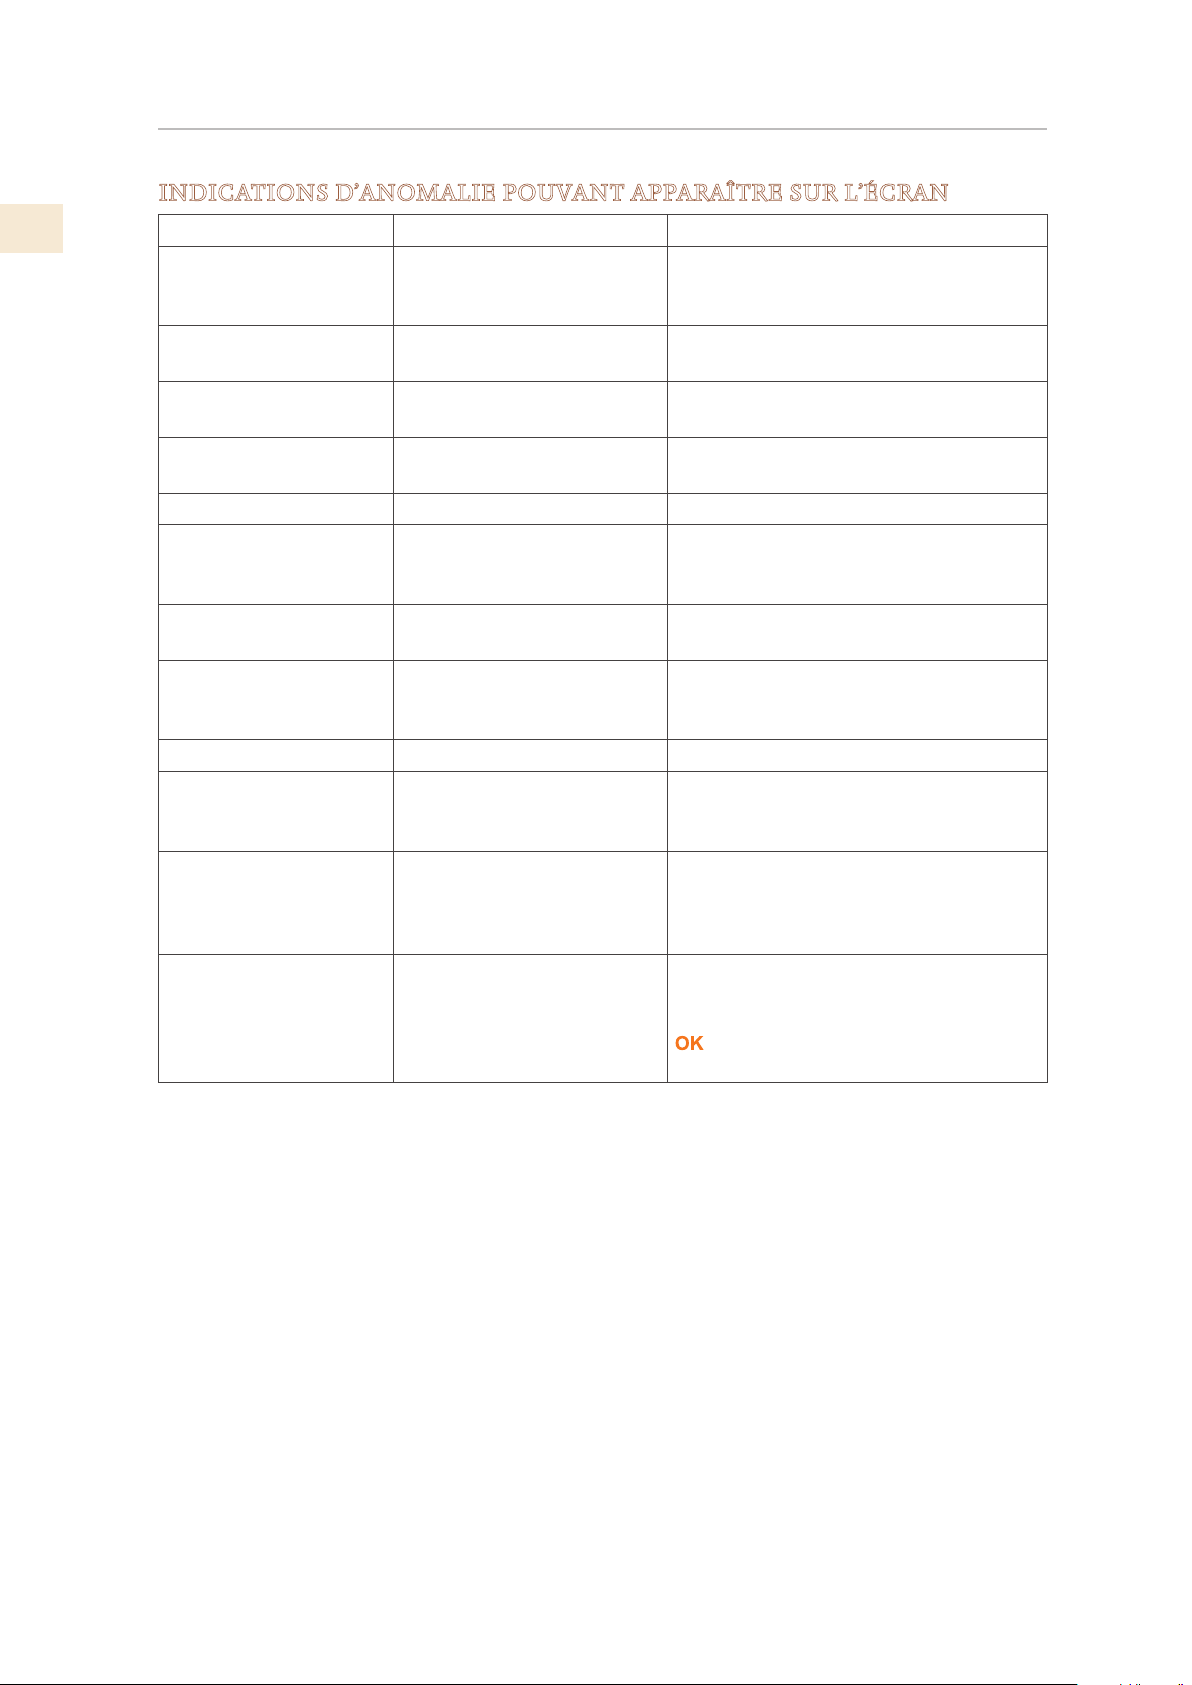
FR
©2019 Hestan Commercial Corporation
30
DÉPANNAGE
(SUITE)
INDICATIONS D’ANOMALIE POUVANT APPARAÎTRE SUR L’ÉCRAN
Message sur l’écran Description de l’Anomalie Action Requise
Panne électrique!! Interruption prolongée de
l'alimentation électrique
L'appareil reprend son travail
automatiquement, l'écran affiche les
températures les plus chaudes atteintes
Porte Réfrigérateur
OUVERT
Porte du réfrigérateur
ouverte
Le message apparaît quelques minutes
après l'ouverture de la porte
FreshZone OUVERT Tiroir du congélateur
ouverte
Le message apparaît quelques minutes
après l'ouverture de la tiroir
Remplacer le filtre Remplacer la cartouche
filtrante
Un message apparaît lorsqu'il ne reste
que 30% de la capacité de filtrage
Frigo trop chaud Frigo trop chaud Voir le Guide de dépannage
Frigo trop froid Frigo trop froid Attendez 12 heures: si le
dysfonctionnement persiste, contactez
le service clientèle.
Fresque trop chaud ExtendFresh Compartiment
trop chaud
Voir le Guide de dépannage
Fresco trop froid ExtendFresh Compartiment
trop froid
Attendez 12 heures: si le
dysfonctionnement persiste, contactez
le service clientèle.
FreshZone trop chaud Congélateur trop chaud Voir le Guide de dépannage
FreshZone trop froid Congélateur trop froid Attendez 12 heures: si le
dysfonctionnement persiste, contactez
le service clientèle.
Code d'erreur.. Problèmes fonctionnels Appelez le service clientèle qui pourra
vous aider à résoudre le problème ou
vous mettre en contact avec l'agent de
service le plus proche.
Vérifier le condenseur Vérifier le condensateur Tous les 6 mois, l'écran affiche le
message «Check Cond». Nettoyez le
condenseur et appuyez sur le bouton
pendant 5 secondes pour le
réinitialiser la notification.
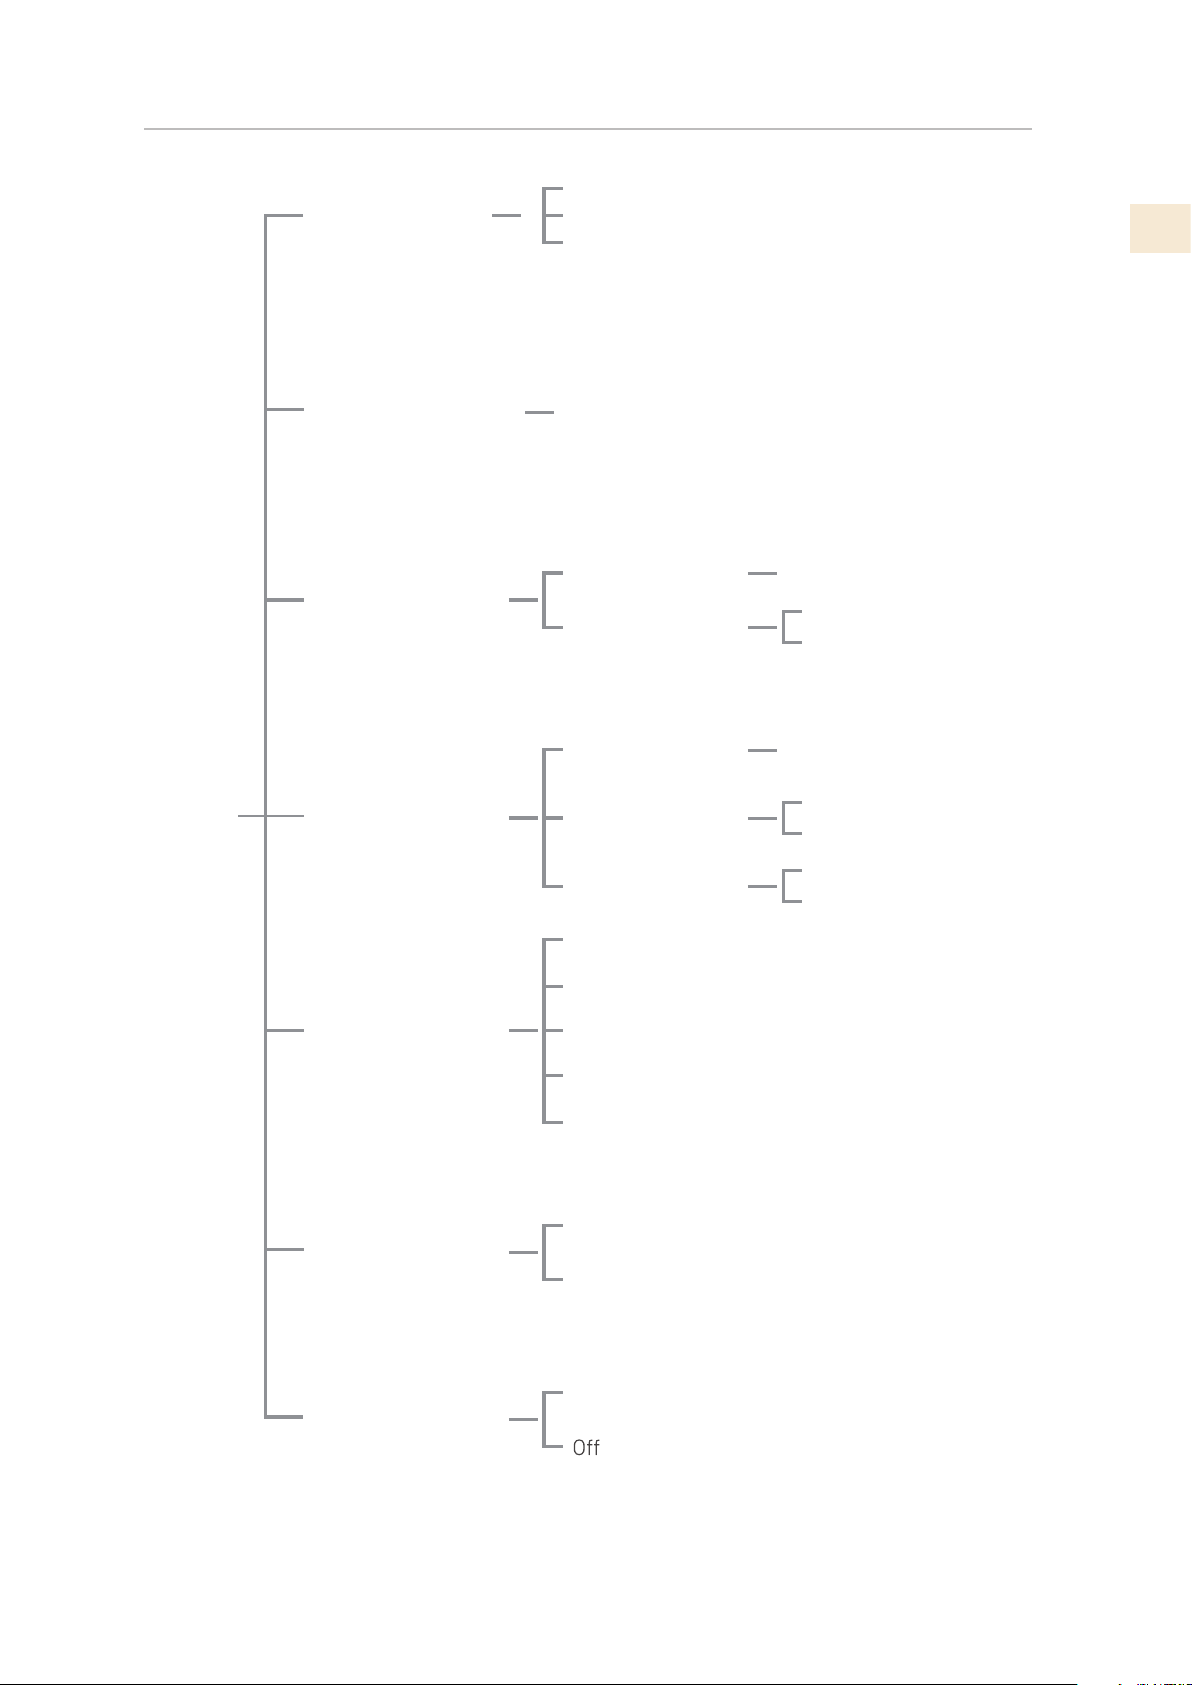
©2019 Hestan Commercial Corporation
31
FR
DA
TE: 01-01-2019 Allumé
HEURE: 01:01 Allumé
Choisir: 24
DATE: 01-01-2019 Fermé
HEURE: 01:01 Frermé
Choisir: 12
DATE: 01-01-2019
HEURE: 01:01
Régler la date
Régler l’heure
Italiano
Français
English
Choisir °C
Montrer la date
Choisir 12/24
Montrer l’heure
Deutsch
Español
Choisir °F
Date
Langue
Réglages °C/°F
Heure
RÉGL
AGES
Option FreshZone
Réglages de base
Freezer
Fresco
Enter > Confirmer
Réfrigérateur
On
Blocage Clavier
PLAN DU MENÙ
FR
©2019 Hestan Commercial Corporation
32
Shopping
Réfrigérateur
Shopping
TriMode
Vacation
Réfrigérateur
TriMode
Vacation
Machine
glaçons
Refr. Bouteilles
Set Mode
Sabbath
Filtre de l’eau
Shopping Réfr. Fermé
Shopping Réfr. Allumé
Régler l’heure: 1
Vacation Réfr. Fermé
Vacation Réfr. Allumé
Régler l’heure: 1
Shopping TriMode Fermé
Shopping T
riMode Allumé
Régler l’heure: 1
Vacation TriMode On
Vacation TriMode Off
Régler les jours: 1
Régler l’heure: 20 min
Refr. Bouteilles Fermé
Refr. Bouteilles Allumé
Taille : GRANDS
Taille : MOYENS
SupGaFermé
SupGaAllumé
Shopping Réfr.
Allumé/Fermé
Temps Shopping
Vacation Réfr.
Allumé/Fermé
Durée Vacation
Shopping TriMode
Allumé/Fermé
Temps Shopping
Vacation TriMode
Allumé/Fermé
Durée Vacation
Temps de refr.
Refr. Bouteilles
Allumé/Fermé
Taille glaçons
Super Ice
Allumé/Fermé
Ice Maker Fermé
Ice Maker Allumé
Ice Maker ON/OFF
Mode Sabbath Fermé
Mode Sabbath Allumé
État Filtre
Nettoyage Manuel
Bypass Filtre Fermé
Bypass Filtre Allumé
Voir État
Reset Filtre
Bypass Filtre
FON
CTIONS
PLAN DU MENÙ
(SUITE)
©2019 Hestan Commercial Corporation
33
FR
SERVICE
Toutes les réparations dans le cadre ou en dehors de la garantie doivent être effectuées par du
personnel d’entretien qualifié. Pour localiser un réparateur agréé dans la région, s’adresser au
concessionnaire Hestan, au représentant local ou à l’usine. Avant d’appeler, veiller à avoir les
numéros de modèle et de série à portée de la main.
Hestan Commercial Corporation
3375 E. La Palma Avenue
Anaheim, CA 92806
(888) 905-7463
LISTE DES PIÈCES
Visiter le site Web Hestan pour consulter la liste des pièces de ce produit:
www.hestanhome.com.
PIÈCES / SERVICE
ENREGISTREMENT D’INFORMATIONS DE SERVICE
L’emplacement de l’étiquette de série sur le produit est visible lorsque la porte du réfrigérateur
est ouverte.
Il est situé à gauche ou à droite en fonction du modèle.
Le moment est venu d’écrire ces informations dans l’espace ci-dessous. Conservez votre facture
pour la validation de la garantie.
Numéro de modèle _________________________________
Numéro de série __________________________________
Date d’installation ou d’occupation __________________
GARANTIE LIMITÉE
ÉLÉMENTS COUVERTS PAR LA PRÉSENTE GARANTIE LIMITÉE:
Hestan Commercial Corporation (« HCC ») garantit à l’acheteur initial d’un produit de
refroidissement Hestan (le « Produit ») chez un revendeur agréé HCC que le Produit ne présente
aucun vice de matière ni de fabrication pendant une période de deux (2) ans à compter de la
date de l’achat initial au détail ou de la date de clôture en cas de construction neuve, suivant la
période la plus longue (« Période de garantie limitée »). HCC accepte de réparer ou de remplacer,
à sa seule discrétion, tout composant ou pièce du Produit dont la défaillance est due à des vices
de matières ou de fabrication pendant la Période de garantie limitée. La présente Garantie
limitée n’est pas transférable et n’est offerte à personne d’autre que l’acheteur initial au détail
(« Acheteur »). La présente garantie limitée n’est valable que pour les Produits achetés chez et
reçus d’un revendeur agréé HCC dans tous les Etats-Unis, dans le District de Columbia et au
Canada. La présente Garantie limitée ne s’applique qu’aux Produits pour usage non commercial,
à l’exclusion de ceux utilisés à des fins commerciales.
FR
©2019 Hestan Commercial Corporation
34
GARANTIE LIMITÉE
(SUITE)
MARCHE À SUIVRE POUR UNE RÉPARATION AU TITRE DE LA GARANTIE:
En cas de défaillance du Produit pendant la Période de garantie limitée pour des raisons
couvertes par la présente Garantie limitée, l’Acheteur doit contacter immédiatement le
revendeur auquel il a acheté le Produit ou HCC au 888.905.7463.
Il incombe à l’Acheteur de rendre le Produit raisonnablement accessible pour réparation ou
de régler les frais de mise à disposition raisonnable du Produit pour réparation. La réparation
sera effectuée pendant les heures d’ouverture normales du Centre de réparation agréé par
Hestan. Dans la mesure où l’Acheteur demande une réparation en dehors des heures d’ouverture
normales du Centre de réparation agréé par Hestan, l’Acheteur règlera la différence entre le tarif
normal et celui des heures supplémentaires ou des primes. L’Acheteur doit régler tous les frais
de déplacement si celui-ci dépasse 80 km [50 milles] (dans un sens) par rapport au Centre de
réparation le plus proche agréé par Hestan.
ALLONGEMENTS AU-DELÀ DE LA PÉRIODE DE GARANTIE LIMITÉE D’UN AN:
En plus de la garantie limitée de deux ans, les composants qui suivent bénéficient d’un
prolongement de la garantie comme expressément énoncé ci-après:
Le compresseur, le condenseur, l’évaporateur, le séchoir et tous les tuyaux de raccordement
du produit (le cas échéant) sont garantis exempts de vices de matières et de fabrication dans
des conditions normales d’utilisation non-commerciale et de réparation pendant une période
de cinq (5) ans au profit de l’Acheteur initial. Cela exclut la corrosion superficielle, les rayures
et la décoloration susceptibles de se produire pendant une utilisation normale et se limite au
remplacement de la ou des pièces défectueuses, y compris ceux de main d’œuvre, de transport et
de manutention, le cas échéant.
Le compresseur, le condenseur, l’évaporateur, le séchoir et tous les tuyaux de raccordement du
produit (le cas échéant) sont garantis exempts de vices de matières et de fabrication dans des
conditions normales d’utilisation non-commerciale et de réparation pendant une période de
douze (12) ans au profit de l’Acheteur initial. Cela exclut la corrosion superficielle, les rayures
et la décoloration susceptibles de se produire pendant une utilisation normale et se limite au
remplacement de la ou des pièces défectueuses, l’Acheteur assumant tous les autres coûts, y
compris ceux de main d’œuvre, de transport et de manutention, le cas échéant.
ÉLÉMENTS NON-COUVERTS PAR LA PRÉSENTE GARANTIE LIMITÉE:
La présente Garantie limitée ne couvre pas ce qui suit, excluant toute responsabilité financière
de HCC: tous dommages ou vices affectant tout Produit non acheté chez un revendeur agréé
HCC; variations de coloris dans la finition ou autres dommages esthétiques; panne ou dommages
dus à une utilisation abusive ou erronée, un accident, un incendie, une catastrophe naturelle,
un usage commercial du Produit, une interruption de l’alimentation électrique ou en gaz du
Produit; dommages résultant d’une modification, d’une installation ou utilisation incorrecte du
Produit; dommages résultant de la réparation ou du remplacement incorrect ou sans autorisation
de tout composant ou pièce du Produit; dommages résultant d’un service après vente assuré
par quiconque autre qu’un agent ou représentant agréé du réseau commercial de Hestan; usure
normale et détérioration; dommages résultant de l’exposition du Produit à une atmosphère
corrosive contenant du chlore, du fluor ou toute autre substance chimique nuisible; dommages
résultant de l’absence d’un entretien normal du Produit; dommages dont HCC n’a pas été avisé
ou qui se sont produits après expiration de la Période de garantie limitée; dommages accessoires
et indirects causés par tout vice de matière ou de fabrication.
ARBITRAGE:
La présente Garantie limitée est régie par la Loi fédérale sur l’arbitrage. Tout litige opposant
l’Acheteur à HCC et relatif au Produit ou à la présente Garantie limitée doit être résolu par voie
d’arbitrage exécutoire exclusivement sur une base individuelle avec l’Acheteur. L’arbitrage sera
effectué par l’Association Américaine d’Arbitrage (American Arbitration Association, « AAA
») conformément à ses règles d’arbitrage pour la protection du consommateur ou par JAMS.
©2019 Hestan Commercial Corporation
35
FR
GARANTIE LIMITÉE
(SUITE)
L’audience d’arbitrage se tiendra devant un arbitre nommé par l’AAA ou par JAMS. L’arbitre ne
devra procéder à aucun arbitrage collectif et l’Acheteur devra renoncer à tout recours contre
HCC en qualité de représentant de tiers.
LIMITATION DE RESPONSABILITÉ:
La présente Garantie limitée constitue l’accord définitif, intégral et exclusif entre HCC et
l’Acheteur eu égard au Produit.
IL N’EXISTE AUCUNE GARANTIE EXPRESSE AUTRE QUE CELLES ÉNUMÉRÉES ET
DÉCRITES PLUS HAUT. AUCUNE GARANTIE EXPRESSE OU IMPLICITE, Y COMPRIS
SANS S’Y LIMITER, TOUTE GARANTIE IMPLICITE DE QUALITÉ MARCHANDE OU
D’ADAPTATION À UN USAGE PARTICULIER NE S’APPLIQUERA APRÈS L’EXPIRATION
DE LA PÉRIODE DE GARANTIE LIMITÉE INDIQUÉE PLUS HAUT. AUCUNE GARANTIE
EXPRESSE APPLICABLE À CE PRODUIT OFFERTE PAR UNE PERSONNE OU ENTREPRISE
QUELCONQUE N’ENGAGERA HCC. HCC NE GARANTIT EN AUCUNE FAÇON
L’ADAPTATION DU PRODUIT À UN USAGE PARTICULIER, SAUF DISPOSITION CONTRAIRE
DE LA LÉGISLATION APPLICABLE. HCC N’ASSUME AUCUNE RESPONSABILITÉ POUR
TOUT MANQUE À GAGNER, IMPOSSIBILITÉ DE RÉALISER DES ÉCONOMIES OU AUTRES
AVANTAGES NI POUR TOUT AUTRE DOMMAGE PARTICULIER, DIRECT OU INDIRECT
CAUSÉ PAR L’UTILISATION, L’USAGE ABUSIF OU L’INCAPACITÉ D’UTILISER CE PRODUIT,
QUELLE QUE SOIT LA THÉORIE JURIDIQUE SUR LAQUELLE LA DEMANDE SE FONDE,
MÊME SI HCC EST INFORMÉ DE LA POSSIBILITÉ DE TELS DOMMAGES. AUCUN
RECOUVREMENT À L’ENCONTRE DE HCC NE SERA SUPÉRIEUR AU PRIX D’ACHAT DU
PRODUIT. SANS LIMITER LA PORTÉE DE CE QUI PRÉCÈDE, VOUS ASSUMEZ TOUS LES
RISQUES ET LA RESPONSABILITÉ DES PERTES, DOMMAGES OU BLESSURES ET DÉGÂTS
MATÉRIELS SUBIS PAR VOUS-MÊMES ET DES TIERS RÉSULTANT DE L’UTILISATION,
DE L’USAGE ABUSIF OU DE L’INCAPACITÉ D’UTILISER CE PRODUIT, QUI NE SONT PAS
CAUSÉS DIRECTEMENT PAR LA NÉGLIGENCE DE HCC. LA PRÉSENTE GARANTIE LIMITÉE
FORMULE VOTRE RECOURS EXCLUSIF.
Aucune déclaration ni aucun engagement verbal ou écrit de la part de qui que ce soit, y compris
sans s’y limiter un employé, représentant ou agent de HCC, ne créera une garantie ni élargira en
quoi que ce soit la portée de la présente Garantie limitée expresse d’un an. En cas de divergence
entre la présente garantie limitée et tout autre accord ou déclaration lié ou relatif au Produit, ce
sera cette Garantie qui s’applique. Si une disposition quelconque de la présente Garantie limitée
est déclarée invalide ou inapplicable, elle sera réputée modifiée dans la limite nécessaire pour la
rendre applicable et le reste de la Garantie limitée restera valide et applicable selon ses modalités.
INTERACTION ENTRE CERTAINES LOIS ET LA PRÉSENTE GARANTIE LIMITÉE:
Il se peut que certains États, Provinces et Territoires n’autorisent pas la limitation de durée
d’une garantie implicite ni l’exclusion ou la restriction des dommages directs ou indirects. Les
limitations ou exclusions qui précèdent peuvent par conséquent ne pas être applicables. Il se
peut que certains États, Provinces ou Territoires prévoient d’autres droits et recours en matière
de garantie. Les dispositions de la présente Garantie limitée n’ont pas pour but de limiter,
modifier, restreindre, nier ni exclure les conditions obligatoires de garantie prévues par des États,
Provinces ou Territoires, y compris certaines garanties implicites. La présente garantie confère
des droits précis, auxquels peuvent s’en ajouter d’autres qui varient selon le lieu.
Toute question relative à la présente Garantie limitée peut être adressée à:
Hestan Commercial Corporation au (888) 905-7463

RETAIN THIS MANUAL FOR FUTURE REFERENCE
CONSERVEZ CE MANUEL POUR UNE RÉFÉRENCE FUTURE
©2019 Hestan Commercial Corporation P/N 020055 REV B
Hestan Commercial Corporation
3375 E. La Palma Ave.
Anaheim, CA 92806
(888) 905-7463