Loading ...
Loading ...
Loading ...
When using an extension cord, be sure to use one heavy enough to carry the current
your product will draw. An undersized cord will cause a drop in line voltage resulting
in loss of power and overheating. The following table shows the correct size to use
depending on cord length and nameplate ampere rating. If in doubt, use the next
heavier gage. The smaller the gage number, the heavier the cord.
Recommended Minimum Wire Size for Extension Cords
Total Length of Cord
25 ft. 50 ft. 75 ft. 100 ft. 125 ft. 150 ft. 175 ft.
7.6 m 15.2 m 22.9 m 30.5 m 38.1 m 45.7 m 53.3 m
Wire Size AWG
18 18 16 16 14 14 12
Important Safety InStructIonS for Battery chargerS
SAVE THESE INSTRUCTIONS: T
his manual contains important safety instructions for
battery chargers.
•Beforeusingcharger,readallinstructionsandcautionarymarkingsoncharger,battery
pack, and product using battery pack.
WARNING: Shock hazard. Do not allow any liquid to get inside charger.
CAUTION: Burn hazard. To reduce the risk of injury, charge only designated
BLACK+DECKER batteries. Other types of batteries may burst causing personal injury and damage.
CAUTION:
Under certain conditions, with the charger plugged in to the power supply,
the charger can be shorted by foreign material. Foreign materials of a conductive nature such
as, but not limited to, steel wool, aluminum foil, or any buildup of metallic particles should be kept
away from charger cavities. Always unplug the charger from the power supply when there is no
battery pack in the cavity. Unplug charger before attempting to clean.
WARNING: DO NOT attempt to charge the battery pack with any chargers
other than the ones in this manual. The charger and battery pack are specifically
designed to work together.
•These chargers are not intended for any uses other than charging designated
BLACK+DECKER rechargeable batteries. Any other uses may result in risk of fire,
electric shock or electrocution.
•Do not expose charger to rain or snow.
•Pull by plug rather than cord when disconnecting charger. This will reduce risk of
damage to electric plug and cord.
•Make sure that cord is located so that it will not be stepped on, tripped over, or
otherwise subjected to damage or stress.
5
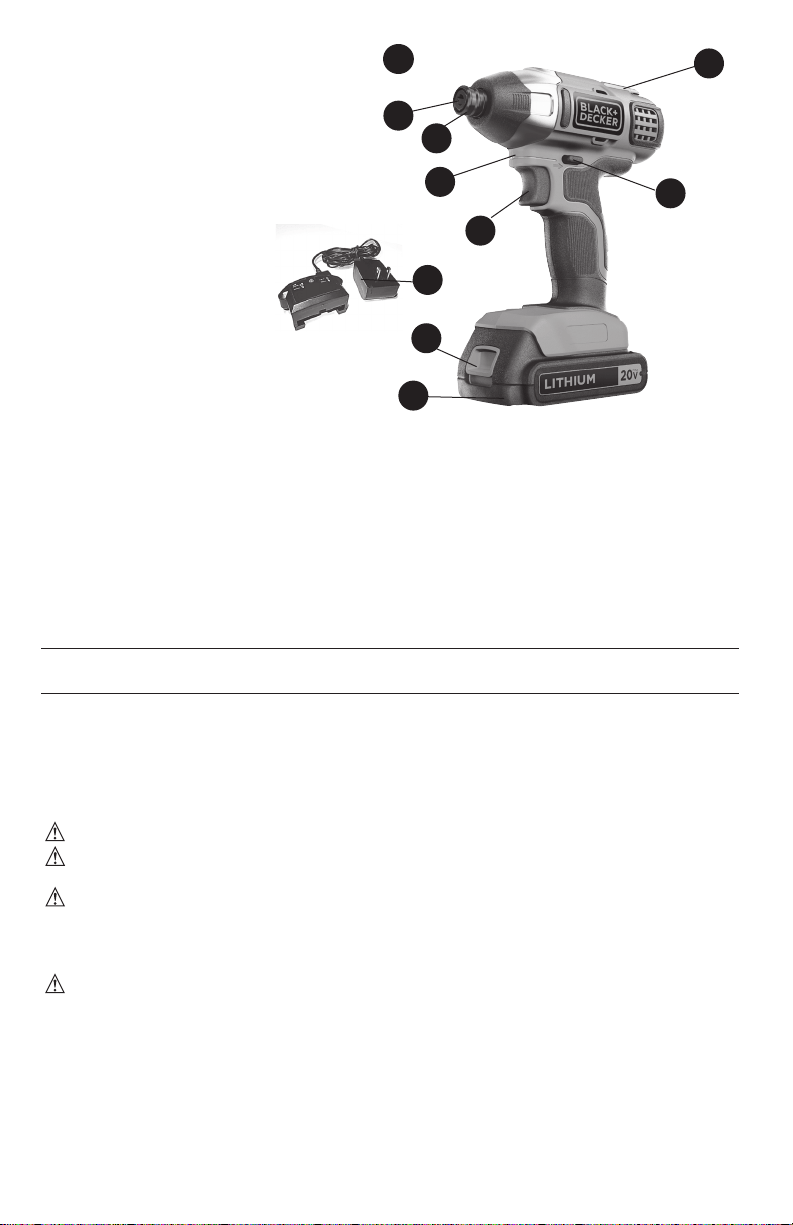
FUNCTIONAL DESCRIPTION
Figure A
1. Trigger switch
2. Forward/Reverse button
3. Chuck collar
4. 1/4 inch hex quick-release chuck
5. LED Work light
6. Bit storage
7. Battery Charger
8. Battery
9. Battery Release Button
(on battery)
3
1
2
4
5
a
8
9
6
7
Loading ...
Loading ...
Loading ...