Loading ...
Loading ...
Loading ...
39 40
ninjakitchen.eu
ENGLISH
USING YOUR GRILL
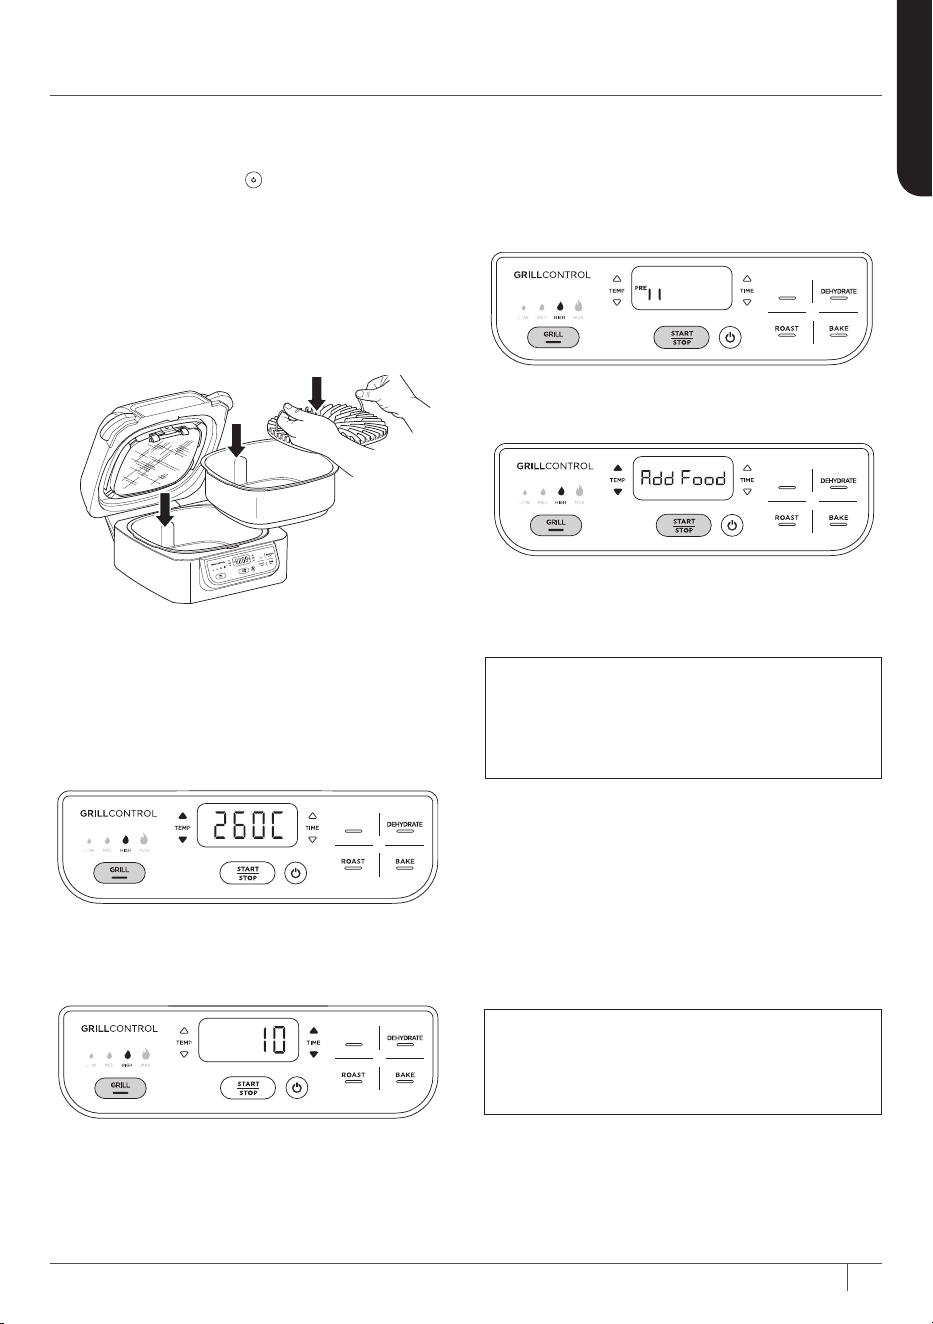
4 Press the START/STOP button to
begin
preheating.
PRE will appear on
the display screenand the progress bar
will begin. It can take about 8 minutes
to preheat, depending on the selected
temperature setting.
5 When preheating is complete, the unit will
beep and Add Food will flash across on
the display screen.
6 Open the lid and place ingredients on
the grill plate. Once the lid is closed,
cooking will begin and the timer will
start counting down.
7 When cook time is complete, the unit will
beep and END will appear on the display
screen. Keep the lid open after removing
your food so the unit will cool down more
quickly. The stainless steel wrap on the
exterior of the unit will be hot after cooking.
If you need to cook your food longer, simply
press the TIME up arrow to add more time,
then press the START/STOP button.
COOKING FUNCTIONS
Ensure the unit is plugged in before turning
it on. Press the power
button.
Grill
1 Place the cooking pot in the unit with
the indent on the pot aligned with the
rear bump on the main unit. Then place
the grill plate in the pot with the handles
facing up. Ensure the splatter guard isin
place and close the lid.
2 Press the GRILL button. The default
temperature level will illuminate on the
left side of the control panel and the
corresponding air temperature will
appear on the display screen. Press the
Grill button or the up and down TEMP
arrows to adjust the temperature setting.
3 Press the up and down TIME arrows
to set the cooking time in one-minute
increments, up to 30 minutes.
GRILLCONTROL TECHNOLOGY
Our technology allows you to control the
temperature of the grill plate for precise
cooking and keep smoke out of the kitchen.
When using the Grill function, you will need
to select the grill plate temperature setting.
Below are recommended temperature levels
for common ingredients.
SPLATTER GUARD
Located on the underside of the lid,
the splatter guard keeps the heating
element clean and prevents smoking.
The splatter guard is removable for
cleaning, but we recommend keeping
it in place when cooking.
Removing the splatter guard
Remove the splatter guard for cleaning after
every use. First allow the splatter guard to
cool completely, then remove it by using
your thumb to release the front clip by
pushing the front clip upward and using
your other hand to pull one of the tabs
toward you. This will release the splatter
guard, allowing you to pull it out of the slot
along the back of the lid.
Installing the splatter guard
To install, gently push the splatter guard into
the back of the lid. Insert the back tab on
guard with the slot on the back of the lid.
Then push the splatter guard upward until
it clicks into the clip on the front of the lid.
NOTE: During cooking, you can open
the lid to check on or flip your food. The
timer will pause when the lid is opened
and then automatically resume after it is
closed.
NOTE: The unit may produce smoke when
cooking meats on a hotter setting than
what is recommended. For more cooking
charts, refer to your Inspiration Guide or
visit ninjakitchen.eu.
NOTE: The unit could create smoke
during the cooking process. For less
smoke, we recommend using vegetable
oil, coconut, avocado or grapeseed
instead of olive oil.
AIR FRY
AIR FRY
AIR FRY
AIR FRY
AIR FRY
Front Tab
Lift Clip
LOW MEDIUM HIGH MAX
• Bacon
• Sausages
• Stued
peppers
when
using
thick
barbecue
sauces
• Calzones
• Frozen Meats
• Marinated/
coated meat
• Steaks
• Chicken
• Burgers
• Hot dogs
• Veggies
• Fruit
• Pizzas
• Fresh/
Frozen
Seafood
• Kebabs
Batch grilling
When grilling more than two consecutive
batches of food, it is recommended that you
empty the fat/oil from the removable cooking
pot. This will help prevent grease from burning
and causing smoke.
We also recommend allowing the grill plate
to heat back up for at least 3–5 minutes
between batches to ensure consistent grill
marks and cooking.
Switching to Grill after using another function
If the unit is already warm from using a
dierent function, and the grill plate is at
room temperature when you place it in the
unit, “Add Food” may appear on the screen
immediately. We recommend allowing the grill
grate to heat up for at least 6 minutes before
placing ingredients on it. As the unit continues
to run and the grill grate heats up, “Add Food”
will remain on the screen until you open the
lid and place ingredients on the plate.
NOTE: If batch cooking, empty the oil
from the removable cooking pot after
every 2 batches. This will help prevent
grease from burning and causing smoke.
Loading ...
Loading ...
Loading ...