
INSTALLATIONANDOPERATIONINSTRUCTIONSFOR
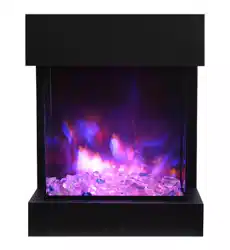
CUBE‐2025WM
INSTALLER:LEAVETHISMANUALWITHTHEAPPLIANCE.
CONSUMER:RETAINTHISMANUALFORFUTUREREFERENCE.
SAFETYINFORMATION
WARNING
Iftheinformationintheseinstructions
arenotfollowedexactly,afireor
explosionmayresultcausingproperty
damage,personalinjuryorlossoflife.
Donotstoreorusegasolineorotherflammablevapors
andliquidsinthevicinityofthisoranyother
li

2
TABLEOFCONTENTS
Pleasereadandcarefullyfollowalloftheinstructionfoundinthismanual.Pleasepayspecial
attentiontothesafetyinstructionsprovidedinthismanual.Theinstructionsincludedherewill
assurethatyouhavemanyyearsofdependableandenjoyableservicefromyourAmantii product.
Contents
IMPORTANT INSTRUCTIONS ............................................................................................................................. 3
UNPACKING AND TESTING APPLIANCE ........................................................................................................ 4
GROUNDING APPLIANCE ................................................................................................................................... 4
LOCATING THE FIREPLACE ............................................................................................................................... 4
CUBE-2025WM ....................................................................................................................................................... 5
INSTALLATION WALL-MOUNT ......................................................................................................................... 6
INSTALLATION CUBE-BASE-LEGS ................................................................................................................... 7
INSTALLATION CUBE-BASE-SPEAKER ........................................................................................................... 8
HARD- WIRE INSTALLATION .......................................................................................................................... 10
MEDIA OPTIONS ................................................................................................................................................. 11
OPERATION ......................................................................................................................................................... 12
MANUAL OPERATION ....................................................................................................................................... 12
AUTO MODE ......................................................................................................................................................... 12
REMOTE CONTROL OPERATION .................................................................................................................... 13
INSTALLING WALL THERMOSTAT ................................................................................................................ 14
REPLACEMENT PARTS ...................................................................................................................................... 15
EXPLODED VIEW ................................................................................................................................................ 16
TROUBLE SHOOTING ........................................................................................................................................ 17
SERVICE HISTORY ............................................................................................................................................. 18

3
IMPORTANTINSTRUCTIONS
1.
Donotoperateappliancebeforereadingandunderstandingoperatinginstructions.Failureto
operateapplianceaccordingtooperatinginstructionscouldcausefireorinjury.
2.
Keepcombustiblematerials,suchasfurniture,pillows,bedding,papers,clothesandcurtainsat
least3feetfromthefrontoftheheater;keepthemawayfromsidesandrearaswell.
3.
Alwaysunplugheaterwhenit’snotinuse.
4.
Donotoperatethefireplaceifithasadamagedcordorplug,afterithasmalfunctioned,orifthe
unithasbeendroppedordamagedinanyway.
5.
Neverplacetheheaterwhereitmayfallintoabathtuborotherwatercontainers.
6.
Donotruncordundercarpeting.Donotcovercordwiththrowrugs,runners,orthelike.Arrange
cordawayfromtrafficareaandwhereitwillnotbetrippedover.
7.
Todisconnecttheheater,turnthecontrolsto"OFF"beforeremovingtheplugfromtheoutlet.
8.
Donotinsertorallowforeignobjectstoenteranyventilationorexhaustopening,asthismay
causeanelectricshock,fireordamagetotheheater.
9.
Topreventapossiblefire,donotblockairintakes.
10.
Aheaterhashotandarcingorsparkingpartsinside.Donotuseitinareaswheregasoline,paint
orflammableliquidsareusedorstored.
11.
Usethisheateronlyasdescribedinthismanual.Anyotherusenotrecommendedbythe
manufacturermaycausefire,electricshockorinjurytopersons.
12.
Alwaysplugappliancesdirectlyintoawalloutlet/receptacle.Neveruseanextensioncordor
relocatablepowertap(outlet/powerstrip).
13.
Alwaysuseproperlygroundedfusedandpolarizedoutlets.
14.
Alwaysusegroundfaultprotectionwhereitisrequiredbyelectricalcodes.
15.
Alwaysdisconnectthepowerbeforeperforminganycleaning,maintenanceorrelocationofthe
heater.
16.
Topreventapossiblefire,donotburnwoodorothermaterialsinthisheater.
17.
Topreventelectricshockorfire,alwaysuseacertifiedelectrician,shouldnewcircuitsor
outletsberequired.
18.
Whentransportingorstoringtheheater,keepitinadryplace,freefromexcessivevibration.
19.
Thisapplianceshouldnotbemodifiedunderanycircumstances.
20.
Keepthepackagingmaterialoutofreachofchildrenanddisposeofthematerialinasafe
manner.Aswithallplasticbags,thesearenottoysandshouldbekeptawayfromchildrenand
infants.
21.
Donotusethisheaterinsmallroomswhentheyareoccupiedbypersonsnotcapableofleaving
theroomontheirown,unlessconstantsupervisionisprovided.
22.
Iftheglassisdamaged,donotusetheheaterinordertoavoidahazard.
23.
Youngchildrenshouldbecarefullysupervisedwhentheyareinthesameroomasthe
appliance.Toddlers,youngchildrenandothersmaybesusceptibletoaccidentalcontactburns.
Aphysicalbarrierisrecommendedifthereareatriskindividualsinthehouse.Torestrictaccess
toanapplianceorstove,installanadjustablesafetygatetokeeptoddlers,youngchildrenand
otherat‐riskindividualsoutoftheroomandawayfromhotsurfaces.
24.
CAUTIONSomepartsofthisproductcanbecomeveryhotandcauseburns.Particularattention
hastobegivenwherechildrenandvulnerablepeoplearepresent.

4
UNPACKING AND TESTING APPLIANCE
Carefully remove the appliance from the box.
Prior to installing the appliance, test to make sure the appliance operates properly by
plugging the power supply cord into a conveniently located 120 Volt grounded outlet.
Test all aspects of its operation (manual switches, remote and heater) to make sure all
components operate correctly.
As
with
most
electronic
de v i c e s
℉
,
your
new
℃
electric
fireplace
has
been
designed
to
operate
at
temperatures between 5 (41) and 35 (95). During the cold winter months, allow the
fireplace to reach room temperature before turning it on.
NOTE: There may be trace of odor during the first few minutes of initial use. This is
harmless, normal and will never occur again.
GROUNDING APPLIANCE
This appliance is for use on 120 Volts. The cord has a plug as shown in (A). An adapter as
shown in (C) is available for connecting three-blade grounding type plugs to two-slot
receptacles. The green grounding lug extending from the adapter must be connected to a
permanent ground such as a properly grounded outlet box. The adapter should not be used if
a three-slot grounded receptacle is available.
To disconnect appliance, turn controls to off, then remove plug from outlet.
LOCATING THE FIREPLACE
Plan where to locate and frame the fireplace. This will save time and money later when you
install the fireplace. Before installation consider the following:
1.
Where the fireplace is located must allow for wall and ceiling clearances.
2.
Consider a location where the fireplace screen will not be exposed to direct sunlight from
windows or doors.
3.
A 15 ampere, 120 Volt, 60 Hz branch circuit with proper ground must be available at the
location. Preferably a dedicated branch circuit should be provided to avoid circuit
breakers to trip of fuses to blow.
55
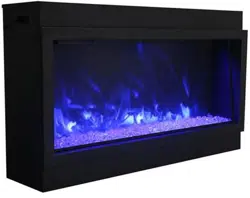
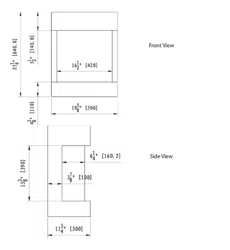
CUBE‐2025WM
Description
ELECTRICFIREPLACE
Voltage 230VAC60Hz
Watts 1500WMax
NOHEATER 25W
MOTORHEATER 19W
ApplianceWidth 195/8"or50cm
ApplianceHeight 251/4"or64.1cm
ApplianceDepth 113/4"or30cm
GrossWeight 50.7lbsor22kgs
PlugLocation Leftside
CordLength 707/8”or180cm
BTU
4800
6
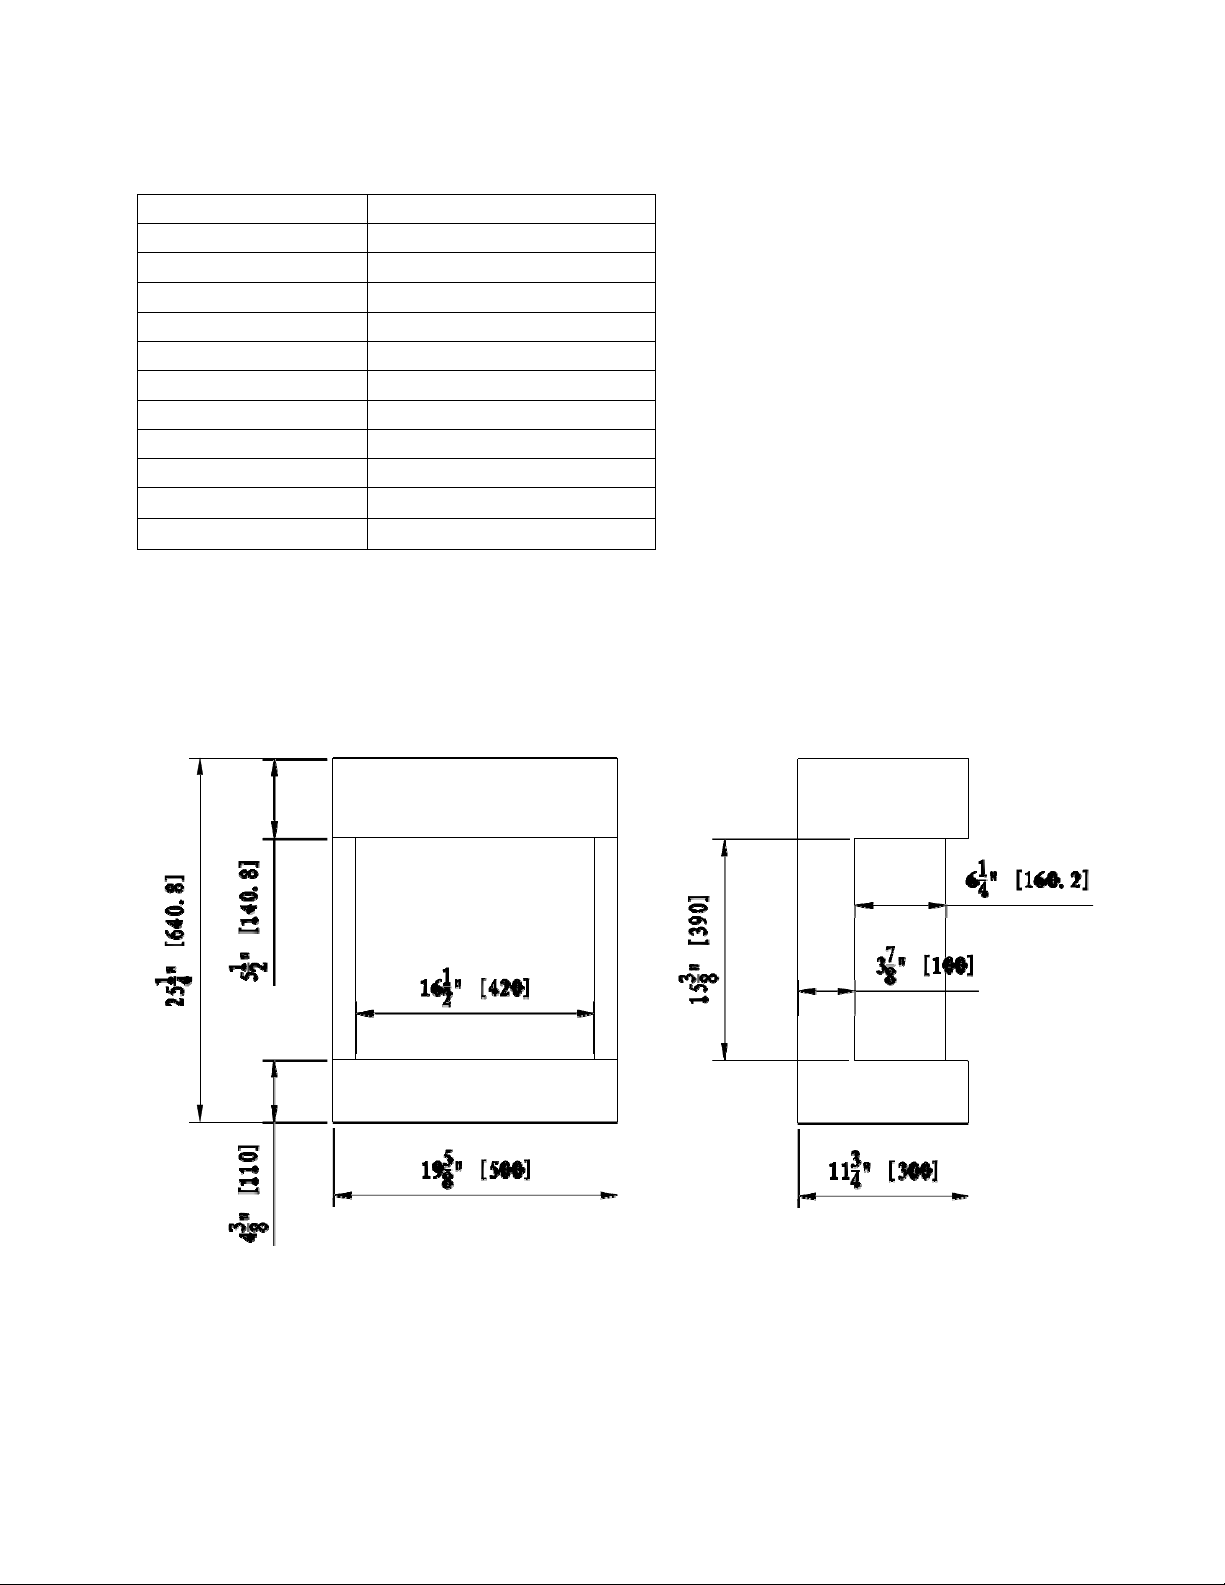
INSTALLATIONWALL‐MOUNT
NOTE: Due to the many different materials used on different walls, it is highly recommended
that you consult your local builder before you install this appliance.
1.
Selectalocationthatisnotproneto
moistureandislocatedatleast0.91mor3
feetawayfromcombustiblematerialssuch
as curtains or drapes, furniture, bedding,
paper,etc.
2.
Selectasuitablepositioninwhichtomount
theheaterhorizontally–useaspiritlevelto
achievethis(Fig.1).
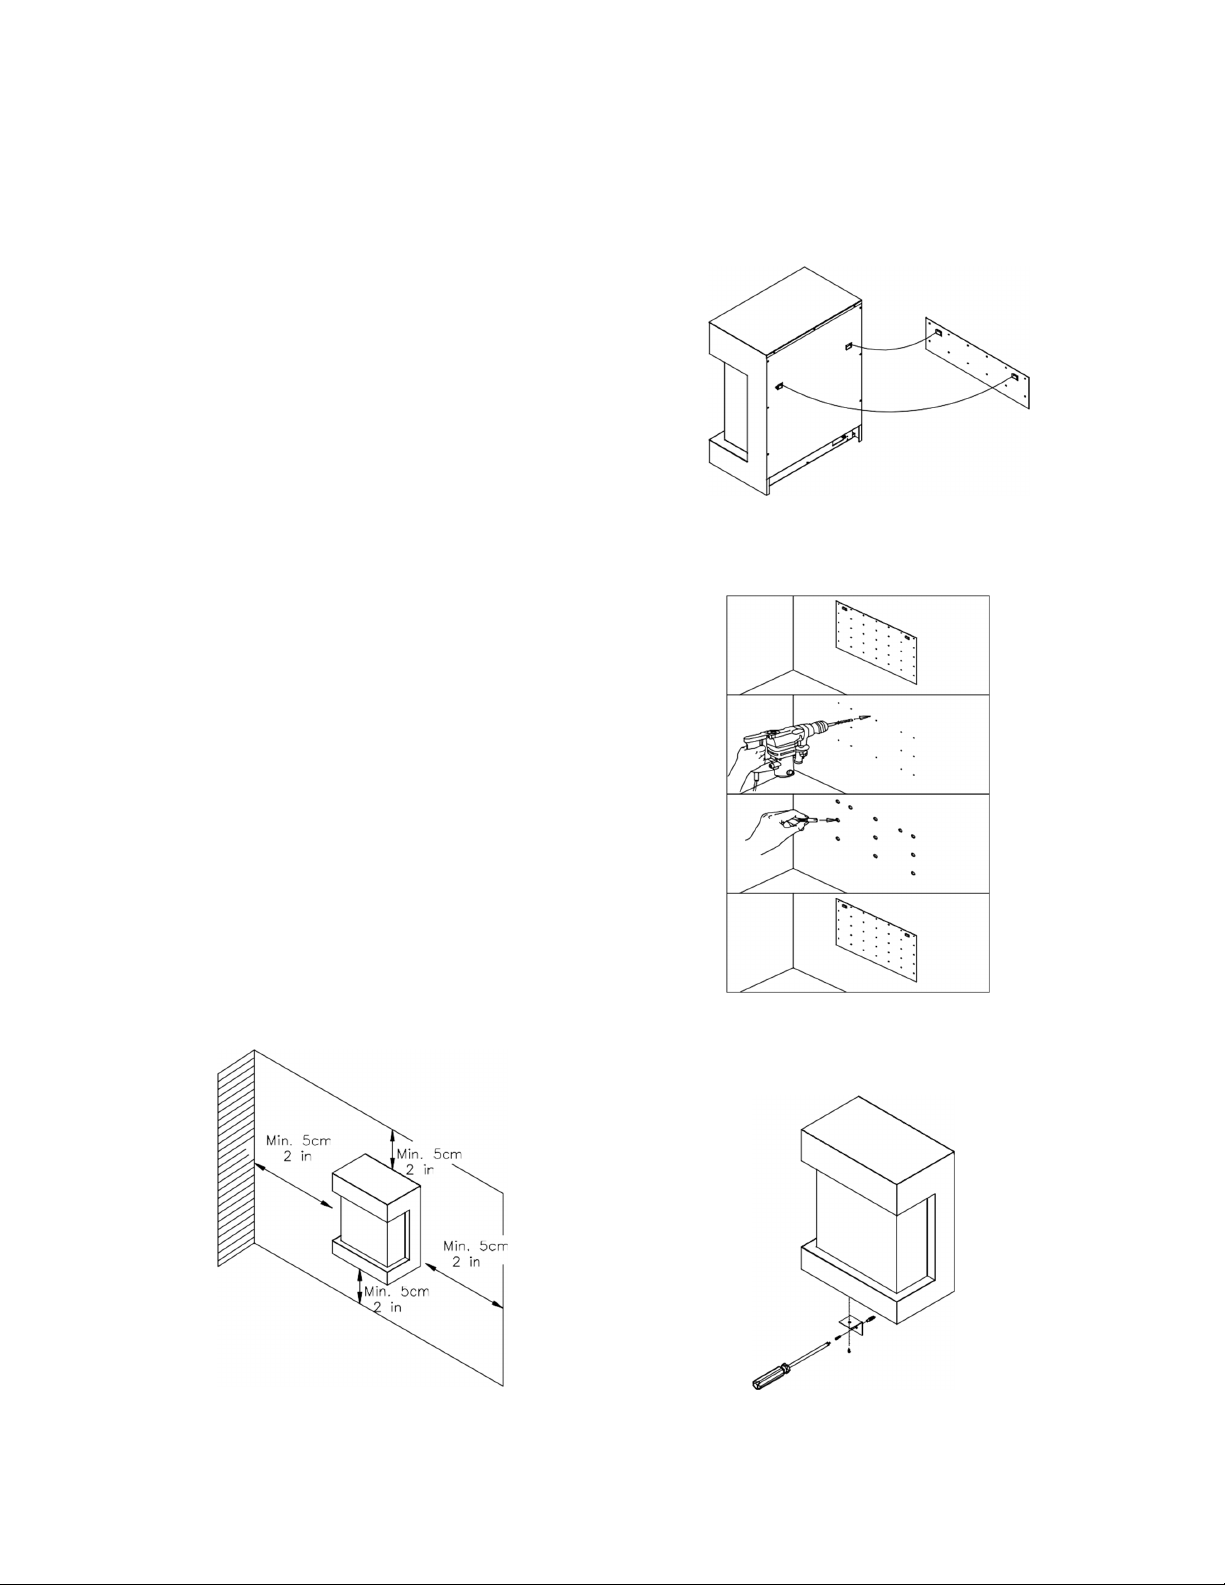
3.
Checkthewalltoensurethereisnowiring,
pipewiresetc.intheareatobedrilled.Drill
8 or more pilot holes (8mm diameter &
40mmdepth)usingasuitablesizedrilland
putthewallplugsintotheholes.
4.
Takeoutthehangerfromthefireplaceby
unscrewthescrew(Fig.2).
5.
Fixthehangertothe
wall.ReferringtoFig.3.
6.
Avoidfireplacetomove,usescrewfix
fireplacetowall(Fig.4).
Warning!
Besurethattheboltshavebeenfixed
firmlyenoughtowithstandtheweight!
Fig.1
Fig.2
Fig.3
Fig.4
7
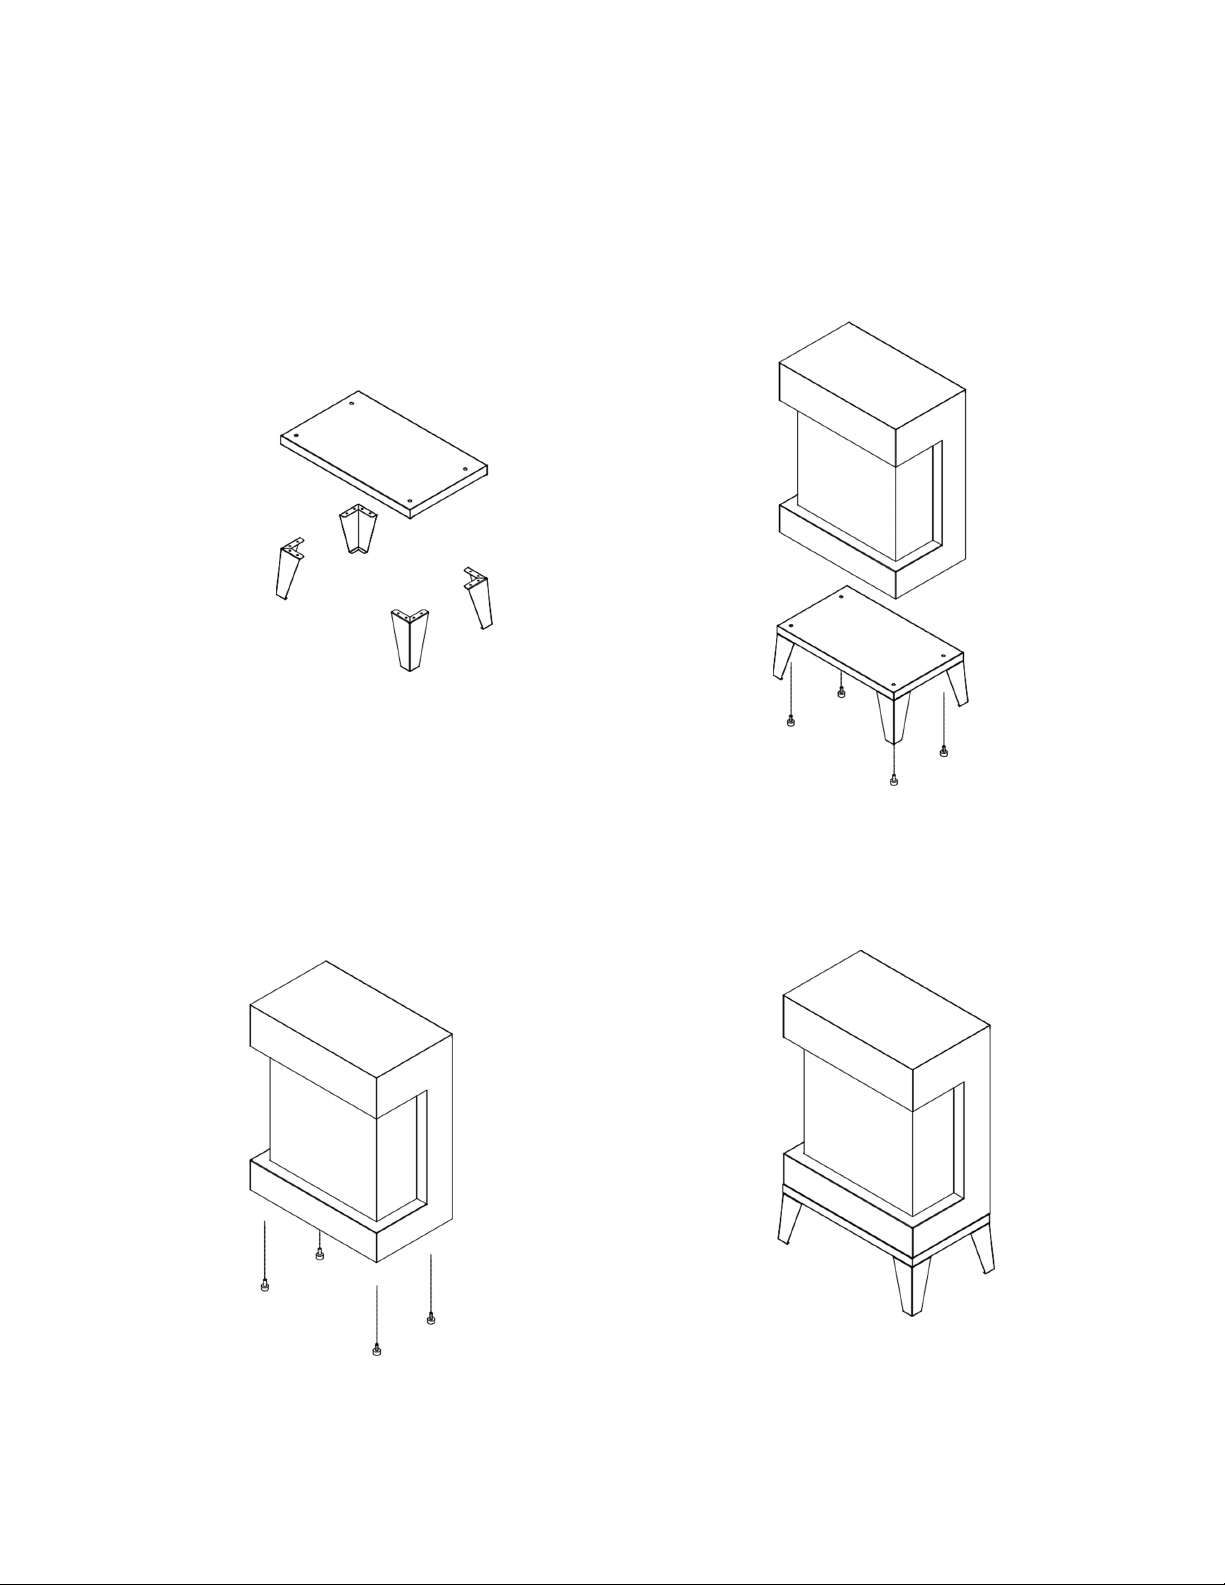
INSTALLATIONCUBE‐BASE‐LEGS
1.
Screwthebaselegstothesteelpanel.
2.
Unscrewtheadjustablefeetfromthe
bottomoftheunit.
3.
Placetheunitontothebaselegandscrew
andscrewintheadjustablefeet,fixingthe
unitandthebaseleg.
4.
Youhavecompletedtheinstallationof
theCUBE‐BASE‐LEGS.
8
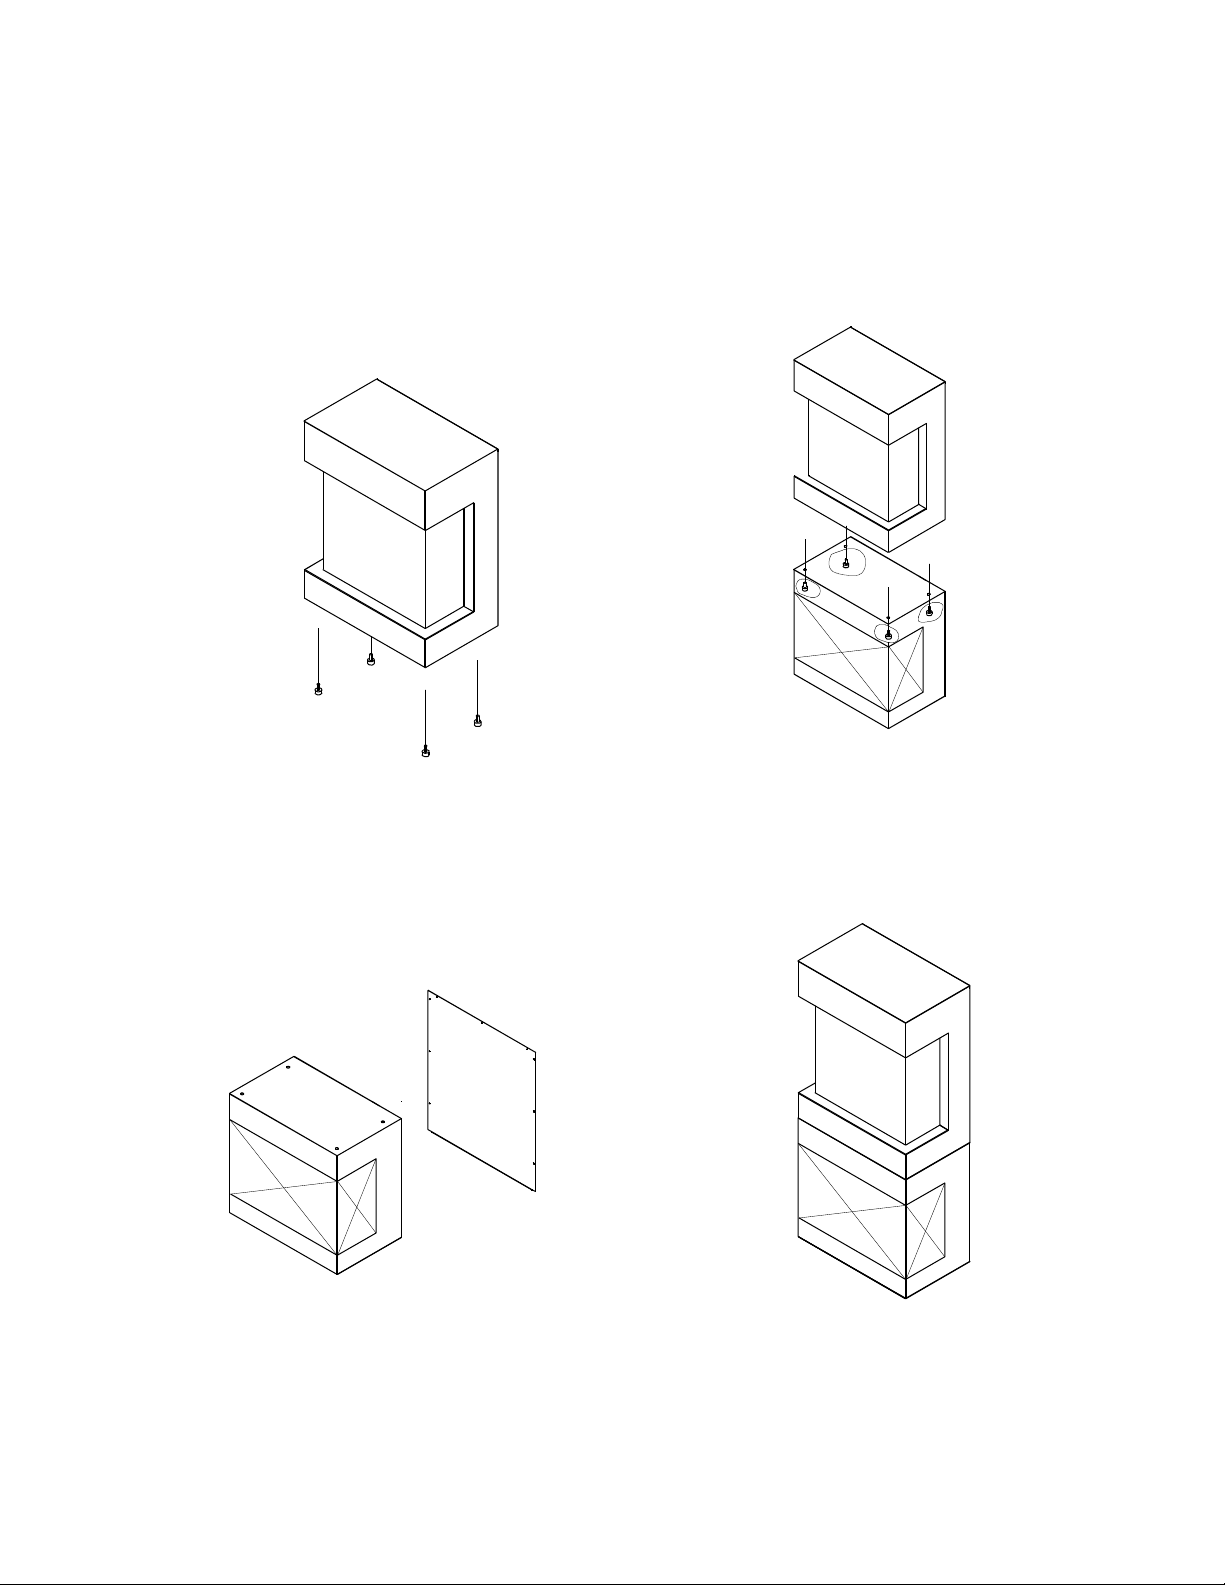
INSTALLATIONCUBE‐BASE‐SPEAKER
1.
Unscrewtheadjustablefeetfromtheunit.
2.
Unscrewtherearscrewsandremovethe
backsteelpanel
3.
PlacetheunitontheCUBE‐BASE‐SPEAKER
andscrewintheadjustablefeet,fixingthe
unitandthespeakerbox.
4.
Plug into the back of the unit. Re‐install
thebacksteelpanel.

9
INSTALLATIONOUTDOOR
CUBEelectricfireplacesaresuitableforinstallationinoutdoorareasprotectedfromdirectwater
impingement.Inadditiontomaintainingthelistedmantelandcombustiblesclearances,arain
protectionoverhangfactorof1/2shallbeconstructedtothefrontandtoeachsideoftheinstalled
appliance.Seeillustrationbelow.Allwiringconnectionstolinepowershallbeinaccordancewithlocal
buildingcoderequirements.
NOTE:TheCUBEWallMountUnitisapprovedforoutdooruse.TheCubeSpeakerBaseandCubeLegBaseare
NOTapprovedforuseoutdoors.
Theoverhang(A)mustextendatleast1/2theroof‐lineheight(B).Heightismeasuredfromthebaseofthe
fireplace.
Forexample:iftheroof‐line(B)is8'abovethebaseofthefireplace,theoverhang(A)mustbeatleast4'.
10
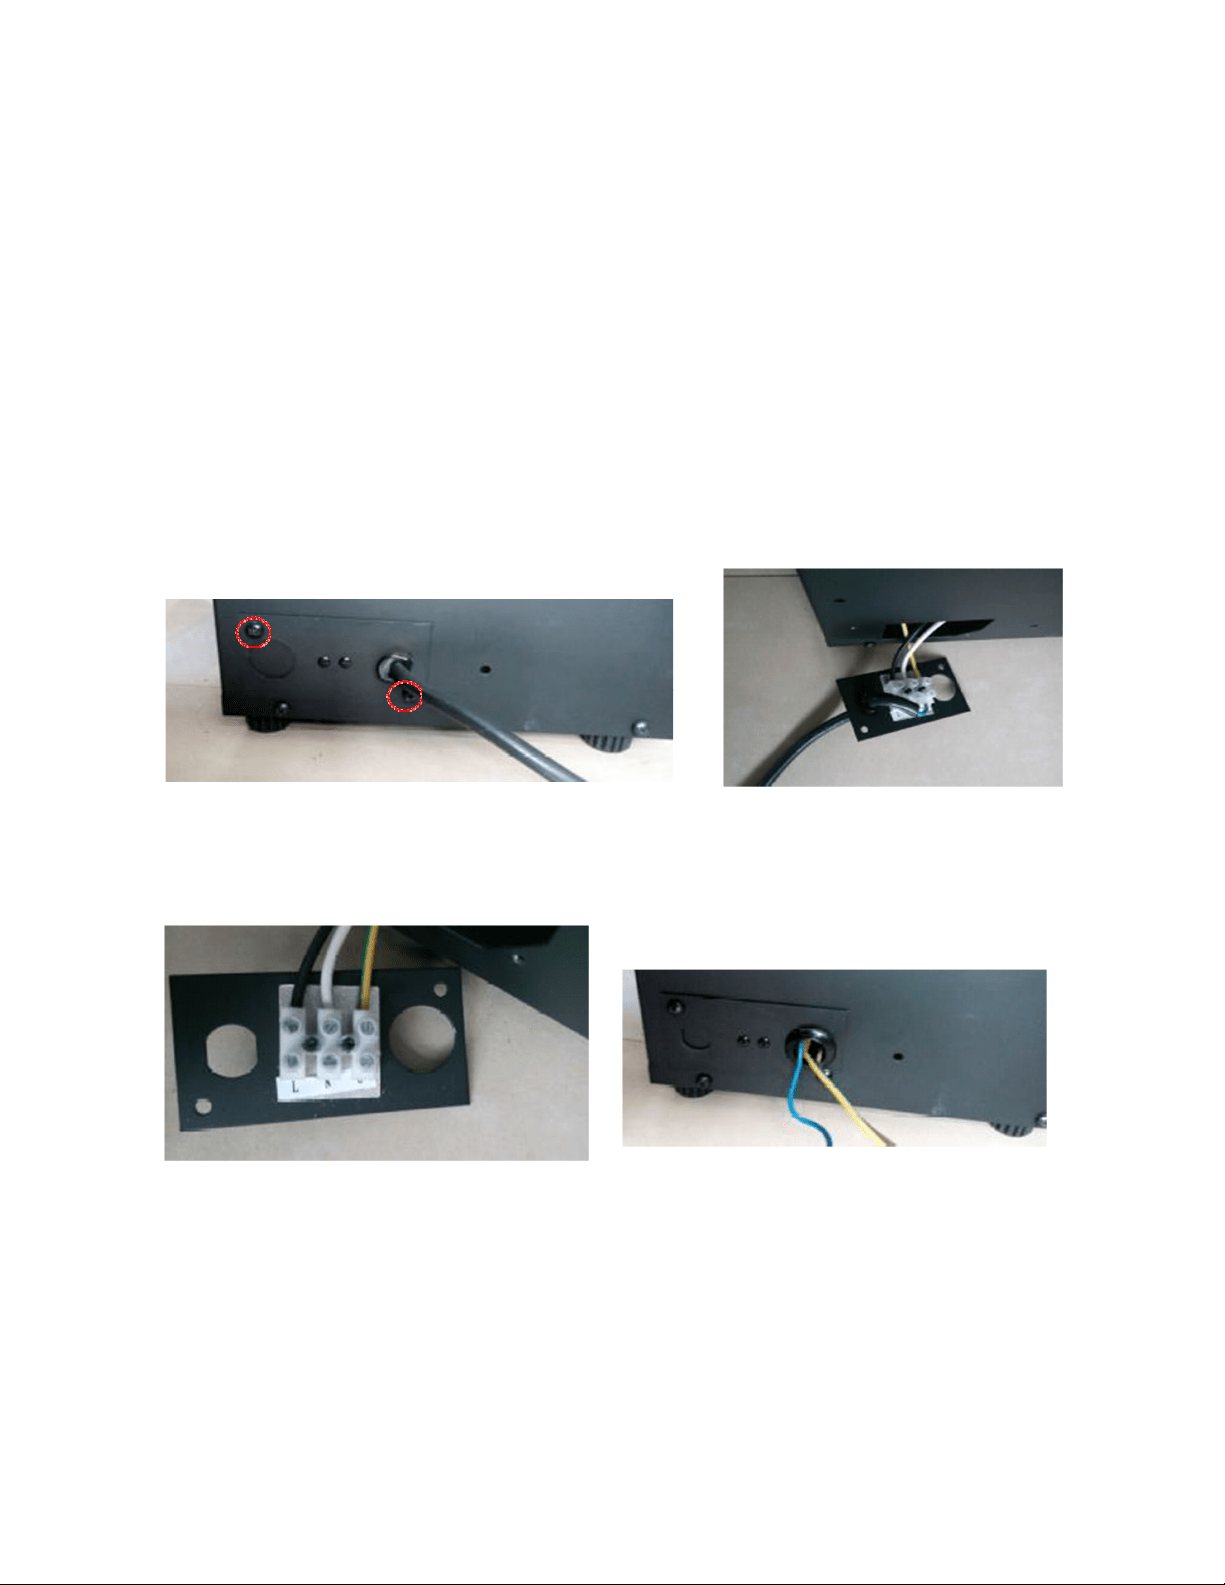
HARD‐WIREINSTALLATION
Turnofftheappliancecompletelyandletcoolbeforeservicing.Onlyaqualifiedtechnician
shouldserviceandrepairthiselectricappliance.
Ifitisnecessarytohardwirethisappliance,aqualifiedelectricianmustremovethecordconnection,
andwiretheappliancedirectlytothehouseholdwiring.
Thisappliancemustbeelectricallyconnectedandgroundedinaccordancewithlocalcodes,ifhard
wired. In the absence of local codes, use the current CSA C22.1 CANADIAN ELECTRICAL CODE in
CanadaorthecurrentANSI/NFPA70NATIONALELECTRICALCODEintheUnitedStates.
1.
Removethecoverplatefromtheleftsideoftheappliancebyremovingthetwoscrews,as
shownbelow.Unscrewandremovepowercord.
2.
Attachthewiringtothejunctionblock.Pleasemakesurethelivewiregoesintothe"L",the
neutralwireinto"N"andthegroundwireinto"G".
3.
Replacethesteelplateandscrews.
11
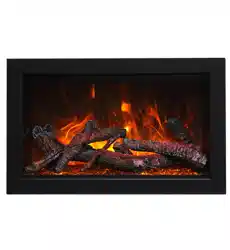
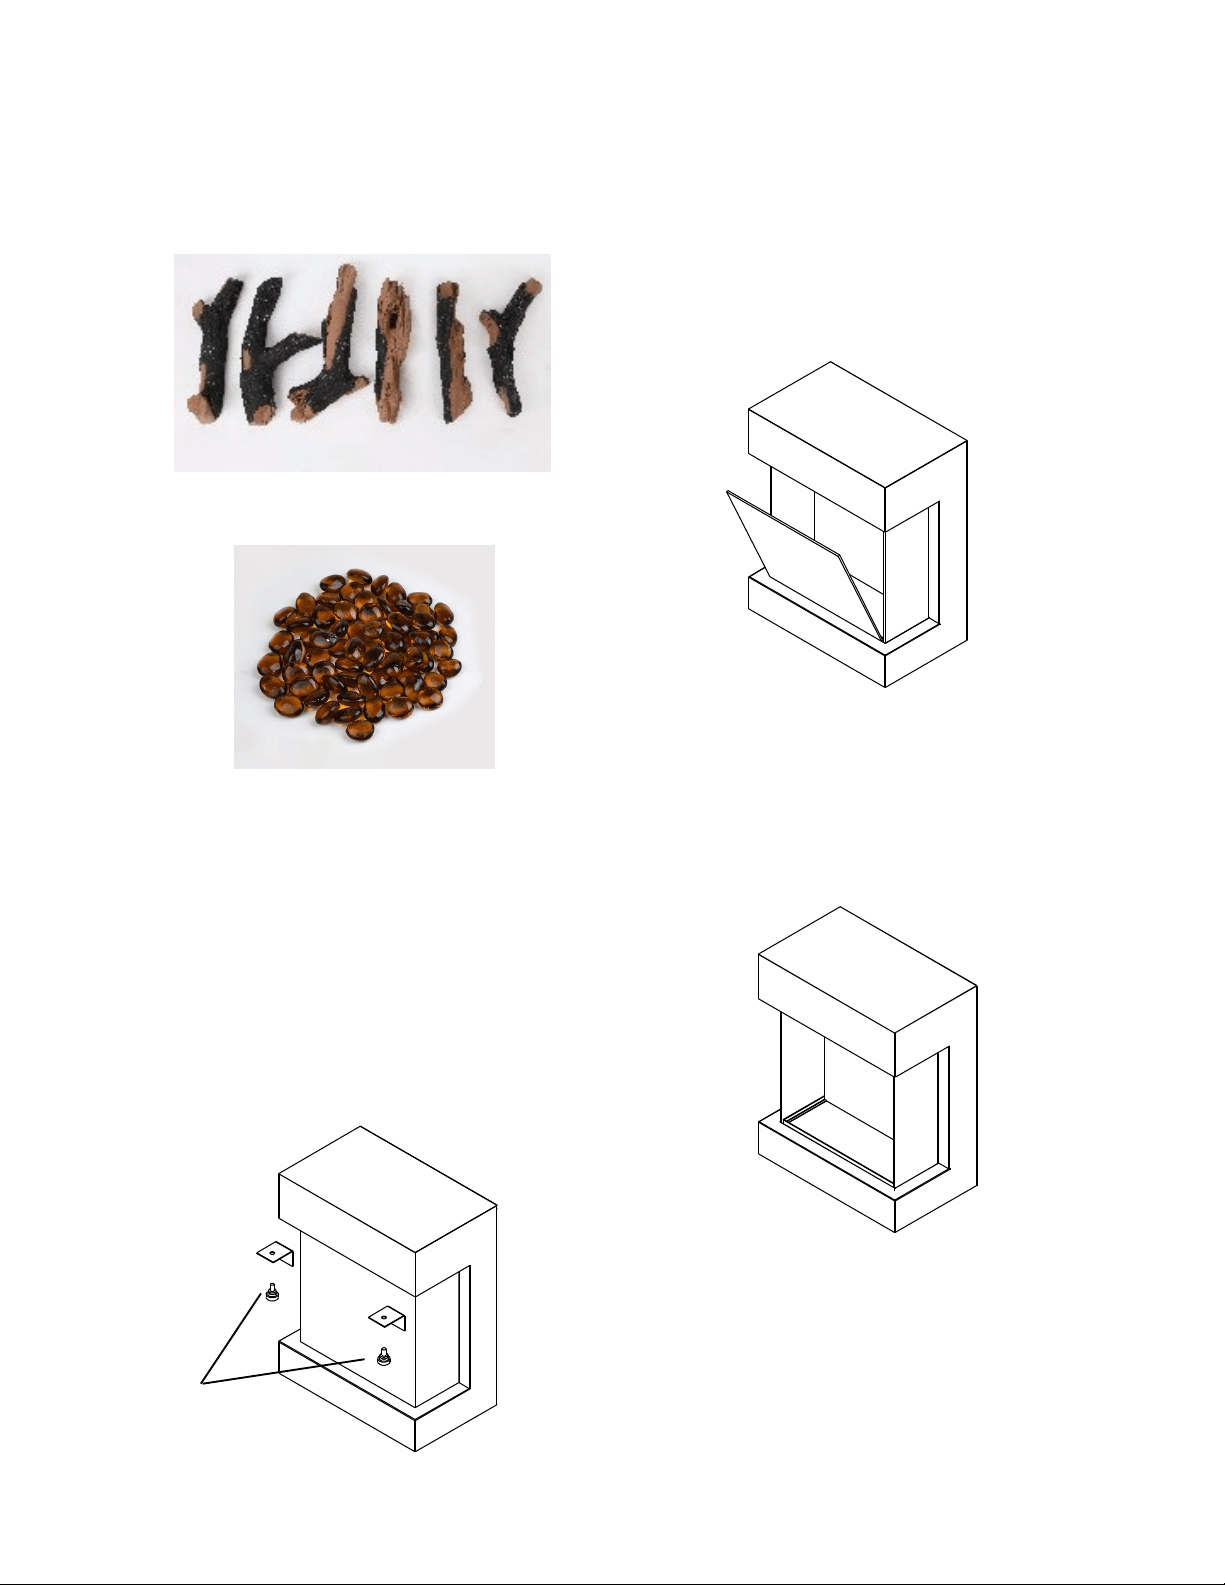
MEDIAOPTIONS
Yourfireplaceshippedwith log set andsable
glass.
LOG SET
SABLE GLASS
MEDIAINSTALLATION
STEP 1: Unplug the unit and make sure
controlsareswitchedoff.
STEP 2: Unscrew 2 adjustable screws that
securingthefrontglasspanel.(Alwayssecure
thefrontglassbeforeunscrewingthesecuring
screws, removal of the securing screws may
causethefrontglasstofalloutsuddenly)
STEP3:Removethefrontglasspanelto
decorate your fireplace. Pour the decorative
mediaintothetray.Feelfreetouseany
combinationoffireglassmediathatyoufind
mostappealing.
STEP 4: After finishing decoration, re‐install
the front glass panel using the securing
screwsremovedinstep2.
adjustable screws
12
OPERATION
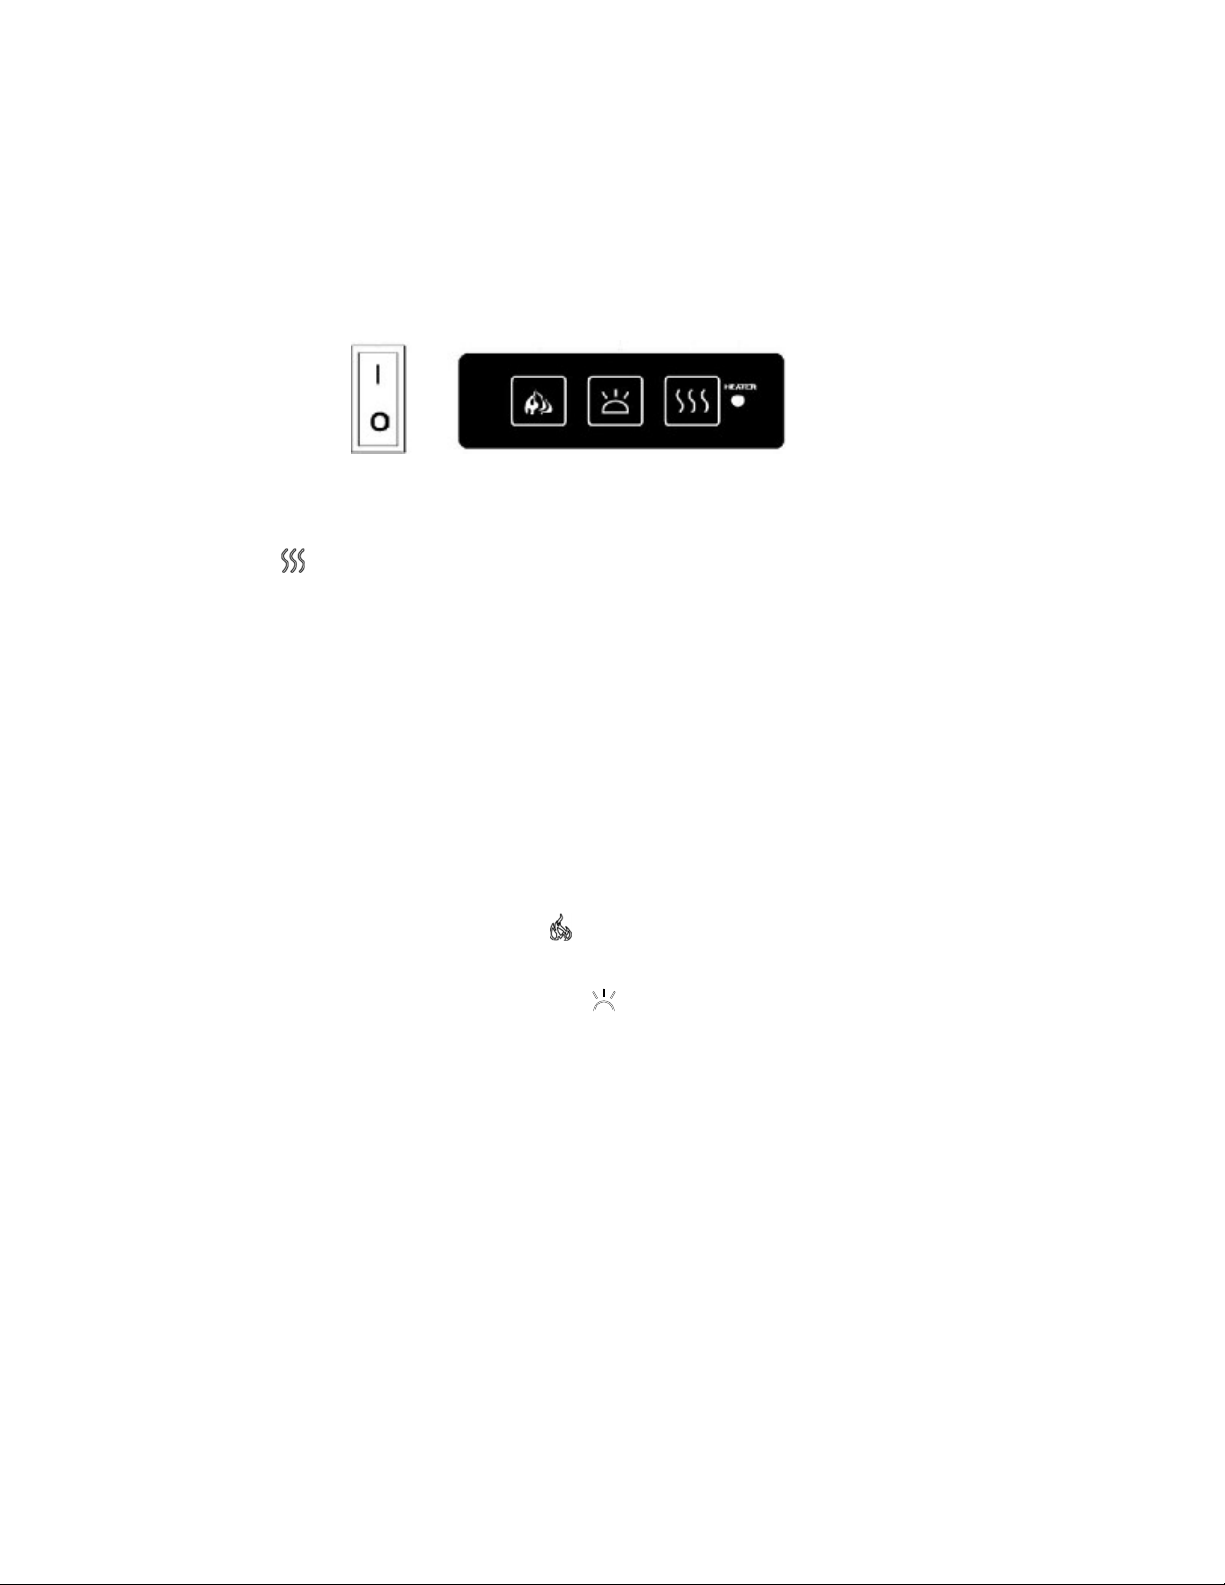
Thefireplacecanbeoperatedeitherbytheswitcheslocatedontheleftfrontofthefireplaceunitor
bysuppliedremotecontrol.
MANUALOPERATION
1.
ThemainpowerON/OFFswitchinpositionO,thefireplaceisOFF.
2.
WhenmainpowerON/OFFswitchisatpositionI,thefireplaceisreadytouse.
3.
Pressthe buttonrepeatedlytosettheheatertodesiredheatsetting.Theheaterindicator
LEDwillglowwhichshowsthecurrentheatersettings.
a)
RED1500WHEATOUTPUT
b)
BLUE750WHEATOUTPUT
c)
PURPLEAUTOMODE
AUTOMODE
UnderthismodetheheaterwillautomaticallyturnONathighheatsetting1500Wheatoutputwhen
theroomtemperaturedropsbelow22℃(72℉).Whentheroomtemperatureisbetween22‐
25℃(72‐77℉)theheateroutputwillswitchtolowheatsetting750W.Whentheroomtemperature
goesabove25℃(77℉)theheaterwillbeturnedoffandthecyclewillcontinue.TheLEDindicator
willbePURPLEincolourunderthismode.
4.
Flameeffect:Pressthebuttonmarked toadjusttheflamebrightness.Theflamebrightness
willcyclethrough–Low‐Medium‐High‐OFF.
5.
Moodlighteffect:Pressthebuttonmarked tochangethemoodlightcolour.
NOTE:
IfoperatedattheLowheatsetting,thefireplacewillnotprovideasmuchheatoutputasin
theHighheatsetting,howeverthelowsettingwillnotrequireasmuchelectricalpowertooperate.
Toavoidoverloadingacircuit,donotplugthefireplaceintoacircuitthatalreadyhasother
appliancesworking.Whenthefireplaceisnotinuseswitchoffandunplug.
SAFETYCUT‐OFF
Thisapplianceisfittedwithasafetycut‐offwhichwilloperateifthefireplaceoverheats(eg.Due
toblockedairvents).Forsafetyreasons,thefireplacewillNOTautomaticallyreset.
Toresettheappliance,disconnecttheappliancefromthemainsupplyforatleast10minutes.
Reconnectthesupplytothemainandswitchontheappliance.
13
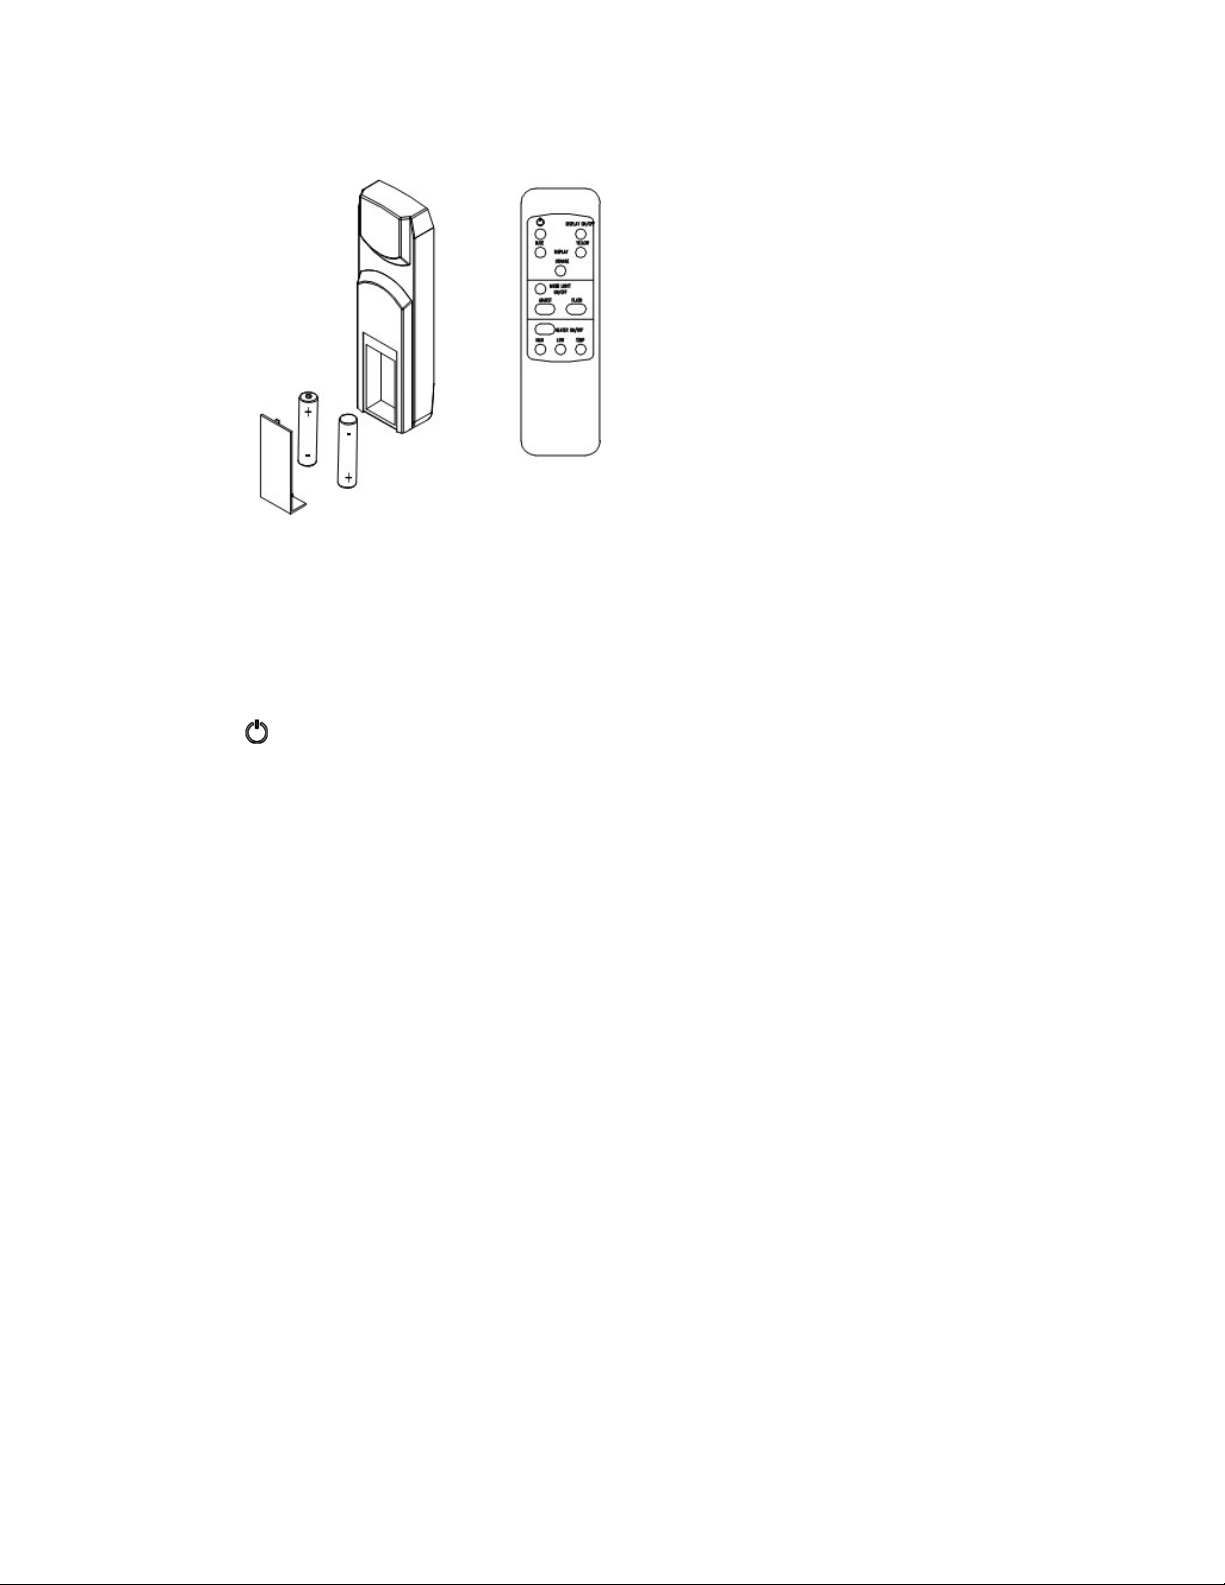
REMOTECONTROLOPERATION
Forremotetofunctionmakesuretheheaterispluggedinandmainpowerswitchlocatedonthe
bottomlefthandsideisatpositionI.
Whenoperatingtheremotemakesureyoupointtheremotetothecenterofthefireplaceandmake
sureeachtimeyoupressthebuttonthebuzzerinsidetheunitwillbeeponce.Ittakessometimefor
the receiver to respond to the transmitter. Do not PRESS the buttonsmore than once within two
secondsforcorrectoperation.
Poweron button:Thepower‐onbuttonattopleftcorneroftheremoteisthemainON/OFF
powerbutton.Thiswillturnoffallthefunctionsandthefireplacewillbeinstandbymode.
DISPLAY ON/OFF button:SwitchingthefireplaceflameandtraylightON/OFF.Ithasfunctionsof
settingmemory.
DISPLAY BLUE button: Adjust the blue color brightness of flame and tray.
DISPLAY YELLOW button: Adjust the yellow color brightness of flame and tray.
DISPLAY ORANGE button: Adjust the orange color brightness of flame and tray.
MOODLIGHTON/OFFbutton:SwitchingthemoodlightON/OFF.
ADJUSTbutton:Switchingthecolorofthemoodlight.
FLASHbutton:Switchesthemoodlightintoflashmode,thiscyclesthroughallmoodlightcolors.
HEATER ON/OFF button: Switching the heater ON/OFF. It has functions of setting memory.
HIGH button: Press the high button to switch the heater to high heat setting 1500W.
LOW button: Press the low button to switch the heater to low heat setting 750W.
TEMP. button: Press the TEMP. button to switch the heater to AUTO mode. Under this mode
the heater will operate in similar way as explained above for the manual operation.
14
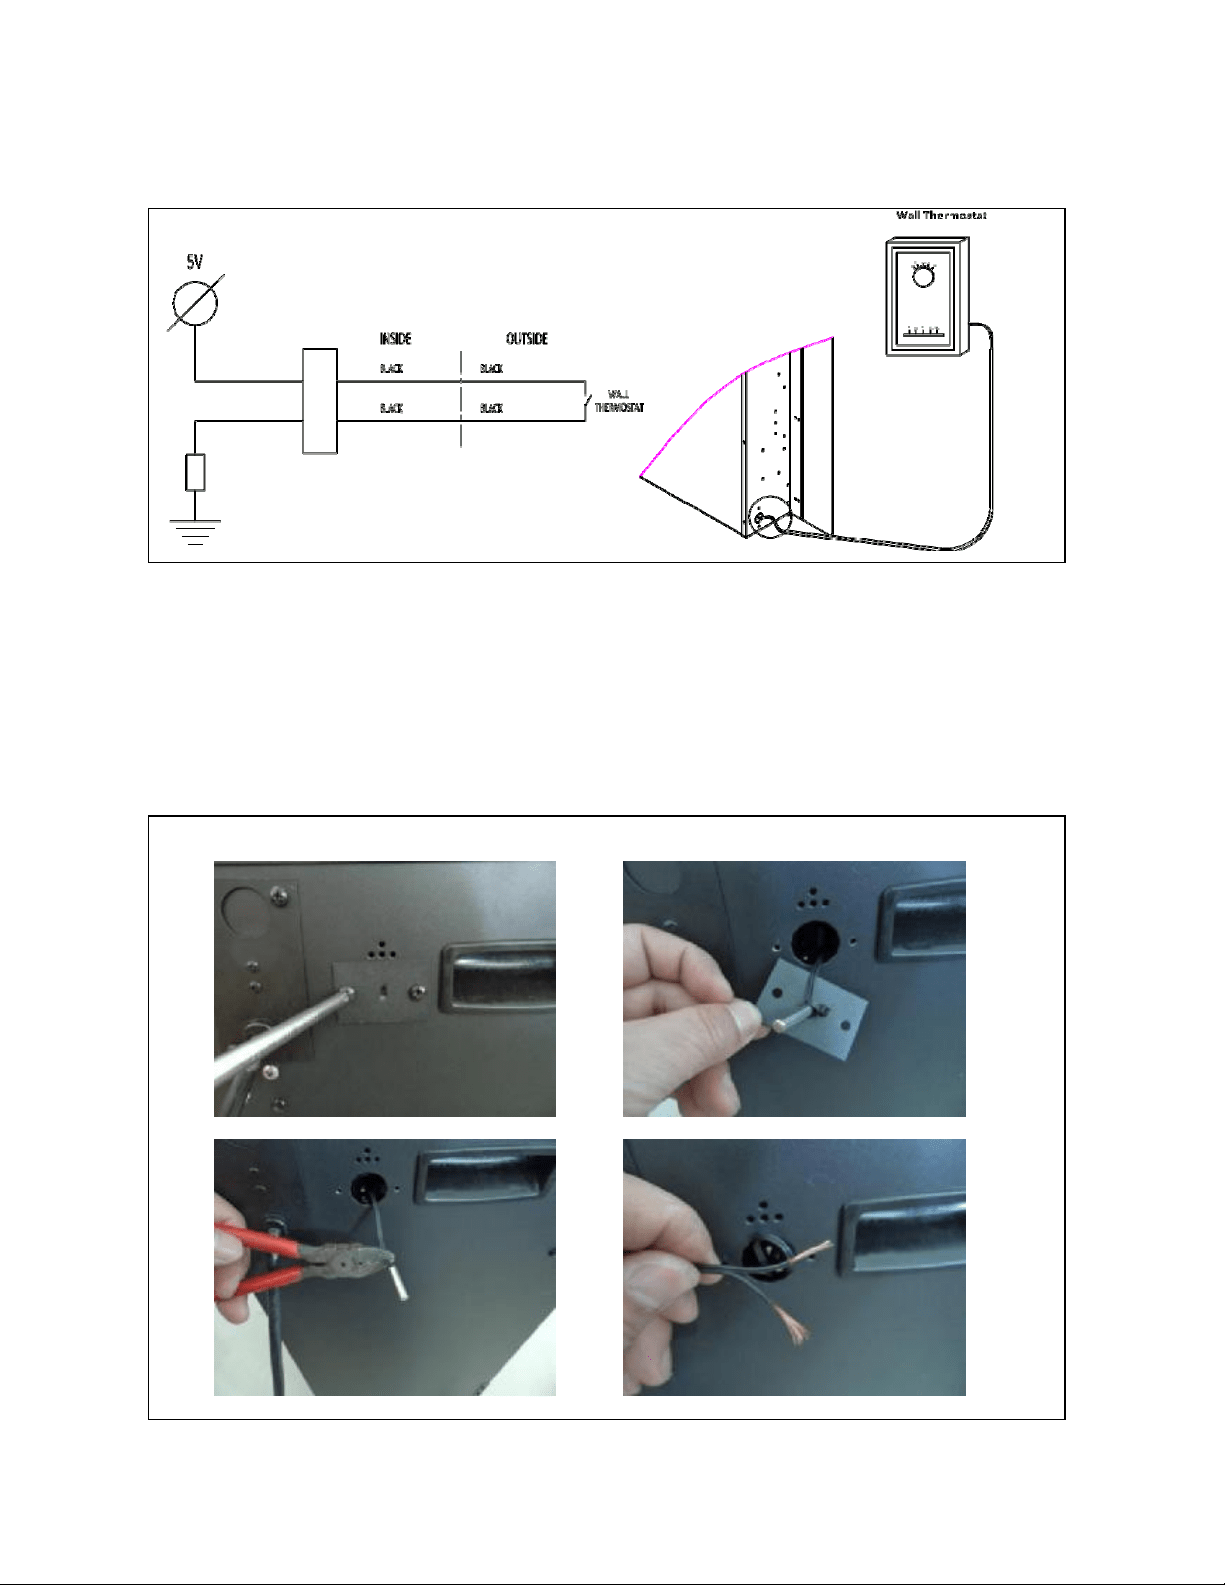
INSTALLINGWALLTHERMOSTAT
WALLTHERMOSTATWIRINGDIAGRAMS
Wirethewallthermostatpriortoinstallingthefireplace.
WALLTHERMOSTATWIRING(24VAC)
InstallWallThermostatperinstructionsprovidedwithkitandperthefollowinginformation:
1.
Turnoffcircuitbreaker.
2.
Removecoverplatelocatedontheleftsideofappliance.
3.
Pullthewireoutandcuttheinsidethermostat.Connectthewirestothewallthermostatas
shownbelow.Followinstructionsprovidedwithwallswitchkit.

15
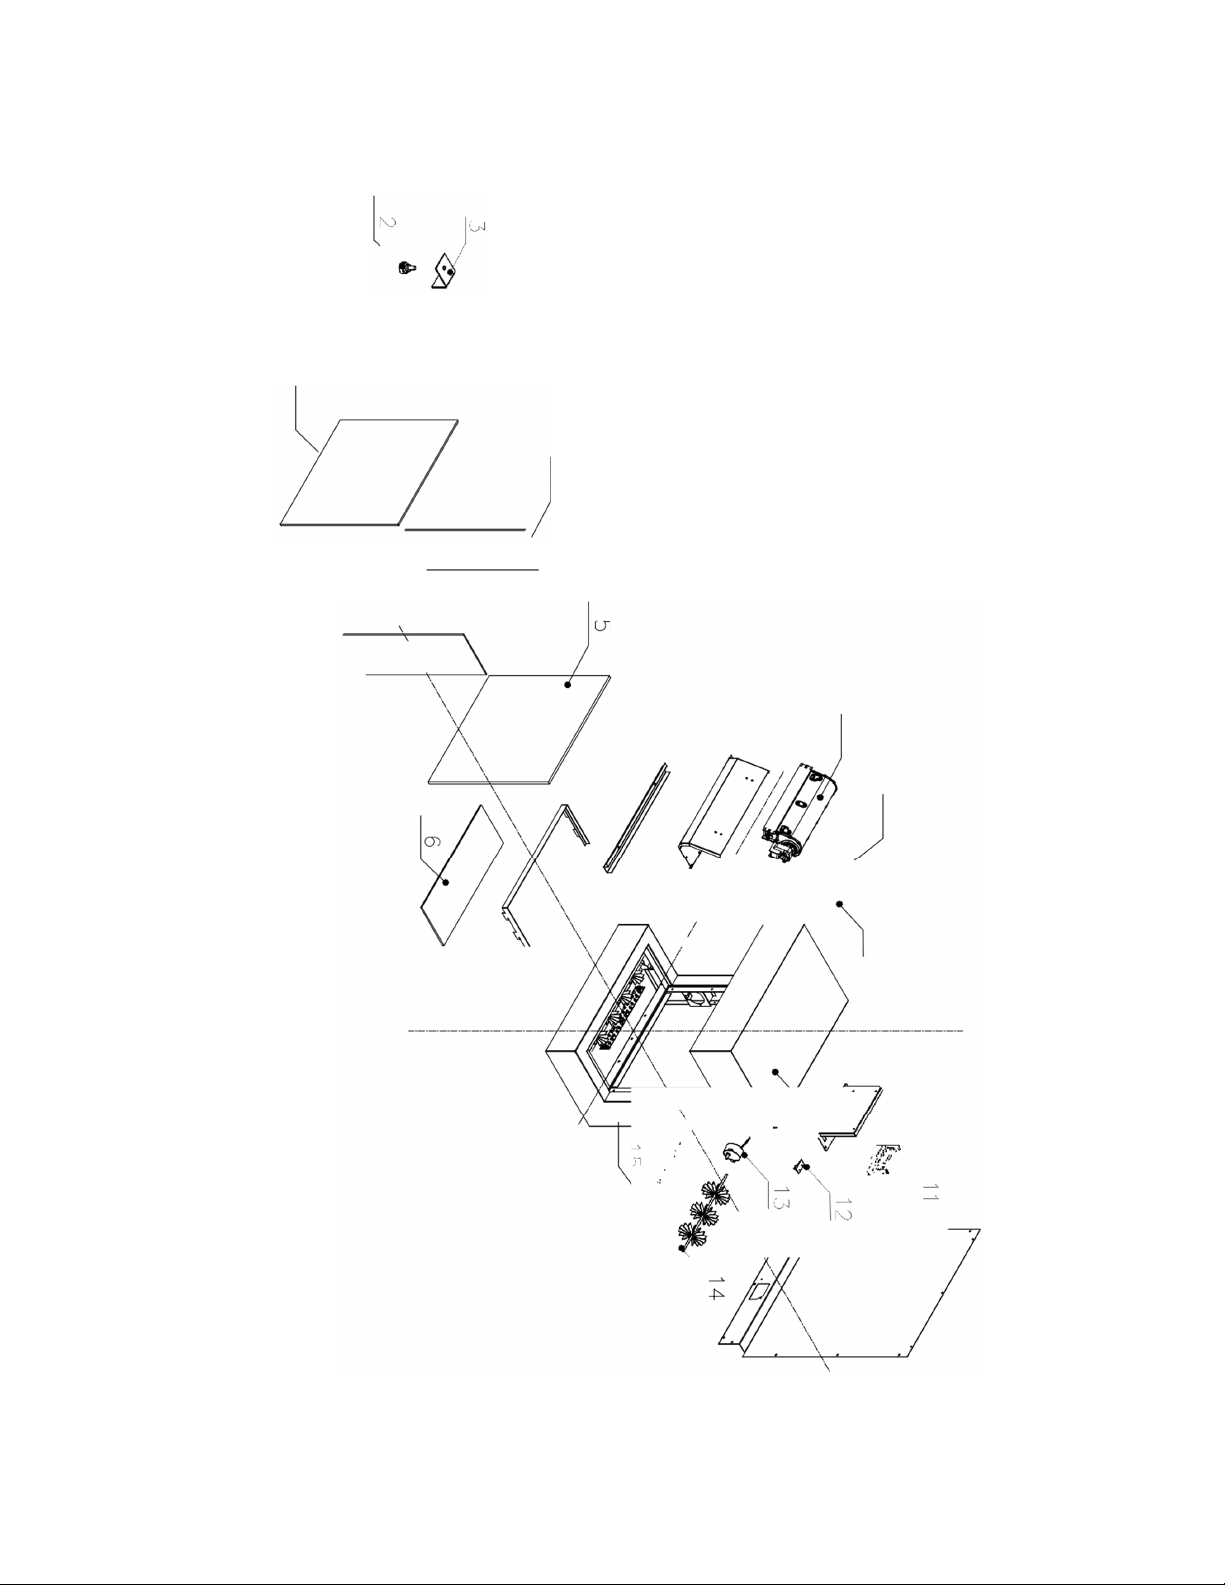
REPLACEMENT PARTS
This list contains replacement parts
NO. PART NUMBER DESCRIPTION QTY.
1 10701357 FRONT CLEAR GLASS (MIDDLE) 1
2 10201505 ADJUSTABLE SCREW 2
3 3123010 FIXER FOR FRONT GLASS PANEL 1
4
10701356
SIDE GLASS PANEL 2
5 10702216 VISUAL GLASS 1
6
10702215
BOTTOMGLASS
1
7 602082 BLOWER AND HEATER ASSEMBLY 1
8 601036 CONTROL PANEL 1
9 10104002 SWITCH 1
10 3158501 FIRE BOX 1
11 601032B CIRCUIT BOARD 1
12 301506 REMOTE RECEIVER 1
13 10101225 FLAME MOTOR 1
14
3173502
FLICKER ASSEMBLY 1
15 1 LED STRIP 1
16 10105063 REMOTE CONTROL 1
17 10125025 TOP LIGHT 1
*Remote control and top light are not shown in the exploded view.
16
EXPLODED VIEW
i
•
+'
\
\
\
\
OJ
/
.
/
'
/
//
lD
\
\
\
\
\
\
-----------
.
-/.
v
TIU
1
00
ꞏ
p
o
ꞏ
Q
0
l \
)
J
00
'
J
"Q
.
I I
Q
z
RECEIVER
-q5
TEMPERATURE SENS R
L\)J
>-
.
I
I
-
J
J
00
ꞏ I
<
oo
<
ꞏ
00
o
!
JJ:-4
00
0
UUlUJ
ll
illRP
0
O - •
IPl
u
0
1--1
Lm. •
L
1
.
/n"'-
-
JJ:-4
00
"•9."
BYB+
C 'U
BUTT N
: J
P.....
a
LI ,iT-B
0
RBI.ATꞏ+
M . . .
RBLAT-H:
P-1,1
0
iL
1
FAN HEATER
SWITCH
P WER RD
e
RBI.AT-Bl
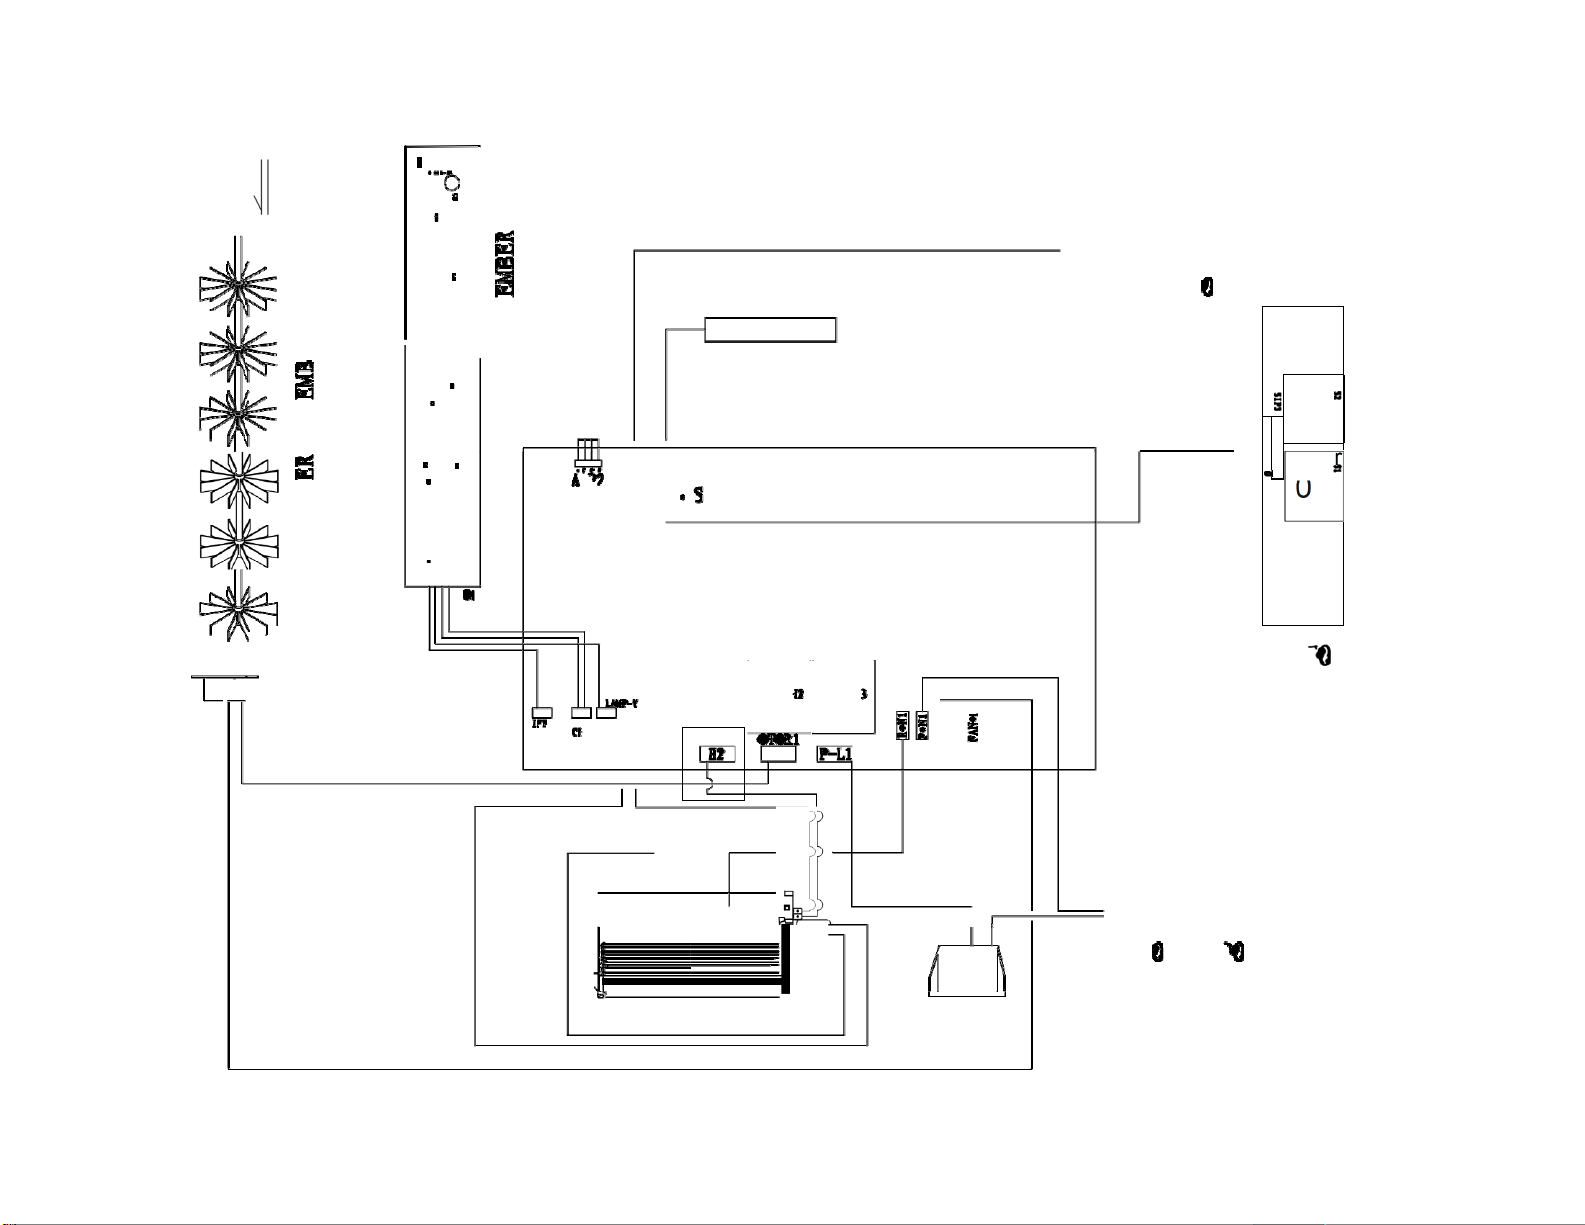
Wiring Diagram
16
□
r
0
r
0

17
TROUBLESHOOTING
PROBLEM POSSIBLECAUSE SOLUTION
Dimornoflame FlameLED’sareburntout. InspecttheLED’sandreplacethemif
necessary.
Backblackclothisfallingoff
androlledupintheflicker.
Changeaflickerandbackblackcloth.
Ember bed is not
glowingordimming
EmberLED’sareburntout InspecttheemberbedLED’sand
replacethemifnecessary.
Applianceturnsoffand
willnotturnon
Appliancehasoverheated,and
safetydevicehascausedthe
thermalswitchtodisconnect.
Turnoffthemainswitch,allow
appliancetocoolfor10minutes,
turnbackon.
House
tripped.
circuit breaker has Resethousecircuitbreaker.
Appliance’sfusehasblown. Replacethefuse.
Appliancewillnotcome
on when switch is
flippedtoON
Applianceisnotpluggedintoan
electricaloutlet.
Checkplugandplugin.
Appliancehasoverheatedand
safetydevicehascausedthe
thermalswitchtodisconnect.
Turnoffthemainswitch,allow
appliancetocoolfor10minutes,turn
backon.
Circuitboardisburntout. Inspectthecircuitboardandreplace
itifnecessary.
Nowarmaircomingout
ofappliance
Heaterisburntout. Inspect the burner and heater
assemblyandreplaceitifnecessary.
Flamesputters Flamemotorisdefective. Callaqualifiedservicetechnicianand
replaceflamemotor.
Remote Control does
notwork.
Lowbatteries.
Unitswitchin“O”position.
Replace AAA batteries in remote
control.
Turntheswitchin“I”position.
Flameisfixed. Wiringmaybelooseorthe
flamemotormaybedefective.

18
SERVICEHISTORY
Thisheatermustbeservicedannuallydependingonusage.
Date Dealer
Name
Service technician
Name
ServicePerformed SpecialConcerns
NOTES:

WARRANTY FOR PRODUCTS MANUFACTURED AFTER JANUARY 1st, 2016
Amantii Imports Corp. ("Amantii " ) warrants that your newly purchased Amantii electric fireplace is free from manufacturing and material defects
for a period of two (2) years from the date of the first purchase, subject to the conditions and limitations contained below.
Warranty Application & Exclusions
This limited warranty applies to your newly purchased Amantii electric fireplace; the limited warranty's application is limited to purchases made in
any province of Canada or in any of the 52 States of the United States of America, including the District of Columbia. Only the original purchaser
of the product is eligible for coverage under this limited warranty; the warranty is not transferable.
Products excluded from this limited warranty
Light bulbs are not covered by this limited warranty and are the sole responsibility of the owner/ purchase r. Amantii does not cover service or
labor charges.
Warranty Coverage and Term
Products covered by this limited warranty have been tested and inspected prior to shipment and, subject to the provisions of this warranty,
Amantii warrants such products to be free from defects in material and workmanship for a period of two (2) years from the date of the first
purchase of such products.
The limited two (2) year warranty period for products also applies to any implied warranties that may exist under applicable law. Some
jurisdictions do not allow limitations on how long an implied warranty lasts, so the above limitation may not apply to the purchaser.
All other warranties-expressed or implied-with respect to the product, its components and accessories or any obligation/liabilities on the part
of Amantii are hereby expressly excluded.
Limitations to Coverage Under Limited Warranty
This limited warranty does not apply to products that have been repaired, except by Amantii or its authorized service representatives, or
otherwise altered. This limited warranty further does not apply to defects resulting from misuse, abuse, accident, neglect, incorrect installation,
improper maintenance or handling, or operation with an incorrect power source. Products made by other manufacturers, sold with the product
or thereafter, are not covered by this limited warranty. The use of unauthorized components will render this warranty null and void.
Outdoor Units
All units that are installed outdoors or in moisture intense conditions must include a rain protection overhang factor of 1/2 shall be constructed to
the front and to each side of the installed appliance. See outdoor installation instructions for more information. Failure to comply will result in
voiding the warranty.
Defects
Defects must be brought to the attention of the selling dealer. Please have your proof of purchase, catalogue/model and serial numbers available
when contacting dealer; any and all service under the limited warranty requires a proof of purchase of the product. Should a product or part
covered by this limited warranty be proven to be defective, in material or workmanship, and during the two (2) year limited warranty period,
Amantii will replace such defective product or part without charge. If Amantii is unable to replace such product, or if replacement is not
commercially practicable or cannot be timely done, in its sole discretion Amantii may, in lieu of replacement, choose to refund the purchase price
for such product or part. Amantii does not cover labor or service charges to replace said par ts.
Limitations
In no event will Amantii, including without limitation any of its directors, officers, shareholders, employees, consultants, agents, heirs, executors,
administrators and assigns, be liable to the purchaser or any third party, whether in contract, in tort, or on any other basis for any indirect , special,
punitive, exemplary, consequential, or incidental loss, cost or damage arising out of or in connection with the sale, maintenance, use or inability
to use the product, even if Amantii, including without limitation any of its directors, officers, shareholders, employees, consultant s, agents, heirs,
executors, administrators and assigns, have been advised of the possibility of such losses, costs or damages, or if such losses, costs or damages
are foreseeable. In no event will Amantii, including without limitation any of its directors, officers, shareholders, employees, consultants, agents,
heirs, executors, administrators and assigns, be liable for any direct losses, costs or damages that exceed the purchase price of the product.
Some jurisdictions do not allow the exclusion or limitation of incidental or consequential damages, so the above limitation or exclusion may not
apply to the purchaser.
Application of Provincial and State Law
This limited warranty gives you specific legal rights, and you may also have other rights which vary from jurisdiction to jurisdiction. The provisions
of the United Nations Convention on Contracts for the Sale of Goods shall not apply to this limited warranty or the sale of products covered by
this limited warranty.
General
Amantii reserves the right to make changes at any time without notice, in design, material, specifications, prices and the right to discontinue styles
and products.
Amantii Electric Fireplaces• 502-1027 Davie Street• Vancouver, BC V6E4L2
Effective January 1, 2016