

I
M
P
O
R
T
A
N
T
I
N
F
O
R
M
A
T
I
O
N
R
e
a
d
b
e
f
o
r
e
u
s
e
&
r
e
t
a
i
n
f
o
r
f
u
t
u
r
e
r
e
f
e
r
e
n
c
e
Original Instructions
0344 844 4558
1800 882 350
Please register your
product warranty on line.
To register your warranty and for all
your parts requirements please visit
www.flymo.com
For all other enquiries

Carton Contents
IMPORTANT !
Please check the contents of the carton are correct
BEFORE
assembling your new Flymo product.
IF ANY PARTS ARE MISSING CONTACT:-
Husqvarna UK Ltd. Customer Service Department direct
Telephone : 0344 844 4558 UK 1800 882 350 ROI Fax : 01325 302530
Safety
If not used properly this Gardenvac can be dangerous. The warnings and safety instructions must be fol-
lowed to ensure reasonable safety and efficiency in using this product. The operator is responsible for
following the warnings and instructions in this manual and on the product.
Explanation of Symbols on the Gar-
denvac
Warning
Read the user instructions
carefully to make sure you
understand all the controls
and what they do.
Do not operate in the rain
or leave the product out-
doors while it is raining.
Switch off! Remove plug
from mains before ad-
justing, cleaning or if
cable is entangled or
damaged.
The use of eye protection
is recommended.
Keep bystanders away.
BEFORE USING YOUR GARDEN-
VAC FOR THE FIRST TIME
Assemble debris bag to
bag frame.
EVERY TIME YOU USE YOUR GAR-
DENVAC
Switch off and disconnect
from the mains electricity
supply
BEFORE
fitting
cutting line to cutting head
& clipping into place and
BEFORE REMOVING
cutting line.
Switch off and disconnect
from the mains electricity
supply
BEFORE FITTING
fully assembled debris
bag to product and
BE-
FORE REMOVING
fully
assembled debris bag
from product.
NEVER CONNECT THE PRODUCT
TO THE MAINS ELECTRICITY SUP-
PLY UNTIL THE FULLY ASSEMBLED
DEBRIS BAG IS FITTED COR-
RECTLY
1
2
t
rigger
nozzle
mode indicator
debris bag
Air inlets
cutting lines
2 handle knobs
adjustable handle
2 handle bolts
d
ebris bag frame
instruction manual
adjustable
shoulder
h
arness
General
1.
This product is not intended for use by persons
(including children) with reduced physical, sen-
sory or mental capabilities, or lack of experience
and knowledge, unless they have been given super-
vision or instruction concerning the use of the prod-
uct by a person responsible for their safety.
Children should be supervised to ensure that they do
not play with the product. Local regulations may re-
strict the age of the operator.
2. Never allow children or people unfamiliar with the in-
structions to use the machine.
3. Stop using the machine while people, especially chil-
dren, or pets are nearby.
4. Only use the product in the manner and for the func-
tions described in these instructions.
5. Never operate the product when you are tired, ill or
under the influence of alcohol, drugs or medicine.
6. The operator or user is responsible for accidents or
hazards occurring to other people or their property.

Electrical
1. We recommend the use of a Residual Current Device
(R.C.D.) with a tripping current of not more than 30mA.
Even with a R.C.D. installed 100% safety cannot be
guaranteed and safe working practice must be followed
at all times. Check your R.C.D. every time you use it.
2. Before use, examine the cable for signs of damage or
ageing. If the cable is found to be defective, take the
product to an Authorised Service Centre and have
the cable replaced.
3. Do not use the product if the electric cables are dam-
aged or worn.
4
. Immediately disconnect from the mains electricity
supply if the cable is cut, or the insulation is damaged.
Do not touch the electric cable until the electrical sup-
ply has been disconnected. Do not repair a cut or
damaged cable. Replace it with a new one.
5. Your electric cable must be uncoiled, coiled cables can
overheat and reduce the efficiency of the product.
6. Do not pull cable around sharp objects.
7. Always switch off at the mains before disconnecting
any plug, cable connector or extension cable.
8. Switch off, remove plug from mains and examine electric
supply cable for damage or ageing
before
winding cable
for storage. Do not repair a damaged cable, replace it
with a new one. Use only genuine replacement cable.
9
. Never carry the product by the cable.
10. Never pull on the cable to disconnect any of the plugs
11. Always wind cable carefully, avoiding kinking.
12. Use only on AC mains supply voltage shown on the
product rating label.
13. Our products are double insulated to EN60335.
Under no circumstance should an earth be con-
nected to any part of the product.
Preparation
1. Always wear suitable clothing, gloves, and stout shoes.
2. The use of eye protection is recommended.
3. The use of ear protection is recommended.
4. To prevent dust irritation, the wearing of a face mask
is recommended.
5. Do not wear loose clothing or jewellery that can be
drawn into the air inlet.
6. Do not wear clothing with attachments, i.e. toggles or
drawstrings that can be drawn into the air inlet.
7. Inspect your product before each use, especially the parts
of the cutting head. Replace cutting line if worn or damaged.
8. Do not use if any part is damaged or broken or if any of the
screws are loose. Have it repaired by an authorised repairer.
9. Always check your product is in a safe operating con-
dition before use.
Use
1. Use the product only in daylight or good artificial light.
2. Do not use the product when it is raining or in damp
and wet areas.
3. Never use the product in or near water or ponds.
4. Know how to stop the product quickly in an emergency.
5. On slopes, be extra careful of your footing and wear
non-slip footwear.
6
. Walk, do not run.
7. Never pick up or carry the product by the cable.
8. Keep children, pets and bystanders at a safe distance
when using your product.
9. Keep long hair away from air inlet.
10. Keep all inlets clear of debris.
11. Always remain alert.
12. Do not attempt to use your product without the fully
assembled debris bag fitted.
13. Never blow debris in the direction of bystanders.
14. Do not overreach. Keep proper footing and balance
at all times.
15. The cutting head and cutting line continue to rotate
after your product has been switched off.
1
6. Remove the plug from the mains :-
- before removing or replacing cutting line;
- before removing or replacing fully assembled debris bag;
- before leaving the product unattended for any period;
- before clearing a blockage;
- before checking, cleaning or working on the appliance;
- if the product starts to vibrate abnormally. Check im-
mediately. Excessive vibration can cause injury.
Maintenance and storage
1. Keep all nuts, bolts and screws tight to be sure the
product is in a safe working condition.
2. Replace worn or damaged parts for safety.
3. After use the product should be stored in a safe place
where it is protected from damage.
4. Inspect the collection bag regularly. If the collection
bag becomes worn or damaged, replace.
5. Store in a cool, dry place and out of reach of children.
Do not store outdoors.
6. Allow the product to cool for at least 30 minutes be-
fore storing.
CABLES - IMPORTANT
If you want to use an extension cable when operating your
product, only the following cable dimensions should be used.
- 1.0 mm
2
: max length 40 m
- 1.5 mm
2
: max length 60 m
- 2.5mm
2
: max length 100 m
Minimum rating :
1.00mm
2
size cable, 10 amps 250 volts AC.
• THE GARDENVAC IS SUPPLIED WITH CABLE
WIRED DIRECTLY INTO THE PRODUCT.
1.
If the supply cord is damaged, it must be replaced by
your local Husqvarna UK Ltd. Approved Service Centre
or similarly qualified persons in order to avoid a hazard.
2. Flymo Extension Cables are available from your local
Husqvarna UK Ltd. Approved Service Centre.
3. Do not wire an extension cable directly to your product
yourself. Please contact your local Husqvarna UK
Ltd. Approved Service Centre for further information
on the connectors and kits available.
4. Only use extension cables specifically designed for
outdoor use and which conform to one of the following
specifications: Ordinary rubber (60245 IEC 53), Ordinary
PVC (60227 IEC 53) or Ordinary PCP (60245 IEC 57)
CONNECTORS - IMPORTANT
• Flymo connectors are suitable for use with 2 core
cable only. Under no circumstances should these
connectors be used for earthed products.
• All Flymo connectors and cables are of splashproof
construction. They are not waterproof and must not be
left outside permanently nor should they be submerged or
immersed in water. Do not let cable lay or trail through
pools of water or splashed with water from hose pipes.
MAINS PLUG REPLACEMENT - IMPORTANT
• If the plug supplied is cut off it should be destroyed.
There is an electric shock hazard if a cut off plug is in-
serted into a 13 amp socket.
1. No earth required. Flymo products are double insu-
lated to EN60335 and under no circumstances should
an earth be connected to any part of the product.
2. Ensure the mains voltage suits your product
3. IMPORTANT!
The wires in the mains lead are coloured in accor-
dance with the following code:
BLUE - NEUTRAL BROWN - LIVE
The wire which is coloured BLUE must be connected
to the Terminal which is marked with the letter 'N' or
coloured BLACK.
The wire which is coloured BROWN must be connected to
the Terminal which is marked with the letter 'L' or coloured RED.
4. It is important that the outer sheath is clamped cor-
rectly into the 3-pin plug.
5. If in doubt consult your local Service Repairer or quali-
fied electrician before the machine is used.
6. A 13 Amp fuse must be fitted to the Mains Plug
.
7. The normal plug fuse and household fuse only protect
the electrical equipment and are not a safeguard
against electrocution.
If your product is hard wired i.e. non-detachable mains
electric cable, a conversion kit and extension cable is
available from all Husqvarna UK Ltd. Approved Service
Centres which can be found in your local Yellow Pages.
Assembly Instructions
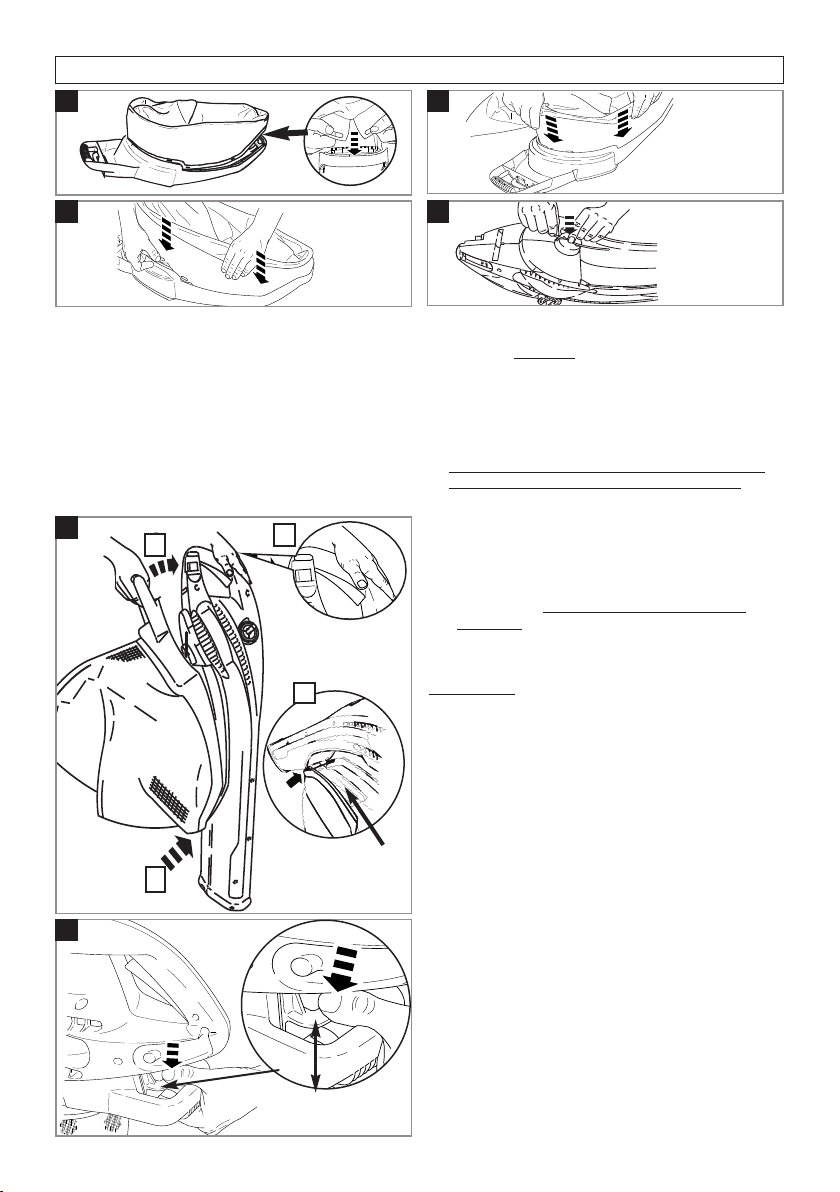
To Fit Assembled Debris Bag To Product (E)
•
Switch off and disconnect from the mains elec-
tricity supply BEFORE REMOVING OR RE-
PLACING the fully assembled debris bag.
• The cutting head and cutting line continue to ro-
tate after your Gardenvac has been switched off.
IMPORTANT
:
Do not squeeze the trigger when fitting
the debris bag (E1)
1. Ensure debris fin is horizontal
(E2)
as illustrated
in
fig E
.
2. Locate bag frame into clip on the underside of
product.
(E3)
.
3. Lift handle towards product until bag latch locates
and click into place.
(E4)
To Remove Debris Bag From Product (F)
1. Gently press bag latch
(F1)
down.
See fig F.
2. Lower handle of bag frame away from product.
3. Move bag frame forward.
1
2
E
2
1
4
3
2
debris fin
F
1
To Attach Debris Bag to Bag Frame
With bag frame on the ground:
-
1. Fit first two holes on the plastic trim of the debris
bag to the first two location points on the front of
the bag frame (where debris fin is attached).
(A)
2. Fit next hole on the plastic trim to next location
point on bag frame.
(B)
3. ...until all holes on the plastic trim of the debris bag
are securely located to bag frame.
(C)
•
ENSURE THE DEBRIS BAG IS FITTED SE-
CURELY TO THE BAG FRAME.
To Fit the Cutting Line to the Cutting Head (D)
• Switch off and disconnect from the mains electric-
ity supply BEFORE removing or fitting the cutting
line.
• Handle the cutting line with care - sharp edges can
cause injury.
1. Place the cutting line into the slot in the cutting
head and click into place as illustrated in
Figure D
.
•
Ensure the cutting line is correctly located.
•
O
NLY
USE
CUTTING
LINE
SPECIFIED
FOR
THIS
PRODUCT
.
S
EE
P
RODUCT
R
ATING
L
ABEL
FOR
MODEL
DETAILS
D
A C
B
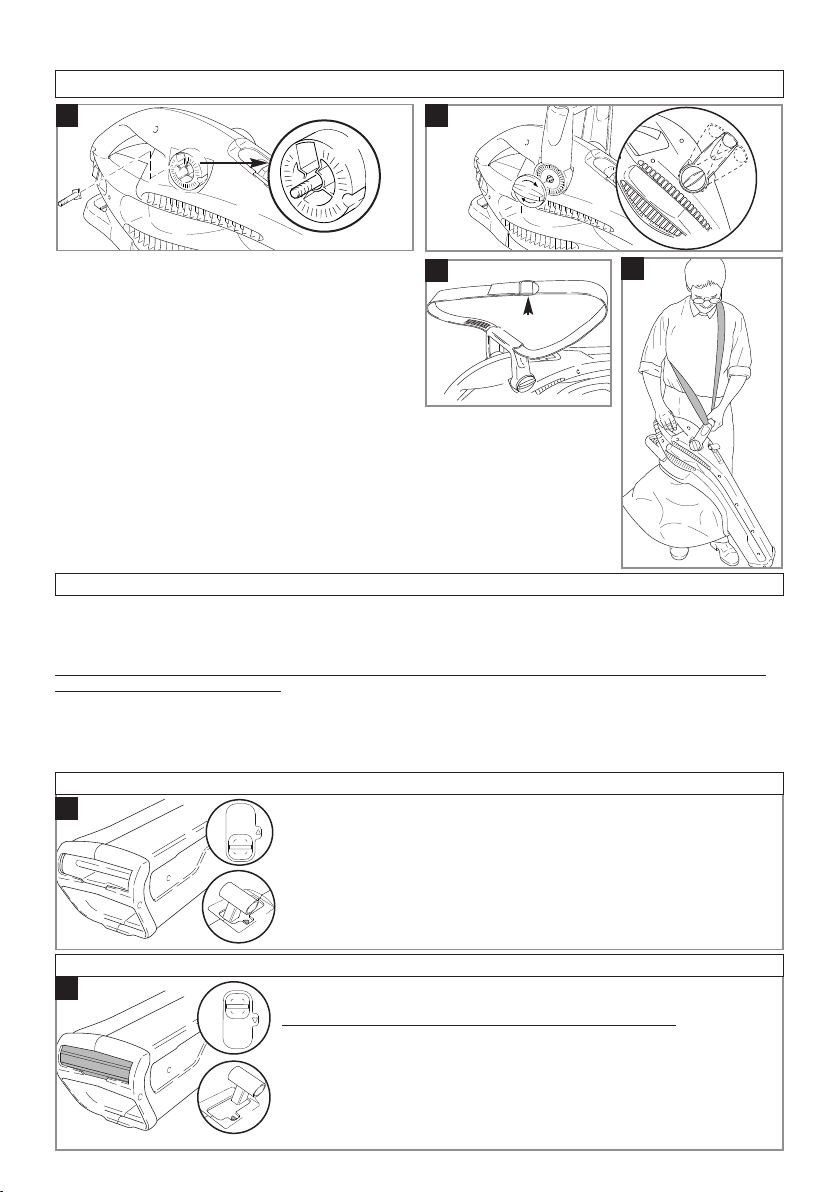
Assembly instructions
Fitting the Handle Bolt (G)
1. Place handle bolt into the location slot on the prod-
uct and slide into place.
(G)
.
2. Repeat on the other side.
Fitting the Handle (H)
1. Locate handle onto handle bolts on each side of
the product.
2. Secure handle by turning handle knobs clockwise.
(H)
3. The handle can be adjusted by turning handle
knobs 3 full turns anti-clockwise, moving handle to
position required and re-securing handle as de-
scribed in 2.
Fitting The Shoulder Harness (J) & (K).
1. Thread strap through the slots in the handle
.(J)
2. Thread strap through the buckle. See
fig J
. Adjust
as required to ensure the shoulder harness is in the
most comfortable position.
See fig. K
.
J
K
G
H
Buckle
How to Use
BLOW
Position 1 - Blow Mode The Gardenvac will blow debris from patios, paths,
driveways, lawns, bushes, borders etc.
Using As A Blower
1. Select position 1 on the mode indicator. See
fig L.
2. Point nozzle towards the ground.
3. To start squeeze trigger.
4. Stand back from debris to be cleared.
5. Point nozzle towards the debris and slowly approach.
6. To stop release trigger.
WARNING
The use of eye protection is recommended. The use of ear protection is recommended.
To prevent dust irritation, the wearing of a face-mask is recommended. Never point your product at bystanders.
Do not use your product in the rain. Do not leave your product outdoors while it is raining.
IMPORTANT!: YOUR PRODUCT WILL NOT OPERATE UNTIL THE FULLY ASSEMBLED DEBRIS BAG AND
FRAME ARE PROPERLY FITTED.
BEFORE USE: E
NSURE THERE ARE
NO GAPS
BETWEEN THE DEBRIS BAG AND THE PRODUCT
.
• The Gardenvac has 3 modes of operation.
• These can be selected by moving the mode indicator to adjust the nozzle position for blow, vacuum or jet vacuum mode.
• In vacuum and jet vacuum modes the product will shred leaves etc.
L
VACUUM
Position 2 - Vacuum Mode
In this position your product will pick up leaves, paper, rubbish, cans etc.
IMPORTANT: R
EMOVE
N
YLON
L
INE
BEFORE V
ACUUMING
C
ANS
Using As A Vacuum
1. Select position 2 on the mode indicator.
See fig M.
2. Position nozzle slightly above the debris, squeeze the trigger and move
slowly back and forth.
3. Do not force the nozzle into the debris as this will impair performance.
4. To stop release the trigger.
M
How to Use Con’t
JET VACUUM
Position 3 - Jet Vacuum Mode This position is intended to be used to col-
lect debris which is damp or stubborn. It directs a small jet of air towards the
ground which will loosen stubborn material.
Using As A Jet Vacuum
1. Select position 3 on the mode indicator.
See fig N.
2. Position the nozzle above and slightly forward of the debris and squeeze
the trigger.
3. Slowly move the nozzle back over the debris. This allows a jet of air to lift
the debris from the ground.
4
. To stop release the trigger.
P
3
x
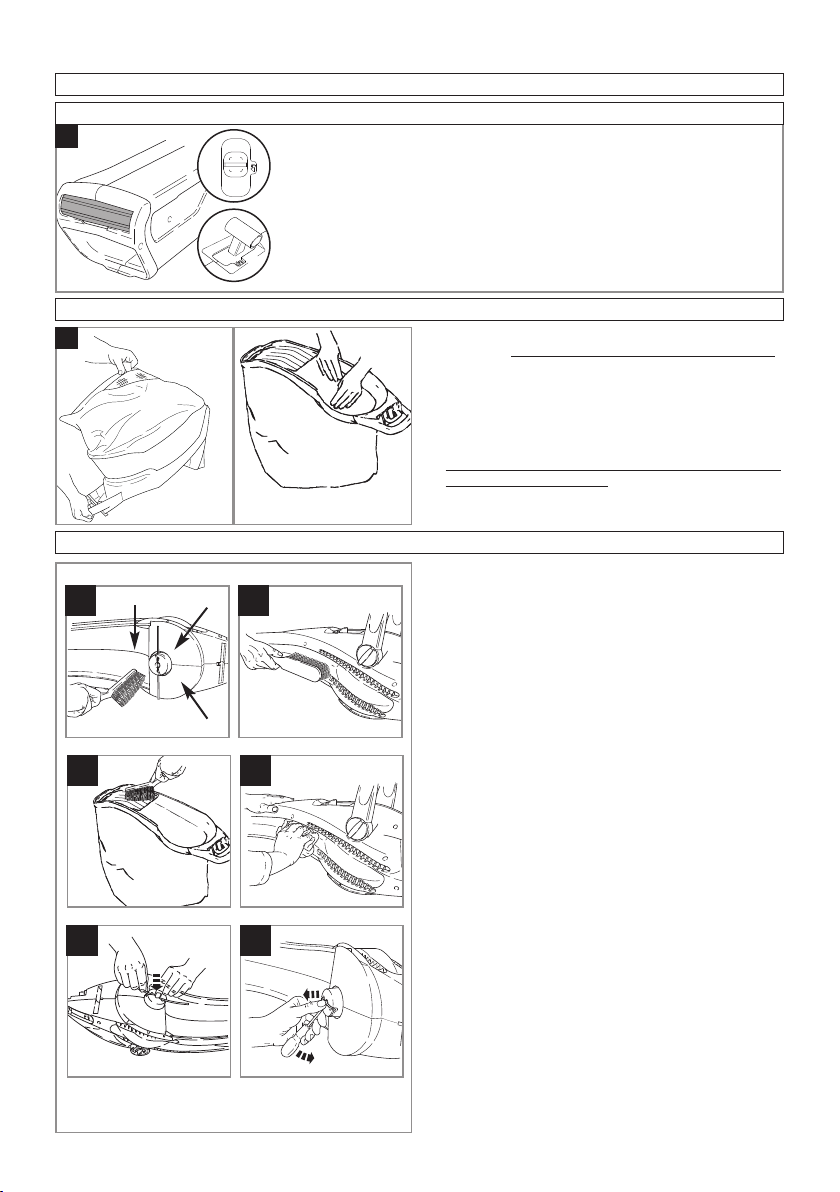
Emptying your Gardenvac
•
Switch off and disconnect from the mains electric-
ity supply BEFORE REMOVING OR REPLACING
the fully assembled debris bag.
Emptying Your Gardenvac
1. Remove debris bag as described on page 4.
2. Empty debris bag holding the moulded handle at
the top of the bag and the fabric handle at the bot-
tom of the bag.
(P)
D
O
N
OT
P
LACE
H
ANDS
IN
B
AG
W
HEN
E
MPTYING
, S
HARP
D
EBRIS
C
AN
C
AUSE
I
NJURY
3. Flip the debris fin back into place before re-fitting
as described on
page 3.
N
WARNING Never use water for cleaning your prod-
uct, use only a dry cloth. Do not clean with chemicals
or solvents, some can destroy critical plastic parts.
After Using Your Gardenvac (Q1, 2, 3 & 4)
1. Switch off and disconnect from the mains electric-
ity supply before cleaning your product.
2. Always empty the debris bag.
3. Take extra care to clean around the cutting head
and the collection chute.
(Q1)
•
Take care when cleaning around the cutting line
area - sharp edges can cause injury.
4. Inspect the cutting line and replace if worn or dam-
aged
5. Using a soft brush remove debris from all air inlets.
(Q2)
6. Remove dirt and debris from debris fin.with a suit-
able tool.
(Q3)
7. Wipe over your product with a soft dry cloth.
(Q4)
Replacing the Cutting Line (Q5 & 6)
•
Switch off and disconnect from the mains electric-
ity supply before replacing the cutting line
• Handle the cutting line with care - sharp edges can
cause injury.
1. Remove debris bag from product.
See Page 4
.
2. Remove cutting line
(Q5)
and discard safely.
3. If the cutting line becomes broken during use - use
a suitable tool to lever the line out of location.
(Q6)
.
4. Place the cutting line into the slot in the cutting
head. Ensure the cutting line is correctly located.
See Page 3
.
5. Re-fit debris bag to product.
See Page 3
.
Storing Your Gardenvac
Always store the product in a dry place ensuring the
cable is not likely to be damaged on sharp edges etc.
Q1 Q2
Q3 Q4
Q5 Q6
Caring for your Gardenvac

Fails To Operate
1. Is the power turned on?
2. Is the fully assembled debris bag correctly fitted to
the product?
3
. Check the fuse in the plug, if blown replace.
4. Fuse continues to blow?
Immediately disconnect from the mains electricity
supply and consult your local Service
Centre/Dealer/Distributor
Poor Blowing
1. The air inlets are blocked, clean all air inlets.
2. Mode indicator not in the right position?
3. If poor blowing persists?
Immediately disconnect from the mains electricity
supply and consult your local Service
Centre/Dealer/Distributor
Poor Vacuum/Jet Vacuum
1. The air inlets are blocked, clean all air inlets.
2. Mode indicator not in the right position?
3. If poor vacuuming persists?
Immediately disconnect from the mains electricity
supply and consult your local Service
Centre/Dealer/Distributor
Excessive Vibration
1. The cutting line is damaged - replace with new cut-
ting line.
2. Ensure the fully assembled debris bag is correctly
f
itted to the product.
3. If excessive vibration persists?
Immediately disconnect from the mains electricity
supply and consult your local Service
Centre/Dealer/Distributor
Poor Shredding
1. The cutting line is damaged - replace with new cut-
ting line.
2. TO PROLONG CUTTING LINE LIFE
The Gardenvac has been designed to shred
leaves. If collecting large amounts of any other de-
bris - remove the cutting line.
3. If poor shredding persists?
Immediately disconnect from the mains electricity
supply and consult your local Service
Centre/Dealer/Distributor
Service Recommendations
1. We strongly recommend that your product is serv-
iced at least every twelve months, more often in a
professional application.
2. Always use genuine Flymo Spare Parts.
3. Prepacked spares are available from most Husq-
varna UK Ltd. stockists.
4. Your product is uniquely identified by a silver and
black product rating label
5. If you have a problem with your machine contact
your local Approved Service Centre ensuring you
have full details of your product as described on
the product rating label.
6. Should it be necessary for work to be carried out
by your Service Centre, it is important to take your
complete machine including cable and any exten-
sion cables used.
A network of specialist dealers can be found in your
local Yellow Pages. To obtain service on your Flymo
product simply telephone or visit your local Service
Centre. Should you require service under the terms
of our guarantee the Service Centre will require proof
of purchase.
All of the centres listed stock genuine Flymo Spare
Parts.
NOTE: Our Service Repairers act on their own behalf
and are not empowered to commit or legally bind
Husqvarna UK Ltd. in any manner whatsoever.
Environmental Information
Husqvarna UK Ltd. are manufactured under an Environmental Management System (ISO 14001) using, where
practical, components manufactured in the most environmentally responsible manner, according to company
procedures, and with the potential for recycling at the end of the products’ life.
• Packaging is recyclable and plastic components have been labelled (where practical) for categorised recy-
cling.
• Awareness of the environment must be considered when disposing of ‘end-of-life’ product.
• If necessary, contact your local authority for disposal information.
The symbol on the product or on its packaging indicates that this product may not be treated as house-
hold waste. Instead it shall be handed over to the applicable collection point for the recycling of electrical and
electronic equipment.
By ensuring this product is disposed of correctly, you will help prevent potential negative consequences for the
environment and human health, which could otherwise be caused by inappropriate waste handling of this
product.
For more detailed information about recycling of this product, please contact your local council office, your
household waste disposal service or the shop where you purchased the product.
Fault Finding Hints
Replacement Parts
Cutting lines
Reference no.:
FLY024
Part no.:
513859390
5119417-09
If any part is found to be defective due to faulty manufacture
within the guarantee period, Husqvarna UK Ltd., through its
Authorised Service Repairers will effect the repair or replace-
m
ent to the customer free of charge providing:
(a) The fault is reported directly to the Authorised Repairer.
(
b) Proof of purchase is provided.
(
c) The fault is not caused by misuse, neglect or faulty ad-
justment by the user.
(
d) The failure has not occurred through fair wear and tear.
(e) The machine has not been serviced or repaired, taken
apart or tampered with by any person not authorised by
Husqvarna UK Ltd.
(f) The machine has not been used for hire.
(
g) The machine is owned by the original purchaser.
(h) The machine has not been used commercially.
* This guarantee is additional to, and in no way diminishes
t
he customers statutory rights.
Failures due to the following are not covered, therefore it is
important that you read the instructions contained in this Op-
erator's Manual and understand how to operate and maintain
y
our machine:
Failures not covered by guarantee
* Replacing Cutting Line.
* Failures as a result of not reporting an initial fault.
*
Failures as a result of sudden impact.
* Failures as a result of not using the product in accor-
d
ance with the instructions and recommendations con-
t
ained in this Operator's Manual.
* Machines used for hire are not covered by this guaran-
t
ee.
* The following items listed are considered as wearing
parts and their life is dependent on regular maintenance
and are, therefore not normally subject to a valid war-
ranty claim: Cutting Line, Electric Mains cable, Debris
B
ag.
* Caution!
Husqvarna UK Ltd. does not accept liability under the
w
arranty for defects caused in whole or part, directly or
indirectly by the fitting of replacement parts or additional
parts that are not either manufactured or approved by
Husqvarna UK Ltd., or by the machine having been
m
odified in any way.
Guarantee & Guarantee Policy
EC Declaration of Conformity
Husqvarna AB, S-561 82 Huskvarna, Sweden
Declare under our sole responsibility that the product(s);
Designation.....................................
Leaf Collector
Designation of Type(s)....................
MEV2500, MEV2700
Identification of Series...................
See Product Rating Label
Year of Construction......................
See Product Rating Label
Conforms to the essential requirements & provisions of the following EC Directives:
2006/42/EC, 2004/108/EC, 2000/14/EC, 2011/65/EU
based on the following EU harmonized standards applied:
IEC60335-1, IEC60335-2-100, EN60335-1
The maximum A weighted sound pressure level L
pA
at the operator’s position, recorded on a sample of the above prod-
uct(s) is given in the table.
The maximum hand / arm vibration weighted value a
h
measured according to EN ISO 20643 on a sample of the above
product(s) is given in the table.
2000/14/EC: The Measured Sound Power L
WA
& Guaranteed Sound Power L
WA
values are according to the tabulated
figures.
Conformity Assessment Procedure.................. Annex V
Huskvarna, 17/01/2013
P. Lameli,
Chief Technical Officer
Keeper of technical documentation
Type
Power (kW)
Nominal Air Flow
m
3
/s
Measured Sound Power L
WA
(dB(A))
Guaranteed Sound Power L
WA
(dB(A))
Sound pressure
L
pA
(dB(A))
Uncertainty
K
pA
(dB(A))
Hand / arm vibration
a
h
(m/s
2
)
Uncertainty
K
ah
(m/s
2
)
Weight (Kg)
MEV2500
2.5
0.1024
99
99
87.9
2.5
2.89
1.5
5.1
MEV2700
2.7
0.1024
99
99
87.9
2.5
2.89
1.5
5.1
Our policy of continuous improvement means that the specification of products may be altered from time to time without prior notice.
Copyright © 2014 Flymo S.A. All rights reserved. Flymo® and other product and feature names are registered or unregistered trademarks
of Flymo S.A.
Husqvarna AB,
S-561 82
Huskvarna,
Sweden
10/14