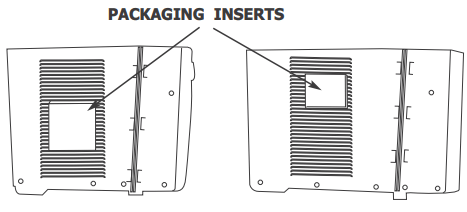
Remove all packaging from inside the carton, along with any inserts placed into the side louvers.
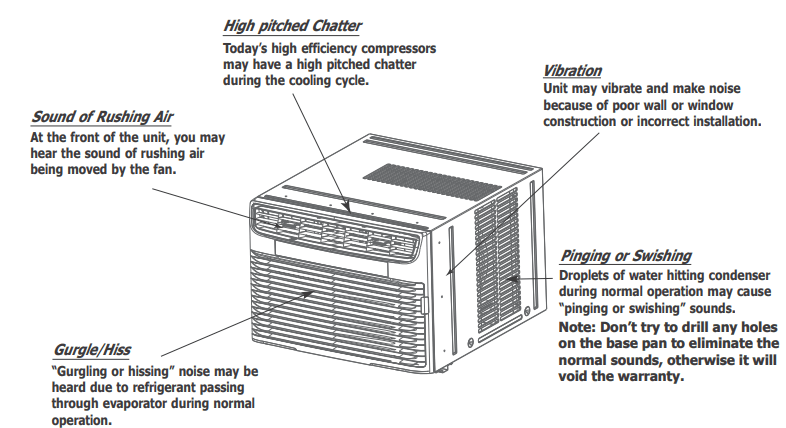
Normal Sounds
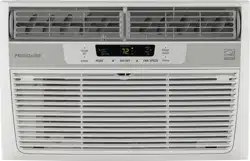
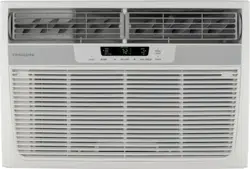
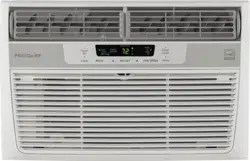
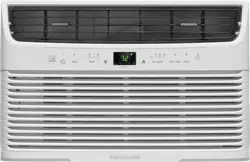
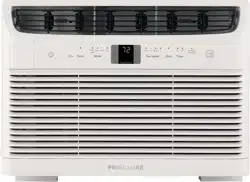
Air Conditioner Features & Operating Instructions
Air Conditioner Features
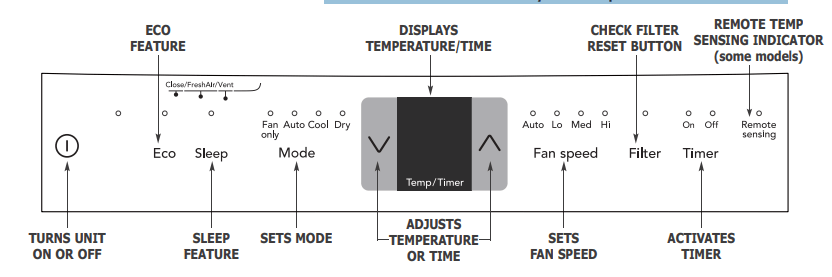
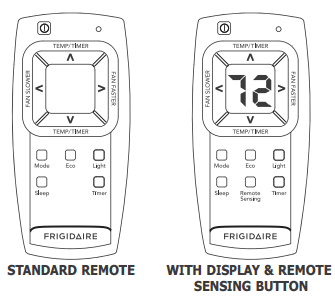
ELECTRONIC CONTROL: Before you begin, thoroughly familiarize yourself with the control panel and remote as shown below and all its functions, then follow the symbol for the functions you desire. The unit can be controlled by the touch pad alone or with the remote.
Light Feature: The display and all LED indicators on the control panel of the unit can be turned off by pressing the "Light" button on the remote control. If any other button of the control panel and remote control is pressed after that, the unit will beep to indicate it works as the corresponding direction of pressing specific button, and the display and LED indicators will illuminate accordingly, but they will turn off again in 5 seconds if no further operation. Press the "Light" button again or unplug the unit to cancel this setting.
Battery Size: AAA
Warning: Do not mix old and new batteries. Do not mix alkaline, standard (carbon-zinc), or rechargeable (nickel-cadmium) batteries.
Operating Instructions
NOTE: The following instructions represent the Touch Pad, the same instructions can be used for the Remote Control.
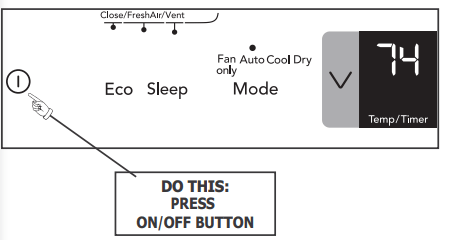
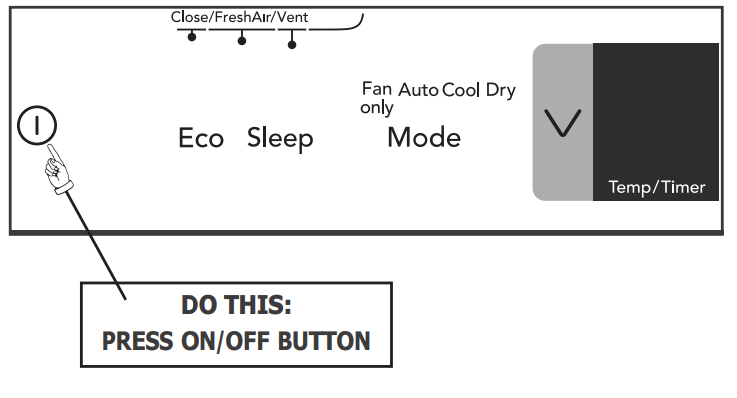
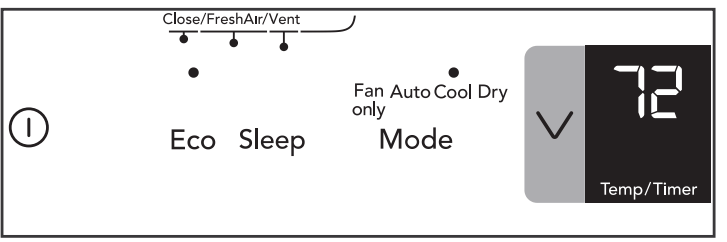
TO TURN UNIT ON:
YOU WILL SEE:
NOTE: The unit will run in Cool mode with Eco feature and Auto fan speed setting when used for the first time. With the Eco feature, when the room temperature is below the set temperature, the fan will continue to run for 3 minutes after the compressor shuts off. The fan then cycles on for 2 minutes at 10 minute intervals until the room temperature is above the set temperature, at which time the compressor turns back on. Eco feature can be activated or deactivated by pressing Eco button, but it is invalid in fan only mode.
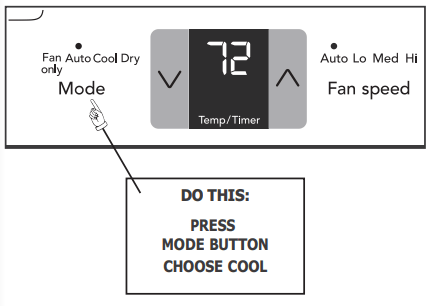
AUTO FEATURE:
YOU WILL SEE:
Note: This mode is a fixed combination of Cool mode and Auto fan speed setting. In this mode, the fan speed can not be selected manually
AUTO FEATURE:
YOU WILL SEE:
Note: In this mode, the fan remains on all the time with the compressor cycling on and off when room temperature is reached.
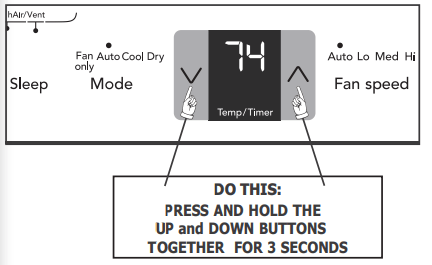
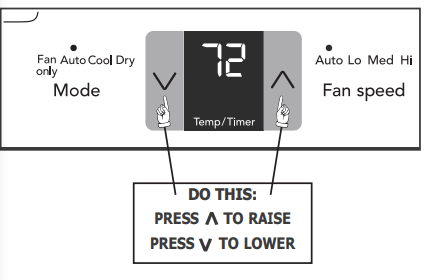
TO CHANGE TEMPERATURE SETTlNG:
YOU WILL SEE:
Note: Tap or hold either up ( ) or down ( ) button until the desired temperature is seen on the display. This temperature will be automatically maintained anywhere between 62 °F (17 °C) and 86 °F (30 °C). If you want the display to read the actual room temperature. See "To Operate on Fan Only" section
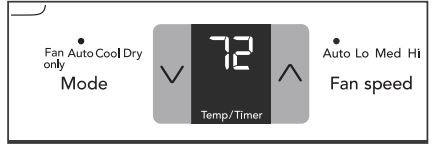
TO ADJUST FAN SPEEDS:
YOU WILL SEE:
Note: The fan speed can be selected among four settings: Auto, Lo(Low), Med(Medium) and Hi(High), unless the unit runs in "Auto" or "Dry" mode, or the Sleep feature is activated
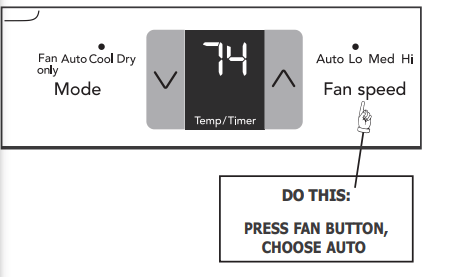
TO USE AUTO FAN FEATURE:
YOU WILL SEE:
Note: Fan starts at Low Speed and adjusts to a proper speed according to the room temperature dictates. For example, if the room doesn't get too warm, it will stay at the slowest speed. If the room temperature rises quickly, such as a door being opened, it will automatically go to the highest speed. The fan speeds will re-adjust back to the slowest speed as the room returns to the original set temperature.
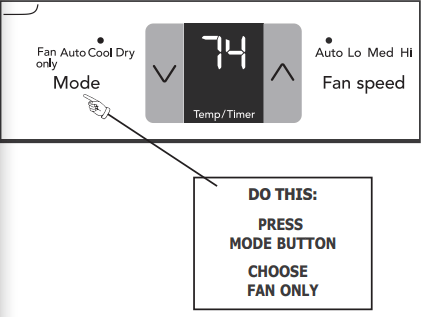
TO OPERATE ON FAN ONLY:
YOU WILL SEE:
Note: Use this function only when cooling is not desired, such as for room air circulation or to exhaust stale air on some models. (Remember to open the vent during this function, but keep it closed during cooling for maximum cooling efficiency.) You can choose any fan speed you prefer.
During this function, the display will show the actual room temperature, not the set temperature as in the cooling mode.
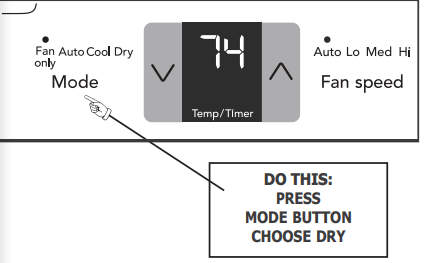
DRY MODE:
YOU WILL SEE:
Note: In this mode, the air conditioner will work like a dehumidifier, but it will cool the room down meanwhile. The temperature can be adjusted between 62 °F (17 °C) and 86 °F (30 °C) and fan speed will be held at “Lo”.
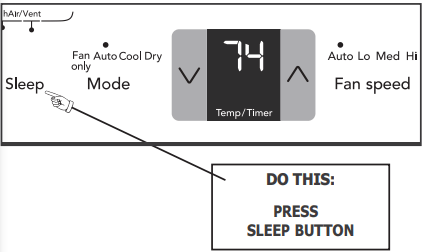
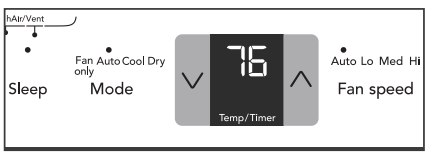
SLEEP FEATURE:
YOU WILL SEE:
Note: In this mode, the unit will select Auto fan speed automatically, and the selected temperature will increase by 2 °F 30 minutes after the mode is selected. The temperature will then increase by another 2 °F after an additional 30 minutes. This new temperature will be maintained for 7 hours before it returns to the originally selected temperature. This ends the "Sleep" mode and the unit will continue to operate as originally programmed. The "Sleep" mode program can be cancelled at any time during operation by again pressing the "Sleep", “Fan speed” or “Mode” button.
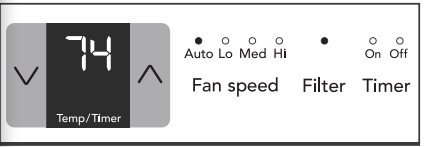
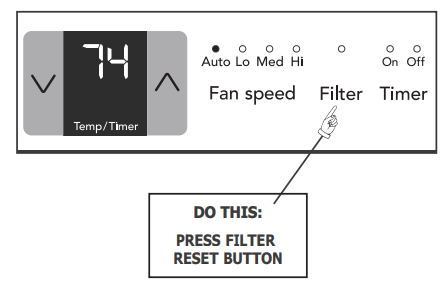
CHECK FILTER FEATURE, YOU WILL SEE:
Note: This feature is a reminder to clean the Air Filter (See Care and Cleaning) for more efficient operation. The LED (light) will illuminate after 250 hours of operation. To reset after cleaning the filter, press the "Filter Reset" button and the light will go off.
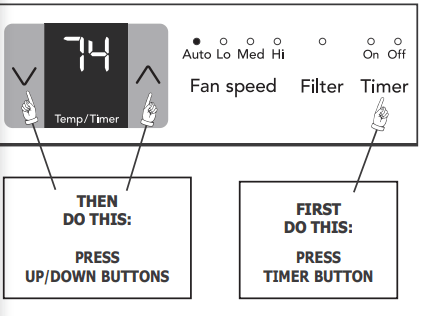
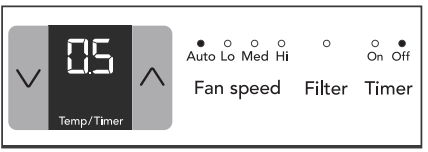
TIMER: DELAY STOP/START FEATURE
YOU WILL SEE HOW MUCH TIME IS CHOSEN:
To delay stop(or start), press the Timer button when the unit is power-on(or power-off), then the "timer off" indicator(or "timer on" indicator) will illuminate. Then adjust timer setting, tap or hold the UP arrow ( ) or the DOWN arrow ( ) to change delay timer at 0.5 hour increments, up to 10 hours, then at 1 hour increments up to 24 hours. The setting will be confirmed automatically in 5 seconds, then the control will count down the time(8, 7.5, 7, etc.) left, and all other settings will remain the same as they were before the timer setting is confirmed, until stop(or start).
Setting combination of “delay stop delay start” or “delay start delay stop” is workable. Both "timer off" indicator and "timer on" indicator will illuminate then. The timer setting can be canceled by either pressing and holding the timer button for 2 seconds, or pressing the power on/off button at any time to turn off the unit directly.
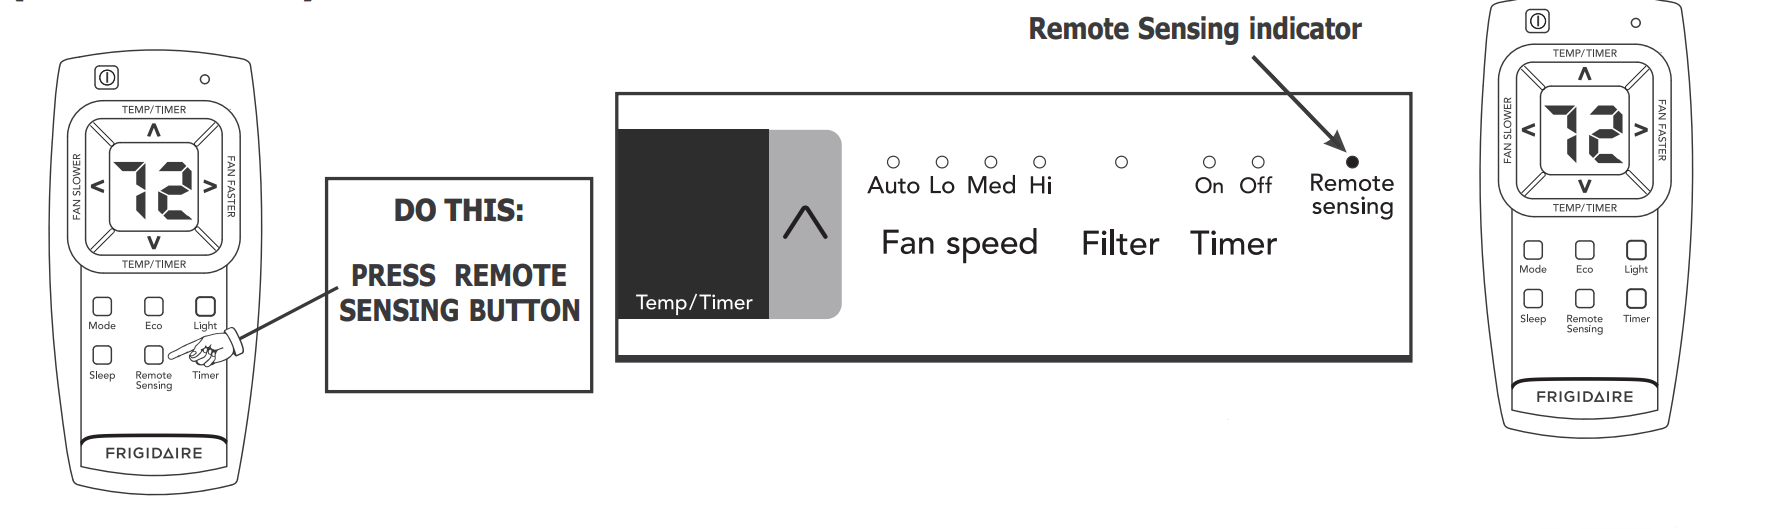
REMOTE SENSING FEATURE (on some models):
NOTE: Unit display shows the set temperature
NOTE: Remote display is actual temperature at remote control only
Note: This feature can be activated from the remote control ONLY, the unit must be in a cooling mode.
To activate the remote sensing feature, point the remote control towards the unit and press the Remote Sensing button. Next, use the “ ” buttons to set the desired temperature at the remote. (Note that the set temperature will only be displayed on the unit itself ). The LIGHT on the unit control will illuminate to indicate it receives the signal. The LIGHT on the remote control will pulse each time it sends a signal. lt will periodically send this signal until the feature is deactivated by pressing the remote sensing button again. lf the unit does not receive the remote sensing signal during any 7 minute interval, the Remote Sensing feature will halt until the unit receives signal from the remote control again. The display on the remote control indicates the temperature at the remote ONLY.
NOTE: The Remote Sensing function can be terminated either by pressing the Remote Sensing button again or the main ON/OFF button on the unit.
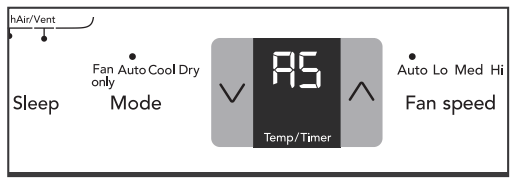
FAULT CODES:
If the display reads "AS" , a sensor has failed. Contact your Authorized Frigidaire Service Center.
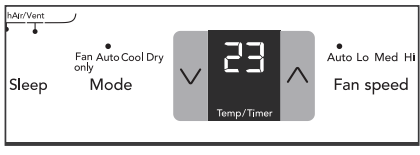
TO CHANGE TEMPERATURE DISPLAY:
YOU WILL SEE:
Note: The control is capable of displaying temperature in degrees Fahrenheit or degrees Celsius.
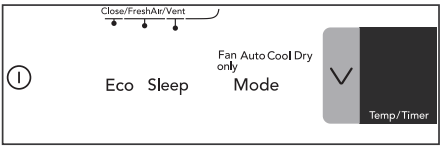
TO TURN UNIT OFF:
YOU WILL SEE:
ADDITIONAL THINGS YOU SHOULD KNOW
Now that you have mastered the operating procedure, here are more features in your control that you should become familiar with.
The "Cool" circuit has an automatic 3 minute time delayed start if the unit is turned off and on quickly. This prevents overheating of the compressor and possible circuit breaker tripping. The fan will continue to run during this time.
There is a 2-Second delay for the compressor shutting down when selecting FAN ONLY. This is to cover the possibility of having to roll through to select another mode.
The control will maintain the set temperature within 2 degrees Fahrenheit, between 62F and 86F degrees.
After a power outage, the unit will memorize the last setting and return the unit to the same setting once power is restored.
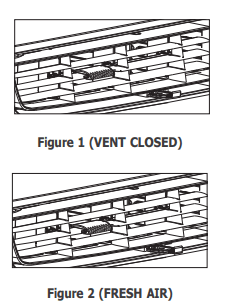
Fresh Air Vent Control (on some models): The Fresh Air Vent allows the air conditioner to:
Recirculate inside air - Vent Closed (see Fig. 1)
Draw fresh air into the room - Fresh Air (see Fig. 2)
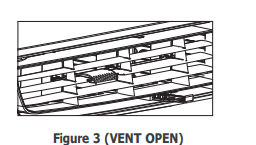
Exchange air from the room - Vent Open (see Fig. 3)
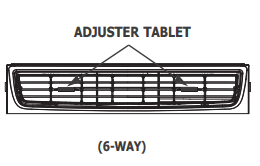
Air Directional Louvers
Air directional louvers control air flow direction. Your air conditioner has the louver type described below.
Slider Type
The louvers will allow you to direct the air flow Up or Down and Left or Right throughout the room as needed. Drag the adjuster tablet until the desired Left/Right direction is obtained. Pivot horizontal louvers until the desired Up/Down direction is obtained.
Care and Cleaning & Energy Saving Ideas
Care and Cleaning
Clean your air conditioner occasionally to keep it looking new. Be sure to unplug the unit before cleaning to prevent shock or fire hazards.
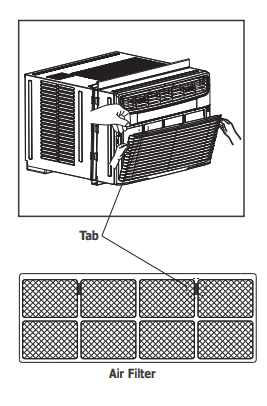
Air Filter Cleaning: The air filter should be checked at least once a month to see if cleaning is necessary. Trapped particles in the filter can build up and cause an accumulation of frost on the cooling coils.
Push the vent handle to the Vent Closed position(where applicable).
Open the front panel
Grasp the filter by the center and pull up and out.
Wash the filter using liquid dishwashing detergent and warm water. Rinse filter thoroughly. Gently shake excess water from the filter. Be sure filter is thoroughly dry before replacing
Or instead of washing, you may vacuum the filter clean
NOTE: When replacing the air filter after cleaning, make sure the tabs on the air filter are on the upper part of filter, and placed outward as shown in the drawing on the left side.
Cabinet Cleaning
Be sure to unplug the air conditioner to prevent shock or fire hazard. The cabinet and front may be dusted with an oil-free cloth or washed with a cloth dampened in a solution of warm water and mild liquid dishwashing detergent. Rinse thoroughly and wipe dry.
Never use harsh cleaners, wax or polish on the cabinet front.
Be sure to wring excess water from the cloth before wiping around the controls. Excess water in or around the controls may cause damage to the air conditioner.
Plug in air conditioner
Winter Storage
If you plan to store the air conditioner during the winter, remove it carefully from the window according to the installation instructions. Cover it with plastic or return it to the original carton.
Energy Saving Ideas
Do not block air flow inside with blinds, curtains or furniture; or outside with shrubs, enclosures, or other buildings.
The capacity of the room air conditioner must fit the room size for efficient and satisfactory operation.
Install the room air conditioner on the shady side of your home. A window that faces north is best because it is shaded most of the day.
Close the fireplace damper, floor and wall registers so cool air does not escape up the chimney and into the duct work.
Keep blinds and drapes in other windows closed during the sunniest part of the day.
Clean the air filter as recommended in the section “Care and Cleaning”.
Proper insulation and weather stripping in your home will help keep warm air out and cool air in.
External house shading with trees, plants or awnings will help reduce the air conditioner’s work load.
Operate heat producing appliances such as ranges, washers, dryers and dishwashers during the coolest part of the day
Troubleshooting
Before You Call: Before calling for service, review this list. It may save you time and exp
OCCURRENCE
SOLUTION
Air conditioner will not operate.
Wall plug disconnected. Push plug firmly into wall outlet.
Plug Current Device Tripped. Press the RESET button.
House fuse blown or circuit breaker tripped. Replace fuse with time delay type or reset circuit breaker.
Control is OFF. Turn Control ON and set to desired setting.
Air from unit does not feel cold enough.
Room temperature below 62°F (17°C). Cooling may not occur until room temperature rises above 62°F (17°C).
Temperature sensing element touching cold coil, located behind air filter. Straighten away from coil.
Reset to a lower temperature.
Compressor shut-off by changing modes. Wait approximately 3 minutes and listen for compressor to restart when set in the COOL mode.
Air conditioner cooling, but room is too warm - ice forming on cooling coil behind decorative front
Outdoor temperature below 62 F (17 C). To defrost the coil, set FAN ONLY mode.
Air filter may be dirty. Clean filter. Refer to Care and Cleaning section. To defrost, set to FAN ONLY mode.
Temperature is set too low for night-time cooling. To defrost the coil, set to FAN ONLY mode. Then, set temperature to a higher setting.
Air conditioner cooling, but room is too warm - NO ice forming on cooling coil behind decorative front.
Dirty air filter - air restricted. Clean air filter. Refer to Care and Cleaning section.
Temperature is set too high. Set temperature to a lower setting.
Air directional louvers positioned improperly. Position louvers for better air distribution.
Front of unit is blocked by drapes, blinds, furniture, etc. - restricts air distribution. Clear blockage in front of unit.
Doors, windows, registers, etc. open - cool air escapes. Close doors, windows, registers, etc.
Unit recently turned on in hot room. Allow additional time to remove “stored heat” from walls, ceiling, floor and furniture.
Air conditioner turns on and off rapidly.
Dirty air filter - air restricted. Clean air filter.
Outside temperature extremely hot. Set FAN speed to a faster setting to bring air through cooling coils more frequently
Noise when unit is cooling.
Air movement sound. This is normal. If too loud, set to lower FAN setting
Window vibration - poor installation. Refer to installation instructions or check with installer
Water dripping INSIDE when unit is cooling
Improper installation. Tilt air conditioner slightly to the outside to allow water drainage. Refer to installation instructions or check with installer
Water dripping OUTSIDE when unit is cooling.
Unit removing large quantity of moisture from humid room. This is normal during excessively humid days.
#1 Does this unit have styrofoam inside, or is it plastic?
Styrofoam interior panels. When you open or pull down the front plastic cover for accessing the screen filter, you will see the internal styrofoam structure separating the Evaporator Coil sitting in front of you from the rear section or outside of the unit. The bottom integrated drip try is also part of that styrofoam superstructure within the unit. On the Left side of the Evaporator coil you will see a fairly large hole passing thru to the outside meaning when looking thru it you see the outside metal cover, compressor, etc. This is also where the copper tubes pass thru from the front evaporator coil upfront to the compressor sitting in the outside section of the unit. The purpose of this large hole is not only to allow pass thru of the copper tubing but ALSO FRESH AIR to be entering into the room. This may or may not be desirable depending on your situation. In wintertime this will allow Cold Air to pass thru into the room. During Eco Mode this is also used to allow air to be sucked in and Mixxed with room air. This will therefore ALSO be a Source of HUMID AIR such as Houston, TX which is called the Armpit of Texas for a reason. You can stuff a rag into the hole to block air entering Full time or put a full cover over the front of the air conditioner on the inside of the building during wintertime. Again, depending on your situation and needs. If you are NOT in a Super Humid environment, I would leave the hole to allow Fresh Air entry which is beneficial. Lots of ways to use that information as stated. One thing to keep in consideration per my Writeup is.... Look on the right side of the evaporator coil and you will see another small hole at the bottom where the drip tray directs water to be drained outside. Behind that on the outside section you will see a depression in the steel pan of the air conditioner. DRILL A LARGE 3/4" HOLE thru it to allow immediate draining of the water. Also, make SURE the unit is Tilted to the right when looking at it from inside to ensure water drains toward the drainage hole. If necessary, place shims under the left side when looking at it from inside the room. You can even pour some water into the drip tray with the front cover open to ensure water is draining OUT toward the right. If not, then it will sit in the tray and cause more problems for you. I realize this is FAR MORE than the question asked.... Hopefully was helpful.
#2 Can we turn it on manually if incase the remote will stop working?
Es, you can. There is a power on/off button. There are also operational buttons (temperature control, fan speed, etc.) in case you lose the remote.
#3 Does it have dehumidifier function and is there a drain in the rear. Are there separate drains with AC or single?
No drain. It splashes the water back onto the motor to help with cooling. That's how it achieves greater efficiency. I pulled the production specification sheet off the internet. It states dehumidifier 1.1 pints/hr.

 ) or down (
 ) button until the desired temperature is seen on the display. This temperature will be automatically maintained anywhere between 62 °F (17 °C) and 86 °F (30 °C). If you want the display to read the actual room temperature. See "To Operate on Fan Only" section
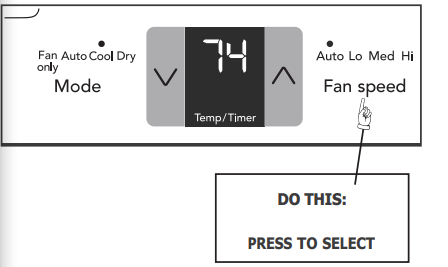
 delay start” or “delay start
  delay stop” is workable. Both "timer off" indicator and "timer on" indicator will illuminate then. The timer setting can be canceled by either pressing and holding the timer button for 2 seconds, or pressing the power on/off button at any time to turn off the unit directly.