Loading ...
Loading ...
1
Complete Control
MX-790 / MX-790i
Owner’s Manual
Congratulations!
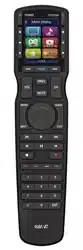
Thank you for purchasing the Complete Control MX-790 universal remote control. This
unit can directly control every IR device in your home. You can also control devices
located in different rooms by integrating an MRF base station. Controlling your home is
simple with the MX-790 remote.
Brilliant LCD color display with hard button interface
The color LCD (Liquid Crystal Display) screen, as well as the remote buttons, light up.
Once the screen is lit, each of the three buttons on either side of the screen are labeled.
These button labels are based on the devices you want to watch or listen to.
User interface customization for any activity
Each Main Menu button can be customized for activities, such as watching TV or
listening to the radio. These activities can contain multiple commands (macros) which
enable a single button press to turn the needed devices ON or OFF.
Ultra-reliable narrow band RF - compatible with URC 418 MHz RF Base Stations
The MX-790 can communicate directly to RF base stations. This gives the MX-790 the
ability to control your system without being in direct line-of-sight. (The MX-790i uses a
frequency of 433MHz.)
Fast setup of complex systems via Complete Control PC editor
To fully automate an audio/video system, the programmer must have a detailed
knowledge of each component and how the system connects and operates. Only a
trained and certied professional audio/video installer can install an MX-790 remote
control in a timely and efcient manner.
Replacing the Batteries
Remove the cover by lightly pressing down on the grooves along the top and sliding
the cover away from the remote. Observe the + and – polarity indicators inside the
battery compartment and the batteries. Place the four AA batteries into their positions
in the battery compartment. Now, replace the battery cover and slide it into place.
Loading ...
Loading ...
Loading ...