Loading ...
Loading ...
Loading ...
5 4
12. Lift the top cooking plate gently. If it pulls, continue cooking for 30 seconds and test again for doneness.
NOTE: Wafes should be baked according to the temperature control setting chosen. If the wafes need to
bake to a darker nish, turn the temperature control dial to increase the setting, close the lid and continue to
bake for 30 additional seconds, checking until the desired color is achieved.
13. Remove wafes from the cooking plates using a using a rubber spatula or any non- metallic utensil.
CAUTION HOT SURFACES: Wafe Maker cooking plates are very hot during use. Use oven mitts when
removing baked wafes to prevent the risk of burns.
NOTE: If additional wafes are to be baked, keep the lid closed to retain heat. Always be sure the Blue READY
light is illuminated before baking more wafes.
NOTE: Wafes made later will bake faster because extra heat has been retained.
14. When baking is complete, unplug the power cord from electric outlet. Make sure the Rotating Square Wafe
Maker’s bottom cooking plate is positioned at and locked into a stable position. Lift top cooking plate and
allow to cool.
WARNING: Always unplug after use. The Wafe Maker will remain ON until unplugged.
15. Do not clean until Wafe Maker has fully cooled.
Locking And Unlocking Your Wafe Maker
Your Wafe Maker is unlocked only when the Control Knob is facing up. You can only open the Wafe Maker
in the unlocked position.
Tips For Perfectly Baked Wafes
1. Sift all dry ingredients together. It is not necessary to beat egg yolks and milk separately.
2. Beat egg whites until they form stiff peaks. Stir 1/4 of the beaten whites into the batter to lighten it, and then gently
fold in the rest. There should be white streaks in the batter. Do not over-mix batter when adding egg whites.
3. Some recipes may be doubled. Do not make large batches of batter when whipped egg whites have been used to
lighten the wafe.
4. Do not open the Rotating Square Wafe Maker during the rst minute of baking or the wafe will separate.
Completely bake wafes before removing.
5. When preparing wafe batter with gluten our, do not over-mix or wafes will be tough. Stir batter only until large
lumps of dry ingredients disappear.
6. The optimal amount of batter to produce a full-shaped wafe, without overowing, will vary with different wafe
batters. Pouring batter from a measuring cup will help to gauge how much batter to use each time. Fill bottom
cooking plate of Rotating Square Wafe Maker with enough batter to cover peak areas. Begin with 1 scant cup.
Add more if needed.
7. For more evenly shaped wafes, spread thick batters to the outer edge of the cooking plate using a heat-proof
rubber spatula or other non-metallic utensil before closing the lid.
8. To retain crispness, move baked wafes to a wire cooling rack. To keep wafes warm, place on an ovenproof dish
on an oven rack and warm at about 200-250°F (90-120°C). Wafes will keep for about 20 minutes before they begin
to dry out.
9. Baked wafes freeze well. Cool completely on a wire rack. Store in a plastic freezer bag or in a covered container,
separating wafes with wax paper.
10. Reheat frozen wafes in a toaster oven, convection oven, conventional oven or toaster until hot and crisp.
For gluten-free wafes:
Use gluten-free baking mixes.
Use gluten-free our.
Replace our in recipes with combinations of: coconut our, rice our, almond our, oat our, corn meal.
For lower fat, lower cholesterol wafes:
• Use skim milk.
• Replace full fat milk with nut or seed milks: almond, cashew, soy, ax, or hemp seed milk.
• Use whites only, eliminate the egg yolk.
• Always use liquid vegetable oils such as canola, coconut, corn or sunower, instead of butter.
• Replace 1 egg with 3 tablespoons cold water + 1 tablespoon ground ax seed.*
• Replace 1 egg with 3 tablespoons cold water + 1/2 tablespoon ground chia seed.*
For higher ber wafes:
• Substitute 1/2 cup or more of white our with whole-wheat our.
• Substitute 1/4 cup of white our with wheat or oat bran.
• Replace 1 egg with 3 tablespoons cold water + 1 tablespoon ground ax seed.*
• Replace 1 egg with 3 tablespoons cold water + 1/2 tablespoon ground chia seed.*
* When creating eggs using ground ax or chia seeds, allow the mixture to rest
for 5 minutes until thickened. Mix well before adding to wafe batter recipe.
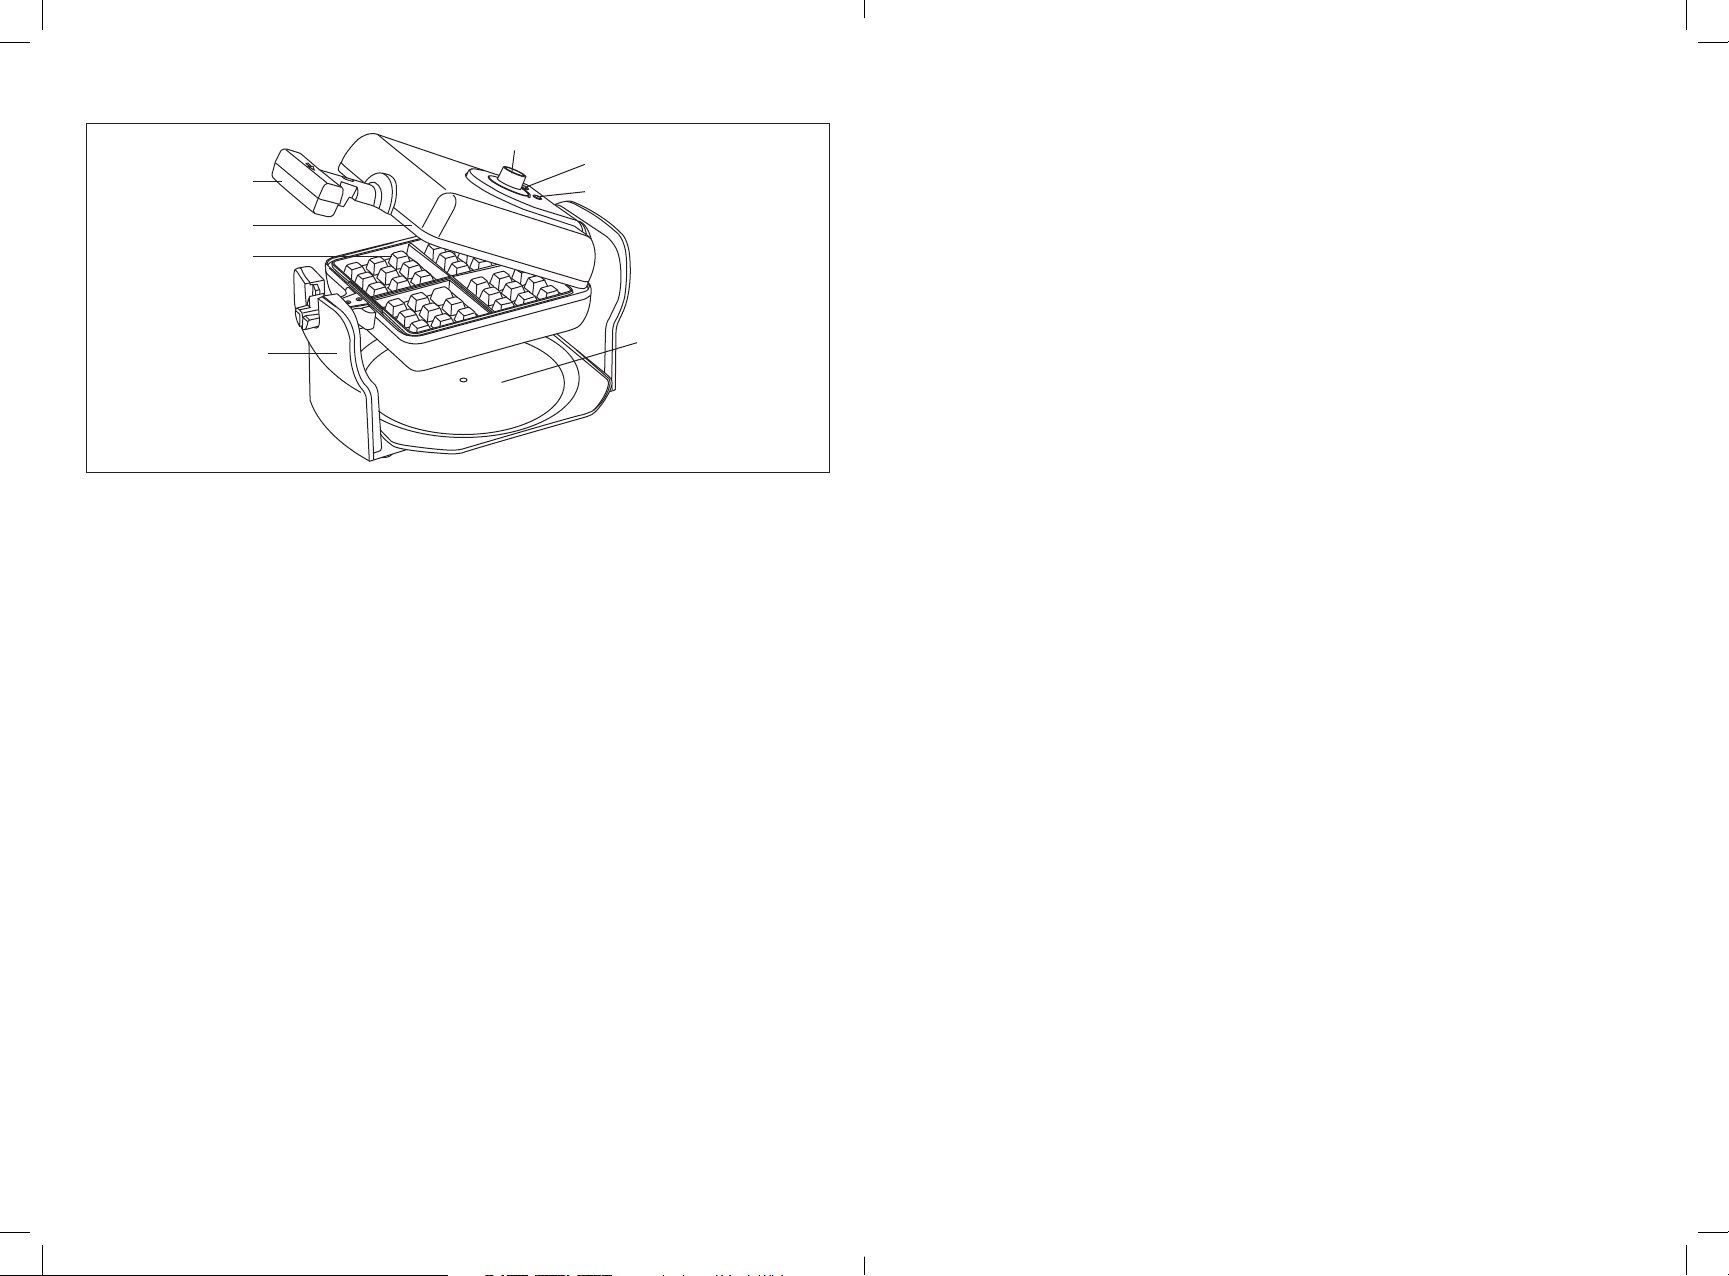
Getting To Know Your Wafe Maker
Product may vary slightly from illustration
Temperature control dial
Top Cooking Plate
Handle
Bottom Cooking Plate
Base
Red POWER Light
Blue READY Light
* Drip tray included
tocollect overow
ofbatter and crumbs.
Drip tray*
Before Using For The First Time
• Carefully unpack the Rotating Square Wafe Maker and remove all packaging and materials.
• Wipe the cooking plates with a damp cloth to remove all dust, and then dry. Wipe the base and outer
surfaces with a slightly damp, soft cloth or sponge.
CAUTION: Take care to prevent water from running into the appliance.
NEVER IMMERSE THE ROTATING WAFFLE MAKER BODY IN WATER OR ANY OTHER LIQUIDS!
• Set the appliance on a dry, clean and at surface. Keep the Wafe Maker closed until use
Operating instructions
1. Lift the top cooking plate.
2. Make sure the Rotating Square Wafe Maker’s bottom cooking plate is positioned at and locked into a stable
position. Before baking the rst wafes of the day, use a pastry brush to lightly coat the top and bottom wafe
plates with butter or vegetable oil.
3. Plug Wafe Maker into a 120V AC electrical outlet. The red POWER light will illuminate and remain lit during use.
NOTE: When your Rotating Square Wafe Maker is heated for the rst time, it may emit slight odor or smoke.
This is normal and should disappear after one or two uses. This does not affect the safety of the appliance.
However, as it may affect the avor of the rst wafes prepared in the Wafe Maker, it is recommended that
these be discarded.
4. Turn the temperature control dial to MAX to preheat.
5. While preheating, prepare wafe batter.
6. After approximately 3 minutes, the Blue READY light will illuminate, indicating the unit is preheated and ready
for use.
7. Turn the temperature control dial to MID, MED, or MAX. Most wafes baked at the MEDIUM will produce
a lighter to nicely browned wafe, while wafes baked at a higher setting (MEDIUM-DARK) are darker and
crispier. When preparing a recipe for the rst time, turn the temperature control dial to MEDIUM; then adjust
according to preference. Recipes will vary in cook time and brownness; batters with more sugar will brown
quicker. Thicker batters may require a longer cooking time. Note the perfect temperature and time setting for
each batter recipe for future use.
8. Lift the top cooking plate.
9. Pour or ladle 1 scant cup of wafe batter onto the bottom cooking plate. Add just enough batter to ll bottom
cooking plate so that the peak area is covered. Use a heat-proof spatula to spread the batter in to the corners
of the plate. Do not overll; batter will expand when cooked.
10. Lower the top cooking plate to close the Rotating Square Wafe Maker and rotate unit 180° to the bottom side.
11. As the Rotating Square Wafe Maker cooks, the Blue READY light (on the bottom side of the Wafe Maker) will
be off. When the Blue READY light illuminates steadily, rotate the Wafe Maker 180° to the top side, until it is
at and locked into a stable position.
SO-315537_14690_BELLA_4sl Square Rotating Waffle Maker_WM_IM_R4.indd 4-5 2018-06-29 11:56 AM
Loading ...
Loading ...
Loading ...