
www.blackanddecker.ae
FSMH1321
FSMH1351SM
FSMH13101SM
FSMH13151SM
FSMH1321J
FSMH1321JSM
FSMH1321JMD
AR FR EN
2
ENGLISH
(Original instructions)
2
1
12
11
3 4
5
7
9
10
6
8
3
ENGLISH
(Original instructions)
12a
5
10
11
11a
C1
8
11
B
A
12
13
14
C
7
9
E
15
6
F
4
ENGLISH
(Original instructions)
5
16
26
17
19
20
21
22
22a
25
18
27
22b
22c
23
21a
20a
23a
16a
12b
23b
23c
23d
28
G
5
ENGLISH
(Original instructions)
18
17
20
28
19
H
22
22a
22c
22b
I
23
23a
J
6
ENGLISH
(Original instructions)
N
23
23b
23d23c
K
27 25
25
27
27a
25a
L
M
7
ENGLISH
(Original instructions)
PO
4
Q
OFF
2
R
8
ENGLISH
(Original instructions)
Intended use
Your BLACK+DECKER
TM
FSMH1321, FSMH13515M,
FSMH13101SM, FSMH13151SM, FSMH1321J,
FSMH1321JSM, FSMH1321JMD steam mop has been
designed for sanitising and cleaning sealed hardwood,
sealed laminate, linoleum, vinyl, ceramic tile, stone and
marble floors. This appliance is intended for indoor
household use only.
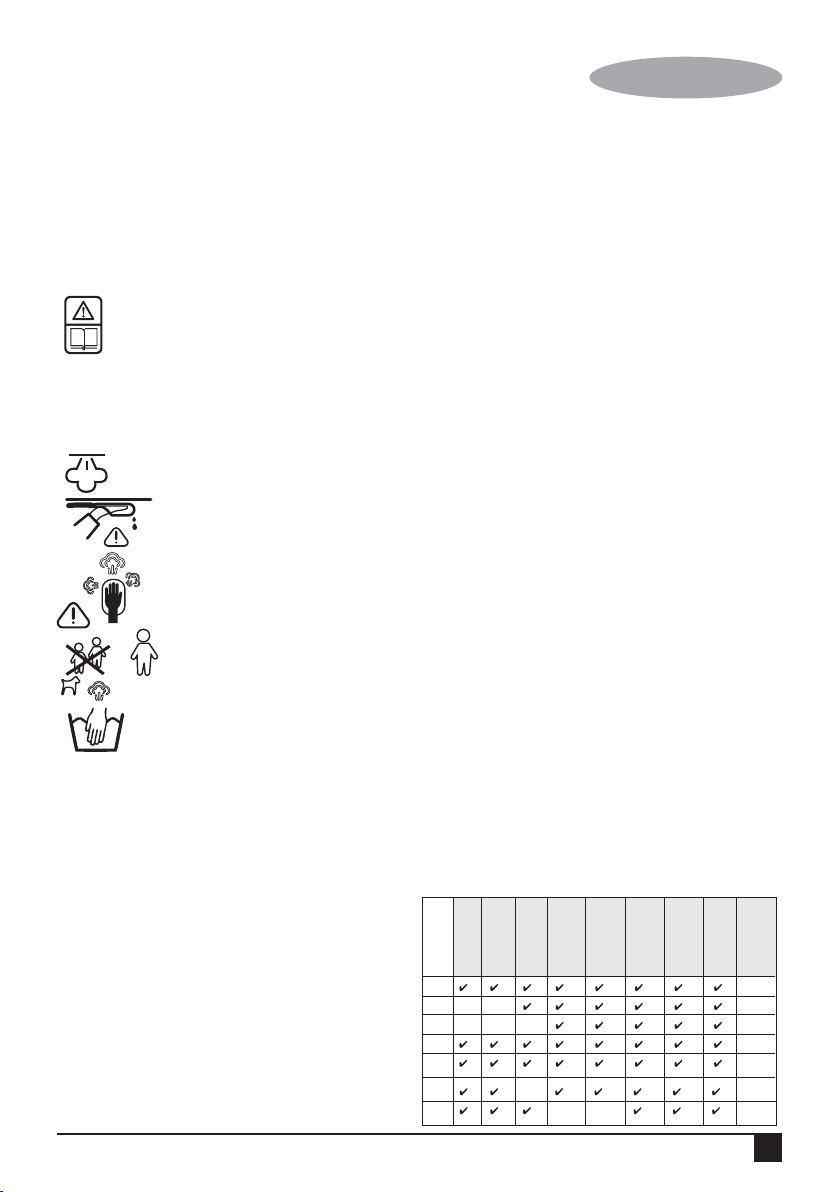
Safety Instructions
Warning! Read all Safety, Maintenance,
Service' manual carefully before operating this
appliance. Read all of this manual carefully
before operating this appliance.
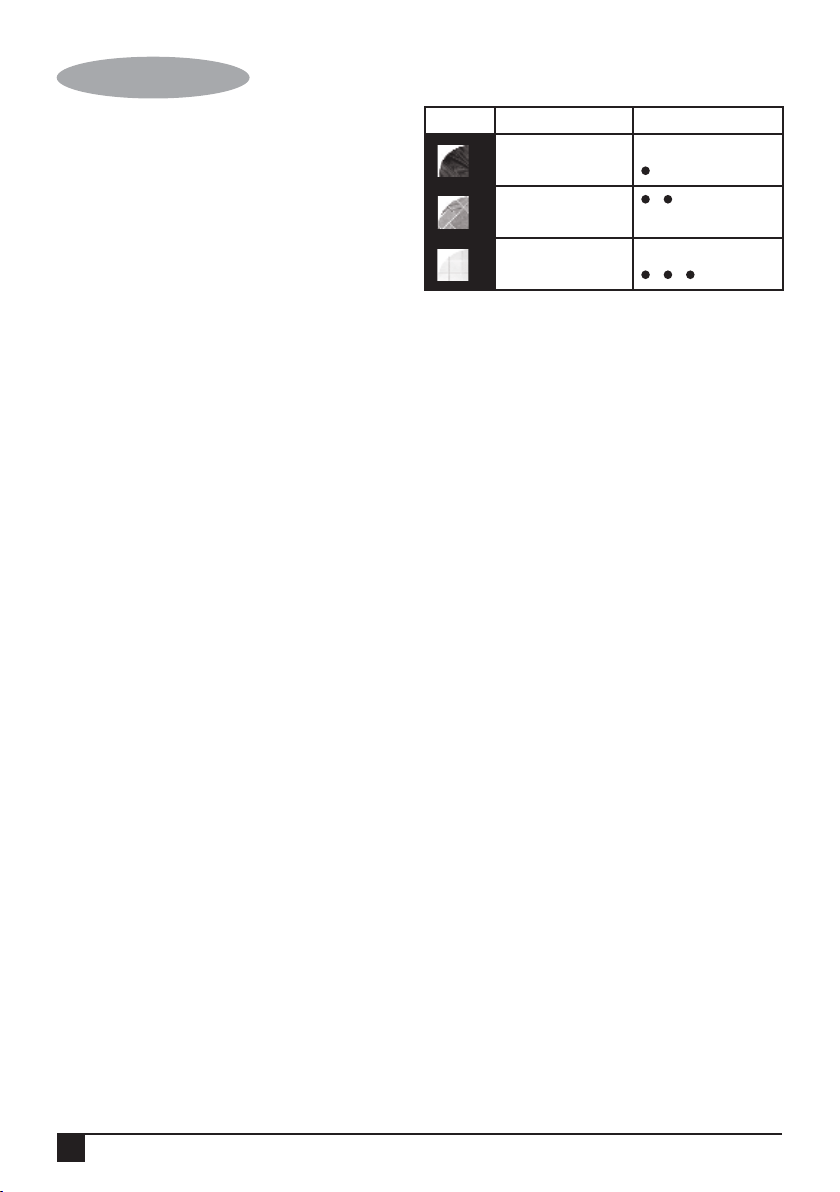
Labels on appliance
The following pictograms along with the date code are
shown on the appliance.
CAUTION Hot Steam
Water dripping when used upside down
Steam escapes from all sides
Do not leave unsupervised with young
children
Hand wash only
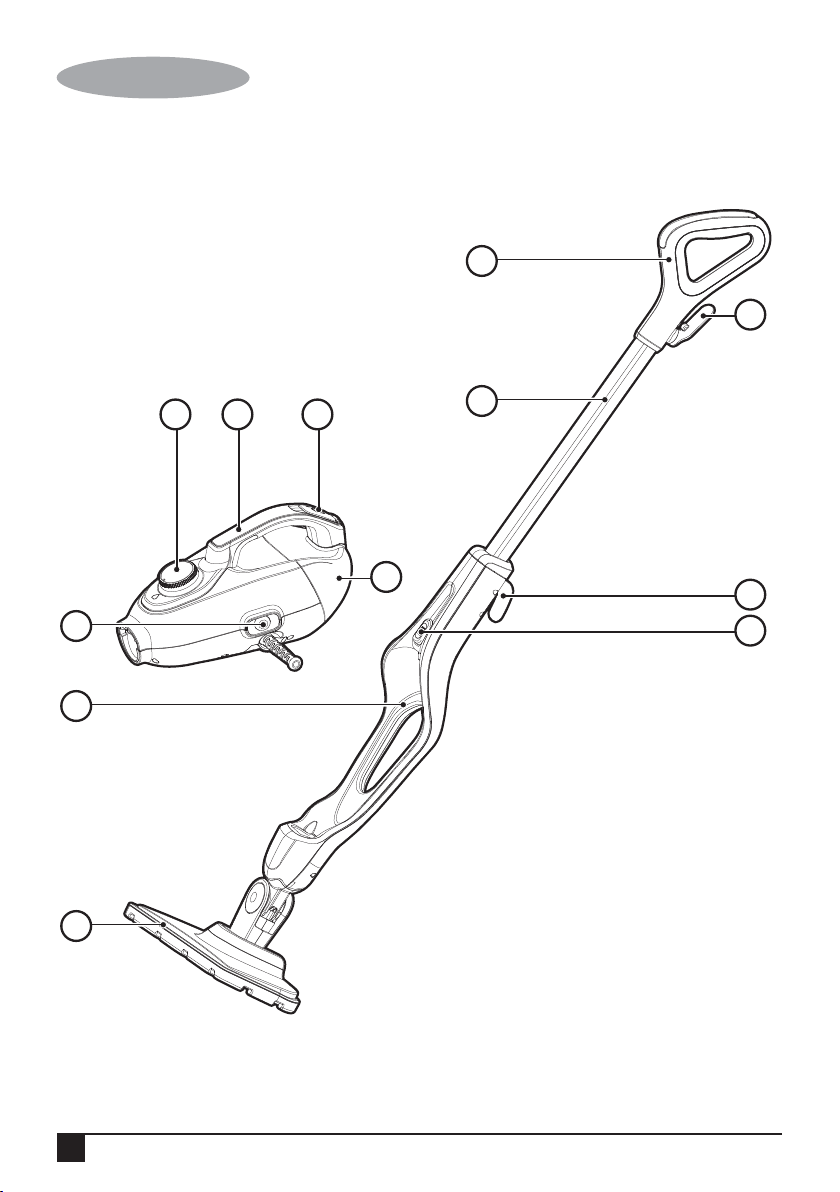
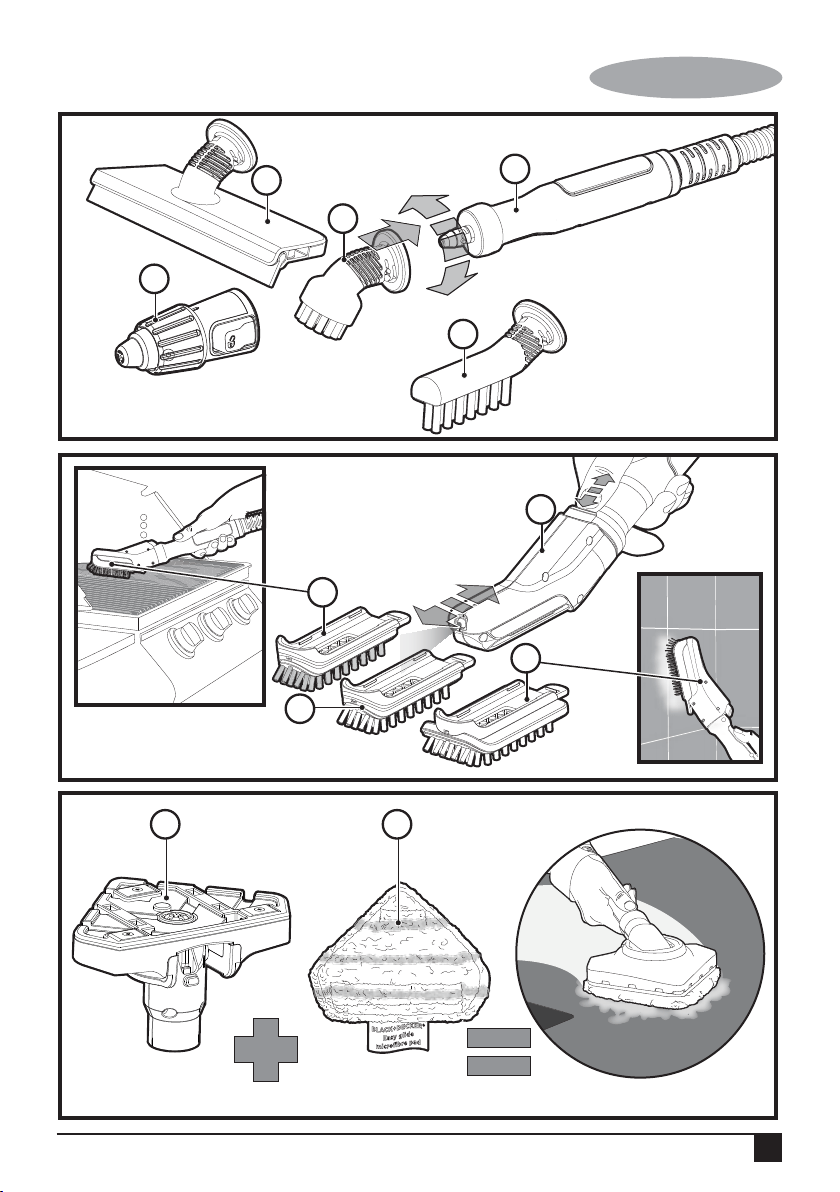
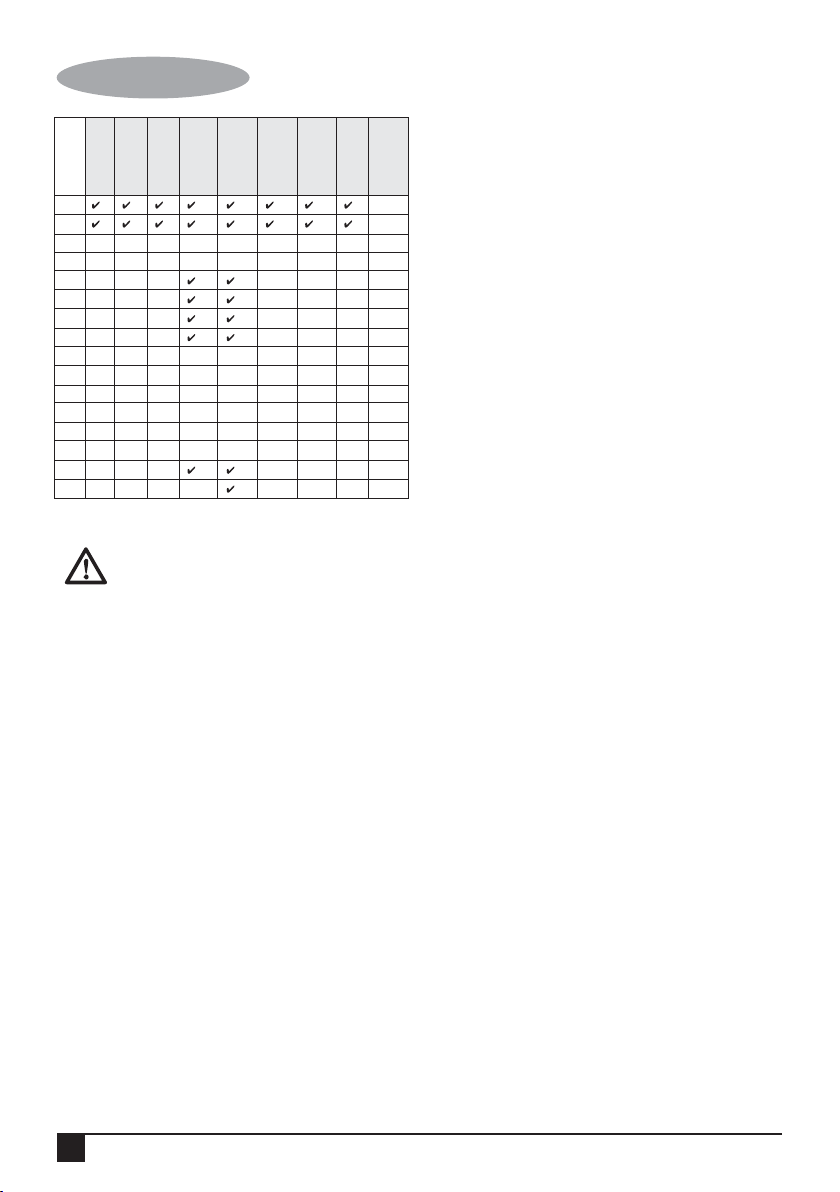
Features
This appliance includes some or all of the following features.
1. On/off switch
2. Autoselect
TM
dial
3. Hand held steam unit handle
4. Filler cap
5. Hand held steam unit
6. Hand grip
7. Top cable tidy hook
8. Main handle
9. Bottom cable tidy hook
10. Hand held steam unit release button
11. Main body
12. Floor cleaning head
12a. Steam burst floor cleaning head
12b. Carpet glider
(for use on carpets)
13. Floor cleaning pad
14. Floor cleaning pad release tab
15. Hanging Bracket
16. Steam hose
17. Steam nozzle
18. Angle brush accessory
(for use on hard to remove stains)
19. Brush accessory
(for use on tiles / grout)
20. Squeegee accessory
(for use on shower screens / glass / mirrors / clothing /
upholstery)
20a. Squeegee sock
21. Large squeegee accessory
(for use on shower screens / glass / mirrors / clothing /
upholstery)
21a. Large squeegee sock
22. Steam burst brush unit
22a. Steam burst wire brush
( for use on BBQ / ovens)
22b. Steam burst brush
( for use on BBQ / ovens / oven hobs / taps / grout)
22c. Steam burst wide brush
(for use on larger work surfaces)
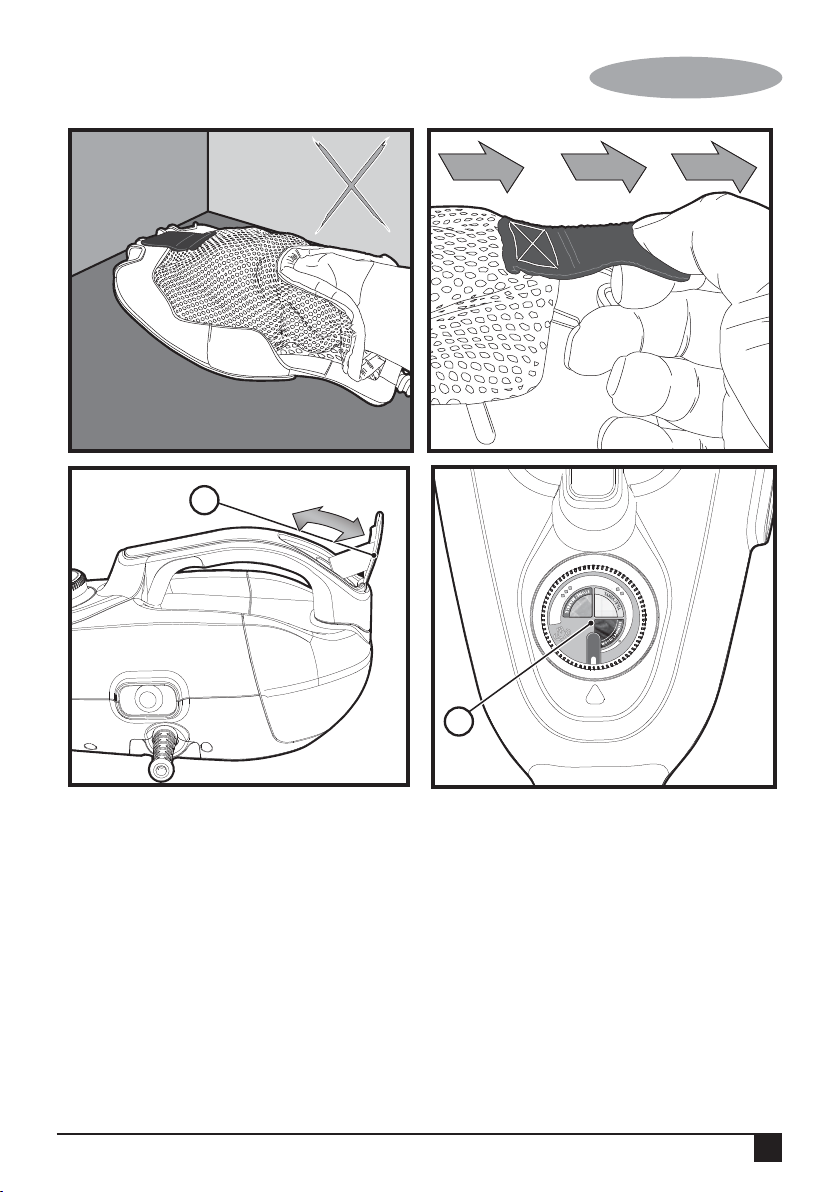
23. Delta head
(for use on clothing / upholstery / larger work surfaces)
23a. Flat surface cleaning pad
23b. Garment steaming interface
(for use on clothing / upholstery)
23c. Garment steaming brush
(for use on clothing / upholstery)
23d. Garment steaming pad
(for use on clothing / upholstery)
24. Fabric and garment steamer pad
(for use on clothing / upholstery)
25. SteaMitt
TM
26. SteaMitt
TM
hose
27. SteaMitt
TM
cleaning pad
28. Adjustable nozzle
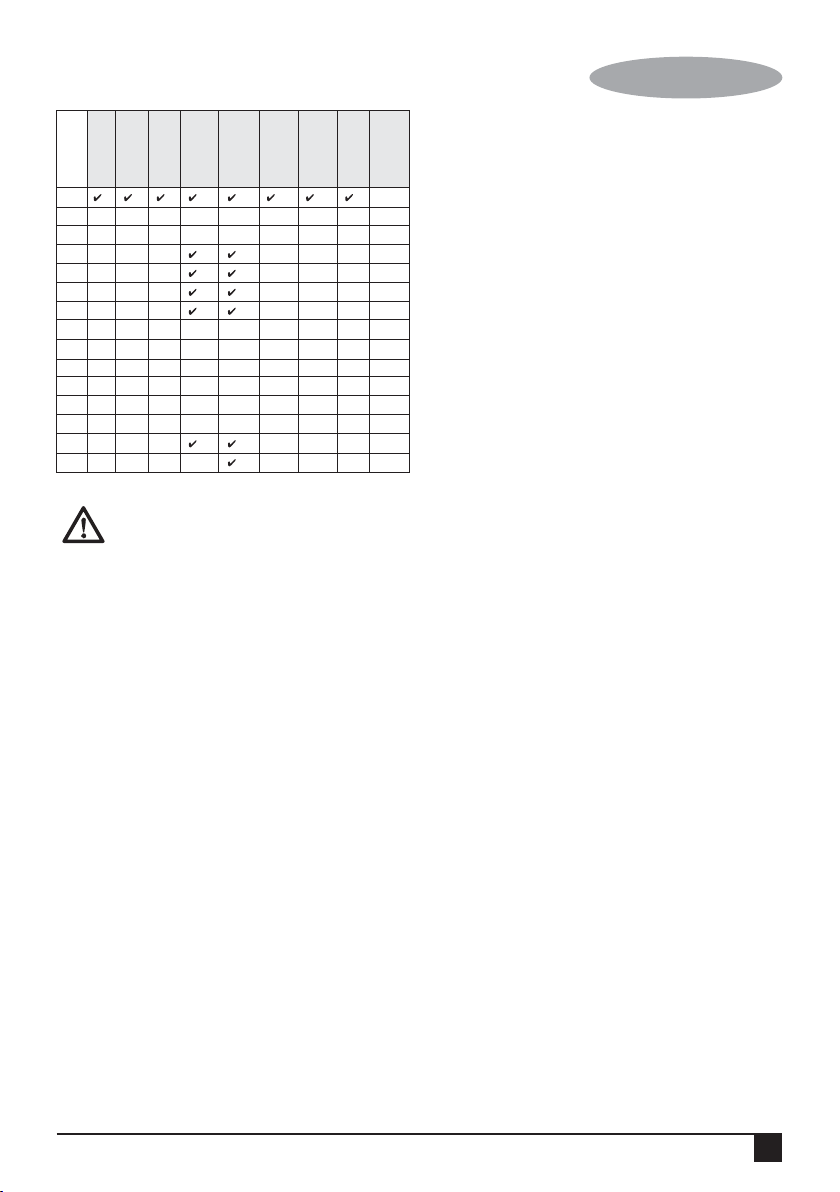
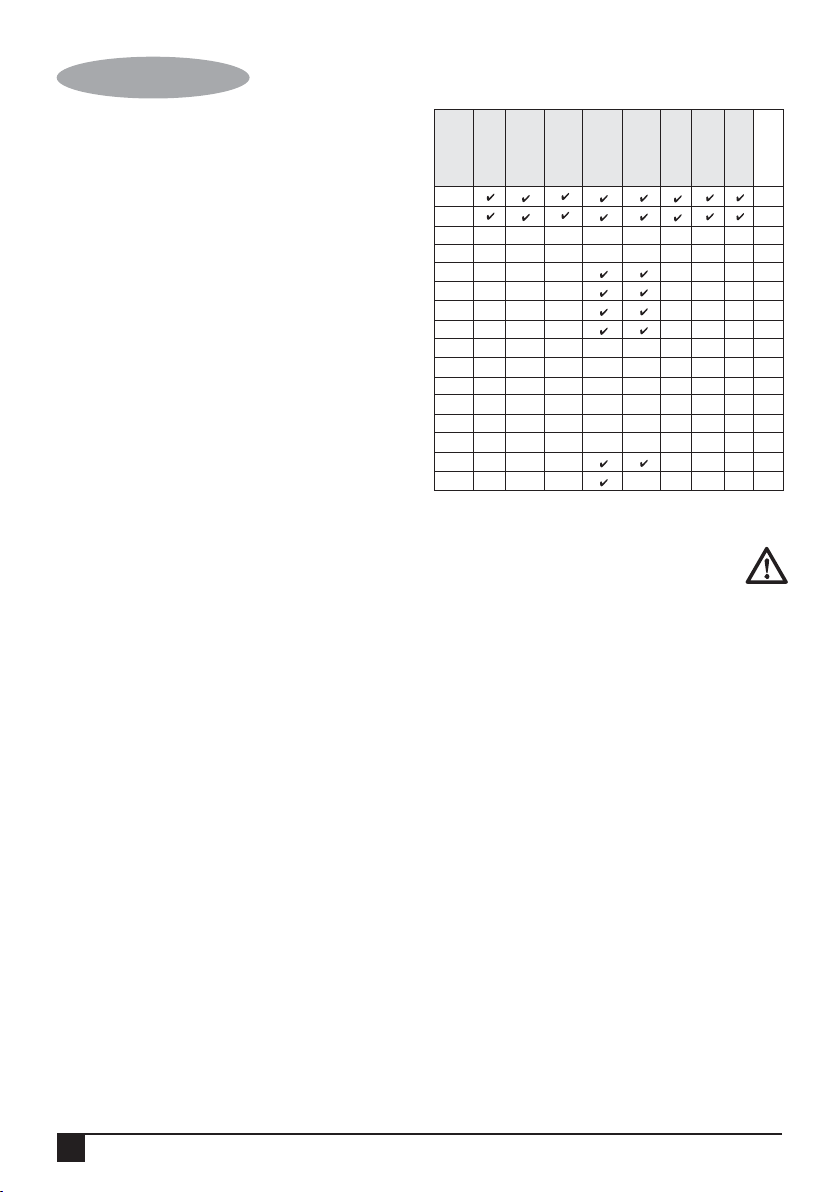
Configuration
12
All
12a
All
12b
All
13
All
16
All
18
�
19
� � �
20
�
FSMH1351SM
FSH13101SM
FSMH13151SM
FSMH13151SM
FSMH1321J
FSMH1321JSM
FSMH1321JMD
SETTINGS
FSMH1321
9
ENGLISH
(Original instructions)
Assembly
Warning! Before attempting any of the following
instructions, make sure that the appliance is
switched off and unplugged and the appliance is
cold and does not contain any water.
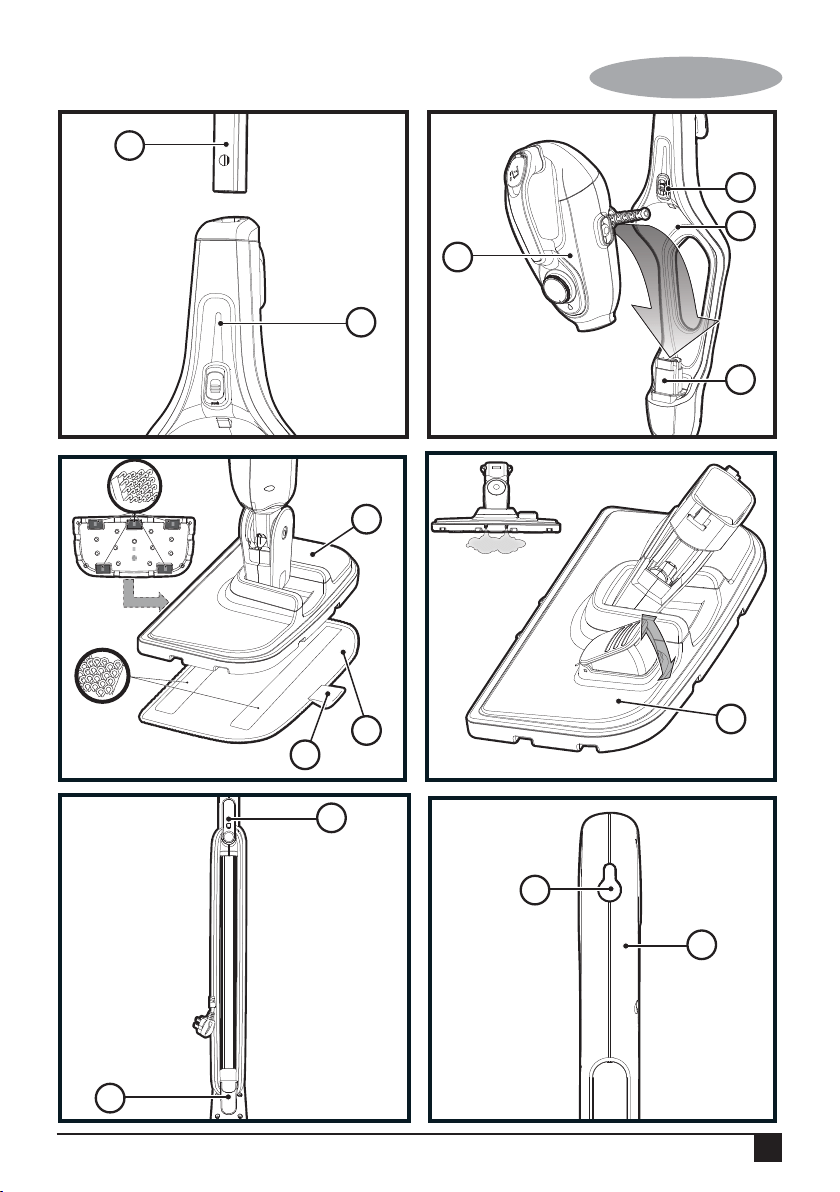
Attaching the handle (Fig. A)
• Slide the bottom end of the handle (8) into the top end of
the steam mop body (11) until it clicks into place.
Attaching the hand held steam cleaner
(Fig. B)
• Holding the back of the steam mop body (11) push the
hand held steam cleaner (5) firmly into the steam mop
body (11) making sure it sits correctly over the interface
(11a) and clicks securely into place.
Removing the hand held steam cleaner
(Fig. B)
• Push the release button (10) on the main body (11) and
lift the hand held steam cleaner (5) off the interface (11a)
and away from the main body (11).
Attaching a cleaning pad (Fig. C)
Replacement cleaning pads are available from your
BLACK+DECKER dealer :- (cat no. FSMP20-XJ).
• Place a cleaning pad (13) on the floor with the velcro
'loop' side facing up.
• Lightly press the steam mop down onto the cleaning pad
(13).
Note: This unit may be supplied with a standard floor
cleaning head (12) or a steam burst cleaning head (12a). In
either case use these instructions to fit a cleaning pad.
Caution! Never leave the steam mop in one spot on any
surface for any period of time. Always place the steam mop
with the handle (8) supported in the upright position when
stationary and make sure the steam mop is turned off when
not in use.
Removing a cleaning pad
Caution! Always wear suitable shoes when changing the
cleaning pad on your steam mop.
Do not wear slippers or open toed footwear.
• Return the handle (8) to the upright position and turn the
steam mop 'OFF'.
• Wait until the steam mop cools down (approximately 5
minutes).
• Lift the steam mop away from the cleaning pad freeing it
from the velcro fastening.
Caution! Never leave the steam mop in one spot on any
surface for any period of time.
Always place the steam mop with the handle (8) supported in
the upright position when stationary and make sure the
steam mop is turned off when not in use.
Filling the water tank (Fig. Q)
Note! Fill the water tank with clean tap water (Do not use any
additives or chemicals).
Note! In areas of hard water, the use of de-ionised water is
recommended.
• Open the filler cap (4) by flipping it up.
• Fill the water tank with water (Do not use any additives or
chemicals).
Warning! When filling, detach from main unit and maintain in
a horizontal position.
Warning! Your water tank has a 0.5 litre capacity. Do not
over fill the tank.
• Close the filler cap (4).
Note! Ensure the filler cap is firmly secured.
Attaching the carpet glider (12b) (For use on
carpets only)
• Place the carpet glider (12b) on the floor.
• Attach a cleaning pad to the floor cleaning head (12)
• Lightly press the steam mop down onto the carpet glider
(12b) until it clicks into place.
Caution! Never leave the steam mop in one spot on any
surface for any period of time. Always place the steam mop
with the handle (8) supported in the upright position when
stationary and make sure the steam mop is turned off when
not in use.
Removing the carpet glider
Caution! Always wear suitable shoes when changing the
carpet glider on your steam mop. Do not wear slippers or
open toed footwear.
20a
�
21
�
21a
�
22
All
22a
All
22b
All
22c
All
23
All
23a
All
23b
�
23c
�
23d
�
24
�
25
N/A
28
ALL
FSMH1351SM
FSH13101SM
FSMH13151SM
FSMH13151SM
FSMH1321J
FSMH1321JSM
FSMH1321JMD
SETTINGS
FSMH1321

10
ENGLISH
(Original instructions)
• Return the handle (8) to the upright position and turn the
steam mop 'OFF'.
• Wait until the steam mop cools down (approximately 5
minutes).
• Place the front of your shoe onto the carpet glider
removal tab and press down firmly.
• Lift the steam mop up and off the carpet glider.
Caution! Never leave the steam mop in one spot on any
surface for any period of time. Always place the steam mop
with the handle (8) supported in the upright position when
stationary and make sure the steam mop is turned off when
not in use.
Attaching the hose and accessories to the
hand held steam cleaner (Fig. G - O)
Warning! Inspect the seal between the connection point on
the hand held steam cleaner (5) and the steam hose (16)
before each use. If the seal malfunctions or is damaged,
please contact your nearest authorised repair agent. Do not
use the appliance.
Attaching the hose
• Press the steam hose release button (16a) on the steam
hose (16).
• Connect the steam hose (16) to the hand held steam
cleaner (5) and release the steam hose release button
(16a) making sure it clicks into place.
Important! Ensure that the steam hose (16) is securely
connected to the hand held steam cleaner (5). If steam
escapes from the joint, the hose is incorrectly fitted. Switch
off, allow the unit to cool then remove and refit the hose.
Attaching accessories (Fig H)
• Align the lugs on the steam nozzle (17) with the
recesses on the accessory.
• Press the accessory onto the steam nozzle (17) and
twist anti-clockwise until the accessory clicks into place.
Important! All accessories, apart from the SteaMitt
TM
(25)
which has its own hose and connector (26), must be
attached to the steam hose (16) for use.
Removing the hose and accessories
Warning! The steam hose (16), Steam nozzle (17) and
accessories become hot during use. Allow the unit and all
accessories to cool before attempting to remove.
Removing an accessory
• Twist the accessory clockwise then pull away from the
hose (16).
Removing the hose
• Press the steam hose release button (16a) on the steam
hose (16) and pull away from the hand held steam unit.
SteaMitt
TM
Your BLACK+DECKER
TM
SteaMitt
TM
has been designed for
sanitising and cleaning tiles, work tops, kitchen surfaces and
bathroom surfaces. This appliance is intended for indoor
household use only.
Attaching the SteaMitt
TM
hose to the hand held steam unit
Warning! Inspect the seal between the connection point on
the hand held steam cleaner (5) and the SteaMitt
TM
hose (26)
before each use. If the seal malfunctions or is damaged,
please contact your nearest authorised repair agent. Do not
use the appliance.
• Press the SteaMitt
TM
hose release button on the
SteaMittTM hose (26).
• Connect the SteaMitt
TM
hose (26) to the hand held steam
cleaner (5) and release the SteaMitt
TM
hose release
button making sure it clicks into place.
Important! Ensure that the SteaMitt
TM
hose (26) is securely
connected to the hand held steam cleaner (5).
If steam escapes from the joint, the hose is incorrectly fitted.
Switch off, allow the unit to cool then remove and refit the
hose.
Fitting a cleaning pad to the SteaMitt
TM
(Fig. L)
• Fit the cleaning pad (27) to the SteaMitt
TM
(25) by
attaching the 'loop' velcro strips (27a) on the upper side
of the cleaning pad, to the 'hook' velcro pads (25a) on the
underside of the SteaMitt
TM
(4). Press down firmly.
Warning! The SteaMitt
TM
should not be used without fitting a
cleaning pad.
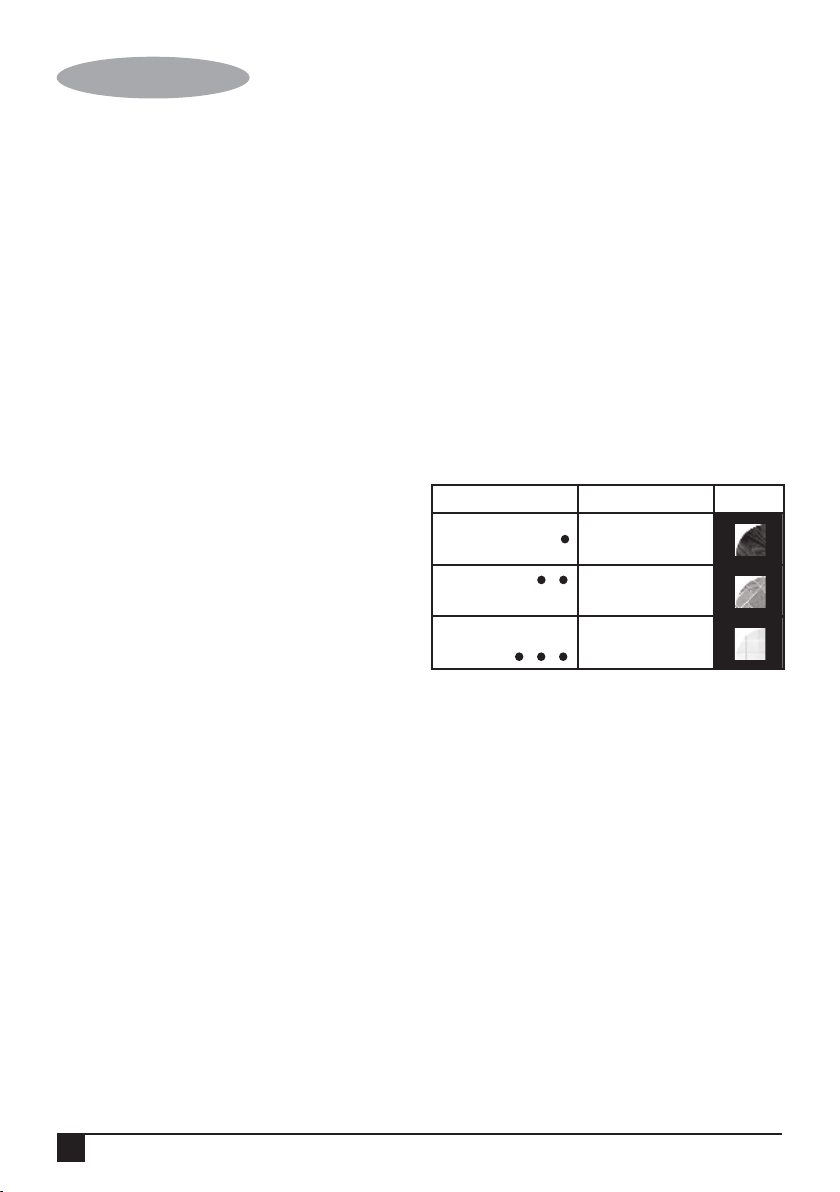
Note: The SteaMitt
TM
accommodates 3 types of cleaning
pads of varying thickness. The thinnest can be used for
cleaning 3D forms such as taps etc. The thicker versions can
be used for larger flat areas.
Warning! Always use the SteaMitt
TM
as shown in figure M,
with your hand inside the protective glove.
Warning! Never attempt to use the SteaMitt
TM
by gripping it
externally as shown in figure N. This will result in scalding.
Warning! Avoid using the SteaMitt
TM
in tight corners as
shown in figure O.
Warning! Should a problem occur during use, use the quick
release tab to quickly remove the SteaMitt
TM
from your hand
as shown in figure P.
Warning! Do not use the SteaMitt
TM
on cold glass, such as
windows as damage may be caused by the sudden change
in temperature.
Warning! Never point or direct the mitt at yourself or any
other person.
Note: Variable steam dial is disconnected when the
SteaMitt
TM
is fitted and subsequently the flow of steam is
limited.
11
ENGLISH
(Original instructions)
Use
Important! This unit will kill 99.9% of bacteria and germs
when used in accordance with the instructions in this manual
and with the micro fibre pads fitted and a continuous run
time of 90 seconds.
Switching on and off
• To switch the appliance on, press the ON/Off switch (1).
It takes approximately 15 seconds for the steam mop to
heat up.
• To switch the appliance off, press the ON/Off switch (1).
Note: always have your hand inside the SteaMittTM before
you press the steam button.
Caution! Never leave the steam mop in one spot on any
surface for any period of time.
Always place the steam mop with the handle (8) supported
in the upright position when stationary and make sure the
steam mop is turned off when not in use.
Caution! Always empty the steam mop after use.
Note! When first filled or after running dry, it can take up to
45 seconds for steam to be produced.
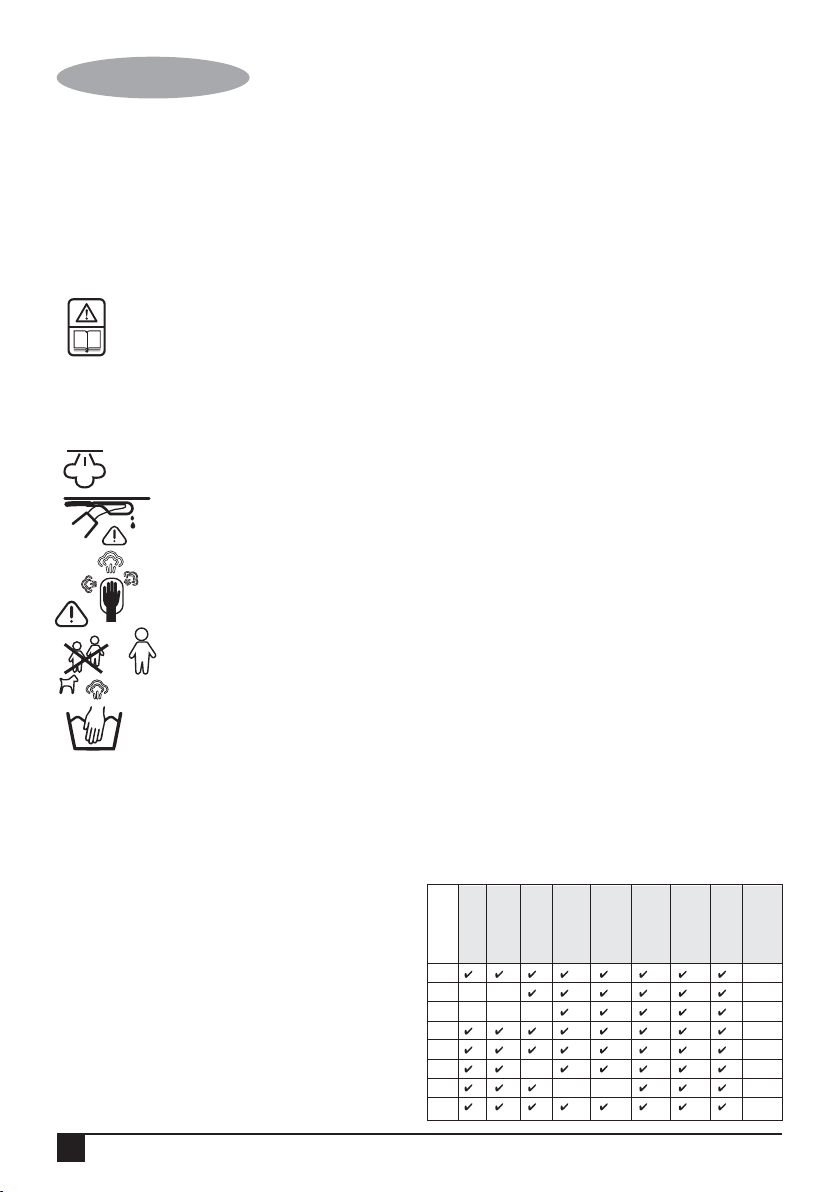
Autoselect
TM
Technology (Fig. R)
This steam mop is fitted with an Autoselect
TM
dial (2) which
shows various cleaning applications. They are used to select
the correct operating mode for your particular cleaning
operation.
Using Autoselect
TM
, choose from one of the following
applications by turning the Autoselect
TM
dial (2) until the
required setting is selected.
The steam mop will select the correct volume of steam
required for your particular cleaning operation.
Note: Always check you are using the correct setting before
using your steam mop.
Steam Burst (Fig. C1) (only available with
units FSMH1310SM, FSMH13151SM)
The floor head (12a) is equipped with a steam burst pedal to
aid in the removal of stubborn marks and stains.
• During use, press the steam burst pedal to apply extra
cleaning power.
• To revert back to normal setting press the pedal again.
Hints for optimum use
General
Caution: Never use the steam mop without first attaching a
cleaning pad.
• Always vacuum or sweep the floor before using the
steam mop.
• The easiest way to use the appliance is to tilt the handle
to a 45º angle and clean slowly, covering a small area at
a time.
• Use water only with no additives or chemicals with your
steam mop. To remove stubborn stains from vinyl or
linoleum floors, you can pre-treat with a mild detergent
and some water before using the steam mop.
Steam Cleaning with the mop
• Fit hand held steam cleaner (5) to the steam mop body
(11)
• Place a cleaning pad (13) on the floor with the velcro
'loop' side facing up.
• Lightly press the steam mop down onto the cleaning pad
(13).
• Connect the steam mop to the mains.
• Press the ON/OFF button (1). It takes approximately 15
seconds for the steam mop to heat up.
• Turn the AutoselectTM dial (2) until the required setting is
reached. After a few seconds steam will start to come out
of the steam head.
Note! When first filled or after running dry, it can take up to
45 seconds for steam to be produced.
• It takes a few seconds for steam to enter the cleaning
pad. The steam mop will now glide easily over the
surface to be sanitized/cleaned.
• Push and pull the steam mop slowly across the surface
to thoroughly steam clean each section.
• When you have finished using the steam mop, return the
handle (8) to the upright position, making sure that it is
supported and turn it 'OFF'. Wait until the steam mop
cools down (approximately five minutes).
Caution! It is important to monitor the water level in the water
tank. To refill the water tank and continue to sanitize/clean
stand the mop upright making sure that the handle is
supported and turn the steam mop 'OFF'. Unplug the unit
from the electrical wall outlet, and refill the water tank.
Caution! Never leave the steam mop in one spot on any
surface for any period of time. Always place the steam mop
with the handle (8) supported in the upright position when
stationary and make sure the steam mop is turned off when
not in use.
Carpet refreshing
• Place a cleaning pad (13) on the floor with the 'loop' side
facing up.
Setting Mop Hand held
Wood/Laminate High temperature steam for
windows
Stone/Marble
Tiles/Vinyl Low temperature steam for
heavy grime
12
ENGLISH
(Original instructions)
• lightly press the steam mop down onto the cleaning pad.
• Place the carpet glider (12b) on the floor.
• Lightly press the steam mop down onto the carpet glider
until it clicks into place.
• Connect the steam mop to the mains.
• Press the ON/OFF button (1). It takes approximately 15
seconds for the steam mop to heat up.
• Turn the Autoselect
TM
dial (2) to the Wood/Laminate
setting.
• Push and pull the steam mop slowly across the carpet to
thoroughly refresh each section.
• When you have finished using the steam mop, return the
handle (8) to the upright position and turn the unit OFF.
Wait until the steam mop cools down (approximately five
minutes).
After use
• Turn the Autoselect
TM
dial (2) to the OFF position.
• Wait until the steam mop cools down.
• Unplug the steam mop from the electrical wall outlet.
• Empty the water tank.
• Remove the cleaning pad (13) and wash it ready for
next use (take care to follow the wash care instructions
printed on the cleaning pad).
• Wrap the supply cable around the cable tidy hooks (7
and 9).
• There is a hanging bracket (15) built into the hand grip
(6) which allows your steam mop to be hung from a
suitable hook on the wall. Always ensure that your wall
hook is capable of supporting the weight of the steam
mop safely.
Hand held steam cleaning
Warning! Unit will not produce steam unless it is connected
to the main body (11) or the steam hose (16) is fitted.
Warning! Only use in a horizontal position.
• Attach the required accessory.
• Connect the hand held steam cleaner to the mains.
• Press the ON/OFF button (1). It takes approximately 15
seconds for the steam mop to heat up.
• Turn the Autoselect
TM
dial (2) until the required setting is
reached. After a few seconds steam will start to come
out of the steam head.
Note! When first filled or after running dry, it can take up to
45 seconds for steam to be produced.
• When you have finished using the hand held steam
cleaner turn the Autoselect
TM
dial (2) to the OFF position.
Turn the unit OFF by pressing the ON/OFF button (1)
and disconnect from the mains supply. Wait until the unit
cools down before storing (approximately five minutes).
Accessories
The performance of your appliance depends on the
accessory used. BLACK+DECKER accessories are
engineered to high quality standards and designed to
enhance the performance of your appliance. By using these
accessories you will get the very best from your equipment.
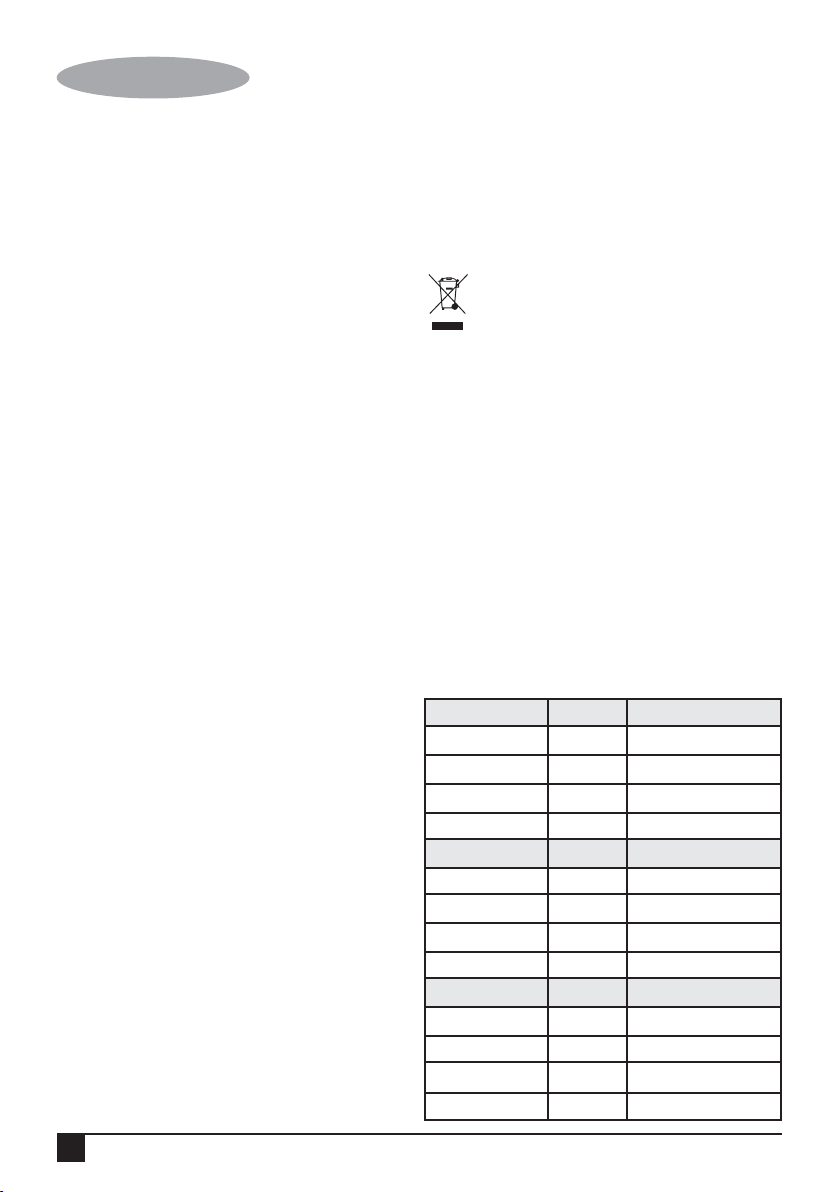
Protecting the environment
Separate collection. This product must not be
disposed of with normal household waste.
Should you find one day that your BLACK+DECKER product
needs replacement, or if it is of no further use to you, do not
dispose of it with other household waste. Make this product
available for separate collection.
• BLACK+DECKER provides a facility for recycling
BLACK+DECKER products once they have reached the
end of their working life. This service is provided free of
charge. To take advantage of this service please return
your product to any authorised repair agent who will
collect them on our behalf.
• You can check the location of your nearest authorised
repair agent by contacting your local BLACK+DECKER
office at the address indicated in this manual.
Alternatively, a list of authorized BLACK+DECKER repair
agents and full details of our after-sales service and
contact are available on the Internet at:
www.2helpU.com.
FSMH1321
Voltage V
ac
220-240
Power W 1300
Tank Capacity ml 500
Weight kg 2.7
FSMH1351SM
Voltage V
ac
220-240
Power W 1300
Tank Capacity ml 500
Weight kg 2.7
FSMH13101SM
Voltage V
ac
220-240
Power W 1300
Tank Capacity ml 500
Weight kg 2.8
Technical Data

13
ENGLISH
(Original instructions)
FSMH1321
Voltage V
ac
220-240
Power W 1300
Tank Capacity ml 500
Weight kg 2.7
FSMH1351SM
Voltage V
ac
220-240
Power W 1300
Tank Capacity ml 500
Weight kg 2.7
FSMH13151SM
Voltage V
ac
220-240
Power W 1300
Tank Capacity ml 500
Weight kg 2.8
FSMH1321J
Voltage V
ac
220-240
Power W 1300
Tank Capacity ml 500
Weight kg 2.7
FSMH1321JSM
Voltage V
ac
220-240
Power W 1300
Tank Capacity ml 500
Weight kg 2.8
FSMH1321JMD
Voltage V
ac
220-240
Power W 1300
Tank Capacity ml 500
Weight kg 2.8
Troubleshooting
If your appliance seems not to operate properly, follow the
instructions below. If this does not solve the problem, please
contact your local BLACK+DECKER repair agent.
Warranty
BLACK+DECKER is confident of the quality of its products
and offers an outstanding warranty.
This warranty statement is in addition to and in no way
prejudices your statutory rights.
If a BLACK+DECKER product becomes defective due to
faulty materials, workmanship or lack of conformity, within 24
months from the date of purchase, BLACK+DECKER
warranty to replace defective parts, repair products subjected
to fair wear and tear or replace such products to ensure
minimum inconvenience to the customer unless:
Problem Step Possible solution
The steam mop is
not turning on
1.
2.
3. Check the fuse in the plug.
The steam mop is not
producing steam
The steam mop stops
producing steam
during use
4.
The steam mop will only produce
steam if the hand held steam cleaner
(5) is correctly docked into the main
body (11) or the steam hose is fitted
or the Autoselect
TM
is turned to ON
Check that the water tank is full. Note:
When first filled or after running dry it
can take up to 45 seconds for steam
to be produced.
Check steps 1, then 2, then 3
Check steps 4, then 5, then 3
The steam mop is
producing too much
steam during use
Turn the Autoselect
TM
dial (2)
anti-clockwise to reduce the amount
of steam being produced
5.
6.
7.
8.
The steam mop is
producing too little
steam during use
Turn the Autoselect
TM
dial (2)
clockwise to increase the amount of
steam being produced
9.
No steam is being
produced from the
hand held steam
cleaner
Check that the Autoselect
TM
dial (2)
is at the ON position
10.
The hand held steam
cleaner is producing
too little steam during
use
Turn the Autoselect
TM
dial (2)
clockwise to increase the amount of
steam being produced
12.
The hand held steam
cleaner is producing
too much steam
during use
Turn the Autoselect
TM
dial (2)
anti-clockwise to reduce the amount
of steam being produced
14.
The accessories keep
falling off the unit
Refer to the assembly chapter for
correct fitting instructions of all parts
and accessories
15.
Steam is escaping
from unexpected
areas of the unit
Refer to the assembly chapter for
correct fitting instructions of all parts
and accessories
16.
Where can I get
further information/
accessories
www.blackanddecker.co.uk/steammop
www.blackanddecker.ie/steammop
17.
Check step 5
13.
Check steps 5, then 1, then 2, then 3
11.
Check the unit is plugged in at the
wall socket.
Check the unit is switched on using
the ON/OFF switch (1)

14
ENGLISH
(Original instructions)
The product has been used for trade, professional or
hire purposes;
The product has been subjected to misuse or neglect;
The product has sustained damage through foreign
objects, substances or accidents;
Repairs have been attempted by persons other than
authorised repair agents or BLACK+DECKER service
staff.
To claim on the warranty, you will need to submit proof of
purchase to the seller or an authorised repair agent. You can
check the location of your nearest authorised repair agent by
contacting your local BLACK+DECKER office at the
address indicated in this manual.
Alternatively, a list of authorised BLACK+DECKER repair
agents and full details of our after-sales service and contacts
are available on the Internet at: www.2helpU.com.
15
FRANÇAIS
(Traduction des instructions d'origine)
Utilisation prévue
Votre balais vapeur BLACK+DECKER
TM
FSMH1321,
FSMH13515M, FSMH13101SM, FSMH13151SM,
FSMH1321J, FSMH1321JSM, FSMH1321JMD a été conçu
pour désinfecter et nettoyer les planchers en bois durs,
laminés, en lino, en vinyle, carrelés, en pierres et en marbre.
Il est destiné à une utilisation à l’intérieur et exclusivement
domestique.
Consignes de sécurité
Avertissement ! Lisez attentivement
l’intégralité des manuels de sécurité, de
maintenance et d’entretien avant d’utiliser cet
appareil. Lisez attentivement et entièrement le
manuel avant d’utiliser l’appareil.
Étiquettes apposées sur l’appareil
Les pictogrammes suivants ainsi que le code date sont
apposés sur l’outil.
ATTENTION Vapeur bouillante
Ruissellement d’eau lorsque l’appareil est
utilisé à l’envers
La vapeur s’échapper de tous les côtés
Ne laissez l’appareil sans surveillance en
présence de jeunes enfants
Lavage à la main
Caractéristiques
Cet appareil présente tout ou partie des caractéristiques
suivantes.
1. Interrupteur Marche/Arrêt
2. Molette Autoselect
TM
3. Poignée de l‘appareil à vapeur portable
4. Bouchon de remplissage
5. Appareil à vapeur portable
6. Poignée
7. Crochet supérieur de retenue de câble
8. Poignée principale
9. Crochet inférieur de retenue de câble
10. Bouton de libération de l‘appareil à vapeur portable
11. Corps principal
12. Tête de nettoyage de sol
12a. Tête de nettoyage de sol avec booster vapeur
12b. Accessoire moquette
(à utiliser sur les tapis)
13. Patin de nettoyage de sol
14. Languette de libération du patin de nettoyage de sol
15. Patte d‘accrochage
16. Tuyau de vapeur
17. Buse vapeur
18. Brosse d‘angle
(à utiliser sur les taches tenaces)
19. Brosse
(à utiliser sur le carrelage / les joints)
20. Raclette
(à utiliser sur les pare-douches / le verre / les miroirs /
les garnitures/ les tissus d‘ameublement)
20a. Chaussette de raclette
21. Grande raclette
(à utiliser sur les pare-douches / le verre / les miroirs /
les garnitures/ les tissus d‘ameublement)
21a. Grande chaussette de raclette
22. Brosse avec booster vapeur
22a. Brosse métallique avec booster de vapeur
(à utiliser pour les BBQ / fours)
22b. Brosse avec booster de vapeur
(à utiliser pour les BBQ / fours / réchauds / robinets /
joints)
22c. Grande brosse avec booster de vapeur
(à utiliser sur les plus grandes surfaces)
23. Tête triangulaire
(à utiliser sur les garnitures / les tissus d‘ameublement /
les plus grandes surfaces)
23a. Patin de nettoyage pour surface plate
23b. Accessoire vapeur pour vêtements
(à utiliser sur vêtements / les tissus d‘ameublement)
23c. Brosse vapeur pour vêtements
(à utiliser sur vêtements / les tissus d‘ameublement)
23d. Patin vapeur pour vêtements
(à utiliser sur vêtements / les tissus d‘ameublement)
24. Patin vapeur pour tissus et vêtements
(à utiliser sur vêtements / les tissus d‘ameublement)
25. SteaMitt
TM
26. Tuyau SteaMitt
TM
27. Patin de nettoyage SteaMitt
TM
28. Buse réglable
Configuration
12
Tous
12a
Tous
12b
Tous
13
Tous
16
Tous
18
�
19
� � �
FSMH1351SM
FSH13101SM
FSMH13151SM
FSMH13151SM
FSMH1321J
FSMH1321JSM
FSMH1321JMD
SETTINGS
FSMH1321
16
FRANÇAIS
(Traduction des instructions d'origine)
Assemblage
Avertissement ! Avant d’exécuter ce qui suit,
assurez-vous que l’appareil est éteint,
débranché, qu’il est froid et ne contient pas
d’eau.
Fixation du manche (Fig. A)
• Glissez l’extrémité inférieure du manche (8) dans
l’extrémité supérieure du corps du balai vapeur (11)
jusqu’à ce qu’il s’enclenche en place.
Fixation du nettoyeur vapeur portable
(Fig. B)
• Tout en maintenant l’arrière du corps du balai vapeur
(11), poussez fermement le nettoyeur à vapeur portable
(5) dans le corps du balai vapeur (11) en vous assurant
qu’il est correctement en place dans le raccord (11a) et
qu’il est bien enclenché.
Retrait du nettoyeur à vapeur portable
(Fig. B)
• Enfoncez le bouton de libération (10) sur le corps
principal (11) et soulevez le nettoyeur à vapeur portable
(5) hors du raccord (11a) pour l’éloigner du corps
principal (11).
Fixation d’un patin de nettoyage (Fig. C)
Vous trouverez des patins de nettoyage de rechange auprès
de votre revendeur BLACK+DECKER (cat. n° FSMP20-XJ).
• Placez un patin de nettoyage (13) sur le sol, côté avec
la boucle en Velcro vers le haut.
• Appuyez légèrement le balai vapeur sur le patin de
nettoyage (13).
Remarque : Cet appareil peut être livré avec un tête de
nettoyage pour les sols standard (12) ou une tête de
nettoyage vapeur (12a). Dans les deux cas utilisez ces
instructions pour installer le patin de nettoyage.
Attention ! Ne laissez jamais le balai vapeur trop longtemps
au même endroit. Placez toujours le balai vapeur, manche (8)
à la verticale et assurez-vous que le balai est éteint lorsqu’il
n’est pas utilisé.
Retrait de la lavette
Attention ! Portez toujours des chaussures adaptées pour
changer la lavette de votre balai vapeur.
Ne portez pas de chaussons ou de pieds-nus.
• Replacez le manche (8) en position verticale et éteignez
le balai vapeur.
• Attendez que le balai vapeur ait refroidi (environ 5
minutes).
• Retirez le balai vapeur du patin de nettoyage en enlevant
la fixation Velcro.
Attention ! Ne laissez jamais le balai vapeur trop longtemps
au même endroit.
Placez toujours le balai vapeur, manche (8) à la verticale et
assurez-vous que le balai est éteint lorsqu’il n’est pas utilisé.
Remplissage du réservoir d’eau (Fig. Q)
Remarque ! Remplissez le réservoir d’eau avec de l’eau
propre du robinet (n’utilisez aucun additif ou produit
chimique).
Remarque ! Dans les zones où l’eau est très calcaire,
l’utilisation d’eau dé ionisée est recommandée.
• Ouvrez le bouchon de remplissage (4) en le basculant
vers le haut.
• Remplissez le réservoir d’eau avec de l’eau (n’utilisez
aucun additif ou produit chimique).
Avertissement ! Lors du remplissage détachez-le du module
principal et gardez-le à l’horizontal.
Avertissement ! La capacité du réservoir d’eau est de 0.5 L.
Ne remplissez pas trop le réservoir.
• Refermez le bouchon de remplissage (4).
Remarque ! Assurez-vous que le bouchon de remplissage
est fermement refermé.
Fixation de l’accessoire moquette (12b) (à
utiliser sur les tapis uniquement)
• Placez l’accessoire moquette (12b) sur le sol.
• Fixez un patin de nettoyage sur la tête de nettoyage (12)
• Appuyez légèrement le balai vapeur sur l’accessoire
moquette (12b) jusqu’à ce qu’il s’enclenche en place.
Attention ! Ne laissez jamais le balai vapeur trop longtemps
au même endroit. Placez toujours le balai vapeur, manche (8)
à la verticale et assurez-vous que le balai est éteint lorsqu’il
n’est pas utilisé.
20
�
20a
�
21
�
21a
�
22
Tous
22a
Tous
22b
Tous
22c
Tous
23
Tous
23a
Tous
23b
�
23c
�
23d
�
24
�
25
S/O
28
TOUS
FSMH1351SM
FSH13101SM
FSMH13151SM
FSMH13151SM
FSMH1321J
FSMH1321JSM
FSMH1321JMD
SETTINGS
FSMH1321

17
FRANÇAIS
(Traduction des instructions d'origine)
Retrait de l’accessoire moquette
Attention ! Portez toujours des chaussures adaptées pour
changer l’accessoire moquette du balai vapeur. Ne portez
pas de chaussons ou de pieds-nus.
• Replacez le manche (8) en position verticale et éteignez
le balai vapeur.
• Attendez que le balai vapeur ait refroidi (environ 5
minutes).
• Placez l’avant de votre chaussure sur la languette de
libération de l’accessoire moquette et appuyez
fermement dessus.
• Soulevez le balai vapeur pour dégager l’accessoire
moquette.
Attention ! Ne laissez jamais le balai vapeur trop longtemps
au même endroit. Placez toujours le balai vapeur, manche
(8) à la verticale et assurez-vous que le balai est éteint
lorsqu’il n’est pas utilisé.
Fixation du tuyau et des accessoires sur le
nettoyeur à vapeur portable (Fig. G - O)
Avertissement ! Contrôlez le joint entre le point de
raccordement du nettoyeur vapeur portable (5) et le tuyau
de vapeur (16) avant chaque utilisation. Si le joint
dysfonctionne ou est endommagé, contactez le réparateur
agréé Black & Decker le plus proche. N’utilisez pas
l’appareil.
Fixation du tuyau
• Appuyez sur le bouton de libération du tuyau de vapeur
(16a) sur le tuyau de vapeur (16).
• Raccordez le tuyau de vapeur (16) au nettoyeur vapeur
portable (5) et relâchez le bouton de libération du tuyau
de vapeur (16a) en vous assurant que le tuyau est bien
en place.
Important ! Assurez-vous que le tuyau de vapeur (16) est
correctement raccordé avant d’utiliser le nettoyeur à vapeur
portable (5). Si de la vapeur s’échappe du joint, cela indique
que le tuyau n’est pas correctement installé. Éteignez
l’appareil et laissez-le refroidir, avant de retirer et de
réinstaller le tuyau.
Fixation des accessoires (Fig. H)
• Alignez les pattes sur la buse vapeur (17) avec les
encoches de l’accessoire.
• Enfoncez l’accessoire sur la buse vapeur (17) et
tournez-le dans le sens inverse des aiguilles d’une
montre jusqu’à ce qu’il s’enclenche en place.
Important ! Tous les accessoires, à l’exception du SteaMitt
TM
(25) qui dispose de son propre tuyau et son propre raccord
(26) doivent être raccordés au tuyau de vapeur (16) pour
être utilisés.
Retrait du tuyau et des accessoires
Avertissement ! Le tuyau de vapeur (16), la buse vapeur
(17) et les accessoires deviennent chauds pendant
l’utilisation. Laissez l’appareil et tous les accessoires refroidir
avant de retirer ces derniers.
Retrait d’un accessoire
• Tournez l’accessoire dans le sens des aiguilles d’une
montre, avant de le tirer hors du tuyau (16).
Retrait du tuyau
• Appuyez sur le bouton de libération du tuyau de vapeur
(16a) sur le tuyau de vapeur (16) et retirer ce dernier du
module vapeur portable.
SteaMitt
TM
Votre BLACK+DECKER
TM
SteaMitt
TM
a été conçu pour
désinfecter et nettoyer les carrelages, plans de travail,
surfaces de cuisines et de salles de bain. Il est destiné à une
utilisation à l’intérieur et exclusivement domestique.
Fixation du tuyau du SteaMitt
TM
sur le module vapeur portable
Avertissement ! Contrôlez le joint entre le point de
raccordement du nettoyeur vapeur portable (5) et le
SteaMitt
TM
(26) avant chaque utilisation. Si le joint
dysfonctionne ou est endommagé, contactez le réparateur
agréé Black + Decker le plus proche. N’utilisez pas l’appareil.
• Appuyez sur le bouton de libération du tuyau du
SteaMitt
TM
sur le tuyau du SteaMitt
TM
(26).
• Raccordez le tuyau du SteaMitt
TM
(26) au nettoyeur
vapeur portable (5) et relâchez le bouton de libération du
tuyau du SteaMitt
TM
en vous assurant que ce dernier
s’enclenche bien en place.
Important ! Assurez-vous que le tuyau du SteaMitt
TM
(26) est
correctement raccordé avant d’utiliser le nettoyeur à vapeur
portable (5).
Si de la vapeur s’échappe du joint, cela indique que le tuyau
n’est pas correctement installé. Éteignez l’appareil et
laissez-le refroidir, avant de retirer et de réinstaller le tuyau.
Installation du patin de nettoyage sur le
SteaMitt
TM
(Fig. L)
• Installez le patin de nettoyage (27) sur le SteaMitt
TM
(25)
en fixant les bandes Velcro “bouclées” (27a) de la partie
supérieure du patin de nettoyage sur les coussinets
Velcro “crochetés” (25a) en dessous du SteaMitt
TM
(4).
Appuyez fermement.
Avertissement ! Le SteaMitt
TM
ne doit pas être utilisé si le
patin de nettoyage n’est pas installé.
Remarque : Le SteaMitt
TM
peut accueillir 3 types de patins de
nettoyage de différentes ‘épaisseurs. Le plus fin peut servir à
nettoyer les formes en 3D comme les robinets, etc. Les plus
épais peuvent servir pour les surfaces plates plus grandes.
Avertissement ! Utilisez toujours le SteaMitt
TM
comme illustré
par la figure M, votre main à l’intérieur du gant de protection.
18
FRANÇAIS
(Traduction des instructions d'origine)
Avertissement ! Ne tentez jamais d’utiliser le SteaMitt
TM
en
le tenant par l’extérieur, comme illustré par la figure N. Vous
pourriez sinon vous brûler.
Avertissement ! Évitez d’utiliser le SteaMitt
TM
dans des
coins étroits comme illustré par la figure O.
Avertissement ! En cas de problème pendant l’utilisation,
utilisez la languette de libération rapide pour pouvoir
rapidement retirer votre main du SteaMitt
TM
comme illustré
par la figure P.
Avertissement ! N’utilisez pas le SteaMitt
TM
sur du verre
froid, comme des fenêtres par exemple, car le choc
thermique pourrait provoquer des dégâts.
Avertissement ! Ne pointez et ne dirigez jamais le
Mittsteam™ vers vous-même ou d’autres personnes.
Remarque : La molette de réglage de la vapeur est
déconnectée lorsque le SteaMitt
TM
est installé et le flux de
vapeur est alors limité.
Utilisation
Important ! Cet appareil détruit 99.9 % des bactéries et
germes pour autant qu’il soit utilisé conformément aux
consignes décrites dans le présent manuel, avec de patins
en microfibre et en fonctionnant en continu pendant 90
secondes.
Mise en marche et extinction
• Pour mettre l’appareil en marche, appuyez sur
l’interrupteur Marche/Arrêt (1). Le balai vapeur a besoin
d’environ 15 secondes pour chauffer.
• Pour éteindre l’appareil, appuyez sur l’interrupteur
Marche/Arrêt (1).
Remarque : Assurez-vous de toujours avoir la main à
l’intérieur du SteaMitt
TM
avant d’appuyer sur le bouton
d’activation de la vapeur.
Attention ! Ne laissez jamais le balai vapeur trop longtemps
au même endroit.
Placez toujours le balai vapeur, manche (8) à la verticale et
assurez-vous que le balai est éteint lorsqu’il n’est pas utilisé.
Attention ! Videz toujours le balai vapeur après utilisation.
Remarque ! Au premier remplissage ou après avoir
fonctionner à vide, la production de vapeur peut prendre
jusqu’à 45 minutes.
Technologie Autoselect
TM
(Fig. R)
Ce balai vapeur est équipé d’une molette Autoselect
TM
(2) qui
permet différents types de nettoyage. Elle permet de
sélectionner le mode de fonctionnement approprié au
nettoyage que vous souhaitez.
Grâce à Autoselect
TM
, choisissez l’une des applications
suivantes en tournant la molette Autoselect
TM
(2) jusqu’à
atteindre le paramètre voulu.
Le balai vapeur sélectionne le volume de vapeur approprié
au nettoyage choisi.
Remarque : Contrôlez toujours que le réglage est correct
avant d’utiliser votre balai vapeur.
Booster vapeur (Fig. C1) (uniquement sur
FSMH1310SM, FSMH13151SM)
La tête pour sol (12a) est équipée d’une pédale pour booster
la vapeur afin de supprimer les marques et les taches
tenaces.
• Pendant l’utilisation, appuyez sur la pédale booster
vapeur pour libérer plus de vapeur.
• Pour revenir à un mode de fonctionnement normal,
appuyez à nouveau sur la pédale.
Conseils pour une utilisation optimale
Généralités
Attention : N’utilisez jamais le balai vapeur sans y avoir
d’abord fixé une lavette.
• Aspirez ou balayez toujours le sol avant d’utiliser le balai
vapeur.
• Le moyen le plus simple d’utiliser l’appareil est d’incliner
le manche à 45° et de nettoyer lentement en couvrant de
petites zones à la fois.
• Utilisez uniquement de l’eau dans votre balai vapeur,
sans aucun additif ou produit chimique. Afin d’éliminer les
taches tenaces sur les sols en vinyle ou en lino, vous
pouvez les pré-traiter avec un mélange de détergent
doux et d’eau, avant d’utiliser le balai vapeur.
Nettoyage à la vapeur avec le balai
• Fixez le nettoyeur vapeur portable (5) dans le corps du
balai vapeur (11)
• Placez un patin de nettoyage (13) sur le sol, côté avec la
boucle en Velcro vers le haut.
• Appuyez légèrement le balai vapeur sur le patin de
nettoyage (13).
• Branchez le balai vapeur au secteur.
• Appuyez sur le bouton Marche/Arrêt (1). Le balai vapeur
a besoin d’environ 15 secondes pour chauffer.
Réglage Balais Portable
Bois/Lamellé Vapeur à haute température
pour les fenêtres
Pierre/Marbre
Carrelage/Vinyle Vapeur à basse température
pour les taches tenaces

19
FRANÇAIS
(Traduction des instructions d'origine)
• Tournez la molette Autoselect
TM
(2) jusqu’à atteindre le
bon réglage. Après quelques secondes, la vapeur
commence à d’échapper de la tête vapeur.
Remarque ! Au premier remplissage ou après avoir
fonctionner à vide, la production de vapeur peut prendre
jusqu’à 45 minutes.
• La vapeur met quelques secondes pour atteindre le
patin nettoyeur. Une fois fait, le balai vapeur glisse
facilement sur la surface à désinfecter/nettoyer.
• Déplacez lentement le balai vapeur d’avant en arrière
sur le sol pour nettoyer chaque zone à fond grâce à la
vapeur.
• Une fois terminé, relevez le manche (8) à la verticale en
vous assurant qu’il est soutenu et éteignez le balai.
Attendez que le balai vapeur ait refroidi (environ cinq
minutes).
Attention ! Il est important de surveiller le niveau d’eau
dans le réservoir. Pour faire le plein d’eau et continuer à
désinfecter/nettoyer, placez le balai à la verticale en vous
assurant que le manche est soutenu et éteignez le balai
vapeur. Débranchez l’appareil de la prise de courant murale,
et remplissez le réservoir d’eau.
Attention ! Ne laissez jamais le balai vapeur trop longtemps
au même endroit. Placez toujours le balai vapeur, manche
(8) à la verticale et assurez-vous que le balai est éteint
lorsqu’il n’est pas utilisé.
Rafraîchissement de moquette
• Placez un patin de nettoyage (13) sur le sol, côté avec
la boucle en Velcro vers le haut.
• Appuyez légèrement le balai vapeur sur le patin de
nettoyage.
• Placez l’accessoire moquette (12b) sur le sol.
• Appuyez légèrement le balai vapeur sur l’accessoire
moquette jusqu’à ce qu’il s’enclenche en place.
• Branchez le balai vapeur au secteur.
• Appuyez sur le bouton Marche/Arrêt (1). Le balai vapeur
a besoin d’environ 15 secondes pour chauffer.
• Tournez la molette Autoselect
TM
(2) sur la position
Bois/Lamellé.
• Poussez et tirez lentement le balai vapeur sur la
moquette pour nettoyer à fond chaque secteur.
• Une fois terminé, relevez le manche (8) à la verticale et
éteignez le balai. Attendez que le balai vapeur ait refroidi
(environ cinq minutes).
Après l’utilisation
• Tournez la molette Autoselect
TM
(2) jusqu’à la position
Arrêt.
• Attendez que le balai vapeur refroidisse.
• Débranchez le balai vapeur de la prise de courant
murale.
• Videz le réservoir d’eau.
• Retirez le patin de nettoyage (13) et lavez-le pour qu’il
soit prêt lors de la prochaine utilisation (prenez soin de
respecter les instructions de lavage imprimées sur les
patins de nettoyage).
• Entourez le câble d’alimentation des crochets de retenue
de câble (7 et 9).
• La poignée (6) intègre une patte d’accrochage (15) qui
permet de suspendre votre balai vapeur sur un support
adapté fixé au mur. Vérifiez que le crochet mural peut
supporter le poids du balai vapeur en toute sécurité.
Nettoyage vapeur avec le module portable
Avertissement ! Le module ne produit pas de vapeur tant
qu’il n’est pas raccordé au corps principal (11) ou que le
tuyau de vapeur (16) n’est pas installé.
Avertissement ! Ne l’utilisez qu’en position horizontale.
• Fixez l’accessoire nécessaire.
• Branchez le nettoyeur vapeur portable au secteur.
• Appuyez sur le bouton Marche/Arrêt (1). Le balai vapeur
a besoin d’environ 15 secondes pour chauffer.
• Tournez la molette Autoselect
TM
(2) jusqu’à atteindre le
bon réglage. Après quelques secondes, la vapeur
commence à d’échapper de la tête vapeur.
Remarque ! Au premier remplissage ou après avoir
fonctionner à vide, la production de vapeur peut prendre
jusqu’à 45 minutes.
• Quand vous avez fini de vous servir du nettoyeur vapeur
portable, tournez la molette Autoselect
TM
(2) en position
Arrêt. Éteignez l’appareil en appuyant sur le bouton
Marche/Arrêt (1) et débranchez-le du secteur. Patientez
jusqu’à ce que l’appareil refroidisse avant de la ranger
(environ cinq minutes).
Accessoires
Les performances de votre appareil dépendent des
accessoires utilisés. Les accessoires BLACK+DECKER sont
élaborés dans le respect de normes de qualité supérieures et
ils sont conçus pour améliorer les performances de votre
appareil. L’utilisation de ces accessoires vous permet de tirer
le meilleur de votre équipement.
Protection de l'environnement
Collecte séparée. Ce produit ne doit pas être jeté
avec les déchets domestiques normaux.
Si vous décidez de remplacer ce produit BLACK+DECKER,
ou si vous n'en avez plus l'utilité, ne le jetez pas avec vos
déchets domestiques Rendez-le disponible pour une collecte
séparée.
• BLACK+DECKER fournit un dispositif permettant de
collecter et de recycler les produits BLACK+DECKER
lorsqu'ils ont atteint la fin de leur cycle de vie. Pour
pouvoir profiter de ce service, veuillez retourner votre
produit à un réparateur agréé qui se chargera de le
collecter pour nous.
20
FRANÇAIS
(Traduction des instructions d'origine)
• Pour connaître l'adresse du réparateur agréé le plus
proche de chez vous, contactez le bureau
BLACK+DECKER à l'adresse indiquée dans ce manuel.
Vous pourrez aussi trouvez un liste des réparateurs
agréés de BLACK+DECKER et de plus amples détails
sur notre service après-vente sur le site Internet à
l'adresse suivante : www.2helpU.com
Dépannage
Si votre appareil semble ne pas fonctionner correctement,
suivez les instructions ci-dessous. Si le problème persiste,
veuillez contacter votre réparateur local BLACK+DECKER.
FSMH1321
Tension V
ac
220-240
Puissance W 1300
Capacité du réservoir ml 500
Poids kg 2.7
FSMH1351SM
Tension V
ac
220-240
Puissance W 1300
Capacité du réservoir ml 500
Poids kg 2.7
FSMH13101SM
Tension V
ac
220-240
Puissance W 1300
Capacité du réservoir ml 500
Poids kg 2.8
FSMH1321
Tension V
ac
220-240
Puissance W 1300
Capacité du réservoir ml 500
Poids kg 2.7
FSMH1351SM
Tension V
ac
220-240
Puissance W 1300
Capacité du réservoir ml 500
Poids kg 2.7
Données techniques
FSMH13151SM
Tension V
ac
220-240
Puissance W 1300
Capacité du réservoir ml 500
Poids kg 2.8
FSMH1321J
Tension V
ac
220-240
Puissance W 1300
Capacité du réservoir ml 500
Poids kg 2.7
FSMH1321JSM
Tension V
ac
220-240
Puissance W 1300
Capacité du réservoir ml 500
Poids kg 2.8
FSMH1321JMD
Tension V
ac
220-240
Puissance W 1300
Capacité du réservoir ml 500
Poids kg 2.8
Problème Étape Solution possible
1.
2.
3.
4.
5.
6.
7.
8.
Le balai vapeur ne
s’allume pas
Le balai vapeur ne
diffuse pas de vapeur
Le balai vapeur cesse de
produire de la vapeur
pendant l’utilisation
Le balai vapeur produit
trop de vapeur pendant
l’utilisation
Vérifiez que l’appareil est branché dans
une prise murale.
Le balai vapeur ne produit de la vapeur que si
le nettoyeur vapeur portable (5) est
correctement raccordé au corps principal (11)
ou que le tuyau de vapeur est installé ou si la
molette Autoselect
TM
est en position Marche
Vérifiez que le réservoir d’eau est plein.
Remarque : Au premier remplissage ou après
avoir fonctionner à vide, la production de
vapeur peut prendre jusqu’à 45 minutes.
Vérifiez que l’appareil a bien été allumé à
l’aide de l’interrupteur Marche/Arrêt (1)
Vérifiez l’étape 4, puis 5, puis 3
Tournez la molette Autoselect
TM
(2) dans le
sens inverse des aiguilles d’une montre afin
de réduire la quantité de vapeur produite
Vérifiez le fusible de la prise.
Vérifiez l’étape 1, puis 2, puis 3
21
FRANÇAIS
(Traduction des instructions d'origine)
9.
10.
12.
14.
15.
16.
17.
13.
11.
Le balai vapeur produit
trop peu de vapeur
pendant l’utilisation
Le nettoyeur vapeur
portable ne produit
aucune vapeur
Les accessoires tombent
de l’appareil
De la vapeur s’échappe
par des zones non
prévues de l’appareil
Où puis-je obtenir plus
d’informations/d’access
oires
Le nettoyeur vapeur
portable produit trop peu
de vapeur pendant
l’utilisation
Le nettoyeur vapeur
portable produit trop de
vapeur pendant
l’utilisation
Vérifiez que la molette Autoselect
TM
(2)
est en position Marche
Tournez la molette Autoselect
TM
(2) dans le
sens inverse des aiguilles d’une montre afin
de réduire la quantité de vapeur produite
Consultez le chapitre sur l’assemblage pour
savoir comment correctement installer les
pièces et les accessoires
Consultez le chapitre sur l’assemblage pour
savoir comment correctement installer les
pièces et les accessoires
www.blackanddecker.co.uk/steammop
www.blackanddecker.ie/steammop
Tournez la molette Autoselect
TM
(2) dans le
sens des aiguilles d’une montre afin
d’augmenter la quantité de vapeur produite
Tournez la molette Autoselect
TM
(2) dans le
sens des aiguilles d’une montre afin
d’augmenter la quantité de vapeur produite
Vérifiez l’étape 5, puis 1, puis 2, puis 3
Vérifiez l’étape 5
Garantie
BLACK+DECKER est confiant dans la qualité de ses
produits et vous offre une garantie très étendue.
Ce certificat de garantie est un document supplémentaire et
ne peut en aucun cas se substituer à vos droits légaux.
Si un produit BLACK+DECKER s'avère défectueux en
raison de matériaux en mauvaises conditions, d'une erreur
humaine, ou d'un manque de conformité dans les 24 mois
suivant la date d'achat, BLACK+DECKER garantit le
remplacement des pièces défectueuses, la réparation des
produits usés ou cassés ou remplace ces produits à la
convenance du client, sauf dans les circonstances
suivantes:
Le produit a été utilisé dans un but commercial,
professionnel, ou a été loué.
Le produit a été mal utilisé ou avec négligence.
Le produit a subi des dommages à cause d'objets
étrangers, de substances ou à cause d'accidents.
Des réparations ont été tentées par des techniciens ne
faisant pas partie du service technique de Black+
Decker.
Pour avoir recours à la garantie, il est nécessaire de fournir
une preuve d'achat au vendeur ou à un réparateur agréé.
Pour connaître l'adresse du réparateur agréé le plus proche
de chez vous, contactez le bureau BLACK+DECKER à
l'adresse indiquée dans ce manuel.
Vous pourrez aussi trouver une liste des réparateurs agréés
de BLACK+DECKER et de plus amples détails sur notre
service après-vente sur le site Internet à l'adresse suivante :
www.2helpU.com
FSMH13151SM
220-240 OOôJ (âdƒØdG) »Hô¡µdG ó¡÷G
1300 äGh IQó≤dG
500 πe ¿GõÿG á©°S
2.8 ºéc ¿RƒdG
FSMH1321J
220-240 OOôJ (âdƒØdG) »Hô¡µdG ó¡÷G
1300 äGh IQó≤dG
500 πe ¿GõÿG á©°S
2.7 ºéc ¿RƒdG
FSMH1321JSM
220-240 OOôJ (âdƒØdG) »Hô¡µdG ó¡÷G
1300 äGh IQó≤dG
500 πe ¿GõÿG á©°S
2.8 ºéc ¿RƒdG
FSMH1321JMD
220-240 OOôJ (âdƒØdG) »Hô¡µdG ó¡÷G
1300 äGh IQó≤dG
500 πe ¿GõÿG á©°S
2.8 ºéc ¿RƒdG
É¡MÓ°UEGh ∫É£YC’G ±É°ûµà°SG
äɪ«∏©àdG ™ÑJÉa ,ºFÓŸG πµ°ûdÉH πª©j ’ ∑RÉ¡L ¿CG hóÑj ¿Éc GPEG
π«cƒH ∫É°üJ’G ≈Lôj ,á∏µ°ûŸG πM ¤EG Gòg ODƒj ⁄ GPEG .≈fOC’ÉH IOQGƒdG
.»∏ëŸG
BLACK+DECKER ìÓ°UEG
¿Éª°†dG
É
k
fɪ°V ¢Vô©Jh É¡JÉéàæe IOƒL ‘ BLACK+DECKER ≥ãJ
.πLC’G πjƒW
’h ¿ƒfÉ≤dG É¡ëæÁ »àdG ∂bƒ≤M ¤EG áaÉ°VE’ÉH ¿ƒµj Gòg ¿Éª°†dG ¿É«H
.∫GƒMC’G øe ∫ÉM …CÉH É¡H πîj
‘ Ö«Y ÖÑ°ùH
BLACK+DECKER èàæe ‘ π∏N OƒLh ádÉM ‘
ïjQÉJ øe G
k
ô¡°T 24 ∫ÓN ,ÒjÉ©ŸG ™e ≥aGƒàdG ΩóY hCG áYÉæ°üdG hCG OGƒŸG
áÑ«©ŸG AGõLC’G ∫GóÑà°SG BLACK+DECKER øª°†J ,AGöûdG
√òg ∫GóÑà°SG hCG »©«Ñ£dG ≈∏ÑdGh πcBÉàdG IÉYGôe ™e äÉéàæŸG ìÓ°UEGh
:⁄ Ée 𫪩∏d êÉYREG πbCG ¿Éª°†d äÉéàæŸG
;ÒLCÉJ ¢VGôZCG hCG á«æ¡e hCG ájQÉŒ ¢VGôZCG ‘ èàæŸG ΩGóîà°SG ºàj
;∫ɪgE’G hCG ΩGóîà°S’G Aƒ°ùd èàæŸG ¢Vô©àj
;çOGƒM hCG áÑjôZ OGƒe hCG AÉ«°TCG áé«àf ∞∏à∏d èàæŸG ¢Vô©àj
áfÉ«°üdG AÓch ÒZ ¢UÉî°TCG ᣰSGƒH èàæŸG ìÓ°UEG ádhÉfi ºàj
ácöûd ™HÉàdG áfÉ«°üdG ≥jôa hCG øjóªà©ŸG
.
BLACK+DECKER
AGöûdG π«dO Ëó≤J ¤EG êÉà– ±ƒ°S ,¿Éª°†dG ÖLƒÃ áÑdÉ£e Ëó≤àd
π«ch ÜôbCG ™bƒe ≈∏Y ±ô©àdG ∂æµÁh .óªà©ŸG áfÉ«°üdG π«ch hCG ™FÉÑ∏d
BLACK+DECKER Öàµe ≈∏Y ∫É°üJ’G ∫ÓN øe óªà©e áfÉ«°U
.π«dódG Gòg ‘ í°VƒŸG ¿Gƒæ©dG ‘ »∏ëŸG
ácöûd Ú©HÉàdG øjóªà©ŸG áfÉ«°üdG AÓcƒH áªFÉb óLƒJ ,∂dP øe
k
’óHh
™«ÑdG ó©H Ée äÉeóÿ á∏eɵdG π«°UÉØàdGh
BLACK+DECKER
:ÊhεdE’G ™bƒŸG ≈∏Y âfÎfE’G ≈∏Y ÉæH á°UÉÿG ∫É°üJ’G πFÉ°Shh
www.2helpU.com
1.
2.
3.
4.
5.
6.
7.
á∏µ°ûŸGIƒ£ÿGπªàëŸG π◊G
áë°SÉŸG 𫨰ûJ CGóÑj ’
ájQÉîÑdG
èàæJ ’ ájQÉîÑdG áë°SÉŸG
G
k
QÉîH
∞bƒàJ ájQÉîÑdG áë°SÉŸG
AÉæKCG QÉîÑdG êÉàfEG øY
ΩGóîà°S’G
.§FÉ◊G ‘ ¢ùÑ≤ŸÉH π°Uƒe RÉ¡÷G ¿CG øe ≥≤–
.¢ùHÉ≤dG ‘ OƒLƒŸG ô¡°üæŸG øe ≥≤–
∫ƒfi ΩGóîà°SÉH IóMƒdG 𫨰ûJ øe ≥≤–
(1) ±É≤jE’G/𫨰ûàdG
3 ºK 2 ºK 1 äGƒ£ÿG øe ≥≤–
¿Éc GPEG QÉîÑdG ájQÉîÑdG áë°SÉŸG èàæJ ±ƒ°S
´ƒ°Vƒe (5) ó«dÉH ∫ƒªëŸG QÉîÑdG ∞¶æe
hCG (11) »°ù«FôdG πµ«¡dG ‘ áë«ë°U á≤jô£H
𫨰ûJ óæY hCG QÉîÑdG ΩƒWôN Ö«côJ ádÉM ‘
Autoselect
TM
»FÉ≤∏àdG QÉ«àN’G
óæY :á¶MÓe .Å∏à‡ √É«ŸG ¿GõN ¿CG øe ≥≤–
¿CG øµÁ ,±É÷G 𫨰ûàdG hCG Iôe ∫hC’ AπŸG
»µd á«fÉK 45 ¤EG π°üJ Ióe QÉîÑdG ¥ô¨à°ùj
.èàæ
o
j
3 ºK 5 ºK 4 äGƒ£ÿG øe ≥≤–
8.
9.
10.
12.
14.
15.
16.
17.
13.
11.
ájQÉîÑdG áë°SÉŸG èàæJ
QÉîÑdG øe G
k
óL ÒãµdG
ΩGóîà°S’G AÉæKCG
ájQÉîÑdG áë°SÉŸG èàæJ
QÉîÑdG øe G
k
óL π«∏≤dG
ΩGóîà°S’G AÉæKCG
øe QÉîH …CG èàæ
o
j ’
∫ƒªëŸG QÉîÑdG ∞¶æe
ó«dÉH
QÉîÑdG ∞¶æe èàæj
G
k
óL π«∏≤dG ó«dÉH ∫ƒªëŸG
ΩGóîà°S’G AÉæKCG QÉîÑdG øe
QÉîÑdG ∞¶æe èàæj
G
k
óL ÒãµdG ó«dÉH ∫ƒªëŸG
ΩGóîà°S’G AÉæKCG QÉîÑdG øe
øe äÉ≤ë∏ŸG §≤°ùJ
RÉ¡÷G
≥WÉæe øe QÉîÑdG Üöùàj
RÉ¡÷G ‘ á©bƒàe ÒZ
≈∏Y ∫ƒ°ü◊G »ææµÁ øjCG
øe ójõŸG
äÉ≤ë∏ŸG/äÉeƒ∏©ŸG
Autoselect
TM
) »FÉ≤∏àdG QÉ«àN’G ¢Uôb QOCG
QÉîÑdG ᫪c π«∏≤àd áYÉ°ùdG ÜQÉ≤Y ¢ùµY (2
áã©ÑæŸG
»FÉ≤∏àdG QÉ«àN’G ¢Uôb ¿CG ≥≤–
𫨰ûàdG ™°Vh ≈∏Y (Autoselect
TM
2)
Autoselect
TM
) »FÉ≤∏àdG QÉ«àN’G ¢Uôb QOCG
QÉîÑdG ᫪c IOÉjõd áYÉ°ùdG ÜQÉ≤Y √ÉŒÉH (2
áã©ÑæŸG
Autoselect
TM
) »FÉ≤∏àdG QÉ«àN’G ¢Uôb QOCG
QÉîÑdG ᫪c IOÉjõd áYÉ°ùdG ÜQÉ≤Y √ÉŒÉH (2
áã©ÑæŸG
Autoselect
TM
) »FÉ≤∏àdG QÉ«àN’G ¢Uôb QOCG
QÉîÑdG ᫪c π«∏≤àd áYÉ°ùdG ÜQÉ≤Y ¢ùµY (2
áã©ÑæŸG
πc Ö«côJ äɪ«∏©àd ™«ªéàdG π°üa ™LGQ
º«∏°S πµ°ûH äÉ≤ë∏ŸGh AGõLC’G
πc Ö«côJ äɪ«∏©àd ™«ªéàdG π°üa ™LGQ
º«∏°S πµ°ûH äÉ≤ë∏ŸGh AGõLC’G
www.blackanddecker.co.uk/steammop
www.blackanddecker.co.uk/steammop
3 ºK 2 ºK 1 ºK 5 äGƒ£ÿG øe ≥≤–
5 Iƒ£ÿG øe ≥≤–
22
ﺔـﻴـﺑﺮـﻌـﻟﺍ
(ﺔﻴﺴﻴﺋﺮﻟﺍ ﺕﺎﻤﻴﻠﻌﺘﻟﺍ)
23
ﺔـﻴـﺑﺮـﻌـﻟﺍ
(ﺔﻴﺴﻴﺋﺮﻟﺍ ﺕﺎﻤﻴﻠﻌﺘﻟﺍ)
(8) ¢†Ñ≤ŸG óYCG ,ájQÉîÑdG áë°SÉŸG ΩGóîà°SG øe »¡àæJ ÉeóæY •
OÈJ ¿CG ¤EG ô¶àfG .RÉ¡÷G 𫨰ûJ ∞bCGh »°SCGôdG ™°VƒdG ¤EG
.(≥FÉbO ¢ùªN ‹GƒM) ájQÉîÑdG áë°SÉŸG
ΩGóîà°S’G ó©H
™°Vh ≈àM (Autoselect
TM
(2 »FÉ≤∏àdG QÉ«àN’G ¢Uôb QOCG •
.𫨰ûàdG ±É≤jEG
.ájQÉîÑdG áë°SÉŸG OÈJ ¿CG ¤EG ô¶àfG •
.§FÉ◊G ‘ AÉHô¡µdG òØæe øY ájQÉîÑdG áë°SÉŸG π°üaG •
.√É«ŸG ¿GõN ≠jôØàH ºb •
ΩGóîà°SÓd IõgÉL ¿ƒµàd É¡∏°ùZGh (13) ∞«¶æàdG áaƒd ´õfG •
áYƒÑ£ŸG π«°ù¨dG ájÉYQ äɪ«∏©J á©HÉàe ≈∏Y ¢UôMG) ΩOÉ≤dG
.(π«°ù¨dG áaƒd ≈∏Y
.(9 h 7) ≥«∏©àdG ‘É£N ∫ƒM ábÉ£dG πHÉc â«ÑãàH ºb •
íª°ùJh (6) ó«dG ¢†Ñ≤e ‘ á›óe (15) ≥«∏©J áëàa ∑Éæg •
ócCÉJ .§FÉ◊G ≈∏Y ºFÓe ±É£N ≈∏Y ájQÉîÑdG ∂àë°SÉe ≥«∏©àH
¿Rh πª– ™«£à°ùj §FÉ◊G ≈∏Y OƒLƒŸG ±É£ÿG ¿CG øe É
k
ªFGO
.¿ÉeCÉH ájQÉîÑdG áë°SÉŸG
ó«dÉH ádƒªëŸG QÉîÑdG ∞¶æe
»°SÉ°SC’G πµ«¡dÉH ¬∏«°UƒJ ºàj ≈àM G
k
QÉîH RÉ¡÷G èàæj ød !ôjò–
.(16) QÉîÑdG ΩƒWôN Ö«côJ hCG (11)
.»≤aCG ™°Vh ‘ §≤a Ωóîà°ù
o
j !ôjò–
.܃∏£ŸG ≥ë∏ŸG â
q
ÑK •
.QÉ«àdG òNCÉà ó«dÉH ádƒªëŸG QÉîÑdG ∞¶æe π°UhCG •
15 ‹GƒM ôeC’G ¥ô¨à°ùj .(1) ±É≤jE’G/𫨰ûàdG QR ≈∏Y §¨°VG •
.ájQÉîÑdG áë°SÉŸG øî°ùJ »µd á«fÉK
∫ƒ°UƒdG ≈àM (Autoselect
TM
(2 »FÉ≤∏àdG QÉ«àN’G ¢Uôb QOCG •
øe êhôÿG ‘ QÉîÑdG CGóÑ«°S á∏«∏b
m
¿GƒK ó©H .܃∏£ŸG OGóYEÓd
.QÉîÑdG ¢SCGQ
¥ô¨à°ùj ¿CG øµÁ ,±É÷G 𫨰ûàdG ó©H hCG Iôe ∫hC’ AπŸG óæY !á¶MÓe
.èàæ
o
j »µd á«fÉK 45 ¤EG π°üJ Ióe QÉîÑdG
QOCG ó«dÉH ∫ƒªëŸG QÉîÑdG ∞¶æe ΩGóîà°SG øe »¡àæJ ÉeóæY •
±É≤jEG ™°Vƒd (Autoselect
TM
(2 »FÉ≤∏àdG QÉ«àN’G ¢Uôb
/𫨰ûàdG QR ≈∏Y §¨°†dG ᣰSGƒH RÉ¡÷G 𫨰ûJ ∞bhCG .𫨰ûàdG
RÉ¡÷G OÈj ¿CG ¤EG ô¶àfG .QÉ«àdG òNÉe øY ¬∏°üaGh (1) ±É≤jE’G
.(≥FÉbO ¢ùªN ‹GƒM) ¬æjõîJ πÑb
äÉ≤ë∏ŸG
äÉ≤ë∏e â©æ
o
°U .áeóîà°ùŸG äÉ≤ë∏ŸG ≈∏Y IGOC’G √òg AGOCG óªà©j
⪪
o
°Uh ,á«dÉ©dG IOƒ÷G äÉØ°UGƒÃ »Øàd
BLACK+DECKER
ᣰSGƒH ∑RÉ¡÷ AGOCG π°†aCG ≈∏Y π°ü– ±ƒ°S .∑RÉ¡L AGOCG Ú°ùëàd
.äÉ≤ë∏ŸG √òg ΩGóîà°SG
áÄ«ÑdG ájɪM
™e èàæŸG Gòg øe ¢ü∏îàdG ΩóY Ωõ∏j .π°üØæŸG ™ª÷G
.ájOÉ©dG á«dõæŸG áeɪ≤dG
BLACK+DECKER èàæe ∫GóÑà°SG ΩÉjC’G øe Ωƒj ‘ Ωõd GPEG
áeɪ≤dG ™e ¬æe ¢ü∏îàJ Óa ,¬eóîà°ùJ ó©J ⁄ GPEG hCG ,∂H ¢UÉÿG
.π°üØæŸG ™ªé∏d èàæŸG Gòg áMÉJEG øe ócCÉJ πH ,iôNC’G á«dõæŸG
ôjhóJ IOÉYE’ ≥aôe
BLACK+DECKER ácöT ôaƒJ •
ájÉ¡f ¤EG É¡dƒ°Uh Oôéà BLACK+DECKER äÉéàæe
.É
k
fÉ› áeóÿG √òg Ëó≤J ºàjh .πª©∏d É¡à«MÓ°U ΩóYh ÉgôªY
áfÉ«°U π«ch …CG ¤EG èàæŸG IOÉYEG ≈Lôj ,áeóÿG √òg øe IOÉØà°SÓd
.ÉæY áHÉ«f äÉéàæŸG ™ªL √QhóH ¤ƒàj ±ƒ°S …òdGh óªà©e
∫ÓN øe óªà©e áfÉ«°U π«ch ÜôbCG ™bƒe ≈∏Y ±ô©àdG ∂æµÁ •
¿Gƒæ©dG ‘ »∏ëŸG
BLACK+DECKER Öàµe ≈∏Y ∫É°üJ’G
áfÉ«°üdG AÓcƒH áªFÉb óLƒJ ,∂dP øe
k
’óHh .π«dódG Gòg ‘ í°VƒŸG
π«°UÉØàdGh BLACK+DECKER ácöûd Ú©HÉàdG øjóªà©ŸG
≈∏Y ÉæH á°UÉÿG ∫É°üJ’G πFÉ°Shh ™«ÑdG ó©H Ée äÉeóÿ á∏eɵdG
.www.2helpU.com :ÊhεdE’G ™bƒŸG ≈∏Y âfÎfE’G
FSMH1321
220-240 OOôJ (âdƒØdG) »Hô¡µdG ó¡÷G
1300 äGh IQó≤dG
500 πe ¿GõÿG á©°S
2.7 ºéc ¿RƒdG
FSMH1351SM
220-240 OOôJ (âdƒØdG) »Hô¡µdG ó¡÷G
1300 äGh IQó≤dG
500 πe ¿GõÿG á©°S
2.7 ºéc ¿RƒdG
FSMH13101SM
220-240 OOôJ (âdƒØdG) »Hô¡µdG ó¡÷G
1300 äGh IQó≤dG
500 πe ¿GõÿG á©°S
2.8 ºéc ¿RƒdG
FSMH1321
220-240 OOôJ (âdƒØdG) »Hô¡µdG ó¡÷G
1300 äGh IQó≤dG
500 πe ¿GõÿG á©°S
2.7 ºéc ¿RƒdG
FSMH1351SM
220-240 OOôJ (âdƒØdG) »Hô¡µdG ó¡÷G
1300 äGh IQó≤dG
500 πe ¿GõÿG á©°S
2.7 ºéc ¿RƒdG
á«æØdG äÉfÉ«ÑdG
24
ﺔـﻴـﺑﺮـﻌـﻟﺍ
(ﺔﻴﺴﻴﺋﺮﻟﺍ ﺕﺎﻤﻴﻠﻌﺘﻟﺍ)
§¨°†dG πÑb SteaMitt
TM
QÉîÑdG RÉØb πNGO É
k
ªFGO ∂jój ≥HG :á¶MÓe
.QÉîÑdG QR ≈∏Y
í£°S …CG ≈∏Y óMGh ¿Éµe ‘ G
k
óHCG ájQÉîÑdG áë°SÉŸG ∑ÎJ ’ !¬«ÑæJ
.øeõdG øe IÎØd
™°VƒdG ‘ (8) ¢†Ñ≤ŸG ¿ƒµj å«ëH ájQÉîÑdG áë°SÉŸG É
k
ªFGO ™°V
∫ÉM ‘ ájQÉîÑdG áë°SÉŸG 𫨰ûJ ±É≤jEG øe ócCÉJh äÉÑãdG óæY »°SCGôdG
.ΩGóîà°S’G ΩóY
.ΩGóîà°S’G ó©H ájQÉîÑdG áë°SÉŸG É
k
ªFGO ÆôaCG !¬«ÑæJ
¥ô¨à°ùj ¿CG øµÁ ,±É÷G 𫨰ûàdG ó©H hCG Iôe ∫hC’ AπŸG óæY !á¶MÓe
.èàæ
o
j »µd á«fÉK 45 ¤EG π°üJ Ióe QÉîÑdG
Autoselect
TM
»FÉ≤∏àdG QÉ«àN’G É«LƒdƒæµJ
(¢U πµ°ûdG)
»FÉ≤∏J 𫨰ûJ ¢Uôb É¡H Öcôe ájQÉîÑdG áë°SÉŸG Gòg
å«M .IójóY ∞«¶æJ äÉ≤«Ñ£J ô¡¶
o
j …òdGh (Autoselect
TM
(2
.∂H á°UÉÿG ∞«¶æàdG á«∏ª©d í«ë°üdG 𫨰ûàdG ™°Vh QÉ«àN’ Ωóîà°ù
o
J
øe G
k
óMGh QÉàNG ,Autoselect
TM
»FÉ≤∏àdG QÉ«àN’G ΩGóîà°SG
»FÉ≤∏àdG QÉ«àN’G ¢Uôb ôjhóJ ᣰSGƒH á«dÉàdG äÉ≤«Ñ£àdG
.܃∏£ŸG OGóYE’G Oóë
o
j ňM (Autoselect
TM
(2
á«∏ª©d ΩRÓdG í«ë°üdG QÉîÑdG ºéM ájQÉîÑdG áë°SÉŸG QÉàîà°S
.∂H á°UÉÿG ∞«¶æàdG
ΩGóîà°SG πÑb í«ë°üdG OGóYE’G πª©à°ùJ ∂fCG É
k
ªFGO ≥≤– :á¶MÓe
.∂H á°UÉÿG ájQÉîÑdG áë°SÉŸG
…RÉ¡L ™e §≤a ìÉàe) (1ê πµ°ûdG) QÉîÑdG ≥aóJ
(
FSMH13151SMh FSMH1310SM
‘ IóYÉ°ùª∏d QÉîÑdG ≥aóJ á°SGhóH Iõ¡› (CG12) äÉ«°VQC’G ¢SCGQ ¿EG
.™≤ÑdGh á«°ü©à°ùŸG äÉeÓ©dG ádGREG
Iƒb ≥«Ñ£àd QÉîÑdG ≥aóJ á°SGhO ≈∏Y §¨°VG ,ΩGóîà°S’G AÉæKCG •
.á«aÉ°VEG ∞«¶æJ
.á°SGhódG ≈∏Y G
k
Oó› §¨°VG »©«Ñ£dG OGóYE’G ¤EG IOƒ©∏d •
πãeCG ΩGóîà°S’ äÉ뫪∏J
ΩÉY
∞«¶æàdG áaƒd â«ÑãJ ¿hóH G
k
óHCG ájQÉîÑdG áë°SÉŸG Ωóîà°ùJ ’ :¬«ÑæJ
.
k
’hCG
áë°SÉŸG ΩGóîà°SG πÑb É
k
jhój hCG á°ù浟ÉH ¢VQC’G ¢ùæµH É
k
ªFGO ºb •
.ájQÉîÑdG
45 ájhGõH ¢†Ñ≤ŸG ádÉeEG »g RÉ¡÷G ΩGóîà°S’ á≤jôW π¡°SCG •
.Iôe πc ‘ IÒ¨°U á≤£æe á«£¨J ™e ,A§ÑH ∞«¶æàdGh áLQO
∂àë°SÉe ™e á«FÉ«ª«c OGƒe hCG äÉaÉ°VEG …CG ¿hóH §≤a √É«e Ωóîà°SG •
,™ª°ûŸG hCG π«æ«ØdG äÉ«°VQCG øe á«°ü©à°ùŸG ™≤ÑdG ádGRE’ .ájQÉîÑdG
ΩGóîà°SG πÑb AÉŸG ¢†©Hh ∞«ØN ∞¶æà É
k
≤Ñ°ùe É¡à÷É©e ∂æµÁ
.ájQÉîÑdG áë°SÉŸG
áë°SÉŸG ᣰSGƒH QÉîÑdÉH ∞«¶æàdG
ájQÉîÑdG áë°SÉŸG πµ«g ‘ (5) ó«dÉH ∫ƒªëŸG QÉîÑdG ∞¶æe ÖcQ •
(11)
§jöT ÖfÉL ¬éàj å«ëH ¢VQC’G ≈∏Y (13) ∞«¶æàdG áaƒd ™°V •
.≈∏YC’ "äÉfhõ∏◊G" hôµ∏«ØdG
.(13) ∞«¶æàdG áaƒd ≈∏Y ≥aôH ájQÉîÑdG áë°SÉŸÉH §¨°VG •
.QÉ«àdG òNCÉà ájQÉîÑdG áë°SÉŸG π«°UƒàH ºb •
15 ‹GƒM ôeC’G ¥ô¨à°ùj .(1) ±É≤jE’G/𫨰ûàdG QR ≈∏Y §¨°VG •
.ájQÉîÑdG áë°SÉŸG øî°ùJ »µd á«fÉK
∫ƒ°UƒdG ≈àM (Autoselect
TM
(2 »FÉ≤∏àdG QÉ«àN’G ¢Uôb QOCG •
¢SCGQ øe êhôÿG ‘ QÉîÑdG CGóÑ«°S á∏«∏b
m
¿GƒK ó©H .܃∏£ŸG OGóYEÓd
.QÉîÑdG
¥ô¨à°ùj ¿CG øµÁ ,±É÷G 𫨰ûàdG ó©H hCG Iôe ∫hC’ AπŸG óæY !á¶MÓe
.èàæ
o
j »µd á«fÉK 45 ¤EG π°üJ Ióe QÉîÑdG
.∞«¶æàdG áaƒd ¤EG QÉîÑdG πNój »µd á∏«∏b
m
¿GƒK ôeC’G ¥ô¨à°ùj •
ºà«°S …òdG í£°ùdG ≈∏Y ádƒ¡°ùH ¿B’G ájQÉîÑdG áë°SÉŸG ≥dõæà°S
.¬Ø«¶æJ/¬ª«≤©J
πc ∞«¶æàd í£°ùdG ≈∏Y A§ÑH É¡Ñë°SGh ájQÉîÑdG áë°SÉŸG ™aOG •
.G
k
ó«L QÉîÑdÉH º°ùb
¤EG (8) ¢†Ñ≤ŸG óYCG ,ájQÉîÑdG áë°SÉŸG ΩGóîà°SG øe »¡àæJ ÉeóæY •
±É≤jEG" ™°Vh ‘h Oƒæ°ùe ¬fCG øe ócCÉàdG ™e ,»°SCGôdG ™°VƒdG
¢ùªN ‹GƒM) ájQÉîÑdG áë°SÉŸG OÈJ ¿CG ¤EG ô¶àfG ."𫨰ûàdG
.(≥FÉbO
¿GõN Aπe IOÉYE’ .AÉŸG ¿GõN ‘ AÉŸG iƒà°ùe áÑbGôe º¡ŸG øe !¬«ÑæJ
™e »°SCGôdG ™°VƒdG ‘ áë°SÉŸG ™°V ,∞«¶æàdG / º«≤©àdG á∏°UGƒeh AÉŸG
™°Vh ¤EG ájQÉîÑdG áë°SÉŸG QR QOCGh Oƒæ°ùe ¢†Ñ≤ŸG ¿CG øe ócCÉàdG
Aπe óYCGh ,§FÉ◊G ‘ QÉ«àdG òNCÉe øY IóMƒdG π°üaG ."𫨰ûàdG ±É≤jEG"
…CG ≈∏Y óMGh ¿Éµe ‘ G
k
óHCG ájQÉîÑdG áë°SÉŸG ∑ÎJ ’ !¬«ÑæJ .AÉŸG ¿GõN
¿ƒµj å«ëH ájQÉîÑdG áë°SÉŸG É
k
ªFGO ™°V .øeõdG øe IÎØd í£°S
𫨰ûJ ±É≤jEG øe ócCÉJh äÉÑãdG óæY »°SCGôdG ™°VƒdG ‘ (8) ¢†Ñ≤ŸG
.ΩGóîà°S’G ΩóY ∫ÉM ‘ ájQÉîÑdG áë°SÉŸG
OÉé°ùdG ¢TÉ©fEG
§jöT ÖfÉL ¬éàj å«ëH ¢VQC’G ≈∏Y (13) ∞«¶æàdG áaƒd ™°V •
.≈∏YC’ "äÉfhõ∏◊G" hôµ∏«ØdG
.∞«¶æàdG áaƒd ≈∏Y ≥aôH ájQÉîÑdG áë°SÉŸÉH §¨°VG •
.¢VQC’G ≈∏Y (Ü12) OÉé°ùdG áL’R ™°V •
‘ â
q
Ñã
o
J ≈àM OÉé°ùdG áL’R ≈∏Y ≥aôH ájQÉîÑdG áë°SÉŸG §¨°VG •
.É
k
Jƒ°U
k
áKófi É¡fɵe
.QÉ«àdG òNCÉà ájQÉîÑdG áë°SÉŸG π«°UƒàH ºb •
15 ‹GƒM ôeC’G ¥ô¨à°ùj .(1) ±É≤jE’G/𫨰ûàdG QR ≈∏Y §¨°VG •
.ájQÉîÑdG áë°SÉŸG øî°ùJ »µd á«fÉK
™°Vh ≈àM (Autoselect
TM
(2 »FÉ≤∏àdG QÉ«àN’G ¢Uôb QOCG •
.íFGöûdG/Ö°ûÿG
πc ¢TÉ©fE’ í£°ùdG ≈∏Y A§ÑH É¡Ñë°SGh ájQÉîÑdG áë°SÉŸG ™aOG •
.πeɵdÉH º°ùb
OGóYE’Gáë°SÉŸG
íFGöûdG / Ö°ûÿGòaGƒæ∏d á«dÉY QGôM áLQO
á°†Øîæe IQGôM áLQO
áØ«ãµdG äÉNÉ°ùJEÓd
ΩÉNôdG / ôé◊G
π«æ«ØdG / •ÓÑdG
ó«dÉH ádƒªëŸG

25
ﺔـﻴـﺑﺮـﻌـﻟﺍ
(ﺔﻴﺴﻴﺋﺮﻟﺍ ﺕﺎﻤﻴﻠﻌﺘﻟﺍ)
í£°S …CG ≈∏Y óMGh ¿Éµe ‘ G
k
óHCG ájQÉîÑdG áë°SÉŸG ∑ÎJ ’ !¬«ÑæJ
¢†Ñ≤ŸG ¿ƒµj å«ëH ájQÉîÑdG áë°SÉŸG É
k
ªFGO ™°V .øeõdG øe IÎØd
áë°SÉŸG 𫨰ûJ ±É≤jEG øe ócCÉJh äÉÑãdG óæY »°SCGôdG ™°VƒdG ‘ (8)
.ΩGóîà°S’G ΩóY ∫ÉM ‘ ájQÉîÑdG
∫ƒªëŸG QÉîÑdG ∞¶æe ‘ äÉ≤ë∏ŸGh ΩƒWôÿG â«ÑãJ
(¢S - R ∫ɵ°TC’G) ó«dÉH
∫ƒªëŸG QÉîÑdG ∞¶æe ‘ π«°UƒàdG á£≤f ÚH πØ≤dG ¢üëaG !ôjò–
¬H πØ≤dG ¿Éc GPEG .ΩGóîà°SG πc πÑb (16) QÉîÑdG ΩƒWôNh (5) ó«dÉH
’ .∂jód óªà©e ìÓ°UEG π«ch ÜôbCÉH ∫É°üJ’G ≈L
o
Òa ,É
k
ØdÉJ hCG π∏N
.RÉ¡÷G Ωóîà°ùJ
ΩƒWôÿG â«ÑãJ
QÉîÑdG ΩƒWôN ‘ (CG16) QÉîÑdG ΩƒWôN ôjô– QR ≈∏Y §¨°VG •
.(16)
(5) ó«dÉH ∫ƒªëŸG QÉîÑdG ∞¶æà (16) QÉîÑdG ΩƒWôN π°UhCG •
‘ â
q
Ñ
o
K ¬fCG ócCÉàdG ™e (CG16) QÉîÑdG ΩƒWôN ôjô– QR QôMh
.É
k
Jƒ°U É
k
Kófi ¬fɵe
∞¶æe ‘ ¿ÉeCÉH
k
’ƒ°Uƒe (16) QÉîÑdG ΩƒWôN ¿CG øe ócCÉJ !ΩÉg
¿C’ Gò¡a ,á∏°UƒdG øe QÉîÑdG ÜöùJ GPEG .(5) ó«dÉH ∫ƒªëŸG QÉîÑdG
≈àM RÉ¡÷G ∑ôJGh ,𫨰ûàdG ∞bhCG .áë«ë°U á≤jô£H Öcô
o
j ⁄ ΩƒWôÿG
.¬Ñ«côJ óYCGh ΩƒWôÿG π°üaG ºK OÈj
(ì πµ°ûdG) äÉ≤ë∏ŸG â«ÑãJ
∞jhÉéàdG OƒLh ™e (17) QÉîÑdG ágƒa ≈∏Y …hGô©dG IPÉëà ºb •
.≥ë∏ŸG πNGO
ÜQÉ≤Y ¢ùµY ôjhóàdÉH ºbh (17) QÉîÑdG ágƒa ‘ ≥ë∏ŸG §¨°VG •
.É
k
Jƒ°U É
k
Kófi ¬fɵe ‘ ≥aôŸG â
q
Ñã
o
j ≈àM áYÉ°ùdG
…òdG (SteaMitt
TM
25) QÉîÑdG RÉØb øY
k
Gó«©H ,äÉ≤ë∏ŸG πc !ΩÉg
ΩƒWôN ‘ â
q
Ñã
o
J ¿CG Öéj ,(26) ¬∏°Uƒeh ¢UÉÿG ¬eƒWôN ¬jód
.ΩGóîà°SÓd (16) QÉîÑdG
äÉ≤ë∏ŸGh ΩƒWôÿG ádGREG
(17) QÉîÑdG ágƒah (16) QÉîÑdG ΩƒWôN øe πc íÑ°üJ !ôjò–
äÉ≤ë∏ŸG ™«ªLh RÉ¡÷G ∑ôJG .ΩGóîà°S’G AÉæKCG áæNÉ°S äÉ≤ë∏ŸGh
.É¡àdGREG ádhÉfi πÑb OÈJ ≈àM
≥ë∏ŸG ádGREG
ΩƒWôÿG øY G
k
ó«©H ¬Ñë°SG ºK áYÉ°ùdG ÜQÉ≤Y √ÉŒÉH ≥ë∏ŸG QOCG •
.(16)
ΩƒWôÿG ádGREG
QÉîÑdG ΩƒWôN ‘ (CG16) QÉîÑdG ΩƒWôN ôjô– QR ≈∏Y §¨°VG •
.ó«dÉH ádƒªëŸG QÉîÑdG IóMh øY G
k
ó«©H ¬Ñë°SGh (16)
SteaMitt
TM
QÉîÑdG RÉØb
BLACK+DECKER
TM
SteaMitt
TM
QÉîÑdG RÉØb ºª
o
°U
í£°SCGh ïHÉ£ŸG í£°SCGh πª©dG í£°SCGh •ÓÑdG ∞«¶æJh º«≤©àd
.§≤a »∏NGódG ‹õæŸG ΩGóîà°S’G ƒg RÉ¡÷G Gòg øe ¢Vô¨dG .äÉeɪ◊G
ádƒªëŸG QÉîÑdG IóMh ‘ SteaMitt
TM
QÉîÑdG RÉØb ΩƒWôN â«ÑãJ
ó«dÉH
∫ƒªëŸG QÉîÑdG ∞¶æe ‘ π«°UƒàdG á£≤f ÚH πØ≤dG ¢üëaG !ôjò–
.ΩGóîà°SG πc πÑb (SteaMitt
TM
(26 QÉîÑdG RÉØb ΩƒWôNh (5) ó«dÉH
ìÓ°UEG π«ch ÜôbCÉH ∫É°üJ’G ≈L
o
Òa ,É
k
ØdÉJ hCG π∏N ¬H πØ≤dG ¿Éc GPEG
.RÉ¡÷G Ωóîà°ùJ ’ .∂jód óªà©e
‘ SteaMitt
TM
QÉîÑdG RÉØb ΩƒWôN ôjô– QR ≈∏Y §¨°VG •
.(SteaMitt
TM
(26 QÉîÑdG RÉØb ΩƒWôN
QÉîÑdG ∞¶æà (SteaMitt
TM
(26 QÉîÑdG RÉØb ΩƒWôN π°UhCG •
QÉîÑdG RÉØb ΩƒWôN ôjô– QR QôMh (5) ó«dÉH ∫ƒªëŸG
.É
k
Jƒ°U É
k
Kófi ¬fɵe ‘ â
q
Ñ
o
K ¬fCG ócCÉàdG ™e SteaMitt
TM
k
’ƒ°Uƒe (SteaMitt
TM
(26 QÉîÑdG RÉØb ΩƒWôN ¿CG øe ócCÉJ !ΩÉg
.(5) ó«dÉH ∫ƒªëŸG QÉîÑdG ∞¶æe ‘ ¿ÉeCÉH
á≤jô£H Öcô
o
j ⁄ ΩƒWôÿG ¿C’ Gò¡a ,á∏°UƒdG øe QÉîÑdG ÜöùJ GPEG
.áë«ë°U
.¬Ñ«côJ óYCGh ΩƒWôÿG π°üaG ºK OÈj ≈àM RÉ¡÷G ∑ôJGh ,𫨰ûàdG ∞bhCG
SteaMitt
TM
QÉîÑdG RÉØb ‘ ∞«¶æàdG áaƒd Ö«côJ
(∫ πµ°ûdG)
(SteaMitt
TM
(25 QÉîÑdG RÉØb ‘ (27) ∞«¶æàdG áaƒd ÖcQ •
ÖfÉ÷G ≈∏Y (CG27) "äÉfhõ∏◊G" hôµ∏«ØdG áWöTCG â«ÑãJ ᣰSGƒH
(CG25) "∞«WÉ£ÿG" hôµ∏«ØdG áWöTCGh ,∞«¶æàdG áaƒd øe …ƒ∏©dG
§¨°VG .(SteaMitt
TM
(4 QÉîÑdG RÉØb øe »∏Ø°ùdG ÖfÉ÷G ≈∏Y
.ΩõëH πØ°SCÓd
áaƒd Ö«côJ ¿hóH SteaMitt
TM
QÉîÑdG RÉØb ΩGóîà°SG »¨Ñæj ’ !ôjò–
.∞«¶æàdG
±ƒd øe ´GƒfCG 3 ™e SteaMitt
TM
QÉîÑdG RÉØb ≥aGƒàj :á¶MÓe
∫ɵ°TC’G ∞«¶æàd É
k
µª°S πbC’G ΩGóîà°SG øµÁ .∂ª°ùdG áJhÉØàŸG ∞«¶æàdG
É
k
µª°S ÌcC’G ΩGóîà°SG øµÁh .ïdEG ÒHÉæ°üdG πãe OÉ©HC’G á«KÓK
.ájƒà°ùŸG IÒѵdG äÉMÉ°ùª∏d
‘ í°Vƒe ƒg ɪc SteaMitt
TM
QÉîÑdG RÉØb É
k
ªFGO Ωóîà°SG !ôjò–
.á«bGƒdG äGRÉØ≤dG ‘ ∂jój ™°Vh ™e ,Ω πµ°ûdG
ᣰSGƒH SteaMitt
TM
QÉîÑdG RÉØb ΩGóîà°SG É
k
≤∏£e ∫hÉ– ’ !ôjò–
¤EG Gòg …ODƒ«°S .¿ πµ°ûdG ‘ í°Vƒe ƒg ɪc êQÉÿG øe ¬H ∑É°ùeE’G
.¥GÎM’G
á≤«°†dG ÉjGhõdG ‘ SteaMitt
TM
QÉîÑdG RÉØb ΩGóîà°SG ÖæŒ !ôjò–
.¢S πµ°ûdG ‘ í°Vƒe ƒg ɪc
™jöùdG ôjôëàdG ¿É°ùd πª©à°SG ,ΩGóîà°S’G AÉæKCG á∏µ°ûe âKóM GPEG !ôjò–
‘ í°Vƒe ƒg ɪc ∂jój øe É
k
©jöS SteaMitt
TM
QÉîÑdG RÉØb ádGRE’
.´ πµ°ûdG
πãe ,OQÉÑdG êÉLõdG ≈∏Y SteaMitt
TM
QÉîÑdG RÉØb Ωóîà°ùJ ’ !ôjò–
.IQGô◊G äÉLQO ‘ ÅLÉØŸG Ò¨à∏d G
k
ô¶f ∞∏àJ ¿CG øµ‡ É¡fC’ òaGƒædG
¢üî°T …CG √ÉŒ hCG ∂°ùØf √ÉŒ IöTÉÑe RÉØ≤dG ܃°üJ hCG ¬LƒJ ’ !ôjò–
.ôNBG
QÉîÑdG RÉØb Ö«côJ óæY Ò¨àŸG QÉîÑdG ¢Uôb π°üa ºàj :á¶MÓe
.Ohófi QÉîÑdG ≥aóJ íÑ°üj ‹ÉàdÉHh SteaMitt
TM
ΩGóîà°S’G
¬eGóîà°SG óæY º«KGô÷Gh ÉjÒàµÑdG øe 99.9% ≈∏Y RÉ¡÷G »°†≤j !ΩÉg
™eh á≤«bódG ±É«dC’G äGP ±ƒ∏dG ΩGóîà°SÉHh π«dódG Gòg äɪ«∏©àd É
k
≤ah
.á«fÉK 90 𫨰ûJ âbh
𫨰ûàdG ±É≤jEGh 𫨰ûàdG
±É≤jE’G/𫨰ûàdG ìÉàØe ≈∏Y §¨°†dG ≈Lô
o
j ,RÉ¡÷G 𫨰ûJ AóÑd •
.ájQÉîÑdG áë°SÉŸG øî°ùJ »µd á«fÉK 15 ‹GƒM ôeC’G ¥ô¨à°ùj .(1)
±É≤jE’G/𫨰ûàdG ìÉàØe ≈∏Y §¨°†dG ≈Lô
o
j ,RÉ¡÷G 𫨰ûJ ±É≤jE’ •
.(1)
26
ﺔـﻴـﺑﺮـﻌـﻟﺍ
(ﺔﻴﺴﻴﺋﺮﻟﺍ ﺕﺎﻤﻴﻠﻌﺘﻟﺍ)
™«ªéàdG
øe ócCÉJ ,á«JB’G äɪ«∏©àdG øe
m
…CG ‘ ádhÉëŸG πÑa !ôjò–
’h OQÉH RÉ¡÷G ¿CGh QÉ«àdG øY ∫ƒ°üØeh CÉØ£
o
e RÉ¡÷G ¿CG
.√É«e ≈∏Y iƒàëj
(CG πµ°ûdG) ¢†Ñ≤ŸG â«ÑãJ
…ƒ∏©dG ±ô£dG πNGO ¤EG (8) ¢†Ñ≤ª∏d »∏Ø°ùdG ±ô£dG ôjôªàH ºb •
.É
k
Jƒ°U É
k
Kófi ¬fɵe ‘ â
q
Ñã
o
j ≈àM (11) ájQÉîÑdG áë°Sɪ∏d
(Ü πµ°ûdG) ó«dÉH ádƒªëŸG QÉîÑdG IóMh â«ÑãJ
∞¶æe ¢†Ñ≤e ™aOGh (11) QÉîÑdG áë°SÉe πµ«g ô¡¶H ∂°ùeCG •
QÉîÑdG áë°SÉe πµ«g πNGO äÉÑãH (5) ó«dÉH ∫ƒªëŸG QÉîÑdG
¬fCGh (CG11) ¿É°ù∏dG ¥ƒa áë«ë°U á≤jô£H â
q
Ñ
o
K ¬fCG øe ócCÉJh (11)
.¬fɵe ‘ ¿ÉeC’G 䃰U Qó°UCG
(Ü πµ°ûdG) ó«dÉH ∫ƒªëŸG QÉîÑdG ∞¶æe ádGREG
Öë°SGh (11) »°ù«FôdG πµ«¡dG ‘ (10) ôjôëàdG QR ≈∏Y §¨°VG •
øYh (CG11) ¿É°ù∏dG øY G
k
ó«©H (5) ó«dÉH ∫ƒªëŸG QÉîÑdG ∞¶æe
.(11) »°ù«FôdG πµ«¡dG
(ê πµ°ûdG) ∞«¶æàdG áaƒd â«ÑãJ
-:∂jód BLACK+DECKER ´Rƒe øe πjóH ∞«¶æJ ±ƒd ôaƒàj
.(FSMP20-XJ áÄØdG ºbQ)
§jöT ÖfÉL ¬éàj å«ëH ¢VQC’G ≈∏Y (13) ∞«¶æàdG áaƒd ™°V •
.≈∏YC’ "äÉfhõ∏◊G" hôµ∏«ØdG
.(13) ∞«¶æàdG áaƒd ≈∏Y ≥aôH ájQÉîÑdG áë°SÉŸÉH §¨°VG •
á«°SÉ«b äÉ«°VQCG ∞«¶æJ ¢SCGQ IóMƒdG √òg ™e ≥aô
o
j ÉÃQ :á¶MÓe
ÚàdÉ◊G Óc ‘ .(CG12) QÉîÑdG ≥aóH äÉ«°VQC’G ∞«¶æJ ¢SCGQ hCG (12)
.∞«¶æàdG áaƒd Ö«cÎd äɪ«∏©àdG ∂∏J Ωóîà°SG
í£°S …CG ≈∏Y óMGh ¿Éµe ‘ G
k
óHCG ájQÉîÑdG áë°SÉŸG ∑ÎJ ’ !¬«ÑæJ
¢†Ñ≤ŸG ¿ƒµj å«ëH ájQÉîÑdG áë°SÉŸG É
k
ªFGO ™°V .øeõdG øe IÎØd
áë°SÉŸG 𫨰ûJ ±É≤jEG øe ócCÉJh äÉÑãdG óæY »°SCGôdG ™°VƒdG ‘ (8)
.ΩGóîà°S’G ΩóY ∫ÉM ‘ ájQÉîÑdG
∞«¶æàdG áaƒd ádGREG
∂àë°SÉe ‘ ∞«¶æàdG áaƒd Ò«¨J óæY áªFÓe ájòMCG É
k
ªFGO
p
óJQG !¬«ÑæJ
.ájQÉîÑdG
.™HÉ°UC’G óæY É
k
MƒàØe
k
AGòM hCG É
k
Ñ°ûÑ°T …óJôJ ’
¤EG ájQÉîÑdG áë°SÉŸG QR QOCGh »°SCGôdG ™°VƒdG ¤EG (8) ¢†Ñ≤ŸG óYCG •
."𫨰ûàdG ±É≤jEG" ™°Vh
.(≥FÉbO 5 ‹GƒM) ájQÉîÑdG áë°SÉŸG OÈJ ¿CG ¤EG ô¶àfG •
øe Égôjô– ™e ∞«¶æàdG áaƒd øY G
k
ó«©H ájQÉîÑdG áë°SÉŸG ™aQG •
.hôµ∏«ØdG âÑãe
IÎØd í£°S …CG ≈∏Y óMGh ¿Éµe ‘ G
k
óHCG ájQÉîÑdG áë°SÉŸG ∑ÎJ ’ !¬«ÑæJ
.øeõdG øe
™°VƒdG ‘ (8) ¢†Ñ≤ŸG ¿ƒµj å«ëH ájQÉîÑdG áë°SÉŸG É
k
ªFGO ™°V
∫ÉM ‘ ájQÉîÑdG áë°SÉŸG 𫨰ûJ ±É≤jEG øe ócCÉJh äÉÑãdG óæY »°SCGôdG
.ΩGóîà°S’G ΩóY
(± πµ°ûdG) AÉŸG ¿GõN Aπe
hCG äÉaÉ°VEG ájCG Ωóîà°ùJ ’) ∞«¶f QƒÑæ°U AÉà AÉŸG ¿GõN CÓeG !á¶MÓe
.(á«FÉ«ª«c OGƒe
´hõæe AÉŸG ΩGóîà°SÉH ≈°Uƒj ,öù©dG AÉŸG ≥WÉæe ‘ !á¶MÓe
.äÉfƒjC’G
.≈∏YCÓd ¬«W ≥jôW øY (4) áÄÑ©àdG áëàa AÉ£Z íàaG •
.(á«FÉ«ª«c OGƒe hCG äÉaÉ°VEG ájCG Ωóîà°ùJ ’) AÉŸÉH AÉŸG ¿GõN CÓeG •
™°Vh ‘ ¬«∏Y ßaÉMh á«°ù«FôdG IóMƒdG øY ¬∏°üaG ,AπŸG óæY !ôjò–
.»≤aCG
¥ƒa ¿GõÿG CÓ“ ’ .Îd 0.5 ∂H ¢UÉÿG AÉŸG ¿GõN á©°S ≠∏ÑJ !ôjò–
.¬àbÉW
.(4) áÄÑ©àdG áëàa AÉ£Z ≥∏ZG •
.ΩɵMEÉH øeCÉe áÄÑ©àdG áëàa AÉ£Z ¿CG øe ócCÉJ !á¶MÓe
(§≤a OÉé°ùdG ™e ΩGóîà°SÓd) (Ü12) OÉé°ùdG áL’R â«ÑãJ
.¢VQC’G ≈∏Y (Ü12) OÉé°ùdG áL’R ™°V •
(12) äÉ«°VQC’G ∞«¶æJ ¢SGQ ≈∏Y ∞«¶æàdG áaƒd âÑK •
≈àM (Ü12) OÉé°ùdG áL’R ≈∏Y ≥aôH ájQÉîÑdG áë°SÉŸG §¨°VG •
.É
k
Jƒ°U
k
áKófi É¡fɵe ‘ âÑã
o
J
IÎØd í£°S …CG ≈∏Y óMGh ¿Éµe ‘ G
k
óHCG ájQÉîÑdG áë°SÉŸG ∑ÎJ ’ !¬«ÑæJ
‘ (8) ¢†Ñ≤ŸG ¿ƒµj å«ëH ájQÉîÑdG áë°SÉŸG É
k
ªFGO ™°V .øeõdG øe
‘ ájQÉîÑdG áë°SÉŸG 𫨰ûJ ±É≤jEG øe ócCÉJh äÉÑãdG óæY »°SCGôdG ™°VƒdG
.ΩGóîà°S’G ΩóY ∫ÉM
OÉé°ùdG áL’R ádGREG
‘ OÉé°ùdG áL’R Ò«¨J óæY áªFÓe ájòMCG É
k
ªFGO …óJôJ ¿CG ∂«∏Y !¬«ÑæJ
.™HÉ°UC’G óæY É
k
MƒàØe
k
AGòM hCG É
k
Ñ°ûÑ°T …óJôJ ’ .ájQÉîÑdG ∂àë°SÉe
¤EG ájQÉîÑdG áë°SÉŸG QR QOCGh »°SCGôdG ™°VƒdG ¤EG (8) ¢†Ñ≤ŸG óYCG •
."𫨰ûàdG ±É≤jEG" ™°Vh
.(≥FÉbO 5 ‹GƒM) ájQÉîÑdG áë°SÉŸG OÈJ ¿CG ¤EG ô¶àfG •
πØ°SCÓd §¨°VGh OÉé°ùdG áL’R ∂a ¿É°ùd ≈∏Y ∂FGòM áeó≤e ™°V •
.ΩõëH
.OÉé°ùdG áL’R øY G
k
ó«©H ≈∏YC’ QÉîÑdG áë°SÉe ™aQG •
20
�
20ﺃ
�
21
�
21ﺃ
�
22
ﻊﻴﻤﳉﺍ
ﻊﻴﻤﳉﺍ
ﻊﻴﻤﳉﺍ
ﻊﻴﻤﳉﺍ
ﻊﻴﻤﳉﺍ
ﻊﻴﻤﳉﺍ
ﻡ/ﻍ
ﻊﻴﻤﳉﺍ
22ﺃ
22ﺏ
22c
23
23ﺃ
23ﺏ
�
23ﺝ
�
23ﺩ
�
24
�
25
28
äGOGóYEG
FSMH1351SM
FSH13101SM
FSMH13151SM
FSMH13151SM
FSMH1321J
FSMH1321JSM
FSMH1321JMD
FSMH1321
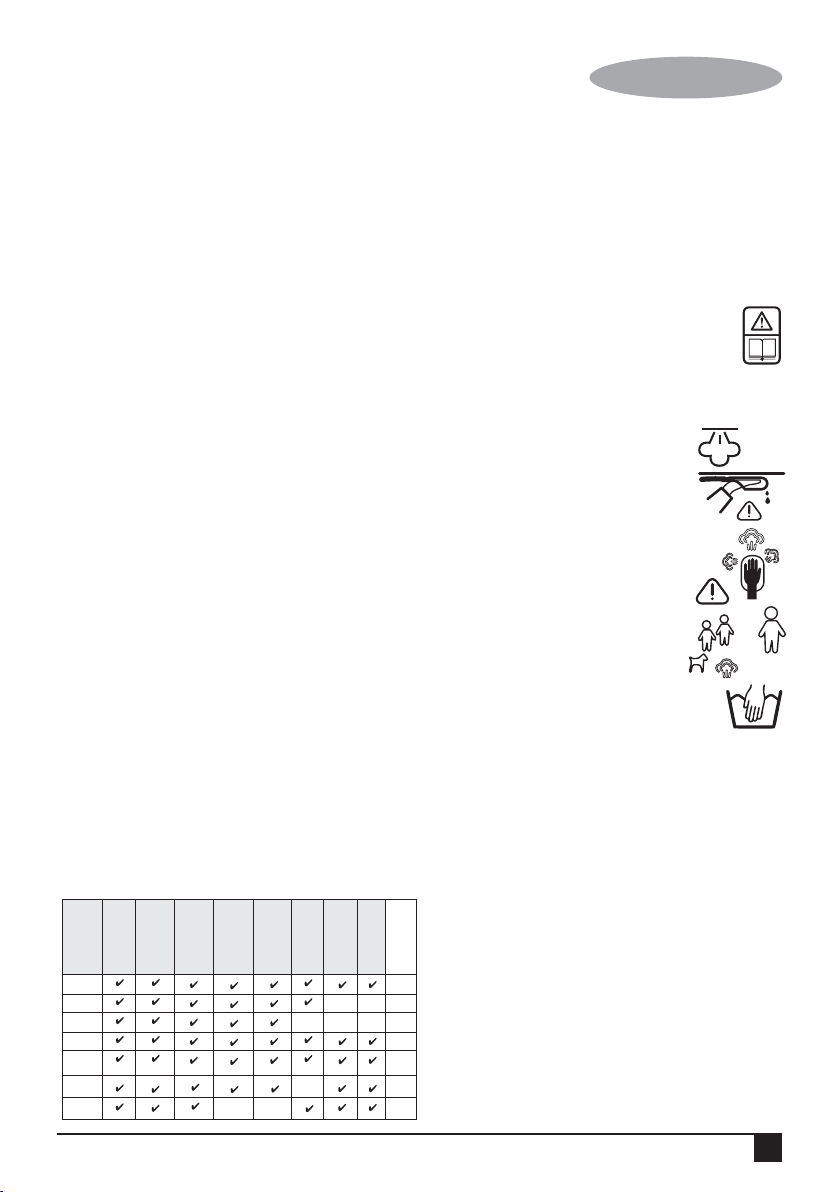
27
ﺔـﻴـﺑﺮـﻌـﻟﺍ
(ﺔﻴﺴﻴﺋﺮﻟﺍ ﺕﺎﻤﻴﻠﻌﺘﻟﺍ)
ΩGóîà°S’G øe ¢Vô¨dG
BLACK+DECKER
TM
ájQÉîÑdG ∂àë°SÉe º«ª°üJ ”
FSMH1321, FSMH13515M, FSMH13101SM,
FSMH13151SM, FSMH1321J, FSMH1321JSM,
áÑ∏°üdG á«Ñ°ûÿG äÉ«°VQC’G ∞«¶æJh º«≤©àd FSMH1321JMD
π«æ«ØdGh ™ª°ûŸGh Üöùà∏d á©fÉŸG íFGöûdGh Üöùà∏d á©fÉŸG
ƒg RÉ¡÷G Gòg øe ¢Vô¨dG .ΩÉNôdGh ôé◊Gh ∂«eGÒ°ùdG äÉ«°VQCGh
.§≤a »∏NGódG ‹õæŸG ΩGóîà°S’G
áeÓ°ùdG äɪ«∏©J
πeɵdÉH áeóÿGh áfÉ«°üdGh áeÓ°ùdG π«dO CGôbG !ôjò–
πeɵdÉH π«dódG Gòg CGôbG .RÉ¡÷G Gòg 𫨰ûJ πÑb ájÉæ©H
.RÉ¡÷G Gòg 𫨰ûJ πÑb ájÉæ©H
RÉ¡÷G ≈∏Y IOƒLƒŸG äÉ≤°ü∏ŸG
RÉ¡÷G ≈∏Y ïjQÉàdG Oƒc ™e á«dÉàdG á«ë«°VƒàdG Qƒ°üdG ô¡¶J
øNÉ°S QÉîH ¬«ÑæJ
É
k
°SCGQ RÉ¡÷G ΩGóîà°SG óæY √É«ŸG äGô£b §bÉ°ùàJ
Ö≤Y ≈∏Y
ÖfGƒ÷G πc øe QÉîÑdG êôîj
∫ÉØWC’G OƒLh ‘ áHÉbQ ¿hóH ¬cÎJ ’
§≤a …hój π«°ùZ
¢UGƒÿG
:á«dÉàdG AGõLC’G ™«ªL hCG ¢†©H ≈∏Y RÉ¡÷G Gòg πªà°ûj
±É≤jE’G/𫨰ûàdG ìÉàØe .1
Autoselect
TM
»FÉ≤∏àdG QÉ«àN’G ¢Uôb .2
ó«dÉH ádƒªëŸG QÉîÑdG IóMh ¢†Ñ≤e .3
áÄÑ©àdG áëàa AÉ£Z .4
ó«dÉH ádƒªëŸG QÉîÑdG IóMh .5
ó«dG ¢†Ñ≤e .6
πHɵdG ≥«∏©àd …ƒ∏Y ±É£N .7
»°ù«FôdG ¢†Ñ≤ŸG .8
πHɵdG ≥«∏©àd »∏Ø°S ±É£N .9
ó«dÉH ádƒªëŸG QÉîÑdG IóMh ôjô– QR .10
»°ù«FôdG πµ«¡dG .11
äÉ«°VQC’G ∞«¶æJ ¢SCGQ .12
QÉîÑdG ≥aóH äÉ«°VQC’G ∞«¶æJ ¢SCGQ .CG12
OÉé°ùdG áL’R .Ü12
(OÉé°ùdG ™e §≤a Ωóîà°SÓd)
äÉ«°VQC’G ∞«¶æJ áaƒd .13
äÉ«°VQC’G ∞«¶æJ áaƒd ôjô– ¿É°ùd .14
≥«∏©J áëàa .15
QÉîÑdG ΩƒWôN .16
QÉîÑdG ágƒa .17
ÉjGhõdG ∞«¶æàd á≤aôe IÉ°Tôa .18
(™≤ÑdG ádGRE’ áÑ∏°üdG í£°SC’G ≈∏Y ΩGóîà°SÓd)
á≤ë∏e IÉ°Tôa .19
(•ÓŸG / •ÓÑdG ≈∏Y Ωóîà°SÓd)
á≤aôe áë°ù‡ .20
/ ¢ùHÓŸG / ÉjGôŸG / êÉLõdG / ¢TódG êÉLR ≈∏Y ΩGóîà°SÓd)
(¢TôØdG ó«éæJh
áë°ùªŸG ÜQƒL .CG20
á≤aôe IÒÑc áë°ùe Ω .21
/ ¢ùHÓŸG / ÉjGôŸG / êÉLõdG / ¢TódG êÉLR ≈∏Y ΩGóîà°SÓd)
(¢TôØdG ó«éæJh
IÒÑc áë°ù‡ ÜQƒL .CG21
QÉîÑdG ≥aO IÉ°Tôa IóMh .22
᫵∏°ùdG QÉîÑdG ≥aO IÉ°Tôa .CG22
(¿GôaC’G / äÉjGƒ°ûdG ™e ΩGóîà°SÓd)
QÉîÑdG ≥aO IÉ°Tôa .22b
/ ÒHÉæ°üdG / ¿GôaC’G í£°SCG / ¿GôaC’G / äÉjGƒ°ûdG ™e ΩGóîà°SÓd)
(•ÓŸG
á°†jô©dG QÉîÑdG ≥aO IÉ°Tôa .ê22
(iȵdG πª©dG í£°SCG ™e ΩGóîà°SÓd)
å∏ãe
l
¢SCGQ .23
(iȵdG πª©dG í£°SCG / ó«éæàdG ¢Tôa / ¢ùHÓŸG ™e ΩGóîà°SÓd)
ájƒà°ùŸG í£°SC’G ∞«¶æJ áaƒd .CG23
¢ùHÓª∏d QÉîH á¡LGh .Ü23
(ó«éæàdG ¢Tôa / ¢ùHÓŸG ™e ΩGóîà°SÓd)
¢ùHÓª∏d QÉîH IÉ°Tôa .ê23
(ó«éæàdG ¢Tôa / ¢ùHÓŸG ™e ΩGóîà°SÓd)
¢ùHÓª∏d QÉîH áaƒd .O23
(ó«éæàdG ¢Tôa / ¢ùHÓŸG ™e ΩGóîà°SÓd)
¢ùHÓŸGh á°ûªbCÓd QÉîH áaƒd .24
(ó«éæàdG ¢Tôa / ¢ùHÓŸG ™e ΩGóîà°SÓd)
SteaMitt
TM
QÉîH RÉØb .25
SteaMitt
TM
QÉîH RÉØb ΩƒWôN .26
SteaMitt
TM
QÉîH RÉØ≤H á°UÉN ∞«¶æJ áaƒd .27
πjó©à∏d á∏HÉb ágƒa .28
18
�
19
� � �
12
12ﺃ
12ﺏ
13
16
äGOGóYEG
ﻊﻴﻤﳉﺍ
ﻊﻴﻤﳉﺍ
ﻊﻴﻤﳉﺍ
ﻊﻴﻤﳉﺍ
ﻊﻴﻤﳉﺍ
ﺔﺌﻴﻬﺗ
FSMH1351SM
FSH13101SM
FSMH13151SM
FSMH13151SM
FSMH1321J
FSMH1321JSM
FSMH1321JMD
FSMH1321

PRODUCT MODEL NO.
FSMH1321, FSMH1351SM, FSMH13101SM, FSMH13151SM
FSMH1321J, FSMH1321JSM, FSMH1321JMD
WARRANTY REGISTRATION CARD
YOUR NAME/ VOTRE NOM/
YOUR ADDRESS/ VOTRE ADRESSE/
POSTCODE/ CODE POSTAL/
DATE OF PURCHASE/ JOUR D’ACHAT/
DEALER'S NAME & ADDRESS/ NOM ET ADRESSE DU VENDEUR/
«ùßr
«∞FMu«Ê
«∞d±e «∞∂d¥bÍ
¢U¸¥a «∞Ad«¡
≈ßr Ë ´Mu«Ê «∞∂Uzl

N50925002.2017