
2
3
Table of Contents
Finishing Initial Set Up
Naming Cameras ...............................................................
Checking Recording Schedule ............................................
Motion Detection ...............................................................
How to Check Playback ......................................................
How to Export File .............................................................
Additional Set Up/Mobile Set Up
Remote Viewing P2P (Mobile Viewing) ................................
(PDLO1RWLˋFDWLRQV
3XVK1RWLˋFDWLRQV3RUW)RUZDUGLQJ
Advanced Setting
Password Reset ..................................................................
Recording Parameter Settings ............................................
Digital Zoom ......................................................................
4
6
8
10
12
15
22
25
29
31
34
4
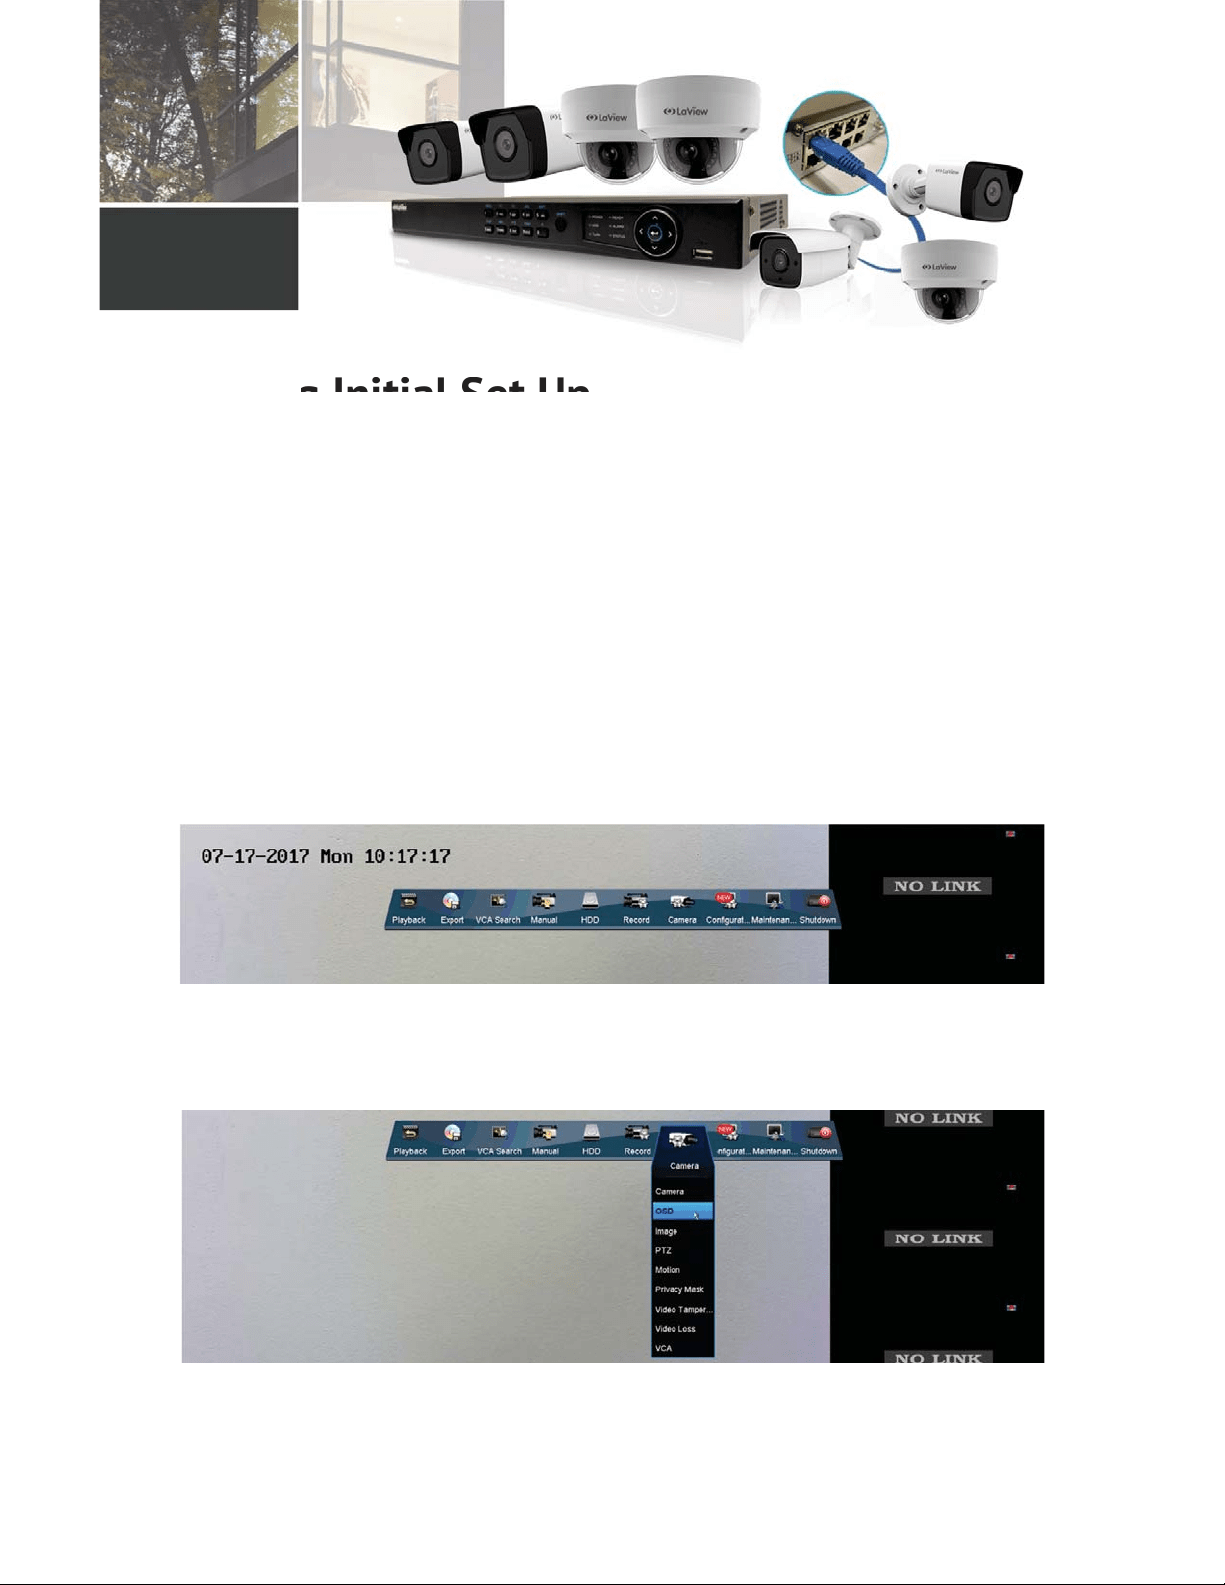
Finishing Initial Set Up
Naming Cameras
If you’d like to personalize your NVR with special camera names, please
follow these steps:
1. Open the Main Menu by hovering the mouse over the top of the screen and
clicking on the “Menu” button.
2. Click on the “Camera” option. Then click on the “OSD” option. OSD stands
for On Screen Display.
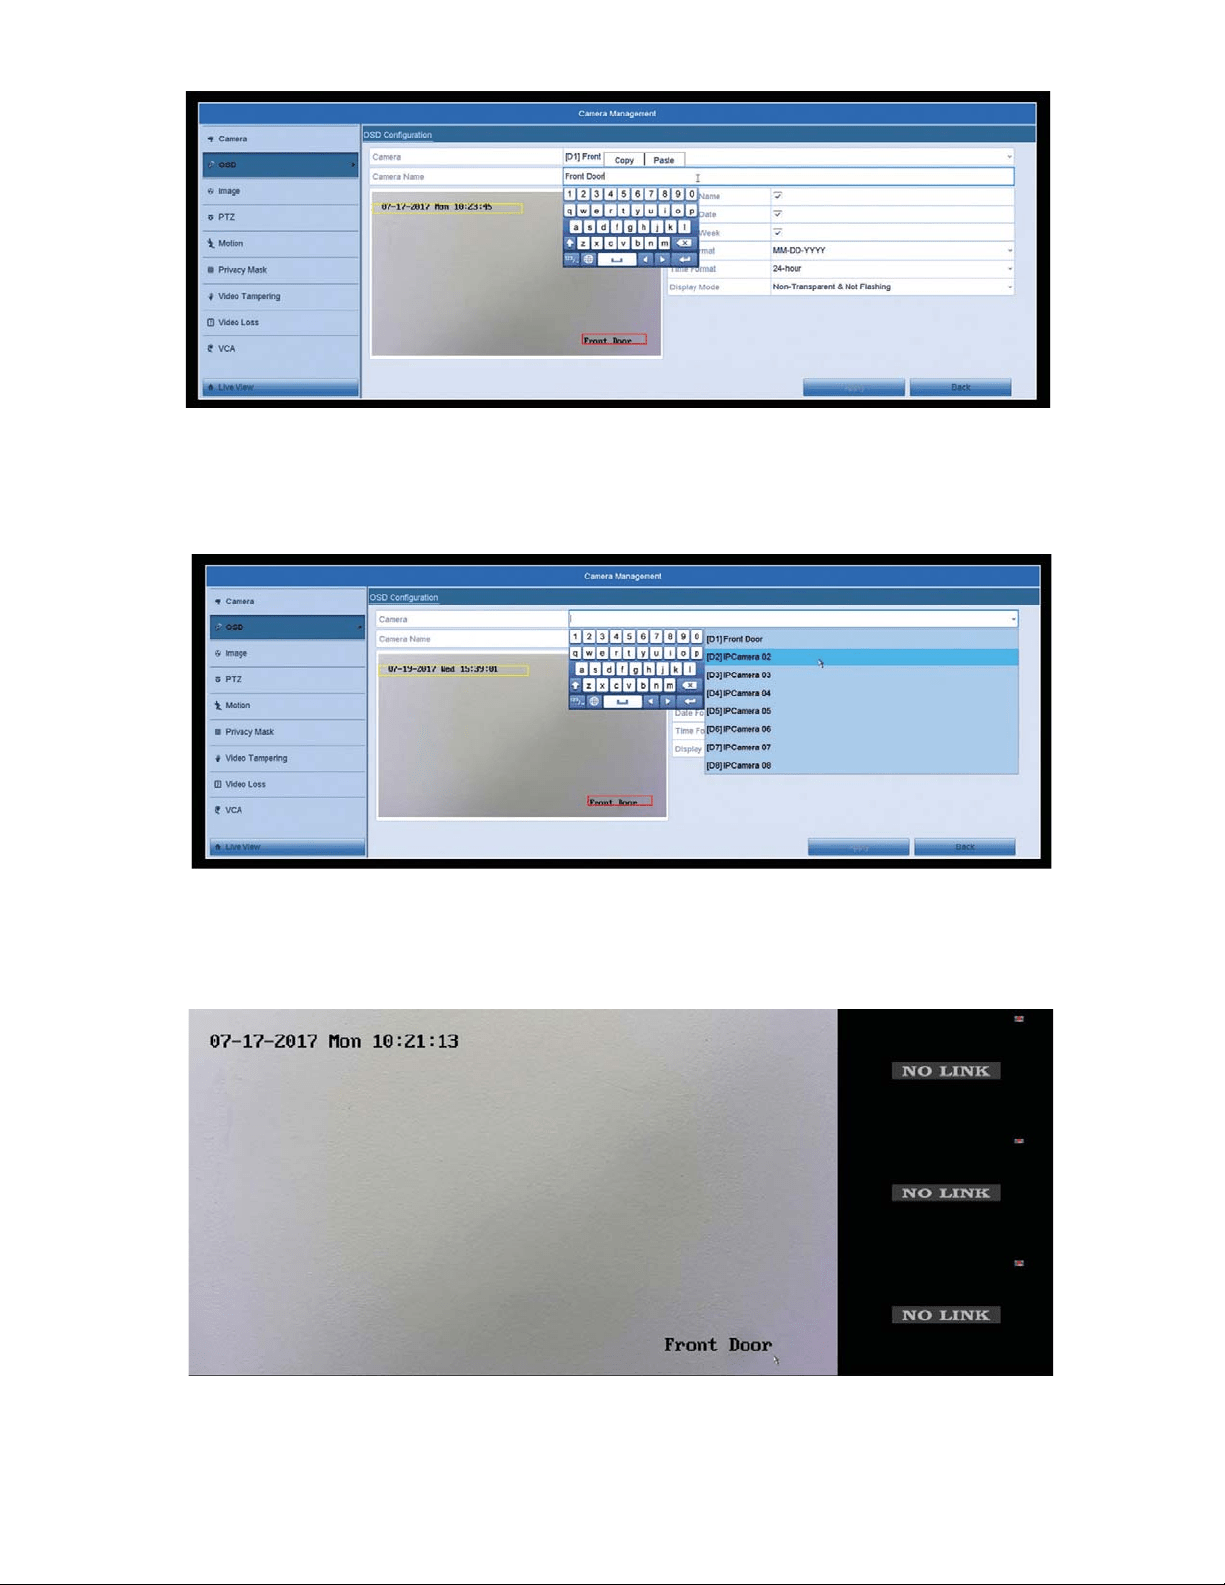
7KHQFOLFNRQWKHȤ&DPHUD1DPHȥˋHOGWRHGLWWKHVHFWLRQ<RXFDQSXWDQ\
thing in this section, for example “Front Door”. Then click Apply at the bottom
right.
g Initial Set Up
5
4. To change your other camera’s names, click on the “Camera” drop down
at the top and select another camera. Be sure to click “Apply” at the bottom
before switching cameras to save your settings.
5. Right click twice to get out of the menu and now the Live View should
UHˌHFW\RXUFDPHUDȢVQHZQDPH
6
Checking Recording Schedule
If you’d like to check how your cameras are recording throughout the
day, follow these steps:
1. Open the Main Menu by hovering the mouse over the top of the screen and
clicking on the “Menu” button
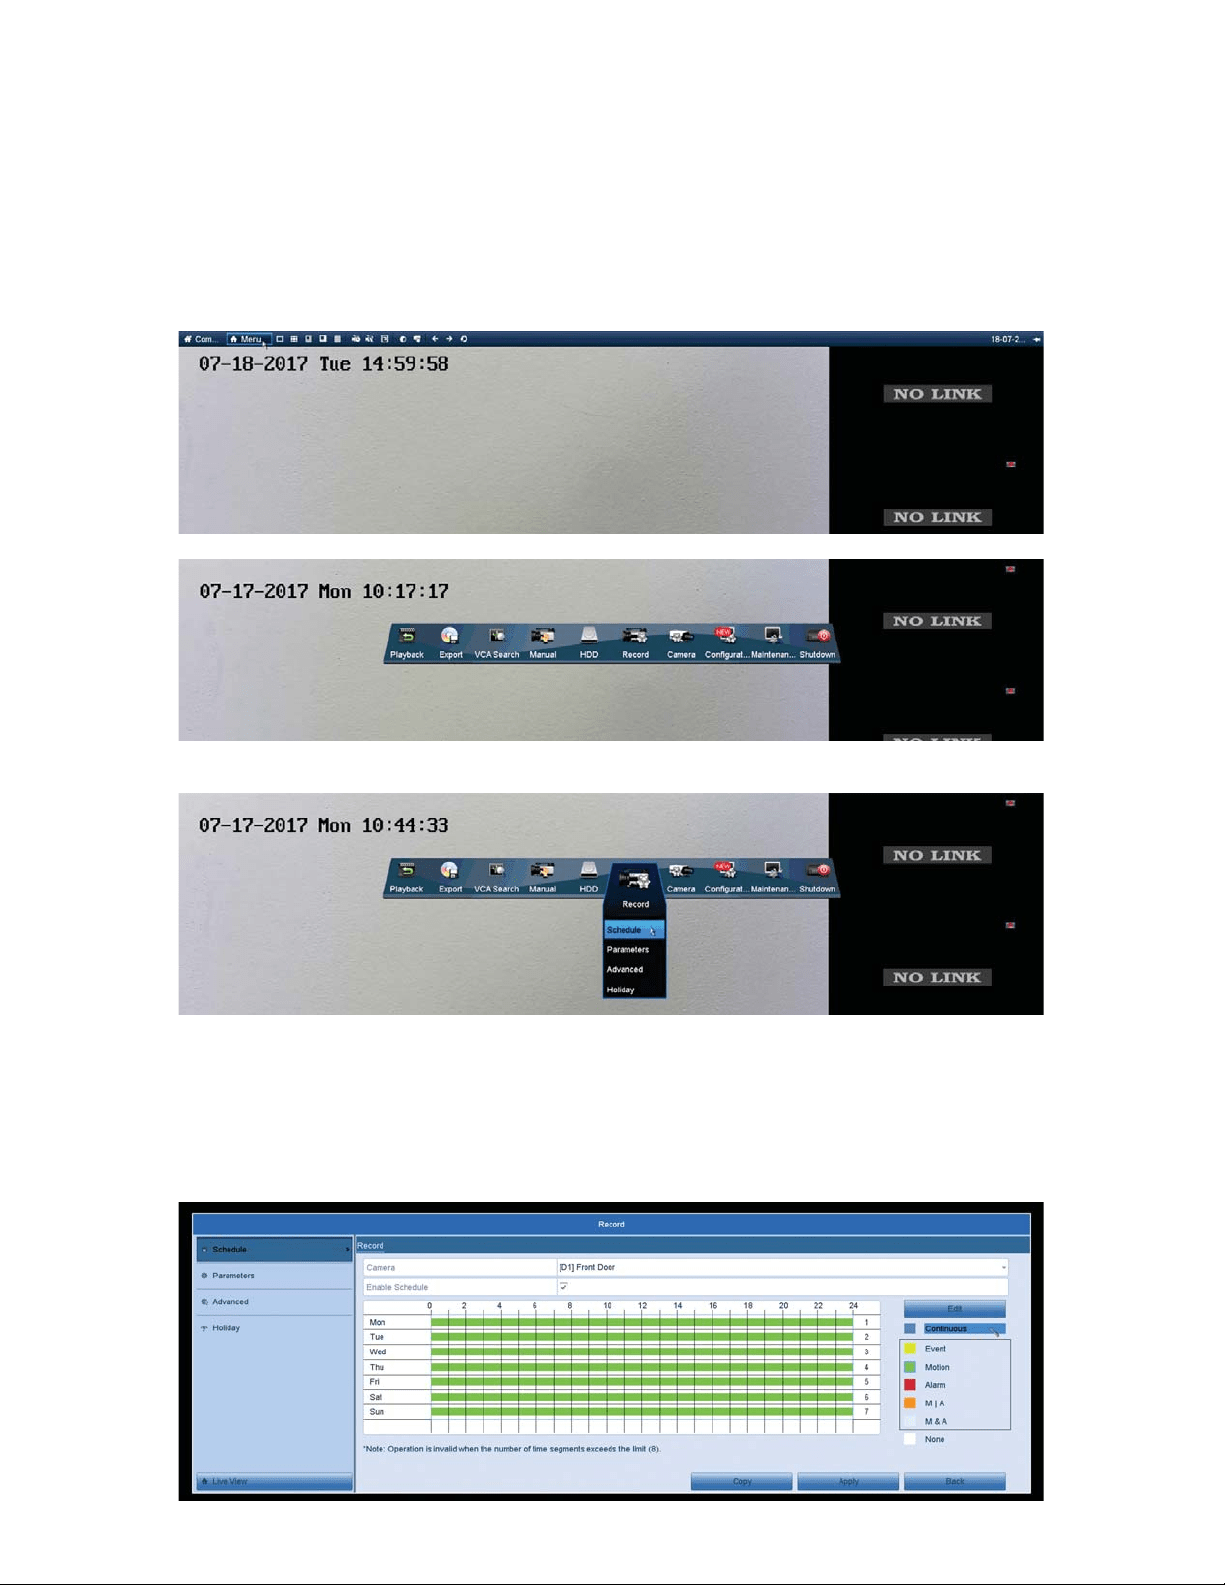
2. Click on the “Record” icon. Then click on the “Schedule” option.
3. Once in the Record schedule section, choose your camera at the top and
make sure the “Enable Schedule” box is checked. On the right-hand side,
select how you’d like to record throughout the week. Continuous will record
24/7, but will take up the most storage space. Motion will only record when
motion is detected within the motion detection areas.
7
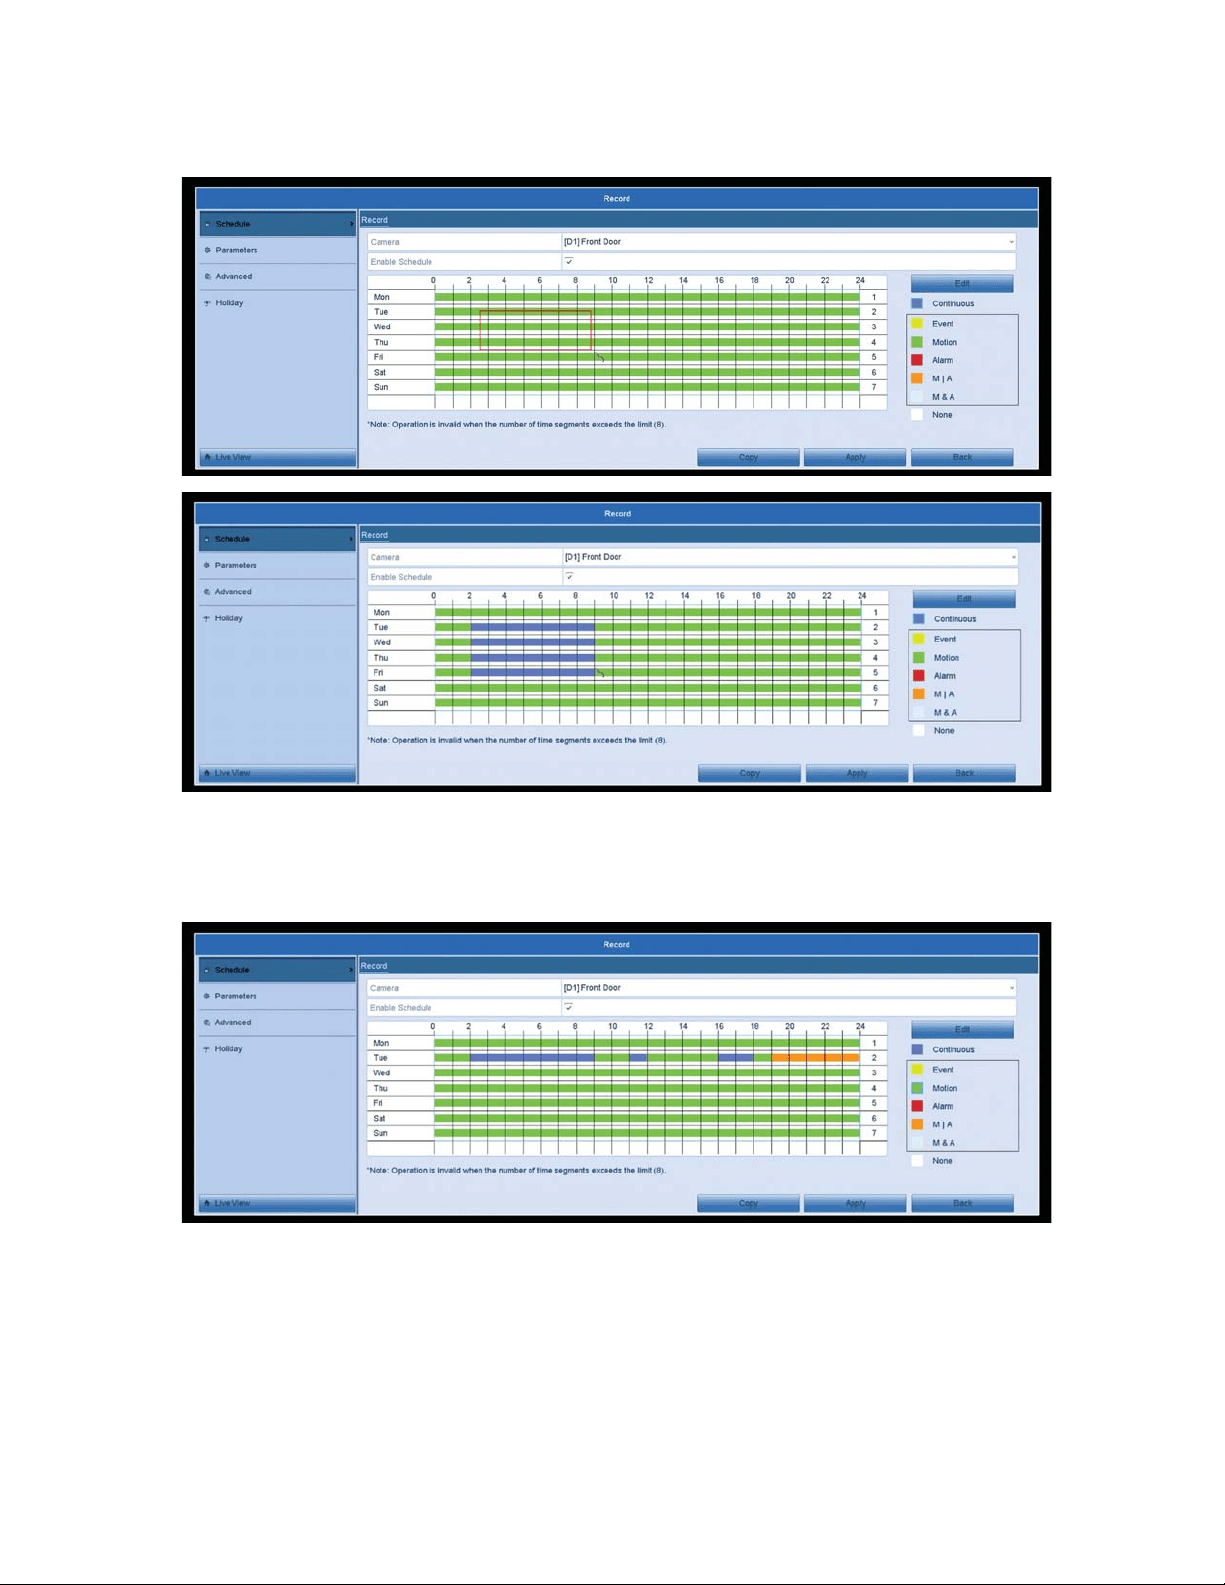
4. After selecting your desired recording type, draw a box on the sections
you’d like to change. The section should change colors to the desired
recording type.
<RXFDQKDYHXSWRUHFRUGLQJVHFWLRQVRQDVLQJOHGD\7KHVHFWLRQVDUH
divided by same color boxes next to each other, until the next color. Once you
are done with this camera, click apply at the bottom right.
Recording Types:
Continuous: Will record 24/7
Event: Will record when an “Event” was triggered. “Events” are special
features that certain cameras have, an example would be “Line Crossing” or
“Face Detection”. If you have a camera that supports any special features, you
can set them up within the VCA section of the NVR. In the Record Schedule
section, this option will only record when such “Events” are triggered.

8
Motion: Records when motion is detected within the motion detection areas
that you have setup.
Alarm: Will only record if an external alarm is triggered. (An external Alarm is
required with this, if your system supports it)
M | A: Will record when motion is detected or an alarm is triggered.
M & A: Will only record when both motion is detected and an alarm is triggered.
None: Will not record at all.
*Notes: If you’d like to use Motion Detection as your recording type and want to check
your Motion Detection Areas, please see the Motion Detection Section.
Motion Detection
To check your camera’s motion detection and the motion detection areas,
please follow these steps:
1. Open the Main Menu by hovering the mouse over the top of the screen and
clicking on the “Menu” button.
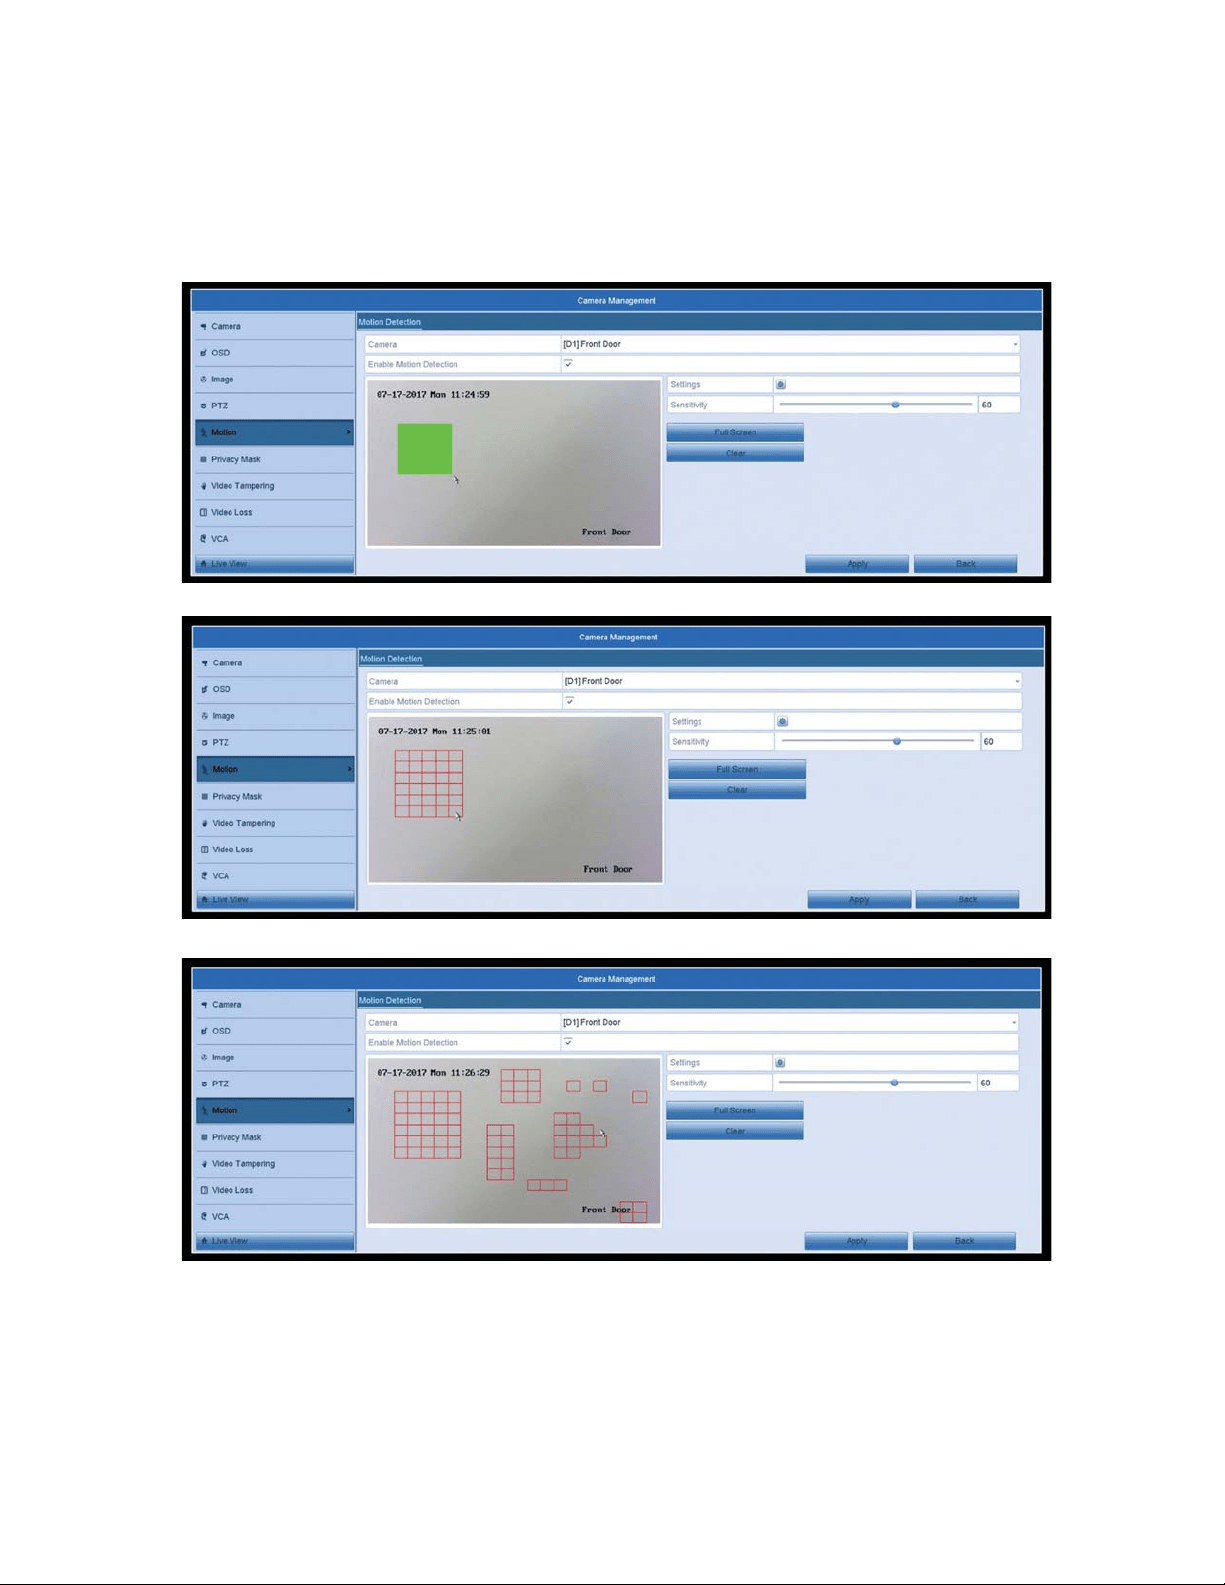
2. Click on the “Camera” Icon. Then click on the “Motion” option.
3. Select the camera, from the “Camera” dropdown at the top, that you’d like
WRFRQˋJXUHDQGPDNHVXUHWKHȤ(QDEOH0RWLRQ'HWHFWLRQȥER[LVFKHFNHG
9
4. We can now draw our desired motion detection area on the camera preview.
Use the mouse cursor to drag and draw your motion detection areas. The
areas with the red grid will detect motion and will trigger your recording or
HPDLOQRWLˋFDWLRQ<RXFDQKDYHDQ\DPRXQWRIDUHDVFUHDWHGRUXVHWKH)XOO
screen button to make the entire view a motion detection area. The clear
option will remove all areas.
5. Once we are done drawing our motion areas, we want to make sure the
V\VWHPZLOOWULJJHU\RXUUHFRUGLQJRUHPDLOQRWLˋFDWLRQV&OLFNRQWKHVHWWLQJV
icon. In the Trigger Channel section, make sure the correct channel is
selected that you are working on. It should match the Camera channel at the
top. In this case, it would be D1.

10
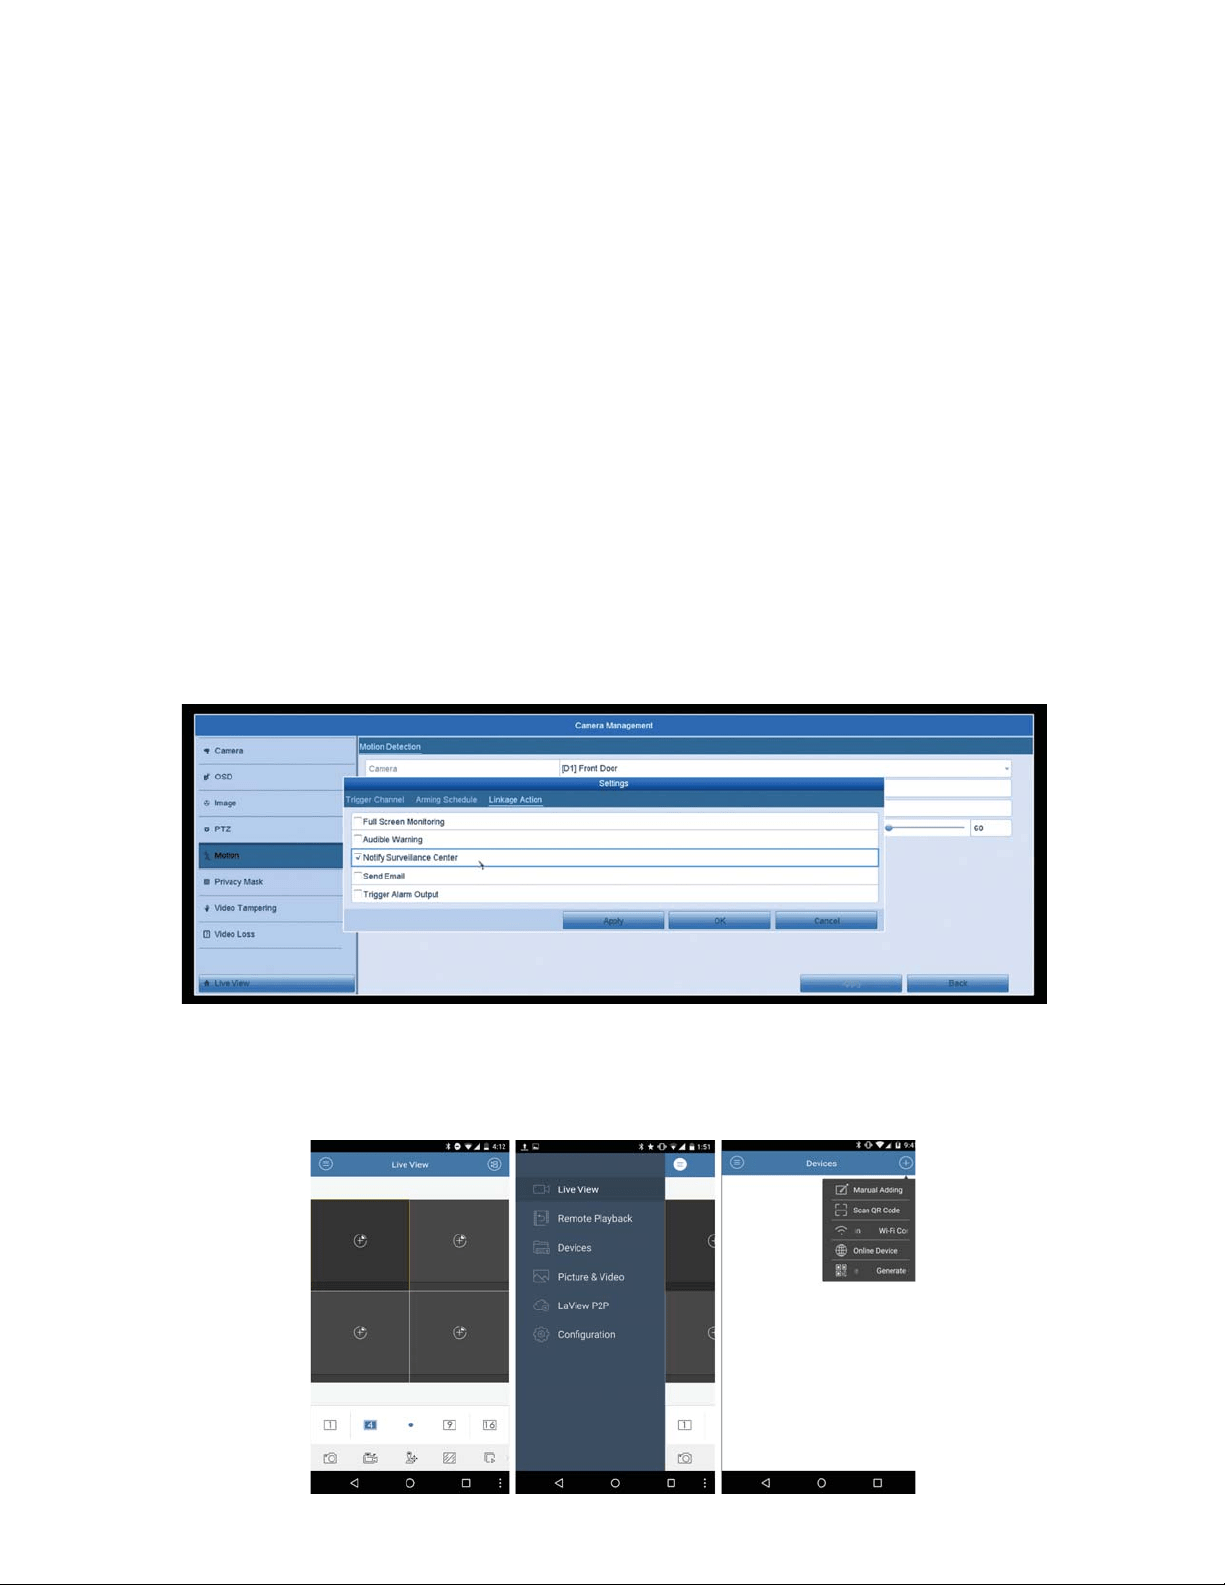
6. Then click on “Linkage Action” at the top. If you plan on setting up Email
1RWLˋFDWLRQVPDNHVXUHWKHȤ6HQG(PDLOȥER[LVFKHFNHGȤ)XOO6FUHHQ0RQLWRULQJȥ
will make the channel selected full screen when motion is detected.
“Audible Warning” will sound some loud beeps from the NVR when motion is
GHWHFWHGȤ1RWLI\6XUYHLOODQFH&HQWHUȥZLOOEHXVHGIRUSXVKQRWLˋFDWLRQVDQG
“Trigger Alarm Output” will trigger any external alarms you may have if setup
correctly. Onceyou are done here, click Apply at the bottom then Ok. Once the
box closes click Apply once more.
*Notes:
1. Motion recording will only work if your Recording Schedule is setup for
Motion Detection.
,I\RXȢGOLNHWRVHWXS(PDLO1RWLˋFDWLRQVSOHDVHVHHWKH(PDLO1RWLˋFDWLRQV
Section.
How to Check Playback
If you want to check past footage that your NVR has recorded, please
follow these steps:
1. Open the Main Menu by hovering the mouse over the top of the screen and
clicking on the “Menu” button.
11
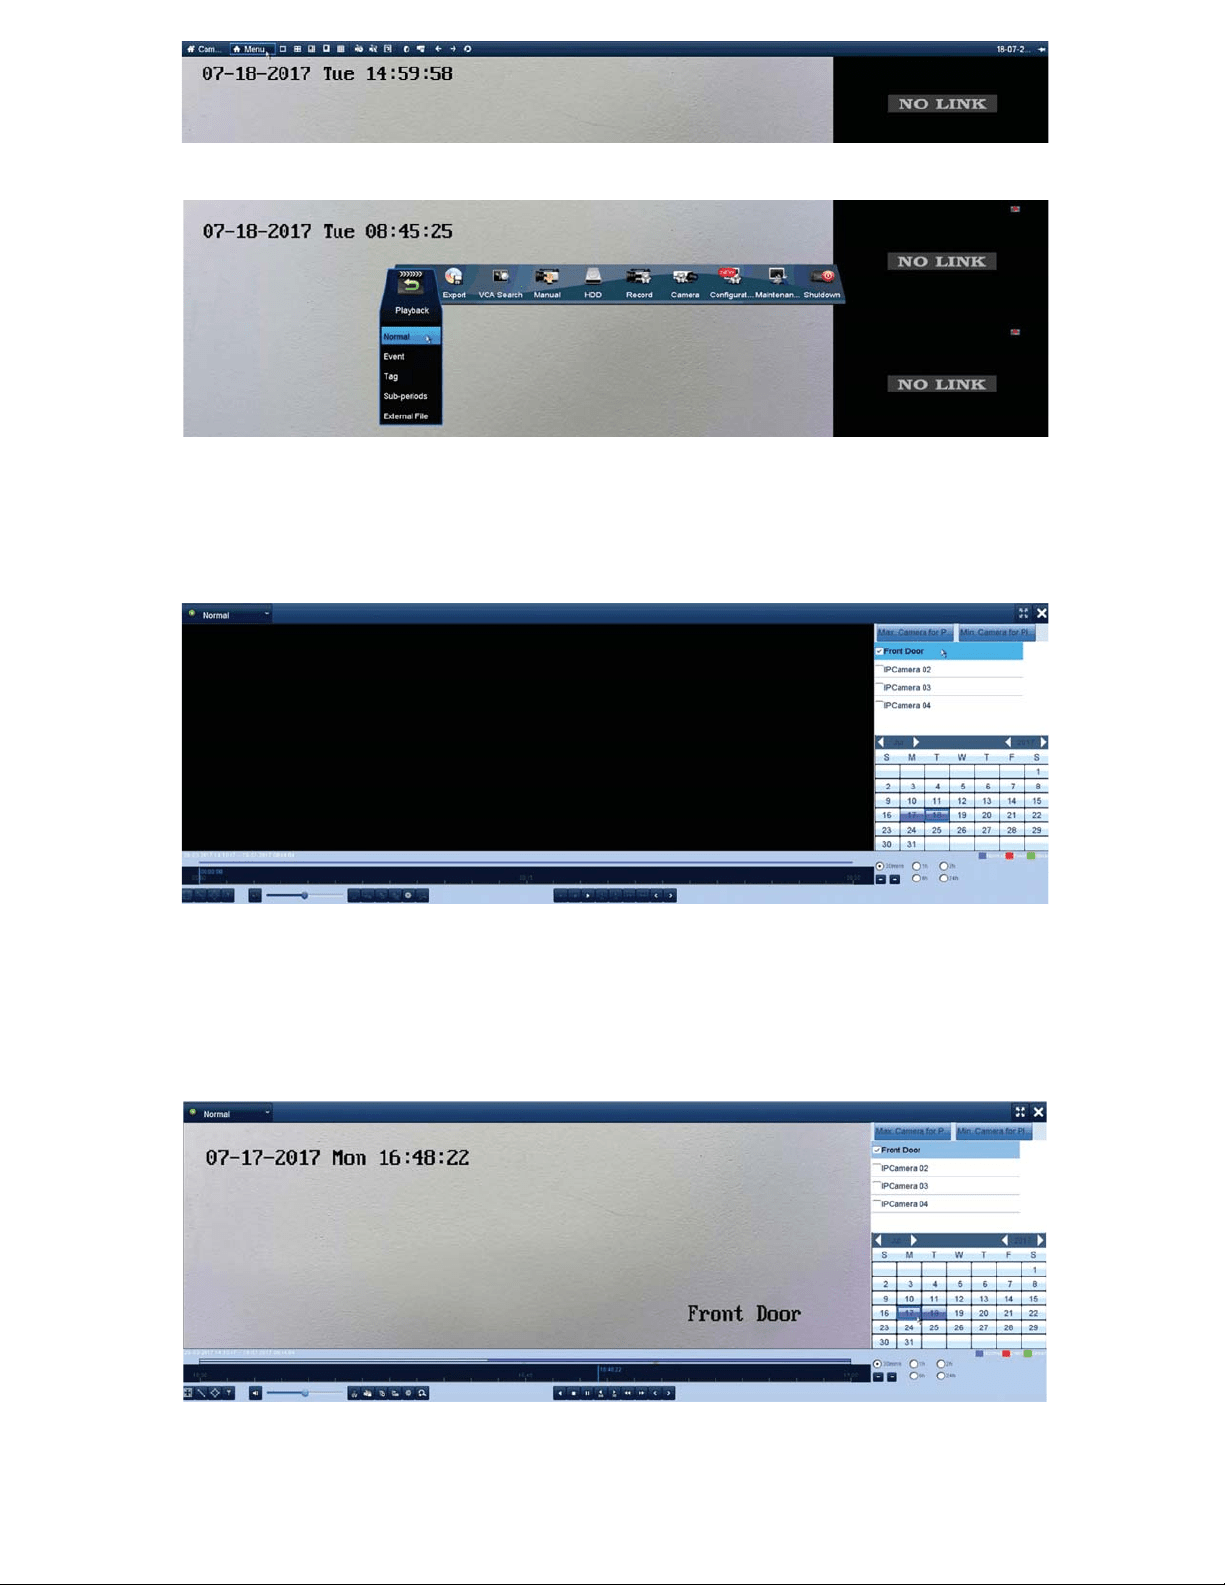
2. Click on the “Playback” icon. Then click on the “Normal” option.
3. Once you are in the Playback menu, on the right-hand side, check the box
next to your desired channel to review. When the box is checked, you’ll notice
WKHFDOHQGDUGD\VZLOOˋOOLQZLWKFRORUWKLVUHSUHVHQWVUHFRUGLQJIRUWKDWGD\
4. Double click on any of the boxes with color to start up playback from that
VSHFLˋFGD\<RXFDQXVHWKHWLPHEDUDORQJWKHERWWRPWRQDYLJDWHWKURXJK-
RXWWKHGD\<RXFDQFKRRVHRWKHUFDPHUDVRUGD\VDWDQ\SRLQW
going through this process.
12
How to Export Files
To extract videos from your NVR Hard Drive please follow these steps:
3OHDVHQRWHWKDW\RXZLOOQHHGD86%)ODVK'ULYHXQGHU*%IRUWKLV
process)
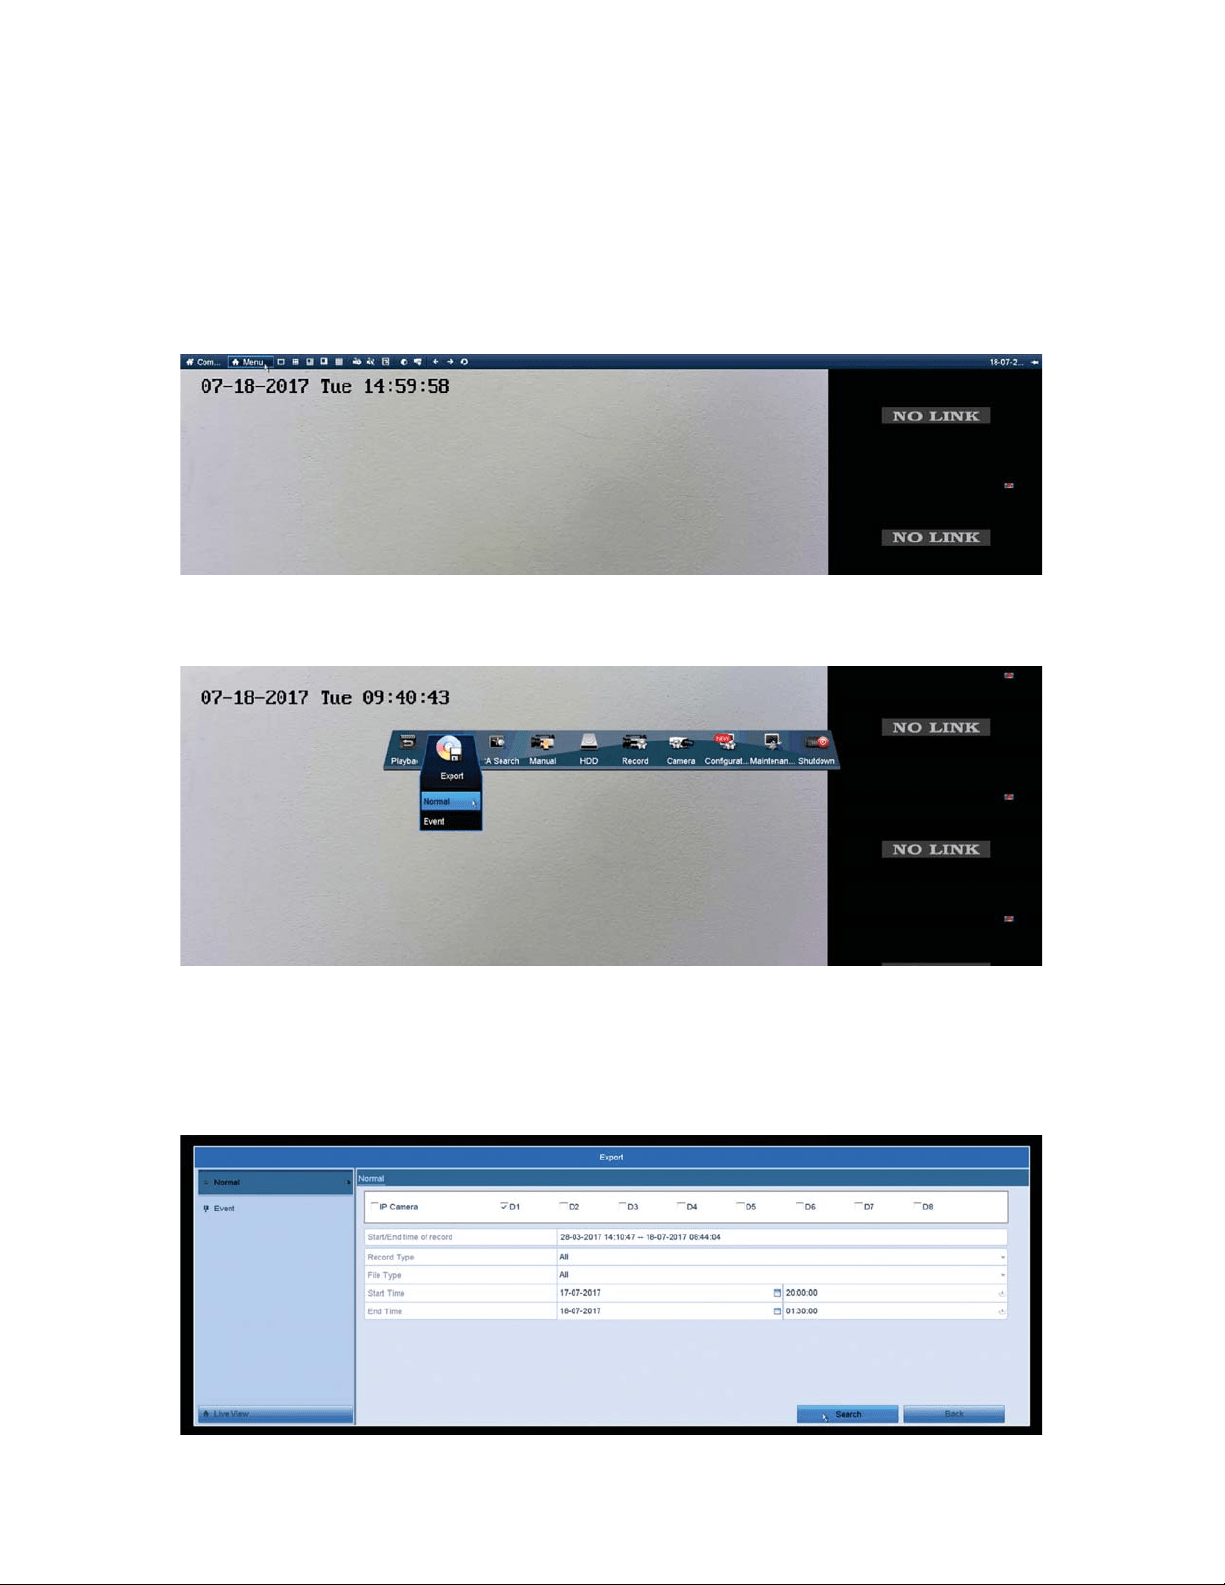
1. Open the Main Menu by hovering the mouse over the top of the screen and
clicking on the “Menu” button.
2. Click on the “Export” icon. Then click on the “Normal” option.
3. In the Export Menu choose your desired channel at the top from the “D1-
'ȥRSWLRQV7KHQXVHWKHGURSGRZQVQH[WWRȤ6WDUW7LPHȥDQGȤ(QG7LPHȥ
WRVHDUFKIRUDVSHFLˋFWLPHIUDPH7KHQFOLFNȤ6HDUFKȥZKHQDOORSWLRQVDUH
ˋOOHGRXWWR\RXUOLNLQJ
13
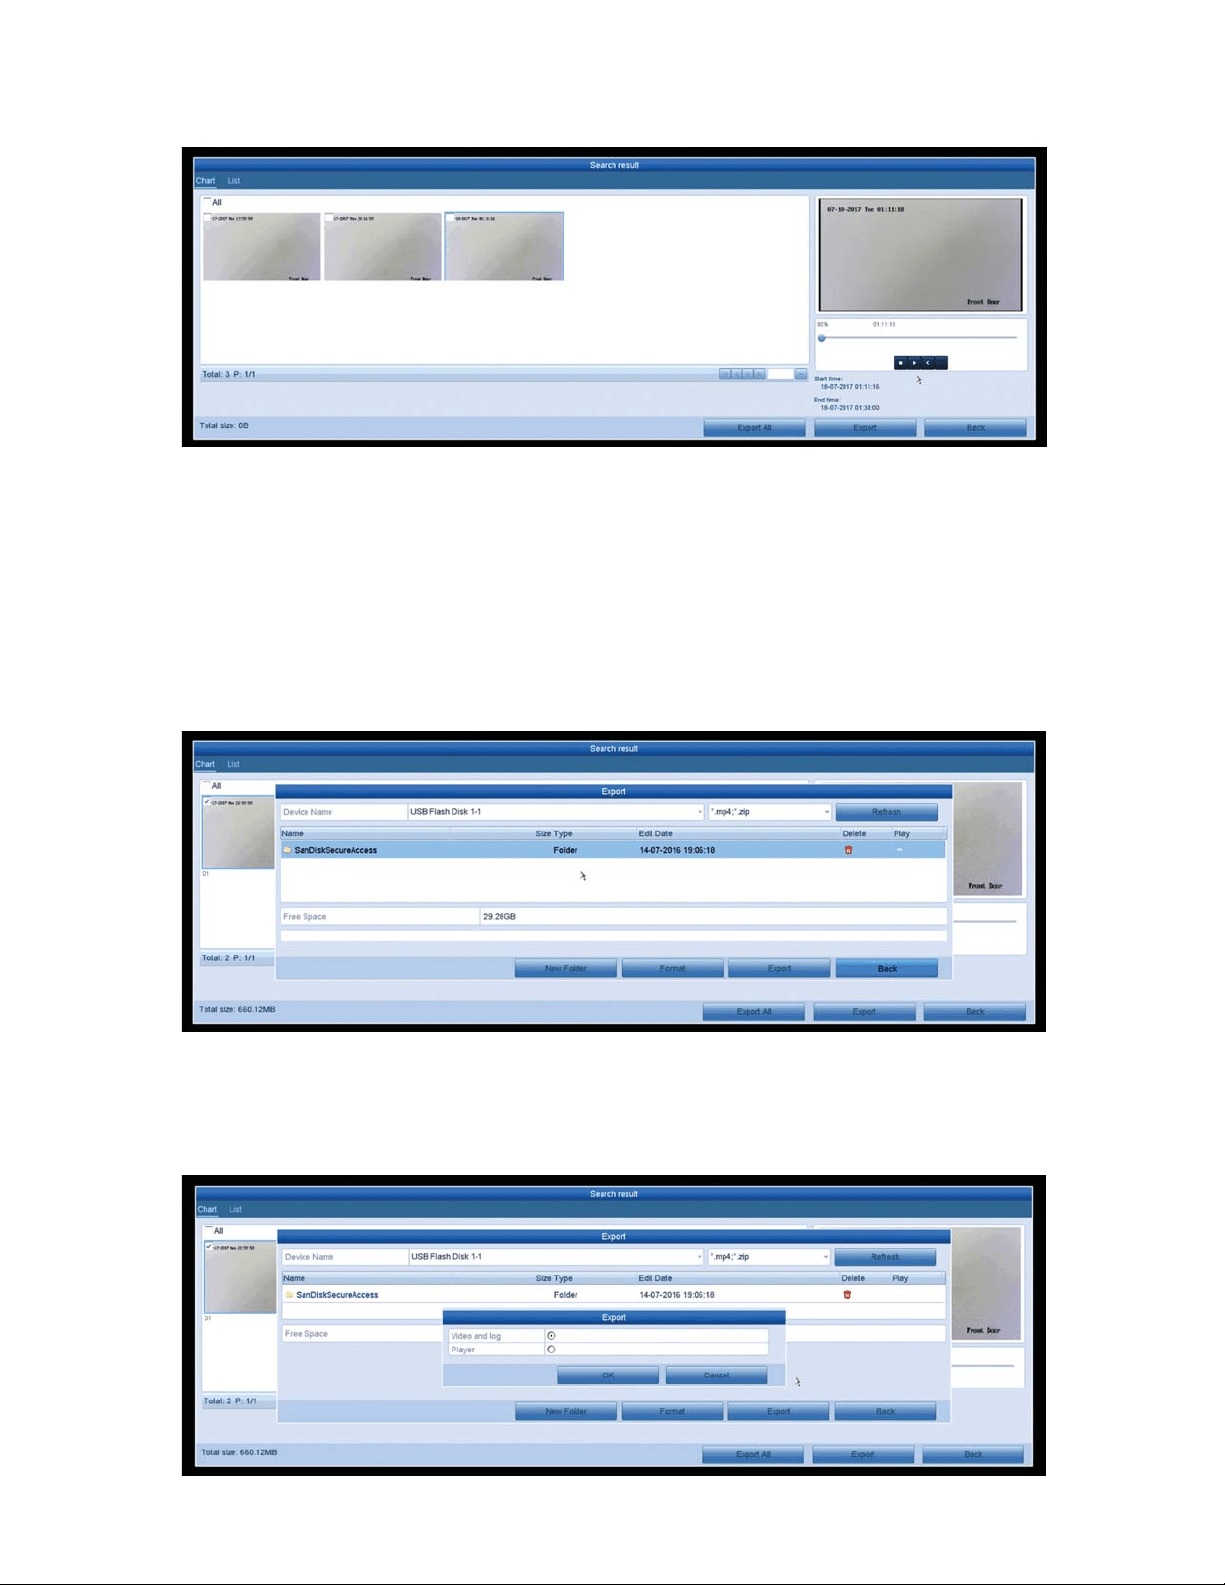
7KHQH[WVFUHHQZLOOSRSXODWHDIHZYLGHRˋOHVWKDWDUHRQ\RXU+DUG'ULYH
EDVHGRQWKHWLPH\RXKDYHSURYLGHG<RXFDQVHOHFWRQHE\FOLFNLQJRQLWDQG
preview it on the right-hand side of the screen.
2QFH\RXKDYHIRXQG\RXUGHVLUHGˋOHFKHFNWKHER[RQWKHWRSOHIWRIWKH
preview then click “Export” at the bottom.
7KH195ZLOODXWRGHWHFW\RXU)ODVKGULYHDQGVKRZLWVFRQWHQWVDQGIROGHUV<RX
FDQH[SRUWWKHˋOHWRWKHURRWIROGHURUFKRRVHDQH[LVWLQJIROGHUWRH[SRUWWR
<RXFDQDOVRFUHDWHDQHZIROGHUIRU\RXH[SRUWHGˋOHVZLWKWKHȤ1HZ)ROGHUȥ
option. To enter a folder just double click it and it will populate that folder’s
contents. Once you are in the desired area, click “export” at the bottom.
<RXȢOOKDYHWKHRSWLRQWRH[SRUWWKHYLGHRRUWKHSOD\HU&KRRVH\RXU
GHVLUHGH[SRUWDQGFOLFNRN<RXFDQDOZD\VJREDFNWKURXJKVWHSDQG
H[SRUWWKHYLGHRSOD\HUDIWHUWKHYLGHRˋOH
14
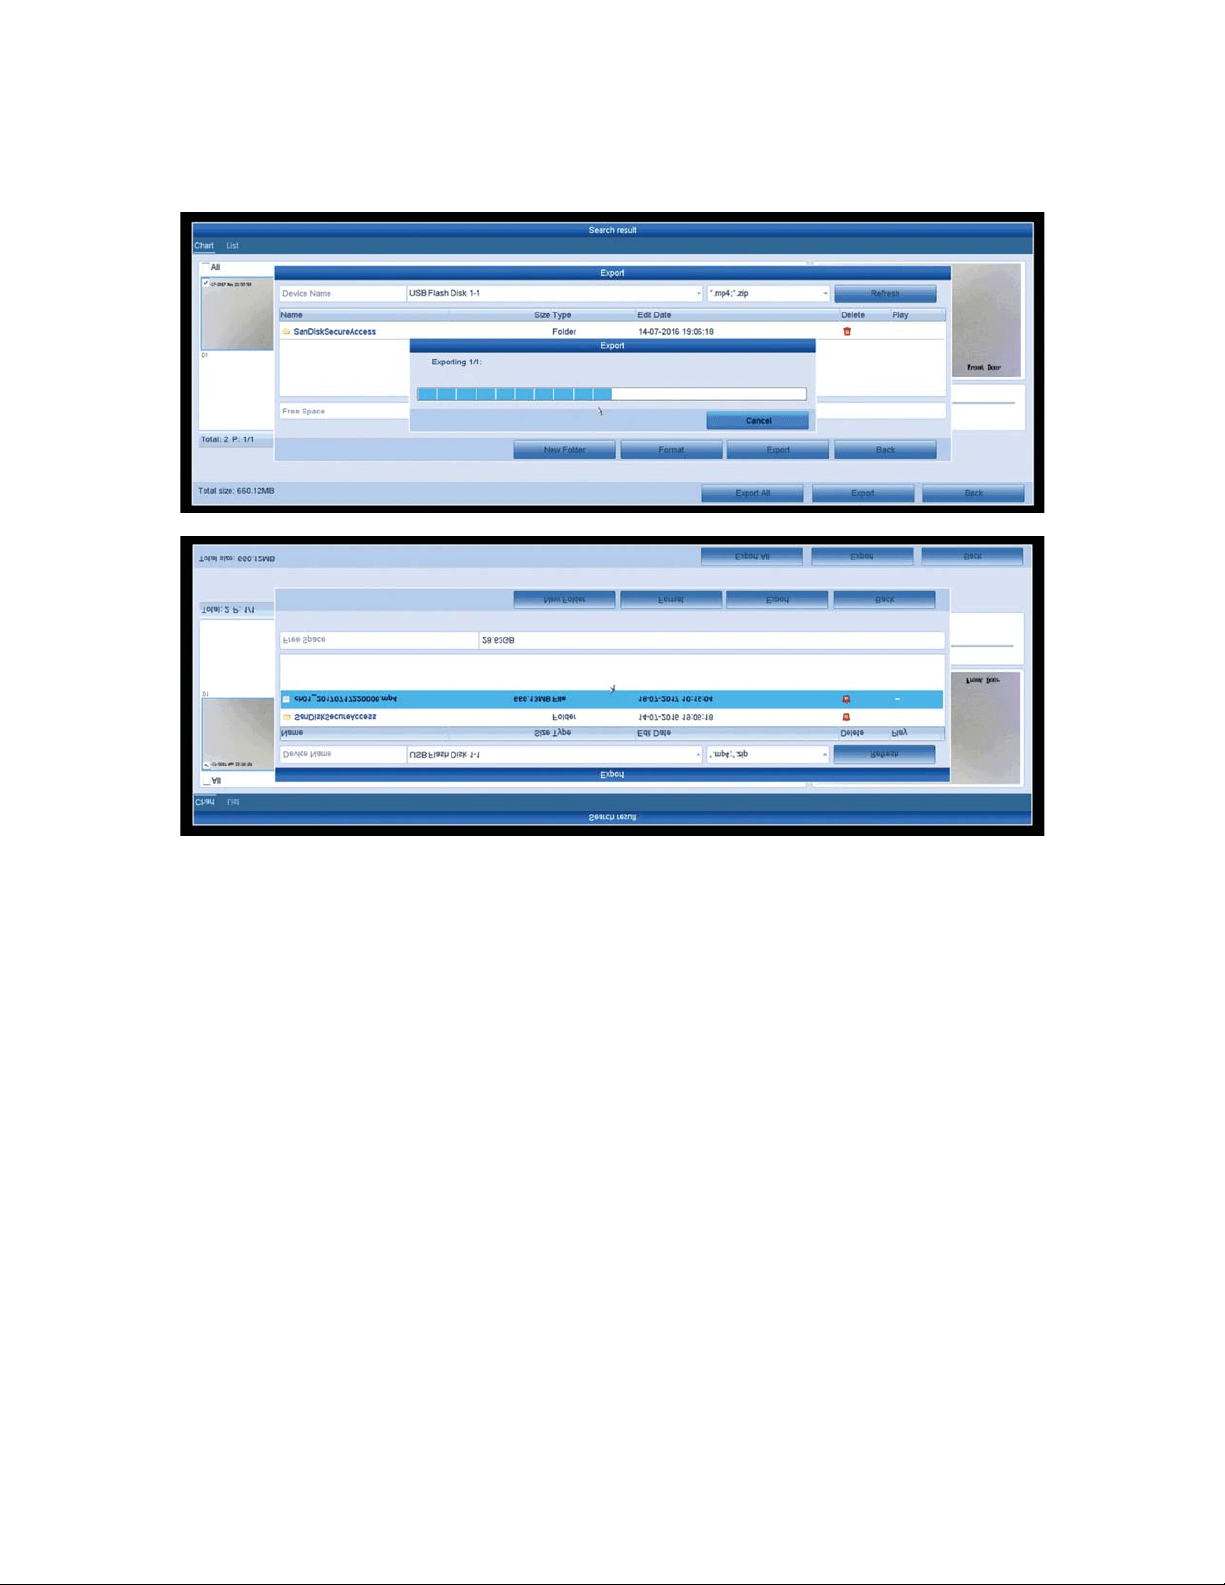
2QFH\RXFOLFNRNWKH([SRUWSURFHVVZLOOEHJLQ'RQRWUHPRYHWKH86%
)ODVK'ULYHRUWXUQRIIWKHSRZHUWRWKH1952QFHLWLVGRQHWKHˋOHVKRXOG
DSSHDURQWKH)ODVK'ULYHDQG\RXFDQQRZSOD\LWRQD3&<RXFDQHLWKHUXVH
the player off the NVR or download VLC player online.
*Notes:
1. If the NVR does not detect your USB Flash Drive, be sure it is formatted to
FAT32 with a PC.
15
Additional Set up/Mobile Set Up
Remote Viewing – P2P
To setup remote viewing on your smart phone, follow these steps:
(Before starting this setup, please be sure your NVR is connected to
your router/modem by an Ethernet cable)
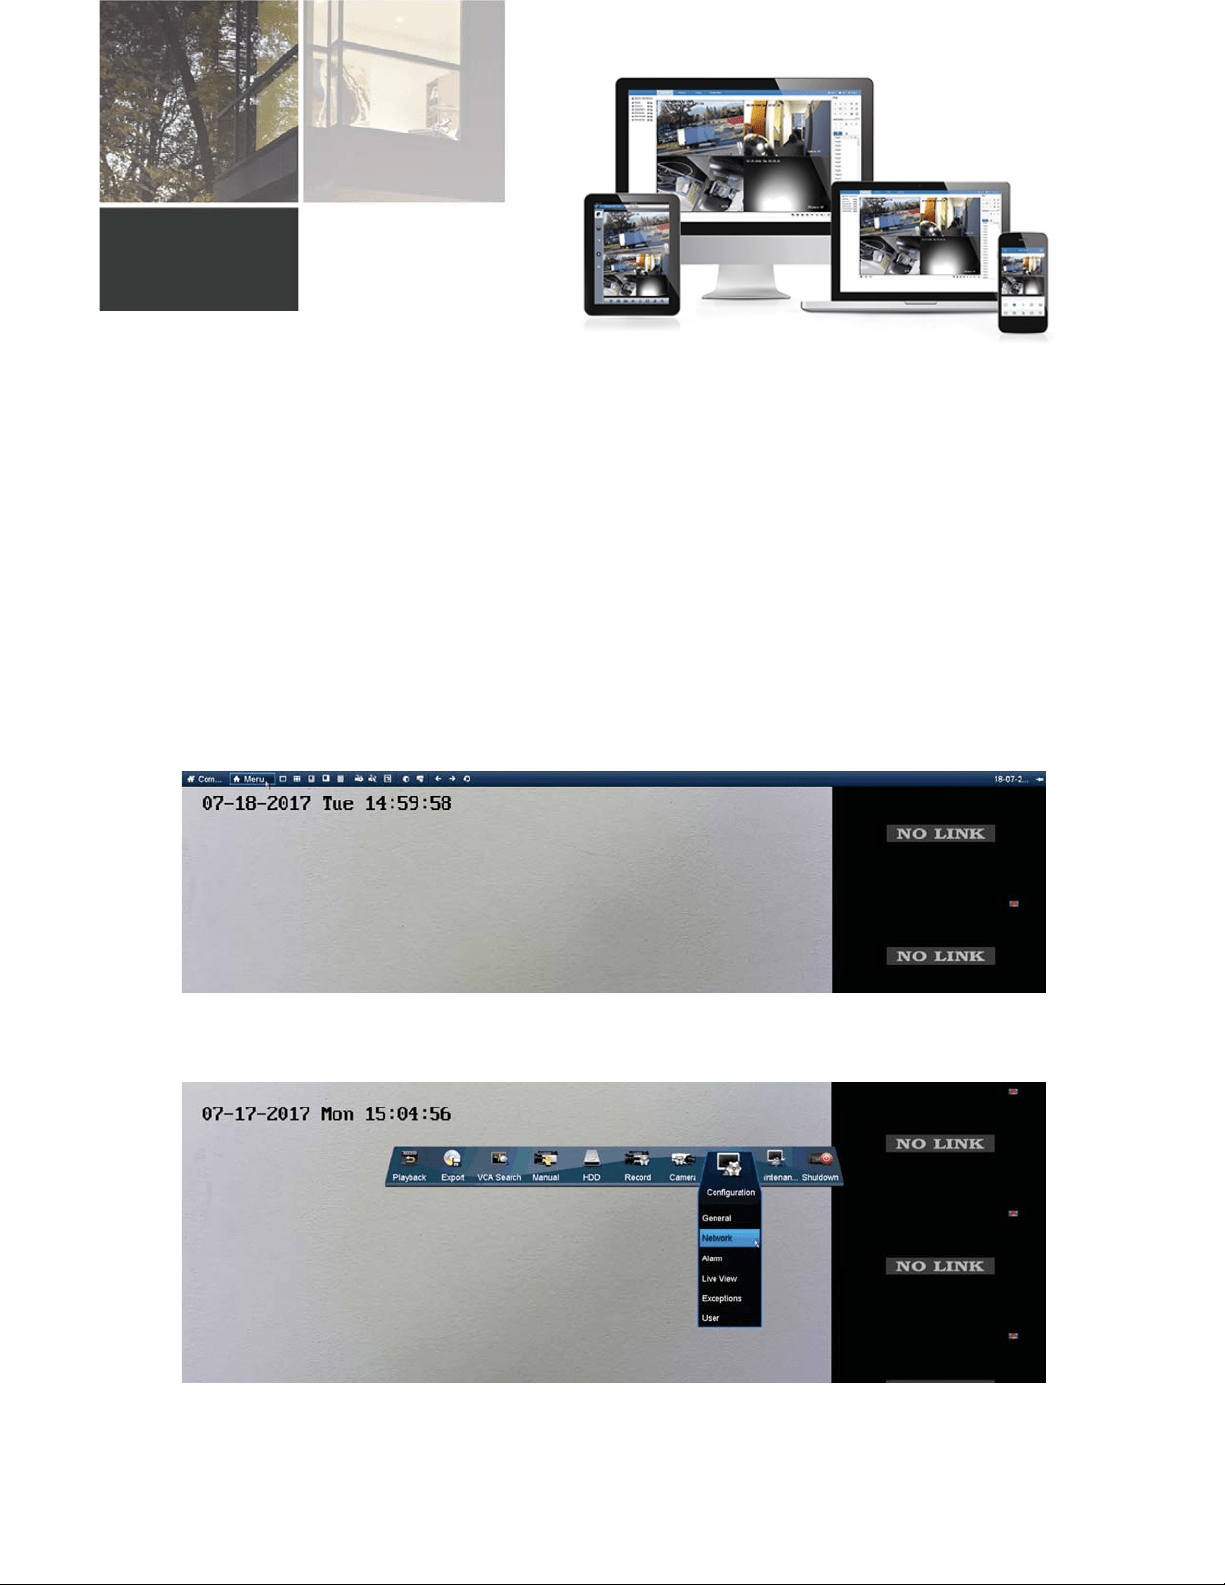
1. Open the Main Menu by hovering the mouse over the top of the screen and
clicking on the “Menu” button.
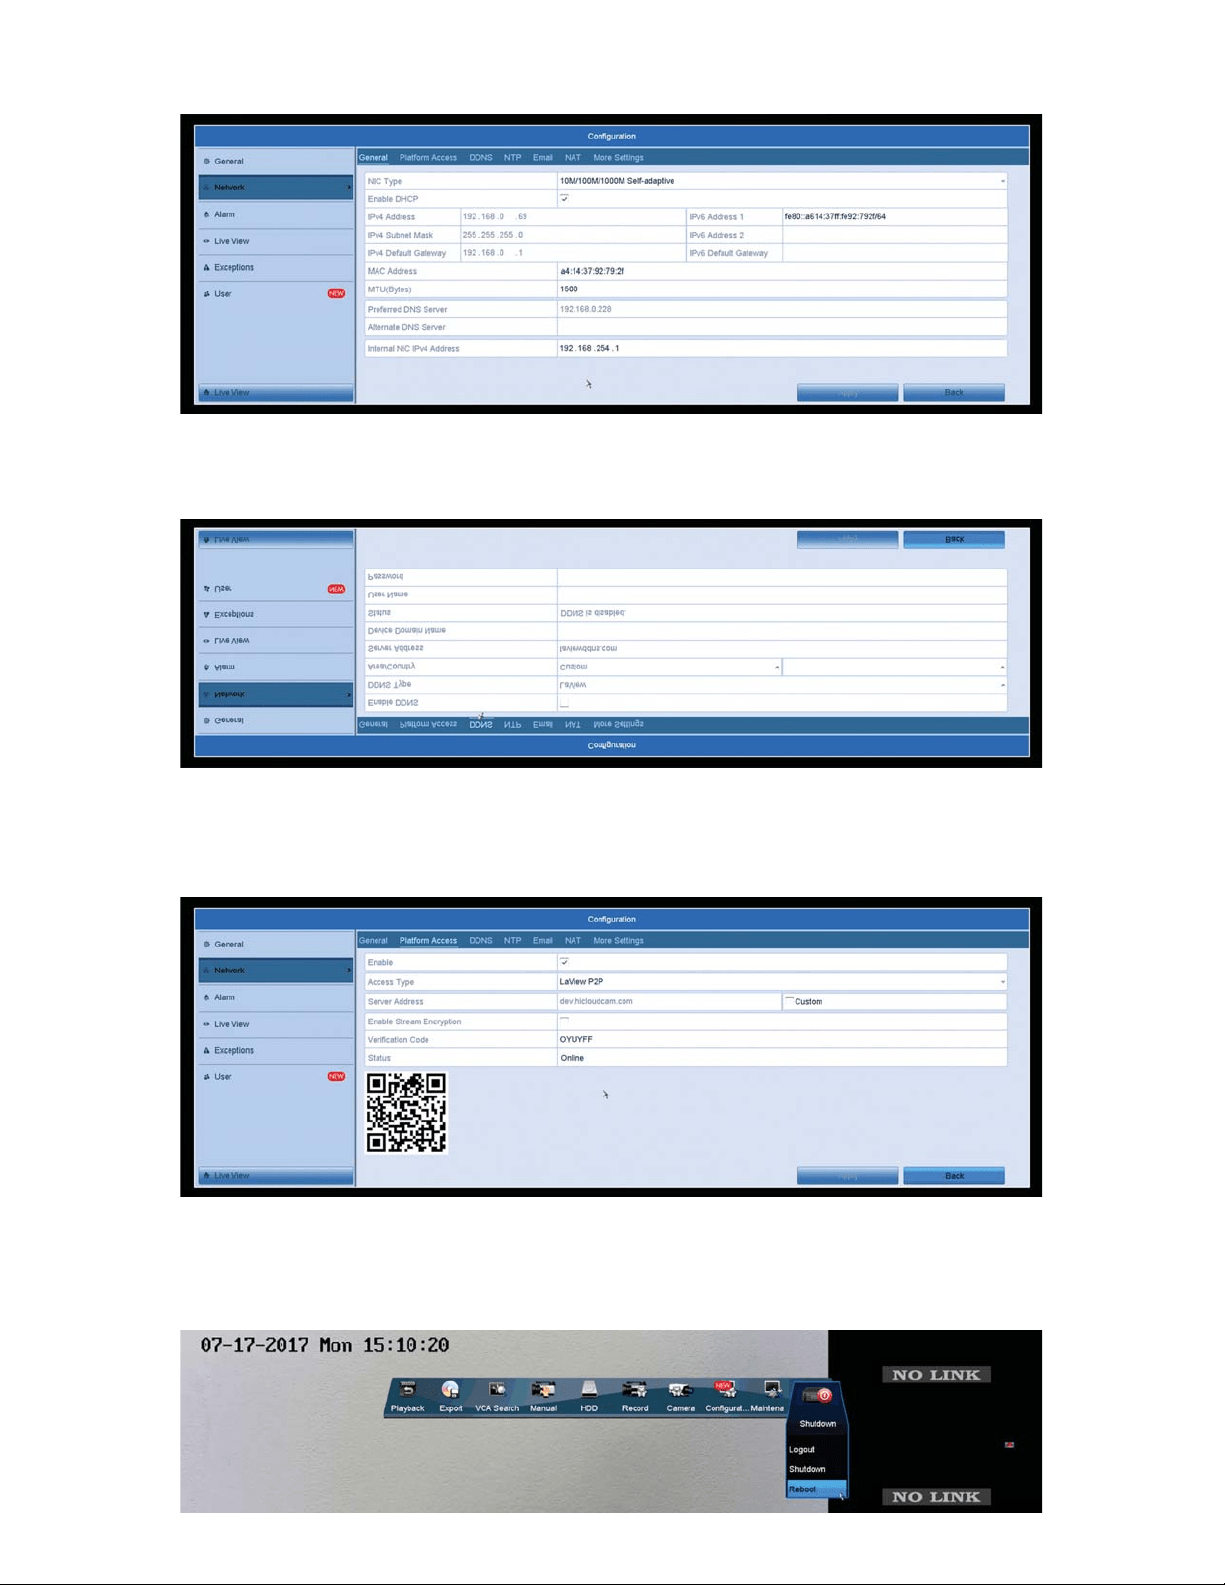
&OLFNRQWKHȤ&RQˋJXUDWLRQȥLFRQ7KHQFOLFNRQWKHȤ1HWZRUNȥRSWLRQ
16
,QWKH1HWZRUN&RQˋJXUDWLRQPHQXZHZDQWWRPDNHVXUHWKHȤ(QDEOH
“DHCP” box is checked.
4. Then click on “DDNS” at the top. In here, we want to make sure the “Enable
DDNS” box is not checked.
5. Then click on “Platform Access” at the top. We want to make sure the
“Enable” box is checked and make sure “Enable Stream Encryption” is not
checked. At the bottom, we also want to make sure your “Status” says Online.
- If your status does not say Online, right click back to the Main Menu and click on the
“Shut Down” Icon and click on the “Reboot” option. Once the system restarts, check
the “Status” under the “Platform Access” section.
17
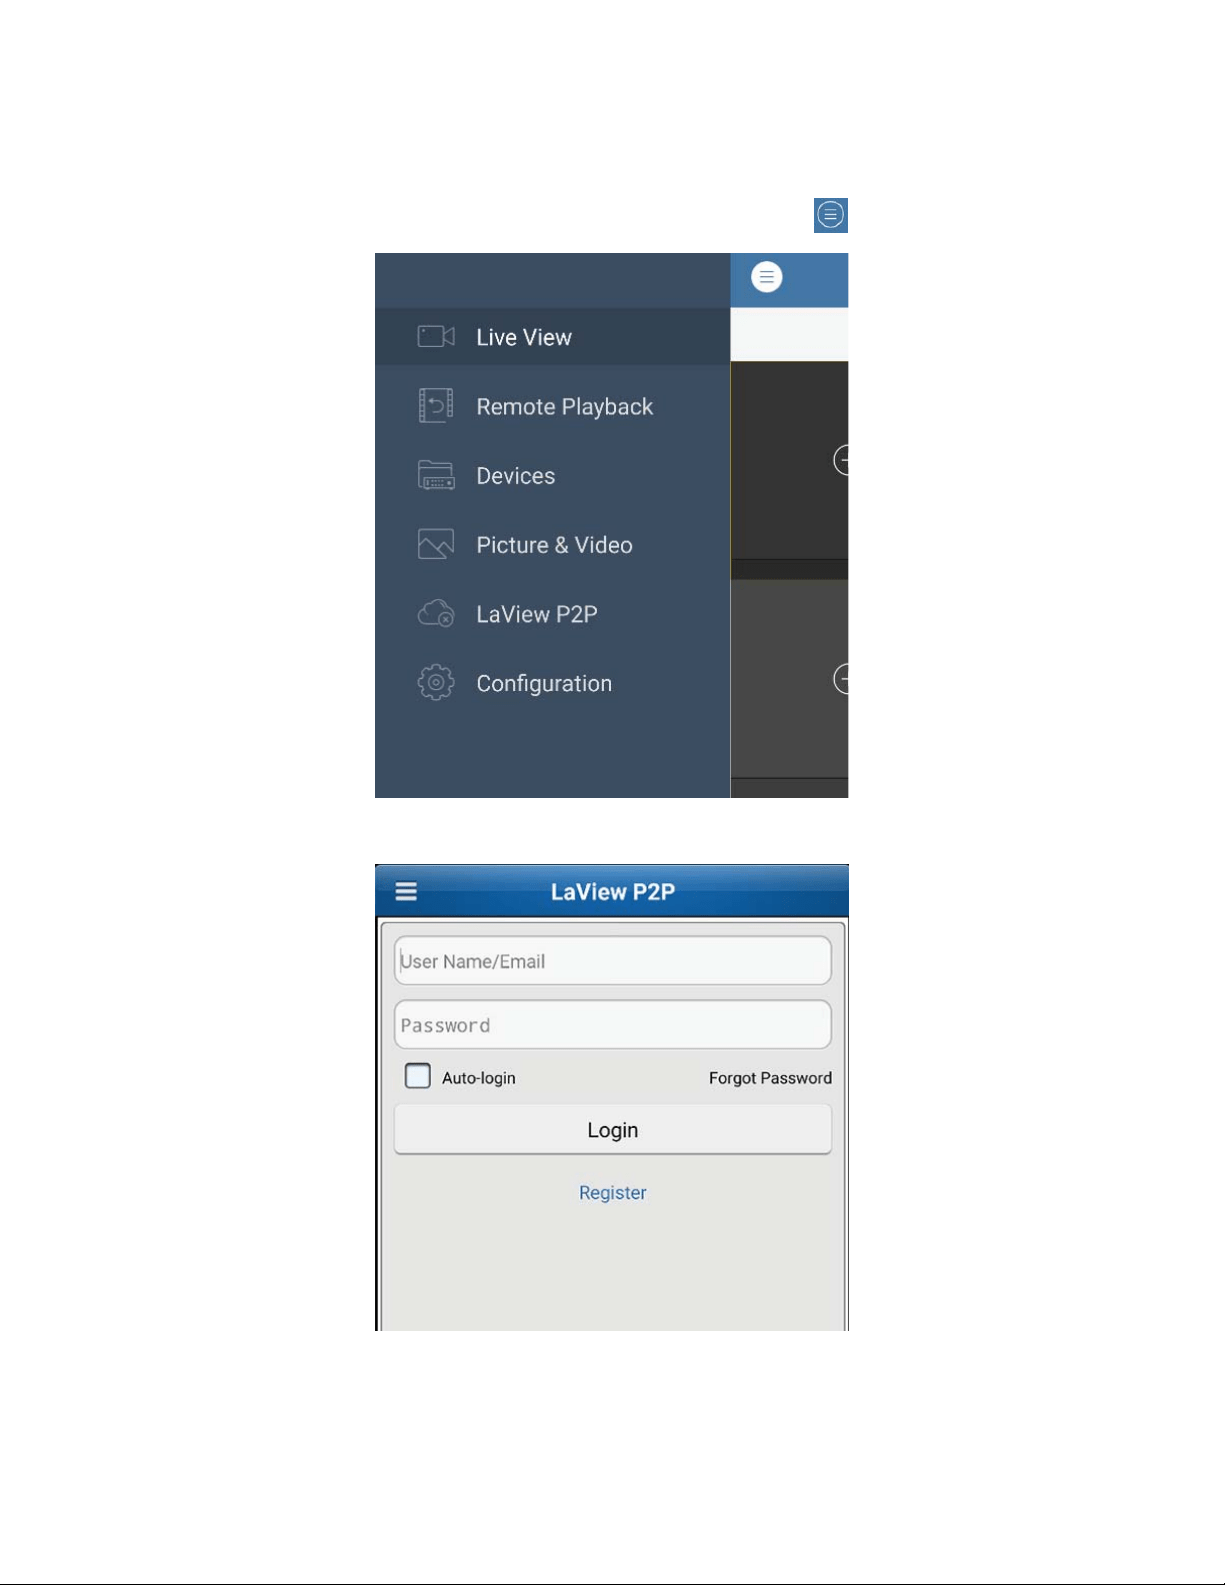
We will now go to the smart phone for the rest of the setup.
*RWRWKH$SS6WRUHDQGGRZQORDG/D9LHZ1HW
7. Open the LaView NET app. Click on the Menu icon tap LaView P2P.
,Q/D9LHZ33FOLFN5HJLVWHU
(QWHU\RXUHPDLODGGUHVVDQGYHULˋFDWLRQSLFWXUHVHHQLQFRORU7KHYHULˋFDWLRQ
SLFWXUHZLOOEHWRWKHULJKWKDQGVLGHRIWKHȤ9HULˋFDWLRQ&RGHȥˋHOG<RXFDQ
tap on the picture to generate a new code, if you cannot read the one you
KDYH,QRXUH[DPSOHLWLVȤ&0%/ȥ7DSȤ*HW9HULˋFDWLRQ&RGHȥRQFH\RXKDYH
HQWHUHGLQDOOˋHOGV$QHPDLOZLWKDYHULˋFDWLRQFRGHZLOOEHVHQWWRWKH
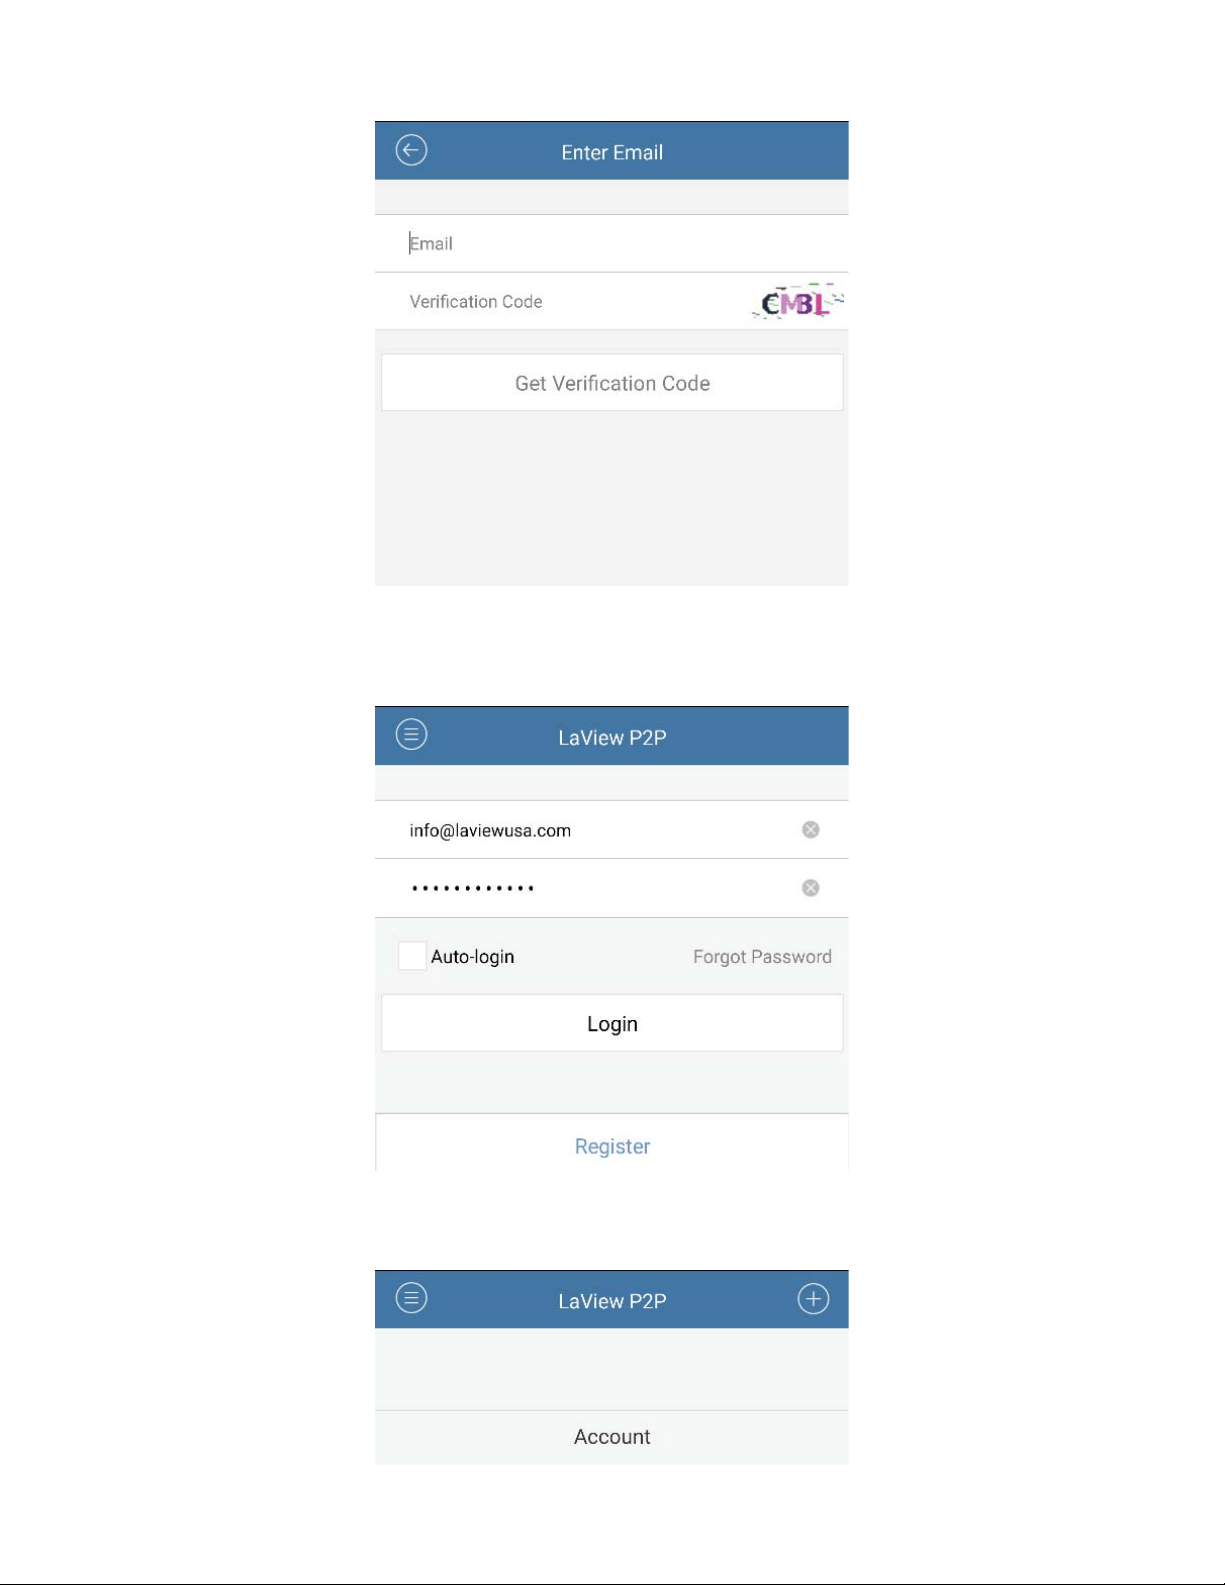
18
email address you provided. Create username and password after entering
\RXUYHULˋFDWLRQFRGH
10. Login using email/username and password you just created. Enable
“Auto-login”.
11. Tap the (+) icon to add a device to the account.
19
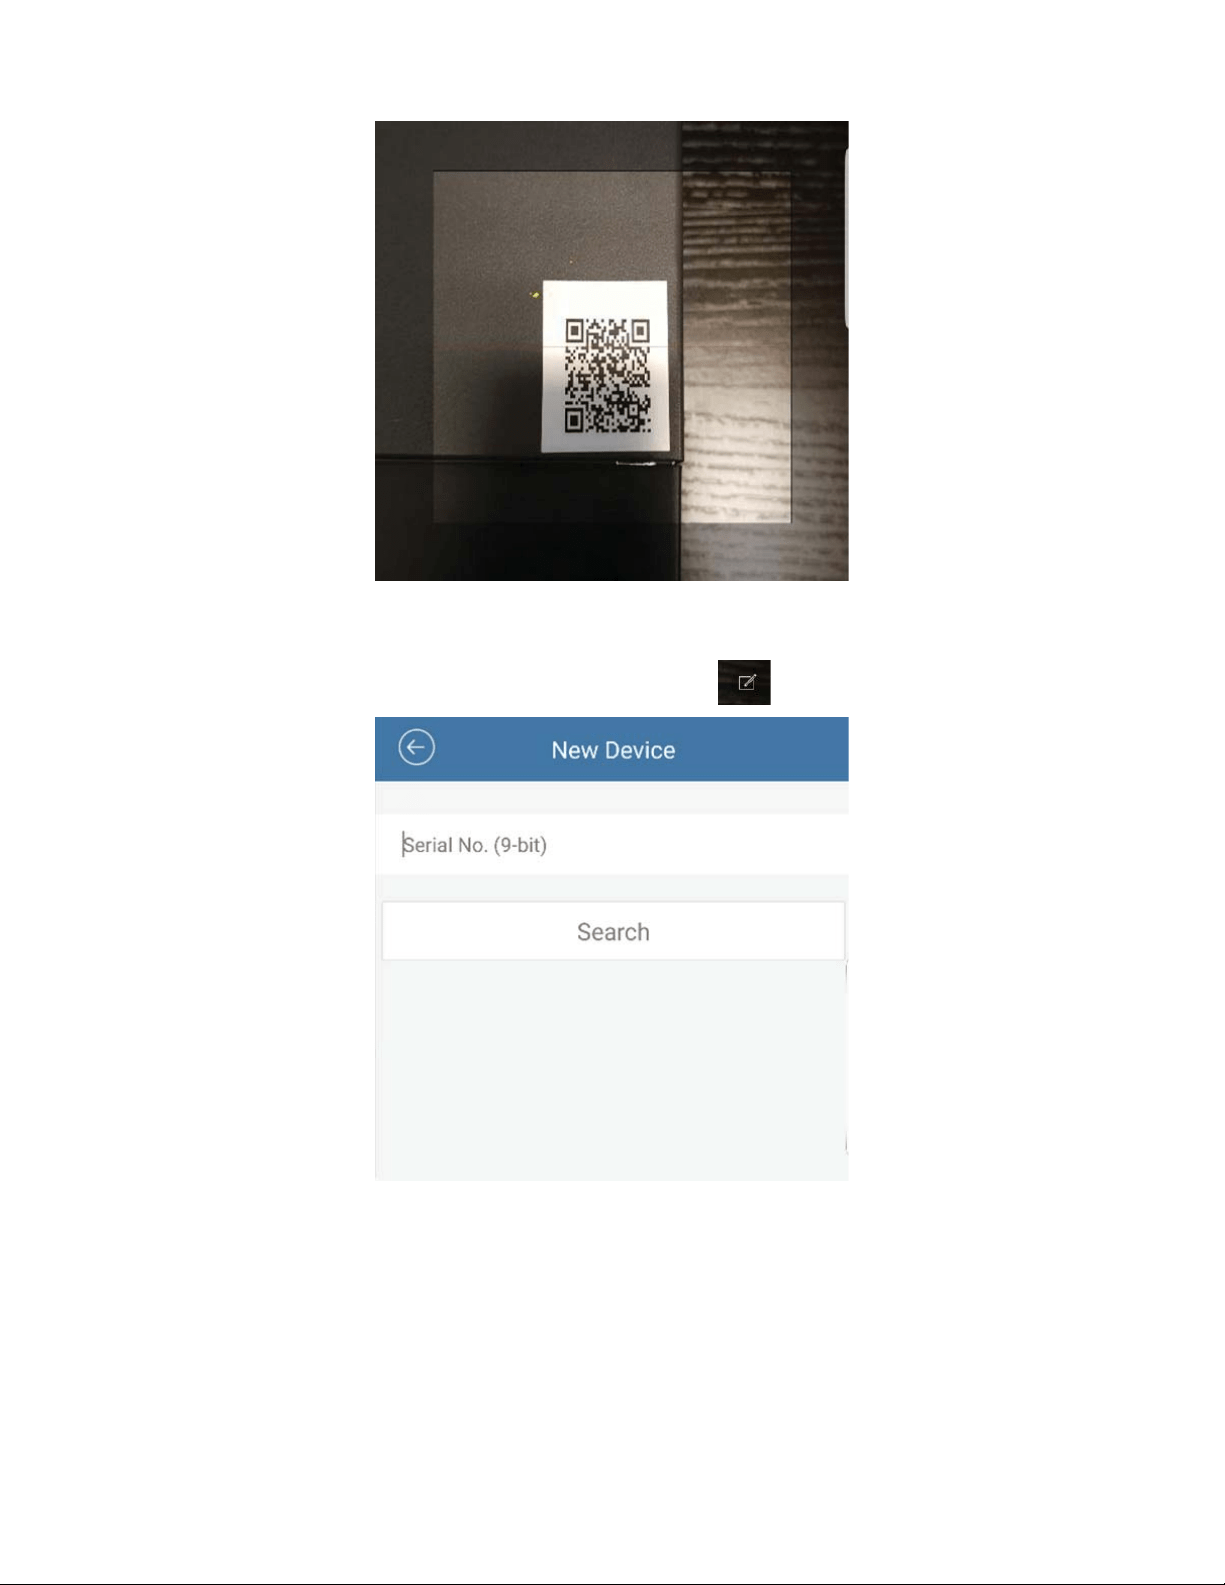
12. Scan the QR code on top of the system.
,I\RXUV\VWHPLVGLIˋFXOWWRJHWWRRU\RXGRQRWKDYHWKH45&RGHVWLFNHU
tap on the manual add icon at the top right.
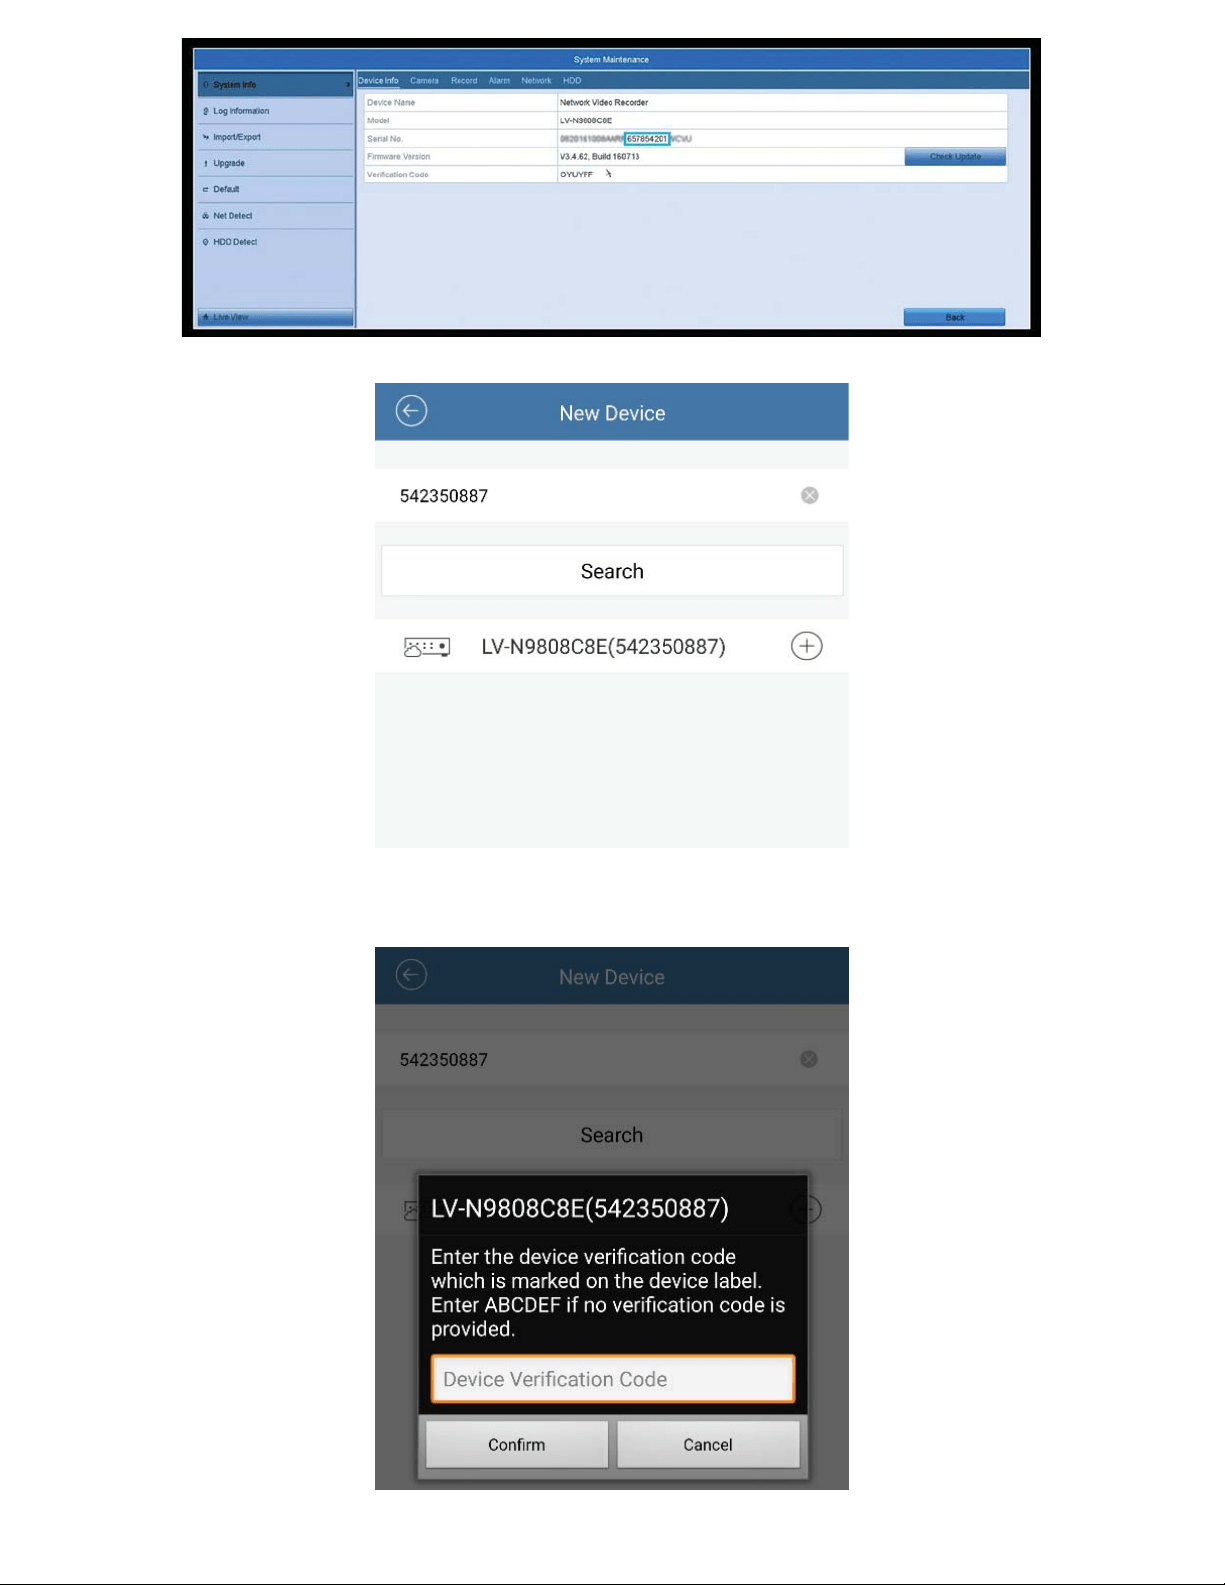
- Then we will need to go into the NVR’s menu to get the 9-bit Serial Number.
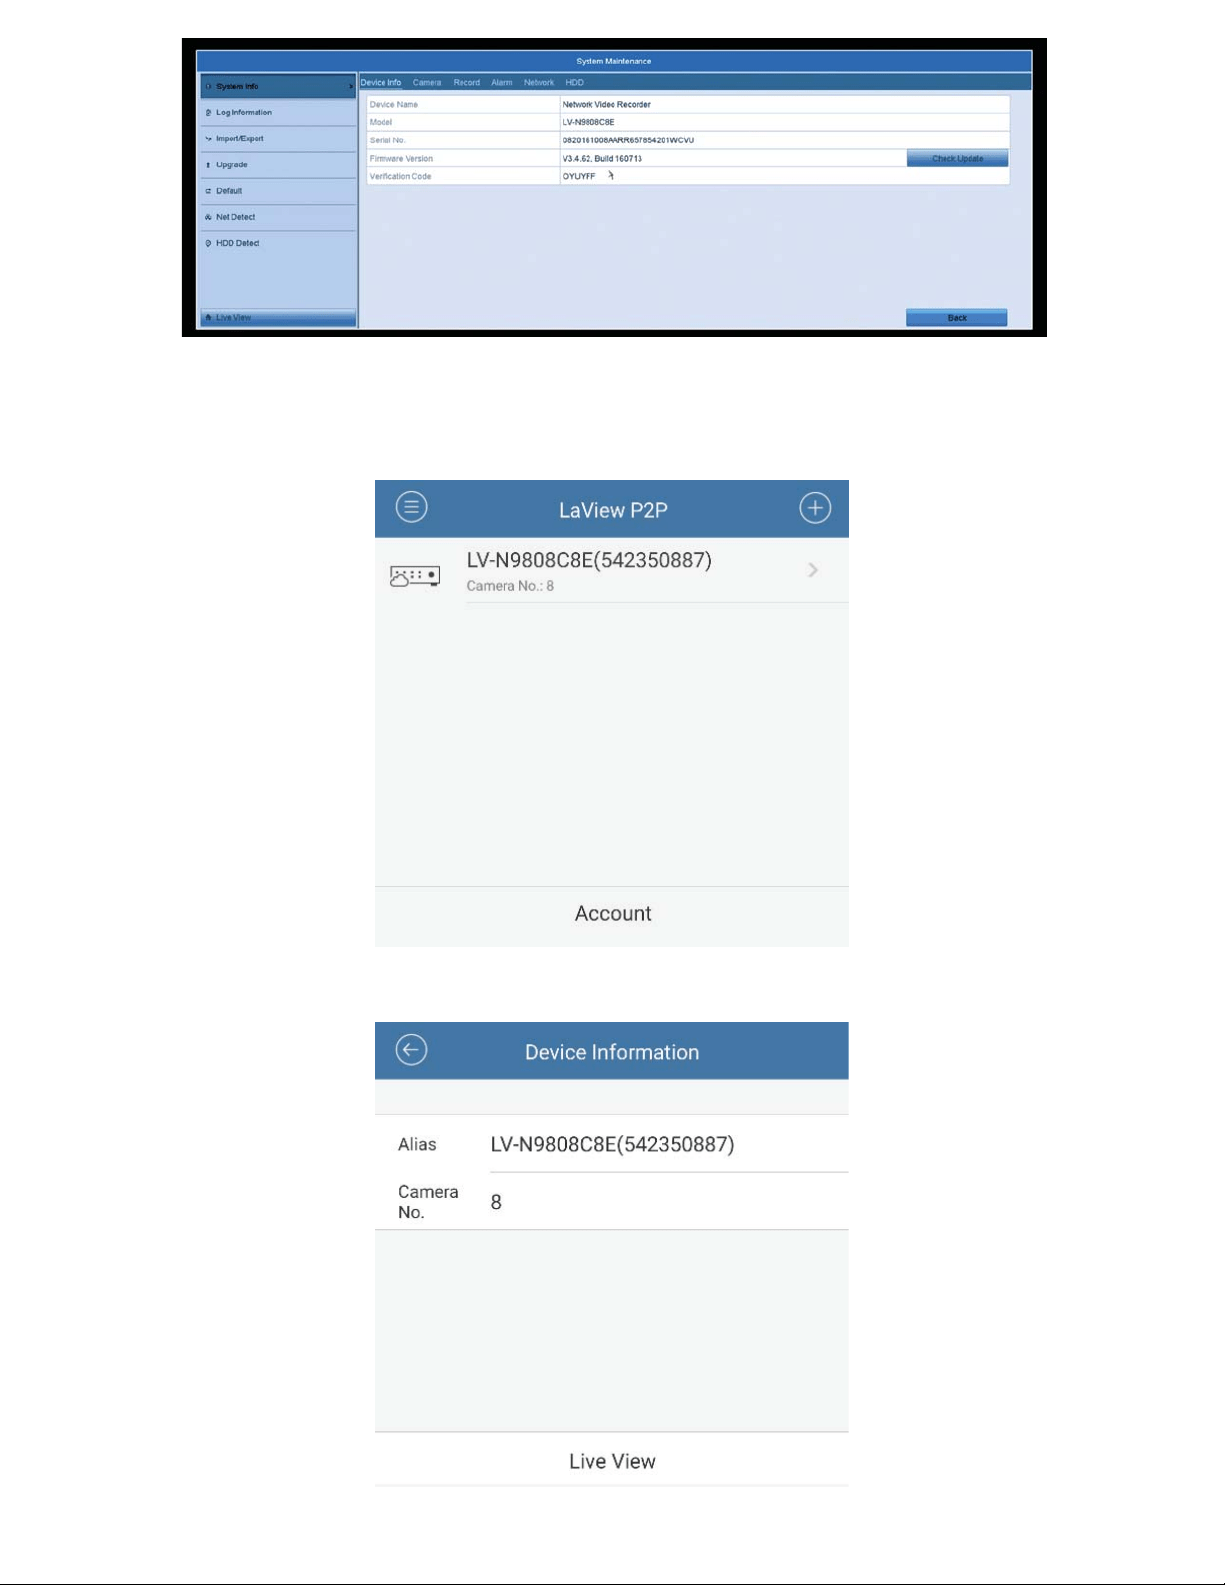
*RWR0DLQ0HQX!0DLQWHQDQFH!6\VWHP,QIR,QWKDWPHQX\RXZLOOKDYHD
Ȥ6HULDO1Rȥ<RXZLOORQO\QHHGWRHQWHUWKHODVWQXPEHUVRIWKH6HULDO1R
Do not include any letters. Once you have entered the serial number into
phone app, click “Search” and proceed to step 13.
20
13. Tap the (+) symbol to add your system.
(QWHUWKHYHULˋFDWLRQFRGHIRXQGLQ0DLQ0HQX!0DLQWHQDQFH!6\VWHP
,QIRDQGLWZLOOEHWKHȤ9HULˋFDWLRQ&RGHȥ
21
,I\RXFDQQRWˋQGLWZLWKLQWKHPHQXWKHYHULˋFDWLRQFRGHVKRXOGEHRQWKH
label of your NVR. Located either on the bottom or side.
15. Tap on the newly added device.
16. Press “Live View” at the bottom and be sure to enjoy your LaView system.
22
(PDLO1RWLˋFDWLRQV
7RVHWXS(PDLO1RWLˋFDWLRQVWREHVHQWWR\RXZKHQPRWLRQLVGHWHFWHG
follow these steps:
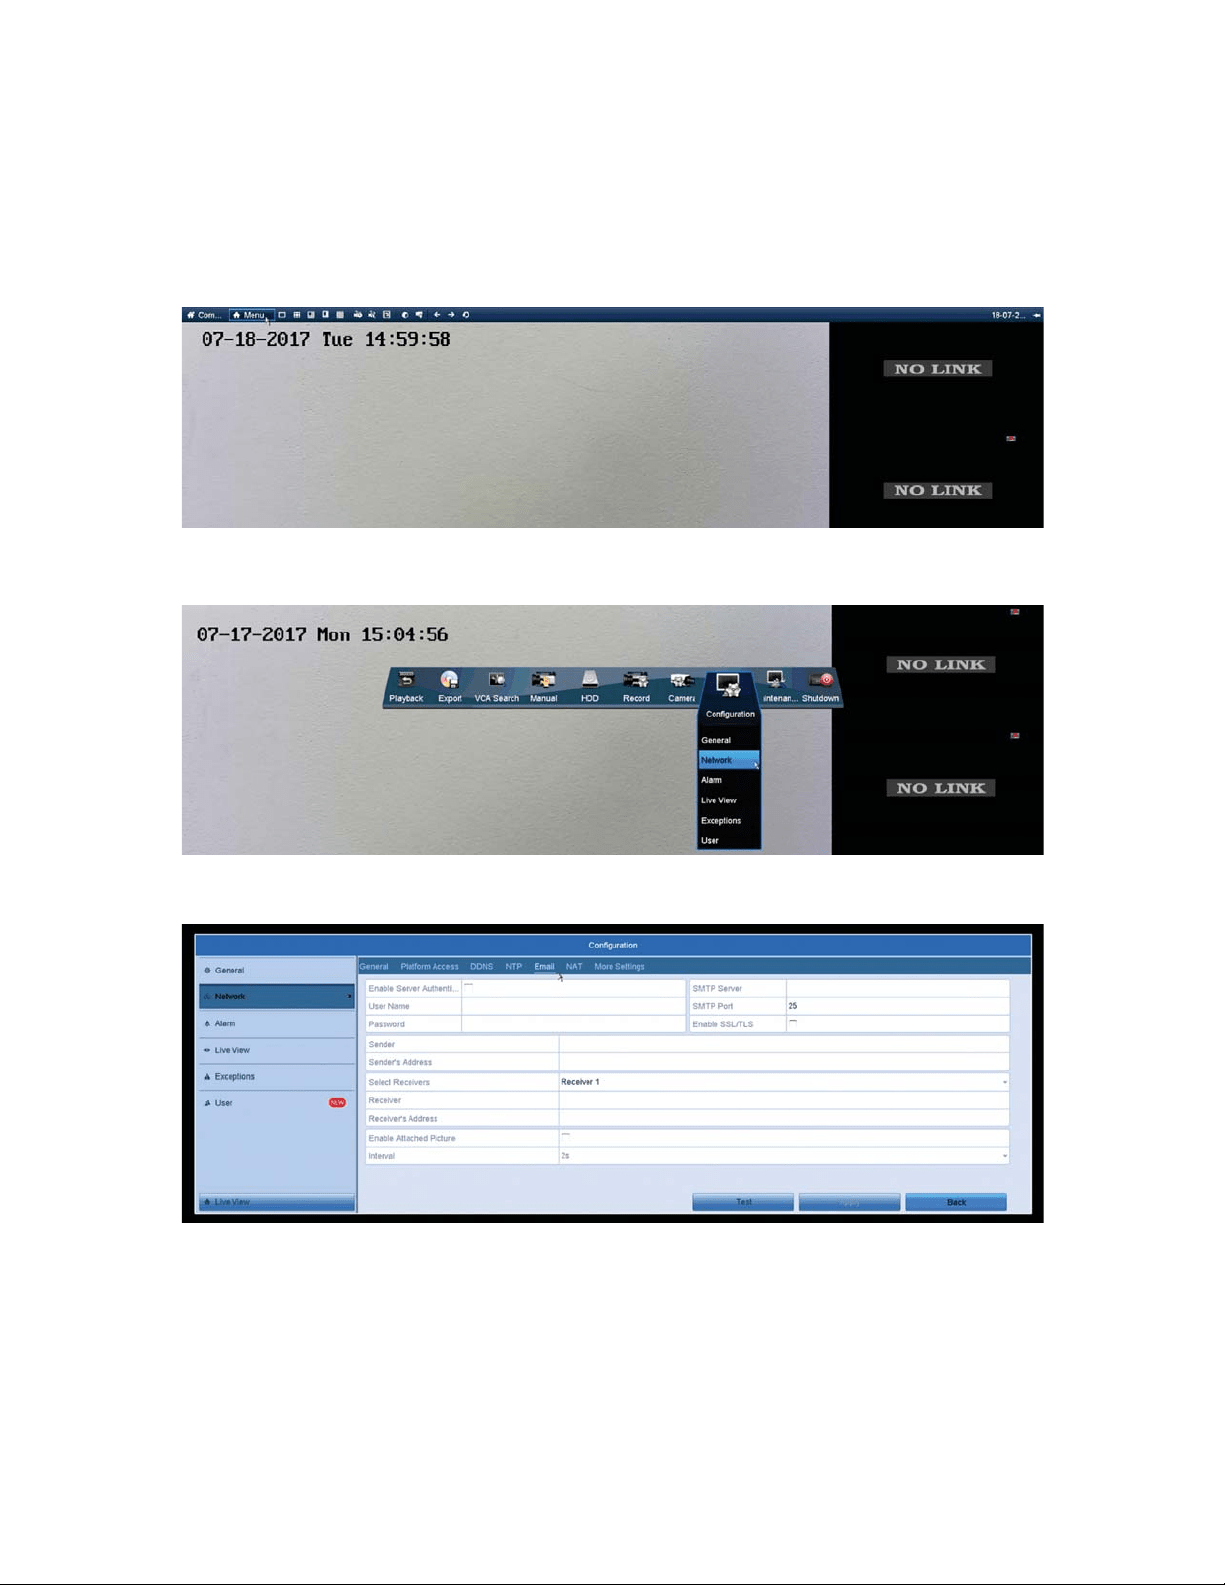
1. Open the Main Menu by hovering the mouse over the top of the screen and
clicking on the “Menu” button.
&OLFNRQWKHȤ&RQˋJXUDWLRQȥ,FRQ7KHQFOLFNWKHȤ1HWZRUNȥRSWLRQ
3. Then click on the “Email” tab at the top.
7KHQ\RXZLOOZDQWWRˋQGWKH2XWJRLQJ60736HWWLQJVIRU\RXUHPDLO
VHUYLFH:HZLOOEHXVLQJ*PDLOIRUQRZ7KH6HWWLQJVDUHDVIROORZHG
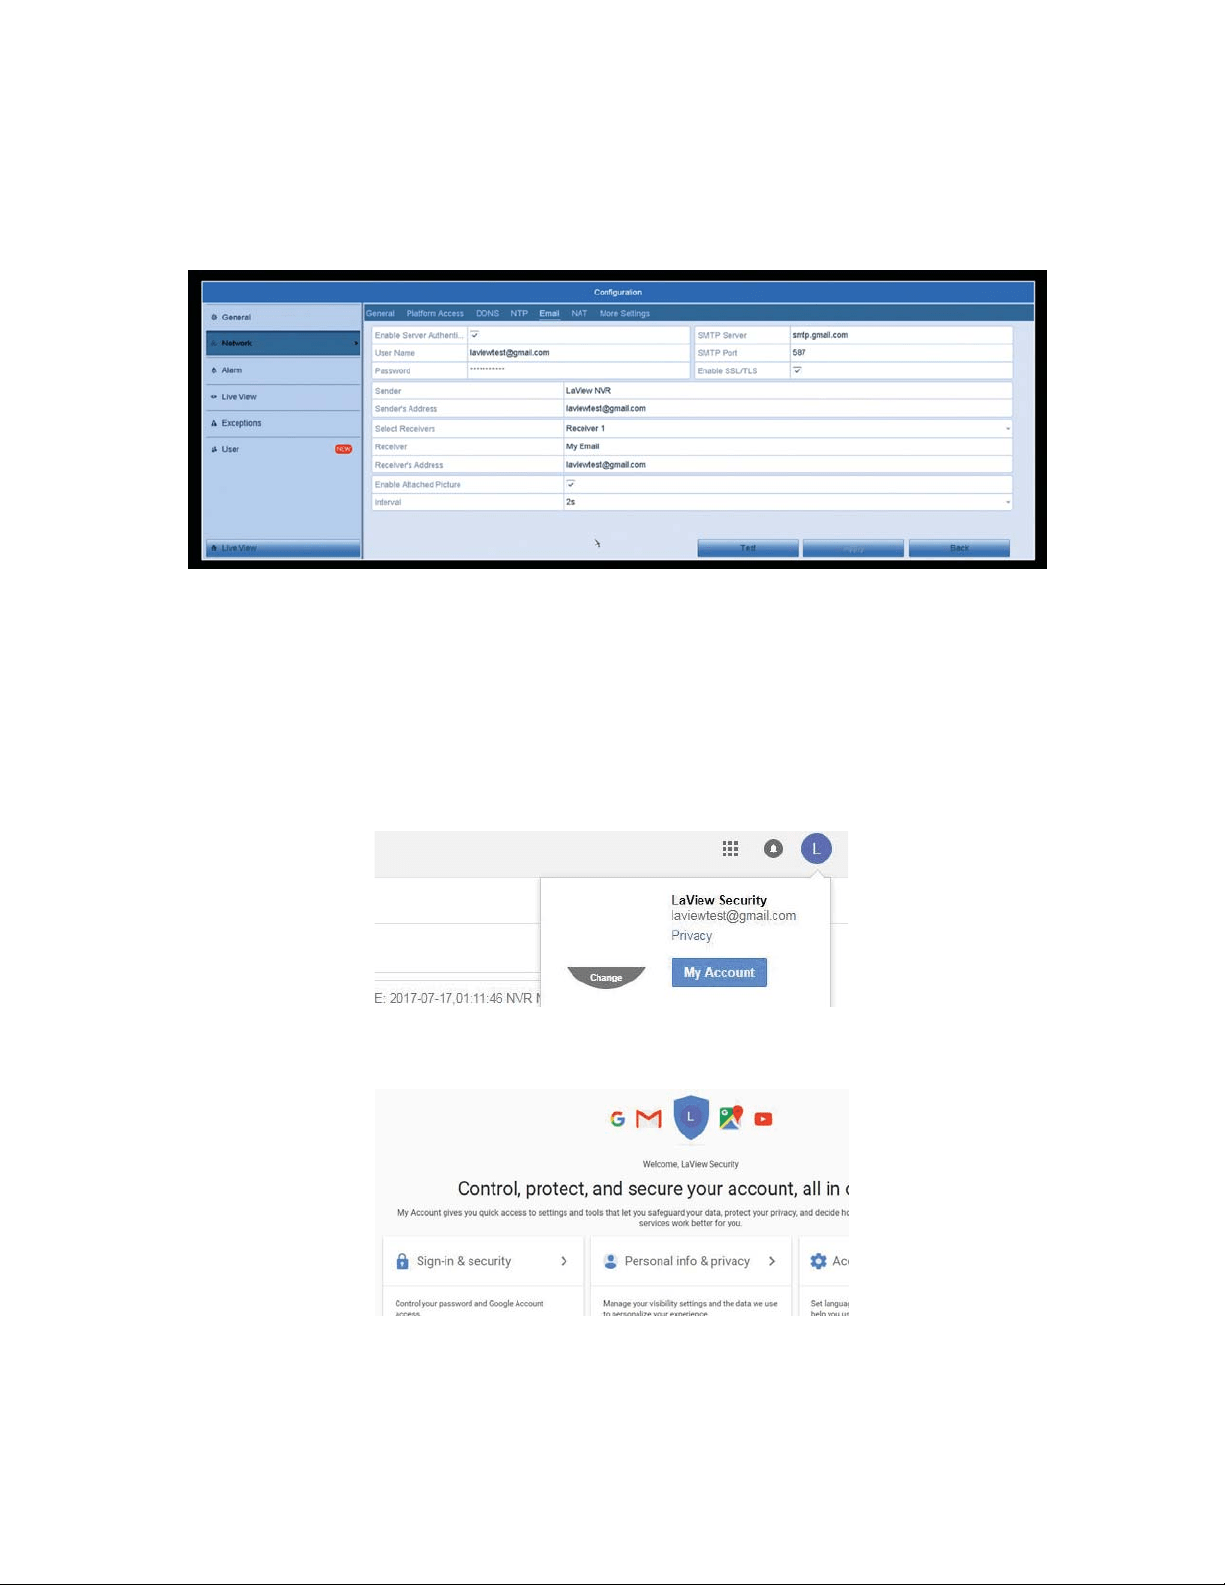
- Enable Server Authentication checked
8VHUQDPH<RXU(PDLO$GGUHVV
- Password: Password for your Email, as if you were logging into your Email
account.
- SMTP: Outgoing SMTP address for your Email service
- Enable SSL/TLS Checked
23
- Sender: Sender Name when you receive the email.
6HQGHUȢV$GGUHVV<RXU(PDLO$GGUHVV
5HFHLYHU1DPHIRUZKRLVUHFHLYLQJWKH(PDLO1RWLˋFDWLRQ
5HFHLYHUȢV$GGUHVV(PDLODGGUHVVZKHUH\RXZDQWWKH(PDLO1RWLˋFDWLRQ
sent to.
- Enable Attached Picture Checked
- Interval: 2s
5.Once all the Email Settings are entered click apply at the bottom.
*PDLOKDVDQRWKHUVHFXULW\VWHSWRJRWKURXJKVRPHHPDLOVGRQRWKDYHWKLV
so please check with your email provider.
6. Using a computer, go to www.gmail.com and log into your account.
7. Click on the top right icon, then click on “My Account”.
&OLFNRQȤ6LJQLQ6HFXULW\ȥ
24
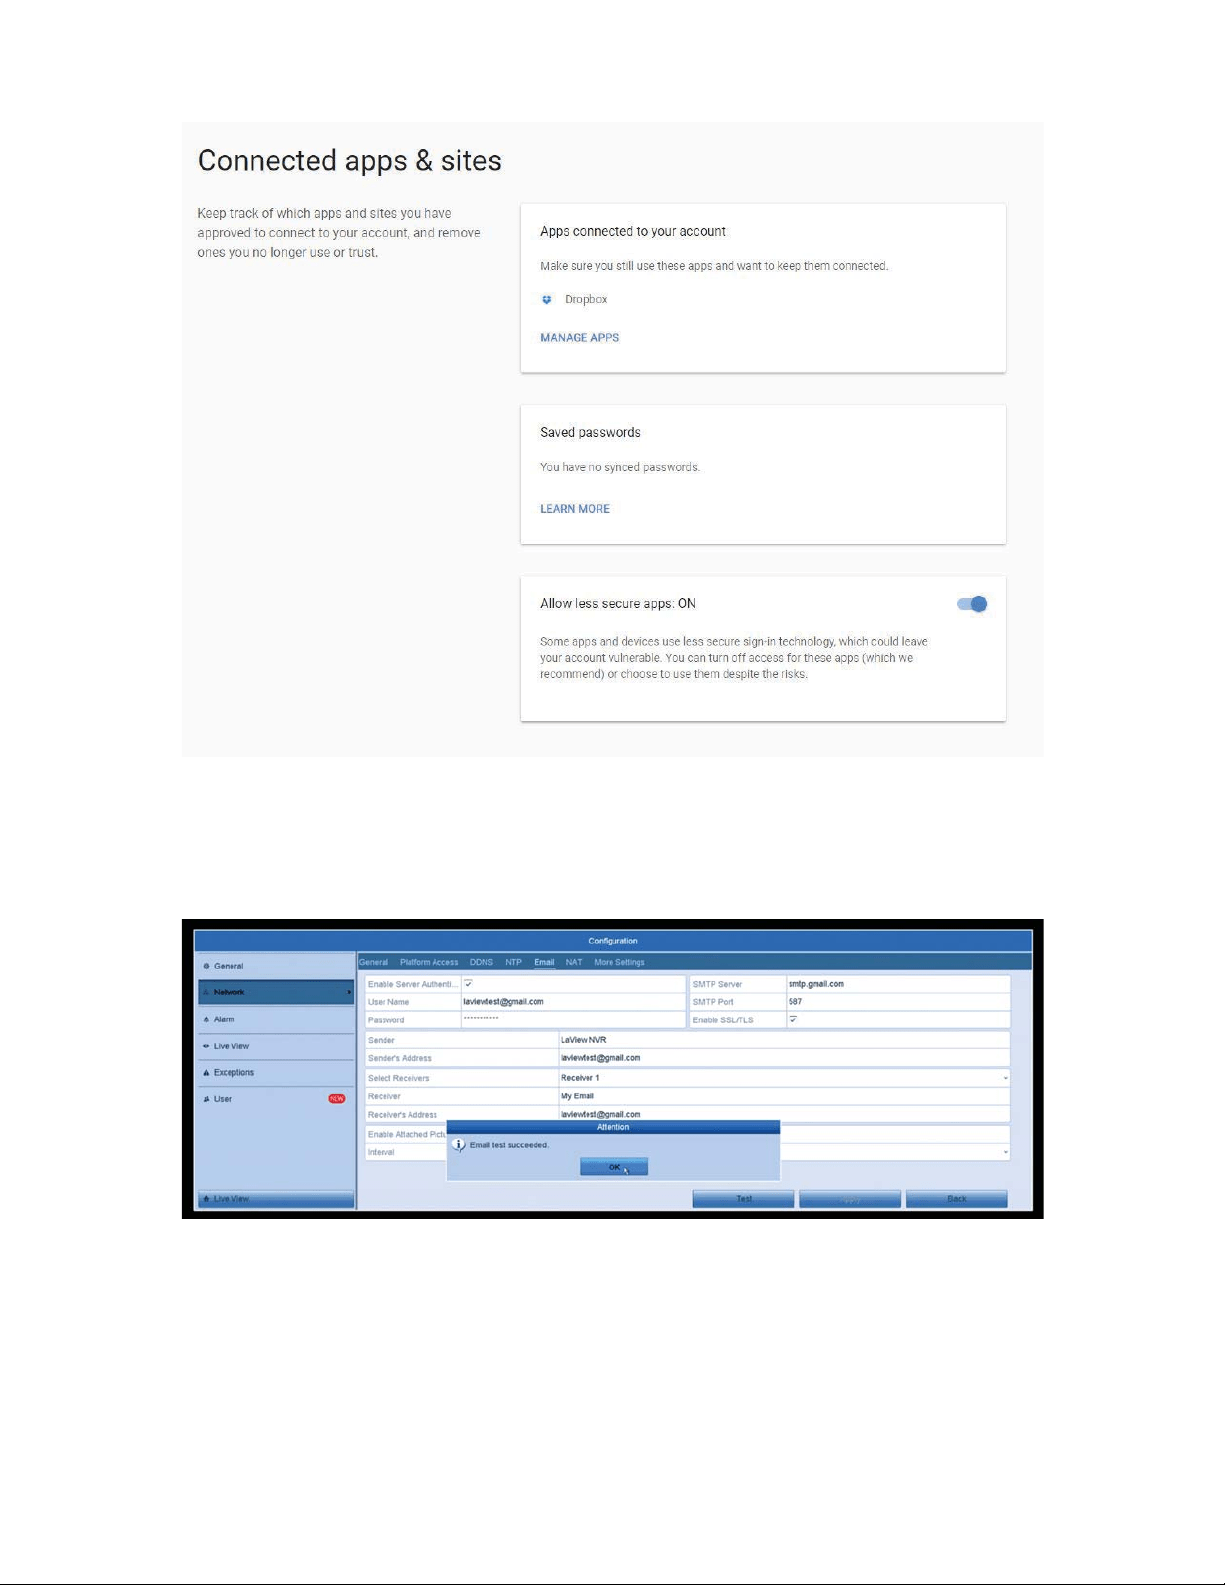
9. Once in the Security options, scroll all the way down and turn on “Allow
Less Secure Apps” Under the “Connected Apps & Sites” section.
10. Then go to back to the NVR’s Email Settings. At the bottom click on “Test”
DQG\RXVKRXOGJHWDȤ7HVW6XFFHHGHGȥ1RWLˋFDWLRQ,I\RXUWHVWIDLOVSOHDVH
check all SMTP settings from your provider and make sure the password is
correct.
7KH195ZLOOQRZVHQG(PDLO1RWLˋFDWLRQVRXWIURPHDFKFKDQQHOWKDW
has Motion Detection Enabled and the “Linkage Action” is setup for Email
1RWLˋFDWLRQV
*Notes:
1. If you want to check your “Linkage Action” settings, please see Steps 5 & 6
in the Motion Detection Section.
25
2. The SMTP settings should be very similar to other email services, but
stated in step 6, not all email services have the “Allow Less Secure” option. Or
it can be called something different, we recommend contacting your email
SURYLGHULI\RXDUHKDYLQJWURXEOHˋQGLQJWKLV
3XVK1RWLˋFDWLRQV
,I\RXȢGOLNHWRVHWXSSXVKQRWLˋFDWLRQVWR\RXUSKRQHSOHDVHIROORZ
these steps:
3OHDVHQRWH3XVKQRWLˋFDWLRQVZLOORQO\ZRUNZKLOH\RXȢUHXVLQJ3RUW)RUZDUGLQJ,I
you are only using our P2P service, they will not push to your phone. Please contact
your internet provided or router manufacturer for port forwarding instructions.)
)RU3XVK1RWLˋFDWLRQVWRZRUN\RXU0RWLRQ'HWHFWLRQVHWWLQJVVKRXOGDOO
be enabled and correctly setup. Please refer to the Motion Detection section
for in-depth instructions. At step 6 in the Motion Detection section, we want
to make sure each channel has “Notify Surveillance Center” checked. This
RSWLRQLVXVHGIRU3XVK1RWLˋFDWLRQV2QFHWKLVRSWLRQLVHQDEOHGIRUHDFK
channel, and your motion detection settings are setup we will move to the
phone app, LaView Net.
2. Since we must use Port Forwarding, we will be adding your system via IP
Address. Tap the Menu icon on the top right then “Devices” and press the (+)
on the top right, choose “Manual Adding”.
26
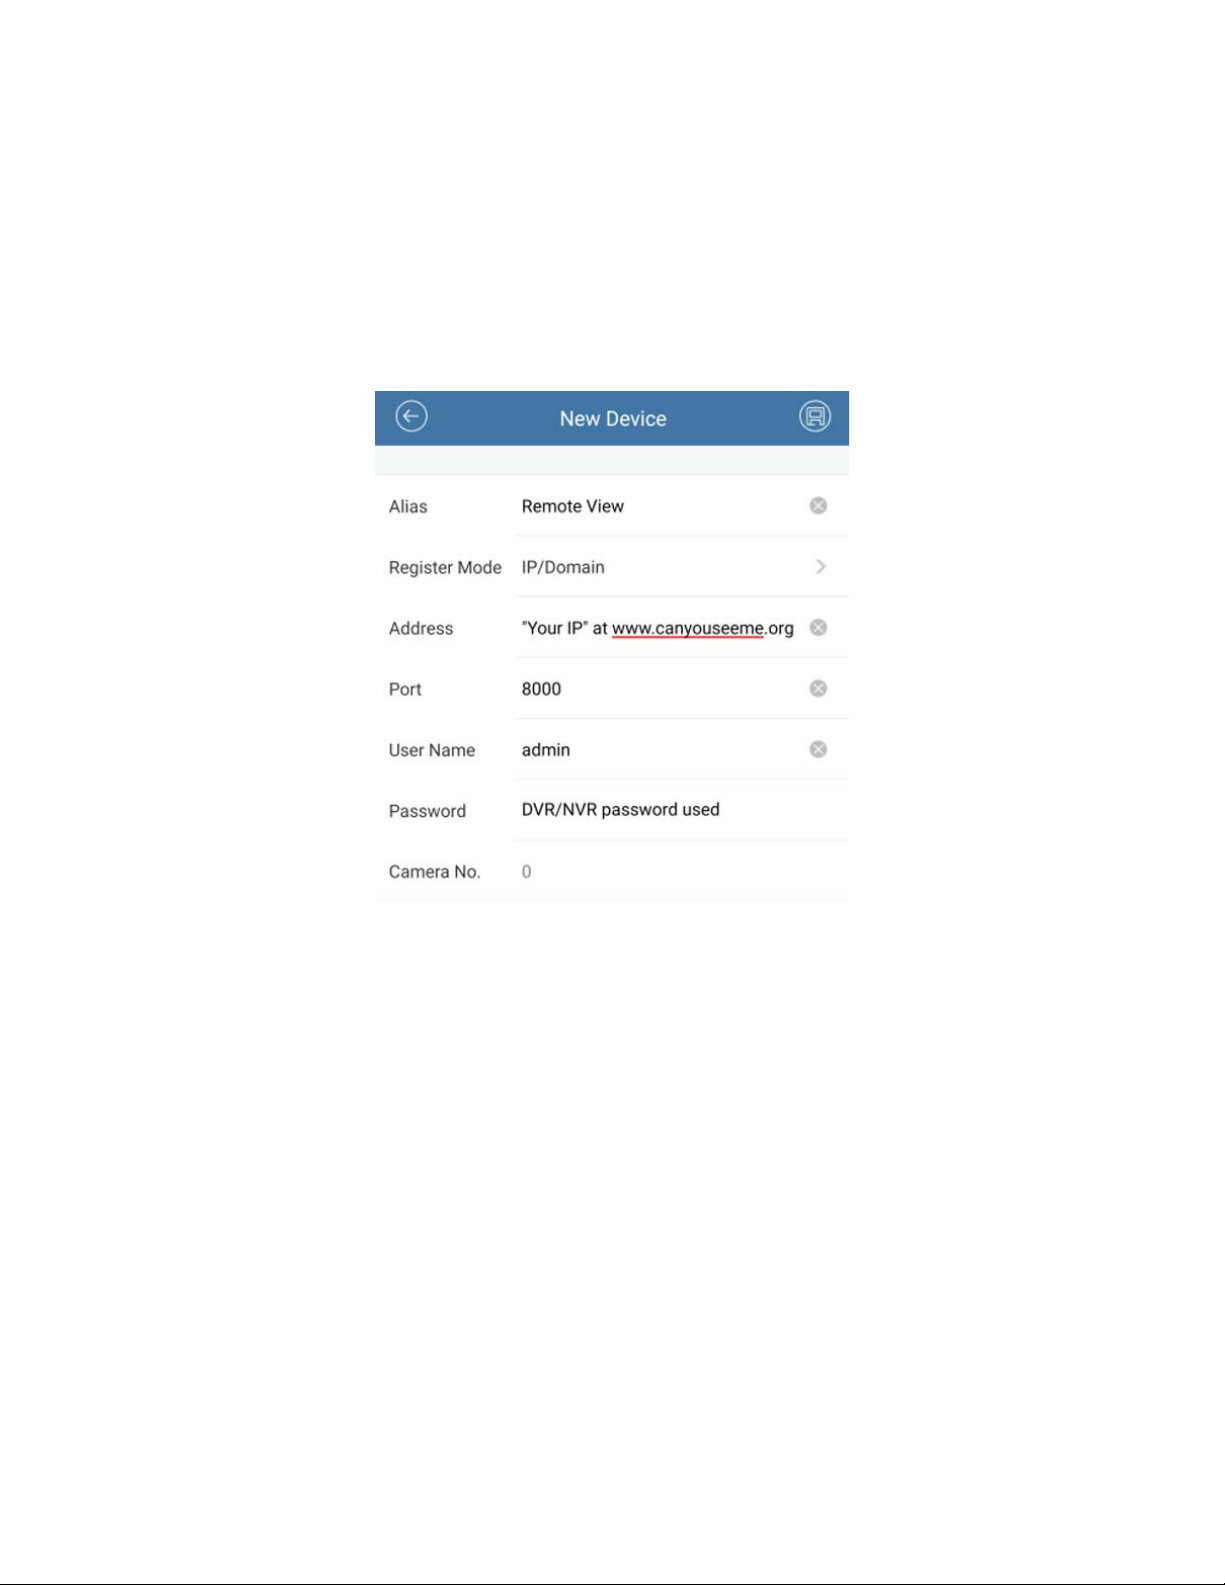
3. Now enter the following information to add your NVR:
a. Alias: Remote View
b. Register Mode: IP/Domain
F$GGUHVV,3DGGUHVVVKRZQXQGHUȤ<RXU,3ȥDWZZZFDQ\RXVHHPHRUJ0DNH
sure you are at DVR location for this step)
G3RUW
e. User Name: admin
f. Password: DVR password
g. Camera No.: updates after “Save” on step 4.
4. Save on the top right.
5. Once you save, click on the “Start Live View” option that will appear at the
bottom.
2QFH\RXFRQˋUPWKDW\RXFDQYLHZ\RXUFDPHUDV\RXU195LVVXFFHVVIXOO\
DGGHGYLD,3$GGUHVV1RZZHZLOOVHWXSWKHSXVKQRWLˋFDWLRQV

27
7. Tap on the menu icon on the top left and go to “Alarm” then tap on “Set
$ODUP1RWLˋFDWLRQȥDWWKHERWWRP
7XUQRQWKHQRWLˋFDWLRQIRUWKHGHYLFHQHHGHG
:KHQPRWLRQLVGHWHFWHGDQRWLˋFDWLRQZLOODSSHDULQWKHQRWLˋFDWLRQEDU
tap it to check on motion alarms. (New alarms are in red)

28
10. Tap on the camera link icon to check the live view or the remote playback.
29
Advanced Settings
Password Reset
If you forget your password we can reset it, please follow these
instructions to do so:
1. Hover your mouse over the top of the screen and click on the “Menu”
option.
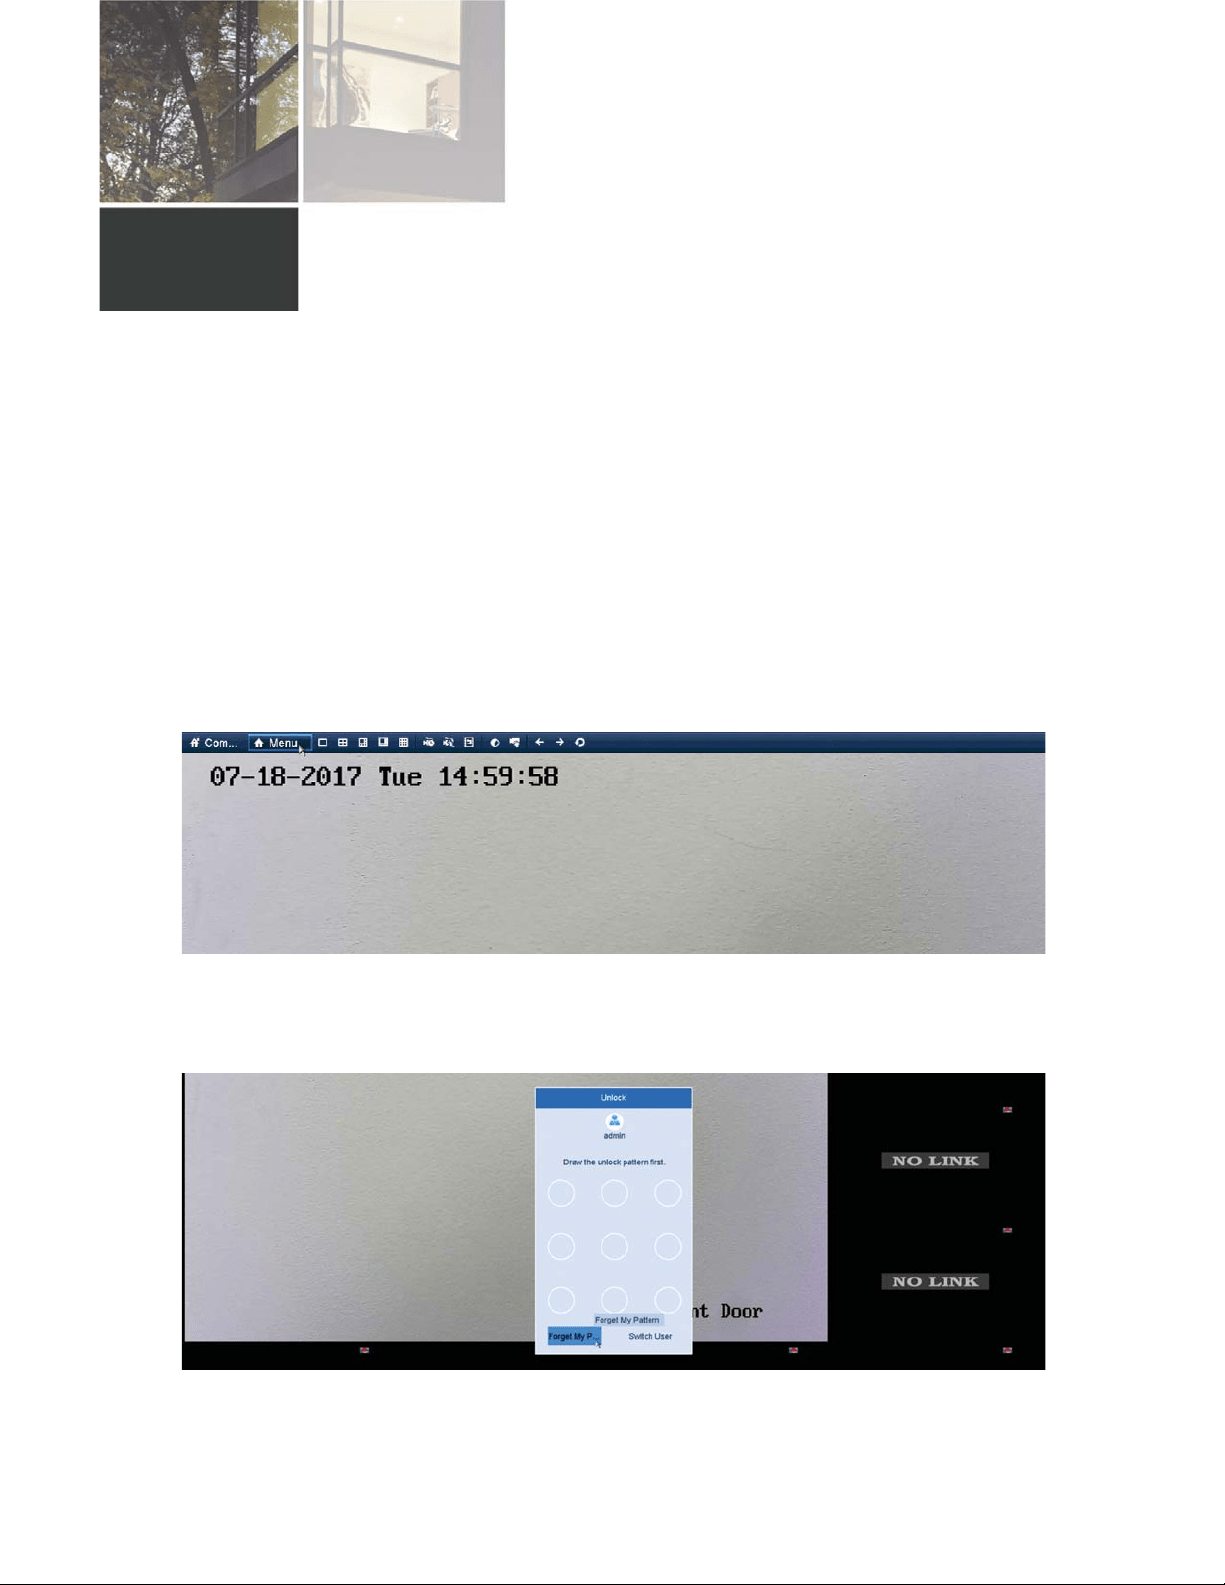
)RUQHZHUˋUPZDUHLWZLOODVN\RXWRGUDZ\RXUSDWWHUQ,I\RXGRQRWKDYH
the pattern, please skip this step. Click on the “Forgot My Pattern” option at
the bottom left.
<RXFDQQRZHQWHULQWKHSDVVZRUG\RXFUHDWHGZKHQˋUVWVHWWLQJXSWKH
system. If you do not remember this password either, we can reset this password.
LaView will need some information off your system before we can reset the

30
password. Double click on the bottom left hand corner of this screen.
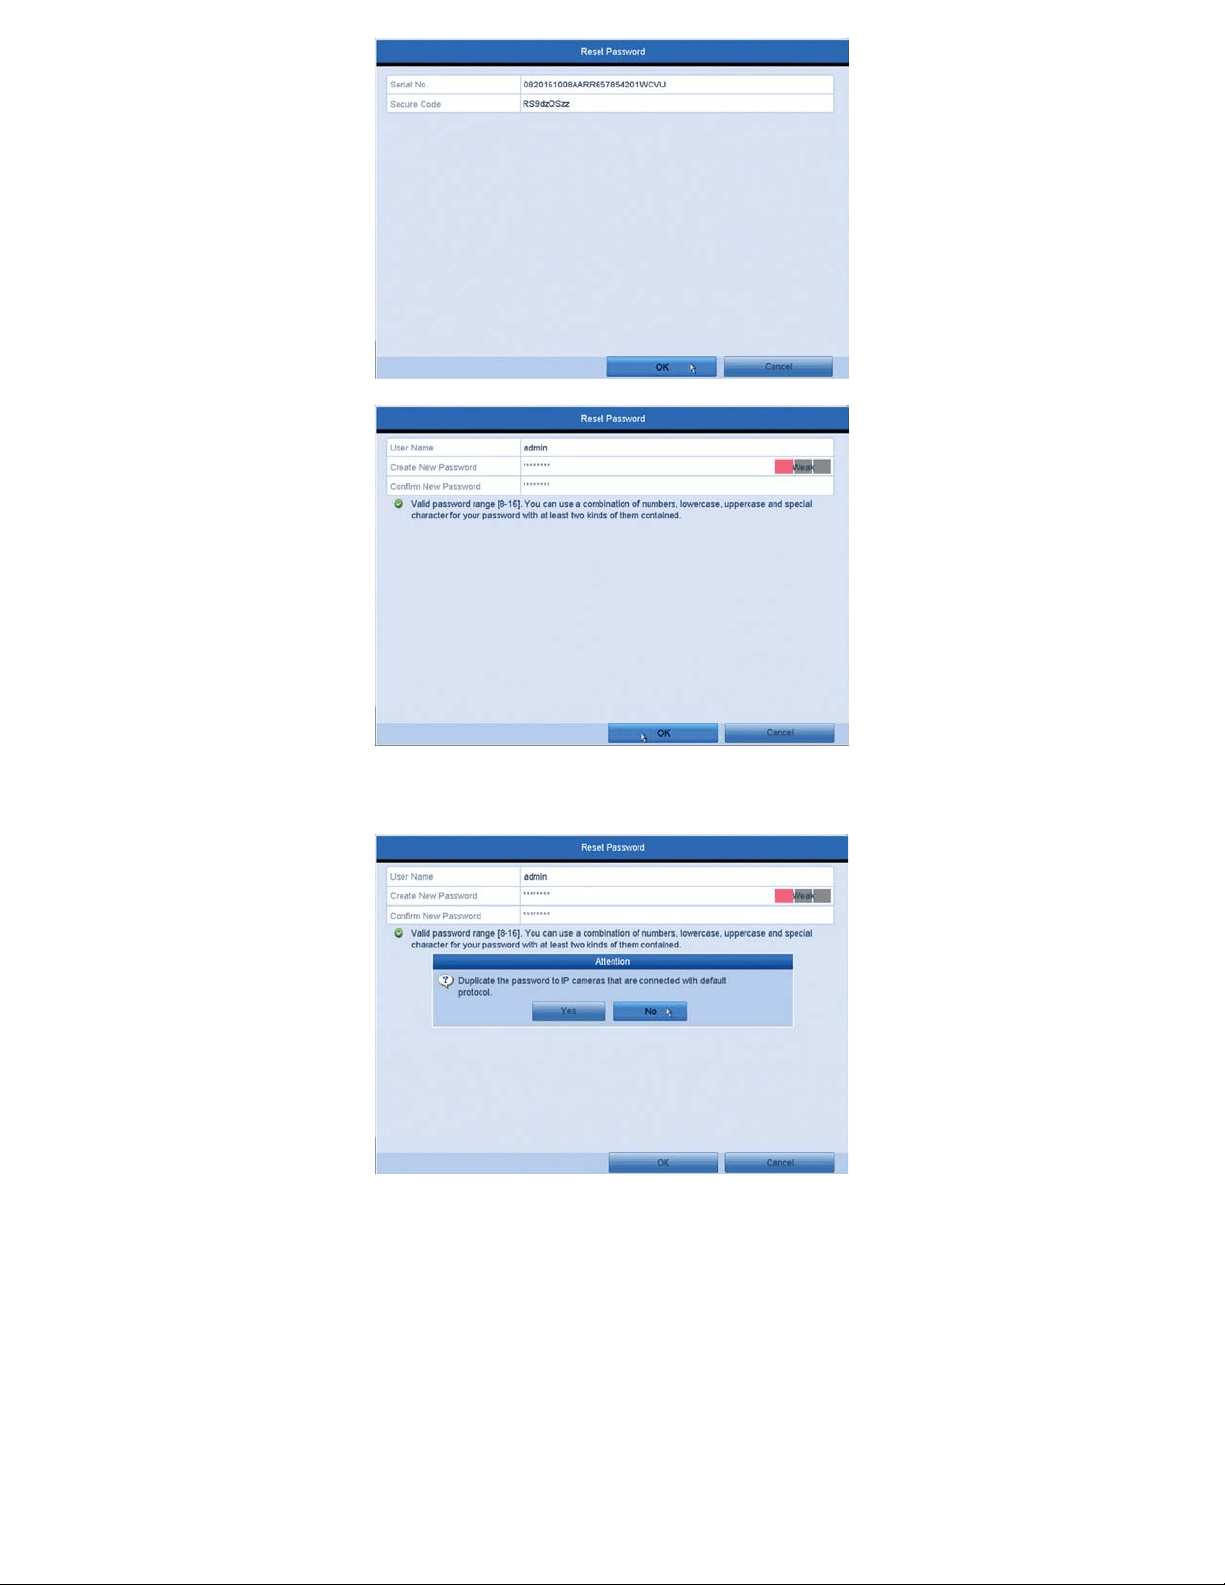
4. A “Serial No.” and a “Secure Code” sections will appear. Use your smart
phone to take a picture of this screen as the LaView Technicians will need
this information.
5. Right click and the screen will disappear. Use the mouse to hover over the
top of the screen, then hover over the date at the top right. LaView
Technicians will also need this date to reset the password. Use your smart
phone to take a picture of this date as well.
6. Once we have these two pieces of information please visit www.laviewse-
curity.com/contact and send this information to our technicians through a
ticket. One of our technicians will generate a “Secure Code” for you to enter
in into the screen in steps 3-4. The system will now ask you to create a new
password or reset the password to 12345. If you are creating a new password,
WKHQHZSDVVZRUGPXVWEHDWOHDVWFKDUDFWHUVDQGKDYHOHWWHUVDQG
numbers.
31
7. If you get a prompt asking if you’d like to duplicate the password to your
cameras, please select no.
Recording Parameters
The Recording Parameters section is used to modify the way each
channel is recording. This section is recommended for Advanced users,
to help modify the systems bandwidth/priority to each channel. The
default settings are optimized for performance and video quality of the
system and recordings.
32
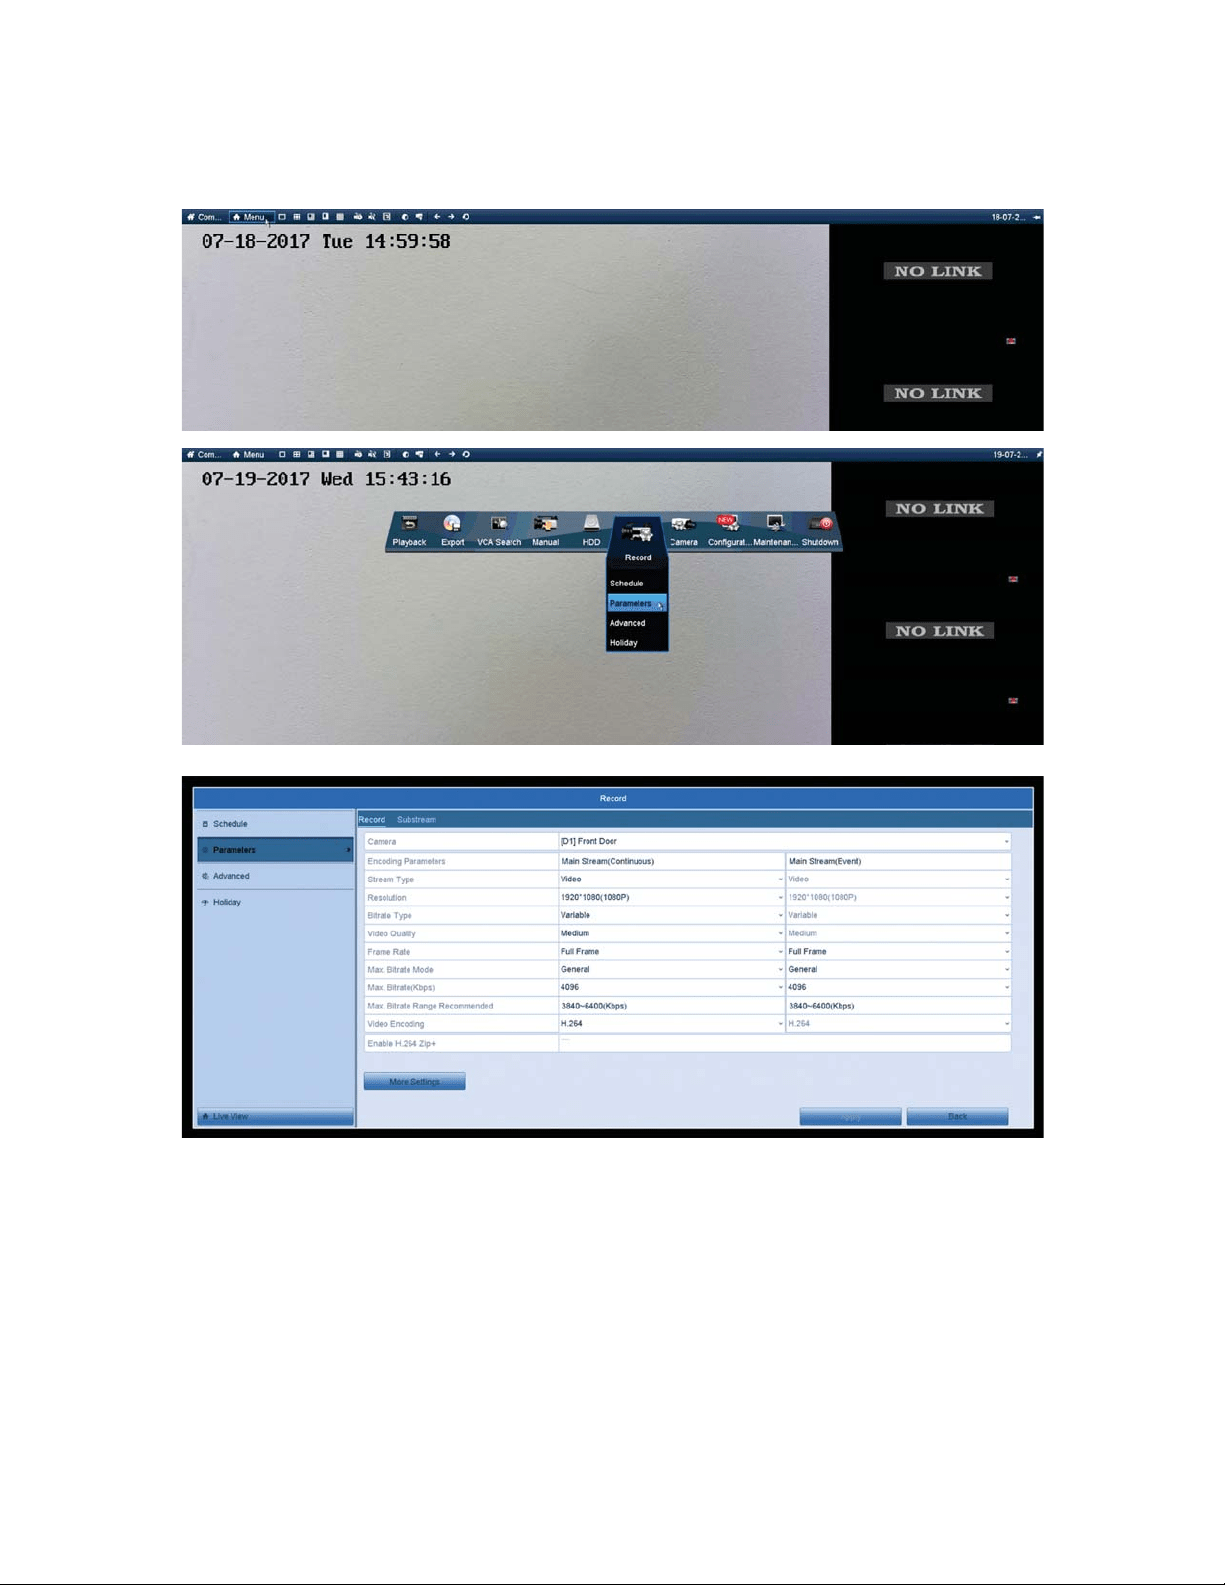
To access this Menu, use the mouse to hover over the top of the screen
and click on “Menu”. Then click on the “Record” icon, then the
“Parameters” option.
Here is a list of all the settings and what they are responsible for:
Encoding Parameters: Recording Type, Continuous or Motion Detection
Stream Type: Video or Video and Audio if you have a camera with a
microphone.
Resolution: The size of the video that is being recorded
33
Bitrate Type: 9DULDEOH%LWUDWHZLOOˌXFWXDWHWKHDPRXQWRIGDWDWKHFDPHUD
is using. When motion is low,the camera will only use minimal data and vice
versa. When the motion is high, it will use more data to create a smoother
picture. Constant will keep the data at the same range regardless of motion.
Video Quality: The system uses this as a guide for data usage when using
constant or variable. The better the picture, the more data will be streamed
through the motherboard of the system. High bandwidth could cause the
V\VWHPWRGURSFDPHUDVRIˌLQH
Frame Rate: The number of frames per second being recorded. The higher
the frames, the smoother the video is. Full frame will use the max FPS for
that camera.
Max Bitrate Mode: *HQHUDOKDVSUHVHWVRIUHFRPPHQGHGELWUDWHV&KDQJLQJLW
will allow you to use any Bitrate you’d like.
Max Bitrate(Kbps): The maximum number of kilobytes that the camera can
use per second. The higher this number is, the more data the camera will use.
Max. Bitrate Range Recommended: The recommended range for kilobytes for
performance and quality. It is usually best to be in the middle.
Video Encoding: 7KHW\SHRIHQFRGLQJXVHGZKHQVDYLQJWKHYLGHRˋOHV([
H.264, H.265, ect.
Enable H.264 Zip +: <RXFDQXVHWKLVIHDWXUHLI\RXUFDPHUDVXSSRUWV+
encoding.
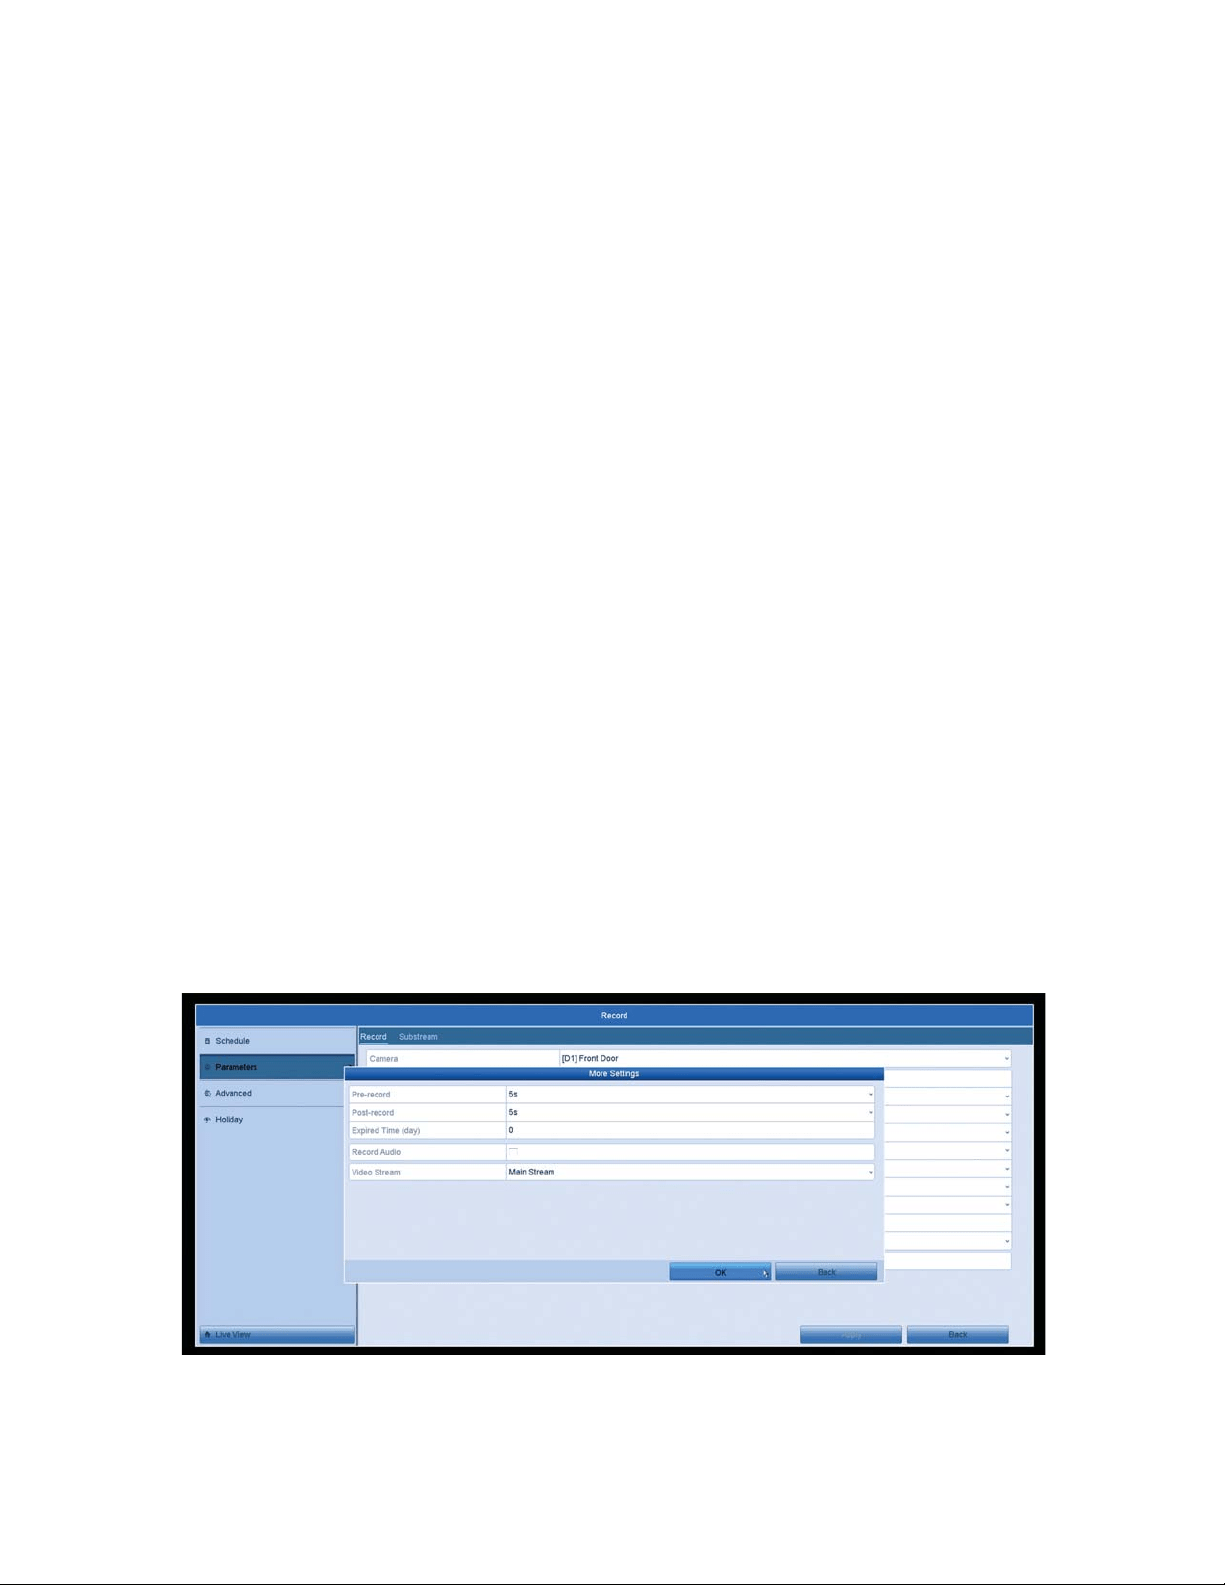
The “More Settings” option has some other features for each channel.
Pre-Record: If using “Motion Detection” recording, this will tell the system to
record seconds before the motion was picked up as well as all the motion
detection. System defaulted at 5 seconds and can go up to 30 seconds.
34
Post-Record: If using “Motion Detection” recording, this will tell the system to
record seconds after the motion has stopped. System defaulted at 5 seconds
and can go up to 30 seconds.
Expired Time (day):7KHH[SLUHGWLPHLVWKHORQJHVWWLPHIRUDUHFRUGHGˋOH
WREHNHSWLQWKH+''LIWKHGHDGOLQHLVUHDFKHGWKHˋOHZLOOEHGHOHWHG<RX
FDQVHWWKHH[SLUHGWLPHWRDQGWKHQWKHˋOHZLOOQRWEHGHOHWHGRWKHUZLVH
ROGHUˋOHZLOOEHDXWRPDWLFDOO\EHUHZULWWHQ7KHDFWXDONHHSLQJWLPHIRUWKH
ˋOHZLOOEHGHWHUPLQHGE\WKHFDSDFLW\RIWKH+''
Record Audio:<RXFDQFKHFNPDUNWKLVER[LI\RXUFDPHUDKDVDEXLOWLQ
microphone, and you want to record audio from it.
Video Stream: The default stream the system will record from. Main Stream
will be the highest quality stream to use for recording.
Digital Zoom
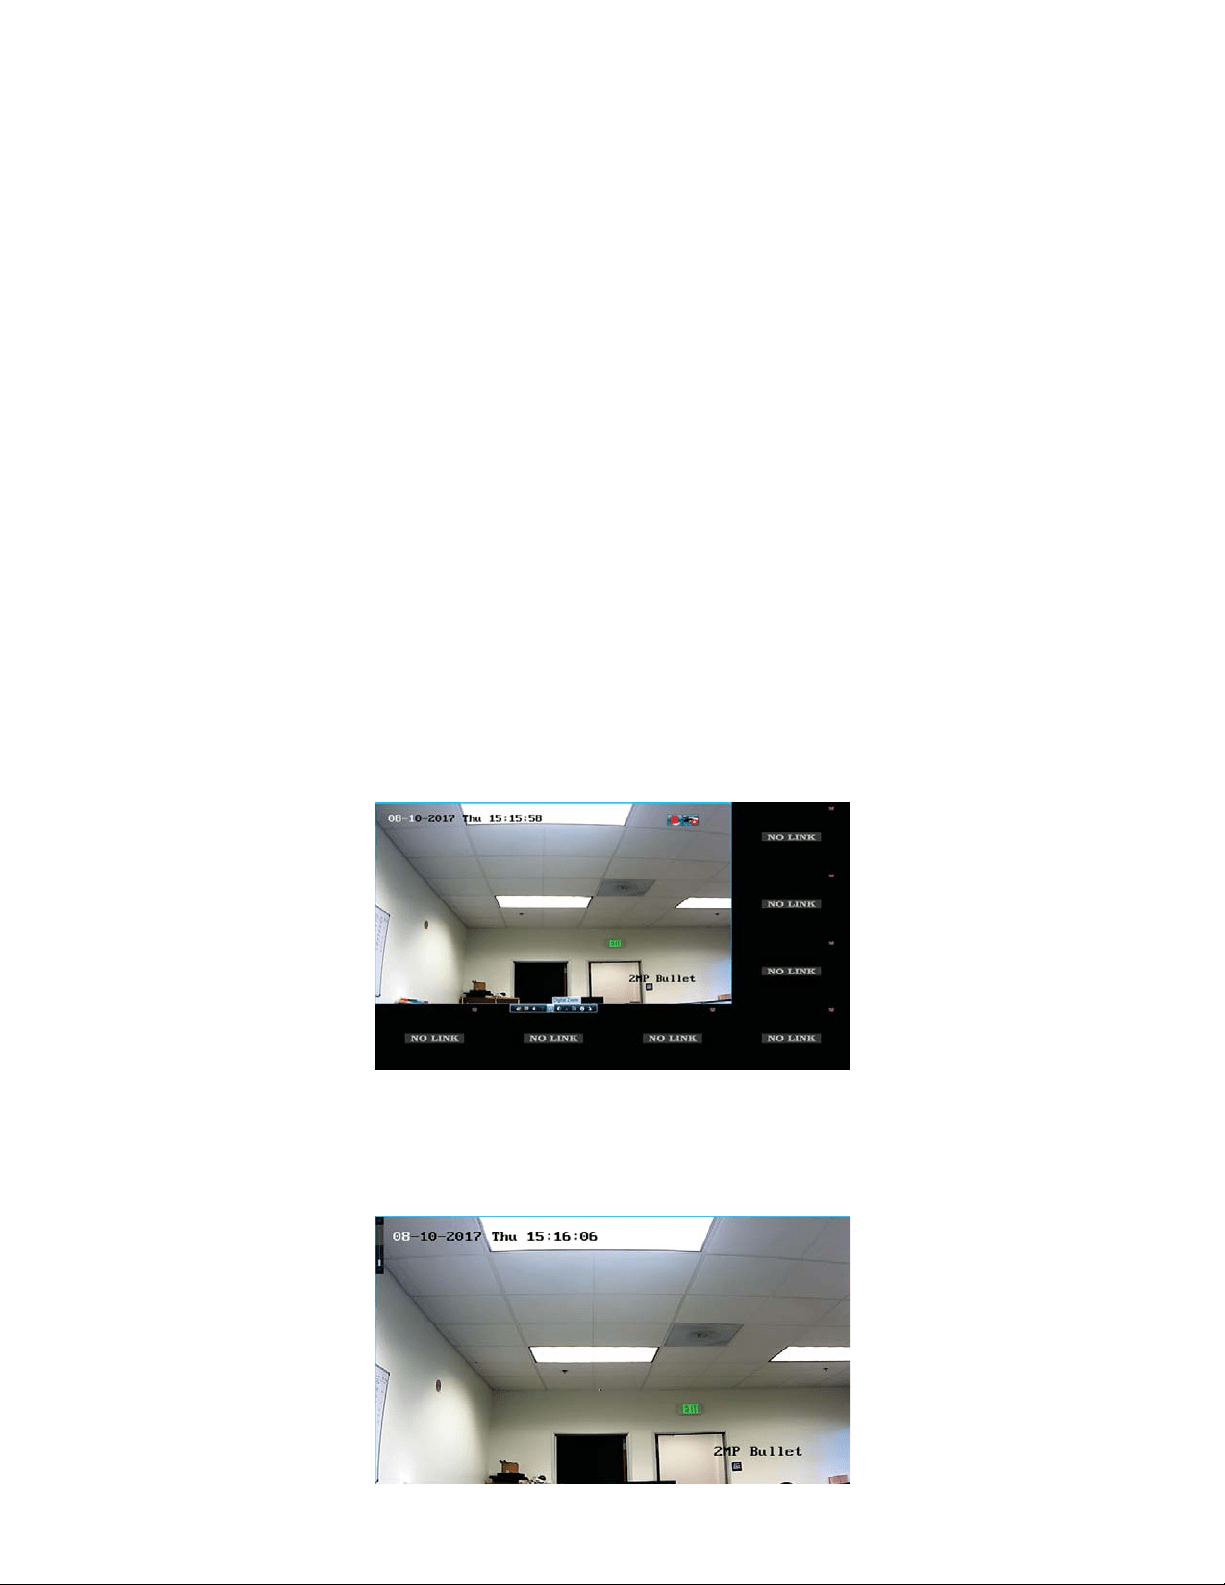
To use the digital zoom on your system, follow these steps:
1. Click on your desired camera view and a bar across the bottom will appear
with some options.
2. Click on the “Digital Zoom” icon and it will make the camera view full
screen.

35
<RXFDQQRZXVHWKHZKHHORQ\RXUPRXVHWR]RRPLQDQGRXW7KHV\VWHP
will zoom on your mouse cursor.