wood block
Installation Guide
www.kwikset.com
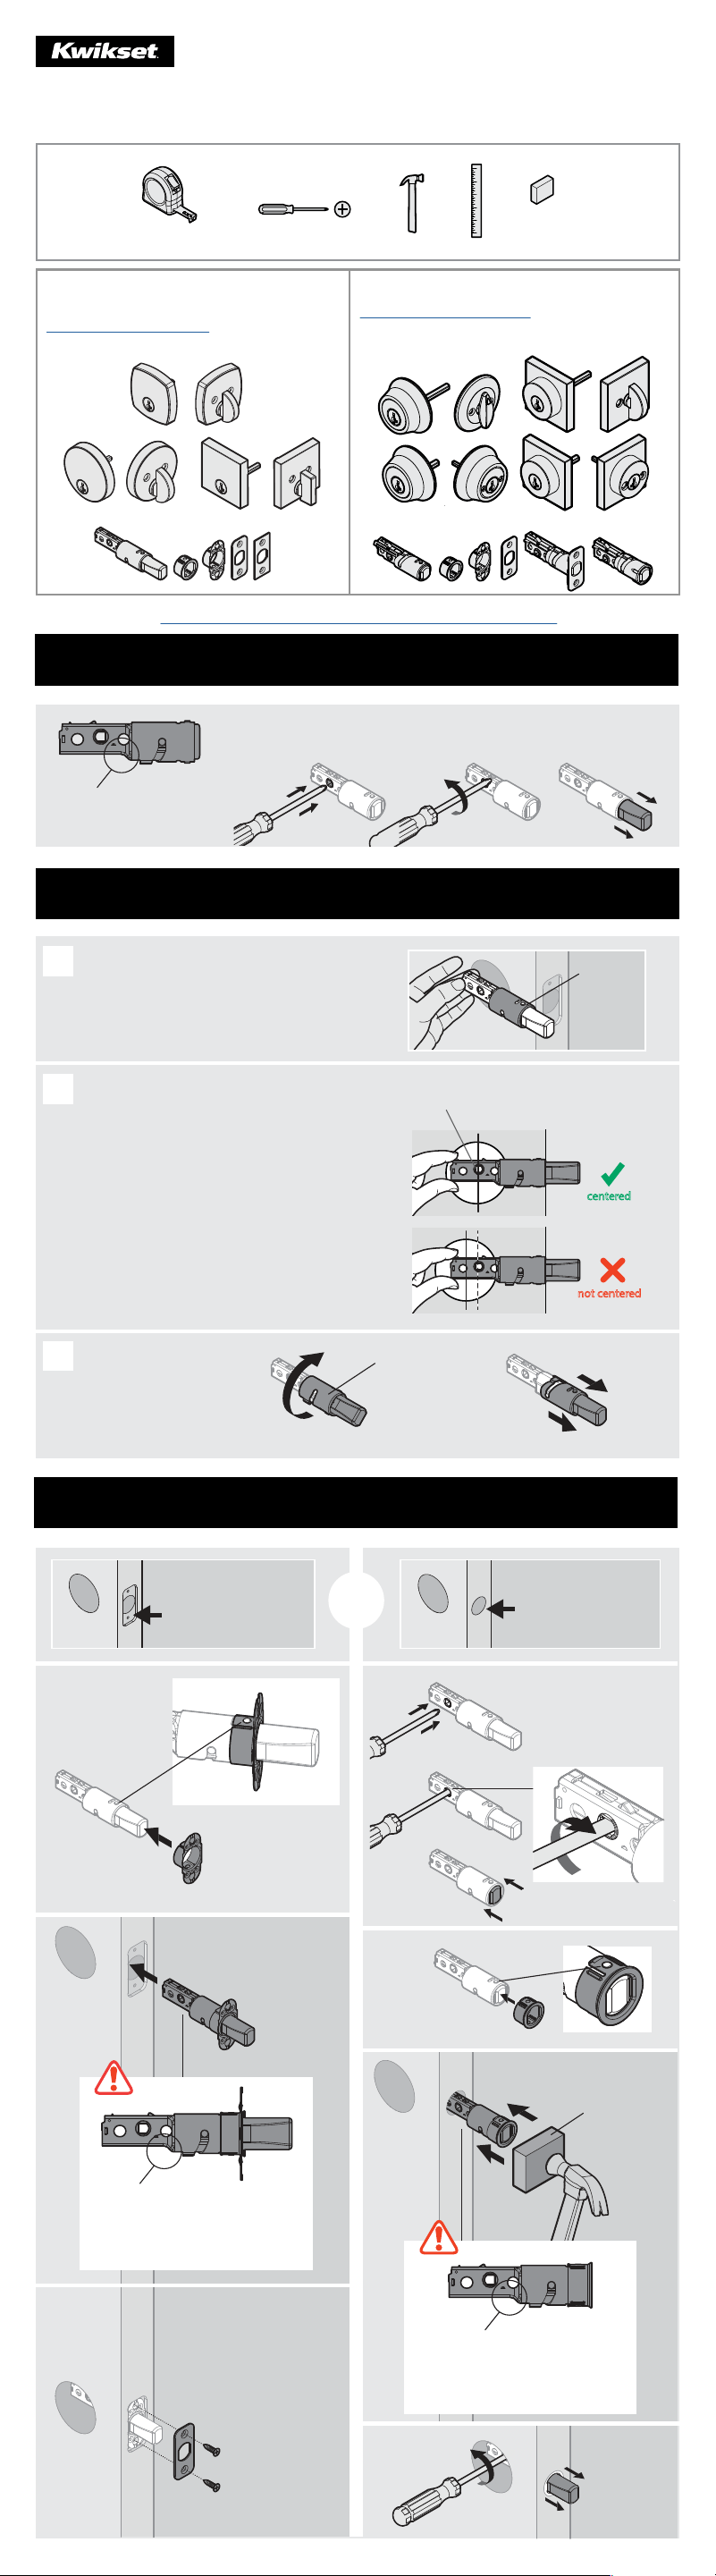
*Tools
*Tools will depend on install type
53973 / 01
This manual can be used to install a variety of deadbolts.
1-800-327-5625
Scroll to the bottom if you need help in preparing your door
or or
Latch
Latch
1
Extend latch bolt (Low prole models)
180°
Use a screwdriver to extend the latch bolt.
Make sure the curve is on
the bottom of the latch.
A
B
C
2
Adjust the backset of the latch (if needed)
Use a screwdriver to
retract the latch bolt.
Install
drive-in
collar.
Extend the
latch bolt.
2x
Install backplate.
Install
faceplate.
Make sure the curve is on
the bottom of the latch.
Make sure the curve is on
the bottom of the latch.
Door edge NOT
chiseled
Door edge chiseled
or
wood block
3
Install Latch
Hold the latch in front of the door hole, with
the latch case ush against the door edge.
latch case
If the D-shaped hole is centered
in the door hole, no adjustment is
required. Proceed to step 4.
If the D-shaped hole is NOT centered, adjust
latch. See “Latch Adjustment” (step 3C).
Latch Adjustment
(only if needed)
180°
Rotate the front of the
latch to extend it.
centered
not centered
D-shaped hole
For Low Profile Deadbolts Models
(
258 series, Uptown, Downtown, Midtown, and
San Clemente rectangular)
Follow steps 1 through 6
For Regular Deadbolts Models
(158
, 159, 660, 665, 780, 816, 980, 985, Halifax and Milan)
Follow steps 7 through 11
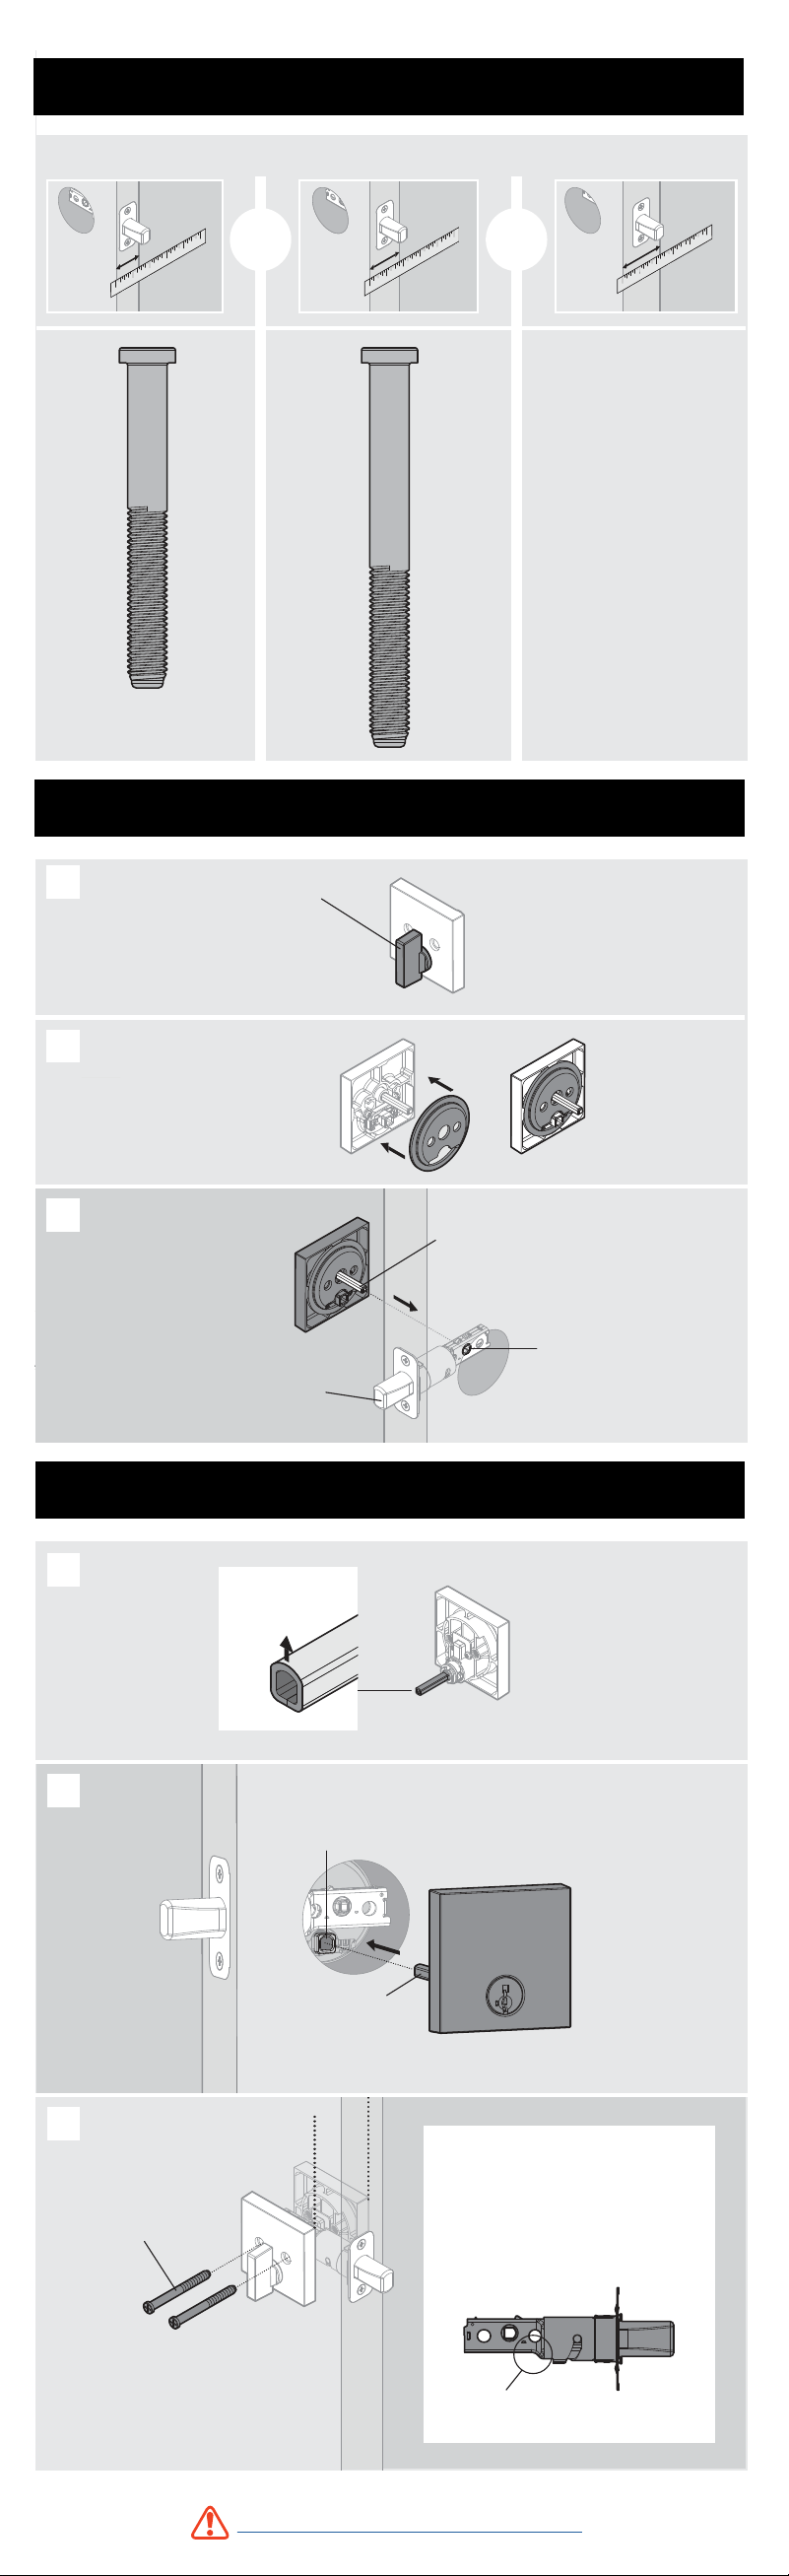
Measure the thickness of your door to determine the required mounting screws for step 6.
or
or
Actual size Actual size
Call Kwikset to order a service
kit for 2-1/4” (57 mm) thick doors.
Use the screws provided in the kit.
(2x)
(2x)
35 mm 44 mm 57 mm
Determine required mounting screws
4
1-3/8” 1-3/4” 2-1/4”
Install deadbolt interior (Low prole models)
5
Make sure turnpiece is vertical.
torque blade
latch cam
interior
Mounting plate should be
pre-installed on interior.
If removed, re-install.
Make sure latch bolt is fully extended.
A
B
C
torque blade
turnpiece
exterior
Support deadbolt
interior while
installing exterior.
Use screws from step 4.
Keep parallel.
Curve points up.
Troubleshooting
curve on bottom
A
B
C
Install deadbolt exterior
6
If the screws are dicult to tighten, make
sure the latch is installed correctly.
To finalize your installation, proceed to Step 12.
Extend latch bolt (Regular deadbolt models)
7
Adjust the backset of the latch (if needed)
8
Hold the latch in front of the door hole, with
the latch face ush against the door edge.
If the latch holes are centered in the door hole,
no adjustment is required. Proceed to step 9.
If the D-shaped hole is NOT centered, adjust
latch. See “Latch Adjustment” (step 8C).
Latch Adjustment (only if needed)
not centered
centered
A
B
C
180°
Rotate the front of the
latch to extend it.
Prepare latch (if not pre-assembled)
9
interior
Install deadbolt interior.
A
C
(Ring adapter available
with some models)
Insert interior
torque blade
into exterior
torque blade.
exterior
Rotate torque
blade to align
with D-shaped
hole.
Install deadbolt exterior.
Not available with
all models
Remove interior cylinder.
Pull paper tab to
remove cover plate.
Reinstall cylinder.
Do not reinstall
cover plate.
cover plate
Interior cylinder
has holes.
or
Remove cover plate from interior cylinder (For double cylinders only).
B
Door edge NOT
chiseled
Door edge chiseled
Install plate.
Ensure plate snaps into place.
Ensure collar snaps into place.
Install collar.
or
2 tabs
2 tabs
Pull plate to test for tight t.
Pull plate to test for tight t.
Door edge NOT
chiseled
Door edge chiseled
wood block
Retract latch bolt.
Extend latch bolt.
2x
Install front plate.
Install
latch.
Install
latch.
or
“UP” is on top
“UP” is on top
Install latch (Regular deadbolt models)
10
11
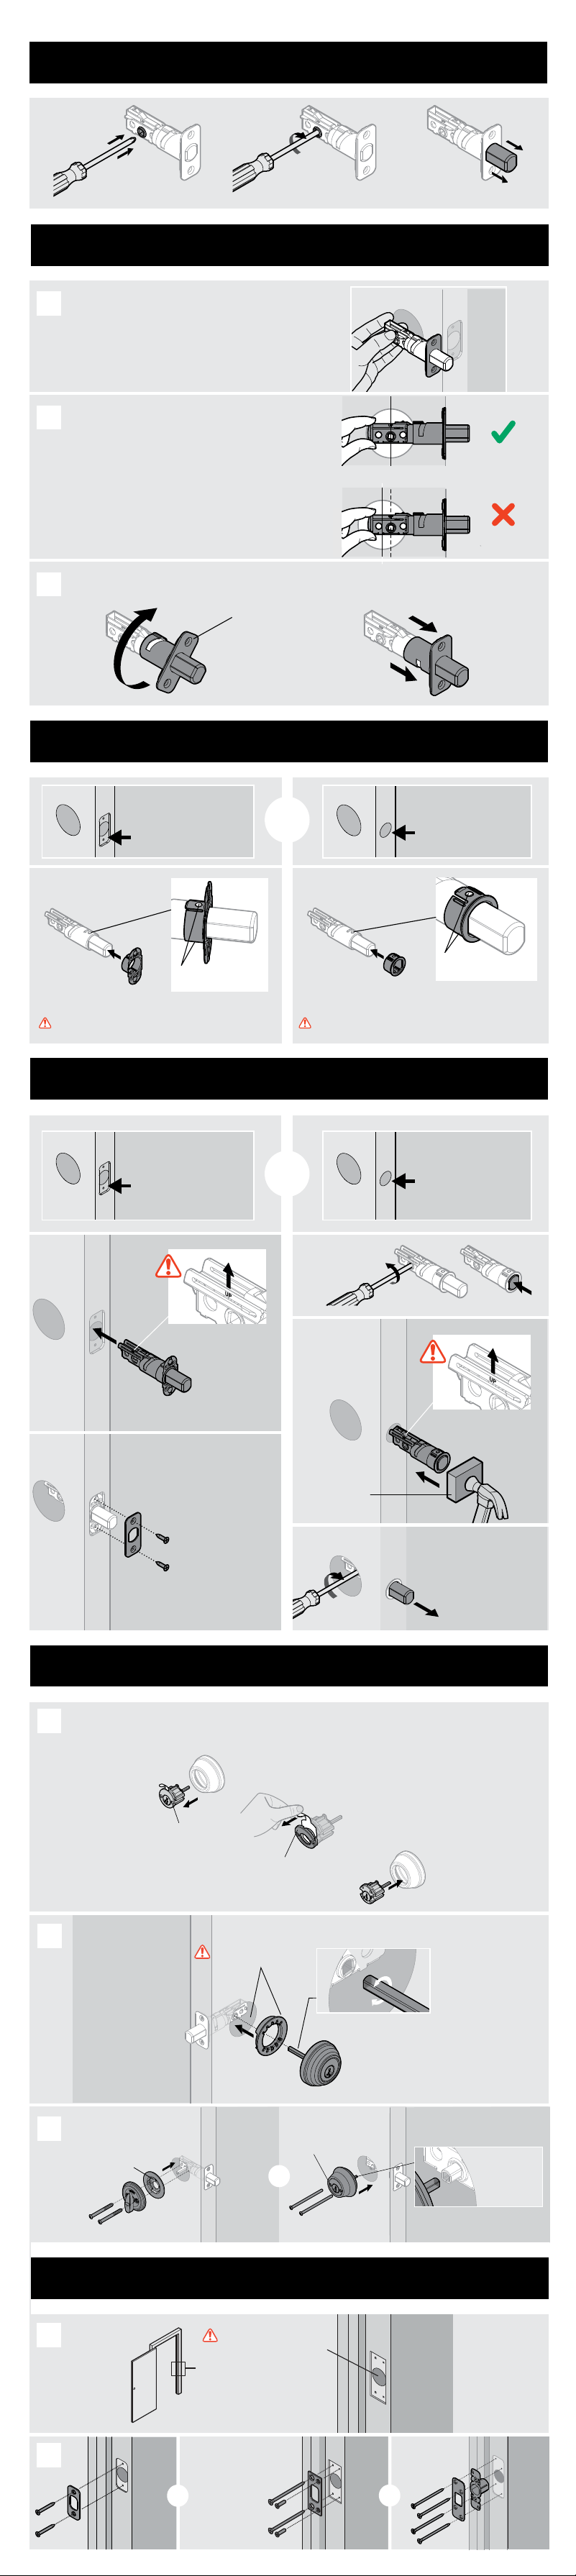
Install deadbolt (Regular deadbolt models)
The cylinder with holes
should be installed on the
interior side of the door.
Make sure hole in door
frame is drilled a minimum
of 1in (25mm) deep.
Install strike on door frame
12
or
Longer screws install
closest to jamb.
A
B
or
1/8 in
3 mm
2-1/8"
54 mm
1/8"
3 mm
1"
25 mm
1/8"
3 mm
2-1/8"
54 mm
1/8 in
3 mm
1"
1/8"
3 mm
2-1/8 in
54 mm
1/8"
3 mm
1"
25 mm
1/8"
3 mm
2-1/8"
54 mm
1/8"
3 mm
1 in
25 mm
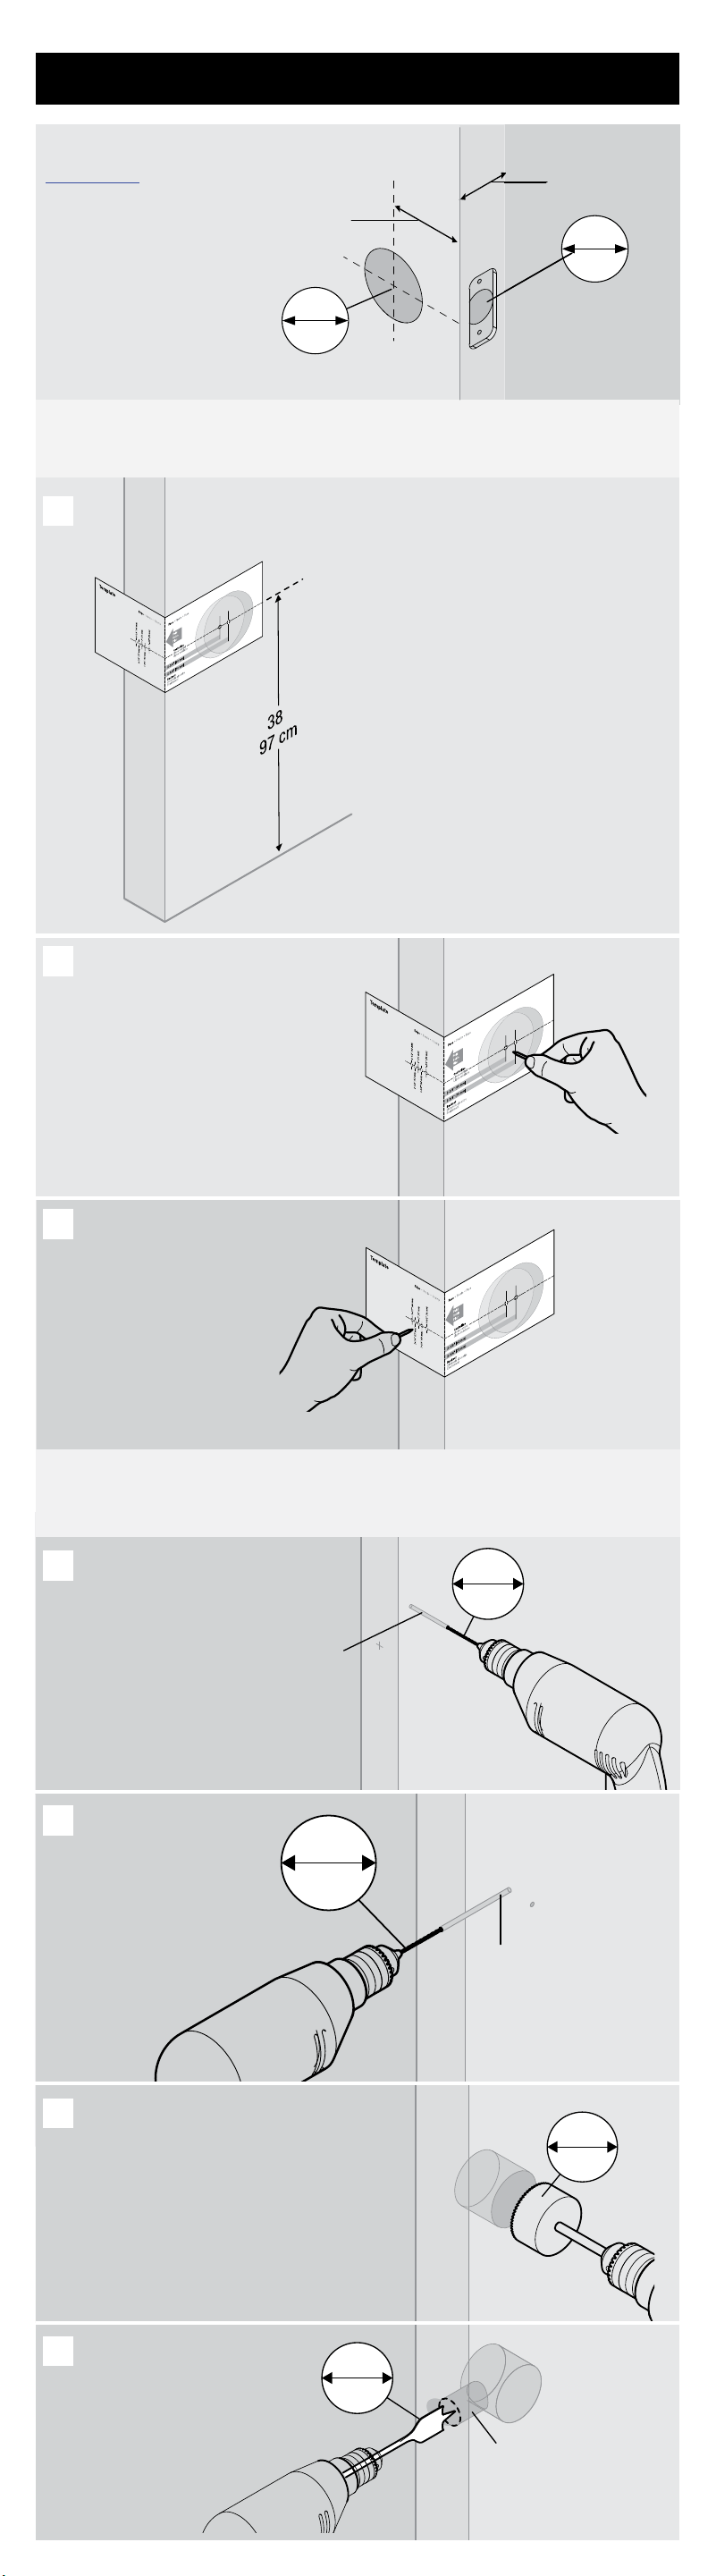
Drill holes in door
Select the template that allows you to place
the template on the EXTERIOR side of door.
Fold template along fold line and place fold
line along the edge of door. Place centerline
approximately 38 in (97 cm) from the oor.
Mark hole on the face of the door.
Select desired backset before marking
hole. If there is another hole in the
door, or if you are drilling double
doors, make sure to keep the backset
consistent.
Mark hole on the edge of the
door. Select door thickness before
marking hole.
Drill from one side until the point
of drill just breaks through, then
complete hole from the other side
to prevent splintering.
Exterior
Floor
*Call Kwikset to order a
service kit for 2-1/4 in
(57 mm) thick doors.
or
35 mm–57 mm*
54 mm
1 in
25 mm
B
A
B
C
D
A
C
Through door
2 in [51 mm] deep
2 in [51 mm] deep
Preparing Your Door
Use template to mark holes on door
1-3/8 in–2-1/4 in
2-1/8 in
2-3/4 in (70 mm)
2-3/8 in (60mm)
in
For consumers requiring the door
prep template, please visit:
Drilling instructions

1/8"
3 mm
B
C
D
E
1/8"
3 mm
1/8"
3 mm
1/8"
3 mm
1/8 in
3 mm
1/8"
3 mm
Latch with drive-in collar
Proceed to Next Step.
Latch with rectangular faceplate
1 in
25 mm
1/8 in
3 mm
3/32"
2 mm
2x
1"
25 mm
1/8"
3 mm
3/32"
2 mm
1"
25 mm
1/8"
3 mm
3/32"
1"
25 mm
1/8"
3 mm
3/32"
2 mm
2x
1"
25 mm
1/8"
3 mm
3/32 in
2 mm
2x
WARNING: This Manufacturer advises that no lock can provide complete security by itself. This lock
may be defeated by forcible or technical means, or evaded by entry elsewhere on the property. No lock
can substitute for caution, awareness of your environment, and common sense. Builder’s hardware
is available in multiple performance grades to suit the application. In order to enhance security and
reduce risk, you should consult a qualied locksmith or other security professional.
Register your product at www.kwikset.com/productregistration
Rate your product at www.kwikset.com/reviews
©2023 Spectrum Brands, Inc.
A
B
C
D
Chisel
Mark holes
1 in [25 mm]
deep
A
B
C
Locate center of strike hole:
Measure back from door stop, 1/2 thickness of door.
5/8 in [16mm] deep
5/8 in [16mm] deep
E
F
G
D
Keep level and trace.
Chisel
Mark holes (2x)
1 in [25mm] deep
Prepare door frame for strike
or
Determine which latch will be installed and prepare door edge