r
e
c
i
p
e
s
i
n
s
i
d
e
!
#DBBM450
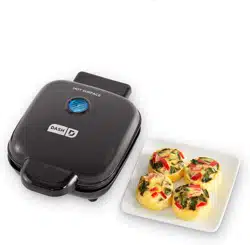
Deluxe
Egg Bite Maker
Instruction Manual | Recipe Guide
Deluxe
Egg Bite Maker
Important Safeguards ...................................................................4-8
Parts & Features ................................................................................ 9
Using Your Deluxe Egg Bite Maker ........................................10-15
Tips & Tricks ....................................................................................16
Cleaning & Maintenance ..............................................................17
Troubleshooting ............................................................................. 18
Notes... ............................................................................................19
Recipes... ................................................................................... 20-37
Customer Support .........................................................................38
Warranty .......................................................................................... 39
t
h
e
d
a
s
h
t
e
a
m
!

Section Title
∙ 4 ∙ ∙ 5 ∙
• Read all instructions.
• Remove all bags and packaging
from appliance before use.
• Do not use appliance outdoors or
for commercial purposes.
• Never leave appliance
unattended when in use.
• Only use the appliance on a
stable, dry surface.
• Make sure the appliance is
cleaned thoroughly before using.
• Do not use appliance for other
than its intended use. For
household use only. Do not use
outdoors.
• Close supervision is necessary
when any appliance is used by or
near children. Children should be
supervised to ensure that they do
not play with the appliance.
• Do not operate this appliance
with a damaged cord, damaged
plug, after the appliance
malfunctions, is dropped,
or damaged in any manner.
Return appliance to the nearest
IMPORTANT SAFEGUARDS: PLEASE
READ AND SAVE THIS INSTRUCTION
AND CARE MANUAL.
IMPORTANT SAFEGUARDS: PLEASE
READ AND SAVE THIS INSTRUCTION
AND CARE MANUAL.
When using electrical appliances, basic safety precautions should be followed, including:
their safety.
• Always be sure to unplug the appliance
from the outlet prior to moving, cleaning,
storage, and when not in use.
• StoreBound shall not accept liability for
damages caused by improper use of the
appliance.
• Improper use of the appliance can result
in property damage or personal injury.
• This appliance has a polarized plug (one
blade is wider than the other). To reduce
the risk of electric shock, this plug will
t in a polarized outlet only one way. If
the plug does not completely t in the
outlet, reverse the plug. If it still does not
t, contact a qualied electrician. Do not
attempt to modify the plug in any way.
• Turn the appliance off, then unplug
from the outlet when not in use, before
assembling or disassembling parts and
before cleaning. To unplug, grasp the
plug and pull from the outlet. Never pull
from the power cord.
• A short power supply cord is to be
provided to reduce the risk resulting
from becoming entangled in or tripping
over a longer cord. An extension cord
may be used if care is exercised in its
use. If an extension cord is used, the
marked electrical rating of the extension
authorized service facility for examination,
repair, or adjustment.
• For maintenance excluding cleaning,
please contact StoreBound directly
at 1-800-898-6970 from 7AM-7PM PT
Monday-Friday or by email at support@
storebound.com.
• Do not place appliance on or near a hot
gas burner, hot electric burner, or in
a heated oven. Extreme caution must
be used when moving an appliance
containing hot oil or other hot liquids.
To disconnect, remove plug from wall
outlet. Do not use appliance for other than
intended use.
• Refrain from using attachments that are
not recommended by the appliance
manufacturer, as this may result in re,
electric shock, or personal injury.
• Do not let the cord touch hot surfaces or
hang over the edges of tables or counters.
• This appliance is not intended for use by
persons (including children) with reduced
physical, sensory, or mental capabilities,
or lack of experience and knowledge
unless they are provided with supervision
and instruction concerning use of the
appliance by a person responsible for
cord should be at least as great
as the electrical rating of the
appliance. The extension cord
should be arranged so that it will
not drape over the countertop or
tabletop where it can be pulled
on by children or tripped over
unintentionally. If the appliance
is of the grounded type, the cord
set or extension cord should be a
grounding-type 3-wire cord.
• To avoid burns, use extreme caution
when removing accessories.
• When not in use, always unplug
the unit. Do not store any materials
other than manufacturer’s
recommended accessories in this
appliance.
• Do not allow the appliance to be
covered by or touch ammable
materials such as curtains, draperies
or walls, when in operation. Do
not store any items on top of the
appliance when in operation. Do
not operate under wall cabinets.
• Do not clean with metal scouring
pads.
• Do not attempt to dislodge food
when the appliance is plugged into
electrical outlet.
IMPORTANT SAFEGUARDS IMPORTANT SAFEGUARDS

∙ 6 ∙ ∙ 7 ∙
garanties importantes
• Lisez toutes les instructions.
• Retirez tous les sacs et emballages
de l’appareil avant utilisation.
• N’utilisez pas cet appareil
à l’extérieur ou à des ns
commerciales.
• Ne laissez jamais l’appareil sans
surveillance lorsqu’il est utilisé.
• Utilisez l’appareil uniquement sur
une surface stable et sèche.
• Assurez-vous que l’appareil est
nettoyé à fond avant de l’utiliser.
• Ne pas utiliser cet appareil pour un
usage autre que celui auquel il est
destiné. Pour usage domestique
seulement. Ne pas utiliser à
l’extérieur.
• Une surveillance étroite est
nécessaire lorsqu’un appareil est
utilisé par ou à proximité d’enfants.
Les enfants doivent être surveillés
pour s’assurer qu’ils ne jouent pas
avec l’appareil.
• Ne pas utiliser cet appareil avec un
cordon ou une che endommagé,
après un dysfonctionnement
de l’appareil, une chute ou un
dommage quelconque. Renvoyez
l’appareil à un centre de service
agréé le plus proche pour un
examen, une réparation ou
un réglage.
• Pour tout entretien autre que
le nettoyage, veuillez contacter
StoreBound directement au
1-800-898-6970 de 7h à 19h
du lundi au vendredi ou par
courrier électronique à support@
storebound.com.
• Ne placez pas l’appareil sur ou à
proximité d’un brûleur à gaz chaud,
d’un brûleur électrique chaud ou
dans un four chauffé. Une extrême
prudence doit être utilisée lors
du déplacement d’un appareil
contenant de l’huile chaude ou
d’autres liquides chauds. Pour
déconnecter, puis retirez la che
GARANTIES IMPORTANTES:
VEUILLEZ
LIRE
ATTENTIVEMENT
CE
MANUEL
AVANT
D’UTILISER
L’APPAREIL.
de la prise murale. N’utilisez pas cet
appareil pour un usage autre que
celui prévu.
• Évitez d’utiliser des accessoires
qui ne sont pas recommandés par
le fabricant de l’appareil car cela
pourrait provoquer un incendie, un
choc électrique ou des blessures.
• Ne laissez pas le cordon toucher des
surfaces chaudes ou pendre des
bords de tables ou de comptoirs.
• Cet appareil n’est pas destiné à être
utilisé par des personnes (y compris
des enfants) ayant des capacités
physiques, sensorielles ou mentales
réduites, ou manquant d’expérience
et de connaissances, à moins qu’une
personne responsable de leur
sécurité ne les supervise et ne
les instruise.
• Assurez-vous toujours de
débrancher l’appareil de la prise
avant de le déplacer, de le nettoyer,
de le ranger et lorsqu’il n’est
pas utilisé.
• StoreBound n’acceptera aucune
responsabilité pour les dommages
causés par une utilisation incorrecte
de l’appareil.
• Une utilisation inappropriée
de l’appareil peut entraîner
des dommages matériels,
voire corporels.
• Cet appareil est doté d’une che
polarisée (une lame est plus
large que l’autre). Pour réduire
les risques d’électrocution, cette
che ne peut être insérée dans une
prise polarisée. Si la che n’entre
pas complètement dans la prise,
inversez-la. Si le problème persiste,
contactez un électricien qualié.
N’essayez pas de modier la che
de quelque manière que ce soit.
• Éteignez l’appareil, puis
débranchez-le de la prise lorsqu’il
n’est pas utilisé, avant d’assembler
ou de désassembler des pièces
et avant de le nettoyer. Pour
débrancher, saisissez la che et
retirez-la de la prise. Ne tirez jamais
sur le cordon d’alimentation.
• Un cordon d’alimentation court
doit être fourni an de réduire
les risques d’enchevêtrement ou
de trébuchement sur un cordon
plus long. Une rallonge peut être
utilisée si elle est utilisée avec
soin. Si une rallonge est utilisée, le
calibre électrique indiqué doit être
au moins égal à celui de l’appareil.
La rallonge doit être disposée de
manière à ne pas se poser sur le
comptoir ou la table, où elle pourrait
être tirée par des enfants ou faire
trébucher dessus par inadvertance.
Si l’appareil est du type mis à la
Lors de l’utilisation d’appareils électriques, des précautions élémentaires
de sécurité doivent être respectées, notamment:
garanties importantes

∙ 8 ∙ ∙ 9 ∙
garanties importantes
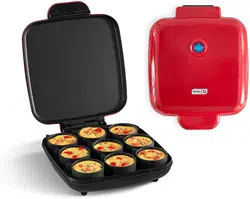
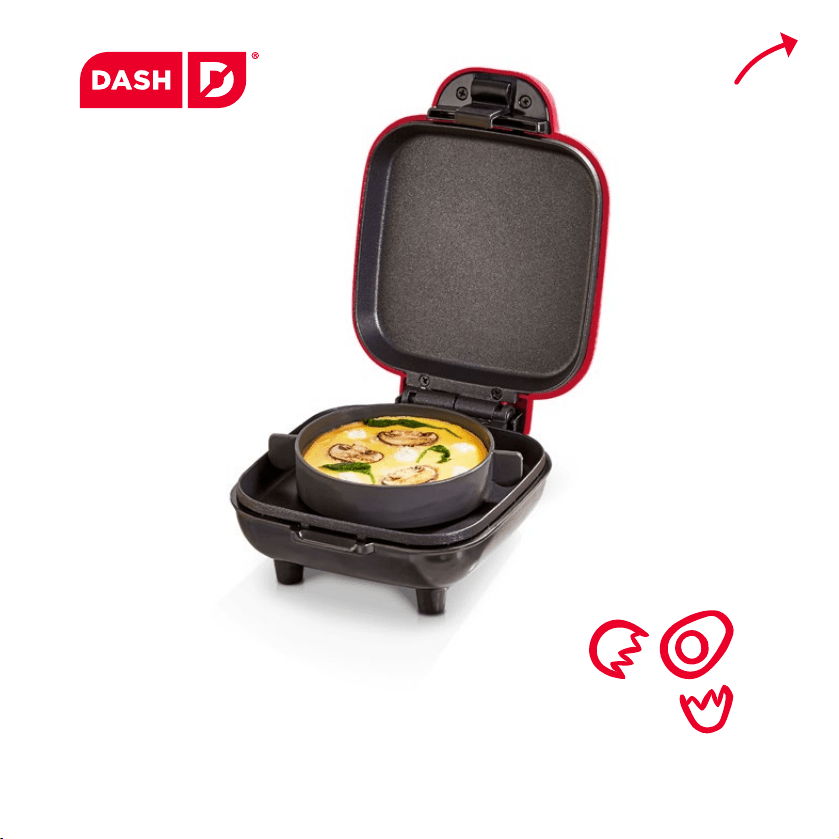
PARTS & FEATURES
Silicone Cups
Lid Handle
Heating Plate
terre, le cordon ou la rallonge doit
être un cordon à 3 ls.
• Pour éviter les brûlures, soyez
extrêmement prudent lorsque vous
retirez des accessoires.
• Lorsqu’il n’est pas utilisé,
débranchez toujours l’appareil. Ne
stockez pas de matériaux autres
que les accessoires recommandés
par le fabricant dans cet appareil.
• Ne laissez pas l’appareil en contact
avec des matériaux inammables,
tels que des rideaux, des rideaux
ou des murs, pendant qu’il est en
marche. Ne rangez aucun objet sur
le dessus de l’appareil lorsqu’il est
en marche. Ne pas utiliser sous des
armoires murales.
• Ne pas nettoyer avec des tampons
à récurer en métal.
• N’essayez pas de déloger des
aliments lorsque l’appareil est
branché sur une prise électrique.
GARANTIES IMPORTANTES:
VEUILLEZ
LIRE
ATTENTIVEMENT
CE
MANUEL
AVANT
D’UTILISER
L’APPAREIL.
Large Silicone Cup
Indicator Light

∙ 8 ∙ ∙ 9 ∙
garanties importantes
PARTS & FEATURES
Silicone Cups
Lid Handle
Heating Plate
terre, le cordon ou la rallonge doit
être un cordon à 3 ls.
• Pour éviter les brûlures, soyez
extrêmement prudent lorsque vous
retirez des accessoires.
• Lorsqu’il n’est pas utilisé,
débranchez toujours l’appareil. Ne
stockez pas de matériaux autres
que les accessoires recommandés
par le fabricant dans cet appareil.
• Ne laissez pas l’appareil en contact
avec des matériaux inammables,
tels que des rideaux, des rideaux
ou des murs, pendant qu’il est en
marche. Ne rangez aucun objet sur
le dessus de l’appareil lorsqu’il est
en marche. Ne pas utiliser sous des
armoires murales.
• Ne pas nettoyer avec des tampons
à récurer en métal.
• N’essayez pas de déloger des
aliments lorsque l’appareil est
branché sur une prise électrique.
GARANTIES IMPORTANTES:
VEUILLEZ
LIRE
ATTENTIVEMENT
CE
MANUEL
AVANT
D’UTILISER
L’APPAREIL.
Large Silicone Cup
Indicator Light

∙ 10 ∙ ∙ 11 ∙
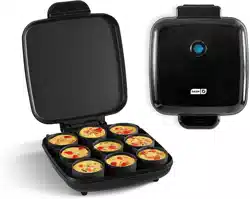
Using Your Deluxe Egg Bite Maker
BEFORE USING YOUR DELUXE EGG BITE MAKER
1. Remove all packaging materials.
2. Check that the Deluxe Egg Bite Maker has no visible damage and no parts are
missing.
3. Before using the appliance for the rst time or before using it after prolonged
storage, wash and dry the appliance and any accompanying accessories.
4. Be sure to remove any dust from the Heating Plate and Silicone Cups.
using YOUR Deluxe Egg Bite Maker
Set the Deluxe Egg Bite Maker on a stable, at, heat-resistant surface
(photo A).
note: You do not need to pre-heat your Deluxe Egg Bite Maker, but doing
so can decrease the cooking time.
Fill one of the small Silicone Cups with water, and pour it onto the Heating
Plate (photo B). The water will heat and become steam, which will allow the
egg bites to cook evenly and maintain a soft, creamy texture.
1
2
A
B

∙ 10 ∙ ∙ 11 ∙
Using Your Deluxe Egg Bite Maker
BEFORE USING YOUR DELUXE EGG BITE MAKER
1. Remove all packaging materials.
2. Check that the Deluxe Egg Bite Maker has no visible damage and no parts are
missing.
3. Before using the appliance for the rst time or before using it after prolonged
storage, wash and dry the appliance and any accompanying accessories.
4. Be sure to remove any dust from the Heating Plate and Silicone Cups.
using YOUR Deluxe Egg Bite Maker
Set the Deluxe Egg Bite Maker on a stable, at, heat-resistant surface
(photo A).
note: You do not need to pre-heat your Deluxe Egg Bite Maker, but doing
so can decrease the cooking time.
Fill one of the small Silicone Cups with water, and pour it onto the Heating
Plate (photo B). The water will heat and become steam, which will allow the
egg bites to cook evenly and maintain a soft, creamy texture.
1
2
A
B

∙ 13 ∙
C
h
e
f
T
i
p
!
Using Your Deluxe Egg Bite Maker
Whisk your egg together with ingredients in a small bowl (photo C).
See the Recipe Guide on page 21 for ideas. The Large Silicone Cup holds
about 2 large eggs, and the four smaller Silicone Cups hold about
2 large eggs.
Place the Large Silicone Cup into the water on
the Heating Plate (photo D).
Fill the Large Silicone Cup ¾ of the way with egg mixture and ingredients
(photo E). This will allow the egg bites to expand as they cook.
Plug the Deluxe Egg Bite Maker in and close the lid (photo F). The blue
Indicator Light on the lid of the Deluxe Egg Bite Maker will illuminate,
indicating the Deluxe Egg Bite Maker is on and heating. When the Deluxe
Egg Bite Maker reaches maximum temperature, the Indicator Light will turn
off, but this does not mean the Deluxe Egg Bite Maker has turned off.
3
5
4
6
NOTE: Adding ingredients adds
volume to the mixture, so two eggs
may end up making more than one
sandwich patty. You can restart
the process from Step 2 to use the
leftover ingredients!
C
h
e
f
T
i
p
!
D
C
E
F
Using Your Deluxe Egg Bite Maker
∙ 12 ∙
It may help to use a cooking spray on the
interior of the Silicone Cups to ensure that
egg bites release cleanly.

Section Title
∙ 14 ∙ ∙ 15 ∙
Using Your Deluxe Egg Bite Maker
8
Allow egg to cook for approximately 10-12 minutes, or until the water on
the Heating Plate has completely evaporated. You can open the Deluxe Egg
Bite Maker to check your progress (photo G).
When eggs are done, unplug the Deluxe Egg Bite Maker to turn it off.
Remove the Large Silicone Cup (photo H) and turn it upside down to allow
the egg to release. If the egg is stuck, squeeze the Large Silicone Cup
gently to release. Do not use force, as this may break or deform the egg.
h
G
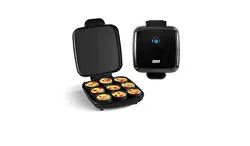
Or Make Egg Bites!
Using Your Deluxe Egg Bite Maker
Egg Bites are delicious as a snack or breakfast on-the-go! To make egg
bites, refer to the instructions on pages 11-14, but switch out the Large
Silicone Cup for the four small Silicone Cups (shown below).
7
!
CAUTION: the Large Silicone Cup will be hot, so use a protective
cooking glove when handling after cooking!

Section Title
∙ 14 ∙ ∙ 15 ∙
Using Your Deluxe Egg Bite Maker
8
Allow egg to cook for approximately 10-12 minutes, or until the water on
the Heating Plate has completely evaporated. You can open the Deluxe Egg
Bite Maker to check your progress (photo G).
When eggs are done, unplug the Deluxe Egg Bite Maker to turn it off.
Remove the Large Silicone Cup (photo H) and turn it upside down to allow
the egg to release. If the egg is stuck, squeeze the Large Silicone Cup
gently to release. Do not use force, as this may break or deform the egg.
h
G
Or Make Egg Bites!
Using Your Deluxe Egg Bite Maker
Egg Bites are delicious as a snack or breakfast on-the-go! To make egg
bites, refer to the instructions on pages 11-14, but switch out the Large
Silicone Cup for the four small Silicone Cups (shown below).
7
!
CAUTION: the Large Silicone Cup will be hot, so use a protective
cooking glove when handling after cooking!

Section Title
∙ 16 ∙ ∙ 17 ∙
Tips & Tricks
Be sure not to overll the Silicone
Cups, as this may cause them to
spill onto the Heating Plate once the
eggs begin cooking. Eggs expand
while cooking, so it’s best to ll the
Silicone Cups only ¾ full.
Don’t just limit yourself to eggs, try using
the Deluxe Egg Bite Maker to prepare
cheesecake bites, custard, or other
sweet treats!
Cooking spray, oil, and butter are
not necessary to prevent sticking in
the Silicone Cups. However, a thin
coating can help ensure your egg
bites release cleanly.
Plugging in the Deluxe Egg Bite Maker
to preheat for 2-3 minutes before
adding water to the Heating Plate will
signicantly increase the speed at which
the water heats.
Cleaning & Maintenance
• Before cleaning, remove the plug from the wall socket and let the Deluxe Egg Bite
Maker cool down completely.
• Thoroughly clean the Deluxe Egg Bite Maker after every use.
• Do not clean the Heating Plate with metal kitchen utensils or abrasive cleaning
materials. Using these may damage the Heating Plate’s coating.
• To clean the exterior of the Deluxe Egg Bite Maker, wipe it down with water, dish
soap, and a non-abrasive sponge or soft cloth.
• NOTE: DO NOT submerge the Deluxe Egg Bite Maker in water.
• Clean the Silicone Cups with a soft cleaning brush to remove any food residue.
• Make sure that the Deluxe Egg Bite Maker is unplugged and all parts are clean and
dry before storing.
Non-abrasive Sponge
scrub with a
homemade
Submerge in Water
Do Not

∙ 19 ∙∙ 18 ∙
Troubleshooting
PROBLEM POSSIBLE CAUSE SOLUTION
The Deluxe Egg
Bite Maker does not
turn on.
The appliance is not
plugged in.
Plug the mains plug into a
grounded wall socket.
Egg bite is not
done after the
recommended time.
The Silicone Cup is
loaded with too
many ingredients
and toppings.
Allow an additional few
minutes of cooking.
The Deluxe Egg Bite
Maker won’t close.
Something may be stuck
between the lid and
Silicone Cups.
Remove item that is stuck
between lid and Silicone
Cups and clean any
impacted surface.
The eggs are
not cooking.
There is no water on the
Heating Plate.
Pour water onto the
Heating Plate.
NOTES

Section Title Section Title
∙ 20 ∙ ∙ 21 ∙
Deluxe Egg Bite Maker
RECIPE
guide
Follow us @unprocessyourfood
for recipes, videos, & daily inspiration

Section Title Section Title
∙ 20 ∙ ∙ 21 ∙
Deluxe Egg Bite Maker
RECIPE
guide
Follow us @unprocessyourfood
for recipes, videos, & daily inspiration

∙ 22 ∙ ∙ 23 ∙
C
h
e
f
T
i
p
!
Spraying Silicone Cups with
oil or cooking spray helps egg
whites release more easily.
Directions:
1. Add a splash of olive oil to a sauteé pan on the stovetop. Sauteé spinach,
onion, pepper, and mushroom over medium heat for 3-4 minutes.
2. Combine egg whites, cottage cheese, salt, and pepper in a bowl or blender.
Whisk or blend until fully combined.
3. Add one Silicone Cup full of water to the Heating Plate of the Deluxe Egg
¼ cup spinach
¼ cup diced onion
¼ cup diced mushroom
¼ cup diced pepper
2 tbsp cottage cheese
4 large egg whites
plash olive oil
pinch of salt
pinch of ground pepper
veggie
egg white bites
Makes 8-10 egg bites
Ingredients:
Bite Maker.
4. Spray the inside of the Silicone Cups with a non-stick
cooking spray so that the egg bites release cleanly.
Add ingredients to the bottom of the Silicone Cups,
then pour in the egg mixture so that the Silicone
Cups are ¾ full.
5. Plug in the Deluxe Egg Bite Maker and cook the
egg bites for 12-15 minutes.
Ingredients:
4 large eggs
¼ cup shredded Swiss or Gruyere
2 tbsp cottage cheese
pinch of salt
pinch of ground pepper
Directions:
1. Combine eggs, shredded cheese, cottage cheese, salt, and pepper in a bowl
or blender. Whisk or blend until fully combined.
2. Add one Silicone Cup full of water to the Heating Plate of the Deluxe Egg
Bite Maker.
3. Spray the inside of the Large Silicone Cup with a non-stick cooking spray
so that egg bites release cleanly. Pour in the egg mixture so that the Large
Silicone Cup is ¾ full.
4. Plug in the Deluxe Egg Bite Maker and cook for 10-12 minutes.
CHEESY
Eg g Pat t y
Makes 2 egg patties

∙ 24 ∙ ∙ 25 ∙
Directions:
1. Cook the egg patties using add-ins of your choice using the Deluxe Egg Bite
Maker and the recipe on page 23.
2. Heat a griddle on the stove over medium heat. Place a sausage patty on the
griddle and cook until browned. Add a slice of cheese to nish.
3. Cut English Mufn in half and lightly toast. Assemble sandwich, placing the
sausage with cheese on the bottom of the English Mufn, then the egg patty,
the topping with the other half of the English Mufn. Add salt or pepper
as desired.
4. Serve with hot sauce, ketchup, or your choice of condiments.
Ingredients:
2 Cheesy Egg Patties (see page 23)
2 slices cheese of your choice
2 sausage patties
2 English Mufns
hot sauce, ketchup, or other condiments
salt and pepper, to taste
egg & sausage
breakfast sandwich
Makes 2 sandwiches

∙ 26 ∙ ∙ 27 ∙
Ingredients:
2 orets cooked broccoli
2 cooked and crumbled bacon slices
4 large eggs
2 tbsp cottage cheese
Directions:
1. Combine eggs, cheddar cheese, cottage cheese, salt, and pepper in a bowl or
blender. Whisk or blend until fully combined.
2. Add one Silicone Cup full of water to the Heating Plate of the Deluxe Egg
Bite Maker.
3. Spray the inside of the Silicone Cups with a non-stick cooking spray so that
the egg bites release cleanly. Add broccoli and bacon to the bottom of the
Silicone Cups, then pour in the egg mixture so that the Silicone Cups are ¾ full.
4. Plug in the Deluxe Egg Bite Maker and cook the egg bites for 10-12 minutes.
bacon, broccoli,
cheddar Egg Bites
2 tbsp shredded cheddar cheese
pinch of salt
pinch of ground pepper
Makes 8-10 egg bites
Directions:
1. Combine eggs, cottage cheese, salt, and pepper in a bowl or blender.
Whisk or blend until fully combined.
2. Add one Silicone Cup full of water to the Heating Plate of the Deluxe Egg
Bite Maker.
3. Spray the inside of the Silicone Cups with a non-stick cooking spray so that
the egg bites release cleanly. Add diced tomato and feta to the bottom of the
Silicone Cups, then pour in the egg mixture so that the Silicone Cups
are ¾ full.
4. Plug in the Deluxe Egg Bite Maker and cook the egg bites for 10-12 minutes.
Ingredients:
¼ cup diced tomatoes
¼ cup crumbled feta cheese
4 large eggs
2 tbsp cottage cheese
pinch of salt
pinch of ground pepper
tomato feta
egg bites
Makes 8-10 egg bites

∙ 28 ∙ ∙ 29 ∙
Directions:
1. Combine eggs, cottage cheese, salt, and pepper in a bowl or blender.
Whisk or blend until fully combined.
2. Add one Silicone Cup full of water to the Heating Plate of the Deluxe Egg
Bite Maker.
3. Spray the inside of the Silicone Cups with a non-stick cooking spray so that the
egg bites release cleanly. Add diced tomato, onion, and bell pepper to the
bottom of the Silicone Cups, then pour in the egg mixture so that the Silicone
Cups are ¾ full.
4. Plug in the Deluxe Egg Bite Maker and cook the egg bites for 10-12 minutes.
Ingredients:
¼ cup tomato, diced
¼ cup onion, diced
¼ cup bell pepper, diced
1 tbsp hot sauce
4 large eggs
2 tbsp cottage cheese
pinch of salt
pinch of ground pepper
fiesta
egg bites
Makes 8-10 egg bites

∙ 30 ∙ ∙ 31 ∙
egg bite
Breakfast burrito
Ingredients:
8 Fiesta Egg Bites
1 cup cooked black or pinto beans
½ cup shredded cheese
¼ cup salsa
2 (10”) our tortillas
½ avocado
1 tbsp cilantro, shredded
Directions:
1. Cook 8 Fiesta Egg Bites following the recipe on page 29.
2. Lay our tortillas on a at surface. Add beans to the center of the tortilla in a
line, along with four egg bites per tortilla. Dice avocado and add along the line
of egg bites. Sprinkle on shredded cheese.
3. Roll the tortilla by folding the top and bottom in, then wrapping the sides in.
4. Grill to heat if desired. Garnish with salsa and shredded cilantro.
Makes 2 breakfast burritos

∙ 32 ∙ ∙ 33 ∙
egg bite
Caramel Custard
Ingredients:
3 tbsp white sugar, divided
1 cup whole milk
4 large egg yolks, at room temperature
1 tsp vanilla extract
fresh raspberries, for garnish, optional
Directions:
1. Add one Silicone Cup of water to the Heating Plate of the Deluxe Egg
Bite Maker.
2. Line up the four Silicone Cups on the counter. In a small saucepan, moisten 2
tbsp of the sugar with 1 tbsp water; do not stir. Over medium-high heat, boil
until the sugar mixture turns amber and just begins to smell burnt. Immediately
divide the hot caramel among the four cups. Be VERY careful, the sugar is
extremely hot.
Makes 10 custards
a
k
a
F
l
a
n
!
3. In a microwavable cup or small pot, heat the milk until steaming. In a small
bowl, whisk the egg yolks, 2 tbsp sugar, and vanilla together. While whisking,
pour in a little hot milk. Still whisking, add the remaining milk.
4. Place the Silicone Cups in the Deluxe Egg Bite Maker. Spoon in the custard
mixture so the Silicone Cups are nearly full.
5. Plug in the Deluxe Egg Bite Maker and cook the custards for 12-14 minutes.
Unplug, and with tongs, lift the lid of the Deluxe Egg Bite Maker. Let the
custards sit for 2 minutes. Lift the Silicone Cups by the handle and place them
onto a plate. Cool the custards for 10 minutes. Run a thin butter knife blade
around the inside of each Silicone Cup. Unmold the custards onto
dessert plates.
6. Replace the Silicone Cups in the Deluxe Egg Bite Maker. Fill the Silicone Cups
with the custard mixture, bake, cool and unmold the custards as above.
7. Just before serving, garnish with some raspberries.
Note: Do not leave the pot of boiling sugar
unattended. Keep young children and pets away
from the stove while making the caramel.

∙ 34 ∙ ∙ 35 ∙
Lemon
Cheesecake Bites
Ingredients:
4 two-cracker sheets of graham crackers
3 tbsp unsalted butter, melted
8 oz cream cheese, at room
temperature
¼ cup sugar
3 tablespoons sour cream
1 large egg
1 tsp grated lemon zest
¼ tsp vanilla extract
Directions:
1. Add one small Silicone Cup full of water to the Heating Plate of the Deluxe Egg
Bite Maker.
2. Lightly spray the inside of the Silicone Cups with a nonstick cooking spray so
that the cheesecake bites release cleanly.
3. For the crust, in a food processor, whirl the graham crackers until they are
ne crumbs. Transfer the crumbs to a mixing bowl. Add the butter, working it
in until the mixture resembles moist sand and clings together when pressed
between your ngers. Set aside. Wipe out the food processor bowl.
Makes 10 cheesecake bites using small Silicone Cups or 2 cheesecakes
using Large Silicone Cup.
4.
For the lling, in a food processor, whirl the cream cheese and sugar until
blended, then blend in the sour cream and lemon zest. Add the egg and
vanilla and blend again. Fill each Silicone Cup with cheesecake mixture to just
below the rim. Tap the lled cup on the counter to eliminate air bubbles.
5. Measure about 1 tbsp of buttery crumbs, press until they cling together then
place onto the top of lled cup. Repeat to fully cover cream cheese mixture in
all the cups.
6. Cut foil into 4x4” pieces, coat lightly with nonstick cooking spray. Wrap cups in
foil, pinching to tuck it tightly around the sides.
7. Plug in the Deluxe Egg Bite Maker and cook the cheesecake bites for
12 minutes.
8. Remove the foil and let the cheesecake bites sit for 5 minutes. Run a thin
knife around inside cups then unmold. Cool cheesecake bites for 15 minutes.
Refrigerate for 30 minutes to rm cheesecake bites.

∙ 36 ∙ ∙ 37 ∙∙ 37 ∙
4. To make the lling, in the food processor, whirl the cream cheese, sugar, and
sour cream until blended. Add the egg and vanilla and whirl until the lling is
smoothly blended.
5. Fill each Silicone Cup with cheesecake mixture to just below the rim. Tap the
lled cup on the counter to eliminate air bubbles.
6. Measure about 1 tablespoon of crumbs, press until they cling together then
place onto the top of lled cup. Repeat to fully cover cream cheese mixture in
all the cups.
7. Cut foil into 4x4” pieces, coat lightly with nonstick cooking spray. Wrap cups in
foil, pinching to tuck it tightly around the sides.
8. Plug in the Deluxe Egg Bite Maker and cook the cheesecake bites for
12 minutes.
9. Remove the foil and let the cheesecake bites sit for 5 minutes. Run a thin
knife around inside cups then unmold (use a butter knife or a plastic knife so
as not to damage the Silicone Cups). Cool cheesecake bites for 15 minutes.
Refrigerate for 30 minutes to rm cheesecake bites.
Note: If using regular Oreo
®
cookies, use 6
cookies and add 1 to 2 tablespoons melted
unsalted butter, enough for the crumbs to cling
together when pressed between your ngers.
Cookies N’ Cream
Cheesecake Bites
Ingredients:
5 Double Stuf Oreo
®
cookies (see note)
8 oz cream cheese, at room temperature
¼ cup sugar
2 tbsp sour cream
1 large egg
¼ tsp vanilla extract
Directions:
1. Add one small Silicone Cup full of water to the Heating Plate of the Deluxe Egg
Bite Maker.
2. Lightly spray the inside of the Silicone Cups with a nonstick cooking spray so
that the cheesecake bites release cleanly.
3. To make the crust, whirl the Oreo® cookies in a food processor until they are
ne crumbs that cling together when pressed between your ngers. Set aside.
Wipe out the food processor bowl.
Makes 12 cheesecake bites using small Silicone Cups or 2
cheesecakes using Large Silicone Cup.

∙ 38 ∙ ∙ 39 ∙
warr ant y
STOREBOUND, LLC — 1 YEAR LIMITED WARRANTY
Your StoreBound product is warranted to be free from defects in material and workmanship for a
period of one (1) year from the date of the original purchase when utilized for normal and intended
household use. Should any defect covered by the terms of the limited warranty be discovered within
one (1) year, StoreBound, LLC will repair or replace the defective part. To process a warranty claim,
contact Customer Support at 1(800)898-6970 for further assistance and instruction. A Customer
Support agent will assist you by troubleshooting minor problems. If troubleshooting fails to x the
problem, a return authorization will be issued. Proof of purchase indicating the date and place of
purchase is required and should accompany the return. You must also include your full name, shipping
address, and telephone number. We are unable to ship returns to a PO box. StoreBound will not be
responsible for delays or unprocessed claims resulting from a purchaser’s failure to provide any or all
of the necessary information. Freight costs must be prepaid by the purchaser.
Send all inquiries to support@storebound.com.
There are no express warranties except as listed above.
REPAIR OR REPLACEMENT AS PROVIDED UNDER THIS WARRANTY IS THE EXCLUSIVE REMEDY OF
THE CUSTOMER. STOREBOUND SHALL NOT BE LIABLE FOR ANY INCIDENTAL OR CONSEQUENTIAL
DAMAGES OR FOR BREACH OF ANY EXPRESS OR IMPLIED WARRANTY ON THIS PRODUCT EXCEPT
TO THE EXTENT REQUIRED BY APPLICABLE LAW. ANY IMPLIED WARRANTY OF MERCHANTABILITY
OR FITNESS FOR A PARTICULAR PURPOSE ON THIS PRODUCT IS LIMITED IN DURATION TO THE
DURATION OF THIS WARRANTY.
Some states do not allow the exclusion or limitation of incidental or consequential damages, or
limitations on how long an implied warranty lasts. Therefore, the above exclusions or limitations may
not apply to you. This warranty gives you specic legal rights and you may also have other rights, which
vary from state to state.
REPAIRS
DANGER! Risk of electric shock! The Dash Deluxe Egg Bite Maker is an electrical appliance.
Do not attempt to repair the appliance yourself under any circumstances.
Contact Customer Support regarding repairs to the appliance.
TECHNICAL SPECIFICATIONS
Model: DBBM450
Voltage: 120V ~ 60Hz
Power Rating: 420W
Stock#: DBBM450_20191029_v4
7am
–
7pm
Our US-based customer support team is at your service
Monday - Friday during the times below.
Reach us at 1 (800) 898-6970 or suppor[email protected]
customer support
Dash values quality and workmanship and stands behind this
product with our Feel Good Guarantee
™
. To learn more about
our commitment to quality, visit bydash.com/feelgood.
8am
–
8pm
9am
–
9pm
10am
–
10pm
Hey Hawaii! You can reach our customer service team from 5AM to 5PM.
And also, Alaska, feel free to reach out from 6AM - 6PM.
feel good
guarantee
™

∙ 38 ∙ ∙ 39 ∙
warr ant y
STOREBOUND, LLC — 1 YEAR LIMITED WARRANTY
Your StoreBound product is warranted to be free from defects in material and workmanship for a
period of one (1) year from the date of the original purchase when utilized for normal and intended
household use. Should any defect covered by the terms of the limited warranty be discovered within
one (1) year, StoreBound, LLC will repair or replace the defective part. To process a warranty claim,
contact Customer Support at 1(800)898-6970 for further assistance and instruction. A Customer
Support agent will assist you by troubleshooting minor problems. If troubleshooting fails to x the
problem, a return authorization will be issued. Proof of purchase indicating the date and place of
purchase is required and should accompany the return. You must also include your full name, shipping
address, and telephone number. We are unable to ship returns to a PO box. StoreBound will not be
responsible for delays or unprocessed claims resulting from a purchaser’s failure to provide any or all
of the necessary information. Freight costs must be prepaid by the purchaser.
Send all inquiries to support@storebound.com.
There are no express warranties except as listed above.
REPAIR OR REPLACEMENT AS PROVIDED UNDER THIS WARRANTY IS THE EXCLUSIVE REMEDY OF
THE CUSTOMER. STOREBOUND SHALL NOT BE LIABLE FOR ANY INCIDENTAL OR CONSEQUENTIAL
DAMAGES OR FOR BREACH OF ANY EXPRESS OR IMPLIED WARRANTY ON THIS PRODUCT EXCEPT
TO THE EXTENT REQUIRED BY APPLICABLE LAW. ANY IMPLIED WARRANTY OF MERCHANTABILITY
OR FITNESS FOR A PARTICULAR PURPOSE ON THIS PRODUCT IS LIMITED IN DURATION TO THE
DURATION OF THIS WARRANTY.
Some states do not allow the exclusion or limitation of incidental or consequential damages, or
limitations on how long an implied warranty lasts. Therefore, the above exclusions or limitations may
not apply to you. This warranty gives you specic legal rights and you may also have other rights, which
vary from state to state.
REPAIRS
DANGER! Risk of electric shock! The Dash Deluxe Egg Bite Maker is an electrical appliance.
Do not attempt to repair the appliance yourself under any circumstances.
Contact Customer Support regarding repairs to the appliance.
TECHNICAL SPECIFICATIONS
Model: DBBM450
Voltage: 120V ~ 60Hz
Power Rating: 420W
Stock#: DBBM450_20191029_v4
7am
–
7pm
Our US-based customer support team is at your service
Monday - Friday during the times below.
customer support
Dash values quality and workmanship and stands behind this
product with our Feel Good Guarantee
™
. To learn more about
our commitment to quality, visit bydash.com/feelgood.
8am
–
8pm
9am
–
9pm
10am
–
10pm
Hey Hawaii! You can reach our customer service team from 5AM to 5PM.
And also, Alaska, feel free to reach out from 6AM - 6PM.
feel good
guarantee
™

Section Title
∙ 40 ∙
1-800-898-6970 | @unprocessyourfood | bydash.com