
OVER THE RANGE MICROWAVE OVEN
USE & CARE MANUAL
Model KOTR30MXE
TINSEB585MRR0

PRECAUTIONS TO AVOID
POSSIBLE EXPOSURE
TO EXCESSIVE
MICROWAVE ENERGY
• Do not attempt to operate this oven with the
door open since open-door operation can
result in harmful exposure to microwave
energy. It is important not to defeat or tamper
with the safety interlocks.
• Do not place any object between the oven
front face and the door or allow soil or cleaner
residue to accumulate on sealing surfaces.
• Do not operate the microwave oven if it is
damaged. It is particularly important that the
microwave oven door close properly and that
there is no damage to the: (1) door (bent), (2)
hinges and latches (broken or loosened), (3)
door seals and sealing surfaces.
• The microwave oven should not be adjusted or
repaired by anyone except properly qualied
service personnel.
BERTAZZONI SERVICE
Bertazzoni is committed to providing the best customer and product service. We have a dedicated team of trained professionals
to answer your needs.
If you own a Bertazzoni appliance and need service in the US or Canada please use the following contact information:
e-mail: aftersaleservice@bertazzoni.com
Telephone - Monday through Friday, 7:30 am to 7:30 pm EST (except US public holidays)
US 866-905-0010
WESTERN CANADA 866-905-0010 (BC, AB, SK, MB)
EASTERN CANADA 800-561-7265 (ON, QC, NL, NB, NS, PE)
FOR CUSTOMER ASSISTANCE
WARNING:
This equipment generates and uses ISM frequency
energy and if not installed and used properly, that
is in strict accordance with the manufacturer's
instructions, may cause interference to radio and
television reception.
It has been type-tested and found to comply with
limits for an ISM Equipment pursuant to part 18
of FCC Rules, which are designed to provide
reasonable protection against such interference in
a residential installation.
However, there is no guarantee that interference
will not occur in a particular installation.
If this equipment does cause interference to radio
or television reception, which can be determined
by turning the equipment off and on, the user is
encouraged to try to correct the interference by one
or more of the following:
• Reorient the receiving antenna of radio or
television.
• Relocate the Microwave oven with respect to
the receiver.
• Move the microwave oven away from the
receiver.
• Plug the microwave oven into a different outlet
so that microwave oven and receiver are on
different branch circuits.
THE MANUFACTURER is not responsible for any
radio or TV interference caused by UNAUTHORIZED
MODIFICATION to this microwave oven. It is the
responsibility of the user to correct such interference.
2E

CONTENTS
FOR CUSTOMER ASSISTANCE .............................................2
PRECAUTIONS TO AVOID POSSIBLE EXPOSURE TO
EXCESSIVE MICROWAVE ENERGY ......................................2
TWO YEAR LIMITED WARRANTY .........................................4
IMPORTANT SAFETY INSTRUCTIONS .................................5
INSTALLATION GUIDE ....................................................... 6-7
EXAMINE THE OVEN AFTER UNPACKING .................................. 6
CHECK THE PARTS .......................................................................6
LOCATION ...................................................................................... 6
POWER SUPPLY ............................................................................6
CRITICAL USAGE WARNINGS ......................................................7
SPECIFICATIONS ....................................................................8
FEATURES DIAGRAM .......................................................9-11
OPERATION PROCEDURE ..................................................12
TO SET POWER LEVEL ...............................................................12
CONTROLS ..................................................................... 13-20
SETTING THE CLOCK ................................................................. 13
KITCHEN TIMER MODE .............................................................. 13
HOW TO USE AS A MINUTE TIMER ............................................13
HOW TO USE TO DELAY THE START OF COOKING ................13
HOW TO USE TO SET A HOLDING TIME ...................................13
TIME DEFROSTING ..................................................................... 14
WEIGHT DEFROSTING ...............................................................14
MELT/SOFTEN .............................................................................14
MELT/SOFTEN ITEM CHART ......................................................14
KEEP WARM ................................................................................14
TIME COOK .................................................................................. 14
COOKING IN TWO STAGES ........................................................ 15
DEFROSTING + COOKING .........................................................15
COOKING + COOKING ................................................................ 15
+30 SEC ........................................................................................16
EXPRESS COOK..........................................................................16
ONE TOUCH COOK (PRESET) ...................................................16
SENSOR OPERATIONS ...............................................................16
USING SENSOR SETTINGS ........................................................16
COVERING FOODS .....................................................................17
SENSOR COOK ...........................................................................17
SENSOR COOK CHART .............................................................. 18
TURNTABLE ON-OFF ..................................................................18
VENT FAN .....................................................................................18
COOKTOP LIGHT .........................................................................18
MUTE ............................................................................................ 19
FILTER RESET .............................................................................19
TO SET POWER SAVE MODE ..................................................... 19
CHILD SAFETY LOCK ..................................................................19
TO STOP THE OVEN WHILE THE OVEN IS OPERATING ......... 19
METAL RACK ................................................................................19
TO AVOID RISK OF PROPERTY DAMAGE: ................................19
TO USE METAL RACK: ................................................................20
CARE AND CLEANING ................................................... 21-25
MICROWAVE OVEN INTERIOR ................................................... 21
OVEN BOTTOM ............................................................................21
GLASS TRAY/TURNTABLE ..........................................................21
METAL RACK ................................................................................21
ROLLER GUIDE ...........................................................................21
OVEN EXTERIOR .........................................................................21
LIGHT COMPARTMENT ...............................................................21
CONTROL PANEL ........................................................................21
WAVEGUIDE COVER ................................................................... 21
THE EXHAUST FEATURE ...........................................................21
REUSABLE GREASE FILTERS ................................................... 21
TO REMOVE GREASE FILTER ...................................................22
TO CLEAN GREASE FILTER ....................................................... 22
TO REPLACE GREASE FILTER ..................................................22
LIGHT REPLACEMENT ................................................................22
COOKTOP LIGHT .........................................................................22
OVEN LIGHT ................................................................................23
INSTALL/REPLACE CHARCOAL FILTER .................................... 23
CHARCOAL FILTER ..................................................................... 23
IF NOTHING ON THE OVEN OPERATES: ..................................24
IF THE OVEN INTERIOR LIGHT DOES NOT WORK: ................. 24
IF OVEN WILL NOT COOK: .........................................................24
IF OVEN TAKES LONGER THAN NORMAL TO COOK OR COOKS
TOO RAPIDLY: .............................................................................24
IF THE TIME-OF-DAY CLOCK DOES NOT ALWAYS KEEP
CORRECT TIME: .......................................................................... 24
IF OVEN FLOOR OR GLASS TRAY ARE HOT: ...........................24
IF THE INTERIOR OF OVEN COLLECTS MOISTURE: ..............24
IF FOOD COOKS UNEVENLY: .....................................................24
IF FOOD IS UNDERCOOKED: .....................................................24
IF FOOD IS OVERCOOKED: .......................................................24
IF ARCING (SPARKS) OCCUR: ...................................................24
IF THE DISPLAY SHOWS A TIME COUNTING DOWN
BUT THE OVEN IS NOT COOKING: ............................................24
COOKING INSTRUCTIONS ............................................ 26-36
UTENSIL GUIDE ...........................................................................26
USE YOUR MICROWAVE OVEN SAFELY...................................27
GENERAL USE .............................................................................27
FOOD ............................................................................................27
ARCING ........................................................................................27
MICROWAVING PRINCIPLES ...................................................... 27
HOW MICROWAVES COOK FOOD ............................................. 27
CONVERSION CHART .................................................................28
COOKING TECHNIQUES .............................................................28
STANDING TIME ..........................................................................28
MOISTURE CONTENT ................................................................. 28
DENSITY .......................................................................................28
CLING FILM .................................................................................. 28
SHAPE .......................................................................................... 28
SPACING ......................................................................................28
STARTING TEMPERATURE ........................................................28
LIQUIDS ........................................................................................28
TURNING & STIRRING ................................................................28
ARRANGING ................................................................................29
DEFROSTING GUIDE ..................................................................29
QUANTITY ....................................................................................29
PIERCING .....................................................................................29
COVERING ................................................................................... 29
DEFROSTING CHART (BY TIME DEFROST) .............................30
COOKING .....................................................................................31
COOKING CHART ........................................................................31
REHEATING .................................................................................32
REHEATING CHART ....................................................................32
VEGETABLE ................................................................................. 33
COOKING CHART FOR FRESH VEGETABLES .......................... 33
COOKING CHART FOR FROZEN VEGETABLES ....................... 33
RECIPES ......................................................................................34
E3

TWO YEAR LIMITED WARRANTY
Cod. 3070333 rev.3
The warranties provided by Bertazzoni Spa in this statement apply exclusively to Bertazzoni appliances and
accessories sold as new products to the original owner by a Bertazzoni authorized distributor, retailer, dealer or
service center and installed in the United States and Canada. The warranties provided in this statement are not
transferable and have validity from the date of installation.
COVERAGE INFORMATION
Bertazzoni SpA will repair or replace any component part which fails or proves defective due to materials and/or
workmanship within 2 years from the date of installation and under conditions of normal residential use. Repair or
replacement will be free of charge, including labor at standard rates and shipping expenses. Repair service must be
performed by a Bertazzoni Authorized Service Center during normal working hours.
COSMETIC WARRANTY
Bertazzoni will cover parts showing cosmetic defects in material and workmanship for a period of thirty (30) days
from date of installation of the unit. This coverage will include scratches, stains, surface imperfections on stainless
steel, paint and porcelain, with the exclusion of slight differences in color due to materials and painting/enamelling
technologies.
Exclusions are labor costs, B stock items, out-of-box appliances and display units.
HOW TO OBTAIN SERVICE
To obtain warranty service please contact Bertazzoni Customer Service at the numbers below and provide model
number, serial number and date of purchase.
ENGLISH 866 905 0010 - FRANCAIS 800 561 7265
Save proof of original purchase or of original installation to establish warranty period. Copy of the product serial tag
is affixed to the back cover of the instruction manual.
WHAT IS NOT COVERED
1 The product used in any commercial application
2 Repair service provided by other than a Bertazzoni authorized service agency.
3 Damage or repair service to correct service provided by an unauthorized agency or the use of unauthorized
parts.
4 Installation not in accordance with local electrical codes or plumbing codes.
5 Defects or damage due to improper storage of the product.
6 Defects or damage or missing parts on products sold out of the original factory packaging or from displays.
7 Service calls or repairs to correct the installation of the product and/or related accessories.
8 Service calls to connect, convert or otherwise repair the electrical wiring and/or gas line to properly use the
product.
9 Service calls to provide instructions on the use of a Bertazzoni product.
10 Repair service due to product usage in manner other than what is normal and customary for home use.
11 Replacement of wear and tear parts
12 Replacement of glasses and light bulbs if they are claimed to have failed later than 30 days after installation
and in no case later than 4 months after date of purchase
13 Defects and damages arising from accident, alteration, misuse, abuse, improper installation.
14 Defects and damages arising from transportation of the product to the home of the owner.
15 Defects and damage arising from external forces beyond the control of Bertazzoni SpA such as fire, flood,
earthquakes and other acts of God.
In case the product will be installed in a remote area, where certified trained technicians are not reasonably
available, the customer will be responsible for the transportation costs for the delivery of the product to the nearest
authorized service center or for the displacement costs of a certified trained technician.
Bertazzoni does not assume any responsibility for incidental or consequential damages. Some states do not
allow the exclusion or limitation of incidental or consequential damages, so the above limitation or exclusion may not
apply to you. This warranty gives you specific legal rights and you may also have other rights which may vary from
state to state or province to province.
4E

When using electrical appliances, basic safety precau-
tions should be followed, including the following:
WARNING - To reduce the risk of burns, electric shock,
re, injury to persons or exposure to excessive micro-
wave energy:
1. Read all instructions before using the appliance.
2. Read and follow the specic “PRECAUTIONS TO
AVOID POSSIBLE EXPOSURE TO EXCESSIVE
MICROWAVE ENERGY” on page 2.
3. This appliance must be grounded. Connect only
to properly grounded outlet. See “GROUNDING
INSTRUCTIONS” on page 7.
4. Install or locate this appliance only in accordance with
the provided installation instructions.
5. Some products such as whole eggs and sealed
containers–for example, closed glass jars are able to
explode and should not be heated in this oven.
6. Use this appliance only for its intended use as described
in this manual. Do not use corrosive chemicals or
vapors in this appliance. This type of oven is specically
designed to heat, cook or dry food. It is not designed for
industrial or laboratory use.
7. As with any appliance, close supervision is necessary
when used by children.
8. Do not operate this appliance if it has a damaged cord
or plug, if it is not working properly, or if it has been
damaged or dropped.
9. This appliance should be serviced only by qualied
service personnel. Contact nearest Authorized Servicer
for examination, repair or adjustment.
10. Do not cover or block any openings on the appliance.
11. Do not store this appliance outdoors. Do not use this
product near water—for example, near a kitchen sink,
in a wet basement, near a swimming pool, or similar
locations.
12. Do not immerse cord or plug in water.
13. Keep cord away from heated surfaces.
14. Do not let cord hang over edge of table or counter.
15. When cleaning surfaces of door and oven that come
together upon closing the door, use only mild, non-
abrasive soaps or detergents applied with a sponge or
soft cloth.
16. To reduce the risk of re in the microwave oven cavity:
a. Do not overcook food. Carefully attend to appliance
when paper, plastic or other combustible materials
are placed inside the microwave oven to facilitate
cooking.
b. Remove wire twist-ties from paper or plastic bags
before placing bag in microwave oven.
c. If materials inside the microwave oven should
ignite, keep microwave oven door closed, turn
microwave oven off and disconnect the power
cord or shut off power at the fuse or circuit
breaker panel.
d. Do not use the cavity for storage purposes. Do not
leave paper products, cooking utensils or food in
the cavity when not in use.
17. Liquids, such as water, coffee or tea are able to be
overheated beyond the boiling point without appearing
to be boiling due to surface tension of the liquid. Visible
bubbling or boiling when the container is removed
from the microwave oven is not always present. THIS
COULD RESULT IN VERY HOT LIQUIDS SUDDENLY
BOILING OVER WHEN A SPOON OR OTHER
UTENSIL IS INSERTED INTO THE LIQUID.
To reduce the risk of injury to persons:
a. Do not overheat the liquid.
b. Stir the liquid both before and halfway through
heating it.
c. Do not use straight-sided containers with narrow
necks. Use a wide-mouthed container.
d. After heating, allow the container to stand in the
microwave oven at least for 20 seconds before
removing the container.
e. Use extreme care when inserting a spoon or other
utensil into the container.
18. Do not use this microwave oven to heat corrosive
chemicals (for example, sulfides and chlorides).
Vapors from such corrosive chemicals may interact
with the contact and springs of the safety interlock
switches thereby rendering them inoperable.
19. Never heat oil or fat for deep frying as you cannot
control the temperature and doing so may lead to
overheating and re.
20. Do not operate the oven without the glass tray in
place. Be sure it is properly sitting on the rotating
base.
21. Use care when cleaning the vent hood filters.
Corrosive cleaning agents such as lye-based oven
cleaners may damage the lters.
22. Clean the ventilating hood frequently. Do not allow
grease to accumulate on the hood or the lters.
23. Suitable for use above both gas and electric cooking
equipment up to 30 inches wide.
24. Do not use this oven for commercial purposes. It is
designed for household use only.
25. When aming foods under the hood, turn the fan on.
Keep the area under the hood properly ventilated at
all times. Turn off cooking equipment if you see ames
or a re occurs.
IMPORTANT SAFETY INSTRUCTIONS
SAVE THESE INSTRUCTIONS
E5

EXAMINE THE OVEN AFTER UNPACKING
Unpack the oven, remove all packaging material and examine
the oven for any damage such as dents on the interior or
exterior of the oven, broken door latches, cracks in the door,
or a door that is not lined up correctly. If there is any damage,
do not operate the oven and notify your dealer immediately.
CHECK THE PARTS
Carefully unpack your microwave oven, and make sure you’ve
received all the parts shown below. If your microwave oven
was damaged during shipping, or if you do not have all the
parts, contact Bertazzoni.
IMAGE PART & DESCRIPTION QTY.
Hardware Kit (Screws) 1
Metal Rack 1
Damper
(Exhaust Adapter)
1
Mounting Plate 1
Top Cabinet
Template
Top Cabinet Template 1
Wall Template
Rear Wall Template 1
Installation
Manual
Installation Manual 1
Use & Care
Manual
Use and Care Manual 1
Guide Roller Ring 1
Grease Filters 2
Grease Filter Holders 2
Glass Turntable 1
LOCATION
• The installation of this appliance must be performed by a
qualied technician or service company.
Failing to have a qualied technician install the oven may
result in electric shock, re, an explosion, problems with
the product, or injury.
• Do not install this appliance in a humid, oily, or dusty
location, or in a location exposed to direct sunlight or water
(rain drops).
• Plug the power plug into the wall socket rmly. Do not use
a damaged power plug, damaged power cord, or loose wall
socket.
• Do not mount over a sink.
• Do not stand on top of the microwave or place objects (such
as laundry, oven covers, lighted candles, lighted cigarettes,
dishes, chemicals, metal objects, etc.) on the appliance.
This may result in electric shock, re, problems with the
product, or injury.
POWER SUPPLY
• Check your local power source.
This microwave oven requires a current of approximately
15 amperes, 120Volts, 60Hz and a grounded outlet.
a. A short power-supply cord is provided to reduce the
risks of the user becoming entangled in or tripping over
a longer cord.
b. Longer cord sets or extension cords are available and
may be used if care is exercised in their use.
c. If a long cord or extension cord is used:
- The marked electrical rating of the cord set or
extension cord should be at least as great as the
electrical rating of the oven.
- The extension cord must be a grounding type 3-wire
cord.
- The longer cord should be arranged so that it will not
drape the table top or counter where it can be pulled
on by children or tripped over unintentionally.
• Check power cord and outlet.
- Remove all foreign substances such as dust or water
from the power plug terminals and contact points using
a dry cloth on a regular basis.
- Unplug the power plug and clean it with a dry cloth.
- Plug the power cord into a properly grounded 3-pronged
outlet. Your oven should be the only appliance connected
to this circuit.
- Sharing a wall socket with other appliances, using a
power strip, or extending the power cord may result in
electric shock or re.
- Do not use an electric transformer. It may result in electric
shock or re.
- Ensure that the voltage, frequency and current provided
match the product’s specications.
INSTALLATION GUIDE
6E

When using 3-pronged plug
3-Prong Receptacle
Receptacle
Box Cover
3-P
rong Plug
When using grounding adapter, make sure
the receptacle box is fully grounded.
Receptacle Box Cover
Receptacle
Grounding
Lead
Grounding
Adapter
THE CANADIAN ELECTRICAL CODE DOES NOT ALLOW
THE USE OF THE GROUNDING ADAPTOR.
GROUNDING INSTRUCTIONS
This appliance must be grounded. In the event of an electrical
short circuit, the grounding plug reduces the risk of electric
shock by providing an escape wire for electric current. This
appliance is equipped with a cord having a grounding wire
with a grounding plug. The plug must be plugged into an outlet
that is properly installed and grounded.
WARNING:
Improper use of the grounding can result in a risk of
electric shock.
Consult a qualied electrician or serviceman if the
grounding instructions are not completely understood,
or if doubt exists as to whether the appliance is properly
grounded. And if it is necessary to use an extension
cord, use only a 3-wire extension cord that has a
3-blade grounding plug, and a 3-slot receptacle that will
accept the plug on the appliance. The marked rating
of the extension cord shall be equal to or greater than
the electrical rating of the appliance.
WARNING:
Do not cut or remove the third (ground) prong from the
power cord under any circumstances.
CRITICAL USAGE WARNINGS
If the microwave appliance is ooded, please contact your
nearest service center. Failing to do so may result in electric
shock or re.
Read and follow the specic “Precautions to Avoid Possible
Exposure to Excessive Microwave Energy” found on page 2.
If the microwave generates a strange noise, a burning smell
or smoke, unplug it immediately and contact your nearest
service center.
• In the event of a gas leak (propane gas, LP gas, etc.),
ventilate the room immediately. Do not touch the microwave,
power cord, or plug.
• Do not use a ventilating fan.
• A spark may result in an explosion or re.
Take care that the door or any of the other parts do not
come into contact with your body while cooking or just after
cooking.
• In the event of a grease re on the surface units below
the oven, smother the aming pan on the surface unit by
covering the pan completely with a lid, a cookie sheet or a
at tray.
Never leave surface units beneath your oven unattended
at high heat settings. Boilovers cause smoking and greasy
spills that may ignite and spread if the vent fan is operating.
To minimize automatic fan operation, use adequate sized
cookware. Use high heat on surface units only when
necessary.
If materials inside the oven should ignite, keep the oven
door closed, turn the oven off and disconnect the power
cord, or shut off power at the fuse or circuit breaker panel.
If the door is opened, the re may spread.
• Always observe Safety Precautions when using your
oven. Never try to repair the oven on your own. There is
dangerous voltage inside. If the oven needs to be repaired,
contact an authorized service center near you.
INSTALLATION GUIDE
E7
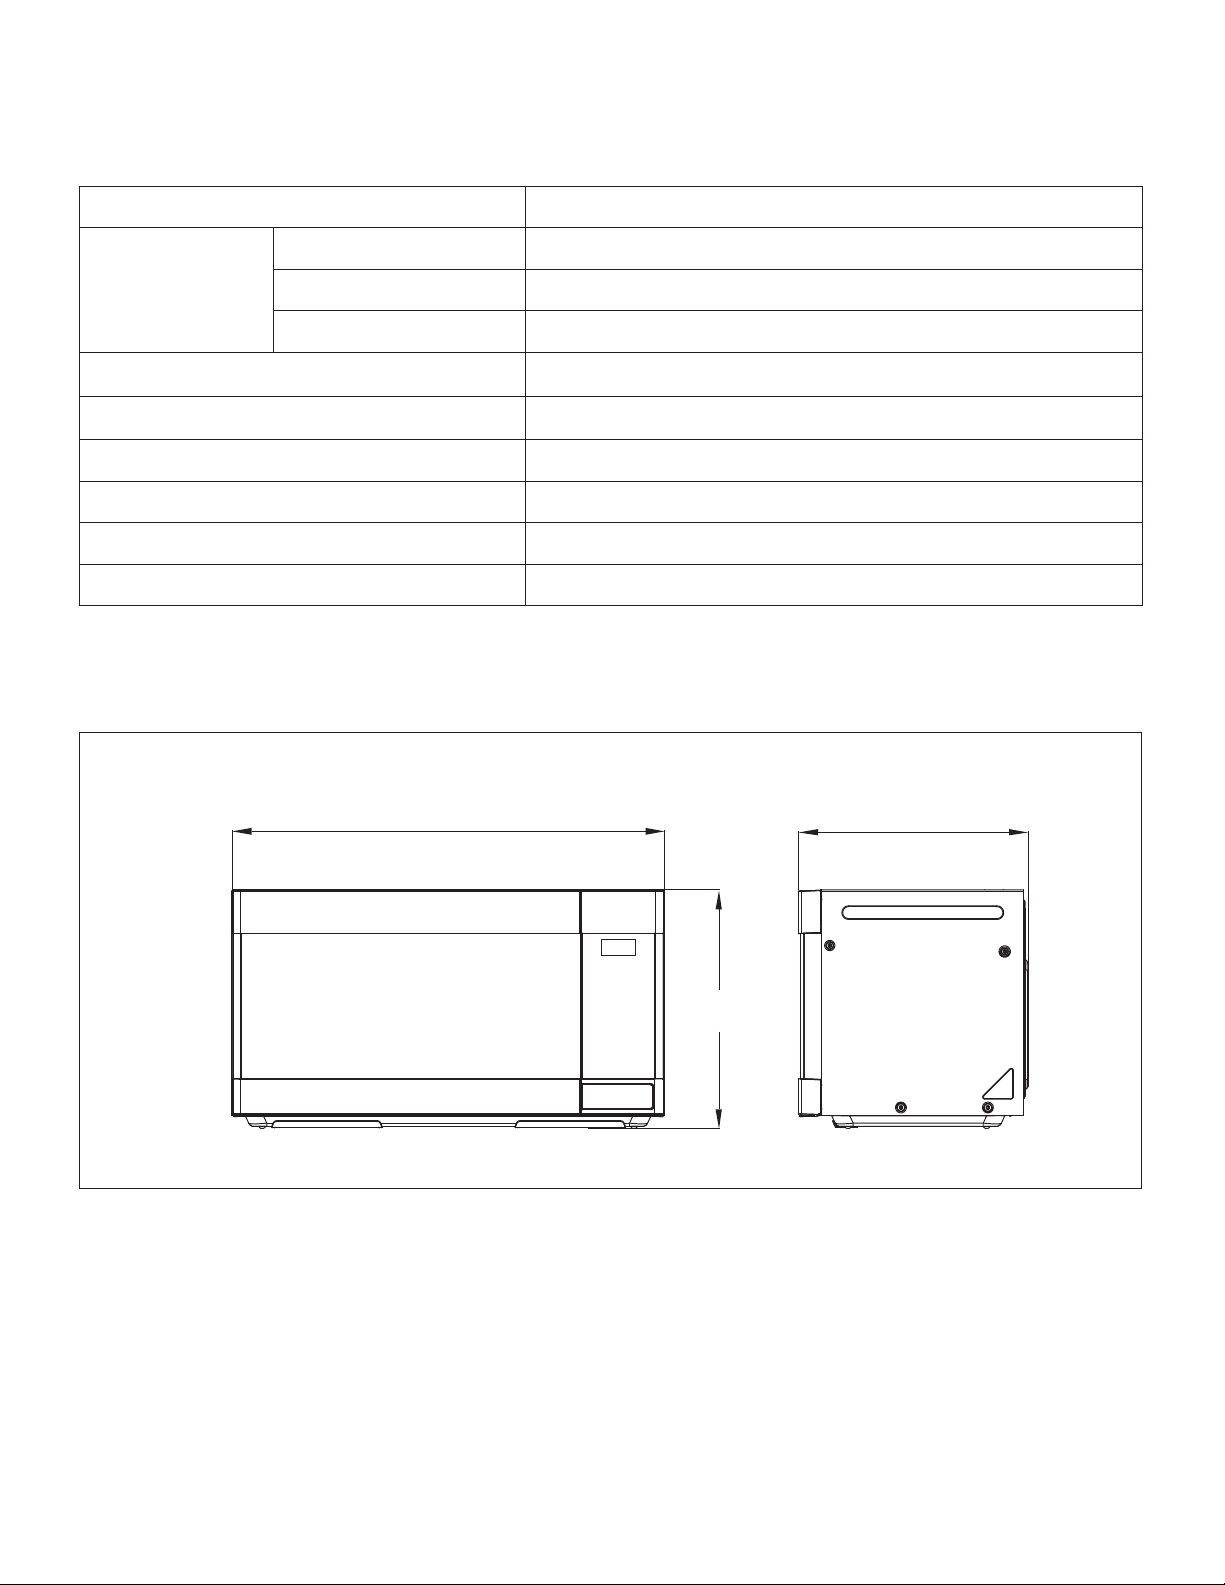
SPECIFICATIONS
Power Supply 120V AC, 60Hz single phase with grounding
Microwave
Input Power 1500 W
Energy Output 950 W
Frequency 2450 MHz
Outside Dimensions (W x H x D) 29.9" x 16.3" x 15.9"
Cavity Dimensions (W x H x D) 20.6" x 10" x 14.9"
Cavity Volume 1.6 cu. ft.
Net Weight Approx. 50.3 LBS
Timer 99 min. 99 sec.
Power Selections 10 levels
*
Specications are subject to change without notice.
29.9” 15.9”
16.3”
8E

FEATURES DIAGRAM
1
2 3 4 5 6 7
15
12 11 10
9 8
13 14 16
1. DOOR LATCHES
2. WINDOW with METAL SHIELD
Screen allows cooking to be viewed while keeping
microwaves conned in oven.
3. MODEL NUMBER PLATE
Located on the front wall of the microwave oven.
4. CHARCOAL FILTER
Behind Vent Grille
5. OVEN LIGHT
6. WAVEGUIDE COVER
Protects the microwave outlet from splashes of cooking
foods.
7. TOUCH CONTROL PANEL and DIGITAL DISPLAY
For detailed information on each feature, see Features
Diagram section, pages 10, 11.
8. HOOD CONTROLS
Vent Fan - Press High, Low or Off.
Light - Press On or Off.
9. DOOR BUTTON
To open the door push the door open button.
10. COOKTOP LIGHT
11. GREASE FILTERS
12. HANDLE FILTERS
Use to insert Grease Filters.
13. METAL RACK
Use for extra space when cooking with more than one
container at the same time.
14. TURNTABLE / GLASS TRAY
Composed of glass tray and roller guide. The roller guide
is placed rst in the bottom of the microwave and supports
the glass tray. Both parts must be in place when using the
microwave oven.
15. VENTILATION MOTOR
Your microwave oven is designed for adaptation to the
following three types of ventilation.
(Recirculation ventilation system, Vertical ventilation
system, Horizontal ventilation system)
See installation manual to select the type of ventilation
required for your installation.
16. GUIDE ROLLER RING
E9
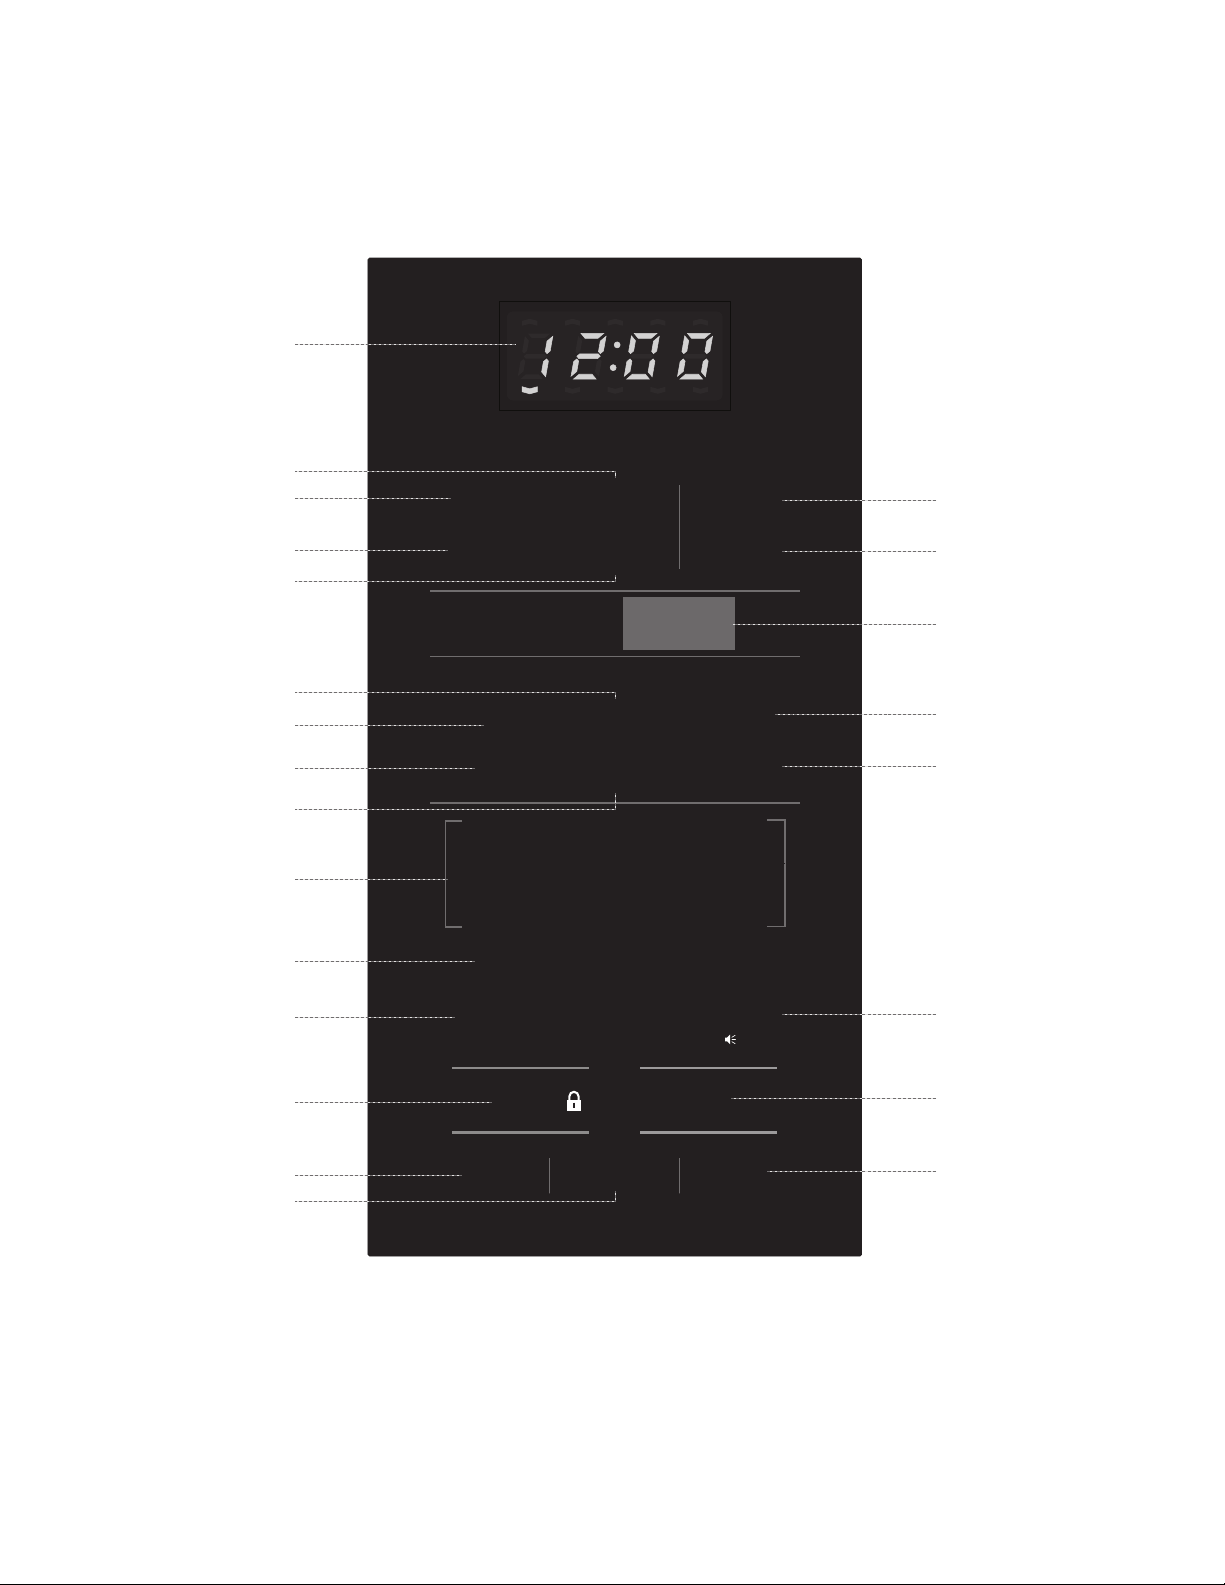
The Touch Control Panel allows you to set the oven controls with the press of a nger.
It’s designed to be easy to use and understand.
ENTER
START
Sensor Cook
Convenience Features
Express Cook
Potato
Reheat
Popcorn
Beverage
Melt /
Soften
Frozen
Entree
Frozen
Vegetables
Turntable
On-Off
Time
Cook
1
4
7
+30 sec
2
5
8
0
Stop
Clear
Start
3
6
9
Power
Level
Filter
Reset
(3 Sec)
Vent Fan
Hi-Lo-Off
Light
On-Off
Clock
Keep
Warm
Defrost
Time/Weight
Preset
COOK
1. Butter
2. Chocolate
3. Ice Cream
4. Cheese
FILTER
DEF.
TIME
CODE
MUTE
LBS. OZ.
Kitchen
Timer
( 3 Sec)
• Each time a pad is pressed, a beep will sound.
• When STOP/CLEAR Pad is pressed during oven operation, the oven will stop; however, all
programmed information is retained. To clear all information, press the STOP/CLEAR Pad again.
1
3
4
10
11
15
16
17
19
21
2
9
5
14
22
6
7
12
13
20
23
8
18
FEATURES DIAGRAM
10E

FEATURES DIAGRAM
1. DISPLAY - Displays time of day, time or power level being
used, cooking mode and instructions.
2. FROZEN ENTREE - Press this pad to cook Frozen
Entrees. The microwave oven sensor will automatically
adjust the cooking time to the type and amount of food.
3. POTATO - Press this pad to cook a potato. The microwave
oven sensor will automatically adjust the cooking time to
the type and amount of food.
4. REHEAT - Press this pad to reheat food. The microwave
oven sensor will automatically adjust the cooking time to
the type and amount of food.
5. FROZEN VEGETABLES - Press this pad to cook Frozen
Vegetables. The microwave oven sensor will automatically
adjust the cooking time to the type and amount of food.
6. POPCORN - Press this pad to cook prepackaged
microwave Popcorn weight 3.5/3.0/1.75 ounces.
7. BEVERAGE - Press this pad to reheat a beverage.
8. MELT/SOFTEN - Press this pad to melt or soften Butter,
Chocolate, Ice Cream and Cheese.
9. CLOCK - Press this pad to enter time of day.
Also press and hold this pad for 3 seconds to set power
save mode. For detailed information on this feature, see
Controls section, page 19.
10. TURNTABLE ON-OFF - Press this pad to turn turntable
on or off.
11. TIME COOK - Press this pad to set the Microwave cooking
time.
• Power Level 10 (High) is automatic but lower heat levels
may be programmed.
12. KEEP WARM - Press this pad and safely keep food warm
for up to 30 minutes.
13. DEFROST - Press this pad to set defrosting time or
defrosting weight.
14. POWER LEVEL - Press this pad if you want to change
from automatic Power Level 10 (High) for cooking.
15. EXPRESS COOK - Press these pads to set 1-6 minutes
preset cooking time at 100% power level.
16. NUMBER PADS - Press these pads to enter cooking time,
defrosting time or weight, time of day, power level.
17. +30 SEC - Press this pad for 30 seconds instant "ON"
cooking time or to add 30 seconds of cooking time as the
timer is counting down.
18. KITCHEN TIMER - Press this pad to use as a minute
timer, delay cooking, hold setting after cooking.
Also press and hold this pad for 3 seconds to set sound
on/off. For detailed information on this feature, see
Controls section, page 19.
19. STOP/CLEAR - When pressed once, it pauses the oven
operation. When pressed twice, it resets the oven and
erases all settings (except time of day).
Also press and hold this pad for 3 seconds to set child
safety lock function. For detailed information on this
feature, see Controls section, page 19.
20. START - After all selections are made, press this pad to
start the oven or timer.
21. LIGHT - Press this pad to turn on or off the cooktop light.
22. VENT FAN - Press this pad to turn the fan on high, low
or off.
23. FILTER RESET - Press and hold this pad for 3 seconds
to reset time after replacing the lter.
Charcoal lters must be replaced every 6 months.
E11

This section includes useful information about oven operation.
1. Plug power supply cord into a standard 3-pronged 15 Amp
120V AC 60Hz power outlet.
2. After placing the food in a suitable container, open the
oven door and put it on the glass tray.
The glass tray and roller guide must always be in place
during cooking.
3. Close the door. Make sure that it is rmly closed.
4. The oven light is on when the microwave oven is operating.
5. The oven door can be opened at any time during operation
by pushing the door open button of the control panel. The
oven will automatically stop.
6. Each time a pad is pressed, a beep will sound to
acknowledge the press.
7. The oven automatically cooks on full power unless set to
a lower power level.
8. The display will show “ : 0” when the oven CLOCK is not
set.
9. Time clock returns to the present time when the cooking
time ends.
10. When the STOP/CLEAR pad is pressed during oven
operation, the oven stops cooking and all information
is retained. To erase all information (except the present
time), press the STOP/CLEAR pad once more. If the oven
door is opened during oven operation, all information is
retained.
11. If the START pad is pressed and the oven does not
operate, check the area between the door and door seal
for obstructions and make sure the door is closed securely.
The oven will not start cooking until the door is completely
closed or the program has been reset.
Make sure the oven is properly installed and plugged
into the electrical outlet.
OPERATION PROCEDURE
TO SET POWER LEVEL
The power level is set by pressing the POWER LEVEL pad
and number pad. If you wish to use a different power level,
press the POWER LEVEL pad before pressing START pad.
Enter the power level desired by pressing the appropriate
number pad. The chart shows the display, the power level
and the percentage of power.
PRESS POWER
LEVEL PAD AND
NUMBER
POWER
LEVEL
(DISPLAY)
APPROXIMATE
PERCENTAGE
OF POWER
Power Level + 1 + 0 PL10 100%
Power Level + 9 PL-9 90%
Power Level + 8 PL-8 80%
Power Level + 7 PL-7 70%
Power Level + 6 PL-6 60%
Power Level + 5 PL-5 50%
Power Level + 4 PL-4 40%
Power Level + 3 PL-3 30%
Power Level + 2 PL-2 20%
Power Level + 1 PL-1 10%
Power Level + 0 PL-0 0%
NOTE: If “PL-0” is selected, the oven will work with the
fan but no power. You can use this level to remove odors.
12E

CONTROLS
SETTING THE CLOCK
When the oven is rst plugged in, the display will show " : 0"
and a tone will sound. If the AC power ever goes off, the
display shows “ : 0” when the power comes back on.
Clock
1. Press the CLOCK pad.
This is a 12 hour clock system.
2. Press the CLOCK pad once more.
This is a 24 hour clock system.
3. Enter the correct time of day by
pressing the number pads in
sequence.
4. Press the CLOCK pad.
The ENTER, TIME indicators blink and "12H" is displayed.
NOTE: This oven has multiple clock systems. If you want
a 12 hour clock system, omit step 2.
The display stops blinking, and the colon starts blinking.
If you selected a 12 hour clock system, this digital clock
allows you to set from 1:00 to 12:59. If you selected a 24
hour clock system, this digital clock allows you to set from
0:00 to 23:59.
NOTE:
1. If you attempt to enter an incorrect time, the time will not be
set and an error signal tone will sound. Press the CLOCK
pad and re-enter the time.
2. If you want to set power save mode, press and hold the
CLOCK pad for 3 seconds. For detailed information on this
feature, see Controls section, page 19.
KITCHEN TIMER MODE
Timer operates as a minute timer. Timer operates without
microwave energy.
HOW TO USE AS A MINUTE TIMER
Kitchen
Timer
( 3 Sec)
1. Press KITCHEN TIMER pad.
2. Press the amount of time you want to
count down.
Start
3. Press START pad.
The ENTER, TIME indicators blink and “ : 0” is displayed.
The display will show what you pressed.
When you press the START pad, the TIME indicator starts
blinking and the display counts down the time remaining
in KITCHEN TIMER mode. When KITCHEN TIMER mode
ends, you will hear 3 beeps.
NOTE: If you want to turn sound on or off, press and hold
KITCHEN TIMER pad for 3 seconds. For detailed information
on this feature, see Controls section, page 19.
HOW TO USE TO DELAY THE START OF
COOKING
Kitchen
Timer
( 3 Sec)
1. Press KITCHEN TIMER pad.
2. Press the amount of time you want to
delay.
Time
Cook
3. Press TIME COOK pad to program
the desired cooking time for food to
be cooked.
Start
4. Press START pad.
The ENTER, TIME indicators blink and “ : 0” is displayed.
The display will show what you pressed.
When you press the START pad, the TIME indicator starts
blinking and the display counts down the time remaining
in KITCHEN TIMER mode. When KITCHEN TIMER mode
ends, the oven will beep. The TIME indicator goes off and
COOK indicator starts blinking. The display counts down the
time remaining in MICROWAVE mode. When MICROWAVE
cook ends, you will hear 3 beeps.
HOW TO USE TO SET A HOLDING TIME
Time
Cook
1. Press TIME COOK pad to program
the desired cooking time for food to be
cooked.
Kitchen
Timer
( 3 Sec)
2. Press KITCHEN TIMER pad.
3. Press the amount of time you want the
oven to hold.
Start
4. Press START pad.
The ENTER, TIME indicators blink and “ : 0” is displayed.
The display will show what you pressed.
When you press the START pad, the COOK indicator starts
blinking and the display counts down the time remaining in
MICROWAVE mode. When the MICROWAVE cook ends,
the oven will beep. The COOK indicator goes off and TIME
indicator starts blinking. The display counts down the time
remaining in KITCHEN TIMER mode. When the KITCHEN
TIMER mode ends, you will hear 3 beeps.
NOTE: Your oven can be programmed for 99 minutes 99
seconds. (99:99)
E13

CONTROLS
TIME DEFROSTING
When TIME DEFROST is selected, the automatic cycle divides
the defrosting time into periods of alternating defrost and stand
times by cycling on and off.
Defrost
Time/Weight
1. Press DEFROST pad once.
2. Press number pads for the desired
defrosting time.
Start
3. Press START pad.
The DEF indicator lights and ENTER, TIME indicators blink,
“ : 0” is displayed.
The display will show what you pressed.
When you press the START pad, the DEF indicator starts
blinking to show the oven is in the TIME DEFROST mode.
The display counts down the time to show you how much
defrosting time is left in the TIME DEFROST mode. The
oven beeps during the defrosting cycle to signal that the
food needs to be turned or rearranged. When the defrosting
time ends, you will hear 3 beeps.
NOTE: Your oven can be programmed for 99 minutes 99
seconds. (99:99)
WEIGHT DEFROSTING
WEIGHT DEFROST lets you easily defrost food by eliminating
guesswork in determining defrosting time.
Follow the steps below for easy defrosting.
Defrost
Time/Weight
1. Press DEFROST pad twice.
2. Press number pads for the desired
defrosting weight.
Start
3. Press START pad.
The DEF indicator lights and ENTER, LBS indicators blink,
"0.0" is displayed.
The display will show what you pressed.
The defrosting time is automatically determined by the
weight selected.
When you press the START pad, the DEF indicator starts
blinking and the defrosting time counts down in the display
window. The oven beeps during the defrosting cycle to signal
that the food needs to be turned or rearranged. When the
defrosting time ends, you will hear 3 beeps.
NOTE: Your oven can be programmed for 0.2 to 6.0 lbs.
MELT/SOFTEN
The MELT/SOFTEN feature can be used to melt or soften
butter, chocolate, ice cream and cheese.
See the chart for specic settings to use.
Melt /
Soften
1. Press MELT/SOFTEN pad once for
butter, twice for chocolate, three times
for ice cream, four times for cheese.
Start
2. Press START pad.
The display will show what you pressed.
Melt/Soften Item Chart
PRESS PAD DISPLAY SOFTEN ITEM WEIGHT
Once S-1
Butter
1
/2 cup
Twice S-2
Chocolate 8 oz
Three Times S-3
Ice Cream
1
/2 gallon
Four Times S-4
Cheese 1 plate
KEEP WARM
KEEP WARM feature maintains food at a warm temperature
for 30 minutes.
Keep
Warm
1. Press KEEP WARM pad.
Start
2. Press START pad.
When pressing KEEP WARM pad, the display shows
"30:00".
When the cooking time ends, you will hear 3 beeps.
TIME COOK
Time
Cook
1. Press TIME COOK pad.
2. Press number pads for the cooking
time.
Power
Level
3. Press POWER LEVEL pad.
4. Press number pads for power level
(0~10).
Start
5. Press START pad.
14E

CONTROLS
The COOK indicator lights and ENTER, TIME indicators
blink., “ : 0” is displayed.
The display will show what you pressed.
The display will show PL10 for 100% power.
The display will show PL-0 ~ PL10.
If you skip steps 3 and 4, 100% power is automatic.
When you press START pad, the COOK indicator starts
blinking to show the oven is cooking.
The display counts down the time to show how much
cooking time is left. When the cooking time ends, you will
hear 3 beeps.
NOTE:
• Your oven can be programmed for 99 minutes 99 seconds.
(99:99)
• Using lower power levels increases the cooking time which
is recommended for foods such as cheese, milk and slow
cooking of meats.
COOKING IN TWO STAGES
This feature lets you program two sequential operations such
as defrosting and cooking or cooking using two different
power levels. It automatically changes power settings and
cooking time.
DEFROSTING + COOKING
Defrost
Time/Weight
1. Press DEFROST pad once.
2. Press number pads for the desired
defrosting time.
Time
Cook
3. Press TIME COOK pad.
4. Press number pads for the cooking
time.
Power
Level
5. Press POWER LEVEL pad.
6. Press number pads for power level
(0~10).
Start
7. Press START pad.
The DEF indicator lights and ENTER, TIME indicators blink,
“ : 0” is displayed.
The display will show what you pressed.
The COOK indicator lights and ENTER, TIME indicators
blink., “ : 0” is displayed.
The display will show what you pressed.
The display will show PL10 for 100% power.
The display will show PL-0 ~ PL10.
If you skip steps 5 and 6, 100% power is automatic.
When you press the START pad, the DEF and COOK
indicators come on to conrm the power levels selected.
The DEF indicator starts blinking to show you that the oven
is in TIME DEFROST mode.
The display counts down the time remaining in TIME
DEFROST mode. When the oven beeps, turn over, break
apart and/or redistribute the food. At the end of TIME
DEFROST mode, the oven will beep and start MICROWAVE
cook.
The DEF indicator goes off and the COOK indicator starts
blinking. The display counts down the time remaining in
MICROWAVE mode. When MICROWAVE cook ends, you
will hear 3 beeps.
NOTE: Your oven can be programmed for 99 minutes
99 seconds. (99:99)
COOKING + COOKING
Time
Cook
1. Press TIME COOK pad.
2. Press number pads for the cooking
time.
Time
Cook
3. Press TIME COOK pad.
4. Press number pads for the cooking
time.
Power
Level
5. Press POWER LEVEL pad.
6. Press number pads for power level
(0~10).
Start
7. Press START pad.
COOK indicator lights and ENTER, TIME indicators blink.
“ : 0” is displayed.
The display will show what you pressed.
The COOK indicator lights and ENTER, TIME indicators
blink., “ : 0” is displayed.
The display will show what you pressed.
The display will show PL10 for 100% power.
The display will show PL-0 ~ PL10.
If you skip steps 5 and 6, 100% power is automatic.
When you press the START pad, the COOK indicator starts
blinking to show the oven is in cook mode for stage 1.
At the end of stage 1, the oven will beep and start stage 2.
The display counts down the time remaining in stage 2
mode. When stage 2 ends, you will hear 3 beeps.
NOTE: Your oven can be programmed for 99 minutes 99
seconds. (99:99)
E15

CONTROLS
+30 SEC
+30 SEC allows you to reheat for 30 seconds at 100% (full
power) by simply pressing the +30 sec pad. By repeatedly
pressing the +30 sec pad, you can also extend reheating time
to 99 minutes 99 seconds by 30 second increments.
+30 sec
Press the +30 SEC pad.
When you press the +30 SEC pad, “:30” is displayed and
the oven starts reheating.
NOTE: +30 SEC cannot be used while the sensor is detecting
the vapor emitted from the food during sensor cooking such as
Potato, Frozen Entree, Frozen Vegetables or Sensor Reheat.
EXPRESS COOK
EXPRESS COOK is a quick way to set cooking time from 1-6
minutes at 100% (full power).
ENTER
START
Sensor Cook
Convenience Features
Express Cook
Potato
Reheat
Popcorn
Beverage
Melt /
Soften
Frozen
Entree
Frozen
Vegetables
Turntable
On-Off
Time
Cook
1
4
7
+30 sec
2
5
8
0
Stop
Clear
Start
3
6
9
Power
Level
Filter
Reset
(3 Sec)
Vent Fan
Hi-Lo-Off
Light
On-Off
Clock
Keep
Warm
Defrost
Time/Weight
Preset
COOK
1. Butter
2. Chocolate
3. Ice Cream
4. Cheese
FILTER
DEF.
TIME
CODE
MUTE
LBS. OZ.
Kitchen
Timer
( 3 Sec)
Press one of the EXPRESS
COOK pads (from 1-6) for
1-6 minutes of cooking at
100% (full power).
The display will show what you pressed.
After 1.5 seconds, the display is changed into cooking time
and the oven starts cooking.
ONE TOUCH COOK (PRESET)
ONE TOUCH cooking allows you to cook or reheat many of
your favorite foods by pressing just one pad.
To increase quantity, press the chosen pad until the number
in the display is the same as desired quantity to cook.
Popcorn
1. Press POPCORN pad once for 3.5
oz bag, twice for 3.0 oz bag or three
times for 1.75 oz bag.
Start
2. Press START pad.
When you press POPCORN pad once, “3.5” is displayed.
NOTE:
1. Use prepackaged room-temperature microwave popcorn.
2. Place bag in oven according to manufacturer’s directions.
3. Pop only one bag at a time.
4. After popping, open bag carefully: popcorn and steam are
extremely hot.
5. Do not reheat unpopped kernels or reuse bag.
6. Do not leave oven unattended while popping popcorn.
CAUTION: If prepackaged popcorn is of a different weight
than the recommended weight, do not use the popcorn pad.
Follow the manufacturer's instruction.
CAUTION:
DO NOT leave the microwave oven unattended while
popping corn.
When popping commercially packaged popcorn, remove
the rack from the oven.
Do not place the bag of microwave popcorn on the rack or
under the rack.
Beverage
1. Press BEVERAGE pad once for 1 cup,
twice for 2 cups or three times for 3
cups.
Start
2. Press START pad.
When you press BEVERAGE pad once, “1” is displayed.
BEVERAGE: 7 oz/cup (mug)
• 1 cup (7 oz total volume): Press BEVERAGE once.
• 2 cups (14 oz total volume): Press BEVERAGE twice.
• 3 cups (20 oz total volume): Press BEVERAGE three times.
SENSOR OPERATIONS
The Sensor Cook categories are designed to detect the
increasing humidity released by the food during the cooking
process. The microwave oven sensor will automatically adjust
the cooking time to the type and amount of food.
USING SENSOR SETTINGS
1. After the oven is plugged in, wait 2 minutes before using
Sensor Cook.
2. Be sure the exterior of the cooking container and the interior
of the oven are dry. Wipe off any moisture with a dry cloth
or paper towel.
3. The oven works with foods at normal storage temperature.
4. More or less food than the quantity listed in the chart should
be cooked following the guidelines in any microwave
cookbook.
5. Do not open the oven door or press STOP/CLEAR pad
until cooking time appears on the display window. The
measurement of vapor will be interrupted. If this occurs,
an error message "Er01" will appear. To continue cooking,
press the STOP/CLEAR pad and cook manually.
16E

CONTROLS
When the sensor detects the vapor emitted from the food,
the remainder of cooking time will appear.
The door may be opened when remaining cooking time
appears on the display. At this time, you may stir or season
food, as desired.
6. Always use microwave-safe containers and cover them
with loose tting lids or vented plastic wrap. Never use tight
sealing plastic containers. They will prevent steam from
escaping and this will mislead the sensor, usually causing
the food to overcook.
7. Check food for temperature or doneness after cooking. If
food is not completely cooked, enter additional cooking time
manually. Do not use one of the Sensor Cook categories
twice in succession on the same food portion. This may
result in severely overcooked or burnt food.
COVERING FOODS
Some foods work best when covered. Use the cover
recommended in the Sensor Cook Chart for these foods.
1. Casserole lid.
2. Plastic wrap: Use plastic wrap recommended for microwave
cooking. Cover dish loosely; allow approximately
1
/2 inch to
remain uncovered to allow steam to escape. Plastic wrap
should not touch food.
3. Wax paper: Cover dish completely; fold excess wrap under
dish to secure. If dish is wider than paper, overlap two pieces
at least one inch to cover.
Be careful when removing any covering to allow steam to
escape away from you.
SENSOR COOK
Sensor is a semi-conductor device that detects the vapor
emitted from the food as it heats. The sensor adjusts the
cooking time and power level for various food and quantities
and you don't need to enter the weight or quantity of the food.
Potato 1. Press POTATO pad.
Start
2. Press START pad.
When you press POTATO pad, "SCPO" is displayed.
When the sensor detects the vapor emitted from the food,
the remainder of cooking time will appear.
Frozen
Entree
1. Press FROZEN ENTREE pad.
Start
2. Press START pad.
When you press FROZEN ENTREE pad, "SCFE" is
displayed.
When the sensor detects the vapor emitted from the food,
the remainder of cooking time will appear.
Frozen
Vegetables
1. Press FROZEN VEGETABLES pad.
Start
2. Press START pad.
When you press FROZEN VEGETABLES pad, "SCFU" is
displayed.
When the sensor detects the vapor emitted from the food,
the remainder of cooking time will appear.
Reheat 1. Press REHEAT pad.
Start
2. Press START pad.
When you press REHEAT pad, "SrH" is displayed.
When the sensor detects the vapor emitted from the food,
the remainder of cooking time will appear.
E17

CONTROLS
Sensor Cook Chart
PRESS PAD DISPLAY WEIGHT COMMENTS
Potato
SCPO 8 - 24 oz Before cooking, pierce potato skin with fork 5-6 times. Place potatoes on the
turntable.
Frozen
Entree
SCFE 8 - 32 oz Follow the directions that are specic for the microwave oven that are printed on
the packaging.
Frozen
Vegetables
SCFU 6 - 16 oz 2-4 tbsp water per serving. Cover with lid or vented plastic wrap.
Reheat
SrH 4 - 36 oz For casseroles, add 2-3 tbsp water, cover with lid or vented plastic wrap.
• The food type to avoid: beverage, frozen pizza or frozen food, raw food, biscuits
and cake.
NOTE:
Do not use the SENSOR COOK twice in succession on the
same food portion.
This may result in severely overcooked or burnt food.
If additional time is needed after previous cooking, use one
of the +30 SEC pad or TIME COOK pad.
• Use proper container and cover for best sensor cooking
result.
• Always use microwave-safe containers and cover them with
lid or vented plastic wrap. Never use tight sealing plastic
containers—they can be prevent steam from escaping and
cause food to overcook.
• Be sure the outside of the cooking containers and the inside
of the microwave oven are dry before placing food in the
oven.
TURNTABLE ON-OFF
For best cooking results, the turntable should be on. However,
the turntable can be turned off so that it does not rotate when
extra large dishes are used.
Turntable
On-Off
Press TURNTABLE ON-OFF pad.
The options are displayed for 2 seconds.
NOTE:
1. This option is not available in sensor cook, one touch cook,
defrost and melt/soften modes.
2. Sometimes the turntable can become too hot to touch. Be
careful touching the turntable during and after cooking.
3. Do not run the oven empty.
VENT FAN
The vent fan removes steam and other vapors from surface
cooking. You can control the 2-speed fan by pressing the
VENT FAN pad.
Vent Fan
Hi-Lo-Off
Press VENT FAN pad once for high fan
speed, twice for low fan speed or three
times to turn the fan off.
The options are displayed for 2 seconds.
NOTE:
1. High fan speed cannot be used together with microwave
cooking.
2. An automatic fan feature protects the microwave from too
much heat rising from the cooktop below it. It automatically
turns on for low speed if it senses too much heat. If you
have turned the fan on you may nd that you cannot turn
it off. The fan will automatically turn off when the internal
parts are cool.
3. If there is no user input for 10 hours, cooktop light and vent
fan will turn off automatically to save energy.
COOKTOP LIGHT
You can control the light by pressing the LIGHT pad.
Light
On-ff
Press LIGHT pad once to turn the light on
or twice to turn the light off.
The options are displayed for 2 seconds.
NOTE: If there is no user input for 10 hours, cooktop light and
vent fan will turn off automatically to save energy.
18E

CONTROLS
MUTE
Kitchen
Timer
( 3 Sec)
Audible signals are available to guide you
when setting and using your oven.
To mute, press KITCHEN TIMER pad for 3
seconds. The MUTE indicator lights. To turn
sound on, press KITCHEN TIMER pad for
3 seconds. A beep sounds and the MUTE
indicator will be turned off.
FILTER RESET
Filter
Reset
(3 Sec)
If your oven is vented to the inside,
the charcoal filter should be replaced
approximately every 6 months. The charcoal
lter cannot be cleaned.
The FILTER indicator will light up when it is
time to replace the charcoal lter.
Press and hold FILTER RESET pad for
3 seconds after replacing the lter. See
page 23.
TO SET POWER SAVE MODE
Stop
Clear
1. Press the STOP/CLEAR pad.“ :0” or clock
appears in the display.
Clock
2. Press and hold the CLOCK pad for
3 seconds.
The display will turn off and a beep
sounds.
To operate the oven in power save mode,
press any key.
Then “ :0” or clock will be shown and the
operation of all function keys will be same
as in the normal mode.
But if there is no operation within 10
seconds in clear mode, all the contents
of display will disappear.
3. To cancel power save mode simply repeat
setting procedure when the display is on.
The power save mode will be canceled
and a beep sounds.
The oven is again available for normal
use.
CHILD SAFETY LOCK
Stop
Clear
Child safety lock feature may lock the
control panel to prevent the oven from being
accidentally started or used by children. To
lock, press and hold STOP/CLEAR pad for
3 seconds.
A beep sounds and "Loc" will be displayed
for 3 seconds.
To unlock, press and hold STOP/CLEAR pad
for 3 seconds. A beep sounds.
NOTE:
1. While the Child Lock is active, only the STOP/CLEAR pad
works to unlock it.
2. Microwave oven cannot be used while Child Lock is
activated.
TO STOP THE OVEN WHILE THE OVEN IS
OPERATING
Stop
Clear
1. Press the STOP/CLEAR pad.
• You can restart the oven by pressing
the START pad.
• Press the STOP/CLEAR pad once
more to erase all instructions.
• You must enter in new instructions.
2. Open the door.
• You can restart the oven by closing
the door and pressing the START pad.
NOTE: Oven stops operating when door is opened.
METAL RACK
The metal rack gives you extra space when cooking in more
than one container at the same time.
The rack allows several foods to be cooked or reheated at
one time.
However, for the best cooking and reheating, use TURNTABLE
ON function and cook with SENSOR COOK modes without
the rack. When the rack is used, set time and power level
manually.
The oven is again available for normal use.
TO AVOID RISK OF PROPERTY DAMAGE:
1. Do not use rack to pop popcorn.
2. Rack must be on the four plastic supports when used.
3. Use the rack only when cooking food on rack position.
4. Do not cook with rack on oor of the oven.
E19

TO USE METAL RACK:
1. Place rack securely on the four plastic supports.
Rack MUST NOT touch metal walls or back of microwave
oven.
Allow plenty of space around and between the dishes. Pay
close attention to the cooking and reheating progress.
2. Place equal amounts of food both ABOVE AND BELOW
rack.
Amount of food must be approximately the same to balance
out cooking energy.
3. Reposition the foods and reverse them from the rack to
turntable and stir them at least once during any cooking
or reheating time.
After cooking or reheating, stir if possible. Using a lower
power level will assist in better cooking and reheating
uniformity.
IMPORTANT:
To avoid oven damage, DO NOT store or use the metal rack
in this oven unless more than one item is being cooked or a
recipe calls for it.
CONTROLS
RECOMMENDED USAGE
1. Soups
2. Casseroles
3. Dinner Plates
20E
WARNING:
The oven should be cleaned regularly and any food deposits
removed.
Failure to maintain the oven in a clean condition could lead
to deterioration of the surface that could adversely affect
the life of the appliance and possibly result in a hazardous
situation.
MICROWAVE OVEN INTERIOR
Disconnect the power cord before cleaning or leave the
door open to inactivate the oven during cleaning.
The oven interior should be cleaned after each use with a damp
cloth to keep it free from grease and soil buildup. Stubborn
soils can be removed with a plastic scrub pad. When cleaning
interior surfaces and surfaces of door and oven that come
together when the door is closed, use only mild, non-abrasive
soaps or detergents applied with a sponge or soft cloth.
Odors can be eliminated from the inside of the oven by boiling
a solution of one cup of water and several tablespoons of
lemon juice in the oven for 5-7 minutes. This also helps loosen
any dried soil in the oven. Wipe off excess moisture after use.
NOTE:
• Do not spray or pour liquid cleansers directly onto a surface.
Spray or pour cleanser onto a cloth or sponge and then
clean.
• Do not use abrasive cleaners, oven cleaners, abrasive
cleaning pads or steel wool, as they can scratch or dull
oven surfaces.
• Do not remove or insert knife around the stirrer cover
to clean, it may damage the cover or affect the cooking
performance of your oven.
OVEN BOTTOM
Wash oven bottom with hot sudsy water, rinse and dry. Do
not use excessive amounts of water when cleaning the oven,
especially around the turntable. Do not allow water or cleaning
agents to seep into turntable gears located underneath.
GLASS TRAY/TURNTABLE
Allow to cool before removing and cleaning. Wash in soapy
water or dishwasher.
METAL RACK
Wash the metal rack with a mild soap and a soft or nylon
scrub brush.
Dry completely.
Do not use abrasive scrubbers or cleaners to clean rack.
ROLLER GUIDE
Clean frequently to prevent excessive noise. Wash in soapy
water or dishwasher.
OVEN EXTERIOR
Wipe the outside of your oven with a soapy cloth, rinse and dry.
Do not use abrasive cleaners. They may scratch the surface.
LIGHT COMPARTMENT
Clean off the grease and dust on the light compartment cover
on the bottom side of the microwave oven often with warm
water and detergent.
CONTROL PANEL
Wipe with a damp cloth. Dry. Do not spray cleaners directly
on panel. Spray cleaners on cloth and then wipe.
WAVEGUIDE COVER
The waveguide cover is located on the right side wall of
the oven cavity. It is made from mica so it requires special
care. Keep the waveguide cover clean to assure good oven
performance. Carefully wipe with a damp cloth any food
spatters from the surface of the cover immediately after they
occur. Built-up splashes may overheat and cause smoke or
possibly catch re. DO NOT REMOVE THE WAVEGUIDE
COVER.
THE EXHAUST FEATURE
The exhaust hood feature on your microwave oven is equipped
with two metal lters which collect grease. When the fan is
being operated, air is drawn up through the lters and is then
discharged through the venting to the outside or through the
charcoal lters if not vented to the outside.
METAL GREASE
FILTER
METAL GREASE
FILTER
COOKTOP
LIGHT
REUSABLE GREASE FILTERS
The reusable grease lters should be cleaned at least once
a month. Never operate the microwave without the lters in
place. In situations where aming might occur on surfaces
below the hood, lters will stop the entry of ames into the unit.
CARE AND CLEANING
E21
LIGHT REPLACEMENT
COOKTOP LIGHT
When replacing the cooktop light, make sure that you are
wearing gloves to avoid injury from the heat of the lamp.
1. Unplug the oven or turn off the power at the main power
supply.
2. Remove the screw from the light cover and lower the cover
until it stops.
3. Remove the screw on center of the LED Light secured to
the cover and pull out terminal.
4. Replace with 1.0-watt LED light available from your
authorized dealer and secure with screw.
5. Replace the light cover and mounting screw.
6. Turn the power back on at the main power supply.
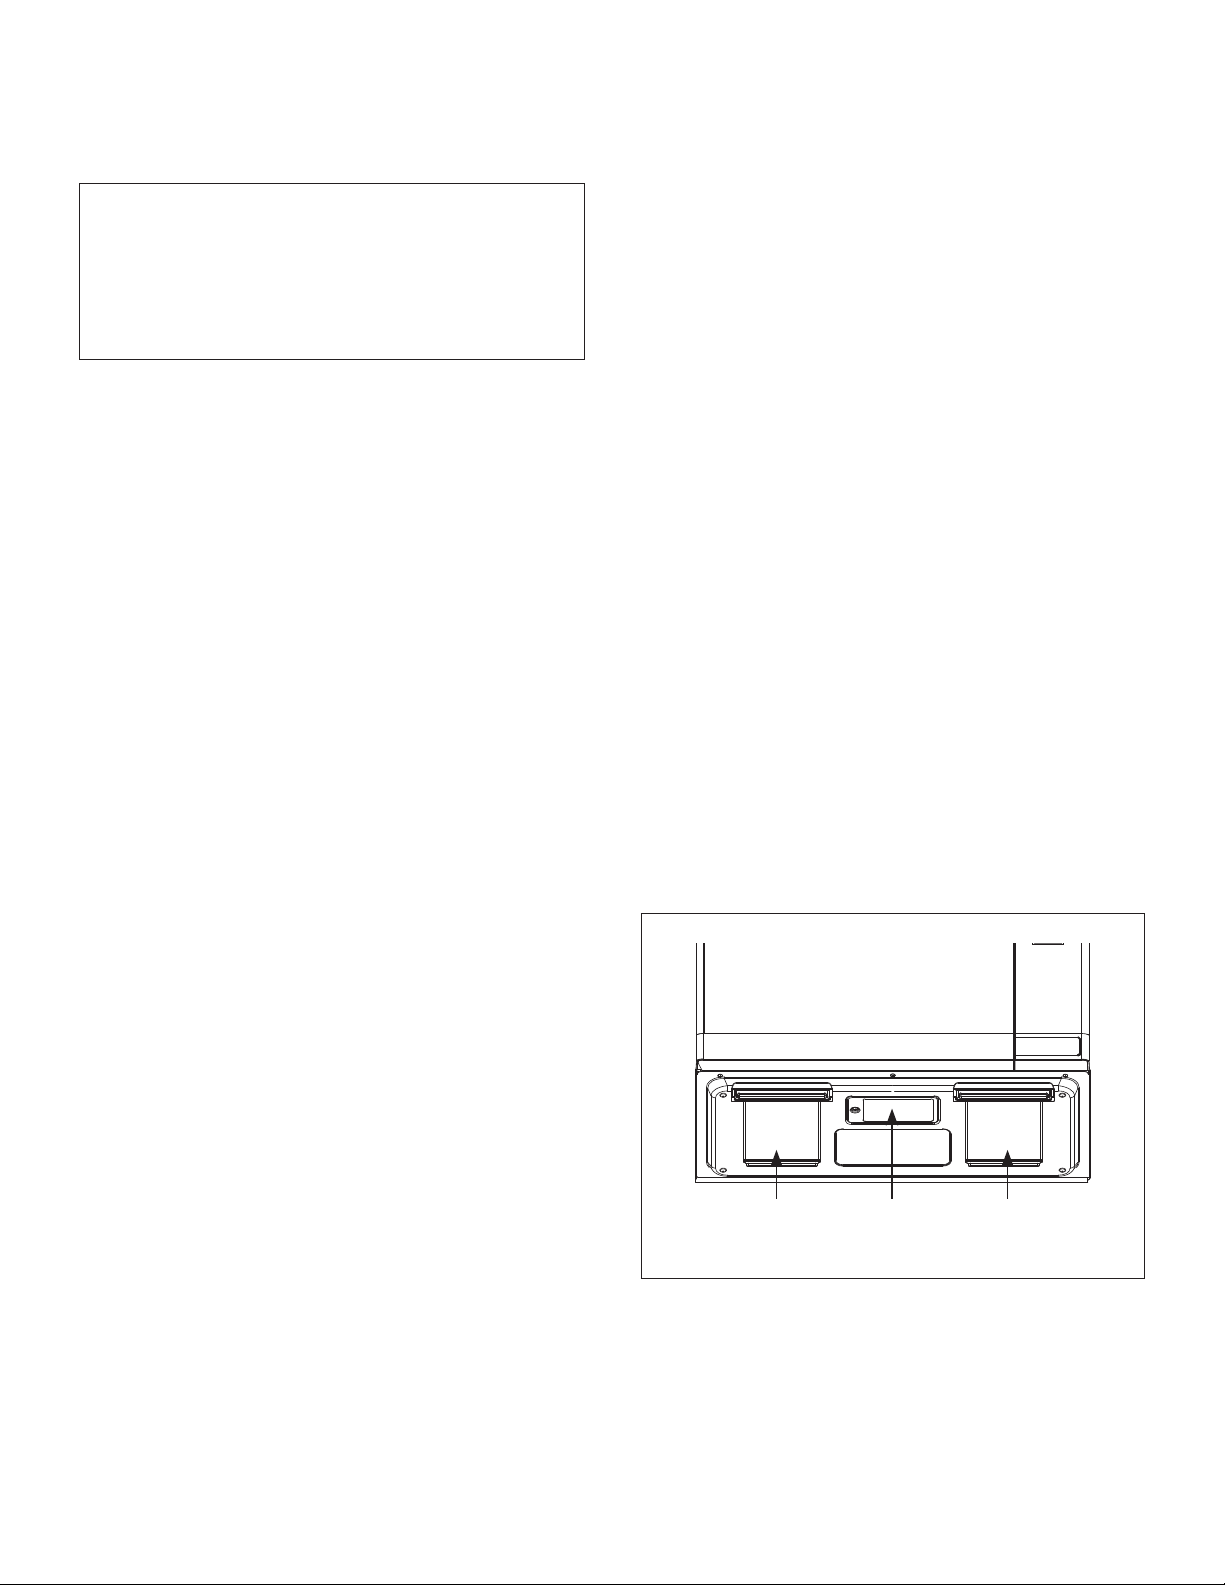
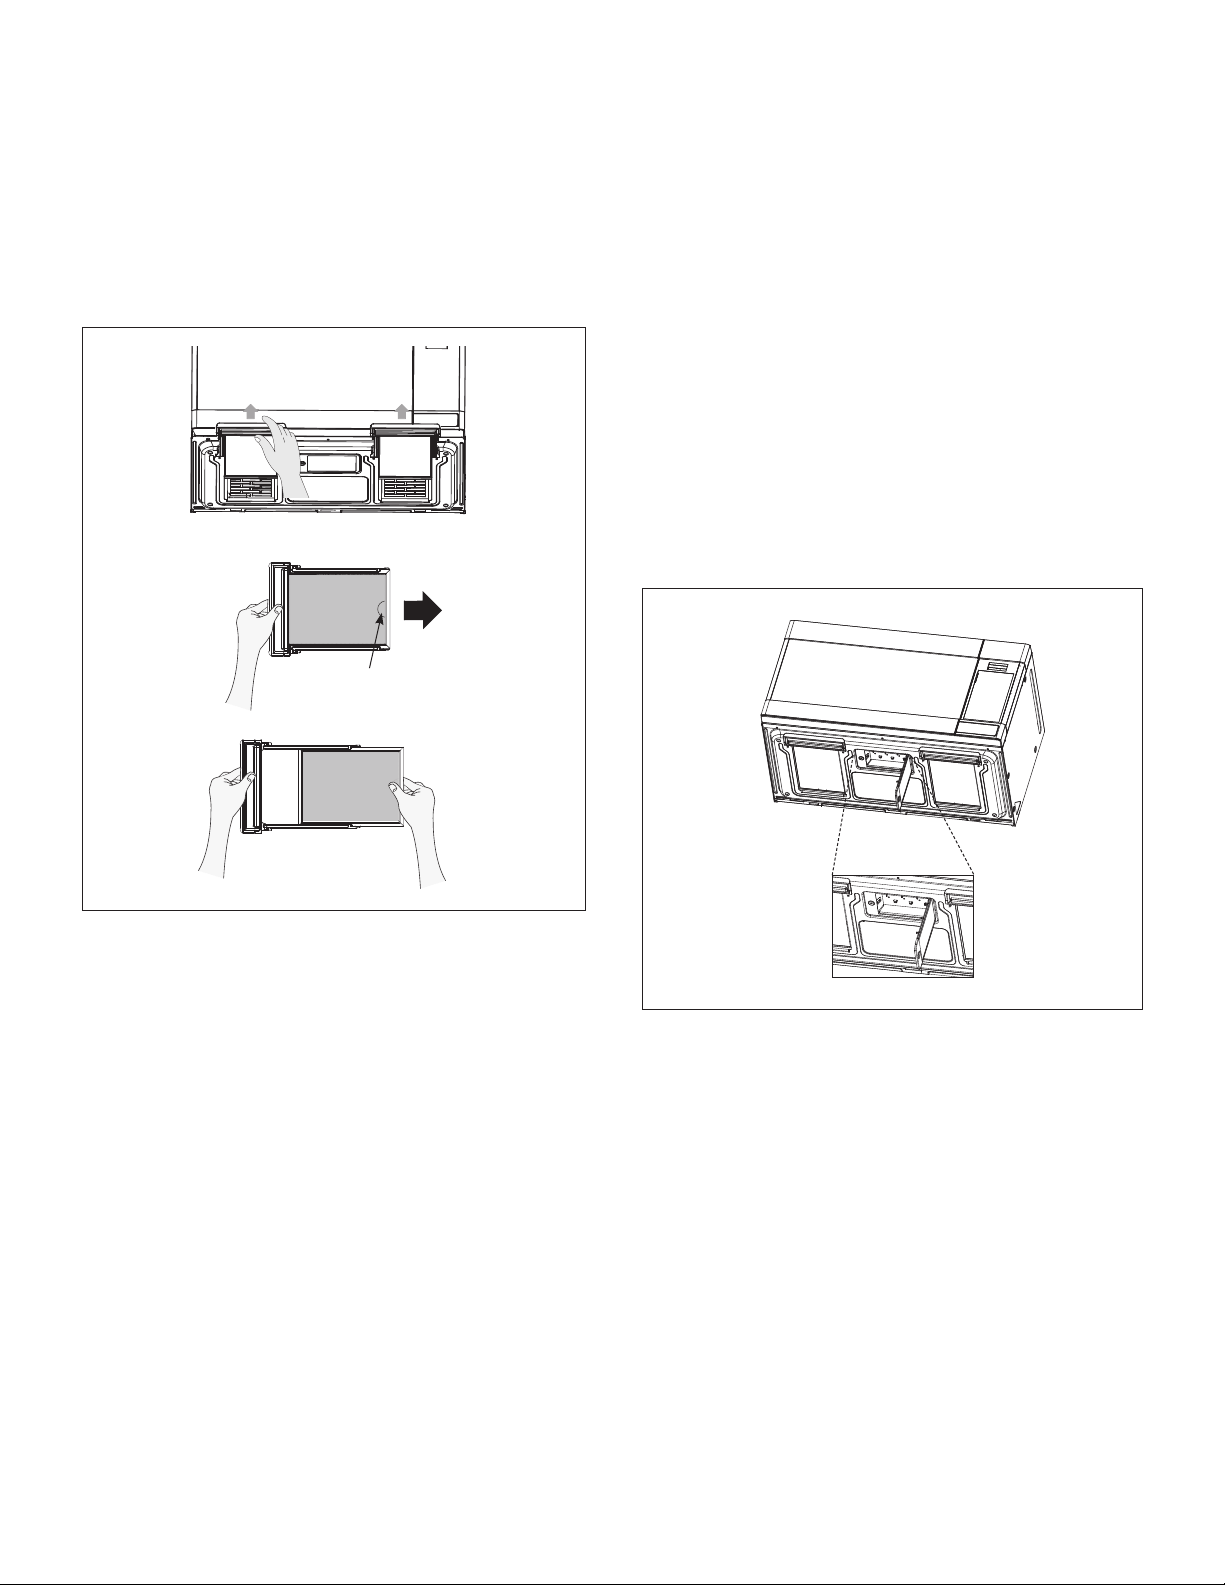
TO REMOVE GREASE FILTER
To remove the grease lter holder, pull the tab toward the front
of the oven. Repeat for the other grease lter holder.
To remove the grease lter from the holder, pull using the
"nger hold" to assist as shown in below image.
PULL
FINGER HOLD
TO CLEAN GREASE FILTER
To clean grease lters, soak and then agitate lter in solution
of hot water and detergent. Do not use ammonia or ammonia
products because they will darken the metal. Light brushing
can be used to remove embedded dirt. Rinse, shake and
remove moisture before replacing.
TO REPLACE GREASE FILTER
To replace the grease lter, slide the grease lter into the
grease lter holder. Insert the grease lter holder into the
designated area of the bottom of the oven. Repeat for the
other grease lter.
CARE AND CLEANING
22E
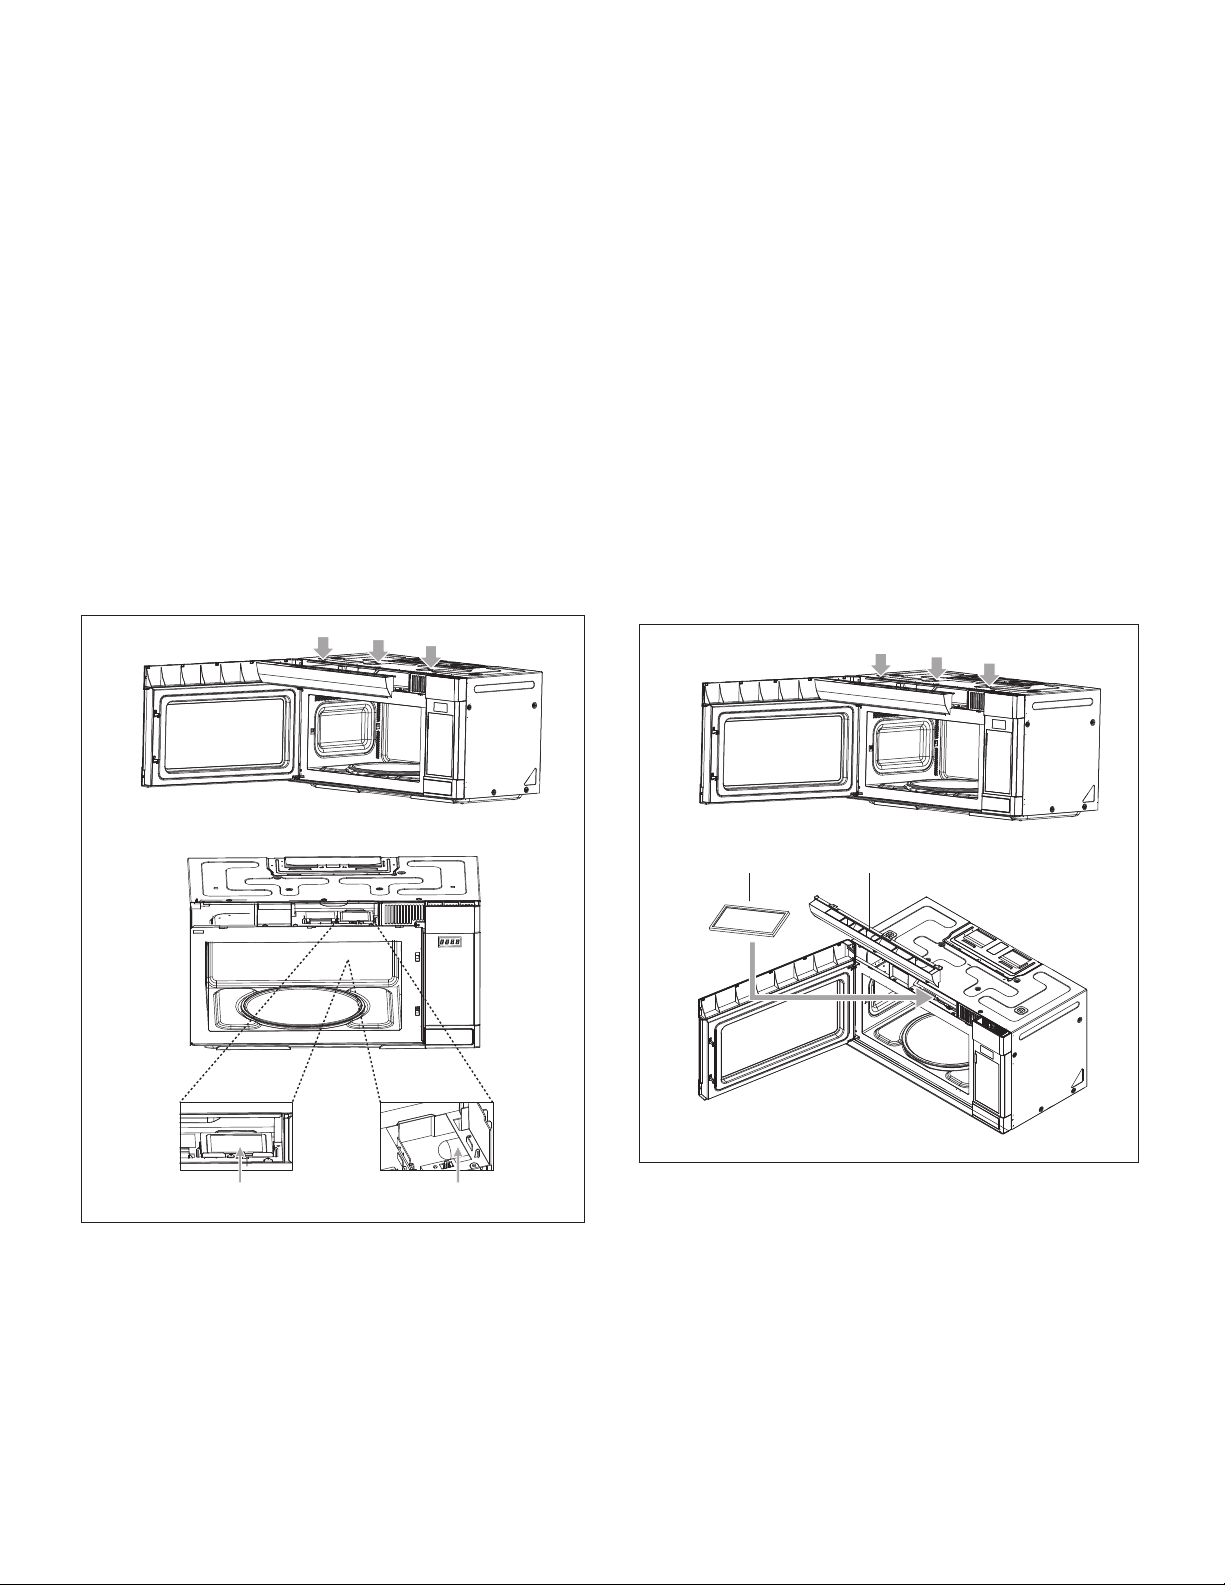
OVEN LIGHT
When replacing the oven light, make sure that you are wearing
gloves to avoid injury from the heat of the lamp.
1. Unplug the oven or turn off the power at the main power
supply.
2. Remove the vent grille mounting 3 screws and open the
door.
3. Slide the grille air to the left, then pull it straight out.
4. Remove the charcoal lter, if present.
5. Pull the hook a little and remove light cover.
6. Replace the light bulb with 30-watt bulb, available from your
authorized dealer or Bertazzoni at (866) 905-0010.
7. Replace the light cover.
8. Replace the grille air and 3 screws and close the door.
9. Plug the oven in or turn on the power at the main power
supply.
LIGHT COVER LIGHT BULB
INSTALL/REPLACE CHARCOAL FILTER
CHARCOAL FILTER
If your oven is vented to the inside, the charcoal lter should
be replaced if it is used for approximately 6 months.
You can purchase Charcoal Filter from Bertazzoni.
1. Unplug the oven or turn off the power at the main power
supply.
2. Remove the grille air mounting 3 screws and open the door.
3. Slide the grille air to the left, then pull it straight out.
4. Push the charcoal lter backward and remove it.
5. Slide a new charcoal lter into place. The lter should rest
at the angle.
6. Replace the grille air and 3 screws and close the door.
7. Plug the oven in or turn on the power at the main power
supply.
CHARCOAL FILTER GRILLE AIR
CARE AND CLEANING
E23

IF OVEN FLOOR OR GLASS TRAY IS HOT:
• This is normal. The oor is absorbing heat from the food.
IF THE INTERIOR OF OVEN COLLECTS
MOISTURE:
• This is normal. Food gives off moisture when cooking and
the steam collects on the door and the oven surface. Wipe
off excess moisture from oven after each use.
IF FOOD COOKS UNEVENLY:
• Refer to your recipe for proper cooking procedures.
• Be sure food is evenly shaped.
• Be sure food is completely defrosted before cooking.
• Check placement of aluminum strips used to prevent
overcooking.
IF FOOD IS UNDERCOOKED:
• Check recipe to be sure all directions (amount, time and
power levels) were correctly followed.
• Check household voltage.
• Try plugging the oven into an outlet on a separate electrical
circuit.
• Be sure food was completely defrosted before cooking.
IF FOOD IS OVERCOOKED:
• Check recipe to be sure all directions (amount, time and
power levels) were correctly followed.
• The initial temperature of food may have been higher than
normal.
IF ARCING (SPARKS) OCCUR:
• Be sure microwave-safe dishes were used.
• Be sure wire twist-ties were not used.
• Be sure oven was not operated when empty.
IF THE DISPLAY SHOWS A TIME COUNTING
DOWN BUT THE OVEN IS NOT COOKING:
• Check that door is rmly closed.
Check the following to be sure a service call is necessary:
IF NOTHING ON THE OVEN OPERATES:
• Check for a blown circuit fuse or a tripped main circuit
breaker.
• Check if oven is properly connected to electric circuit in
house.
• Check that controls are set properly.
• Check that the cooking time is set.
IF THE OVEN INTERIOR LIGHT DOES NOT
WORK:
• The LED light may be loose or defective. See page 22 or
call a qualied servicer.
IF OVEN WILL NOT COOK:
• Check that control panel was programmed correctly.
• Check that door is rmly closed.
• Check that START pad was pressed.
• Auto Start may have been set.
• The Control Lockout may have been set.
• Check the area between the door and seal for obstructions.
IF OVEN TAKES LONGER THAN NORMAL TO
COOK OR COOKS TOO RAPIDLY:
• Be sure the Power Level is programmed properly.
• Check instructions on food density, etc.
• Verify that voltage to the microwave oven is not low.
IF THE TIME-OF-DAY CLOCK DOES NOT
ALWAYS KEEP CORRECT TIME:
• Check that the power cord is fully inserted into the outlet
receptacle.
• Check that the oven is properly grounded.
• Try plugging the oven into an outlet on a separate electrical
circuit.
CARE AND CLEANING
24E

Q : I accidentally ran my microwave oven without any
food in it. Is it damaged?
A : Running the oven empty for a short time will not damage
the oven. However, it is not recommended.
Q : Can the oven be used with the glass tray or roller
guide removed?
A : No. Both the glass tray and roller guide must always be
used in the oven before cooking.
Q : Can I open the door when the oven is operating?
A : The door can be opened anytime during the cooking
operation. Then microwave energy will be instantly
switched off and the time setting will maintain until the
door is closed.
Q : What does "Er01" message mean?
A : "Er01" means SENSOR ERROR and will appear if you
open the oven door or press STOP/CLEAR pad while
cooking time is displayed. To continue cooking, press
the STOP/CLEAR pad and cook manually.
Q : Why do I have moisture in my microwave oven after
cooking?
A : The moisture on the side of your microwave oven is
normal. It is caused by steam from cooking food hitting
the cool oven surface.
Q : Will the microwave oven be damaged if it operates
while empty?
A : Yes. Never run it empty.
Q : Why do eggs sometimes pop?
A : When baking or poaching eggs, the yolk may pop due to
steam buildup inside the yolk membrane. To prevent this,
simply pierce the yolk with a toothpick before cooking.
Never cook eggs without piercing their shells.
Q : Why is this standing time recommended after the
cooking operation has been completed?
A : Standing time is very important.
With microwave cooking, the heat is in the food, not in the
oven. Many foods build up enough internal heat to allow
the cooking process to continue, even after the food is
removed from the oven. Standing time for joints of meat,
large vegetables and cakes is to allow the inside to cook
completely, without overcooking the outside.
Q : What does “standing time” mean?
A : “Standing time” means that food should be removed
from the oven and covered for additional time to allow it
to nish cooking. This frees the oven for other cooking.
Q : Why does my oven not always cook as fast as the
microwave cooking guide says?
A : Check your cooking guide again, to make sure you’ve
followed directions exactly, and to see what might cause
variations in cooking time. Cooking guide times and heat
settings are suggestions to help prevent over-cooking,
the most common problem in getting accustomed to a
microwave oven.
Variations in the size, shape, weights and dimensions
could require longer cooking time. Use your own
judgement along with the cooking guide suggestions to
check whether the food has been properly cooked just
as you would do with a conventional cooker.
Q : Does microwave energy pass through the viewing
screen in the door?
A : No. The metal screen bounces back the energy to the
oven cavity. The holes are made to allow light to pass
through. They do not let microwave energy pass through.
Q : Can I operate my microwave oven without the
turntable or turn the turntable over to hold a large
dish?
A : No. If you remove or turn over the turntable, you will get
poor cooking results. Dishes used in your oven must t
on the turntable.
Q : Is it normal for the turntable to turn in either direction?
A : Yes. The turntable rotates clockwise or counterclockwise,
depending on the rotation of the motor when the cooking
cycle begins.
Q : Can I pop popcorn in my microwave oven?
How do I get the best results?
A : Yes. Pop packaged microwave popcorn following
manufacturer’s guidelines. Do not use regular paper
bags. Use the “listening test” by stopping the oven
as soon as the popping slows to a “pop” every 1 or 2
seconds. Do not repop unpopped kernels. Do not pop
popcorn in glass cookware.
CARE AND CLEANING
E25
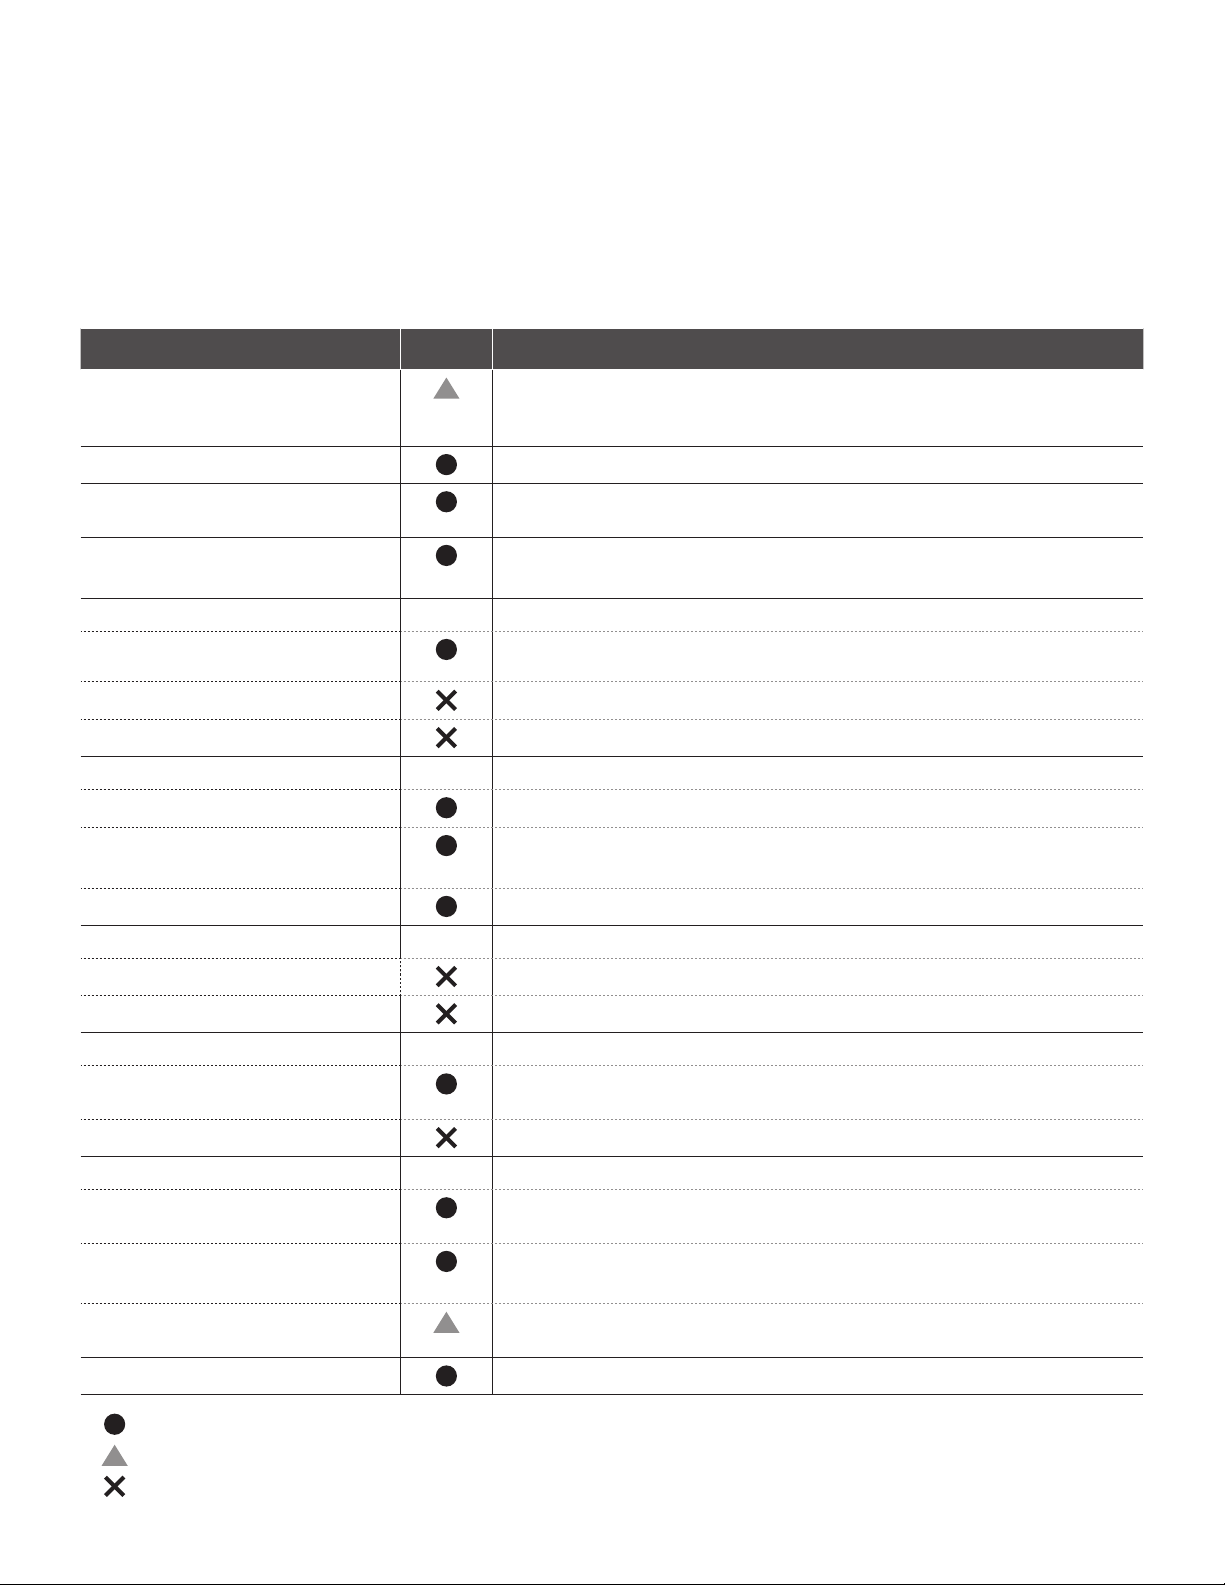
UTENSIL GUIDE
Only use utensils that are suitable for use in microwave ovens.
To cook food in the microwave oven, the microwaves must be able to penetrate the food, without being reected or absorbed by
the dish used. Care must therefore be taken choosing the utensil. If the utensil is marked microwave-safe, you do not need to
worry. The following table lists various utensils and indicates whether and how they should be used in a microwave oven.
UTENSIL SAFE COMMENTS
Aluminum foil Can be used in small quantities to protect areas against overcooking.
Arcing can occur if the foil is too close to the oven wall or if too much foil is
used.
Crisp plate
Do not preheat for more than 8 minutes.
China and earthenware
Porcelain, pottery, glazed earthenware and bone china are usually suitable,
unless decorated with a metal trim.
Disposable polyester
cardboard dishes
Some frozen foods are packaged in these dishes.
Fast-food packaging
• Polystyrene cup containers
Can be used to warm food. Overheating may cause the polystyrene to
melt.
• Paper bags or newspaper
May catch re.
• Recycled paper or metal trims
May cause arcing.
Glassware
• Oven-to-table ware
Can be used, unless decorated with a metal trim.
• Fine glassware
Can be used to warm foods or liquids.
Delicate glass may break or crack if heated suddenly.
• Glass jars
Must remove the lid. Suitable for warming only.
Metal
• Dishes
May cause arcing or re.
• Freezer bag twist-ties
May cause arcing or re.
Paper
• Plates, cups, napkins and
kitchen paper
For short cooking times and warming. Also to absorb excess moisture.
• Recycled paper
May cause arcing.
Plastic
• Containers
Particularly if heat-resistant thermoplastic. Some other plastics may warp
or discolor at high temperatures. Do not use Melamine plastic.
• Cling lm
Can be used to retain moisture. Should not touch the food.
Take care when removing the lm as hot steam will escape.
• Freezer bags
Only if boilable or oven-proof. Should not be airtight. Prick with a fork, if
necessary.
Wax or grease-proof paper
Can be used to retain moisture and prevent spattering.
Recommended use
Limited Use
Not Recommended
COOKING INSTRUCTIONS
26E
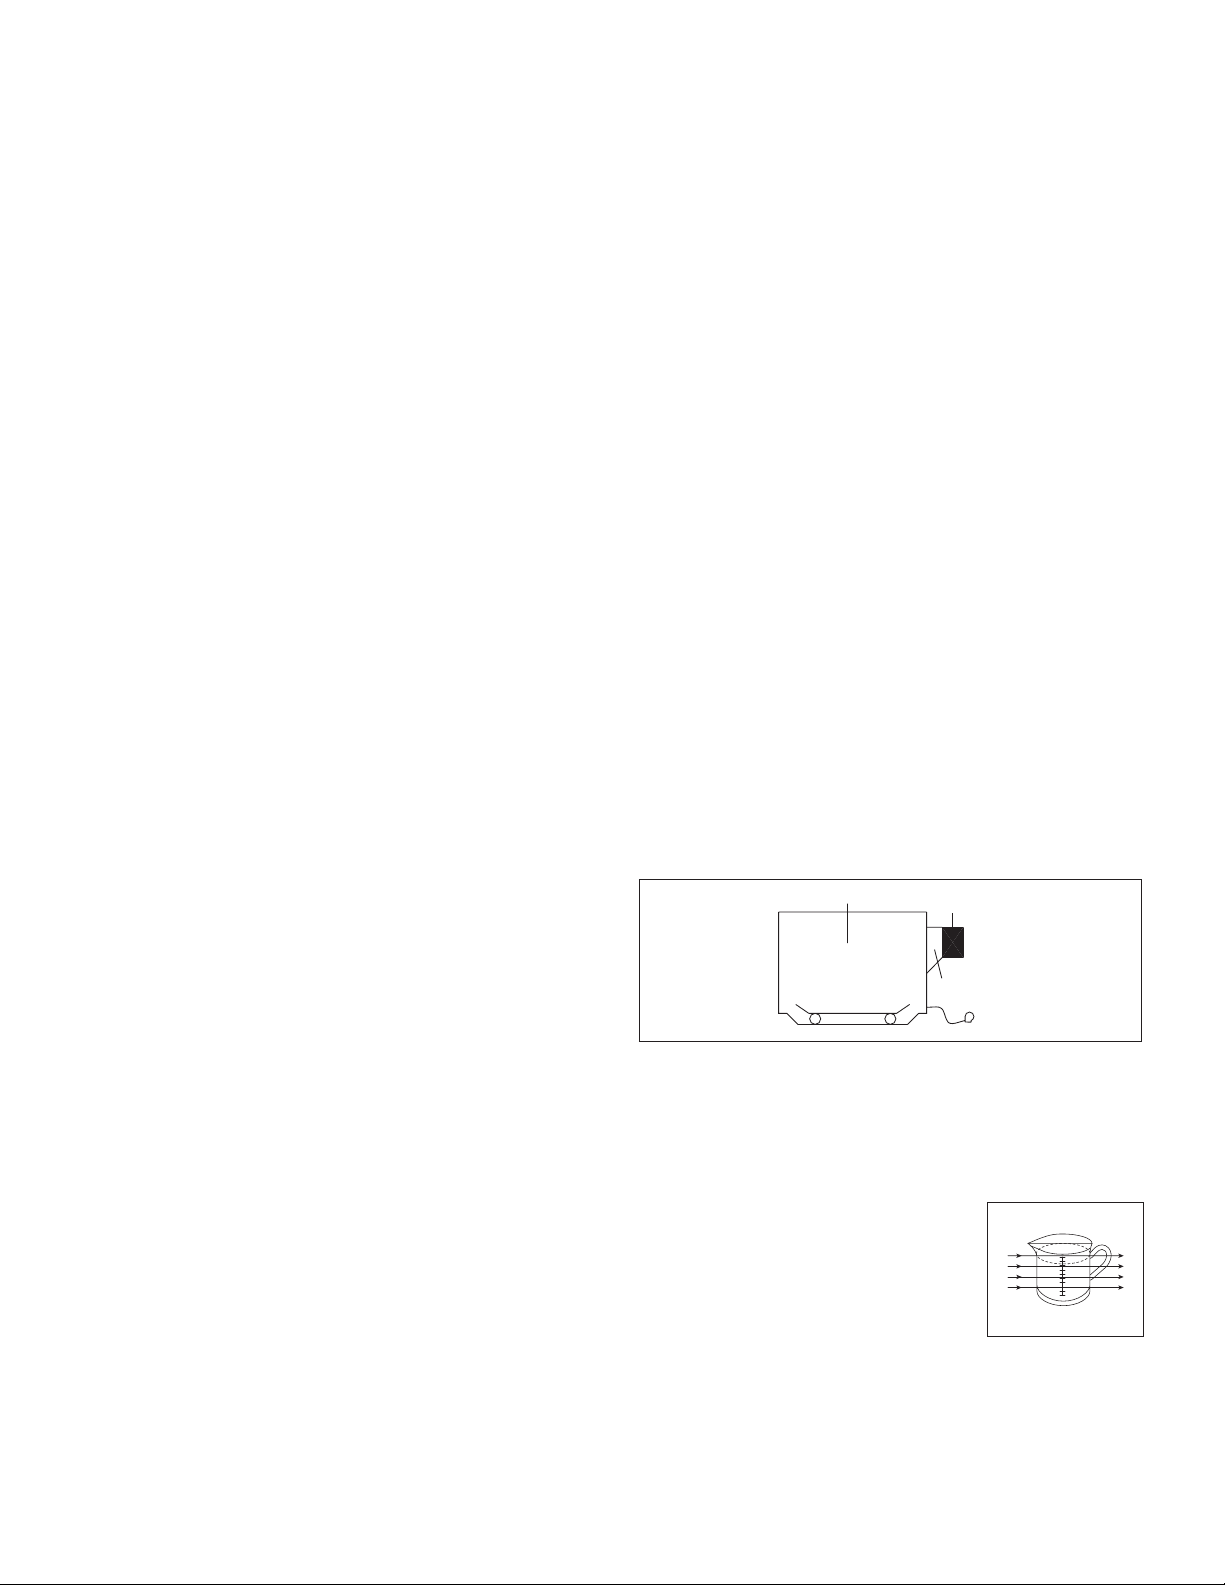
USE YOUR MICROWAVE OVEN SAFELY
GENERAL USE
• Do not attempt to defeat or tamper with safety interlocks.
• Do not place any object between the oven front frame and
the door or allow residue to build up on sealing surfaces.
Wipe with a mild detergent, rinse and dry. Never use
abrasive powders or pads.
• Do not subject the oven door to strain or weight such as a
child hanging on an open door. This could cause the oven
to fall forward resulting in injury to you and damage to the
oven.
• Do not operate the oven if door seals or sealing surfaces
are damaged; or if door is bent; or if hinges are loose or
broken.
• Do not operate the oven empty. This will damage the oven.
• Do not attempt to dry clothes, newspapers or other
materials in the oven. They may catch on re.
• Do not use recycled paper products as they may contain
impurities which may cause sparks or res.
• Do not hit or strike the control panel with hard objects. This
can damage the oven.
FOOD
• Never use your microwave oven for home canning. The
oven is not designed for proper home canning. Improperly
canned food may spoil and be dangerous to consume.
• Always use the minimum recipe cooking time. It is better
to undercook rather than overcook foods.
• Undercooked foods can be returned to the oven for more
cooking. If food is overcooked, nothing can be done.
• Heat small quantities of food or foods with low moisture
carefully. These can quickly dry out, burn or catch on re.
• Do not heat eggs in the shell. Pressure may build up and
eggs can explode.
Potatoes, apples, egg yolks and sausages are examples
of food with non-porous skins.
These must be pierced before cooking to prevent bursting.
• Do not attempt to deep fat fry in your microwave oven.
• Always allow a standing time of at least 20 seconds after
the oven has been switched off to allow the temperature
to even out. Stir during heating, if necessary, and ALWAYS
stir after heating. To prevent eruptive boiling and possible
scalding, you should put a spoon or glass stick into the
beverages and stir before, during and after heating.
• Do not leave the oven unattended while popping corn.
Do not pop corn in a paper bag unless it is the commercially
prepared Microwave Popcorn product. The kernels can
overheat and ignite a brown paper bag.
Do not exceed the Microwave Popcorn manufacturer's
suggested popping time.
Longer popping does not yield more popcorn but it can
result in scorch, burn or re. Remember, the popcorn bag
and tray can be too hot to handle. Remove with caution
and use pot holders.
ARCING
If you see arcing, open the door and correct the problem.
Arcing is the microwave term for sparks in the oven.
Arcing is caused by:
• Metal or foil touching the side of the oven.
• Foil not molded to food (upturned edges act like antennas).
• Metal, such as twist-ties, poultry pins, or gold rimmed
dishes, in the microwave.
• Recycled paper towels containing small metal pieces being
used in the microwave.
• Dirt or grease on waveguide cover.
MICROWAVING PRINCIPLES
Microwave energy has been used in this country to cook and
reheat food since early experiments with RADAR in World
War ll. Microwaves are present in the atmosphere all the
time, both naturally and from manmade sources. Manmade
sources include radar, radio, television, telecommunication
links and car phones.
HOW MICROWAVES COOK FOOD
In a microwave oven, electricity is converted into microwave
by the MAGNETRON.
Oven Cavity
Magnetron
Waveguide
Turntable
REFLECTION
The microwaves bounce off the metal walls and the metal
door screen.
TRANSMISSION
Then they pass through the cooking
containers to be absorbed by the water
molecules in the food, all foods contain
water to a more or lesser extent.
ABSORPTION
The microwaves cause the water molecules to vibrate which
causes FRICTION, i.e., HEAT. This heat then cooks the food.
Microwaves are also attracted to fat and sugar particles, and
foods high in these will cook more quickly. Microwaves can
only penetrate to a depth of 1½-2 inches (4-5cm) and as heat
spreads through the food by conduction, just as in a traditional
oven, the food cooks from the outside inward.
COOKING INSTRUCTIONS
E27

Conversion Chart
WEIGHT MEASUREMENTS
15 g
1
/2 oz
25 g 1 oz
50 g 2 oz
100 g 4 oz
175 g 6 oz
225 g 8 oz
450 g 1 lb
VOLUME MEASUREMENTS
30 ml 1 oz
100 ml 3 oz
150 ml 5 oz (
1
/4 pt)
300 ml 10 oz (
1
/2 pt)
600 ml 20 oz (1 pt)
SPOON MEASUREMENTS
1.25 ml
1
/4 tsp
2.5 ml
1
/2 tsp
5 ml 1 tsp
15 ml 1 tbsp
FLUID MEASUREMENTS
1 c 8 oz 240 ml
1 pt 16 oz (UK 20 oz) 480 ml (UK 560 ml)
1 q 32 oz (UK 40 oz) 960 ml (UK 1120 ml)
1 g 128 oz (UK 160 oz) 3840 ml (UK 4500 ml)
COOKING TECHNIQUES
STANDING TIME
Dense foods e.g., meat, jacket potatoes and cakes, require
standing time (inside or outside of the oven) after cooking, to
allow heat to nish conducting to cook the center completely.
Wrap meat joints and jacket potatoes in aluminum foil while
standing. Meat joints need approx. 10-15 minutes, jacket
potatoes 5 minutes. Other foods such as plated meals,
vegetables, sh, etc. require 2-5 minutes standing. After
defrosting food, standing time should also be allowed. If food
is not cooked after standing time, return to the oven and cook
for additional time.
MOISTURE CONTENT
Many fresh foods e.g., vegetables and fruit, vary in their
moisture content throughout the season, particularly jacket
potatoes. For this reason, cooking times may have to be
adjusted. Dry ingredients e.g., rice and pasta, can dry out
during storage so cooking times may differ.
DENSITY
Porous airy foods heat more quickly than dense heavy foods.
CLING FILM
Cling lm helps keep the food moist and the trapped steam
assists in speeding up cooking times. Pierce before cooking
to allow excess steam to escape. Always take care when
removing cling lm from a dish as the buildup of steam will
be very hot.
SHAPE
Even shapes cook evenly. Food cooks better by microwave
when in a round container rather than square.
SPACING
Foods cook more quickly and evenly if spaced apart. NEVER
pile foods on top of each other.
STARTING TEMPERATURE
The colder the food, the longer it takes to heat up. Food from
a fridge takes longer to reheat than food at room temperature.
LIQUIDS
All liquids must be stirred before and during heating. Water
especially must be stirred before and during heating, to avoid
eruption. Do not heat liquids that have previously been boiled.
DO NOT OVERHEAT.
TURNING & STIRRING
Some foods require stirring during cooking. Meat and poultry
should be turned after half the cooking time.
COOKING INSTRUCTIONS
28E

ARRANGING
Individual foods e.g., chicken portions or chops, should be
placed on a dish so that the thicker parts are toward the
outside.
DEFROSTING GUIDE
• Do not defrost covered meat. Covering might allow cooking
to take place. Always remove outer wrap and tray. Use only
containers that are microwave-safe.
• Begin defrosting whole poultry breast-side-down. Begin
defrosting roasts fat-side-down.
• The shape of the package alters the defrosting time. Shallow
rectangular shapes defrost more quickly than a deep block.
• After
1
/3 of the defrost time has elapsed, check the food.
You may wish to turn over, break apart, rearrange or remove
thawed portions of the food.
• During defrost, the oven will prompt you to turn the food
over. At this point, open oven door and check the food.
Follow the techniques listed below for optimum defrost
results.
Then, close oven door, press the START pad to complete
defrosting.
• When defrosted, food should be cool, but softened in all
areas. If still slightly icy, return to microwave oven very
briey, or let stand a few minutes. After defrosting, allow
food to stand 5-60 minutes if there are any icy areas.
Poultry and sh may be placed under running cool water
until defrosted.
• Turn over: Roast, ribs, whole poultry, turkey breasts, hot
dogs, sausages, steaks or chops.
• Rearrange: Break apart or separate steaks, chops,
hamburger patties, ground meat, chicken or seafood pieces
and chunks of meat such as stew beef.
• Shield: Use small strips of aluminum foil to protect thin
areas or edges of unevenly shaped foods such as chicken
wings. To prevent arcing, do not allow foil to come within
1-inch of oven walls or door.
• Remove: To prevent cooking, thawed portions should be
removed from the oven at this point. This may shorten
defrost time for food weighing less than 3 lbs (1350 g).
QUANTITY
Small quantities cook faster than large quantities, also small
meals will reheat more quickly than large portions.
PIERCING
The skin or membrane on some foods will cause steam to
build up during cooking. These foods must be pierced or a
strip of skin should be peeled off before cooking to allow the
steam to escape. Eggs, potatoes, apples, sausages, etc., will
all need to be pierced before cooking. DO NOT ATTEMPT TO
BOIL EGGS IN THEIR SHELLS.
COVERING
Cover foods with microwave cling lm or a lid. Cover sh,
vegetables, casseroles and soups. Do not cover cakes,
sauces, jacket potatoes or pastry items.
COOKING INSTRUCTIONS
E29

Defrosting Chart (By Time Defrost)
ITEM WEIGHT
DEFROSTING
TIME
STANDING
TIME
SPECIAL INSTRUCTIONS
BEEF
Minced Beef 1 lb / 450 g 8 - 10 min. 15 - 20 min. Break apart and remove thawed
portions with fork.
Stew Meat 1
1
/2 lb / 675 g 12 - 14 min. 25 - 30 min. Separate and rearrange once.
Patties 4 (4 oz / 110 g) 6 - 8 min. 15 - 20 min. Turn over after half the time.
PORK
Spareribs 1 lb / 450 g 6 - 8 min. 25 - 30 min. Separate and rearrange once.
Chops 4 (5 oz / 125 g) 6 - 8 min. 25 - 30 min. Separate and turn over once.
Minced Pork 1 lb / 450 g 7 - 8 min. 15 - 20 min. Break apart and remove thawed
portions with fork.
POULTRY
Whole Chicken 2
1
/2 lb / 1125 g 22 - 24 min. 45 - 90 min. Break side down. Turn over after half the
time. Shield as needed.
Chicken Breasts 1 lb / 450 g 8 - 10 min. 15 - 30 min. Separate and rearrange once.
Fryer Chicken (cut up) 2 lb / 900 g 17 - 19 min. 25 - 30 min. Separate and rearrange once.
Chicken Thighs 1
1
/2 lb / 675 g 12 - 14 min. 15 - 30 min. Separate and rearrange once.
FISH & SEAFOOD
Whole Fish 1 lb / 450 g 6 - 8 min. 15 - 20 min. Turn over after half the time.
Shield as needed.
Fish Fillets 1
1
/2 lb / 675 g 8 - 10 min. 15 - 20 min. Turn over after half the time.
Shield as needed.
Shrimp
1
/2 lb / 225 g 2 - 3 min. 15 - 20 min. Turn over after half the time.
Shield as needed.
COOKING INSTRUCTIONS
30E

COOKING
Cooking Chart
ITEM POWER LEVEL
COOKING
TIMEPER
LB/450G
SPECIAL INSTRUCTIONS
MEAT
- Chilled meat and poultry should be removed from
the refrigerator at least 30 minutes before cooking.
- Always let the meat and poultry stand, covered, after
cooking.
Beef Joint - Rare PL-8 6 - 8 min.
- Medium PL-8 7 - 10 min.
- Well Done PL-8 9 - 11 min.
Pork Joint PL10 9 - 12 min.
Bacon Joint PL10 5 - 7 min.
POULTRY
Whole Chicken PL10 4 - 9 min.
Portions of Chicken PL-8 5 - 7 min.
Breast (boned) PL-8 6 - 8 min.
FISH & SEAFOOD
- Brush a little oil or melted butter over the sh, or add
1-2 tbsp (15-30 ml) lemon juice, wine, stock, milk or
water.
- Always let the sh stand, covered, after cooking.
Fish Fillets PL10 3 - 5 min.
Whole Mackerel,
cleaned and prepared
PL10 3 - 5 min.
Whole Trout,
cleaned and prepared
PL10 4 - 6 min.
Salmon Steaks PL10 4 - 6 min.
NOTE: The above times should be regarded only as a guide. Allow for differences in individual tastes and
preferences.
The times may vary due to the shape, cut and composition of the food. Frozen meat, poultry and sh must be
thoroughly thawed before cooking.
COOKING INSTRUCTIONS
E31

COOKING INSTRUCTIONS
REHEATING
• Baby food particularly needs to be checked carefully before serving to prevent burns.
• When heating pre-packaged ready-cooked foods, always follow the package instructions carefully.
• If you freeze foods which were bought from the fresh or chilled counters, remember that they should be thoroughly thawed before
following the heating instructions on the package. It’s worth putting a note on them so that other members of the household
will remember too.
• Remember to remove metal ties and transfer food from foil containers before reheating.
• Chilled (refrigerated) food takes longer to reheat than food at room temperature (such as just-cooled food or food from the
store shelves).
• All foods should be reheated using full microwave power.
Reheating Chart
ITEM AMOUNT
REHEATING
TIME
SPECIAL INSTRUCTIONS
Baby Food 4.5 oz 20 sec. Empty into a small serving bowl. Stir well once or twice during
heating. Before serving, check the temperature carefully.
Baby Milk 4 oz / 100 ml 20 - 30 sec. Stir or shake well and pour into a sterilized bottle.
Before serving, shake well and check the temperature carefully.
8 oz / 225 ml 40 - 50 sec.
Sandwich Roll or
Bun
1 roll 20 - 30 sec. Wrap in paper towel and place on glass microwaveable rack.
Note: Do not use recycled paper towels.
Lasagna 1 serving
10
1
/2 oz / 300 g
4 - 6 min. Place lasagna on microwaveable plate. Cover with plastic wrap
and vent.
Casserole 1 c 1
1
/2 - 3 min. Cook covered, in microwaveable casserole. Stir once halfway
through cooking.
4 c 5 - 7 min.
Mashed Potatoes 1 c 2 - 3 min. Cook covered, in microwaveable casserole. Stir once halfway
through cooking.
4 c 6 - 8 min.
Baked Beans 1 c 2 - 3 min. Cook covered, in microwaveable casserole. Stir once halfway
through cooking.
Ravioli or Pasta in
Sauce
1 c 2 - 3 min. Cook covered, in microwaveable casserole. Stir once halfway
through cooking.
4 c 6 - 9 min.
32E

COOKING INSTRUCTIONS
VEGETABLE
Use a suitable glass Pyrex
®
bowl with lid. Add 2-3 tbsp (30-45 ml) cold water for every
1
/2 lb (250 g) unless another water quantity
is recommended - see chart. Cook covered for the minimum time - see chart.
Continue cooking to get the result you prefer. Stir once during and once after cooking. Add salt, herbs or butter after cooking.
Cover during a standing time of 3 minutes.
Hint: Cut the fresh vegetables into evenly sized pieces. The smaller they are cut, the more quickly they will cook.
All vegetables should be cooked using full microwave power.
Cooking chart for fresh vegetables
VEGETABLES WEIGHT TIME SPECIAL INSTRUCTIONS
Broccoli
1
/2 lb / 250 g 3 - 5 min. Prepare evenly sized orets. Arrange the stems to the center.
1 lb / 500 g 6 - 8 min.
Brussels Sprouts
1
/2 lb / 250 g 3 - 5 min. Add 4-5 tbsp (60-75 ml) water.
Carrots
1
/2 lb / 250 g 3 - 5 min. Cut carrots into evenly sized slices.
Cauliower
1
/2 lb / 250 g 3 - 5 min. Prepare even sized orets. Cut big orets into halves.
Arrange stems to the center.
1 lb / 500 g 6 - 8 min.
Zucchini
1
/2 lb / 250 g 3 - 4 min. Cut zucchini into slices. Add 2 tbsp (30 ml) water or a knob of butter.
Cook until just tender.
Eggplant
1
/2 lb / 250 g 3 - 4 min. Cut eggplant into small slices and sprinkle with 1 tbsp lemon juice.
Leeks
1
/2 lb / 250 g 3 - 4 min. Cut leeks into thick slices.
Mushrooms 0.3 lb / 125 g 2 - 3 min. Prepare small whole or sliced mushrooms. Do not add any
water. Sprinkle with lemon juice. Spice with salt and pepper.
Drain before serving.
1
/2 lb / 250 g 3 - 4 min.
Onions
1
/2 lb / 250 g 2 - 3 min. Cut onions into slices or halves. Add only 1 tbsp (15 ml) water.
Pepper
1
/2 lb / 250 g 2 - 4 min. Cut pepper into small slices.
Potatoes
1
/2 lb / 250 g 4 - 5 min. Weigh the peeled potatoes and cut them into similarly sized halves
or quarters.
1 lb / 500 g 6 - 8 min.
Turnip Cabbage
1
/2 lb / 250 g 4 - 6 min. Cut turnip cabbage into small cubes.
Cooking chart for frozen vegetables
ITEM WEIGHT TIME SPECIAL INSTRUCTIONS
Spinach 0.3 lb / 125 g 2 - 3 min. Add 1 tbsp (15 ml) water.
Broccoli
1
/2 lb / 250 g 4 - 5 min. Add 2 tbsp (30 ml) water.
Peas
1
/2 lb / 250 g 4 - 5 min. Add 1 tbsp (15 ml) water.
Green Beans
1
/2 lb / 250 g 4 - 5
1
/2 min. Add 2 tbsp (30 ml) water.
Mixed Vegetables (carrots/peas/corn)
1
/2 lb / 250 g 4 - 5 min. Add 1 tbsp (15 ml) water.
Mixed Vegetables (Chinese style)
1
/2 lb / 250 g 4 - 6 min. Add 1 tbsp (15 ml) water.
E33

COOKING INSTRUCTIONS
RECIPES
TOMATO & ORANGE SOUP
1 oz (25 g) butter
1 medium onion, chopped
1 large carrot & 1 large potato, chopped
1
3
/4 lb (800 g) canned, chopped tomatoes
1 small orange (juice and grated rind)
1
1
/2 pt (900 ml) hot vegetable stock
salt and pepper to taste
1. Melt the butter in a large bowl on PL10 for 30 seconds.
2. Add the onion, carrot and potato and cook on PL10 for 4 minutes.
Stir halfway through cooking.
3. Add the tomatoes, orange juice, orange rind and stock. Mix
thoroughly. Season with salt and pepper to taste. Cover the
bowl and cook on PL10 for 15 minutes. Stir 2-3 times during
cooking, until the vegetables are tender.
4. Blend and serve immediately.
FRENCH ONION SOUP
1 large onion, sliced
1 tbsp (15 ml) corn oil
2 oz (50 g) plain our
2 pt (1.2 liters) hot meat or vegetable stock
salt and pepper to taste
2 tbsp (30 ml) parsley, chopped
4 thick slices French bread
2 oz (50 g) cheese, grated
1. Place the onion and oil a bowl, mix well and cook on PL10 for
1 minute.
2. Stir in the our to make a paste and gradually add stock. Season
and add the parsley.
3. Cover the bowl and cook on PL-7 for 16 minutes.
4. Pour the soup into serving bowls, submerge bread and sprinkle
generously with cheese.
5. Cook on PL-7 for 2 minutes, until the cheese has melted.
STIR FRIED VEGETABLES
1 tbsp (15 ml) sunower oil
2 tbsp (30 ml) soy sauce
1 tbsp (15 ml) sherry
1 in (2.5 cm) ginger root, peeled and
nely grated
2 medium carrots, cut into ne strips
4 oz (100 g) button mushrooms, chopped
2 oz (50 g) bean sprouts
4 oz (100 g) snow pea
1 red pepper, seeded and thinly sliced
4 spring onions, chopped
4 oz (100 g) canned water chestnuts, sliced
1
/4 head of Chinese leaves, thinly slice
1. Place the oil, soy sauce, sherry, ginger, garlic and carrots in a
large bowl, mix thoroughly.
2. Cover and cook on PL10 for 3-5 minutes, stirring once.
3. Add the button mushrooms, bean sprouts, snow pea, red
pepper, spring onions, water chestnuts and Chinese leaves.
Mix thoroughly.
4. Cook on PL10 for 5-6 minutes, until the vegetables are tender.
Stir 2-3 times during cooking.
Stir fried vegetables are ideally served with meat or sh.
34E

COOKING INSTRUCTIONS
RECIPES
HONEYED CHICKEN
4 boneless chicken breasts
2 tbsp (30 ml) clear honey
1 tbsp (15 ml) whole grain mustard
1
/2 tsp (2.5 ml) dried tarragon
1 tbsp (15 ml) tomato puree
1
/4 pt (150 ml) chicken stock
1. Place the chicken breasts in a casserole dish.
2. Mix all remaining ingredients together and pour over the chicken.
Salt and pepper to taste.
3. Cook on PL10 for 13-14 minutes. Rearrange and coat the
chicken with the sauce twice during cooking.
BLUE CHEESE & CHIVE JACKETS
2 baking potatoes, approx. 9 oz (250 g) each
2 oz (50 g) butter
4 oz (100 g) blue cheese, chopped
1 tbsp (15 ml) fresh chives, chopped
2 oz (50g) mushrooms, sliced
salt and pepper to taste
1. Prick each potato in several places. Cook on PL10 for 7-9
minutes. Halve and scoop the esh into a bowl, add the butter,
cheese, chives, mushrooms, salt and pepper, mix thoroughly.
2. Pile mixture into the potato skins and place in a an dish.
3. Cook on PL-5 for 10 minutes.
WHITE SAUCE
1 oz (25 g) butter
1 oz (25 g) plain our
1
/2 pt (300 ml) milk
salt and pepper to taste
1. Place the butter in a bowl and cook on PL10 for 30 seconds,
until melted.
2. Stir in the our and whisk in the milk. Cook on PL10 for 3-4
minutes, stirring every 2 minutes until thick and smooth. Season
with salt and pepper to taste.
STRAWBERRY JAM
1
1
/2 lb (675 g) strawberries, hulled
3 tbsp (45 ml) lemon juice
1
1
/2 lb (675 g) caster sugar
1. Place strawberries and lemon juice in a very large bowl, heat
on PL10 for 4 minutes, or until the fruit has softened. Add sugar,
mix well, uncovered.
2. Cook on PL-7 for 20-25 minutes, until setting point* is reached,
stir every 4-5 minutes.
3. Pour into hot, clean jars. Cover, seal and label.
* Setting Point: To determine setting point, place 1 tsp (5 ml)
jam onto chilled saucer. Allow to stand for 1 minute. Move
surface of jam gently with your nger, if the surface wrinkles
setting point has been reached.
E35

COOKING INSTRUCTIONS
RECIPES
PLAIN MICROWAVE CAKE
4 oz (100 g) margarine
4 oz (100 g) sugar
1 egg
4 oz (100 g) self rising our, sifted
2-3 tbsp (30-45 ml) milk
1. Line the base of 8" (20.4 cm) cake dish with grease-proof paper.
2. Cream the margarine and sugar together until light and uffy.
Beat in the eggs and fold in the sifted our alternately with the
milk.
3. Pour into prepared container. Cook on PL10 for 4-5 minutes,
until a skewer comes out cleanly.
4. Leave the cake to stand for 5 minutes before turning out.
OMELETTE
1
/2 oz (15 g) butter
4 eggs
6 tbsp (90 ml) milk
salt and pepper
1. Whisk together eggs and milk.
2. Place butter in 10" (26 cm) an dish. Cook on PL10 for 30
seconds, until melted. Coat the dish with the melted butter.
3. Pour omelette mixture into an dish. Cook on PL10 for 2 minutes.
Whisk mixture and cook again on PL10 for 1 minute.
SCRAMBLED EGG
1
/2 oz (15 g) butter
2 eggs
2 tbsp (30 ml) milk
salt and pepper
1. Melt the butter in a bowl on PL10 for 30 seconds.
2. Add the eggs, milk and seasoning and mix well.
3. Cook on PL10 for 3 minutes, stirring every 30 seconds.
SAVORY MINCE
1 small onion, diced
1 clove garlic, crushed
1 tsp (5 ml) oil
7 oz (200 g) can chopped tomatoes
1 tbsp (15 ml) tomato puree
1 tsp (5 ml) mixed herbs
8 oz (225 g) minced beef
salt and pepper
1. Place onion, garlic and oil in casserole, and cook on PL10 for
2 minutes or until soft.
2. Place all other ingredients in casserole. Stir well.
3. Cover and cook on PL10 for 5 minutes then PL-5 for 8-13 minutes
or until the meat is cooked.
36E

FOUR À MICRO-ONDES MONTÉ AU DESSUS D’UNE CUISINIÈRE
MANUEL D’UTILISATION ET D’ENTRETIEN
Modèle KOTR30MXE

MESURES POUR ÉVITER
UNE EXPOSITION
POSSIBLE À UNE
ÉNERGIE MICRO-ONDE
EXCESSIVE
• Ne pas essayer de faire fonctionner ce four avec
la porte ouverte puisque le fonctionnement
avec la porte ouverte peut entraîner une
exposition dangereuse à l’énergie micro-onde.
Il est important de ne pas enlever ou modier
les verrouillages de sécurité.
• Ne pas placer d’objet entre l’avant du four et
la porte ou laisser s’accumuler de la saleté
ou des résidus de nettoyant sur les surfaces
d’étanchéité.
• Ne pas faire fonctionner le four s’il est
endommagé. Il est particulièrement important
que la porte du four ferme bien et qu’il n’y ait
pas de dommages: (1) à la tête du tiroir (tordue),
(2) aux glissières et verrous (brisés ou avec du
jeu), (3) aux joints et aux surfaces d’étanchéité
du tiroir.
• Seul du personnel qualié en réparations doit
ajuster ou réparer ce four.
ASSISTANCE À LA CLIENTÈLE
AVERTISSEMENT :
Cet équipement produit et utilise de l'énergie des
bandes de fréquences ISM (industrielles, scientiques et
médicales); s'il n'est pas installé et utilisé correctement,
c'est-à-dire rigoureusement selon les instructions du
fabricant, il est susceptible de causer de l'interférence
à la réception des ondes radio et de télévision.
Suite à des tests, il a été déterminé qu'il se conforme aux
limites prescrites aux équipements ISM conformément
à la section 18 des règles de la CFC, qui sont conçues
pour offrir une protection raisonnable contre de telles
interférences dans une installation résidentielle.
Cependant, il n'est pas garanti qu'aucune interférence
ne se produira dans une installation particulière.
Si cet appareil cause de l'interférence à la réception des
ondes radio ou de télévision, ce qui peut se vérier en
allumant et en éteignant l'appareil, nous encourageons
l'utilisateur à tenter de corriger les interférences par
l'une ou plusieurs des méthodes suivantes
• Réorienter l'antenne de réception de la radio ou
du téléviseur.
• Déplacer le four à micro-ondes par rapport à
l'appareil récepteur.
• Placer le four à micro-ondes plus loin de l'appareil
récepteur.
• Brancher le four à micro-ondes dans une prise
différente pour que le four à micro-ondes et
l'appareil récepteur soient sur des circuits
différents.
LE FABRICANT n'est pas responsable des interférences
aux ondes radio ou de télévision causées par une
MODIFICATION NON AUTORISÉE de ce four à micro-
ondes. C'est la responsabilité de l'utilisateur de corriger
cette interférence.
COMMENT FAIRE APPLIQUER LA GARANTIE
Pour faire appliquer la garantie, veuillez contacter le Service clients de Bertazzoni aux numéros cidessous en indiquant le numéro
de modèle, le numéro de série et la date d'achat.
ENGLISH 866-905-0010 (est situé dans US, BC, B, Sk et MB)
FRANÇAIS 800 561 7265 (est situé dans ON, QC, PE, NU, NS, NL, NB)
Conserver les documents attestant l'achat original ou l'installation originale a n de déterminer la période de garantie. Le numéro
de série du produit est reproduit au dos du manuel d'instructions.
2F

TABLE DES MATIÈRES
ASSISTANCE À LA CLIENTÈLE ............................................2
MESURES POUR ÉVITER UNE EXPOSITION POSSIBLE
À UNE ÉNERGIE MICRO-ONDE EXCESSIVE .......................2
GARANTIE LIMITEE DE DEUX ANS ......................................4
INSTRUCTIONS DE SÉCURITÉ IMPORTANTES ..................5
GUIDE D'INSTALLATION .................................................... 6-7
EXAMINEZ LE FOUR APRÈS L'AVOIR DÉBALLÉ .......................6
VÉRIFICATION DES PIÈCES ......................................................... 6
EMPLACEMENT ............................................................................. 6
ALIMENTATION ÉLECTRIQUE ......................................................6
INSTRUCTIONS DE MISE À LA TERRE ........................................7
AVERTISSEMENTS TRÈS IMPORTANTS CONCERNANT
L'UTILISATION ..............................................................................7
CARACTÉRISTIQUES TECHNIQUES ....................................8
ILLUSTRATION DES CARACTÉRISTIQUES ....................9-11
PROCÉDURE D'UTILISATION .............................................12
POUR RÉGLER LE NIVEAU DE PUISSANCE ...........................12
COMMANDES ................................................................. 13-20
RÉGLAGE DE L'HORLOGE ......................................................... 13
MODE DE MINUTERIE POUR CUISINER .................................. 13
COMMENT UTILISER EN TANT QUE MINUTERIE ....................13
COMMENT UTILISER LA MINUTERIE POUR RETARDER LE
MODE CUISSON .......................................................................... 13
COMMENT RÉGLER UN TEMPS DE REPOS
(APRÈS CUISSON) .....................................................................13
DÉCONGÉLATION MINUTÉE ...................................................... 14
DÉCONGÉLATION SELON LE POIDS ....................................... 14
MELT/SOFTEN (FONDRE/RAMOLLIR) ....................................... 14
TABLEAU DES MELT/SOFTEN ....................................................14
KEEP WARM (CONSERVER CHAUD) ........................................14
TIME COOK (TEMPS DE CUISSON) ...........................................14
CUIRE EN DEUX ÉTAPES ........................................................... 15
DÉCONGELER ET CUIRE ...........................................................15
CUISSON + CUISSON .................................................................15
+30 SEC ........................................................................................16
EXPRESS COOK (CUISSON EXPRESS) ....................................16
CUISSON UNE TOUCHE - PRÉPROGRAMMÉ (PRESET) .........16
OPÉRATIONS AVEC CAPTEUR ..................................................17
UTILISATION DES RÉGLAGES AVEC CAPTEUR ...................... 17
RECOUVRIR LES ALIMENTS ...................................................... 17
CUISSON AVEC CAPTEUR .........................................................17
TABLEAU DE CUISSON AVEC CAPTEUR .................................. 18
TURNTABLE ON-OFF (ACTIVER ET DÉSACTIVER
LA PLAQUE TOURNANTE) .......................................................... 18
VENT FAN (VENTILATEUR D'AÉRATION) ..................................19
LAMPE DE LA HOTTE..................................................................19
MODE SILENCIEUX ..................................................................... 19
FILTER RESET (RÉINITIALISATION DU TEMPS DU FILTRE) ... 19
POUR ACTIVER LE MODE D'ÉCONOMIE D'ÉNERGIE ..............19
VERROUILLAGE SÉCURITAIRE POUR LES ENFANTS ............20
POUR ARRÊTER LE FOUR LORSQU'IL EST EN MARCHE ....... 20
GRILLE MÉTALLIQUE ..................................................................20
POUR ÉVITER D'ENDOMMAGER VOS BIENS : .......................20
POUR UTILISER LA GRILLE MÉTALLIQUE : ............................. 20
ENTRETIEN ET NETTOYAGE ........................................ 21-23
INTÉRIEUR DU FOUR À MICRO-ONDES ................................... 21
BAS DU FOUR .............................................................................21
PLATEAU DE VERRE / PLAQUE TOURNANTE .........................21
GRILLE MÉTALLIQUE .................................................................21
ANNEAU-GUIDE ..........................................................................21
EXTÉRIEUR DU FOUR ...............................................................21
COMPARTIMENT DE LA LAMPE ................................................ 21
PANNEAU DE COMMANDE ........................................................ 21
COUVERCLE DU GUIDE D'ONDES ........................................... 21
LE SYSTÈME DE VENTILATION ................................................ 21
FILTRES À GRAISSE RÉUTILISABLES ...................................... 22
POUR RETIRER LES FILTRES À GRAISSE ............................... 22
NETTOYER LES FILTRES À GRAISSE ....................................... 22
REMETTRE LES FILTRES À GRAISSE EN PLACE ................... 22
REMPLACEMENT DES AMPOULES DE LUMIÈRE .................... 22
LAMPE DE LA HOTTE..................................................................22
INSTALLER /REMPLACER LE FILTRE AU CHARBON ............... 23
FILTRE AU CHARBON .................................................................23
AVANT D'APPELER ..............................................................24
SI AUCUNE PARTIE DU FOUR NE FONCTIONNE : ................... 24
SI LA LAMPE À L'INTÉRIEUR DU FOUR
NE FONCTIONNE PAS : ..............................................................24
SI LE FOUR NE RÉCHAUFFE PAS LES ALIMENTS : .................24
SI LE FOUR PREND PLUS DE TEMPS QU'À L'HABITUDE
POUR CHAUFFER /CUIRE LA NOURRITURE OU LE FAIT TROP
RAPIDEMENT : .............................................................................24
SI L'HORLOGE NE MAINTIENT PAS L'HEURE CORRECTEMENT
: .....................................................................................................24
SI LE BAS DU FOUR OU LE PLATEAU EN VERRE SONT
CHAUDS : .................................................................................... 24
SI L'INTÉRIEUR DU FOUR DEVIENT HUMIDE :.........................24
SI LA NOURRITURE NE CUIT PAS DE FAÇON UNIFORME : .... 24
SI LA NOURRITURE N'EST PAS ASSEZ CUITE : ...................... 24
SI LA NOURRITURE EST TROP CUITE : ................................... 24
SI DES ÉTINCELLES SE PRODUISENT : .................................. 24
SI L'ÉCRAN AFFICHE UNE PÉRIODE DE TEMPS QUI
S'ÉCOULE, MAIS QUE LE FOUR NE CUIT/CHAUFFE PAS : ..... 24
QUESTIONS ET RÉPONSES ................................................25
INSTRUCTIONS POUR LA CUISSON ............................ 26-36
GUIDE POUR LES USTENSILES ................................................26
UTILISEZ VOTRE FOUR À MICRO-ONDES DE FAÇON
SÉCURITAIRE ..............................................................................27
UTILISATION GÉNÉRALE ............................................................27
ALIMENTS ....................................................................................27
JAILLISSEMENTS D'ÉTINCELLES ..............................................27
PRINCIPES DES MICRO-ONDES ..............................................27
COMMENT LES MICRO-ONDES CUISENT LES ALIMENTS ....27
TALEAUX DE CONVERSION ....................................................... 28
TECHNIQUES DE CUISSON .......................................................28
STEMPS DE REPOS ....................................................................28
GUIDE DE DÉCONGÉLATION ..................................................... 29
TABLEAU DE DÉCONGÉLATION (AVEC TIME DEFROST) ......30
CUISSON .....................................................................................31
TABLEAU DE CUISSON ...............................................................31
RÉCHAUFFAGE ..........................................................................32
TABLEAU POUR RÉCHAUFFER ................................................. 32
LÉGUMES.....................................................................................33
TABLEAU POUR LES LÉGUMES ................................................ 33
GUIDE DE CUISSON POUR LÉGUMES CONGELÉS ................33
RECETTES ................................................................................... 34
3 F

GARANTIE LIMITEE DE DEUX ANS
I
”。”
I
I
『
a 。
a
a
25
4F

Lorsque vous utilisez des appareils électriques, des
précautions de base doivent être respectées, dont les
suivantes :
AVERTISSEMENT - An de réduire les risques de brûlures,
d'électrocution, d'incendie, de blessures ou de surexposition
à l'énergie des micro-ondes :
1. Lisez toutes les instructions avant d'utiliser l'appareil.
2. Lisez et respectez spéciquement les PRÉCAUTIONS
POUR ÉVITER UNE POSSIBLE SUREXPOSITION À
L'ÉNERGIE DES MICRO-ONDES en page 2.
3. Cet appareil doit être mis à la terre. Branchez-le uniquement
à une prise correctement mise à la terre. Voir les
INSTRUCTIONS DE MISE À LA TERRE en page 7.
4. Installez ou placez cet appareil conformément aux
instructions d'installation fournies seulement.
5. Certains produits, comme les œufs entiers et les
contenants scellés, par exemple des bocaux en verre
fermés, peuvent exploser et ne devraient pas être
chauffés dans ce four.
6. Utilisez ce four uniquement pour les usages décrits
dans ce manuel. N'utilisez pas de produits chimiques
corrosifs ni vapeurs corrosives dans cet appareil. Ce
type de four est conçu spéciquement pour réchauffer,
cuire ou sécher la nourriture. Il n'a pas été conçu pour
un usage industriel ou de laboratoire.
7. Comme pour tout appareil, une surveillance étroite est
nécessaire lorsqu'il est employé par des enfants.
8. N'utilisez pas cet appareil si le cordon ou la che sont
endommagés, s'il ne fonctionne pas correctement, s'il
est endommagé ou s'il a été échappé.
9. Cet appareil devrait être entretenu par un technicien
qualié uniquement.
Contactez le service d'entretien autorisé les plus près
pour l'examiner, le réparer ou le régler.
10. Ne couvrez ou ni ne bloquez aucune ouverture de cet
appareil.
11. Ne conservez pas cet appareil à l'extérieur. N'utilisez pas
cet appareil près d'une source d'eau, comme l'évier de
la cuisine, dans un sous-sol humide, près d'une piscine
ou dans des endroits semblables.
12. Ne plongez jamais le cordon ou la che dans l'eau.
13. Gardez le cordon éloigné des surfaces chauffantes.
14. Ne laissez pas le cordon pendre sur le bord de la table
ou du comptoir.
15. Lorsque vous nettoyez les surfaces de la porte et du
four qui entrent en contact lorsque la porte est fermée,
n'utilisez que du savon doux et non abrasif, appliqué
avec une éponge ou un chiffon doux.
16. Pour réduire les risques d'incendie à l'intérieur du four :
a. Ne faites pas trop cuire la nourriture. Portez une
attention particulière à l'appareil si vous utilisez du
papier, du plastique ou d'autres matières combustibles
dans le four pour faciliter la cuisson.
b. Retirez des sacs de papier ou de plastique les attaches
contenant un l métallique avant de mettre le sac dans
le four.
c. Si des matières s'enamment à l'intérieur du four,
gardez la porte du four fermée, éteignez le four et
débranchez le cordon d'alimentation ou coupez
le courant au panneau de disjoncteurs ou de
fusibles.
d. N'utilisez pas le four comme espace de rangement.
Ne laissez pas de produits en papier, d'ustensiles pour
la cuisson ou de nourriture dans le four lorsqu'il n'est
pas utilisé.
17. Les liquides, tels que l'eau, le café ou le thé, peuvent
surchauffer au-delà du point d'ébullition sans en avoir
l'air, à cause de la tension supercielle du liquide. Une
ébullition ou des bulles ne sont pas toujours visibles
lorsque l'on retire le contenant du four à micro-ondes.
DE CE FAIT, LE LIQUIDE POURRAIT ÊTRE TRÈS
CHAUD ET SE METTRE À BOUILLIR SOUDAINEMENT
LORSQU'UNE CUILLÈRE OU UN AUTRE USTENSILE
Y EST INSÉRÉ.
Pour réduire les risques de blessures :
a. Ne surchauffez pas les liquides.
b. Remuez le liquide avant de le réchauffer et au milieu
du processus de réchauffement.
c. N'utilisez pas de contenants aux parois droites avec
des goulots étroits.
d. Après le processus de chauffage, laissez le contenant
dans le four à micro-ondes quelques instants avant
de l'en retirer.
e. Faites très attention lorsque vous insérez une cuillère
ou un autre ustensile dans le contenant.
18. N'utilisez pas ce four à micro-ondes pour chauffer des
produits chimiques corrosifs (ex. : les suldes et les
chlorures). Les vapeurs des produits chimiques corrosifs
comme ceux-ci peuvent interagir avec les contacts et les
ressorts des interrupteurs de verrouillage, les rendant
inopérants.
19. Ne chauffez jamais de l'huile ou de la graisse pour faire
frire de la nourriture, car vous ne pouvez pas en contrôler
la température et ceci entraînerait un risque de surchauffe
et d'incendie.
20. N'utilisez pas le four sans le plateau de verre. Assurez-
vous qu'il repose correctement sur la base tournante.
21. Faites attention lorsque vous nettoyez les filtres du
ventilateur de la hotte. Les produits nettoyants corrosifs,
comme les produits nettoyants à base de soude pour les
cuisinières électriques, peuvent endommager les ltres.
22. Nettoyez la hotte de ventilation fréquemment. Ne laissez
pas la graisse s'accumuler sur la hotte ou dans les ltres.
23. Convient à une utilisation au-dessus des cuisinières
électriques et au gaz jusqu'à 30 pouces de largeur.
24. N'utilisez pas ce four à des ns commerciales. Il est conçu
pour une utilisation domestique seulement.
25. Lorsque vous ambez des aliments sous la hotte, activez
le ventilateur. Gardez la zone sous la hotte adéquatement
ventilée en tout temps. Éteignez l'équipement de cuisson
si vous voyez des ammes ou si un incendie survient.
CONSERVEZ CES INSTRUCTIONS
INSTRUCTIONS DE SÉCURITÉ IMPORTANTES
5 F

EXAMINEZ LE FOUR APRÈS L'AVOIR
DÉBALLÉ
Déballez le four, retirez tout le matériel d'emballage et
examinez le four à la recherche de dommages, comme
des bosses à l'extérieur ou à l'intérieur du four, des loquets
de porte brisés, des ssures dans la porte ou un mauvais
alignement de la porte. Si le four est endommagé, ne l'utilisez
pas et avisez-en votre vendeur immédiatement.
VÉRIFICATION DES PIÈCES
Déballez soigneusement votre four à micro-ondes et assurez-
vous d'avoir reçu toutes les pièces indiquées ci-dessous.
Si votre four à micro-ondes a été endommagé pendant
l'expédition ou si vous n'avez pas toutes les pièces, contactez
le centre de service à la clientèle de Bertazzoni.
IMAGE PIÈCE ET DESCRIPTION QTÉ
Trousse de quincaillerie (vis) 1
Grille métallique 1
Clapet (adaptateur
d'échappement)
1
Plaque de montage 1
Top Cabinet
Template
Gabarit de l'armoire
supérieure
1
Wall Template
Gabarit mural 1
Installation
Manual
Manuel d'installation 1
Use & Care
Manual
Manuel d'utilisation 1
Anneau-guide à roulettes 1
Filtres à graisse 2
Supports de ltre à graisse 2
Plaque tournante en verre 1
EMPLACEMENT
• L'installation de cet appareil doit être effectuée par un
technicien qualié ou une compagnie d'entretien technique
qualiée.
L'installation du four par une personne autre qu'un technicien
qualié pourrait entraîner des risques d'électrocution,
d'incendie, d'explosion, des problèmes avec le produit ou
des blessures.
• N'installez pas cet appareil dans un endroit humide,
graisseux ou poussiéreux, ou dans un endroit exposé
directement au soleil ou à l'eau (pluie).
• Branchez fermement la che du cordon électrique dans
la prise murale. N'utilisez jamais une che ou un cordon
électriques endommagés, ou une prise murale qui n'est
pas solide.
• N'installez pas cet appareil au-dessus d'un évier.
• Ne grimpez pas sur le four à micro-ondes et ne placez
pas d'objets (comme de la lessive, un couvre-four, des
chandelles ou cigarettes allumées, de la vaisselle, des
produits chimiques, des objets en métal, etc.) sur l'appareil.
Ceci pourrait entraîner des risques d'électrocution,
d'incendie, de problèmes avec le produit et de blessures.
ALIMENTATION ÉLECTRIQUE
• Vériez votre alimentation électrique locale.
Ce four à micro-ondes requiert un courant d'environ 15
ampères, 120 volts, 60 Hz et une prise de courant mise à
la terre.
a. Un cordon d'alimentation court est fourni pour réduire
les risques qu'un utilisateur s'y empêtre ou trébuche.
b. Des cordons plus longs et des rallonges sont disponibles
et peuvent être utilisés s'ils sont employés avec
discernement.
c. Si vous utilisez un cordon plus long ou une rallonge :
- La capacité électrique indiquée du cordon ou
de la rallonge doit être égale ou supérieure aux
caractéristiques électriques du four.
- La rallonge doit être un cordon à trois ls avec mise
à la terre.
- Le cordon plus long doit être placé de façon à ce
qu'il ne pende pas d'une table ou du comptoir, ce qui
causerait un risque de s'accrocher et trébucher, ou
permettrait à des enfants de tirer dessus.
• Vériez le cordon d'alimentation et la prise de courant
- Retirez régulièrement, à l'aide d'un chiffon sec, toutes
les matières étrangères, comme la poussière et l'eau,
sur les broches du cordon d'alimentation et les points
de contact.
- Débranchez la che et nettoyez-la avec un chiffon sec.
- Branchez la che dans une prise murale à trois orices
mise à la terre. Votre four devrait être le seul appareil
branché sur ce circuit.
- Partager une prise murale avec d'autres appareils,
utiliser une bande à prises multiples ou rallonger le
GUIDE D'INSTALLATION
6F

cordon d'alimentation pourrait entraîner des risques
d'électrocution ou d'incendie.
- N'utilisez pas de transformateur électrique. Ceci pourrait
entraîner un risque d'électrocution ou d'incendie.
- Assurez-vous que la tension, la fréquence et l'intensité
fournies correspondent aux caractéristiques techniques
du produit.
Lors de l'utilisation d'une fiche à trois broches
Prise murale à 3 orifices
Couvercle de
boîte de prise
de courant
Fiche à trois broches
Prise de
courant
Fil de mise
à la terre
Si vous utilisez un adaptateur de mise à la
terre, assurez-vous que la boîte de la prise de
courant est correctement mise à la terre.
Couvercle de boîte
de prise de courant
Adaptateur de
mise à la terre
LE CODE CANADIEN DE L'ÉLECTRICITÉ NE PERMET PAS
L'UTILISATION D'UN ADAPTATEUR DE MISE À LA TERRE.
INSTRUCTIONS DE MISE À
LA TERRE
Cet appareil doit être mis à la terre. Dans l'éventualité d'un
court-circuit électrique, la mise à la terre réduit le risque
d'électrocution en fournissant un l de sortie pour le courant
électrique. Cet appareil est équipé d'un cordon avec l de mise
à la terre et une che pour mise à la terre. Cette che doit
être branchée dans une prise murale correctement installée
et mise à la terre.
AVERTISSEMENT :
L'utilisation inappropriée de la mise à la terre peut
entraîner un risque d'électrocution.
Consultez un électricien ou technicien qualié si vous
ne comprenez pas en entier les instructions de mise
à la terre ou si vous avez des doutes sur la mise à la
terre adéquate de cet appareil. De plus, si vous devez
utiliser une rallonge électrique, utilisez uniquement
une rallonge à trois ls avec che mise à la terre à
trois broches ainsi qu'une prise à trois orices pouvant
accepter la che de l'appareil. La capacité indiquée de
la rallonge électrique doit être égale ou supérieure aux
caractéristiques électriques de l'appareil.
AVERTISSEMENT :
Sous aucune circonstance, ne coupez ni ne retirez
la troisième broche (de mise à la terre) du cordon
d'alimentation.
AVERTISSEMENTS TRÈS IMPORTANTS
CONCERNANT L'UTILISATION
Si le four à micro-ondes est inondé, veuillez communiquer le
centre de réparation le plus près. Négliger de le faire pourrait
entraîner un risque d'électrocution ou d'incendie.
Lisez et respectez spéciquement les « Précautions pour
éviter une possible surexposition à l'énergie des micro-ondes
» en page 2.
Si le four à micro-ondes produit un bruit étrange, une odeur
de brûlé ou de la fumée, débranchez-le immédiatement et
contactez le centre de service le plus près.
• Dans l'éventualité d'une fuite de gaz (propane, gaz de
pétrole liquéé, etc.), ventilez la pièce immédiatement.
Ne touchez pas au four à micro-ondes, au cordon
d'alimentation ou à la che.
• N'utilisez pas de ventilateur pour aérer.
• Une étincelle pourrait causer une explosion ou un incendie.
Assurez-vous que la porte ou n'importe quelles autres
pièces n'entrent pas en contact avec votre corps pendant
le fonctionnement du four ou juste après.
• Dans l'éventualité d'un feu de friture sur la surface de
cuisson sous le four à micro-ondes, étouffez le chaudron
enflammé en le recouvrant complètement avec un
couvercle, une plaque à biscuits ou un plateau plat.
Ne laissez pas la surface de cuisson sans supervision
lorsqu'elle fonctionne et est réglée à une chaleur élevée.
Les débordements par bouillonnement entraînent de la
fumée et les déversements graisseux peuvent s'enammer
et prendre de l'expansion si le ventilateur de la hotte est
en fonction. Pour minimiser l'activation automatique de la
hotte, utilisez des chaudrons et poêles de tailles adéquates.
Ne cuisinez à température élevée que lorsque nécessaire.
Si des matières s'enamment à l'intérieur du four, gardez
la porte du four fermée, éteignez le four et débranchez le
cordon d'alimentation ou coupez le courant au panneau de
disjoncteurs ou de fusibles. Ouvrir la porte du four pourrait
permettre aux ammes de s'étendre.
• Respectez en tout temps les précautions de sécurité lorsque
vous utilisez votre four. N'essayez jamais de réparer le four
vous-même. Il y a une tension électrique dangereuse à
l'intérieur. Si le four doit être réparé, communiquez avec
un centre de réparation autorisé près de chez vous.
GUIDE D'INSTALLATION
7 F
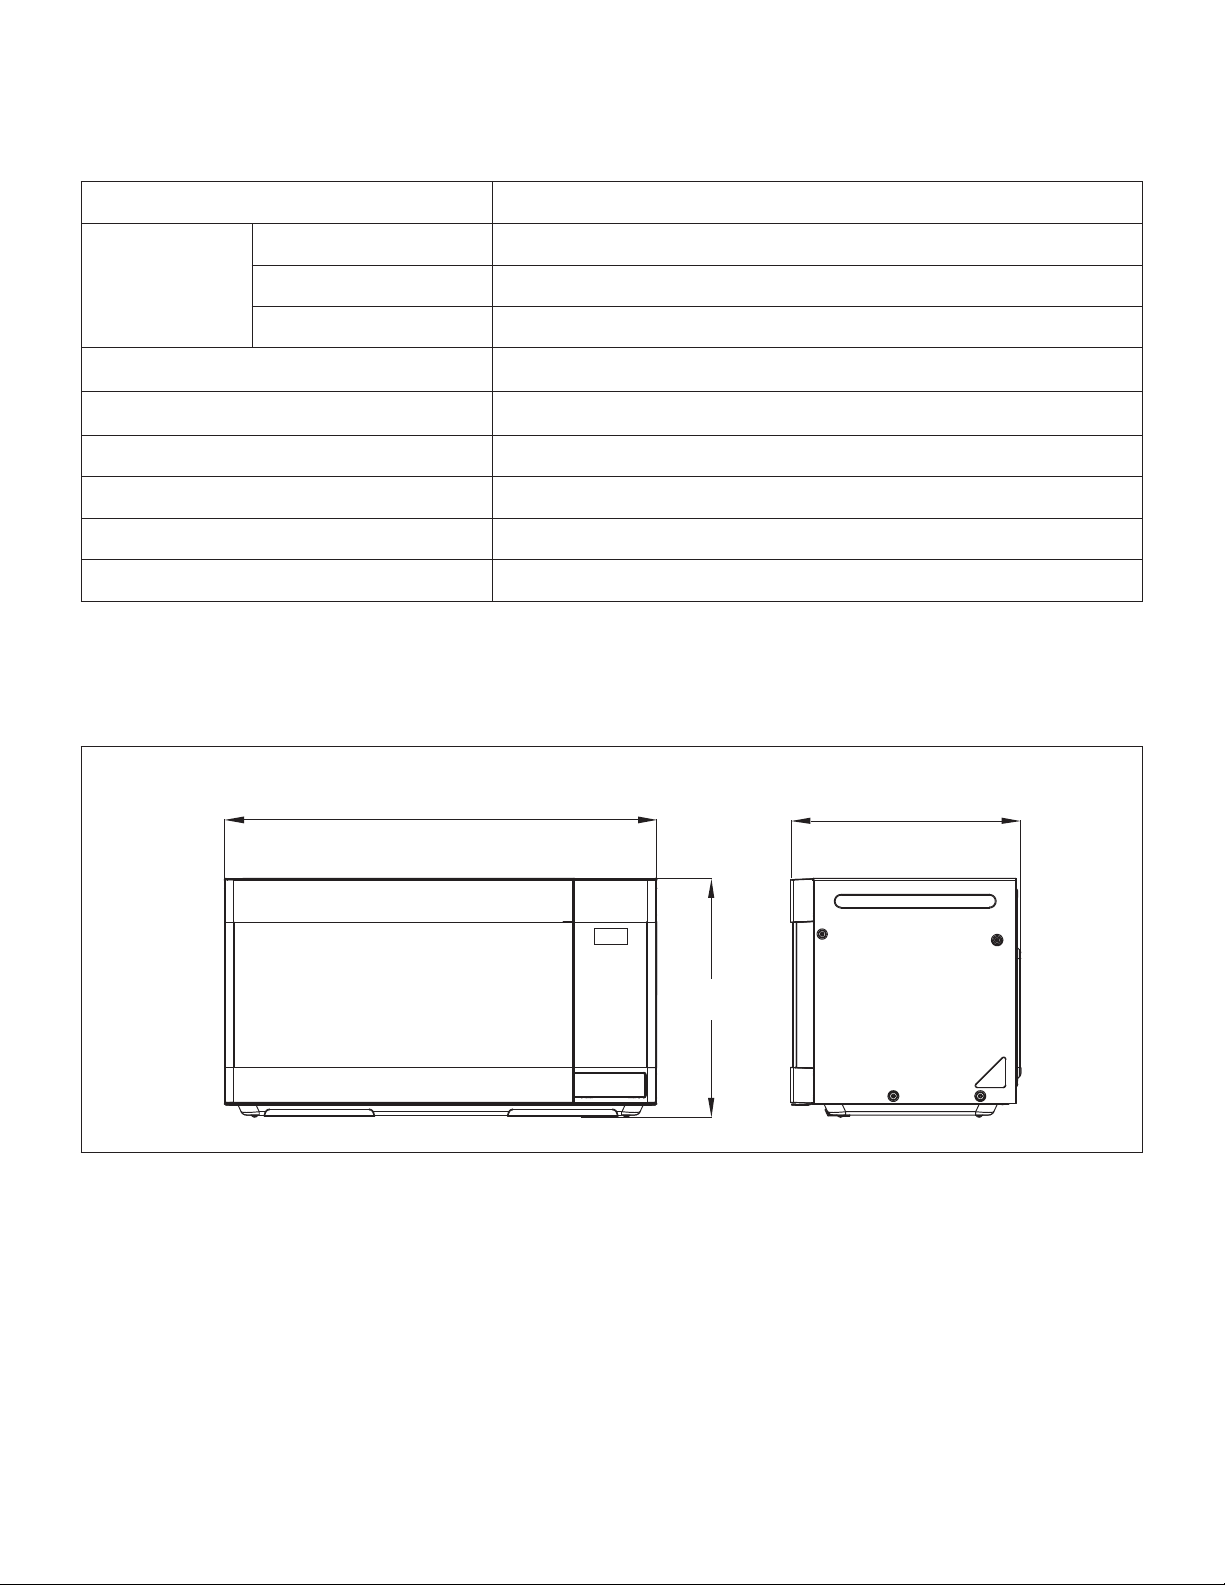
CARACTÉRISTIQUES TECHNIQUES
Alimentation électrique 120 V CA, 60 Hz, MONOPHASÉE AVEC MISE À LA TERRE
Micro-ondes
Puissance d'entrée 1 500 W
Énergie produite 950 W
Fréquence 2 450 MHz
Dimensions extérieures (la x h x p) 29,9 x 16,3 x 15,9 po
Dimensions de l'enceinte (la x h x p) 20,6 x 10,0 x 14,9 po
Volume de l'enceinte du four 1,6 pi
3
Poids net Env. 50,3 LB (22,8 KG)
Minuterie 99 min. 99 Sec.
Sélections de puissance 10 niveaux
* Les caractéristiques techniques peuvent changer sans préavis.
29,9 po 15,9 po
16,3 po
8F
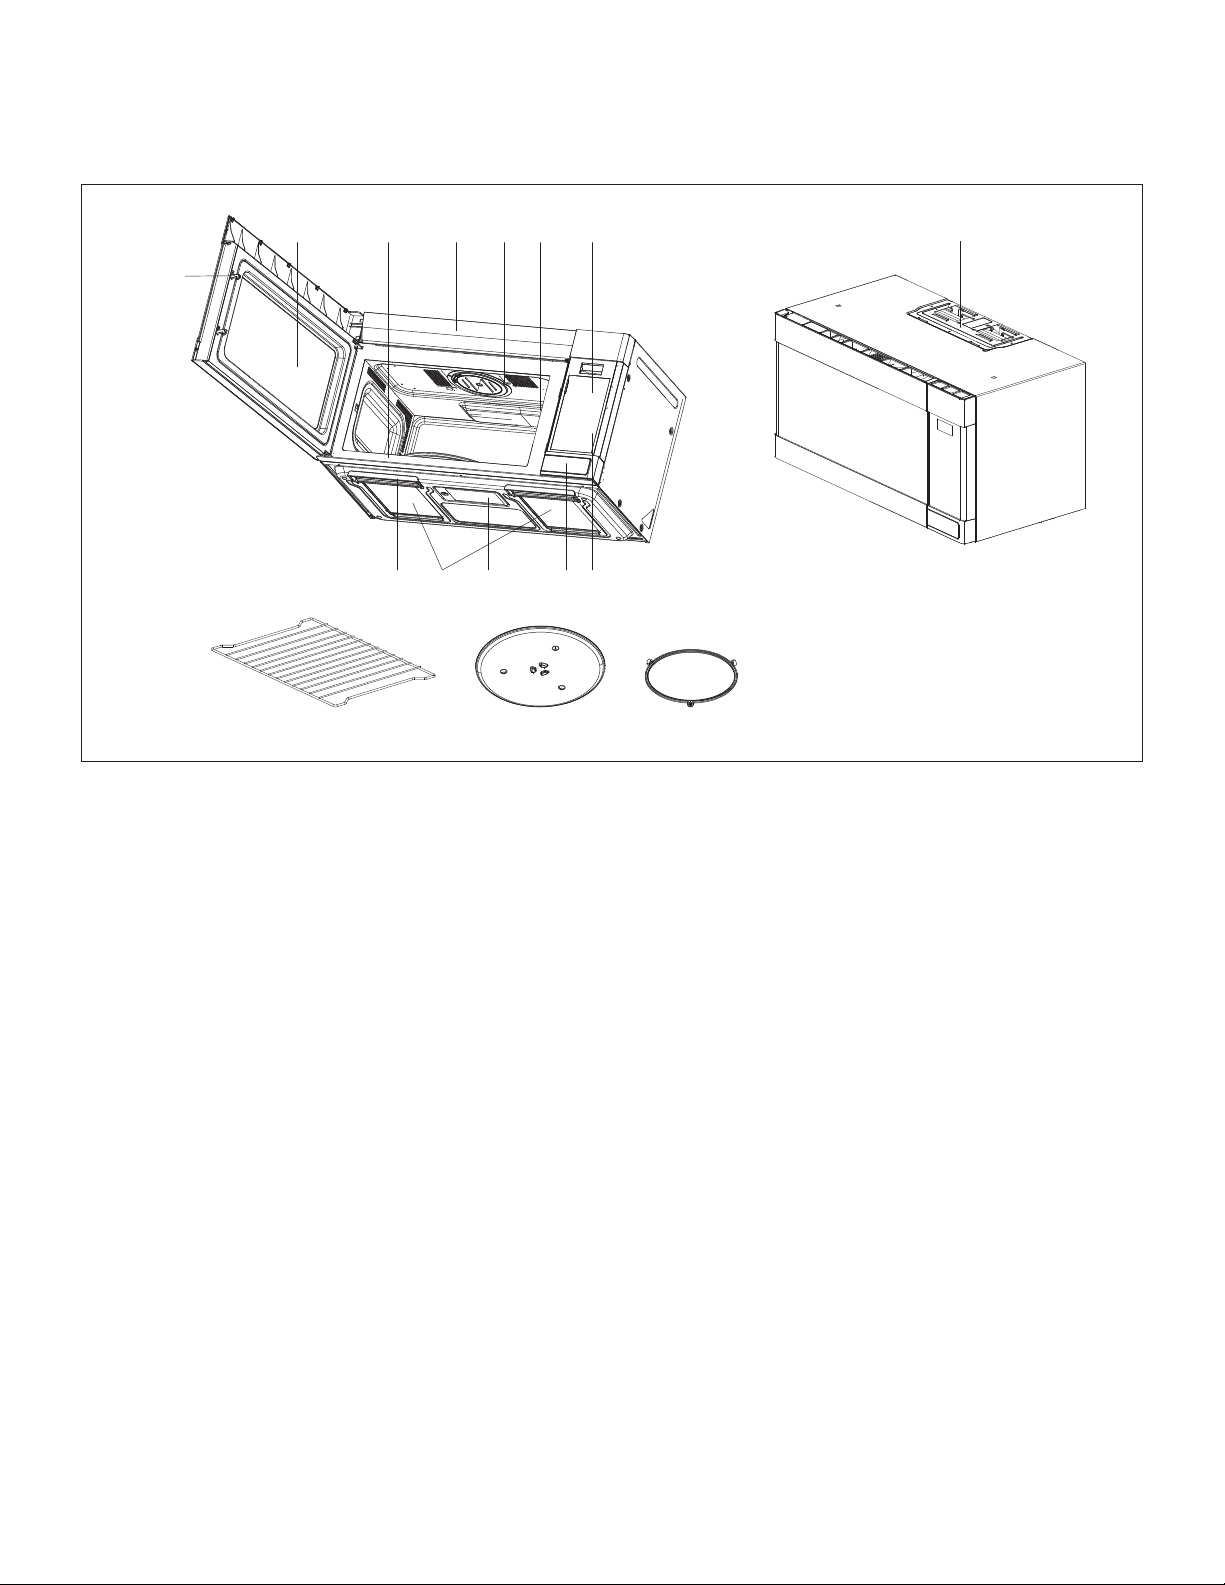
ILLUSTRATION DES CARACTÉRISTIQUES
1
2 3 4 5 6 7
15
12 11 10
9 8
13 14 16
1. LOQUETS DE PORTE
2. FENÊTRE avec TREILLIS MÉTALLIQUE
Le treillis métallique permet de voir la cuisson tout en
empêchant les micro-ondes de s'échapper.
3. PLAQUE DU NUMÉRO DE MODÈLE
Située sur la façade du four.
4. FILTRE AU CHARBON (derrière la grille de ventilation)
5. LUMIÈRE DU FOUR
6. COUVERCLE DU GUIDE D'ONDES
Protège l'émetteur de micro-ondes contre les
éclaboussures de nourriture.
7. PANNEAU DE COMMANDE TACTILE et AFFICHAGE
NUMÉRIQUE
Pour des renseignements détaillés sur chacune des
caractéristiques, consulter la section Illustration des
caractéristiques, pages 10 et 11.
8. COMMANDES DE LA HOTTE
Ventilateur - Appuyer pour vitesses Haute, Basse ou
Hors-fonction.
Lampe - Appuyer pour allumer ou éteindre.
9. BOUTON DE LA PORTE
Appuyer sur ce bouton pour ouvrir la porte.
10. LAMPE DE LA HOTTE
11. FILTRES À GRAISSE
12. POIGNÉE POUR FILTRE
Pour l'accès aux ltres à graisse.
13 . GRILLE MÉTALLIQUE
À utiliser pour créer de l'espace et chauffer plus d'un plat
à la fois.
14. PLAQUE TOURNANTE/ PLATEAU DE VERRE
Composée du plateau de verre et de l'anneau-guide à
roulettes. L'anneau-guide est d'abord placé dans la partie
inférieure du four et soutient le plateau de verre. Les deux
pièces doivent être présentes lors de l'utilisation du four
à micro-ondes.
15. MOTEUR DE VENTILATION
Votre micro-ondes à hotte intégrée est conçu pour
s'adapter à trois types de ventilation.
(Système de recirculation d'air, ventilation verticale,
ventilation horizontale). Consulter le Manuel d'installation
pour choisir le type de ventilation requis par votre
installation.
16. ANNEAU-GUIDE À ROULETTES
9 F
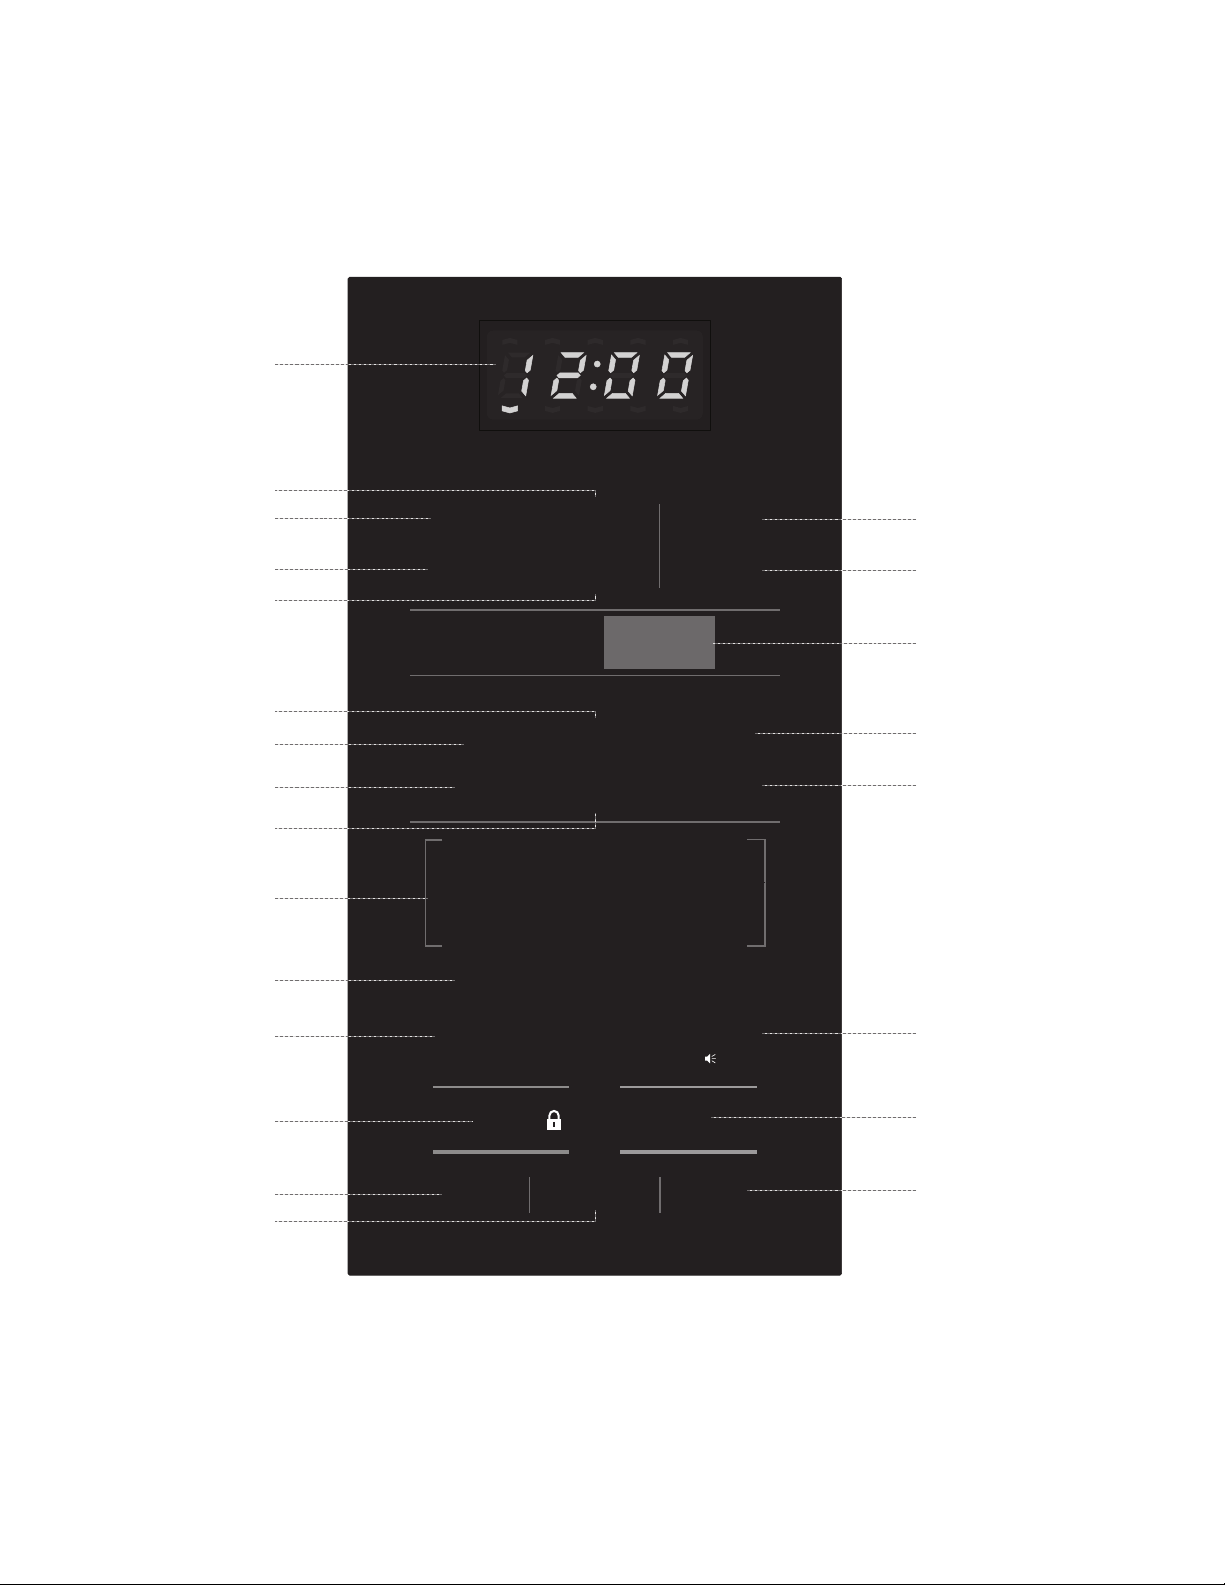
ILLUSTRATION DES CARACTÉRISTIQUES
Le Panneau de commande tactile vous permet d'utiliser les commandes du four d'une simple pression du doigt.
Il est conçu pour être facile à utiliser et à comprendre.
ENTER
START
Sensor Cook
Convenience Features
Express Cook
Potato
Reheat
Popcorn
Beverage
Melt /
Soften
Frozen
Entree
Frozen
Vegetables
Turntable
On-Off
Time
Cook
1
4
7
+30 sec
2
5
8
0
Stop
Clear
Start
3
6
9
Power
Level
Filter
Reset
(3 Sec)
Vent Fan
Hi-Lo-Off
Light
On-Off
Clock
Keep
Warm
Defrost
Time/Weight
Preset
COOK
1. Butter
2. Chocolate
3. Ice Cream
4. Cheese
FILTER
DEF.
TIME
CODE
MUTE
LBS. OZ.
Kitchen
Timer
( 3 Sec)
1
3
4
10
11
15
16
17
19
21
2
9
5
14
22
6
7
12
13
20
23
8
18
• Chaque fois que l'on appuie sur une touche, un signal sonore (BIP) est émis.
• Lorsque l'on appuie sur la touche STOP/CLEAR pendant que le four est en fonction, le four arrête;
cependant, toute l'information programmée est conservée. Pour supprimer cette information,
appuyez sur STOP/CLEAR à nouveau.
10F

ILLUSTRATION DES CARACTÉRISTIQUES
1. ÉCRAN D'AFFICHAGE - Afche l'heure, le temps ou le
niveau de puissance utilisé, le mode de cuisson et les
instructions.
2. FROZEN ENTREE (repas congelé) - Appuyez sur cette
touche pour réchauffer un repas congelé. Le capteur du
four à micro-ondes règle automatiquement le temps de
cuisson selon le type et la quantité d'aliments.
3. POTATO (pommes de terre) - Appuyez sur cette touche
pour cuire des pommes de terre. Le capteur du four à
micro-ondes règle automatiquement le temps de cuisson
selon le type et la quantité d'aliments.
4. REHEAT (réchauffer) - Appuyez sur cette touche pour
réchauffer des aliments. Le capteur du four à micro-ondes
règle automatiquement le temps de cuisson selon le type
et la quantité d'aliments.
5. FROZEN VEGETABLES (légumes congelés) - Appuyez
sur cette touche pour cuire des légumes congelés. Le
capteur du four à micro-ondes règle automatiquement le
temps de cuisson selon le type et la quantité d'aliments.
6. POPCORN (maïs soufé) - Appuyez sur cette touche
pour faire éclater des grains de maïs préemballés pour
four à micro-ondes (100, 85 ou 50 g).
7. BEVERAGE (boisson) - Appuyez sur cette touche pour
réchauffer une boisson.
8. MELT/SOFTEN (fondre/ramollir) - Appuyez sur cette
touche pour faire fondre ou ramollir du beurre, du
chocolat, de la crème glacée ou du fromage.
9. CLOCK (horloge) - Appuyez sur cette touche pour régler
l'heure.
Tenez-la enfoncée pendant 3 secondes pour
activer le mode d'économie d'énergie. Pour des
renseignements détaillés sur cette fonction, voir la
section Commandes, page 19.
10. TURNTABLE On-Off (plaque tournante) - Appuyez
sur cette touche pour activer ou désactiver la plaque
tournante.
11. TIME COOK (temps de cuisson) - Appuyez sur cette
touche pour régler le temps de cuisson par micro-ondes.
• Le niveau de puissance 10 (Élevé) est automatique,
mais des niveaux d'intensité plus bas peuvent être
programmés.
12. KEEP WARM (conserver chaud) - Appuyez sur cette
touche pour garder chaude la nourriture de façon
sécuritaire pendant 30 minutes.
13. DEFROST (décongélation) - Appuyez sur cette touche
pour régler le temps de décongélation ou le poids à
décongeler.
14. POWER LEVEL (niveau de puissance) - Appuyez
sur cette touche si vous souhaitez sélectionner un
niveau de puissance autre que le niveau 10 (Élevé)
automatique.
15. TOUCHES DE CHIFFRES - Utilisez ces touches pour
entrer le temps de cuisson, le temps ou le poids de
décongélation, l'heure ou le niveau de puissance.
16. EXPRESS COOK (cuisson express) - Appuyez sur ces
touches pour utiliser les temps de cuisson préréglés
de 1 à 6 minutes au niveau de puissance de 100 %.
17. +30 SEC - Appuyez sur cette touche pour lancer
instantanément un « temps de cuisson » 30 secondes
ou pour ajouter 30 secondes au temps de cuisson en
cours.
18. KITCHEN TIMER (minuterie) - Appuyez sur cette
touche pour utiliser la minuterie, retarder la cuisson
et ou le temps de repos après la cuisson.
De plus, tenez enfoncé pendant 3 secondes
pour activer ou désactiver le son. Pour des
renseignements détaillés sur cette fonction, voir la
section Commandes, page 19.
19. STOP/CLEAR (arrêt/effacer) - Lorsqu'enfoncée une
fois, cette touche interrompt le fonctionnement du
four. Lorsqu'enfoncée une deuxième fois, le four est
réinitialisé et tous les réglages sont effacés (sauf
l'heure).
De plus, tenez cette touche enfoncée pendant
3 secondes pour activer la fonction de
verrouillage sécuritaire pour les enfants. Pour des
renseignements détaillés sur cette fonction, voir la
section Commandes, page 20.
20. START (démarrer) - Lorsque tous les choix sont
effectués, appuyez sur cette touche pour activer le
four ou la minuterie.
21. LIGHT (lampe) - Appuyez sur cette touche pour
allumer ou éteindre la lampe de la hotte.
22. VENT FAN (ventilateur) - Appuyez sur cette touche
pour activer le ventilateur aux vitesses rapide ou
basse, ou pour l'arrêter.
23. FILTER RESET (réinitialisation du ltre) - Tenez cette
touche enfoncée 3 secondes pour réinitialiser le temps
pour le ltre après son remplacement. Les ltres au
charbon doivent être remplacés tous les six mois.
11 F

Cette section comprend des renseignements utiles sur
l'utilisation du four.
1. Branchez le cordon d'alimentation dans une prise de
courant standard à trois orices avec un courant alternatif
de 120 V, 15 A et 60 Hz.
2. Après avoir placé la nourriture dans un contenant adéquat,
ouvrez la porte du four et placez le contenant sur le
plateau de verre. Le plateau de verre et l'anneau-guide
doivent toujours être en place pendant la cuisson.
3. Fermez la porte. Assurez-vous qu'elle est solidement
fermée.
4. La lumière du four est allumée pendant que le micro-
ondes est en fonction.
5. La porte du four peut être ouverte en tout temps
pendant le fonctionnement en appuyant simplement
sur le bouton d'ouverture de la porte. Le four s'arrêtera
automatiquement.
6. Chaque fois que l'on appuie sur une touche, un signal
sonore (Bip) est émis an de conrmer la pression.
7. Le four est activé automatiquement à la puissance
maximale, à moins qu'il soit réglé à une puissance
inférieure.
8. L'écran afche « : 0 » lorsque l'horloge du four n'est pas
réglée.
9. L'horloge afche à nouveau l'heure actuelle lorsque le
temps de cuisson se termine.
10. Lorsque l'on appuie sur la touche STOP/CLEAR pendant
que le four est en fonction, la cuisson s'interrompt et
toutes les informations programmées sont conservées.
Pour effacer toutes les informations (sauf l'heure actuelle),
appuyez à nouveau sur la touche STOP/CLEAR. Si la
porte du four est ouverte pendant son fonctionnement,
toute les informations sont conservées.
11. Si vous appuyez sur la touche START et que le four ne
s'active pas, vériez la surface de contact entre le joint
de la porte et le four à la recherche d'une obstruction
et assurez-vous que la porte se ferme solidement. Le
four n'entrera pas en fonction avant que la porte soit
entièrement fermée ou que le programme soit réinitialisé.
Assurez-vous que le four est installé correctement
et bien branché à la prise de courant.
PROCÉDURE D'UTILISATION
POUR RÉGLER LE NIVEAU DE PUISSANCE
Le niveau de puissance se règle en appuyant sur la touche
POWER LEVEL et sur un chiffre. Si vous souhaitez utiliser
un niveau de puissance différent, appuyez sur la touche
POWER LEVEL avant d'appuyer sur START. Entrez le niveau
de puissance désiré en appuyant sur la touche de chiffre
appropriée. Le tableau suivant montre les touches à utiliser,
le message afché et le pourcentage de puissance.
TOUCHE POWER
LEVEL + CHIFFRE
NIVEAU
PUISSANCE
(AFFICHÉ)
% DE
PUISSANCE
APPROXIMATIF
Power Level + 1 + 0 PL10 100%
Power Level + 9 PL-9 90%
Power Level + 8 PL-8 80%
Power Level + 7 PL-7 70%
Power Level + 6 PL-6 60%
Power Level + 5 PL-5 50%
Power Level + 4 PL-4 40%
Power Level + 3 PL-3 30%
Power Level + 2 PL-2 20%
Power Level + 1 PL-1 10%
Power Level + 0 PL-0 0%
REMARQUE : Si « PL-0 » est choisi, le four fonctionnera
avec le ventilateur, mais sans puissance. Vous pouvez
vous servir de ce niveau pour chasser les odeurs.
12F

COMMANDES
Lorsque vous appuyez sur la touche START, le témoin
TIME commence à clignoter et l'écran indique le temps
qui s'écoule en mode de minuterie. Lorsque le temps
programmé à la minuterie est écoulé, un signal sonore
triple est émis.
REMARQUE : Pour activer ou désactiver le son, maintenez
la touche KITCHEN TIMER enfoncée pendant trois secondes.
Pour des renseignements détaillés sur cette fonction, voir la
section Commandes, page 20.
COMMENT UTILISER LA MINUTERIE POUR
RETARDER LE MODE CUISSON
Kitchen
Timer
( 3 Sec)
1. Appuyez sur la touche KITCHEN TIMER.
2. Inscrivez la durée (temps) souhaitée pour
le délai.
Time
Cook
3. Appuyez sur la touche TIME COOK pour
programmer le temps de cuisson souhaité.
Start
4. Appuyez sur la touche START.
Les témoins ENTER et TIME clignotent et « : 0 » s'afche.
« : 0 » est afché. L'écran afche votre choix.
Lorsque vous appuyez sur la touche START, le témoin TIME
commence à clignoter et l'écran afche le temps restant
en mode Minuterie. Lorsque le mode Minuterie prend n,
le four produit un signal sonore. Le témoin TIME s'éteint et
le témoin COOK commence à clignoter. L'écran afche le
temps qui s'écoule en mode de Temps de cuisson. Lorsque
le mode Temps de cuisson se termine, un signal sonore
(trois bips) est émis.
COMMENT RÉGLER UN TEMPS DE REPOS
(APRÈS CUISSON)
Time
Cook
1. Appuyez sur la touche TIME COOK pour
programmer le temps de cuisson souhaité.
Kitchen
Timer
( 3 Sec)
2. Appuyez sur la touche KITCHEN TIMER.
3. Inscrivez la durée (temps) désirée pour la
période de repos.
Start
4. Appuyez sur la touche START.
Les témoins ENTER et TIME clignotent et « : 0 » est afché.
L'écran afche les chiffres sur lesquels vous appuyez.
RÉGLAGE DE L'HORLOGE
Lorsque l'on branche le four, l'afchage initial indique « : 0
» et un signal sonore est émis. Si l'alimentation électrique
est coupée, l'afchage indiquera « : 0 » lorsque le courant
sera rétabli.
Clock
1. Appuyez sur la touche CLOCK.
L'horloge adopte un système d'afchage
à 12 heures.
2. Appuyez sur la touche CLOCK à
nouveau. L'horloge adopte un système
d'afche à 24 heures.
3. Réglez l'heure actuelle en appuyan=t sur
les chiffres en séquence.
4. Appuyez sur la touche CLOCK.
Les témoins ENTER et TIME clignotent et « 12H » est
afché.
REMARQUE : Ce four possède deux systèmes d'afchage
de l'heure. Si vous préférez le système à 12 heures, omettre
l'étape 2.
L'afchage cesse de clignoter et les deux-points commencent
à clignoter. Si vous avez choisi le système à 12 heures, cette
horloge numérique accepte les heures de 1:00 à 12:59.
Si vous avez choisi le système à 24 heures, cette horloge
numérique accepte les heures de 0:00 à 23:59.
REMARQUE :
1. Si vous tentez d'inscrire une heure incorrecte, l'horloge ne
sera pas réglée et un signal d'erreur sera émis. Appuyez
sur la touche CLOCK et entrez l'heure à nouveau.
2. Si vous voulez activer le mode d'économie d'énergie,
maintenez la touche CLOCK enfoncée pendant trois
secondes. Pour des renseignements détaillés sur cette
fonction, voir la section Commandes, page 20.
MODE DE MINUTERIE POUR CUISINER
Le four offre une fonction de minuterie. La minuterie fonctionne
sans émettre de micro-ondes.
COMMENT UTILISER EN TANT QUE
MINUTERIE
Kitchen
Timer
( 3 Sec)
1. Appuyez sur la touche KITCHEN TIMER.
2. Inscrivez la période de temps requise.
Start
3. Appuyez sur la touche START.
Les témoins ENTER et TIME clignotent et « : 0 » s'afche.
L'écran afche votre choix.
13 F

COMMANDES
Lorsque vous appuyez sur la touche START, le témoin
COOK commence à clignoter et l'écran afche le temps
restant en mode Minuterie. Lorsque le mode Minuterie
prend n, le four produit un signal sonore. Le témoin TIME
s'éteint et le témoin COOK commence à clignoter. L'écran
afche le temps qui s'écoule en mode de Temps de cuisson.
Lorsque le mode Temps de cuisson se termine, un signal
sonore (trois bips) est émis.
REMARQUE : Votre four peut être programmé pour jusqu'à
99 minutes et 99 secondes. (99:99).
DÉCONGÉLATION MINUTÉE
Lorsque la Décongélation minutée (TIME DEFROST) est
choisie, le cycle automatique divise le temps de décongélation
en périodes de décongélation et de repos en activant et en
désactivant l'émission de micro-ondes.
Defrost
Time/Weight
1. Appuyez une fois sur la touche
DEFROST.
2. Appuyez sur les chiffres pour entrer le
temps de décongélation souhaité.
Start
3. Appuyez sur la touche START.
Le témoin DEF s'allume, les témoins ENTER et TIME
clignotent et « : 0 » est afché. « : 0 » est afché.
L'écran afche votre choix.
Lorsque vous appuyez sur START, le témoin DEF
commence à clignoter pour indiquer que le four est en mode
de Décongélation minutée (Time Defrost). L'écran afche le
temps qui s'écoule pour indiquer combien de temps il reste
en mode de Décongélation minutée. Le four produit des
signaux sonores pendant le cycle de décongélation pour
indiquer que la nourriture doit être tournée ou réarrangée.
Lorsque le mode de décongélation se termine, un signal
sonore triple est émis.
REMARQUE : Votre four peut être programmé pour jusqu'à
99 minutes et 99 secondes. (99:99).
DÉCONGÉLATION SELON LE POIDS
Le mode Décongélation selon le poids (Weight Defrost)
permet de dégeler facilement la nourriture sans avoir à deviner
le temps de décongélation requis. Suivez les étapes suivantes
pour une décongélation facile.
Defrost
Time/Weight
1. Appuyez deux fois sur la touche
DEFROST.
2. Appuyez sur les chiffres pour entrer le
poids de nourriture à décongeler.
Start
3. Appuyez sur la touche START.
Le témoin DEF s'allume, les témoins ENTER et LBS
clignotent et « 0.0 » est afché. L'écran afche votre choix.
Le temps de décongélation est automatiquement déterminé
selon le poids inscrit.
Lorsque vous appuyez sur START, le témoin DEF
commence à clignoter et le temps de décongélation est
afché et s'écoule à l'écran. Le four produit des signaux
sonores pendant le cycle de décongélation pour indiquer
que la nourriture doit être tournée ou réarrangée. Lorsque
le mode de décongélation se termine, un signal sonore
triple est émis.
REMARQUE : Votre four peut être programmé de 0,2 à 6,0 lb.
MELT/SOFTEN (FONDRE/RAMOLLIR)
La fonction MELT/SOFTEN (Fondre/Ramollir) peut être
utilisée pour faire fondre ou ramollir le beurre, le chocolat, la
crème glacée et les fromages. Consultez le tableau pour les
réglages à utiliser.
Melt /
Soften
1. Appuyez sur la touche MELT/SOFTEN
une fois pour le beurre, deux fois pour
le chocolat, trois fois pour la crème
glacée et quatre fois pour le fromage.
Start
2. Appuyez sur START.
L'écran afche votre choix.
Tableau des Melt/Soften
PRESSIONS
SUR LA
TOUCHE
AFFICHAGE ALIMENT POIDS
Une S-1
Beurre
1
/2
tasse
Deux S-2
Chocolat 227 g (8 oz)
Trois S-3
Crème
glacée
1
/2
gallon
(1,9 L)
Quatre S-4
Fromage 1 assiette
KEEP WARM (CONSERVER CHAUD)
La fonction KEEP WARM garde la nourriture chaude pendant
30 minutes.
Keep
Warm
1. Appuyez sur la touche
KEEP WARM.
Start
2. Appuyez sur la touche START.
Lorsque vous appuyez sur la touche KEEP WARM, l'écran
afche « 30:00 ».
Lorsque le temps d'activation se termine, un signal sonore
triple est émis.
TIME COOK (TEMPS DE CUISSON)
14F

COMMANDES
Time
Cook
1. Appuyez sur la touche TIME COOK.
2 Appuyez sur les touches de chiffre pour
entrer le temps de cuisson.
Power
Level
3. Appuyez sur la touche
POWER LEVEL.
4. Appuyez sur les touches de chiffre pour
entrer le niveau de puissance (0 à 10).
Start
5. Appuyez sur la touche START.
Le témoin COOK s'allume, les témoins ENTER et TIME
clignotent et « : 0 » est afché.
L'écran afche votre choix.
L'afchage indique PL10 pour le niveau de puissance de
100 %. L'écran afche de PL-0 à PL10.
Si vous sautez les étapes 3 et 4, le niveau 100 % de
puissance est automatique.
Lorsque vous appuyez sur START, le témoin COOK
commence à clignoter pour indiquer que la fonction de
cuisson est activée. L'écran afchage le temps de cuisson
restant qui s'écoule. Lorsque le temps d'activation se
termine, un signal sonore triple est émis.
REMARQUE :
• Votre four peut être programmé pour jusqu'à 99 minutes
et 99 secondes. (99:99).
• L'utilisation des niveaux de puissance autres que 100 %
augmente le temps de cuisson, ce qui est recommandé
pour des aliments comme le fromage, le lait et la cuisson
lente des viandes.
CUIRE EN DEUX ÉTAPES
Cette fonction vous permet de programmer une séquence de
deux opérations, comme décongeler et cuire ou cuire à deux
niveaux de puissance différents. Elle change automatiquement
les paramètres de puissance et le temps de cuisson.
DÉCONGELER ET CUIRE
Defrost
Time/Weight
1. Appuyez une fois sur la touche
DEFROST.
2. Appuyez sur les touches de chiffre pour
entrer le temps de décongélation.
Time
Cook
3. Appuyez sur la touche
TIME COOK.
4. Appuyez sur les touches de chiffre pour
entrer le temps de cuisson.
Power
Level
5. Appuyez sur la touche
POWER LEVEL.
6. Appuyez sur les touches de chiffre pour
entrer le niveau de puissance (0 à 10).
Start
7. Appuyez sur la touche START.
Le témoin DEF s'allume, les témoins ENTER et TIME
clignotent et « : 0 » est afché. « : 0 » est afché.
L'écran afche votre choix.
Le témoin COOK s'allume, les témoins ENTER et TIME
clignotent et « : 0 » est afché.
L'écran afche votre choix.
L'afchage indique PL10 pour le niveau de puissance de
100 %.
L'écran afche de PL-0 à PL10.
Si vous sautez les étapes 5 et 6, le niveau 100 % de
puissance est automatique.
Lorsque vous appuyez sur la touche START, les témoins
DEF et COOK s'allument pour conrmer les niveaux de
puissance choisis. Le témoin DEF commence à clignoter
pour indiquer que le four est en mode de Décongélation
minutée (Time Defrost).
L'écran afche le temps qui s'écoule en mode Décongélation
minutée. Lorsque le four produit un signal sonore, tournez,
séparez ou redistribuez la nourriture. À la n du mode de
Décongélation minutée, le four produit un signal sonore et
commence le mode Cuisson (Time Cook).
Le témoin DEF s'éteint et le témoin COOK commence à
clignoter. L'écran afche le temps qui s'écoule en mode de
Temps de cuisson. Lorsque le mode Temps de cuisson se
termine, un signal sonore (trois bips) est émis.
REMARQUE : Votre four peut être programmé pour jusqu'à
99 minutes et 99 secondes. (99:99).
CUISSON + CUISSON
Time
Cook
1. Appuyez sur la touche
TIME COOK.
2. Appuyez sur les touches de chiffre
pour entrer le temps de cuisson.
Time
Cook
3. Appuyez sur la touche
TIME COOK.
4. Appuyez sur les touches de chiffre
pour entrer le temps de cuisson.
15 F

Power
Level
5. Appuyez sur la touche
POWER LEVEL.
6. Appuyez sur les touches de chiffre
pour entrer le niveau de puissance (0
à 10).
Start
7. Appuyez sur la touche START.
Le témoin COOK s'allume, les témoins ENTER et TIME
clignotent et « : 0 » est afché.
L'écran afche votre choix.
Le témoin COOK s'allume, les témoins ENTER et TIME
clignotent et « : 0 » est afché.
L'écran afche votre choix.
L'afchage indique PL10 pour le niveau de puissance de
100 %.
L'écran afche de PL-0 à PL10.
Si vous sautez les étapes 5 et 6, le niveau 100 % de
puissance est automatique.
Lorsque vous appuyez sur la touche START, le témoin
COOK commence à clignoter pour indiquer que le four est
dans la première étape de cuisson.
À la n de la première étape, le four produit un signal
sonore et commence l'étape 2. L'écran afche le temps de
la deuxième étape qui s'écoule. Lorsque la deuxième étape
se termine, un signal sonore (trois bips) est émis.
REMARQUE : Votre four peut être programmé pour jusqu'à
99 minutes et 99 secondes. (99:99).
+30 SEC
La touche « +30 SEC » vous permet de réchauffer pendant
30 secondes à 100 % (puissance maximale) en appuyant
simplement sur la touche « +30 SEC ». En appuyant plusieurs
fois sur la touche « +30 SEC », vous pouvez prolonger le
temps de cuisson par bonds de 30 secondes jusqu'à 99
minutes et 99 secondes.
+30 sec
Appuyez sur la touche +30 sec.
Lorsque vous appuyez sur la touche +30 sec, l'écran afche
« :30 » et le four commence la cuisson.
REMARQUE : La touche « +30 SEC » ne peut pas être
utilisée lorsque le capteur détecte de la vapeur dégagée par
la nourriture pendant une cuisson par capteur, comme les
modes Patates (Potato), Repas congelé (Frozen Entree),
Légumes congelés (Frozen Vegetables) et Réchauffer par
capteur (Sensor Reheat).
EXPRESS COOK (CUISSON EXPRESS)
Le mode EXPRESS COOK est un moyen facile de choisir un
temps de cuisson de 1 à 6 minutes à 100 % (pleine puissance).
ENTER
START
Sensor Cook
Convenience Features
Express Cook
Potato
Reheat
Popcorn
Beverage
Melt /
Soften
Frozen
Entree
Frozen
Vegetables
Turntable
On-Off
Time
Cook
1
4
7
+30 sec
2
5
8
0
Stop
Clear
Start
3
6
9
Power
Level
Filter
Reset
(3 Sec)
Vent Fan
Hi-Lo-Off
Light
On-Off
Clock
Keep
Warm
Defrost
Time/Weight
Preset
COOK
1. Butter
2. Chocolate
3. Ice Cream
4. Cheese
FILTER
DEF.
TIME
CODE
MUTE
LBS. OZ.
Kitchen
Timer
( 3 Sec)
Appuyez sur l'un des
boutons Express Cook
(1 à 6) pour une cuisson
de 1 à 6 minutes à 100 %
(pleine puissance).
L'écran afche votre choix. Après 1,5 seconde, l'écran
afche le temps de cuisson et le four commence la cuisson.
CUISSON UNE TOUCHE - PRÉPROGRAMMÉ
(PRESET)
La Cuisson une touche vous permet de cuire ou de réchauffer
plusieurs de vos mets préférés en appuyant sur une seule
touche.
Pour augmenter la quantité, appuyez sur la touche choisie
jusqu'à ce que le chiffre afché corresponde à la quantité à
cuire.
Popcorn
1. Appuyez sur POPCORN une fois pour
un sac de 100 g (3,5 oz), deux fois pour
un sac de 85 g (3,0 oz) et trois fois pour
un sac de 50 g (1,75 oz).
Start
2. Appuyez sur la touche START.
Lorsque vous appuyez sur la touche POPCORN une fois,
« 3.5 » est afché.
REMARQUE :
1. N'utilisez que des grains de maïs préemballés pour four à
micro-ondes à la température ambiante.
2. Placez le sac dans le four conformément aux directives du
fabricant.
3. Ne faire éclater qu'un sac de grains à la fois.
4. Une fois l'opération terminée, ouvrez le sac avec
précautions : le maïs soufé et la vapeur sont extrêmement
chauds.
5. Ne faites pas chauffer les grains non éclatés une fois et ne
réutilisez pas le sac.
6. Ne laissez pas le four sans surveillance lorsque vous faites
éclater des grains de maïs.
MISE EN GARDE : Si l'emballage de maïs soufflé ne
correspond pas aux poids proposés, n'utilisez pas la touche
POPCORN. Suivez les directives du fabricant.
COMMANDES
16F

MISE EN GARDE :
Ne laissez PAS le four à micro-ondes sans surveillance
lorsque vous faites éclater des grains de maïs.
Lorsque vous faites éclater des grains de maïs préemballés,
retirez la grille du four.
Ne placez pas le sac à maïs soufé sur la grille ou sous
celle-ci.
Beverage
1. Appuyez sur BEVERAGE une fois pour
une tasse de boisson, deux fois pour
deux tasses et trois fois pour trois tasses.
Start
2. Appuyez sur la touche START.
Lorsque vous appuyez sur BEVERAGE une fois, « 1 » est
afché.
* BEVERAGE (BOISSON) : 7 oz/tasse (p. ex. de café)
(237 ml)
• 1 tasse (volume total de 237 mL) : appuyez sur BEVERAGE
une fois.
• 2 tasses (volume total de 473 mL) : appuyez sur
BEVERAGE deux fois.
• 3 tasses (volume total de 710 mL) : appuyez sur
BEVERAGE trois fois.
OPÉRATIONS AVEC CAPTEUR
Les catégories « Cuisson avec capteur » (Sensor Cook) sont
conçues pour détecter l'humidité croissante dégagée par les
aliments pendant la cuisson. Le capteur du four à micro-ondes
règle automatiquement le temps de cuisson selon le type et
la quantité d'aliments.
UTILISATION DES RÉGLAGES AVEC
CAPTEUR
1. Après avoir branché le four, attendez deux minutes avant
d'utiliser la cuisson avec capteur.
2. Assurez-vous que l'extérieur du contenant utilisé pour la
cuisson soit sec, tout comme l'intérieur du four. Essuyez
toute présence d'humidité avec un chiffon sec ou un essuie-
tout.
3. Le four est prévu pour fonctionner avec les aliments à leur
température normale de rangement.
4. Une quantité d'aliments moindre ou supérieure à celle
indiquée dans le tableau peut être cuite en respectant les
directives d'un livre de recettes pour four à micro-ondes.
5. N'ouvrez pas la porte du four et n'appuyez pas sur la touche
STOP/CLEAR avant que le temps de cuisson apparaisse
sur l'écran d'afchage. Les mesures de la vapeur seraient
alors interrompues. Dans une telle situation, le message
d'erreur « Er01 » s'afchera. Pour poursuivre la cuisson,
appuyez sur la touche STOP/CLEAR et programmez la
cuisson manuellement.
Lorsque le capteur détecte la vapeur émise par les aliments,
le temps de cuisson restant et qui s'écoule apparaît.
La porte peut être ouverte lorsque le temps de cuisson
restant apparaît sur l'écran. Vous pouvez alors mélanger
ou assaisonner la nourriture, au besoin.
6. Utilisez toujours des contenants ou de la vaisselle
pouvant aller au four à micro-ondes et recouvrez-les
avec un couvercle non hermétique ou avec une pellicule
en plastique percée. N'utilisez jamais de contenants en
plastique hermétiques. Ceux-ci empêchent la vapeur de
s'échapper, ce qui trompe le capteur et mène habituellement
à une cuisson excessive des aliments.
7. Vériez que la nourriture est chaude ou cuite adéquatement
à la n de l'opération de cuisson. Si la nourriture n'est
pas complètement cuite, ajoutez du temps de cuisson
manuellement. N'utilisez pas l'une des catégories de
cuisson avec capteur deux fois de suite pour la même
portion de nourriture. Ceci pourrait avoir pour résultat des
aliments beaucoup trop cuits ou brûlés.
RECOUVRIR LES ALIMENTS
Certains aliments chauffent ou cuisent mieux quand ils sont
couverts. Utilisez la méthode de recouvrement recommandée
dans le Tableau de cuisson avec capteur.
1. Couvercle de casserole.
2. Pellicule de plastique : Utilisez une pellicule de plastique
recommandée pour la cuisson à micro-ondes. Recouvrez
le plat sans tenter de le sceller; laissez environ 1,5 cm non
recouvert pour permettre à la vapeur de s'échapper. La
pellicule ne devrait pas toucher aux aliments.
3. Papier ciré : Recouvrez le plat complètement et repliez le
papier en excès sous le plat pour le maintenir en place. Si
le plat est plus large que le papier, faites chevaucher deux
feuilles sur une distance d'au moins 2,5 cm pour recouvrir
le plat.
Retirez le recouvrement avec précaution, en faisant en sorte
que la vapeur ne s'échappe pas dans votre direction.
CUISSON AVEC CAPTEUR
Le capteur est un dispositif à semi-conducteur qui détecte la
vapeur émise par les aliments qui sont chauffés. Le capteur
règle le temps et la puissance de la cuisson pour divers
aliments et différentes quantités; vous n'avez pas à indiquer
le poids ou la quantité de nourriture.
COMMANDES
17 F
TURNTABLE ON-OFF
(ACTIVER ET DÉSACTIVER LA PLAQUE
TOURNANTE)
Pour une cuisson plus efcace, la plaque tournante devrait être
activée. Cependant, la plaque tournante peut être désactivée
pour éviter qu'elle tourne lorsque des plats très grands sont
utilisés.
Turntable
On-Off
Appuyez sur la touche
TURNTABLE ON-OFF.
Les options sont afchées pendant deux secondes.
REMARQUE :
1. Cette option n'est pas disponible dans les modes Cuisson
avec capteur, Cuisson une touche, Décongélation ou
Fondre/ramollir.
Potato
1. Appuyez sur la touche POTATO.
Start
2. Appuyez sur la touche START.
Lorsque vous appuyez sur POTATO, « SCPO » s'afche.
Lorsque le capteur détecte la vapeur émise par les aliments,
le temps de cuisson restant et qui s'écoule apparaît.
Frozen
Entree
1. Appuyez sur la touche FROZEN
ENTREE.
Start
2. Appuyez sur la touche START.
Lorsque vous appuyez sur FROZEN ENTREE, « SCFE »
s'afche.
Lorsque le capteur détecte la vapeur émise par les aliments,
le temps de cuisson restant et qui s'écoule apparaît.
Frozen
Vegetables
1. Appuyez sur la touche FROZEN
VEGETABLES.
Start
2. Appuyez sur la touche START.
Lorsque vous appuyez sur FROZEN VEGETABLES, «
SCFU » s'afche.
Lorsque le capteur détecte la vapeur émise par les aliments,
le temps de cuisson restant et qui s'écoule apparaît.
Reheat
1. Appuyez sur la touche REHEAT.
Start
2. Appuyez sur la touche START.
WLorsque vous appuyez sur REHEAT, « SrH » s'afche.
Lorsque le capteur détecte la vapeur émise par les aliments,
le temps de cuisson restant et qui s'écoule apparaît.
REMARQUE :
N'utilisez pas la cuisson avec capteur deux fois de suite pour
la même portion de nourriture.
Ceci pourrait avoir pour résultat des aliments beaucoup trop
cuits ou brûlés.
Si la portion doit être cuite ou chauffée davantage, utilisez la
touche +30 sec ou ajoutez le temps manuellement.
• Utilisez des contenants et couvercles adéquats pour une
cuisson par capteur plus efcace.
• Utilisez toujours des contenants ou de la vaisselle pouvant
aller au four à micro-ondes et recouvrez-les avec un
couvercle non hermétique ou une pellicule en plastique
percée. N'utilisez jamais de contenants en plastique
hermétiques. Ceux-ci empêchent la vapeur de s'échapper
et provoquent une cuisson excessive des aliments.
• Assurez-vous que l'extérieur des contenants et l'intérieur
du four à micro-ondes sont secs avant de mettre de la
nourriture dans le four.
COMMANDES
Tableau de cuisson avec capteur
PRESSIONS SUR
LA TOUCHE
AFFICHAGE POIDS COMMENTAIRES
Potato
SCPO 225 à 680 g Avant la cuisson, percer 5 à 6 fois les patates avec une fourchette. Placer
les patates sur la plaque tournante.
Frozen Entree
SCFE 225 à 900 g Suivre les directives pour fours à micro-ondes imprimées sur l'emballage..
Frozen
Vegetables
SCFU 170 à 450 g 2 à 4 cuillerées à table d'eau par portion. Recouvrir avec un couvercle ou
une pellicule percée.
Reheat
SrH 115 à 1020 g Pour un ragoût, ajouter 2 à 3 cuillerées à table d'eau et recouvrir avec un
couvercle ou une pellicule percée.
• Aliments à éviter : boissons, pizzas congelées, repas congelés, aliments
crus, biscuits, gâteaux.
18F

2. Parfois, la plaque tournante devient trop chaude pour
y toucher. Faites attention de pas toucher à la plaque
tournante pendant et après la cuisson.
3. N'activez pas le four lorsqu'il est vide.
VENT FAN (VENTILATEUR D'AÉRATION)
Le ventilateur d'aération chasse les vapeurs d'eau et de
cuisson produites sur la surface de cuisson de la cuisinière.
Vous pouvez contrôler les deux vitesses du ventilateur en
appuyant sur la touche VENT FAN.
Vent Fan
Hi-Lo-Off
Appuyez sur VENT FAN une fois pour la
vitesse Élevée, deux fois pour vitesse Basse
ou trois fois pour arrêter le ventilateur.
Les options sont afchées pendant deux secondes.
REMARQUE :
1. La vitesse élevée du ventilateur ne peut pas être utilisée
avec la cuisson au micro-ondes.
2. Une fonction de ventilation automatique protège le micro-
ondes à hotte intégrée contre une chaleur excessive
provenant de la surface de cuisson sous lui. Cette fonction
active automatiquement le ventilateur à basse vitesse si
une chaleur trop élevée est détectée. Si vous avez activé le
ventilateur, il se pourrait que vous ne puissiez pas l'arrêter.
Le ventilateur s'arrêtera automatiquement lorsque les
pièces intérieures auront refroidi.
3. S'il n'y a aucune intervention d'un utilisateur pendant 10
heures, la lampe de la hotte et le ventilateur s'éteignent
automatiquement pour épargner de l'énergie.
LAMPE DE LA HOTTE
Vous pouvez contrôler la lampe en appuyant sur la touche
LIGHT.
Light
On-ff
Appuyez sur la touche LIGHT une fois
pour allumer la lampe ou deux fois pour
l'éteindre.
Les options sont afchées pendant deux secondes.
REMARQUE : S'il n'y a aucune intervention d'un utilisateur
pendant 10 heures, la lampe de la hotte et le ventilateur
s'éteignent automatiquement pour épargner de l'énergie.
MODE SILENCIEUX
Kitchen
Timer
( 3 Sec)
Les signaux sonores sont fournis pour vous
guider pendant le réglage et l'utilisation du
four.
Pour passer un mode silencieux, tenez la
touche KITCHEN TIMER enfoncée pendant
trois secondes. Le témoin MUTE s'allume.
Pour réactiver les sons, tenez la touche
KITCHEN TIMER enfoncée pendant trois
secondes. Un signal sonore est émis et le
témoin MUTE s'éteint.
FILTER RESET (RÉINITIALISATION DU TEMPS
DU FILTRE)
Filter
Reset
(3 Sec)
Si votre four est ventilé vers l'intérieur de
la maison, le ltre au charbon devrait être
remplacé aux six mois environ. Le ltre au
charbon ne peut pas être nettoyé.
L'indicateur FILTER s'allume lorsqu'il est
temps de remplacer le ltre à charbon.
Maintenez la touche FILTER RESET
enfoncée pendant trois secondes après le
remplacement du ltre. Voir le page 23.
POUR ACTIVER LE MODE D'ÉCONOMIE
D'ÉNERGIE
Stop
Clear
1. Appuyez sur la touche STOP/CLEAR. «
: 0 » ou l'horloge apparaît à l'écran.
Clock
2. Maintenez la touche CLOCK enfoncée
pendant trois secondes.
L'afchage s'éteint et un signal sonore est
émis.
Pour utiliser le four en mode d'économie
d'énergie, appuyez sur n'importe quelle
touche.
« : 0 » ou l'horloge apparaît à l'écran et
le fonctionnement de toutes les touches
est alors identique à celui mode normal.
Si aucune opération n'est effectuée
pendant dix secondes, tout le contenu de
l'afchage s'éteint.
3. Pour annuler le mode d'économie
d'énergie, répétez simplement la
procédure pendant que l'afchage est
actif. Le mode d'économie d'énergie est
annulé et un signal sonore est émis.
Le four est disponible pour un usage
normal.
COMMANDES
19 F

VERROUILLAGE SÉCURITAIRE POUR LES
ENFANTS
Stop
Clear
La fonction de verrouillage sécuritaire
pour les enfants verrouille le panneau de
commande pour empêcher que le four
soit activé accidentellement ou utilisé par
des enfants. Pour verrouiller, maintenez la
touche STOP/CLEAR enfoncée pendant
trois secondes.
Un signal sonore est émis et « Loc » est
afché pendant trois secondes.
Pour déverrouiller, maintenez la touche
STOP/CLEAR enfoncée durant trois
secondes. Un signal sonore est émis.
REMARQUE :
1. Lorsque le verrouillage sécuritaire est activé, il ne peut être
désactivé qu'avec la touche STOP/CLEAR.
2. Le four à micro-ondes ne peut pas être utilisé lorsque le
verrouillage sécuritaire pour les enfants est activé.
POUR ARRÊTER LE FOUR LORSQU'IL EST
EN MARCHE
Stop
Clear
1. Appuyez sur la touche
STOP/CLEAR.
• Vous pouvez réactiver le four en
appuyant sur la touche START.
• Appuyez sur STOP/CLEAR à nouveau
pour effacer toutes les instructions.
• Vous devez entrer de nouvelles
instructions.
2. Ouvrez la porte.
• Vous pouvez réactiver le four en
fermant la porte et en appuyant sur la
touche START.
REMARQUE : Le four cesse de fonctionner lorsque la porte
est ouverte.
GRILLE MÉTALLIQUE
La grille métallique crée un espace supplémentaire permettant
d'utiliser plus d'un contenant à la fois.
La grille permet de faire cuire ou chauffer plusieurs plats ou
aliments en même temps.
Cependant, pour cuire ou réchauffer de façon optimale, il est
préférable d'utiliser la fonction de PLAQUE TOURNANTE
et les modes de CUISSON AVEC CAPTEUR sans grille.
Lorsque vous utilisez la grille, réglez le temps et le niveau de
puissance manuellement.
Le four est disponible pour un usage normal.
POUR ÉVITER D'ENDOMMAGER VOS BIENS :
1. N'utilisez pas la grille lorsque vous préparez du maïs
soufé.
2. Lorsqu'utilisée, la grille doit être placée sur les quatre
supports en plastique.
3. Utilisez la grille uniquement lorsque vous voulez cuire ou
chauffez des aliments sur celle-ci.
4. N'utilisez jamais la grille directement sur la paroi inférieure
du four.
POUR UTILISER LA GRILLE MÉTALLIQUE :
1. Mettez la grille bien en place sur les quatre supports en
plastique.
La grille NE doit PAS toucher aux parois métalliques ou
l'arrière du four à micro-ondes.
Laissez amplement d'espace autour des plats et entre
ceux-ci. Portez une attention particulière au processus de
cuisson ou de réchauffement.
2. Placez des quantités équivalentes d'aliments AU-DESSUS
ET EN DESSOUS de la grille.
La quantité d'aliments doit être environ la même pour
équilibrer l'énergie de cuisson.
3. Déplacez la nourriture de la grille à la plaque tournante et
vice versa et mélangez-la au moins une fois pendant la
cuisson ou le réchauffement.
Après la cuisson ou le réchauffement, mélangez si possible.
L'utilisation d'un niveau de puissance plus bas aide à cuire
et à réchauffer de façon plus uniforme.
IMPORTANT:
Pour éviter d'endommager le four, NE conservez PAS la grille
métallique dans ce four, sauf lorsque vous devez l'utiliser
pour faire cuire ou chauffer plus d'un plat, ou qu'une recette
le demande.
UTILISATION RECOMMANDÉE
1. Soupes
2. Ragoûts
3. Assiettes de repas
COMMANDES
20F
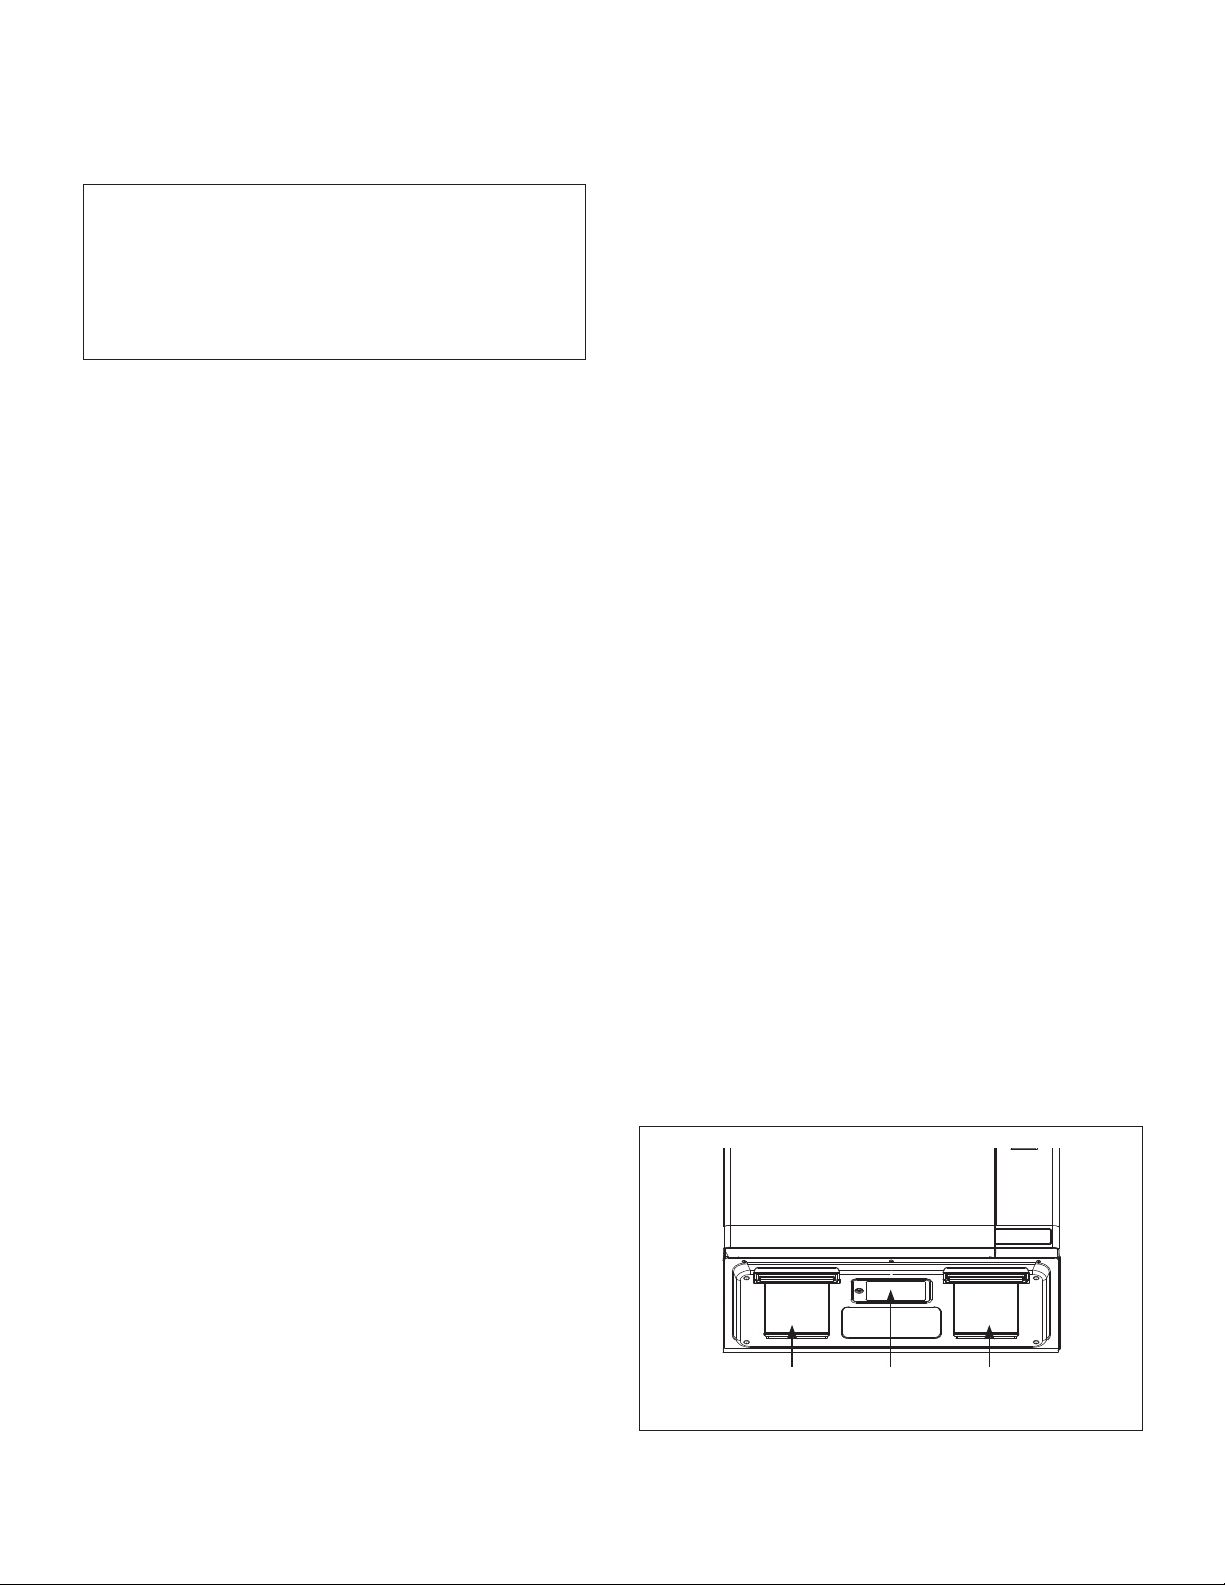
ANNEAU-GUIDE
Nettoyez fréquemment pour éviter la production de bruits
excessifs. Lavez-le dans de l'eau savonneuse ou au lave-
vaisselle.
EXTÉRIEUR DU FOUR
Essuyez l'extérieur du four avec un chiffon savonneux; rincez
et séchez. N'utilisez pas de produits nettoyants abrasifs. Ils
pourraient égratigner la surface.
COMPARTIMENT DE LA LAMPE
Nettoyez souvent la graisse et la poussière sur le couvercle
de la lampe dessous le four à micro-ondes avec de l'eau
chaude et un détergent.
PANNEAU DE COMMANDE
Essuyez avec un chiffon humide. Séchez. Ne pulvérisez pas
de produits nettoyants directement sur le panneau. Pulvérisez
le produit sur un chiffon, puis essuyez.
COUVERCLE DU GUIDE D'ONDES
Le couvercle du guide d'ondes est situé sur la paroi droite du
four. Il est fabriqué en mica et nécessite un entretien particulier.
Gardez le couvercle du guide d'ondes propre pour assurer
le rendement optimal du four. Essuyez avec précautions à
l'aide d'un chiffon humide les éclaboussures de la surface du
couvercle immédiatement après qu'elles se soient produites.
Les accumulations d'éclaboussures pourraient surchauffer et
créer de la fumée ou possiblement s'enammer. NE RETIREZ
PAS LE COUVERCLE DU GUIDE D'ONDES.
LE SYSTÈME DE VENTILATION
Le système de hotte avec ventilation de votre micro-ondes à
hotte intégrée est muni de deux ltres en métal qui recueillent
la graisse. Lorsque le ventilateur est en fonction, l'air est
aspiré à travers les ltres, puis évacué à travers les tuyaux
jusqu'à l'extérieur, ou vers les ltres au charbon si l'air n'est
pas évacué vers l'extérieur.
FILTRE À GRAISSE
EN MÉTAL
FILTRE À GRAISSE
EN MÉTAL
LAMPE
DE LA HOTTE
AVERTISSEMENT :
Le four devrait être nettoyé régulièrement et les dépôts
d'aliments retirés.
Le défaut de maintenir le four propre pourrait mener à une
détérioration de sa surface, ce qui aurait un effet négatif sur
la durée de vie de l'appareil et possiblement engendrer une
situation dangereuse.
INTÉRIEUR DU FOUR À MICRO-ONDES
Débranchez le cordon d'alimentation avant de nettoyer
ou laissez la porte ouverte pour le désactiver.
L'intérieur du four devrait être nettoyé après chaque utilisation
au moyen d'un chiffon humide pour éviter l'accumulation
de graisse et de saletés. Les saletés tenaces peuvent être
retirées avec un tampon à récurer en plastique. Lorsque vous
nettoyez les surfaces intérieures et celles de la porte et du four
qui entrent en contact lorsque la porte est fermée, n'utilisez
qu'un savon doux et non abrasif, appliqué avec une éponge
ou un chiffon doux.
Vous pouvez éliminer les odeurs du four en faisant bouillir
une solution d'une tasse d'eau et de plusieurs cuillerées à
table de jus de citron dans le four pendant 5 à 7 minutes. Ce
processus aide aussi à déloger les saletés qui ont séché.
Essuyez l'excès d'humidité par la suite.
REMARQUE :
• Ne pulvérisez et ne versez pas de produits nettoyants
liquides directement sur l'une des surfaces. Pulvérisez ou
versez le produit sur un chiffon ou une éponge servant à
nettoyer le four.
• N'utilisez pas de produits nettoyants abrasifs, de produits
nettoyants pour cuisinières, de tampons abrasifs ou de laine
d'acier; ceux-ci peuvent égratigner ou ternir les surfaces
du four.
• Ne retirez pas le couvercle du mécanisme de la plaque
tournante et n'insérez pas la lame d'un couteau; vous
pourriez endommager le couvercle ou affecter la
performance de cuisson du four.
BAS DU FOUR
Nettoyez le bas du four avec de l'eau chaude et savonneuse;
rincez et asséchez. N'utilisez pas une quantité d'eau excessive
lorsque vous nettoyez le four, surtout autour de la plaque
tournante. Ne laissez pas de l'eau ou des produits nettoyants
s'inltrer dans les engrenages de la plaque tournante, situés
sous celle-ci.
PLATEAU DE VERRE / PLAQUE TOURNANTE
Laissez le plateau refroidir avant de le retirer et le nettoyer.
Lavez-le dans de l'eau savonneuse ou au lave-vaisselle.
GRILLE MÉTALLIQUE
Nettoyez la grille métallique avec un savon doux et avec une
brosse à récurer douce ou en nylon.
Séchez complètement.
N'utilisez pas de brosse ou de produits nettoyants abrasifs
pour nettoyer la grille.
ENTRETIEN ET NETTOYAGE
21 F
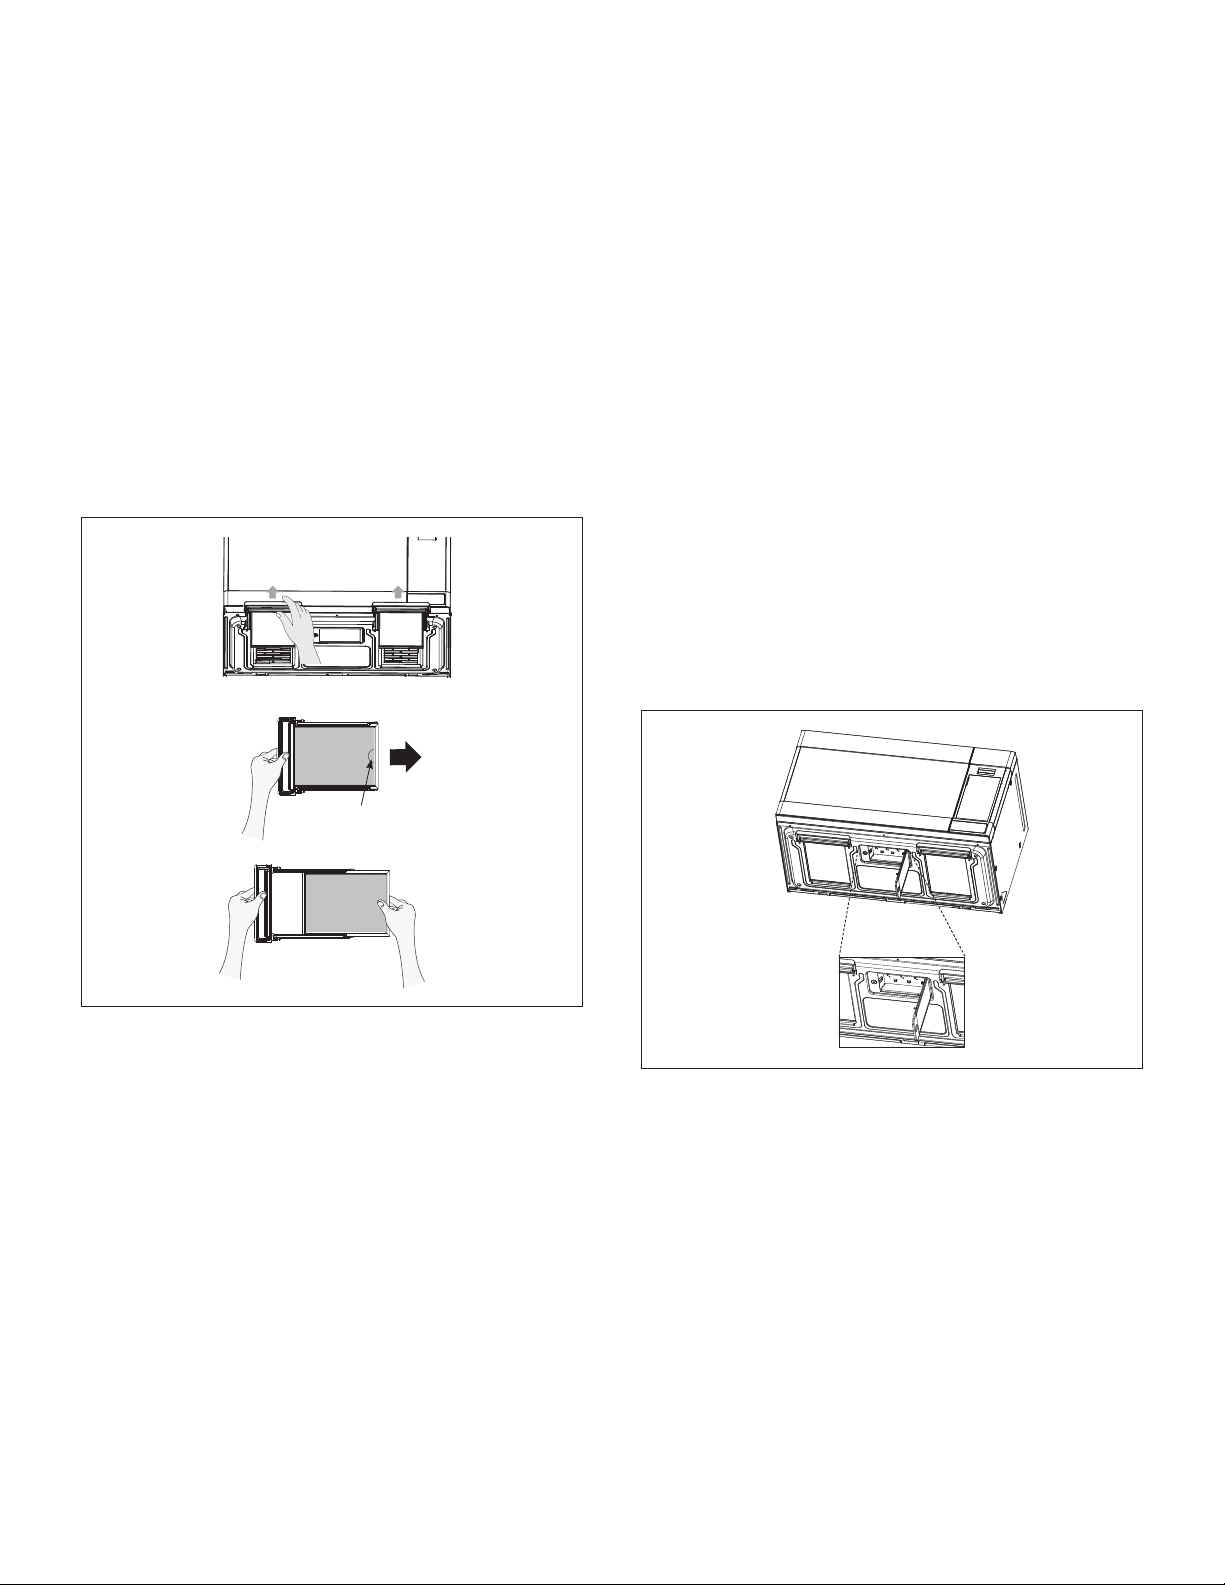
FILTRES À GRAISSE RÉUTILISABLES
Les ltres à graisse réutilisables devraient être nettoyés au
moins une fois par mois. N'utilisez jamais le micro-ondes
à hotte intégrée sans les ltres en place. Si des ammes
venaient à être produites en dessous de la hotte, les ltres
empêcheraient les ammes de s'introduire dans l'appareil.
POUR RETIRER LES FILTRES À GRAISSE
Pour retirer le support de ltre à graisse, tirez la languette
vers l'avant du four. Répétez pour le second support de ltre
à graisse.
Pour retirer le ltre à graisse du support, tirez en utilisant l'«
espace pour doigts » illustré ci-dessous.
TIRER
ESPACE POUR DOIGTS
NETTOYER LES FILTRES À GRAISSE
Pour nettoyer les ltres à graisse, faites tremper et agitez-
les dans une solution d'eau chaude et de savon. N'utilisez
pas d'ammoniac ni de produits contenant de l'ammoniac;
ceux-ci assombrissent le métal. Vous pouvez les brosser
doucement pour déloger les saletés incrustées. Rincez, agitez
et asséchez avant de les remettre en place.
REMETTRE LES FILTRES À GRAISSE EN
PLACE
Pour remettre un ltre à graisse en place, glissez-le dans le
support de ltre à graisse. Insérez le support dans la zone
désignée sous le four. Répétez pour le second ltre à graisse.
REMPLACEMENT DES AMPOULES DE
LUMIÈRE
LAMPE DE LA HOTTE
Lorsque vous remplacez l'ampoule de la lampe de la hotte,
portez des gants pour éviter que la chaleur de l'ampoule ne
vous blesse.
1. Débranchez le four à micro-ondes ou coupez le courant
directement au panneau de distribution électrique.
2. Retirez la vis du couvercle de la lampe et abaissez le
couvercle jusqu'à son arrêt.
3. Retirez la vis au centre de la lampe à DEL xant celle-ci
au couvercle et sortez la lampe.
4. Remplacer l'ampoule à DEL par une ampoule identique
de 1,0 watt disponible chez votre vendeur autorisé et xer
avec la vis.
5. Remettez le couvercle en place, puis la vis.
6. Rebranchez l'appareil ou rétablissez le courant au panneau
de distribution.
ENTRETIEN ET NETTOYAGE
22F
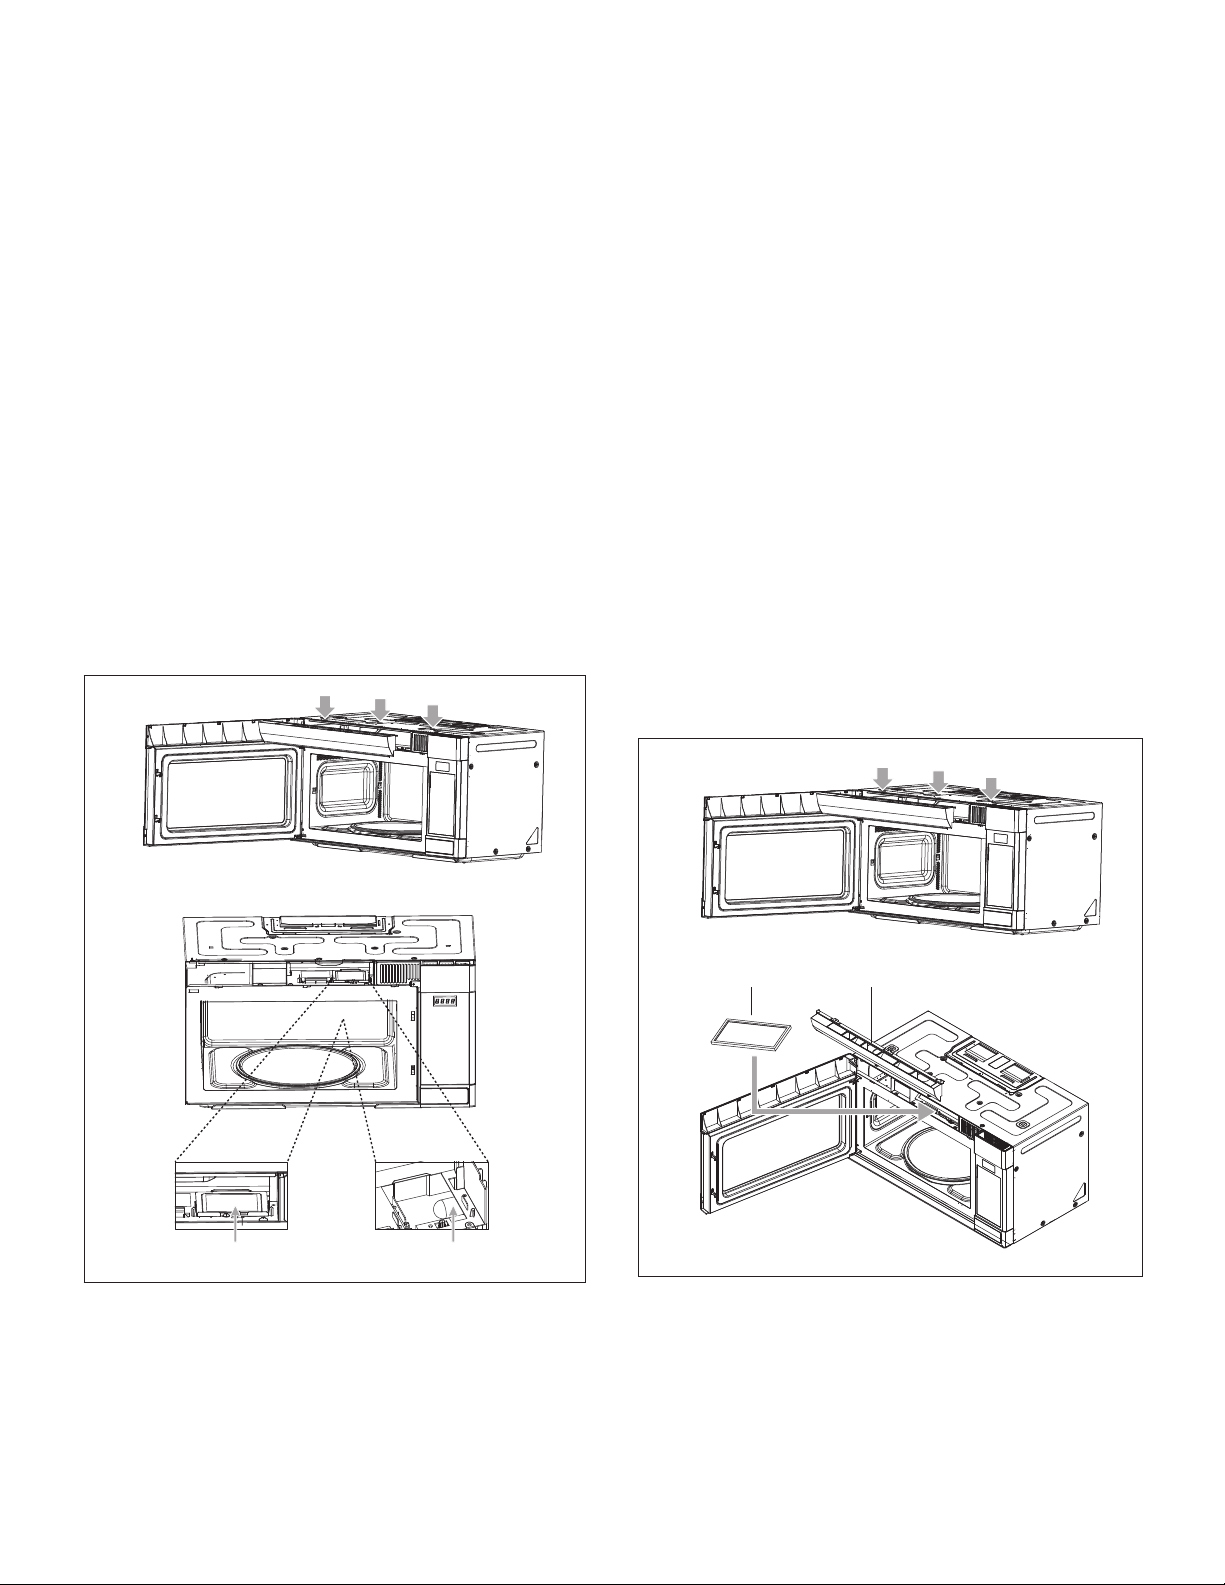
INSTALLER /REMPLACER LE FILTRE AU
CHARBON
FILTRE AU CHARBON
Si votre four n'est pas ventilé vers l'extérieur, le ltre au
charbon devrait être remplacé tous les six mois environ.
Vous pouvez acheter le ltre au charbon en composant
Bertazzoni.
1. Débranchez le four à micro-ondes ou coupez le courant
directement au panneau de distribution électrique.
2. Retirez les 3 vis de montage de la grille d'aération et ouvrez
la porte.
3. Glissez la grille d'aération vers la gauche, puis tirez pour
l'enlever.
4. Poussez le ltre au charbon vers l'arrière et retirez-le.
5. Glissez en place un ltre au charbon neuf. Le ltre devrait
reposer avec un angle d'inclinaison.
6. Replacez la grille d'aération et les 3 vis de montage et
fermez la porte.
7. Rebranchez le four à micro-ondes ou rétablissez le courant
au panneau de distribution.
FILTRE AU CHARBON GRILLE D'AÉRATION
LAMPE DU FOUR
Lorsque vous remplacez la lampe du four, assurez-vous de
porter des gants pour éviter que la chaleur de la lampe ne
vous blesse.
1. Débranchez le four à micro-ondes ou coupez le courant
directement au panneau de distribution électrique.
2. Retirez les 3 vis de montage de la grille d'aération et ouvrez
la porte.
3. Glissez la grille d'aération vers la gauche, puis tirez pour
l'enlever.
4. Retirez le ltre à charbon, le cas échéant.
5. Tirez légèrement sur le crochet et retirez le cache de la
lampe.
6. Remplacez l'ampoule par une ampoule de 30 watts,
disponible chez votre revendeur agréé ou auprès de
Bertazzoni au (800) 561-7625.
7. Replacez le cache de la lampe.
8. Replacez la grille d’air et les 3 vis et fermez la porte.
9. Branchez le four ou allumez l'alimentation électrique.
COUVERCLE DE LA LAMPE AMPOULE
ENTRETIEN ET NETTOYAGE
23 F

AVANT D'APPELER
SI LE BAS DU FOUR OU LE PLATEAU EN
VERRE SONT CHAUDS :
• Il s'agit d'une situation normale. La base du four absorbe
la chaleur dégagée par les aliments.
SI L'INTÉRIEUR DU FOUR DEVIENT HUMIDE :
• Il s'agit d'une situation normale. Les aliments dégagent de
l'humidité pendant le processus de cuisson et la vapeur
s'accumule sur la porte et sur les surfaces du four. Essuyez
l'excès d'humidité après chaque utilisation.
SI LA NOURRITURE NE CUIT PAS DE FAÇON
UNIFORME :
• Consultez la recette et suivez la procédure de cuisson
correctement.
• Assurez-vous que les aliments sont distribués uniformément.
• Assurez-vous que les aliments sont entièrement décongelés
avant de les cuire.
• Vériez la disposition des bandes d'aluminium utilisées
pour éviter une cuisson excessive.
SI LA NOURRITURE N'EST PAS ASSEZ CUITE
:
• Vériez la recette et assurez-vous de suivre correctement
toutes les directives (quantité, temps et niveau de
puissance).
• Vériez la tension électrique fournie par la prise de courant.
• Essayez de brancher le four dans une prise d'un circuit
électrique différent.
• Assurez-vous que les aliments sont entièrement décongelés
avant de les cuire.
SI LA NOURRITURE EST TROP CUITE :
• Vériez la recette et assurez-vous de suivre correctement
toutes les directives (quantité, temps et niveau de
puissance).
• La température initiale des aliments était peut-être plus
élevée qu'à la normale.
SI DES ÉTINCELLES SE PRODUISENT :
• Assurez-vous d'utiliser seulement des plats convenant aux
fours à micro-ondes.
• Vériez l'absence d'attaches contenant un l métallique.
• Assurez-vous de ne pas activer le four lorsqu'il est vide.
SI L'ÉCRAN AFFICHE UNE PÉRIODE DE
TEMPS QUI S'ÉCOULE, MAIS QUE LE FOUR
NE CUIT/CHAUFFE PAS :
• Vériez que la porte se ferme solidement.
Vériez les points suivants pour vous assurer qu'un appel
d'entretien est nécessaire :
SI AUCUNE PARTIE DU FOUR NE
FONCTIONNE :
• Vériez si un fusible sauté ou un disjoncteur ouvert a coupé
le courant.
• Vériez si le four est branché correctement au circuit
électrique de la maison.
• Vériez que les commandes sont réglées correctement.
• Vériez que le temps de cuisson est réglé.
SI LA LAMPE À L'INTÉRIEUR DU FOUR NE
FONCTIONNE PAS :
• La lampe à DEL est peut-être desserrée ou défectueuse.
Voir la page 22 ou appeler un technicien qualié.
SI LE FOUR NE RÉCHAUFFE PAS LES
ALIMENTS :
• Vériez si le panneau de commande a été programmé
correctement.
• Vériez que la porte se ferme solidement.
• Vériez que vous avez appuyé sur la touche START.
• Un démarrage automatique a peut-être été programmé.
• Le Verrouillage sécuritaire pour les enfants a peut-être été
activé.
• Vériez l'espace entre la porte et le joint d'étanchéité à la
recherche d'une obstruction.
SI LE FOUR PREND PLUS DE TEMPS
QU'À L'HABITUDE POUR CHAUFFER /
CUIRE LA NOURRITURE OU LE FAIT TROP
RAPIDEMENT :
• Assurez-vous que le niveau de puissance est programmé
correctement.
• Vériez les instructions sur la densité de la nourriture, etc.
• Vériez que la tension fournie au four à micro-ondes n'est
pas trop basse.
SI L'HORLOGE NE MAINTIENT PAS L'HEURE
CORRECTEMENT :
• Vériez que la che du cordon d'alimentation est insérée
complètement dans la prise.
• Vériez que le four est mis à la terre correctement.
• Essayez de brancher le four dans une prise d'un circuit
électrique différent.
24F

QUESTIONS ET RÉPONSES
Q : J'ai accidentellement activé mon four à micro-ondes
sans aucun aliment à l'intérieur. Est-il endommagé?
R : Faire fonctionner le four vide pendant une courte période
n'endommage pas le four. Cependant, ce n'est pas
recommandé.
Q : Peut-on utiliser le four sans la plaque de verre et
l'anneau-guide?
R : Non. Le plateau de verre et l'anneau-guide doivent
toujours être en place avant d'activer la cuisson.
Q : Puis-je ouvrir la porte pendant que le four est en
marche?
R : La porte peut être ouverte à n'importe quel moment
pendant l'opération de cuisson/chauffage. L'émission
de micro-ondes sera instantanément interrompue et le
réglage du temps sera maintenu jusqu'à ce que la porte
soit refermée.
Q : Que signie le message « Er01 »?
R : « Er01 » signie ERREUR DE CAPTEUR et il apparaît
si vous ouvrez la porte ou appuyez sur la touche STOP/
CLEAR avant que le temps de cuisson soit afché. Pour
poursuivre la cuisson, appuyez sur la touche STOP/
CLEAR et programmez la cuisson manuellement.
Q : Pourquoi y a-t-il de l'humidité dans le four à micro-
ondes après une utilisation?
R : L'humidité sur les parois du four à micro-ondes est
normale. Elle est causée par la vapeur qui s'échappe
durant la cuisson/ le chauffage des aliments et qui entre
en contact avec les surfaces froides du four.
Q : Le four à micro-ondes sera-t-il endommagé s'il est
activé pendant qu'il est vide?
R : Oui. Ne le faites jamais fonctionner lorsqu'il est vide.
Q : Pourquoi mes œufs éclatent-ils parfois?
R : Lors de la cuisson d'œufs ou d'œufs pochés, le jaune
est susceptible d'éclater en raison de la vapeur qui
s'accumule à l'intérieur de la membrane. Pour prévenir
ceci, il suft de percer le jaune avec un cure-dents avant
de le faire cuire. Ne faites jamais cuire des œufs sans en
percer la coquille.
Q : À quoi sert le temps de repos recommandé après
l'opération de cuisson?
R : Le temps de repos est très important.
Avec la cuisson par micro-ondes, la chaleur est générée
dans les aliments et non dans le four. Plusieurs aliments
génèrent sufsamment de chaleur interne pour permettre
au processus de cuisson de se poursuivre, même après
que l'aliment ait été sorti du four. Le temps de repos pour
les morceaux de viande, les gros légumes et les gâteaux
sert à permettre à l'intérieur de cuire complètement, sans
endommager l'extérieur.
Q : Que signie « temps de repos »?
R : « Temps de repos » signie que la nourriture doit être
retirée du four et recouverte pour une période de temps
supplémentaire pour lui permettre de terminer sa cuisson.
Ceci libère le four pour d'autres besoins de cuisson.
Q : Comment se fait-il que parfois, mon four ne cuise pas
aussi rapidement que l'indique le guide de cuisson?
R : Vériez à nouveau votre guide de cuisson pour vous
assurer que vous avez suivi les instructions avec précision
et pour voir ce qui pourrait causer des variations dans le
temps de cuisson. Les temps et les réglages de chaleur
du guide de cuisson sont des suggestions qui ont pour
but d'aider à éviter la cuisson excessive... le problème
le plus commun pour ceux qui tentent de s'habituer à un
four à micro-ondes.
Des variations dans la quantité, la forme, le poids et les
dimensions pourraient nécessiter un temps de cuisson
plus long. Utilisez votre propre jugement ainsi que les
suggestions du guide de cuisson an de vérier si les
aliments ont été cuits adéquatement, comme vous le
feriez avec un four conventionnel.
Q : Est-ce que l'énergie des micro-ondes traverse le
treillis (écran) de la porte du four?
R : Non. L'énergie frappe le treillis métallique et est redirigée
vers l'intérieur du four. Les trous permettent à la lumière
de passer au travers. Par contre, ils ne laissent pas les
micro-ondes les traverser.
Q : Puis-je faire fonctionner mon four à micro-ondes sans
plaque tournante ou retourner la plaque tournante
pour soutenir un grand plat?
R : Non. Si vous enlevez ou retournez la plaque tournante,
vous obtiendrez de piètres résultats de cuisson. Les plats
utilisés dans votre four doivent pouvoir tenir sur la plaque
tournante.
Q : Est-ce normal que la plaque tournante tourne dans
les deux directions?
R : Oui. La plaque tournante tourne en sens horaire ou
antihoraire, selon la rotation du moteur au moment où le
cycle de cuisson commence.
Q : Puis-je faire éclater des grains de maïs (préparer
du popcorn) dans le four à micro-ondes? Comment
obtenir les meilleurs résultats?
R : Oui. Utilisez les préparations en sachet pour micro-ondes
et suivez les directives sur le paquet. N'utilisez pas des
sacs de papier ordinaire. Utilisez la « méthode à l'oreille
», qui consiste à arrêter la cuisson dès que les bruits
d'éclatement ralentissent à un éclatement à toutes les 1
ou 2 secondes. Ne tentez pas de faire éclater les grains
qui n'ont pas éclaté. Ne faites pas éclater des grains de
maïs dans des plats en vitre.
25 F
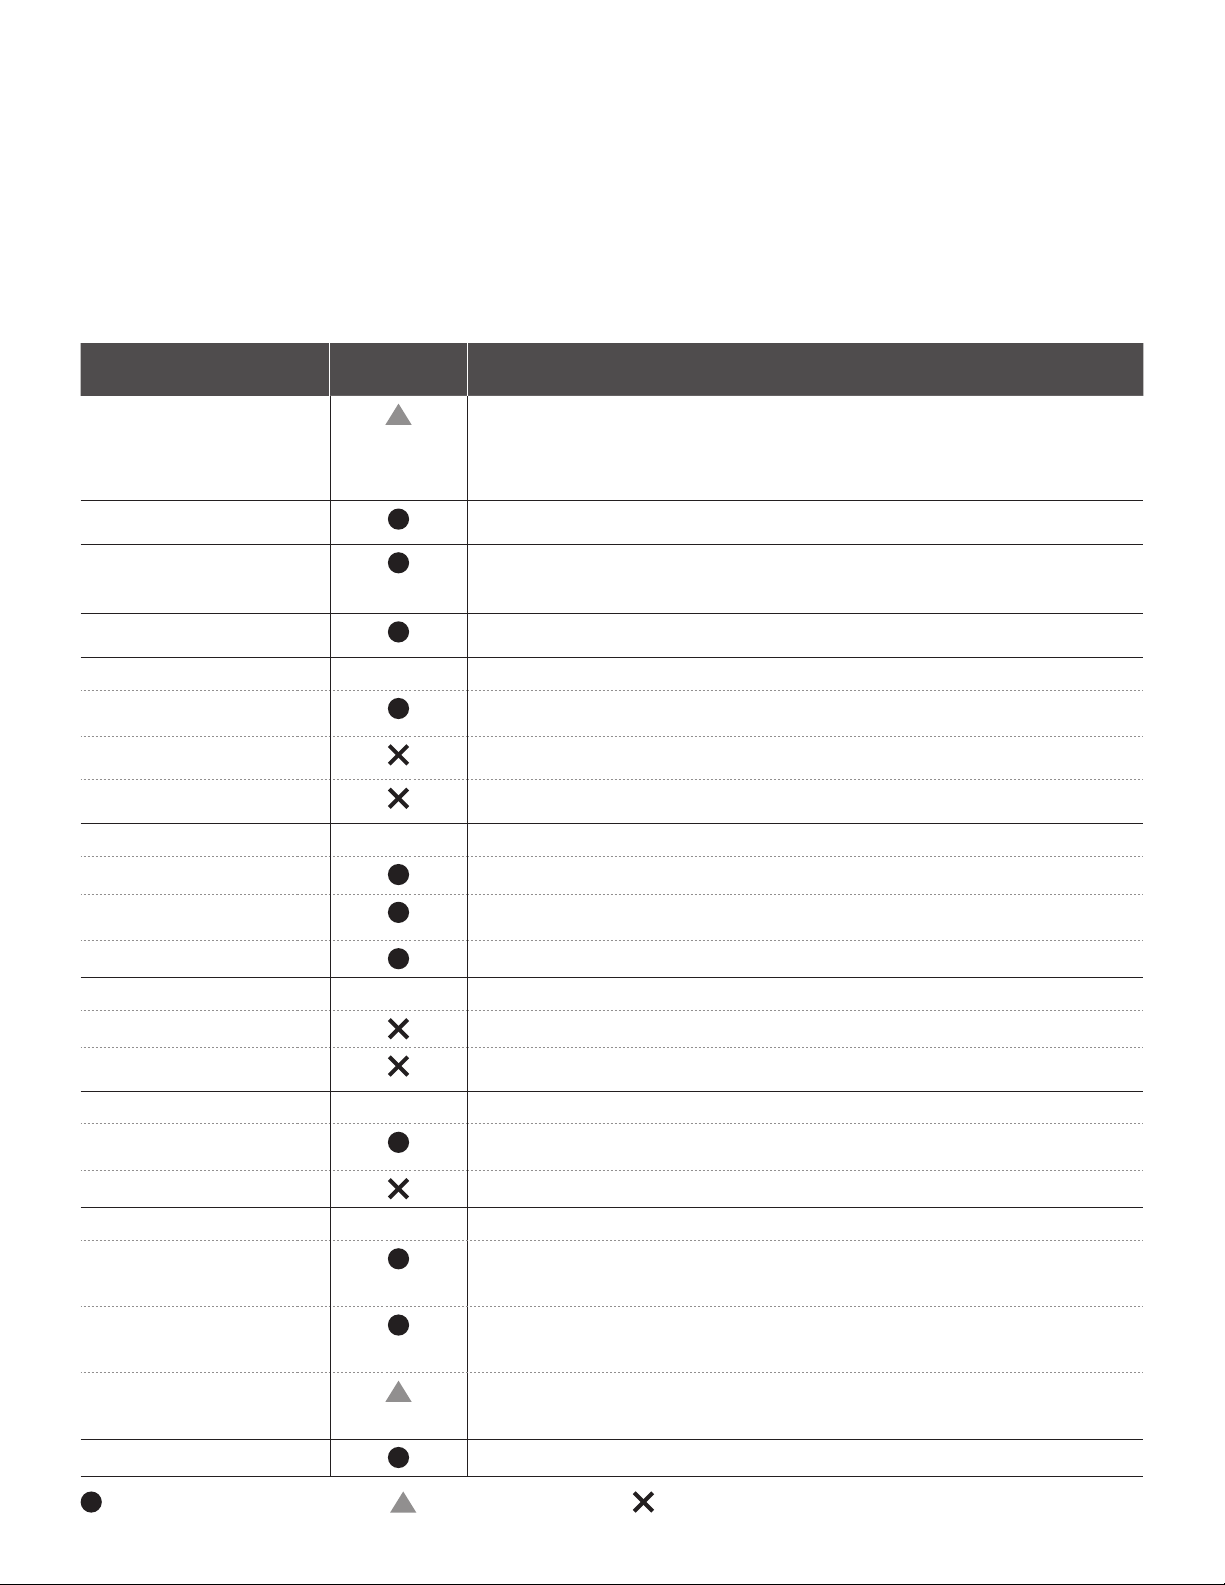
INSTRUCTIONS POUR LA CUISSON
GUIDE POUR LES USTENSILES
N'utilisez que de la vaisselle et des contenants pouvant aller au four à micro-ondes.
Pour faire cuire des aliments au four à micro-ondes, les micro-ondes doivent pouvoir pénétrer les aliments, sans être rééchies
ou absorbées par la vaisselle utilisée. Il faut donc choisir la vaisselle avec soin. Si un plat est identié « convient aux micro-ondes
», vous n'avez pas à vous inquiéter. Le tableau qui suit dresse la liste des différents ustensiles et accessoires et indique s'ils
peuvent ou non être utilisés dans un four à micro-ondes.
USTENSILE OU
ACCESSOIRE
SÉCURITAIRE COMMENTAIRES
Pellicule d'aluminium
Peut être utilisé en petites quantités pour protéger des zones contre la
cuisson excessive. Des jaillissements d'étincelles pourraient se produire si la
pellicule d'aluminium est trop près de la paroi du four ou si une trop grande
quantité est utilisée.
Récipient à technologie «
Crisp Plate »
Ne pas préchauffer pendant plus de 8 minutes.
Porcelaine et grès
La porcelaine, la poterie, la terre cuite glacée et la porcelaine anglaise tendre
conviennent habituellement, si elles ne sont pas décorées avec une bordure
métallique.
Assiettes en carton
polyester jetables
Certains repas congelés sont préparés dans ces types de plats.
Emballage à « fast-food »
• Gobelets en polystyrène
Peuvent être utilisés pour réchauffer des aliments. Une chaleur excessive
pourrait faire fondre le polystyrène.
• Sacs de papier ou
papier journal
Pourraient s'enammer.
• Papier recyclé ou
bandelettes de métal
Pourraient causer un jaillissement d'étincelles.
Vaisselle en verre
• Plats du four à la table
Peuvent être utilisés, si ne sont pas décorés d'une bordure en métal.
• Vaisselle ne
Peuvent être utilisés pour réchauffer des aliments ou les liquides. Le verre
délicat peut se briser ou ssurer s'il est chauffé soudainement.
• Pots en verre
Le couvercle doit être enlevé. Convenable uniquement pour réchauffer.
Métal
• Assiettes
Peuvent causer un jaillissement d'étincelles ou un incendie.
• Attaches avec l
métallique
Peuvent causer un jaillissement d'étincelles ou un incendie.
Papier
• Assiettes, gobelets,
serviettes et essuie-tout
Pour de courtes périodes de cuisson et de réchauffement. Aussi pour
absorber l'excès d'humidité.
• Papier recyclé
Pourraient causer un jaillissement d'étincelles.
Plastique
• Contenant
Particulièrement s'il s'agit de thermoplastique résistant à la chaleur. D'autres
types de plastiques peuvent se déformer ou se décolorer aux températures
élevées. Ne pas utiliser de mélamine.
• Pellicule cellophane
Peut être utilisée pour retenir l'humidité. Ne devrait pas toucher aux aliments.
Attention lorsque vous retirez la pellicule; de la vapeur brûlante pourrait
s'échapper.
• Sacs de congélation
Uniquement si résistants à l'ébullition ou convenant aux fours à micro-ondes.
Ne devraient pas être fermés hermétiquement. Percer avec une fourchette si
nécessaire.
Papier ciré ou sulfurisé
Peut être utilisée pour retenir l'humidité et prévenir les éclaboussures.
Utilisation recommandée Utilisation limitée Non recommandé
26F

INSTRUCTIONS POUR LA CUISSON
UTILISEZ VOTRE FOUR À MICRO-ONDES DE
FAÇON SÉCURITAIRE
UTILISATION GÉNÉRALE
• Ne tentez pas de déjouer ou d'altérer les verrouillages de
sécurité.
Ne placez aucun objet entre le cadre avant du four et la
porte, et ne laissez pas des résidus s'accumuler sur les
surfaces d'étanchéité. Essuyez avec un savon doux, rincez
et faites sécher. N'utilisez jamais de poudres ou de tampons
abrasifs.
• Ne pas soumettre la porte du four à une pression ou à un
poids, comme un enfant qui s'accroche à la porte ouverte.
Ceci pourrait faire tomber le four vers l'avant, causer des
blessures ainsi qu'endommager le four.
• N'utilisez pas le four si les joints de la porte ou les surfaces
d'étanchéité sont endommagés, ou si la porte est tordue,
ou si les pentures sont lâches ou brisées.
• N'activez pas le four lorsqu'il est vide. Ceci risque
d'endommager le four.
• Ne tentez pas de faire sécher des vêtements, des journaux
ou d'autres matériaux dans le four. Ceux-ci pourraient
s'enammer.
N'utilisez pas des produits en papier recyclé, puisqu'ils
pourraient contenir des impuretés susceptibles des causer
des étincelles ou un incendie.
• Ne tapez ni ne frappez pas le panneau de commande avec
des objets durs. Ceci risque d'endommager le four.
ALIMENTS
• N'utilisez jamais votre four à micro-ondes pour faire des
conserves maison. Le four n'est pas conçu pour faire des
conserves adéquates. Des aliments mis en conserve de
manière inadéquate peuvent se gâcher et être dangereux
si consommés.
• Utilisez toujours le temps de cuisson minimum pour la
recette. Il est préférable de cuire insufsamment que de
trop cuire.
• Les aliments cuits insufsamment peuvent être retournés
au four pour une cuisson supplémentaire. S'ils sont trop
cuits, cela ne se corrige pas.
• Chauffez avec précaution les petites quantités d'aliments
ou les aliments contenant peu d'humidité. Ceux-ci peuvent
sécher, brûler ou s'enammer rapidement.
• Ne faites pas chauffer des œufs dans leur coquille. La
pression risque de s'accumuler et faire exploser les œufs.
Les patates, les pommes, jaunes d'œuf et saucisses sont
des exemples d'aliments avec des pellicules non poreuses.
Celles-ci doivent être percées avant la cuisson pour éviter
les éclatements.
• Ne tentez pas de faire frire des aliments dans un bain d'huile
ou de graisse fondue dans un four à micro-ondes.
• Laissez toujours un temps de repos d'au moins 20
secondes après l'extinction du four, pour permettre à la
température de se répandre, si nécessaire, mélangez
durant le processus de chauffage et mélangez TOUJOURS
après le chauffage. Pour prévenir les bouillonnements avec
éclaboussures et les risques de brûlures, vous devriez
mettre une cuillère ou une tige de verre dans les breuvages
et brasser avant, durant et après le chauffage.
• Ne laissez pas le four à micro-ondes sans surveillance
lorsque vous faites éclater des grains de maïs. Ne faites
pas du maïs soufé dans un sac de papier, à moins qu'il
s'agisse d'un produit pour maïs soufé au micro-ondes
commercial. Les grains de maïs peuvent surchauffer et
faire s'enammer un sac de papier brun. Ne dépassez pas
le temps de chauffage suggéré par le fabricant de sachets
préparés de maïs à éclater.
Des temps plus longs ne donneront pas davantage de
grains éclatés, mais cela pourrait faire brûler les grains
déjà éclatés ou provoquer un incendie. N'oubliez pas, le
sac de maïs éclaté et le plateau pourraient être trop chauds
pour les manipuler. Retirer avec précaution et utiliser des
mitaines pour le four.
JAILLISSEMENTS D'ÉTINCELLES
Si vous voyez des étincelles, ouvrez la porte et corrigez le
problème.
Scientifiquement parlant, on parle de formation d'arcs
électriques. Les étincelles sont causées par :
• Le métal ou une pellicule d'aluminium qui touche une paroi
du four.
• Une pellicule d'aluminium qui n'est pas moulée sur la
nourriture (les rebords tournés vers le haut agissent comme
des antennes.
• Le métal, comme celui des attaches avec l métallique, les
agrafes à volaille ou la vaisselle avec bordure dorée, dans
le four à micro-ondes.
• Les papiers recyclés contenant de minuscules pièces
métalliques utilisés dans le four à micro-ondes.
• La saleté ou la graisse sur le couvercle du guide d'ondes.
PRINCIPES DES MICRO-ONDES
L'énergie des micro-ondes est utilisée pour cuire et chauffer
les aliments depuis les premières expériences avec les radars
au cours de la Deuxième Guerre mondiale. Les micro-ondes
sont présentes en tout temps dans l'atmosphère, à la fois
de sources naturelles et humaines. Les sources humaines
comprennent les radars, les ondes radio et de télévision,
les liens de télécommunication et les téléphones cellulaires.
COMMENT LES MICRO-ONDES CUISENT
LES ALIMENTS
Dans un four à micro-
ondes, l'électricité est
convertie en micro-ondes
par le MAGNÉTRON.
Enceinte du four
Magnétron
Guide d'ondes
Plaque
tournante
27 F
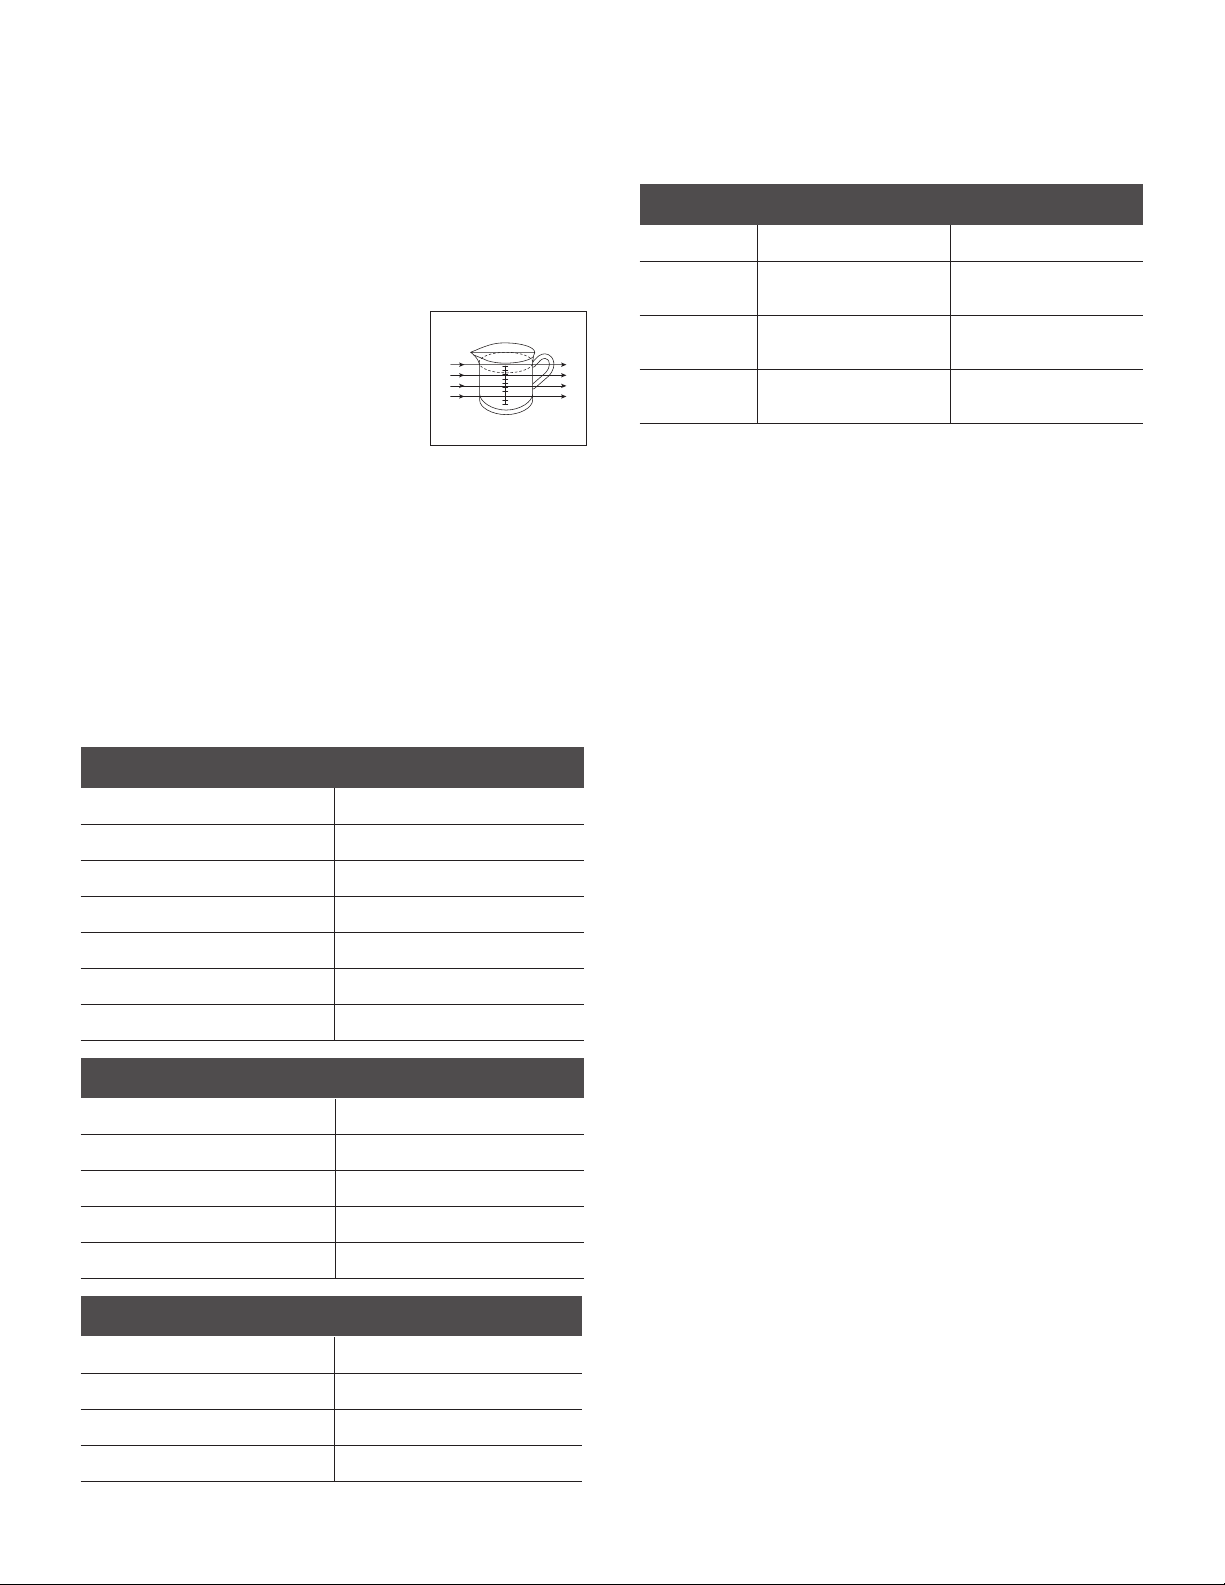
RÉFLEXION
Les micro-ondes rebondissent sur les parois métalliques et
le treillis métallique de la porte.
TRANSMISSION
Elles traversent les contenants de
cuisson et sont absorbées par les
molécules d'eau dans les aliments; tous
les aliments contiennent de l'eau en
plus ou moins grande quantité.
ABSORPTION
Les micro-ondes font vibrer les molécules d'eau, ce qui
cause de la FRICTION, c'est-à-dire de la CHALEUR. C'est
cette chaleur qui cuit les aliments. Les micro-ondes sont
aussi attirées par les particules de graisse et de sucre,
et les aliments qui en contiennent beaucoup cuisent plus
rapidement. Les micro-ondes ne peuvent pénétrer qu'à une
profondeur de 1,5 à 2 pouces (4 à 5 cm) et tout comme la
chaleur se répand à travers les aliments par conduction,
comme dans les fours traditionnels, les aliments cuisent de
l'extérieur vers l'intérieur.
Taleaux de conversion
MESURES DE POIDS
15 g
1
/2 oz
25 g 1 oz
50 g 2 oz
100 g 4 oz
175 g 6 oz
225 g 8 oz
450 g 1 lb
MESURES DE VOLUME
30 ml 1 oz liq.
100 ml 3 oz liq.
150 ml 5 oz liq. (1/4 chop.)
300 ml 10 oz liq. (1/2 chop.)
600 ml 20 oz liq. (1 chop.)
CUILLERÉES
1,25 ml
1
/4 c. à thé
2,5 ml
1
/2 c. à thé
5 ml 1 c. à thé
15 ml 1c. à table
MESURES DE LIQUIDE
1 tasse 8 oz liq. 240 ml
1 chopine 16 oz liq.
(imp. = 20 oz liq.)
480 ml
(imp. = 560 ml)
1 pinte 32 oz liq.
(imp. = 40 oz liq.)
960 ml
(imp. = 1120 ml)
1 gallon 128 oz liq.
(imp. = 160 oz liq.)
3840 ml
(imp. = 4500 ml)
TECHNIQUES DE CUISSON
STEMPS DE REPOS
Les aliments denses, par exemple la viande, les pommes de
terre en robe des champs, ont besoin d'un temps de repos
(à l'intérieur ou à l'extérieur du four) après la cuisson, pour
permettre à la chaleur de répandre et de cuire le centre
complètement. Enveloppez les morceaux de viande et les
pommes de terre en robe des champs dans une pellicule
d'aluminium pendant cette période. Les morceaux de viande
ont besoin d'environ 10 à 15 minutes, les pommes de terre, 5
minutes. D'autres aliments, comme les repas en assiette, les
légumes, le poisson, etc., nécessitent un temps de repos de
2 à 5 minutes. Après la décongélation d'aliments, un temps de
repos devrait aussi être alloué. Si la nourriture n'est pas cuite
après le temps de repos, retourner au four pour un temps de
cuisson supplémentaire.
CONTENU EN HUMIDITÉ
Plusieurs aliments frais, comme les légumes et les fruits, ont
un taux d'humidité variable selon la saison, particulièrement
les pommes de terre. Pour cette raison, les temps de cuisson
pourraient devoir être ajustés. Les ingrédients secs, p. ex. le
riz et les pâtes, peuvent s'assécher pendant leur entreposage,
ce qui peut faire varier les temps de cuisson.
DENSITÉ
Des aliments poreux et légers chauffent plus rapidement que
les aliments denses et lourds.
PELLICULE CELLOPHANE
Une pellicule cellophane aide à conserver l'humidité des
aliments et la vapeur piégée aide à accélérer le temps de
cuisson. Percez la pellicule avant de la mettre au four pour
permettre à l'excès de vapeur de s'échapper. Soyez toujours
prudent(e) en retirant la pellicule cellophane d'une assiette,
puisque la vapeur accumulée est très chaude.
FORME
Les formes uniformes cuisent uniformément. Les aliments
cuisent mieux au four à micro-ondes dans un contenant rond
que dans un contenant carré.
INSTRUCTIONS POUR LA CUISSON
28F

ESPACEMENT
Les aliments cuisent plus rapidement et uniformément
lorsqu'ils sont séparés. N'empilez JAMAIS les aliments l'un
par-dessus l'autre.
TEMPÉRATURE DE DÉPART
Plus les aliments sont froids, plus ils prendront de temps à
chauffer. Le même aliment sortant du frigo prendra plus de
temps à réchauffer que celui à la température de la pièce.
LIQUIDES
Tous les liquides doivent être brassés avant et pendant le
processus de chauffage. L'eau, plus particulièrement, doit
être brassée avant et pendant le processus de chauffage,
pour éviter une éruption. Ne chauffez pas des liquides qui
ont déjà bouilli. NE SURCHAUFFEZ PAS.
RETOURNER ET MÉLANGER
Certains aliments doivent être mélangés pendant la cuisson.
La viande et la volaille devraient être retournées à mi-chemin
du temps de cuisson.
DISPOSITION
Les aliments individuels, comme les portions de poulet ou
les côtelettes, devraient être placés dans une assiette de
manière à ce que les parties les plus épaisses soient placées
vers l'extérieur.
QUANTITÉ
Les petites quantités cuisent plus rapidement que les grandes
quantités. Aussi, les petits repas se réchaufferont plus
rapidement que les grosses portions.
PERÇAGE
La peau ou la membrane de certains aliments provoqueront
une accumulation de vapeur pendant la cuisson. Ces aliments
doivent être percés ou une bande de peau devrait être retirée
avant la cuisson pour permettre à la valeur de s'échapper. Les
œufs, les patates, les pommes, les saucisses, etc., doivent
être percés avant la cuisson. NE TENTEZ PAS DE FAIRE
BOUILLIR DES OEUFS DANS LEUR COQUILLE.
RECOUVRIR
Recouvrez les aliments avec une pellicule ou un couvercle
convenant au four à micro-ondes. Recouvrez le poisson,
les légumes, les ragoûts et les soupes. Ne couvrez pas les
gâteaux, sauces, pommes de terre en robe des champs, ni
les pâtisseries.
GUIDE DE DÉCONGÉLATION
• Ne décongelez pas de la viande emballée. L'emballage
pourrait entraîner un processus de cuisson. Retirez
toujours la barquette et la pellicule de plastique. N'utilisez
que des contenants convenant aux fours à micro-ondes.
• Commencez à décongeler une volaille entière avec la
poitrine vers le bas. Commencez à décongeler des rôtis
le côté gras vers le bas.
• La forme de l'emballage altère le temps de décongélation.
Des formes rectangulaires minces décongèlent plus
rapidement qu'un bloc épais.
• Vériez l'aliment après qu'un tiers (1/3) du temps de
décongélation se soit écoulé. Vous pourriez vouloir les
retourner, les séparer, les réarranger ou retirer des parties
décongelées.
• Pendant la décongélation, le four pourrait vous indiquer de
retourner la nourriture. À ce moment, ouvrez la porte du
four et vériez vos aliments. Utilisez les techniques décrites
ci-dessous pour des résultats de décongélation optimaux.
Puis fermez la porte du four, appuyez sur la touche START
pour terminer la décongélation.
• Lorsque décongelés, les aliments devraient être frais ou
froids, mais ramollis dans toutes ses parties. Si encore un
peu glacé, retourner brièvement au four à micro-ondes ou
laisser reposer quelques minutes. Après la décongélation,
laisser les aliments reposer de 5 à 60 minutes s'il y a des
parties encore glacées.
Les volailles et les poissons peuvent être placés sous de
l'eau courante jusqu'à ce qu'ils soient décongelés.
• Retourner : rôtis, côtes levées, volailles entières, poitrines
de dinde, saucisses à hot-dog, saucisses, steaks et
côtelettes.
• Réarranger : séparez les steaks, côtelettes, galettes pour
hamburger, viande hachée, morceaux de poulet ou de fruits
de mer, cubes de viande comme le boeuf à ragoût.
• Protéger : utilisez des bandelettes de pellicule d'aluminium
pour protéger des zones minces ou les rebords des
aliments à forme irrégulière, comme les ailes de poulet.
Pour prévenir le jaillissement d'étincelles, ne permettez
pas à la pellicule d'aluminium d'approcher à moins d'un
(1) pouce des parois ou de la porte du four.
• Retirer : pour éviter la cuisson, les portions décongelées
devraient être retirées du four. Ceci pourrait raccourcir le
temps de décongélation pour les aliments de moins de 3
lb (1350 g).
INSTRUCTIONS POUR LA CUISSON
29 F

Tableau de décongélation (avec time defrost)
ARTICLE POIDS
TEMPS DE
DÉCONGÉLATION
TEMPS DE
REPOS
TECHNIQUES SPÉCIALES
BOEUF
Boeuf haché 1 lb / 450 g 8 - 10 min. 15 - 20 min. Séparer et retirer les portions décongelées
avec une fourchette.
Viande à ragoût 1,5
lb / 675 g 12 - 14 min. 25 - 30 min. Séparer et réarranger.
Galettes 4 (4 oz / 110 g) 6 - 8 min. 15 - 20 min. Retourner à la moitié du temps.
PORC
Côtes levées 1 lb / 450 g 6 - 8 min. 25 - 30 min. Séparer et réarranger une fois.
Côtelettes 4 (5 oz / 125 g) 6 - 8 min. 25 - 30 min. Séparer et retourner une fois.
Porc haché 1 lb / 450 g 7 - 8 min. 15 - 20 min. Séparer et retirer les portions décongelées
avec une fourchette.
VOLAILLE
Poulet entier 2,5 lb / 1125 g 22 - 24 min. 45 - 90 min. Poitrine vers le bas. Retourner à la moitié
du temps. Protéger des parties au besoin.
Poitrines de poulet 1 lb / 450 g 8 - 10 min. 15 - 30 min. Séparer et réarranger une fois.
Poulet frit (découpé) 2 lb / 900 g 17 - 19 min. 25 - 30 min. Séparer et réarranger une fois.
Cuisses de poulet 1,5 lb / 675 g 12 - 14 min. 15 - 30 min. Séparer et réarranger une fois.
POISSON ET FRUITS DE
MER
Poisson entier 1 lb / 450 g 6 - 8 min. 15 - 20 min. Retourner à la moitié du temps. Protéger
des parties au besoin.
Filets de poisson 1,5
lb / 675 g 8 - 10 min. 15 - 20 min. Retourner à la moitié du temps. Protéger
des parties au besoin.
Crevettes 0,5
lb / 225 g 2 - 3 min. 15 - 20 min. Retourner à la moitié du temps. Protéger
des parties au besoin.
INSTRUCTIONS POUR LA CUISSON
30F

CUISSON
Tableau de cuisson
ARTICLE
NIVEAU DE
PUISSANCE
TEMPS DE CUISSON
PAR LB / 450 G
INSTRUCTIONS SPÉCIALES
VIANDE
- La viande et la volaille réfrigérées devraient être
sorties du réfrigérateur au moins 30 minutes
avant la cuisson.
- Toujours laisser la viande et la volaille reposer
recouvertes après la cuisson.
Pièce de bœuf
- Saignant
PL-8 6 - 8 min.
- C. moyenne PL-8 7 - 10 min.
- Bien cuit PL-8 9 - 11 min.
Pièce de porc PL10 9 - 12 min.
Pièce de lard PL10 5 - 7 min.
VOLAILLE
Poulet entier PL10 4 - 9 min.
Portions de poulet PL-8 5 - 7 min.
Poitrine (désossée) PL-8 6 - 8 min.
POISSON ET FRUITS DE MER
- Badigeonner le poisson d'un peu d'huile ou de
beurre fondu, ou ajouter 15 à 30 ml (1 à 2 c. à
table) de jus de citron, vin, bouillon, lait ou eau.
- Toujours laisser le poisson reposer recouvert
après la cuisson.
Filets de poisson PL10 3 - 5 min.
Maquereau entier, nettoyé et
préparé
PL10 3 - 5 min.
Truite entière, nettoyée et
préparée
PL10 4 - 6 min.
Darnes de saumon PL10 4 - 6 min.
REMARQUE : Les temps inscrits ci-dessus doivent être considérés comme un guide uniquement. Vous pouvez les modier
en fonction des goûts et préférences. Les temps peuvent varier selon la forme, la coupe et la composition des aliments.
Les viandes, volailles et poissons congelés doivent être complètement décongelés avant de les cuire.
INSTRUCTIONS POUR LA CUISSON
31 F

INSTRUCTIONS POUR LA CUISSON
RÉCHAUFFAGE
• La nourriture pour bébés doit particulièrement être vériée soigneusement avant d'être servie pour éviter les brûlures.
• Lors du réchauffement d'aliments emballés précuits, suivez toujours attentivement les instructions sur l'emballage.
• Si vous faites congeler des aliments achetés frais ou réfrigérés, n'oubliez pas qu'ils devraient être entièrement décongelés
avant de suivre les instructions de chauffage sur le paquet. Cela vaut la peine de laisser une note sur ceux-ci pour que les
autres membres de la maisonnée s'en souviennent eux aussi.
• N'oubliez pas d'enlever les attaches avec l métallique et de transférer les aliments des contenants en aluminium avant de la
réchauffer.
• Les aliments réfrigérés sont plus longs à réchauffer que ceux à la température de la pièce (comme les aliments à peine froids
ou rangés dans une armoire).
• Tous les aliments devraient être réchauffés à la pleine puissance du micro-ondes.
Tableau pour réchauffer
ARTICLE QUANTITÉ
TEMPS DE
RÉCHAUFFEMENT
INSTRUCTIONS SPÉCIALES
Aliments pour
bébés
4,5 oz 20 sec. Vider dans un petit bol de service.
Bien brasser une ou deux fois durant le réchauffement. Avant
de servir, vérier soigneusement la température.
Lait pour bébés 100 ml / 4 oz 20 - 30 sec. Bien mélanger ou brasser et verser dans une bouteille stérilisée.
Avant de servir, bien brasser et vérier avec soin la température.
225 ml / 8 oz 40 - 50 sec.
Rouleau ou pain
sandwich
1 rouleau 20 - 30 sec. Envelopper dans une serviette de papier et placer sur un plateau
de verre allant au micro-ondes.
Remarque : N'utilisez pas des serviettes de papier ordinaire.
Lasagne 1 portion
(10,5 oz / 300 g)
4 - 6 min. Placer la lasagne sur une plaque allant au micro-ondes.
Recouvrir avec une pellicule plastique percée.
Ragoût 1 tasse 1
1
/2 - 3 min. Cuire recouvert, dans une casserole convenant aux micro-
ondes. Mélanger une fois à mi-chemin du temps de cuisson.
4 tasses 5 - 7 min.
Patates en purée 1 tasse 2 - 3 min. Cuire recouvert, dans une casserole convenant aux micro-
ondes. Mélanger une fois à mi-chemin du temps de cuisson.
4 tasses 6 - 8 min.
Fèves au lard 1 tasse 2 - 3 min. Cuire recouvert, dans une casserole convenant aux micro-
ondes. Mélanger une fois à mi-chemin du temps de cuisson.
Ravioli ou pâtes
en sauce
1 tasse 2 - 3 min. Cuire recouvert, dans une casserole convenant aux micro-
ondes. Mélanger une fois à mi-chemin du temps de cuisson.
4 tasses 6 - 9 min.
32F

INSTRUCTIONS POUR LA CUISSON
LÉGUMES
Utilisez un bol en pyrex adéquat avec couvercle. Ajoutez de 30 à 45 ml (2 à 3 c. à table) pour chaque part de 250 g, à moins
qu'une quantité d'eau différente soit recommandée - voir le tableau. Cuire couvert pour la durée minimale - voir le tableau.
Poursuivre la cuisson pour arriver au résultat recherché. Mélanger une fois pendant et une fois après la cuisson. Ajouter le sel,
les herbes et le beurre après la cuisson. Couvrir pendant un temps de repos de 3 minutes.
Conseil : coupez les légumes frais en morceaux de grosseurs égales. Plus ils sont coupés petits, plus rapidement ils vont cuire.
Tous les légumes devraient être cuits à la pleine puissance du micro-ondes.
Tableau pour les légumes
LÉGUMES POIDS TEMPS COMMENTAIRES
Brocoli 0,5 lb / 250 g 3 - 5 min. Préparer en bouquets de tailles similaires. Disposer les tiges vers le
centre.
1 lb / 500 g 6 - 8 min.
Choux de
Bruxelles
0,5 lb / 250 g 3 - 5 min. Ajouter 60 à 76 ml (4 - 5 c. à table) d'eau).
Carottes 0,5 lb / 250 g 3 - 5 min. Couper les carottes en tranches de taille égale.
Choux-eurs 0,5 lb / 250 g 3 - 5 min. Préparer en bouquets de tailles similaires. Couper les gros bouquets en
moitiés. Disposer les tiges vers le centre.
1 lb / 500 g 6 - 8 min.
Courgettes 0,5 lb / 250 g 3 - 4 min. Couper les courgettes en tranches. Ajouter 30 ml (2 c à table) d'eau ou
une noix de beurre. Cuire jusqu'à tendre.
Aubergines 0,5 lb / 250 g 3 - 4 min. Couper l'aubergine en tranches minces et asperger avec 1 c. à table de
jus de citron.
Poireaux 0,5 lb / 250 g 3 - 4 min. Couper les poireaux en tranches épaisses.
Champignons 0.3 lb / 125 g 2 - 3 min. Préparer des champignons petits ou tranchés. N'ajoutez pas d'eau.
Asperger avec du jus de citron. Saler et poivrer. Égoutter avant de servir.
0,5 lb / 250 g 3 - 4 min.
Oignons 0,5 lb / 250 g 2 - 3 min. Couper les oignons en tranches ou en moitiés. N'ajouter que 15 ml (1 c. à
table) d'eau.
Poivrons 0,5 lb / 250 g 2 - 4 min. Couper les poivrons en tranches minces.
Pommes de terre 0,5 lb / 250 g 4 - 5 min. Évaluer les patates pelées et coupez-les en moitiés ou quarts de
dimensions équivalentes.
1 lb / 500 g 6 - 8 min.
Navet 0,5 lb / 250 g 4 - 6 min. Couper les navets en petits cubes.
Guide de cuisson pour légumes congelés
LÉGUMES POIDS TEMPS COMMENTAIRES
Épinards 0.3 lb / 125 g 2 - 3 min. Ajouter 15 ml (1 c. à table) d'eau froide.
Brocoli 0,5 lb / 250 g 4 - 5 min. Ajouter 30 ml (2 c. à table) d'eau froide.
Pois verts 0,5 lb / 250 g 4 - 5 min. Ajouter 15 ml (1 c. à table) d'eau froide.
Fèves vertes 0,5 lb / 250 g 4 - 5
1
/2 min. Ajouter 30 ml (2 c. à table) d'eau froide.
Légumes mélangés (carottes/pois/maïs) 0,5 lb / 250 g 4 - 5 min. Ajouter 15 ml (1 c. à table) d'eau froide.
Légumes mélangés (style chinois) 0,5 lb / 250 g 4 - 6 min. Ajouter 15 ml (1 c. à table) d'eau froide.
33 F

INSTRUCTIONS POUR LA CUISSON
RECETTES
SOUPE TOMATES ET ORANGE
1 oz (25 g) de beurre
1 oignon moyen, haché
1 grosse carotte et 1 grosse patate, coupées
en petits morceaux
1,75 lb (800g) de tomates en dés (en boîte), jus
et zeste d'une petite orange
1,5 chopine (900 ml) de bouillon de légumes
chaud, sel et poivre au goût.
1. Faire fondre le beurre dans un grand bol à PL10 pendant 30
secondes.
2. Ajouter l'oignon, la carotte et la patate et cuire à PL10 pendant
4 minutes. Mélanger à mi-chemin de la cuisson.
3. Ajouter les tomates, le jus et les zestes d'orange et le bouillon.
Bien mélanger. Saler et poivrer au goût. Recouvrir le bol et
cuire à PL10 pendant 15 minutes. Mélanger 2 à 3 fois durant la
cuisson, jusqu'à ce que les légumes soient tendres.
4. Mélanger et servir immédiatement.
SOUPE À L'OIGNON FRANÇAISE
1 gros oignon tranché
1 c. à table (15 ml) d'huile de maïs
2 oz (50 g) de farine tout usage
2 pinte (1,2 L) de bouillon de boeuf ou de
légumes
sel et poivre au goût
2 c. à table (30 ml) de persil, haché
4 tranches épaisses de pain français
2 oz (50 g) de fromage, râpé
1. Placer l'oignon et l'huile dans un bol, bien mélanger et cuire à
PL10 pendant 1 minute.
2. Incorporer la farine pour faire une pâte et ajouter graduellement
le bouillon. Assaisonner et ajouter le persil.
3. Couvrir le bol et faire cuire à PL-7 pendant 16 minutes.
4. Verser la soupe dans des plats de service, placer les tranches
de pain sur le dessus et saupoudrer généreusement de fromage.
5. Cuire à PL-7 pendant 2 minutes, jusqu'à ce que le fromage soit
fondu.
LÉGUMES SAUTÉS
1 c. à table (15 ml) d'huile de tournesol
2 c. à table (30 ml) de sauce soya
1 c. à table (15 ml) de sherry
1 po (2,5 cm) de gingembre, pelé et
nement râpé
2 carottes moyennes, coupées en nes
lanières
4 oz (100 g) de champignons, découpés
2 oz (50 g) de fèves germées
4 oz (100 g) de pis mange-tout
1 poivron rouge, égrainé et en nes lanières
4 oignons nouveaux hachés ns
4 oz (100 g) de châtaignes d'eau, en
tranches
1
/4 de chou chinois, en tranches minces
1. Placer l'huile, la sauce soya, le cherry, le gingembre, l'ail et les
carottes dans un grand bol; bien brasser.
2. Recouvrir et cuire à PL10 pendant 3 à 5 minutes, en brassant
une fois.
3. Ajouter les champignons, les fèves germées, les pois mange-
tout, poivron rouge, oignon, châtaignes d'eau et chou chinois.
Bien mélanger.
4. Cuire à PL10 pendant 5 à6 minutes, jusqu'à ce que les légumes
soient tendres. Brasser 2 à 3 fois pendant la cuisson.
Les légumes sautés sont habituellement servis avec de la
viande ou du poisson. Les légumes sautés sont habituellement
servis avec de la viande ou du poisson.
34F

INSTRUCTIONS POUR LA CUISSON
RECETTES
POULET AU MIEL
4 poitrines de poulet désossées
2 c. à table (30 ml) de miel liquide
1 c. à table (15 ml) de moutarde à grains
entiers
1
/2 c. à thé (2,5 ml) d'estragon séché
1 c. à table (15 ml) de purée de tomate
1
/4 de chopine (150 ml) de bouillon de poulet
1. Placer les poitrines de poulet dans un plat à ragoût.
2. Mélanger tous les autres ingrédients et disposer ceux-ci sur le
poulet. Saler et poivrer au goût.
3. Cuire à PL10 pendant 13 à 14 minutes. Réarranger et
badigeonner le poulet avec la sauce deux fois durant la cuisson.
POMMES DE TERRE AU FROMAGE BLEU ET À LA CIBOULETTE
2 pommes de terre à cuire au four (environ 9
oz [250 g] chacune)
2 oz (50 g) de beurre
4 oz (100 g) de fromage bleu, découpé en
petits morceaux
1 c. à table (15 ml) de ciboulette hachée
2 oz (50 g) de champignons tranchés
sel et poivre au goût
1. Percer les pommes de terre à plusieurs reprises. Cuire à PL10
pendant 7 à 9 minutes. Couper en moitiés; retirer la chair de la
pomme de terre à la cuillère et la mettre dans un bol. Ajouter le
beurre, le fromage, la ciboulette, les champignons, sel et poivre
et bien mélanger.
2. Empiler le mélange dans les moitiés évidées des pommes de
terre et placer dans un plat à tarte.
3. Cuire à PL-5 pendant 10 minutes.
SAUCE BLANCHE
1 oz (25 g) de beurre
1 oz (25 g) de farine tout usage
1
/2 chopine (300 ml) de lait
sel et poivre au goût
1. Placer le beurre dans un bol et cuire à PL10 pendant 30
secondes, jusqu'à ce que fondu.
2. Incorporer la farine en brassant et ajouter le lait graduellement.
Cuire à PL10 pendant 3 à 4 minutes, en brassant chaque 2
minutes jusqu'à une consistance épaisse et onctueuse. Saler
et poivrer au goût.
CONFITURE DE FRAISES
1,5 lb (675 g) de fraises, équeutées
3 c. à table (45 ml) de jus de citron
1,5 lb (675 g) de sucre en poudre
1. Placer les fraises et le jus de citron dans un très grand bol,
chauffer à PL10 pendant 4 minutes, ou jusqu'à ce que les
fruits soient ramollis. Ajouter le sucre, bien mélanger. Ne pas
recouvrir.
2. Cuire à PL-7 pendant 20 à 25 minutes, jusqu'à ce que le point
de solidication* soit atteint; brasser à toutes les 4 à 5 minutes.
3. Verser dans des bols chauds et propres. Mettre des couverts,
sceller et étiqueter.
* Point de solidification : pour déterminer le point de
solidication, placez 1 c. à table (5 ml) de conture dans
une soucoupe froide. Laissez reposer 1 minute. Déplacez
délicatement la surface de la conture avec votre doigt. Si
la surface se ride, le point de solidication a été atteint.
35 F

INSTRUCTIONS POUR LA CUISSON
RECETTES
GÂTEAU BLANC AU MICRO-ONDES
4 oz (100 g) de margarine
4 oz (100 g) de sucre
1 oeuf
4 oz (100 g) de farine autolevante, tamisée
2 à 3 c. à table (30 à 45 ml) lait
1. Couvrir la base d'un moule à gâteau de 8 po (20,4 cm) avec du
papier ciré.
2. Crémer ensemble la margarine et le sucre jusqu'à ce que léger et
duveteux. Battre l'oeuf dans le mélange et ajouter en alternance
avec le lait.
3. Verser dans le moule préparé. Cuire à PL10 pendant 4 à 5
minutes, jusqu'à ce qu'un cure-dents en ressorte propre.
4. Laisser le gâteau reposer pendant 5 minutes avant de la
démouler.
OMELETTE
0,5 oz (15 g) de beurre
4 oeufs
6 c. à table (90 ml) de lait
sel et poivre
1. Battre ensemble les œufs et le lait.
2. Placer le beurre dans une assiette à tarte de 10 po (26 cm).
Cuire à PL10 pendant 30 secondes, jusqu'à ce fondu. Enduire
le moule avec le beurre fondu.
3. Verser la mixture dans l'assiette à tarte. Cuire à PL10 pendant 2
minutes. Brasser la mixture et cuire à nouveau à PL10 pendant
1 minute.
OEUFS BROUILLÉS
0,5 oz (15 g) de beurre
2 oeufs
2 c. à table (30 ml) de lait
sel et poivre
1. Faire fondre le beurre dans un bol à PL10 pendant 30 secondes.
2. Ajouter les oeufs, le lait, l'assaisonnement et bien mélanger.
3. Cuire à PL10 pendant 3 à minutes, en brassant à toutes les 30
secondes.
HACHIS SAVOUREUX
1 petit oignon, en dés
1 gousse d'ail, écrasée
1 c. à thé (5 ml) d'huile
7 oz (200 g) de tomates en dés (en boîte)
1 c. à table (15 ml) de purée de tomates
1 c. à thé (5 ml) d'herbes mélangées
8 oz (225 g) de boeuf haché
sel et poivre
1. Placer l'oignon, l'ail et l'huile dans un plat et cuire à PL10 pendant
2 minutes ou jusqu'à ce que ramolli.
2. Placer les autres ingrédients dans le plat. Bien mélanger.
3. Couvrir et cuire à PL10 pendant 5 minutes, puis à PL-5 pendant
8 à 13 minutes, ou jusqu'à ce que la viande soit cuite.
36F


BERTAZZONI SPA
VIA PALAZZINA 8
42016 GUASTALLA RE
ITALY
WWW.BERTAZZONI.COM