Loading ...
Loading ...
Loading ...

15
the connector lug or wire around the binding post shaft or threaded through
the hole in the binding post. Turn the binding post clockwise to clamp the
connector lug or wire firmly in place.
NOTE: Be sure there are no loose wire strands that could touch adjacent
wires or connectors.
Cooling Fans
4
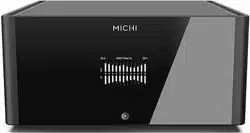
The Michi S5 / M8 is equipped with dual cooling fans to help ventilate the
internal components. It will adjust the fan speed automatically depending
on the temperature of the unit.
NOTE: The amplifier produces significant power and associated heat -
even with the cooling fans in use. Appropriate installation and ventilation
is required to ensure proper operation.
RS232 7
The S5 / M8 can be controlled via RS232 for integration with automation
systems. The RS232 input accepts a standard straight DB-9 Male-to-Female
cable.
For additional information on the connections, software, and operating codes
for RS232 control of the amplifier, contact your authorized Michi dealer.
Network Connection
6
The S5/ M8 can be attached to a network using the rear panel NETWORK
socket 6. The NETWORK configurations allow both STATIC and DHCP IP
addressing. See the Network section of this manual under Setting Menu for
IP address configuration information.
The NETWORK connection allows software updates to be downloaded from
the Internet. The NETWORK connection also allows IP control for integration
with automation systems.
For additional information on the IP control please contact your authorized
Michi dealer.
Setup Menu
The Michi S5 / M8 features a front panel display to show information and
status. A more comprehensive ON-SCREEN DISPLAY (OSD) menu system is
available at any time by pressing the SETUP button on the remote. These OSD
menus guide you through the configuration and setup of the amplifier. The
settings made in the configuration process are memorized as default settings
and need not be made again for normal operation of the unit.
Front Panel Overview
The following is a brief overview of the controls and features on the front
panel of the unit.
Remote Sensor
3
This remote sensor window receives IR commands from the remote control.
Please do not block this sensor.
Display
1
The front panel display shows the current amplifier status. The display provides
access to the setup and configuration menu options of the amplifier.
Overview of Buttons and
Controls
This section provides a basic overview of the buttons and controls on the remote
control. Detailed instructions on the use of these buttons are provided in the
more complete operating instructions in the following sections.
Navigating
D
and Enter
K
Buttons : Use the navigation buttons
/
D
and the Enter button
K
on the remote control to access the various menus.
Power 2A: The Power button on the front panel and on the remote control
activate or deactivate the unit. There is an LED light in the middle of the Power
button on the remote control, which will be illuminated when you pick up the
remote control. To power on the unit, the rear panel master POWER switch
must be in the ON position for the front panel Power and the remote standby
function to operate.
Power On - To power on the unit press and release the power button 2 on
the front panel or remote control A.
Power Off / Standby - To power off the unit to standby push and release the
power button 2 on the front panel or PUSH-HOLD the the remote control
power button A for 1.5 seconds.
NOTE All Michi products will respond to the same Power On and Off
commands to simplify the power control when multiple products are
installed. To control the power using the IR remote follow the instructions
above and point the remote control at the Michi products. If a unit does
not respond to a power on or off from the IR remote simply PUSH or PUSH
HOLD the power button again to resend the desired command.
SETUP B: The SETUP button activates the OSD setup screen on the front
display. Push the SETUP button again to move to the previous setup menu as
a “back” button or exit setup menu if on the first level of setup menu.
SOURCE C: This function is not used on the S5 and M8.
DISPLAY G: Dims the front display. To dim the display PUSH-HOLD the
DISPLAY G button on the remote control for 3 seconds. To turn on the
display to the level of brightness configured in the setup menu PUSH and
release the DISPLAY G button.
NOTE The DISPLAY button is common for all Michi models. To Dim or
enable the display PUSH or PUSH-HOLD the button and point to the Michi
products. If a unit does not respond to a DISPLAY command simply send
the command again using a PUSH or PUSH-HOLD.
AUDIO H: This function is not used on the S5 and M8.
Button
E
: This function is not used on the S5 and M8. However MUTE
will toggle the MUTE function on the Michi P5 Preamplifier.
Loading ...
Loading ...
Loading ...
