INSTRUCTION AND
RECIPE BOOKLET
For your safety and continued enjoyment of this product,
always read the instruction book carefully before using.
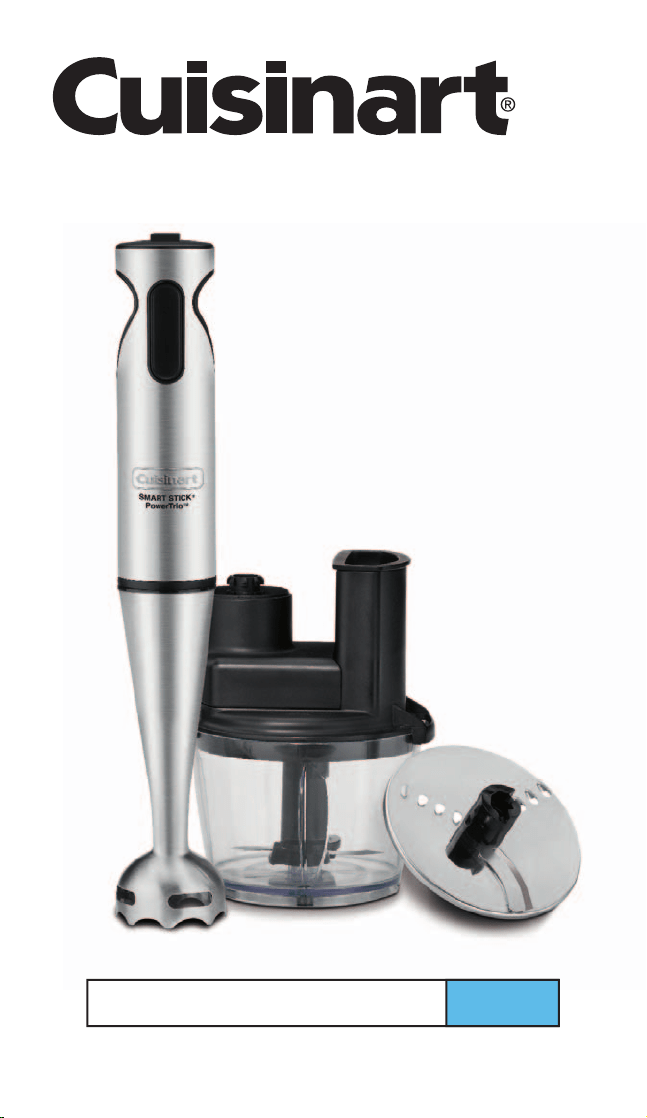
Smart Stick
®
PowerTrio
™
Hand Blender CSB-80


3
IMPORTANT SAFEGUARDS
When using an electrical appliance, basic safety precautions should
always be followed, including the following:
1. READ ALL INSTRUCTIONS.
2. Unplug from outlet when not in use, before putting on or
taking off parts, and before cleaning. To unplug, grasp plug
and pull from electrical outlet. Never pull cord.
3. To protect against electrical shock, do not put the motor body,
cord or electrical plug of this hand blender in water or other
liquids. Only the detachable blending shaft and other certain parts
of this appliance have been designed for immersion into water or
other liquids. Never submerge any other portion of this unit. If
hand blender falls into liquid, remove immediately. Do not reach
into the liquid without unplugging the unit first.
4. This appliance should not be used by children. To avoid possible
accidental injury, close supervision is necessary when used
near children.
5. Avoid contact with moving parts.
6. During operation keep hands, hair and clothing, as well as
spatulas and other utensils, away from attachments and any
mixing container to reduce risk of injury to persons and/or
damage to the appliance. A spatula may be used, but must be
used only when the unit is not operating.
7. Do not operate any appliance with a damaged cord or plug,
or after the appliance has malfunctioned or has been dropped
or damaged in any way or is not operating properly. Return the
appliance to the nearest Cuisinart Repair Center for examination,
repair, or mechanical or electrical adjustment.
8. Remove detachable shaft from the blender before washing the
blades or shaft.
9. Blades are SHARP. Handle carefully when removing, inserting
or cleaning. Exercise the same care when removing,
inserting the cutting blade or reversing disc for the food
processor attachment.
10. When mixing liquids, especially hot liquids, use a tall container
or make small quantities at a time to reduce spillage, splattering
and possibility of injury from burning.
11. To reduce the risk of injury, never place food processor
attachment cutting blade on base without first putting prep bowl
properly in place.
12. Be certain the food processor attachment cover is securely
locked in place before operating appliance. Do not attempt to
remove cover until blade has stopped rotating.
13. Check work bowl for presence of foreign objects before using.

4
14. The use of attachments or accessories not recommended by
Cuisinart may cause fire, electrical shock, or risk of injury.
15. Do not use outdoors or for other than intended use.
16. Do not let any cord hang over the edge of the table or counter.
Do not let cord contact hot surfaces, including stovetop.
17. Make sure the appliance is off, the motor has stopped complete-
ly, and the appliance is unplugged from outlet before putting on
or taking off attachments, and before cleaning.
18. Maximum rating is based on the 400W food processor
attachment that draws the greatest power.
19.
Do not operate your appliance in an appliance garage or
under a wall cabinet. When storing in an appliance garage
always unplug the unit from the electrical outlet. Not doing
so could create a risk of fire, especially if the appliance touch-
es the walls of the garage or the door touches the unit as it
closes.
SAVE THESE INSTRUCTIONS
FOR HOUSEHOLD USE ONLY
NOTICE
This appliance has a polarized plug (one blade is wider than the
other). As a safety feature, this plug will fit in a polarized outlet only
one way. If the plug does not fit fully in the outlet, reverse the plug.
If it still does not fit, contact a qualified electrician. Do not attempt
to defeat this safety feature.

5
CONTENTS
Important Safeguards . . . . . . . . . . . . . . . . . . . . . . . . . . . . . . . . . . . . 3
Unpacking Instructions . . . . . . . . . . . . . . . . . . . . . . . . . . . . . . . . . . . 5
Parts and Features . . . . . . . . . . . . . . . . . . . . . . . . . . . . . . . . . . . . . . 6
Assembly . . . . . . . . . . . . . . . . . . . . . . . . . . . . . . . . . . . . . . . . . . . . . . 8
Blending Attachment . . . . . . . . . . . . . . . . . . . . . . . . . . . . . . . . 8
Food Processor Attachment . . . . . . . . . . . . . . . . . . . . . . . . . . 8
Slicing and Shredding Disc . . . . . . . . . . . . . . . . . . . . . . . . . . . 9
Chopping Blade . . . . . . . . . . . . . . . . . . . . . . . . . . . . . . . . . . . 10
Whisk Attachment . . . . . . . . . . . . . . . . . . . . . . . . . . . . . . . . . 10
Operation . . . . . . . . . . . . . . . . . . . . . . . . . . . . . . . . . . . . . . . . . . . . . 11
Blending . . . . . . . . . . . . . . . . . . . . . . . . . . . . . . . . . . . . . . . . . 11
Food Processing . . . . . . . . . . . . . . . . . . . . . . . . . . . . . . . . . . 11
Whisking . . . . . . . . . . . . . . . . . . . . . . . . . . . . . . . . . . . . . . . . 12
Cleaning and Maintenance . . . . . . . . . . . . . . . . . . . . . . . . . . . . . . . 12
Tips and Hints . . . . . . . . . . . . . . . . . . . . . . . . . . . . . . . . . . . . . . . . . 13
Frequent Uses for Food Processor Attachment . . . . . . . . . . . . . . . 16
Recipes . . . . . . . . . . . . . . . . . . . . . . . . . . . . . . . . . . . . . . . . . . . . . . 17
Warranty . . . . . . . . . . . . . . . . . . . . . . . . . . . . . . . . . . . . . . . . . . . . . 33
UNPACKING INSTRUCTIONS
Place the package containing the Cuisinart
®
Smart Stick
®
PowerTrio
™
Hand Blender on a sturdy surface. Unpack the Smart Stick
®
Hand
Blender from its box by removing the upper protective insert. Gently
slide the unit from the box. Remove all support materials from the box
and replace the upper insert. Save packaging for possible repacking
of the unit.
NOTE: The blending blade is extremely sharp.
Before using the Cuisinart
®
Smart Stick
®
PowerTrio
™
Hand Blender for
the first time, we recommend that you wipe the unit with a clean,
damp cloth to remove any dirt or dust. Dry it thoroughly with a soft
absorbent cloth. To clean all parts see instructions on page 12. Read
all instructions completely for detailed operating procedures.

6
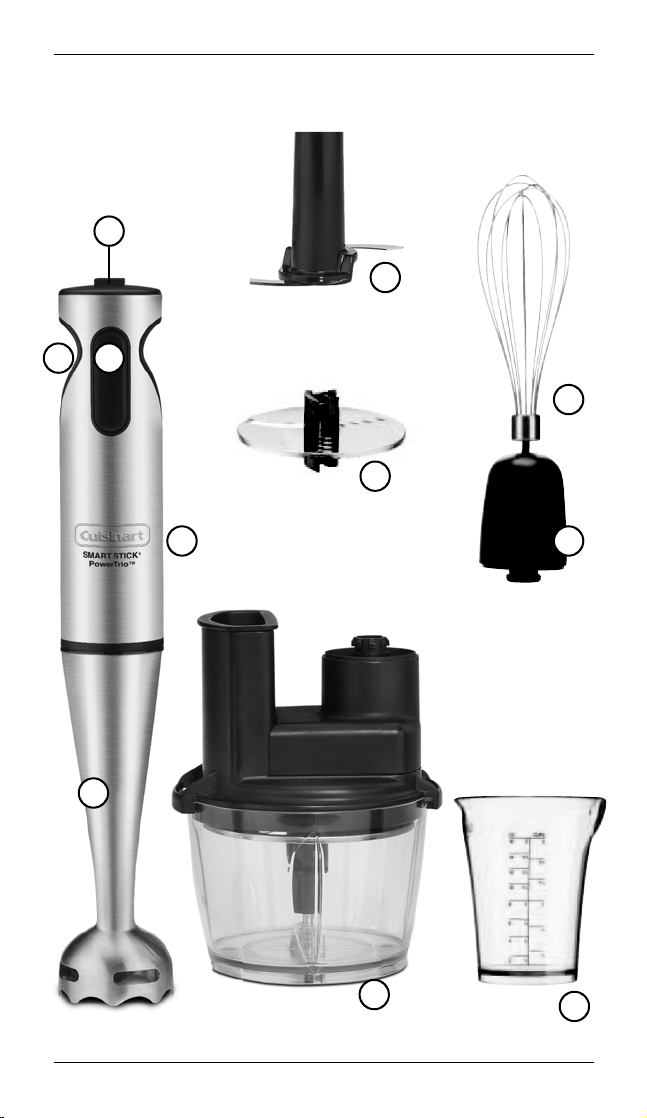
PARTS AND FEATURES
1. One-Touch Power Button: Allows you to activate the hand
blender at the touch of a button. Simply press and hold down
the button to blend/process or pulse. Once the button is
released, blending will stop.
2. Lock/Unlock Button
Must be pressed to unlock before power handle will operate.
3. Comfort Grip Handle: The handle allows you to control the
hand blender with ease.
4. Motor Body Housing
5. Blending Attachment: This attachment easily snaps into the
motor body housing. The fixed stainless blade is partially cov-
ered by a stainless housing that keeps splashing to a mini-
mum. Press the release button on the back of the unit to
detach for easy cleaning.
6. Whisk Attachment: Whisk attachment snaps into the motor
body housing. This attachment is great for whipping cream,
egg whites and other delectable treats.
a. Gearbox: Whisk attaches to it.
7. Food Processor Attachment:
a. 4-cup capacity work bowl with a feed tube and pusher;
works as a mini food processor. The food processor attach-
es to the blender motor body in place of the
blending attachment.
b. Chop with the stainless steel chopping blade.
c. Slice on one side and shred on the other with the stainless
steel slicing and shredding disc.
8. Mixing Cup: 2-cup blending cup is microwave and
dishwasher safe. Use this container to blend drinks, shakes,
salad dressings and more. Designed for easy gripping and
drip-free pouring.

1
7
PARTS AND
FEATURES
4
3
2
6
6a
8
5
7a.
7c.
7b.

8
ASSEMBLY
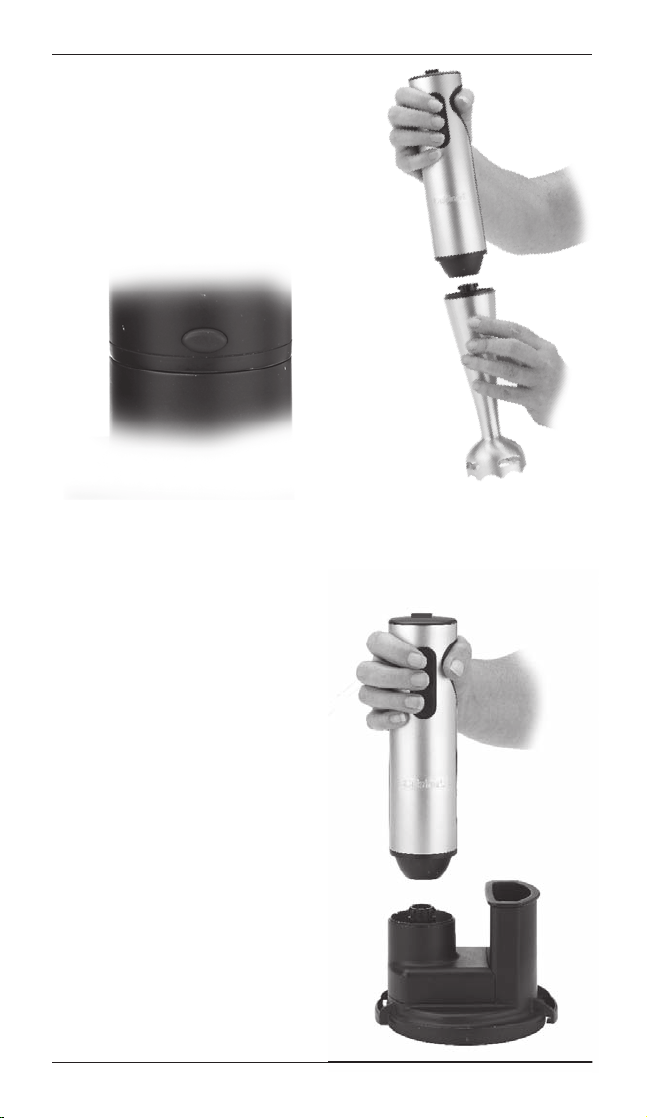
BLENDING ATTACHMENT
1. Align the motor body housing with
the blending shaft and push the
pieces together until you hear and
feel them click together. It may be
helpful to press the release button
when assembling.
2. Plug the power cord of the hand
blender into an electrical outlet.
FOOD PROCESSOR ATTACHMENT
1. Connect the motor body
housing to the top of the
food processor attachment
cover.
2. Align the spine in the food
processor cover’s drive
shaft with the ribbed open-
ing on the underside of the
motor body housing.
3. When aligned properly,
slide the two pieces
together until you feel
and hear a slight click.
HMENT
9
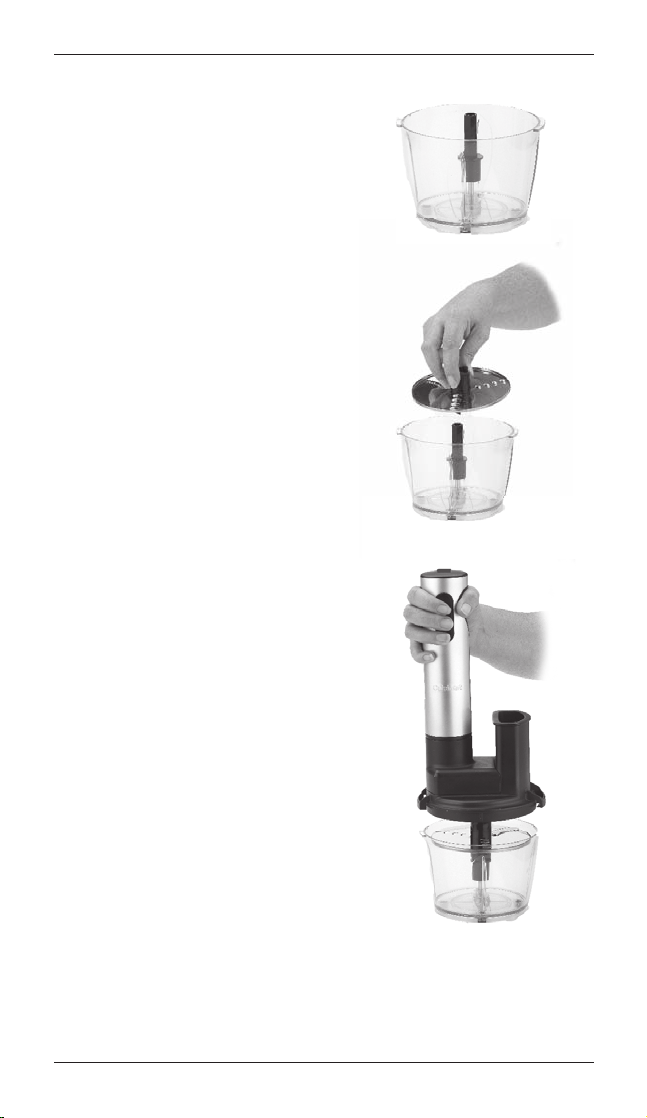
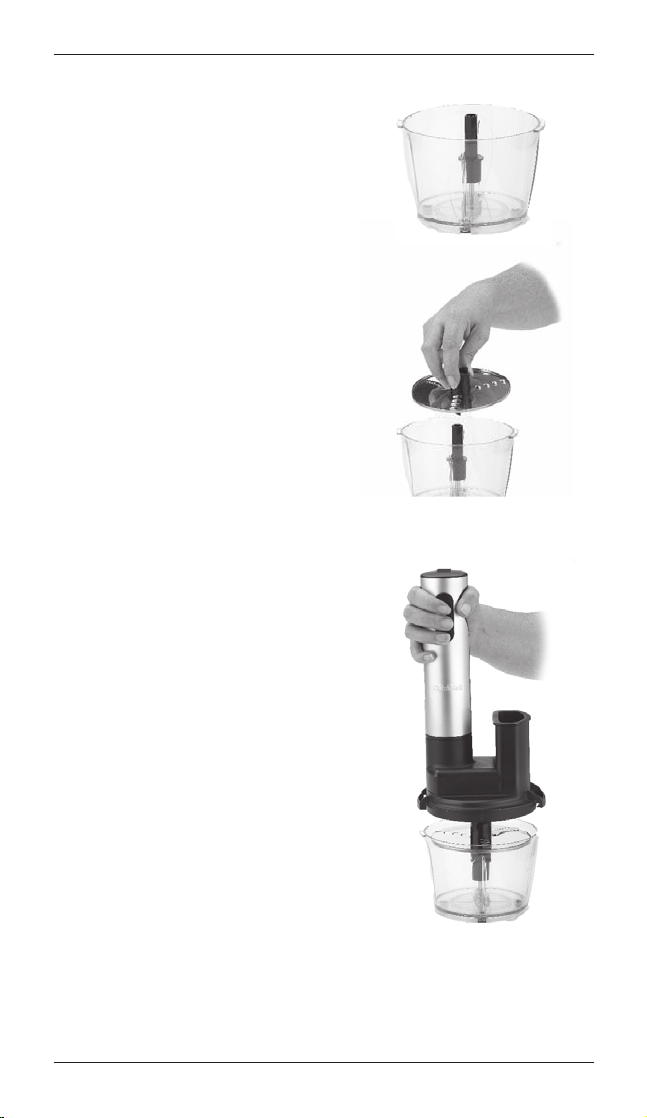
SLICING AND SHREDDING DISC
1. Insert adapter stem into
center of work bowl.
2. Place the slicing/shredding
disc onto shaft with the desired
cutting blade facing up.
To slice: Attach disc to stem
with the raised edge of slicer
on top.
To shred: Attach disc to stem
with the raised shredding slots
on top.
BE SURE TO HANDLE THE
METAL DISC WITH CARE,
AS IT IS RAZOR SHARP.
3. Place the hand blender
with cover on top of the
work bowl and rotate the cover
clockwise to lock into place.
4. Plug the power cord of
the hand blender into
an electrical outlet.
10
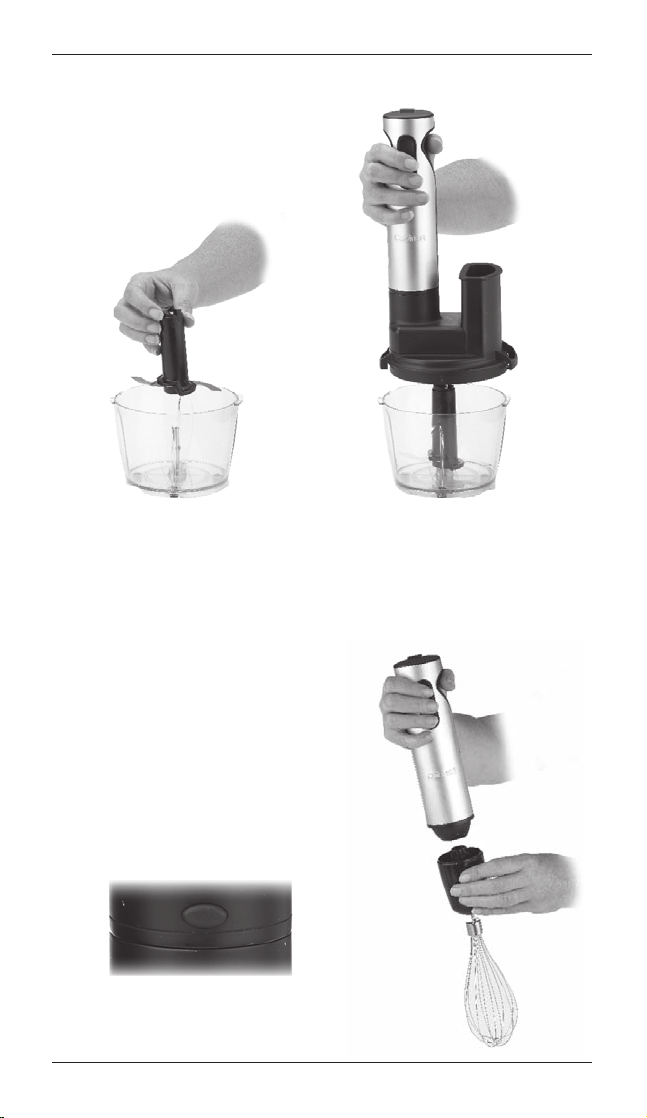
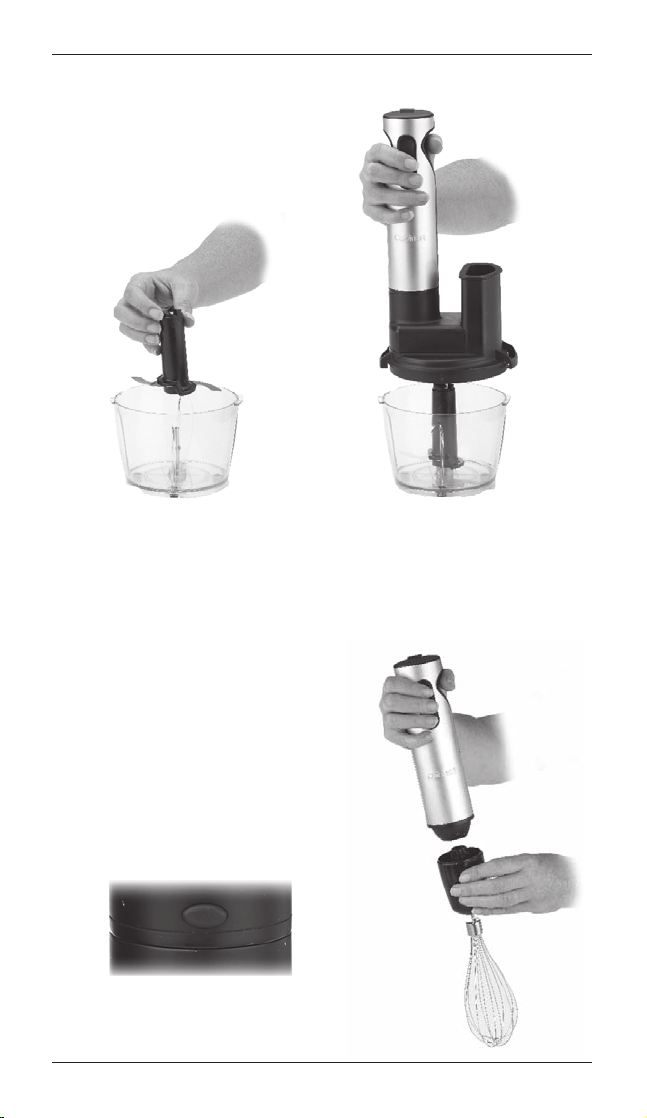
CHOPPING BLADE
1. Place the chopping blade into center of the work bowl over metal
blade shaft.
2. Place the motor body housing with cover on top of the work bowl
and rotate counterclockwise to lock into place.
3. Plug the power cord of the hand blender into an electrical outlet.
WHISK ATTACHMENT
1. Align the motor body housing
with the assembled whisk
attachment and push the pieces
together until you hear and feel
them click together. It may be
helpful to press the release
button when assembling.
Note: Whisk and whisk gearbox
are detachable from one another.

11
OPERATION
BLENDING
The specially designed blade is for mixing and puréeing all kinds of
foods, including salad dressings, powdered drink products, soups and
sauces and blended drinks like milkshakes or smoothies.
This blade mixes and stirs while adding only a minimum of air to your
mixture. A gentle up-and-down motion is all you need to make the
most flavorful, full-bodied recipes. Be careful never to remove the
blending shaft from the liquid while in operation, for it will splatter.
Tilt the pan or bowl away from you if needed to ensure the protective
blade guard on the blending shaft is fully submerged.
1. Put blending shaft into mixture to be blended.
2. Press and hold the Power button. Press and hold the Lock/
Unlock button on top of the motor housing to turn motor on.
Once motor is on, you can release the Lock/Unlock button but
continue to hold in the speed button. You can also press the
Lock/Unlock button first, holding it down as you press the speed
button to turn motor on. Do not hold power button down for more
than 60 seconds at a time.
3. Do not press the button for longer than 60 seconds at a time.
4. Unplug immediately after use.
CAUTION: DO NOT PUT FINGERS NEAR BLADE.
TO DISLODGE FOOD, UNPLUG HAND BLENDER
FROM THE OUTLET FIRST.
PULSING
To pulse, press and release Power button.
FOOD PROCESSING
CHOPPING FOOD
1. Place the work bowl firmly on a flat, sturdy surface like a
countertop.
2. Put food in the work bowl. Be sure the food is cut into small
pieces (½ to 1 inch), and the bowl is not overloaded.
3. Put the food processor cover on top of the work bowl. Be sure
the cover is properly seated.
4. Press and hold the Power button.
Note: Due to the powerful motor provided with this unit,
Cuisinart recommends using one hand to support the
work bowl during operation.
5. When you have finished processing the food, stop the machine
by taking your finger off the Power button.
6.
WHEN THE BLADE STOPS MOVING, unplug the unit.

12
7. Remove the motor body with the cover from the work bowl.
8. Carefully remove the chopping blade, holding it by the gripping
ridges on the plastic sheath.
NEVER TOUCH THE BLADE
ITSELF
.
9. Remove food with a spatula.
Note: Do not operate the food processor attachment
without food contents in the work bowl.
SLICING AND SHREDDING FOOD
The reversible slicing/shredding disc can slice and shred a variety of
fruits, vegetables and cheeses. See Slicing and Shredding Tips on
page 15. Refer to Slicing and Shredding Disc Assembly on page 9.
1. Place the work bowl firmly on a flat, sturdy surface like a counter-
top. Be sure the disc is assembled to use the desired cutting
edge.
2. Insert food in feed tube. Insert pusher. Use light to moderate
pressure to push down on pusher with one hand while using your
other hand to push the Power button on hand blender.
3. Slicing and shredding take only a few seconds. Wait until disc
stops spinning before removing cover.
ALWAYS USE THE
PUSHER TO GUIDE FOOD THROUGH FEED TUBE. NEVER
USE YOUR FINGERS OR A SPATULA.
4. Unplug hand blender. Remove cover, then the slicing/shredding
disc. To remove it, grasp flat top section of adapter stem and lift
it straight up while holding the work bowl.
WHISKING
1. Insert the whisk attachment into the motor body. (See Assembly
for Whisk Attachment, page 10.)
2. Plug electrical cord into a wall socket.
3. Put the whisk into mixture to be blended.
4. Press and hold the Power button. The hand blender will continue
to run as long as the switch is pressed in. To turn hand blender
off, release the Power button and the motor will stop.
CLEANING AND MAINTENANCE
HAND BLENDER
Always clean the motor body and blending shaft thoroughly after
using.
Remove the blending shaft from the motor body. Clean the
motor body only with a sponge or damp cloth. Do not use abrasive
cleaners that could scratch the surface. To clean the blending shaft,
wash by hand in hot water using mild detergent. Be mindful of the
fixed razor-sharp edges.

13
FOOD PROCESSOR ATTACHMENT
To simplify cleaning, rinse the work bowl, blade, disc immediately
after use so that food won’t dry on them. Do not submerge the work
bowl cover in water or put in the dishwasher. Wash chopping blade,
disc, stem, pusher and work bowl in warm, soapy water. Rinse and
dry. Wipe the underside of the food processor cover with a sponge
or damp cloth to remove any food. Wash the blade carefully. Avoid
leaving it in soapy water where it may disappear from sight.
You can wash the work bowl, chopping blade, disc and pusher on
the upper shelf of your dishwasher. Unload the dishwasher carefully
to avoid contact with the sharp blade. Wipe the motor body and top
of the cover with a damp sponge or cloth. Dry it immediately. Never
submerge the motor body or the cover in water or other liquids.
The food processor attachment is intended for HOUSEHOLD USE
ONLY.
WHISK ATTACHMENT
To clean your whisk attachment, simply release the attachment
from the motor body housing. Once the whisk is removed, detach
the metal whisk from the gearbox by pulling the pieces apart. To clean
the gearbox, simply wipe with a damp cloth. To clean the metal
whisk, wash with warm soapy water or put in the dishwasher.
Do not submerge the gearbox in water or any other liquid.
Any service, other than cleaning and normal user maintenance, should
be performed by an authorized Cuisinart Service Representative.
TIPS AND HINTS
FOR HAND BLENDER
• Be sure that blending blade guard is fully submerged before blending
ingredients.
• To purée a soup, use the hand blender to blend the soup ingredients to
the desired consistency, using a gentle up-and-down motion right in the
saucepan or pot.
• When blending ingredients right in a pot or pan tilt the pan away from
you to create a deeper area for blending to prevent splatter.
• When using a nonstick cooking surface, be careful not to scratch the
coating with the hand blender.
• When blending into the blending cup, for example when making a fruit
smoothie, cut most solid foods into ½ inch pieces for easy blending.
• Use the hand blender to make smooth gravies and pan sauces.
• Do not immerse motor body housing in water or any other liquid.
• When blending in the mixing cup, pour liquid ingredients in first, unless
recipe instructs otherwise.

14
• The hand blender is perfect for frothing milk for cappuccino or lattés.
Just warm milk in a small saucepan, and then pulse the hand blender
gently, being sure to keep the blending blade guard fully submerged.
• Do not let hand blender stand in a hot pot on stove while not in use.
• Do not attempt to blend fruit pits, bones or other hard materials as
these are liable to damage the blades.
• Do not fill mixing containers too full. The level of mixture will rise when
blending and can overflow.
• To whip air into a mixture, always hold the blade just under the surface.
• Using a gentle up-and-down motion is the best way to blend and incor-
porate ingredients uniformly.
• Liquid should not come closer than 1-inch of where the shaft attaches
to the motor housing.
FOR WHISK ATTACHMENT
•
Do not immerse whisk attachment gearbox in water or any other liquid.
• Use the whisk attachment for beating heavy cream or egg whites.
• When beating egg whites use a very clean metal or glass bowl,
never plastic. Plastic can contain hidden oils and fats that can
ruin the delicate egg white foam. To help stabilize the egg whites,
add
1
/
8
teaspoon of cream of tartar per egg white prior to beating
them. (If using a copper bowl omit the cream of tartar.) Beat the
egg whites until desired peaks form.
• It may also be used for any task that you would normally whisk
by hand, like crêpe batters or eggs for omelets.
• Beating the egg whites too long causes them to dry out and
become less stable.
• When adding sugar to beaten egg whites, add it slowly when soft
peaks just begin to form and then continue beating to form
desired peaks.
• When beating heavy cream, if possible and time allows, use a
chilled bowl and chill the whisk attachment. The best shaped bowl
for whipping cream is one that is deep with a rounded bottom to
minimize any splatter.
•
The cream should come out of the refrigerator just before whipping.
Whipped cream may be used at either soft or firm peaks depend-
ing on preference. It may be flavored as desired. For best results,
whip cream just before using.
FOR FOOD PROCESSOR ATTACHMENT
• When making compound butters, remove the butter from the refrigera-
tor and let it come to room temperature before blending the ingredients.
• Do not grind spices in food processor work bowl.
• Liquids in work bowl should not exceed 1½ cups. Use quantities
given in the recipe section as a guide.

15
• Do not overload work bowl. For best results most foods should
not reach more than
2
∕
3
of the way up the work bowl.
• Do not attempt to chop fruit pits, bones or other hard materials,
as these are liable to damage the blades.
• Do not immerse food processor cover in water or any other liquid.
• Do not operate food processor attachment for more than
30 seconds continuously.
• To add liquid while the machine is running, pour it through open
feed tube. This is especially useful when making sauces.
•
A small hole in the pusher allows you to add liquids in a very
slow, steady stream – useful when making dressings and/or
emulsions.
• ALWAYS USE PUSHER TO GUIDE FOOD THROUGH FEED
TUBE. NEVER USE YOUR FINGERS OR A SPATULA.
• The size of pieces you put in bowl should be about the same size
to achieve even results.
• For raw ingredients: peel, core and/or remove seeds and pits.
Food should be between ½ and 1-inch, depending on hardness
of the food.
• Pulse food in 1-second increments to chop. For the finest chop,
process continuously. Watch ingredients closely to achieve
desired consistency and scrape the work bowl as necessary.
Slicing and Shredding (using the reversible slicing/shredding disc)
• Always pack food in the feed tube. Use light to medium pressure
on the feed tube while processing
• For round fruits or vegetables, remove a thick slice on the bottom
of the food so that it sits upright in the feed tube. If food does not
fit in the feed tube, halve or quarter it to fit. Process with even
pressure.
• For small ingredients, like mushrooms, radishes or strawberries,
trim the ends so the food sits upright in the feed tube.
• When slicing or shredding cheese, soft to medium firm cheeses
be sure that the cheese is well chilled.
• When slicing or shredding harder cheeses like Parmesan, bring to
room temperature first.
• To shred leafy vegetables like lettuce or spinach, roll leaves
together and stand up in feed tube. Process with even pressure.

16
FREQUENT USES FOR FOOD PROCESSOR ATTACHMENT
Ingredient Attachment in work bowl Comments
Baby foods (always
consult a pediatrician
or family physician for
appropriate food recom-
mendations)
Chopping Blade
Place small amounts (no more than 2 cups) of cooked
foods into food processor work bowl. Add small amount of
appropriate liquid. Pulse to chop then hold to blend.
Bread Crumbs - fresh or
dry (day old)
Chopping Blade
Pulse to chop, then process until desired consistency is
reached.
Hard Cheese (Asiago,
Locatelli, Parmesan,
Romano, etc.) (Not
recommended for softer
cheeses unless making
a dip or dressing)
Chopping Blade
For grated cheese: Cut into ¼ inch pieces. Pulse to chop
then process until desired consistency is reached. Grate
up to 4 ounces.
For shredded cheese: Let cheese come to room tempera-
ture fi rst and then cut into pieces to fi t the feed tube. Place
cheese in feed tube with pusher in place and turn unit on.
Use very light to no pressure, letting the pusher almost
naturally guide the cheese through the shredding disc. Stop
as soon as cheese has fi nished shredding.
Shredding Disc
Chocolate
Chopping Blade
Cut into ½ inch pieces; may chill in freezer for 3 minutes
before chopping. Pulse to chop, then process, no more than
1 ounce at a time, until desired texture is reached.
Shredding Disc
Larger chocolate pieces work best (may chill in
freezer for 3 minutes before shredding. Process, using
medium pressure. Results are a fi nely grated product.
Creamy Dressing
and Dips
Chopping Blade
Place ingredients in food processor work bowl; do not
cover or spill on stem. Use pulse action to chop, then
continuous-hold action to blend to desired consistency.
Dressings can also easily be made in the mixing cup with
the blending shaft.
Garlic Chopping Blade Peel up to 12 cloves. Pulse to chop.
Gingerroot (fresh)
Chopping Blade
To grate: Peel, cut into ½ inch pieces. Pulse to chop 2
ounces at a time.
Slicing/Shredding Disc
To slice or shred: peel and cut to fi t the feed tube; using
light to medium pressure on the pusher, turn the unit on.
Stop as soon as ginger is completely shredded/sliced.
Herbs (fresh) Chopping Blade 1 cup; must be clean and dry. Pulse to chop.
Nuts Chopping Blade
Shelled, toast fi rst for best fl avor. Pulse to chop; process
up to a
½
cup at a time until desired consistency is reached.
Meat (beef, poultry, pork)
Chopping Blade
To process: 6 ounces; cut into ½ inch pieces. Pulse until
desired consistency.
Slicing/Shredding Disc
To slice or shred: Chill cooked meat that is cut to fi t the
feed tube for at least 15 to 20 minutes in the freezer. Using
light to medium pressure on the pusher, turn the unit on.
Stop as soon as meat is completely shredded/sliced.
Onion Chopping Blade
Peel, cut into ½ inch pieces. Pulse to chop, up to 1½ cups at
a time, until desired chop is reached.
Vegetables (cooked) Chopping Blade
Cut into ½ inch pieces; pulse to chop, up to 2 cups at a
time. Add cooking liquid; stock to process to a purée. Not
recommended for mashed potatoes.
Vegetables (uncooked)
Chopping Blade
To process: Peel as needed, cut into ½-inch pieces. Peel
celery with peeler to remove tough strings. Chop/process up
to 2 cups at a time.
Slicing/Shredding Disc
To slice or shred: Cut vegetables to fi t the feed tube. Using
medium pressure on the pusher, turn the unit on. Stop im-
mediately when all product has been sliced or shredded.

17
SMOOTHIES AND DRINKS
Breakfast Shake for the Road
Nutrition in a cup! Make this smoothie in the morning
for breakfast on the road.
Makes about 16 ounces
½ cup juice
½ cup lowfat yogurt
3 strawberries, hulled and halved
½ cup mango pieces (fresh or frozen, cut into ½-inch pieces)
1 tablespoon ground flax seeds (optional)
1 frozen banana, cut into ½-inch pieces
1. Put all ingredients in order listed into the mixing cup.
2. Using the blending shaft, blend until smooth, about 30 to 45 seconds.
3. Serve immediately.
Nutritional information per serving (8 ounces):
Calories 181 (11% from fat) • carb. 38g • pro. 4g • fat 2g • sat. fat 0g
• chol. 4mg • sod. 43mg • calc. 111mg • fiber 4g
Power Blast Protein Smoothie
Blend this for a post-workout pick-me-up.
Makes about 16 ounces
½ cup coconut milk
1
∕
3
cup vanilla or plain yogurt
2 tablespoon protein powder
1 banana, cut into ½-inch pieces
1 cup mango pieces, cut into ½-inch pieces
½ cup pineapple pieces, cut into ½-inch pieces
1. Put all ingredients in order listed into the mixing cup.
2. Using the blending shaft, blend until smooth, about 25 to 30 seconds.
3. Serve immediately.
Nutritional information per serving (8 ounces):
Calories 270 (40% from fat) • carb. 38g • pro. 6g • fat 13g • sat. fat 11g
• chol. 5mg • sod. 68mg • calc. 89mg • fiber 4g

18
Simple Fruit Smoothie
This recipe works great with any type of fruit or juice.
Makes about 16 ounces
½ cup pomegranate juice
½ banana, cut into 1-inch pieces
1½ cups mixed fruit, fresh or frozen
1. Put all ingredients in order listed into the mixing cup.
2. Using the blending shaft, blend until smooth, about 30 seconds.
3. Serve immediately.
Nutritional information per serving (8 ounces):
Calories 112 (4% from fat) • carb. 28g • pro. 1g • fat 1g • sat. fat 0g
• chol. 0mg • sod. 6mg • calc. 16mg • fiber 3g
Zucchini Spice Muffins
The shredding disc makes these muffins a breeze to make.
Makes 6 large muffins
nonstick cooking spray
½ cup toasted, cooked walnuts
1 medium zucchini (about 8 ounces), trimmed and cut to fit the
feed tube of the work bowl
½ cup packed light or dark brown sugar
1 large egg, lightly beaten
¾ cup unbleached, all-purpose flour
¼ teaspoon baking soda
¼ teaspoon baking powder
1 teaspoon ground cinnamon
¼ teaspoon ground cloves
¼ teaspoon ground nutmeg
¼ teaspoon ground ginger
½ teaspoon table salt
1
∕
3
cup vegetable oil
¾ teaspoon pure vanilla extract
1. Preheat oven to 375°F. Lightly coat a 6-cup regular muffin pan with
nonstick cooking spray; reserve.
2. Insert the chopping blade into the work bowl. Add the toasted nuts
and pulse until chopped. Remove and reserve.
3. Replace the chopping blade with the shredding disc. Shred the
zucchini, and then remove to squeeze as much of the liquid out of
it as possible (you should end up with about 2 cups of shredded
zucchini). Reserve in a large mixing bowl.

19
4. Add the brown sugar and egg to the shredded zucchini; mix to fully
combine. Add the remaining ingredients and mix to just combine.
Spoon evenly into prepared muffin cups.
5. Bake in the preheated oven for about 25 minutes, or until a cake
tester inserted comes out clean.
Nutritional information per muffin:
Calories 318 (54% from fat) • carb. 33g • pro. 5g • fat 20g • sat. fat 2g
• chol. 35mg • sod. 284mg • calc. 94mg • fiber 2g
Tapenade
A traditional French condiment. Serve alongside crackers or
a nice crusty bread.
Makes about 1 cup
1 large garlic clove
3 tablespoons packed fresh parsley
1½ cups pitted black olives (Kalamata or Niçoise work very well)
1
∕
3
cup pitted green olives
¼ cup capers, drained and rinsed
½ tablespoon fresh lemon juice
½ tablespoon Dijon-style mustard
½ teaspoon freshly ground black pepper
2 tablespoons extra virgin olive oil
1. Insert the chopping blade into the work bowl. Add the garlic and
parsley; process for about 5 to 10 seconds to chop. Scrape the work
bowl. Add the olives and capers; pulse 12 to 15 times to chop. Add
the lemon juice, mustard and pepper; process for 10 to 15 seconds,
stopping to scrape down the sides of the bowl as necessary.
2. With the motor running, add the olive oil through the feed tube and
process until a thick paste forms and is homogenous, about 20
seconds.
Nutritional information per serving (1 tablespoon):
Calories 31 (84% from fat) • carb. 1g • pro. 0g • fat 3g • sat. fat 0g
• chol. 0mg • sod. 186mg • calc. 14mg • fiber 1g

20
Hummus
This is your basic hummus. To change it up a bit, add a cooked
red pepper, or roasted beets or fresh herbs.
Makes about 2 cups
1 large garlic clove
1 can (15.5 ounce) chickpeas, drained and rinsed
6 tablespoons tahini
3 tablespoons fresh lemon juice
½ to ¾ teaspoon sea or kosher salt, or to taste
¼ teaspoon freshly ground black pepper
¼ cup extra virgin olive oil, more if desired
1
∕
3
cup water (plus more if needed)
1. Insert the chopping blade into the work bowl. Add garlic to bowl and
process for 10 to 15 seconds; scrape bowl. Add chickpeas, tahini,
lemon juice, salt and pepper; pulse 10 to 12 times. Add the oil and
process until almost completely combined. Add the water and process
until very smooth. If a thinner consistency is desired, add more water.
Adjust seasoning to taste.
Nutritional information per serving (2 tablespoons):
Calories 68 (41% from fat) • carb. 8g • pro. 2g • fat 3g • sat. fat 0g
• chol. 0mg • sod. 153mg • calc. 33mg • fiber 2g
Fresh Tomato and Corn Salsa
Be sure you know the freshness of your ingredients, for they can
dramatically change the taste of this salsa. You can always add more
flavors at the end of mixing.
Makes about 2 cups
1 large garlic clove
½ medium onion, cut into 1-inch pieces
½ jalapeño (or to taste, depending on the heat intensity of the
pepper), seeded and cut into ½-inch pieces
2 green onions, cut into 1-inch pieces
½ cup fresh cilantro
1 tablespoon fresh lime juice
¼ to ½ teaspoon sea or kosher salt
pinch freshly ground black pepper
pinch chili powder
2 medium tomatoes, cut into 1-inch pieces (you can substitute
1 cup grape or cherry tomatoes)
2
∕
3
cup frozen corn kernels, not defrosted
1. Insert the chopping blade in the work bowl. Add the garlic, onion,
jalapeño, green onion and cilantro to the bowl and pulse about 5
times, or until roughly chopped; scrape bowl. Add the lime juice, salt,
pepper, chili powder and tomatoes; pulse an additional 5 to 6 times.
Add the corn and pulse 3 to 4 times to combine.

21
2. Adjust seasoning to taste. Serve with warm tortilla chips.
Nutritional information per serving (2 tablespoons):
Calories 11 (6% from fat) • carb. 3g • pro. 0g • fat 0g • sat. fat 0g
• chol. 0mg • sod. 35mg • calc. 4mg • fiber 0g
Mayonnaise
You will be amazed with how easily you can make
homemade mayonnaise. It is best with raw egg yolks,
so seek out fresh local eggs.
Makes about 1 cup
¼ cup pasteurized liquid egg product (such as EggBeaters
®
);
you can also use raw egg yolks – be sure you use the freshest
eggs possible and from a trusted source
1 tablespoon fresh lemon juice
½ tablespoon white vinegar
½ tablespoon Dijon-style mustard
½ teaspoon granulated sugar
pinch sea or kosher salt
pinch ground white pepper
2
∕
3
cup vegetable oil
1. Put all ingredients, except for the oil, in the mixing cup in order listed.
Using the blending shaft, process until mixture begins to thicken. Be
sure to keep the metal blade completely submerged while blending.
Gradually add the oil, two tablespoons at a time. Continue processing
with a gentle up-and-down motion until thick, about 30 seconds
longer.
Nutritional information per serving
(1 tablespoon based on recipe with pasteurized liquid egg product):
Calories 83 (96% from fat) • carb. 0g • pro. 0g • fat 9g • sat. fat 1g
• chol. 0mg • sod. 27mg • calc. 1mg • fiber 0g
Creamy Champagne Vinaigrette
This delicious vinaigrette will become a favorite after the first taste.
Makes about 1 cup
1 garlic clove
1 small shallot, cut into ½-inch pieces
1 tablespoon Dijon-style mustard
¼ teaspoon kosher or sea salt
pinch freshly ground black pepper
2½ tablespoons champagne vinegar
¾ cup extra virgin olive oil
1. Put all ingredients in the blending cup except for the olive oil. Process
to break up the garlic and shallot. Add oil, ¼ cup at a time, and blend
until emulsified.

22
2. Let mixture blend an additional 30 seconds after all ingredients have
been added.
Nutritional information per serving (1 tablespoon):
Calories 93 (90% from fat) • carb. 1g • pro. 0g • fat 11g • sat. fat 2g
• chol. 0mg • sod. 57mg • calc. 1mg • fiber 0
Pesto
This is a traditional basil pesto but experiment with other herbs like
parsley and cilantro and nuts like walnuts.
Makes about ¾ cup
1½ ounces Reggiano Parmigiano, cut into ½-inch cubes
1
∕
3
cup toasted pine nuts (may substitute another nut like wal
nuts if not available)
2 garlic cloves
½ to ¾ teaspoon kosher salt
1½ cups packed fresh basil leaves
1
∕
3
cup extra virgin olive oil
1. Insert the chopping blade into the work bowl. Add the cheese to bowl
and pulse about 5 times to break up, and then process until finely
ground, about 15 to 20 seconds. Remove and reserve.
2. Add nuts to the work bowl. Pulse about 8 times until chopped;
remove and reserve with the cheese.
3. Add the garlic and salt to the work bowl; process for 5 seconds.
Scrape down the sides of the bowl and add the basil and half of the
olive oil. Pulse about 10 to 12 times for 10 to 15 seconds; scrape
bowl. With the motor running, add the remaining oil slowly through the
feed tube in a steady stream until blended. Add the reserved cheese
and nuts and process for 10 to 15 seconds to fully blend.
4. Transfer pesto to an airtight container. Pesto will keep in the
refrigerator for up to a week, or it may be frozen.
Nutritional information per serving (2 tablespoons):
Calories 144 (88% from fat) • carb. 2g • pro. 3g • fat 15g • sat. fat 3g
• chol. 5mg • sod. 282mg • calc. 73mg • fiber 1g
Classic Caesar Salad
An old favorite made fresh at home.
Makes 4 to 6 servings
Croutons:
2 cups crusty bread, cut into ½-inch cubes
1 tablespoon extra virgin olive oil
1 garlic clove, crushed
¼ teaspoon kosher salt

23
Salad and Dressing:
1 head romaine lettuce
2 ounces Parmigiano Reggiano
1 small garlic clove
3 to 4 anchovy fillets
2 tablespoons egg substitute
(may substitute 1 fresh, raw egg yolk; be sure you use the
freshest eggs possible and from a trusted source –
or use 2 tablespoons mayonnaise)
1 teaspoon Dijon-style mustard
2 teaspoons fresh lemon juice
2 teaspoons red wine vinegar
1 teaspoon Worcestershire sauce
¼ teaspoon freshly ground black pepper
1
∕
3
cup extra virgin olive oil
1. Preheat oven to 350°F. Line baking tray with aluminum foil. Toss bread
cubes together with olive oil, crushed garlic clove and salt. Pour onto
prepared baking tray and bake for about 10 to 12 minutes, tossing
croutons once during bake time. Croutons should be evenly golden.
Remove and reserve.
2. Clean lettuce and tear each leaf into bite size pieces. Dry well and
reserve in large salad bowl.
3. Insert the shredding disc into the work bowl. Shred the cheese;
remove and reserve.
4. Carefully remove the shredding disc and insert the chopping blade.
Add the garlic clove and process until finely chopped. Add anchovies,
egg substitute/yolk/mayonnaise, mustard, lemon juice, vinegar,
Worcestershire sauce and pepper to the work bowl. Process until well
blended. With machine running, slowly pour olive oil through the feed
tube in a steady stream so that dressing becomes emulsified.
5. Toss lettuce with reserved croutons, Parmesan and dressing. Serve
immediately.
Nutritional information per serving (based on 6 servings):
Calories 256 (68% from fat) • carb. 14g • pro. 7g • fat 20g • sat. fat 4g
• chol. 45mg • sod. 433mg • calc. 161mg • fiber 3g
Citrus-Dill Dressing
We love serving this over sliced cucumbers
(use the slicing disc for quick preparation).
Makes about 1 cup
½ tablespoon champagne vinegar (you may substitute sherry
vinegar)
1 small shallot, cut into ½-inch pieces
1 small garlic clove
1 tablespoon Dijon-style mustard
3 tablespoons fresh orange juice

24
1 tablespoon fresh lemon juice
1 tablespoon fresh lime juice
3 tablespoons fresh dill
¼ teaspoon kosher or sea salt
pinch freshly ground black pepper
½ cup extra virgin olive oil
1. Put all ingredients in the mixing cup except for the olive oil. Using the
blending shaft, blend to break up the garlic and shallot. Add oil, ¼ cup
at a time, and blend until emulsified. Let mixture blend an additional 30
seconds after all ingredients have been added.
Nutritional information per serving (based on 2 tablespoons)::
Calories 128 (94% from fat) • carb. 2g • pro. 0g • fat 14g • sat. fat 2g
• chol. 0mg • sod. 113mg • calc. 3mg • fiber 0g
Roasted Red Pepper and Tomato Sauce
This is a very versatile sauce. It is equally great over
grilled chicken or a bowl of pasta.
Makes about 4 cups
2 teaspoons extra virgin olive oil
1 medium onion, cut into ½-inch pieces
1 carrot, cut into ½-inch pieces
1 stalk celery, cut into ½-inch pieces
2 garlic cloves
1 teaspoon dried basil
1
∕
3
cup dry white wine, or vermouth
3 roasted red peppers, cut into ½-inch pieces
2 tablespoons tomato paste
2 cans (15 ounce) diced tomatoes, with juices
¾ teaspoon kosher or sea salt
¼ teaspoon freshly ground black pepper
1
∕
8
teaspoon crushed red pepper flakes, or to taste
1. Put the olive oil in a medium saucepan and set over medium heat.
Once hot, add the onion, carrot, celery, garlic and basil. Partially cover
and let cook until vegetables are softened but not browned, about 6 to
8 minutes. Add the wine/vermouth, stirring to deglaze the pan (picking
up the brown bits from the bottom of the pan and working into the
mixture); let cook until fully evaporated. Add roasted peppers, tomato
paste, tomatoes with juices, salt, pepper and red pepper flakes. Bring
to a boil, then reduce heat to allow to simmer, partially covered, for
about 35 to 40 minutes. Uncover and then simmer for an additional 15
to 20 minutes longer to thicken.
2. Using the blending shaft, blend sauce until puréed. If using a larger
saucepan, tilt the pan to the side away from you to ensure that the
protective guard of the blending shaft is fully submerged to prevent
splatter.
3. Taste and adjust seasonings as desired.

25
Nutritional information per serving (¼ cup):
Calories 29 (18% from fat) • carb. 5g • pro. 1g • fat 1g • sat. fat 0g
• chol. 0mg • sod. 216mg • calc. 15mg • fiber 1g
Mole Sauce
These are many varieties of mole sauce. Ours is full flavored
yet mild – perfect over chicken and rice.
Makes about 4 cups
2 tablespoons extra virgin olive oil
1 medium onion, chopped
3 garlic cloves, chopped
2 tablespoons chili powder
¼ teaspoon ground cinnamon
¼ teaspoon ground cumin
¼ teaspoon ground coriander
1 teaspoon kosher salt
1 corn tortilla, cut into small pieces
¼ cup toasted almonds
2 tablespoons natural peanut butter
2 cans (4 to 5 ounce) chopped green chilies
1 can (28 ounce) diced tomatoes, liquid drained
1½ cups chicken broth, reduced sodium
¼ cup raisins
2 tablespoons cocoa powder
1 teaspoon granulated sugar
1. Put the olive oil in a medium saucepan and set over medium heat.
Add the onion and sauté until soft and translucent, about 5 to 8
minutes. Reduce heat to low and add the garlic. Stir until coated
with oil and fragrant. Add the spices and salt. Cook until spices are
well distributed and the onion and garlic are coated, about 1 minute.
First stir in the tortilla, almonds and peanut butter, and then add the
remaining ingredients and stir to combine. Cover and bring to a boil
over medium heat. Reduce heat and let simmer for about 45 minutes,
loosely covered and stirring occasionally.
2. Once sauce has simmered, use the blending shaft to blend until
puréed. If using a larger saucepan, tilt the pan to one side away from
you to ensure that the protective guard of the blending shaft is fully
submerged to prevent splatter. If sauce is too thick, thin out with a bit
more broth.
3. Taste and adjust seasonings as desired.
Nutritional information per serving (2 tablespoons):
Calories 36 (48% from fat) • carb. 4g • pro. 1g • fat 2g • sat. fat 0g
• chol. 0mg • sod. 180mg • calc. 17mg • fiber 1g

26
Winter White Bean Soup
A rich and creamy soup, it will be sure to warm you
up on a cold winter day. If you do not have prosciutto,
bacon would work well in its place.
Makes about 6 cups
1 tablespoon extra virgin olive oil, divided
1 ounce prosciutto (2 thin slices), chopped
1 garlic clove, chopped*
1 medium onion, chopped*
1 celery stalk, chopped*
1 tablespoon dry white wine, or vermouth
2 cans (15 ounce) cannellini beans drained (or 1 pound dried,
soaked overnight)**
1 rosemary sprig
1 bay leaf
¼ to ½ teaspoon sea salt
pinch freshly ground black pepper
5 cups chicken or vegetable broth, reduced sodium
grated Parmesan for garnish
1. Heat ½ tablespoon oil over medium-high heat. Add prosciutto to
quickly fry. Once crispy, remove and reserve.
2. Add remaining oil and reduce heat to medium. Once hot, add garlic,
onion and celery. Sauté until softened, about 8 to 10 minutes. Add
the wine/vermouth, stirring to deglaze the pan (picking up the brown
bits from the bottom of the pan and working into the mixture); let cook
until fully evaporated. Add the beans, rosemary, bay leaf, salt and
pepper and stir to mix. Heat until beans are warmed through. Add
the broth and raise the heat to bring to a boil. Once boiling, reduce
heat to allow to simmer, partially covered, for about 60 to 75 minutes.
Remove the rosemary and bay leaf.
3. Using the blending shaft, blend sauce until puréed. If using a larger
saucepan, tilt the pan to one side away from you to ensure that the
protective guard of the blending shaft is fully submerged to prevent
splatter.
4. Taste and adjust seasonings as desired. Garnish with a sprinkling of
prosciutto and/or grated Parmesan.
* All chopping can be easily and quickly done in the food processor
attachment's work bowl.
** When using soaked, dried beans, you may have to add more broth and
a bit more salt as well.
Nutritional information per serving (based on 6 servings):
Calories 321 (14% from fat) • carb. 44g • pro. 24g • fat 5g • sat. fat 1g
• chol. 3mg • sod. 873mg • calc. 142mg • fiber 16g

27
Spring Asparagus Leek Soup
Makes about 8 cups
2 tablespoons unsalted butter
2 garlic cloves, chopped*
2 medium leeks, white and light green parts only, washed well
and sliced*
2 large bunches asparagus (about 2 to 2½ pounds), rough
ends trimmed and cut into 2-inch pieces (tips removed and
reserved)* – optional (see note in step 3)
1 large red potato (about 8 ounces), peeled and sliced, held in
water to prevent oxidation*
4 tablespoons dry white wine or cognac
1 to 1½ teaspoons kosher salt, to taste
¼ teaspoon freshly ground black pepper
5 cups vegetable broth (the more clear the broth, the greener
the soup will be)
1 teaspoon fresh lemon juice
crème fraîche for garnish
chopped chives for garnish
1. Put the butter in a medium saucepan and set over medium heat. Add
the garlic and leeks; stir until you hear a slight sizzle and then cover
pan to sweat the leeks for about 5 to 10 minutes, until they are very
soft.
2. Add the asparagus and potato to the pan. Stir to coat all vegetables
and sauté until soft. Pour in white wine or cognac and stir until
completely reduced. Add salt and pepper and stir in the vegetable
broth. Bring mixture to a boil and then reduce to a simmer. Simmer
until all vegetables are very tender, about 20 to 25 minutes.
3. While soup is simmering, steam the asparagus tips separately, about
5 to 8 minutes until crisp tender. Shock tips in ice water to maintain
a bright green color. Once cool, slice tips thinly lengthwise to be
used for garnish. (Note: This step is optional, but makes for a great
presentation.)
4. Once soup vegetables are tender, use the blending shaft and blend
soup until puréed. If using a larger saucepan, tilt the pan to the side
away from you to ensure that the protective guard of the blending
shaft is fully submerged to prevent splatter.
5. Stir in lemon juice. Taste and adjust seasonings as desired.
6. Serve immediately garnishing with a dollop of crème fraîche, some
chopped chives and asparagus tips.
* All chopping and slicing can be easily and quickly done in the food
processor attachment's work bowl.
Nutritional information per serving (based on 6 servings):
Calories 97 (26% from fat) • carb. 13g • pro. 5g • fat 35g • sat. fat 2g
• chol. 8mg • sod. 650mg • calc. 45mg • fiber 3g

28
Summer Zucchini Soup
A great way to use up that surplus of summer garden zucchini – serve
cold or warm!
Makes about 6 cups (without cream)
1 tablespoon unsalted butter or extra virgin olive oil
2 medium leeks, white and light green parts, sliced*
1 medium celery stalk, cut into small dice*
2 garlic cloves, crushed
4 medium zucchini (about 2 pounds), sliced*
8 ounces white (waxy) potato, peeled and cut into 2- inch pieces
1½ teaspoons kosher salt, divided
¼ teaspoon freshly ground black pepper
½ cup dry white wine
3½ cups chicken broth, reduced sodium
2 tablespoons fresh mint leaves (about 6 medium leaves)
2 tablespoons fresh basil leaves (about 3 to 4 large leaves)
¼ cup heavy cream (optional)
1. Put the butter in a large saucepan over medium heat. Once the butter
melts add the leeks, celery and garlic. Stir over medium heat until
vegetables soften, about 8 to 10 minutes.
2. Once soft, add the zucchini and potato with 1 teaspoon of the salt and
the peppers; stir ingredients together until well coated. Once coated,
add the white wine. Simmer until wine is just about evaporated. Add
the broth and turn the heat up to bring mixture to a boil. Once the
soup comes to a boil, reduce the heat in order to maintain a simmer.
Simmer until all vegetables are tender, about 20 to 25 minutes.
3. Once all vegetables are tender, add the fresh herbs and blend using
the blending shaft. To help facilitate blending, tilt pot to the side away
from you to ensure that the protective guard of the blending shaft is
submerged. Blend until mixture is completely puréed.
4. Taste and adjust seasoning, add remaining salt to taste if necessary.
5. If using optional cream, add at the very end of blending. Stir in cream
and simmer soup for an additional 5 to 10 minutes before seasoning.
*All chopping and slicing can be easily and quickly done in the food
processor attachment's work bowl.
Nutritional information per serving (based on 6 servings without cream):
Calories 109 (17% from fat) • carb. 16g • pro. 4g • fat 2g • sat. fat 1g
• chol. 5mg • sod. 911mg • calc. 50mg • fiber 3g

29
Autumn Carrot-Ginger Soup
The ginger gives this soothing soup a nice kick.
Makes about 5 cups
2 tablespoons extra virgin olive oil
2 small shallots, chopped*
1 tablespoon finely chopped fresh ginger*
1 teaspoon kosher or sea salt, divided
½ teaspoon freshly ground black pepper, divided
2 pounds carrots, sliced*
½ teaspoon ground cumin
pinch ground cloves
¼ teaspoon ground cinnamon
5 cups vegetable or chicken broth, reduced sodium
½ teaspoon fresh lemon juice
1. Heat oil in a large saucepan over medium-low heat. Once hot, add
the shallots, ginger and a pinch each of the salt and pepper. Sauté
until vegetables are softened, about 5 minutes. Add the carrots and
raise the heat to medium/medium-high. Sauté for 2 to 3 minutes, or
until carrots are heated through and just starting to get tender. Add
the remaining salt and pepper and the spices and stir to mix with the
carrots to fully coat. Add the broth and bring to a boil. Reduce heat to
let soup simmer, uncovered, for about 25 to 30 minutes (carrots should
be completely tender).
2. Stir in the lemon juice and blend using the blending shaft. Use an
up-and-down motion until ingredients are smooth and completely
combined. To help facilitate blending, tilt pot to one side away from
you so the protective cover of the blending shaft is fully submerged.
3. Taste and adjust seasonings as desired.
*These can be quickly chopped or sliced in the food processor
attachment.
Nutritional information per serving (based on 6 servings):
Calories 161 (32% from fat) • carb. 25g • pro. 3g • fat 6g • sat. fat 1g
• chol. 0mg • sod. 1133mg • calc. 88mg • fiber 5g

30
Compound Butters
Compound butters are very versatile and add a nice touch to a number
of dishes. The sweeter butters are delicious when spread on toast or
served with pancakes, while the more savory ones can enhance the
flavor of a steak hot off the grill, or finish a soup before serving. Our list
is only a suggestion – use your imagination and play around with your
favorite flavors.
Orange-Maple
Makes ½ cup
8 tablespoons unsalted GOOD quality butter, like Plugra or
Kerrygold, room temperature
1½ tablespoon orange zest
2 tablespoons pure maple syrup
1. Put butter and zest into the work bowl fitted with the chopping blade.
Process until full combined, about 30 seconds. Scrape bowl as
necessary. With unit running, add the maple syrup through the feed
tube and allow to process until fully combined, about 30 seconds.
2. Remove butter from bowl and place on a sheet of waxed paper. With
the aid of the paper, form the butter into a log. Roll and wrap well in
plastic. Butter can either be refrigerated or frozen.
Nutritional information per serving (1 teaspoon):
Calories 38 (87% from fat) • carb. 1g • pro. 0g • fat 4g • sat. fat 2g
• chol. 10mg • sod. 0mg • calc. 2mg • fiber 0g
Nut Butter
Makes ½ cup
½ cup toasted nuts (cashews and walnuts are excellent choices)
8 tablespoons unsalted GOOD quality butter, like Plugra or
Kerrygold, room temperature
pinch sea salt
pinch ground cinnamon (optional)
1. Put nuts into the work bowl fitted with the chopping blade. Pulse a few
times to chop. Add butter, salt and cinnamon, if using. Process until
fully combined, about 30 seconds. Scrape bowl as necessary.
2. Remove butter from bowl and place on a sheet of waxed paper. With
the aid of the paper, form the butter into a log. Roll and wrap well in
plastic. Butter can either be refrigerated or frozen.
Nutritional information per serving (1 teaspoon; based on cashew butter):
Calories 34 (99% from fat) • carb. 0g • pro. 0g • fat 4g • sat. fat 2g
• chol. 10mg • sod. 11mg • calc. 0mg • fiber 0g

31
Lemon-Thyme
Makes ½ cup
8 tablespoons unsalted GOOD quality butter, like Plugra or
Kerrygold, room temperature
1½ to 2 teaspoons fresh thyme leaves
1½ to 2 tablespoons lemon zest
pinch sea salt (optional)
1. Put all ingredients into the work bowl fitted with the chopping blade.
Process until full combined, about 30 seconds. Scrape bowl as
necessary.
2. Remove butter from bowl and place on a sheet of waxed paper. With
the aid of the paper, form the butter into a log. Roll and wrap well in
plastic. Butter can either be refrigerated or frozen.
Nutritional information per serving (1 teaspoon):
Calories 34 (99% from fat) • carb. 0g • pro. 0g • fat 4g • sat. fat 2g
• chol. 10mg • sod. 0mg • calc. 1mg • fiber 0g
Bacon-Sage
Makes about ½ cup
2 slices bacon, diced and cooked through (about 2 tablespoons
bacon crumbles)
3 to 4 fresh sage leaves
8 tablespoons unsalted GOOD quality butter, like Plugra or
Kerrygold, room temperature
pinch kosher salt
pinch freshly ground black pepper
1. Put the bacon and sage leaves in the prep bowl fitted with the
chopping blade. Pulse until evenly and finely chopped. Add the butter,
salt and pepper and process until combined.
2. Remove butter from bowl and place on a sheet of waxed paper. With
the aid of the paper, form the butter into a log. Roll and wrap well in
plastic. Butter can either be refrigerated or frozen.
Nutritional information per serving (1 teaspoon):
Calories 48 (96% from fat) • carb. 0g • pro. 0g • fat 5g • sat. fat 3g
• chol. 12mg • sod. 37mg • calc. 1mg • fiber 0g

32
Berry Fool
A traditional British dessert, fool is great anytime of the year, but is a real
treat when summer berries are at their peak.
Makes about 4 to 5 cups
2 cups mixed berries (strawberries, raspberries, blueberries)
1 tablespoon granulated sugar
2 cups heavy cream, chilled
2 tablespoons confectioners’ sugar
½ teaspoon pure vanilla extract
1. Put the berries and granulated sugar into the mixing cup. Using the
blending shaft, purée, using an up-and-down motion, until almost fully
puréed; reserve.
2. Put the remaining ingredients into a medium to large mixing bowl.
Using the whisk attachment, whisk until medium peaks form, about 1
minute. Fold in berry mixture.
3. Serve immediately for the best texture (fool will only stay in good form
for about 1 hour maximum).
Nutritional information per serving (½ cup):
Calories 231 (85% from fat) • carb. 8g • pro. 0g • fat 20g • sat. fat 14g
• chol. 80mg • sod. 0mg • calc. 4mg • fiber 1g
Triple Chocolate Shake
The ultimate chocolate dessert.
Makes about 2 cups
2 cups premium chocolate ice cream
½ tablespoon cocoa powder
1½ tablespoons chocolate syrup
¾ cup milk (any type of milk will do, whole, reduced-fat or skim)
Garnishes: whipped cream, chocolate shavings or cocoa
powder
1. Put all ingredients into the mixing cup in the order listed. Using
the blending shaft, blend, using an up-and-down motion, until fully
combined, about 30 to 40 seconds.
2. Top with whipped cream and chocolate shavings or cocoa powder.
Nutritional information per serving (1 cup; based on 2% milk):
Calories 597 (55% from fat) • carb. 55g • pro. 11g • fat 37g • sat. fat 22g
• chol. 233mg • sod. 142mg • calc. 339mg • fiber 3g

33
LIMITED THREE-YEAR WARRANTY
(U.S. and CANADA only)
This warranty is available to consumers only. You are a consumer if you
own a Cuisinart
®
Smart Stick
®
PowerTrio
™
Hand Blender that was
purchased at retail for personal, family or household use. Except as
otherwise required under applicable law, this warranty is not available to
retailers or other commercial purchaser or owners.
We warrant that your Cuisinart
®
Smart Stick
®
PowerTrio
™
Hand Blender
will be free of defects in materials and workmanship under normal home
use for 3 years from the date of original purchase.
We recommend that you visit our website, www.cuisinart.com, for a fast,
efficient way to complete your product registration. However, product
registration does not eliminate the need for the consumer to maintain the
original proof of purchase in order to obtain the warranty benefits. In the
event that you do not have proof of purchase date, the purchase date for
purposes of this warranty will be the date of manufacture.
If your Cuisinart
®
Smart Stick
®
PowerTrio
™
Hand Blender should prove to
be defective within the warranty period, we will repair it, or if we think
necessary, replace it. To obtain warranty service, simply call our toll-free
number 1-800-726-0190 for additional information from our Customer
Service Representatives or send the defective product to Customer
Service at
Cuisinart
7475 North Glen Harbor Blvd.
Glendale, AZ 85307.
To facilitate the speed and accuracy of your return, please enclose
$10.00 for shipping and handling of the product.
Please pay by check or money order (California residents need only
supply proof of purchase and should call 1-800-726-0190 for shipping
instructions).
NOTE: For added protection and secure handling of any Cuisinart
product that is being returned, we recommend you use a traceable,
insured delivery service. Cuisinart cannot be held responsible for
in-transit damage or for packages that are not delivered to us. Lost and/
or damaged products are not covered under warranty.
Please be sure to include your return address, daytime phone number,
description of the product defect, product model # (located on bottom of
product), original date of purchase, and any other information pertinent
to the product’s return.
CALIFORNIA RESIDENTS ONLY
California law provides that for In-Warranty Service, California residents
have the option of returning a nonconforming product
(A) to the store where it was purchased or
(B) to another retail store that sells Cuisinart products of the same type.
The retail store shall then, at its discretion, either repair the product,
refer the consumer to an independent repair facility, replace the product,
or refund the purchase price less the amount directly attributable to the
consumer’s prior usage of the product. If either of the above two options
does not result in the appropriate relief to the consumer, the consumer
may then take the product to an independent repair facility if service or
repair can be economically accomplished. Cuisinart and not the
consumer will be responsible for the reasonable cost of such service,
repair, replacement, or refund for nonconforming products under
warranty.

34
California residents may also, according to their preference, return
nonconforming products directly to Cuisinart for repair, or if necessary,
replacement, by calling our Consumer Service Center toll-free at
1-800-726-0190.
Cuisinart will be responsible for the cost of the repair, replacement, and
shipping and handling for such products under warranty.
BEFORE RETURNING YOUR CUISINART® PRODUCT
If you are experiencing problems with your Cuisinart
®
product, we
suggest that you call our Cuisinart
®
Service Center at 1-800-726-0190
before returning the product to be serviced. If servicing is needed, a
Representative can confirm whether the product is under warranty and
direct you to the nearest service location.
Your Cuisinart
®
Smart Stick
®
PowerTrio
™
Hand Blender
has been
manufactured to the strictest specifications and has been designed for use
only in 120 volt outlets and only with authorized accessories and replacement
parts. This warranty expressly excludes any defects or damages caused by
attempted use of this unit with a converter, as well as use with accessories,
replacement parts or repair service other than those authorized by Cuisinart.
This warranty does not cover any damage caused by accident, misuse,
shipment or other than ordinary household use. This warranty excludes all
incidental or consequential damages. Some states do not allow the exclusion
or limitation of these damages, so these exclusions may not apply to you. You
may also have other rights, which vary from state to state.
Important: If the nonconforming product is to be serviced by someone
other than Cuisinart's Authorized Service Center, please remind the
servicer to call our Consumer Service Center at 1-800-726-0190 to ensure
that the problem is properly diagnosed, the product is serviced with the
correct parts, and the product is still under warranty.

35
NOTES:

Trademarks or service marks of third
parties referred to herein are the
trademarks or service marks of their
respective owners.
©2015 Cuisinart
150 Milford Road
East Windsor, NJ 08520
Printed in China
15CE016635
G IB-10608-ESP
INSTRUCCIONES Y
LIBRO DE RECETAS
Para su seguridad y para disfrutar plenamente de este producto,
siempre lea las instrucciones cuidadosamente antes de usarlo.
Licuadora de mano multifunción Smart Stick
®
PowerTrio
™
CSB-80


3
MEDIDAS DE SEGURIDAD
IMPORTANTES
Siempre que use aparatos eléctricos, debe tomar precauciones
básicas de seguridad, incluso las siguientes:
1. LEA TODAS LAS INSTRUCCIONES.
2. Desconecte el aparato cuando no está en uso, antes de
instalar/sacar piezas y antes de limpiarlo. Para desconectar
el cable de la toma de corriente, agárrelo por la clavija;
nunca jale el cable.
3. Para reducir el riesgo de electrocución, no ponga la base, el
cable o la clavija en agua u otro líquido. Sólo la varilla
desmontable y algunas otras partes de este aparato son
sumergibles. No sumerja ninguna otra parte del aparato en agua
u otro líquido. Si el aparato cayera en líquido, desconéctelo y
luego retírelo del líquido; no trate de alcanzar el aparato sin
haberlo desconectado.
4. Este aparato no debe ser usado por niños. Supervise el uso de
este aparato cuidadosamente cuando esté usado por o cerca
de niños.
5. Evite el contacto con las piezas móviles.
6. Para evitar el riesgo de heridas y/o daños al aparato, mantenga
los dedos, cabello, ropa, espátulas y otros utensilios lejos de
los accesorios y del recipiente durante el funcionamiento. Se
podrá usar una espátula de goma, siempre que el aparato
esté apagado.
7. No utilice este aparato si el cable o la clavija estuviesen
dañados, después de que hubiese funcionado mal o que se
hubiese caído o si estuviese dañado; regréselo a un centro
de servicio autorizado para su revisión, reparación o ajuste.
8. Retire la varilla desmontable del aparato antes de lavar las
cuchillas o la varilla.
9. Las cuchillas son MUY FILOSAS; manipúlelas con sumo
cuidado al retirar, instalar o limpiarlas. Ejerza el mismo
cuidado al instalar/retirar la cuchilla picadora o el disco
reversible en el bol del accesorio procesador.
10. Para reducir el riesgo de salpicadura o quemadura al mezclar
líquidos, especialmente líquidos calientes, utilice un recipiente
alto o procese pequeñas cantidades de alimentos a la vez.
11. Para reducir el riesgo de heridas, asegúrese de que el accesorio
procesador esté debidamente ensamblado antes de instalar
la cuchilla.
12. Asegúrese de que la tapa del accesorio procesador esté
debidamente cerrada antes de encender el aparato. No intente
abrir la tapa hasta que la cuchilla esté completamente inmóvil.

4
13. Averigüe que no hay objetos extraños en el bol antes de usarlo.
14. El uso de accesorios no recomendados por Cuisinart presenta
un riesgo de incendio, electrocución o herida.
15. No lo utilice en exteriores, ni para ningún otro fin que no sea el
indicado.
16. No permita que el cable cuelgue del borde de la encimera o de
la mesa, ni que haga contacto con superficies calientes.
17. Asegúrese de que el aparato esté apagado y desconectado, y de
que el motor se haya detenido completamente, antes de instalar/
retirar accesorios o limpiar el aparato.
18. La potencia nominal máxima (400 vatios) está basada en el
accesorio que consume más electricidad (el accesorio
procesador).
19.
No haga funcionar el aparato bajo o adentro de un armario.
Siempre desconecte el aparato antes de guardarlo en un
armario. Dejar el aparato conectado presenta un riesgo de
incendio, especialmente si éste toca las paredes o la puerta
del armario cuando cierra.
GUARDE ESTAS INSTRUCCIONES
PARA USO DOMÉSTICO
SOLAMENTE
AVISO
El cable de este aparato está dotado de una clavija polarizada (una
pata es más ancha que otra). Como medida de seguridad, se podrá
enchufar de una sola manera en la toma de corriente polarizada. Si
no entrara en la toma de corriente, inviértala.
Si aún no entrara completamente, comuníquese con un electricista.
No intente ir en contra de esta función de seguridad.

5
ÍNDICE
Medidas de seguridad importantes . . . . . . . . . . . . . . . . . . . . . . . . . 3
Instrucciones de desembalaje . . . . . . . . . . . . . . . . . . . . . . . . . . . . . 5
Piezas y características . . . . . . . . . . . . . . . . . . . . . . . . . . . . . . . . . . . 6
Ensamblaje . . . . . . . . . . . . . . . . . . . . . . . . . . . . . . . . . . . . . . . . . . . . 8
Accesorio licuador . . . . . . . . . . . . . . . . . . . . . . . . . . . . . . . . . . 8
Accesorio procesador . . . . . . . . . . . . . . . . . . . . . . . . . . . . . . . 8
Disco rebanador/triturador . . . . . . . . . . . . . . . . . . . . . . . . . . . 9
Cuchilla picadora . . . . . . . . . . . . . . . . . . . . . . . . . . . . . . . . . . 10
Accesorio batidor . . . . . . . . . . . . . . . . . . . . . . . . . . . . . . . . . 10
Funcionamiento . . . . . . . . . . . . . . . . . . . . . . . . . . . . . . . . . . . . . . . . 11
Cómo licuar . . . . . . . . . . . . . . . . . . . . . . . . . . . . . . . . . . . . . . 11
Cómo procesar alimentos . . . . . . . . . . . . . . . . . . . . . . . . . . . 11
Cómo batir . . . . . . . . . . . . . . . . . . . . . . . . . . . . . . . . . . . . . . . 12
Limpieza y mantenimiento . . . . . . . . . . . . . . . . . . . . . . . . . . . . . . . 12
Consejos útiles . . . . . . . . . . . . . . . . . . . . . . . . . . . . . . . . . . . . . . . . 13
Pautas de uso del accesorio procesador . . . . . . . . . . . . . . . . . . . . 16
Recetas . . . . . . . . . . . . . . . . . . . . . . . . . . . . . . . . . . . . . . . . . . . . . . 17
Garantía . . . . . . . . . . . . . . . . . . . . . . . . . . . . . . . . . . . . . . . . . . . . . . 33
DESEMBALAJE
Coloque la caja de su licuadora de mano multifunción Smart Stick
®
PowerTrio
™
de Cuisinart
®
sobre una superficie llana y segura. Abra la
caja y retire el inserto de cartón ubicado encima del aparato. Deslice
el aparato fuera de la caja. Retire el manual de instrucciones y otros
folletos de la caja y regrese el inserto adentro de la caja. Le
aconsejamos que guarde el material de embalaje.
NOTA: la cuchilla licuadora es muy filosa.
Le aconsejamos que limpie el aparato con un paño limpio y
ligeramente humedecido antes del primer uso. Seque todas las piezas
con un paño suave y absorbente. Limpie todas las piezas según se
describe en la sección "Limpieza y mantenimiento". Lea
cuidadosamente las instrucciones antes de usar el aparato.

6
PIEZAS Y CARACTERÍSTICAS
1. Botón de encendido/apagado: permite encender el aparato
al toque de un botón. Simplemente mantenga oprimido el
botón para licuar/procesar o pulsar. El aparato se apagará al
soltar el botón.
2. Botón de desbloqueo:
Evita poner el aparato en marcha sin querer. Siempre lo deberá
presionar para que el motor se encienda.
3. Cómoda empuñadura: permite controlar fácilmente la
licuadora de mano.
4. Bloque-motor
5. Accesorio licuador: fácil de instalar sobre el bloque-motor.
El protector de cuchillas de acero inoxidable evita las
salpicaduras. Para limpiar: simplemente oprima el botón de
liberación ubicado en la parte trasera del aparato para liberar
la varilla.
6. Accesorio batidor: fácil de instalar sobre el bloque-motor.
Este accesorio es ideal para montar claras y preparar crema
batida y otras delicias.
a. Caja de engranajes desmontable: conectada al batidor.
7. Accesorio procesador:
a. Bol de 4 tazas (945 ml) con boca de llenado y empujador;
trabaja como una mini-procesadora de alimentos. El
accesorio procesador se conecta al bloque-motor de la
misma manera que el accesorio batidor y el accesorio
licuador.
b. Úselo con la cuchilla de acero inoxidable para picar los
alimentos.
c. Úselo con el disco rebanador/triturador reversible para
rebanar/cortar en rodajas y triturar/rallar.
8. Vaso medidor: vaso de 2 tazas (475 ml), apto para
microondas y lavavajillas. Ideal para licuar bebidas, batidos,
aderezos y mucho más. Cuenta con un pico anti-goteo y es
fácil de agarrar.
7
PIEZAS Y
CARACTERÍSTICAS
1
4
3
2
6
6a
8
5
7a.
7c.
7b.
8
ENSAMBLAJE
ACCESORIO LICUADOR
1. Haga coincidir la varilla con el
bloque-motor (la empuñadura) y
conecte ambas piezas, presionando
hasta que encajen. Puede resultar
útil oprimir el botón de liberación
de la varilla.
2. Conecte el cable a una toma de
corriente.
ACCESORIO PROCESADOR
1. Conecte el bloque-motor
a la tapa del accesorio
procesador.
2. Haga coincidir el eje de
la tapa del accesorio
procesador con el árbol
del motor.
3. Una vez alineadas,
conecte ambas piezas,
presionando hasta que
encajen.
9
DISCO REBANADOR/TRITURADOR
1. Coloque el adaptador para
disco sobre el eje en el centro
del bol.
2. Instale el disco rebanador
triturador sobre el adaptador,
el lado deseado apuntando
hacia arriba.
Para rebanar/cortar en rodajas:
instale el disco sobre el
adaptador, con lado rebanador
apuntando hacia arriba.
Para triturar/rallar: instale el
disco sobre el adaptador, con
el lado rallador apuntando
hacia arriba.
MANIPULE EL DISCO CON
SUMO CUIDADO; SUS
FILOS SON MUY
CORTANTES.
3. Coloque la tapa (conectada al
bloque-motor) sobre el bol y gire
en sentido horario para sujetar.
4. Conecte el cable a una toma
de corriente.
10
CUCHILLA PICADORA
1. Instale la cuchilla sobre el eje en el centro del bol.
2. Coloque la tapa (conectada al bloque-motor) sobre el bol y gire
en sentido antihorario para sujetar.
3. Conecte el cable a una toma de corriente.
ACCESORIO BATIDOR
1. Haga coincidir la caja de
engranaje con el bloque-motor
y conecte ambas piezas,
presionando hasta que encajen.
Puede resultar útil oprimir el
botón de liberación de la varilla.
Nota: la caja de engranaje es
desmontable.

11
FUNCIONAMIENTO
CÓMO LICUAR
La cuchilla ha sido diseñada para procesar una gran variedad de
alimentos, incluso aderezos, bebidas en polvo, salsas, sopas, batidos/
licuados y mucho más.
La cuchilla licua los alimentos sin incorporar mucho aire a la mezcla.
Un movimiento suave hacia arriba y abajo es todo lo que necesita
para preparar las más sabrosas recetas. Para evitar las salpicaduras,
procure no sacar la cuchilla del líquido durante el funcionamiento.
Si es necesario, incline ligeramente la cacerola o el recipiente lejos de
su cuerpo para que el protector de cuchillas quede sumergido.
1. Sumerja la varilla en la mezcla.
2. Mantenga oprimido el botón de encendido. Oprima y mantenga
oprimido el botón de velocidad deseado. Mantenga oprimido el
botón de desbloqueo arriba de la empuñadura para encender el
motor. Una vez encendido el motor, puede soltar el botón de
desbloqueo, pero deberá seguir oprimiendo el botón de
velocidad. Nota: también puede hacer el contrario, oprimiendo
primero el botón de velocidad y luego el botón de desbloqueo.
No presione el botón de velocidad durante más de 60 segundos
seguidos.
3. No haga funcionar el aparato durante más de 60 segundos
seguidos.
4. Desconecte el aparato inmediatamente después del uso.
PRECAUCIÓN: NO ACERQUE LOS DEDOS A LA CUCHILLA.
DESCONECTE EL APARATO ANTES DE DESALOJAR
ALIMENTOS TRABADOS EN LA CUCHILLA.
FUNCIÓN DE PULSO
Para pulsar, manténgalo oprimido mientras presiona repetidamente el
botón de velocidad deseado.
CÓMO PROCESAR ALIMENTOS
COMO PICAR
1. Coloque el bol del accesorio procesador sobre una superficie
plana y segura, como una encimera.
2. Coloque los ingredientes en el bol. Asegúrese de que los
alimentos estén cortados en pedazos pequeños (½–1
pulgada/1.5–2.5 cm) y cerciórese de no sobrellenar el bol.
3. Cierre la tapa del bol, asegurándose de que esté debidamente
puesta.
4. Mantenga oprimido el botón de encendido.
Nota: debido a la potencia del motor, le recomendamos
que sostenga el bol con una mano durante el
funcionamiento.

12
5. Suelte el botón de encendido para apagar el motor.
6.
ESPERE HASTA QUE LA CUCHILLA ESTE INMÓVIL, y
luego desconecte el cable de la toma de corriente.
7. Retire la tapa (junta con el bloque-motor) del bol.
8. Retire cuidadosamente la cuchilla, agarrándola por la parte de
plástico.
NUNCA TOQUE LOS FILOS DE LA CUCHILLA.
9. Retire los alimentos del bol con una espátula.
Nota: nunca haga funcionar el accesorio procesador con
el bol vacío.
CÓMO REBANAR/TRITURAR
El disco rebanador/triturador reversible puede rebanar/cortar en
rodajas y triturar/rallar una gran variedad de frutas, vegetales y
quesos. Véase la sección "Consejos para rebanar/triturar" en la
página 15. Véase las instrucciones de ensamblaje en la página 9.
1. Coloque el bol del accesorio procesador sobre una superficie
plana y segura, como una encimera. Instale el disco, el lado
que desea usar apuntando hacia arriba.
2. Introduzca los alimentos en la boca de llenado. Introduzca el
empujador en ésta. Empuje los alimentos, usando presión
moderada, con una mano mientras enciende el aparato con la
otra mano.
3. Rebanar/triturar alimentos toma tan sólo segundos; apague ni
bien los alimentos estén rebanados/triturados. Espere hasta que
el disco esté totalmente inmóvil antes de abrir la tapa.
SIEMPRE UTILICE EL EMPUJADOR PARA EMPUJAR LOS
ALIMENTOS EN LA BOCA DE LLENADO. NUNCA EMPUJE
LOS ALIMENTOS CON SUS DEDOS O UNA ESPÁTULA.
4. Desconecte el cable de la toma de corriente. Abra la tapa y retire
el disco, agarrando el adaptador por la parte plana y alzando
mientras sostiene el bol con la otra mano.
CÓMO BATIR
1. Conecte el accesorio batidor al bloque-motor. (véase las
instrucciones de ensamblaje en la página 10).
2. Conecte el cable a una toma de corriente
3. Sumerja el batidor en la mezcla.
4. Mantenga oprimido el botón de encendido. El aparato se apagará
al soltar el botón.
LIMPIEZA Y MANTENIMIENTO
LICUADORA DE MANO
Limpie el bloque-motor y la varilla cuidadosamente después de cada
uso.
Retire el accesorio licuador del bloque-motor. Limpie el bloque-
motor con una esponja o un paño ligeramente humedecido. No utilice

13
limpiadores abrasivos, los cuales podrían dañarlo. Lave la varilla a
mano o en el lavavajillas, con un detergente suave. Tenga mucho
cuidado al manipular la varilla; la cuchilla es muy filosa.
ACCESORIO PROCESADOR
Le recomendamos que enjuague el bol, la cuchilla, el disco y la tapa
inmediatamente después del uso, ya que alimentos secos podrían
dificultar la limpieza. No sumerja la tapa del bol en agua y no la meta
al lavavajillas. Lave la cuchilla, el disco, el adaptador, el empujador
y el bol en agua jabonosa tibia. Enjuague y seque las piezas. Limpie
la parte inferior de la tapa con una esponja o un paño ligeramente
humedecido para eliminar los residuos de alimentos. Lave la cuchilla
cuidadosamente. No la deje en agua jabonosa, donde la pueda
perder de vista.
El bol, la cuchilla, el disco y el empujador también pueden lavarse en
el nivel superior del lavavajillas. Tenga cuidado al sacar la cuchilla del
lavavajillas. Limpie el bloque-motor y la parte superior de la tapa con
una esponja o un paño ligeramente húmedo. Seque inmediatamente.
Nunca sumerja el bloque-motor o la tapa en agua u otro líquido.
El accesorio procesador ha sido diseñado para USO DOMÉSTICO
SOLAMENTE.
ACCESORIO BATIDOR
Separe el accesorio batidor del bloque-motor. Separe el batidor de la
caja de engranajes, jalando cada pieza en dirección opuesta. Limpie
la caja de engranajes con un paño humedecido. Lave el batidor en
agua jabonosa tibia, o en el lavavajillas.
No sumerja la caja de engranajes en agua u otro líquido.
Toda reparación, excepto la limpieza y el mantenimiento por parte del
usuario, debe ser llevada a cabo por personal de servicio autorizado.
CONSEJOS ÚTILES
ACCESORIO LICUADOR
• Asegúrese de que el protector de cuchillas esté completamente
sumergido antes de empezar a licuar.
• Licue las sopas directamente en la cacerola/olla, usando un
movimiento suave hacia arriba y abajo, hasta obtener la
consistencia deseada.
• Cuando licue directamente en la cacerola/olla, incline ligeramente
la cacerola/olla para evitar las salpicaduras.
• Si usa cacerolas/ollas antiadherentes, no permita que la licuadora
haga contacto con el revestimiento antiadherente.
• Cuando licue directamente en el vaso, por ejemplo para preparar
batidos de frutas, corte los alimentos en trocitos de ½ pulgada
(1.5 cm).

14
• Utilice la licuadora de mano para preparar salsas suaves y
homogéneas.
• No sumerja el bloque-motor en agua u otro líquido.
• Cuando licue directamente en el vaso, siempre agregue los
ingredientes líquidos primero, salvo indicación contraria en la receta.
• La licuadora de mano es perfecta para espumar la leche, para
servir con capuchino o café con leche. Simplemente caliente la
leche en una cacerola, y luego lícuela suavemente, pulsando y
manteniendo la cuchilla sumergida.
• No deje el aparato adentro de una cacerola/olla caliente.
• No licue alimentos que contengan materias duras como hueso,
pepas, etc.; esto podría dañar las cuchillas.
• No sobrellene los recipientes en los cuales licua; la mezcla se
expande durante el licuado y puede desbordarse.
• Para incorporar aire a una mezcla, mantenga la cuchilla justo
debajo de la superficie.
• Un movimiento suave hacia arriba y abajo es la mejor manera de
conseguir resultados uniformes y homogéneos.
•
No sumerja la varilla hasta más de 1 pulgada (2.5 cm) del bloque-motor.
ACCESORIO BATIDOR
• No sumerja la caja de engranajes en agua u otro líquido.
• Utilice el accesorio batidor para montar claras o batir crema.
• Para montar claras, utilice un tazón de metal o de cristal muy
limpio. Nunca utilice un tazón de plástico; el plástico suele
contener aceites que pueden impedir montar las claras. Para
ayudar a estabilizar las claras, añada
1
/
8
cucharadita de crémor
tártaro por clara antes de montarlas. Nota: no use crémor tártaro
si usa un recipiente de cobre. Bata las claras a punto de nieve.
• El accesorio batidor también puede usarse para preparar mezcla
de "crêpes" (crepas) o tortillas de huevos.
• Batir las claras durante un tiempo excesivo hace que se sequen y
sean menos estables.
• Cuando añada azúcar a las claras, haga esto despacio, justo
cuando se forman picos, y luego siga batiendo.
• Si el tiempo lo permite, es aconsejable refrigerar el tazón y el
batidor antes de batir crema. El mejor tazón para preparar crema
batida es un tazón profundo con un fondo redondo que minimiza
las salpicaduras.
• Refrigere la crema/nata antes de batirla. Bata la crema hasta
conseguir picos suaves o firmes, al gusto. Añada saborizante (por
ej. extracto de vainilla) si desea. Para conseguir resultados
óptimos, prepare la crema batida justo antes de usarla.
ACCESORIO PROCESADOR
• Para preparar mantequilla aromatizada, utilice mantequilla a
temperatura ambiente.

15
• No muela especias en el bol del accesorio procesador.
• No procese más de 1½ taza (355 ml) de líquido a la vez. Utilice
las cantidades indicadas en nuestras recetas como referencia.
• No sobrellene el bol. Para lograr resultados óptimos, los
ingredientes no deben pasar los
2
∕
3
del bol.
• No pique alimentos que contengan materias duras como huesos,
pepas, etc.; esto podría dañar las cuchillas.
• No sumerja la tapa del accesorio procesador en agua u otro
líquido.
• No haga funcionar el accesorio procesador durante más de 30
minutos seguidos.
•
Para agregar líquido sin interrumpir el procesado, échelos
directamente en el empujador. Esta característica es muy práctica.
• El empujador ha sido diseñado para permitirle agregar líquido
muy lentamente, sin interrumpir el procesado, lo que resulta muy
útil para preparar salsas, aderezos o mayonesa.
• SIEMPRE UTILICE EL EMPUJADOR PARA EMPUJAR LOS
ALIMENTOS EN LA BOCA DE LLENADO. NUNCA EMPUJE LOS
ALIMENTOS CON SUS DEDOS O UNA ESPÁTULA.
• Obtendrá resultados más homogéneos si los pedazos son del
mismo tamaño.
• Pele las frutas/verduras y retire las partes duras (corazón, pepas,
semillas, huesos, etc.). Corte los alimentos en pedazos de ½–1
pulgada (1.5–2.5 cm).
• Pulse, usando pulsaciones de 1 segundo, hasta obtener la
consistencia deseada. Para conseguir resultados más finos,
procesa los alimentos de manera continua. Averigüe la
consistencia a menudo y raspe el bol con una espátula si es
necesario.
Cómo rebanar/triturar (usando el disco rebanador/triturador
reversible)
• Para obtener resultados homogéneos, apretuje los alimentos en
la boca de llenado. Empuje los alimentos, usando presión
moderada, a la vez que procesa.
• Para cortar frutas/verduras redondas en rodajas: corte la
extremidad inferior de la fruta/verdura e introdúzcala en la boca
de llenado, el lado cortado primero. Si no cabe, corte a la mitad
o en cuartos. Procese, ejerciendo presión uniforme.
• Para rebanar pequeños alimentos como champiñones, rábanos o
fresas: corte ambas extremidades de la fruta/hortaliza e
introdúzcala verticalmente en la boca de llenado.
• Refrigere o congele brevemente el queso suave a medio-firme
antes de rebanar o triturarlo.
• Entibie el queso duro (por ej. Parmesano) a temperatura ambiente
antes de rebanar o rallarlo.

16
PAUTAS DE USO DEL ACCESORIO PROCESADOR
Ingrediente Aditamento usado Comentarios
Papillas (pida consejo a
su pediatra/médico)
Cuchilla picadora
Colocar una pequeña cantidad de alimentos cocidos en el
bol. Agregar una pequeña cantidad de líquido. Pulsar para
picar, y luego procesar continuamente para licuar.
Pan rallado (pan fresco
o pan del día anterior)
Cuchilla picadora
Pulsar para picar, y luego procesar continuamente hasta
obtener la textura deseada.
Queso rallado (Asiago,
Locatelli, Parmesano,
Romano, etc.) (no se
recomienda procesar
queso suave a menos
que sea para preparar
un aderezo o una salsa
para mojar)
Cuchilla picadora
Queso rallado: Cortar en pedazos muy pequeños. Pulsar
para picar, y luego procesar continuamente hasta obtener la
textura deseada. Hasta 4 onzas (115 g).
Queso triturado: Dejar entibiar a temperatura ambiente
y cortar en pedazos que quepan en la boca de llenado.
Colocar el queso en la boca de llenado y encender el
aparato. Empujar el queso, usando presión muy leve.
Apagar ni bien el queso esté triturado.
Disco triturador/rallador
Chocolate
Cuchilla picadora
Cortar en pedazos de ½ pulgada (1.5 cm) y congelar por
3 minutos antes de procesar. Pulsar para picar, y luego
procesar continuamente hasta obtener la textura deseada.
No procesar más de 1 onza (30 g) a la vez.
Disco triturador/rallador
Cortar en pedazos grandes y congelar por 3 minutos
antes de procesar. Procesar, usando presión moderada. El
resultado es un producto rallado fino.
Aderezos y cremas para
mojar
Cuchilla picadora
Colocar los ingredientes en el bol, sin cubrir el eje
de la cuchilla. Pulsar para picar, y luego procesar
continuamente hasta obtener la textura deseada. También
puede colocar los ingredientes en el vaso medidor y
licuarlos con el accesorio licuador.
Ajo Cuchilla picadora Pelar 12 dientes de ajo. Pulsar para picar.
Jengibre (fresco)
Cuchilla picadora
Para rallar: Pelar y cortar en trocitos de ½ pulgadas (1.5 cm).
Pulsar para picar. No procesar más de 2 onzas (55 g) a la vez.
Disco rebanador/rallador
Para rebanar o triturar: pelar y cortar en pedazos que
quepan en la boca de llenado; encender la máquina y
rebanar/triturar, usando presión leve a moderada para
empujar. Apagar ni bien el jengibre esté rebanado/triturado.
Hierbas (frescas) Cuchilla picadora
Colocar 1 taza (60 g) de hierbas limpias y secas en el bol.
Pulsar para picar.
Nueces Cuchilla picadora
Utilizar nueces sin cáscara. Tostar las nueces para
maximizar el sabor. Pulsar para picar, y luego procesar
continuamente hasta obtener la textura deseada. No
procesar más de
½
taza (75 g) a la vez.
Carne (res, cerdo, aves)
Cuchilla picadora
Para procesar: 6 onzas (170 g), en trocitos de ½ pulgada
(1.5 cm). Pulsar hasta obtener la consistencia deseada.
Disco rebanador/rallador
Para rebanar o triturar: Cortar en pedazos que quepan en
la boca de llenado y congelar por 15–20 minutos. Empujar
los alimentos, usando presión leve a moderada, a la vez que
procesa. Soltar el botón ni bien la carne esté rebanada/triturada.
Cebolla Cuchilla picadora
Pelar; cortar en trocitos de ½pulgada (1.5 cm). No procesar
más de 1½ taza a la vez. Pulsar para picar, y luego procesar
continuamente hasta obtener la textura deseada.
Vegetales (cocidos) Cuchilla picadora
Cortar en pedazos de ½ pulgada (1.5 cm). Pulsar para
picar. No procesar más de 2 tazas (400 g) a la vez. Agregar
un poco de líquido de cocción, caldo o leche para preparar
puré. No se aconseja preparar puré de papas.
Vegetales (crudos)
Cuchilla picadora
Para procesar: Pelar y cortar en pedazos de ½ pulgada
(1.5 cm). Pelar el apio con un pelador para eliminar los
hilos duros. Pulsar para picar. No procesar más de 2 tazas
(400 g) a la vez.
Disco rebanador/rallador
Para rebanar o triturar: Cortar los vegetales en pedazos
suficientemente pequeños como para caber en la boca de
llenado. Empujar los alimentos, usando presión moderada, a la
vez que procesa. Apagar ni bien todo esté rebanado/triturado.

17
• Para rallar col, lechuga y otras hortalizas de hoja: forme un rollo
de hojas. Introduzca el rollo verticalmente en la boca de llenado.
Procese, ejerciendo presión uniforme.
BATIDOS Y BEBIDAS
Batido de desayuno para el camino
¡Nutrición en un vaso! Prepare este batido de mañana para tomar
su desayuno en camino al trabajo.
Rinde aproximadamente 16 onzas (475 ml)
½ taza (120 ml) de jugo
½ taza (120 ml) de yogur natural bajo en grasa
3 fresas, partidas en dos
½ taza (70 g) de cubos de mango fresco o congelado
1 cucharada de semillas de linaza en polvo (opcional)
1 banano congelado, en trozos
1. Colocar todos los ingredientes en el vaso medidor, en el orden
indicado.
2. Licuar durante 30–45 segundos, hasta conseguir una mezcla suave.
3. Servir inmediatamente.
Información nutricional por porción de 8 onzas (235 ml):
Calorías 181 (11% de grasa) • Carbohidratos 38g • Proteínas 4g • Grasa 2g • Gasa
saturada 0g • Colesterol 4mg • Sodio 43mg • Calcio 111mg • Fibra 4g
Batido proteico
Este batido energizante es perfecto después de hacer ejercicio.
Rinde aproximadamente 16 onzas (475 ml)
½ taza (120 ml) de leche de coco
1
⁄
3
taza (80 ml) de yogur natural o yogur de vainilla
2 cucharadas de proteínas en polvo
1 banano, en trocitos
1 taza (140 g) de cubitos de mango
½ taza (125 g) de trocitos de piña
1. Colocar todos los ingredientes en el vaso medidor, en el orden
indicado.
2. Licuar durante 25–30 segundos, hasta conseguir una mezcla suave.
3. Servir inmediatamente.
Información nutricional por porción de 8 onzas (235 ml):
Calorías 270 (40% de grasa) • Carbohidratos 38g • Proteínas 6g • Grasa 13g • Gasa
saturada 11g • Colesterol 5mg • Sodio 68mg • Calcio 89mg • Fibra 4g

18
Batido de frutas simple
Esta receta puede servir para preparar muchos batidos, usando
cualquier tipo de jugo o fruta.
Rinde aproximadamente 16 onzas (475 ml)
½ taza (120 ml) de jugo de granada
½ banano, en trozos
1½ taza (225 g) de frutas del bosque frescas o congeladas
1.
Colocar todos los ingredientes en el vaso medidor, en el orden indicado.
2. Licuar durante aproximadamente 30 segundos, hasta conseguir una
mezcla suave.
3. Servir inmediatamente.
Información nutricional por porción de 8 onzas (235 ml):
Calorías 112 (4% de grasa) • Carbohidratos 28g • Proteínas 1g • Grasa 1g • Gasa
saturada 0g • Colesterol 0mg • Sodio 6mg • Calcio 16mg • Fibra 3g
"Muffins" de calabacín con especias
¡Preparar estos sabrosos "muffins" es muy fácil gracias
al disco triturador!
Rinde 6 "muffins" grandes
Spray vegetal
½ taza (50 g) de nueces tostadas
1 calabacín ("zucchini") pequeño, cortado para caber en la boca
de llenado
½ taza llena (100 g) de azúcar rubia o morena
1 huevo grande, ligeramente batido
¾ taza (95 g) de harina común
¼ cucharadita de bicarbonato de sodio
¼ cucharadita de polvo de hornear
1 cucharadita de canela en polvo
¼ cucharadita de clavo de olor en polvo
¼ cucharadita de nuez moscada rallada
¼ cucharadita de jengibre en polvo
½ cucharadita de sal
1
⁄
3
taza (80 ml) de aceite vegetal
¾ cucharadita de extracto natural de vainilla
1. Precalentar el horno a 375°F (190°C). Engrasar levemente un molde
de 6 muffins con spray vegetal; reservar.
2. Instalar la cuchilla en el bol. Agregar las nueces; procesar para picar.
Reservar.

19
3. Instalar el disco triturador. Rallar el calabacín, y luego retirarlo del bol
y exprimirlo para eliminar el exceso de agua. Reservar, en un tazón
grande.
4. Agregar el azúcar y el huevo; revolver bien. Agregar los ingredientes
remanentes y mezclar ligeramente para incorporar. Echar la mezcla en
los moldecitos.
5. Meter al horno por aproximadamente 25 minutos, hasta que un
probador introducido en el centro salga limpio.
Información nutricional por "muffin":
Calorías 318 (54% de grasa) • Carbohidratos 33g • Proteínas 5g • Grasa 20g • Gasa
saturada 2g • Colesterol 35mg • Sodio 284mg • Calcio 94mg • Fibra 2g
"Tapenade"
Condimento francés tradicional, ideal para servir con galletas
saladas o pan crujiente.
Rinde aproximadamente 1 taza (235 ml)
1 diente de ajo grande
3 cucharadas de perejil fresco picado
1½ taza (300 g) de aceitunas negras (por ej. Kalamata o Niçoises)
deshuesadas
1
⁄
3
taza (65 g) de aceitunas verdes deshuesadas
1 taza (140 g) de alcaparras, escurridas y lavadas
½ cucharada de jugo de limón fresco
½ cucharadita de mostaza de Dijon
½ cucharadita de pimienta negra recién molida
2 cucharadas de aceite de oliva virgen extra
1. Instalar la cuchilla en el bol. Agregar el ajo y el perejil; procesar por
5–10 segundos para picar. Raspar el bol. Agregar las aceitunas y las
alcaparras; pulsar 12–15 veces para picar. Agregar el jugo de limón, la
mostaza y la pimienta; procesar por 10–15 segundos, raspando el bol
de vez en cuando.
2. Encender la máquina; echar el aceite de oliva en la boca de llenado
y procesar durante aproximadamente 20 segundos, hasta que la
mezcla forme una pasta espesa.
Información nutricional por porción (1 cucharada):
Calorías 31 (84% de grasa) • Carbohidratos 1 g • Proteínas 0g • Grasa 3g • Gasa
saturada 0g • Colesterol 0mg • Sodio 186mg • Calcio 14mg • Fibra 1g

20
Humus
Puede cambiar esta receta básica, añadiéndole pimiento rojo
cocido, remolacha asada o hierbas frescas.
Rinde aproximadamente 2 tazas (475 ml)
1 diente de ajo grande
1 lata de 15.5 onzas (450 g) de garbanzos, escurridos y lavados
6 cucharadas de salsa Tahini
3 cucharadas de jugo de limón fresco
½–¾ cucharadita de sal kosher o sal marina, al gusto
¼ cucharadita de pimienta negra recién molida
¼ taza (60 ml) o más de aceite de oliva virgen extra
1
⁄
3
taza (80 ml) de agua (usar más si es necesario)
1. Instalar la cuchilla en el bol. Poner el ajo en el bol y pulsar 10–15
veces; raspar el bol. Agregar los garbanzos, la salsa Tahini, el jugo
de limón, la sal y la pimienta; pulsar 10–12 veces. Agregar el aceite y
procesar hasta emulsionar. Agregar el agua y procesar hasta obtener
una mezcla muy suave. Si desea una consistencia menos espesa,
agregue más agua. Ajustar la sazón al gusto.
Información nutricional por porción (2 cucharadas):
Calorías 68 (41% de grasa) • Carbohidratos 8g • Proteínas 2g • Grasa 3g • Gasa
saturada 0g • Colesterol 0mg • Sodio 153mg • Calcio 33mg • Fibra 2g
Salsa de tomates y maíz
Para un sabor óptimo, utilice ingredientes muy frescos.
Siempre puede ajustar la sazón al final.
Rinde aproximadamente 2 tazas (475 ml)
1 diente de ajo grande
½ cebolla mediana, en pedazos
½ jalapeño (o al gusto), sin semillas, en trocitos
2 cebolletas ("green onions"), en trozos
½ taza (30 g) de cilantro fresco
1 cucharada de jugo de lima/limón verde fresco
¼ –½ cucharadita de sal marina o kosher
1 pizca de pimienta negra recién molida
1 pizca de chile en polvo
2 tomates medianos, en pedazos (también puede usar tomates
de pera)
2
⁄
3
taza (65 g) de maíz en grano congelado
1. Instalar la cuchilla en el bol. Colocar el ajo, la cebolla, el jalapeño, la
cebolleta y el cilantro en el bol y pulsar 5 veces, hasta picar grueso;
raspar el bol. Agregar el jugo de lima, la sal, la pimienta, el chile en
polvo y el tomate. Pulsar 5–4 veces. Agregar el maíz; pulsar 3 ó 4
veces para mezclar.

21
2. Ajustar la sazón al gusto. Servir con chips de maíz calientes.
Información nutricional por porción (2 cucharadas):
Calorías 11 (6% de grasa) • Carbohidratos 3g • Proteínas 0g • Grasa 0g • Gasa
saturada 0g • Colesterol 0mg • Sodio 35mg • Calcio 4mg • Fibra 0g
Mayonesa
Le sorprenderá lo fácil que es preparar esta mayonesa casera.
Si usa yemas crudas, lo que le da más sabor, cerciórese
de usar huevos locales frescos.
Rinde aproximadamente 1 taza (235 ml)
¼ taza (60 ml) de sustituto de huevo pasteurizado (por ej.
EggBeaters
®
); también puede usar yemas de huevo, siempre
que se cerciore que estén muy frescos
1 cucharada de jugo de limón fresco
½ cucharada de vinagre de vino blanco
½ cucharadita de mostaza de Dijon
½ cucharadita de azúcar granulada
1 pizca de sal marina o kosher
1 pizca de pimienta blanca recién molida
2
⁄
3
taza (80 ml) de aceite vegetal
1. Colocar todos los ingredientes, excepto el aceite, en el vaso medidor,
en el orden indicado. Licuar hasta que la mezcla empiece a espesarse.
Cerciorarse de mantener la cuchilla sumergida durante el licuado.
Agregar el aceite 2 cucharadas a la vez, sin dejar de licuar. Tras haber
agregado todo el aceite, seguir licuando durante aproximadamente 30
segundos, usando un movimiento suave hacia arriba y abajo, hasta
que la mezcla esté espesa.
Información nutricional por porción
(1 cucharada, usando sustituto de huevo pasteurizado)
Calorías 83 (96% de grasa) • Carbohidratos 0g • Proteínas 0g • Grasa 9g • Gasa
saturada 1g • Colesterol 0mg • Sodio 27mg • Calcio 1mg • Fibra 0g
Vinagreta cremosa de champaña
Esta deliciosa vinagreta se volverá su favorita ni bien la pruebe.
Rinde aproximadamente 1 taza (235 ml)
1 diente de ajo
1 chalote pequeño, en pedazos
1 cucharadita de mostaza de Dijon
1 cucharadita de sal marina o sal kosher
1 pizca de pimienta negra recién molida
2½ cucharadas de vinagre de champaña
¾ taza (175 ml) de aceite de oliva virgen extra

22
1. Colocar todos los ingredientes, excepto el aceite, en el vaso medidor,
en el orden indicado. Procesar para romper el ajo y el chalote.
Agregar el aceite, un cuarto de taza (60 ml) a la vez, y seguir licuando
para emulsionar.
2. Tras haber agregado todo el aceite, licuar durante 30 segundos
adicionales.
Información nutricional por porción (1 cucharada):
Calorías 93 (90% de grasa) • Carbohidratos 1 g • Proteínas 0g • Grasa 11g • grasa
saturada 2g • Colesterol 0mg • Sodio 57mg • Calcio 1mg • Fibra 1g
Pesto
Puede modificar esta receta tradicional al gusto, sustituyendo
la albahaca por hierbas como perejil o cilantro, y usando
nueces en vez de piñones.
Rinde aproximadamente ¾ taza (175 ml)
1½ onza (45 g) de queso Reggiano Parmigiano, en cubitos
1
∕
3
taza (40 g) de piñones tostados (también puede usar nueces)
2 dientes de ajo
½–¾ cucharadita de sal kosher
1½ taza llena (90 g) de hojas de albahaca fresca
1
⁄
3
taza (80 ml) de aceite de oliva virgen extra
1. Instalar la cuchilla en el bol. Agregar el queso, pulsar 5 veces para
romper, y luego procesar durante 15–20 segundos hasta que esté
finamente molido. Reservar.
2. Colocar los piñones en el bol. Pulsar 8 veces para picar; reservar,
junto con el queso.
3. Colocar el ajo y la sal en el bol; procesar durante 5 segundos. Raspar
el bol; agregar la albahaca y la mitad del aceite de oliva. Pulsar 10–12
veces; raspar el bol. Encender la máquina y agregar lentamente el
aceite de oliva remanente por la boca de llenado. Agregar el queso y
las nueces; procesar por 10–15 segundos adicionales.
4. Colocar en un recipiente hermético. El pesto se conservará durante
hasta una semana en el refrigerador; también puede congelarlo.
Información nutricional por porción (2 cucharadas):
Calorías 144 (88% de grasa) • Carbohidratos 2g • Proteínas 3g • Grasa 15g • Gasa
saturada 3g • Colesterol 5mg • Sodio 282mg • Calcio 73mg • Fibra 1g
Ensalada César clásica
Un favorito de restaurante de siempre, hecho fresco en casa.
Rinde 4–6 porciones
Picatostes:
2 tazas (500 g) de cubos de pan
1 cucharada de aceite de oliva virgen extra

23
1 diente de ajo, machacado
¼ cucharadita de sal kosher
Ensalada y aderezo:
1 lechuga romana
2 onzas (55 g) de queso Parmigiano Reggiano
1 diente de ajo pequeño
3–4 filetes de anchoa
2 cucharadas de sustituto de huevo pasteurizado (por ej.
EggBeaters
®
); también puede usar yemas de huevo (siempre
que se cerciore que estén muy frescos)
o 2 cucharadas de mayonesa
1 cucharadita de mostaza de Dijon
2 cucharaditas de jugo de limón fresco
2 cucharaditas de vinagre de vino tinto
1 cucharadita de salsa Worcestershire
¼ cucharadita de pimienta negra recién molida
1
⁄
3
taza (80 ml) de aceite de oliva virgen extra
1. Precalentar el horno a 350°F (180°C). Forrar una placa para horno
con papel de aluminio. Revolver los cubitos de pan con el aceite de
oliva, el ajo y la sal. Echar la mezcla sobre la placa para horno y meter
al horno por 10–12 minutos, revolviendo una vez durante el horneado.
Hornear hasta que los picatostes estén dorados. Reservar.
2. Lavar la lechuga y romper las hojas en pedacitos. Secar y reservar, en
un tazón grande.
3. Instalar el disco triturador en el bol. Rallar el queso; reservar.
4. Instalar la cuchilla picadora. Agregar el ajo y procesar hasta que esté
finamente picado. Agregar las anchoas, el sustituto de huevo (o la
yema/mayonesa), la mostaza, el jugo de limón, el vinagre, la salsa
Worcestershire y la pimienta. Procesar hasta conseguir una mezcla
homogénea. Sin apagar la máquina, agregar lentamente el aceite de
oliva por la boca de llenado y seguir procesando hasta conseguir una
mezcla emulsionada.
5. Revolver la lechuga con los picatostes, el queso rallado y el aderezo.
Servir inmediatamente.
Información nutricional por porción (basada en 6 porciones):
Calorías 256 (68% de grasa) • Carbohidratos 14g • Proteínas 7g • Grasa 20g • Gasa
saturada 4g • Colesterol 45mg • Sodio 433mg • Calcio 161mg • Fibra 3g
Aderezo de cítrico y eneldo
Nos encanta este aderezo con pepinos en rodajas (para una preparación
rápida, use el disco rebanador).
Rinde aproximadamente 1 taza (235 ml)
1½ cucharadita de vinagre de champaña o vinagre de jerez
1 chalote pequeño, en pedazos
1 diente de ajo pequeño

24
1 cucharadita de mostaza de Dijon
3 cucharadas de jugo de naranja fresco
1 cucharada de jugo de limón fresco
1 cucharada de jugo de lima/limón verde fresco
3 cucharadas de eneldo fresco
1 cucharadita de sal marina o sal kosher
1 pizca de pimienta negra recién molida
½ taza (120 ml) de aceite de oliva virgen extra
1. Colocar todos los ingredientes, excepto el aceite, en el vaso medidor.
Procesar brevemente para romper el ajo y el chalote. Agregar el
aceite, un cuarto de taza (60 ml) a la vez, y seguir licuando para
emulsionar. Tras haber agregado todo el aceite, licuar durante 30
segundos adicionales.
Información nutricional por porción (basada en 2 cucharadas):
Calorías 128 (94% de grasa) • Carbohidratos 2g • Proteínas 0g • Grasa 14g • Gasa
saturada 2g • Colesterol 0mg • Sodio 113mg • Calcio 3mg • Fibra 0g
Salsa de pimiento rojo asado y tomate
Esta salsa muy versátil acompaña deliciosamente tanto
pollo asado como pasta.
Rinde aproximadamente 4 tazas (945 ml)
2 cucharaditas de aceite de oliva virgen extra
1 cebolla mediana, en cubitos
1 zanahoria, en trozos
1 rama de apio, en trozos
2 dientes de ajo
1 cucharadita de albahaca seca
1
⁄
3
taza (80 ml) de vino blanco seco o vermú
3 pimientos dulces rojos asados, en pedazos
2 cucharadas de concentrado/pasta de tomate
2 latas de 15 onzas (435 g) de tomates cocidos picados, con
jugo
¾ cucharadita de sal marina o sal kosher
¼ cucharadita de pimienta negra recién molida
1
∕
8
cucharadita de hojuelas de pimiento rojo
1. Calentar el aceite de oliva a fuego medio, en un sartén mediano.
Cuando esté caliente, agregar la cebolla, la zanahoria, el apio, el
ajo y la albahaca. Tapar parcialmente y cocer durante 6–8 minutos,
hasta que los vegetales estén tiernos, pero sin permitir que se doren.
Agregar el vino y raspar el fondo de la cacerola con un cucharón para
despegar los pedazos. Reducir hasta que el vino se haya evaporado
casi por completo. Agregar los pimientos asados, el concentrado de
tomate, los tomates con su jugo, la sal, la pimienta y las hojuelas de
pimienta roja. Dejar hervir, y luego reducir el fuego y hervir a fuego
lento, parcialmente tapado, durante 35–40 minutos. Quitar la tapa y
hervir a fuego lento durante 15–20 minutos adicionales.

25
2. Licuar la salsa con la licuadora de mano hasta obtener ua mezcla
suave. Si usa una cacerola grande, inclinar ligeramente la cacerola
para que el protector de cuchillas esté completamente sumergido.
3. Probar y ajustar la sazón al gusto.
Información nutricional por porción (¼ taza/60 ml):
Calorías 29 (18% de grasa) • Carbohidratos 5g • Proteínas 1g • Grasa 1g • Gasa
saturada 0g • Colesterol 0mg • Sodio 216mg • Calcio 15mg • Fibra 1g
Mole
Hay muchas variedades de mole. Nuestro mole, lleno de sabor
y suave, es perfecto para acompañar pollo y arroz.
Rinde aproximadamente 4 tazas (945 ml)
2 cucharadas de aceite de oliva virgen extra
1 cebolla mediana, picada
3 dientes de ajo, picados
2 cucharadas de chile en polvo
¼ cucharadita de canela en polvo
¼ cucharadita de comino en polvo
¼ cucharadita de semillas de cilantro en polvo
1 cucharadita de sal kosher
1 tortilla de maíz, en pedacitos
¼ taza (30 g) de almendras tostadas
2 cucharadas de mantequilla de maní natural
2 latas de 4–5 onzas (115–140 g) de chiles verdes picados
1 lata de 28 onzas (420 g) de tomates picados, escurridos
1½ taza (355 ml) de caldo de pollo bajo en sodio
¼ taza (30 g) de pasas
2 cucharadas de cacao en polvo
1 cucharadita de azúcar granulada
1. Calentar el aceite de oliva a fuego medio, en un sartén mediano.
Agregar la cebolla y saltear durante 5–8 minutos, hasta suavizarse.
Reducir el fuego y agregar el ajo. Revolver para cubrir con aceite y
cocer hasta que esté fragante. Agregar las especias y la sal. Cocer
durante aproximadamente 1 minuto, revolviendo. Agregar la tortilla,
las almendras y la mantequilla de maní primero. Luego, agregar el
resto de los ingredientes y revolver. Tapar y cocer a fuego medio-
alto hasta que empiece a hervir. Reducir el fuego y seguir cociendo
a fuego lento durante aproximadamente 45 minutos, revolviendo
ocasionalmente.
2. Cuando la salsa esté lista, licuarla hasta conseguir un puré. Si usa
una cacerola grande, inclinar ligeramente la cacerola para que el
protector de cuchillas esté completamente sumergido. Si la salsa
parece muy espesa, agregar un poco de agua.
3. Probar y ajustar la sazón al gusto.
Información nutricional por porción (2 cucharadas):
Calorías 36 (48% de grasa) • Carbohidratos 4g • Proteínas 1g • Grasa 2g • Gasa
saturada 0g • Colesterol 0mg • Sodio 180mg • Calcio 17mg • Fibra 1g

26
Crema invernal de frijoles blancos
Esta sopa rica y cremosa le calentará durante los días fríos del invierno.
Si no tiene jamón de Parma (Prosciutto), puede usar tocino.
Rinde aproximadamente 6 tazas (1.4 L)
1 cucharada de aceite de oliva virgen extra
1 onza (30 g) de jamón de Parma (Prosciutto), picado
1 diente de ajo, picado*
1 cebolla mediana, picada*
1 rama de apio, picada*
1 cucharada de vino blanco seco o vermú
2 latas de 15 onzas (435 g) de frijoles blancos cocidos,
escurridos (o 1 libra/455 g de frijoles secos, remojados
durante 8–12 horas)*
1 ramita de romero
1 hoja de laurel
¼–½ cucharadita de sal kosher
1 pizca de pimienta negra recién molida
5 tazas (1.2 L) de caldo de pollo o de vegetales bajo en sodio
queso Parmesano rallado para decorar
1. Poner ½ cucharada del aceite a calentar a fuego medio-alto. Agregar
el jamón y freírlo rápidamente, Una vez crujiente, reservar.
2. Poner a calentar el resto del aceite a fuego medio. Una vez caliente,
agregar la cebolla, el ajo y el apio. Saltear durante 8–10 minutos,
hasta que estén suaves. Agregar el vino y raspar el fondo de la
cacerola con un cucharón para despegar los pedazos. Reducir hasta
que el vino se haya evaporado casi por completo. Agregar los frijoles,
el romero, la hoja de laurel, la sal y la pimienta, y revolver. Seguir
cociendo hasta que los frijoles estén calientes. Agregar el caldo y
subir el fuego hasta que hierva. Dejar hervir, y luego reducir el fuego
y hervir a fuego lento, parcialmente tapado, durante 60–75 minutos.
Retirar el romero y la hoja de laurel.
3. Licuar la salsa con la licuadora de mano hasta obtener una mezcla
suave. Si usa una cacerola grande, inclinar ligeramente la cacerola
para que el protector de cuchillas esté completamente sumergido.
4. Probar y ajustar la sazón al gusto. Decorar con pedacitos de jamón
y/o queso Parmesano rallado.
* Utilice el accesorio procesador para picar/rebanar los ingredientes
fácilmente.
** Si remoja frijoles secos, puede que tenga que usar más caldo y sal.
Información nutricional por porción (basada en 6 porciones):
Calorías 321 (14% de grasa) • Carbohidratos 44g • Proteínas 24g • Grasa 5g • Gasa
saturada 1g • Colesterol 3mg • Sodio 873mg • Calcio 142mg • Fibra 16g

27
Crema primaveral de espárragos y puerro
Rinde aproximadamente 8 tazas (1.9 L)
2 cucharadas (30 g) de mantequilla sin sal
2 dientes de ajo, picados*
2 puerros medianos (parte blanca y verde claro solamente), en
rodajas*
2–2½ libras (910 g–1.1 kg) de espárragos, sin la parte dura del tallo
y las puntas reservadas (opcional; véase la nota en el paso 3),
cortados en trozos de 2 pulgadas (5cm)
1 papa roja grande, pelada y cortada en rodajas (mantener en
agua fría hasta el momento de usar)
4 cucharadas de vino blanco seco o coñac
1–1½ cucharadita de sal kosher, a gusto
¼ cucharadita de pimienta negra recién molida
5 tazas (1.2 L) de caldo de vegetales (cuanto más claro el caldo,
más verde la sopa)
1 cucharadita de jugo de limón fresco
"Crème fraîche" para servir
Cebollinos ("chives") picados para decorar
1. Derretir la mantequilla a fuego medio, en una cacerola mediana.
Agregar el ajo y el puerro; revolver hasta que empiece a crepitar, y
luego tapar la cacerola y rehogar durante 5–10 minutos, hasta que el
puerro esté muy suave.
2. Agregar los espárragos (no las puntas) y la papa. Revolver para cubrir
con la mantequilla y saltear hasta que estén suaves. Agregar el vino
blanco y cocer, revolviendo, hasta que el vino se haya evaporado.
Agregar la sal, la pimienta y el caldo de vegetales. Dejar hervir, luego
reducir el fuego. Cocer a fuego lento durante 20–25 minutos, hasta
que los vegetales estén muy suaves.
3. Mientras la sopa está cociendo, cocer las puntas de los espárragos al
vapor durante 5–8 minutos, hasta que estén tiernas-crujientes. Enfriar
las puntas en un baño de agua helada para que mantengan su color
verde vivo. Una vez enfriadas, cortar las puntas longitudinalmente
a la mitad. Nota: este paso es opcional, pero provee una hermosa
decoración.
4. Cuando los vegetales estén tiernos, licuar la sopa hasta conseguir un
puré. Si usa una cacerola grande, inclinar ligeramente la cacerola para
que el protector de cuchillas esté completamente sumergido.
5. Agregar el jugo de limón. Probar y ajustar la sazón al gusto.
6. Decorar con "crème fraîche", cebollinos picados y las puntas de los
espárragos. Servir inmediatamente.
* Utilice el accesorio procesador para picar/rebanar los ingredientes
fácilmente.
Información nutricional por porción (basada en 6 porciones):
Calorías 97 (26% de grasa) • Carbohidratos 13g • Proteínas 5g • Grasa 35g • Gasa
saturada 2g • Colesterol 8mg • Sodio 650mg • Calcio 45mg • Fibra 3g

28
Crema estival de calabacines
Esta sabrosa sopa, que puede servirse caliente o fría, es una excelente
manera de usar los calabacines del huerto.
Rinde aproximadamente 6 tazas (1.4 L) (sin crema)
1 cucharada (15 g) de mantequilla sin sal o de aceite de oliva
virgen extra
2 puerros medianos (parte verde claro y blanca), rebanados*
1 rama de apio mediana, en cubitos
2 dientes de ajo, machacados
4 calabacines ("zucchini") medianos, en rodajas*
8 onzas (225 g) de papas blancas, peladas y cortadas en cubos
1½ cucharadita de sal kosher
¼ cucharadita de pimienta negra recién molida
½ taza (120 ml) de vino blanco seco
3 taza (830 ml) de caldo de pollo bajo en sodio
2 cucharadas de menta fresca (aproximadamente 6 hojas
medianas)
2 cucharadas de albahaca fresca (3–4 hojas grandes)
¼ taza (60 ml) de crema líquida para batir ("heavy cream")
(opcional)
1. Derretir la mantequilla a fuego medio, en una cacerola grande. Agregar
el puerro, el apio y el ajo. Cocer a fuego medio durante 8–10 minutos,
revolviendo, hasta que las verduras estén tiernas.
2. Agregar los calabacines y las papas, junto con 1 cucharadita de la
sal y de la pimienta. Revolver bien. Agregar el vino blanco. Seguir
cociendo hasta que el vino se haya evaporado casi por completo.
Agregar el caldo y subir el fuego hasta que hierva. Cuando empiece
a hervir, reducir el fuego. Cocer a fuego lento durante 20–25 minutos,
hasta que las verduras estén tiernas.
3. Agregar las hierbas frescas y licuar, usando un movimiento suave
hacia arriba y abajo, hasta conseguir una mezcla homogénea. Si es
necesario, incline ligeramente la olla/cacerola lejos de su cuerpo para
que el protector de cuchillas esté completamente sumergido. Seguir
procesando hasta obtener una mezcla suave.
4. Probar y ajustar la sazón al gusto, agregando más sal si desea.
5. Si desea usar crema (opcional), agregarla después de licuar. Agregar
la crema y calentar la sopa a fuego bajo durante 5–10 minutos antes
de ajustar la sazón.
* Utilice el accesorio procesador para picar/rebanar los ingredientes
fácilmente.
Información nutricional por porción (basada en 6 porciones, sin crema):
Calorías 109 (17% de grasa) • Carbohidratos 16g • Proteínas 4g • Grasa 2g • Gasa
saturada 1g • Colesterol 5mg • Sodio 911mg • Calcio 50mg • Fibra 3g

29
Crema otoñal de zanahoria y jengibre
El jengibre da a esta sopa un sabor muy especial.
Rinde aproximadamente 5 tazas (1.2 L)
2 cucharadas de aceite de oliva virgen extra
2 chalotes pequeños, picados*
1 cucharada de jengibre fresco finamente picado
1 cucharadita de sal kosher o sal marina
½ cucharadita de pimienta negra recién molida
2 libras (910 g) de zanahorias, en rodajas*
½ cucharadita de comino en polvo
1 pizca de clavo de olor en polvo
¼ cucharadita de canela en polvo
5 tazas (1.2 L) de caldo de vegetales o de pollo bajo en sodio
½ cucharadita de jugo de limón fresco
1. Poner el aceite de oliva a calentar a fuego medio-lento, en una
cacerola grande. Una vez caliente, agregar el chalote, el jengibre
y una pizca de sal y pimienta. Saltear los vegetales durante
aproximadamente 5 minutos, hasta que estén suaves. Agregar las
zanahorias y ajustar el fuego a medio-alto, Saltear por 2–3 minutos,
hasta que las zanahorias empiecen a suavizarse. Agregar el resto de
la sal y de la pimienta y las especias; revolver bien. Agregar el caldo y
dejar hervir. Reducir el fuego y cocer a fuego lento, sin tapar, durante
25–30 minutos, hasta que las zanahorias estén muy suaves.
2. Agregar el jugo de limón y licuar, usando un movimiento suave hacia
arriba y abajo, hasta obtener una mezcla suave y homogénea. Si es
necesario, inclinar ligeramente la olla/cacerola para que el protector de
cuchillas esté completamente sumergido.
3. Probar y ajustar la sazón al gusto.
*Utilice el accesorio procesador para picar/rebanar los ingredientes rápido.
Información nutricional por porción (basada en 6 porciones):
Calorías 161 (32% de grasa) • Carbohidratos 25g • Proteínas 3g • Grasa 6g • Gasa
saturada 1g • Colesterol 0mg • Sodio 1 g • Calcio 88mg • Fibra 5g

30
Mantequilla aromatizada
Las mantequillas aromatizadas son muy versátiles y pueden usarse para
dar un toque de sabor a muchos platos. Las mantequillas aromatizadas
dulces son deliciosas sobre tostadas o panqueques, mientras las
mantequillas aromatizadas saladas son perfectas para servir con bistec
recién asado o terminar una sopa. La lista a continuación incluye algunas
de nuestras mantequillas aromatizadas favoritas, pero no dude en usar
su imaginación y experimentar con sus sabores favoritos.
Naranja-Jarabe de arce
Rinde ½ taza (115 g)
8 onzas (225 g) de mantequilla sin sal de ALTA calidad (por ej.
Plugra o Kerrygold) a temperatura ambiente, en pedacitos
1½ cucharada de ralladura de naranja
2 cucharadas de jarabe de arce puro
1. Colocar la mantequilla y la ralladura en el bol, equipado con la
cuchilla picadora. Procesar durante 30 segundos. Raspar el bol si es
necesario. Encender la máquina y echar el jarabe de arce en la boca
de llenado pequeña; procesar durante aproximadamente 30 segundos
para incorporar.
2. Poner la mantequilla sobre una hoja de papel encerado. Formar una
barra de mantequilla. Envolver en una película de plástico. Refrigerar o
congelar la mantequilla hasta el momento de usar.
Información nutricional por porción (1 cucharadita):
Calorías 38 (87% de grasa) • Carbohidratos 1 g • Proteínas 0g • Grasa 4g • Gasa
saturada 2g • Colesterol 10mg • Sodio 0mg • Calcio 2mg • Fibra 0g
Mantequilla de nueces
Rinde ½ taza (115 g)
½ taza (75 g) de anacardos (o nueces) tostados
8 onzas (225 g) de mantequilla sin sal de ALTA calidad (por ej.
Plugra o Kerrygold) a temperatura ambiente, en pedacitos
1 pizca de sal marina
1 pizca de canela en polvo (opcional)
1. Colocar los anacardos en el bol, equipado con la cuchilla picadora.
Pulsar varias veces para picar. Agregar la mantequilla, la sal y la
canela (opcional). Procesar durante 30 segundos, hasta conseguir una
mezcla homogénea. Raspar el bol si es necesario.
2. Poner la mantequilla sobre una hoja de papel encerado. Formar una
barra de mantequilla. Envolver en una película de plástico. Refrigerar o
congelar la mantequilla hasta el momento de usar.
Información nutricional por porción (1 cucharada, usando anacardos):
Calorías 34 (99% de grasa) • Carbohidratos 0g • Proteínas 0g • Grasa 4g • Gasa
saturada 2g • Colesterol 10mg • Sodio 11mg • Calcio 0mg • Fibra 0g

31
Limón-Tomillo
Rinde ½ taza (115 g)
8 cucharadas (115 g) de mantequilla sin sal de ALTA calidad (por
ej. Plugra o Kerrygold) a temperatura ambiente, en pedacitos
1½–2 cucharaditas de hojas de tomillo fresco
1½–2 cucharadas de ralladura de limón
1 pizca de sal marina (opcional)
1. Colocar todos los ingredientes en el bol, equipado con la cuchilla
picadora. Procesar durante 30 segundos. Raspar el bol si es
necesario.
2. Poner la mantequilla sobre una hoja de papel encerado. Formar una
barra de mantequilla. Envolver en una película de plástico. Refrigerar o
congelar la mantequilla hasta el momento de usar.
Información nutricional por porción (1 cucharadita):
Calorías 34 (99% de grasa) • Carbohidratos 0g • Proteínas 0g • Grasa 4g • Gasa
saturada 2g • Colesterol 10mg • Sodio 0mg • Calcio 1mg • Fibra 0g
Tocino-Salvia
Rinde aproximadamente ½ taza (115 g)
2 lonjas de tocino, picado y cocinado (aproximadamente 2
cucharadas)
3–4 hojas de salvia fresca
8 cucharadas (115 g) de mantequilla sin sal de ALTA calidad
(por ej. Plugra o Kerrygold) a temperatura ambiente, en
pedacitos
1 pizca de sal kosher
1 pizca de pimienta negra recién molida
1. Colocar el tocino y la salvia en el bol, equipado con la cuchilla
picadora. Pulsar para picar finamente. Agregar la mantequilla, la sal y
la pimienta; procesar hasta conseguir una mezcla homogénea.
2. Poner la mantequilla sobre una hoja de papel encerado. Formar una
barra de mantequilla. Envolver en una película de plástico. Refrigerar o
congelar la mantequilla hasta el momento de usar.
Información nutricional por porción (1 cucharadita):
Calorías 48 (96% de grasa) • Carbohidratos 0g • Proteínas 0g • Grasa 5g • Gasa
saturada 3g • Colesterol 12mg • Sodio 37mg • Calcio 1mg • Fibra 0g

32
"Fool" de frutas del bosque (crema batida con
puré de frutas del bosque)
Este postre británico tradicional es perfecto en cualquier momento del
año, pero es verdaderamente delicioso en verano, cuando las frutas del
bosque están maduras.
Rinde aproximadamente 4–5 tazas (945 ml–1.2 L)
2 tazas (400 g) de frutas del bosque mixtas (fresas, frambuesas,
arándanos azules)
1 cucharada de azúcar granulada
2 tazas (475 ml) de crema líquida para batir ("heavy cream")
refrigerada
2 cucharadas de azúcar glasé
½ cucharadita de extracto natural de vainilla
1. Colocar las frutas del bosque y el azúcar en el vaso medidor. Licuar,
usando un movimiento suave hacia arriba y abajo, casi hasta obtener
un puré.
2.
Colocar el resto de los ingredientes en un tazón mediano a grande.
Batir, usando el accesorio batidor, durante aproximadamente 1 minuto,
hasta obtener picos medio-firmes. Incorporar la mezcla de frutas.
3. Servir inmediatamente (el postre mantendrá su textura durante
solamente una hora).
Información nutricional por porción (½ taza/120 ml):
Calorías 231 (85% de grasa) • Carbohidratos 8g • Proteínas 0g • Grasa 20g • Gasa
saturada 14g • Colesterol 80mg • Sodio 0mg • Calcio 4mg • Fibra 1g
Batido de triple chocolate
El último postre de chocolate.
Rinde aproximadamente 2 tazas (475 ml)
2 tazas (475 ml) de helado de chocolate
½ cucharada de cacao en polvo
1½ cucharada de jarabe de chocolate
¾ taza (175 ml) de leche (entera, semi-descremada o
descremada)
Crema batida, virutas de chocolate o cacao en polvo para
decorar
1. Poner los ingredientes en el vaso medidor, en el orden indicado.
Licuar durante 30–40 segundos, usando un movimiento suave hacia
arriba y abajo.
2. Decorar con crema batida, virutas de chocolate o cacao en polvo.
Información nutricional por porción (1 taza/235 ml, preparado con leche semi-descremada):
Calorías 597 (55% de grasa) • Carbohidratos 55g • Proteínas 11g • Grasa 37g • Gasa
saturada 22g • Colesterol 233mg • Sodio 142mg • Calcio 339mg • Fibra 3g

33
GARANTÍA LIMITADA DE UN AÑO (12 MESS)
(VÁLIDA EN LOS EE.UU. Y EN CANADÁ
SOLAMENTE)
Esta garantía es para los consumidores solamente. Usted es un
consumidor si ha comprado su aparato Cuisinart
®
en una tienda, para
uso personal o casero. A excepción de los estados donde la ley lo
permita, esta garantía no es para los detallistas u otros comerciantes.
Cuisinart garantiza este aparato contra todo defecto de materiales o
fabricación durante un año después de la fecha de compra original,
siempre que el aparato haya sido utilizado para uso doméstico y según
las instrucciones.
Le aconsejamos que llene el formulario de registro disponible en www.
cuisinart.com a fin de facilitar la verificación de la fecha de compra
original. Sin embargo, no es necesario registrar el producto para recibir
servicio bajo esta garantía. En ausencia del recibo de compra, el período
de garantía será calculado a partir de la fecha de fabricación.
Si este aparato presentara algún defecto de materiales o fabricación
durante el período de garantía, la reparemos o reemplazaremos (a
nuestra opción). Para obtener servicio bajo esta garantía, llame a
nuestra línea directa gratuita al 1-800-726-0190 o regrese el aparato
defectuoso a:
Cuisinart, 7475 North Glen Harbor Blvd. Glendale, AZ 85307.
Regrese el aparato defectuoso, junto con su recibo de compra y un
cheque o giro postal de US$10.00 por gastos de manejo y envío.
Los residentes de California sólo necesitan dar una prueba de compra y
deben llamar al 1-800-726-0190 para recibir instrucciones de envío.
NOTA: para más seguridad, le aconsejamos que mande su paquete por
un método de entrega con seguro y seguimiento. Cuisinart no será
responsable por los daños ocurridos durante el transporte o por los
paquetes mandados a una dirección equivocada. Los productos
perdidos y/o lastimados durante el envío no serán cubiertos bajo
esta garantía.
Recuerde incluir su nombre, dirección y teléfono, la descripción del
problema, así como cualquier información pertinente.
RESIDENTES DE CALIFORNIA SOLAMENTE
La ley del estado de California ofrece dos opciones bajo el período de
garantía. Los residentes del estado de California pueden
(A) regresar el producto defectuoso a la tienda donde lo compraron o
(B) a otra tienda que venda productos Cuisinart
®
de este tipo.
La tienda, a su opción, reparará el producto, referirá el consumidor a un
centro de servicio independiente, cambiará el producto o reembolsará el
consumidor por el precio original del producto, menos la cantidad
imputable al uso del producto por el consumidor hasta que éste se
dañe. Si estas dos opciones no satisfacen al consumidor, podrá llevar el
aparato a un centro de servicio independiente, siempre que se pueda
ajustar o reparar el aparato de manera económica. Cuisinart será
responsable por los gastos de servicio, reparación, reemplazo o
reembolso de los productos defectuosos durante el período de garantía.
Los residentes de California también pueden, si lo desean, mandar el
aparato defectuoso directamente a Cuisinart para que lo reparen o lo
cambien. Para esto, se debe llamar a nuestro servicio posventa al
1-800-726-0190.

34
ANTES DE HACER REPARAR SU APARATO
Si su aparato tiene algún problema, le recomendamos que llame a nuestro
servicio posventa al 1-800-726-0190 antes de regresar el aparato a
Cuisinart. Un representante le confirmará si su aparato sigue bajo garantía
y le indicará la dirección del centro de servicio más cercano.
Este aparato satisface las más altas exigencias de fabricación y ha sido
diseñado para uso sobre corriente de 120V, usando accesorios y piezas de
repuesto autorizados solamente. Esta garantía excluye expresamente los
daños causados por accesorios, piezas o reparaciones no autorizados por
Cuisinart, así como los daños causados por el uso de un convertidor de
voltaje. Esta garantía no cubre el uso institucional o comercial del
producto, y no es válida en caso de daños causados por mal uso,
negligencia o accidente. Esta garantía excluye expresamente todos los
daños incidentales o consecuentes. Algunos Estados no permiten la
exclusión o limitación de daños incidentales o consecuentes, de modo que
las limitaciones mencionadas pueden no regir para usted. Usted puede
tener otros derechos que varían de un Estado a otro.
Importante: si debe llevar el aparato defectuoso a un centro de servicio no
autorizado, por favor informe al personal del centro de servicio que
deberían llamar al servicio posventa de Cuisinart al 1-800-726-0190 a fin
de diagnosticar el problema correctamente, usar las piezas correctas para
repararlo y asegurarse de que el producto esté bajo garantía.

35

Todas marcas registradas o marcas
de comercio mencionadas en ésta
pertenecen a sus titulares respectivos.
©2015 Cuisinart
150 Milford Road
East Windsor, NJ 08520
Impreso en China
15CE016635
G IB-10608-ESP