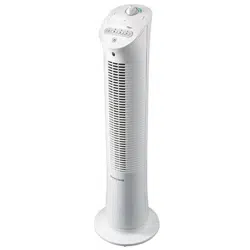
This fan features a patented fused safety plug which is designed to cut off electric current to the fan if an electrical fault occurs. Please see below for more information on how to properly use your fan and replace the safety plug fuse, if needed.
USER SERVICING INSTRUCTIONS
• Grasp plug and remove from the receptacle or other outlet device. Do not unplug by pulling on cord.
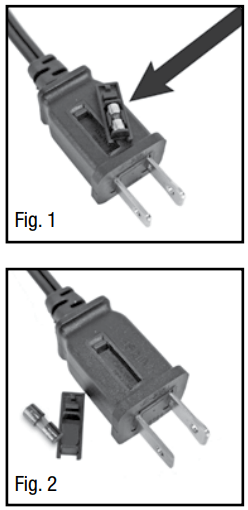
• If your fan loses power and you suspect that the fuse on your fan has blown, you should first remove the spare fuse holder attached to the cord plug (Fig. 1). Remove the spare fuse from the plastic spare fuse holder, and set the spare fuse aside (Fig. 2).
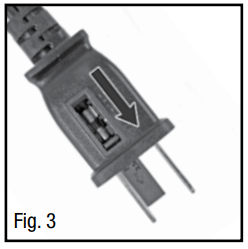
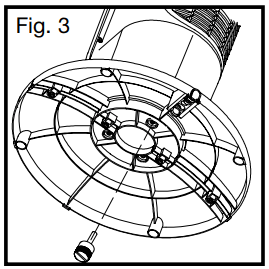
• You can gain access to the blown fuse by sliding open the door found on the side of the plug. Slide the door outward until the blown fuse is fully visible (Fig. 3).
• Carefully remove the blown fuse and snap the replacement fuse into place. Risk of fire. Replace fuse only with 2.5 Amp, 125 volt fuse (provided with product). Fully close the fuse door by sliding back into place. Discard the blown fuse. The plug should now be ready for normal use.
• Risk of fire. Do not replace attachment plug. Contains a safety device (fuse) that should not be removed. Discard product if the attachment plug is damaged.
• If you need further information on how or when to replace the fuse in the safety plug, please contact Kaz Consumer Relations Department by visiting our website.
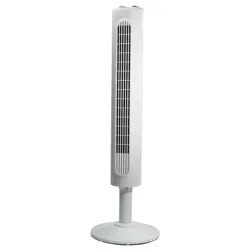
ASSEMBLY INSTRUCTIONS
ASSEMBLY INSTRUCTIONS FOR LOW FAN HEIGHT OPTION
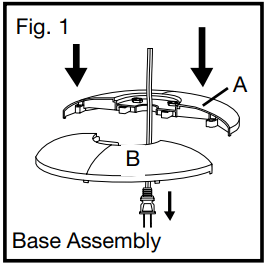
A. Base Assembly
•Align the two portions of the circular base and snap together by gently pushing the 4 round extrusions (Fig. 1, Item A) into the adjacent circles of the connecting piece. (Fig. 1, Item B).
• Place the power cord through the center of the 2 halves of the base assembly.
B. Securing the Tower Fan to the Base
•Carefully turn the fan on its side.
• Pull any slack out of the power cord. Align the base arrow marked as with the tower fan arrow marked as . Rotate the base clockwise to lock the tower fan in place (Fig. 2).
•Secure the base assembly to the tower fan by inserting and tightening the thumb screw to the bottom of the base (Fig. 3).
C. Securing the Cord to the Base
• With the fan on its side, locate the cord holding bracket on the bottom of the base.
• Gently pull any slack out of the power cord, place the power cord securely in the power cord holding bracket and secure the power cord bracket over the power cord (Fig. 4).
• Return the tower fan to its upright position.
Note: Do not operate the tower fan unless it is in its proper, upright position.
Note: Only one thumb screw is needed for the low height option. Do not discard the additional screws as they will be needed for Tall Height Option.
D. Placing the Remote Control in the Storage Area
• Locate the remote control that has been provided with the tower fan. Make sure that the remote control is not thrown out with the packing materials.
• Install batteries into the remote control battery compartment (see Battery Installation/Replacement Instructions).
• Place the remote control in the recessed remote holder located on the top of the fan (Fig. 5).
ASSEMBLY INSTRUCTIONS FOR TALL FAN HEIGHT OPTION (USING PEDESTAL HEIGHT EXTENDER)
NOTE: Product is most stable when pedestal extender is not used.
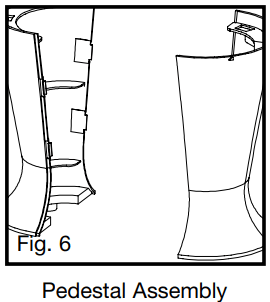
A. Pedestal Assembly
•Line up the left and right pedestal assembly and firmly snap together (Fig. 6).
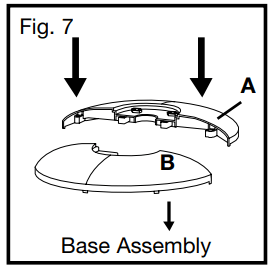
B. Base Assembly
• Align the two portions of the circular base and snap together by gently pushing the 4 round extrusions (Fig. 7, Item A) into the adjacent circles of the connecting piece (Fig. 7, Item B).
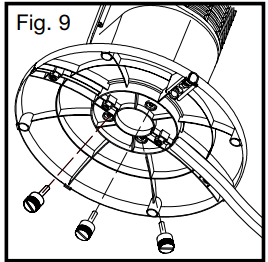
C. Securing the Pedestal to the Base
• Line up the arrow marked as on the pedestal with the arrow marked as on the base (Fig. 8). Align the 3 round extrusions with the 3 holes in the base.
• Secure the base assembly to the pedestal by inserting and tightening the 3 thumb screws in the 3 holes located on the bottom of the base (Fig. 9).
D. Securing the Tower Fan to the Pedestal
• Carefully turn the fan on its side. Place the power cord through the center of the pedestal and base assembly.
• Align the pedestal arrow marked as with the tower fan arrow marked as . Firmly hold the base steady and rotate the pedestal assembly clockwise to lock the tower fan in place (Fig. 10).
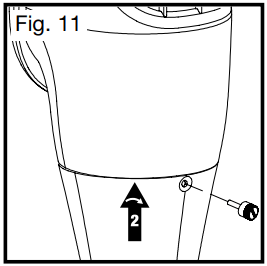
• Secure the pedestal to the tower fan by inserting and tightening 1 thumb screw in the opening located near the top rear of the pedestal assembly (Fig. 11).
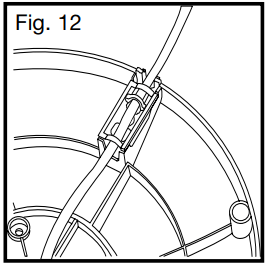
E. Securing the Cord to the Base
• With the fan still on its side, locate the cord holding bracket on the bottom of the base.
• Gently pull any slack out of the power cord, place the power cord securely in the holding bracket and secure the power cord bracket over the power cord (Fig. 12).
• Return the tower fan to its upright position.
Note: Do not operate the tower fan unless it is in its proper, upright position.
Note: Only one thumb screw is needed for the low height option. Do not discard the additional screws as they will be needed for Tall Height Option.
F. Placing the Remote Control in the Storage Area
• Locate the remote control that has been provided with the tower fan. Make sure that the remote control is not thrown out with the packing materials.
• Install batteries into the remote control battery compartment (see Battery Installation/Replacement Instructions).
• Place the remote control in the recessed remote holder located on the top of the fan (Fig. 13).
BATTERY INSTALLATION/REPLACEMENT INSTRUCTIONS
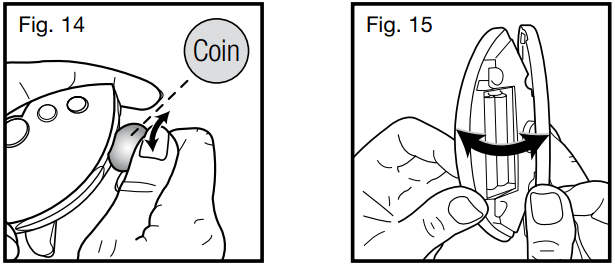
A. Separate the front and rear housing by inserting a small coin into the two recessed slots located on the bottom of the remote (Fig 14). Twist the coin until the housings separate. Pull the remote open, separating the halves (Fig. 15). This will automatically force the lens cover to dislodge.
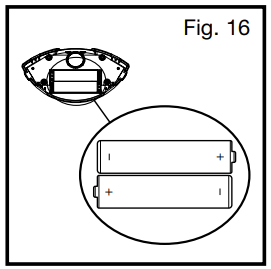
B. Insert 2 AAA batteries into the remote following the directional guides in the recessed slots (Fig. 16).
C. Snap the remote together by lining up the front and back and firmly pressing together.
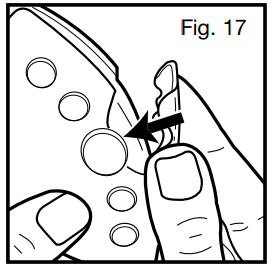
D. Replace the Lens Cover to its original location by snapping back into place (Fig. 17).
NOTE: DO NOT MIX OLD AND NEW BATTERIES. DO NOT MIX ALKALINE, STANDARD (CARBON-ZINC) OR RECHARGEABLE (NICKEL-CADMIUM) BATTERIES.
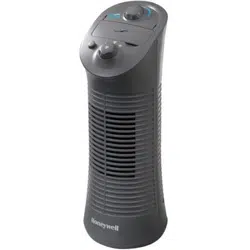
FAN OPERATION AND HY-041 SERIES FAN OPERATION
On/Off
To turn fan on, press the Power button () located on the center of the control panel.
Speed Control
The fan will automatically start on the High speed setting () when initially turned on. To adjust the speed up or down, press the Fan Speed button once for Low speed (), and twice for Medium speed (). Pressing the Fan Speed button a third time will return the fan to High speed operation.
Note: When the fan is turned off and restarted using the Power button, it will operate in the same speed setting that it was last set to. If unplugged, the fan will reset to start on High speed when turned on again.
Breeze Mode
A. Press the Breeze Mode button ( ) once to operate Breeze Mode in the low breeze setting ( ). The low breeze mode operates in accordance with the chosen speed setting of the fan as follows:
High Fan Speed: Breeze Mode will alternate between the high and medium speed settings
Medium Fan Speed: Breeze Mode will alternate between the medium and low speed settings
Low Fan Speed: Breeze Mode will alternate between the low and off setting
B. Press the Breeze Mode button a second time to operate the fan in high Breeze Mode ( ). This will operate the fan in a random high/medium/low pattern regardless of the speed setting.
C. Press the Breeze Mode button a third time to turn the Breeze Mode off.
Oscillation
To activate the Oscillation feature, press the Oscillation button () once. Press the Oscillation button again to turn the Oscillation feature off. Timer
The Timer can be set in two hour increments. Choose from 2, 4, 6, or 8 hour settings by performing the following function:
• 2 hours: Press the Timer button ( ) once.
• 4 hours: Press the Timer button twice.
• 6 hours: Press the Timer button a third time.
• 8 hours: Press the Timer button a fourth time.
Press the Timer button a fifth time to turn the Timer feature off.
EFY-041 SERIES REMOTE EFY-041 SERIES AND HY-041 SERIES REMOTE CONTROL OPERATIONCONTROL OPERATION
Note: The Remote Control functions the same as the control panel on the fan.
On/Off:
Press the Power button () once to turn the fan on. Press the Power button a second time to turn the fan off.
Speed Control
The fan will automatically start on the High speed setting when initially turned on. To adjust the speed up or down, press the Fan Speed button once for Low speed, and twice
for Medium speed. Pressing the Fan Speed button a third time will return the fan to High speed operation.
Note: When the fan is turned off and restarted using the Power button, it will operate in the same speed setting that it was last set to. If unplugged, the fan will reset to start on High speed when turned on again.
Breeze Mode
A. Press the Breeze Mode button () once to operate Breeze Mode in the low breeze setting. The low breeze mode operates in accordance with the chosen speed setting of the fan as follows:
• High Fan Speed: Breeze Mode will alternate between the high and medium speed settings
• Medium Fan Speed: Breeze Mode will alternate between the medium and low speed settings
• Low Fan Speed: Breeze Mode will alternate between the low and off setting
B. Press the Breeze Mode button a second time to operate the fan in high Breeze Mode. This will operate the fan in a random high/medium/low pattern regardless of the speed setting.
C. Press the Breeze Mode button a third time to turn the Breeze Mode off.
Oscillation
To activate the Oscillation feature, press the Oscillation button once.
Press the Oscillation button again to turn the Oscillation feature off.
Timer Function
The Timer can be set in two hour increments. Choose from 2, 4, 6, or 8 hour settings by performing the following function:
• 2 hours: Press the Timer button () once.
• 4 hours: Press the Timer button twice.
• 6 hours: Press the Timer button a third time.
• 8 hours: Press the Timer button a fourth time.
Press the Timer button a fifth time to turn the Timer feature off.
Flashlight Feature:
Press and hold the Flashlight button ( ) located on the back of the remote control to activate the Flashlight.
Note: Only one bulb will activate when using the flashlight feature. The Remote Control has only one light. The second bulb is the Remote Transmitter.
Remote Control Storage
The remote control may be stored in the recessed area located behind the controls when it is not in use.
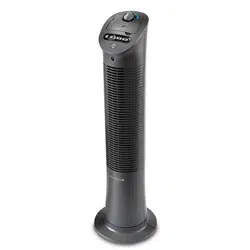
EFY-045, EFY-047 SERIES, HY-047,HY-048 AND HY-049 SERIES FAN OPERATION
Power and Speed Mode
A. Press the Power button () once: Fan will activate and run on High speed ()
B. Press the Power button twice: Fan will change to Medium speed ()
C. Press the Power button a third time: Fan will run at Low speed ()
D. Press the Power button a fourth time: Fan will turn off
Note: The fan will run continuously on high speed when initially activated. The temperature displayed will be the current ambient temperature.
Timer and Temperature Mode
A. Pressing the Mode button () once will activate the Temperature Mode. The thermometer icon () will display and blink on the LCD screen and the desired room temperature will be displayed. The default temperature setting is 74°F (23°C). To change the temperature setting, press the Up and Down buttons (/\ \/). The fan may be programmed in two degree increments between 60°F (16°C) and 90°F (32°C). The temperature will set within 5 seconds of the last time the Up and Down buttons are pressed. The thermometer icon will stop flashing and the current room temperature will once again be displayed. The fan will automatically turn off when the selected temperature is reached. If the room temperature exceeds the selected temperature setting, the fan will turn on.
B. Press the Mode button a second time to activate the Timer Mode. The clock icon () will display and blink on the LCD screen.
Note: The temperature set mode will automatically disengage once the Timer Mode is activated. The LCD screen will display a default timer setting of 10 hours. To set the timer, use the Up and Down buttons to set the timer off function between 1 and 12 hours in 1 hour increments.
The timer will set itself within 5 seconds of the last time the Up and Down buttons are pressed. The timer icon will stop flashing. The current room temperature will once again be displayed along with the chosen timer hour setting followed by “HR”. When time runs out the fan will turn off.
C. Press the Mode button a third time to activate the combined Temperature/Timer Mode. In this mode your fan will operate based on the temperature and timer settings set previously in A and B. If you have not set one of your modes, you may press the Temp/Timer Mode button a fourth time to start over and follow instructions A and B.
D. Press the Mode button a fourth time to disengage the Temperature/Timer modes and return to the continuous run mode.
Note: When operating in either mode, the temperature or timer can be adjusted by pressing the Up or Down buttons. The appropriate icon will blink for 5 seconds after the last adjustment is made. When operating in the Temperature/Timer combination mode, no changes can be made to the previous settings. To change the temperature or timer settings for the combination mode, you must go back through the temperature and timer set modes and then enter the combination mode.
Oscillation and Ionizer Mode
NOTE: The HY-049 does NOT include the Ionizer Feature
The fan may be operated in Oscillation or Ionizer mode independently or may be operated using both features simultaneously.
A. Press the Oscillation/lonization button () once to activate oscillation
B. Press the Oscillation/lonization button twice to activate ionization in addition to oscillation
C. Press the Oscillation/lonization button a third time to operate the ionizer and turn the oscillation fan off
D. Press the Oscillation/lonization button a fourth time to turn the ionizer off.
Breeze Mode
A. Press the Breeze Mode button () once to operate Breeze Mode in the low breeze setting. The low breeze mode operates in accordance with the chosen speed setting of the fan as follows:
• High Fan Speed: Breeze Mode will alternate between the high and medium speed settings
• Medium Fan Speed: Breeze Mode will alternate between the medium and low speed settings
• Low Fan Speed: Breeze Mode will alternate between the low and off setting
B. Press the Breeze Mode button a second time to operate the fan in high Breeze Mode. This will operate the fan in a random high/medium/low pattern regardless of the speed setting.
C. Press the Breeze Mode button a third time to turn the Breeze Mode off.
°F to °C Display Change
This is done by simultaneously pressing and holding the Up and Down buttons v) for 2 seconds.
Note: The EFY-045, EFY-047, HY-047,HY-048 and HY-049 Series are not air purifiers. These fans are equipped with an ionizer feature which helps freshen the air with negative ions creating a crisp, natural sensation. These units do not make any claims regarding air cleaning or purification and should not be expected to perform as such. If you have allergy or asthma symptoms that could be triggered by the presence of an ionizer, an alternate product would be advisable. „
EFY-045 SERIES, HY-047, HY-048 AND HY-049 SERIES REMOTE CONTROL OPERATION
Power and Fan Speed Mode
A. Press the Power button ( ) once: Fan will activate and run on High speed ( )
B. Press the Power button twice: Fan will change to Medium speed ( )
C. Press the Power button a third time: Fan will run at Low speed ()
D. Press the Power button a fourth time: Fan will turn off
Note: The fan will run continuously on high speed when initially activated. The temperature displayed will be the current ambient temperature.
Up and Down Buttons
When the fan is operating in Temperature or Timer Mode, press the Up or Down buttons ( ^ v ) on the remote control to change the temperature or timer settings.
Note: The Temperature and Timer, or the combined Temperature/Timer mode cannot be entered by using the remote control.
Oscillation and Ionizer Mode
NOTE: The HY-049 does NOT include the Ionizer Feature
The fan may be operated in Oscillation or Ionizer mode independently or may be operated using both features simultaneously.
A. Press the Oscillation/Ionization button ( ) once to activate oscillation
B. Press the Oscillation/Ionization button twice to activate ionization in addition to oscillation
C. Press the Oscillation/Ionization button a third time to operate the ionizer and turn the oscillation off
D. Press the Oscillation/Ionization button a fourth time to turn the ionizer off.
Note: The Ionizer is activated when the green light on the receiver is on.
Breeze Mode
A. Press the Breeze Mode button ( ) once to operate Breeze Mode in the low breeze setting ( ). The low breeze mode operates in accordance with the chosen speed setting of the fan as follows:
High Fan Speed: Breeze Mode will alternate between the high and medium speed settings
Medium Fan Speed: Breeze Mode will alternate between the medium and low speed settings
Low Fan Speed: Breeze Mode will alternate between low and off setting
B. Press the Breeze Mode button a second time to operate the fan in high Breeze setting ( ). This will operate the fan in a random high/medium/low pattern regardless of the speed setting.
C. Press the Breeze Mode button a third time to turn the Breeze Mode off.
Flashlight Feature:
Note: Only one bulb will activate when using the flashlight feature. The Remote Control has only one light. The second bulb is the Remote Transmitter.
Press and hold the Flashlight button ( ) located on the back of the remote control to activate the Flashlight.
Remote Control Storage
The remote control may be stored in the recessed area located behind the bezel controls when it is not in use.
USER SERVICING INSTRUCTIONS EFY-041, HY-041, EFY-047, HY-047, HY-048 AND HY-049
A. CLEANING THE FILTER
Note: The filter feature is only available on the EFY-041 Series, EFY-047 Series, HY-041 Series, HY-047 Series, and HY-048 Series. The EFY-045 Series does not have this feature.
The filter is located behind the rear grille of the fan. To clean the filter:
Be sure the fan is turned off and the power cord in unplugged from the outlet.
Gently unsnap the rear grille from the fan (Fig. 18) and remove the filter.
Run the filter under cool water to remove the accumulation of particles.
Once filter has been cleaned let it dry completely before placing back in fan. Do not wring, bend or pull on the filter as this may cause damage.
Once the filter is completely dry, replace the filter and firmly snap rear grille cover back in place.
B. CLEANING THE FAN
Ensure the fan is turned off and unplugged.
Use only a soft cloth to gently wipe the outer surfaces of the fan clean.
To clean between the grilles and fan blade area, we recommend using a pipe cleaner, flexible dustwand, vacuum cleaner or compressed air to gently remove the dust.
To clean the rear grille use a soft dry cloth. Once the rear grille is clean replace filter and rear grille before operating. (Fig. 19)
This fan is equipped with a safety “OFF” switch to prevent the fan from operating if the rear grille is removed or not properly assembled.
DO NOT immerse the fan in water and never allow water to drip into the motor housing.
DO NOT use gasoline, paint thinner or other chemicals to clean the fan.
For storage, you may leave the fan assembled and covered to protect it from dust. Store the fan in a cool, dry place.
USER SERVICING INSTRUCTIONS
CLEANING AND STORAGE
• Be sure the fan is turned off and the power cord is unplugged from the outlet.
• Use only a soft, damp cloth to gently wipe the outer surfaces of the fan clean.
•To clean between the grilles, we recommend using a pipe cleaner, flexible dustwand, vacuum cleaner or compressed air to gently remove the dust.
• DO NOT immerse the fan in water and never allow water to drip into the motor housing.
• DO NOT use gasoline, paint thinner or other chemicals to clean the fan.
• For storage, you may leave the fan assembled and covered to protect it from dust. Store the fan in a cool, dry place.
 with the tower fan arrow marked as
  . Rotate the base clockwise to lock the tower fan in place (Fig. 2).


 on the base (Fig. 8). Align the 3 round extrusions with the 3 holes in the base.
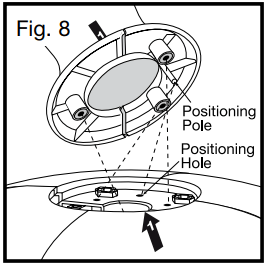
 with the tower fan arrow marked as
  . Firmly hold the base steady and rotate the pedestal assembly clockwise to lock the tower fan in place (Fig. 10).
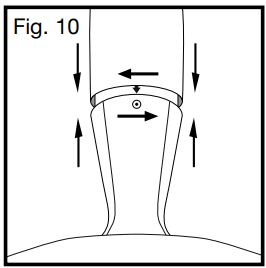

 ) located on the center of the control panel.
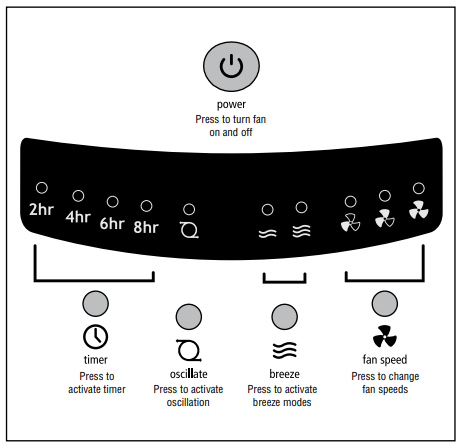


 ). Pressing the Fan Speed button a third time will return the fan to High speed operation.
 ) once to operate Breeze Mode in the low breeze setting (
  ). The low breeze mode operates in accordance with the chosen speed setting of the fan as follows:
 ) once. Press the Oscillation button again to turn the Oscillation feature off.
  ) once.
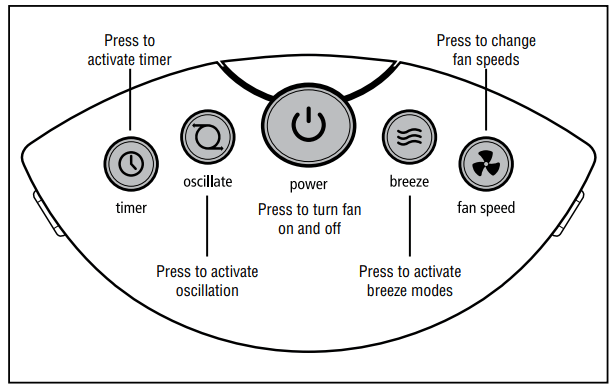
 ) once to turn the fan on. Press the Power button a second time to turn the fan off.
 ) located on the back of the remote control to activate the Flashlight.


 ) once to activate oscillation