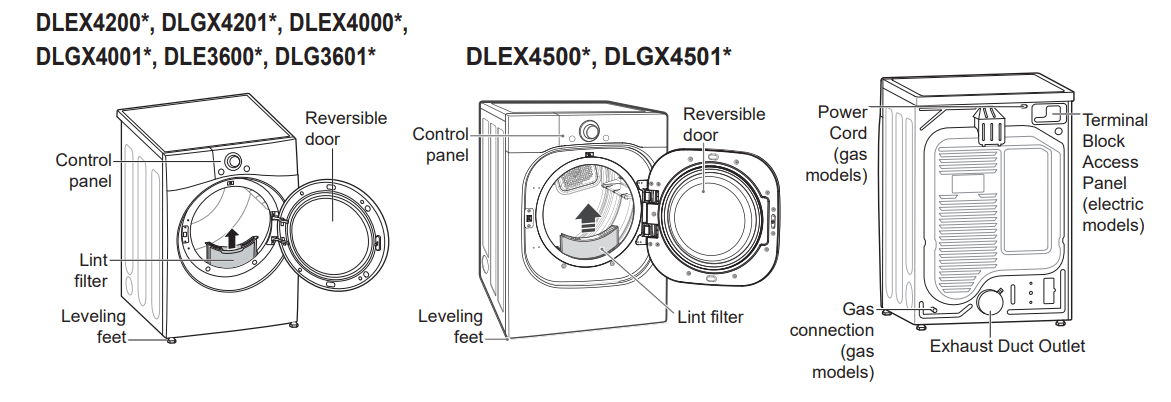
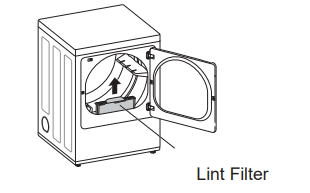
If the lint filter has not already been cleaned, lift out the filter and remove the lint from the last load. This will help ensure the fastest and most efficient drying performance. Make sure to reinstall the filter, pressing down until it clicks firmly into place.
2. Load the Dryer
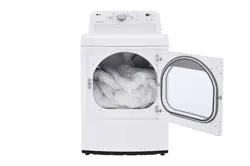
Load the dryer with the wet laundry from the washer. If the load is extra large, you may need to divide it into smaller loads for proper performance and fabric care.
3. Turn on the Dryer
Press the Power button to turn on the dryer. The cycle LEDs will illuminate and a chime will sound.
4. Select a Cycle
Turn the cycle selector knob in either direction until the LED for the desired cycle is on. The preset temperature, dry level, and option settings for that cycle will be shown. Default settings for the selected cycle can now be changed if desired. Refer to the Cycle Setting and Options page for details.
5. Begin Cycle
Press the Start/Pause button to begin the cycle. The cycle can be paused at any time either by opening the door or by pressing the Start/Pause button. If the cycle is not restarted within 60 minutes of being paused, the dryer will shut off and the settings will be lost.
6. End of Cycle
When the cycle is finished, the chime will sound. Immediately remove your clothing from the dryer to reduce wrinkling. If Wrinkle Care is selected, the dryer will tumble briefly every few minutes to help prevent wrinkles from setting in the clothes.
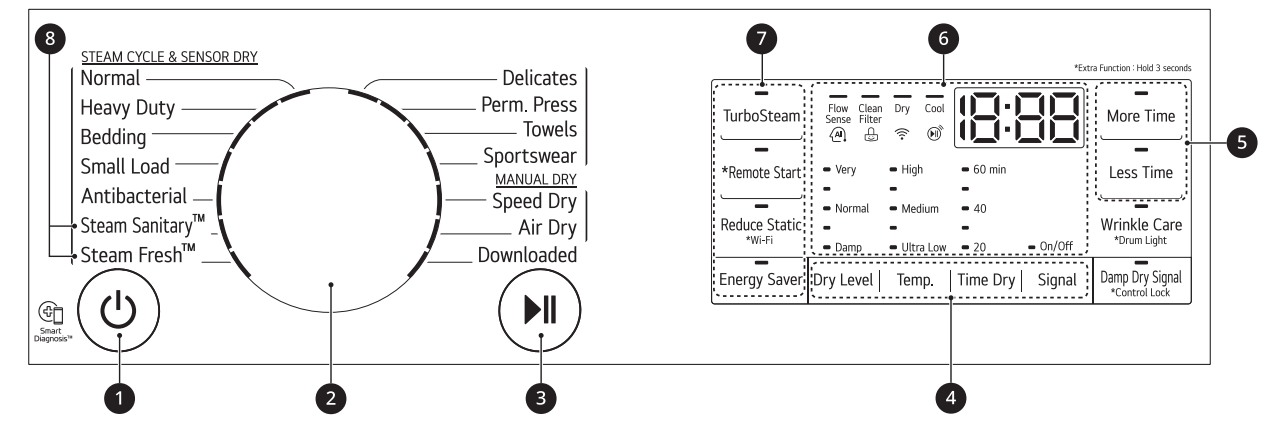
Press the button to turn the dryer ON. Press again to turn the dryer OFF.
2. Cycle Selector Knob
Turn this knob to select the desired cycle. Once the desired cycle has been selected, the standard presets will be shown in the display. On Manual Dry cycles, these settings can be adjusted using the cycle modifier buttons anytime before starting the cycle.
3. Start/Pause Button
Press this button to start the selected cycle. If the dryer is running, use this button to pause the cycle without losing the current settings.
4. Cycle Modifier Buttons
Use these buttons to select the desired cycle settings for the selected cycle. The current settings are shown in the display. Press the button for that option to view and select other settings.
5. More Time/Less Time Buttons
Use these buttons with the Time Dry and other Manual Dry cycles to adjust the drying time. Press the More Time button to increase the selected manual cycle time by 5 minutes; press the Less Time button to decrease the cycle time by 5 minutes.
6. Time and Status Display
The display shows the settings, estimated time remaining, options, and status messages for the dryer.
7. Cycle Option Buttons
Press each of these buttons to select additional cycle options. Press and hold any button marked with an asterisk for 3 seconds to activate a special function.
8. Steam Functions
LG’s steam technology allows you to inject fabrics with a swirling jet of steam to refresh clothes, reduce static, and make ironing easier. Simply select the Steam Fresh™ or Steam Sanitary™ cycle or add a Steam option to selected cycles.
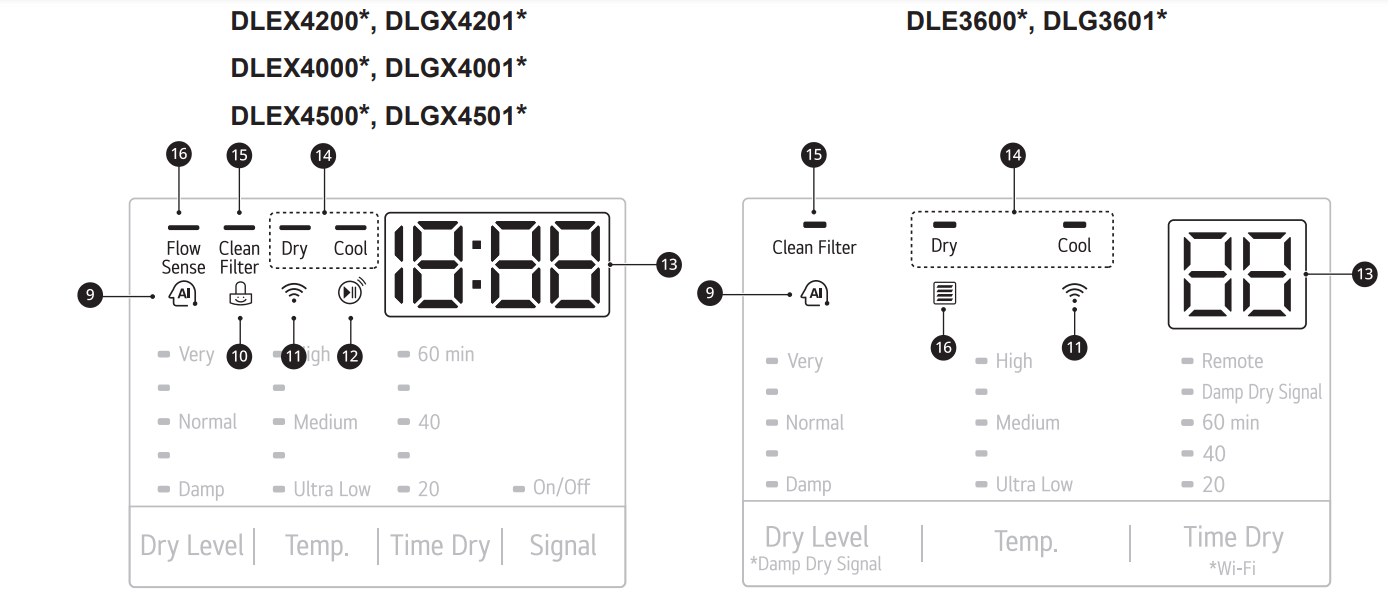
9. AI Sensor Dry Indicator
• AI Sensor Dry optimizes drying times and temperatures by detecting the laundry’s characteristics.
• The indicator lights up when the Normal cycle is selected with the Normal dry level, except when the Energy Saver option is turned on.
10. Control Lock Indicator
When Control Lock is set, the Control Lock indicator appears and all buttons are disabled except the POWER button. This prevents children from changing settings while the dryer is operating.
11. WI-FI Indicator
When the appliance is connected to the Internet through a home Wi-Fi network, this indicator appears.
12. Remote Start Indicator
This indicator lights up when the Remote Start feature is activated.
13. Estimated Time Remaining
This display shows the estimated time remaining for Sensor Dry cycles or the actual time remaining for Time Dry or Manual Dry cycles.
14. Cycle Completion Indicator
This portion of the display shows which stage of the drying cycle is currently underway (Dry or Cool).
15. Clean Filter Reminder
The display will show Clean Filter when the dryer is turned on as a reminder to clean the filter. It turns off when the START/PAUSE button is pressed.
16. Flow Sense Duct Blockage Sensing System Indicator
The Flow Sense™ duct blockage sensing system detects and alerts you to blockages in the ductwork that reduce exhaust flow from the dryer. Maintaining a clean exhaust system improves operating efficiency and helps minimize service calls, saving you money
Cycle Modifier Buttons
Sensor Dry cycles have preset settings that are selected automatically. Manual Dry cycles have default settings, but you may also customize the settings using the cycle modifier buttons. Press the button for that option to view and select other settings.
Dry Level
Use this button to select the level of dryness for the cycle. Press the Dry Level button repeatedly to scroll through available settings.
• This option is only available with Sensor Dry cycles.
• The dryer will automatically adjust the cycle time. Selecting dry levels above Normal will increase the cycle time. Selecting dry levels below Normal will decrease the cycle time.
• Use the dry level between Normal and Damp or the Damp dry level for items that you wish to iron.
Temp.
Use this button to adjust the temperature setting. This allows precise care of fabrics and garments. Press the Temp. button repeatedly to scroll through available settings.
Time Dry
Use this button to manually select the drying time, from 20 to 60 minutes, in 10-minute increments. Use this for small loads or to remove wrinkles. Use the More Time/Less Time buttons to add or reduce the drying time in 5-minute increments.
Option Buttons
The dryer features several additional cycle options to customize cycles to meet individual needs. Certain option buttons also feature a special function that can be activated by pressing and holding that option button for 3 seconds.
Adding Cycle Options to a Cycle
Turn on the dryer and turn the cycle selector knob to select the desired cycle.
Use the cycle modifier buttons to adjust the settings for that cycle.
Press the cycle option button(s) to add the desired options. A confirmation message is shown in the display.
Press the Start/Pause button to start the cycle. The dryer starts automatically
Wrinkle Care
Selecting this option will tumble the load periodically for up to 3 hours after the selected cycle, or until the door is opened. This is helpful in preventing wrinkles when you are unable to remove items from the dryer immediately
MAINTENANCE
Regular Cleaning
Cleaning the Exterior
Proper care of your dryer can extend its life. The outside of the machine can be cleaned with warm water and a mild, nonabrasive household detergent. Immediately wipe off any spills with a soft, damp cloth.
Cleaning the Interior
Wipe around the door opening and seal with a soft, damp cloth to prevent lint and dust buildup that could damage the door seal.
Clean the window with a soft cloth dampened with warm water and a mild, nonabrasive household detergent, then wipe dry.
The stainless steel drum can be cleaned with a conventional stainless steel cleaner, used according to the manufacturer’s specifications. Never use steel wool or abrasive cleansers; they may scratch or damage the surface.
Cleaning Around and Under the Dryer
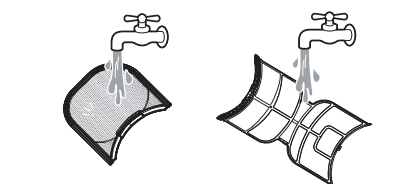
Vacuum lint and dust from around the dryer and underneath it regularly. Vent ductwork should be checked for lint buildup and cleaned at least once per year. If any noticeable reduction in airflow or drying performance occurs, immediately check ductwork for obstructions and blockages.
Maintaining Ductwork
Vent ductwork should be checked for lint buildup once per month and cleaned at least once per year. If any noticeable reduction in airflow or drying performance occurs, immediately check ductwork for obstructions and blockages. Contact a qualified technician or service provider.
Cleaning the Lint Filter
Always clean the lint from the filter after every cycle.
To clean the lint filter, open the dryer door and pull the lint filter straight up. Then:
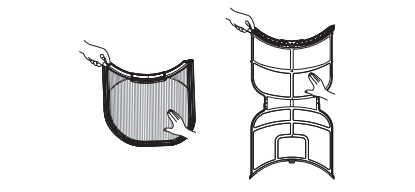
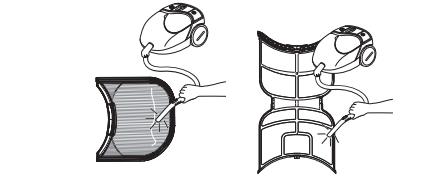
1 For everyday cleaning, roll any lint off the filter with your fingers, or
2 Vacuum the lint filter.
3 If the lint filter has become very dirty or clogged with fabric softener, wash the lint filter in warm, soapy water and allow it to dry thoroughly before reinstalling.
TROUBLESHOOTING
FAQs: Frequently Asked Questions
Q: When I press a button, why does my dryer beep and then nothing happens?
A: The Control Lock feature is turned on. To turn off Control Lock, turn the dryer on, then press and hold the button that has *Control Lock on or under it for 3 seconds.
Q: Why does my dryer take so long to dry clothes?
A: Proper airflow is critical to the efficient operation of clothes dryers. A lint filter which is full of lint or clogged with fabric softener sheet residue can reduce the airflow to the point that the time required to dry clothing will be greatly increased. Another factor affecting dry time is your home exhaust system. An exhaust system which is dirty and clogged with lint, or is excessively long, needs to be professionally cleaned or repaired.
Q: Why does my dryer start by itself every few minutes?
A: This is how the Wrinkle Care feature works. The dryer runs briefly every few minutes for up to 3 hours after the cycle finishes. This feature is designed to help prevent wrinkles from setting in when the dryer is not unloaded immediately after the cycle is finished.
Q: Why does my dryer show 3 minutes when I select the Steam Fresh™ cycle?
A: When the Steam Fresh™ cycle is selected, the dryer displays the recommended number of garments for the cycle, not the estimated cycle time, until the cycle is started. Use the More Time or Less Time buttons to adjust the load size setting for the number of garments you desire. For a large load or single bulky item use the (big) setting.
User Support Videos
For further assistance, there are videos and tutorials available through the LG website.
On the lg/us home page, click on the Support menu tab to bring up the menu selections. Select Video Tutorials.
Type Dryer in the search box on the new page and click the Search button.
Scan this QR code to quickly access the video search page on the LG website.
Before Calling for Service
This dryer is equipped with an automatic error-monitoring system to detect and diagnose problems at an early stage. If the dryer does not function properly or does not function at all, check the following before you call for service.
Operation
Problem
Possible Cause
Solutions
The Flow Sense™ indicator remains active after clearing the restriction in the venting.
After clearing the restriction, the Flow Sense™ system requires multiple, consecutive cycles to determine that the performance value has improved before the Flow Sense™ indicator is reset.
• If the Flow Sense™ indicator remains active for more than five cycles after the restriction has been cleared, call for service.
Dryer will not turn on
Power cord is not properly plugged in.
• Make sure that the plug is securely plugged into a grounded outlet matching the dryer’s rating plate
House fuse is blown, circuit breaker has tripped, or power outage has occurred.
• Reset circuit breaker or replace fuse. Do not increase fuse capacity. If the problem is a circuit overload, have it corrected by a qualified electrician.
Dryer does not heat
House fuse is blown, circuit breaker has tripped, or power outage has occurred.
• Reset circuit breaker or replace fuse. Do not increase fuse capacity. If the problem is a circuit overload, have it corrected by a qualified electrician.
• NOTE: Due to the design of electric dryers, it is possible for a circuit problem to allow an electric dryer to run without heat.
Gas supply or service is turned off.
• Confirm that the house gas shutoff and the dryer gas shutoff valves are both fully open. Even if gas is not supplied to the dryer, it will run and no error codes will display. Verify that other gas appliances in the home are working normally.
ENERGY SAVER option selected (on some models)
• If using the Normal cycle, deselect the ENERGY SAVER option. The Energy Saver option is selected by default. This option reduces energy use by adding an air dry section to the beginning of the cycle. It is normal to feel no heat at the beginning of the cycle while in ENERGY SAVER mode.
Clothes take too long to dry
Exhaust ducts are blocked, dirty, or duct run is too long.
• Confirm that the exhaust duct is properly configured and free of debris, lint, and obstructions. Make sure that outside wall dampers can open properly and are not blocked, jammed, or damaged.
Load is not properly sorted.
• Separate heavy items from lightweight items. Larger and heavier items take longer to dry. Light items in a load with heavy items can fool the sensor because the light items dry faster
Display shows error code nP
Electric dryer power cord is not connected correctly, or house power supply is incorrect.
• Check the power supply or the connection of the power cord to the terminal block.
Display shows error code gAS
Gas supply or service turned off (gas models only).
• Confirm that house gas shutoff and the dryer gas shutoff are both fully open.
Clothes take too long to dry
Large load of heavy fabrics.
• Heavy fabrics take longer to dry because they tend to retain more moisture. To help reduce and maintain more consistent drying times for large and heavy fabrics, separate these items into smaller loads of a consistent size.
Dryer controls are not set properly.
• Use the appropriate control settings for the type of load you are drying. Some loads may require an adjustment of the dry level setting for proper drying.
Lint filter needs to be cleaned.
• Remove the lint from the filter before every load. With the lint removed, hold the filter up to a light to see if it is dirty or clogged. With some loads that produce high amounts of lint, such as new bath towels, it may be necessary to pause the cycle and clean the filter during the cycle.
House fuse is blown, circuit breaker has tripped, or power outage has occurred.
• Reset circuit breaker or replace fuse. Do not increase fuse capacity. If the problem is a circuit overload, have it corrected by a qualified electrician.
• NOTE: Due to the design of electric dryers, it is possible for a circuit problem to allow an electric dryer to run without heat.
Dryer is overloaded.
• Divide extra large loads into smaller loads for better drying performance and efficiency
Dryer is underloaded.
• If you are drying a very small load, add a few extra items to ensure proper tumbling action. If the load is very small and you are using SENSOR DRY cycles, the electronic control cannot properly sense the dryness of the load and may shut off too soon. Use TIME DRY or add some extra wet clothes to the load.
ENERGY SAVER option selected (on some models)
• If using the Normal cycle, deselect the ENERGY SAVER option. This option reduces energy use by adding an air dry section to the beginning of the cycle.
Drying time is not consistent
Heat settings, load size, or dampness of clothing is not consistent.
• The drying time for a load will vary depending on the type of heat used (electric, natural gas, or LP gas), the size of the load, the type of fabrics, the wetness of the clothes, and the condition of the exhaust duct and lint filter. Even an unbalanced load in the washer can cause poor spinning, resulting in wetter clothes which will take longer to dry.
Performance
Problem
Possible Cause
Solutions
Greasy or dirty spots on clothes
Fabric softener used incorrectly.
• Confirm and follow the instructions provided with your fabric softener.
Clean and dirty clothes are being dried together.
• Use your dryer to dry only clean items. Soil from dirty clothes can transfer to the clean clothes in the same or later loads.
Clothes were not properly cleaned or rinsed before being placed in the dryer.
• Stains on dried clothes could be stains that were not removed during the washing process. Make sure that clothes are being completely cleaned or rinsed according to the instructions for your washer and detergent. Some difficult soils may require pre-treating prior to washing.
Clothes are wrinkled
Clothes dried too long (over dried)
• Over drying a load of laundry can lead to wrinkled clothes. Try a shorter drying time or LESS DRY setting and remove items while they still retain a slight amount of moisture.
Clothes left in dryer too long after cycle ends.
• Use the WRINKLE CARE option. This feature will tumble the clothes briefly every few minutes for up to 3 hours to help prevent wrinkling.
Clothes are shrinking
Garment care instructions are not being followed.
• To avoid shrinking your clothes, always consult and follow fabric care instructions. Some fabrics will naturally shrink when washed. Other fabrics can be washed but will shrink when dried in a dryer. Use a low or no heat setting.
Lint on clothes
Lint filter not cleaned properly.
• Remove the lint from the filter before every load. With the lint removed, hold the filter up to a light to see if it is dirty or clogged. If it looks dirty, follow the cleaning instructions. With some loads that produce high amounts of lint, it may be necessary to clean the filter during the cycle.
Laundry not sorted properly.
• Some fabrics are lint producers (i.e., a fuzzy white cotton towel) and should be dried separately from clothes that are lint trappers (i.e., a pair of black linen pants).
Excess static in clothes.
• Use a fabric softener to reduce static electricity. Be sure to follow the manufacturer’s instructions. Overdrying a load of laundry can cause a buildup of static electricity. Adjust settings and use a shorter drying time, or use SENSOR DRY cycles.
Dryer is overloaded.
• Divide extra large loads into smaller loads for drying.
Tissue, paper, etc., left in pockets.
• Check pockets thoroughly before washing and drying clothes.
Excess static in clothes after drying
Fabric softener is not used or used incorrectly.
• Use a fabric softener or the REDUCE STATIC option, if equipped, to reduce static electricity. Be sure to follow the manufacturer’s instructions.
Clothes dried too long (overdried).
• Overdrying a load of laundry can cause a buildup of static electricity. Adjust settings and use a shorter drying time, or use MANUAL DRY cycles. Select a LESS DRY setting on SENSOR DRY cycles, if necessary.
Drying synthetics, permanent press, or synthetic blends.
• These fabrics are naturally more prone to static buildup. Try using fabric softener, or use LESS DRY and/or shorter TIME DRY time settings.
Clothes have damp spots after a Sensor Dry cycle.
Very large load or very small load.Single large item such as a blanket or comforter.
• If items are too tightly packed or too sparse the sensor may have trouble reading the dryness level of the load. Use a TIME DRY cycle for very small loads.
• Large, bulky items such as blankets or comforters can sometimes wrap themselves into a tight ball of fabric. The outside layers will dry and register on the sensors, while the inner core remains damp. When drying a single bulky item, it may help to pause the cycle once or twice and rearrange the item to unwrap and expose any damp areas.
• To dry a few remaining damp items from a very large load or a few damp spots on a large item after a sensor cycle has completed, empty the lint trap, then set a TIME DRY cycle to finish drying the item(s).
Trouble connecting appliance and smartphone to WiFi network
The password for the WiFi network was entered incorrectly.
• Delete your home Wi-Fi network and begin the registration process again.
Mobile data for your smartphone is turned on.
• Turn off the Mobile data on your smartphone before registering the appliance.
The wireless network name (SSID) is set incorrectly.
• The wireless network name (SSID) should be a combination of English letters and numbers. (Do not use special characters.)
The router frequency is not 2.4 GHz.
• Only a 2.4 GHz router frequency is supported. Set the wireless router to 2.4 GHz and connect the appliance to the wireless router. To check the router frequency, check with your Internet service provider or the router manufacturer.
The appliance is too far from the router.
• If the appliance is too far from the router, the signal may be weak and the connection may not be configured correctly. Move the router closer to the appliance or purchase and install a Wi-Fi repeater.
Steam Functions (Steam Models)
Problem
Possible Cause
Solutions
Water drips from nozzle when STEAM CYCLE starts
This is normal.
• This is steam condensation. The dripping water will stop after a short time.
Garments still wrinkled after Steam Fresh™
Too many or overly different types of garments in dryer.
• Small loads of 1 to 5 items work best. Load fewer garments. Load similar types of garments.
Creases or pleats are gone from garments after Steam Fresh™
The function of this cycle is to remove wrinkles from fabric.
• Use an iron to replace creases and pleats in garments.
Garments have static after using the Reduce Static option
This is normal.
• The amount of static experienced will depend on the individual moisture level in the skin.
Garments are too damp or too dry after using the Reduce Static option
Correct drying options not selected.
• Select the load weight manually before starting the Reduce Static option.
Steam does not generate, but no error code is shown
Water level error.
• Unplug dryer and call for service.
Water drips from door during STEAM CYCLE
This is normal.
• Condensation will normally form on the inside of the dryer door during steam operation. Some condensation may drip out the bottom of the door
Steam is not visible during STEAM CYCLE
This is normal.
• Steam vapor is difficult to see when the door is closed. However, condensation will normally form on the inside of the dryer door if the steam system is operating normally
Drum does not turn during STEAM CYCLE
This is normal.
• The drum is turned off so that the steam vapor remains in the drum. The drum will normally turn for about 2 seconds once a minute.
Cannot see steam vapor at the beginning of cycle
This is normal.
• Steam is released at different stages of the cycle for each option.
Odors remain in clothing after Steam Fresh™
Steam Fresh™ did not remove odor completely.
• Fabrics containing strong odors should be washed in a normal cycle.
Error Codes
Problem
Possible Cause
Solutions
Error code: tE1 through tE7
Temperature sensor failure.
• Turn off the dryer and call for service.
Display shows error code: PS
Power cord is connected incorrectly.
• Check the connection of the power cord to the terminal block.
*Flow Sense™ indicator shows four bars during the drying cycle or the display shows "d80" after drying
* This warning light is not a dryer failure and is not covered by the dryer warranty. Contact a duct cleaning service to set up an appointment to have your exhaust system cleaned and inspected.
Exhaust system is too long or has too many turns/restrictions.
• Install a shorter or straighter duct run. See the Installation Instructions for details.
Partial blockage of the ductwork due to lint buildup or other foreign object.
• Ductwork should be checked/cleaned immediately. Dryer can be used in this condition, but drying times will be longer and energy consumption will increase.
The appliance has detected a restriction in the external dryer venting.
• If exhaust restrictions are sensed by the Flow Sense™ system, the indicator will remain on for 2 hours after the end of the cycle. Opening the door or pressing the Power button will turn off the display.
The Flow Sense™ indicator remains active after clearing the restriction in the venting.
After clearing the restriction, the Flow Sense™ system requires multiple, consecutive cycles to determine that the performance value has improved before the Flow Sense™ indicator is reset.
• If the Flow Sense™ indicator remains active for more than five cycles after the restriction has been cleared, call for service.
The display shows
More Time button was pressed.
• This display indicates that the steam option has been set for a “big” item such as a comforter.
Press the LESS TIME button to reduce the indicated load size.
The display shows
The duct work is about 80% - 95% blocked. (“d80”, “d90” or “d95” error code is displayed for 2 hours only)
• Do not use the dryer until the exhaust system has been cleaned and/or repaired. Using the dryer with a severely restricted exhaust is dangerous and could result in a fire or other property damage.
Check the outside dryer vent while the dryer is operating to make sure there is strong airflow.
If the exhaust system is extremely long, have it repaired or rerouted.
House exhaust system blocked.
• Keep the area around the dryer clean and free of clutter.
Check vent hood for damage or lint clogging. Make sure the area around the vent hood is clear.
Check Filter indicator is on during the drying cycle
Lint filter not cleaned properly.
• Remove the lint from the filter before every load. With the lint removed, hold the filter up to a light to see if it is dirty or clogged. If it looks dirty, follow the cleaning instructions. With some loads that produce high amounts of lint, it may be necessary to clean the filter during the cycle.


 (big) setting.