
www.lg.com
20CAV37K
24CAV37K
CLOUD(LED LCD) MONITOR MODEL
Owner's Manual
CLOUD MONITOR
LED LCD MONITOR
(LED MONITOR*)
Please read this manual carefully before operating
your set and retain it for future reference.
*LG LED Monitors are LCD Monitors with LED Backlighting.

2
ENG
English
Table of Contents
TABLE OF CONTENTS
3 ASSEMBLING AND
PREPARING
3 Unpacking
4 Partsandbuttons
5 LiftingandmovingtheMonitor
5 SettingUptheMonitorset
5 - AttachingtheStandBase
6 - Mountingonatable
6 - Adjustingtheangle
7 - Adjustingthestandheight
7 - UsingtheKensingtonlockingdevice
8 - Detachingthestandbase
8 - Usingthecableholder
8 - Detachingthestandbody
9 - Swivelstand
9 - UsingthePivotfunction
10 - Installingthewallmountplate
10 - Mountingonawall
12 USING THE MONITOR SET
12 ConnectingInputSignalCable
12 - D-SUBINconnection-PC
13 - DVIconnection
14 ConnectingLAN/Peripherals
14 - LANconnection
15 - Peripheraldeviceconnection
16 - SelfImageAdjustment
17 CUSTOMIZING SETTINGS
18 CustomizingSettings
18 - MenuSettings
19 - Picture
20 - Color
21 - Display
22 - Others
23 - Volume
24 TROUBLESHOOTING
26 PRODUCT SPECIFICATION
26 20CAV37K
27 24CAV37K
28 PresetMode
28 Indicator
29 USING CLOUD SOLUTION

3
ENG
English
ASSEMBLING AND PREPARING
ASSEMBLING AND PREPARING
Unpacking
Pleasecheckwhetherallthecomponentsareincludedintheboxbeforeusingtheproduct.Ifthereare
missingcomponents,contacttheretailstorewhereyoupurchasedtheproduct.Notethattheproductand
componentsmaylookdifferentfromthoseshownhere.
OnlyuseanapprovedLGpoweradapter.
Damagecausedbyotherpoweradaptersisnotcoveredbywarranty.
Notethatthecomponentsmaylookdifferentfromthoseshownhere.
Withoutpriornotice,allinformationandspecificationsinthismanualaresubjecttochangetoimprove
theperformanceoftheproduct.
Topurchaseoptionalaccessories,visitanelectronicsstoreoronlineshoppingsiteorcontacttheretail
storewhereyoupurchasedtheproduct.
Power Cord
User Manual/Card
CAUTION
NOTE
D-SUB Cable
(Thiscableisnotincludedinall
countries.)
Stand Base
One Screw
Cable Holder
AC-DC Adapter
4
ENG
English
ASSEMBLING AND PREPARING
1
1
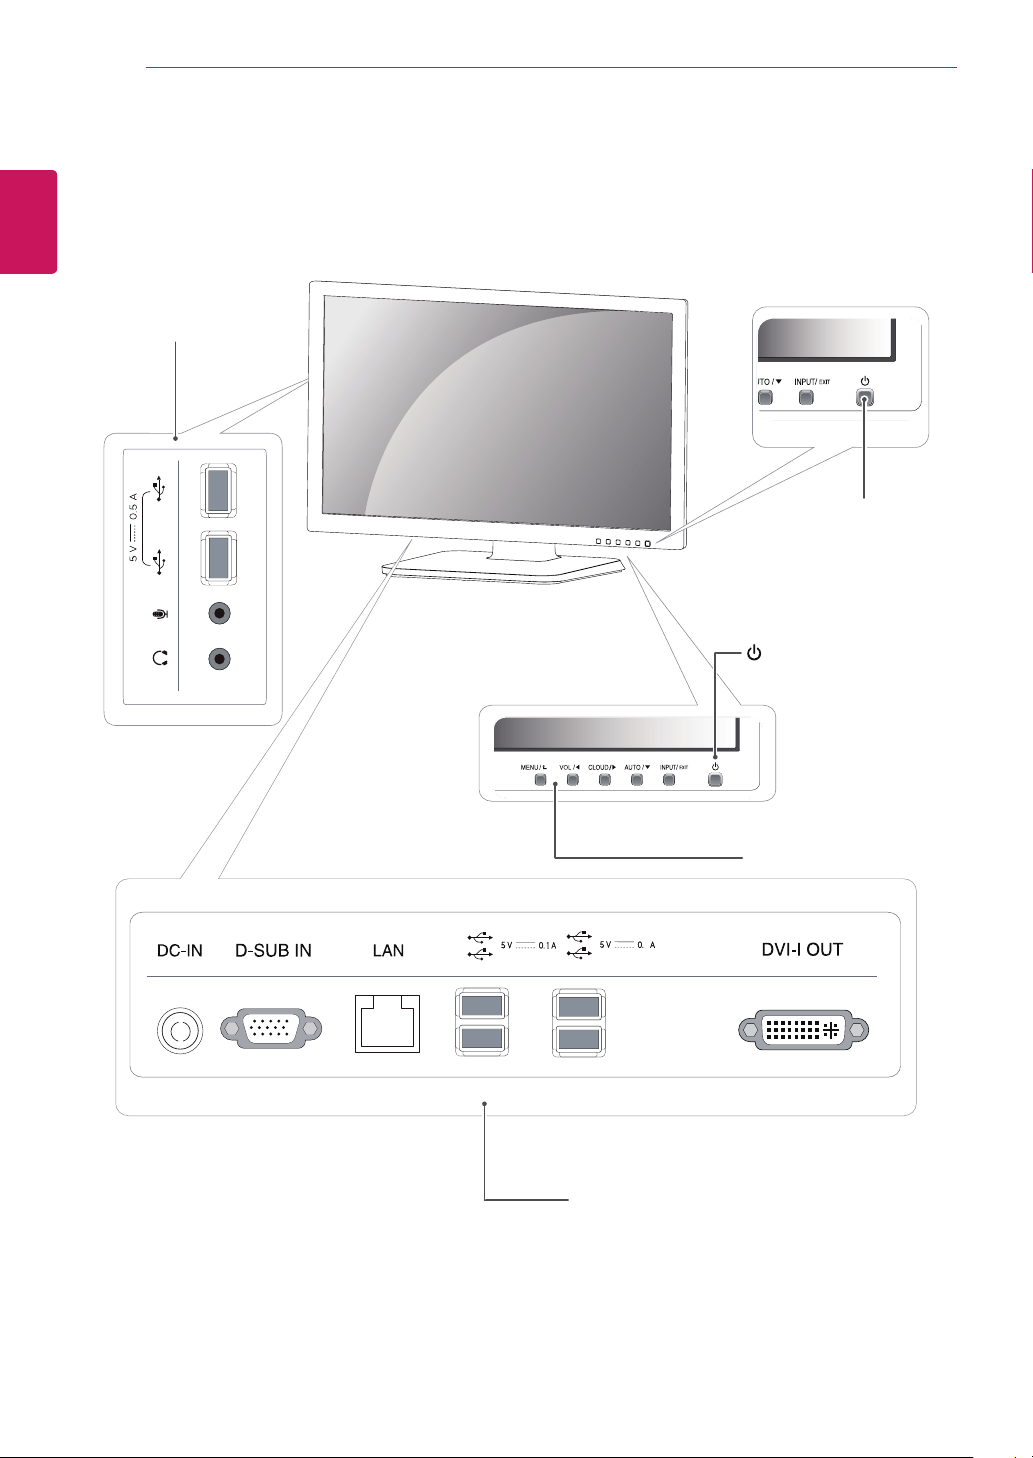
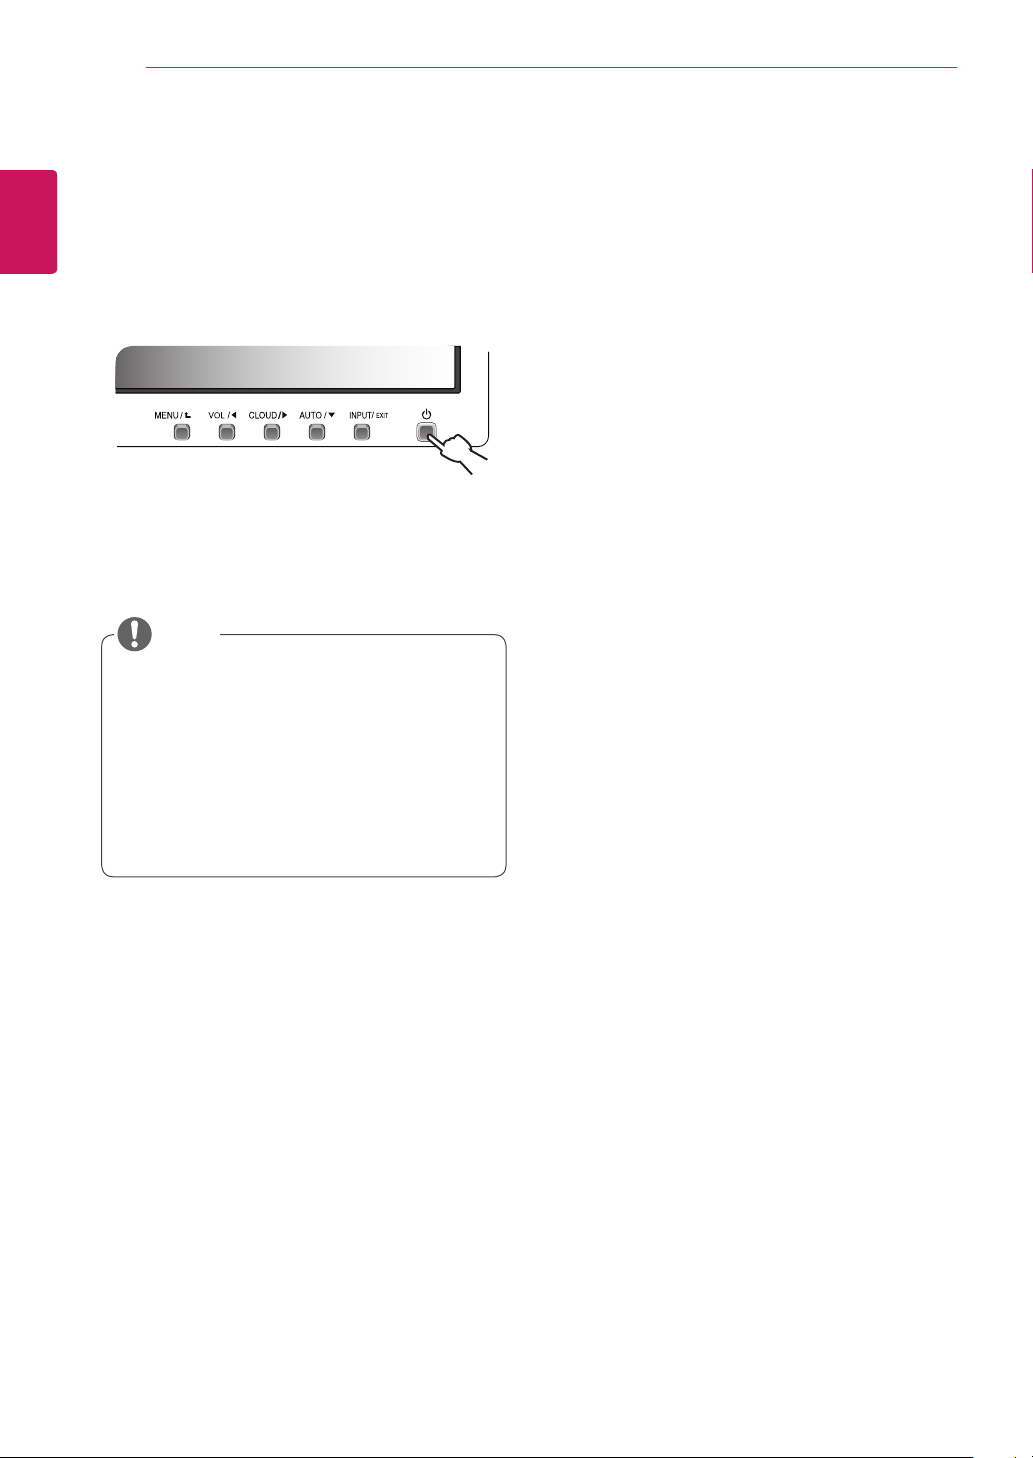
Parts and buttons
Power Indicator
LEDOn:Powerison
LEDOff:Powerisoff
FrontSideButtons
InputConnectors(Seep.12to15)
(PowerButton)
InputConnectors
(Seep.15)
5
ENG
English
ASSEMBLING AND PREPARING
Setting Up the Monitor set
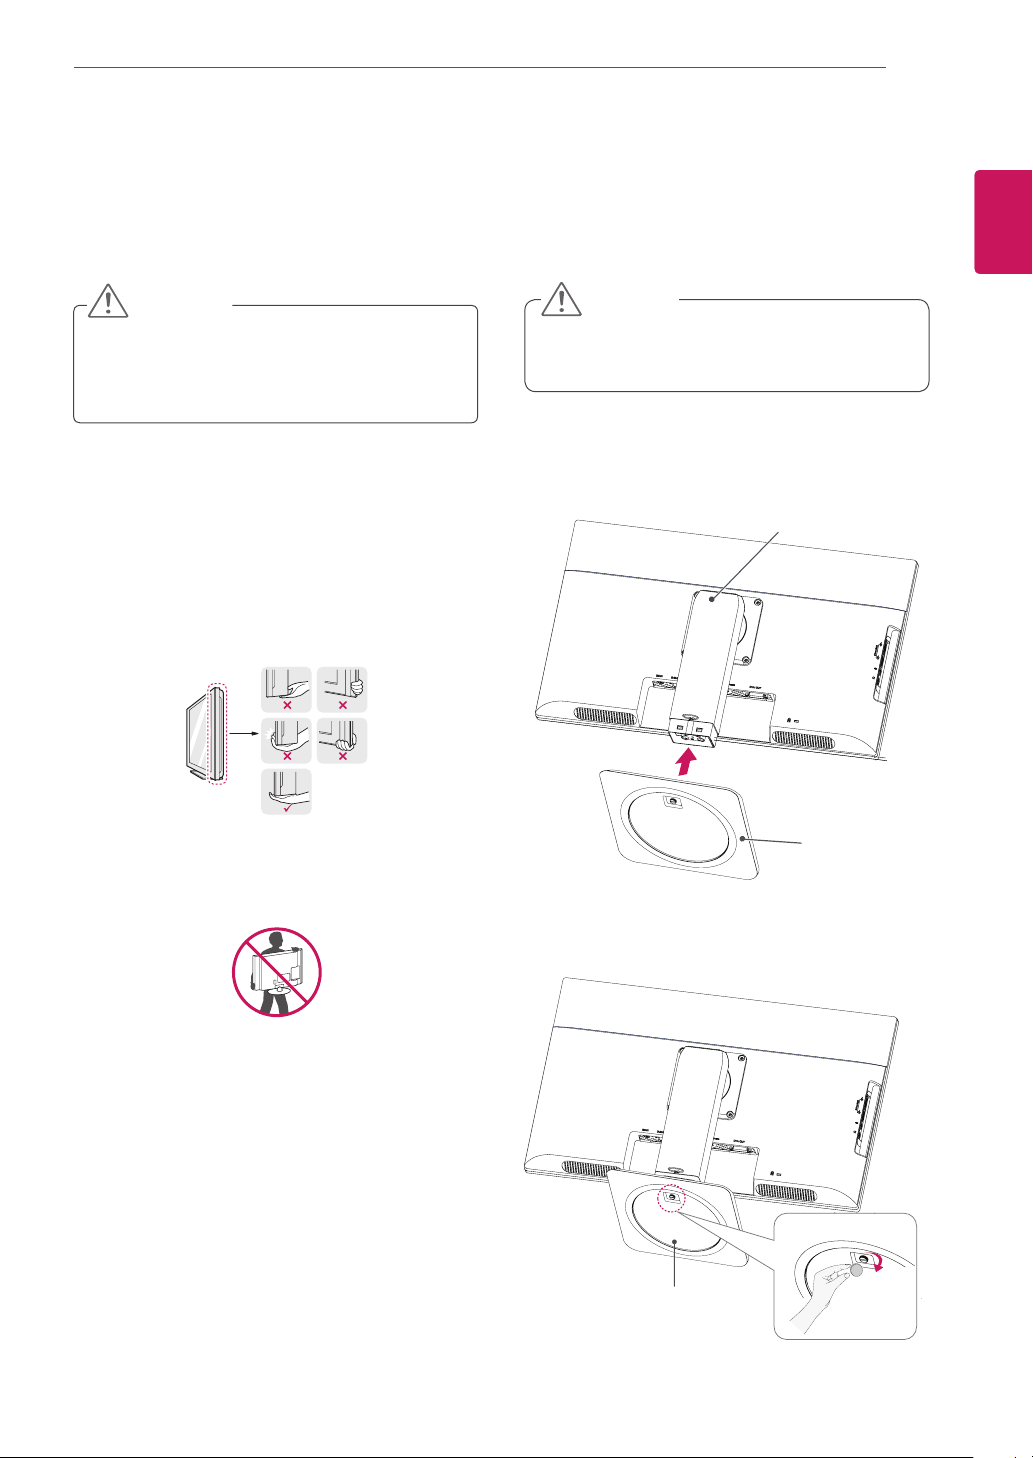
Attaching the Stand Base
1
Placethemonitor'sscreenfacedown.
Toprotectthescreenfromscratches,cover
thesurfacewithasoftcloth.
3
Usingacoin,turnthescrewclockwisetose-
cure
the
stand base.
2
Checkthe
position (at the front and rear)
of
thestandbody,
then
mountthe
stand base
on
the
stand body
asshowninthefigure.
CAUTION
Stand Body
Stand Base
Stand Base
Lifting and moving the
Monitor
Pleaseheedthefollowinginformationwhen
movingthemonitor.
Avoidtouchingthescreenatalltimes,asthis
mayresultindamagetothescreenorpixels.
CAUTION
ItisrecommendedtomovetheMonitorin
theboxorpackingmaterialthattheMonitor
originallycamein.
BeforemovingorliftingtheMonitor,
disconnectthepowercordandallcables.
HoldthetopandbottomoftheMonitorframe
firmly.Makesurenottoholdthetransparent
partarea.
WhenholdingtheMonitor,thescreenshould
faceawayfromyoutopreventthescreen
fromscratches.
WhentransportingtheMonitor,donot
exposetheMonitortojoltsorexcessive
vibration.
WhentransportingtheMonitor,keepthe
Monitorupright,neverturntheMonitoronits
side,ortilttowardstheleftorright.
6
ENG
English
ASSEMBLING AND PREPARING
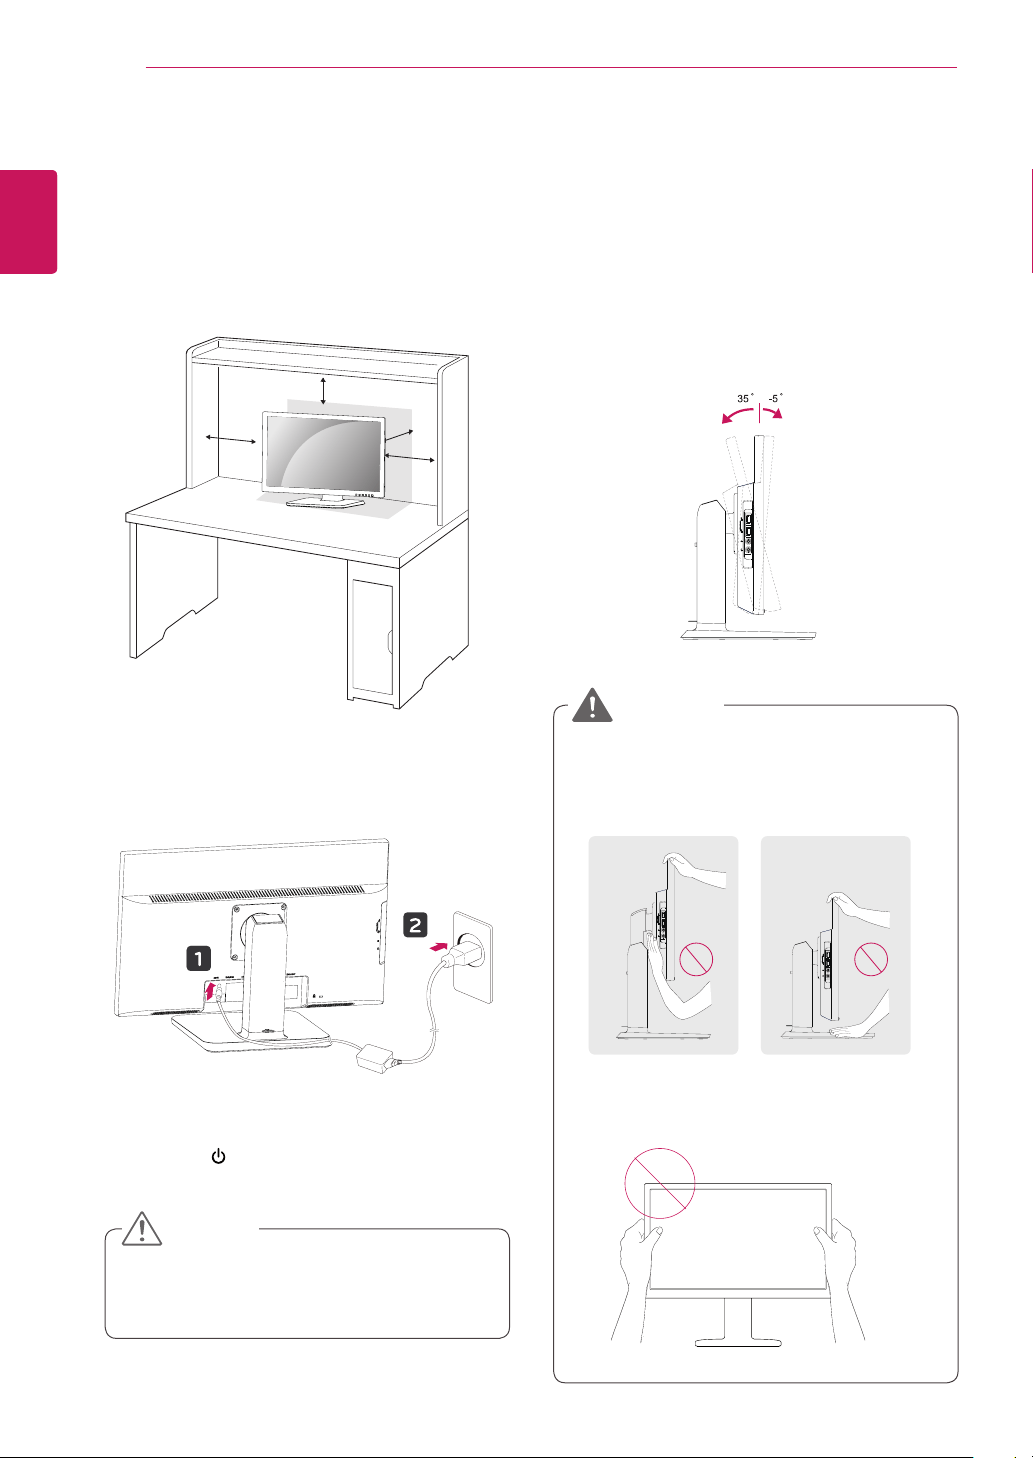
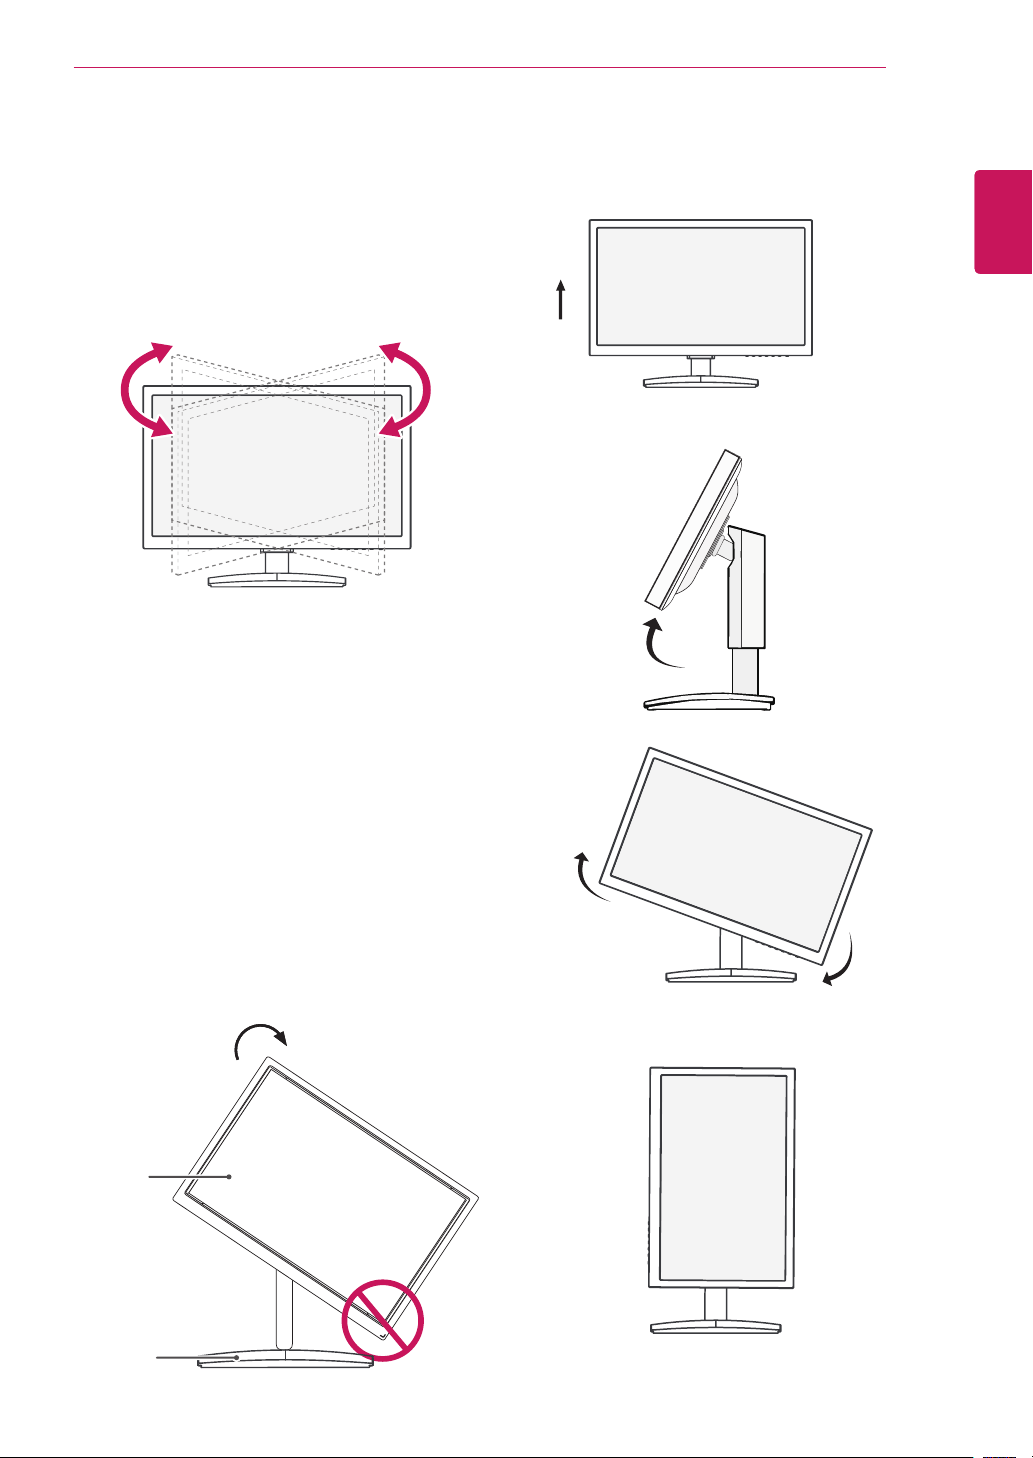
Adjusting the angle
1
Placethemonitormountedonthestandbase
inanuprightposition.
2
Adjusttheangleofthescreen.Theangleof
thescreencanbeadjustedupto5°forwards
and35°backwardsforacomfortableviewing
experience.
Toavoidinjurytothefingerswhenadjusting
thescreen,donotholdthelowerpartofthe
monitor'sframeasillustratedbelow.
Becarefulnottotouchorpressthescreen
areawhenadjustingtheangleofthemonitor.
WARNING
Mounting on a table
1
Liftthemonitorandplaceitonthetableinan
uprightposition.
Installatleast
10 cm
awayfromthewallto
ensuresufficientventilation.
2
Connecttheadaptortothemonitor,thenplug
thepowercordintothewalloutlet.
3
Pressthe (Power)buttononthefrontofthe
monitortoturnonthemonitor.
10 cm
10 cm
10 cm
10 cm
Unplugthepowercordpriortomovingor
installingthemonitor.Thereisriskofelectric
shock.
CAUTION
Front SideRear Side
7
ENG
English
ASSEMBLING AND PREPARING
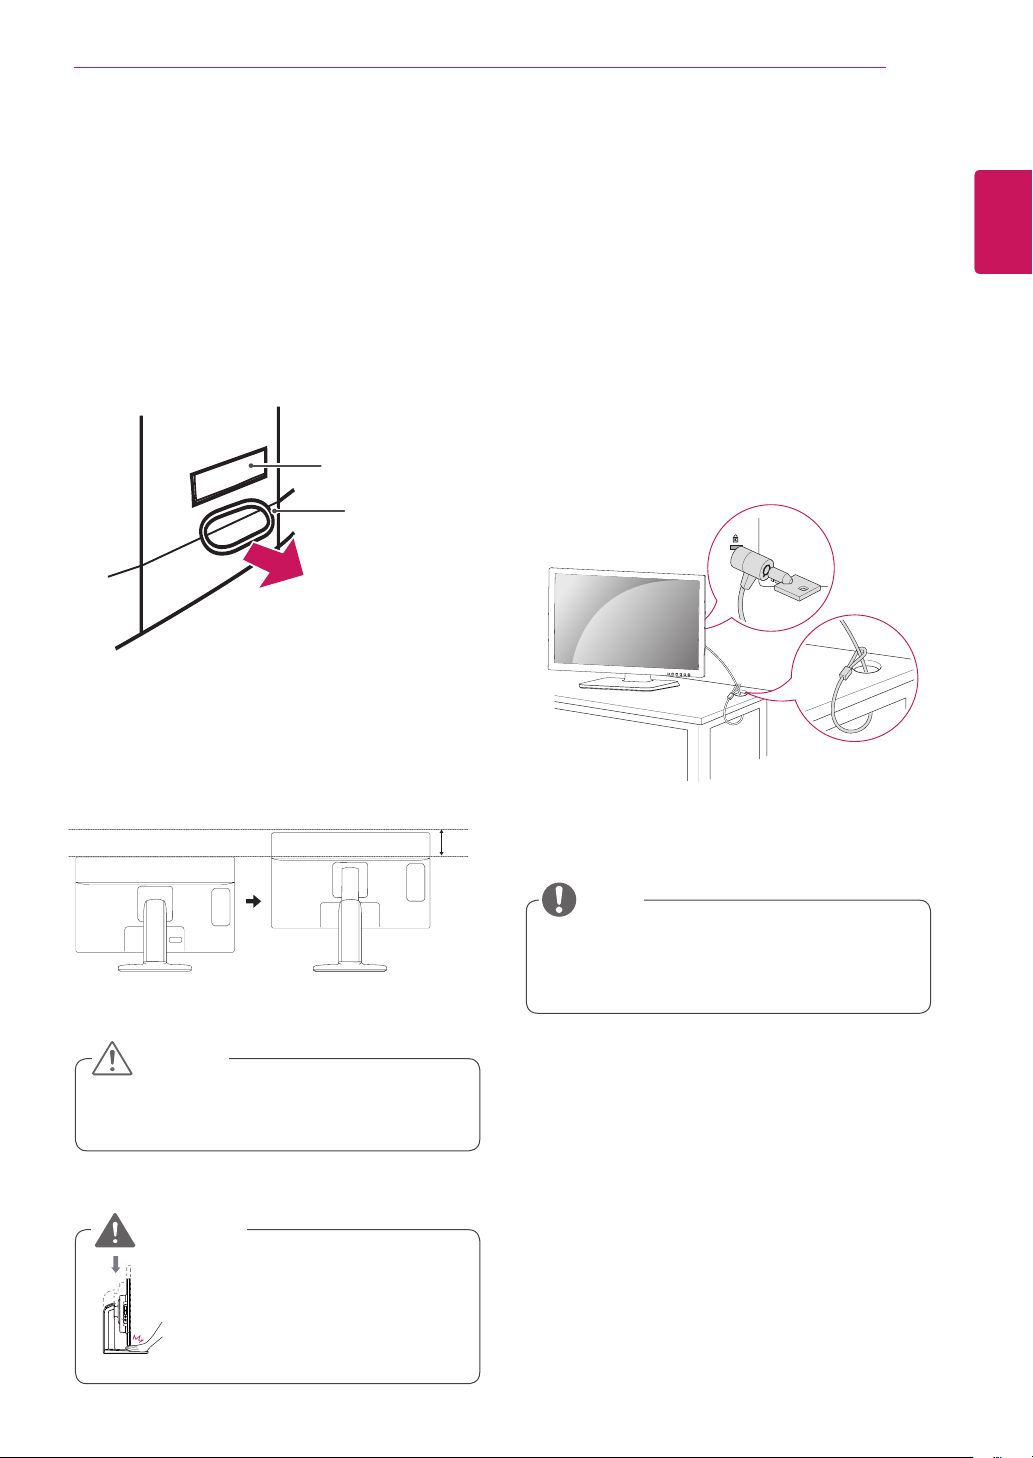
Using the Kensington locking
device
TheconnectorfortheKensingtonlockislocated
ontherearofthemonitor.
Formoreinformationoninstallationandusage,
refertotheKensingtonlockusermanualorvisit
thewebsiteathttp://www.kensington.com.
ConnectthemonitortothetablewiththeKensing-
tonlockcable.
UsingtheKensingtonlockisoptional.The
accessoriescanbepurchasedatyourlocal
electronicsstore.
NOTE
Oncethepinisremoved,itisnotnecessary
tore-insertittoadjusttheheight.
Adjusting the stand height
1
Placethemonitormountedonthestandbase
inanuprightposition.
2
Removethe
tape
attachedatthebottomrear
ofthe
stand body,
thenpulloutthe
locking
pin
.
3
Theheightcanbeadjustedupto
130 mm
.
Donotputyourfingerbe-
tweenthescreenandthe
base(chassis)whenadjust-
ingthescreen'sheight.
CAUTION
WARNING
130.0mm
Tape
Locking Pin
Stand Body
8
ENG
English
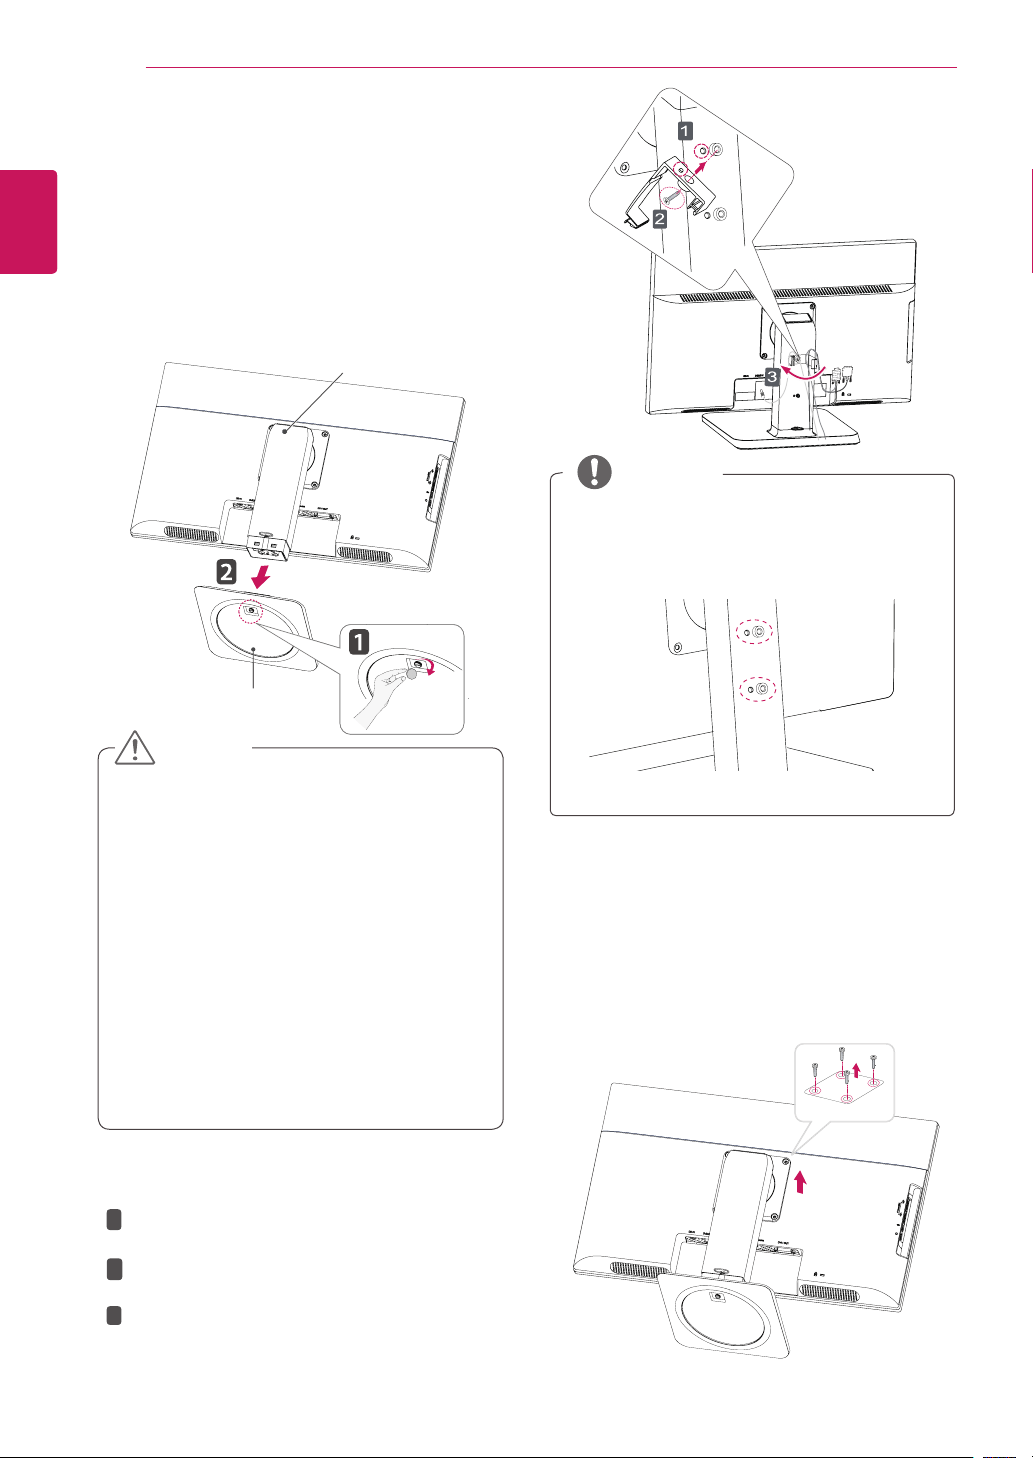
ASSEMBLING AND PREPARING
Detaching the stand body
1
Placethemonitor'sscreenfacedown.To
protectthescreenfromscratches,coverthe
surfacewithasoftcloth.
2
Usingascrewdriver,removethefourscrews
anddetachthestandfromthemonitor.
Thecomponentsappearingintheillustra-
tionsmaylookdifferentfromtheactualprod-
uct.
Donotcarrythemonitorupside-downasthis
maycauseittofalloffitsstand,resultingin
damageorinjury.
Toavoiddamagingthescreenwhenlifting
ormovingthemonitor,onlyholdthestandor
theplasticcover.Thisavoidsputtingunnec-
essarypressureonthescreen.
Onlyremovethetapeandthelockingpin
whenthemonitorismountedonthestand
baseandisinanuprightposition.Otherwise,
thestandbodymayprotrude,whichmay
leadtoinjury.
Detaching the stand base
1
Placethemonitor'sscreenfacedown.
Toprotectthescreenfromscratches,coverthe
surfacewithasoftcloth.
2
Usingacoin,turnthescrewinthestandbase
counterclockwise.Detachthe
stand base
from
the
stand body
.
CAUTION
Stand Body
Stand Base
Using the cable holder
NOTE
The holes are used for wall mount bracket.
Varies depending upon your country or
model.
Theholesareusedforwallmountbracket.
Variesdependinguponyourcountryor
model.
NOTE
NOTE
The holes are used for wall mount bracket.
Varies depending upon your country or
model.
FixtheKnob(Cableholder)tothe
Hole(Hingebody).
1
2
3
UseonescrewtofixtheCableHolderand
monitorset.
ClosetheCableholder.
9
ENG
English
ASSEMBLING AND PREPARING
Swivel stand
ImageshownmaydifferfromyourMonitor
set.
1
Swivel355degreesandadjusttheangleofthe
Monitorsettosuityourview.
1
Liftthemonitortoitshighestheighttoutilize
thePivotfunction.
Using the Pivot function
Thepivotfunctionallowsyoutorotatethescreen
90degreesclockwise.
2
Landscape&Portrait:Youcanrotatethepanel
90°clockwise.Pleasebecautiousandavoid
contactbetweenthemonitorheadandthe
StandBasewhenrotatingthescreentoaccess
thePivotfunction.Ifthemonitorheadtouches
theStandBase,thentheStandBasecould
crack.
Head
section
Stand
section
3
Becarefulwiththecableswhenrotatingthe
screen.
10
ENG
English
ASSEMBLING AND PREPARING
10 cm
10 cm
10 cm
10 cm
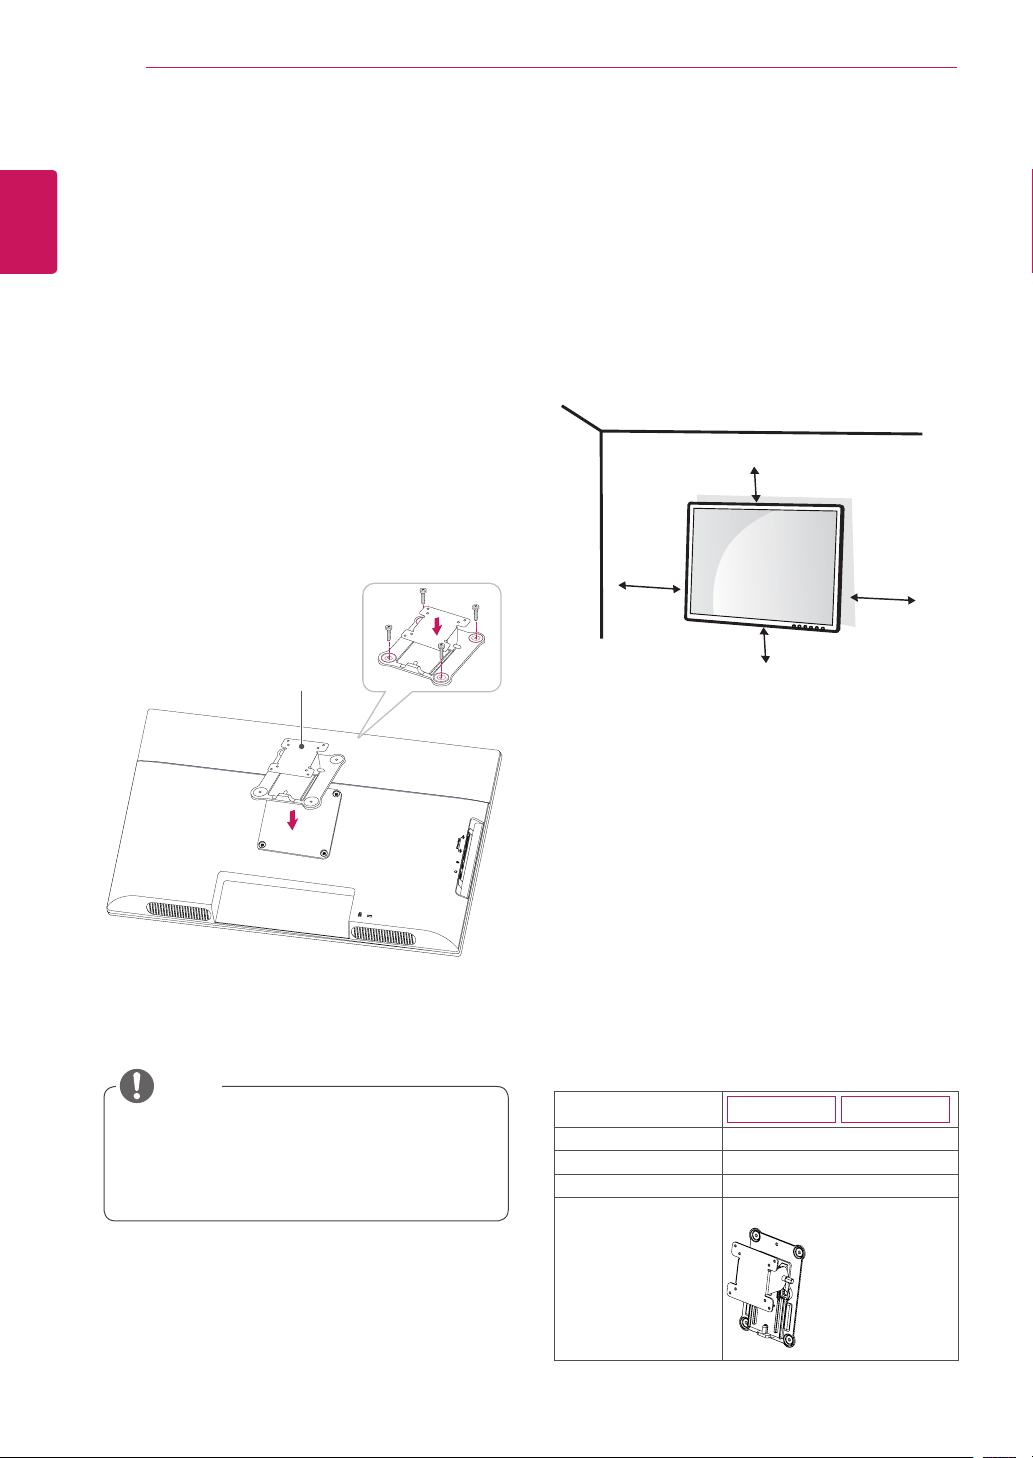
IfyouintendtomounttheMonitorsettoawall,
attachWallmountinginterface(optionalparts)to
thebackoftheset.
WhenyouinstalltheMonitorsetusingawall
mountinginterface(optionalparts),attachit
carefullysoitwillnotdrop.
1Ifyouusescrewlongerthanstandard,themoni-
tormightbedamagedinternally.
2Ifyouuseimproperscrew,theproductmightbe
damagedanddropfrommountedposition.
Inthiscase,LGElectronicsisnotresponsible
forit.
Mounting on a wall
Installthemonitoratleast10cmawayfromthe
wallandleaveabout10cmofspaceateachside
ofthemonitortoensuresufficientventilation.De-
tailedinstallationinstructionscanbeobtainedfrom
yourlocalretailstore.Pleaserefertothemanual
toinstallandsetupatiltingwallmountingbracket.
Installing the wall mount plate
ThismonitorhasaVESAcompatiblemountonthe
back.MostmountswillrequireanLGmounting
plate.
1
Placethemonitor'sscreenfacedown.To
protectthescreenfromscratches,coverthe
surfacewithasoftcloth.
2
Placethewallmountplateonthemonitorand
alignitwiththescrewholesonthemonitor.
3
Usingascrewdriver,tightenthefourscrewsto
fixtheplateontothemonitor.
Thewallmountplateissoldseparately.
Formoreinformationontheinstallation,refer
tothewallmountplate'sinstallationguide.
NOTE
Wall Mount Plate
Model
20CAV37K
24CAV37K
Wall Mount (A x B)
100x100
Stand Screw
M4
Number of screws
4
Wall Mount Plate
(Optional)
RW120

11
ENG
English
ASSEMBLING AND PREPARING
Disconnectthepowercordfirst,andthen
moveorinstalltheMonitorset.Otherwise
electricshockmayoccur.
IfyouinstalltheMonitorsetonaceilingor
slantedwall,itmayfallandresultinsevere
injury.
UseonlyanauthorizedLGwallmount
andcontactthelocaldealerorqualified
personnel.
Donotovertightenthescrewsasthismay
causedamagetotheMonitorsetandvoid
yourwarranty.
Useonlyscrewsandwallmountsthat
meettheVESAstandard.Anydamages
orinjuriesbymisuseorusinganimproper
accessoryarenotcoveredbythewarranty.
Screwlengthfromoutersurfaceofback
covershouldbeunder8mm.
UsethescrewsthatarelistedontheVESA
standardscrewspecifications.
Thewallmountkitwillincludeaninstallation
manualandnecessaryparts.
Thewallmountbracketisoptional.Youcan
obtainadditionalaccessoriesfromyourlocal
dealer.
Thelengthofscrewsmaydifferdepending
onthewallmount.Besuretousetheproper
length.
Formoreinformation,refertothe
instructionssuppliedwiththewallmount.
CAUTION
NOTE
BackCover
WallmountPad
WallmountPad
BackCover
Standardscrew
Max.8mm
VESA (A x B)
A
B
Wall Mount (A x B)
12
ENG
English
USING THE MONITOR SET
USING THE MONITOR SET
Connecting Input Signal Cable
Thismonitorsupportsthe*PlugandPlay
feature.
*PlugandPlay:Afeaturethatallowsyouto
addadevicetoyourcomputer,withouthaving
toreconfigureanythingorinstallanymanual
drivers.
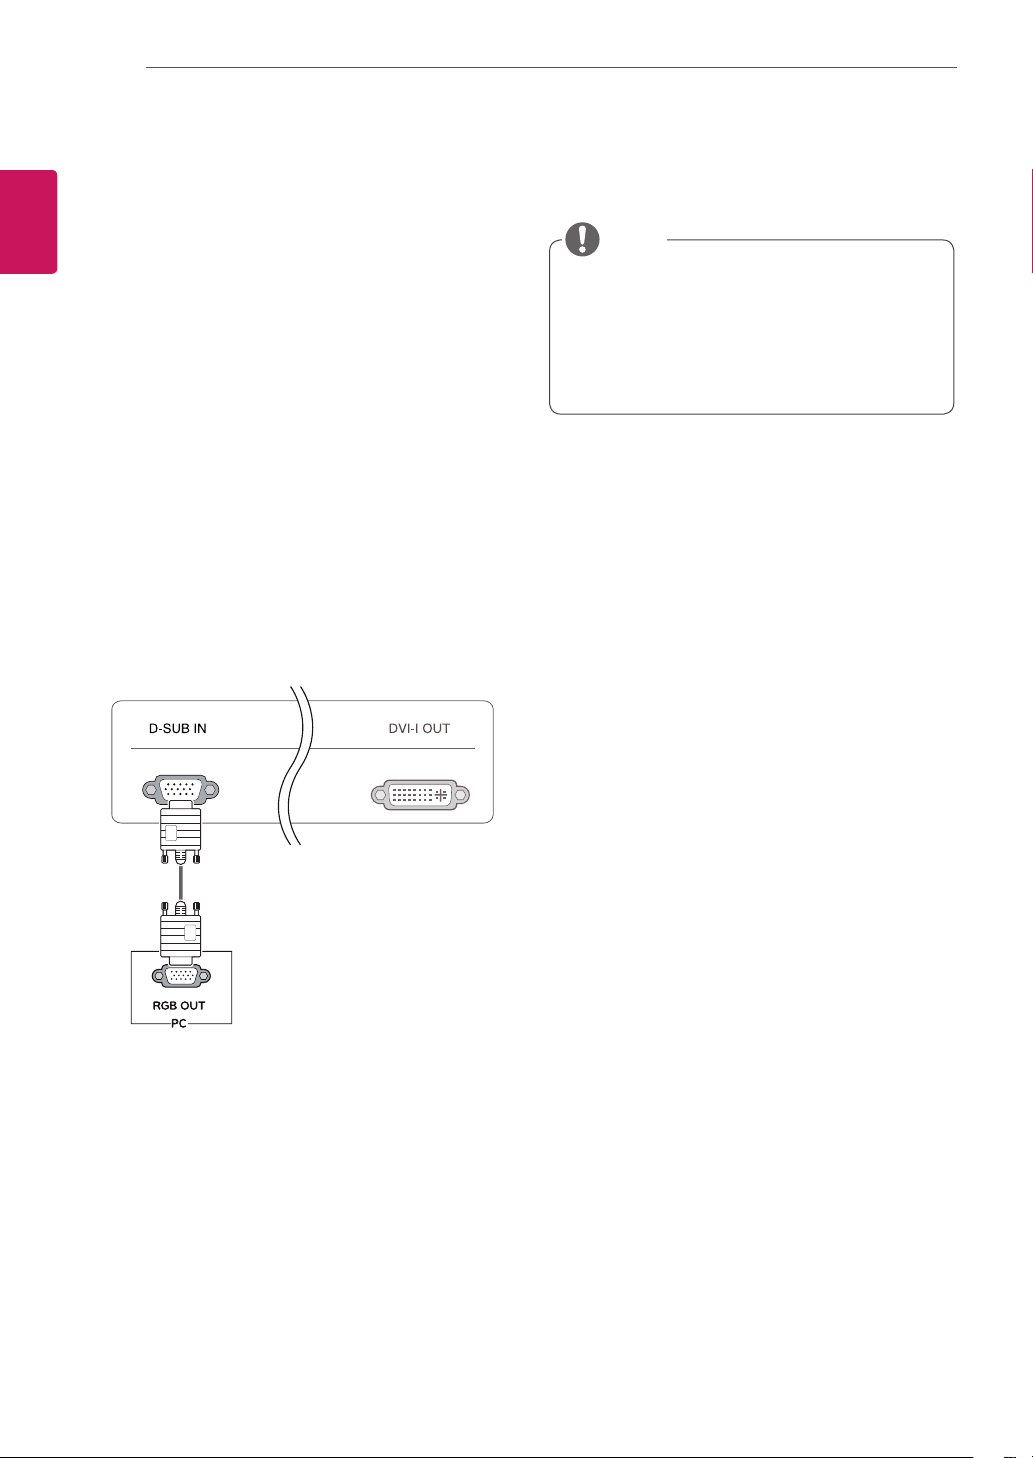
D-SUB IN connection - PC
D-SUBINtransfersanalogvideosignalsfromthe
PCtothemonitor.
ConnectthemonitortothePCusingtheprovided
15-pinD-SUBsignalcableasillustratedbelow.
NOTE
RGB IN
MONITOR
Apple Adapter
AnadaptermaybeneededforApple
computers.Thisadaptercanbepurchased
fromApple.
13
ENG
English
USING THE MONITOR SET
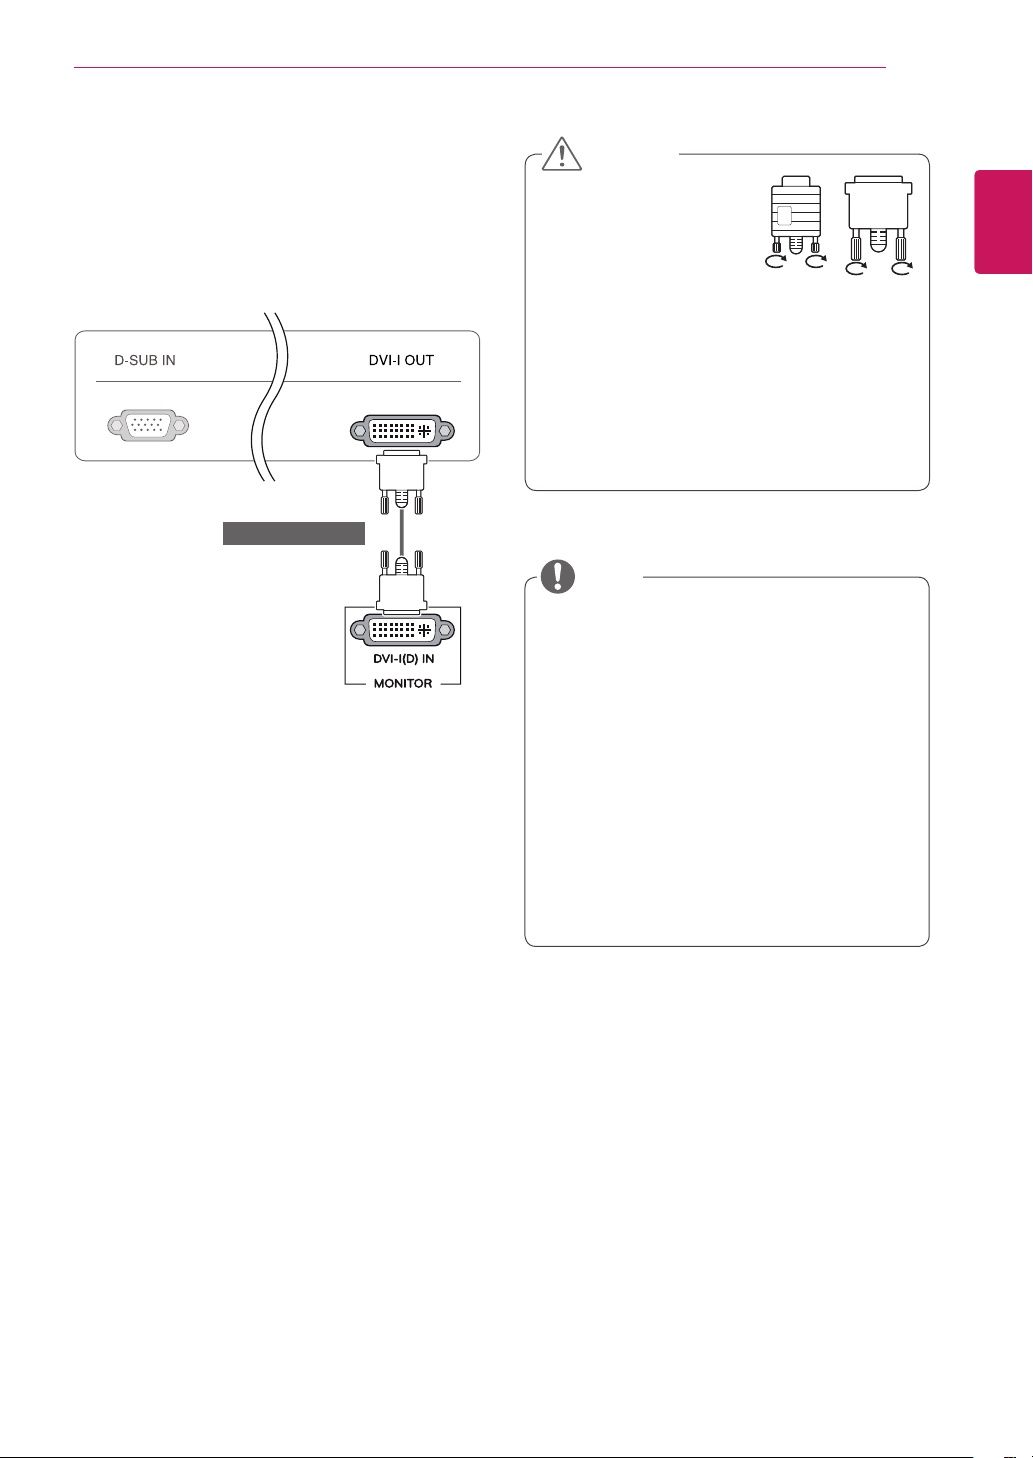
DVI connection
TransfersdigitalvideosignalsfromtheCloudMon-
itortoanextendedmonitor.
ConnecttheCloudMonitortoanextendedmonitor
usingaDVIcable.
Toconnectthemonitortoacomputer,use
theappropriatesignalcable(LANandD-
SUB).
AconvertercanbeusedtoconverttheDVI-I
inputsignaltoD-SUBinputsignal.
Whenconnectingthepowercordtotheout-
let,useagrounded(3-hole)multi-socketora
groundedwalloutlet.
Themonitormayflickerwhenturnedoninan
areaoflowtemperature.Thisisnormal.
Sometimesred,greenorbluespotsmayap-
pearonthescreen.Thisisnormal.
Connecttheinputsignal
cableandtighteninthe
directionofthearrow.To
preventdisconnection
securethecabletightly.
Donotpressonthescreenforaprolonged
time.Thismaycauseimagedistortion.
Donotdisplayastillimageonthescreen
foraprolongedtime.Thismaycauseimage
retention.Ifpossible,usethescreensaver.
CAUTION
NOTE
(soldseparately)
14
ENG
English
USING THE MONITOR SET
Connecting LAN/Peripherals
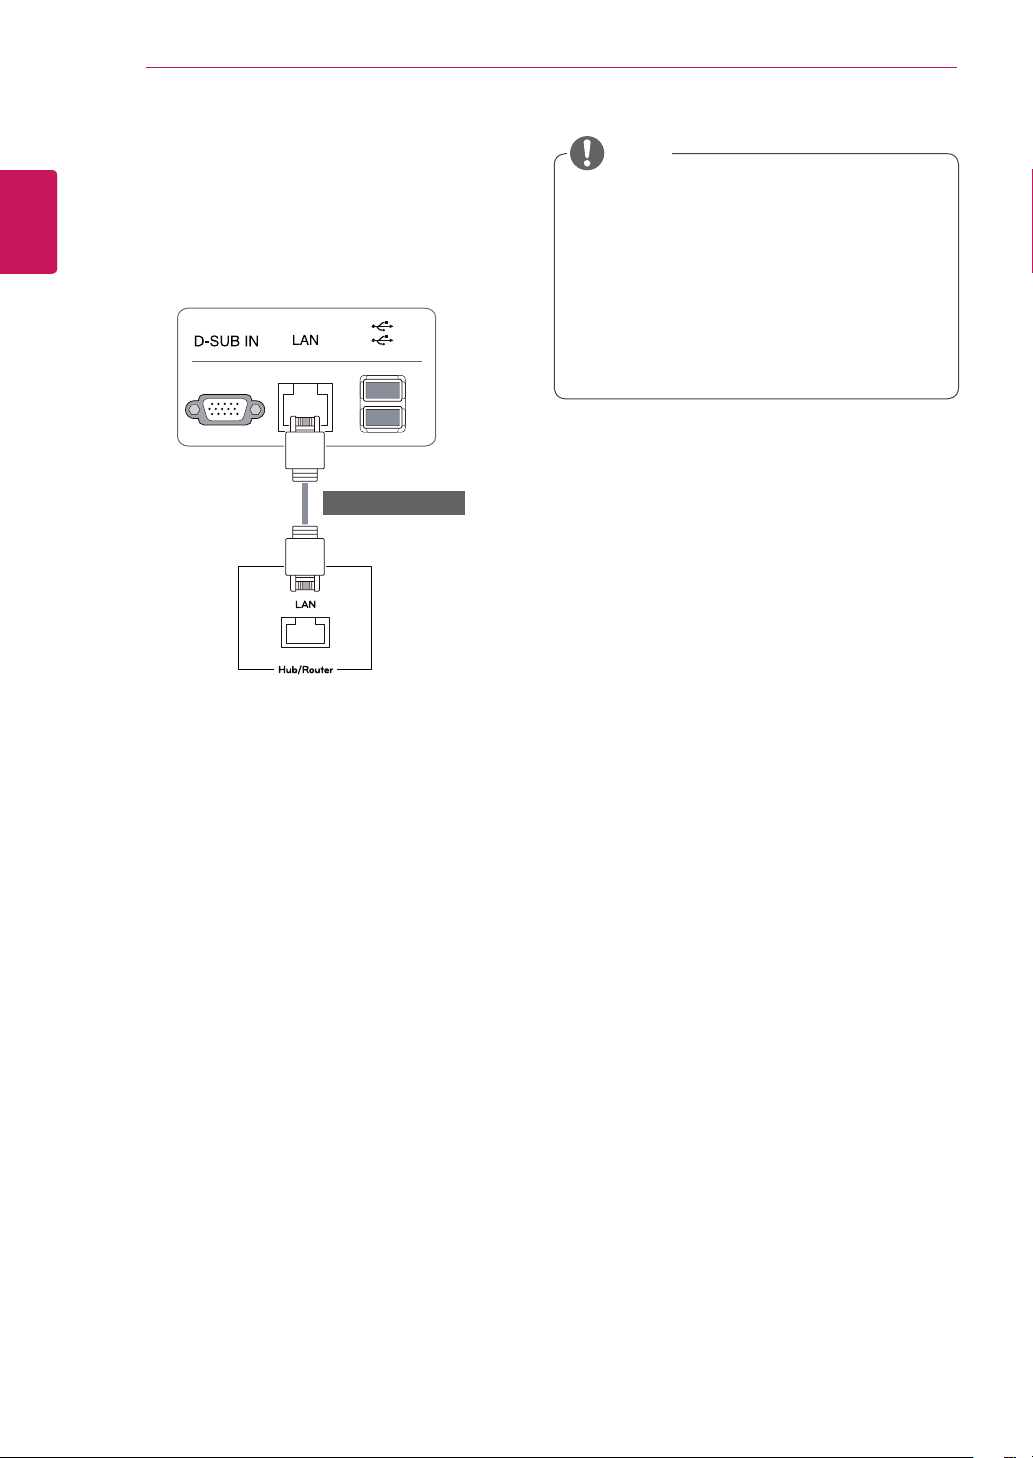
LAN connection
Connecttherouterorswitchtothemonitorusinga
LANcableasillustratedbelow.
TheLANcableissoldseparately.
ThefollowingLANcabletypecanbeused:
Standard:IEEE802.3ETHERNET
Ifadeviceisconnectedintotheearphone
outportviaaLANcable,youcanadjustthe
volumewiththevolumeicononPCtaskbar.
ConnecttheLANcableandtheperipheral
devicespriortobootingupthePC.
NOTE
(soldseparately)
15
ENG
English
USING THE MONITOR SET
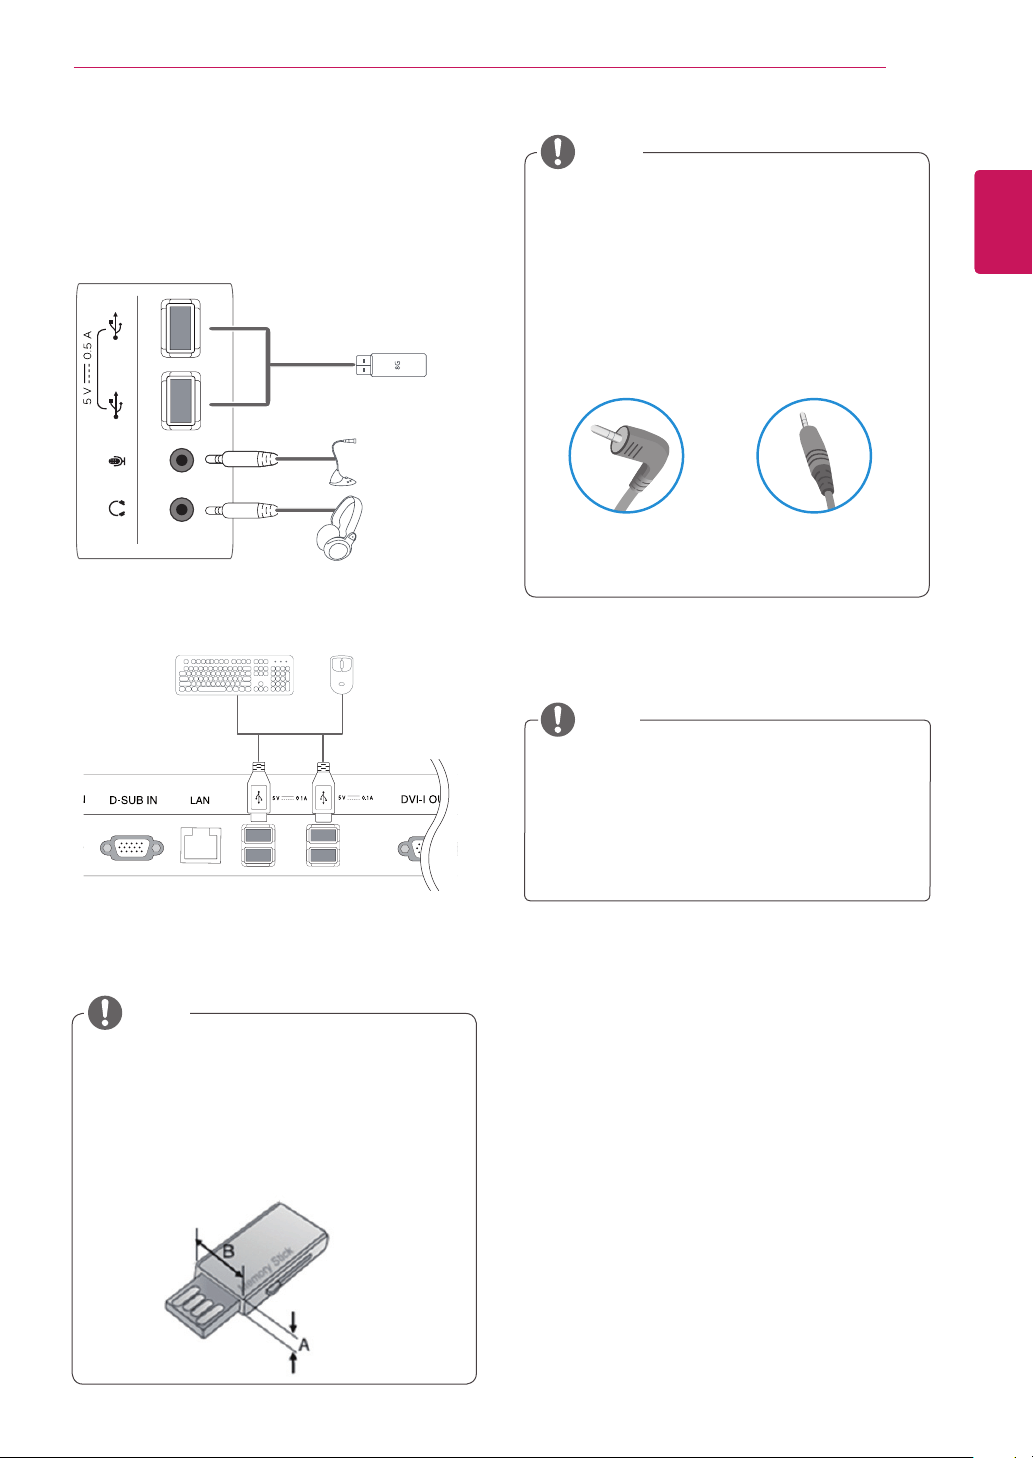
Peripheraldevicesaresoldseparately.
TheUSBportsontheleftandbottomofthe
monitorcanbeusedtoconnectthekey-
board,mouse,andotherUSBdevices.
Cableswithangledplugsmayhaveclear-
anceissues,usestraightplugswhenpos-
sible.
AngleType StraightType
Peripheral device connection
Connectperipheraldevicestothemonitorusing
USB,microphoneandheadphoneports.
NOTE
NOTE
Headphones,speakersormicrophonemay
notworknormally,dependingontheserver
PCsettings.
Virtualsolutionsmayaffectthefunctionsor
speedofthespecificUSBstoragedevice.
Left
Bottom
1
1
1
1
WhentheuserusetheUSBdevicestocon-
nectthetopandbottomportsatthesame
time,Pleasereferthebelowdepthandlength
ofUSBforoptimalconnection.
NOTE
A≤8.5mmB≤18mm
16
ENG
English
USING THE MONITOR SET
Whatis"SelfImageAdjustment"?Thisfunc-
tionrunswhenthemonitorisconnectedfor
thefirsttimeandperformsautomaticimage
adjustmentforeachsignal(onlyavailablefor
analog[D-SUBinput]signals)toprovidean
optimalscreendisplay.
Self Image Adjustment
Pressthepowerbuttononthefronttoturnon
themonitor.Whenpoweredon,the
"Self Image
Adjustment"
functionwillrunautomatically(only
availableforanalog[D-SUBinput]signals).
NOTE
17
ENG
English
CUSTOMIZING SETTINGS
CUSTOMIZING SETTINGS
1
PressthedesiredbuttononthebottomoftheMonitorset.
2
ChangethevalueofthemenuitembypressingthebuttonsonthebottomoftheMonitorset.
Toreturntotheuppermenuorsetothermenuitems,usetheuparrow( )button.
3
Select
EXIT
toleavetheOSDmenu.
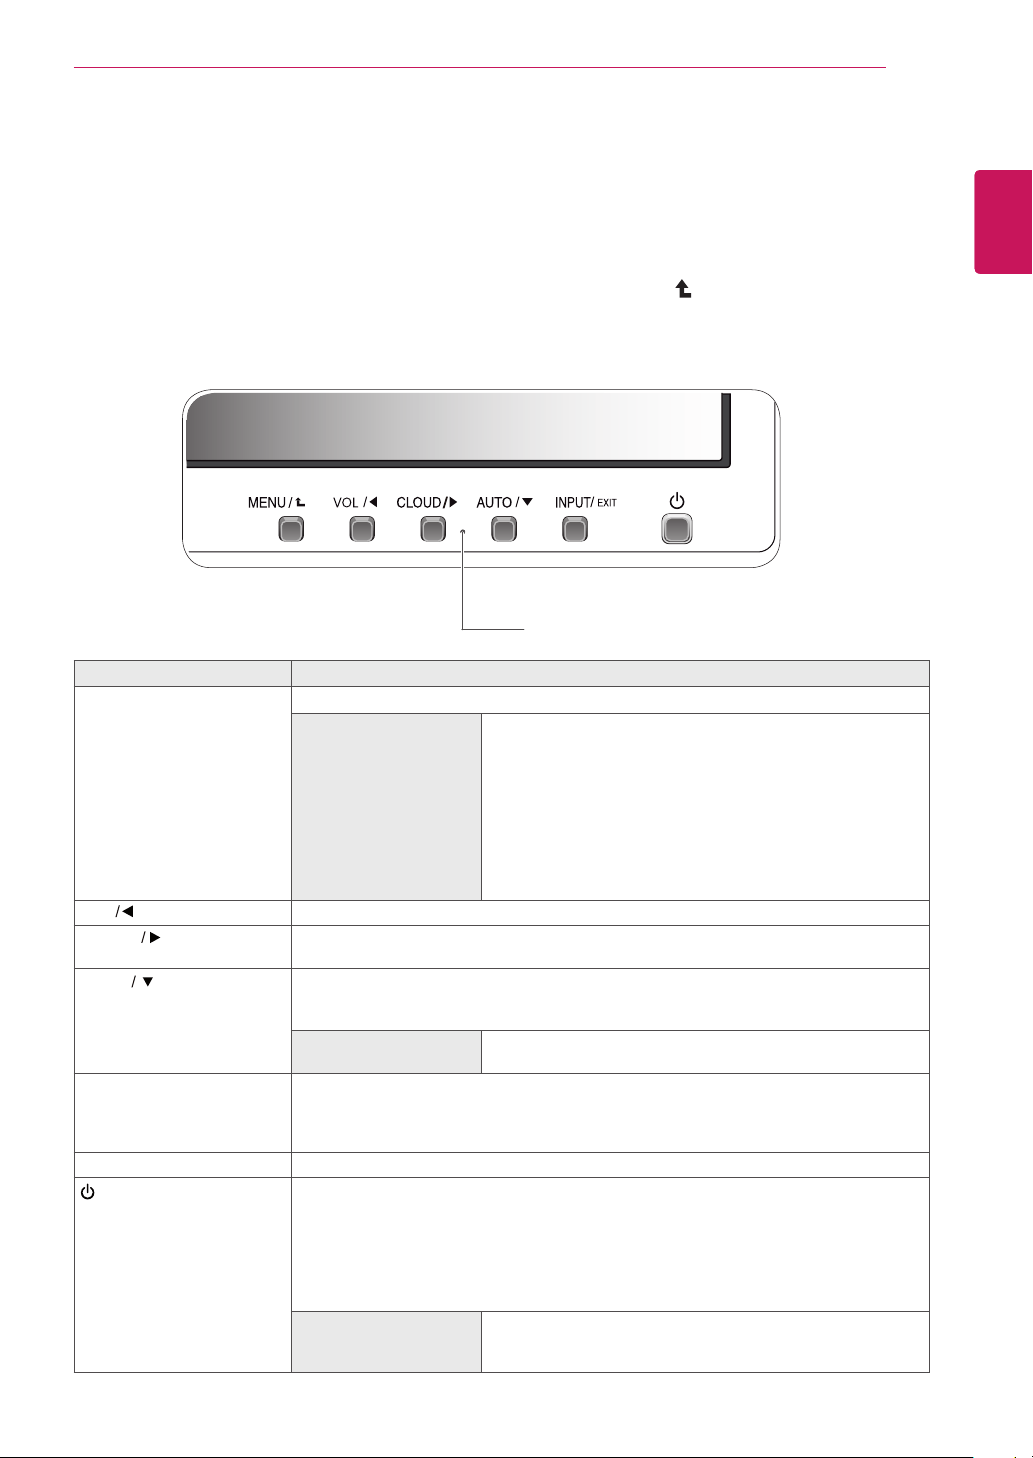
Monitor set Buttons
Button Description
MENU Activatesthemainmenu.
OSD Lock/Unlock
Functions
Thisfunctionallowyoutolockthecurrentcontrolsettings,so
thattheycannotbeinadvertentlychanged.
PressandholdtheMENUbuttonforseveralseconds.Then
OSDof“OSDLock”willappear.Afterthat,usercanselect
lockorunlockbypressingleft/rightbutton.
Ifuserselectsthe“Lock”iconbypressingthe“OK”button,
themessage“OSDLocked”willappear.Otherwise,“OSD
Unlocked”willappear.Afterselectingthe“Lock”,Ifyouwant
tochangetoUnlock,youcanpushthe“MENU”buttonfor
severalseconds.Themessage“OSDUnlocked”willappear.
VOL
Adjustthevolumeofthemonitor.(onlyworksinCloudmode)/theleftarrowkey.
CLOUD
DisconnectstheconnectionwhenthekeyispressedforafewsecondswhileinCloud
mode;therightarrowkey.
AUTO Toadjustthemonitorsettings,presstheAUTObuttonontheMONITORSETUPOSD
menu(onlysupportedforanalogsignal).
Foroptimalscreendisplay,usethefollowingresolution.
Optimal Resolution 20CAV37K:1440x900
24CAV37K:1920x1080
INPUT Allowsselectionoftheinputsignal.
IfyouconnectthemonitortoacomputerusingaD-SUBcable,selecteitherthe
CLOUDorD-SUBinputsignal.
TheinitialinputsignalisD-SUB.
EXIT ExitstheOSDmenu.
(PowerButton)
D-SUBInput:PowerOn/Off
CLOUDInput
MonitorOff:Pressthepowerbuttononcethenthemonitorwillbeturnedoffafter5
seconds.
CLOUDOff:PressthepowerbuttontwicethenthemonitorandCLOUDconnection
willbedisabled.
CLOUDOn:Pressthepowerbutton.
Power Indicator Thepowerindicatorstayswhiteifthedisplayisrunning
properly(OnMode).IfthedisplayisinSleepMode,the
powerindicatorblinkswhite.
18
ENG
English
CUSTOMIZING SETTINGS
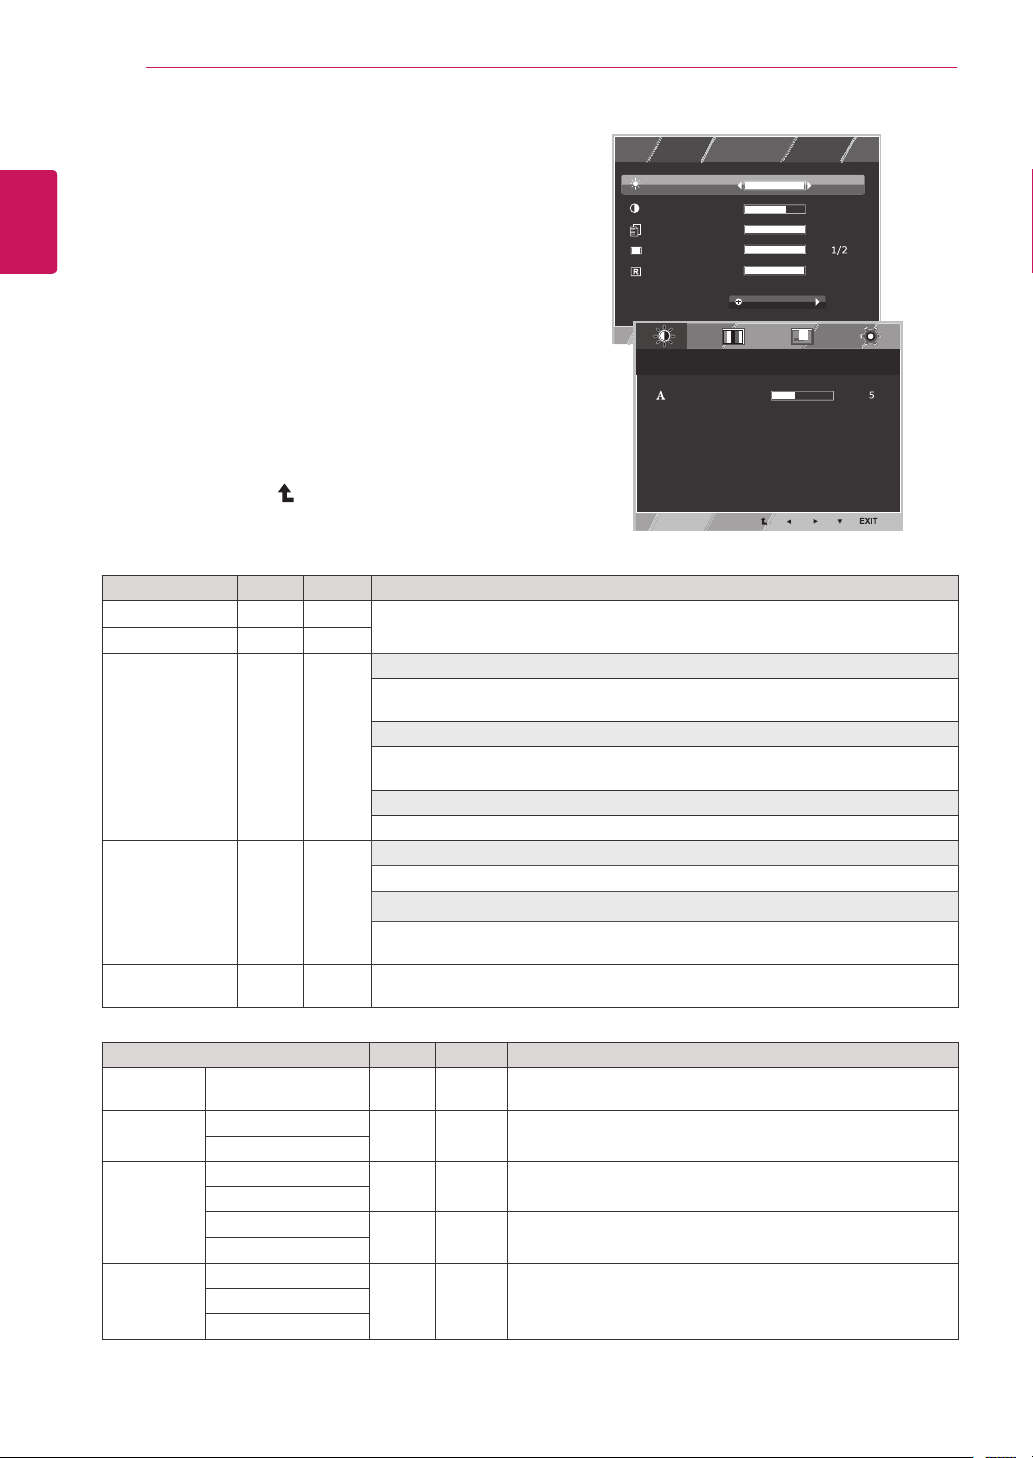
Customizing Settings
Menu Settings
1
Press
MENU
buttononthebottomoftheMonitorset
todisplaythe
Menu
OSD.
2
Settheoptionsbypressingthe◄or►or▼
buttons.
3
Selectthe"
Next Menu
"buttontoenterthemore
optionsettings.
4
Select
EXIT
toleavetheOSDmenu.
Toreturntotheuppermenuorsetothermenuitems,
usetheuparrow( )button.
Eachoptionisexplainedbelow.
Menu > Next Menu
D-SUB CLOUD Description
Picture
Sharpness
● ●
Toadjusttheclearnessofthescreen.
Color Gamma
● ●
Tocustomizethecolorofthescreen
Color Temp
Display Horizontal
●
Toadjustthepositionofthescreen
Vertical
Clock
●
Toimprovetheclarityandstabilityofthescreen
Phase
Others Language
● ●
Tocustomizethescreenstatusforauser'soperating
environment
Cloud
Power Indicator
CLOUD:
UsingPCviaanetwork.
Menu
D-SUB CLOUD Description
Brightness
● ●
Toadjustthebrightness,contrastofthescreen
Contrast
● ●
Reader Mode
● ●
Reader 1
Itisamodethatthescreenisadjustedtothebestforthenewspaper.Ifyouwant
screenmorebright,youcancontrolbrightnessinMenuOSD.
Reader 2
Itisamodethatthescreenisadjustedtothebestforthecartoon.Ifyouwant
screenmorebright,youcancontrolbrightnessinMenuOSD.
Reader Off
Itisamodethatreadermodeisoff.
Wide/Original
● ●
Wide
Switchtofullscreenmodeaccordingtoinputimagesignal.
Original
Changetheinputimagesignalratiotooriginal.
*ThisfunctionworksonlyifinputresolutionislowerthanMonitorsetratio(16:9).
Reset
● ●
Restoreallfactorydefaultsettings.Pressthe
◄
,
►
buttonstoreset
immediately.
Reader Mode
3/3
70
100
1/2
Reset
Wide / Original
Brightness
Contrast
Menu
Menu > Next Menu > Picture
Sharpness
Menu > Next Menu > Color
Gamma
Color Temp
Red
Green
Blue
Menu > Next Menu > Display
Horizontal
Vertical
Clock
Phase
Menu > Next Menu > Others
Language
Cloud
Power Indicator
Volume
Off
Wide
No
Next Menu
Gamma 1
Custom
English
Off
Off
Menu > Next Menu > Others
Language
Cloud
Power Indicator
English
Off
Off
19
ENG
English
CUSTOMIZING SETTINGS
Picture
1
Press
Menu
buttononthebottomoftheMonitorset
todisplaythe
Menu
OSD.
2
Selectthe"
Next Menu
"buttontoenterthemore
optionsettings.
3
Enterto
Picture
bypressingthe▼button.
4
Settheoptionsbypressingthe◄or►buttons.
5
Select
EXIT
toleavetheOSDmenu.
Toreturntotheuppermenuorsetothermenuitems,
usetheuparrow( )button.
Eachoptionisexplainedbelow.
Menu > Next Menu > Picture
Description
Sharpness
Toadjusttheclearnessofthescreen.
Reader Mode
3/3
70
100
1/2
Reset
Wide / Original
Brightness
Contrast
Menu
Menu > Next Menu > Picture
Sharpness
Menu > Next Menu > Color
Gamma
Color Temp
Red
Green
Blue
Menu > Next Menu > Display
Horizontal
Vertical
Clock
Phase
Menu > Next Menu > Others
Language
Cloud
Power Indicator
Volume
Off
Wide
No
Next Menu
Gamma 1
Custom
English
Off
Off
Menu > Next Menu > Others
Language
Cloud
Power Indicator
English
Off
Off
20
ENG
English
CUSTOMIZING SETTINGS
Color
1
Press
MENU
buttononthebottomoftheMonitorset
todisplaythe
Menu
OSD.
2
Selectthe"
Next Menu
"buttontoenterthemore
optionsettings.
3
Select
Color
bypressingthe►button.
4
Enterto
Color
bypressingthe▼button.
5
Settheoptionsbypressingthe◄or►or▼
buttons.
6
Select
EXIT
toleavetheOSDmenu.
Toreturntotheuppermenuorsetothermenuitems,
usetheuparrow( )button.
Eachoptionisexplainedbelow.
Reader Mode
3/3
70
100
1/2
Reset
Wide / Original
Brightness
Contrast
Menu
Menu > Next Menu > Picture
Sharpness
Menu > Next Menu > Color
Gamma
Color Temp
Red
Green
Blue
Menu > Next Menu > Display
Horizontal
Vertical
Clock
Phase
Menu > Next Menu > Others
Language
Cloud
Power Indicator
Volume
Off
Wide
No
Next Menu
Gamma 1
Custom
English
Off
Off
Menu > Next Menu > Others
Language
Cloud
Power Indicator
English
Off
Off
Menu > Next Menu > Color Description
Gamma Setyourowngammavalue.:Gamma0,Gamma1,Gamma2,Offon
themonitor,highgammavaluesdisplaywhitishimagesandlowgamma
valuesdisplayblackishimages.
Ifuserdon'twantadjustedgamma,usercanselectGammaoff.
Color Temp Custom
• Red:
Setyourownredcolorlevels.
• Green:
Setyourowngreencolorlevels.
• Blue:
Setyourownbluecolorlevels.
Selectthescreencolor.
Warm:
Setthescreentowarmcolortemperature(morered).
Medium:
Setthescreentomediumcolortemperature.
Cool:
Setthescreentocoolcolortemperature(moreblue).
21
ENG
English
CUSTOMIZING SETTINGS
Display
1
Press
MENU
buttononthebottomoftheMonitorset
todisplaythe
Menu
OSD.
2
Selectthe"
Next Menu
"buttontoenterthemore
optionsettings.
3
Select
Display
bypressingthe►button.
4
Enterto
Display
bypressingthe▼button.
5
Settheoptionsbypressingthe◄or►or▼
buttons.
6
Select
EXIT
toleavetheOSDmenu.
Toreturntotheuppermenuorsetothermenuitems,
usetheuparrow( )button.
Eachoptionisexplainedbelow.
Menu > Next Menu > Display
Description
Horizontal
Tomoveimageleftandright.
Vertical
Tomoveimageupanddown.
Clock
Tominimizeanyverticalbarsorstripesvisibleonthescreenbackground.The
horizontalscreensizewillalsochange.
Phase
Toadjustthefocusofthedisplay.Thisitemallowsyoutoremoveanyhorizontal
noiseandclearorsharpentheimageofcharacters.
Reader Mode
3/3
70
100
1/2
Reset
Wide / Original
Brightness
Contrast
Menu
Menu > Next Menu > Picture
Sharpness
Menu > Next Menu > Color
Gamma
Color Temp
Red
Green
Blue
Menu > Next Menu > Display
Horizontal
Vertical
Clock
Phase
Menu > Next Menu > Others
Language
Cloud
Power Indicator
Volume
Off
Wide
No
Next Menu
Gamma 1
Custom
English
Off
Off
Menu > Next Menu > Others
Language
Cloud
Power Indicator
English
Off
Off
Only available in D-SUB input mode.
22
ENG
English
CUSTOMIZING SETTINGS
Others
1
Press
MENU
buttononthebottomoftheMonitorset
todisplaythe
Menu
OSD.
2
Selectthe"
Next Menu
"buttontoenterthemore
optionsettings.
3
Select
Others
bypressingthe►button.
4
Enterto
Others
bypressingthe▼button.
5
Settheoptionsbypressingthe◄or►or▼
buttons.
6
Select
EXIT
toleavetheOSDmenu.
Toreturntotheuppermenuorsetothermenuitems,
usetheuparrow( )button.
Eachoptionisexplainedbelow.
Menu > Next Menu > Others
Description
Language
Tochoosethelanguageinwhichthecontrolnamesaredisplayed.
Cloud
Off
CLOUDisdisabledinD-SUBinputmode.
On
CLOUDisenabledinD-SUBinputmode.
Power
Indicator
Usethisfunctiontosetthepowerindicatoronthebottomsideofthemonitorto
OnorOff.IfyousetOff,itwillgooff.
IfyousetOnatanytime,thepowerindicatorwillautomaticallybeturnedon.
Reader Mode
3/3
70
100
1/2
Reset
Wide / Original
Brightness
Contrast
Menu
Menu > Next Menu > Picture
Sharpness
Menu > Next Menu > Color
Gamma
Color Temp
Red
Green
Blue
Menu > Next Menu > Display
Horizontal
Vertical
Clock
Phase
Menu > Next Menu > Others
Language
Cloud
Power Indicator
Volume
Off
Wide
No
Next Menu
Gamma 1
Custom
English
Off
Off
Menu > Next Menu > Others
Language
Cloud
Power Indicator
English
Off
Off
24CAV37K
20CAV37K

23
ENG
English
CUSTOMIZING SETTINGS
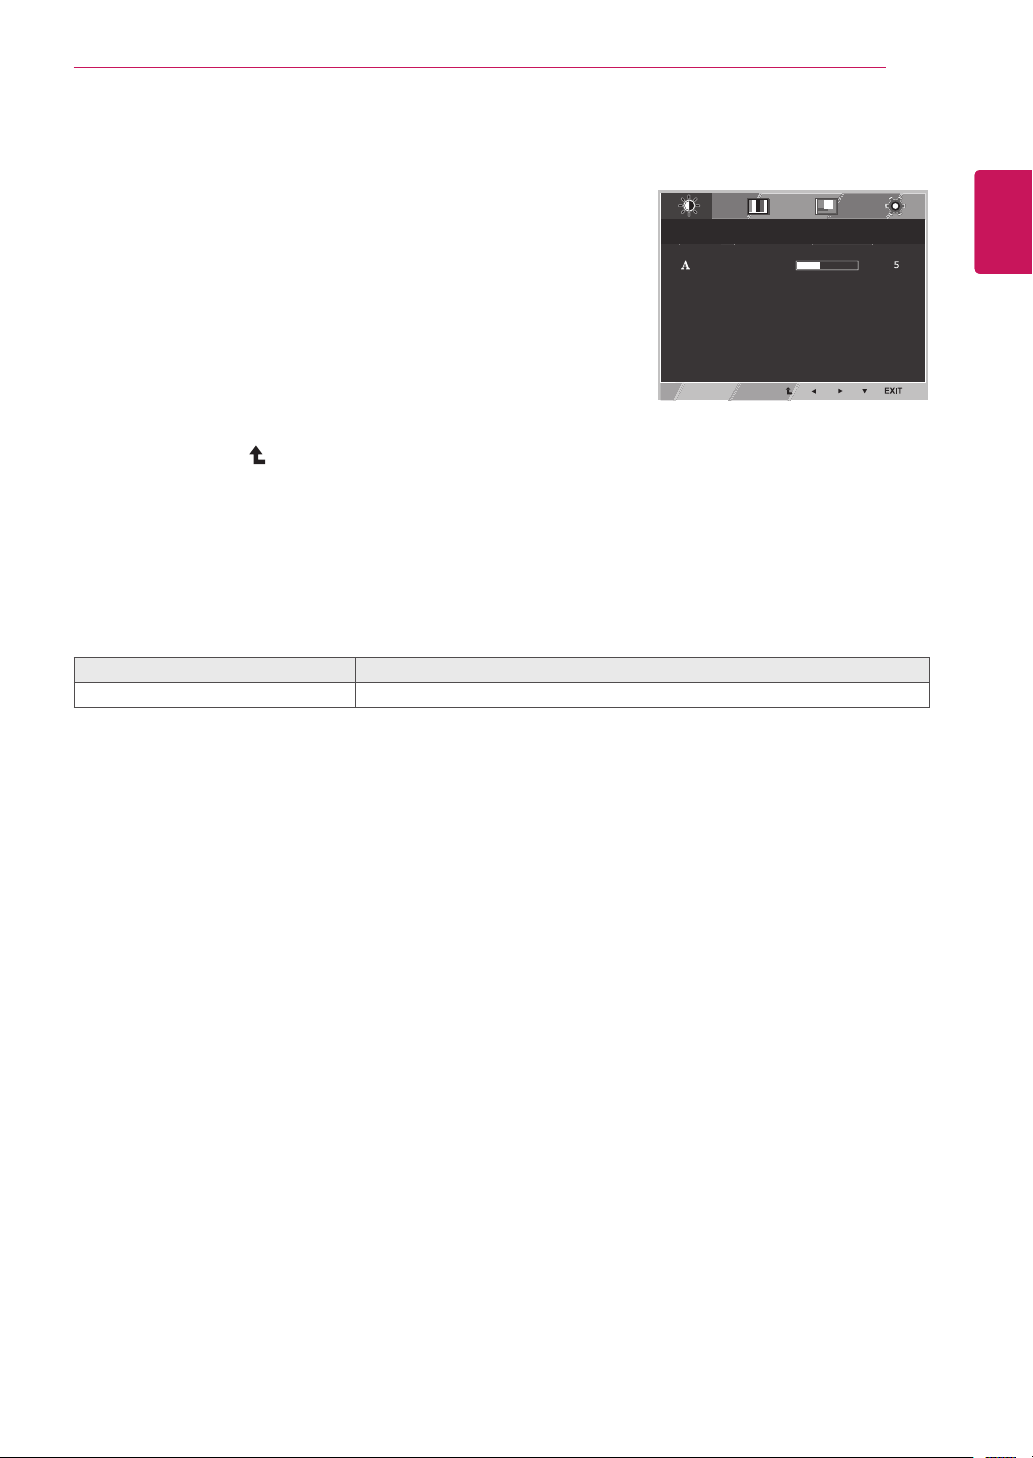
Volume
1
Pressthe
VOL
buttonatthebottomofthemonitorto
displaythe
VOL
OSDmenu.
2
Pressthe◄or►buttontoadjustthevolume.
3
PressthebuttontoenableordisableMute.
4
Select
EXIT
toleavetheOSDmenu.
Eachoptionisexplainedbelow.
Volume
Description
Volume
Adjuststhevolume(onlyavailableinCLOUDinputmode).
Reader Mode
3/3
70
100
1/2
Reset
Wide / Original
Brightness
Contrast
Menu
Menu > Next Menu > Picture
Sharpness
Menu > Next Menu > Color
Gamma
Color Temp
Red
Green
Blue
Menu > Next Menu > Display
Horizontal
Vertical
Clock
Phase
Menu > Next Menu > Others
Language
Cloud
Power Indicator
Volume
Off
Wide
No
Next Menu
Gamma 1
Custom
English
Off
Off
Menu > Next Menu > Others
Language
Cloud
Power Indicator
English
Off
Off
24
ENG
English
Troubleshooting
TROUBLESHOOTING
Vertical Frequency:
Inordertodisplayanimage,thescreenmustberefresheddozensoftimesper
secondlikeafluorescentlamp.Thenumberoftimesthescreenisrefreshedpersecondiscalled
verticalfrequencyorrefreshrateandisrepresentedbyHz.
Horizontal Frequency:
Thetimeittakestodisplayonehorizontallineiscalledthehorizontalcycle.
Thenumberofhorizontallinesdisplayedinonesecond
canbecalculatedbydividingonebythehorizontalcycle.Thisiscalledhorizontalfrequencyandis
representedbykHz.
NOTE
Check the following before calling for service.
No image appears
Isthepowercordofthedisplay
connected?
Checkandseeifthepowercordisconnectedproperlytothepower
outlet.
Isthepowerindicatorlighton?
PressthePowerbutton.
Isthepoweronandthepower
indicatorWhite?
Adjustthebrightnessandthecontrast.
Isthepowerindicatorflickering?
Ifthedisplayisinpowersavingmode,trymovingthemouseor
pressinganykeyonthekeyboardtobringupthescreen.
TrytoturnonthePC.
Doyouseean"OUTOFRANGE"
messageonthescreen?
ThismessageappearswhenthesignalfromthePC(videocard)is
outofhorizontalorverticalfrequencyrangeofthedisplay.Seethe
'Specifications'sectionofthismanualandconfigureyourdisplay
again.
IstheNoSignalmessagebeing
displayed?
Afterthemonitorison"NOSIGNAL",themonitorgoestoDPMmode.
ThisisdisplayedwhenthesignalcablebetweenthePCandthe
monitorismissingordisconnected.Checkthecableandreconnectit.
Do you see a "OSD LOCKED" message on the screen?
Doyousee“OSDLOCKED”when
youpushMENUbutton?
Youcansecurethecurrentcontrolsettings,sothattheycannotbe
inadvertentlychanged.YoucanunlocktheOSDcontrolsatanytime
bypushingtheMENUbuttonforseveralseconds:themessage“OSD
UNLOCKED”willappear.
Display image is incorrect
DisplayPositionisincorrect.
Pressthe
AUTO
buttontoautomaticallyadjustyourdisplayimageto
theidealsetting.
Onthescreenbackground,vertical
barsorstripesarevisible.
Pressthe
AUTO
buttontoautomaticallyadjustyourdisplayimageto
theidealsetting.
Anyhorizontalnoiseappearingin
anyimageorcharactersarenot
clearlyportrayed.
Pressthe
AUTO
buttontoautomaticallyadjustyourdisplayimageto
theidealsetting.
Check
Control Panel ► Display ► Settings
andadjustthedisplay
totherecommendedresolutionoradjustthedisplayimagetotheideal
setting.Setthecolorsettinghigherthan24bits(truecolor).

25
ENG
English
Troubleshooting
Checkifthevideocard'sresolutionorfrequencyiswithintherangeallowedbythemonitorandsetto
therecommended(optimal)resolutionin
Control Panel >
Display > Settings.
Failingtosetthevideocardtotherecommended(optimal)resolutionmayresultinblurredtext,a
dimmedscreen,atruncateddisplayareaormisalignmentofthedisplay.
Theconfigurationproceduremaydifferdependingonyourcomputerand/oroperatingsystem.Also,
somevideocardsmaynotsupportcertainresolutions.Ifthisisthecase,contactthecomputeror
videocardmanufacturerforassistance.
TheAUTOoptionisonlyavailableforD-SUB(analog)signals.
The display color is abnormal.
Doesthedisplaycolorappeardis-
colored(16color)?
Setthecolorto24bit(truecolor)orhigher.InWindows,gotoControl
Panel>Display>Settings>ColorQuality.
Doesthedisplaycolorappearun-
stableorinmonochrome?
Checkifthesignalcableisconnectedproperly.Re-connectthecable
orre-insertthePC'svideocard.
Aretherespotsonthescreen?
Whenusingthemonitor,pixilatedspots(red,green,blue,whiteor
black)mayappearonthescreen.ThisisnormalfortheLCDscreen.
Itisnotanerrornorisitrelatedtothemonitor'sperformance.
NOTE
26
ENG
English
Product Specication
PRODUCT SPECIFICATION
LCDScreen Type TFT(ThinFilmTransistor)
LCD(LiquidCrystalDisplay)Screen
PixelPitch 0.2907mmx0.2915mm
Resolution MaximumResolution 1440x900@60Hz
RecommendedResolution 1440x900@60Hz
VideoSignal HorizontalFrequency 30kHzto69kHz
VerticalFrequency 57Hzto63Hz
Synchronization SeparateSync
InputConnector 15-pinD-SUB(Analog)
Power 19V 2.3A
PowerConsumption:
CLOUD/D-SUB
OnMode:24W(D-sub)/29W(CLOUD)
PowerSavingMode≤0.5W(CLOUDmode:5.5W)
OffMode≤0.5W
AC/DCAdapter TypeDA-48F19,manufacturedbyAsianPowerDevicesInc.
OrtypeLCAP35,manufacturedbyLIENCHANGELECTRONICENTERPRISE
OrtypePA-1650-43,manufacturedbyLITE-ONTECHNOLOGYCORPORATION
OUTPUT:19V 2.53A
Dimension/
Weight
MonitorSize(WidthxHeightxDepth)
WithStand 452.3mmx369.4mmx258.6mm
WithoutStand 452.3mmx299.4mmx50.8mm
Weight(Without
Packaging)
4.2kg
Environment
Condition
OperatingCondition Temperature:0°Cto40°C;Humidity:Lessthan80%
StoringCondition Temperature:-20°Cto60°C;Humidity:Lessthan85%
Thespecificationsaresubjecttochangewithoutnotice.
20CAV37K

27
ENG
English
Product Specication
PRODUCT SPECIFICATION
LCDScreen Type
TFT(ThinFilmTransistor)
LCD(LiquidCrystalDisplay)Screen
PixelPitch
0.2745mmx0.2745mm
Resolution MaximumResolution
1920x1080@60Hz
RecommendedResolution
1920x1080@60Hz
VideoSignal HorizontalFrequency
30kHzto69kHz
VerticalFrequency 57Hzto63Hz
Synchronization SeparateSync
InputConnector 15-pinD-SUB(Analog)
Power 19V 2.3A
PowerConsumption:
CLOUD/D-SUB
OnMode:24W(D-sub)/29W(CLOUD)
PowerSavingMode≤0.5W(CLOUDmode:5.5W)
OffMode≤0.5W
AC/DCAdapter
TypeDA-48F19,manufacturedbyAsianPowerDevicesInc.
OrtypeLCAP35,manufacturedbyLIENCHANGELECTRONICENTERPRISE
OrtypePA-1650-43,manufacturedbyLITE-ONTECHNOLOGYCORPORATION
OUTPUT:19V 2.53A
Dimension/
Weight
MonitorSize(WidthxHeightxDepth)
WithStand
56.9cmx39.0cmx25.9cm
WithoutStand
56.9cmx34.2cmx5.1cm
Weight(Without
Packaging)
5.5kg
Environment
Condition
OperatingCondition
Temperature:0°Cto40°C;Humidity:Lessthan80%
StoringCondition
Temperature:-20°Cto60°C;Humidity:Lessthan85%
Thespecificationsaresubjecttochangewithoutnotice.
24CAV37K
28
ENG
English
Product Specication
Preset Mode
20CAV37K
Display Modes
(Resolution)
Horizontal
Frequency (kHz)
Vertical
Frequency (Hz)
Polarity (H/V) Remark
720x400 31.468 70.08 -/+
640x480 31.469 59.94 -/-
800x600 37.879 60.317 +/+
1024x768 48.363 60 -/-
1280x1024 63.981 60.02 +/+
1440x900 55.93 59.89 +/+ RecommendedMode
24CAV37K
Display Modes
(Resolution)
Horizontal
Frequency (kHz)
Vertical
Frequency (Hz)
Polarity (H/V) Remark
720x400 31.468 70.08 -/+
640x480 31.469 59.94 -/-
800x600 37.879 60.317 +/+
1024x768 48.363 60 -/-
1280x1024 63.981 60.02 +/+
1680x1050 65.290 59.954 -/+
1920x1080 67.5 60 +/+ RecommendedMode
Indicator
Mode LED Color
OnMode White
SleepMode BlinkingWhite
OffMode Off
29
ENG
English
Using CLOUD Solution
USING CLOUD SOLUTION
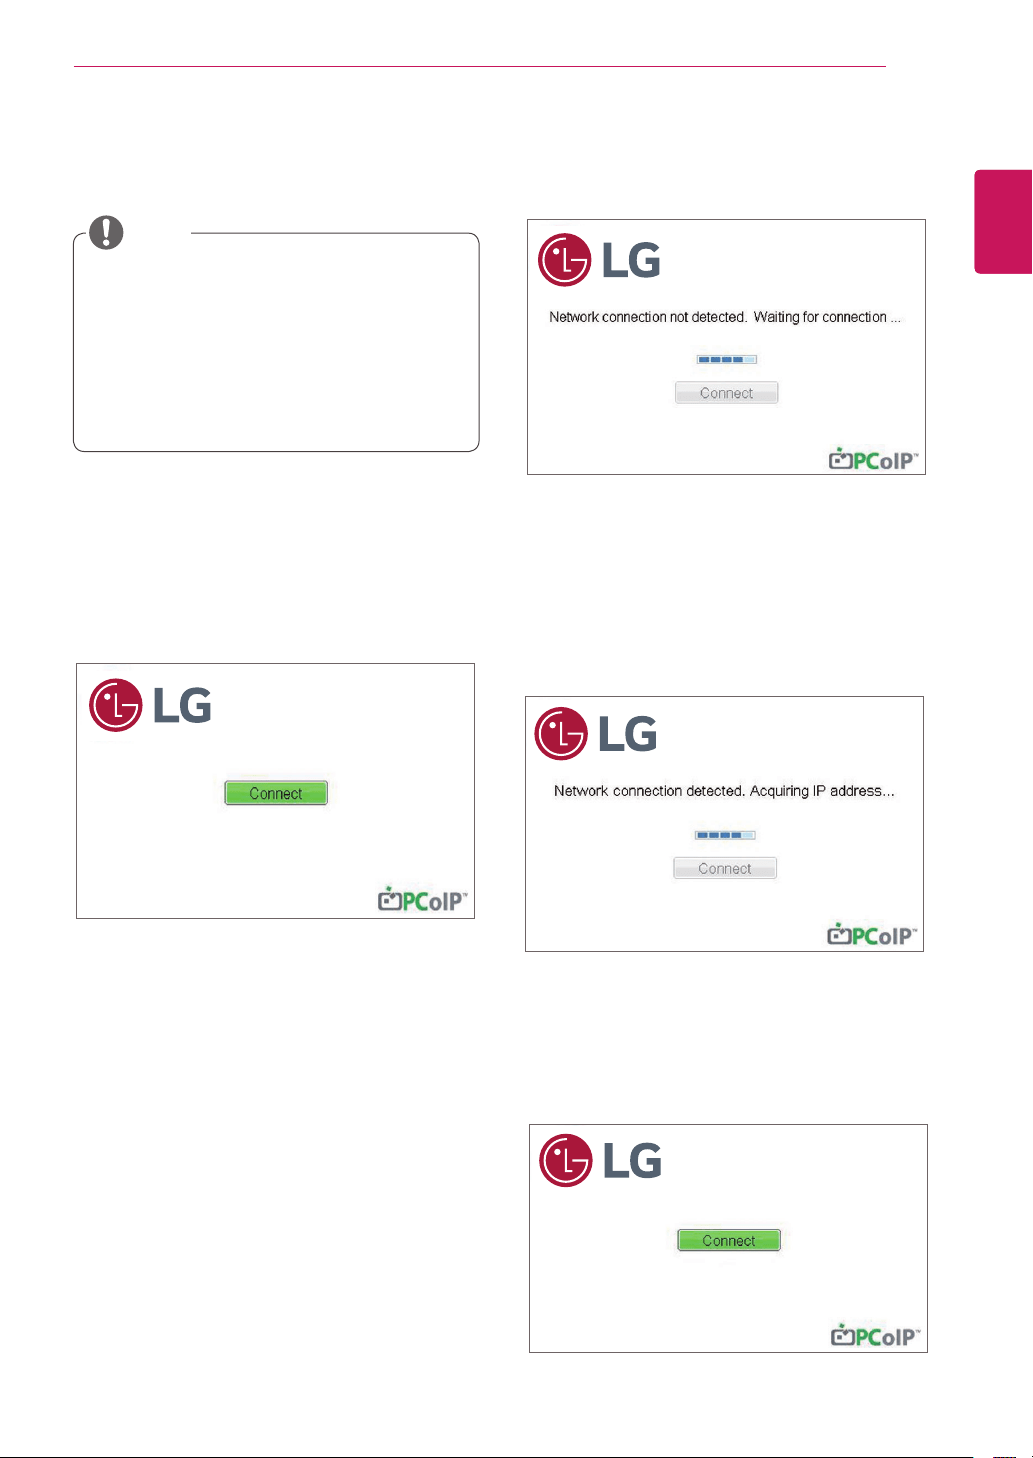
IfthenetworkisconnectedandIPisbeingac-
quired,themessage"Networkconnectiondetect-
ed.AcquiringIPaddress…"isdisplayedonthe
Connectionscreen.Figure2-3showsthemessage
displayedwhenthenetworkisreadyandtheIPis
beingacquired.
ThebelowistheConnectionscreendisplayed
whennetworkiscompletelyready.
Ifthenetworkisnotproperlyconnected(e.g.,dur-
ingportalbootup),orconnectionisbeingcreated,
the"Networkconnectionlost.Waitingforconnec-
tion…"messageisdisplayedontheConnection
screen.
Figure2-2showsthemessagedisplayedwhenthe
networkisnotready.
<Figure2-1:OSDConnectScreen>
<Figure2-3:AcquiringtheIPafterNetworkCon-
nected>
Connect Screen
TheConnectscreenisshownduringstart-up,
exceptwhentheportalhasbeenconfiguredfora
managedstart-uporauto-reconnect.Thelogodis-
playedabovetheConnectbuttoncanbechanged
byuploadingareplacementimageviatheadmin
interface.
<Figure2-2:NetworkNotReady>
NOTE
MenusandfunctionsinCLOUDmodemay
beslightlydifferentdependingonthefirm-
wareversion.Youcandownloadtheuser
manualforeachversionfromtheTeradici
homepage:http://techsupport.teradici.com
Tocheckthefirmwareversion,seepage
<51>.
<Figure2-4:NetworkReady>
30
ENG
English
Using CLOUD Solution
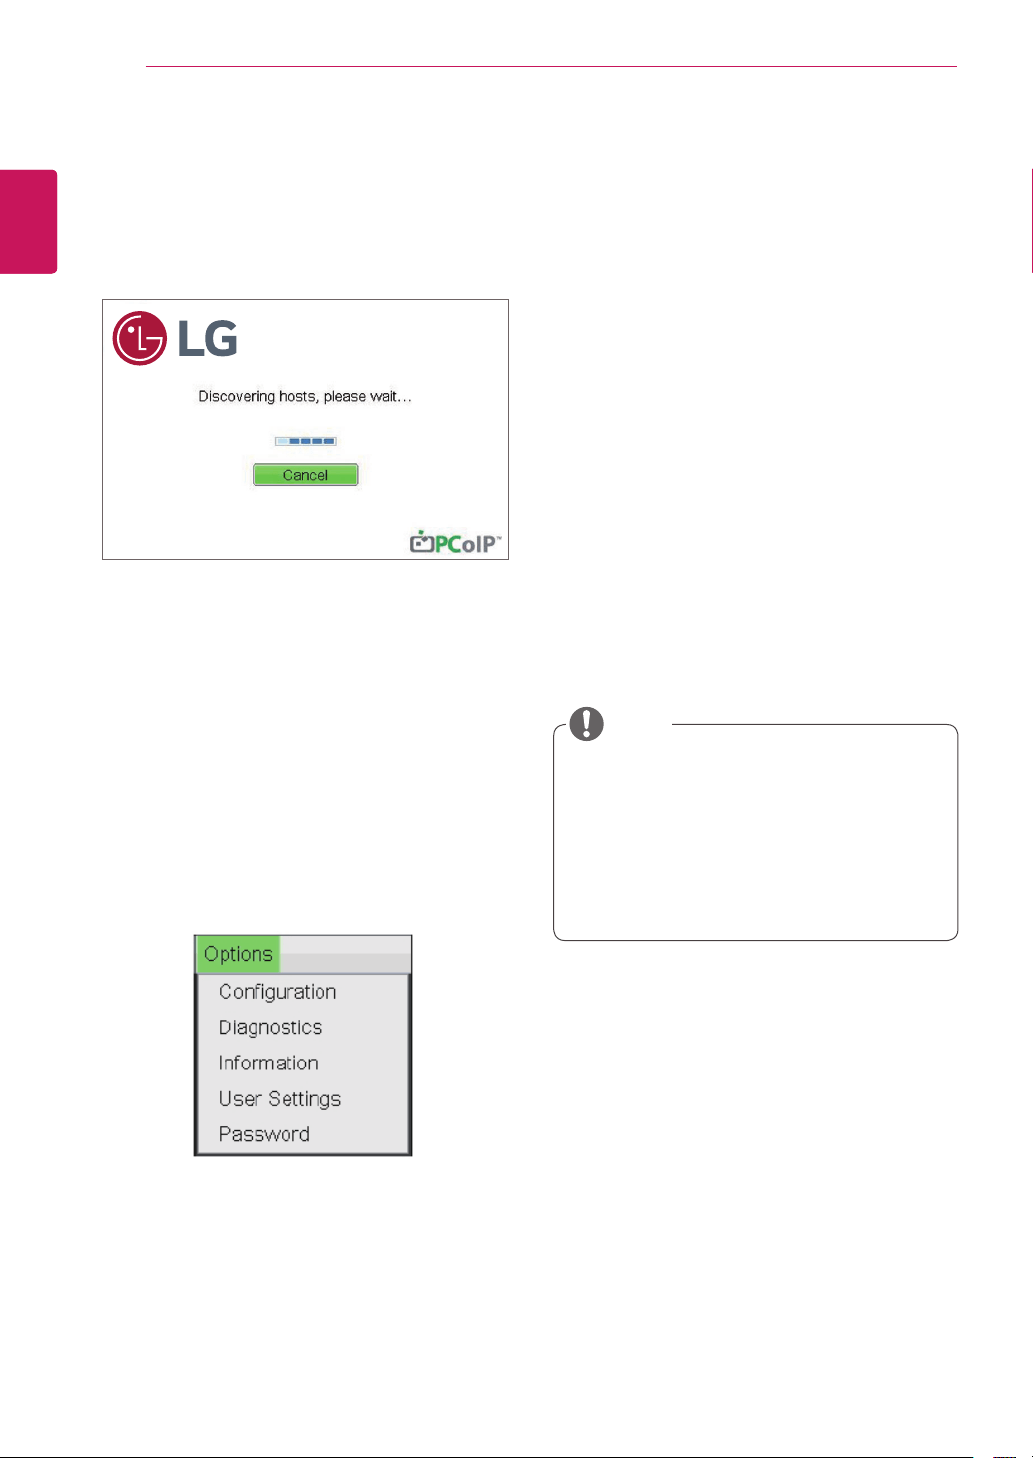
<Figure2-5:OSDConnectScreen(Connecting)>
OSDOptionsMenu
SelectingtheOptionsmenuwillproducealistof
selections.TheOSDOptionsmenucontains:
Configuration
Diagnostics
Information
UserSettings
Password
Selectingoneoftheoptionswillproduceasettings
window.
SomePCoIPdeviceshavetheirpassword
protectiondisabledandcanbeloggedinto
themanagementwebpageoraccessthe
OSDparameterswithoutapassword.The
loginpageandtheOSD'spasswordprotec-
tioncanbeenabledinthePCoIPmanage-
mentconsole.
NOTE
IfyouselecttheConnectbutton,theconnection
sessionisstarted.Whentheconnectionispend-
ing,the"Discoveringhosts,pleasewait…"mes-
sageisdisplayedontheOSDlocalGUI.Whenthe
connectionisestablished,theOSDlocalGUIwill
disappearandbereplacedbythesessionimage.
<Figure2-6:OSDOptionsMenu>
Configuration Window
IntheConfigurationwindow,theadministratorcan
accessthewindowtabsthatcontainthesettingsto
configureandmanagetheportalenvironment.
TheConfigurationwindowhasthefollowingtabs:
Network
IPv6
SCEP
Label
Discovery
Session
Language
Power
Display
Access
Audio
Reset
EachtabcontainsOK,CancelandApplybuttons
toallowtheadministratortoapplyorcancelthe
modifiedsettingsaswellastheAdvancedbutton
foradvancedsettings.
31
ENG
English
Using CLOUD Solution
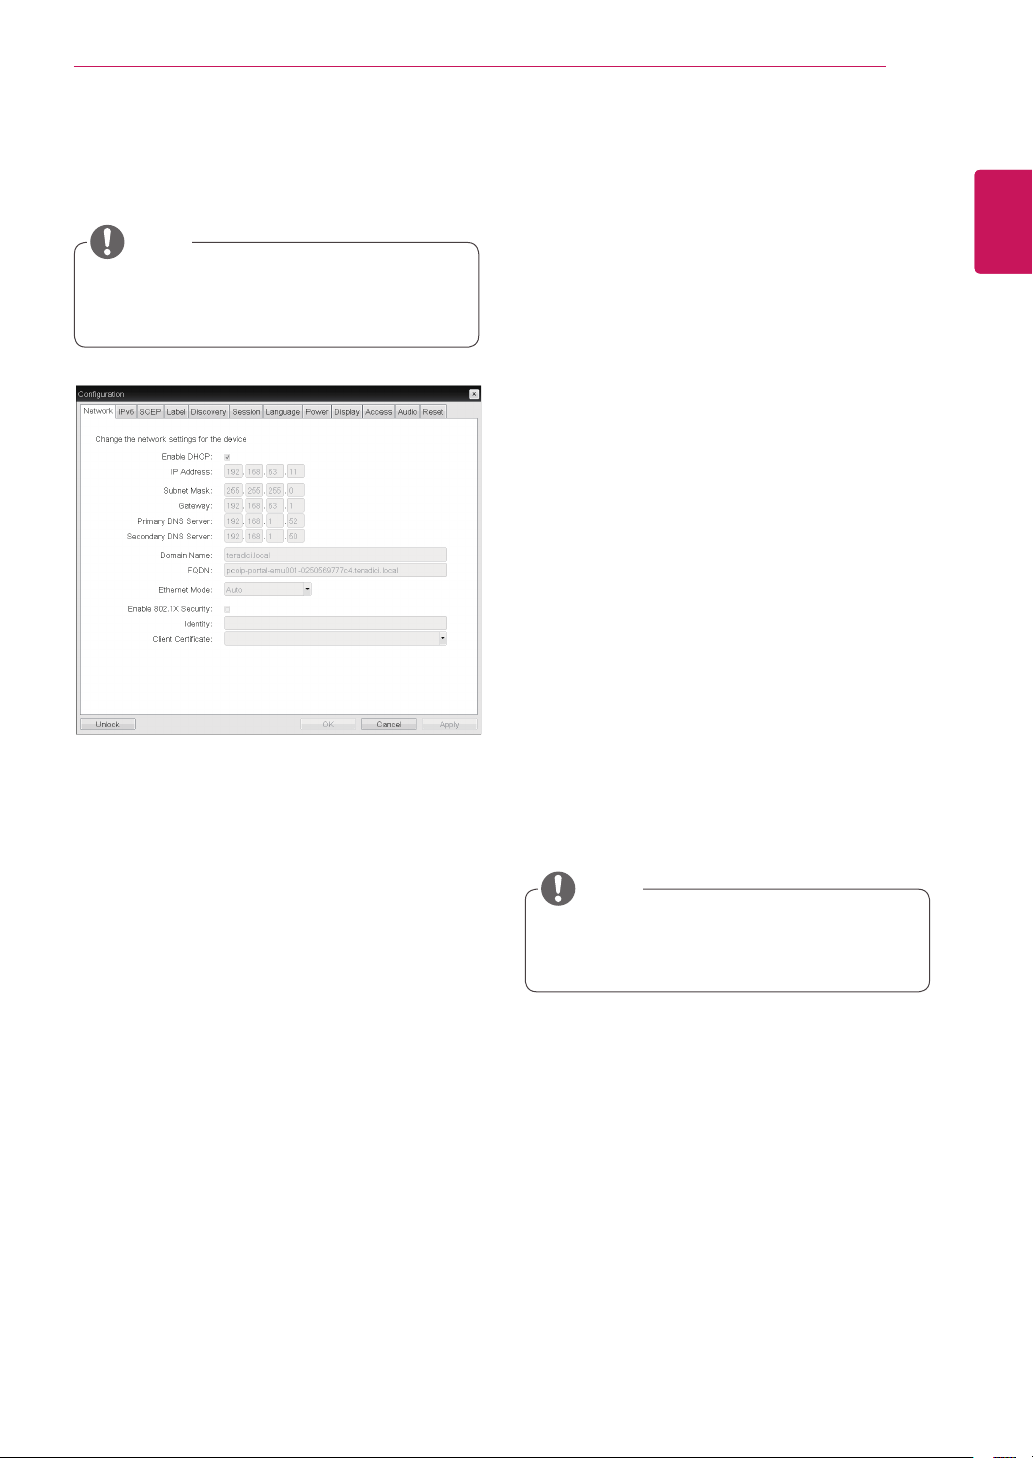
InordertoutilizetheFQDNfeature,aDNS
server,configuredproperlywithDHCPoption
81,mustbeused.
Gateway
TheGatewayfieldcontainsthegatewayIPad-
dressofthedevice.IfDHCPisdisabled,thisfield
isrequired.IfDHCPisenabled,thisfieldcannotbe
edited.
Primary DNS Server
ThePrimaryDNSServerfieldcontainstheprimary
DNSIPaddressofthedevice.Thisfieldisoption-
al.IfDHCPisenabled,thisfieldcannotbeedited.
Secondary DNS Server
TheSecondaryDNSServerfieldcontainsthesec-
ondaryDNSIPaddressofthedevice.Thisfieldis
optional.IftheDHCPisenabled,thisfieldcannot
beedited.
Domain Name
TheDomainNamefieldcontainsthedomainname
used,e.g."domainlocal".Thisfieldisoptional.Itspeci-
fiesonwhichdomainthehostorportaloperates.
FQDN
TheFQDNfieldrepresentstheFullyQualifiedDo-
mainNameofthehostorportal.Thedefaultvalueis
PCoIP-host-MACorPCoIP-portal-MAC,whereMAC
istheMACaddressofthehostorportal.Ifthereis
adomainname,itwillbeaddedtotheFQDNinthe
formatofPCoIP-host-MAC.domain.local
Ethernet Mode
TheEthernetModefieldspecifiestheportal'sEth-
ernetmode.
Theavailableoptionsareasfollows.
Auto
100MbpsFull-Duplex
10MbpsFull-Duplex
Enable 802.1X Security
Enablethisfieldforeachofyourremoteworksta-
tioncardsandzeroclientsifyournetworkuses
802.1xsecuritytoensurethatonlyauthorized
devicesaccessthenetwork.
NOTE
Thenetworkparameterscanalsobecon-
figuredusingtheWebpageAdministration
Interface.
NOTE
Network Tab
TheNetworktaballowstheadministratortoconfig-
uretheportalnetworkparameters.
<Figure2-7:NetworkConfiguration>
Enable DHCP
IftheEnableDHCPoptionisselected,adevicewill
beconnectedtotheDHCPserver.thatallocates
theIPaddress,subnetmask,gatewayIPaddress,
andDNSserver.Ifthisoptionisdisabled,the
aboveparametersmustbeconfiguredmanually.
IP Address
TheIPAddressfieldcontainstheIPaddressofthe
device.IfDHCPisdisabled,thisfieldisrequired.
IfDHCPisenabled,thisfieldcannotbeedited.
ThisfieldmustcontainthecorrectIPaddress.Ifan
incorrectIPaddressisprovided,anOSDmessage
isdisplayedpromptingtheadministratortoprovide
thecorrecttheIPaddress.
Subnet Mask
TheSubnetMaskfieldcontainsthesubnetmask
ofthedevice.IfDHCPisdisabled,thisfieldis
required.IfDHCPisenabled,thisfieldcannotbe
edited.Thisfieldmusthavethecorrectsubnet
mask.Ifanincorrectsubnetmaskisprovided,an
OSDmessageisdisplayedpromptingtheadminis-
tratortoprovidethecorrectthesubnetmask.
32
ENG
English
Using CLOUD Solution
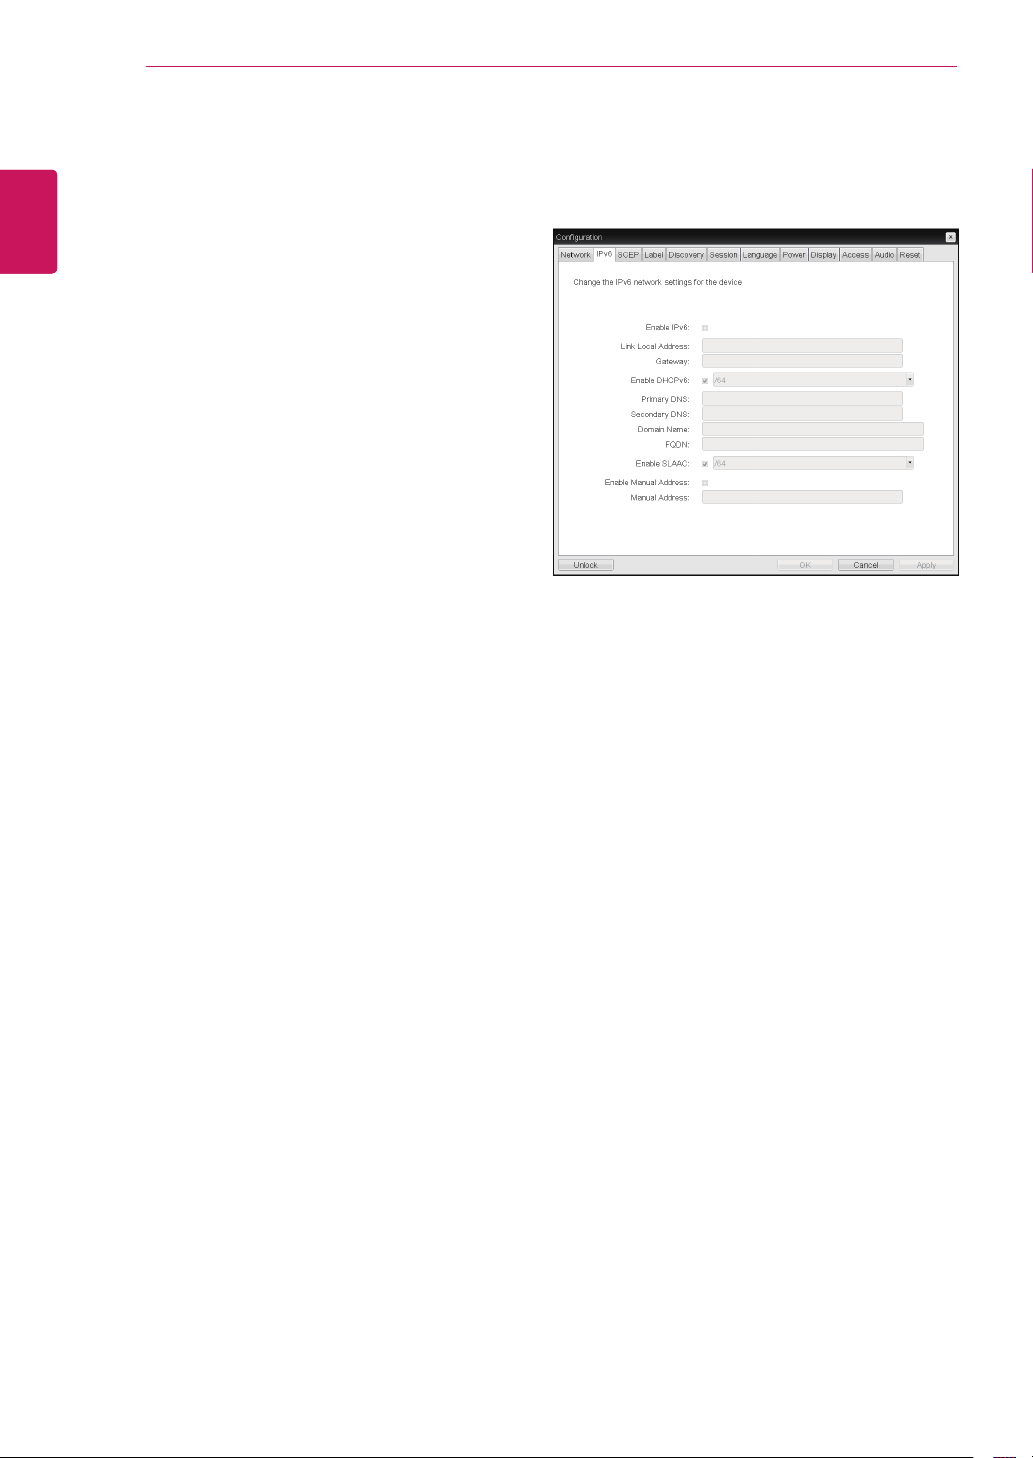
<Figure2-8:IPv6Configuration>
IPv6 Tab
TheIPv6tabisusedwhentheportalisconnected
tothenetworkconfiguredwiththeIPv6.
Enable IPv6
IfyouselectEnableIPv6,theportalinusecanbe
connectedtothenetworkconfiguredwiththeIPv6.
Link Local Address
TheLinkLocalAddressfieldisautomaticallyfilled
withtheIPaddressofadevice.
Gateway
TheGatewayfieldcontainsthegatewayIPad-
dressofthedevice.Enterthegatewayaddressto
beusedbyadevice.
Enable DHCPv6
ToassigntheDynamicHostConfigurationProtocol
version6(DHCPv6)ofadeviceselecttheEnable
DHCPv6field.
Primary DNS Server
ThePrimaryDNSServerfieldcontainsthepri-
maryDNSIPaddressofthedevice.Thisfieldis
optional.IfDHCPv6isenabled,thisfieldcannotbe
edited.
Identity
Entertheidentitystringusedtoidentifyyourdevice
tothenetwork.
Client Certificate
ClickChoosetoselecttheclientcertificateyou
wanttouseforyour802.1xdevices.
Thelistofcertificatesthatappearsincludesthe
certificateuploadedfromtheCertificateUpload
pagethatcontainaprivatekey.
Ifanothernetworkdevice(forexample,aswitch)is
configuredtooperateunder10MbpsFull-Duplex,
100MbpsFull-Duplexor1GbpsFull-Duplex,the
administratorshouldalwayssettheEthernetMode
fieldtoAuto;andifthedeviceistooperateunder
onlyonespeedoutofmultiplesettings,selectei-
ther10MbpsFull-Duplexor100MbpsFull-Duplex.
33
ENG
English
Using CLOUD Solution
Secondary DNS Server
TheSecondaryDNSServerfieldcontainsthesec-
ondaryDNSIPaddressofthedevice.Thisfieldis
optional.IfDHCPv6isenabled,thisfieldcannot
beedited.
Domain Name
TheDomainNamefieldcontainsthedomainname
used,e.g."domainlocal".Thisfieldisoptional.It
specifiesonwhichdomainthehostorportaloper-
ates.
FQDN
TheFQDNfieldrepresentstheFullyQualifiedDo-
mainNameofthehostorportal.Thedefaultvalue
isPCoIP-host-MACorPCoIP-portal-MAC,where
MACistheMACaddressofthehostorportal.If
thereisadomainname,itwillbeaddedtothe
FQDNintheformatofPCoIP-host-MAC.domain.
local.
Enable SLAAC
SelecttheEnableSLAACfieldtousethestateless
auto-configurationofthedevice.
Enable Manual Address
SelecttheEnableManualAddressfieldtoenter
thedeviceaddressmanually.
Manual Address
IntheManualAddressfield,entertheIPaddress
manually.
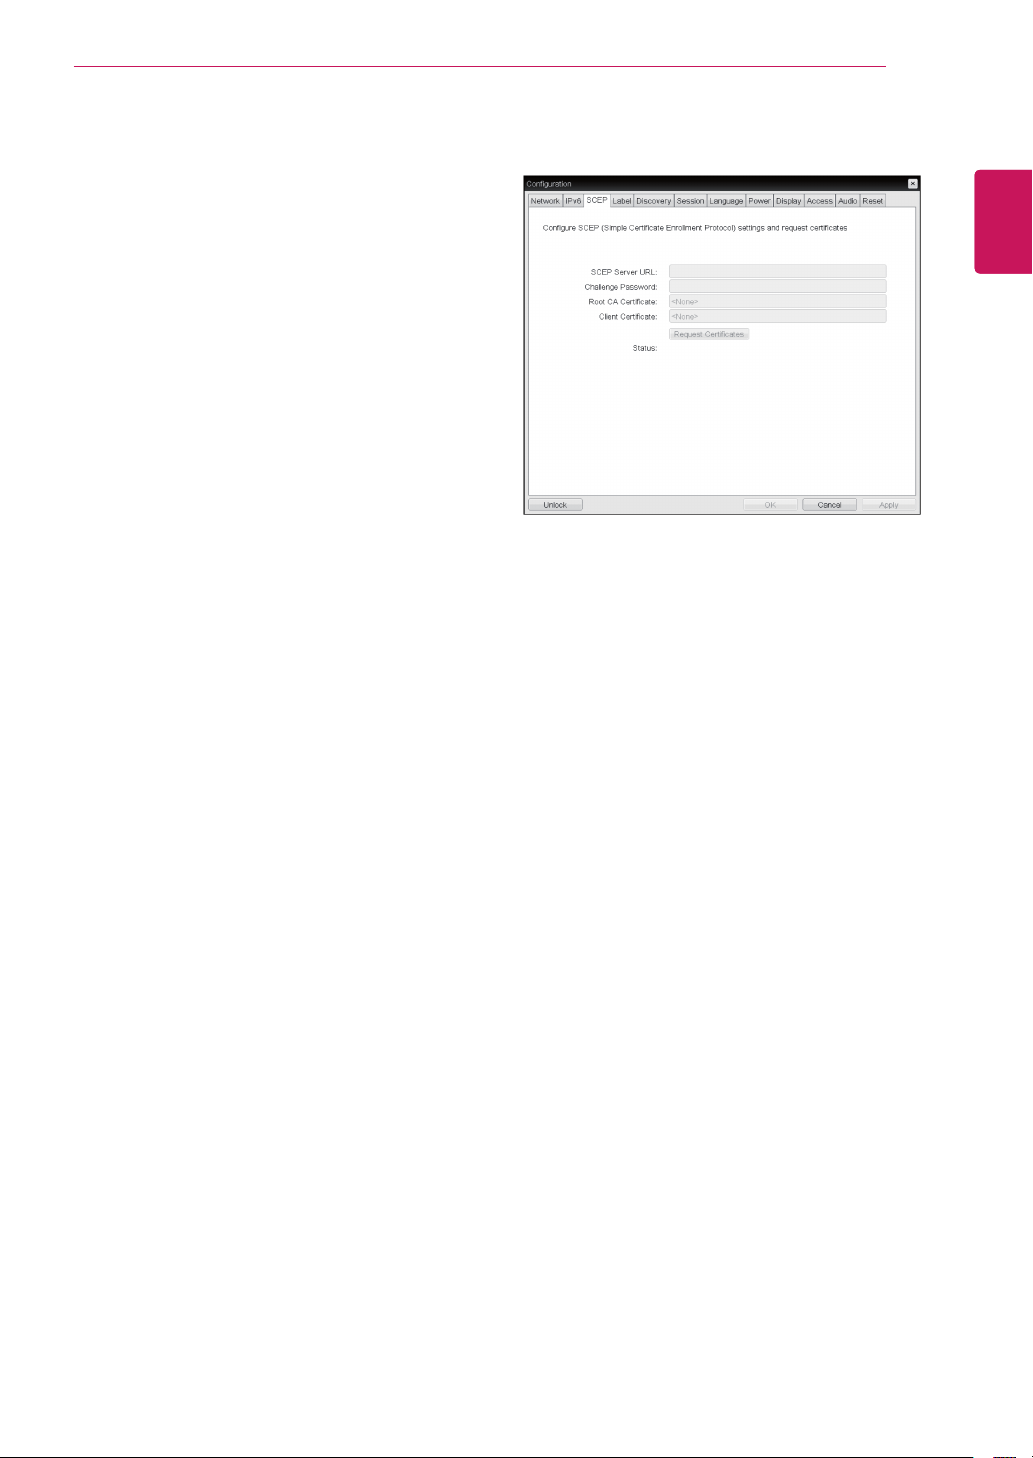
SCEP Tab
SCEP Server URL
EntertheURLfortheSCEPserverthatisconfig-
uredtoissuecertificatesforthedevice.
Challenge Password
EnterthepasswordtopresenttotheSCEPserver.
Root CA Certificate
DisplaysthenameoftherootCAcertificatethat
hasbeeninstalledinthedevice.
Client Certificate
Displaysthenameoftheclientcertificatethathas
beeninstalledinthedevice.
Status
Displaysthestatusoftherequest(e.g.,inprog-
ress,successful,failed)
<Figure2-9:SCEPConfiguration>
34
ENG
English
Using CLOUD Solution
<Figure2-9:LabelConfiguration>
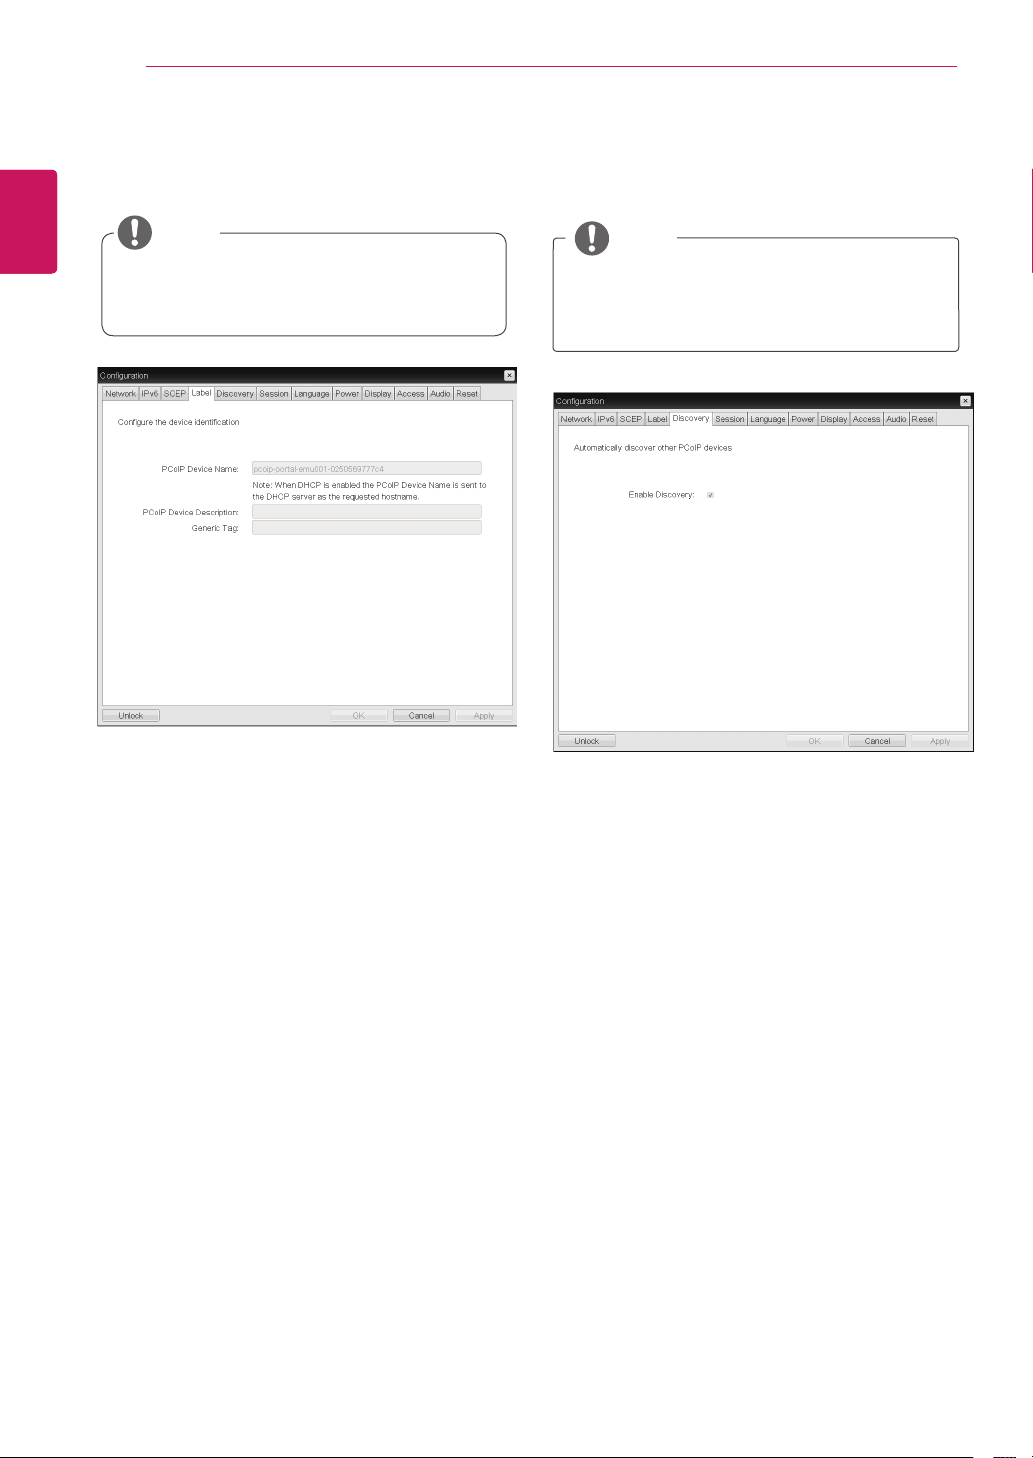
Label Tab
TheLabeltaballowstheadministratororhostto
addcustomizedinformationtotheportal.
Theportallabelparameterscanalsobecon-
figuredusingtheWebpageAdministration
Interface.
PCoIP Device Name
InthePCoIPDeviceNamefield,theadministrator
canspecifyalogicalnametothehostorportal.
ThedefaultvalueisPCoIP-host-MACorPCoIP-
portal-MAC,whereMACistheMACaddressofthe
hostorportal.
PCoIP Device Description
InthePCoIPDeviceDescriptionfield,theadministra-
torcanaddspecificinformation,suchastheendpoint
location,oraddadescriptiontothehostorportal.
ThisfieldcannotbeusedinthePCoIPfirmwareand
accessibilityisstrictlylimitedtotheadministrator.
Generic Tag
IntheGenericTagfield,theadministratorcanadda
generictagtothehostorportal.
ThisfieldcannotbeusedinthePCoIPfirmwareand
accessibilityisstrictlylimitedtotheadministrator.
NOTE
Enable Discovery
IftheEnableDiscoveryoptionisselected,adevice
willuseSLPDiscoverytodynamicallylocatethe
peerdevicewithoutrequiringanyinformationabout
thelocationofthedeviceinthenetwork.This
meansthattheconfigurationandmaintenance
workinacomplicatedsystemcanbesignificantly
reduced.
AsSLPDiscoveryrequiresamulticast-enabled
router,therecommendedsearchstructureisDNS-
SRVDiscovery.
<Figure2-11:DiscoveryConfiguration>
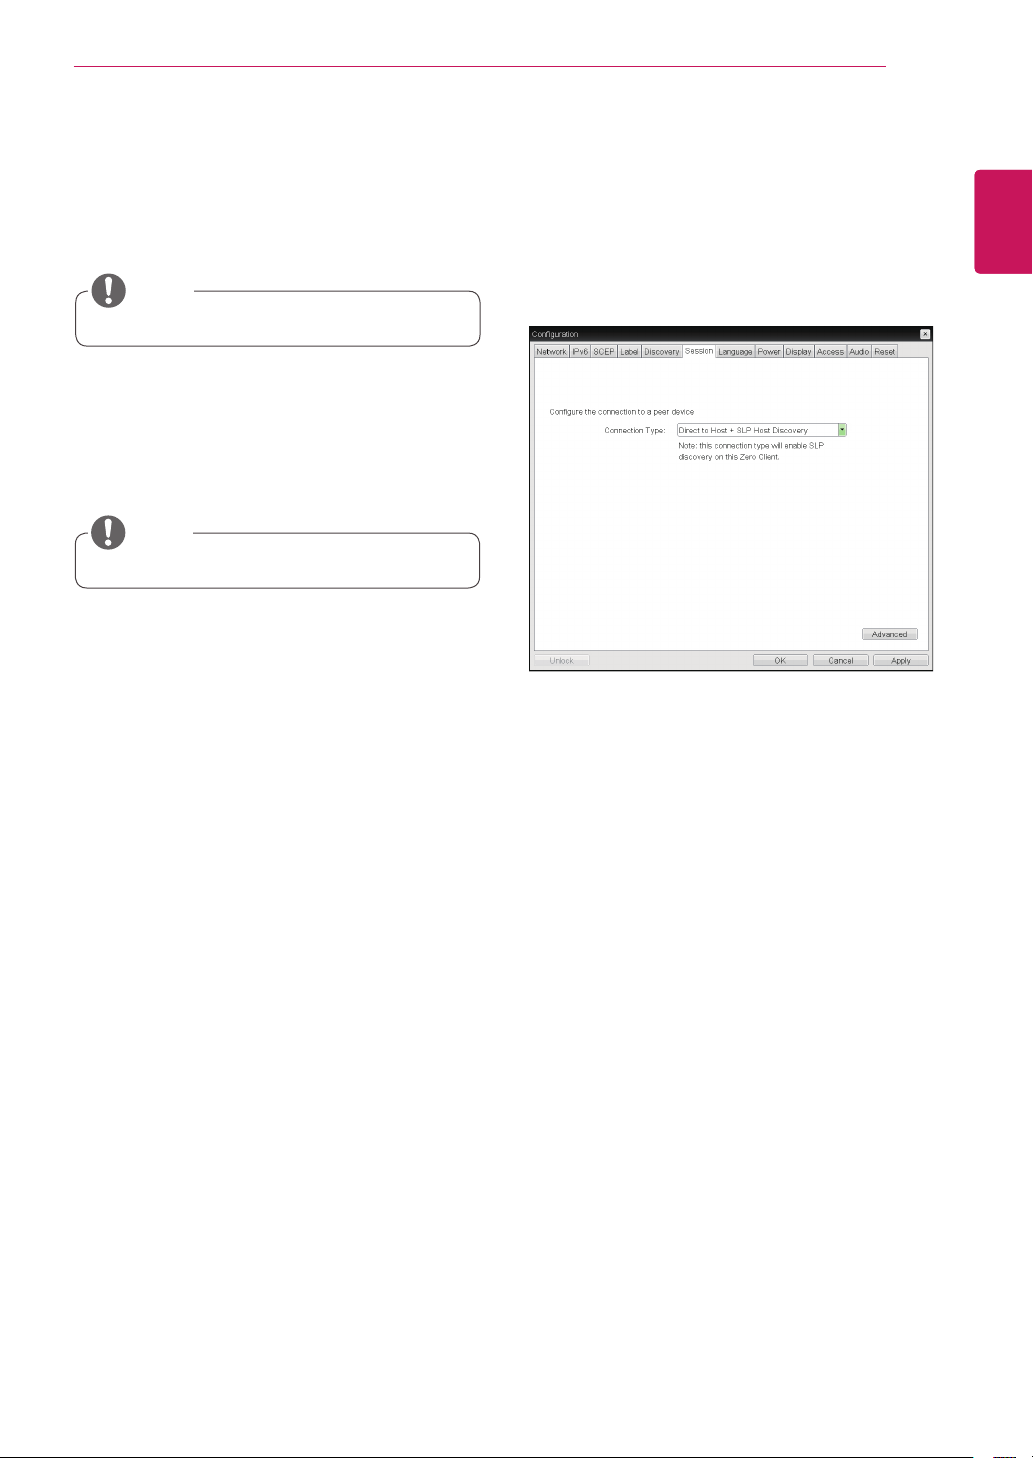
Discovery Tab
TheDiscoverytaballowstheadministratortoeas-
ilyfindaportalinthePCoIPsystem.
TheDiscoveryparameterscanalsobecon-
figuredusingtheWebpageAdministration
Interface.
NOTE
<Figure2-10:LabelConfiguration>
35
ENG
English
Using CLOUD Solution
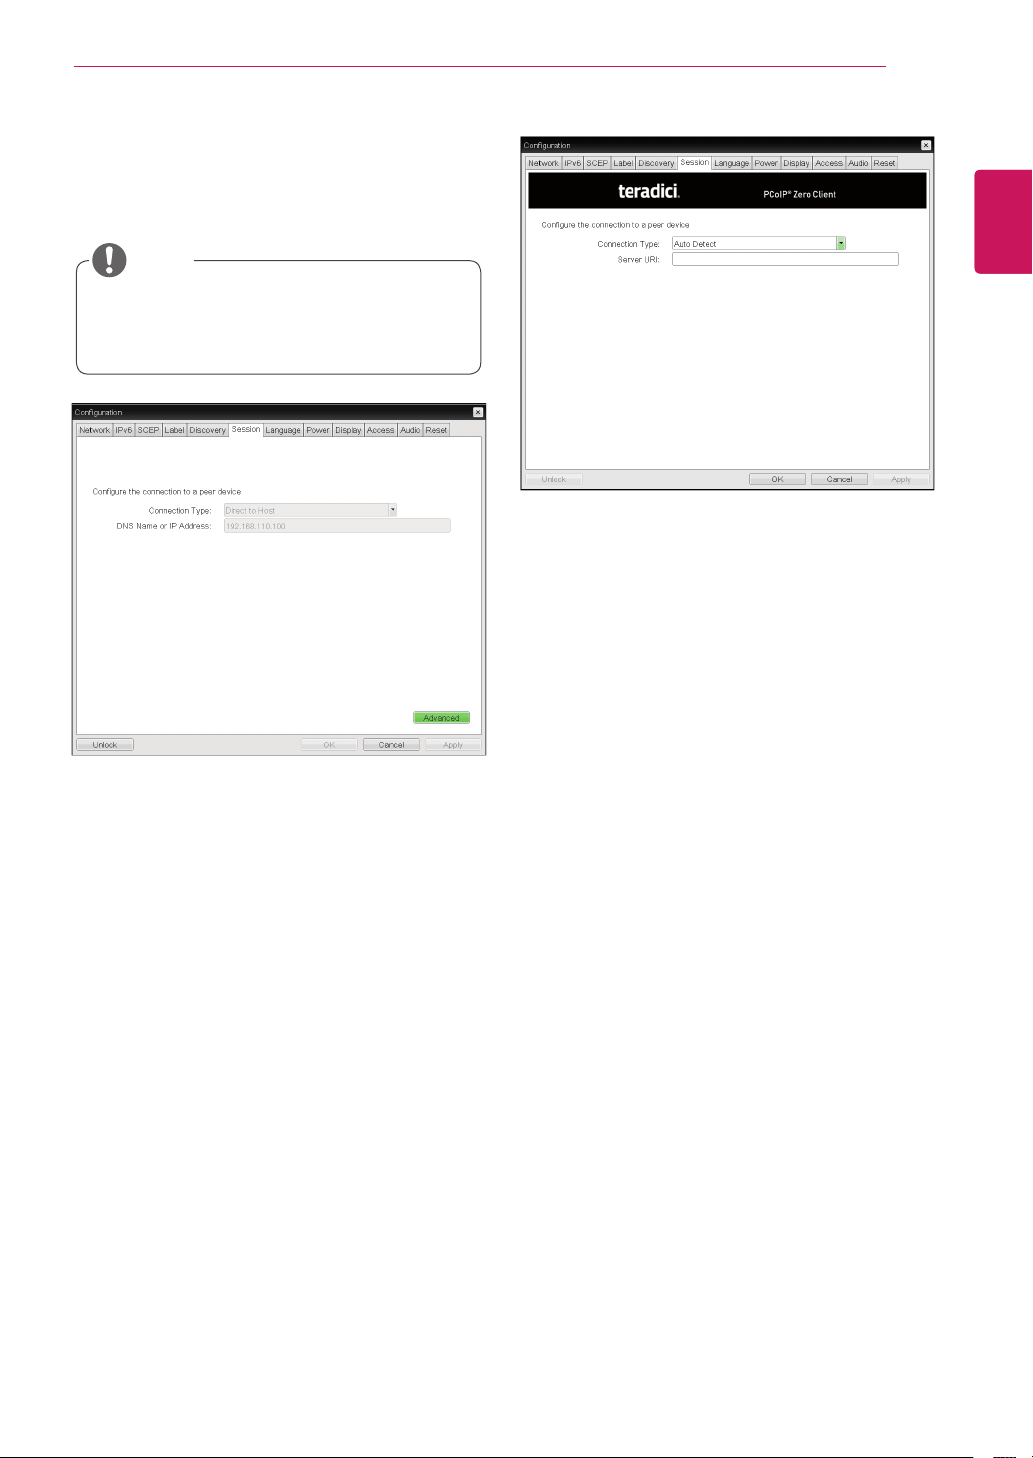
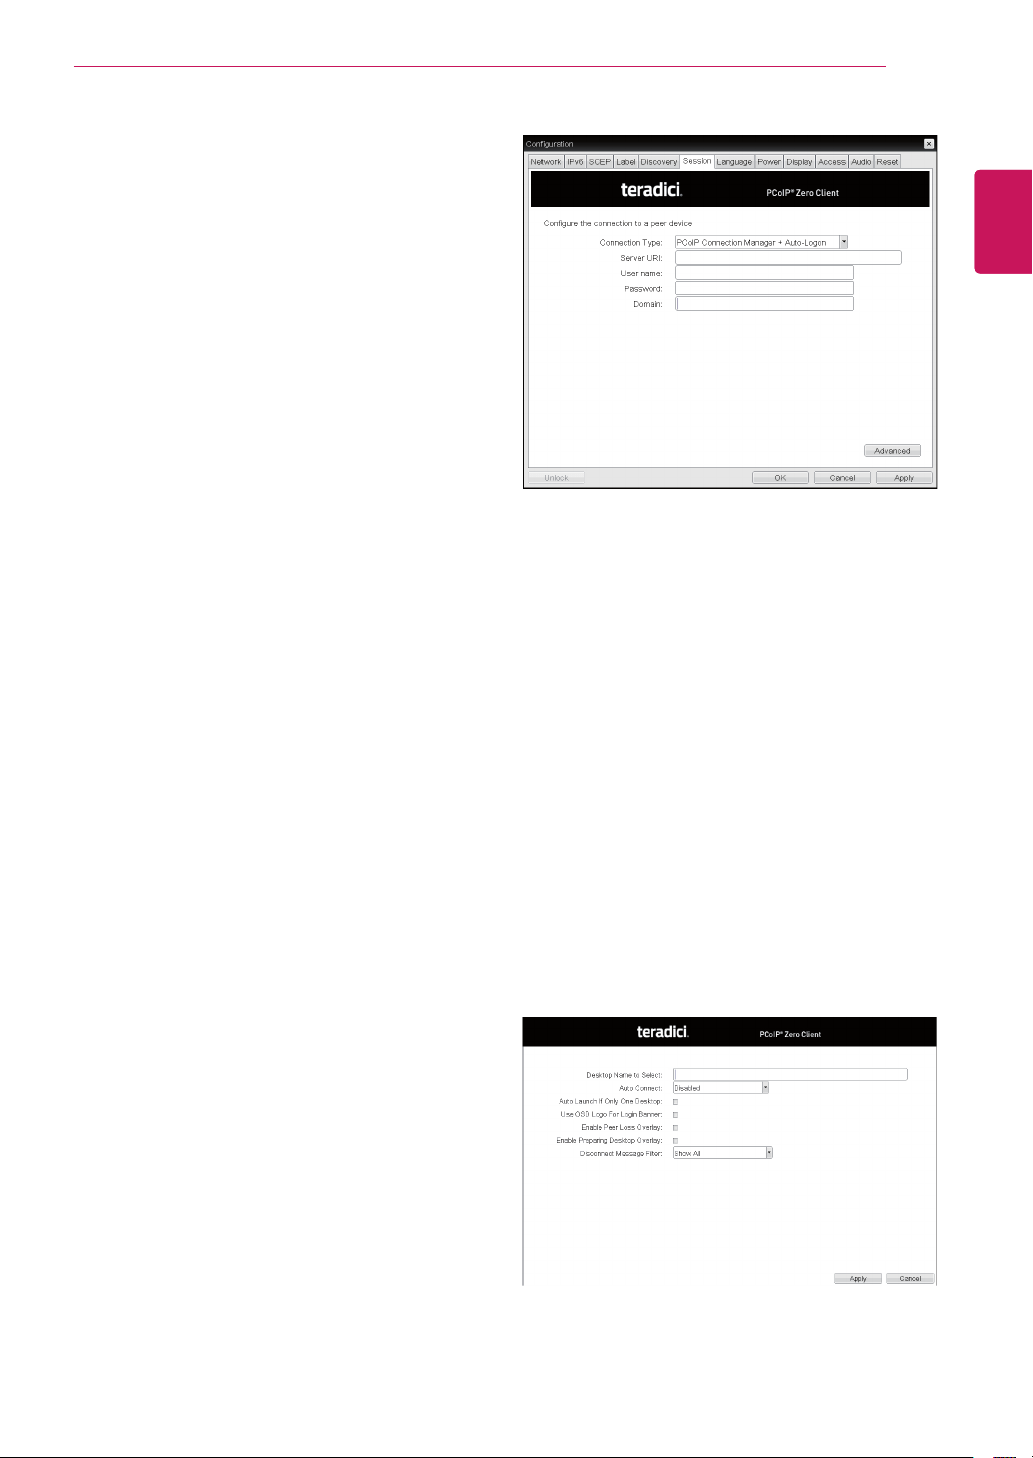
<Figure2-12:SessionConfiguration>
Session Tab
TheSessiontaballowstheadministratortosetthe
methodtoconnectthedevicetoapeerdevice.
TheSessionparameterscanalsobecon-
figuredusingtheWebpageAdministration
Interface.
NOTE
Connection Type
TheConnectionTypefieldallowstheusertoselect
thedevicetobeconnectedwiththeportal.
TheConnectionTypefieldhasfollowingoptions:
AutoDetect
DirecttoHost
DirecttoHost+SLPHostDiscovery
PCoIPConnectionManager
PCoIPConnectionManager+Auto-Logon
ViewConnectionServer
ViewConnectionServer+Auto-Logon
ViewConnectionServer+Kiosk
ViewConnectionServer+ImprivataOneSign
ConnectionManagementInterface
<Figure2-13:AutoDetectSetting>
Auto Detect
Thisconnectiontypeautomaticallydetectswhich
brokerprotocolaconnectionserverisusingsous-
ersinamixedenvironmentdonothavetomanu-
allyreconfigurethesessiontypeeachtimethey
switchbrokers.
Server URI
EntertheUniformResourceIdentifier(URI)ofthe
currentconnectionbroker.
36
ENG
English
Using CLOUD Solution
Wake Host from Low Power State
Selectwhethertousethehost’sMACaddressor
IPaddresswhenconfiguringtheWake-On-LAN
featureforaclient.Thisfeaturewakesupthehost
whentheuserpressestheclient’sremotePC
buttonorclickstheconnectbuttonontheconnect
window.
Host Wake MAC Address
Enterthehost’sMACaddresstocompletethehost
wakeupconfigurationwhenWake-On-LANEn-
abled+PeerAddressorWake-On-LANEnabled+
CustomAddressisselected.Thisclientwillsend
a“Magicpacket”tothisMACaddresstowakethe
hostcomputerfromalowpowerstate.
Host Wake IP Address
Enterthehost’sIPaddresstocompletethehost
wakeupconfigurationwhenWake-On-LANEn-
abled+CustomAddressisselected.Thisclientwill
senda“Magicpacket”tothisIPaddresstowake
thehostcomputerfromalowpowerstate.
<Figure2-15:AdvancedSettingsforDirectto
Host>
Direct to Host
YoucanviewthescreenofthehostPCbyestab-
lishing1:1connectionbetweenthePCIhostcard
connectedtothehostPCthroughtheenteredIP
addressofthehostPCandtheportal.
DNS Name or IP Address
EntertheDNSnameorIPaddressofthehostPC.
<Figure2-14:DirecttoHostSetting>
Seebelowforinformationhowtosetforeachop-
tion.
37
ENG
English
Using CLOUD Solution
<Figure2-16:DirecttoHost+SLPHostDiscoverySet-
tings>
Thissettingisprovidedonlyfortheclient.
NOTE
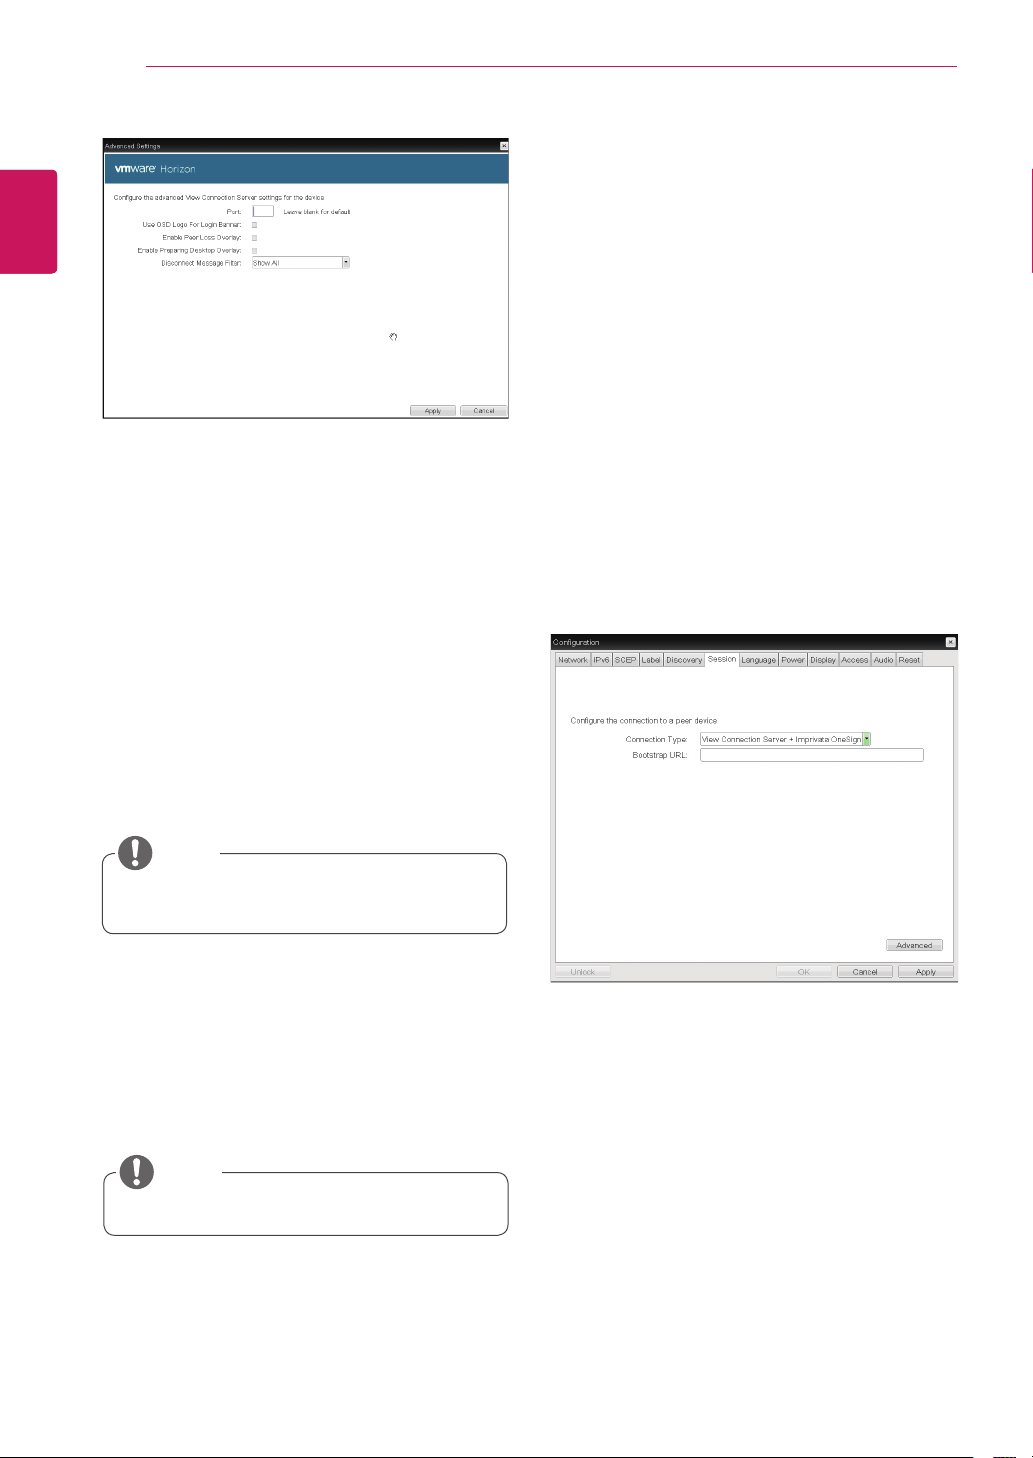
Enable Peer Loss Overlay
The"ConnectionLost"messageisdisplayed.The
displayisthesameasintheVDIenviron-ment.
ThedefaultisDisable.
Thissettingisprovidedonlyfortheclient.
NOTE
Enable Preparing Desktop Overlay
Ifthisoptionisselected,the"PreparingDesk-top"
messageisdisplayedonthescreenwhentheuser
isloggedin.
Disconnect Message Filter
Thisoptiondeterminesthetypeofmessageto
displaywhenasessionisdisconnected.
-ShowAll:Showsalltheerrormessages.
-ShowErrorandWarningOnly:Showsthe
errorandwarningmessagesonly.
-ShowErrorOnly:Showstheerrormessages
only.
-ShowNone:Showsnothing.
Direct to Host + SLP Host Discovery
YoucanviewthescreenofthehostPCbydiscov-
eringthehostPCwithinthenetworkandestab-
lishing1:1connectionbetweenthePCIhostcard
connectedtothehostPCandtheportal.
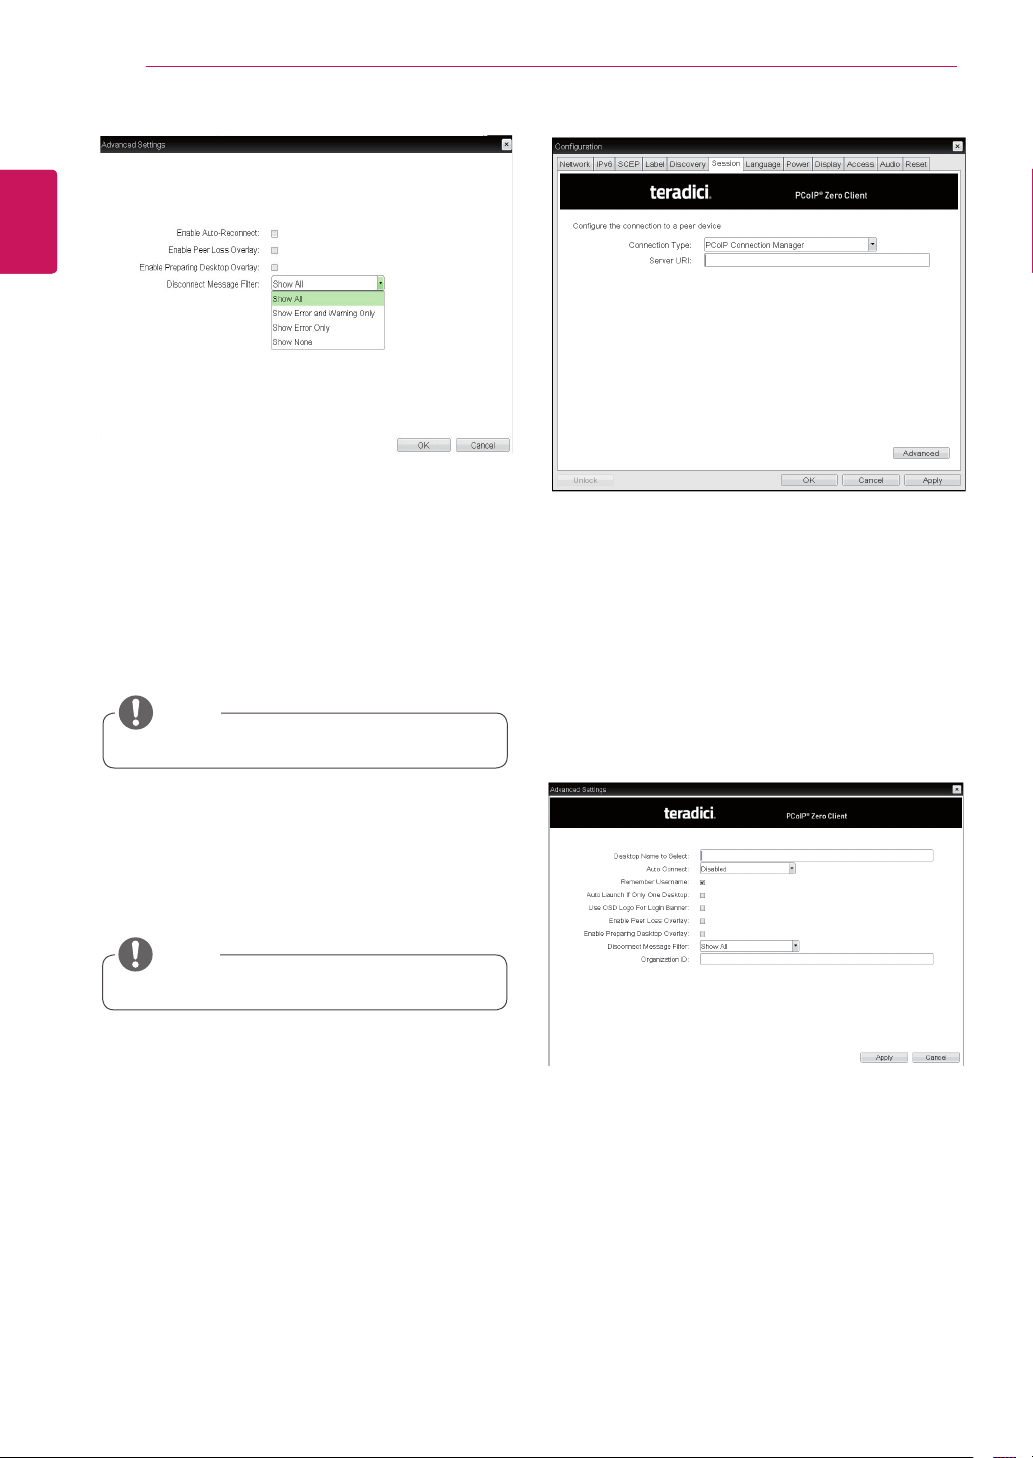
Enable Auto-Reconnect
Ifthisoptionisselected,reconnectionisattempted
automaticallywhenasessionisdisconnectedor
theuserisloggedoff.
38
ENG
English
Using CLOUD Solution
<Figure2-17:AdvancedSettingsforDirecttoHost
+SLPHostDiscovery>
Enable Auto-Reconnect
Ifthisoptionisselected,reconnectionisattempted
automaticallywhenasessionisdisconnectedor
theuserisloggedoff.
Thissettingisprovidedonlyfortheclient.
NOTE
Enable Peer Loss Overlay
The"ConnectionLost"messageisdisplayed.The
displayisthesameasintheVDIenviron-ment.
ThedefaultisDisable.
Thissettingisprovidedonlyfortheclient.
NOTE
Enable Preparing Desktop Overlay
Ifthisoptionisselected,the"PreparingDesk-top"
messageisdisplayedonthescreenwhentheuser
isloggedin.
Disconnect Message Filter
Thisoptiondeterminesthetypeofmessageto
displaywhenasessionisdisconnected.
-ShowAll:Showsalltheerrormessages.
-ShowErrorandWarningOnly:Showsthe
errorandwarningmessagesonly.
-ShowErrorOnly:Showstheerrormessages
only.
-ShowNone:Showsnothing.
<Figure2-18:PCoIPConnectionManagerSetting>
PCoIP Connection Manager
ThisoptioncanconfiguretheclienttouseaPCoIP
ConnectionManagerasthePCoIPsessionbroker.
Server URI
EntertheUniformResourceIdentifier(URI)forthe
PCoIPConnectionManager.
<Figure2-19:AdvancedSettingforPCoIPCon-
nectionManagerSetting>
39
ENG
English
Using CLOUD Solution
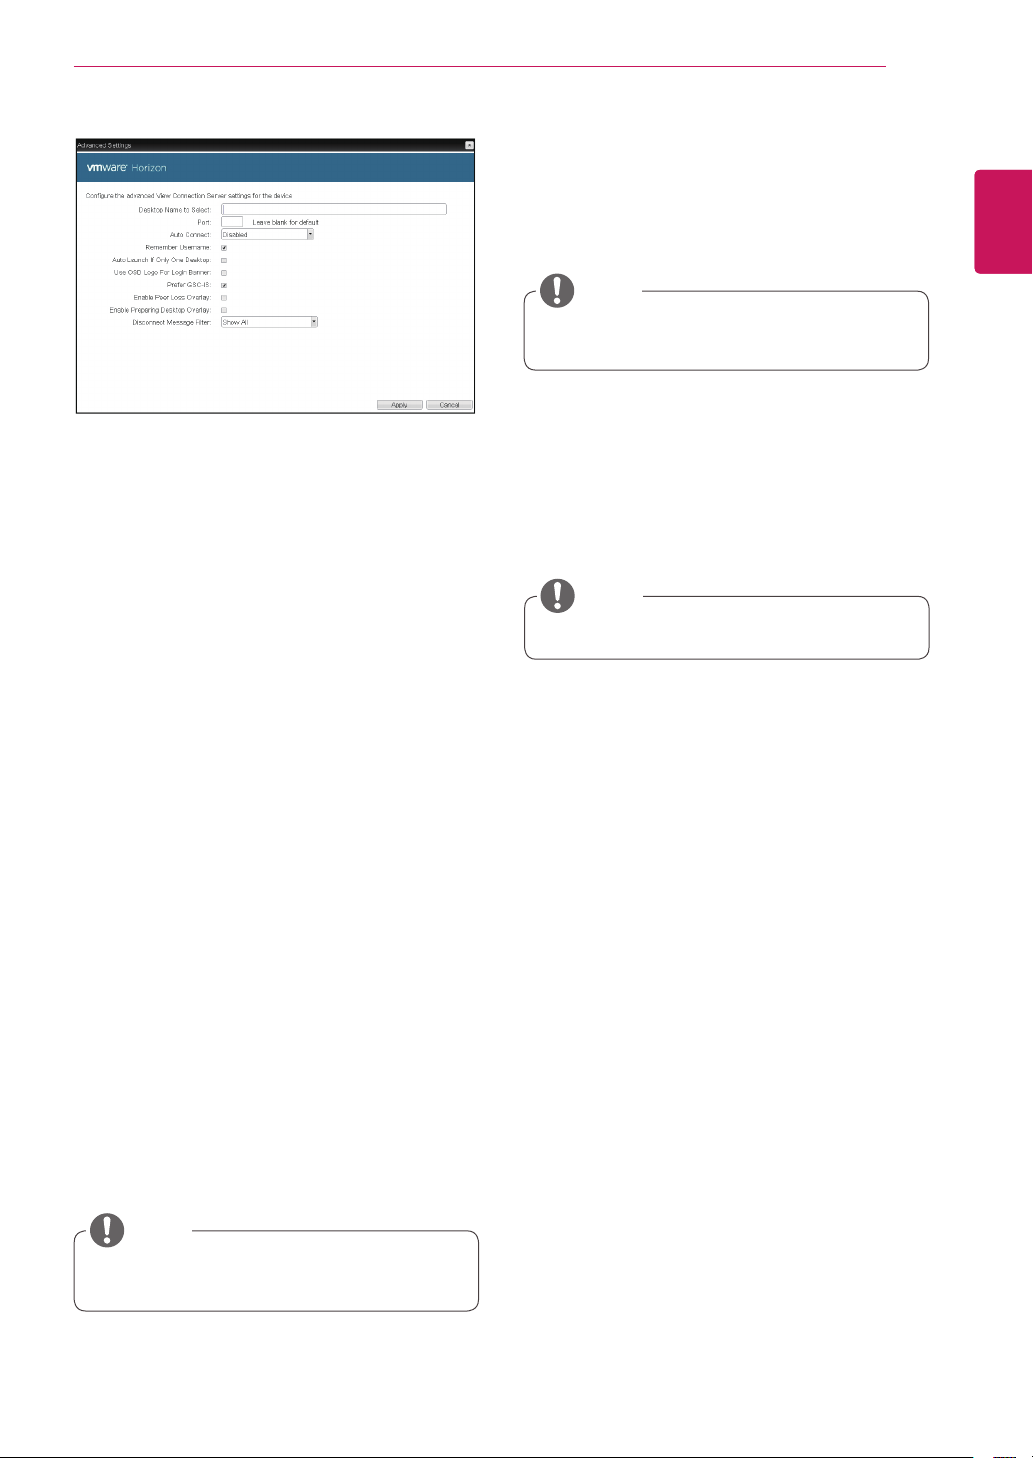
Desktop Name to Select
Enterthenameofthepool/desktopwhichtheuser
clientusesuponstartingasession.
Auto Connect
Ifthisoptionisenabled,theselectedVMwareView
ConnectionServerisautomaticallyconnected
whentheuserclientispoweredon.
IftheAutoConnectoptionisenabled,youshould
turntheuserclientoffandturnitonagainatleast
once.
Remember Username
Ifthisoptionisselected,theusernamewhich
ispreviouslyusedtoaccesstheVMwareView
ConnectionServerisautomaticallyenteredinthe
usernamefield.
Auto Launch if Only One Desktop
Ifthisoptionisselected,connectionisestablished
tothedesktopwhenthereisonlyonevirtualdesk-
topthatauserwantstoaccess.
Use OSD logo for View banner
Ifthisoptionisenabled,youcanchangetheOSD
logoofPCoIPduringthelogin.
Enable Peer Loss Overlay
Ifthisoptionisselected,the"NetworkConnection
Lost"messageisdisplayedonthescreenwhenit
isconfirmedthatthenetworkisdisconnected.The
displayisthesameasintheVDIenvironment.The
defaultisDisable.
Enable Preparing Desktop Overlay
Ifthisoptionisselected,the"PreparingDesktop"
messageisdisplayedonthescreenwhentheuser
isloggedin.
Disconnect Message Filter
Thisoptiondeterminesthetypeofmessageto
displaywhenasessionisdisconnected.
-ShowAll:Showsalltheerrormessages.
-ShowErrorandWarningOnly:Showstheerror
andwarningmessagesonly.
-ShowErrorOnly:Showstheerrormessages
only.
-ShowNone:Showsnothing.
Organization ID
EnteranorganizationIDforthecompany.This
fieldacceptsanyUTF-8character.
<Figure2-20:PCoIPConnectionManager+Auto-
LogonSetting>
PCoIP Connection Manager + Auto-Logon
Thisoptioncanconfigureaclienttoautomatically
enterauser’slogindetailswhenaPCoIPConnec-
tionManagerisusedasthePCoIPsessionbroker.
Server URI
EntertheUniformResourceIdentifier(URI)forthe
PCoIPConnectionManager.
Username
Entertheusernamefortheclient.
Password
Enterthepasswordfortheclient.
Domain
Enterthedomainname.
<Figure2-21:AdvancedSettingforPCoIPCon-
nectionManager+Auto-LogonSetting>

40
ENG
English
Using CLOUD Solution
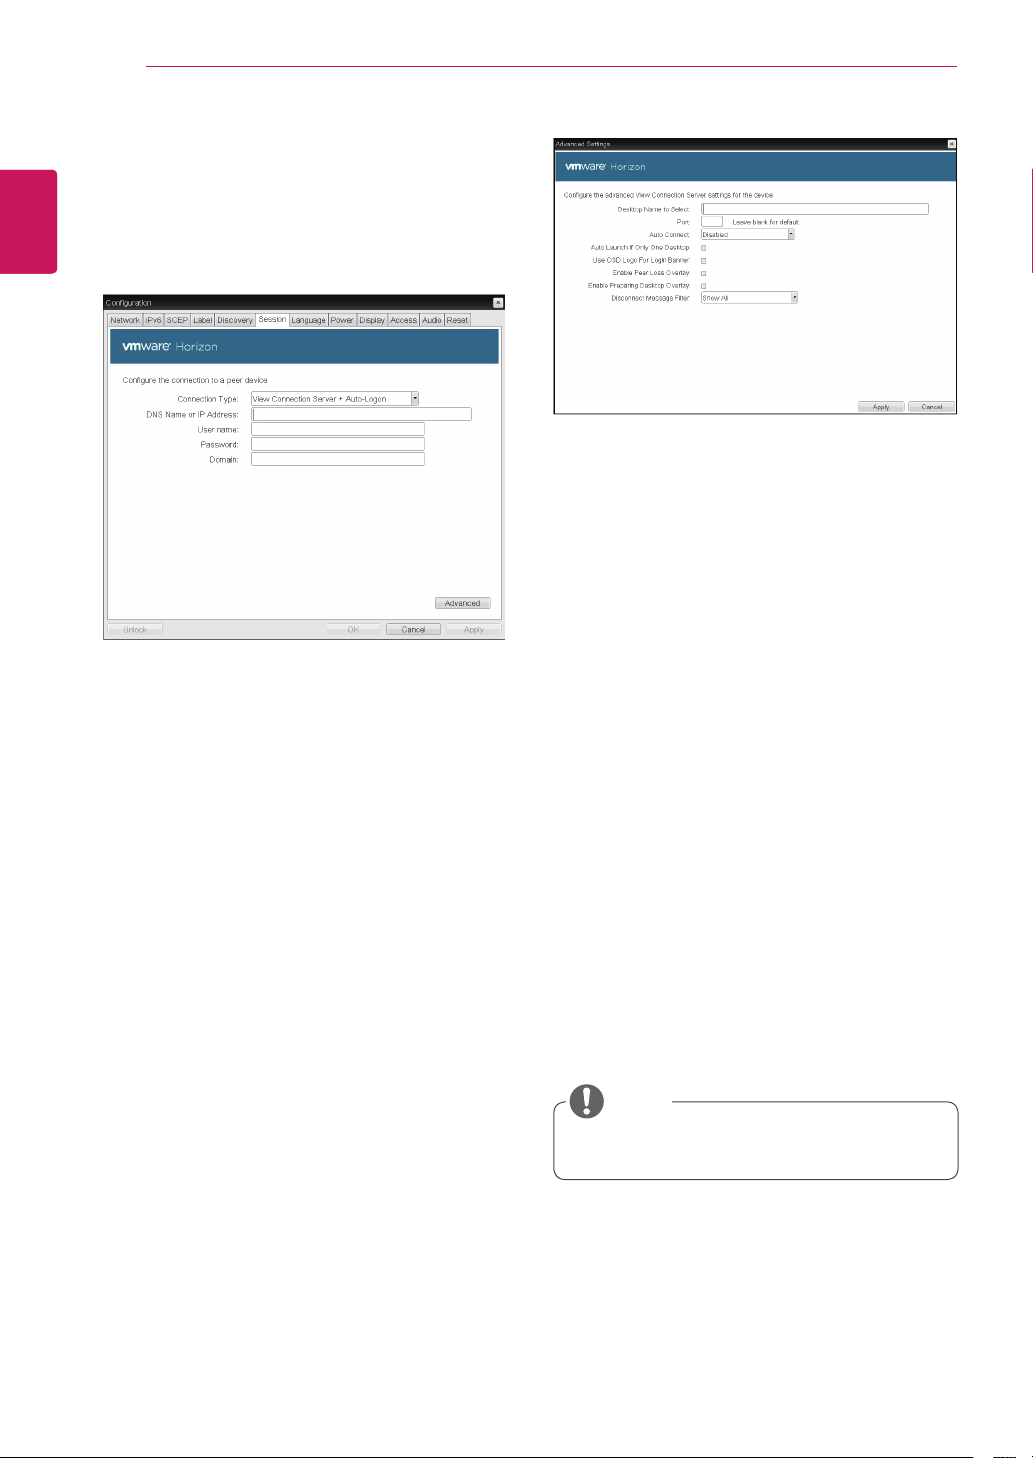
<Figure2-22:ViewConnectionServerSetting>
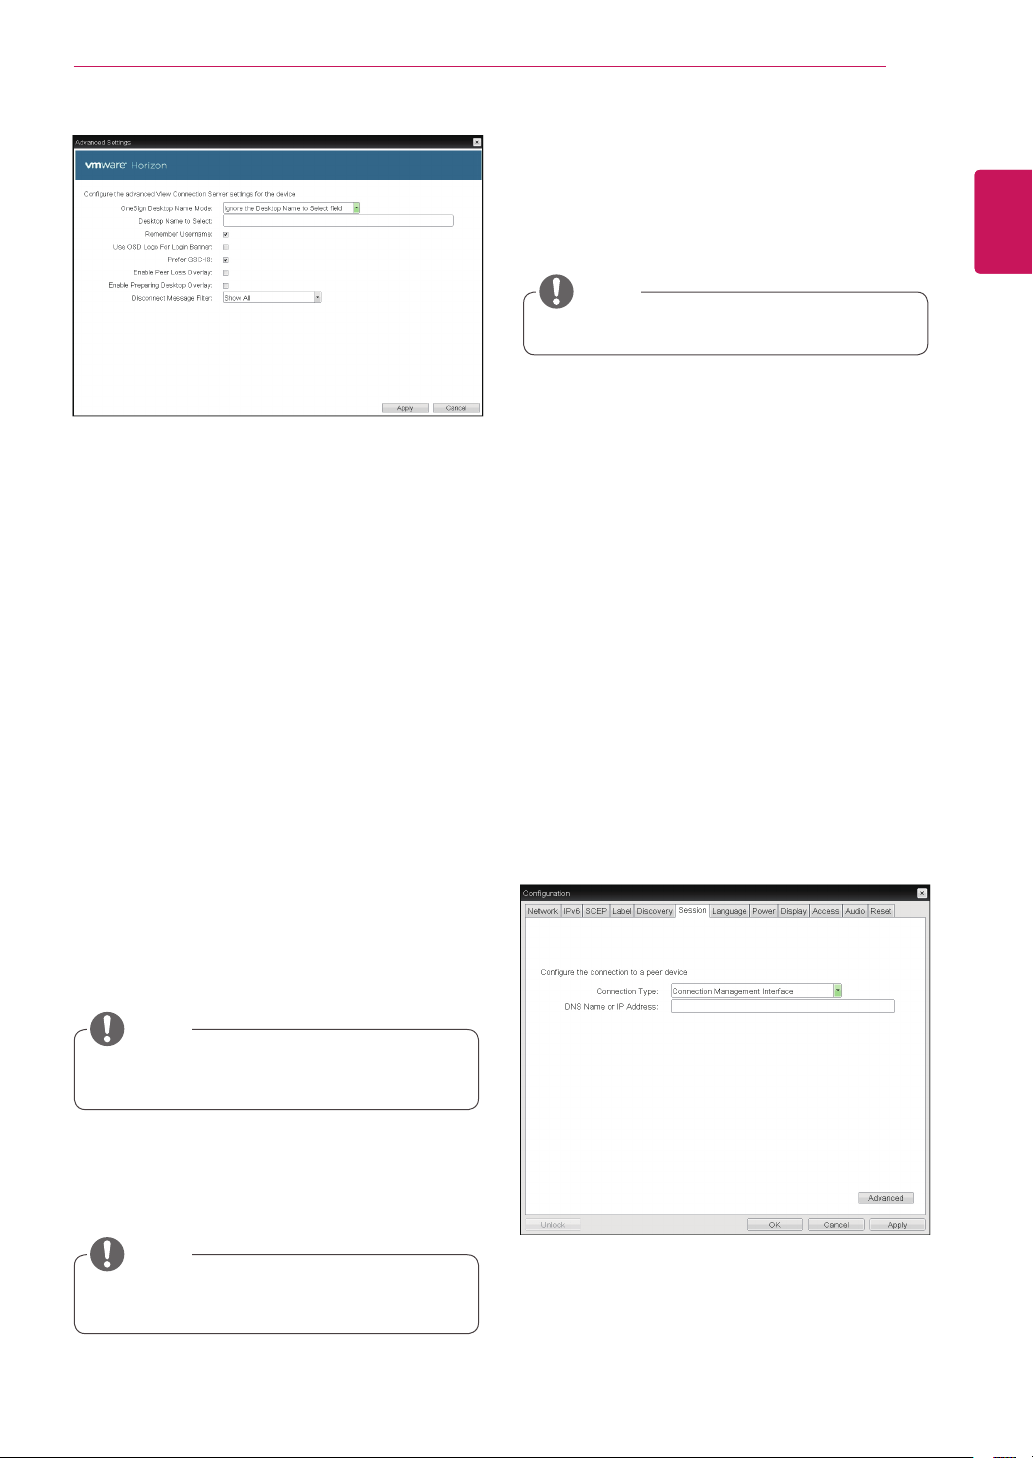
View Connection Server
IntheSessiontab,youcanselecttoenablethe
userclienttoaccesstheVMwareViewConnec-
tionServer.Todothis,selectViewConnection
ServerforConnectionType.
DNS Name or IP Address
EntertheDNSnameorIPaddressoftheVM-
wareViewConnectionServer.
Desktop Name to Select
Enterthenameofthepool/desktopwhichtheuser
clientusesuponstartingasession.
Auto Connect
Ifthisoptionisenabled,theselectedVMwareView
ConnectionServerisautomaticallyconnected
whentheuserclientispoweredon.
IftheAutoConnectoptionisenabled,youshould
turntheuserclientoffandturnitonagainatleast
once.
Auto Launch if Only One Desktop
Ifthisoptionisselected,connectionisestablished
tothedesktopwhenthereisonlyonevirtualdesk-
topthatauserwantstoaccess.
Use OSD logo for View banner
Ifthisoptionisenabled,youcanchangetheOSD
logoofPCoIPduringthelogin.
Enable Peer Loss Overlay
Ifthisoptionisselected,the"NetworkConnection
Lost"messageisdisplayedonthescreenwhenit
isconfirmedthatthenetworkisdisconnected.The
displayisthesameasintheVDIenvironment.The
defaultisDisable.
Enable Preparing Desktop Overlay
Ifthisoptionisselected,the"PreparingDesktop"
messageisdisplayedonthescreenwhentheuser
isloggedin.
Disconnect Message Filter
Thisoptiondeterminesthetypeofmessageto
displaywhenasessionisdisconnected.
-ShowAll:Showsalltheerrormessages.
-ShowErrorandWarningOnly:Showstheerror
andwarningmessagesonly.
-ShowErrorOnly:Showstheerrormessages
only.
-ShowNone:Showsnothing.
41
ENG
English
Using CLOUD Solution
Desktop Name to Select
Enterthenameofthepool/desktopwhichthe
userclientusesuponstartingasession.
Port
Forthedefaultsetting,leavetheportfieldempty.
WhentheVMwareViewConnectionServeruses
theSSLauthentication,enter443inthePortfield.If
theserverwhereausertriestoaccessusesaport
otherthanageneralport,entertheport.
Auto Connect
Ifthisoptionisenabled,theselectedVMwareView
ConnectionServerisautomaticallyconnected
whentheuserclientispoweredon.
IftheAutoConnectoptionisenabled,youshould
turntheuserclientoffandturnitonagainatleast
once.
Remember Username
Ifthisoptionisselected,theusernamewhichis
previouslyusedtoaccesstheVMwareView
ConnectionServerisautomaticallyenteredinthe
usernamefield.
Auto Launch if Only One Desktop
Ifthisoptionisselected,connectionisestablished
tothedesktopwhenthereisonlyonevirtualdesk-
topthatauserwantstoaccess.
Use OSD logo for View banner
Ifthisoptionisenabled,youcanchangetheOSD
logoofPCoIPduringthelogin.
<Figure2-23:AdvancedSettingsforViewConnec-
tionServer>
Prefer GSC-IS
Ifthisoptionisselected,theGCS-ISinterface
isusedwhenasmartcardsupportsmorethan
oneinterface.Ifthesmartcardsupportsonlyone
interface,itisnotused.
TheOSDlogocanbeuploadedusingthe
WebpageAdministrationInterface.
NOTE
Thissettingisprovidedonlywhenasmart
cardisused.
NOTE
Enable Peer Loss Overlay
Ifthisoptionisselected,the"NetworkConnection
Lost"messageisdisplayedonthescreenwhenit
isconfirmedthatthenetworkisdisconnected.
ThedisplayisthesameasintheVDIenviron-
ment.ThedefaultisDisable.
Enable Preparing Desktop Overlay
Ifthisoptionisselected,the"PreparingDesk-
top"messageisdisplayedonthescreenwhenthe
userisloggedin.
Disconnect Message Filter
Thisoptiondeterminesthetypeofmessageto
displaywhenasessionisdisconnected.
-ShowAll:Showsalltheerrormessages.
-ShowErrorandWarningOnly:Showsthe
errorandwarningmessagesonly.
-ShowErrorOnly:Showstheerrormessages
only.
-ShowNone:Showsnothing.
Thissettingisprovidedonlyfortheclient.
NOTE
42
ENG
English
Using CLOUD Solution
Desktop Name to Select
Enterthenameofthepool/desktopwhichthe
userclientusesuponstartingasession.
Port
Forthedefaultsetting,leavetheportfieldempty.
WhentheVMwareViewConnectionServeruses
theSSLauthentication,enter443inthePortfield.If
theserverwhereausertriestoaccessusesaport
otherthanageneralport,entertheport.
Auto Connect
Ifthisoptionisenabled,theselectedVMwareView
ConnectionServerisautomaticallyconnected
whentheuserclientispoweredon.
IftheAutoConnectoptionisenabled,youshould
turntheuserclientoffandturnitonagainatleast
once.
Auto Launch if Only One Desktop
Ifthisoptionisselected,connectionisestablished
tothedesktopwhenthereisonlyonevirtualdesk-
topthatauserwantstoaccess.
Use OSD logo for View banner
Ifthisoptionisenabled,youcanchangetheOSD
logoofPCoIPduringthelogin.
<Figure2-25:AdvancedSettingsforViewConnec-
tionServerwithAuto-Logon>
View Connection Server with Auto-Logon
IntheSessiontab,youcanselecttoenablethe
userclienttoautomaticallyaccesstheVMware
ViewConnectionServer.Todothis,selectView
ConnectionServerwithAuto-LogonforConnection
Type.
<Figure2-24:ViewConnectionServerwithAuto-
LogonSetting>
DNS Name or IP Address
EntertheDNSnameorIPaddressoftheVM-
wareViewConnectionServer.
Username
Entertheusernamefortheuserclient.
Password
Enterthepasswordfortheuserclient.
Domain
Enterthedomainname.
TheOSDlogocanbeuploadedusingthe
WebpageAdministrationInterface.
NOTE
43
ENG
English
Using CLOUD Solution
Enable Peer Loss Overlay
Ifthisoptionisselected,the"NetworkConnection
Lost"messageisdisplayedonthescreenwhenit
isconfirmedthatthenetworkisdisconnected.
ThedisplayisthesameasintheVDIenviron-
ment.ThedefaultisDisable.
Enable Preparing Desktop Overlay
Ifthisoptionisselected,the"PreparingDesk-
top"messageisdisplayedonthescreenwhenthe
userisloggedin.
Disconnect Message Filter
Thisoptiondeterminesthetypeofmessageto
displaywhenasessionisdisconnected.
-ShowAll:Showsalltheerrormessages.
-ShowErrorandWarningOnly:Showsthe
errorandwarningmessagesonly.
-ShowErrorOnly:Showstheerrormessages
only.
-ShowNone:Showsnothing.
Thissettingisprovidedonlyfortheclient.
NOTE
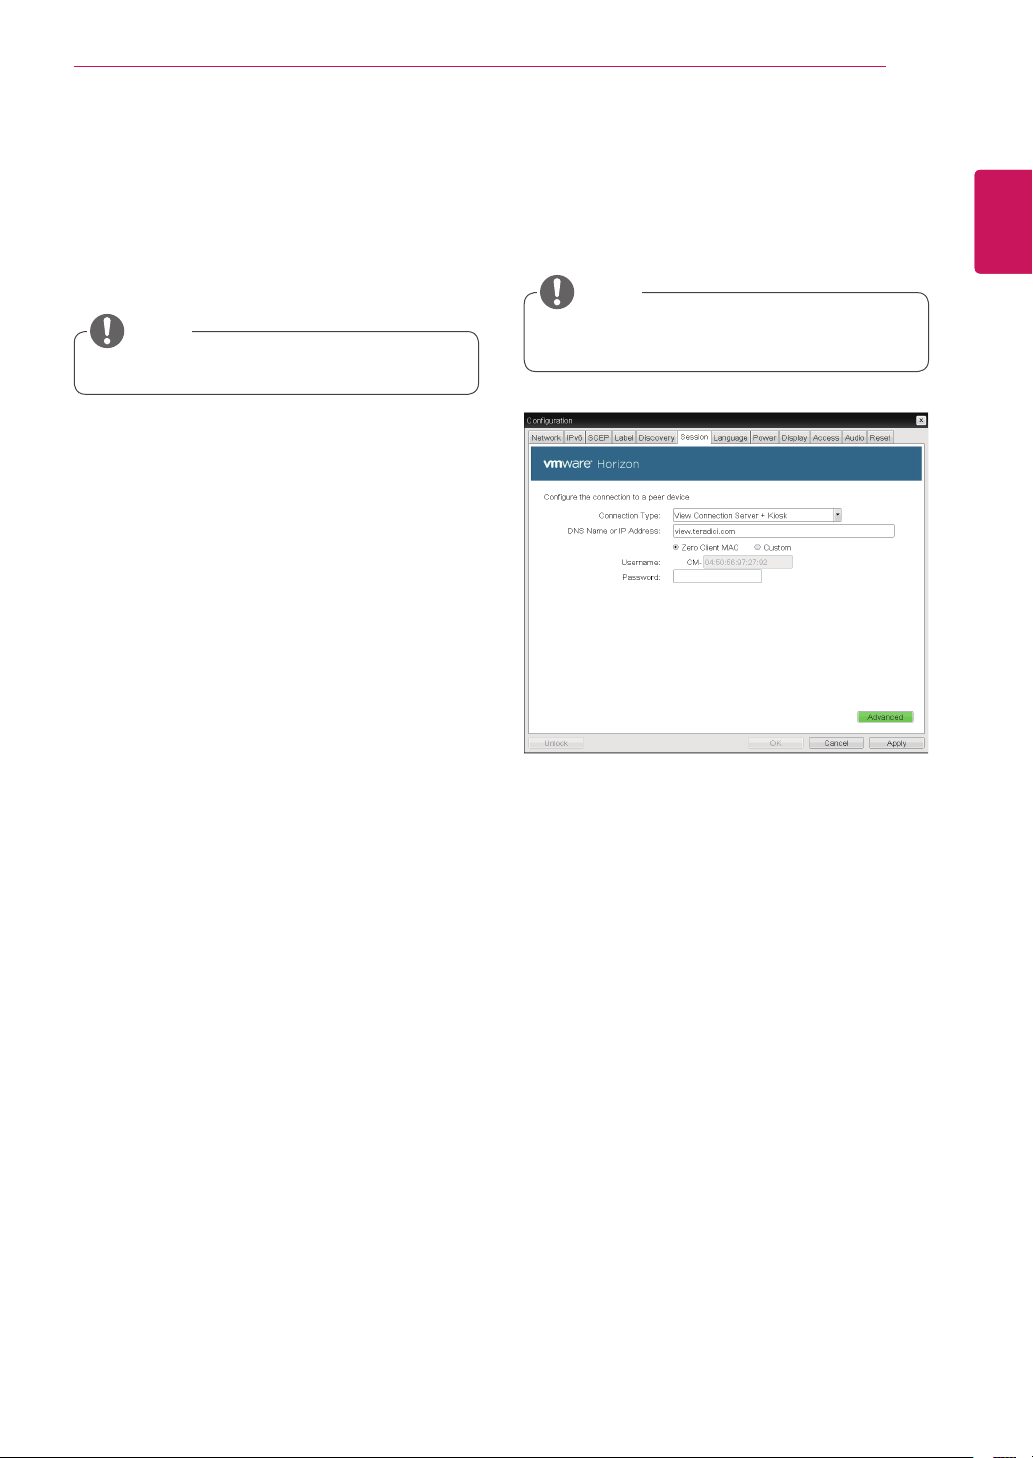
<Figure2-26:ViewConnectionServer+Kiosk
Setting>
View Connection Server + Kiosk
SelectViewConnectionServer+Kiosktouse
thekioskmode.YoucanconfiguretheViewCon-
nectionServer+KioskmodeusingtheWebpage
AdministrationInterface.
Youcannotusethekioskmodebyconnect-
ingtothehostPC.
NOTE
DNS Name or IP Address
EntertheDNSnameorIPaddressoftheVM-
wareViewConnectionServer.
Username
Selectthetypeofusernamethatmatchesthede-
vicenameusedintheVMwareViewCon-
nectionServer.
Password
Enterthepasswordfortheuserclient.
44
ENG
English
Using CLOUD Solution
<Figure2-27:AdvancedSettingforViewConnec-
tionServer+Kiosk>
<Figure2-28:ViewConnectionServer+ImprivataOne-
SignConnectionSetting>
Port
Forthedefaultsetting,leavetheportfieldempty.
WhentheVMwareViewConnectionServeruses
theSSLauthentication,enter443inthePortfield.
Iftheserverwhereausertriestoaccessusesa
portotherthanageneralport,entertheport.
Use OSD logo for View banner
Ifthisoptionisenabled,youcanchangetheOSD
logoofPCoIPduringthelogin.
TheOSDlogocanbeuploadedusingthe
WebpageAdministrationInterface.
NOTE
Enable Peer Loss Overlay
Ifthisoptionisselected,the"NetworkConnection
Lost"messageisdisplayedonthescreenwhenit
isconfirmedthatthenetworkisdisconnected.
ThedisplayisthesameasintheVDIenviron-
ment.ThedefaultisDisable.
Thissettingisprovidedonlyfortheclient.
NOTE
Enable Preparing Desktop Overlay
Ifthisoptionisselected,the"PreparingDesk-
top"messageisdisplayedonthescreenwhenthe
userisloggedin.
Disconnect Message Filter
Thisoptiondeterminesthetypeofmessageto
displaywhenasessionisdisconnected.
-ShowAll:Showsalltheerrormessages.
-ShowErrorandWarningOnly:Showsthe
errorandwarningmessagesonly.
-ShowErrorOnly:Showstheerrormessages
only.
-ShowNone:Showsnothing.
View Connection Server + Imprivata OneSign
Connection
SelectViewConnectionServer+ImprivataOne-
signConnectiontousetheImprivataOne-
signConnectionfortheclientauthentication.
Bootstrap URL
EntertheIPaddressorFQDNinformationofthe
serverwhichperformstheOneSignau-
thentication.
45
ENG
English
Using CLOUD Solution
<Figure2-29:AdvancedSettingsforViewConnec-
tionServer+ImprivataOneSignConnection>
Onesign Desktop Name Mode
SelectwhethertheDesktopNametoSelectprop-
ertyisusedinOneSignMmode:
IgnoretheDesktopNametoSelectfield
UsetheDesktopNametoSelectfieldifset
Desktop Name to Select
Enterthedesktopname.Whenthedesktoppool
listincludesapoolwiththisname,theclientwill
immediatelystartasessionwiththatpool.
Remember Username
Ifthisoptionisselected,theusernamewhichis
previouslyusedtoaccesstheVMwareView
ConnectionServerisautomaticallyenteredinthe
usernamefield.
Use OSD logo for View banner
Ifthisoptionisenabled,youcanchangetheOSD
logoofPCoIPduringthelogin.
TheOSDlogocanbeuploadedusingthe
WebpageAdministrationInterface.
NOTE
Prefer GSC-IS
Ifthisoptionisselected,theGCS-ISinterface
isusedwhenasmartcardsupportsmorethan
oneinterface.Ifthesmartcardsupportsonlyone
interface,itisnotused.
Thissettingisprovidedonlywhenasmart
cardisused.
NOTE
Enable Peer Loss Overlay
Ifthisoptionisselected,the"NetworkConnection
Lost"messageisdisplayedonthescreenwhenit
isconfirmedthatthenetworkisdisconnected.
ThedisplayisthesameasintheVDIenviron-
ment.ThedefaultisDisable.
Thissettingisprovidedonlyfortheclient.
NOTE
Enable Preparing Desktop Overlay
Ifthisoptionisselected,the"PreparingDesk-
top"messageisdisplayedonthescreenwhenthe
userisloggedin.
Disconnect Message Filter
Thisoptiondeterminesthetypeofmessageto
displaywhenasessionisdisconnected.
-ShowAll:Showsalltheerrormessages.
-ShowErrorandWarningOnly:Showsthe
errorandwarningmessagesonly.
-ShowErrorOnly:Showstheerrormessages
only.
-ShowNone:Showsnothing.
Connection Management Interface
IntheConnectionManagementInterfacesetting,
youcanmanagetheconnectionbyenteringtheIP
addressforconnectionmanagementinsteadofus-
ingtheIPaddressoftheVMwareViewConnection
Serverandcanselecttoenableordisabledthe
managementinterface.
<Figure2-30:ConnectionManagementInterface
Setting>
DNS Name or IP Address
EntertheDNSnameorIPaddressoftheVMware
ViewConnectionServer.
46
ENG
English
Using CLOUD Solution
Language
TheLanguagefieldisusedtosetthedisplay
languageoftheOSDandtheuserleveleventlog
messages.
Keyboard Layout
TheKeyboardLayoutfieldallowstheadministrator
tomodifythekeyboardlayout.
<Figure2-32:LanguageConfiguration>
Language Tab
TheLanguagetaballowstheadministratortoset
theOSDlanguage.
TheLanguageparameterscanalsobecon-
figuredusingtheWebpageAdministration
Interface.
NOTE
<Figure2-31:AdvancedSettingsforConnection
ManagementInterface>
Enable Peer Loss Overlay
Ifthisoptionisselected,the"NetworkConnection
Lost"messageisdisplayedonthescreenwhenit
isconfirmedthatthenetworkisdisconnected.
ThedisplayisthesameasintheVDIenviron-
ment.ThedefaultisDisable.
Thissettingisprovidedonlyfortheclient.
NOTE
Enable Preparing Desktop Overlay
Ifthisoptionisselected,the"PreparingDesk-
top"messageisdisplayedonthescreenwhenthe
userisloggedin.
Enable Event Log Notification
Withthisoption,youcanselectwhethertoallow
thehostandclientdevicetosendtheireventlog
informationtotheConnectionManagementServer.
Disconnect Message Filter
Thisoptiondeterminesthetypeofmessageto
displaywhenasessionisdisconnected.
-ShowAll:Showsalltheerrormessages.
-ShowErrorandWarningOnly:Showsthe
errorandwarningmessagesonly.
-ShowErrorOnly:Showstheerrormessages
only.
-ShowNone:Showsnothing.
47
ENG
English
Using CLOUD Solution
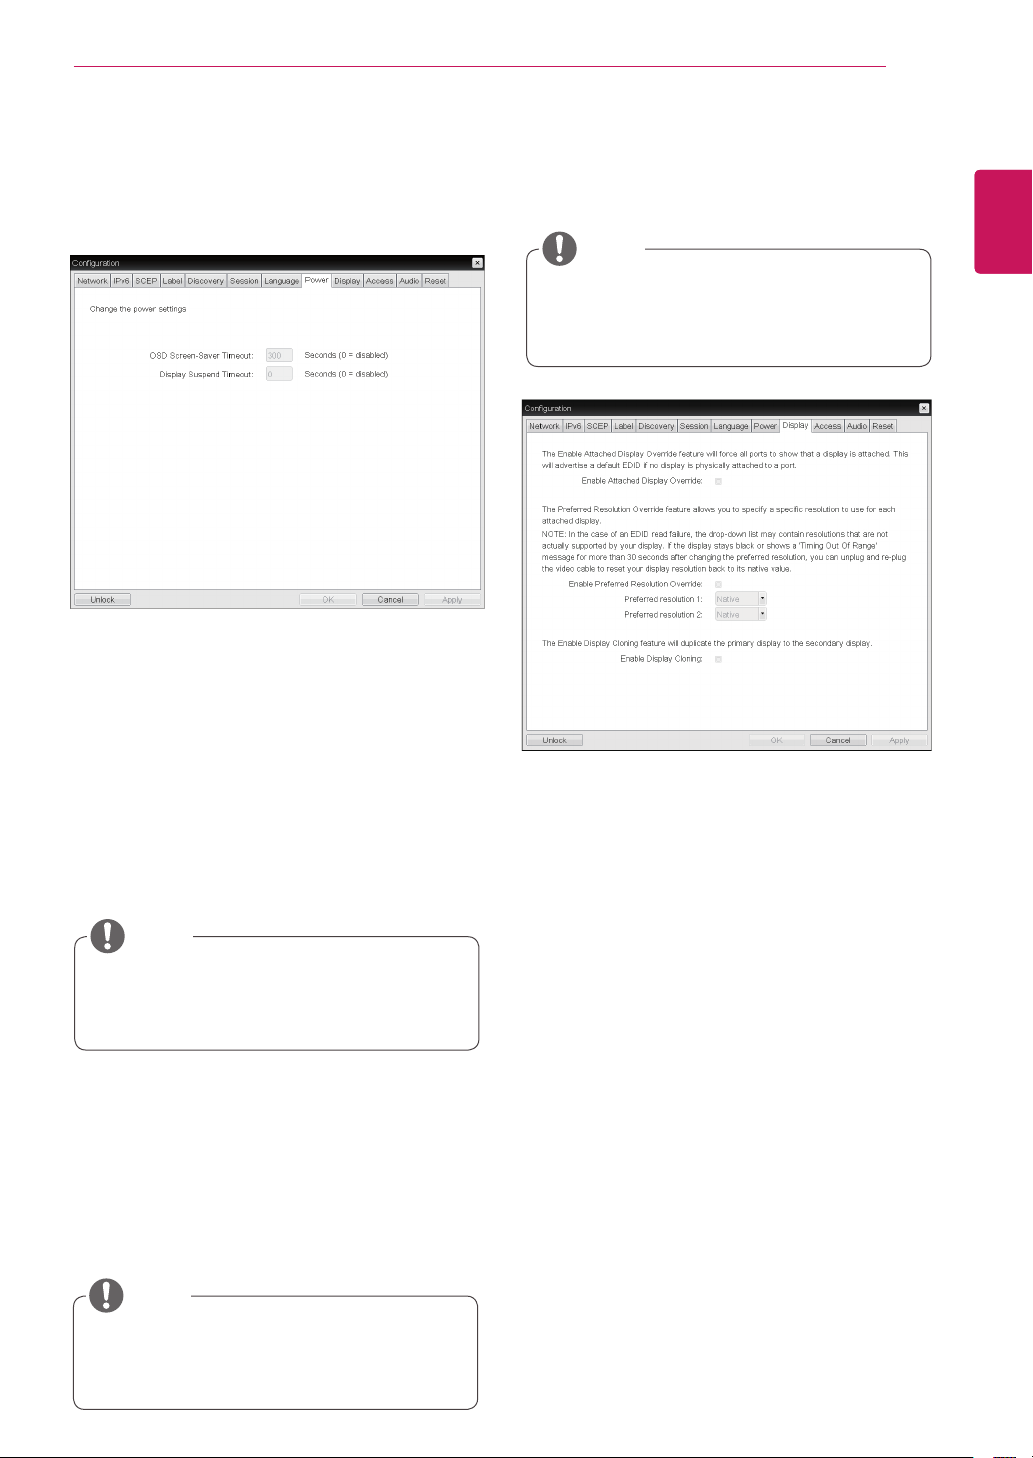
OSD Screen-Saver Timeout
Configurethenumberofsecondstowaitafter
aperiodofinactivity(i.e.,nokeyboardormouse
action)beforetheclientputsitsattacheddisplays
intolowpowermode.
Validvaluesare10to9999,oruse0todisablethe
feature.
<Figure2-33:PowerConfiguration>
<Figure2-34:DisplayConfiguration>
Display Tab
TheDisplaytaballowstheusertoconfigurethe
EDIDfunctionofthemonitor.
TheEnabledisplayoverridefunctioncanbe
usedwhentheEDIDfunctionofthemonitor
isnotrunning.
NOTE
Display Suspend Timeout
Configurethenumberofsecondstowaitafter
aperiodofinactivity(i.e.,nokeyboardormouse
action)beforetheclientputsitsattacheddisplays
intolowpowermode.
Validvaluesare10to14400seconds,oruse0to
disablethefeature.
Thistimeoutonlyapplieswhenthedeviceis
notinsession.
NOTE
Thistimeoutonlyapplieswhenthedeviceis
insession.
NOTE
Enable Attached Display Override
Thisoptionisintendedforlegacysystems.Itcon-
figurestheclienttosenddefaultEDIDinformation
tothehostwhenamonitorcannotbedetectedor
isnotattachedtotheclient.
Enable Preferred Resolution Override
Enablethisoptionwhenadisplayisattachedbut
cannotbedetectedbythesystem,andyouwantto
specifyapreferredresolutionforthedisplay.
Enable Display Cloning
ThisoptionisonlyavailablefortheTERA2321
zeroclient.Enablethedisplaycloningoptionifyou
wantthesecondarydisplaytomirrortheprimary
display.
Power Tab
ThePowerTaballowstheusertoconfiguretime-
outandpowersettingsfortheclient.
48
ENG
English
Using CLOUD Solution
<Figure2-35:AccessConfiguration>
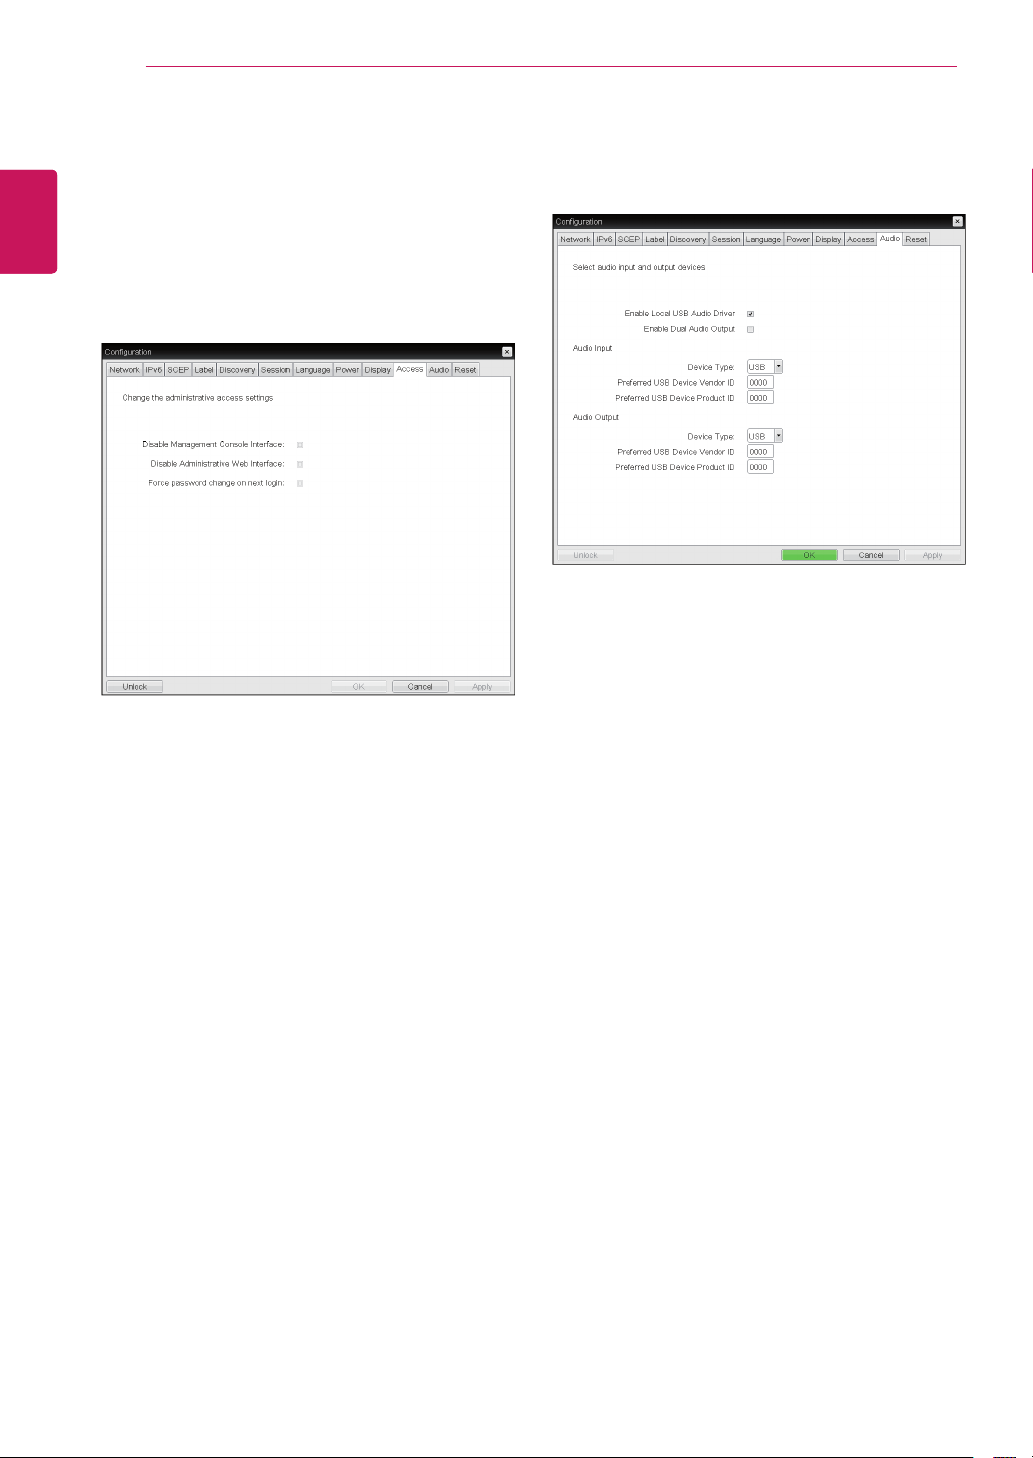
Disable Management Console Interface
Whenenabled,themanagementconsoleinterface
isdisabled,andthedevicecannotbeaccessedor
managedbytheMC.
Disable Administrative Web Interface
Whenenabled,thedevicecannotbeaccessedor
managedusingtheAWI.
Force password change on next login
Whenenabled,theadministrativepasswordmust
bechangedthenexttimeeithertheAWIorOSDis
accessed.Thenewpasswordmaybeblank.
Enable Local USB Audio Driver
ThisoptionlocallyterminatesanyUSBaudiode-
vicesthatareattachedtothezeroclient.
<Figure2-36:AudioConfiguration>
Access Tab
ThisAccesstabletsyoupreventthedevicefrom
beingmanagedbytheMCandletsyoudisable
administrativeaccesstothedevice’sAWI.Italso
providesanoptiontoforceanadministrative
passwordchangethenexttimetheAWIorOSDis
accessed.
Audio Tab
ThisAudiotabletsyouconfigureaudiooptionsfor
thedevice.
49
ENG
English
Using CLOUD Solution
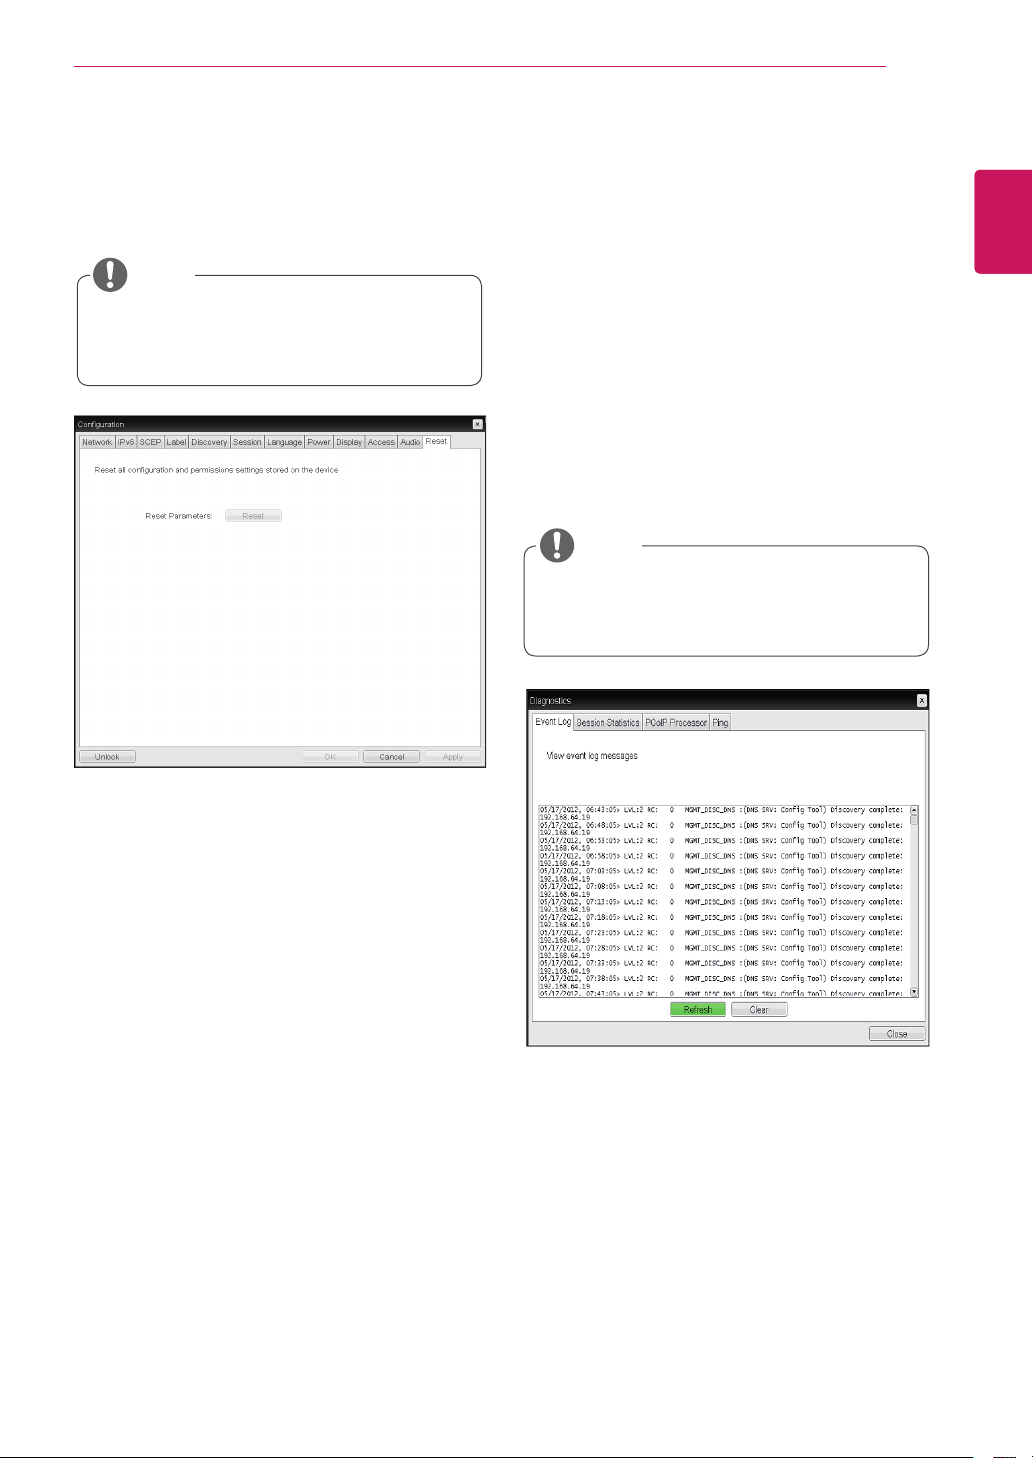
Reset Parameters
PressingtheResetParametersbuttonwillresetall
settingsandoptionstothefactorydefaultsettings.
Whenthisbuttonispressed,anOSDmessageis
displayed.Thisistoprompttheadministratorand
preventaccidentalreset.
<Figure2-37:Reset>
Reset Tab
TheResettaballowstheadministratortoresetall
configurableparametersstoredinFlash.
TheResetfunctioncanalsobeaccessed
throughtheWebpageAdministrationInter-
face.
NOTE
Event Log
Session Statistics
PCoIP Processor
Ping
EachtabhastheClosebuttontoclosethewindow.
Diagnostics Window
IntheDiagnosticswindow,theadministratorcan
accessthewindowtabtodiagnosetheportal.The
Diagnosticswindowhasthefollowingtabs:
View Event Log Message
TheViewEventLogMessagefielddisplaysthelog
messagesaccompaniedbythetimestampinforma-
tion.Thefollowingtwobuttonsareavailable:
Refresh
TheRefreshbuttonrefreshesthedisplayedevent
logmessages.
Clear
TheClearbuttonclearsalleventlogmessages.
<Figure2-38:EventLog>
Event Log Tab
TheEventLogtaballowstheadministratortoview
anddeletetheeventlogmessagesfromtheportal.
Theeventlog(regardlessofthequantity)
canalsoberesetusingtheWebpageAdmin-
istrationInterface.
NOTE
50
ENG
English
Using CLOUD Solution
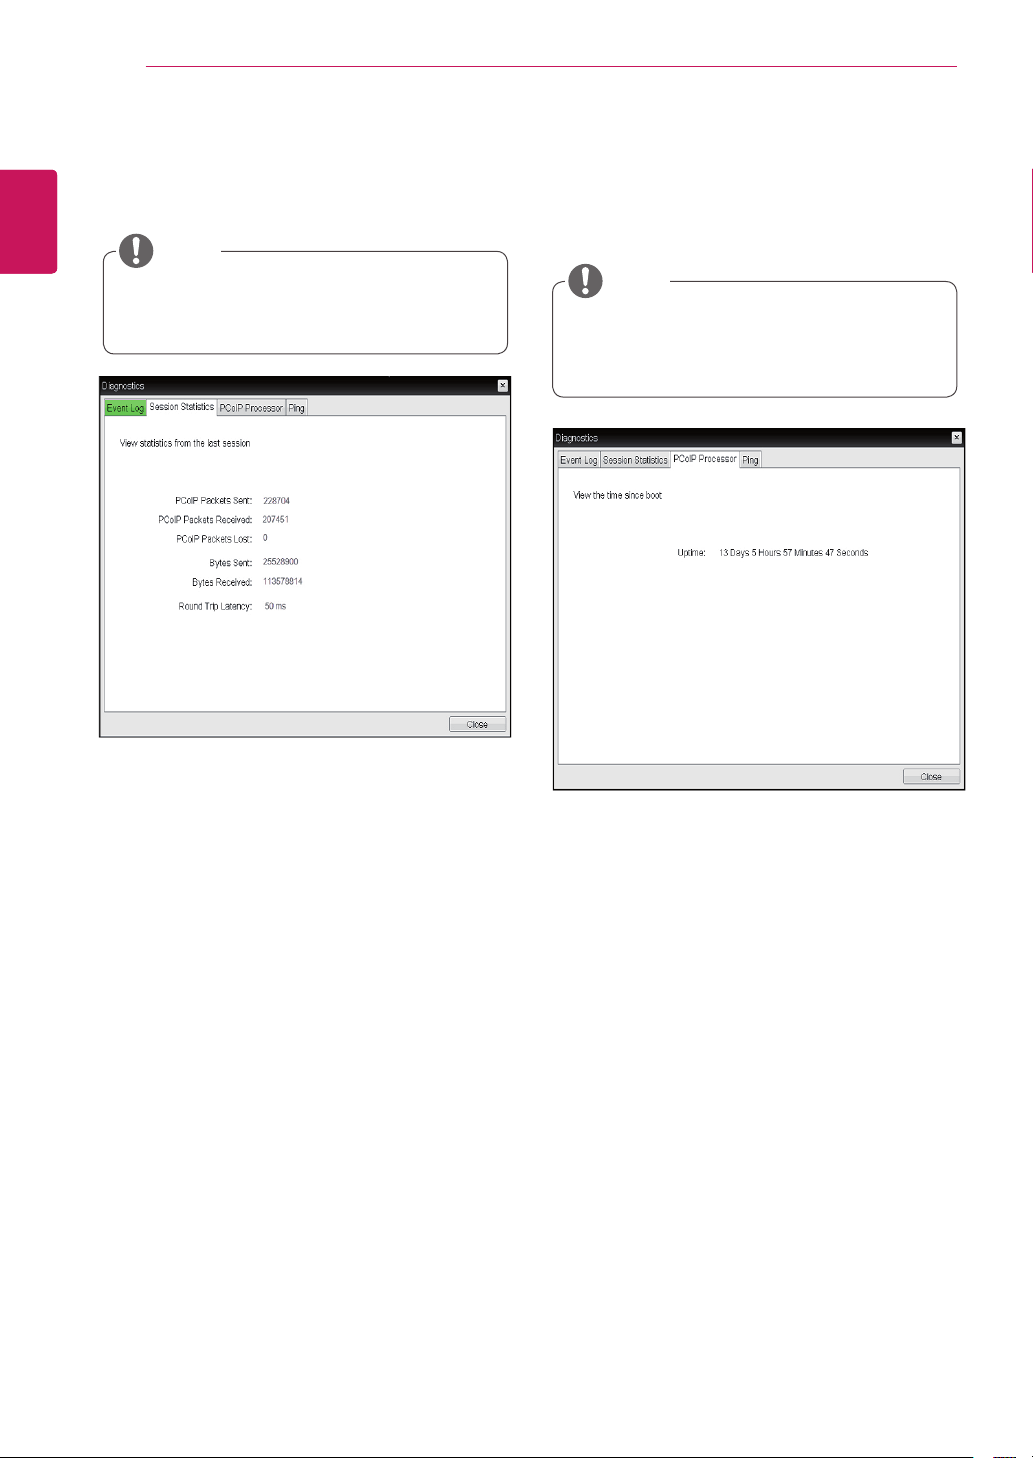
PCoIP Packets Statistics
PCoIPPacketsSent
ThePCoIPPacketsSentfieldshowsthetotal
numberofPCoIPpacketssentfromtheportal
tothehostinthelastactivesession.
PCoIPPacketsReceived
ThePCoIPPacketsReceivedfieldshowsthe
totalnumberofPCoIPpacketsreceivedfrom
thehosttotheportalinthelastactivesession.
PCoIPPacketsLost
ThePCoIPPacketsLostfieldshowsthetotal
numberofPCoIPpacketslostinthelastac-
tivesession.
<Figure2-39:SessionStatistics>
Session Statistics Tab
TheSessionStatisticstaballowstheadministrator
toviewthePCoIPspecificstatisticsofthelastac-
tivePCoIPsessionfromtheportal.
Bytes Statistics
BytesSent
TheBytesSentfieldshowsthetotalnumber
ofbytessentinthelastactivesession.
BytesReceived
TheBytesReceivedfieldshowsthetotal
numberofbytesreceivedinthelastactive
session.
Round Trip Latency
TheRoundTripLatencyfieldshowsthetotal
round-tripPCoIPsystem(e.g.fromtheportalto
thehost,thenbacktotheportal)andthenetwork
latencyinmilliseconds(+/-1ms).
Thesessionstatistics(regardlessofthe
quantity)canalsobeviewedusingtheWeb-
pageAdministrationInterface.
NOTE
<Figure2-40:PCoIPProcessor>
PCoIP Processor Tab
ThePCoIPProcessortaballowstheadministrator
toviewtheportalPCoIPprocessor'suptimesince
itslastbooting.
ThePCoIPProcessorUptimecanalsobe
viewedusingtheWebpageAdministration
Interface.
NOTE
51
ENG
English
Using CLOUD Solution
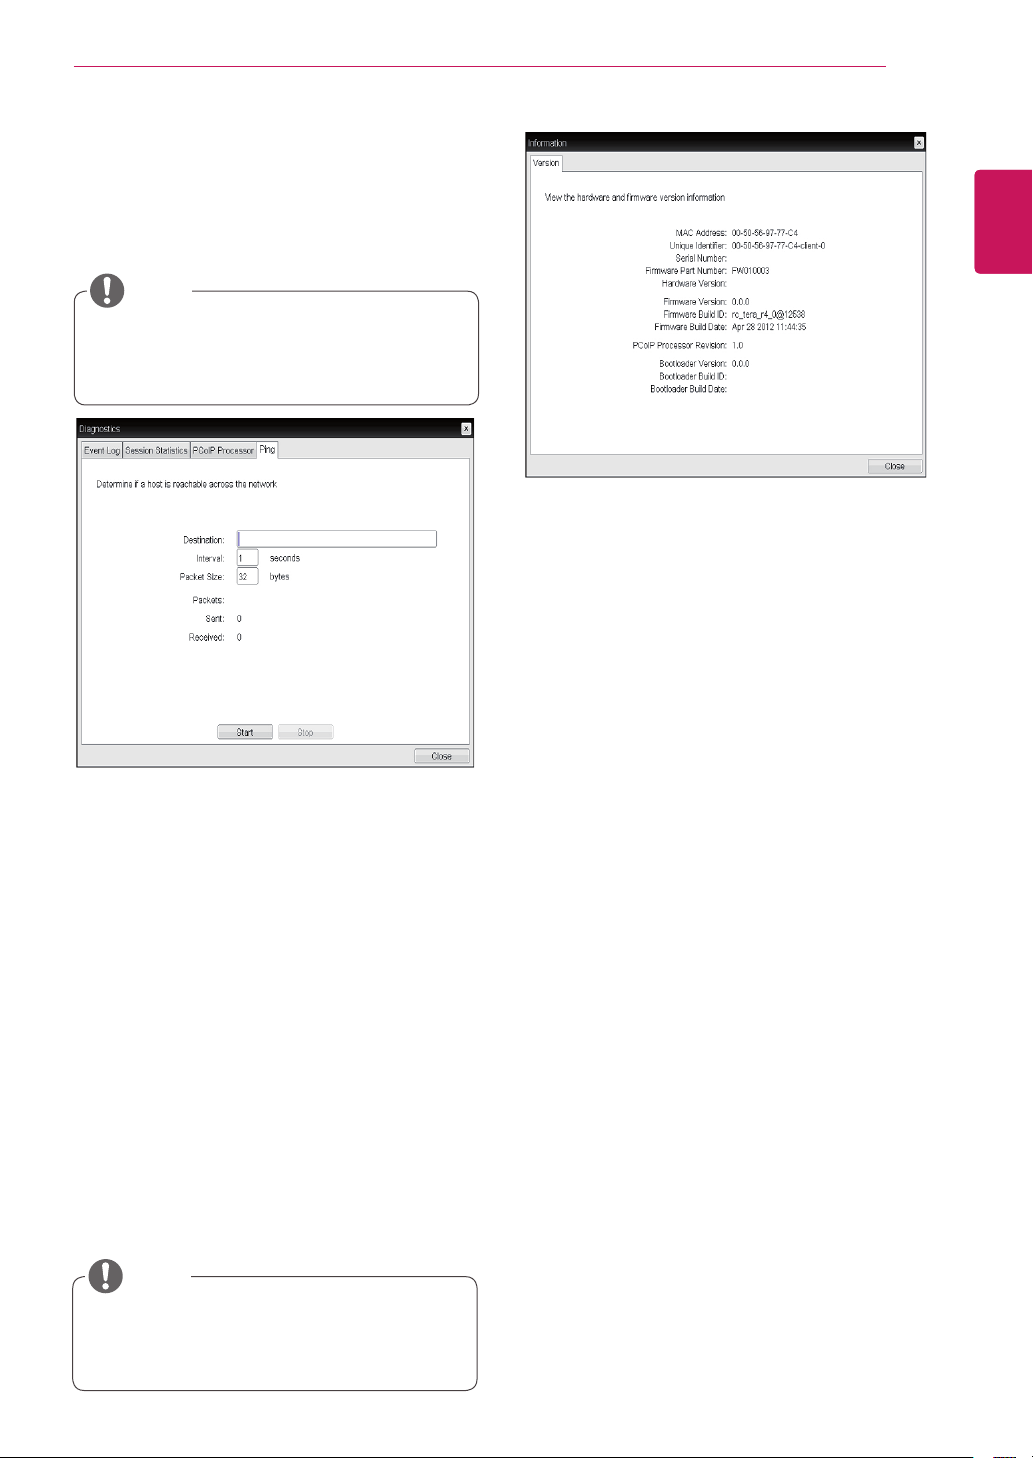
Ping Settings
Destination
TheIPaddressorFQDNtoperformtheping
test.
Interval
Theintervalbetweenthepingpackets.
PacketSize
Thesizeofthepingpacket.
Packets
Sent
Thenumberofpingpacketssent.
Received
Thenumberofpingpacketsreceived.
<Figure2-41:Ping>
Ping Tab
ThePingtaballowstheadministratortoperforma
pingtesttothedeviceandcheckifitcanreachthe
overallIPnetwork.Thisisusefultocheckwhether
thedevicecanreachthehost.
ThePingtabhasnocorrespondingmenuin
totheWebpageAdministrationInterfaceof
Section1.
NOTE
VPD Information
TheVitalProductData(VPD)isinformationthat
uniquelyidentifieseachportalorhost.
MACAddress
TheportalMACaddress
UniqueIdentifier
TheportalID
SerialNumber
Theportalserialnumber
FirmwarePartNumber
ThepartnumberofthePCoIPfirmware
HardwareVersion
Theportalhardwareversion
Firmware Information
TheFirmwareInformationshowsthedetailsofthe
currentPCoIPfirmware.
FirmwareVersion
ThecurrentPCoIPfirmwareversion
FirmwareBuildID
ThecurrentPCoIPfirmwarerevisioncode
FirmwareBuildDate
ThecurrentPCoIPfirmwarebuilddate
<Figure2-42:Version>
Information Window
IntheInformationwindow,theadministratorcan
accesstheVersiontabthatcontainsthedevice
relatedinformation.
Theversioninformationcanalsobeviewed
usingtheWebpageAdministrationInterface.
NOTE
Boot Loader Information
TheBootLoaderInformationshowsthedetailsof
thecurrentPCoIPbootloader.
BootLoaderVersion
ThecurrentPCoIPbootloaderversion
BootLoaderBuildID
ThecurrentPCoIPbootloaderrevisioncode
BootLoaderBuildDate
ThecurrentPCoIPbootloaderbuilddate
PCoIP Processor Revision
ThisshowsthePCoIPprocessor'srevisioncode.
TERA1x00RevisionAsiliconeisdenotedby0.0
andTERA1x00RevisionBsiliconeisdenotedby
1.0.
52
ENG
English
Using CLOUD Solution
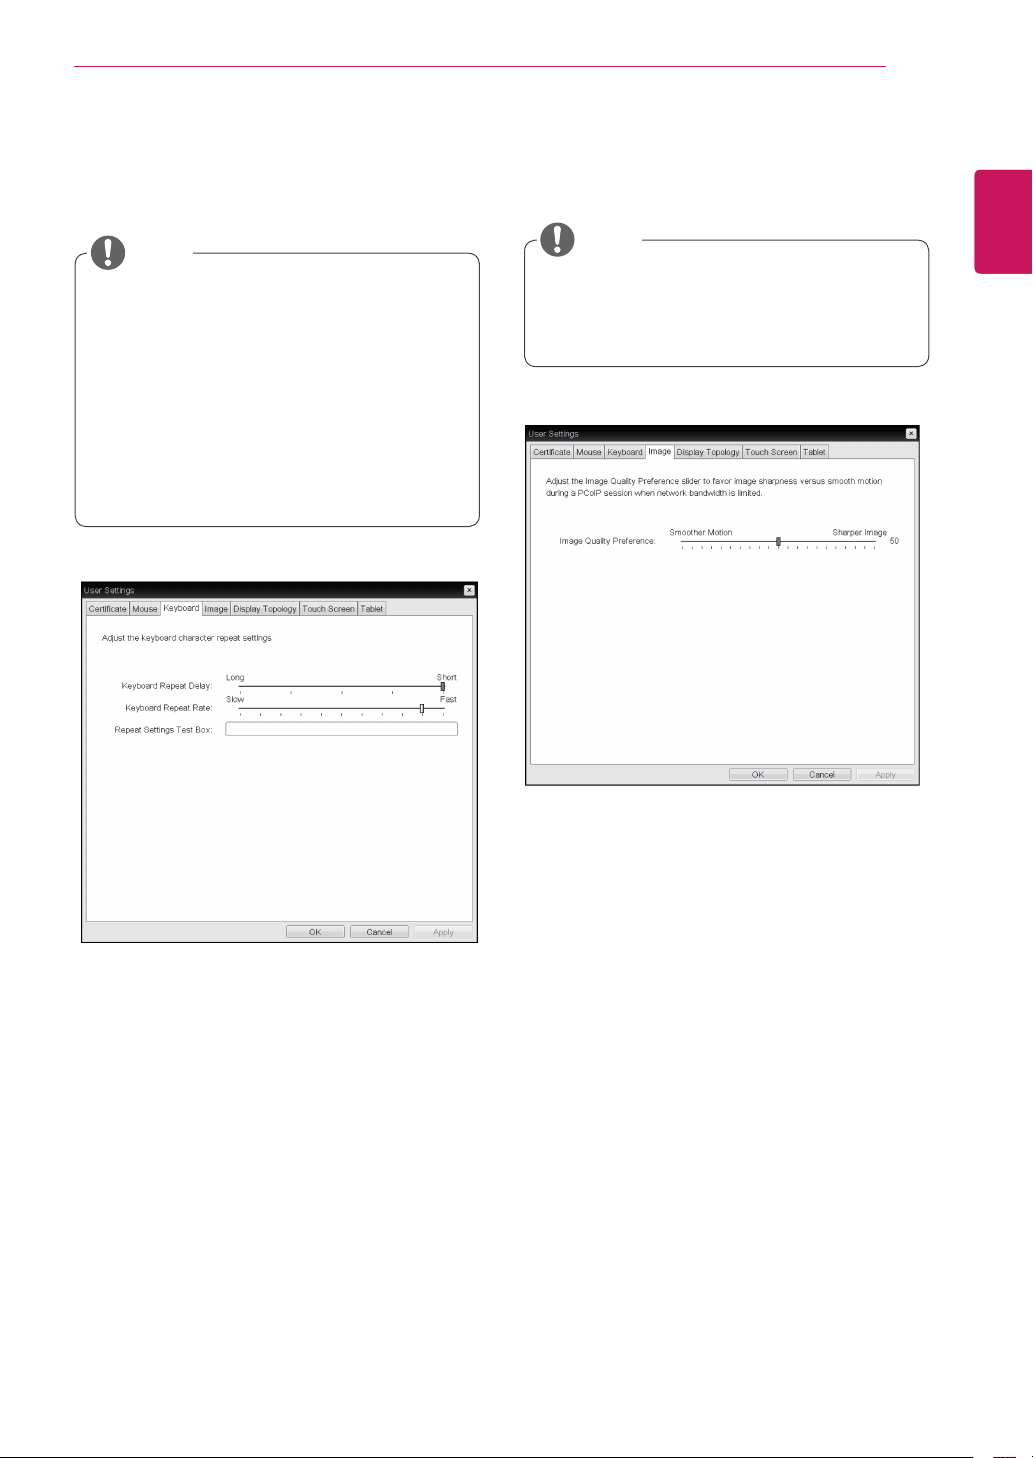
User Settings Window
IntheUserSettingswindow,theadministratorcan
accessthetabtoselectthemouseandkeyboard
anddefinethePCoIPimagequality.
TheUserSettingswindowhasthefollowingtabs:
Certificate
Mouse
Keyboard
Image
DisplayTopology
TouchScreen
Tablet
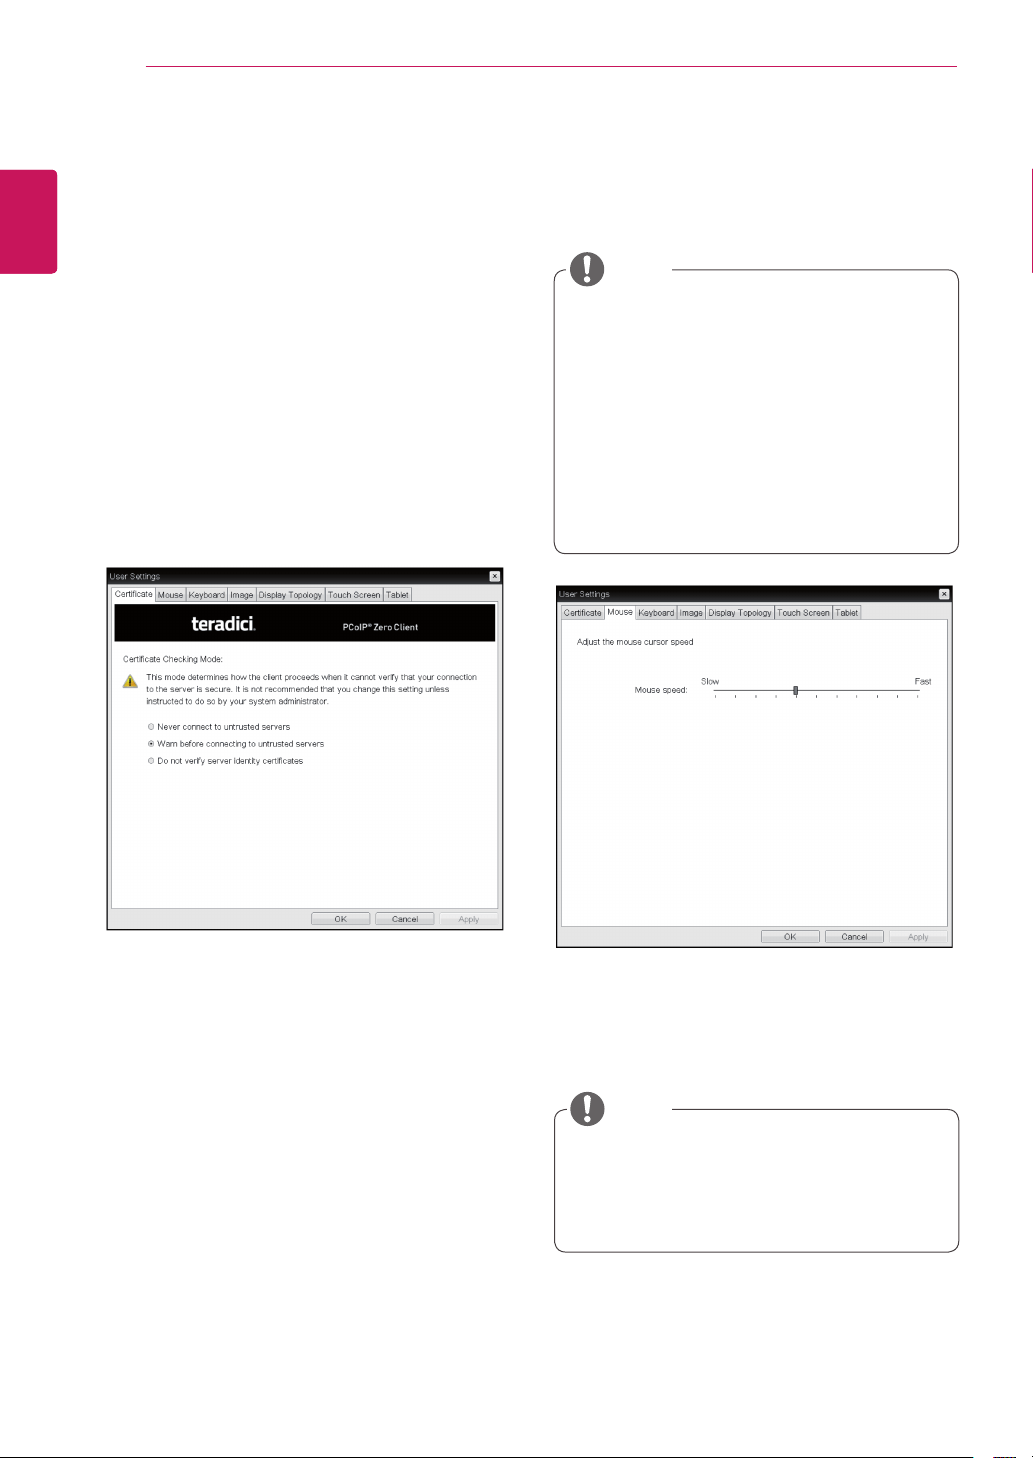
Mouse Speed
TheMouseSpeedfieldallowstheusertosetthe
portal'smousecursorspeed.
<Figure2-44:Mouse>
Mouse Tab
TheMousetaballowstheusertomodifytheOSD
andRDPsession'smousecursorspeedsetting.
TheOSDmousecursorspeedsettingdoes
notaffectthemousecursorsettingswhen
aPColPsessionisactiveunlesstheLocal
KeyboardHostDriverfunctionisbeingused
(seePColPHostSoftwareUserGuidefor
moreinformation).
TheMousetabhasnocorrespondingmenu
intheWebpageAdministrationInterfaceof
Section1.
TheMouseSpeedcanalsobeconfiguredvia
thePCoIPHostSoftware.Formoreinforma-
tiononusingthePCoIPHostSoftware,refer
tothePCoIPHostSoftwareUserGuide.
NOTE
NOTE
<Figure2-43:Certificate>
Certificate Tab
TheCertificatetaballowsusertospecifytheclient
behaviorforwhenausercannotcheckthesecure
connectiontoaserver.
Never connect to untrusted servers
Configurestheclienttorejecttheconnectionifa
trusted,validcertificateisnotinstalled.
Warn before connecting to untrusted servers
Configurestheclienttodisplayawarningifan
unsignedorexpiredcertificateisencountered,or
whenthecertificateisnotself-signedandtheclient
truststoreisempty.
Do not verify server identity certificates
Configurestheclienttoallowallconnections.
53
ENG
English
Using CLOUD Solution
Keyboard Repeat Delay
TheKeyboardRepeatDelayfieldallowstheuser
tosettheportal'skeyboardrepeatdelay.
Keyboard Repeat Rate
TheKeyboardRepeatRatefieldallowstheuserto
settheportal'skeyboardrepeatrate.
Repeat Settings Test Box
TheRepeatSettingsTestBoxallowstheuserto
testtheselectedkeyboardsettings.
<Figure2-45:Keyboard>
Keyboard Tab
TheKeyboardtaballowstheusertomodifythe
OSDandRDPsession'skeyboardrepeatsetting.
TheOSDkeyboardsettingdoesnotaffect
thekeyboardsettingswhenaPColPsession
isactiveunlesstheLocalKeyboardHost
Driverfunctionisbeingused(seePColP
HostSoftwareUserGuideformoreinforma-
tion).
TheKeyboardtabhasnocorresponding
menuintheWebpageAdministrationInter-
faceofSection1.
NOTE
Minimum Image Quality
TheMinimumImageQualitysliderallowsthead-
ministratortomakecompromisesbetweenimage
qualityandframeratewhennetworkbandwidth
islimited.Sometimes,lower-qualityimagesata
higherframeratemayberequired,whileatother
times,higher-qualityimagesatalowerframerate
maybepreferred.
Inenvironmentswherethenetworkbandwidthis
limited,movingtheslidertowardsReduceden-
sureshigherframerates;
movingtheslidertowardsPerception-Freeensures
higherimagequality.Whennetworkbandwidthis
notlimited,thePCoIPsystemwillmaintainpercep-
tion-freequalityregardlessoftheMinimumImage
Qualitysetting.
<Figure2-46:Image>
Image
TheImagetaballowsausertochangetheimage
settingsonthePCoIPsystem.
TheImageparameterscanalsobecon-
figuredusingtheWebpageAdministration
Interface.
NOTE
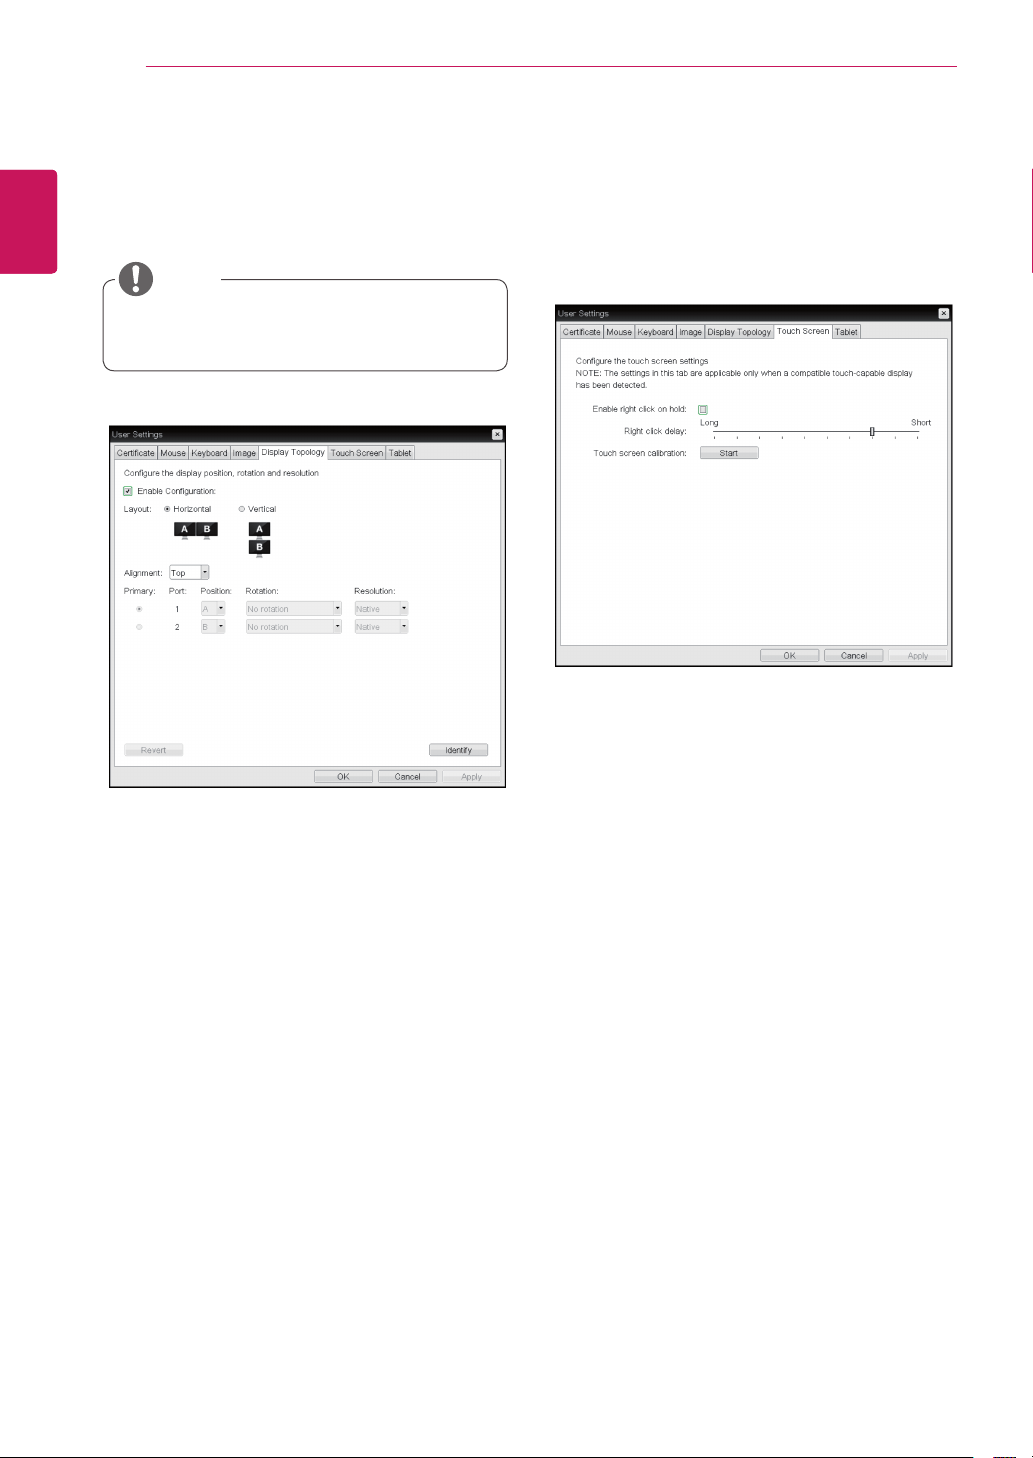
54
ENG
English
Using CLOUD Solution
Display Topology Tab
TheDisplayTopologytaballowstheusertospecify
thepositionandalignmentofaconnectedsecond-
arymonitor.
ItisapplicablewhentheVMwareViewCon-
nectionServerversionis4.5orlater.
NOTE
<Figure2-47:DisplayTopology>
Enable Configuration
Whenthisoptionisselected,youcansetthe
displaypositionandalignment.Youcansavethe
settingsbyclickingtheApplyorOKbutton,and
thesettingswillberesetifyouinitializethemonitor
set.
Display Layout
Thisoptionallowstheusertospecifythedirection
ofmonitorconnection:verticalorhorizontal.
Alignment
Thisoptionallowstheusertospecifythealign-
mentpositionofthemonitortobeconnectedwhen
thereisaresolutiondifferencebetweenthetwo
monitors.
Primary
Thisoptionallowstheusertochangetheprimary/
secondarysettingsoftheconnectedmonitor.
Touch Screen Tab
TheTouchScreentaballowstheusertospecify
thetouchsensitivityandalignmentwhenthemoni-
torsupportsthetouchscreenfunction.
<Figure2-48:TouchScreen>
Enable right click on hold
Ifthisoptionisselected,clickingandholdingthe
touchscreenforseveralsecondsworksthesame
asthemouserightclick.
Right Click Delay
Thisoptionallowstheusertomakemovingthe
pointerpositionworkthesameasthemouseright
click.Youcanalsospecifythedistancetomove
(fromLongtoShort).
Touch screen calibration
Thealignmentofatouchscreenisstartedwhen
clickingtheStartbutton.
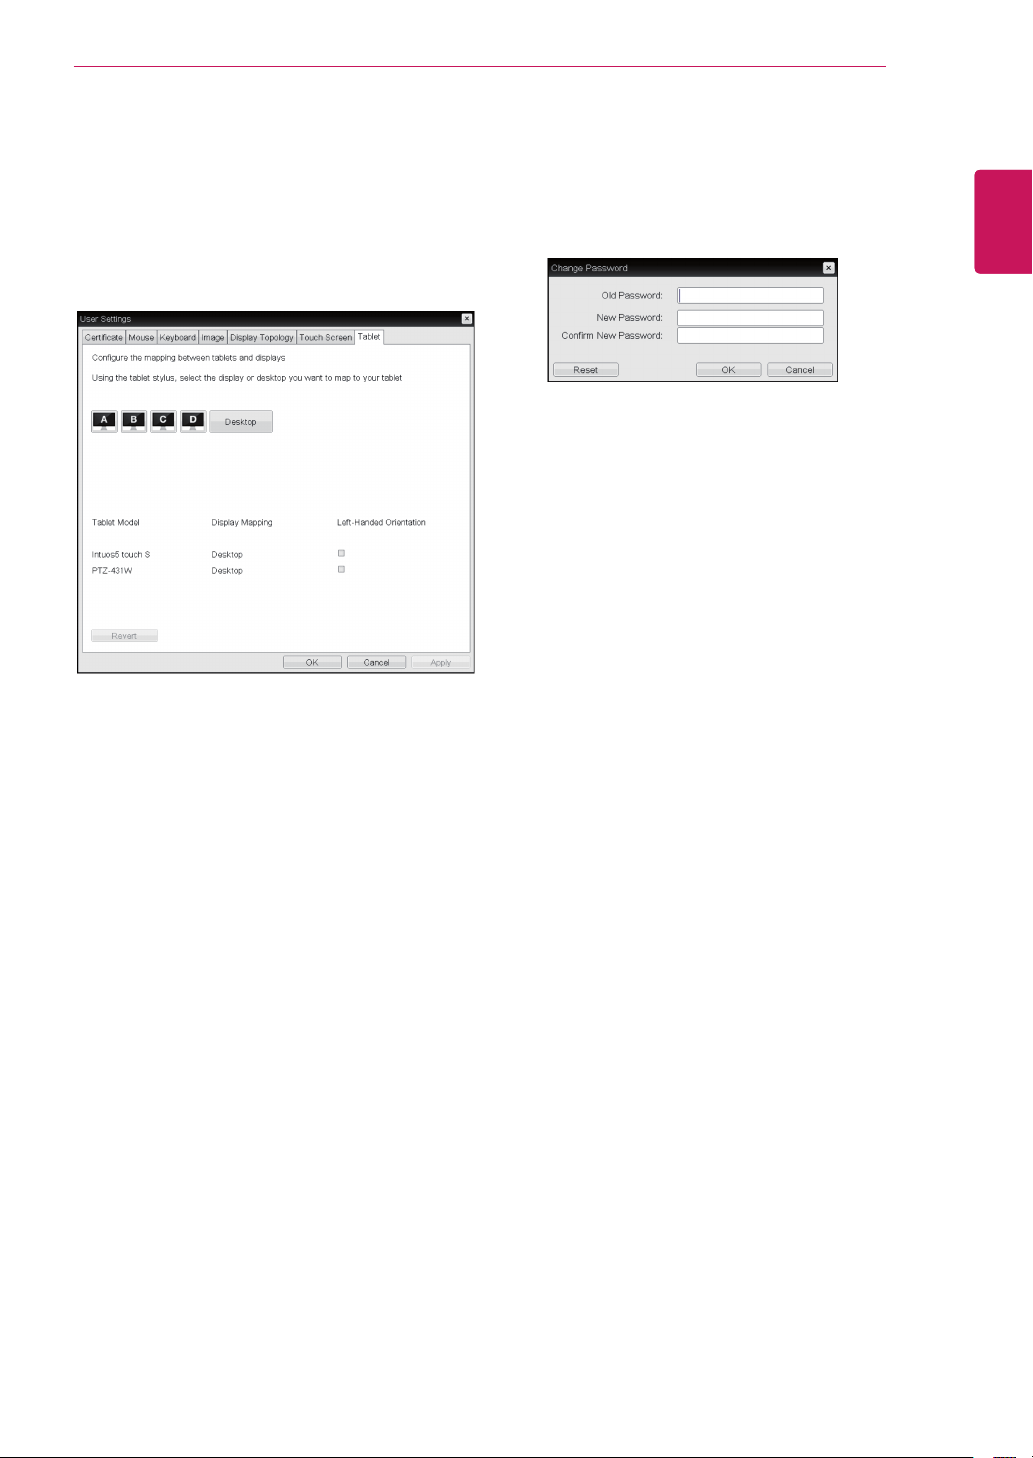
55
ENG
English
Using CLOUD Solution
<Figure2-50:PasswordConfiguration>
Old Password
Thisfieldmustmatchthecurrentadministrative
passwordbeforeyoucanupdatethepassword.
New Password
ThenewadministrativepasswordorboththeAWI
andthelocalOSDGUI.
Confirm New Password
ThisfieldmustmatchtheNewPasswordfieldfor
thechangetotakeplace.
Password Tab
ThisPasswordtabletsyouupdatethelocalad-
ministrativepasswordforthedevice.
Tablet Tab
TheTablettabletsyouselectswhetheranat-
tachedWacomtabletismappedtotheentire
desktoportoaspecificattachedmonitor.Italso
letsyouspecifywhetherthetabletoperatesina
left-handedorright-handedorientation.
<Figure2-49:Tablet>
Display and Desktop icons
Thissectionshowsthenumberofdisplaysthatare
currentlyattachedtothezeroclient.
Whenjustonemonitorisattached,onlythedesk-
topiconappearsinthisarea,andanyattached
tabletsaremappedtotheentiredesktop.
Tablet Model
ShowsthemodelnumberofeachattachedWacom
tablet.
Display Mapping
Showsthecurrentmappingconfigurationforeach
attachedtablet.(A,B,CorD,orDesktop).
Left-Handed Orientation
Toconfigurethetabletforaleft-handedorientation:
1.Usingeitheramouseorthetablet’sstylus,
selectthetablet’sLeft-HandedOrientationcheck
box.
2.ClickApply.
3.Rotatethetablet180degreebeforeusingit.
Revert
Revertsthetabletsettingstothelastappliedcon-
figuration.
Toreverttablemappingstotheirdefault
setting(Desktop),unplugamonitorandthenrecon-
nectittothezeroclient.Applyingtopologychang-
eswillalsoclearthetabletconfigurationandsetit
todefault.

MODEL
SERIAL
Make sure to read the Safety Precautions before
using the product.
Keep the Owner’s Manual (CD) in an accessible
place for future reference.
The model and serial number of the SET is
located on the back and one side of the SET.
Record it below should you ever need service.
To obtain the source code under GPL, LGPL,
MPL and other open source licenses, that is
contained in this product, please visit http://
opensource.lge.com .
In addition to the source code, all referred
license terms, warranty disclaimers and
copyright notices are available for download.
LG Electronics will also provide open source
code to you on CD-ROM for a charge covering
the cost of performing such distribution (such
as the cost of media, shipping and handling)
upon email request to opensource@lge.com.
This offer is valid for three (3) years from the
date on which you purchased the product.
*above information is only for USA FCC Regulatory
Declaration of Conformity
Trade Name: LG
Model : 20CAV37K, 24CAV37K
Responsible Party: LG Electronics Inc.
Address : 1000 Sylvan Ave. Englewood Cliffs
NJ 07632 U.S.A
TEL: 201-266-2534

