User Manual Sony DSLR-A390
Shooting an image without camera shake
“Camera shake” refers to unwanted movement of the camera that occurs after the shutter button has been pressed, resulting in a blurred image. To reduce camera shake, follow the instructions below.
1. Correct posture
Stabilize your upper body and take a position that keeps the camera from moving.
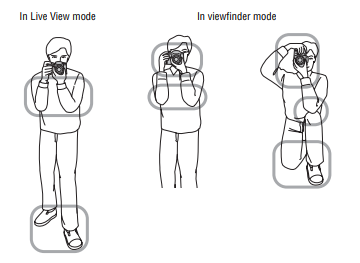
- Point 1 : One hand holds the grip of the camera, and the other hand supports the lens.
- Point 2 : Take a secure stance with your feet shoulder-width apart.
- Point 3 : Lightly tuck your elbows against your body. When shooting in a kneeling position, steady your upper body by placing your elbow on your knee.
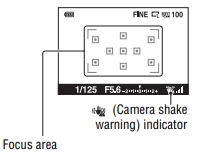
Camera shake warning indicator
Due to potential camera shake, the (Camera shake warning) indicator flashes. In this case, use a tripod or the flash.
Note : The (Camera shake warning) indicator is displayed only in the modes that automatically set the shutter speed. This indicator is not displayed in M/S modes.
2. Using the SteadyShot function
This SteadyShot function can reduce the effect of camera shake by the equivalent of approximately 2.5 to 3.5 increments of shutter speed. The SteadyShot function is set to [On] in the default setting.
The SteadyShot scale indicator
The (SteadyShot scale) indicator shows the camera shake status. Wait until the scale becomes low, then start shooting.
Note : The SteadyShot function may not work optimally when the power has just been turned on or when the shutter button has been pressed all the way down without stopping halfway. Wait for the (SteadyShot scale) indicator scale to go down, and then press the shutter button down slowly
3. Using a tripod
In the following cases, we recommend that you mount the camera on a tripod.
- Shooting without a flash under dark conditions.
- Shooting with slow shutter speeds, which are typically used in night-time shooting.
- Shooting a close subject, such as in macro shooting.
- Shooting with a telescopic lens.
Note : When using a tripod, deactivate the SteadyShot function because there is a potential for malfunction of the SteadyShot function
Shooting with the automatic setting
The “AUTO” mode allows you to easily shoot any subject under any conditions because the camera makes appropriate judgments on the situation to adjust the settings. Select when shooting in a location where the use of a flash is restricted. When you turn the mode dial, the explanation of the selected mode and methods of shooting are displayed on the screen (Help Guide disp.). You can clear the Help Guide
- Set the mode dial to AUTO or (Flash Off).

- Adjust the LCD monitor to an easily viewable angle and hold the camera.
- Place the desired subject within the focus area : • If the (Camera shake warning) indicator flashes, carefully shoot the subject, holding the camera steady, or by using a tripod.
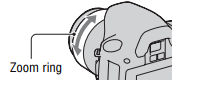
- When using a zoom lens, turn the zoom ring, then decide on your shot.
- Press the shutter button halfway down to focus.
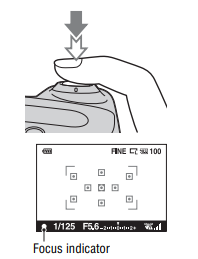
- Press the shutter button fully down to shoot : Pressing the shutter button after the (SteadyShot scale) indicator becomes low makes the SteadyShot function more effective.
Shooting with a suitable setting for the subject (Scene Selection)
Selecting an appropriate mode for the subject or the shooting conditions allows you to shoot the image with a suitable setting for the subject. When you turn the mode dial, the explanation of the selected mode and methods of shooting are displayed on the screen (Help Guide disp.). You can clear the Help Guide
Note : The camera makes appropriate judgments on the situation to adjust the settings. Since the camera turns on the automatic setting function, many features will be unavailable, such as exposure compensation, ISO setting.
Taking portrait photos
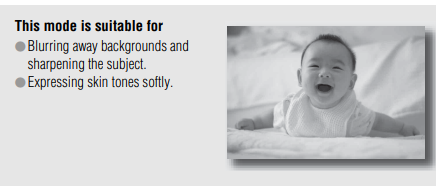
This mode is suitable for
- Blurring away backgrounds and sharpening the subject
- Expressing skin tones softly.
Set the mode dial to (Portrait).
- To blur the background more, set the lens to the telephoto position
- You can shoot a vivid image by focusing on the eye that is closer to the lens
- Use the lens hood (sold separately) to shoot backlit subjects.
- Use the red-eye reduction function if the eyes of your subject turn red from the flash
- Set the flash mode to (Flash Off) when you shoot without the flash
Taking landscape photos
This mode is suitable for
- Shooting the entire range of scenery in sharp focus with vivid colors.
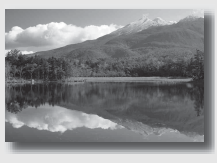
Set the mode dial to (Landscape).
- To accentuate the openness of the scenery, set the lens to wide angle
- Set the flash mode to (Fill-flash) when you shoot with the flash
Taking small-subject photos
This mode is suitable for Shooting close subjects such as flowers, insects, dishes, or small goods 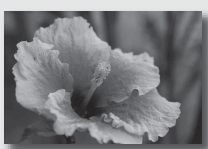
Set the mode dial to (Macro).
- Get close to the subject and shoot at the minimum distance of the lens
- You can shoot a closer subject using a macro lens (sold separately).
- Set the flash mode to (Flash Off) when you shoot a subject within 1 m (3.3 feet).
- When shooting in macro mode, the SteadyShot function will not be fully effective. Use a tripod to achieve better results.
- Set the flash mode to (Flash Off) when you shoot without the flash
Taking moving-subject photos
This mode is suitable for Shooting moving subjects outdoors or in bright places. 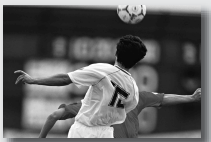
Set the mode dial to (Sports Action).
- The camera shoots images continuously while the shutter button is pressed.
- Press and hold the shutter button halfway down until the right moment.
- Set the flash mode to (Fill-flash) when you shoot with the flash
Taking sunset photos
This mode is suitable for Shooting the red of the sunset beautifully. 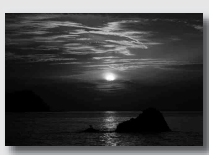
Set the mode dial to (Sunset).
- Used to shoot an image accentuating the red color compared with other modes. This is also suitable for shooting the beautiful red of the sunrise.
- Set the flash mode to (Fill-flash) when you shoot with the flash
Taking night view photos
This mode is suitable for Shooting night scenes at a distance without losing the dark atmosphere of the surroundings. 
Set the mode dial to (Night Port./View)
Set the flash mode to (Flash Off) when you shoot a night view without persons
- Take care that the subject does not move to prevent the image from blurring
- The shutter speed is slower, so using a tripod is recommended.
Note : The picture may not be taken properly when shooting a wholly dark night scene.\
Shooting with the viewfinder (OVF)
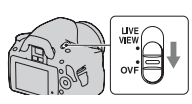
Switching to the viewfinder
Set the LIVE VIEW/OVF switch to “OVF.”
The screen status changes as follows:
When you look into the viewfinder, the subject inside the focus area comes into focus automatically (Eye-Start AF).
To deactivate the Eye-Start AF function
- When attaching the FDA-M1AM Magnifier (sold separately) or the FDAA1AM Angle Finder (sold separately) to the camera, setting [Eye-Start AF] to [Off] is recommended because the eyepiece sensors located below the viewfinder may be activated.
Adjusting the focus of the finder (diopter adjustment)
Adjust the diopter-adjustment dial to your eyesight until the indicators appear clearly in the viewfinder
- Turn the dial toward + when you are farsighted, toward – when you are near-sighted
- Training the camera on a light allows you to adjust the diopter easily.
When it is hard to rotate the diopter-adjustment dial
Put your fingers under the eyecup, and slide it upward to remove the eyecup, then adjust the diopter.
- When attaching the FDA-M1AM Magnifier (sold separately) or the FDA-A1AM Angle Finder (sold separately) to the camera, remove the eyecup as illustrated and attach them.
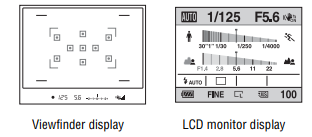
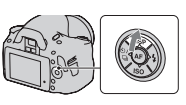
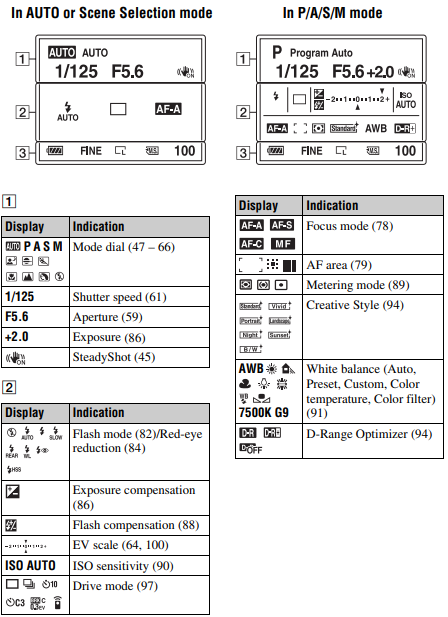
Switching the recording information display (DISP)
Press DISP on the control button to switch between the Graphic Display and the Standard Display. When you rotate the camera to a vertical position, the display automatically rotates to adjust to the camera position

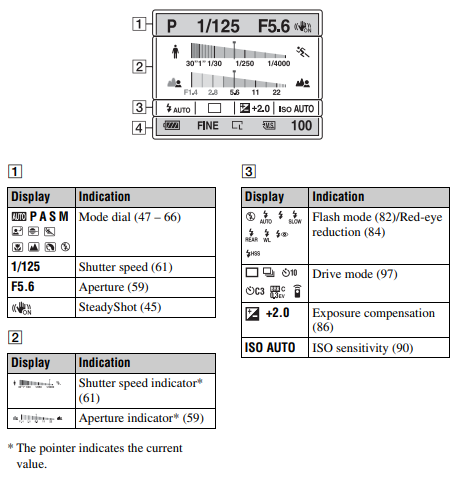
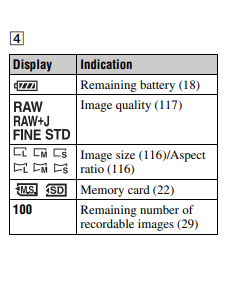
LCD monitor (Graphic Display)
The Graphic Display graphically shows the shutter speed and aperture value and clearly illustrates how the exposure works. In AUTO or Scene Selection mode, only the items that can be set are displayed. See the pages in parentheses for details of operation.
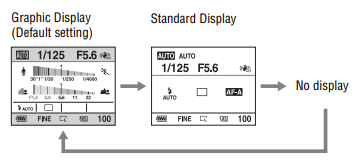
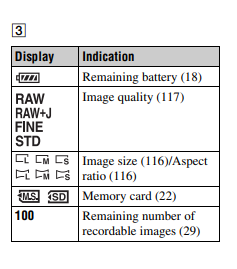
LCD monitor (Standard Display)
See pages in parentheses for details of operation
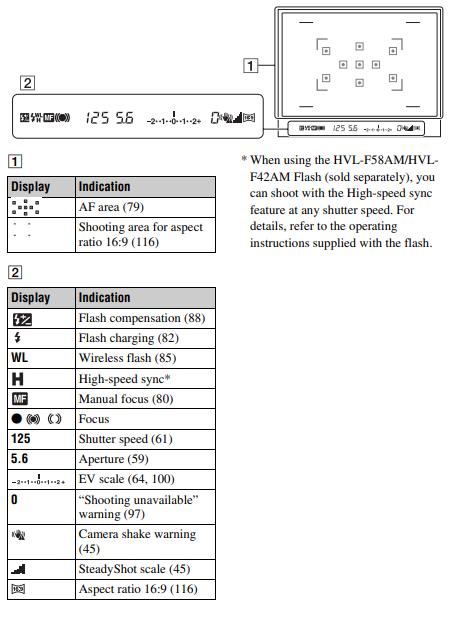
Viewfinder
Setting ISO
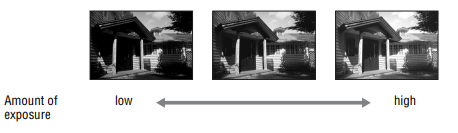
Sensitivity to light is expressed by the ISO number (recommended exposure index). The larger the number, the higher the sensitivity.
- Press ISO on the control button to display the ISO screen.
- Select the desired value with v/V on the control button. ( The larger the number, the higher the noise level. )
Notes
- When the exposure mode is set to AUTO or Scene Selection, ISO is fixed to AUTO and you cannot select other ISO numbers.
- When the exposure mode is set to P/A/S and ISO is set to [AUTO], ISO is automatically set between ISO 100 and ISO 400
- The [AUTO] setting is not provided in recording mode M. If you change the recording mode to M with the [AUTO] setting, it is switched to [100]. Set the ISO according to your shooting conditions.
Adjusting the color tones (White balance)
The color tone of the subject changes depending on the characteristics of the light source. The table below shows how the color tone changes based on various light sources, compared with a subject that appears white under the sunlight.
White balance is a feature that adjusts the color tone to approximate what you see. Use this feature when the color tone of the image did not come out as you expected, or when you want to change the color tone on purpose for photographic expression.
Notes
- When the exposure mode is set to AUTO or Scene Selection, [White balance] is fixed to AWB (Auto WB) and you cannot select other modes.
- If the only light source available is a mercury lamp or a sodium lamp, the camera will not be able to acquire the accurate white balance because of the characteristics of the light source. Use the flash in such cases.
Adjusting the white balance to suit a specific light source (Auto/Preset white balance)
Fn button t [White balance] t Select the desired setting
- When [AWB] is not selected, you can fine tune the color tone with b/B on the control button. Adjusting it toward + turns the image reddish and adjusting it toward – turns the image bluish.
Registering the color tones (Custom white balance)
In a scene where the ambient light consists of multiple types of light source, use of custom white balance is recommended in order to accurately reproduce the whiteness.
- Fn button -> [White balance]
- Select [ SET] with b/B on the control button, then press the center of the control button.
- Hold the camera so that the white area fully covers the focus area located in the center, and then press the shutter button down.
- Press the center of the control button.
To call the custom white balance setting
Fn button -> [White balance] -> (Custom)
Note : If the flash is used when the shutter button is pressed, a custom white balance is registered with the flash light taken into account. Take pictures with the flash in later shootings.
Using the software
To utilize images recorded with the camera, the following software is provided:
- Sony Image Data Suite, “Image Data Converter SR”,“Image Data Lightbox SR”
- “PMB” (Picture Motion Browser)
Note
- “PMB” is not compatible with Macintosh computers.
Recommended computer environment
Windows
Recommended environment for using “Image Data Converter SR Ver.3”/ “Image Data Lightbox SR”
OS (pre-installed): Microsoft Windows XP*1 SP3/Windows Vista*2 SP2/ Windows 7
*1 64-bit editions and Starter (Edition) are not supported.
*2 Starter (Edition) is not supported.
CPU/Memory: Pentium 4 or faster is recommended, RAM 1 GB or more is recommended.
Display: 1024 × 768 dots or more
Recommended environment for using “PMB”
OS (pre-installed): Microsoft Windows XP*1 SP3/Windows Vista*2 SP2/ Windows 7
*1 64-bit editions and Starter (Edition) are not supported. Windows Image Mastering API (IMAPI) Ver.2.0 or later is required to use the function for creating discs.
*2 Starter (Edition) is not supported.
CPU/Memory: Pentium III 500 MHz or faster, 256 MB of RAM or more (Recommended: Pentium III 800 MHz or faster and 512 MB of RAM or more)
Hard Disk: Disk space required for installation—500 MB or more
Display: 1024 × 768 dots or more
Macintosh
Recommended environment for using “Image Data Converter SR Ver.3”/ “Image Data Lightbox SR”
OS (pre-installed): Mac OS X (v10.4, v10.5, v10.6 (Snow Leopard))
CPU: Power PC G4/G5 series (1.0 GHz or faster is recommended)/Intel
Core Solo/Core Duo/Core 2 Duo or faster
Memory: 1 GB or more is recommended.
Display: 1024 × 768 dots or more