Loading ...
Loading ...
Loading ...
w
Dispose of the screws
Fig. 30 (33)
as they will no longer
be needed.
u
Only loosen the screws
Fig. 30 (34)
with 1 to 2 turns.
u
Turn the adjusting screw
Fig. 30 (35)
. In a clockwise
direction: the top of the door tilts away from the appli-
ance body. In an anticlockwise direction: the top of the
door tilts towards the appliance and the bottom tilts
away from the appliance body.
u
After adjusting the inclination, retighten all screws
Fig. 30 (34)
.
4.4.2 Leveling the door
Note
u
Always perform the adjustment on both the right and
left side!
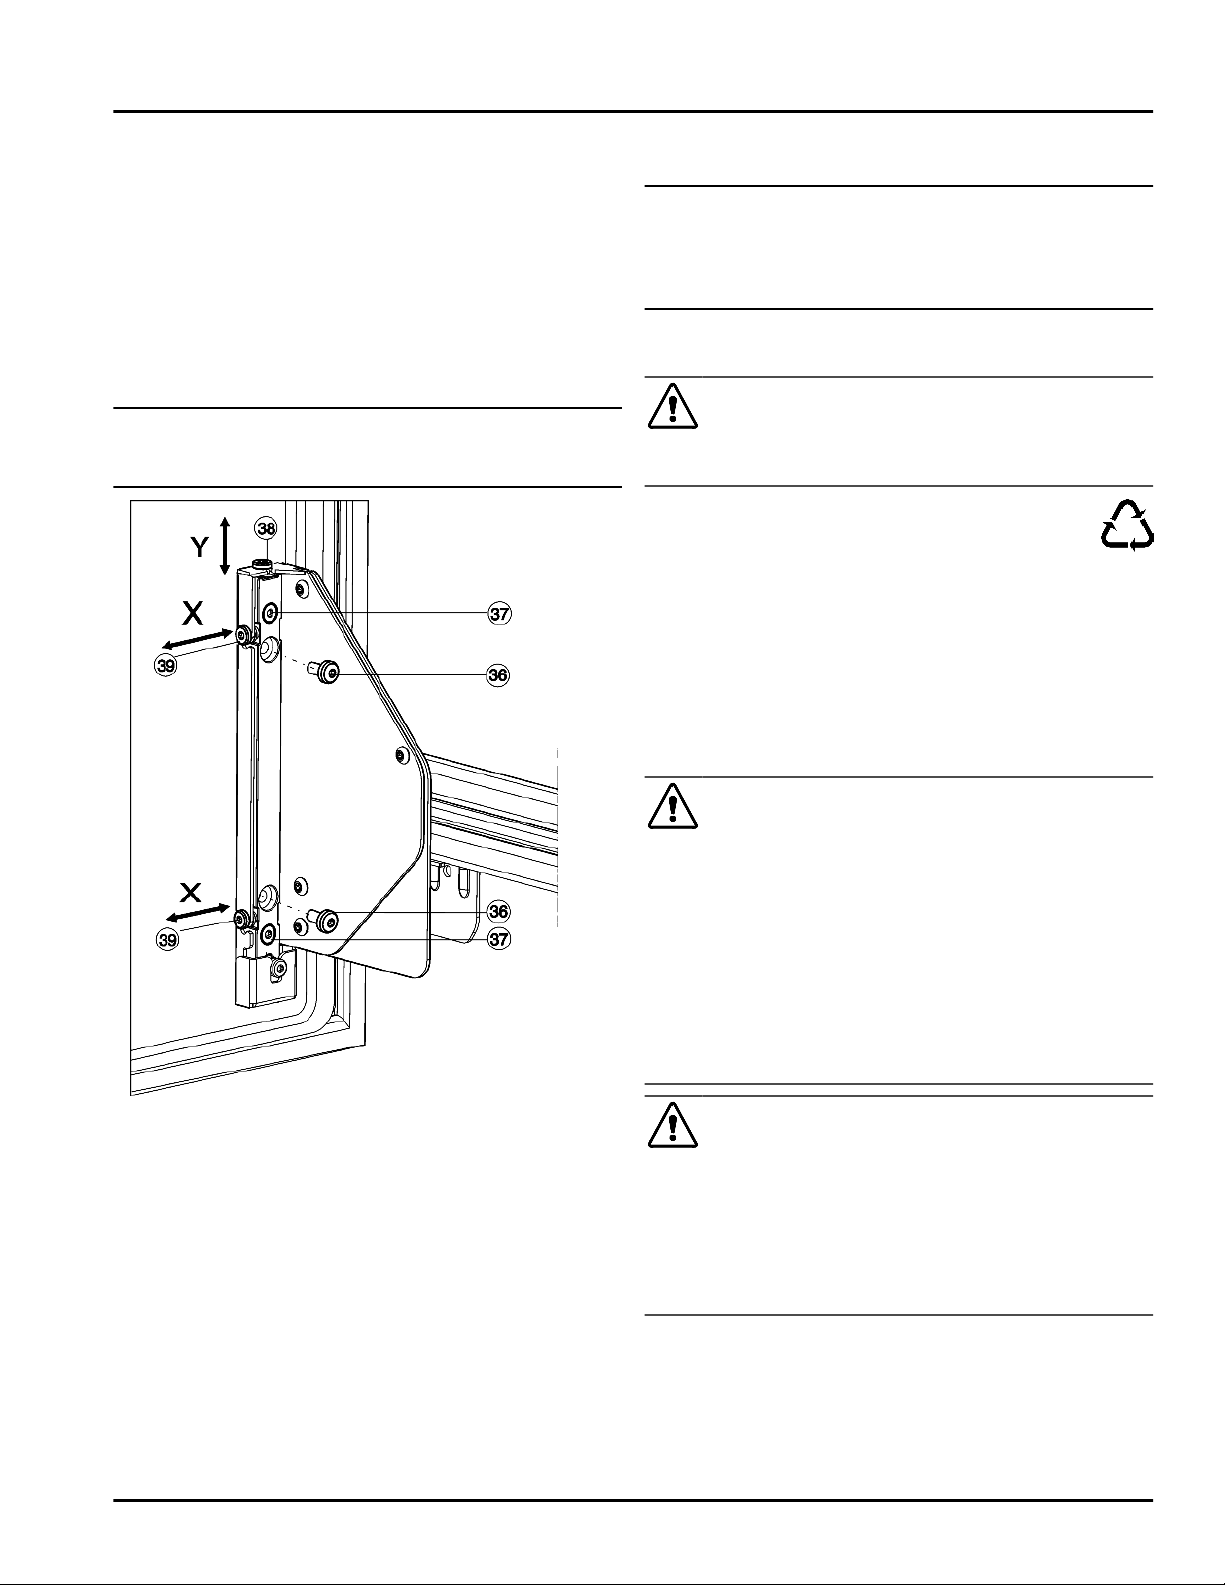
Fig. 31
Height adjustment, Y:
u
Fully screw out the screws
Fig. 31 (36)
.
w
Dispose of the screws
Fig. 31 (36)
as they will no longer
be needed.
u
Only loosen the screws
Fig. 31 (37)
with 1 to 2 turns.
u
Turn the adjusting screw (38). In a clockwise direction:
the door moves max. 4 mm upwards. In an anticlock-
wise direction: the door moves max. 2 mm downwards.
u
Retighten all screws
Fig. 31 (37)
.
Lateral adjustment, X:
u
If the screws
Fig. 31 (36)
are still present, unscrew them
fully.
u
Only loosen the screws
Fig. 31 (37)
with 1 to 2 turns.
u
Adjust the adjusting screws
Fig. 31 (39)
according to the
desired lateral adjustment direction.
u
Retighten the screws
Fig. 31 (37)
after the lateral adjust-
ment is complete.
u
Reinsert the bottle shelf
Fig. 29 (32)
and the pull-out tray
Fig. 29 (31)
.
Note
Make sure that the pull-out tray is correctly inserted and
has engaged.
Otherwise, the door will not close properly.
u
Insert the pull-out tray flush with the inner door.
4.5 Disposal of packaging
WARNING
Danger of suffocation from packaging materials and films!
u
Do not allow children to play with packaging materials.
The packaging is made from recyclable materials:
-
Corrugated card/cardboard
-
Parts made of foamed polystyrene
-
Films and bags from polyethylene
-
Packing bands from polypropylene
-
Wood frame nailed together with a polyethylene
window*
u
Take the packaging material to an official collection
point.
4.6 Connecting the appliance
WARNING
Electrical shock hazard!
u
Start-up should only take place once the appliance has
been installed according to these instructions.
u
Electrically ground appliance.
u
Do not ground to a gas pipe.
u
Check with a qualified electrician if you are not sure the
appliance is properly grounded.
u
Do not have a fuse in the neutral or grounding circuit.
u
Do not use an extension cord, power bar or a multiple
socket adapter.
u
Do not use a power cord that is frayed or damaged.
WARNING
Electrical shock hazard!
This appliance is equipped with a three-prong (grounding)
polarized plug for your protection against possible shock
hazards. Electrical Grounding Required.
u
Do not remove the round grounding prong from the
plug.
u
Use only an grounded adapter.
-
Wait 1 hour after installation before you plug in the
appliance. This allows the refrigerant and system lubri-
cation to reach equilibrium.
-
Make sure incoming voltage is the same as the appli-
ance rating. A 110-120 Volt, 60 Hz, 15 Amp electrical
supply (20 Amp for side-by-side installations) circuit
that is controlled by a circuit breaker or fuse is required.
Start-up
14 * Depending on model and options
Loading ...
Loading ...
Loading ...