| Problem | Possible Causes | What To Do |
| Dryer doesn’t start | Dryer is unplugged | Make sure the dryer plug is pushed completely into the outlet. |
| | Fuse is blown/circuit breaker is tripped | Check the house fuse/circuit breaker box and replace fuse or reset breaker. NOTE: Most electric dryers use two fuses/breakers. |
| Dryer doesn’t heat | Fuse is blown/circuit breaker is ripped; the dryer may tumble but not heat | Check the house fuse/circuit breaker box and replace both fuses or reset both breakers. Your dryer may tumble if only one fuse is blown or one breaker is tripped. |
| | Gas service is off | Make sure gas shutoff at dryer and main shutoff are fully open. |
| | No heat temperature selected | Select another heat setting. |
| Dryer shakes or makes noise | Some shaking/noise is normal. Dryer may be sitting unevenly | Move dryer to an even floor space, or adjust leveling legs as necessary until even. |
| Greasy spots on clothes | Improper use of fabric softener | Follow directions on fabric softener package. |
| | Drying dirty items with clean ones | Use your dryer to dry only clean items. Dirty items can stain clean items and the dryer. |
| | Clothes were not completely clean | Sometimes stains which cannot be seen when the clothes are wet appear after drying. Use proper washing procedures before drying. |
| Lint on clothes | Lint filter is full | Clean lint screen before each load. |
| | Improper sorting | Sort lint producers (like chenille) from lint collectors (like corduroy). |
| | Static electricity can attract lint | See suggestions in this section under Static. |
| | Overloading | Separate large loads into smaller ones. |
| | Paper, tissue, etc., left in pockets | Empty all pockets before laundering clothes |
| Static occurs | No fabric softener was used | Try a fabric softener. Bounce® Fabric Conditioner Dryer Sheets have been approved for use in all GE Dryers when used in accordance with the manufacturer’s instructions. |
| | Over-drying | Try a fabric softener. Adjust setting to Less Dry or Damp Dry. |
| | Synthetics, permanent press and blends can cause static | Try a fabric softener |
| Inconsistent drying times | Type of heat | Automatic drying times will vary according to the type of heat used (electric, natural or LP gas), size of load, types of fabrics, wetness of clothes and condition of exhaust ducts |
| The Dry dryness level was chosen but load is still damp | Load consists of a mixture of heavy and light fabrics | When combining heavy and light fabrics in a load, choose More Dry if you are using a sensor cycle. |
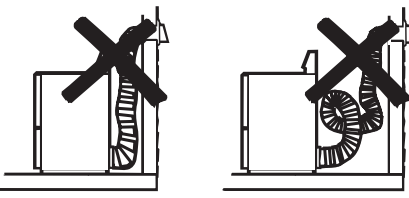
| | Exhaust system is blocked | Inspect and clean exhaust system. |
| Small amount of water on floor in front of dryer | Inadequate load size for steam cycle selected, excess steam condenses inside cabinet and leaks out | If using the Steam Dewrinkle cycle, manually reduce time. If using the Steam Refresh cycle, add more |
| Water on floor in back of dryer | Loose water hose connection to valve | |
| | Hose missing rubber washer at connection with valve | Install rubber washer provided with hose. |
| Water drips from door when opened after a Steam Cycle | Steam condenses on inner door | This is normal. |
| Cannot see steam at beginning of cycle | Steam released at different time in cycle | This is normal. |
| Cannot see steam at any time during the cycle | The steam nozzle might be clogged with debris from your water supply | replace nozzle |
| Garments still wrinkled after steam cycle | Too many garments | Load fewer garments; manually increase time. |
| Dryer continues to tumble after display says complete | Extended/Dewrinkle Tumble was selected | Ensure Extended/Dewrinkle Tumble option is not selected. For the Steam Refresh cycle,Extended/Dewrinkle Tumble will automatically be turned on and cannot be turned off |
| Garments are wet after Steam cycle | Lint filter not clean | Clean lint filter |
| | Load is children/infant garments | Use the Steam Refresh cycle. |
| No numbers displayed during cycle, only lights | Dryer is continuously monitoring the amount of moisture in the clothes | This is normal. When the dryer senses a low level of moisture in the load, the dryer will display the dry time remaining |
| Time Remaining jumped to a lower number | The estimated time may change when a smaller load than usual is drying | This is normal. |
| Dryer is running but 00 is displayed in Time Remaining | The Extended/Dewrinkle Tumble option was chosen | This is normal. During Extended/Dewrinkle Tumble, the time remaining is not displayed. The extended tumbling option lasts approximately 60 minutes; dewrinkle 60 minutes |
| Clothes are still wet and dryer shuts off after a short time | The door was opened mid-cycle.The load was then removed from the dryer and a new load put in without selecting a new cycle | A dry cycle must be re-selected each time a new load is put in. |
| | Small load | When drying 3 items or less, chooseSpeed Dry or Timed Dry. |
| | Load was already dry except for collars and waistbands | Choose Speed Dry or Timed Dry to dry damp collars and waistbands. In the future, when drying a load with collars and waistbands, choose More Dry. |
| | Dryer is not leve | Move dryer to an even floor space or adjust leveling legs as necessary until even. |
| Small amount of water on floor in front of dryer | Inadequate load size for steam cycle selected, excess steam condenses inside cabinet and leaks out | If using the Steam Dewrinkle cycle, manually reduce time. If using the Steam Refresh cycle, add more |
| Water on floor in back of dryer | Loose water hose connection to valve | |
| | Hose missing rubber washer at connection with valve | Install rubber washer provided with hose |
| Water drips from door when opened after a Steam Cycle | Steam condenses on inner door | This is normal. |
| Cannot see steam at beginning of cycle | Steam released at different time in cycle | This is normal. |
| Cannot see steam at any time during the cycle | The steam nozzle might be clogged with debris from your water supply | replace nozzle |
| Garments still wrinkled after steam cycle | Too many garments | Load fewer garments; manually increase time. |
| Dryer continues to tumble after display says complete | Extended/Dewrinkle Tumble was selected | Ensure Extended/Dewrinkle Tumble option is not selected. For the Steam Refresh cycle,Extended/Dewrinkle Tumble will automatically be turned on and cannot be turned off. |
| Garments are wet after Steam cycle | Lint filter not clean | Clean lint filter |
| | Load is children/infant garments | Use the Steam Refresh cycle. |
| No numbers displayed during cycle, only lights | Dryer is continuously monitoring the amount of moisture in the clothes | This is normal. When the dryer senses a low level of moisture in the load, the dryer will display the dry time remaining. |
| Time Remaining jumped to a lower number | The estimated time may change when a smaller load than usual is drying | This is normal. |
| Dryer is running but 00 is displayed in Time Remaining | The Extended/Dewrinkle Tumble option was chosen | This is normal. During Extended/Dewrinkle Tumble, the time remaining is not displayed. The extended tumbling option lasts approximately 60 minutes; dewrinkle 60 minutes. |
| Clothes are still wet and dryer shuts off after a short time | The door was opened mid-cycle. The load was then removed from the dryer and a new load put in without selecting a new cycle | A dry cycle must be re-selected each time a new load is put in. |
| | Small load | When drying 3 items or less, chooseSpeed Dry or Timed Dry. |
| | Load was already dry except for collars and waistbands | Choose Speed Dry or Timed Dry to dry damp collars and waistbands. In the future, when drying a load with collars and waistbands, choose More Dry. |
| | Dryer is not leve | Move dryer to an even floor space or adjust leveling legs as necessary until even. |