Loading ...
Loading ...
Loading ...
113
112
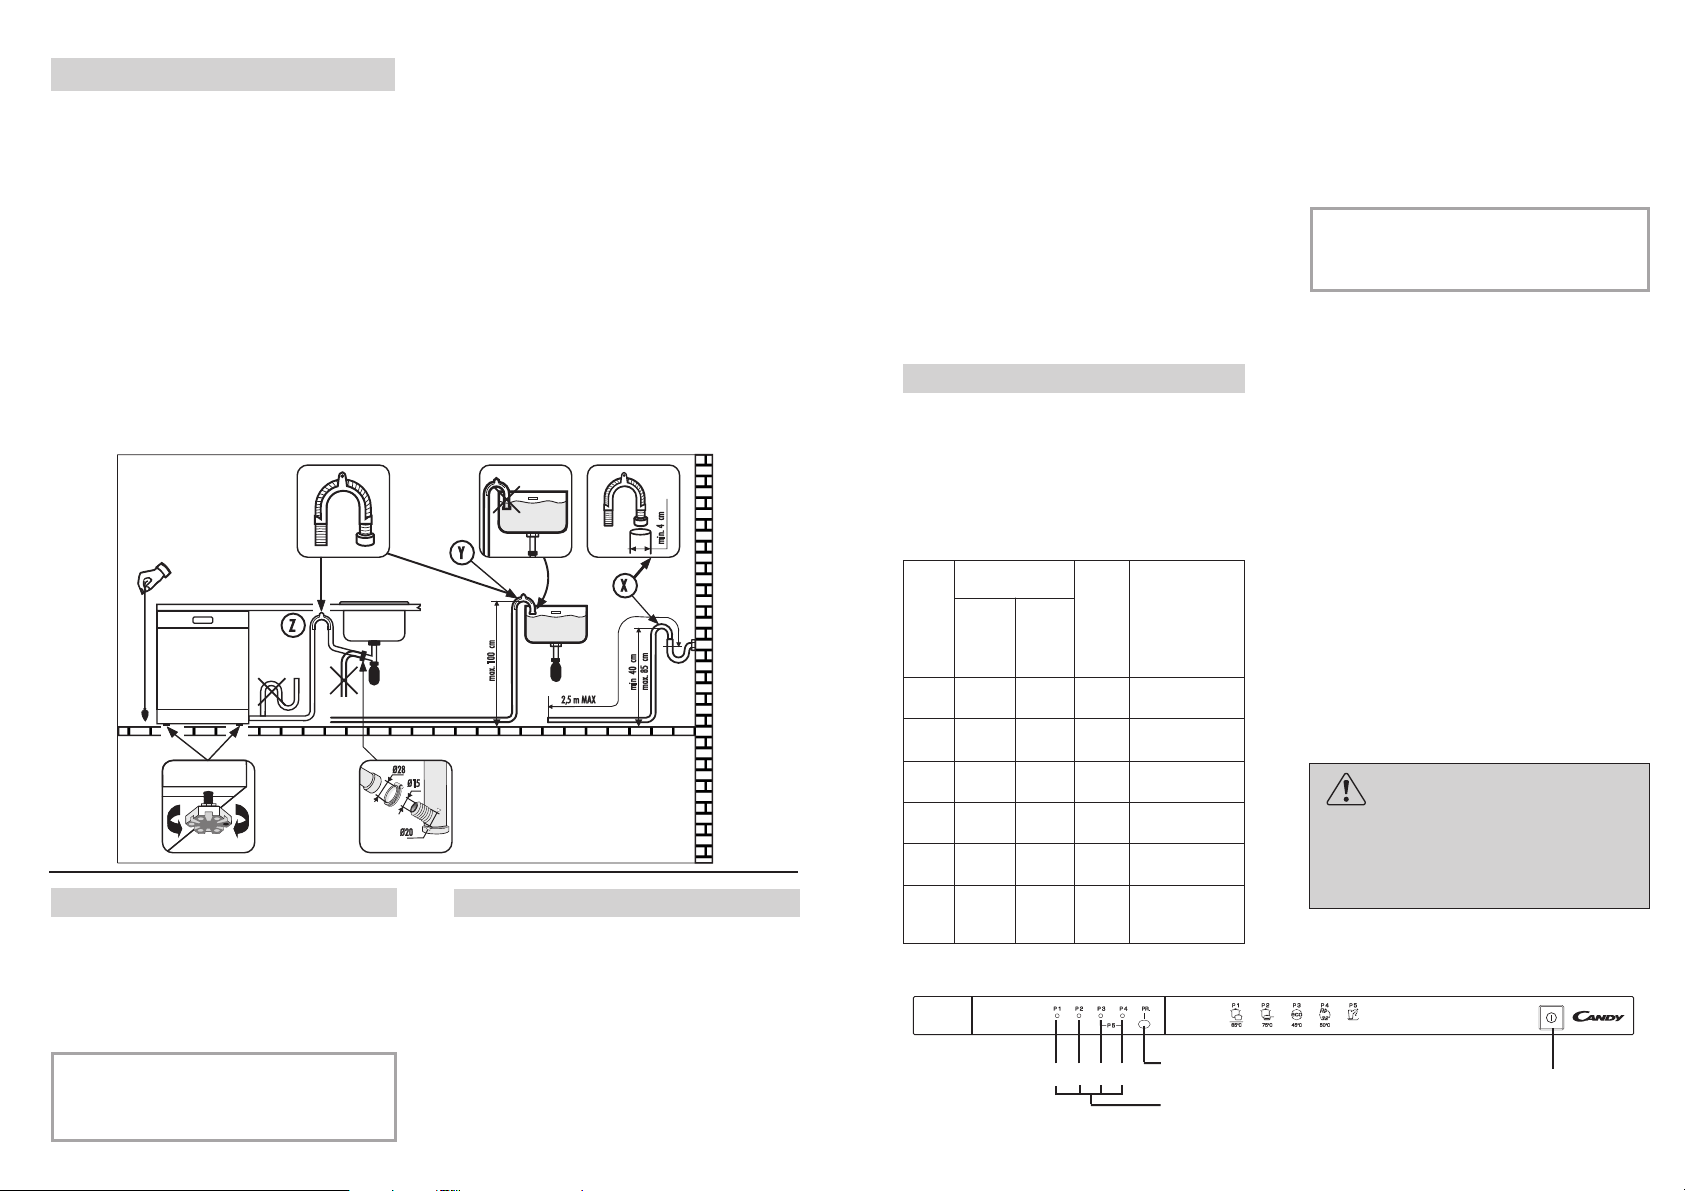
Connecting the outlet hose
■ The outlet hose should disharge into a
standpipe, making sure that there are no
kinks (fig. 4).
■ The standpipe must be at least 40 cm
above floor level and it must have an
internal diameter of at least 4 cm.
■ It is advisable to fit an anti-odour air trap
(fig. 4X).
■ If necessary the outlet hose can be
extended up to 2,5 m, provided that it is
kept at a maximum height of 85 cm
above floor level. The extension pipe is
available from the After Sales Service
Centre.
■ The hose can be hooked over the side of
the sink, but it must not be immersed in
water, in order to prevent water from
being syphoned back to the machine
when this is in operation (fig. 4Y).
■ When installing the appliance under a
worktop the hose pipe clamp must be
attached to the wall in the highest possible
position under the worktop (fig. 4Z).
■ Check that there are no kinks in the inlet
and outlet hoses.
4
Opening the door
If the machine comes open while it is working,
an electrical safety device automatically
switches everything off.
IMPORTANT
For the machine to work properly,
the door should not be opened while
it is in operation.
Closing the door
Place the baskets in the machine.
Make sure that both the spray arms are
free to rotate and are not obstructed by
cutlery, crockery or pans. Close the door,
pressing on it to make sure it is firmly shut.
* The water softener unit is set in the
factory at level 3, as this is suitable for
the majority of users.
According to the degree of hardness of
your water, regulate the softener unit in the
following way:
IMPORTANT
The dishwasher must be ALWAYS
off before start this procedure.
1. Hold down the "PROGRAMME
SELECTION" button and at the same
time switch on the dishwasher by
pressing the "ON/OFF" button (a brief
audible signal will sound).
2. Keep the "PROGRAMME SELECTION"
button pressed for at least 5 seconds,
UNTIL an audible signal sounds. Some
"PROGRAMME SELECTION" indicator
lights will come on to indicate the
current water softener setting level.
3. Press the same button again to select
the required water softener level: each
time the button is pressed, one indicator
light will come on (the water softener
level is indicated by the number of lights
on). For level 5, 4 lights will flash, for
level 0 all lights will be off.
4. Turn off the dishwasher by pressing the
"ON/OFF" button to confirm the new
setting.
WARNING!
If any problem occurs, turn the
dishwasher off by pressing the
"ON/OFF" button and start the
procedure again from the beginning
(STEP 1).
WATER SOFTENER UNIT
Depending on the source of the supply,
water contains varying amounts of limestone
and minerals which are deposited on the
dishes leaving whitish stains and marks.
The higher the level of these minerals
present in the water, the harder the water is.
The dishwasher is fitted with a water
softener unit which, through the use of
special regenerating salt, supplies
softened water for washing the dishes.
The degree of hardness of your water can
be obtained from your water supply
company.
Regulating the water softener
The softener unit can treat water with a
hardness of up to 90°fH (French grading)
or 50°dH (German grading) through 6
different settings.
The table below lists different degrees of
water hardness with the corresponding
setting for the softener unit.
Level
ºfH
(French
grading)
ºdH
(German
grading)
NO
YES
YES
YES
YES
YES
No indicator
lights
Indicator light
1
Indicator lights
1,2
Indicator lights
1,2,3
Indicator lights
1,2,3,4
Indicator lights
1,2,3,4
flashing
Water
hardness
Water
softener
setting
Use of
regenerating
salt
0
1
2
*3
4
5
0-5
6-15
16-30
31-45
46-60
61-90
0-3
4-9
10-16
17-25
26-33
34-50
1234
“PROGRAMME SELECTION” button
“ON/OFF”
button
“PROGRAMME SELECTION” indicator lights
Loading ...
Loading ...
Loading ...