Loading ...
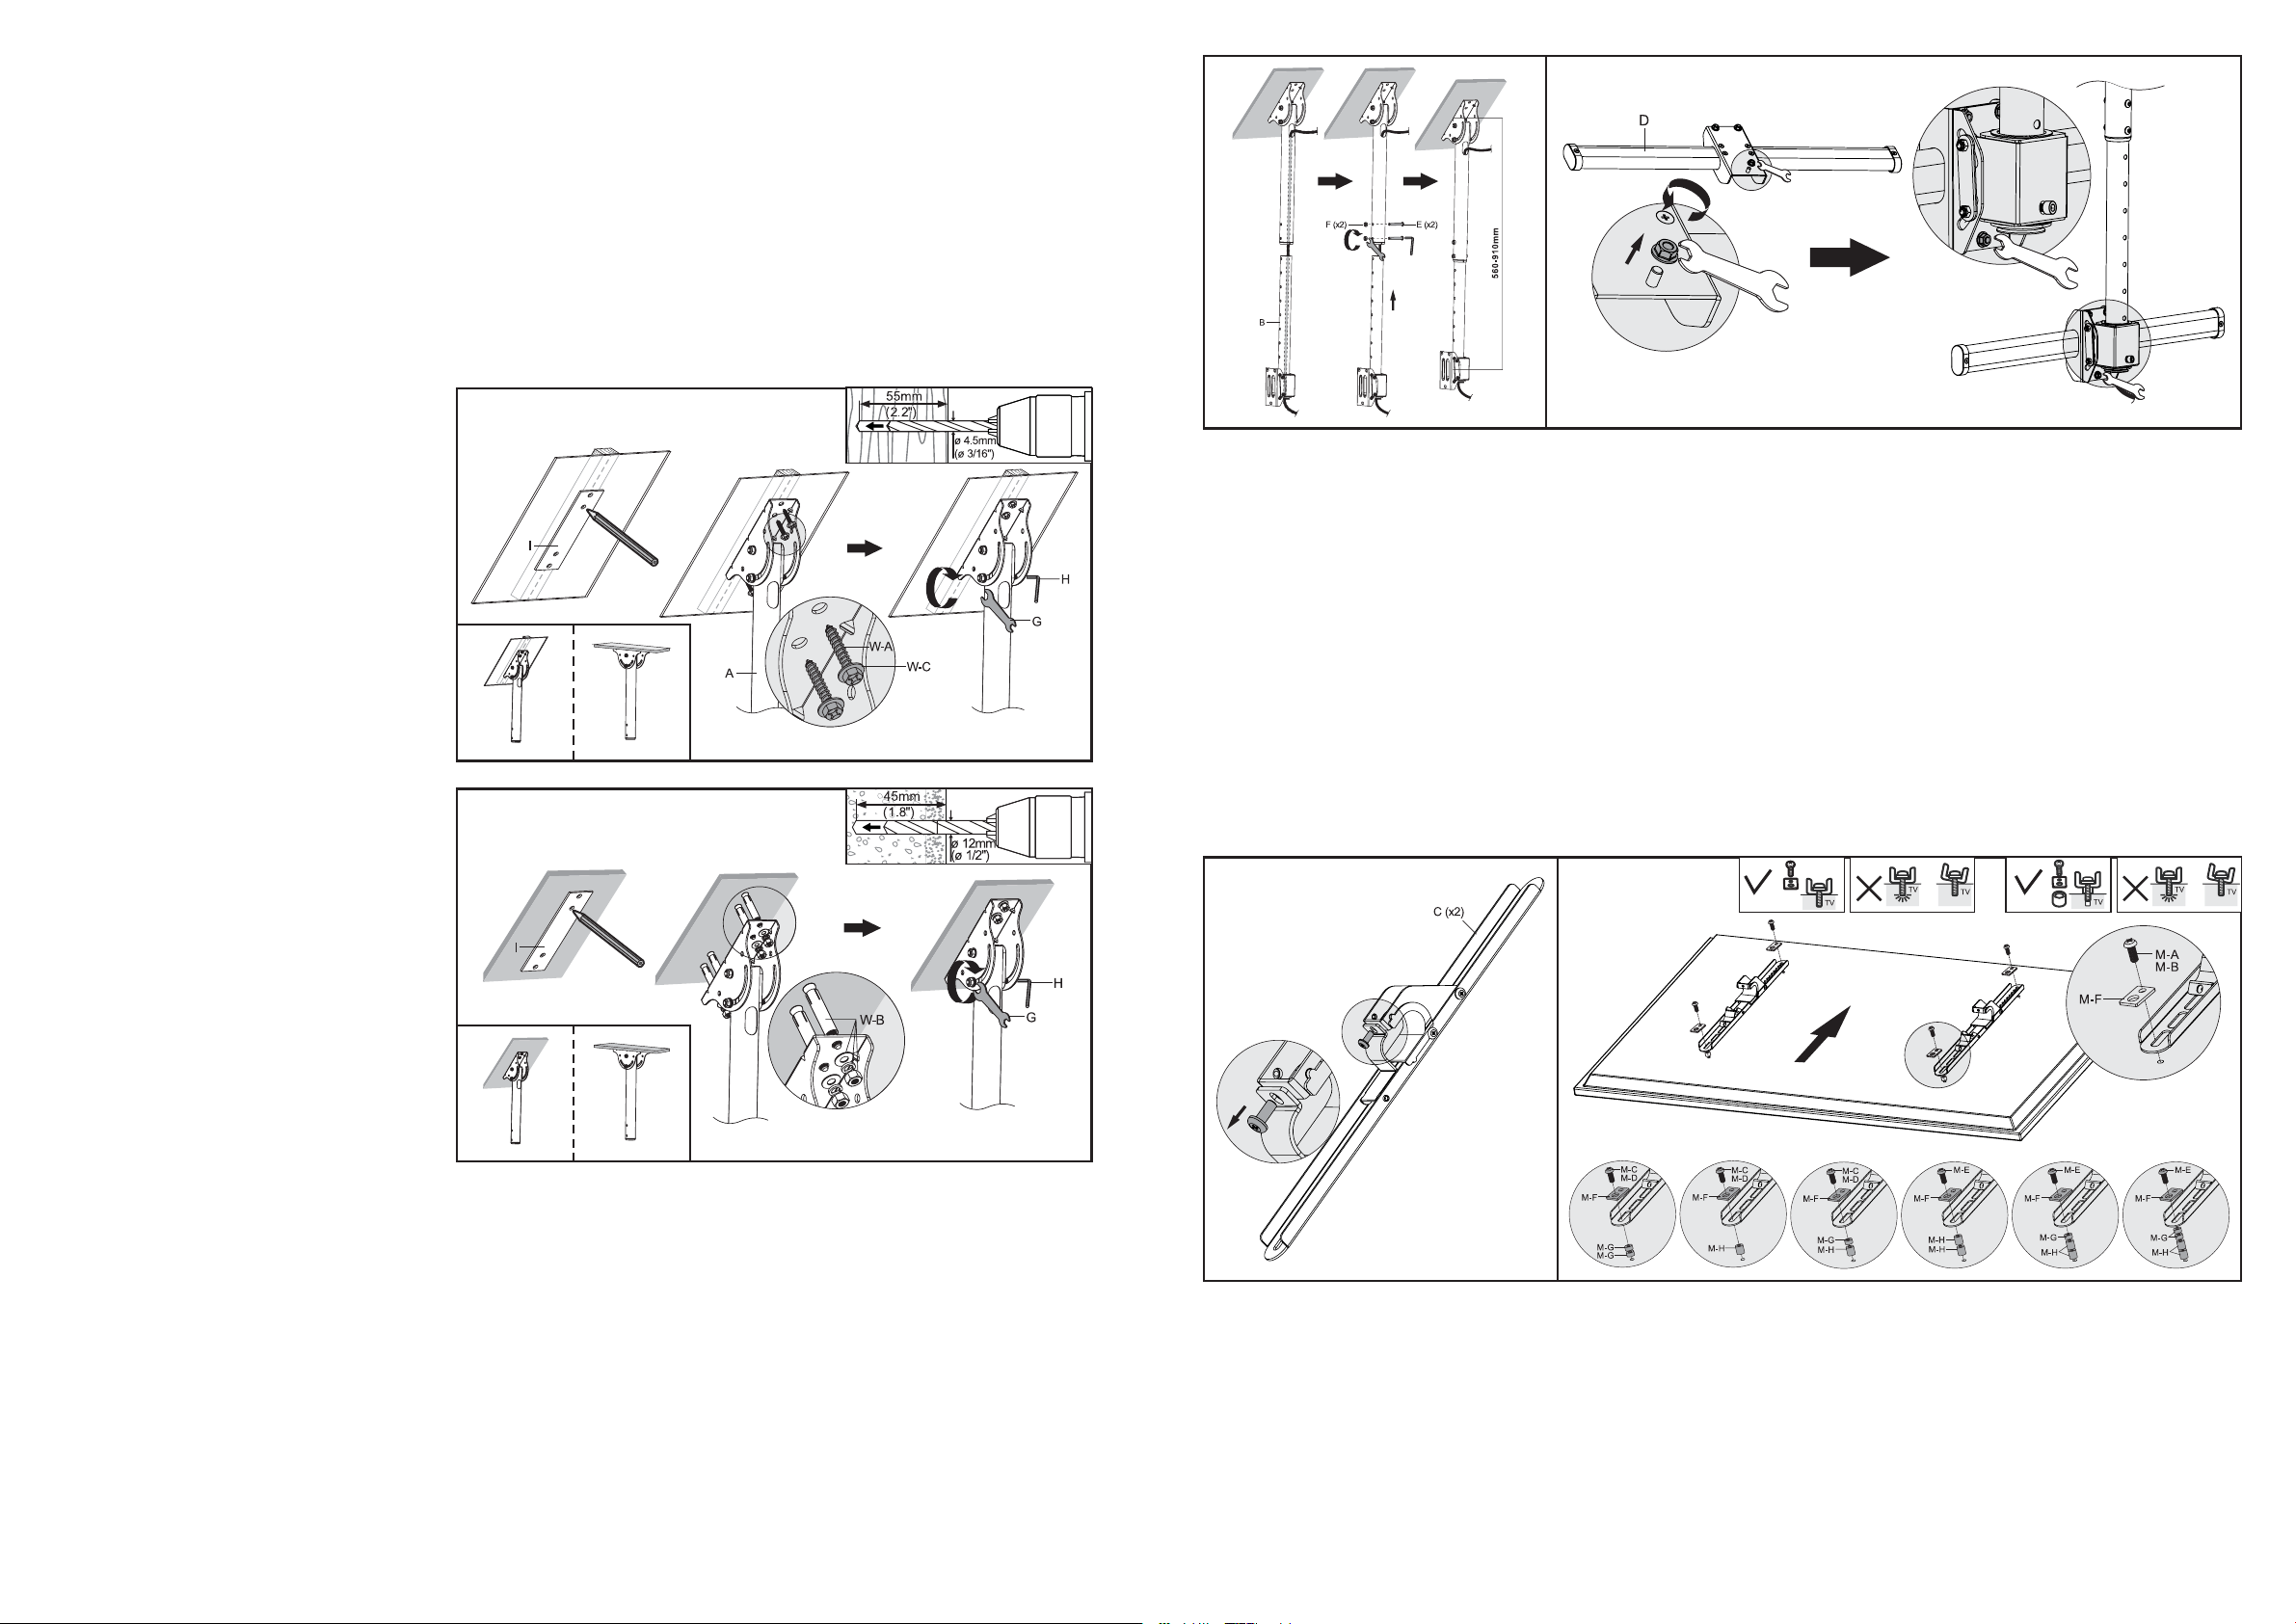
Step 1: Attach Ceiling Plate to Ceiling
A. INSTALLING IN DRYWALL (TIMBER SUPPORTS)
WARNING: The Crest Company holds no responsibility
for incorrectly installed TV Ceiling Mounts.
1. Locate the centre of the timber studs using
a stud finder.
(NOTE: You must use the centre of the
stud to avoid cracking or splitting the
timber during installation).
2. Mark a minimum of 4 fixing holes over
stud centres using the Ceiling Plate (I) as
a guide - position 2 at either end of the
Ceiling Plate. Ensure plate is level.
3. Pre-drill holes to a minimum depth of
55mm using a high speed 4.5mm drill bit.
If installing in hardwood, larger diameter
and deeper holes may be required.
4. Attach the Ceiling Plate using the lag bolts
(W-A) through the washers (W-C). Do not
over tighten.
B. INSTALLING IN MASONRY
WARNING: Ensure you have a minimum of 35mm of
actual concrete/brick thickness in the hole for the
anchors. Do not drill into mortar joints. Installer must
verify that the supporting surface will safely support
the combined weight of the TV Ceiling Mount and TV.
The Crest Company holds no responsibility for
incorrectly installed TV Ceiling Mounts.
1. Mark a minimum of 4 fixing holes over
the stud centre using the Ceiling Plate (I)
as a guide - position 2 at either end of the
Ceiling Plate. Ensure plate is level.
2. Pre-drill holes to a minimum depth of
45mm using 12mm masonry drill bit. Clean
out holes.
3. Fully insert concrete anchors (W-B). Tap in
with hammer if required.
4. Attach Ceiling Plate by inserting the lag
bolts (W-A) through the washers (W-C) into each concrete anchor (W-B).
Do not over tighten.
Step 2: Assembly of Mounting Arm
1. Attach Ceiling Plate Arm (B) to mounted Ceiling Plate (A). Insert the two bolts (E) into the holes on the arm and fix with nuts
(F). Tighten with wrench (G).
2. Attach Mounting Bar (D) to Ceiling Plate Arm (B). Do so by removing the nut on the rear of the Mounting Bar, attach to
the Mouting Arm and then reattach the nut and tighten with the wrench (G).Once you have selected the correct bolt size,
use the washer (M-F or M-G). If no bolts fit you will need to go to your local hardware supplier to find the correct bolt and
washer sizes.
Step 3: Attach Mounting Arms to TV
1. Using a second person for assistance, lay your TV face down on something soft so as not to scratch the TV screen. Check
the back of your TV to find the appropriate mounting pattern.
2. Sort through the provided bolts (M-A to M-E) until you find the correct size that easily fits into the back of your TV and fits
snugly (the bolt must turn at least 3 full turns, do not tighten). If you feel resistance stop immediately and select a smaller bolt.
3. Once you have selected the correct bolt size, use the multi-washer (M-F). If no bolts fit you will need to go to your local
hardware supplier to find the correct bolt and washer sizes.
4. Open the mechanism of the arm (C) by removing the screw. Gently put your mounting arms (C) on the back of the TV so that
the mounting holes are showing through the holes of the mounting arms.
If the back of your TV is curved or recessed you will also need to use a spacer (M-G or M-H) depending upon the amount of
space you are trying to clear. If using a spacer you will also need to use longer screws. Remember that the bolt needs to turn
at least 3 full turns.
5. Using the correct mounting bolt size and length, insert these through the corresponding hole on the multi-washer (M-F) to
attach mounting arms to the rear of the TV. To avoid damaging TV, do not over tighten bolts.
The Crest Company is not responsible for any damage caused by screwing the bolt too far into the back of the TV.
4 5
Step 4: Attach TV onto Ceiling Plate
1. Using a second person for assistance, carefully lift the TV and hook arms over the top of the Mounting bar (See figure 6).
2. Slowly lower the bottom of the TV until the bottom of the mounting arm locks onto the mounting bar.
3. Once your TV is in place close the lock at the bottom of the mounting arms and tighten with screw. This will help ensure
that your TV does not fall off your Ceiling Plate during use.
4. To remove the TV from the Ceiling Plate, use loosen the screws at the bottom of the mounting arms which will release the
mounting arms. Pull the bottom of the TV slightly towards you and then lift the TV from the Ceiling Plate.
5. Tighten nuts and bolts as required.
Tools Required
DRYWALL INSTALLATION (TIMBER SUPPORTS):
• Adjustable spanner/socket set
• Philips head screwdriver
• Power drill
• High speed 4.5mm drill bit
• Stud nder
• Spirit level and pencil
MASONRY INSTALLATION:
• Adjustable spanner/socket set
• Philips head screwdriver
• Power drill with hammer function
• 12mm Masonry drill bit
• Spirit level and pencil
• Hammer
2 3
1a
1b