Documents: Go to download!
- Owner's manual - (English, French, Spanish)
- ATTACHMENTS AND ACCESSORIES
- GENERAL INSTRUCTIONS
- TROUBLESHOOTING PROBLEMS
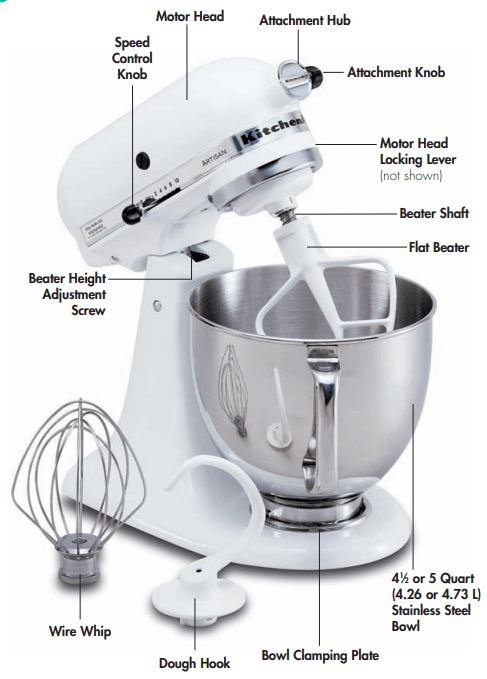
- TILT-HEAD STAND MIXER FEATURES
- ASSEMBLING YOUR TILT-HEAD STAND MIXER
- USING YOUR POURING SHIELD*
- USING YOUR KITCHENAID® ACCESSORIES
- MIXING TIME
- TILT-HEAD STAND MIXER USE
- CARE AND CLEANING
- BEATER TO BOWL CLEARANCE
- SPEED CONTROL GUIDE
- MIXING TIPS
Table of contents
User Manual
ATTACHMENTS AND ACCESSORIES
General Information
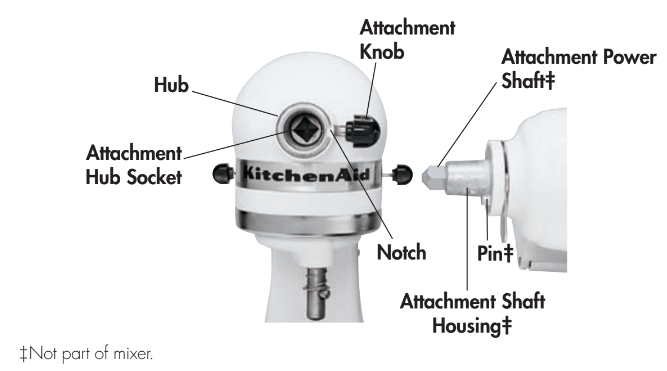
KitchenAid® attachments are designed to assure long life. The attachment power shaft and hub socket are of a square design, to eliminate any possibility of slipping during the transmission of power to the attachment. The hub and shaft housing are tapered to assure a snug fi t, even after prolonged use and wear. KitchenAid® attachments require no extra power unit to operate them; the power unit is built in.
GENERAL INSTRUCTIONS
To Attach
- Turn the speed control to OFF.
- Unplug mixer or disconnect power.
- Loosen the attachment knob by turning it counterclockwise, and remove the attachment hub cover or flip up hinged hub cover.
- Insert the attachment shaft housing into the attachment hub, making certain the attachment power shaft fits into the square attachment hub socket. It may be necessary to rotate the attachment back and forth. When the attachment is in proper position, the pin on the attachment will fit into the notch on the hub rim.
- Tighten the attachment knob by turning it clockwise until the attachment is completely secured to mixer.
- Plug into a grounded prong outlet.
To Remove
- Turn the speed control to OFF.
- Unplug mixer or disconnect power.
- Loosen the attachment knob by turning it counterclockwise. Rotate the attachment slightly back and forth while pulling it out.
- Replace the attachment hub cover. Tighten attachment knob by turning it clockwise.
TROUBLESHOOTING PROBLEMS
Please read the following before calling your service center.
- The Stand Mixer may warm up during use. Under heavy loads with extended mixing time periods, you may not be able to comfortably touch the top of the Stand Mixer. This is normal.
- The Stand Mixer may emit a pungent odor, especially when new. This is common with electric motors.
- If the Flat Beater hits the bowl, stop the Stand Mixer. See “Beater to Bowl Clearance,".
Keep a copy of the sales receipt showing the date of purchase. Proof of purchase will assure you of in-warranty service.
If your Stand Mixer should malfunction or fail to operate, please check the following:
- Is the Stand Mixer plugged in?
- Is the fuse in the circuit to the Stand Mixer in working order? If you have a circuit breaker box, be sure the circuit is closed.
- Turn the Stand Mixer off for 10-15 seconds, then turn it back on. If the mixer still does not start, allow it to cool for 30 minutes before turning it back on.
If the problem cannot be fixed with the steps provided in this section, then contact KitchenAid or an Authorized Service Center:
USA/Puerto Rico: 1-800-541-6390
Canada: 1-800-807-6777
Mexico: 01-800-024-17-17 (JV Distribuciones)
Or
01-800-902-31-00 (Industrias Birtman)
See the KitchenAid Warranty and Service section on page 6 for additional details. Do not return the Stand Mixer to the retailer - they do not provide service.
TILT-HEAD STAND MIXER FEATURES
NOTE: This photo shows the Artisan® Series Stand Mixer. The features on your mixer model may differ slightly.
ASSEMBLING YOUR TILT-HEAD STAND MIXER
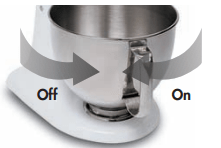
To Attach Bowl
1. Turn speed control to OFF.
2. Unplug Stand Mixer or disconnect power.
3. Tilt motor head back.
4. Place bowl on bowl clamping plate.
5. Turn bowl gently into clockwise direction.
6. Plug into a grounded 3 prong outlet.
To Remove Bowl
1. Turn speed control to OFF.
2. Unplug Stand Mixer or disconnect power.
3. Tilt motor head back.
4. Turn bowl counterclockwise.
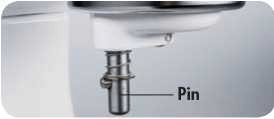
To Attach Flat Beater, Wire Whip, or Dough Hook
1. Turn speed control to OFF.
2. Unplug Stand Mixer or disconnect power.
3. Tilt motor head back.
4. Slip beater onto beater shaft and press upward as far as possible.
5. Turn beater to right, hooking beater over pin on shaft.
6. Plug into a grounded 3 prong outlet.
To Remove Flat Beater, Wire Whip or Dough Hook
1. Turn speed control to OFF.
2. Unplug Stand Mixer or disconnect power.
3. Tilt motor head back.
4. Press beater upward as far as possible and turn left.
5. Pull beater from beater shaft.
To Operate Speed Control
Speed control lever should always be set on lowest speed for starting, then gradually moved to desired higher speed to avoid splashing ingredients out of bowl. See page 15 for Speed Control Guide.
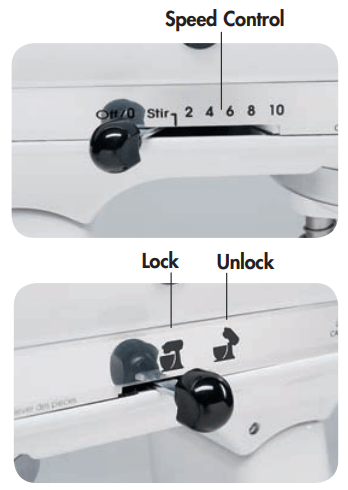
To Lock Motor Head
1. Make sure motor head is completely down.
2. Place locking lever in LOCK position.
3. Before mixing, test lock by attempting to raise head.
To Unlock Motor Head
1. Place lever in UNLOCK position.
NOTE: Motor head should always be kept in LOCK position when using mixer.
USING YOUR POURING SHIELD*
To Attach Pouring Shield
1. Turn speed control to OFF.
2. Unplug Stand Mixer or disconnect power.
3. Attach Flat Beater, Dough Hook, or Wire Whip and bowl (see page 11).
4. From the front of the mixer, slide the Pouring Shield over the bowl until the shield is centered. The bottom rim of the shield should fit within the bowl.
To Remove Pouring Shield
1. Turn speed control to OFF.
2. Unplug Stand Mixer or disconnect power.
3. Lift the front of the Pouring Shield clear of the bowl rim and pull forward.
4. Remove attachment and bowl.
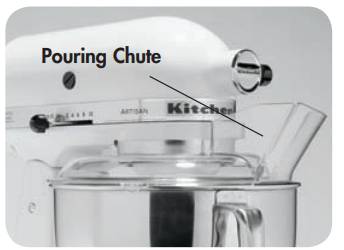
To Use Pouring Shield
1. For best results, rotate the shield so the motor head covers the “u" shaped gap in the shield. The pouring chute will be just to the right of the attachment hub as you face the mixer.
2. Pour the ingredients into the bowl through the pouring chute.
USING YOUR KITCHENAID® ACCESSORIES
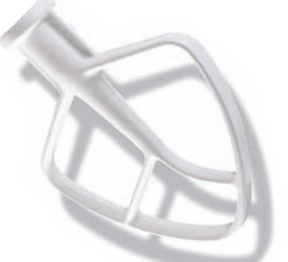
Flat Beater for normal to heavy mixtures:
cakes
creamed frostings
candies
cookies
pie pastry
biscuits
quick breads
meat loaf
mashed potatoes
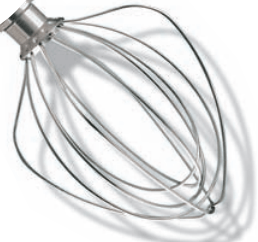
Wire Whip for mixtures that need air incorporated:
eggs
sponge cakes
egg whites
angel food cakes
heavy cream
mayonnaise
boiled frostings
some candies
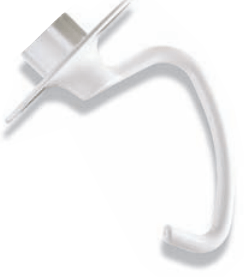
Dough Hook for mixing and kneading yeast doughs:
breads
coffee cakes
rolls
buns
MIXING TIME
Your KitchenAid® Stand Mixer will mix faster and more thoroughly than most other electric Stand Mixers. Therefore, the mixing time in most traditional and non-packaged recipes must be adjusted to avoid overbeating. With cakes, for example, beating time may be half as long as with other Stand Mixers.
TILT-HEAD STAND MIXER USE
NOTE: Do not scrape the bowl while the Stand Mixer is operating.
The bowl and beater are designed to provide thorough mixing without frequent scraping. Scraping the bowl once or twice during mixing is usually suffi cient. Turn the Stand Mixer off before scraping.
The Stand Mixer may warm up during use. Under heavy load with extended mixing time, you may not be able to comfortably touch the top of the Stand Mixer. This is normal.
CARE AND CLEANING
Bowl, white Flat Beater and white Dough Hook may be washed in an automatic dishwasher. Or, clean them thoroughly in hot sudsy water and rinse completely before drying. Wire Whip, burnished Dough Hook and burnished Flat Beater should be hand washed and dried immediately. Do not wash the Wire Whip, burnished Dough Hook and burnished Flat Beater in a dishwasher. Do not store the beaters on the shaft.
NOTE: Always be sure to unplug the Stand Mixer before cleaning. Wipe the Stand Mixer with a soft, damp cloth. Do not use household or commercial cleaners. Do not immerse in water. Wipe off the beater shaft frequently, removing any residue that may accumulate
BEATER TO BOWL CLEARANCE
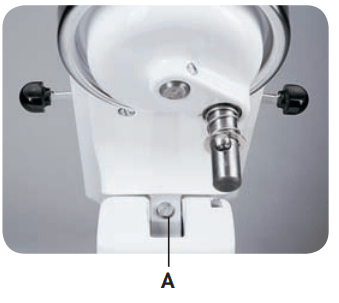
Your Stand Mixer is adjusted at the factory so the Flat Beater just clears the bottom of the bowl. If, for any reason, the Flat Beater hits the bottom of the bowl or is too far away from the bowl, you can correct the clearance easily.
1. Turn speed control to OFF.
2. Unplug Stand Mixer or disconnect power.
3. Tilt motor head back.
4. Turn screw (A) SLIGHTLY counterclockwise (left) to raise the Flat Beater or clockwise (right) to lower the Flat Beater.
5. Make adjustment so that the Flat Beater just clears the surface of the bowl. If you over adjust the screw, you may not be able to lock the motor head when it is lowered.
NOTE: When properly adjusted, the Flat Beater will not strike the bottom or side of the bowl. If the Flat Beater or the Wire Whip is adjusted so that it strikes the bowl, the coating may wear off the beater, or the wires on the whip may wear.
SPEED CONTROL GUIDE
| SPEED | USE FOR | DESCRIPTION |
| Stir | STIRRING | For slow stirring, combining, mashing, starting all mixing procedures. Use to add fl our and dry ingredients to batter, add liquids to dry ingredients, and combine heavy mixtures. Use with Ice Cream Maker attachment. |
| 2 | SLOW MIXING | For slow mixing, mashing, faster stirring. Use to mix heavy batters and candies, start mashing potatoes or other vegetables, cut shortening into flour, mix thin or splashy batters, and mix and knead yeast dough. Use with Can Opener attachment. |
| 4 | MIXING, BEATING | For mixing semi-heavy batters, such as cookies. Use to combine sugar and shortening and to add sugar to egg whites for meringues. Medium speed for cake mixes. Use with: Food Grinder, Rotor Slicer/Shredder, and Fruit/Vegetable Strainer. |
| 6 | BEATING, CREAMING | For medium fast beating (creaming) or whipping. Use to finish mixing cake, doughnut, and other batters. High speed for cake mixes. Use with Citrus Juicer attachment. |
| 8 | FAST BEATING, WHIPPING | For whipping cream, egg whites, and boiled frostings |
| 10 | FAST WHIPPING | For whipping small amounts of cream or egg whites. Use with Pasta Maker and Grain Mill attachments. NOTE: Mixer may not maintain fast speeds under heavy load, such as when the Pasta Maker or Grain Mill attachments are used. This is normal. |
NOTE: The Speed Control Lever can be set between the speeds listed in the above chart to obtain speeds 3, 5, 7, and 9 if a fi ner adjustment is required.
Use Speed 2 when preparing yeast dough – using any other speed may damage the mixer
MIXING TIPS
Converting Your Recipe for the Mixer
The mixing instructions for recipes in this book can guide you in converting your own favorite recipes for preparation with your KitchenAid® Stand Mixer. Look for recipes similar to yours and then adapt your recipes to use the procedures in the similar KitchenAid recipes.
For example, the “quick mix" method (sometimes referred to as the “dump" method) is ideal for simple cakes, such as the Quick Yellow Cake and Easy White Cake included in this book. This method calls for combining dry ingredients with most or all liquid ingredients in one step.
More elaborate cakes, such as tortes, should be prepared using the traditional cake mixing method. With this method, sugar and the shortening, butter, or margarine are thoroughly mixed (creamed) before other ingredients are added.
For all cakes, mixing times may change because your KitchenAid® Stand Mixer works more quickly than other mixers.
In general, mixing a cake with the KitchenAid® Stand Mixer will take about half the time called for in most traditional and non-packaged cake recipes.
To help determine the ideal mixing time, observe the batter or dough and mix only until it has the desired appearance described in your recipe, such as “smooth and creamy."
To select the best mixing speeds, use the Speed Control Guide on page 15.
Adding Ingredients
Always add ingredients as close to side of bowl as possible, not directly into the moving beater. The Pouring Shield can be used to simplify adding ingredients.
NOTE: If ingredients in very bottom of bowl are not thoroughly mixed, then the beater is not far enough into the bowl. See “Beater to Bowl Clearance" on page 14.
Cake Mixes
When preparing packaged cake mixes, use Speed 2 for low speed, Speed 4 for medium speed, and Speed 6 for high speed. For best results, mix for the time stated on the package directions.
Adding Nuts, Raisins, or Candied Fruits
Follow individual recipes for guidelines on including these ingredients. In general, solid materials should be folded in the last few seconds of mixing on Stir Speed. The batter should be thick enough to prevent the fruit or nuts from sinking to the bottom of the pan during baking. Sticky fruits should be dusted with flour for better distribution in the batter.
Liquid Mixtures
Mixtures containing large amounts of liquid ingredients should be mixed at lower speeds to avoid splashing. Increase mixer speed only after the mixture has thickened.
mu
See other models: KSEG950ESS KODE300ESS KV25G0XER KMT4115ER KSDB900ESS
