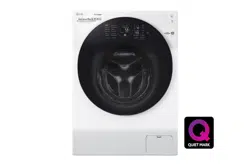
Documents: Go to download!
- Owner's manual - (English)
- OPERATION
- SMART FUNCTIONS EN
- MAINTENANCE
- TROUBLESHOOTING
Table of contents
OWNER'S MANUAL Washing Machine
OPERATION
Using the Washing Machine
Before the first wash, select a washing programme, allow the washing machine to wash without clothing. This will remove residue and water from the drum that may have been left during manufacturing.
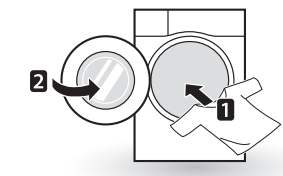
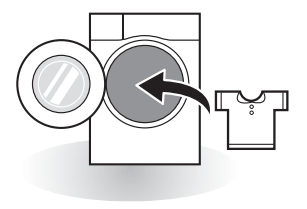
1. Sort laundry and load items.
- Sort laundry by fabric type, soil level, colour and load size as needed. Open the door and load items into the washing machine.
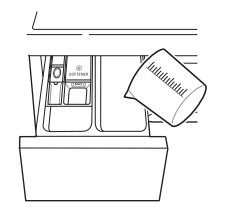
2. Add cleaning products and/or detergent and softener.
- Add the proper amount of detergent to the detergent dispenser drawer. If desired, add bleach or fabric softener to the appropriate areas of the dispenser.
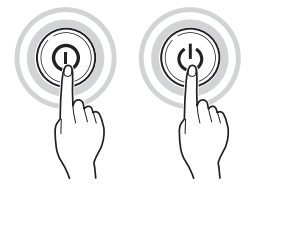
3. Turn on the washing machine.
- Press the Power button to turn on the washing machine.
4. Choose the desired washing cycle.
- Press the cycle button repeatedly or turn the cycle selector knob until the desired cycle is selected.
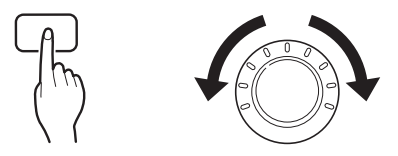
5. Begin cycle.
- Press the Start/Pause button to begin the cycle. The washing machine will agitate briefly without water to measure the weight of the load. If the Start/Pause button is not pressed within 5 minutes, the washing machine will shut off and all settings will be lost.

6. End of cycle.
- When the cycle is finished, a melody will sound. Immediately remove your clothing from the washing machine to reduce wrinkling. Check around the door seal when removing the load for small items that may be caught in the seal.
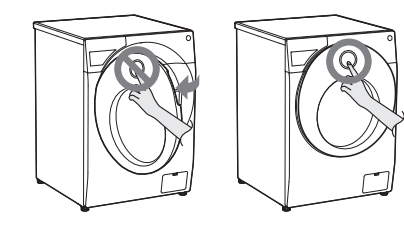
NOTE: The button cannot be recognized when the door is open. Press again after closing the door.
Sorting Laundry
1. Look for a care label on your clothes.
- This will tell you about the fabric content of your garment and how it should be washed.
- Symbols on the care labels.
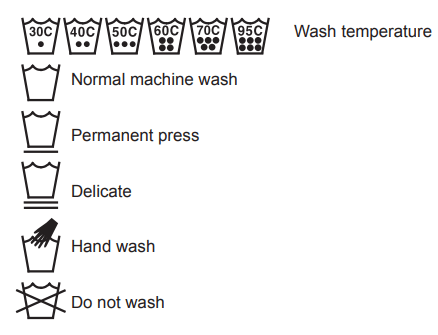
2. Sorting laundry.
- To get the best results, sort clothes into loads that can be washed with the same wash cycle.
- Different fabrics need to be washed at varying temperatures and spin speeds.
- Always sort dark colours from pale colours and whites. Wash separately as dye and lint transfer can occur causing discolouration of white and pale garments. If possible, do not wash heavily soiled items with lightly soiled ones. −Soil (Heavy, Normal, Light) : Separate clothes according to amount of soil.
- Colour (White, Lights, Darks): Separate white fabrics from coloured fabrics.
- Lint (Lint producers, Collectors): Wash lint producers and lint collectors separately
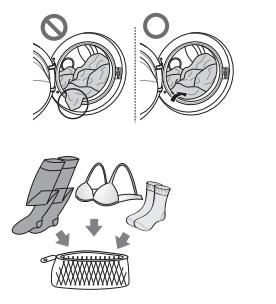
3 Caring before loading.
- Combine large and small items in a load. Load large items first.
- Large items should not be more than half the total wash load. Do not wash single items. This may cause an unbalanced load. Add one or two similar items.
- Check all pockets to make sure that they are empty. Items such as nails, hair clips, matches, pens, coins and keys can damage both your washing machine and your clothes.
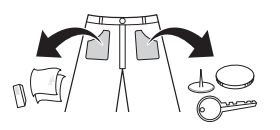
- Close zippers, hooks and strings to make sure that these items don’t snag on other clothes.
- Pre-treat dirt and stains by brushing a small amount of detergent dissolved water onto stains to help lift dirt.
CAUTIONl Check inside the drum and remove any items from a previous wash.
Adding Cleaning Products
Detergent Dosage
- Detergent should be used according to the instruction of the detergent manufacturer and selected according to type, colour, soiling of the fabric and washing temperature.
- If too much detergent is used, too many suds can occur and this will result in poor washing results or cause heavy load to the motor.
- If you wish to use liquid detergent follow the guidelines provided by the detergent manufacturer.
- You can pour liquid detergent directly into the main detergent drawer if you are starting the cycle immediately.
- Do not use liquid detergent if you are using Time delay, or if you have selected Pre Wash, as the liquid may harden.
- If too many suds occur, reduce the detergent amount.
- Detergent usage may need to be adjusted for water temperature, water hardness, size and soil level of the load. For best results, avoid oversudsing.
- Refer to the label of the clothes, before choosing the detergent and water temperature.
- When using the washing machine, use designated detergent for each type of clothing only:
- General powdered detergents for all types of fabric
- Powdered detergents for delicate fabric
- Liquid detergents for all types of fabric or designated detergents only for wool
- For better washing performance and whitening, use detergent with the general powdered bleach.
- Detergent is flushed from the dispenser at the beginning of the cycle.
Adding Detergent and Fabric Softener
Adding Detergent
- Main wash only →

- Pre wash+Main wash →

Adding Fabric Softener
- Do not exceed the maximum fill line. Overfilling can cause early dispensing of the fabric softener, which may stain clothes. Close the dispenser drawer slowly.
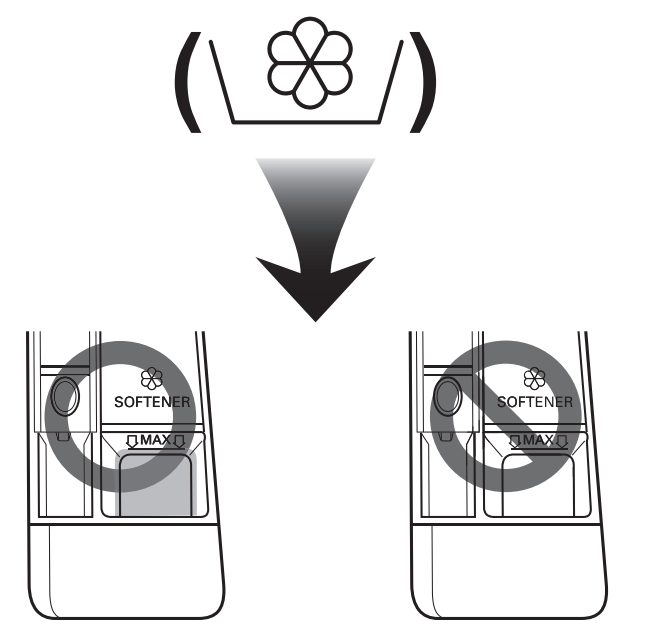
- Do not leave the fabric softener in the detergent drawer for more than 2 days (Fabric softener may harden).
- Softener will automatically be added during the last rinse cycle.
- Do not open the drawer when water is being supplied.
- Solvents (benzene, etc.) must not be used.
Adding Water Softener
- A water softener, such as anti-limescale (e.g. Calgon) can be used to cut down on the use of detergent in extremely hard water areas. Dispense according to the amount specified on the packaging. First add detergent and then the water softener.
- Use the quantity of detergent required for soft water.
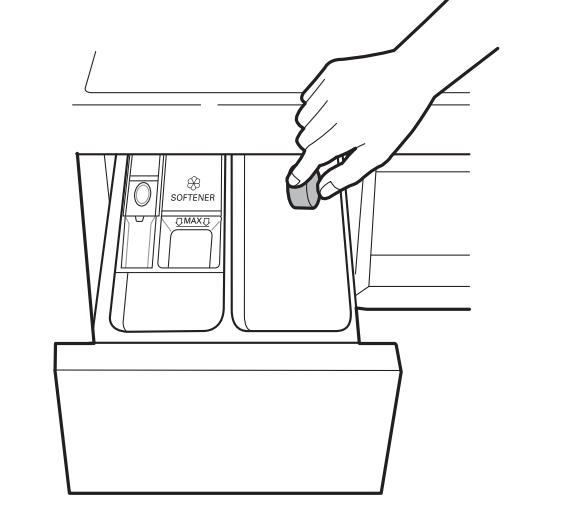
Using Tablet
1. Open the door and put tablets into the drum.
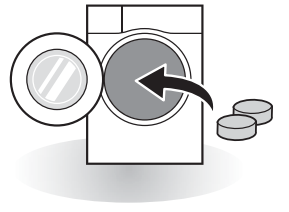
2. Load the laundry into the drum and close the door.
Control Panel
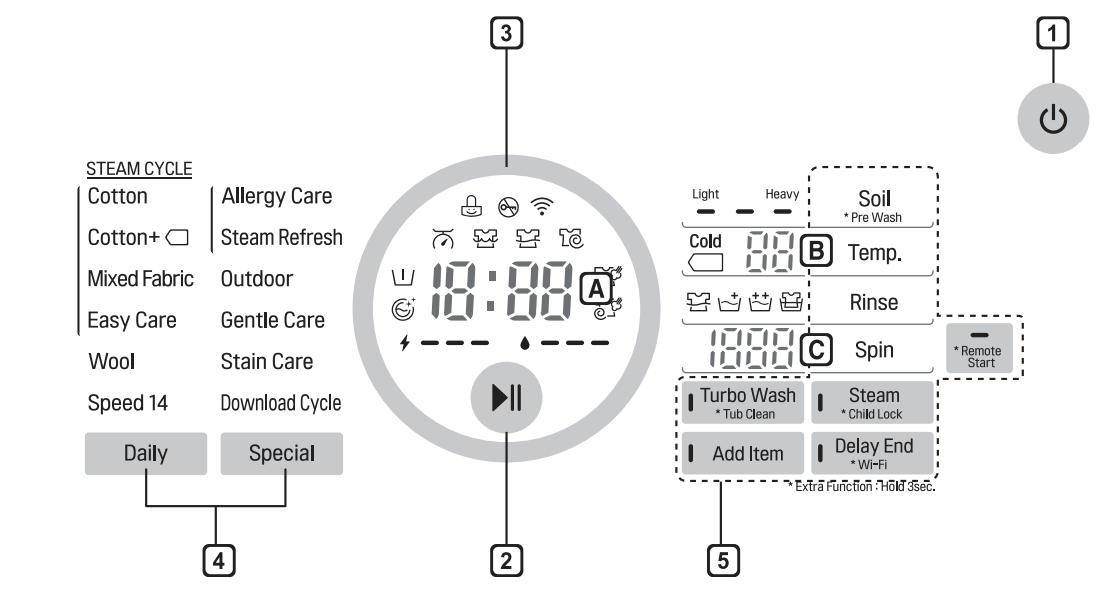
- Power Button
- Press the Power button to turn the washing machine on.
2. Start/Pause Button
- This Start/Pause button is used to start the wash cycle or pause the wash cycle.
- If a temporary stop of the wash cycle is needed, press the Start/Pause button.
3. Display
- The display shows the settings, estimated time remaining, options, and status messages. When the product is turned on, the default settings in the display will illuminate.
- The estimated energy(
 ) and water (
 ) consumptions are displayed before washing and the actual consumptions after washing.
  : The display shows estimate time remaining. While the size of the load is being calculated automatically, blinking
  or ‘Detecting’ appears.
 : The water temperature is displayed when pressing
- he Temp. button.
 : The spin speed level is displayed when pressing the Spin button
4. Programme Button
- Programmes are available according to laundry type.
- Lamp will light up to indicate the selected programme.
5. Options
- This allows you to select an additional programme and will light when selected.
- Use these buttons to select the desired programme options for the selected cycle
Option Programme
Delay End
You can set a time delay so that the washing machine will start automatically and finish after a specified time interval.
- Press the Power button.
- Select a washing programme.
- Press the Delay End button and set the estimated end time required.
- Press the Start/Pause button.
Turbo Wash
Wash cycle in under 1 hour with energy and water saving. (based on half of laundry)
- Press the Power button.
- Select a washing programme.
- Press the Turbo Wash button.
- Press the Start/Pause button.
Steam (Optional)
Steam Wash features enhanced washing performance with low energy consumption. Steam Softener sprays steam after a spinning cycle to reduce creases and make the laundry fluffy.
- Press the Power button.
- For Steam Wash option, select steam programmes. For Steam Softener option, select Cotton or Cotton+, Mixed Fabric, Easy Care.
- The following programme is selected depending on the number of times you press the Steam button.
- Once: Steam Wash
- Twice: Steam Softener
- Three times: Steam Wash and Steam Softener
- Press the Start/Pause button.
Steam Wash ( )
)
For heavily stained clothes, underwear or baby clothes.
Available with the Cotton, Cotton+, Mixed Fabric, Easy Care, Allergy Care, Steam Refresh programmes.
Do not use Steam Wash for easily discoloured clothes and delicates such as wool, silk.
Steam Softener ( )
)
- Good to soften and fluff fabrics after air drying.
- Available with the Cotton, Cotton+, Mixed Fabric, Easy Care programmes.
- Do not use Steam Softener for easily discoloured clothes and delicates such as wool, silk.
- Depending on the kind of fabric, softening performance may be different.
Add Item
Laundry can be added or removed after the washing programme is started.
- Press the Add Item button when the LED is turned on.
- Open the door after door lock is released.
- Add or remove laundry.
- Press the Start/Pause button again to continue the cycle. The cycle continues automatically
Remote Start
Use a smart phone to control your appliance remotely. You can also monitor your cycle operation so you know how much time is left in the cycle.
To Use Remote Start:
- Press the Power button.
- Put the laundry in drum.
- Press and hold Remote Start button for 3 seconds to enable Remote Start function.
- Start a cycle from the LG Smart ThinQ application on your smart phone.
To Disable Remote Start: When the Remote Start is activated, press and hold Remote Start button for 3 seconds.
Pre Wash ( )
)
If the laundry is heavily soiled, the Pre Wash programme is recommended.
- Press the Power button.
- Select a washing programme.
- Press and hold the Pre Wash button for 3 seconds.
- Press the Start/Pause button.
Soil
- Press the Power button.
- Select a washing programme.
- Press the Soil button.
- Press the Start/Pause button.
Temp.
The Temp. button selects the wash and rinse temperature combination for the selected programme. Press this button until the desired setting is lit. All rinses use cold tap water.
- Select the water temperature suitable for the type of load you are washing. Follow the garment fabric care labels for best results.
Rinse (  )
)
- Rinse+ (
 ): Add rinse once.
 - Rinse++(
 ): Add rinse twice.
 - Rinse Hold(
 ): The course is paused until start button is pressed again when rinse is finished.
Spin
- Spin speed level can be selected by pressing the Spin button repeatedly.
- Spin Only
1. Press the Power button.
2. Press the Spin button to select RPM.
3. Press the Start/Pause button.
Child Lock (  )
)
Use this option to disable the controls. This feature can prevent children from changing cycles or operating the appliance
Locking the Control Panel :
- Press and hold the Child Lock button for three seconds.
- A beeper will sound, and
 will appear on the display. When the Child Lock is set, all buttons are locked except the Power button.
Unlocking the Control Panel: Press and hold the Child Lock button for three seconds.
- A beeper will sound and the remaining time for the current programme will reappear on the display.
Beep On / Off
- Press the Power button.
- Press the Start/Pause button.
- Press and hold the Soil and Temp. button simultaneously for 3 seconds to set the Beep on/off function.
Wi-Fi( )
)
- Set the Wi-fi connection. When Wi-Fi is connected, the Wi-Fi icon on the control panel is lit.
SMART FUNCTIONS EN
Using Smart ThinQ Application
Installing Smart ThinQ
- Search for the LG Smart ThinQ application from the Google Play Store or Apple App Store on a smart phone. Follow instructions to download and install the application.
Wi-Fi Function
- For appliances with the
 or
or  logo Communicate with the appliance from a smart phone using the convenient smart features.
Washer Cycle
- Set or download any preferred cycle and operate by remote control.
Tub Clean Coach
- Check the appropriate Tub Clean period by washing frequency.
Energy Monitoring
- Check the energy consupmtion of the recently used cycles and monthly average.
Smart Diagnosis
- This function provides useful information for diagnosing and solving issues with the appliance based on the pattern of use.
Settings
- Various functions are available.
Push Alert
- Turn on the Push Alerts to receive appliance status notifications. The notifications are triggered even if the LG Smart ThinQ application is off.
Smart Diagnosis™ Using a Smart Phone
- For appliances with the
 or
or  logo
logo
Use this function if you need an accurate diagnosis by an LG Electronics customer information centre when the appliance malfunctions or fails.
Smart Diagnosis™ can not be activated unless the appliance is connected to power. If the appliance is unable to turn on, then troubleshooting must be done without using Smart Diagnosis™.
Using Smart Diagnosis™
Smart Diagnosis™ Through the Customer Information Centre
Use this function if you need an accurate diagnosis by an LG Electronics customer information center when the appliance malfunctions or fails. Use this function only to contact the service representative, not during normal operation.
1. Press the Power button to turn on the washing machine. Do not press any other buttons or turn the programme knob.
2. When instructed to do so by the call center, place the mouthpiece of your phone close to the Power button.
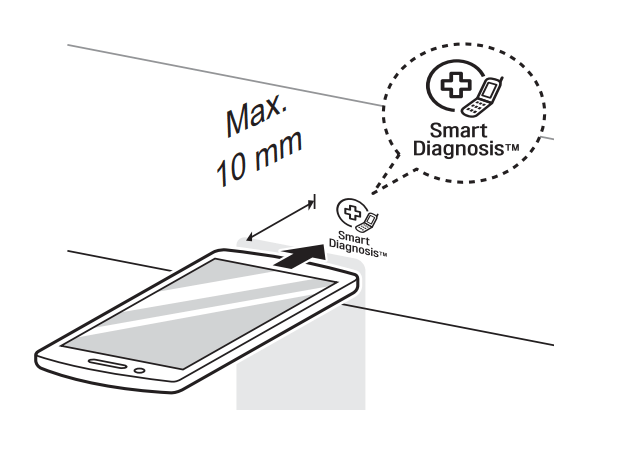
3. Press and hold the Temp. button for 3 seconds, while holding the phone mouthpiece to the icon or Power button.
4. Keep the phone in place until the tone transmission has finished. Time remaining for data transfer is displayed.
- For best results, do not move the phone while the tones are being transmitted.
- If the call centre agent is not able to get an accurate recording of the data, you may be asked to try again.
5. Once the countdown is over and the tones have stopped, resume your conversation with the call centre agent, who will then be able to assist you using the information transmitted for analysis.
MAINTENANCE
WARNING
- Unplug the washing machine before cleaning to avoid the risk of electric shock. Failure to follow this warning may result in serious injury, fire, electric shock, or death.
- Never use harsh chemicals, abrasive cleaners, or solvents to clean the washing machine. They may damage the finish.
Cleaning Your Washing Machine
Care After Wash
- After the cycle is finished, wipe the door and the inside of the door seal to remove any moisture.
- Leave the door open to dry the drum interior.
- Wipe the body of the washing machine with a dry cloth to remove any moisture.
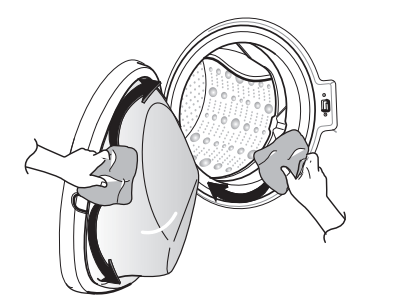
Cleaning the Exterior
Proper care of your washing machine can extend its life.
Door:
- Wash with a damp cloth on the outside and inside and then dry with a soft cloth.
Exterior:
- Immediately wipe off any spills.
- Wipe with a damp cloth.
- Do not press the surface or the display with sharp objects.
Cleaning the Interior
- Use a towel or soft cloth to wipe around the washing machine door opening and door glass.
- Always remove items from the washing machine as soon as the cycle is complete. Leaving damp items in the washing machine can cause wrinkling, colour transfer, and odour.
- Run the Tub Clean programme once a month (or more often if needed) to remove detergent buildup and other residue
Cleaning the Water Inlet Filter
- Turn off the supply taps to the machine if the washing machine is to be left for any length of time (e.g. holiday), especially if there is no floor drain (gully) in the immediate vicinity.
 icon will be displayed on the control panel when water is not entering the detergent drawer.
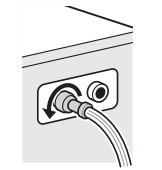
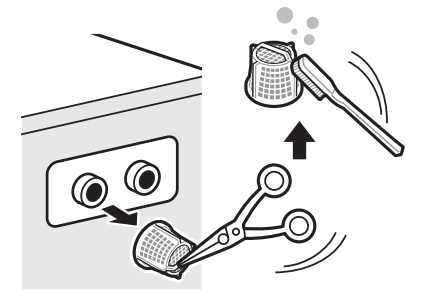
- If water is very hard or contains traces of lime deposit, the water inlet filter may become clogged. It is therefore a good idea to clean it occasionally.
1. Turn off the water tap and unscrew the water supply hose.
2. Clean the filter using a hard bristle brush.
Cleaning the Drain Pump Filter
- The drain filter collects threads and small objects left in the laundry. Check regularly that the filter is clean to ensure smooth running of your washing machine.
- Allow the water to cool down before cleaning the drain pump, carrying out emergency emptying, or opening the door in an emergency.
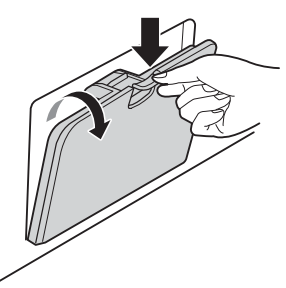
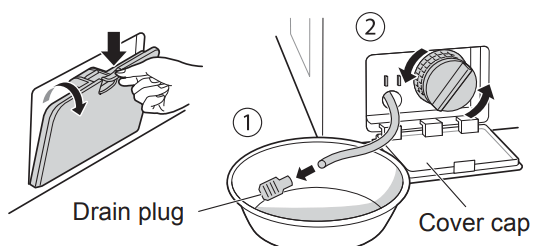
1. Open the cover cap and pull out the hose.
2. Unplug the drain plug and open the filter by turning it to the left.
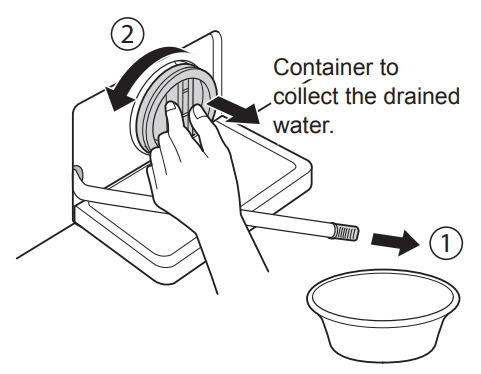
3. Remove any extraneous matter from the pump filter.
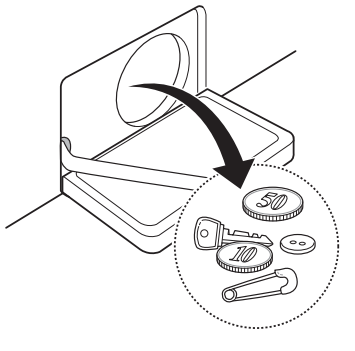
4. After cleaning, turn the pump filter and insert the drain plug.
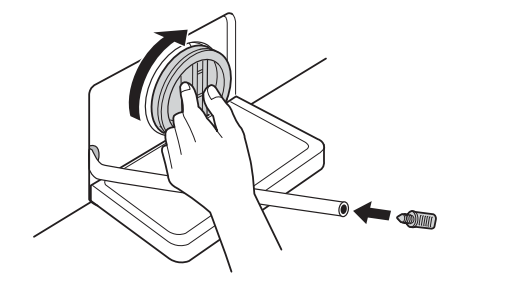
5. Close the cover cap.
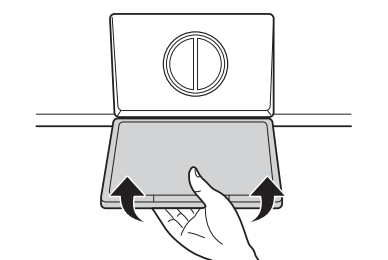
CAUTION
- First drain using the drain hose and then open the pump filter to remove any threads or objects.
- Be careful when draining, as the water may be hot.
Cleaning the Dispenser Drawer
Detergent and fabric softener may build up in the dispenser drawer. Remove the drawer and inserts and check for buildup once or twice a month.
1. Remove the detergent dispenser drawer by pulling it straight out until it stops.
- Press down hard on the disengage button and remove the drawer.
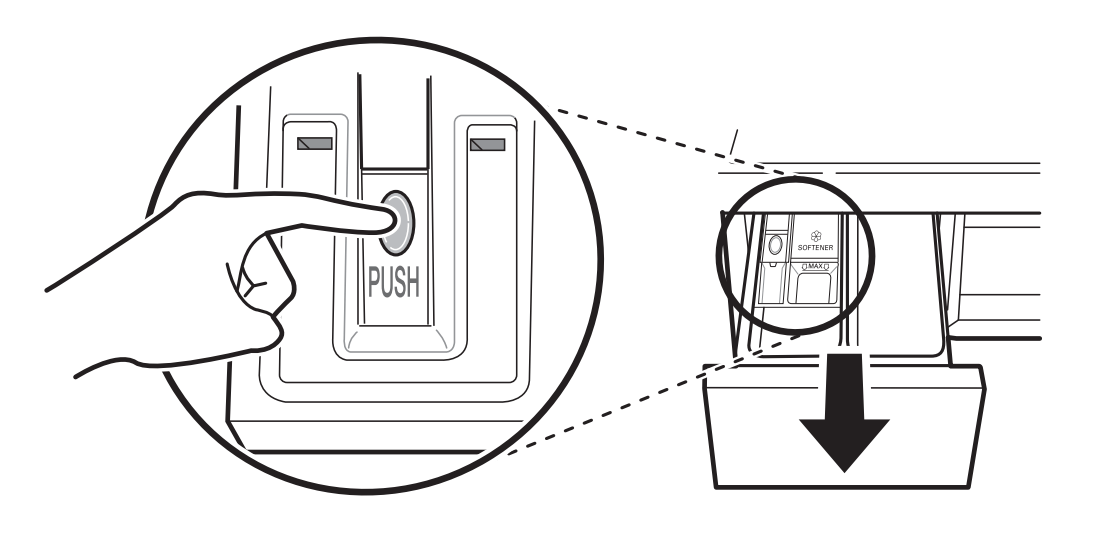
2. Remove the inserts from the drawer.
- Rinse the inserts and the drawer with warm water to remove buildup from laundry products. Use only water to clean the dispenser drawer. Dry the inserts and drawer with a soft cloth or towel.
3. To clean the drawer opening, use a cloth or small, non-metal brush to clean the recess.
- Remove all residue from the upper and lower parts of the recess.
4. Wipe any moisture off the recess with a soft cloth or towel.
5. Return the inserts to the proper compartments and replace the drawer
Tub Clean (Optional)
Tub Clean is a special programme to clean the inside of the washing machine.
A higher water level is used in this programme at higher spin speed. Perform this programme regularly.
- Remove any clothing or items from the washing machine and close the door.
- Open the dispenser drawer and add antilimescale (e.g. Calgon) to the main wash compartment.
- For tablets put into the drum.
- Close the dispenser drawer slowly.
- Power on and then press and hold Tub Clean button for 3 seconds. Then
 will be displayed on the display.
 - Press the Start/Pause button to start.
- After the programme is complete, leave the door open to allow the washing machine door opening, gasket and door glass to dry.
CAUTION: If there is a child, be careful not to leave the door open for too long.
NOTE: Do not add any detergent to the detergent compartments. Excessive suds may generate and leak from the washing machine.
Caution on Freezing During Winter
- When frozen, the product does not operate normally. Make sure to install the product where it will not freeze during winter.
- In case the product must be installed outside on a porch or in other outdoor conditions, make sure to check the following.
How to Keep the Product from Freezing
- After washing, remove water remaining inside the pump completely with the opening hose plug used for removal of residual water. When the water is removed completely, close the hose plug used for removal of residual water and cover cap.
- Hang down drain hose to pull out water inside the hose completely
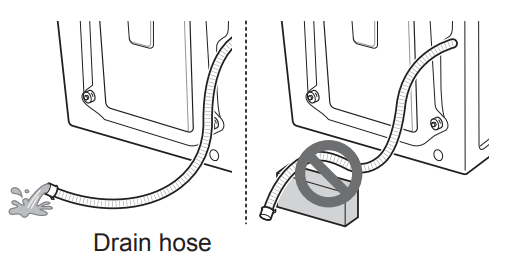
CAUTION: When the drain hose is installed in a curved shape, the inner hose may freeze.
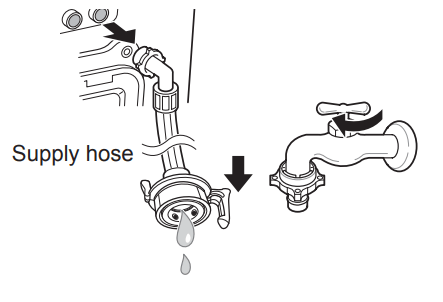
- After closing the tap, disconnect the cold supply hose from the tap, and remove water while keeping the hose facing downwards.
Check for Freezing
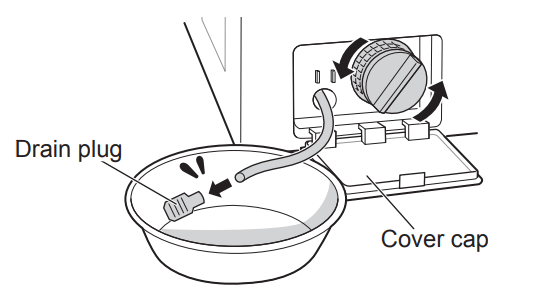
- If water does not drain when opening the hose plug used for removal of residual water, check the drainage unit.
- Turn the power on, choose a washing programme, and press the Start/Pause button.
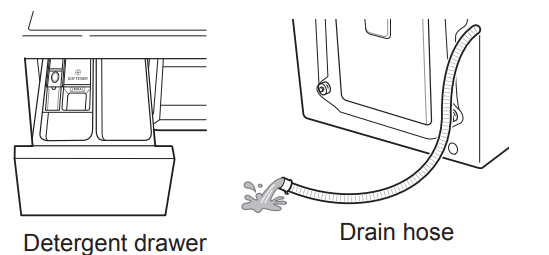
- When '
 ' is shown in display window while the product is in operation, check water supply unit and drainage unit (Some models do not have an alarm function that indicates freezing).
NOTE: Check that water is coming into the detergent drawer while rinsing, and water is draining through the drain hose while spinning.
How to Handle Freezing
- Make sure to empty the drum, pour warm water of 50–60 °C up to the rubber part inside the drum, close the door, and wait for 1–2 hours.
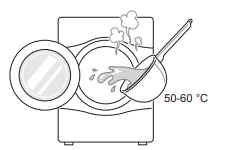
CAUTION: When the drain hose is installed in a curved shape, the inner hose may freeze.
- Open the cover cap and hose plug used for removal of residual water to extract water completely.
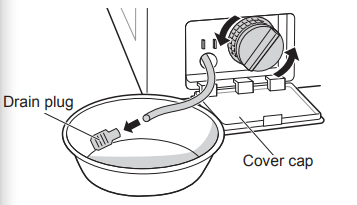
NOTE: If water does not drain, this means the ice is not melted completely. Wait more.
- When water is removed completely from the drum, close the hose plug used for removal of residual water, choose a washing programme, and press the Start/Pause button.
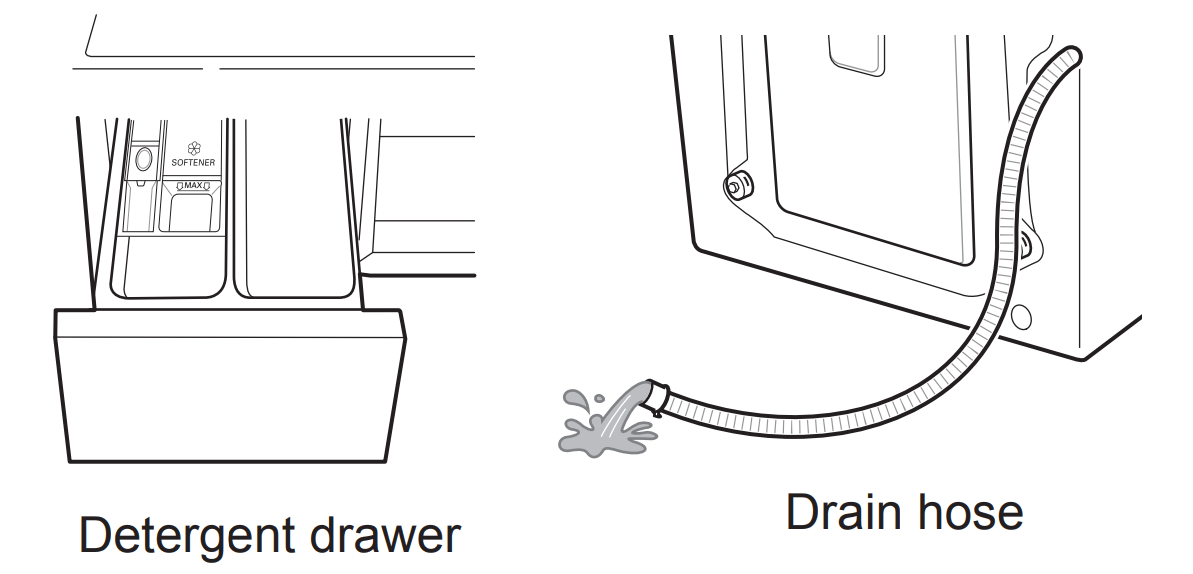
NOTE: Check that water is coming into the detergent drawer while rinsing, and water is draining through the drain hose while spinning.
- When water supply problems occur, take the following measures.
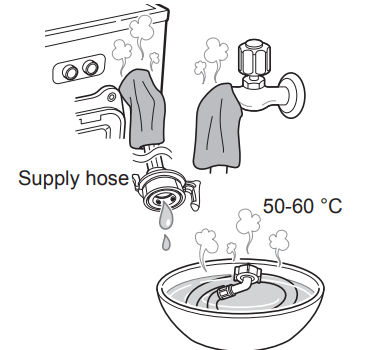
- Turn off the tap, and thaw out the tap and both connection areas of inlet hose of the product using a hot water cloth.
- Take out inlet hose and immerse in warm water below 50–60 °C.
TROUBLESHOOTING
Your washing machine is equipped with an automatic error-monitoring system to detect and diagnose problems at an early stage. If your washing machine does not function properly or does not function at all, check the following before you call for service:
Diagnosing Problems
Symptoms | Reason | Solution |
Rattling and clanking noise | Foreign objects such as coins or safety pins may be in drum or pump. |
|
Thumping sound | Heavy wash loads may produce a thumping sound. This is usually normal. |
|
Vibrating noise | Have all the transit bolts and tub support been removed? |
|
Are all the feet resting firmly on the ground? |
| |
Water leaks | Supply hoses or drain hose are loose at tap or washing machine. |
|
House drain pipes are clogged. |
| |
Oversudsing | Too much detergent or unsuitable detergent may cause excessive foaming which may result in water leaks. |
|
Water does not enter washing machine or it enters slowly | Water supply is not adequate in that location. |
|
Water supply tap is not completely open. |
| |
Water supply hose(s) are kinked. |
| |
The filter of the supply hose(s) clogged. |
| |
Water in the washing machine does not drain or drains slowly | Drain hose is kinked or clogged. |
|
The drain filter is clogged. |
| |
Washing machine does not start | Electrical power cord may not be plugged in or connection may be loose. |
|
House fuse blown, circuit breaker tripped,or a power outage has occurred. |
| |
Water supply tap is not turned on. |
| |
Washing machine will not spin | Check that the door is firmly shut. |
|
Door does not open | Once washing machine has started, the door cannot be opened for safety reasons. |
|
Wash cycle time delayed | If an imbalance is detected or if the suds removing programme is on, the wash time will increase. |
|
Fabric softener overflow | Too much softener may cause an overflow. |
|
Softeners dispensed too early | Too much softener may cause an premature dispensing. |
|
The buttons may not function properly. | The button cannot be recognized when the door is open. |
|
Dry problem | Check water supply tap. |
|
Odor | This odor is caused by the rubber attached to the washing machine. |
|
If the rubber door gasket and door seal area are not cleaned regularly, odors can occur from mold or foreign substances. |
| |
Odors can occur if foreign substances are left in the drainage pump filter. |
| |
Odors can occur if the drainage hose is not properly installed, causing siphoning (water flowing back inside the washing machine). |
| |
Using the dry function, odors can occur from lint and other laundry matter sticking to the heater. (Dryer model only) |
| |
A particular odor can occur from drying wet clothes with hot air. (Dryer model only) |
|
Error Messages
Symptoms | Reason | Solution |
| Water supply is not adequate in area. |
|
Water supply taps are not completely open. |
| |
Water supply hose(s) are kinked. |
| |
The filter of the supply hose(s) are clogged. |
| |
If water leakage occurred in the aqua stop supply hose, indicator May vary depending on the model. |
| |
 | Load is too small. |
|
Load is out of balance. |
| |
The appliance has an imbalance detection and correction system. If individual heavy articles are loaded (e.g. bath mat, bath robe, etc.) this system may stop spinning or even interrupt the spin cycle altogether. |
| |
If the laundry is still too wet at the end of the cycle, add smaller articles of laundry to balance the load and repeat the spin cycle. |
| |
| Drain hose is kinked or clogged. |
|
The drain filter is clogged. |
| |
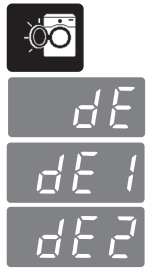 | Ensure door is not open. |
|
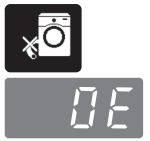
 | Door sensor has malfunctioned. | |
 | Control error. |
|
 | Water overfills due to the faulty water valve. |
|
| Malfunction of water level sensor. |
|
 | Over load in motor. |
|
 | Water leaks. |
|
 | Is supply/drain hose or drain pump frozen? |
|
 | Does not dry. |
|
See other models: GSL360ICEV F4J6JY2S F4J6TY1W GBB60PZJZS F4J5TN7S
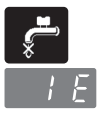
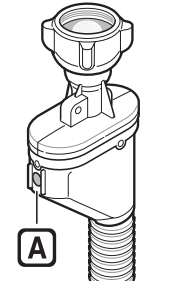 will become red.
 ,
,  ,
, ,
, is not released, call for service.
