Owner’s Manual
IMPORTANT SAFETY INSTRUCTIONS
READ AND SAVE THESE SAFETY INSTRUCTIONS BEFORE USING THIS FAN
When using electrical appliances, basic precautions should always be followed to reduce the risk of fire, electric shock, and injury to persons, including the following:
FOR US MODELS ONLY – This product employs overload protection (fuse). A blown fuse indicates an overload or short-circuit situation. If the fuse blows, unplug the product from the outlet. Replace the fuse as per the user servicing instructions (follow product marking for proper fuse rating) and check the product. If the replacement fuse blows, a short-circuit may be present and the product should be discarded or returned to an authorized service facility for examination and/or repair.
- Use this fan only as described in this manual. Other use not recommended as it may cause fire, electric shock or injury to persons.
- This product is intended for household use ONLY and not for commercial, industrial or outdoor use.
- To protect against electric shock, do not place fan in window, immerse unit, plug or cord in water or spray with liquids.
- This appliance has a polarized plug (one blade is wider than the other). To reduce the risk of shock, this plug is intended to fit only one way in a polarized outlet. If the plug does not fit fully in the outlet, reverse the plug. If it still does not fit, contact a qualified electrician. DO NOT attempt to defeat this safety feature.
- Close supervision is necessary when any appliance is used by or near children.
- Turn the fan OFF and unplug the fan from the outlet when not in use, when moving the fan from one location to another and before cleaning.
- To disconnect the fan, first turn the unit OFF, grip the plug and pull it from the wall outlet. Never pull the plug by the cord.
- Do not use an extension cord with this fan.
- Do not operate the fan in the presence of explosive and/or flammable fumes.
- Do not place the fan or any parts near an open flame, cooking or other heating appliance.
- Do not operate the fan with a damaged cord or plug or if the product malfunctions, is dropped or damaged in any manner (see warranty).
- Avoid contact with moving fan parts.
- The use of attachments not recommended by the manufacturer may be hazardous.
- Place the fan on a dry level surface.
- Do not hang or mount fan on a wall or ceiling.
- Do not operate if the fan housing is damaged.
- A loose fit between the AC outlet receptacle) and plug may cause overheating and a distortion of the plug. Contact a qualified electrician to replace loose or worn outlet.
- Do not operate any fan with a damaged cord or plug. Discard any damaged fan, return the fan to the retailer where the fan was purchased, or request a return authorization to return to Kaz USA, Inc. for examination and/or repair.
- Do not run fan cord under carpeting. Do not cover cord with throw rugs, runners, or similar coverings. Do not route cord under furniture or appliances. Arrange cord away from traffic areas and where it will not be tripped over.
WARNING: To Reduce The Risk of Fire or Electric Shock, Do Not Use This Fan With Any Solid-State Speed Control Device, other than the one supplied.
FUSED SAFETY PLUG - FOR US ONLY
This fan features a fused safety plug which is designed to cut off electric current to the fan if an electrical fault occurs. Please see below for more information on how to properly use your fan and replace the safety plug fuse, if needed.
USER SERVICING INSTRUCTIONS
- If your fan loses power and you suspect that the fuse on your fan has blown, grasp plug and remove from the receptacle or other outlet device. Do not unplug by pulling on cord.
- Slide fuse cover, located on the top of the plug, towards the prongs of the plug. (Fig. 1)
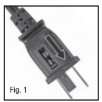
- Carefully remove the blown fuse and snap a new fuse into place.
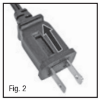
- To Reduce the Risk of Fire, replace fuse only with 2.5 Amp, volt fuse. Fully close the fuse door by sliding back into place. (Fig. 2) Discard the blown fuse. The plug should now be ready for normal use.
- To Reduce the Risk of Fire, do not replace attached plug. Contains a safety device (fuse) that should not be removed. Discard product if the attached plug is damaged.
- If you need further information on how or when to replace the fuse in the safety plug, please contact Kaz Consumer Relations Department by visiting our website at web honeywellpluggedin or calling 1-800-477-0457.
ASSEMBLY INSTRUCTIONS
A. BASE ASSEMBLY
Remove 2 thumb screws from the base and set aside. Align the front and back base pieces and gently push until pieces snap securely together (Fig. 3).

B. SECURING THE TOWER FAN TO THE BASE
- At the base of the housing, remove the locking nut and set aside.
- Carefully lift the fan housing (Fig. 4) and place the power cord through the center of the base.
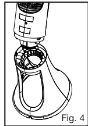
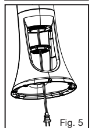
- Lower the fan housing into the base (Fig. 4), align the back of the fan with the back of the base. Gently rotate the fan housing until it is seated in the base. (Fig. 5).
- Take the locking nut and place power cord through the locking nut (Fig 4) bringing locking nut up inside the base, (Fig. 5) screw the locking nut onto the fan housing turning clockwise until fully tightened and an audible ratcheting is heard.
D. SECURING THE CORD INSIDE THE BASE
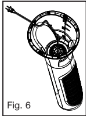
- Gently place the fan on its side, pressing the cord securely into cord guides (Fig. 6) along the inside of fan base, exiting through the notched opening (Fig. 6) ensuring a flat and stable base for the fan.
- Place 2 thumb screws into the the base for added stability (Fig. 7).
- Return the tower fan to its upright position.
Note: Do not operate the tower fan unless it is in its proper, upright position.

REMOTE CONTROL BATTERY INSTALLATION/REPLACEMENT INSTRUCTIONS
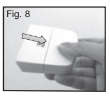
A. Remove battery door by sliding downward in direction of arrow (Fig. 8).
B. Insert 2 AAA batteries into the remote following the directional guides in the recessed slots. Batteries are included.
C. Replace battery door by sliding upward opposite of arrow direction until door snaps in place.
NOTE: DO NOT MIX OLD AND NEW BATTERIES. DO NOT MIX ALKALINE, STANDARD (CARBON-ZINC) OR RECHARGEABLE (NICKEL-CADMIUM) BATTERIES.
SEE RECYCLERS IN YOUR AREA FOR PROPER DISPOSAL OF BATTERIES.
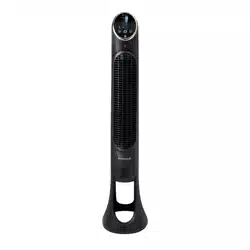
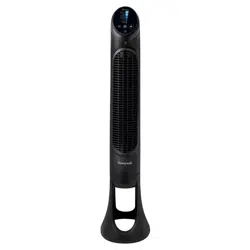
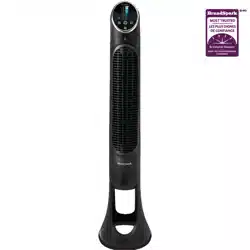
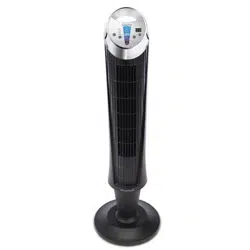
HYF290 SERIES FAN OPERATION
ON/OFF
To turn fan on, press the Power button ( ) located on the bottom center of the control panel.
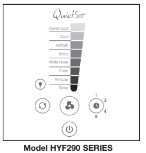
SPEED CONTROL
The fan will automatically start on “Sleep” speed when initially turned on. To adjust the speed up or down, press the Fan Speed button ( ) repeatedly to increase level.
OSCILLATION
To activate the Oscillation feature, press the Oscillation button ( ) once. Press the Oscillation button again to turn the Oscillation feature off.
TIMER
Choose from 1, 2, 4, or 8 hour settings by performing the following function:
- 1 hour: Press the Timer button (
 ) once.
- 2 hours: Press the Timer button twice.
- 4 hours: Press the Timer button a third time.
- 8 hours: Press the Timer button a fourth time.
Press the Timer button a fifth time to turn the Timer feature off.
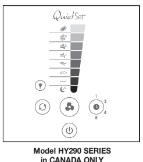
HYF290 SERIES NIGHTTIME LIGHT DIMMING FEATURE
Each time the fan is powered on ( ) the control panel light will be set at brightness.
Choose from 5 settings for your control panel lighting preference:
- Press the Light button (
 ) once for 75% brightness.
- Press the Light button (
 ) twice for 50% brightness.
- Press the Light button (
 ) a third time for 25% brightness.
- Press the Light button () a fourth time for no light.
- Press the Light button ( ) a fifth time for100% brightness.
HYF290 SERIES REMOTE CONTROL OPERATION
ON/OFF
Press the Power button ( ) once to turn the fan on. Press the Power button a second time to turn the fan off.
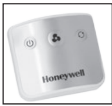
SPEED CONTROL
The fan will automatically start on “Sleep” speed when initially turned on. To adjust the speed up or down, press the Fan Speed button () repeatedly to increase level.
OSCILLATION
To activate the Oscillation feature, press the Oscillation button () once. Press the Oscillation button again to turn the Oscillation feature off.
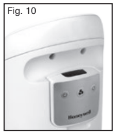
REMOTE CONTROL STORAGE
When it is not in use, the remote control may be stored in the recessed area located behind the controls (Fig. 10).
USER SERVICING INSTRUCTIONS
CLEANING AND STORAGE
- Ensure the fan is turned off and unplugged.
- Use only a soft cloth to gently wipe the outer surfaces of the fan clean.
- To clean between the grills and fan blade area, we recommend using a pipe cleaner, flexible dust wand, vacuum cleaner or compressed air to gently remove the dust.
- To clean the rear grill use a soft dry cloth.
- DO NOT immerse the fan in water and never allow water to drip into the motor housing.
- DO NOT use gasoline, paint thinner or other chemicals to clean the fan.
- For storage, you may leave the fan assembled and covered to protect it from dust. Store the fan in a cool, dry place.
THIS DEVICE (HYF260 and HYF290 SERIES ONLY) COMPLIES WITH PART 15 OF THE FCC RULES
NOTE: This equipment has been tested and found to comply with the limits for a Class B digital device, pursuant to Part 15 of the FCC Rules. These limits are designed to provide reasonable protection against harmful interference in a residential installation. This equipment generates, uses, and can radiate radio frequency energy and, if not installed and used in accordance with the instructions, may cause harmful interference to radio communications. However, there is no guarantee that interference will not occur in a particular installation. If this equipment does cause harmful interference to radio or television reception, which can be determined by turning the equipment off and on, the user is encouraged to try to correct the interference by one or more of the following measures:
- Reorient or relocate the receiving antenna.
- Increase the separation between the equipment and receiver.
- Connect the equipment into an outlet on a circuit different from that to which the receiver is connected.
- Consult the dealer or an experienced radio TV technician for help.
Please note that changes or modifications of this product not expressly approved by the party responsible for compliance could void the user’s authority to operate the equipment.
1 - YEAR LIMITED WARRANTY
You should first read all instructions before attempting to use this product.
A. This 1 year limited warranty applies to repair or replacement of product found to be defective in material or workmanship. This warranty does not apply to damage resulting from commercial, abusive, unreasonable use or supplemental damage. Defects that are the result of normal wear and tear will not be considered manufacturing defects under this warranty. KAZ USA, INC. IS NOT LIABLE FOR INCIDENTAL OR CONSEQUENTIAL DAMAGES OF ANY NATURE. ANY IMPLIED WARRANTY OF MERCHANTABILITY OR FITNESS FOR A PARTICULAR PURPOSE ON THIS PRODUCT IS LIMITED IN DURATION TO THE DURATION OF THIS WARRANTY. Some jurisdictions do not allow the exclusion or limitation of incidental or consequential damages or limitations on how long an implied warranty lasts, so the above limitations or exclusions may not apply to you. This warranty gives you specific legal rights, and you also may have other rights which vary from jurisdiction to jurisdiction. This warranty applies only to the original purchaser of this product from the original date of purchase.
B. At its option, Kaz will repair or replace this product if it is found to be defective in material or workmanship. Defective product should be returned to the place of purchase in accordance with store policy. Thereafter, while within the warranty period defective product may be returned to Kaz.
C. This warranty does not cover damage resulting from any unauthorized attempts to repair or from any use not in accordance with the instruction manual.
D. Return defective product to Kaz, Incorporated with a brief description of the problem. Include proof of purchase and a $10 US/$15.50 CAN check or money order for handling, return packing and shipping charges. Please include your name, address and a daytime phone number. All returns should have their assigned Return Authorization number clearly marked. You must prepay shipping charges. Send to:
In U.S.A.:
Attn: Returns Department
Helen Of Troy Plaza
El Paso, TX 79912
USA
In Canada:
Kaz Canada, Inc.
Attn: Returns Department
Bronte Street South
Milton, ON L9T 2X6
Canada
Please go to web honeywellpluggedin and register your product under the Customer Care Center and receive product information updates and new promotional offers.