Throughout this manual, features and appearance may vary from your model.
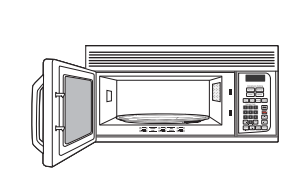
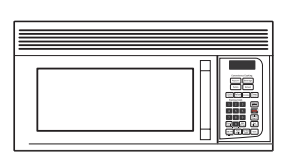
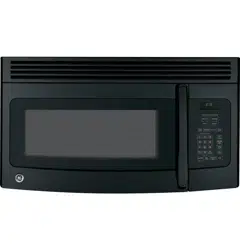
Features of the Oven
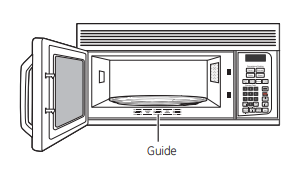
1 Door Handle. Pull to open the door. The door must
be securely latched for the microwave to operate.
2 Door Latches.
3 Window with Metal Shield. Screen allows cooking to be viewed while keeping microwaves confined in the oven.
4 Touch Control Panel.
5 Cooktop Light.
6 Grease Filter.
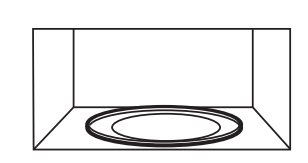
7 Removable Turntable.
Turntable and support must be in place when using the oven. The turntable may be removed for cleaning.
8 Convenience Guide
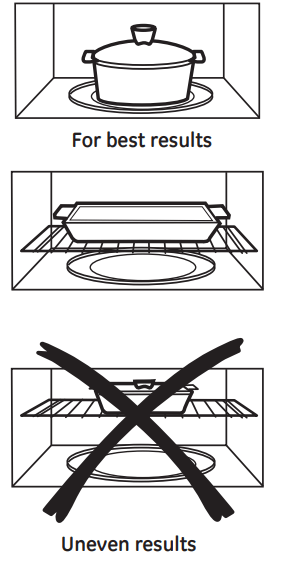
9 Shelf (on some models). Lets you microwave several foods at once. Food microwaves best when placed directly on the oven floor or turntable.
10 Rating Plate.
NOTE: Oven vent(s) and oven light are located on the inside walls of the microwave oven.
Cooking Controls
GUIDE ON MICROWAVE
Before you begin, check the guide located on the inside front of the oven when you open the door.
Quick Start
Time Features
Press
Enter
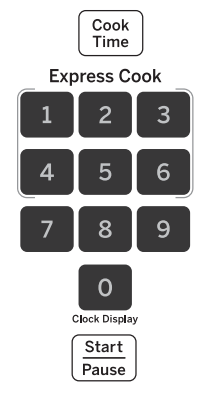
Cook Time I & II (Press once or twice)
Amount of cooking time
Defrost Weight/Time
Press twice
Amount of defrosting time
Express Cook
Press number pads (1-6)
Starts Immediately!
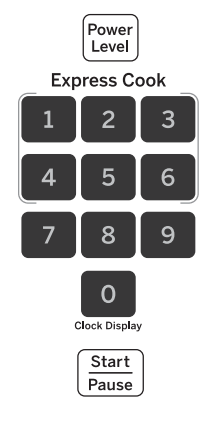
Power Level
Power level 1 to 10
Add 30 Sec
Starts Immediately!
Convenience Features
Press
Enter
Options
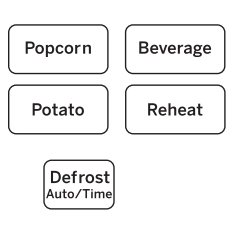
Popcorn
Starts immediately!
more/less time
serving size
Beverage
Starts immediately!
serving size
Reheat
(See Reheat Guide)
serving size
Potato
Starts Immediately!
serving size
Defrost Weight/Time
Press once
Food weight
serving size
Changing the Power Level
The power level may be entered or changed immediately after entering the feature time for Cook Time, Time Defrost, Add 30 Sec or Express Cook. The power level may also be changed during the time countdown.
Press Cook Time or Time Defrost.
Enter cooking or defrosting time
Press Power Level.
Select desired power level 1-10.
Press Start/Pause. Pressing Start/Pause is not necessary for Express Cook buttons.
Variable power levels add flexibility to microwave cooking. The power levels on the microwave oven can be compared to the surface units on a range. High power (power level 10) or full power is the fastest way to cook and gives you 100% power. Each power level gives you microwave energy a certain percent of the time. Power level 7 is microwave energy 70% of the time. Power level 3 is energy 30% of the time.
Power Level 10 will cook faster but food may need more frequent stirring, rotating or turning over. A lower setting will cook more evenly and need less stirring or rotating of the food.
Some foods may have better flavor, texture or appearance if one of the lower settings is used. Use a lower power level when cooking foods that have a tendency to boil over, such as scalloped potatoes.
Rest periods (when the microwave energy cycles off) give time for the food to "equalize" or transfer heat to the inside of the food. An example of this is shown with power level 3—the defrost cycle. If microwave energy did not cycle off, the outside of the food would cook before the inside was defrosted.
Here are some examples of uses for various power levels:
Power Level 10: Fish, bacon, vegetables, boiling liquids.
Power Level 7: Gentle cooking of meat and poultry; baking casseroles and reheating.
Power Level 5: Slow cooking and tenderizing for stews and less tender cuts of meat.
Power Level 2 or 3: Defrosting; simmering; delicate sauces.
Power Level 1: Keeping food warm; softening butter.
About the time features.
Cook Time I
Allows you to microwave for any time up to 99 minutes and 99 seconds.
Power level 10 (high) is automatically set, but you may change it for more flexibility.
Press Cook Time.
Enter cooking time.
Change power level if you don't want full power. (Press Power Level. Select a desired power level 1-10.)
Press Start/Pause.
You may open the door during Cook Time to check the food. Close the door and press Start/Pause to resume cooking.
Cook Time II
Lets you change power levels automatically during cooking. Here's how to do it:
Press Cook Time.
Enter the first cook time.
Change the power level if you don't want full power. (Press Power Level. Select a desired power level 1-10.)
Press Cook Time again.
Enter the second cook time.
Change the power level if you don't want full power. (Press Power Level. Select a desired power level 1-10.)
Press Start/Pause.
At the end of Cook Time I, Cook Time II counts down.
Cooking Guide for Cook Time
NOTE: Use power level 10 unless otherwise noted.
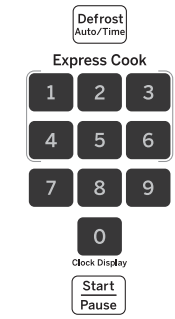
Time Defrost
Time Defrost allows you to defrost for a selected length of time. See the Defrosting Guide for suggested times. (Auto Defrost is explained in the Convenience Feature section.)
Press Defrost Auto/Time twice.
Enter defrosting time.
Press Start/Pause.
Turn food over when the oven signal.
Press Start/Pause.
Power level is automatically set at 3, but you may change this for more flexibility. You may defrost small items more quickly by raising the power level after entering the time. However, they will need more frequent attention than usual.
Power level 7 cuts the total defrosting time in about half; power level 10 cuts the total time to approximately 1/3. Rotate or stir food frequently. At one half of selected defrosting time, the oven signals TURN. At this time, turn food over and break apart or rearrange pieces for more even defrosting. Shield any warm areas with small pieces of foil.
A dull thumping noise may be heard during defrosting. This is normal when oven is not operating at High power.
Defrosting Tips
Foods frozen in paper or plastic can be defrosted in the package. Tightly closed packages should be slit, pierced or vented AFTER food has partially defrosted. Plastic storage containers should be partially uncovered.
Family-size, prepackaged frozen dinners can be defrosted and microwaved. If the food is in a foil container, transfer it to a microwave-safe dish.
Foods that spoil easily, such as milk, eggs, fish, stuffings, poultry and pork, should not be allowed to sit out for more than one hour after defrosting. Room temperature promotes the growth of harmful bacteria.
For more even defrosting of larger foods, such as roasts, use Defrost Weight.
Be sure large meats are completely defrosted before cooking.
Be sure large meats are completely defrosted before cooking.
When defrosted, food should be cool but softened in all areas. If still slightly icy, return to the microwave very briefly, or let it stand a few minutes.
Defrosting Guide
About the time features.
Popcorn
Use only with prepackaged microwave popcorn weighing 3.0 to 3.5 ounces.
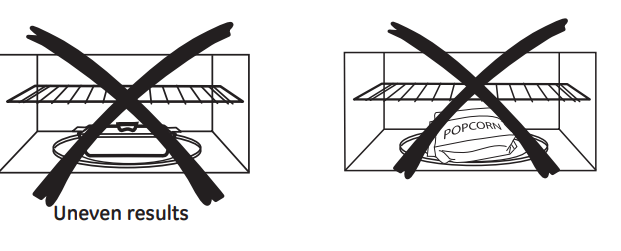
NOTE: Do not use the metal shelf when cooking popcorn.
To use the Popcorn feature:
Follow package instructions, using Cook Time if the package is less than 3.0 ounces or larger than 3.5 ounces. Place the package of popcorn in the center of the microwave.
Press Popcorn. The oven starts immediately. Tap Popcorn to select the bag size you are cooking.
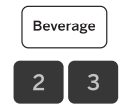
Beverage
To use the Beverage feature:
To use the Beverage feature:
The Beverage feature heats servings of any beverage.
Press Beverage. The oven starts immediately.
On some models, the serving size is automatically set at 1, but can be changed by pressing 2 or 3 right after pressing Beverage.
Drinks heated with the Beverage feature may be very hot. Remove the container with care.
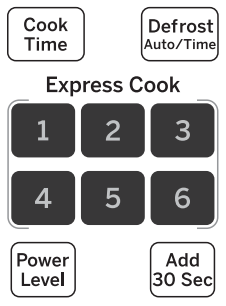
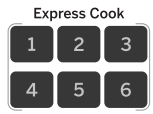
Express Cook
This is a quick way to set cooking time for 1-6 minutes.
Press one of the Express Cook pads (from 1 to 6) for 1 to 6 minutes of cooking at power level 10. For example, press the 2 pad for 2 minutes of cooking time.
The power level can be changed as time is counting down. Press POWER LEVEL and enter 1-10.
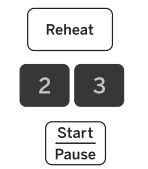
Reheat
To use the Reheat feature:
The Reheat feature reheats servings of many previously cooked foods.
Press Reheat.
Select food type 1-6 for one serving (see Reheat Guide below). On some models, the oven starts immediately.
On some models, press Start/Pause.
Press 2 or 3 to change the serving size.
NOTE: The serving size may be changed or added after the oven starts. Press number pad 2 or 3. On some models, the serving size for food type 6 cannot be changed.
Reheat Guide
Food Type
Comments
1 Pasta
Cover with lid or vented plastic wrap.
2 Meats
Cover with lid or vented plastic wrap.
3 Veggies
Cover with lid or vented plastic wrap.
4 Beverages
Works best with wide mouth mug - do not cover
5 Sauces
Cover with lid or vented plastic wrap.
6 Plate of Leftovers
Cover with lid or vented plastic wrap.
Potato
To use the Potato feature:
The Potato feature cooks up to four 8-10 ounce potatoes.
Press Potato once for one potato, twice for two potatoes, three times for three potatoes and four times for four potatoes. The oven will start immediately after Potato is pressed.
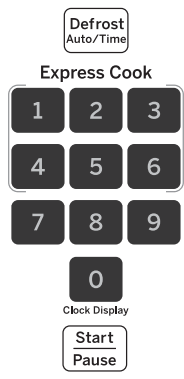
Auto Defrost
To use the Auto Defrost feature:
The Defrost Auto/Time feature gives you two ways to defrost frozen foods. Press DEFROST AUTO/TIME once for Auto Defrost or twice for Time Defrost.
Press Defrost Auto/Time once.
Using the Conversion Guide at right, enter food weight. For example, press pads 1 and 2 for 1.2 pounds (1 pound, 3 ounces).
Press Start/Pause.
(Time Defrost is explained in the Time Features section.)
Use Auto Defrost for meat, poultry and fish. Use Time Defrost for most other frozen foods.
Auto Defrost automatically sets the defrosting times and power levels to give even defrosting results for meats, poultry and fish weighing up to six pounds.
There is a handy guide located on the inside front of the oven.
Conversion Guide
If the weight of food is stated in pounds and ounces, the ounces must be converted to tenths (.1) of a pound.
Weight of Food in Ounces
Enter Food Weight (tenths of a pound)
1-2
.1
3
.2
4-5
.3
6-7
.4
8
.5
9-10
.6
11
.7
12-13
.8
14-15
.9
Remove meat from package and place on microwave-safe dish.
Twice during defrost, the oven signals TURN. At each TURN signal, turn the food over. Remove defrosted meat or shield wiar areas with small pieces of foil.
After defrosting , most meats need to stannd 5 minutes to complete defrosting. Large roasts should stand fir abiyht 30 minutes.
About other features.
Cooking Complete Reminder
To remind you that you have food in the oven, the oven will display "Food is Ready" and beep once a minute until you either open the oven door or press Cancel/Off.
Set Clock
Press to enter the time of day or to check the time of day while microwaving.
Press Set Clock.
Enter time of day.
On some models, select AM or PM.
Press Start/Pause or Set Clock.
To check the time of day while microwaving, press Set Clock.
Scroll Speed (On some models)
The scroll speed of the display can be changed. Press and hold the AM/PM pad about 3 seconds to bring up the display. Select 1-5 for slow to fast scroll speed.
Display On/Off
To turn the clock display on or off, press and hold Display On/Off button for about 3 seconds. The Display On/Off feature cannot be used while a cooking feature is in use.
Delay Start
Delay Start
Delay Start allows you to set the microwave to delay cooking up to 24 hours.
Press Delay Start.
Enter the time you want the oven to start. (Be sure the microwave clock shows the correct time of day.)
On some models, select AM or PM.
Select any combination of Defrost Auto/Time or Cook Time I & II.
Press Start/Pause.
The Delay Start time will be displayed. The oven will automatically start at the delayed time.
The time of day may be displayed by pressing Clock.
Timer On/Off
Timer On/Off operates as a minute timer and can be used at any time, even when the oven is operating.
Press Timer On/Off.
Enter time you want to count down.
Press Timer On/Off to start.
When time is up, the oven will signal. To turn off the timer signal, press Timer On/ Off.
NOTE: The timer indicator will be lit while the timer is operating.
Start/Pause
In addition to starting many functions, Start/Pause allows you to stop cooking without opening the door or clearing the display. Press Start/Pause again to restart the oven.
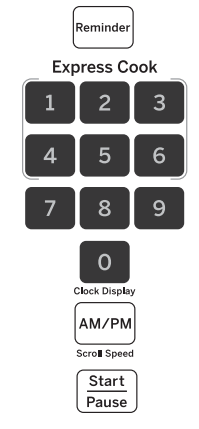
Reminder
The Reminder feature can be used like an alarm clock and can be used at any time, even when the oven is operating. The Reminder time can be set up to 24 hours later.
Press Reminder.
Enter the time you want the oven to remind you. (Be sure the microwave clock shows the correct time of day.)
On some models, select AM or PM.
Press Reminder. When Reminder signal occurs, press Reminder to turn it off. The Reminder time may be displayed by pressing Reminder.
NOTE: The REM indicator will remain lit to show that the Reminder is set. To clear the Reminder before it occurs, press Reminder, then 0. The REM indicator will no longer be lit.
Child Lock-Out
You may lock the control panel to prevent the microwave from being accidentally started or used by children. To lock or unlock the controls, press and hold Cancel/Off for about 3 seconds. When the control panel is locked, “L” or “LOC” will be displayed to the extreme right.
Turntable
For best cooking results, leave the turntable on. It can be turned off for large dishes. Press Turn Table to turn the turntable on or off.
Sometimes the turntable can become too hot to touch. Be careful touching the turntable during and after cooking.
Surface Light
Press Surface Light to turn the surface light on or off. On some models, there is a night light option. Press Surface Light once for bright light, twice for the night light or three times to turn the light off.
Vent
When the microwave oven is off, you may operate the vent fan:
Press the Vent pad once for high fan speed.
Press the Vent pad a second time for low fan speed.
Press the Vent pad a third time to turn the fan off.
When the microwave is on, the vent fan will automatically turn on at low fan speed, stay on while the microwave is operating and automatically turn off after the microwave goes off if the Vent pad is not pressed.
When the microwave oven is on you may also:
Press the Vent pad once for high fan speed.
Press the Vent pad a second time for low fan speed.
Press the Vent pad a third time to set the fan to turn off automatically after the microwave goes off.
If the vent fan is still operating after the microwave goes off, press the Vent pad until it turns off.
NOTE: The vent fan cannot be turned off while the microwave is operating
WARNING ARCING: If you see arcing, press the Cancel/Off button and correct the problem.
Make sure the shelf is positioned properly inside the microwave to prevent damage to the oven from arcing.
Do not use a microwave browning dish on the shelf. The shelf could overheat.
Do not use the oven with the shelf on the microwave floor. This could damage the microwave.
Use pot holders when handling the shelf— it may be hot.
Do not use the shelf when cooking popcorn.
Do not use the shelf with Sensor Cooking or Reheat.
Shelf (on some models)
How to Use the Shelf when Microwaving
Food microwaves best when placed on the turntable or on the shelf in the lower position.
NOTICE: Only use microwave shelf when reheating on more than one level. DO NOT store the oven shelf in the microwave.
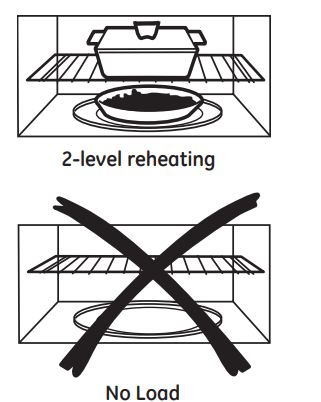
The shelf gives you the option to reheat more than one dish of food at the same time.
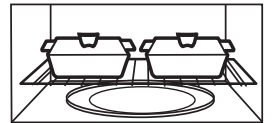
Shelf and Reheating
To reheat on 2 levels or
To reheat 2 dishes on the lower level:
Multiply reheat time by 11
Switch places after 1/2 the time.
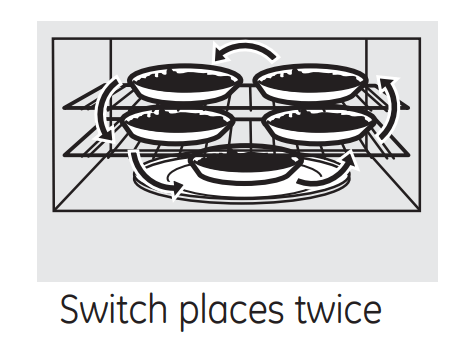
To reheat on 3 levels on some models)
Double the reheating time.
Switch places twice and give the dishes a 1/2 turn during reheating. (Place dense foods, or those that require a longer cook time, on the upper shelf first.)
Microwave terms.
Arcing
Arcing is the microwave term for sparks in the oven. Arcing is caused by:
Metal or foil touching the side of the oven.
Foil that is not molded to food (upturned edges act like antennas).
Metal such as twist-ties, poultry pins, gold-rimmed dishes.
Recycled paper towels containing small metal pieces.
Plates or dishes with a metallic trim or glaze with a metallic sheen.
Covering
Covers hold in moisture, allow for more even heating and reduce cooking time.
Venting plastic wrap or covering with wax paper allows excess steam to escape.
Shielding
In a regular oven, you shield chicken breasts or baked foods to prevent over-browning. When microwaving, you use small strips of foil to shield thin parts, such as the tips of wings
and legs on poultry, which would cook before larger parts.
Standing Time
When you cook with regular ovens, foods such as roasts or cakes are allowed to stand to finish cooking or to set.
Standing time is especially important in microwave cooking. Note that a microwaved cake is not placed on a cooling rack.
Venting
After covering a dish with plastic wrap, you vent the plastic wrap by turning back one corner so excess steam can escape.
Care and cleaning of the microwave oven.
Helpful Hints
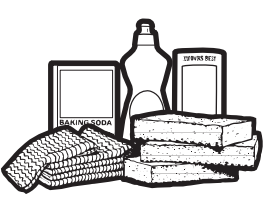
An occasional thorough wiping with a solution of baking soda and water keeps the inside fresh.
Unplug the cord before cleaning any part of this oven.
How to Clean the Inside
Walls, Floor, Inside Window, Metal and Plastic Parts on the Door
Some spatters can be removed with a paper towel; others may require a damp cloth. Remove greasy spatters with a sudsy cloth, then rinse with a damp cloth. Do not use abrasive cleaners or sharp utensils on oven walls.
To clean the surface of the door and the surface of the oven that come together upon closing, use only mild, nonabrasive soaps or detergents using a sponge or soft cloth. Rinse with a damp cloth and dry.
Never use a commercial oven cleaner on any part of your microwave.
Removable Turntable and Turntable Support
To prevent breakage, do not place the turntable into water just after cooking. Wash it carefully in warm, sudsy water or in the dishwasher. The turntable and support can be broken if dropped. Remember, do not operate the oven without the turntable and support in place.
How to Clean the Outside
Do not use cleaners containing ammonia or alcohol on the microwave oven. Ammonia or alcohol can damage the appearance of the microwave.
Case
Clean the outside of the microwave with a sudsy cloth. Rinse with a damp cloth and then dry. Wipe the window clean with a damp cloth.
Control Panel and Door
Wipe with a damp cloth. Dry thoroughly. Do not use cleaning sprays, large amounts of soap and water, abrasives or sharp objects on the panel—they can damage it. Some paper towels can also scratch the control panel.
Door Surface
It is important to keep the area clean where the door seals against the microwave. Use only mild, non-abrasive detergents applied with a clean sponge or soft cloth. Rinse well.
Power Cord
If the cord becomes soiled, unplug and wash with a damp cloth. For stubborn spots, sudsy water may be used, but be certain to rinse with a damp cloth and dry thoroughly before plugging cord into outlet.
Stainless Steel (on some models)
Do not use a steel-wood pad; it will scratch the surface.
To clean the stainless steel surface, use a hot, damp cloth with a mild detergent suitable for stainless steel surfaces. Use a clean, hot, damp cloth to remove soap. Dry with a dry, clean cloth. Always scrub lightly in the direction of the grain.
Cooktop Light/Night Light Replacement
Replace the burned-out bulb with a 30-40-watt incandescent bulb (30 watt - WB36X10198, 40 watt - WB36X10003), available from your GE supplier.
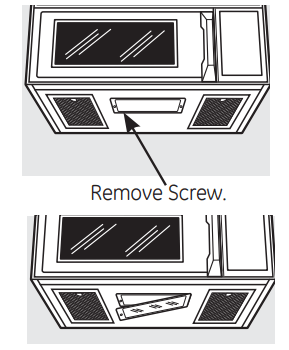
To replace the bulb(s), first disconnect the power at the main fuse or circuit breaker panel or pull the plug.
Remove the screw at the left of the light cover and lower the cover.
Be sure the bulb(s) to be replaced are cool before removing. After breaking the adhesive seal, remove the bulb by gently turning. Replace with the same size and type bulb.
Replace the screw. Connect electrical power to the oven.
Oven Light
Replace the burned-out bulb with a 30-40-watt incandescent bulb (30 watt - WB36X10198, 40 watt - WB36X10003), available from your GE supplier.
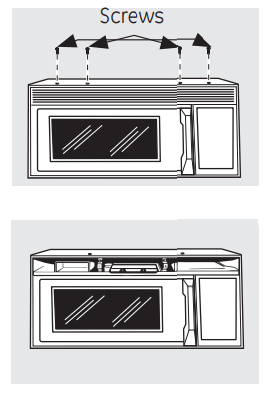
To replace the oven light, first disconnect the power at the main fuse or circuit breaker panel or pull the plug.
To remove the top grille by taking out the 4 screws what hold it in place.
Push tab back and lift light housing. Replace the bulb and press the light housing back into place.
Replace the top grille and 4 screws (comment electrical power to the oven.
Vent Fan
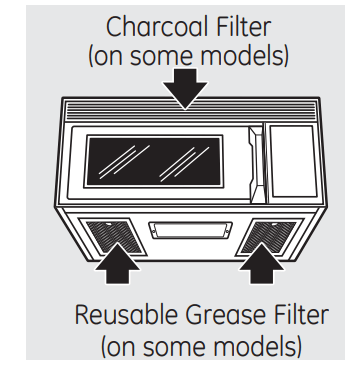
The vent fan has a metal reusable grease filter.
Models that recirculate air back into the room also use a charcoal filter.
Reusable Grease Filter
The reusable grease filter traps grease released by foods on the cooktop. It also prevents flames from foods on the cooktop from damaging the inside of the microwave.
For this reason, the filter must ALWAYS be in place when the hood is used. The grease filter should be cleaned once a month, or as needed.
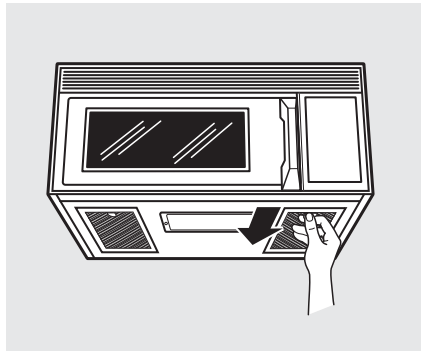
Removing and Cleaning the Filter
To remove, slide it to the side using the tab. Pull it down and out.
To clean the grease filter, soak it and then swish it around in hot water and detergent. Don't use ammonia or ammonia products because it will darken the metal. Light brushing can be used to remove embedded dirt. Filter should be cleaned every 6 months.
Rinse, shake and let it dry before replacing.
To replace, slide the filter in the frame slot on the left side of the opening. Pull up and to the right to lock into place.
Charcoal Filter n some models)
The charcoal filter cannot be cleaned. It must be replaced. Order Part No. WB02X10776 from your GE supplier.
If the model is not vented to the outside, the air will be recirculated through a disposable charcoal filter that helps remove smoke and odors. The charcoal filter should be replaced when it is noticeably dirty or discolored (usually after 6–12 months, depending on hood usage).
To Remove Charcoal Filter
To remove the charcoal filter, disconnect power at the main fuse or circuit breaker panel or pull the plug.
Remove the top grille by removing the 4 screws that hold it in place.
Slide the filter toward the front of the oven and remove it
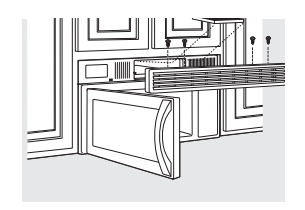
To Install Charcoal Filter
To install a new filter, remove plastic and other outer wrapping from the new filter.
Insert the filter into the top opening of the oven as shown. When properly installed, the wire mesh of the filter should be visible from the front. Replace the grille and 4 screws.
Troubleshooting Tips.
Problem
Possible Cause
What to Do
Oven will not start
A fuse in your home may be blown or the circuit breaker tripped.
Replace fuse or reset circuit breaker.
Power surge.
Unplug the microwave oven, then plug it back in.
Plug not fully inserted wall outlet.
Make sure the 3-prong plug on the into oven is fully inserted into wall outlet.
Door not securely closed.
Open the door and close securely.
Floor of the oven is warm, even when the oven has not been used
Heat from the cooktop light may make the oven floor get warm.
This is normal.
"LOCKED" appears on display
The control has been locked.
Press and hold Cancel/Off for about 3 seconds to unlock the contro
You hear an unusual, low-tone beep
You have tried to start the Reminder without a valid time of day.
Start over and enter a valid time of day.
You have tried to change the power level when it is not allowed.
Many of the oven's features are preset and cannot be changed.
"SENSOR ERROR” appears on display
When using a Sensor feature, the door was opened before steam could be detected.
Do not open door until steam is sensed and time is shown counting down on display.
Steam not detected in maximum amount of time.
Use Cook Time to heat for more time.
Reheat Food amount too large for Sensor Reheat
Sensor Reheat is for single servings of recommended foods.
Use Cook Time for large amounts of food.
Things That Are Normal With Your Microwave Oven
Steam or vapor escaping from around the door.
Light reflection around door or outer case.
Dimming oven light and change in the blower sound at power levels other than high.
Dull thumping sound while oven is operating.
TV/radio interference might be noticed while using the microwave. Similar to the interference caused by other small appliances, it does not indicate a problem with the microwave. Plug the microwave into a different electrical circuit, move the radio or TV as far away from the microwave as possible, or check the position and signal of the TV/radio antenna.


 Display On/Off
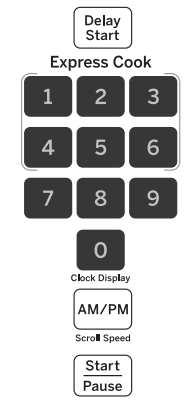
 Timer On/Off
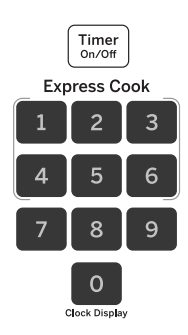
 Start/Pause
 Child Lock-Out
 Turntable
 Surface Light
 Vent
Vent