Owner Manual Ovens
Instructions for Use
The use of a gas cooking appliance results in the production of heat and moisture in the room in which it is installed. Ensure that the kitchen is well ventilated: keep natural ventilation holes open or install a mechanical ventilation device (mechanical extractor hood).
Prolonged intensive use of the appliance may call for additional ventilation, for example opening of a window,or more effective ventilation, for example increasing the level of mechanical ventilation where present.
Do not place anything, e.g. flame tamer between pan and pan support. Do not remove the pan support and enclose the burner with a wok stand, only use the wok support supplied. Do not use large pots or heavy weights which can bend the pan support or deflect flame onto the hotplate. Locate pan centrally over the burner so that it is stable and does not overhang the appliance.
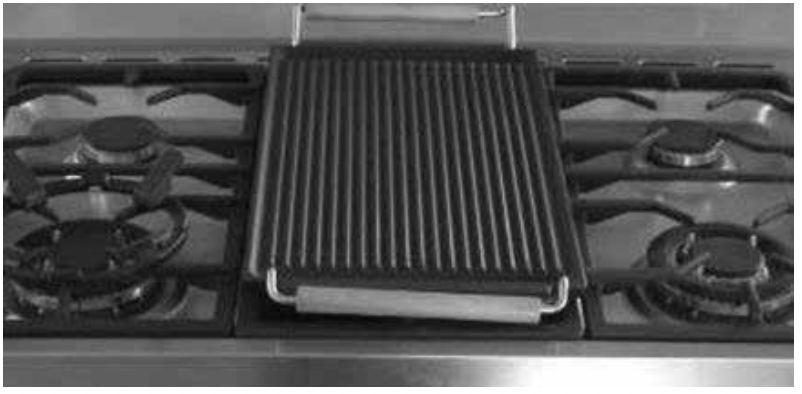
Griddle plate must only be located above the centre fish burner as shown. Caution: ensure plate is cool before removing.
(gas cooking top side)
Description of the main parts of the appliance
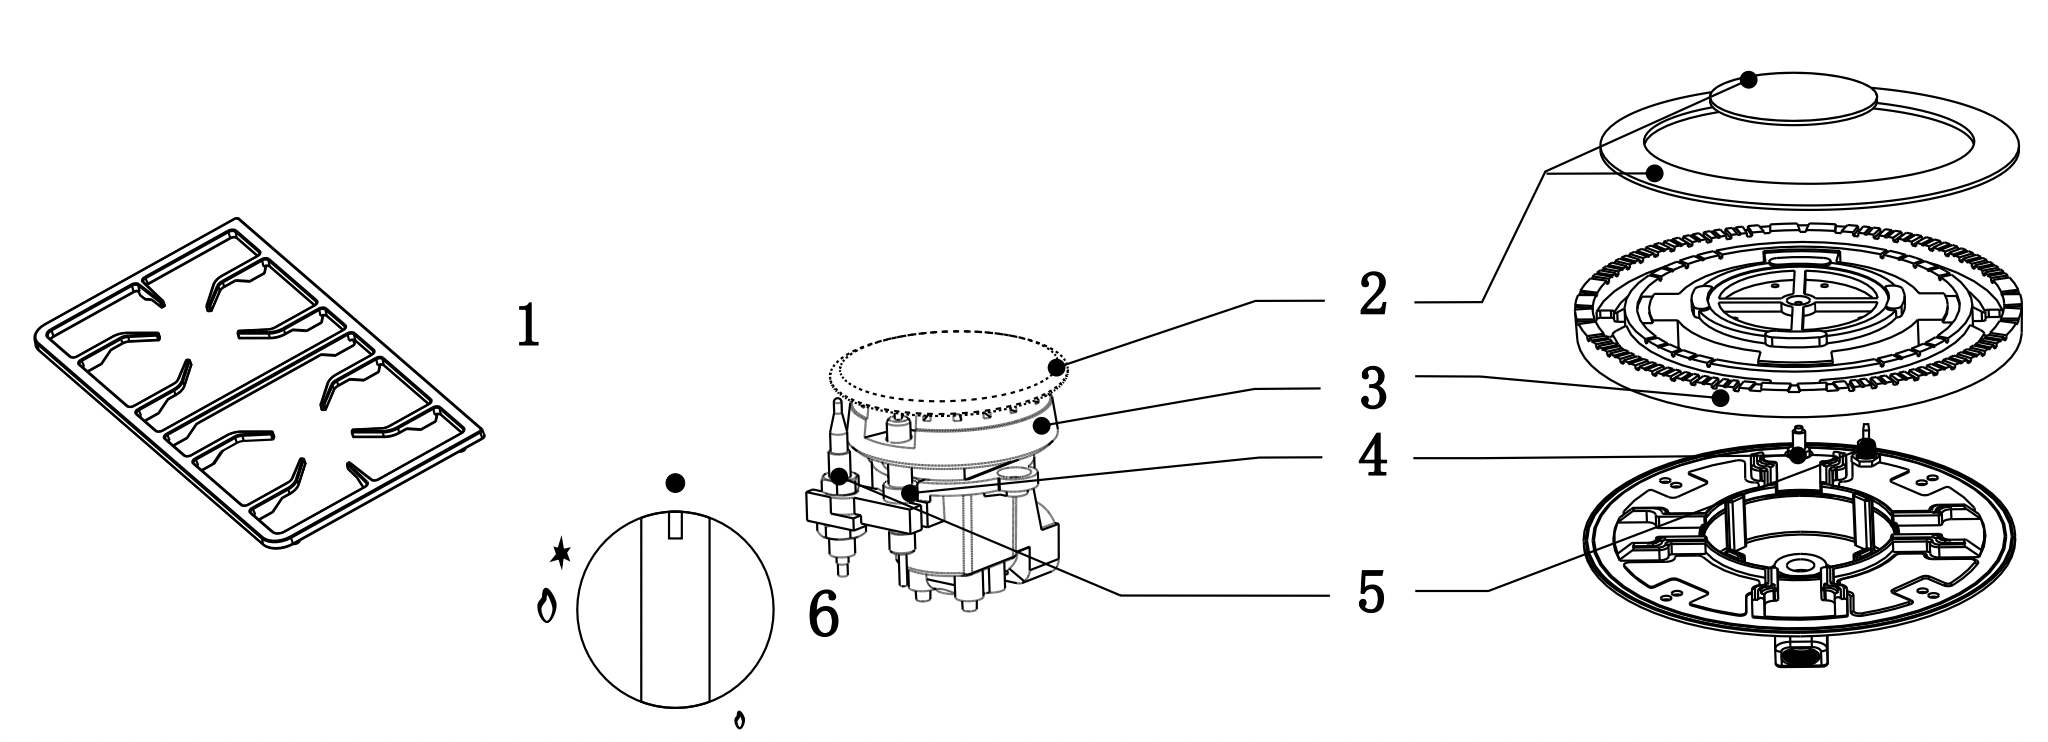
- grid
- burner cap
- burner head
- spark plug
- safety valve (for models equipped with a safety valve)
Description Of Symbols
 FRONT LEFT BURNER
 REAR LEFT BURNER
 FRONT RIGHT BURNER
 REAR RIGHT BURNER
 FRONT CENTRAL BURNER
 REAR CENTRAL BURNER
 LEFT CENTRAL BURNER
 RIGHT CENTRAL BURNER
 CENTRAL BURNER
 ELECTRIC OVEN THERMOSTAT
 ELECTRIC OVEN FUNTION KNOB
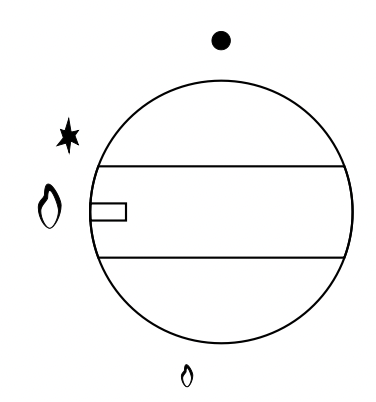
IGNITION AND OPERATION OF THE BURNERS
In order to ignite a burner, it is necessary to depress the knob while rotating it anti-clockwise, till the index is aligned with the position corresponding to the maximum gas delivery (i.e. the large flame symbol). As far as the models equipped with a safety valve are concerned, once the flame is lit hold the knob depressed for about 3-4 seconds till the device keeps the burner automatically lit. If the burner fails to ignite,wait one minute for the gas to dissipate before attempting to reignite. At this moment it is possible to adjust the flame intensity by rotating the knob anticlockwise from Such maximum position to the minimum one (i.e. the small flame symbol).
In order to turn the burner off, rotate the knob clockwise bringing the index back to the position corresponding to the closure symbol (  ).
).
RECOMMENDATIONS
In case of electric power failure, it is necessary to carry out the above-described operations by putting a gas lighter or a flame near the burner (in such an event, pay the utmost attention not to burn yourself).
The safety valve (for models where such item is provided) intervenes in case of accidental flame failure, blocking the gas delivery (e.g.: air draughts, spillage of liquids, etc.).
In any case, the ignition device must not be actuated for longer than 15 seconds. Should the ignition manoeuvre fail, or should the burner be accidentally turned off, immediately close the actuation knob and repeat the ignition after one minute at least.
Once the ignition has taken place, adjust the flame according to your needs.
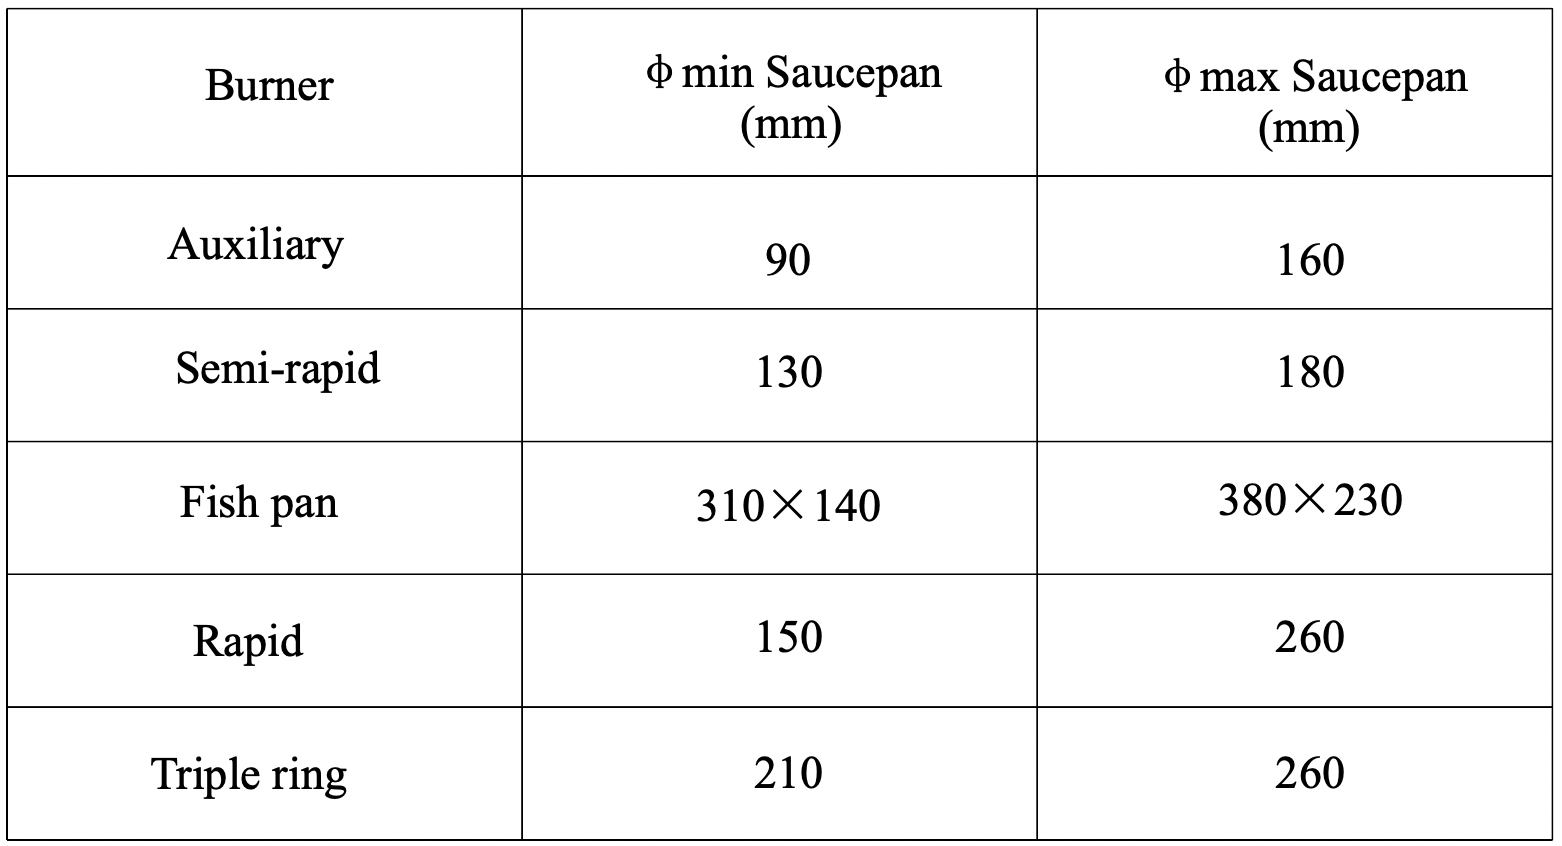
Advice on the use of gas burners For lower gas consumption and a better yield, use saucepans with diameter suitable for the burners, avoiding the flame coming up round the side of the saucepan (see the Container Table). Use only flat-bottomed pans.
As soon as a liquid starts to boil, turn the flame down to a level sufficient to maintain boiling.
During cooking, when using fats and oils, be very careful because if they overheat they could catch fire.

Container table (use flat-bottomed saucepans)
Oven Functions
ELECTRIC OVEN THERMOSTAT KNOB
Selection of cooking temperature is carried out by turning the knob clockwise to the required temperature, between 60℃ and MAX . If the appliance is with an electric oven, the warning light will come on when the oven is heating up. When it goes out it means that it reaches the required temperature . Regular flashing means that oven temperature is being constantly maintained at the programmed level.

ELECTRIC OVEN CONTROL KNOB
Each of the functions listed below can be used only together with the correct temperature.
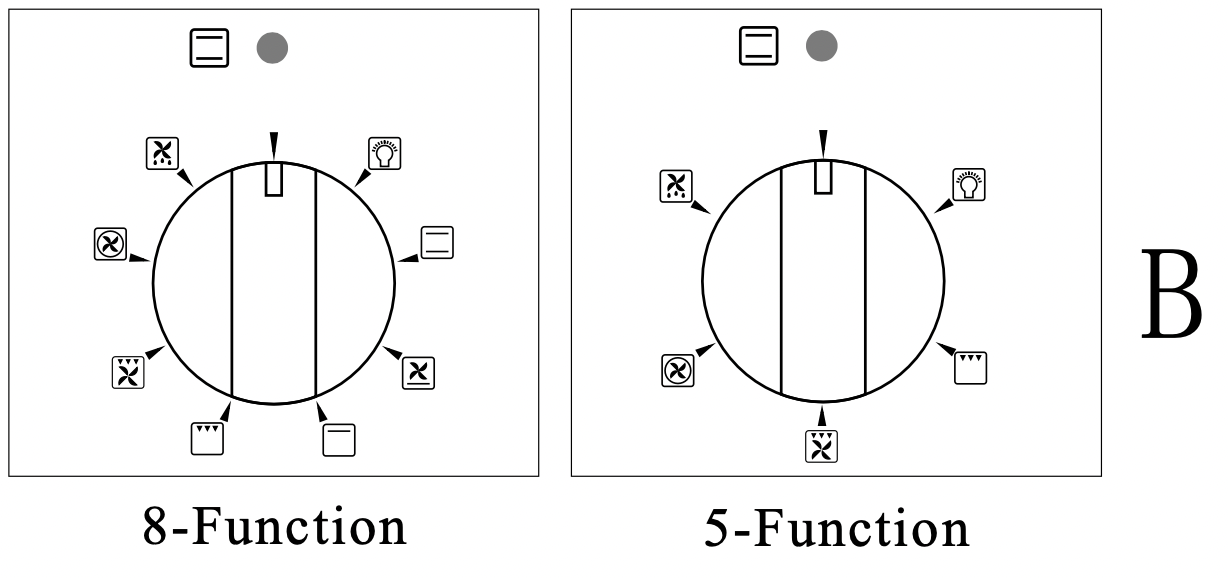
The selector B and thermostat A control is used to select the various oven functions and to choose the cooking temperatures best corresponding to the food to be cooked. During oven operation the lamp will always remain on.
 The lamp of the oven is on, with no heating elements operated (electrical resistances). During oven operation the lamp will always remain on
 TRADITIONAL COOKING THERMOSTAT SELECTOR SWITCH FROM 60℃ TO MAX
The heat is provided from the top and bottom elements. The oven must be preheated before the food is placed inside. Static cooking provides optimum results with: cakes, pizzas, bread and for gentle slow cooking of casseroles. Characteristics of static cooking: heat provided from above and below, cooking is possible only on middle shelf and should be centrally located in the oven.
 DELICATE COOKING THERMOSTAT SELECTOR SWITCH FROM 60℃ TO MAX
Ideal for pastries and cakes with wet covering and little sugar and damp desserts in moulds. Excellent results can also be achieved in completing cooking at the bottom and with dishes requiring heat in the Lower area in particular. The plate is best inserted at bottom level.
 TOP OVEN COOKING THERMOSTAT SELECTOR SWITCH FROM 60℃ TO MAX
Top oven - Use for brown food at the end of cooking.
 GRILL COOKING THERMOSTAT SELECTOR SWITCH FROM 60℃ TO MAX
Grill Element - Use for toasting and melting cheese or browning. The cooking time should be no longer than 5 minutes. To operate,please select Full Grill Function along with the temperature.
 FAN ASSISTED GRILL COOKING THERMOSTAT SELECTOR SWITCH FROM 60℃ TO 200℃
Use of the Grill Element and Fan. Use for grilling meats, vegetables and poultry. Preheat oven, place food on grill rack in baking tray and place in the middle of the oven. Other food may be cooked underneath whilst grilling. The oven door must be closed for all cooking methods
 FAN FORCED COOKING THERMOSTAT SELECTOR SWITCH FROM 60℃ TO MAX
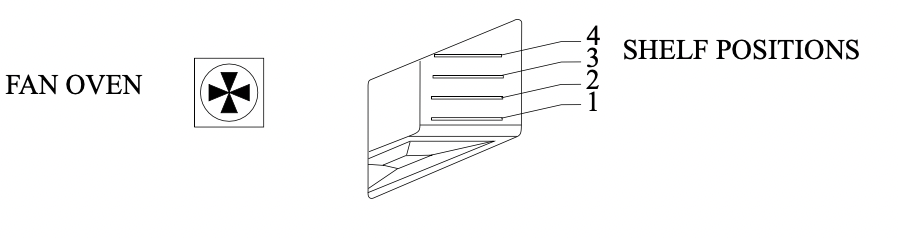
The circular heating element and fan come into operation and the heat is spread evenly to all shelf positions. Various types of food can be cooked on different shelves, naturally with the appropriate cooking times. The oven must be preheated before the foods are placed inside. Fan mode provides optimum results with: cakes (soft and thick), large quantities of foods and cooking various dishes simultaneously. To operate,please select Fan Forced function along with the temperature.
 DEFROSTING THERMOSTAT SELECTOR SWITCH ANY
The fan located on the bottom of the oven makes the air circulate at room temperature around the food .This is recommended for the defrosting of all types of food ,but in particular for delicate types of food which do not require heat such as for example:ice cream cakes,cream or custard desserts,fruit cakes.By using the fan,the defrosting time is approximately halved.In the case of meat,fish and bread,it is possible to accelerate the process using the "Fan forced"and setting the temperature to 80 ℃TO 10 0℃ The oven door must be closed for all cooking methods.
The turnspit(only available on certain models)
To start the turnspit,proceed as follows:
- Place the oven tray on the 1st rack;
- Insert the special turnspit support on the 2nd rack and position the spit by
Inserting it through the speciai hole for the turnspit at the back of the oven;
- Start the turnspit using electric oven control knob to select setting
 /
/  /
/  /
/  .
.
ELECTRONIC PROGRAMMER
6 BUTTON DIGITAL CLOCK/TIMER
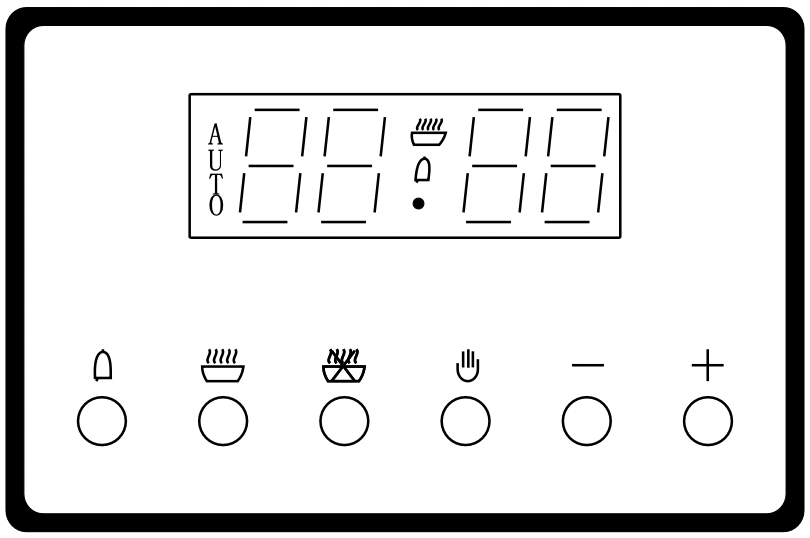
- Showing time(0:00-24:00)and minutes.
- The screen shows 3 flashing number and “AUTO”if the power is on .
- In order to set correct time, press the
 button first, then + or - button to carry forward backward the figure until the exact time shows.
Manual operation setting
Press the  button to remove the flashing of “AUTO ”.
If “AUTO” is gittering (automatic or semi automatic program has been set). Press  button to remove “AUTO” and then the manual operation process is on.
Automatic setting(set the full automatic starting and ending)
- Press
 button,set roast time.
- Press
 button,set roast finish time.
- Set tempeatures and roast modes by turning the thermostat knob and selector knob.
After the setting above, “AUTO” will be flashing, which means the roast process of the oven is set.
For example: If roast time takes 45mintes and expect it will end at 14:00.
Press  the roast time is to be 45minutes.
Press  the roast is set to end 14:00.
After the above setting, the screen shows the real time (hour.minute) and flashing “AUTO”, it means the set roast process is memorized automatically.
When the clock turns to be 13:15 (or between 13:14 - 13:15, the oven will start automatically in the roast time,  and “AUTO” will be always flashing.
When the clock turns to be 14,the roast is done ,the alarm is ringing and flashing “ AUTO”. After pressing the  button, the ringing will stop.
Semi-automatic setting (set the time of automatic starting and ending)
A. Set the time limit of roast(10 hours maximum):
Press the  button to set the time of roast. The oven starts immediately,
  and “AUTO” will flash. After the roast is finished,the roast operation process will be shut automatically. Then “AUTO” flashing, the alarm rings. The ring will stop by pressing the
  button.
B. Set the time of ending (23 hours 59 minutes maximum):
Press the  button to set the time of ending;The oven starts immediately,
  and “AUTO ” will flash. When the set time of ending comes, the roast operation process will be shut automatically. Then “AUTO” flashs, the alarm rings. The ring will stop by pressing the
  button.
Whenever the related button is pressed, the set roast process will be seen. Whenever the  button is pressed, and carry backward the time to “0”, the set roast process will be cancelled.
If button is pressed again,the oven will be in the manual operation process.
Timer: 23 hours 59 minutes can be set as maximum.
When setting time, press the button, and then + or - button, until the required time shows on the screen. After the setting, the correct time (hour, minute) and the button will show on the screen and timing begins immediately. Whenever the button is pressed, timing will be seen. When the set time reaches, the alarm will ring. The ringing will stop after pressing the button.
Notice: After pressing the related button, setting is supposed to be done in 5 seconds. In case of blackout, the set process as well as the real time (hour, minute) will is appear. After the power is on again, three “0” and ”AUTO” shows on the screen, this mean the oven has been automatically reset.
Cooling ventilation: In order to cool down the exterior of the appliance, the model is equipped with a cooling fan, which comes on automatically when the oven is hot.
When the fan is on, a normal flow of air can be heard exitting between the door and the control panel.
Note: When cooking is done, the fan stays on until the oven cools down sufficiently.
3 BUTTON DIGITAL CLOCK/TIMER
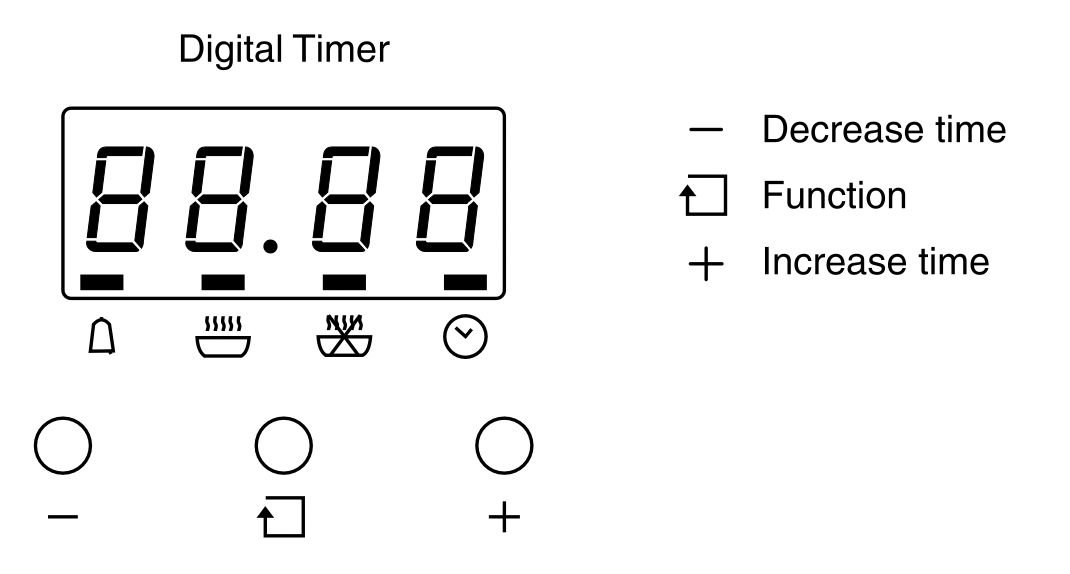
This model has a digital display, 24hr clock with 3 control buttons. When the power is connected, the screen displays '12:00' and the bar above the  symbol.
Adjusting the digital clock
To set the correct time, press the + or - button to advance forward or backward until the correct time is displayed. After 5 seconds it will start automatically or you can press the function button to make it work.
Manual operation setting
Press the function button to select manual operation.
Automatic setting
Automatic setting of the oven allows you to select the end time, cooking time, temperature and cooking mode. The oven will switch on, cook according to the selected cooking mode and temperature and then switch off automatically.
- Press the function button repeatedly until the bar above
 flashes, then press + or - button to set the time frame for baking.
- Press the function button repeatedly until the bar above
 flashes and then press + or - button to set the time to switch off.
- Set cooking temperature and cooking mode by turning the thermostat knob and selector knob.
After these settings, the bars above  and
and  will flash, indicating that the automatic cooking feature of the oven is set.
For example: If cooking time takes 45 minutes and you want it to finish at 14:00:
- Press the function button repeatedly until the bar above
 flashes and set the cooking time 45 minutes.
- Press the function button repeatedly until the bar above
 flashes and set the finish time to 14:00.
After the above setting, the current time is displayed and the bars above  and
and  will flash indicating that the automatic cooking feature is set. When the clock displays 13:15, the oven will start cooking automatically. While cooking the bar will flash.
Timer
The digital countdown timer can be set up to 23 hours and 59 minutes maximum.
To set the timer, press the function button repeatedly until the bar above  is displayed. Once the function button is released, the current time is displayed and the bar above
  flashes. When the function button is pressed the remaining time is displayed. When the set time is reached,
  disappears and the alarm will ring. To stop the alarm, press any button.
Note: After pressing the function button, timer settings should be done within 5 seconds.
In case of a power failure, all settings including the time display will be lost. When the power is returned, the bar above  and '12:00' will be displayed.
Oven Cookings
For a perfect cooking, it is necessary to pre-heat the oven to the preset cooking temperature. Only very fat meat can be placed into a cold oven. To minimse food splashes into the oven (which can produce smoke sometimes) deep baking dishes are recommended. Use instead highedged containers, preferably terracotta containers, put on the grate at about half the height of the oven. The table shows some examples of how to set the thermostat and the cooking time. The cooking times vary according to the type of food, its homogeneity and volume. We are sure that, after a few endeavours, the experience will suggest possible variations to the values shown on the table.
Practical hints to save energy
The oven can be switched off some minutes before cooking end; the residual temperature is enough to complete cooking. Open the oven door only when it is absolutely necessary; to check the cooking phase, look through the glass (the oven lamp is always on).
General Advice The oven offers various kinds of heating:
- the traditional heating for the cooking of special roasts
- the fan forced heating for the cooking of cakes, biscuits and similar.
If the fan forced cooking is chosen, it is recommended to take advantage of it.Hence, cooking or roasts on more shelves is recommended to save time and energy.
Fan Assisted 
A continuous circulation of warm air is created, which allows food to be placed and cooked on different shelves at the same time. The oven will reach the preset temperature in a very short time.
Traditional cooking 
This is especially suitable for the cooking of meats/poultry that requires long, slow cooking as well as for the cooking of bread and sponge cakes. It is advisable to place the food to be cooked into the oven when the right cooking temperature is reached, that is to say when the pilot light of the thermostat estinguishes.
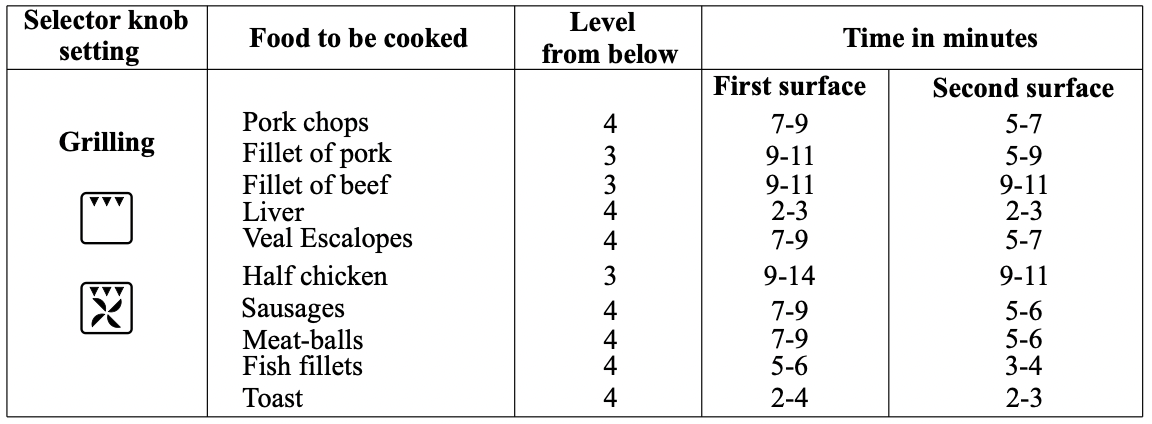
Grill cooking 
Delete, pre-heat the oven for about 5 minutes. During grill operation the heat comes from above; it is based on the infrared radiation and is fit for low thickness meat and for toasts. The meat and the fish to be grilled are to be slightly oiled and always placed on the grate; this is to be arranged on the nearest or on the farthest guide from the grill element, according to the thickness of the meat to be cooked. The table shows some examples of cooking times and food positions. The cooking times vary according to the type of food, its homogeneity and volume.
Cooking pastry
The air circulation of the oven assures an instantaneous and uniform heat distribution. The pre-warmed of the oven is no longer necessary. However for specially delicate pastry the oven can be pre-warmed. More trays can be inserted into the oven together with the pastries, taking care not to use the first grid starting from above.
Gratinating 
By this term is meant the surface alteration of food, often pre-cooked, when, after being introduced into the oven, it takes a golden-brown and crisp aspect.¡Gnocchi alla romana¡,¡ polenta pasticciata" rice, lasagnas, noodles and vegetables dressed with bechamel are typical preparation for this type of cooking.
Cooking times
The table shows some examples for the adjustment of the thermostat and of the cooking time. The cooking times can vary according to the type of food, and volume. We are sure that, after a few endeavours, the experience will suggest possible variations to the values shown on the table.
REMARK:
- The times indicated in the table refer to the cooking of one portion only; for more than one portion, the cooking times should be increased by 5 -10 minutes.
TABLE OF COOKING TIMES:
- The table below provides indicative shelf positions for use with your oven. Please note, the temperature and cooking times are indicative only. According to different cooking habits, it may be necessary to make further modifications. Please add to the 15 minutes to the times indicated for preheating.

Maintenance and Cleaning
Do not use jet of steam for cleaning.
Before any operation disconnect the appliance electrically. Wash the enamelled parts with lukewarm water and detergent. Do not use abrasive products. Wash the burner spreader frequently with boiling water and detergent make sure to remove any deposits which could block the flame outlet. Rinse the stainless steel parts well with water and dry them with a soft cloth.
To clean the hob use slightly damp sponges and wiping cloths: if too much water is used it could penetrate the internal parts and damage electrical parts. The grids of the hob can be washed in the dishwasher.
For persistent stains use normal non-abrasive detergents, specific products commonly available on the market or a little hot vinegar. Clean the glass parts with hot water, avoiding the use of rough cloths.
Do not use stainless steel pads or acids for cleaning. To prevent lighting difficulties, carefully clean the lighting spark plugs regularly (ceramic and electrode).
Periodically if the knobs become difficult to turn, contact a qualified engineer to lubricate the taps.Contact a qualified engineer to deal with any other problems which may arise during use.
To keep the characteristics of brightness of the enamelled parts for a long time it is necessary to clean the oven after each cooking. Once the oven is cold, you will be able to easily remove the fat deposits by means of a sponge or a cloth damp with warm soapy water or a common detergent. Never use abrasive cloths or sponges, that could irreparably damage the enamel. On white ovens even the parts of the dash board such as handgrip and knob have to be cleaned each time because they may become yellow due to the emissions of fat vapours.
ALWAYS CLEAN THE APPLIANCE IMMEDIATELY AFTER ANY FOOD SPILLAGE.
Annual service by an authorised person is recommend, or if any of the following conditions are noticed; incomplete ignition, appreciable yellow tipping, carbon deposition, lifting, floating, lighting back or objectionable odour.
Ovens with facility to lower grill for cleaning purposes
- Warning: Ensure that all controls are in the “OFF” position and wait the grill element cooling.
- Support the front of the grill element while you remove the knurled screw retaining the element.
- Lower the front of the element carefully to the rest position.
- When cleaning the oven make sure do not apply any forces to the grill element
- When the cleaning is complete, carefully remove any cleaning chemicals and water from the grill element.
- Carefully raise the front of the element into position and secure with the knurled screw.
NEVER USE THE OVEN WITH THE GRILL ELEMENT HANGING DOWN!
Important: In case of burners removal for cleaning purposes, we recommend to make sure that all parts are correctly positioned before igniting the burners again.
THE GRIDS OF THE COOKING PLANE ARE EQUIPPED WITH SUITABLE RUBBER PADS, ITS PURPOSE IS BOTH PROVIDING BETTER STABILITY AND AVOIDING SCRATCHES ON THE PLANE SURFACES DURING USAGE.
AFTER A POSSIBLE GRID REMOVAL FOR CLEANING AND/OR MAINTE-NANCE NEEDS,WE RECOMMEND TO VERIFY THE PRESENCE OF SUCH RUBBER PADS AND TO PUT THE GRIDS BACK IN THEIR ORIGINAL POSITION.
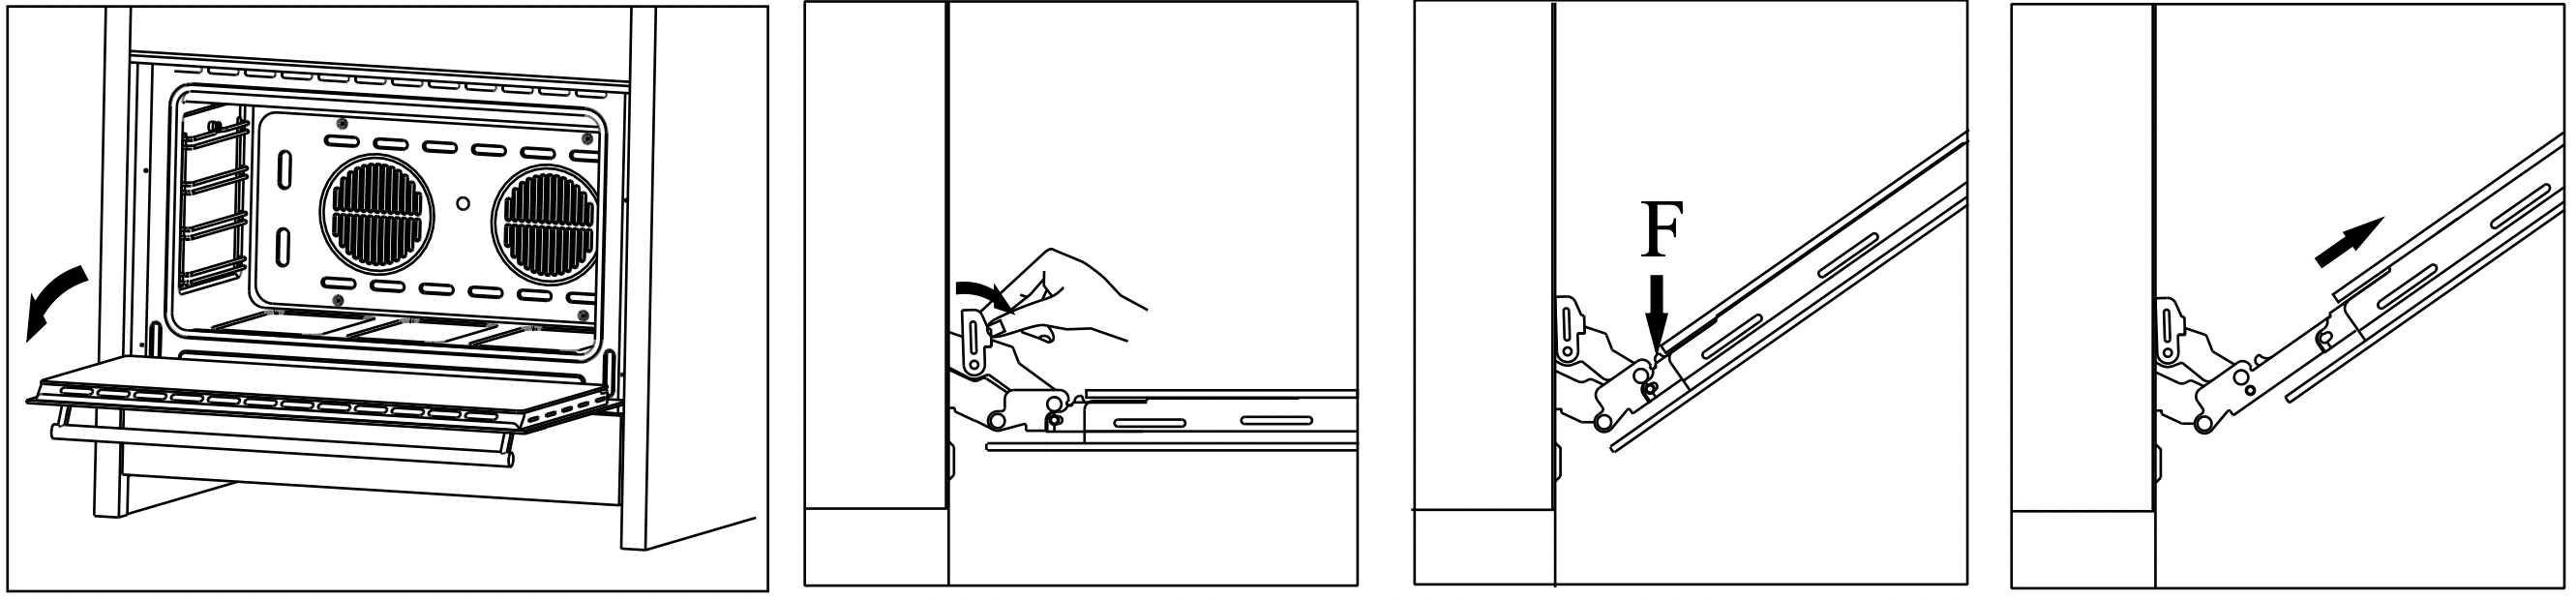
Cleaning the oven door
Unhooking the doors.
For a more thorough clean,you have to remove the oven door.Choose the removal and assemble method according to different structure of oven door purchased.
Proceed as follows:
- Open the door fully
- Lift up and turn the small levers located on the two hinges
- Grip the door on the two external sides and close it approximately half way. Unlock the door by pressing on the clamps F, then pull the door towards you lifting it out of its seat. To replace the door, reverse this sequence.
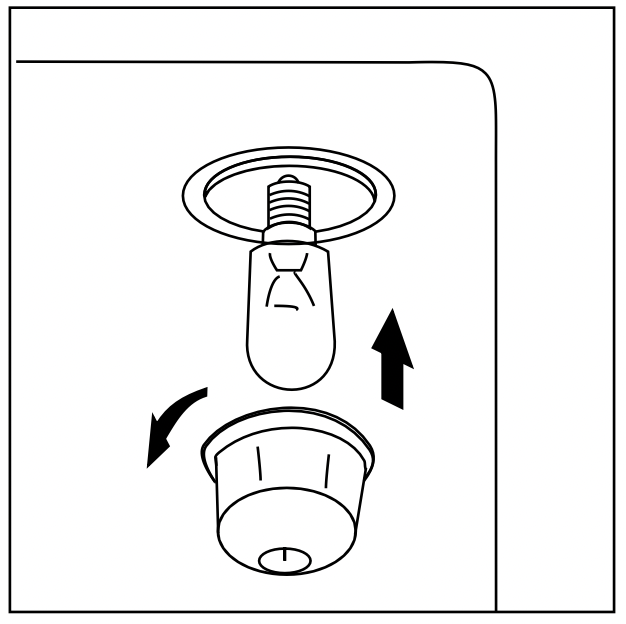
Replacing the oven bulb
Once the oven has been electrically disconnected, unscrew the glass protection cap and the bulb. Always remember to use high temperatures (300/ E14) bulb for the oven. Reassemble the glass cap and reconnect the oven after replacing the bulb.