User manual Television
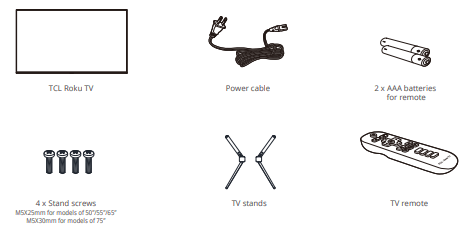
What’s in the box
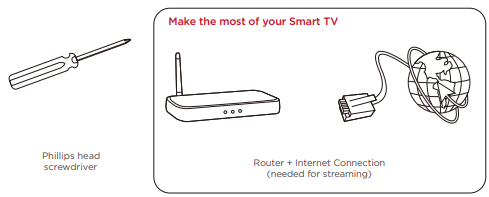
What you need
Step 1 Set up your TV
Ready for the step-by-step? You’re only minutes away from TV bliss!
Remove your TV from the box
Be careful, it’s heavy!
To mount your TV on a wall, skip to page 6.
To use the stand
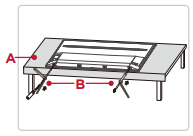
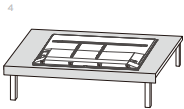
A. To prevent damage to the screen, carefully place your TV on a soft, cushioned surface.
B. Put the column of the stands into the TV, align the stands with the screw holes located on the TV. Secure the stands to the TV with four (4) screws.
Screws:
M5X25mm for models of 50”/55”/65”
M5X30mm for models of 75”
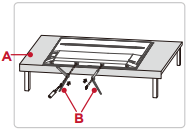
For 65” and 75” models, you have another option to mount the stands to the middle of the TV bottom.
Screws:
M5X25mm for models of 65”
M5X30mm for models of 75”
Warning:
Never place a television set in an unstable location. A television set may fall, causing serious personal injury or death. Many injuries, particularly to children, can be avoided by taking simple precautions such as:
- Using cabinets or stands recommended by the manufacturer of the television set.
- Only using furniture that can safely support the television set.
- Ensuring the television set is not overhanging the edge of the supporting furniture.
- Not placing the television set on tall furniture (for example, cupboards or bookcases) without anchoring both the furniture and the television set to a suitable support.
- Not placing the television set on cloth or other materials that may be located between the television set and supporting furniture.
- Educating children about the dangers of climbing on furniture to reach the television set or its controls.
If your existing television set is being retained and relocated, the same considerations as above should be applied.
Optional - To mount on a wall
(wall mount not included)
To mount on a wall
Preparation must be done before mounting your TV on a wall.
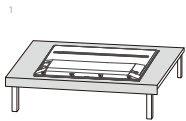
Place your TV on a soft, cushioned surface.
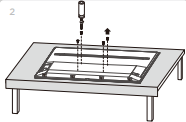
Remove the 4 screws from the back of the TV.
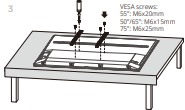
Screw the VESA bracket tightly onto the back cover with 4 VESA screws.
Follow the instructions that come with the wall mount to hang the TV on the wall.
If you are mounting your TV to the wall, don’t attach the stands.
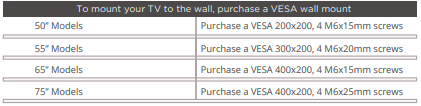
The VESA number is the horizontal and vertical measurement of the mounting holes. For example, 200X200 refers to the fact that the mounting measurements are 200mm horizontally and 200mm vertically.
Follow the instructions that come with the wall mount.
Your wall mount must be able to bear a minimum of five times the TV’s net weight to avoid causing damage.
Step 2 Power up
In this step, we’ll make sure all systems are GO!
Power your TV remote by inserting the included batteries.
Connect your power cable to the TV, then plug it in to the wall outlet.
Connect other devices by referencing port label and descriptions on the bottom of page 8.
Power Tip! Always replace depleted batteries with two same brand-new batteries from the same manufacturer. Never use damaged batteries.
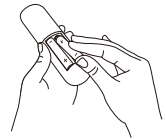
Insert batteries in the correct polarity as indicated in the battery compartment.
Step 3 Grab your remote
The TV remote should feel right at home in your hand. We designed it to be incredibly intuitive for watching TV and navigating on-screen menus.
Here’re some buttons you should know about.
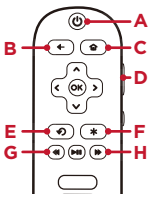
A POWER Turn TV on and off
B BACK Return to previous screen
C HOME Return to Roku Home screen
D VOLUME Raise and lower volume
E INSTANT REPLAY Replay the last few seconds of streaming video
F OPTIONS View more options
G RWD SCAN Rewind streaming video, scroll left one page at a time
H FWD SCAN Fast forward streaming video, scroll right one page at a time
Tip! The  button gives you easy access to picture settings, display options, and more. Try it on every screen!
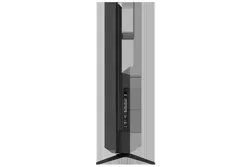
Step 4 Get to know your TV
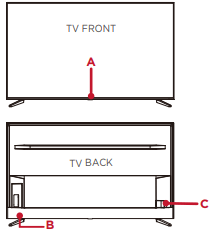
A IR RECEIVER Receives signal from the TV remote.
STATUS LIGHT Glows when the TV is in standby, flashes when the TV is busy, flashes once with each button press of the remote control.
B POWER and OPTIONS BUTTON Press once to open the menu. Press and hold to turn off the TV.
C POWER PORT Connect your TV to the power source with the included power cable.
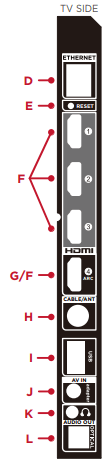
D ETHERNET Connect an Ethernet cable to your home Internet router or switch.
E RESET BUTTON Press once to restart your TV. Press and hold for factory reset, and careful, you will lose all your settings!
F HDMI * PORT Highest quality audio/video connection. Connect cable box, Blu-ray player, gaming console, or other devices to your TV using HDMI cables.
G HDMI ARC PORT Connect HDMI ARC (audio return channel) capable audio devices like sound bars or AV receivers.
H ANTENNA/CABLE IN Connect an outdoor VHF/ UHF antenna or Cable TV feed.
I USB PORT Connect a USB device to access photos, music and movies.
J AV IN adapter AV Input (analog audio/video). The AV Input can be used to connect older devices that use analog audio/video outputs. Compatible adapter (not included) connects to the RCA cable (video - yellow and audio - white and red) that you normally use to connect to that device.
K HEADPHONE OUT Connect headphones or other external speakers.
L OPTICAL (DIGITAL AUDIO OUT) Connect an optical cable to an external digital audio system.
Step 5 Complete guided setup
It’s the final stretch—hurray!
Let’s Connect
Your TV will automatically detect wireless networks in your area. Have your network name and password handy and follow the easy on-screen instructions.
Roku accounts are free, and while a valid credit card is recommended, it is not required. If you choose to register with a credit card, you will be able to seamlessly rent movies, TV shows and download apps without having to enter in your credit card information each time. A unique PIN can be added to the account to prevent unauthorized purchases.
Once you’re connected, your TV will automatically update with the latest software—plus you can start streaming the entertainment you know and love. Unlike other TVs, your new TCL + Roku TV automatically receives regular software updates in the background when it’s connected to the internet. This allows it to give you a better and better experience.
If you aren’t ready to connect your TV to a wireless network, you can still use it as a regular TV.
Troubleshooting
Having trouble completing the guided setup? Don’t worry, it’s usually an easy fix.
4K Picture Quality
- 4K picture quality is largely dependent on the source. Make sure your source content is 4K.
- To stream 4K, we recommend a broadband speed of 25Mbps for optimum viewing.
- For Cable, Satellite, Gaming Consoles, and Blu-Ray players, we recommend using “High-Speed HDMI cables.”
My picture is too small (black bars on the side)
- Play your movie/video and press the (*) asterisk button.
- Select Picture Size, select the picture size of your preference.
How to install the Remote Control Mobile App
The free Roku app allows you to use your mobile device as a full functioning remote control with voice search & keypad.
- Download the Roku app to your phone or tablet through Google Play or iTunes.
- Simply search for “Roku App” and choose the Roku app by Roku Inc.
- Follow the onscreen prompts and you’re on your way!
How do I turn the Text-to-Speech (TTS) audio guide on or off?
Press “*” key on the remote controller four times to turn the audio guide on or off.
Or
1. Select “Settings” at home screen
2. Select “Accessibility”
3. Select “Auto Guide” and turn it on or off
Cannot connect to wireless network (Wi-Fi)
- Select the correct wireless network name and verify the password entered (case sensitive).
- Relocate the router from objects that interfere with performance (cordless phones, baby monitors, etc.).
- Reboot the router by disconnecting the power for more than 2 minutes and reconnect.
Problems connecting my cable/satellite box or antenna through a coax cable
- For best performance, use the HDMI connection. If not available, then:
- Make sure the cable connections to the TV and your device are securely fastened.
- Select cable/satellite box or antenna TV input.
- Select “start finding channels” and follow the on-screen instructions to perform a full channel scan.
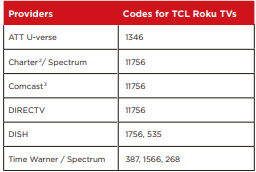
What is the remote code for programming my Universal or Cable/Satellite box remote control