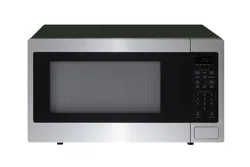
Owner Manual Microwave Oven
SETTING UP YOUR OVEN
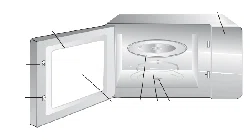
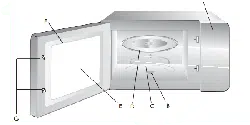
Names of oven Parts and Accessories
Remove the oven and all materials from the carton and oven cavity.
Your oven comes with the following accessories:
- Glass tray
- Turntable ring
- Use & Care Guide
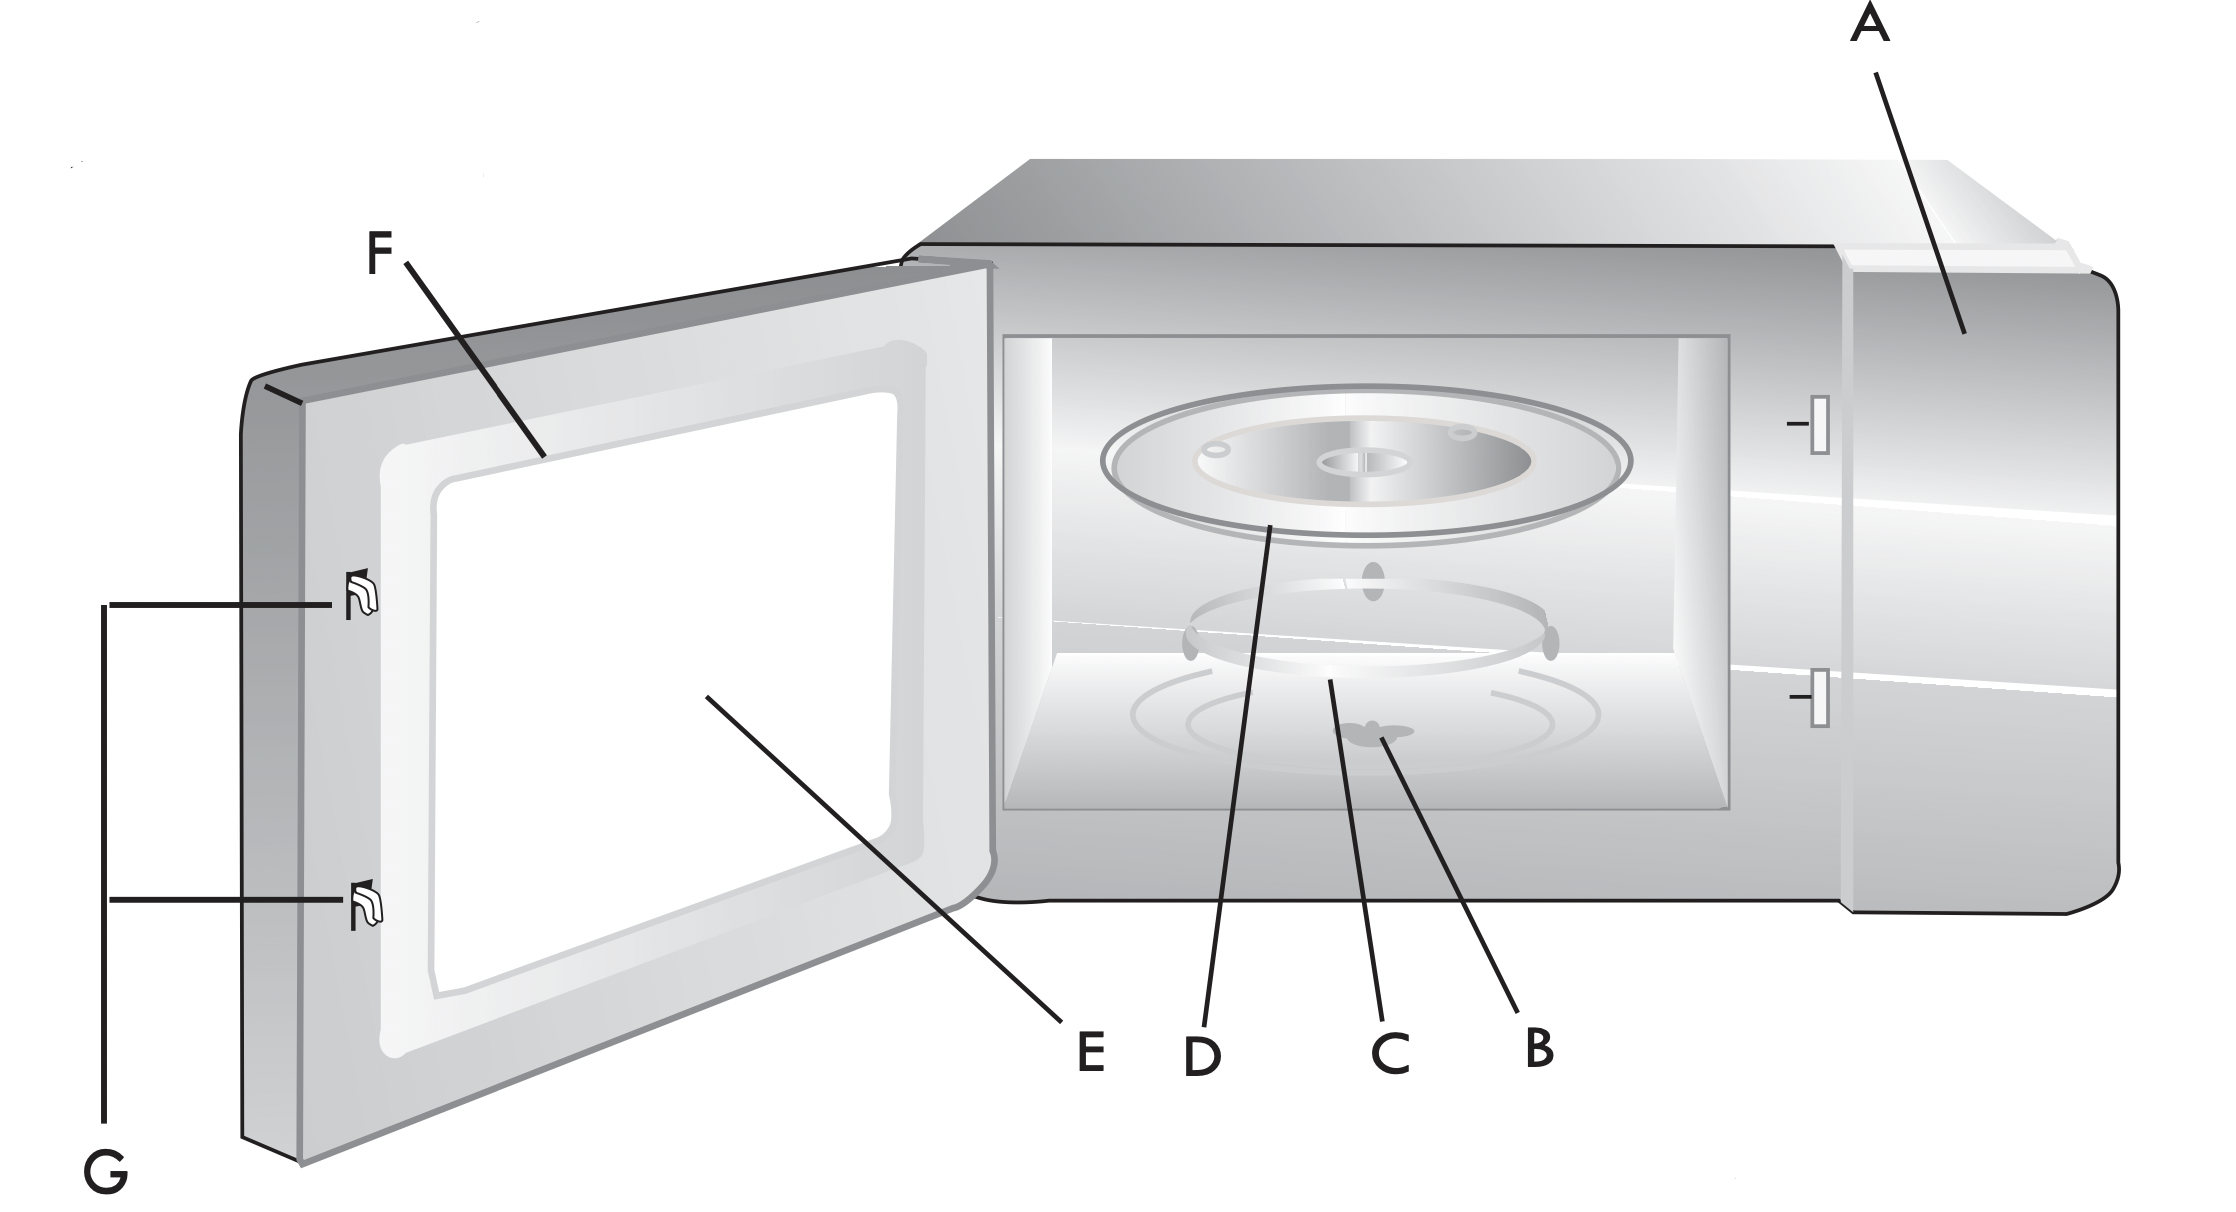
A) Control panel
B) Turntable shaft
C) Turntable ring
D) Glass tray
E) Observation window
F) Oven Door
G) Safety interlock system
Turntable Installation
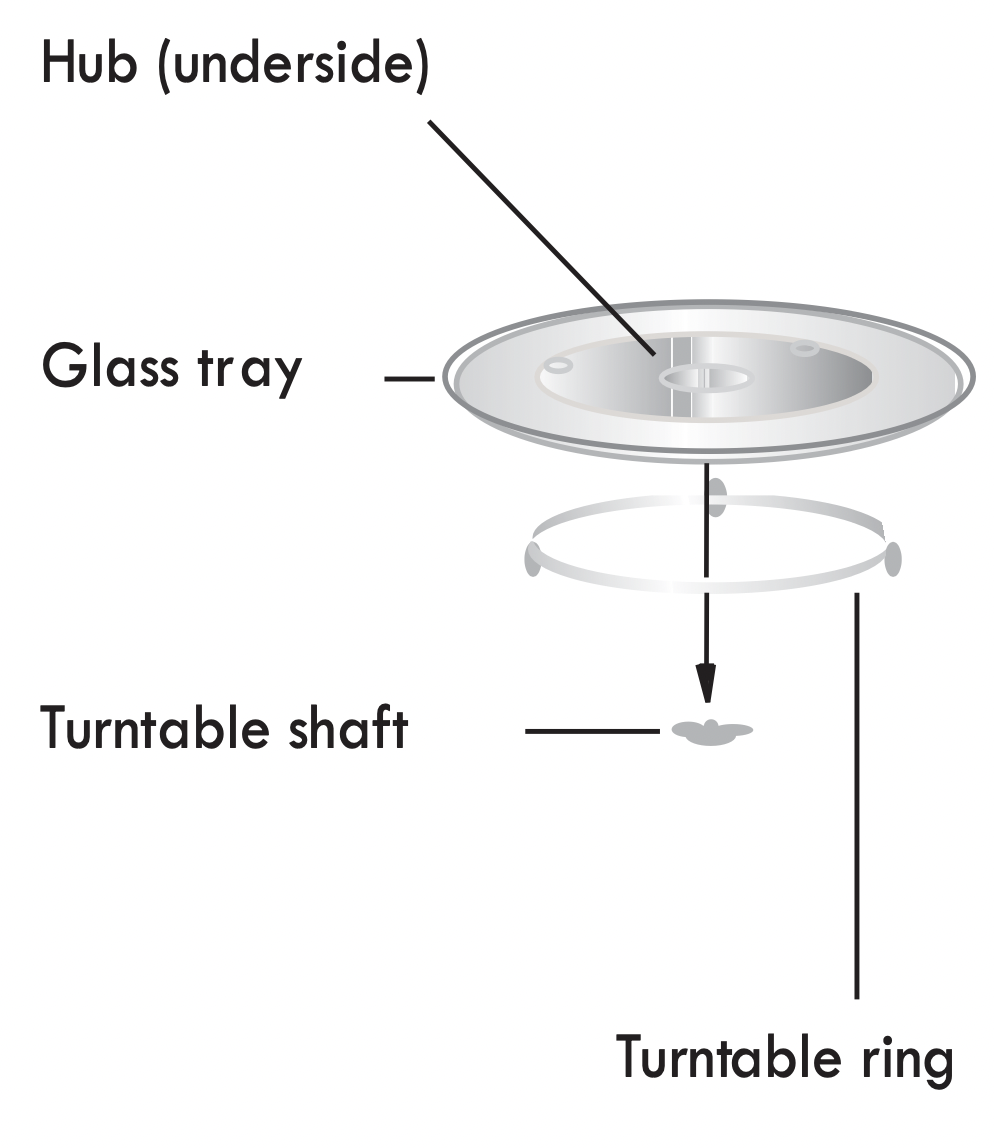

a. Never place the glass tray upside down. The glass tray should never be restricted.
b. Both glass tray and turntable ring must always be used during cooking.
c. All food and containers of food are always to be placed on the glass tray for cooking.
d. If glass tray or turntable ring cracks or breaks, contact the following customer assistance number: 1-800-657-6119
OPERATION
Control Panel and Features
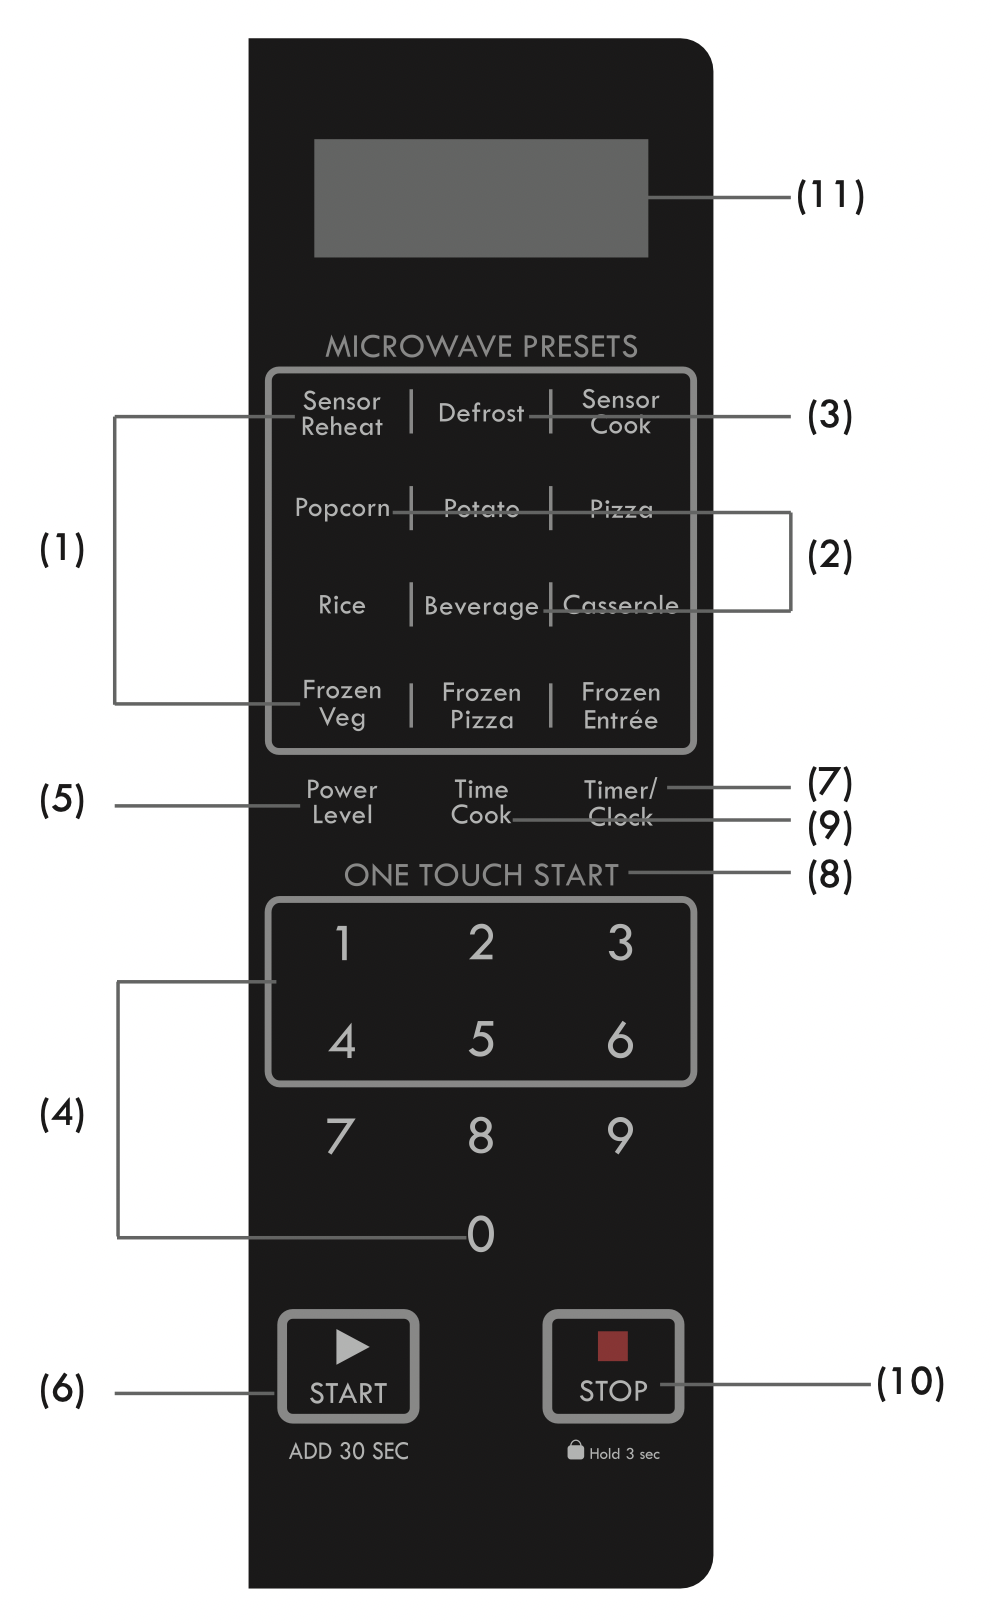
- Sensor Menu ( Sensor Reheat, Sensor Cook, Potato, Pizza, Rice, Casserole, Frozen Veg, Frozen Pizza, Frozen Entrée) Sensor Menu items automatically program correct cooking time and power based on sensor assessment of the amount of steam emitted from food early in the cooking cycle.
- Auto Menu (Popcorn, Beverage) Auto Menu items allow you to easily program cooking time based on food quantity.
- Defrost: Defrost time calculated by entered weight and category of item.
- Number Pads
- Power Level
- START/ADD 30 SEC
- Timer/Clock
- ONE TOUCH START Pads (1- 6)
- Time Cook
- STOP/Hold 3 sec: Before cooking starts, press to clear all previous settings.
During cooking, press once to stop oven; press twice to stop oven and clear all settings. Press pad for 3 seconds to lock or unlock display.
- Display Window
CLOCK SETTING
When the microwave oven is plugged into an outlet, "00:00" will display.
- Press Timer/Clock, "Hr12" will appear in the display.
- Press the number pads and enter the current clock time. For example, if the time is now 8:30, press "8, 3, 0" in order.
- Press Timer/Clock to finish clock setting, ":" will flash and the numbers will appear as a clock time in the display.
Note:
- In the process of setting clock, if the
 pad is pressed or if there is no operation within 25 seconds, the display will automatically return to standby mode.
- This is a 12 hour clock. If the numbers entered are not within the range between 1:00 to 12:59, the setting will not be accepted until valid numbers are entered.
TIMER/CLOCK
- Press the Timer/Clock twice, "00:00" will display.
- Press the number pads to enter the time amount. The maximum amount of time that can be enter is 99 minutes 99 seconds.
- Press
 to confirm setting.
- When the time amount elapses, you will hear a long beep.
Note:
- The Kitchen Timer setting is different from the Clock setting; it is simply a timer.
- The Kitchen Timer function can be used in any cooking process.
- You can check the timer during the timing process for 5 seconds by pressing Timer/Clock once. You can cancel the timing process by pressing during the 5 seconds the timer is displayed.
TIME COOK
- Press Time Cook , "00:00" will appear in the display.
- Press number pads to enter the cooking time; the maximum cooking time is 99 minutes and 99 seconds.
- Press Power Level ; PL10 will display. This is the default power level of 100%. Press number pads 0 through 9 to select a different power level if desired. See the Power Level table below.
- Press to start cooking.
Example: To cook the food with 50% microwave power for 15 minutes.
a. Press Time Cook , "00:00" displays.
b. Press "1, 5, 0, 0" in order for 15:00 to appear in the display.
c. Press Power Level , then press "5" to select 50% microwave power.
d. Press to start cooking.
Note: In the process of setting, if the pad is pressed or if there is no operation within 25 seconds, the oven will automatically return to standby mode.
STANDING TIME
"Standing time" means that after the timed cooking period ends, food should be allowed to stand either inside or outside the oven to completely finish cooking. Outside oven standing time will allow the oven to be available for other use.
POWER LEVEL
Ten power levels are available.
Prior to or during cooking, press Power Level and "PL10" will display. Adjust the power by pressing a number pad as indicated in the table below.
ONE TOUCH START
- Instant cooking at 100% power level and 1 to 6 minutes cooking time can be started by pressing number pads 1 to 6.
- Instant cooking at 100% power level and 30 seconds cooking time can be started by pressing . Each repeated press will increase cooking time by 30 seconds.
The maximum cooking timeis 99 minutes, 59 seconds.
Note:
- Time can also be added in 30 second increments by pressing during Microwave Cooking.
- Time cannot be added by pressing during Microwave Presets function.
DEFROST FUNCTION
- Press Defrost, "DEF1" will appear in the display.
Press the same pad repeatly, "DEF1", "DEF2","DEF3" will display in order.

- Press number pads to enter the weight to be defrosted.
Input the weight range between 0.1 to 5 Lbs (1 to 80 oz).
If the weight input is not between 0.1 to 5 Lbs (1 to 80 oz), the input will be invalid. The oven will not operate until valid numbers are entered.
- Press to start defrosting and the cooking time remaining will be displayed.
Note: When two-thirds of the defrost time passes, the oven will pause defrost and beep twice to remind you to turn over the food. Turn over food, close door and press to resume defrost cycle.
If there is no operation within 25 seconds during the setting process, the oven will automatically return to standby mode.
SENSOR MENU ( Sensor Reheat, Sensor Cook, Potato, Pizza, Rice, Casserole, Frozen Veg, Frozen Pizza, Frozen Entrée )
CAUTION: DO NOT consume foods immediately after the oven finishes cooking. Heated foods, especially pizza, may burn your mouth. Allow foods to cool to a safe eating temperature.
- Place the food in the oven and close the door. Press the appropriate Sensor Menu item pad, and the oven will start immediately.
- For Sensor Reheat or Sensor Cook function, press the corresponding pad repeatedly to select the menu code. The sensor cooking process starts immediately. When the released steam is detected by the oven, the remaining cooking time will appear in the display. The oven beeps 4 times when cooking is finished and END will display.
Note:
- For best sensor cooking results:
a. The room temperature cannot be over 95 F (35°C).
b. The weight of food must be more than 4 oz (110g).
c. The oven cavity, glass tray and utensils must be dry.
- During cooking:
a. The food can be covered, but the cover or lid must be vented with a hole to allow steam to escape.
b. Do not open door or pressing at any time during sensor cooking, or will stop the cooking process and return the oven to standby mode.
c. While using the sensor function, the sensor will self analyze. If there is an error, the sensor function will stop working, show "E-5" in the display and beep every 2 seconds until you press pad. This oven will automatically reset the function.
Example: Potato Sensor Pad
- Press Potato pad once, "SENS" will appear in the display. The cook starts. Note: Puncture the surface of each potato several times with the tines of a fork.

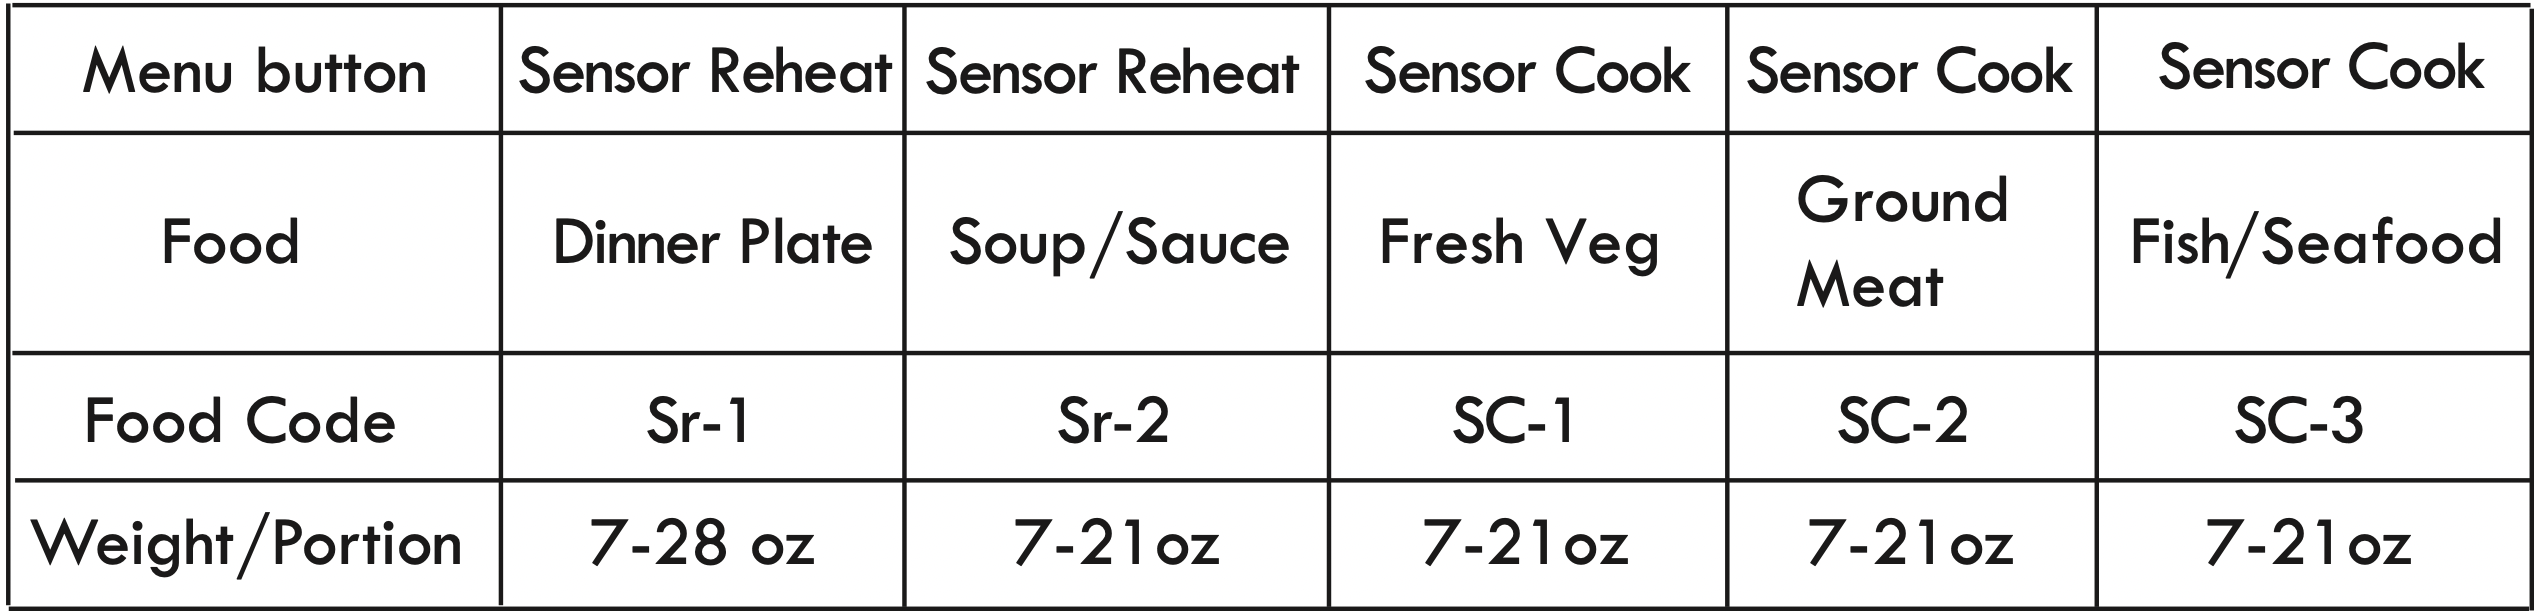
Example: Sensor Reheat Pad
- After placing food into oven, press Sensor Reheat pad and " Sr -1" will display.
- Press the same pad repeatly, "Sr-1", "Sr-2" will display in order.When your choice is in the display, wait a moment for "SENS" to display, and cooking will start. Oven beeps 4 times when cooking is finished.
Note:
- Food to be avoided in sensor reheating.
a. Bread and other dry food, such as biscuits or cake.
b. Raw or uncooked food.
c. Beverage and Frozen food.
- The food can be covered, but the cover or lid must be vented with a hole to allow steam to escape.
- The food temperature must be at least 40°F (5 C) when placing it into the oven for Sensor Heat to work correctly.
Example: Sensor Cook Pad
- After placing food into oven, press Sensor Cook pad and " SC-1" will display.
- Press the same pad repeatly, "SC-1", "SC-2" , "SC-3" will display in order. When your choice is in the display, wait a moment for "SENS" to display, and cooking will start. Oven beeps 4 times when cooking is finished.
Sensor menu chart:
POPCORN
- Place a 3.2 oz package of popcorn in oven and close door. Press Popcorn pad and cooking starts immediately. Oven beeps 4 times when cooking is finished.
- Follow package instructions, using Time Cook if the package is less than 3.2 oz or larger than 3.2 oz. Place the package of popcorn in the center of the microwave.
BEVERAGE
Press Beverage pad repeatedly, "1", "2", "3" cup will display in order. When your choice is in the display, wait a moment for the oven to start cooking. Oven beeps 4 times when cooking is finished.
MULTI-STAGE COOKING
At most 2 stages can be set for cooking.
Note: SENSOR MENU, AUTO MENU, DEFROST and ONE TOUCH START cannot be used in multi-stage cooking.
Example: 80% Power Level for 5 minutes followed by 60% Power Level for 10 minutes;
a. Press Time Cook once, then press "5", "0" and "0" to set first stage cook time.
b. Press Power Level once, then press "8" to choose 80% first stage cooking power.
c. Press Time Cook again, then press "1", "0", "0" and "0" to set second stage cook time.
d. Press Power Level again, then press "6" to choose 60% second stage cooking power.
e. Press to immediately start multi-stage cooking.
LOCK FUNCTION
To lock the microwave so that it cannot be operated by children or other unintended users, press pad for 3 seconds. You will hear a long beep. If the clock has been set, "Loc" will appear in the display for 3 seconds and back to standby mode. The "Loc" will display for 3 seconds when you touch any pad.
To Unlock, press for 3 seconds, you will hear a long beep and "Loc" will disappear.
COOKING END REMINDER FUNCTION
The oven will beep 4 times to alert the user that cooking time has ended. "End" will display. The time of day will display by opening the door or pressing pad.
TROUBLESHOOTING
|
TROUBLE
|
POSSIBLE CAUSE
|
POSSIBLE
REMEDY
|
|
Oven will not start
|
a. Electrical cord for oven is not plugged in.
b. Door is open.
c. Wrong operation is set.
|
a. Plug into the outlet.
b. Close the door and try again.
c. Check instructions.
|
|
Arcing or sparking
|
a. Materials to be avoided in microwave oven were used.
b. The oven is operated when empty.
c. Spilled food remains in the cavity.
|
a. Use microwave-safe cookware only.
b. Do not operate with oven empty.
c. Clean cavity with wet towel.
|
|
Unevenly cooked foods
|
a. Materials to be avoided in microwave oven were used.
b. Food is not defrosted completely.
c. Cooking time, power level is not suitable.
d. Food is not turned or stirred.
|
a. Use microwave-safe cookware only.
b. Completely defrost food.
c. Use correct cooking time, power level.
d. Turn or stir food.
|
|
Overcooked foods
|
Cooking time, power level is not suitable.
|
Use correct cooking time, power level.
|
|
Undercooked foods
|
a. Materials to be avoided in microwave oven were used.
b. Food is not defrosted completely.
c. Oven ventilation ports are restricted.
d. Cooking time, power level is not suitable.
|
a. Use microwave-safe cookware only.
b. Completely defrost food.
c. Check to see that oven ventilation ports are not restricted.
d. Use correct cooking time, power level.
|
|
Improper defrosting
|
a. Materials to be avoided in microwave oven were used.
b. Cooking time, power level is not suitable.
c. Food is not turned or stirred.
|
a. Use microwave-safe cookware only.
b. Use correct cook ing time, power level.
c. Turn or stir food.
|
|
Sensor cooked foods not properly cooked
|
a. Cover or lid on food not vented.
b. Door opened before sensor detected cooking time appears in display.
|
a. Cover or lid over food must contain vent hole for escaping steam.
b. Do not open door to stir or turn food before sensor detected cooking time appears in display.
|