
www.lg.com
Owner's Manual
IPS LED MONITOR
(LED MONITOR)
29UM65
29UB65
Please read the safety information carefully before using the
product.
IPS LED Monitor (LED Monitor) Model List
ENGLISH

2
ENG
ENGLISH
Contents
CONTENTS
24 CUSTOMIZING SETTINGS
24 ActivatingtheMainMenu
25 Customizingsettings
25 - MenuSettings
25 - -Easycontrol
26 - -Function
27 - -PBP
28 - -Screen
29 - -Settings
30 - -Reset
31 - ReaderSettings
32 TROUBLESHOOTING
34 SPECIFICATIONS
35 Factorysupportmode
(PresetMode,DVI-D/HDMI/PC
DisplayPort)
35 HDMITiming(Video)
35 PowerIndicator
36 PROPER POSTURE
36 ProperPostureforUsingtheMonitor
3 LICENSE
4 ASSEMBLING AND
PREPARING
4 ProductComponents
5 ComponentandButtonDescription
7 MovingandLiftingtheMonitor
8 InstallingtheMonitor
8 - Assemblingthestandbase
9 - Usingthecableholder
10 - Detachingthestandbase
12 - Installingontoatable
13 - Adjustingthestandheight
14 - Adjustingtheangle
15 - Pivotfeature
16 - UsingtheKensingtonlock
16 - Installingthewallmountplate
17 - Installingtoawall
18 USING THE MONITOR
18 ConnectingtoaPC
18 - DVIconnection
19 - DisplayPortconnection
19 - HDMIconnection
20 ConnectingtoAVDevices
20 - HDMIconnection
21 ConnectingtoExternalDevices
21 - Headphoneportconnection
22 INSTALLING LG MONITOR
SOFTWARE

3
ENG
ENGLISH
LICENSE
LICENSE
Eachmodelhasdifferentlicenses.Visitwww.lg.comformoreinformationonthelicense.
ThetermsHDMIandHDMIHigh-DefinitionMultimediaInterface,andthe
HDMIlogoaretrademarksorregisteredtrademarksofHDMILicensingLLC
intheUnitedStatesandothercountries.
VESA,VESAlogo,DisplayPortComplianceLogoandDisplayPort
ComplianceLogofordual-modesourceareallregisteredtrademarksofthe
VideoElectronicsStandardsAssociation.
4
ENG
ENGLISH
ASSEMBLING AND PREPARING
ASSEMBLING AND PREPARING
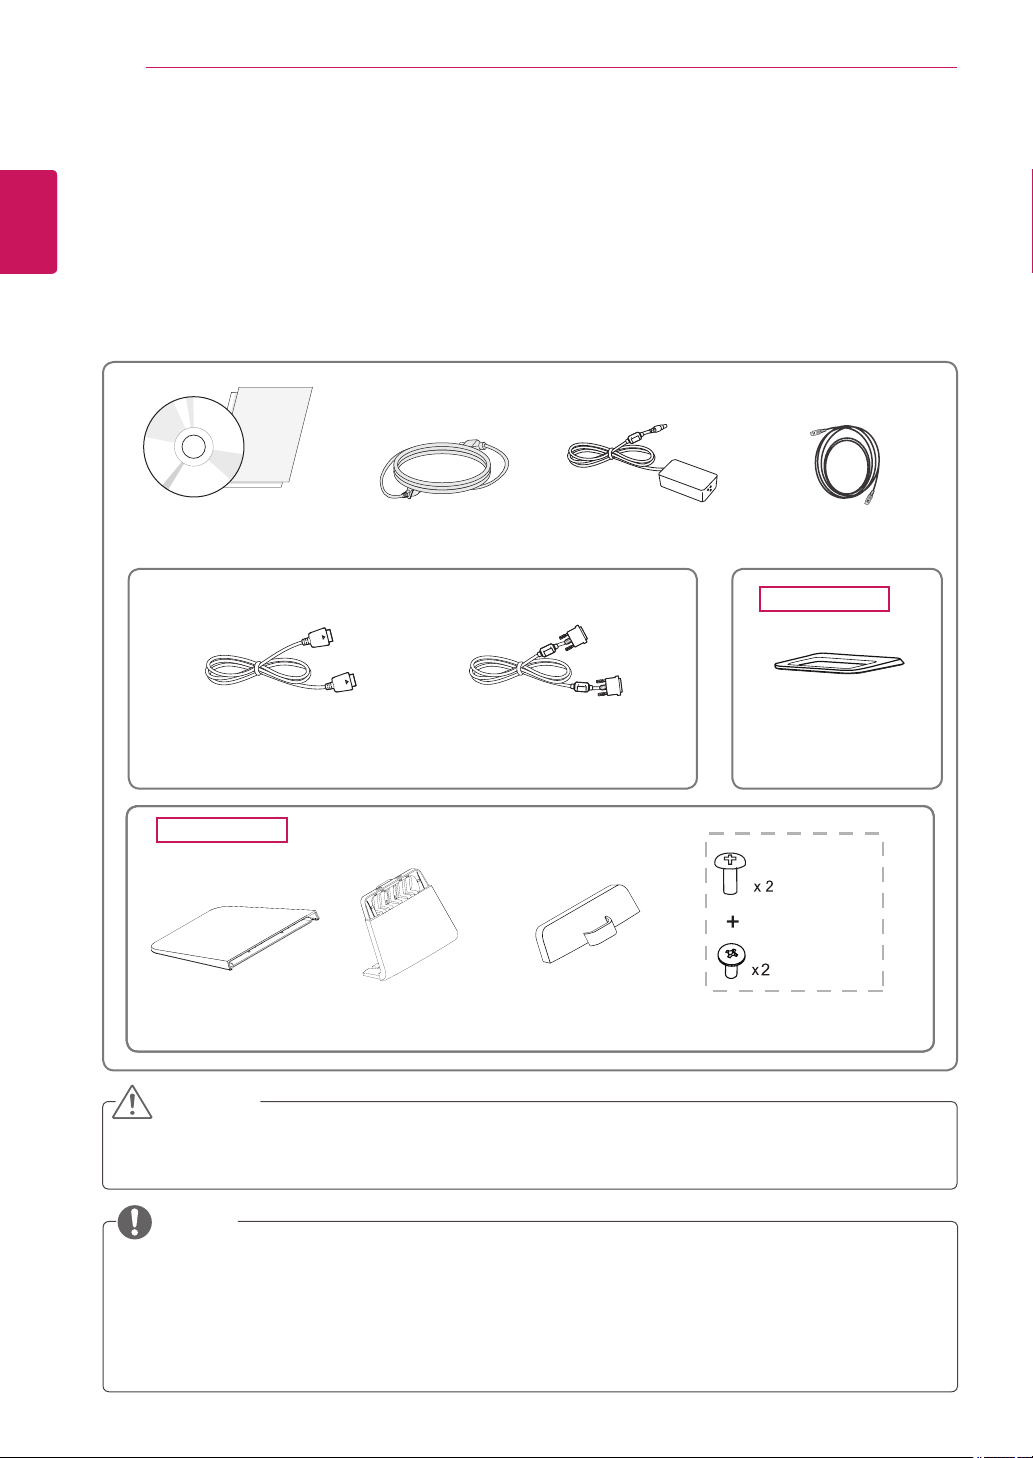
Product Components
Pleasecheckwhetherallthecomponentsareincludedintheboxbeforeusingtheproduct.Ifthereare
missingcomponents,contacttheretailstorewhereyoupurchasedtheproduct.Notethattheproductand
componentsmaylookdifferentfromthoseshownhere.
Alwaysusegenuinecomponentstoensuresafetyandproductperformance.
Theproductwarrantywillnotcoverdamageorinjurycausedbytheuseofcounterfeitcomponents.
Notethatthecomponentsmaylookdifferentfromthoseshownhere.
Withoutpriornotice,allinformationandspecificationsinthismanualaresubjecttochangetoim-
provetheperformanceoftheproduct.
Topurchaseoptionalaccessories,visitanelectronicsstoreoronlineshoppingsiteorcontactthe
retailstorewhereyoupurchasedtheproduct.
TheDisplayPortcablemaynotbeavailableinsomeareas.
CAUTION
NOTE
Power CordUser Manual/Card AC/DC Adapter
29UM65
OPTIONAL ACCESSORIES
TheDisplayPortcablemaynot
beavailableinsomeareas.
Display Port Cable
Stand Base
Stand Base
Stand Body
Cable Holder
Screws
(Black)
(Sliver)
HDMI Cable
29UM65
29UB65
DVI-D Dual Cable
(Thiscableisnotincludedinall
countries.)

5
ENG
ENGLISH
ASSEMBLING AND PREPARING
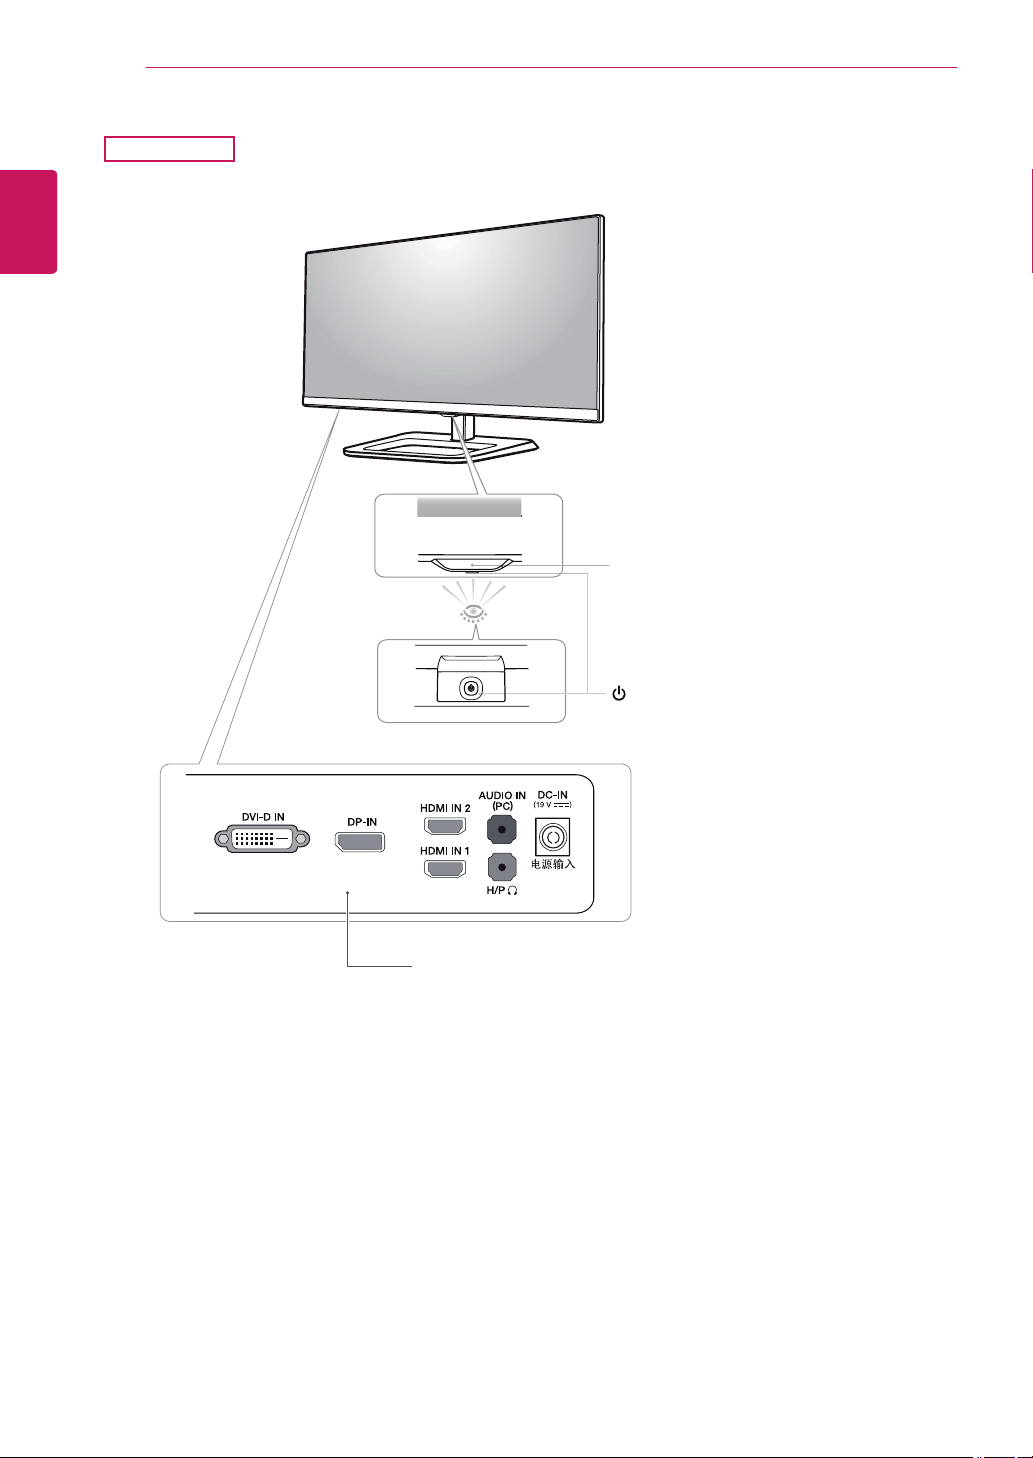
Component and Button Description
29UM65
Power Indicator
On:powerison
Off:powerisoff
Ports
(PowerButton)
6
ENG
ENGLISH
ASSEMBLING AND PREPARING
29UB65
Power Indicator
On:powerison
Off:powerisoff
Ports
(PowerButton)
7
ENG
ENGLISH
ASSEMBLING AND PREPARING
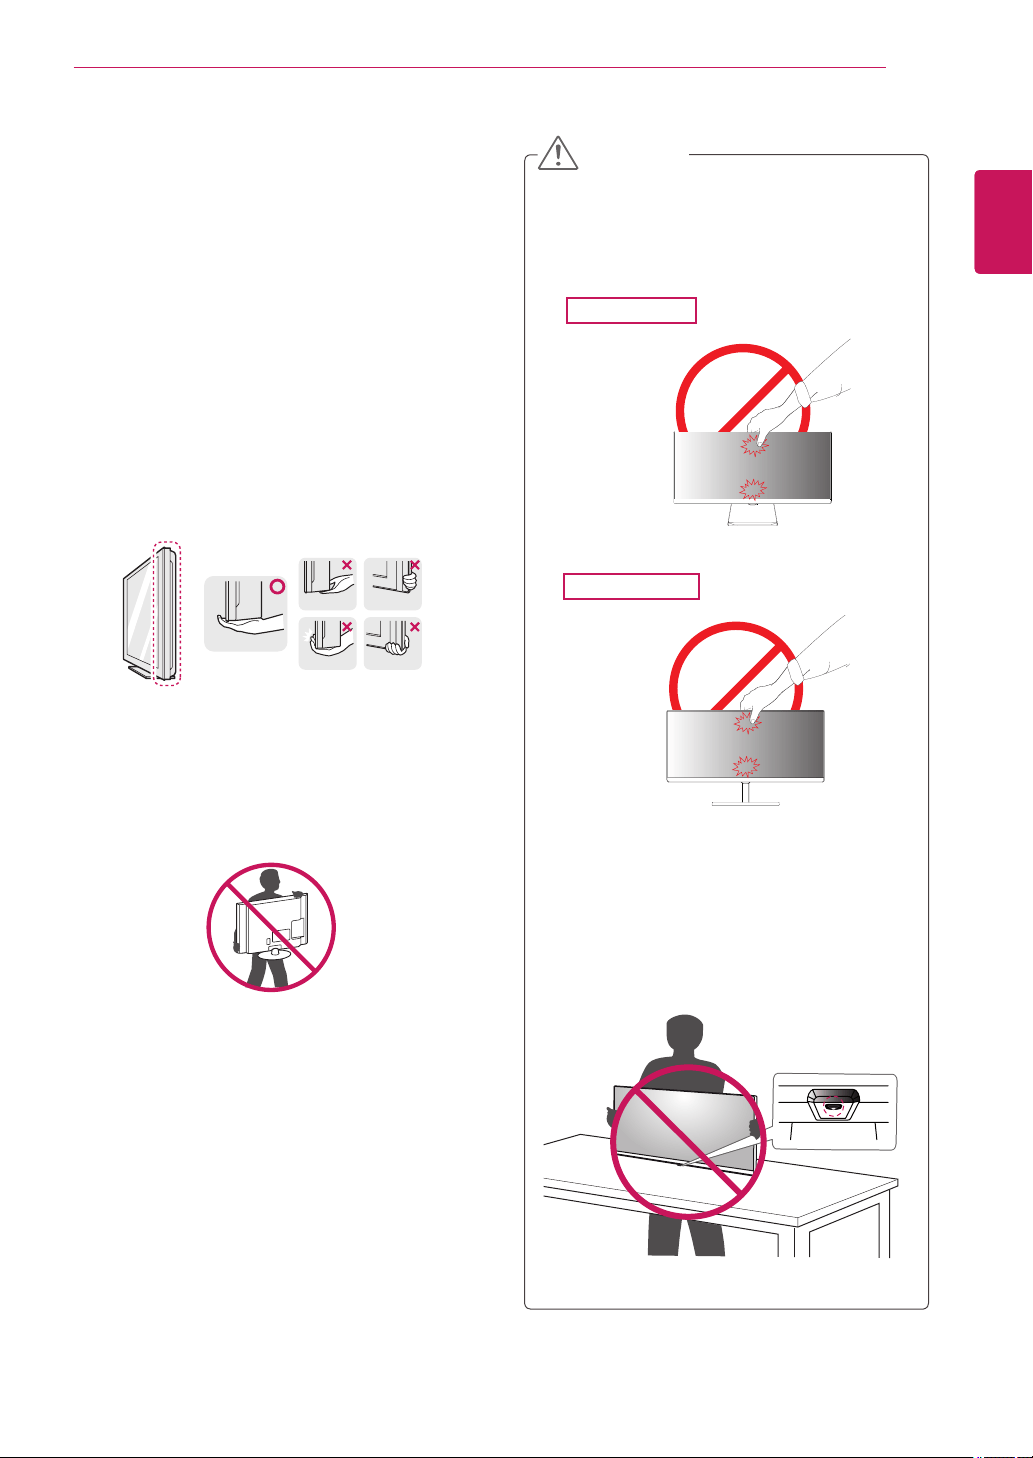
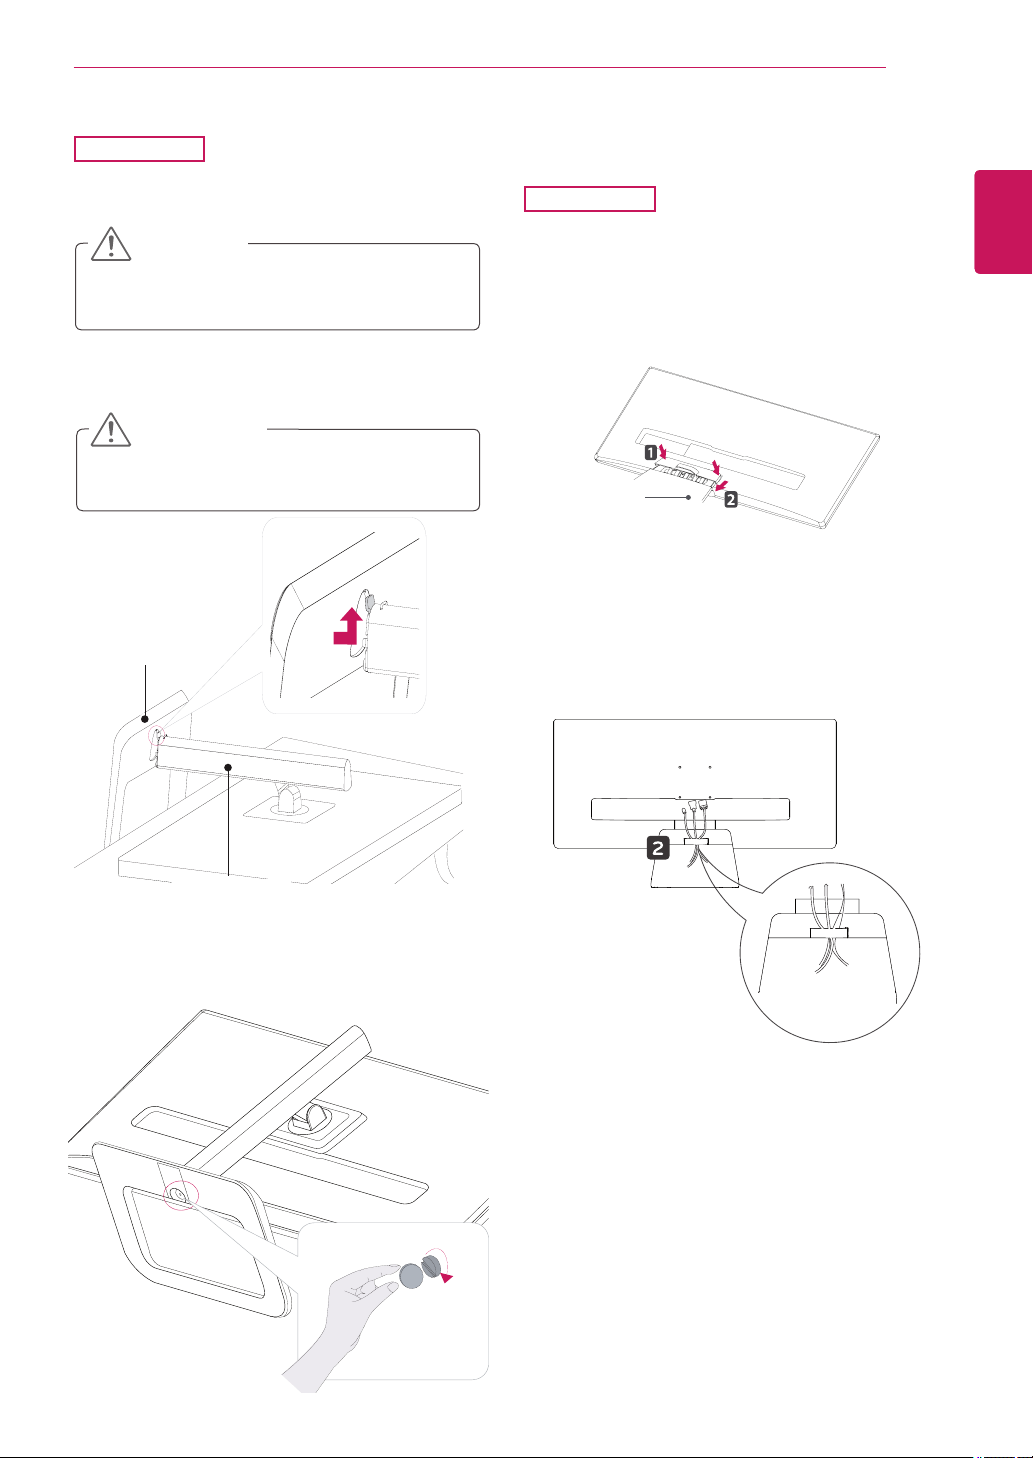
Moving and Lifting the Monitor
Whenmovingorliftingthemonitor,followthese
instructionstopreventthemonitorfrombeing
scratchedordamagedandtoensuresafetrans-
portationregardlessofitsshapeorsize.
Asfaraspossible,avoidtouchingthemoni-
torscreen.Thismayresultindamagetothe
screenorsomeofthepixelsusedtocreate
images.
Itisadvisabletoplacethemonitorinthe
originalboxorpackingmaterialbeforeat-
temptingtomoveit.
Beforemovingorliftingthemonitor,discon-
nectthepowercordandallcables.
Holdthetopandbottomofthemonitorframe
firmly.Donotholdthepanelitself.
Whenholdingthemonitor,thescreenshould
faceawayfromyoutopreventitbeing
scratched.
Whenmovingthemonitor,avoidanystrong
shockorvibrationstotheproduct.
Whenmovingthemonitor,keepitupright,
neverturnthemonitoronitssideortiltit
sideways.
CAUTION
29UM65
29UB65
Ifyouusethemonitorpanelwithoutthe
standbase,itsjoystickbuttonmaycause
themonitortobecomeunstableandfall,
resultingindamagetothemonitororhuman
injury.Inaddition,thismaycausethejoystick
buttontomalfunction.
8
ENG
ENGLISH
ASSEMBLING AND PREPARING
Installing the Monitor
Assembling the stand base
Toprotectthescreenfromscratches,cover
thesurfacewithasoftcloth.
CAUTION
2
First,pleaseinsertStandBodytoStandBase,
Thentightentwoscrewsintothebackofthe
standbase.
1
Placethescreenfacedown.
29UM65
Applyingexcessiveforcewhentightening
thescrewsmaycausedamagetothemoni-
tor.Damagecausedinthiswaywillnotbe
coveredbytheproductwarranty.
CAUTION
3
Checkthedirectionofthestandbody
(front,back)andthenmountthestandbody
ontothestandhinge.
4
Tightentwoscrewsintothebackofthestand
body.
Itmayhurtyourfootoffthestand,sobe
careful.
CAUTION
Stand Body
Stand Body
Stand Base
(Silver)
(Black)
Or
120mm
100mm
(Black)
Stand Hinge
9
ENG
ENGLISH
ASSEMBLING AND PREPARING
Toprotectthescreenfromscratches,cover
thesurfacewithasoftcloth.
CAUTION
1
Placethescreenfacedown.
29UB65
Using the cable holder
3
Fixbyturningthescrewtotherightwithacoin.
2
Insertthe
stand base
intothehookofthe
stand body
.
Itmayhurtyourfootoffthestand,sobe
careful.
CAUTION
29UM65
1
First,asshownintheillustration,pushthe
cableholderonthestandbody,Second,Fix
thecableholdertostandbody.
2
Putthecablesintothecableholder.
Stand Base
Stand Body
Stand Body
10
ENG
ENGLISH
ASSEMBLING AND PREPARING
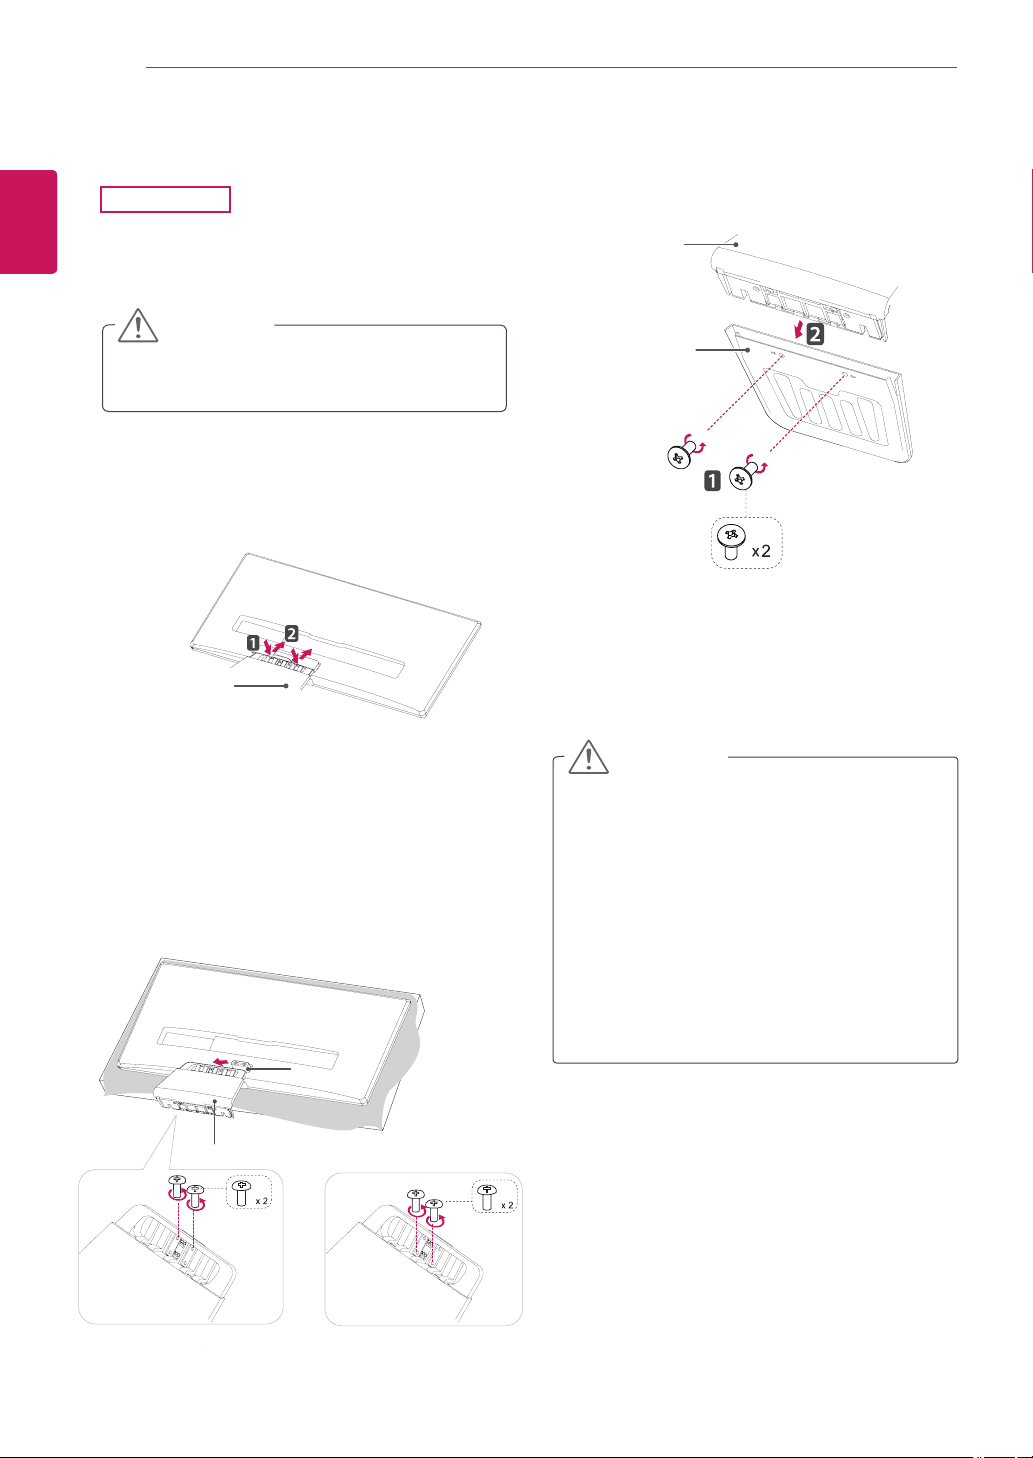
Detaching the stand base
2
First,pressthethecableholderasshownin
theillustration,Second,Removethecable
holderfromthestandbody.
Toprotectthescreenfromscratches,cover
thesurfacewithasoftcloth.
CAUTION
Illustrationsinthisdocumentrepresenttypi-
calprocedures,sotheymaylookdifferent
fromtheactualproduct.
Donotcarrythemonitorupsidedownbyjust
holdingthestandbase.Thismaycausethe
monitortofalloffthestandandcouldresult
inpersonalinjury.
Whenliftingormovingthemonitor,donot
touchthemonitorscreen.Applyingforceor
pressuremaydamagethemonitorscreen.
Instead,holdthestandbodyortheplastic
frameoftheproduct.
CAUTION
1
Placethescreenfacedown.
29UM65
4
RemovethetwoscrewsfromtheStandBase.
RemovetheStandBasefromtheStandBody.
3
Removethetwoscrewsonthebackofstand
body
.
Asshownintheillustration,disconnectthe
stand body from the stand hinge.
Stand Hinge
Stand Body
Stand Body
Stand Body
Stand Base
(Black)
(Black)
(Silver)
or
11
ENG
ENGLISH
ASSEMBLING AND PREPARING
Toprotectthescreenfromscratches,cover
thesurfacewithasoftcloth.
CAUTION
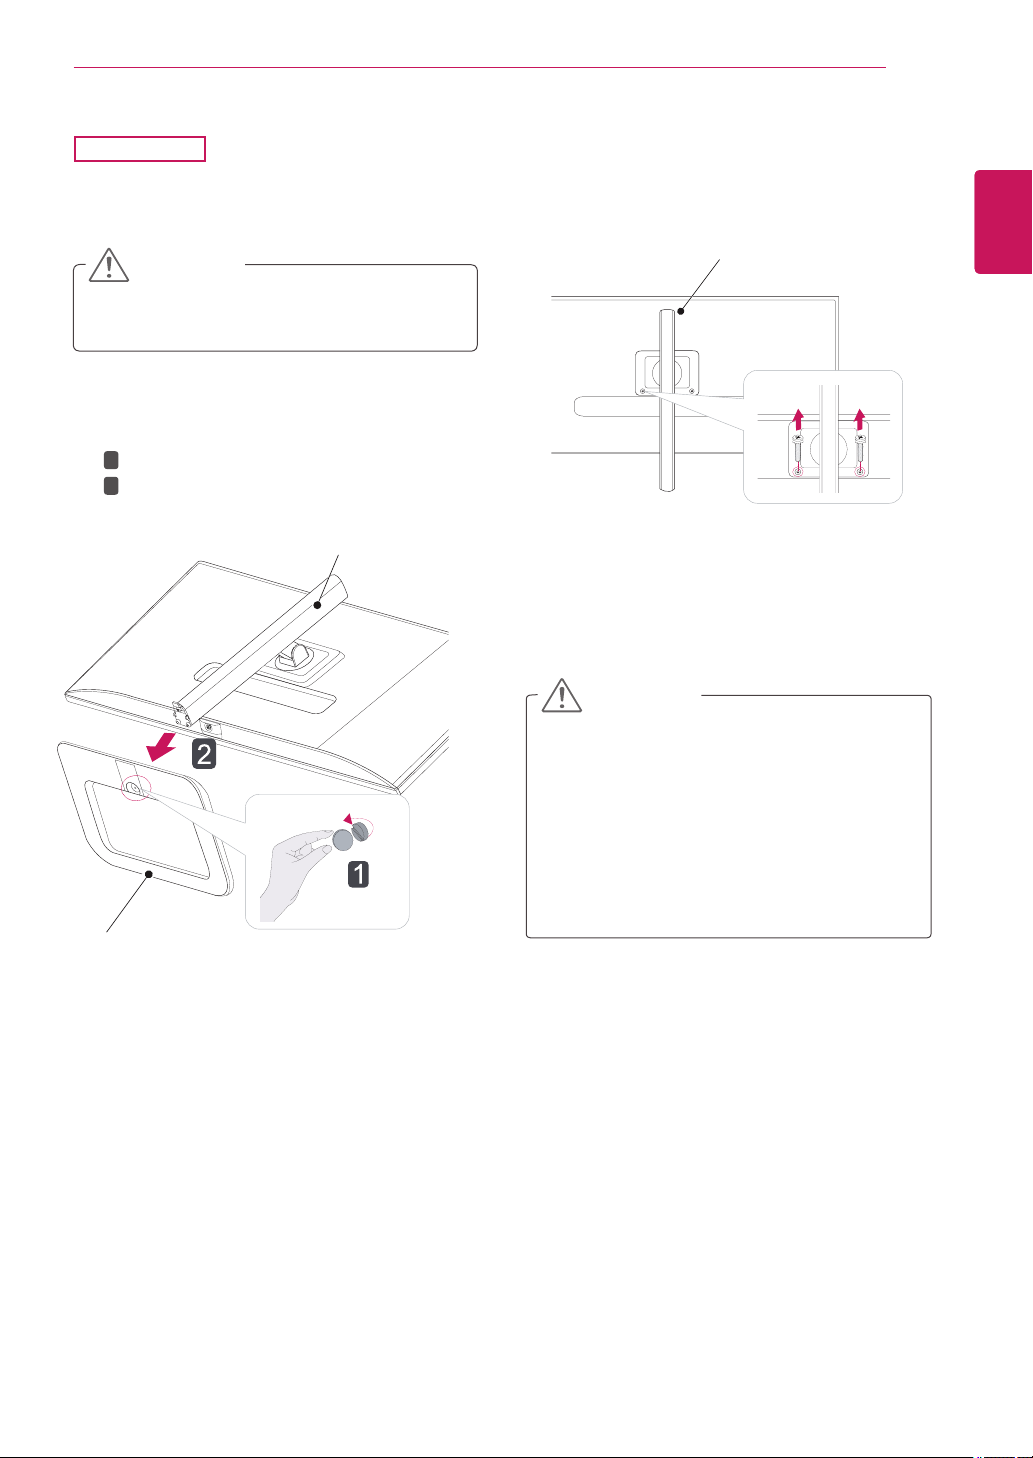
1
Placethescreenfacedown.
29UB65
Thecomponentsintheillustrationsmaydif-
ferfromtheactualproduct.
Donotcarrythemonitorupsidedown,asthis
maycauseittofalloffitsstandandresultin
damageorinjury.
Toavoiddamagingthescreenwhenlifting
ormovingthemonitor,onlyholdthestandor
theplasticcover.Thisavoidsputtingunnec-
essarypressureonthescreen.
CAUTION
2
Turnthescrewtotheleftusingacoin.
Detachthe
stand base
.
1
2
3
Removethetwoscrewsfromthestandbody.
Stand Base
Stand Body
Stand Body
12
ENG
ENGLISH
ASSEMBLING AND PREPARING
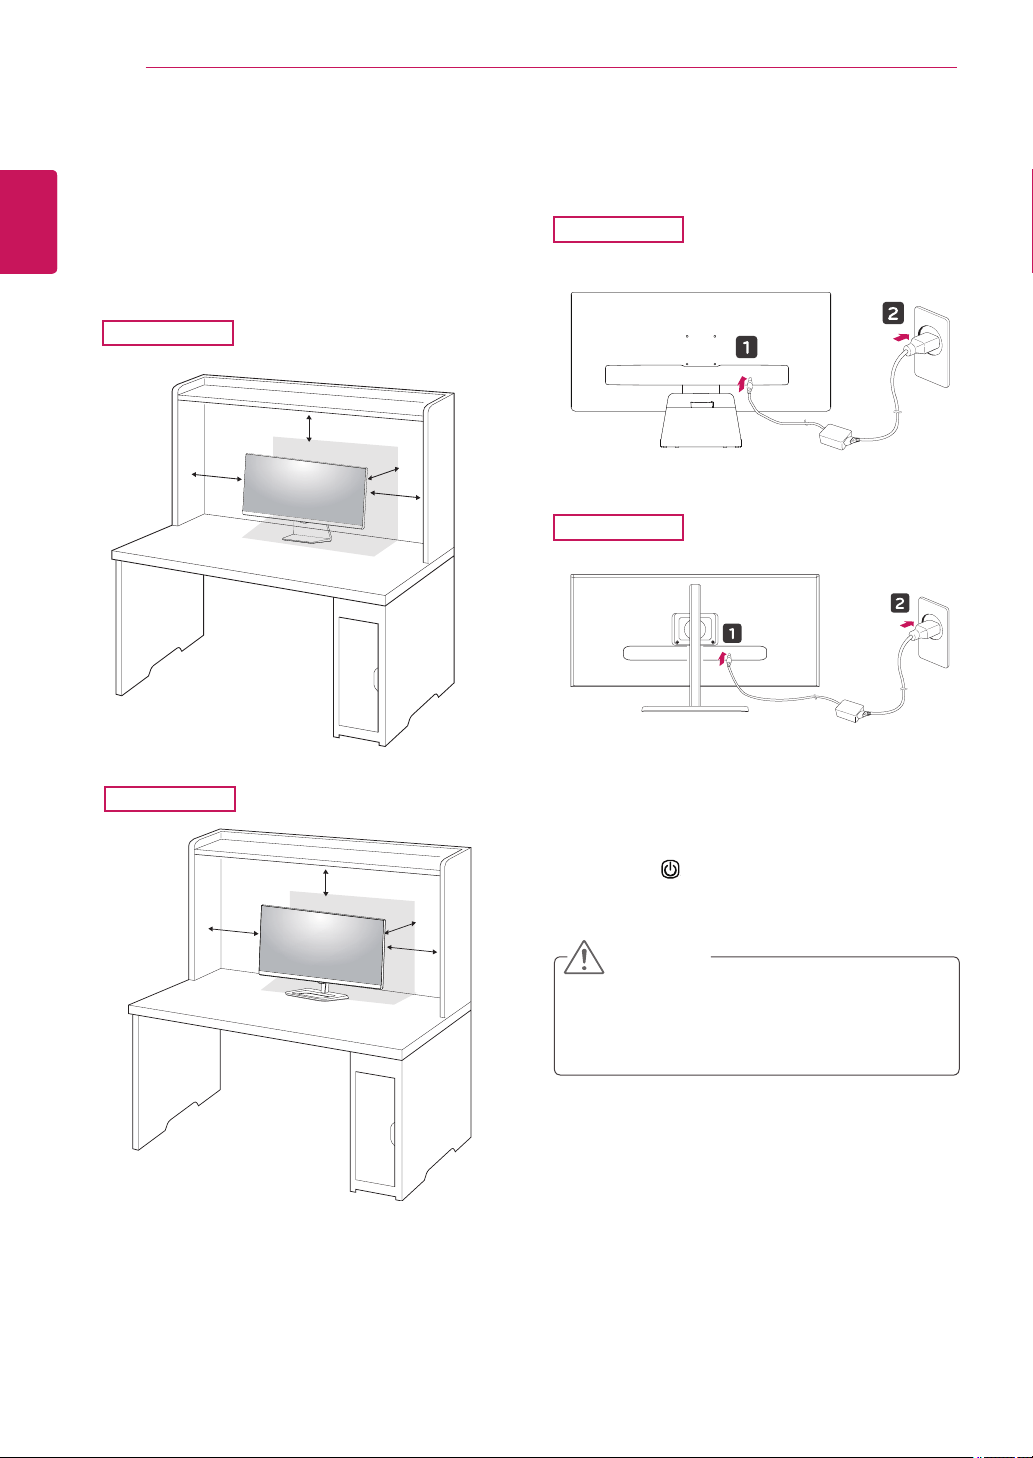
Installing onto a table
1
Liftthemonitorandplaceitonthetableinan
uprightposition.
Placeatleast
10 cm
awayfromthewallto
ensuresufficientventilation.
2
Connecttheadaptertothemonitor,thenplug
thepowercordintothepoweroutlet.
3
Pressthe (Power)buttononthebottomof
themonitortoturniton.
Unplugthepowercordpriortomovingor
installingthemonitor.Thereisriskofelectric
shock.
CAUTION
29UM65
29UM65
29UB65
10cm
10cm
10cm
10cm
29UB65
10 cm
10 cm
10 cm
10 cm
13
ENG
ENGLISH
ASSEMBLING AND PREPARING
Oncethepinisremoved,itisnotnecessary
tore-insertittoadjusttheheight.
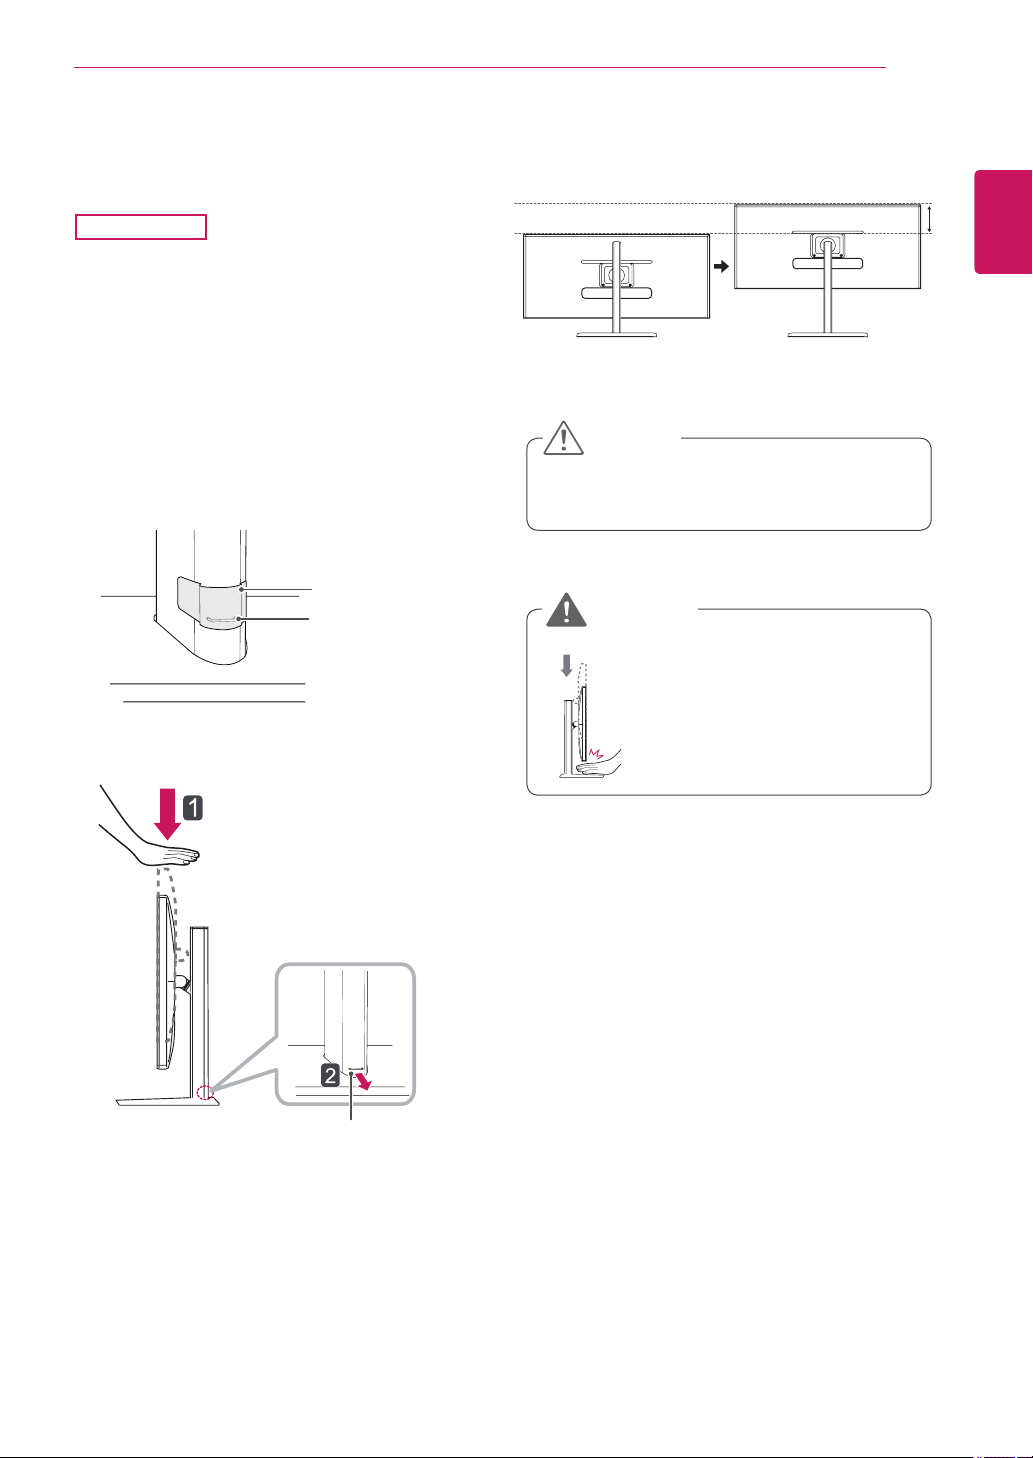
Adjusting the stand height
2
Removethe
tape attached to the bottom
back of the stand body and then pull out the
locking pin while pressing the head down-
ward.
3
Theheightcanbeadjustedupto
110.0 mm
.
Donotputyourfingersor
handbetweenthescreen
andthebase(chassis)when
adjustingthescreen'sheight.
Tape
Locking Pin
Stand Body
CAUTION
WARNING
Head
Locking pin
1
Standthemonitorassembledwiththestand
baseinanuprightposition
29UB65
110.0mm
14
ENG
ENGLISH
ASSEMBLING AND PREPARING
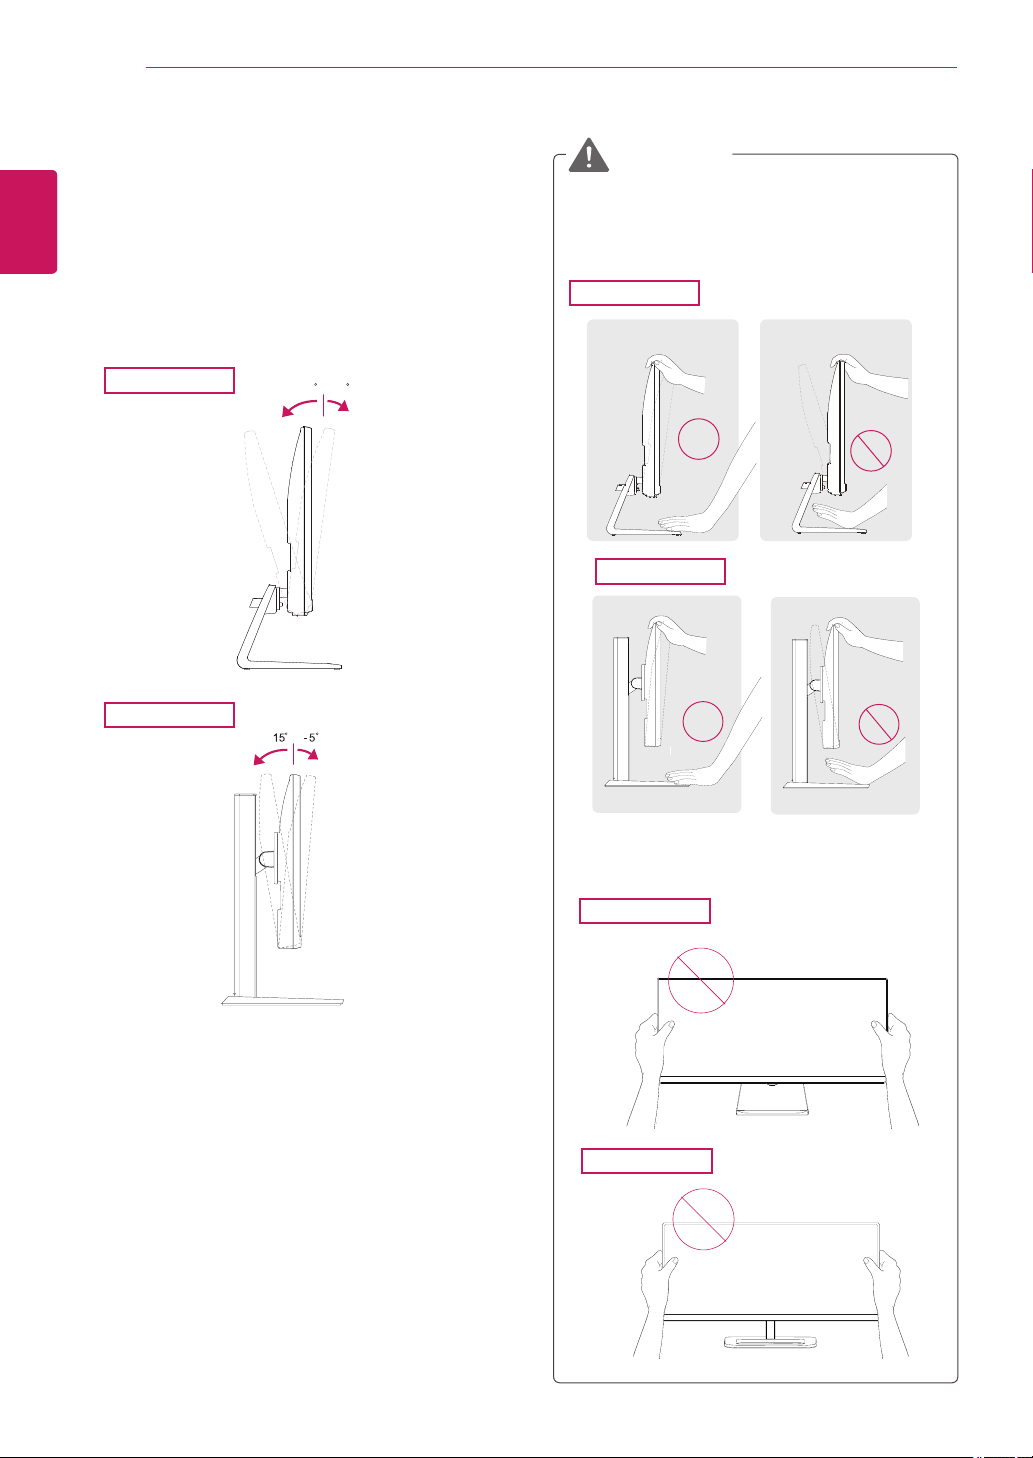
Adjusting the angle
1
Placethemonitorinanuprightposition,mount-
edonthestandbase.
2
Adjusttheangleofthescreen.Theangleofthe
screencanbeadjustedforwardsorbackwards
foracomfortableviewingexperience.
Toavoidinjurytothefingerswhenadjusting
thescreen,donotholdthelowerpartofthe
monitor'sframeasillustratedbelow.
Becarefulnottotouchorpressthescreen
areawhenadjustingtheangleofthemonitor.
WARNING
29UB65
29UM65
29UM65
29UM65
29UB65
29UB65
Front Side
Rear Side
Front Side
Rear Side
-520
-520
-520
15
ENG
ENGLISH
ASSEMBLING AND PREPARING
Toavoidscratchingthestandbase,make
surethatwhenrotatingthemonitorusing
thepivotfeature,thestanddoesnotmake
contactwiththemonitor.
WARNING
Pivot feature
Thepivotfeatureallowsthemonitortorotate90
clockwise.
29UB65
1
Raisethemonitoruptothemaximumheight.
2
Adjusttheangleofthemonitorinthedirection
ofthearrowasshowninthefigure.
3
Rotatethemonitorclockwiseasshowninthe
figure.
4
Completetheinstallationbyrotatingthe
monitor90°asshownbelow.
Takecarewhenrotatingthemonitorifthe
cableisconnected.
WARNING
Animagedisplayedonthemonitor'sscreen
doesnotrotateaccordingtothescreen
orientation.
NOTE
Head
Stand
16
ENG
ENGLISH
ASSEMBLING AND PREPARING
Installing the wall mount plate
Thismonitorsupportsthespecificationofthestan-
dardwallmountplateorcompatibledevice.
1
Placethescreenfacedown.Toprotectthe
screenfromscratches,coverthesurfacewitha
softcloth.
2
Placethewallmountplateontothemonitor
andalignitwiththescrewholes.
3
Usingascrewdriver,tightenthefourscrewsto
fixtheplateontothemonitor.
Thewallmountplateissoldseparately.
Formoreinformationoninstallation,referto
thewallmountplate'sinstallationguide.
Becarefulnottouseexcessiveforcewhen
mountingthewallmountplate,asthiscan
damagethemonitor'sscreen.
NOTE
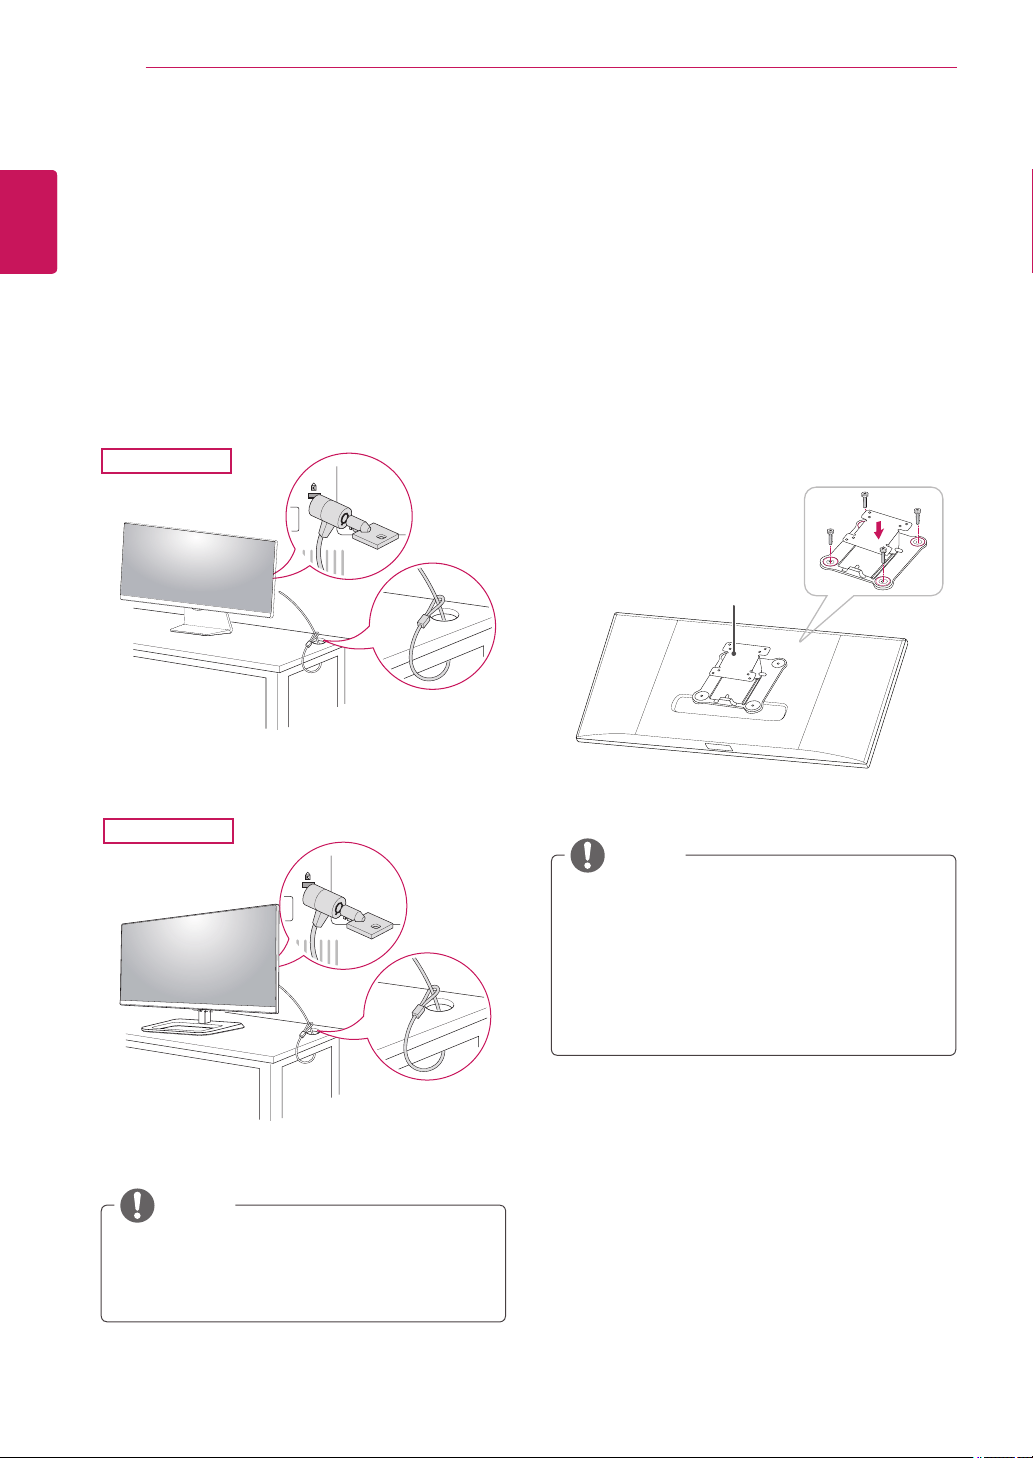
Use oftheKensingtonlockisoptional.
Theaccessoriescanbepurchasedat
your localelectronicsstore.
NOTE
Using the Kensington lock
TheKensingtonsecuritysystemconnectorislocat-
edatthebackoftheMonitorset.
Formoreinformationoninstallationandusage,
refertotheKensingtonlockusermanualorvisit
thewebsiteathttp://www.kensington.com.
ConnecttheKensingtonsecuritysystemcable
betweentheMonitorsetandatable.
29UM65
29UB65
Wall Mount Plate
17
ENG
ENGLISH
ASSEMBLING AND PREPARING
Toinstallthemonitortoawall,attachawallmount-
ingbracket(optional)tothebackofthemonitor.
Makesurethatthewallmountingbracketissecurely
fixedtothemonitorandtothewall.
1Usethescrewsandwallmountingbracketthat
complywiththeVESAstandard.
2Screwswhicharelongerthanthestandard
lengthmaydamagetheinsideofthemonitor.
3Anon-VESAstandardscrewmaydamagethe
productandcausethemonitortofall.LGElec-
tronicsisnotliableforanyaccidentsrelatingto
theuseofnon-standardscrews.
4VESAcompatibleonlywithrespecttoscrew
mountinginterfacedimensionsandmounting
screwspecifications
5UseitaccordingtotheVESAstandardasspeci-
fiedbelow.
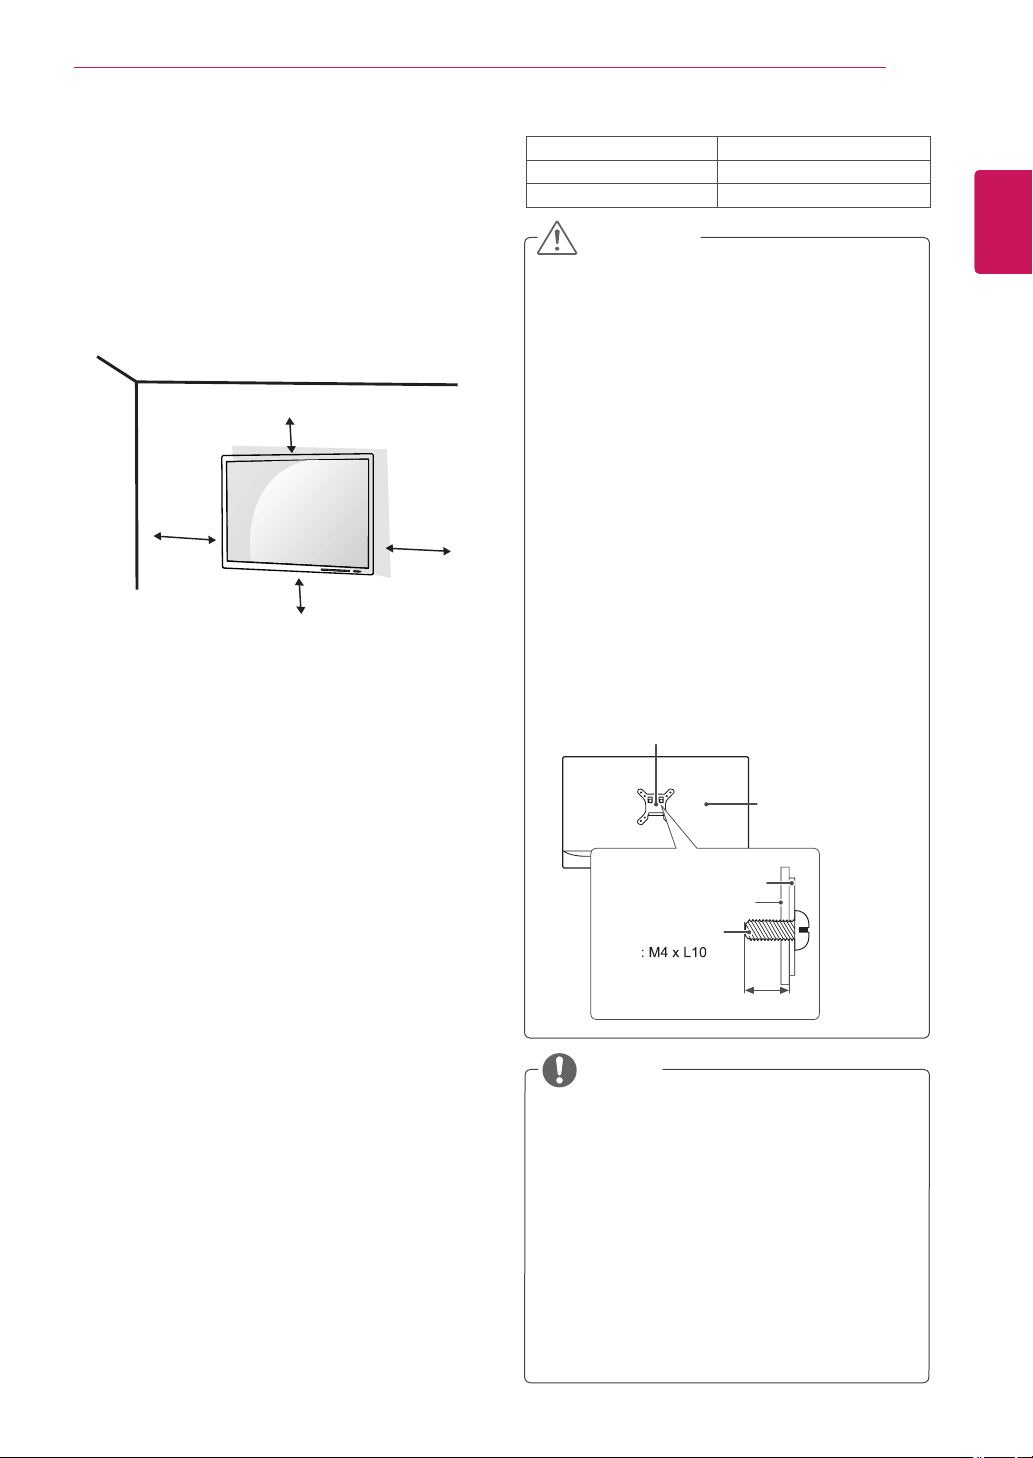
784.8mmorless
*Thicknessofthewallmountplate:2.6mm
*Fasteningscrew:Diameter4.0mmxPitch0.7
mmxLength10mm
787.4mmorgreater
*
Usethewallmountplateandscrewsthatcon-
formtotheVESAstandard
.
Installing to a wall
Installthemonitoratleast10cmawayfromthe
wallandleaveabout10cmofspaceateachside
ofthemonitortoensuresufficientventilation.De-
tailedinstallationinstructionscanbeobtainedfrom
yourlocalretailstore.Pleaserefertothemanual
toinstallandsetupatiltingwallmountingbracket.
10cm
10cm
10cm
10cm
Unplugthepowercordbeforemovingorin-
stallingthemonitortoavoidelectricshocks.
Installingthemonitorontheceilingorona
slantedwallmayresultinthemonitorfalling
off,whichcouldleadtoinjury.Pleaseuse
thegenuineLGwallmountingbracket.For
moreinformation,contactyourlocalretail
storeoraqualifiedinstaller.
Applyingexcessiveforcewhenfastening
screwsmaycausedamagetothemoni-
tor.Damagecausedinthiswaywillnotbe
coveredbytheproductwarranty.
Usethewallmountingbracketandscrews
thatconformtotheVESAstandard.Dam-
agecausedbytheuseormisuseofinap-
propriatecomponentswillnotbecovered
bytheproductwarranty.
Screwlengthfromoutersurfaceofback
covershouldbeunder8mm.
UsethescrewsspecifiedbytheVESAstan-
dard.
Thewallmountkitincludestheinstallation
guideandallnecessaryparts.
Thewallmountingbracketisoptional.The
accessoriescanbepurchasedatyourlocal
retailstore.
Thelengthofthescrewmaydifferforeach
wallmountingbracket.Ensurethecorrect
lengthscrewisused.
Formoreinformation,pleaserefertothe
usermanualforthewallmountingbracket.
CAUTION
NOTE
VESA (A x B)
75x75
Stand Screw
M4x10
Required Screws
4
WallmountPad
WallmountPad
BackCover
BackCover
Standardscrew
Max.8mm
18
ENG
ENGLISH
USING THE MONITOR
USING THE MONITOR
Connecting to a PC
Thismonitorsupportsthe*PlugandPlay
feature.
*PlugandPlay:Afeaturethatallowsyouto
addadevicetoyourcomputerwithouthaving
toreconfigureanythingorinstallanymanual
drivers.
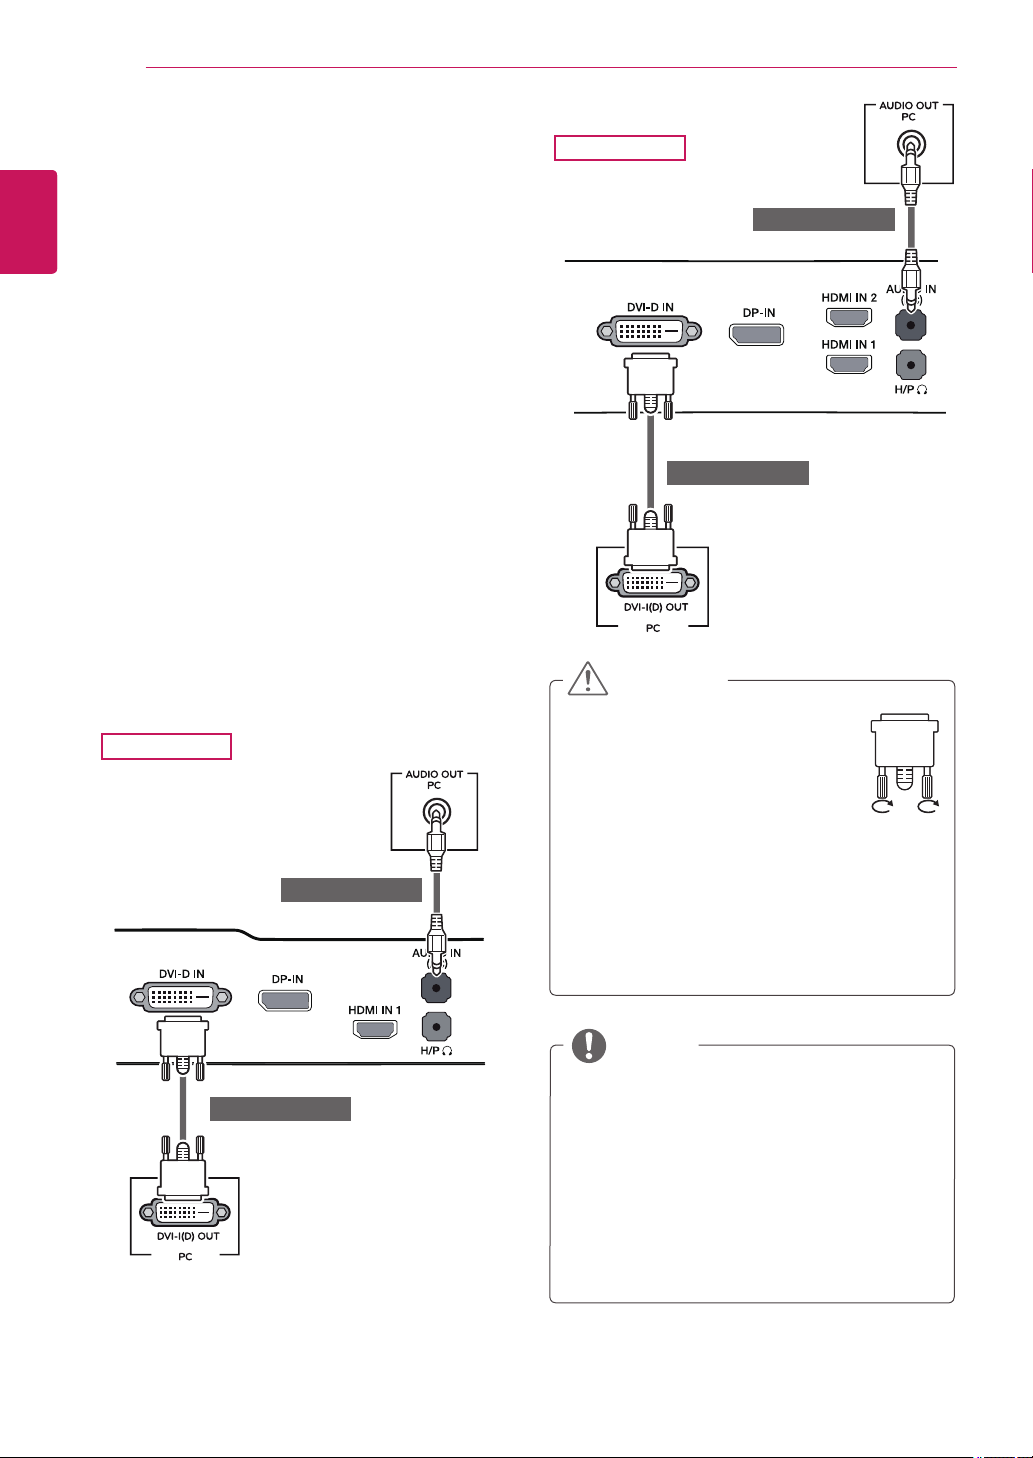
DVI connection
Transmitsdigitalvideosignalstothemonitor.Con-
nectthemonitorusingtheDVIcableasillustrated
below.
Pressthemenubuttonandthenselecttheinput
optionfromtheinputmenu.
TohearthesoundinDVIinputmode,connectthe
PC'sAUDIOOUTporttothemonitor'sAUDIOIN
(PC)portusingtheaudiocablethatcamewiththe
product.
Connecttheinputsignalcableand
turninthedirectionofthearrow.
Topreventdisconnectionsecure
thecabletightly.
Donotpressonthescreenfora
prolongedperiodoftime.Thismaycause
imagedistortion.
Donotdisplayastillimageonthescreen
foraprolongedperiodoftime.Thismay
causeimageretention.Ifpossible,usethe
screensaver.
CAUTION
Whenconnectingthepowercordtotheout-
let,useagrounded(3-hole)multi-socketora
groundedpoweroutlet.
Themonitormayflickerwhenturnedoninan
areaoflowtemperature.Thisisnormal.
Sometimesred,green,orbluespotsmayap-
pearonthescreen.Thisisnormal.
UsingaDVItoHDMIcablemaycausecom-
patibilityissues.
NOTE
29UM65
29UB65
(soldseparately)
(soldseparately)
(soldseparately)
(soldseparately)
19
ENG
ENGLISH
USING THE MONITOR
Theremaybenovideooraudiooutputde-
pendingontheDPversionofthePC.
TheDisplayPortcablemaynotbeavailable
insomeareas.
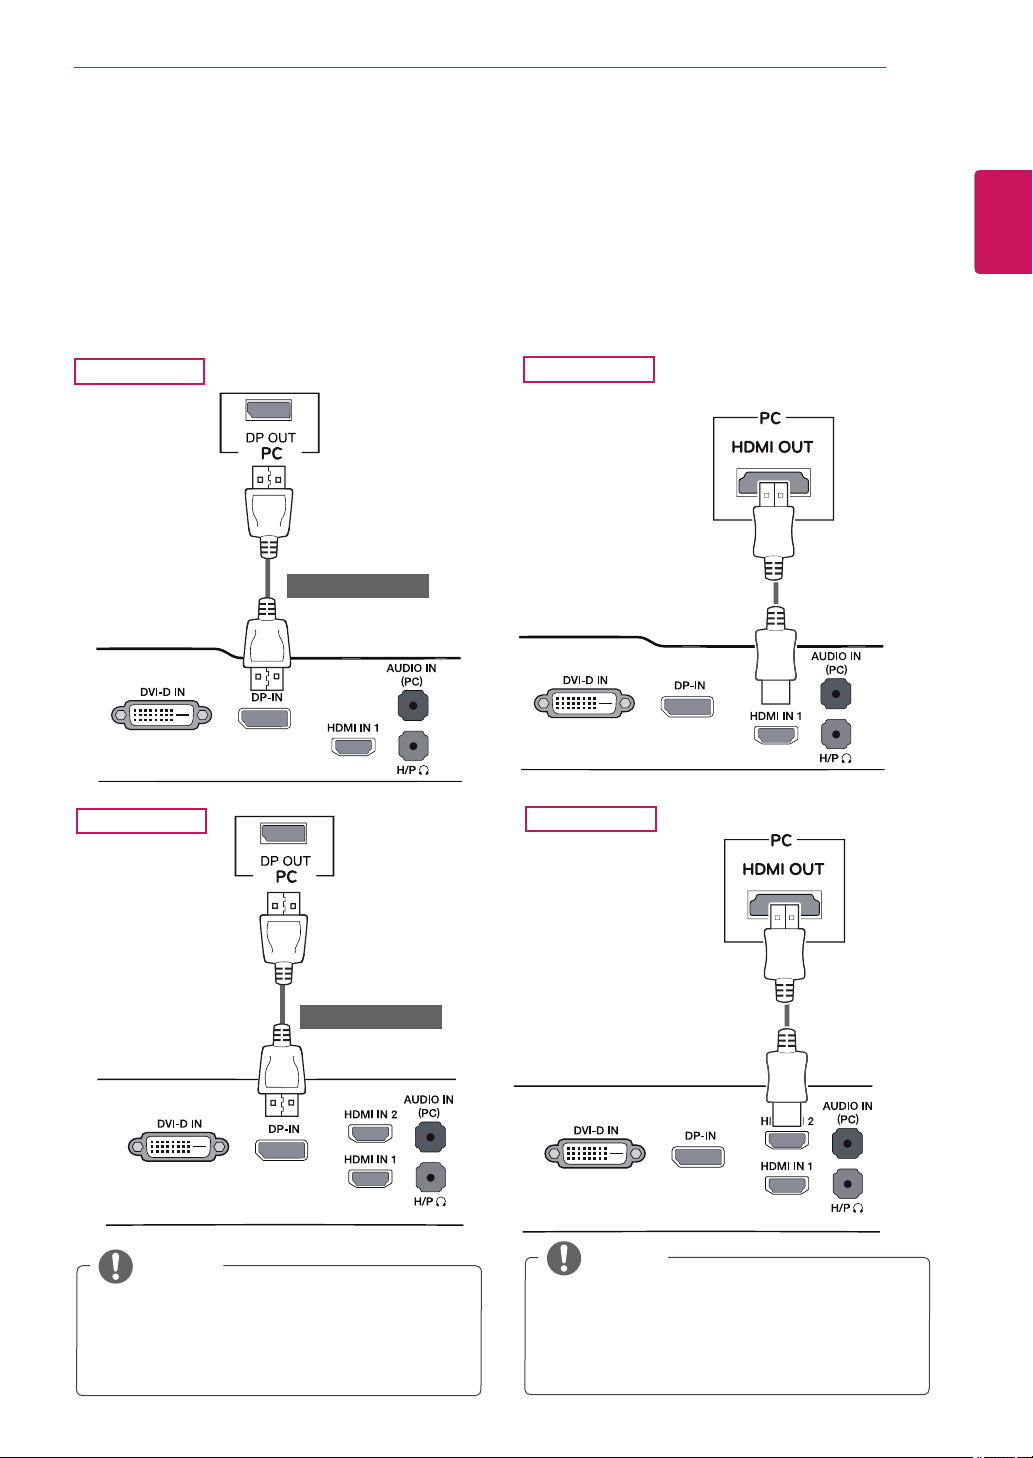
DisplayPort connection
Transmitsthedigitalvideoandaudiosignalsfrom
yourPCtothemonitor.ConnectyourPCtothe
monitorusingthedisplayportcableasillustrated
below.
Pressthemenubuttonandthenselecttheinput
optionfromtheinputmenu.
NOTE
HDMI connection
Transmitsthedigitalvideoandaudiosignalsfrom
yourPCandA/Vdevicestothemonitor.Connect
yourPCandAVdevicetothemonitorwiththe
HDMIcableasillustratedbelow.
Pressthemenubuttonandthenselecttheinput
optionfromtheinputmenu.
HDMIPCmaycausedevicecompatibility
issues.
UsingaDVItoHDMIcablemaycausecom-
patibilityissues.
NOTE
29UM65
29UB65
29UB65
29UM65
(soldseparately)
(soldseparately)
20
ENG
ENGLISH
USING THE MONITOR
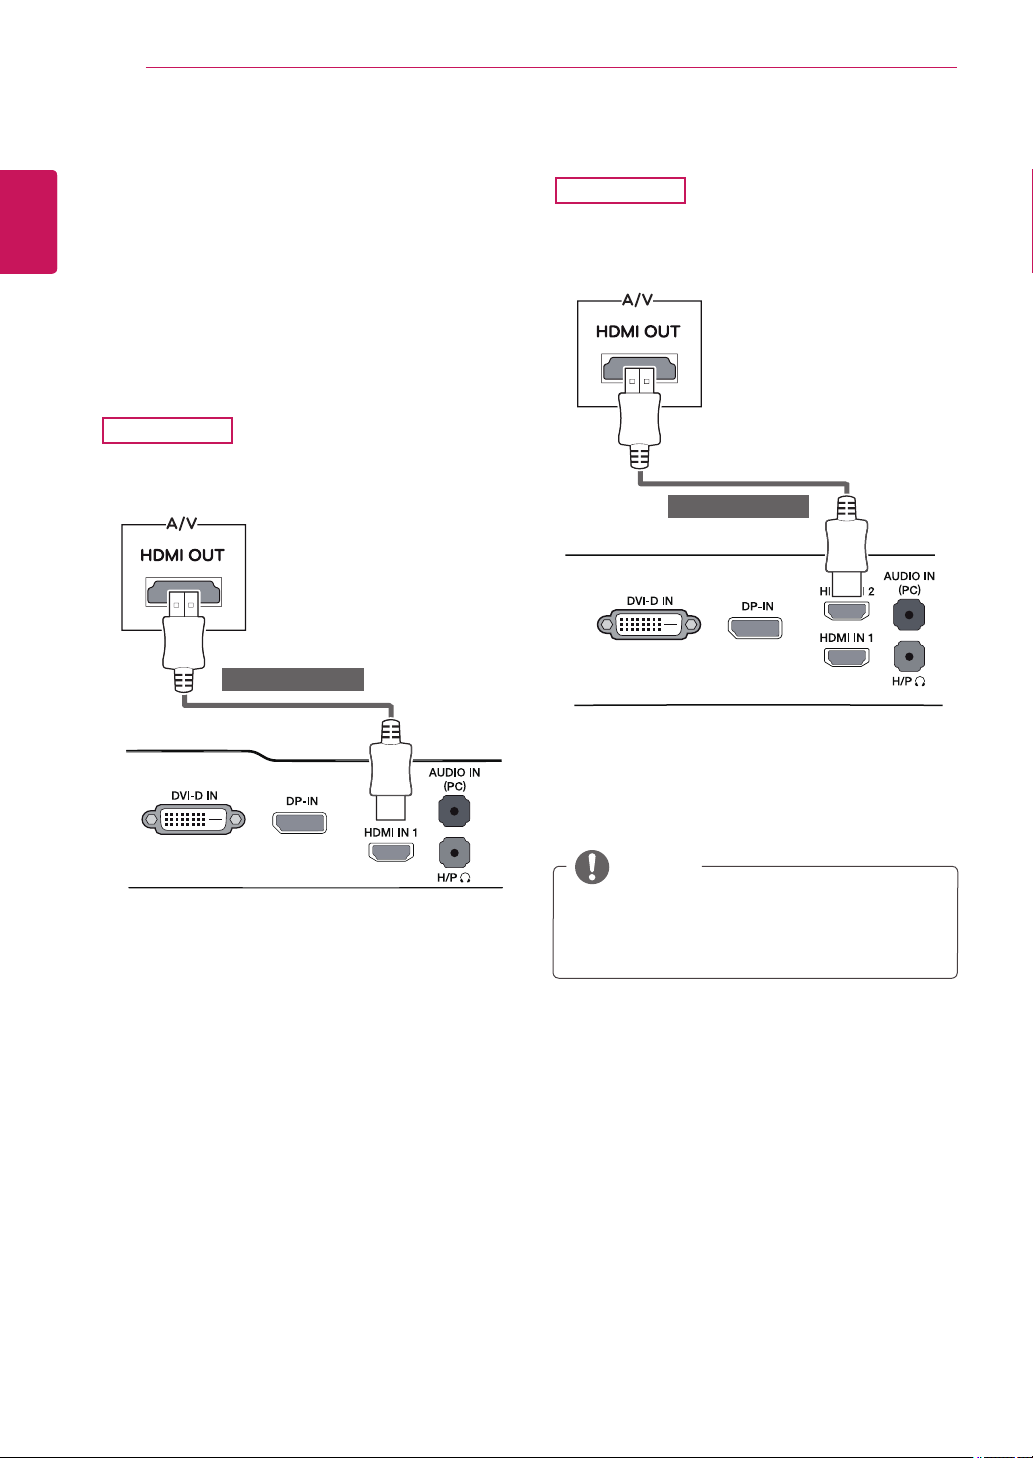
Connecting to AV Devices
HDMI connection
Transmitsthedigitalvideoandaudiosignalsfrom
yourPCandA/Vdevicestothemonitor.Connect
yourPCandAVdevicetothemonitorwiththe
HDMIcableasillustratedbelow.
Pressthemenubuttonandthenselecttheinput
optionfromtheinputmenu.
UsingaDVItoHDMIcablemaycausecom-
patibilityissues.
NOTE
29UM65
29UB65
(soldseparately)
(soldseparately)
21
ENG
ENGLISH
USING THE MONITOR
Connecting to External Devices
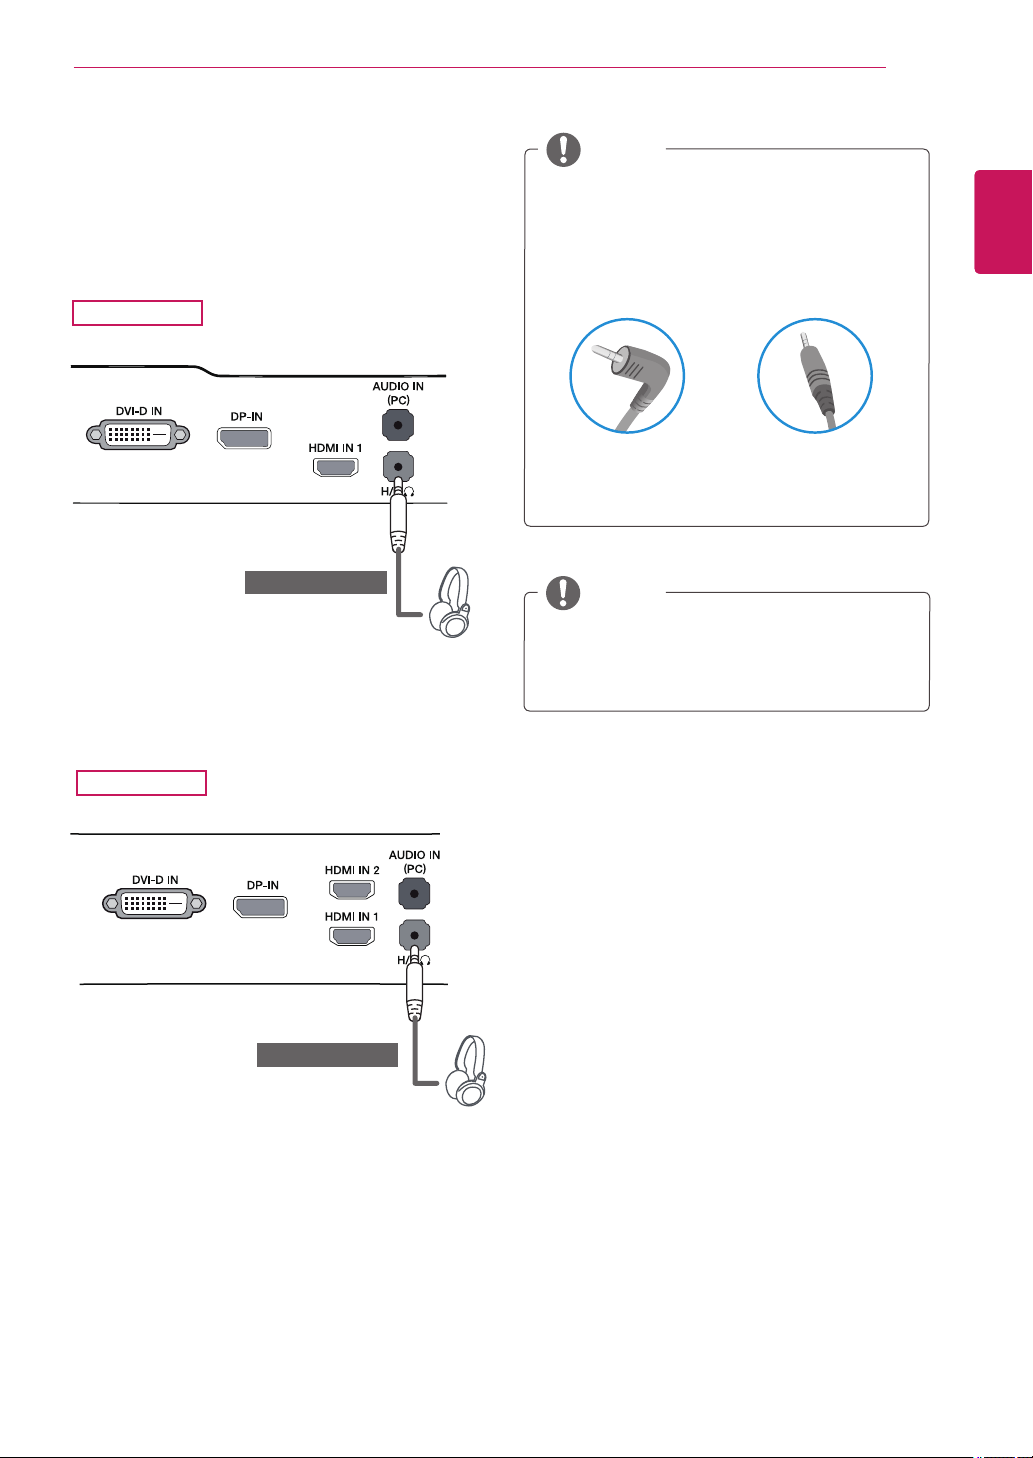
Headphone port connection
Usetheheadphoneporttoconnectaperipheral
devicetothemonitor.Connectasillustrated.
29UM65
29UB65
DependingontheaudiosettingsofthePC
andexternaldevice,headphoneandspeaker
functionsmaybelimited.
NOTE
Foranangleplugearphone,itisdifficult
connectitwithaperipheraldevice,sousea
straighttype.
NOTE
AngleType StraightType
(soldseparately)
(soldseparately)
22
ENG
ENGLISH
INSTALLING LG Monitor Software
INSTALLING LG MONITOR SOFTWARE
1
SetthedefaultWebbrowsertoInternetExplorer.
Insertthetheowner'smanualCDincludedintheproductpackageintoyourPC'sCDdriverandinstallthe
LGMonitorSoftware.
2
Clickthe"LGMonitorSoftware"ontheCD's
mainscreen.Whenthefiledownloadwindow
appears,clicktheRunbutton.(Thefiledown-
loadwindowmayvarydependingontheoper-
atingsystemandtheInternetExplorerversion,
buttheinstallationproceduresaresame.)
ServicePack1orhigherisrequiredfor
Windows7.
3
Followtheinstructionstoproceedwiththe
installation.
4
Check"Iacceptthetermsoftheagreement"on
theLicenseAgreementscreenandthenclick
the[Next]button.
ScreenSplit:Thisprogramautomatically
splitstheprogramwindowasdesired.
ThisprogramnotsupportedWindowsXP.
AutoResolution:Thisisaprogramthat
automaticallychangestheresolutiontothe
optimalsettingswhenconnectingthemonitor
tothePCinPBPmode.
ThisprogramisnotsupportedinClone
Mode.
ExtendedModeisnotsupportedwhen
usingasingledisplay.
ThisprogramnotsupportedWindowsXP&
Vista.
5
Selecttheprogramthatyouwanttoinstall.
NOTE
CAUTION
23
ENG
ENGLISH
INSTALLING LG Monitor Software
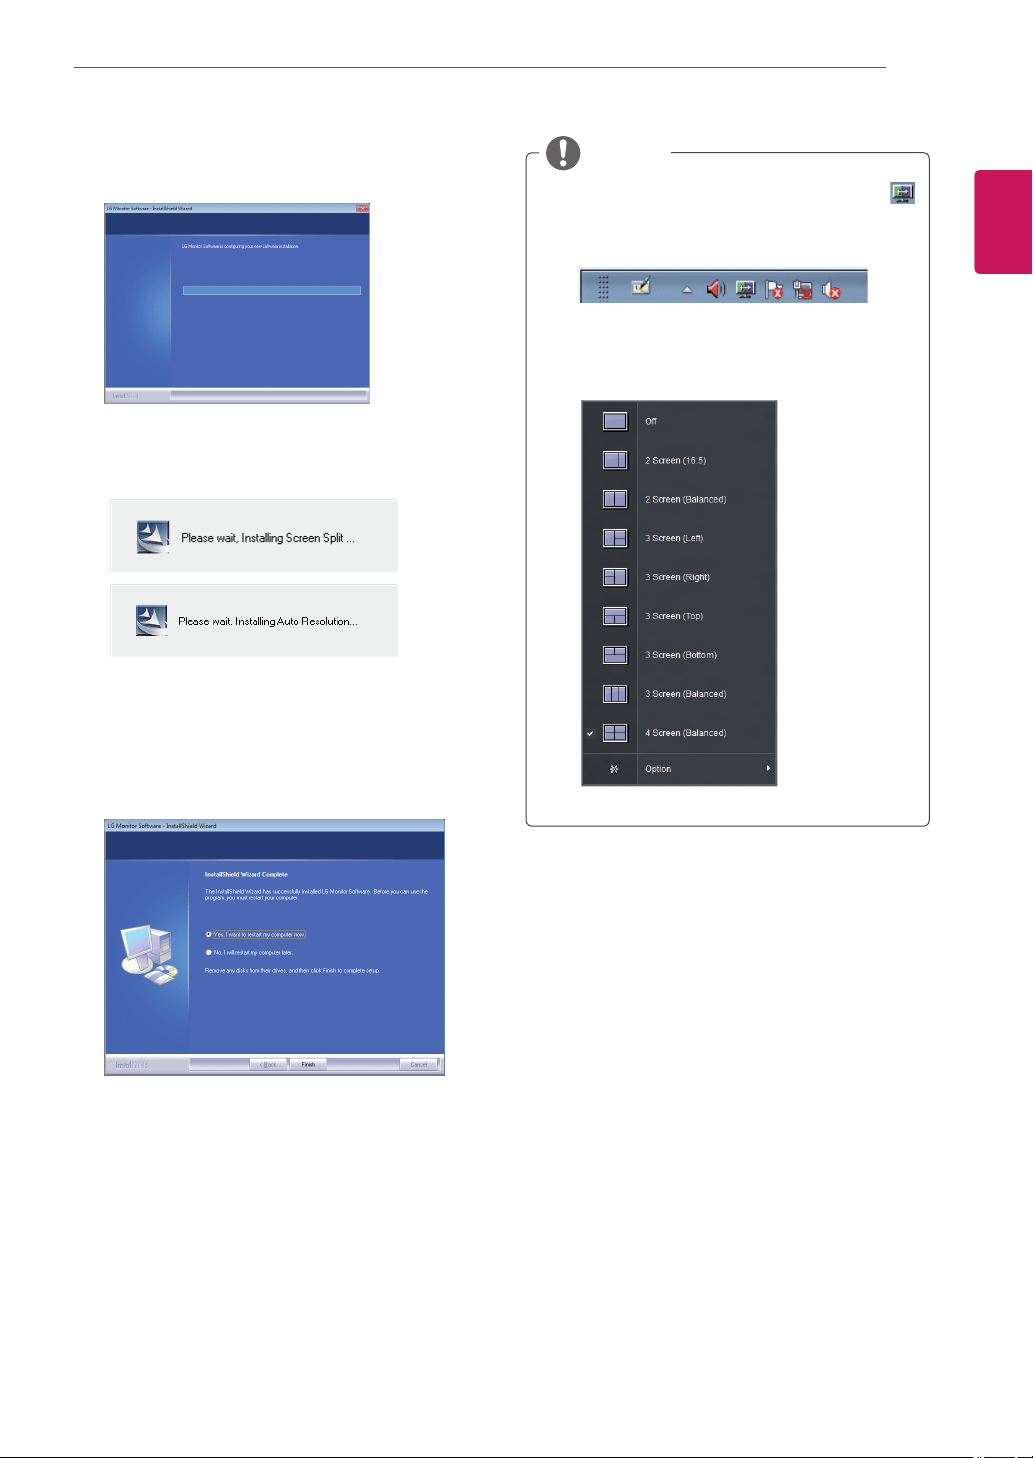
6
TheLGMonitorSoftwareinstallationstartsas
shownbelow.
7
TheprogramyouselectedontheSelect
Featurespagewillinstallautomatically.
8
Whentheinstallationiscomplete,restartyour
system.
NOTE
IfyourunScreenSplit,theScreenSpliticon[
]appearsinthesystemtrayattherightbottomof
thePCscreen.
Right-clicktheScreenSpliticonandselecta
layoutyouwant.
24
ENG
ENGLISH
CUSTOMIZING SETTINGS
CUSTOMIZING SETTINGS
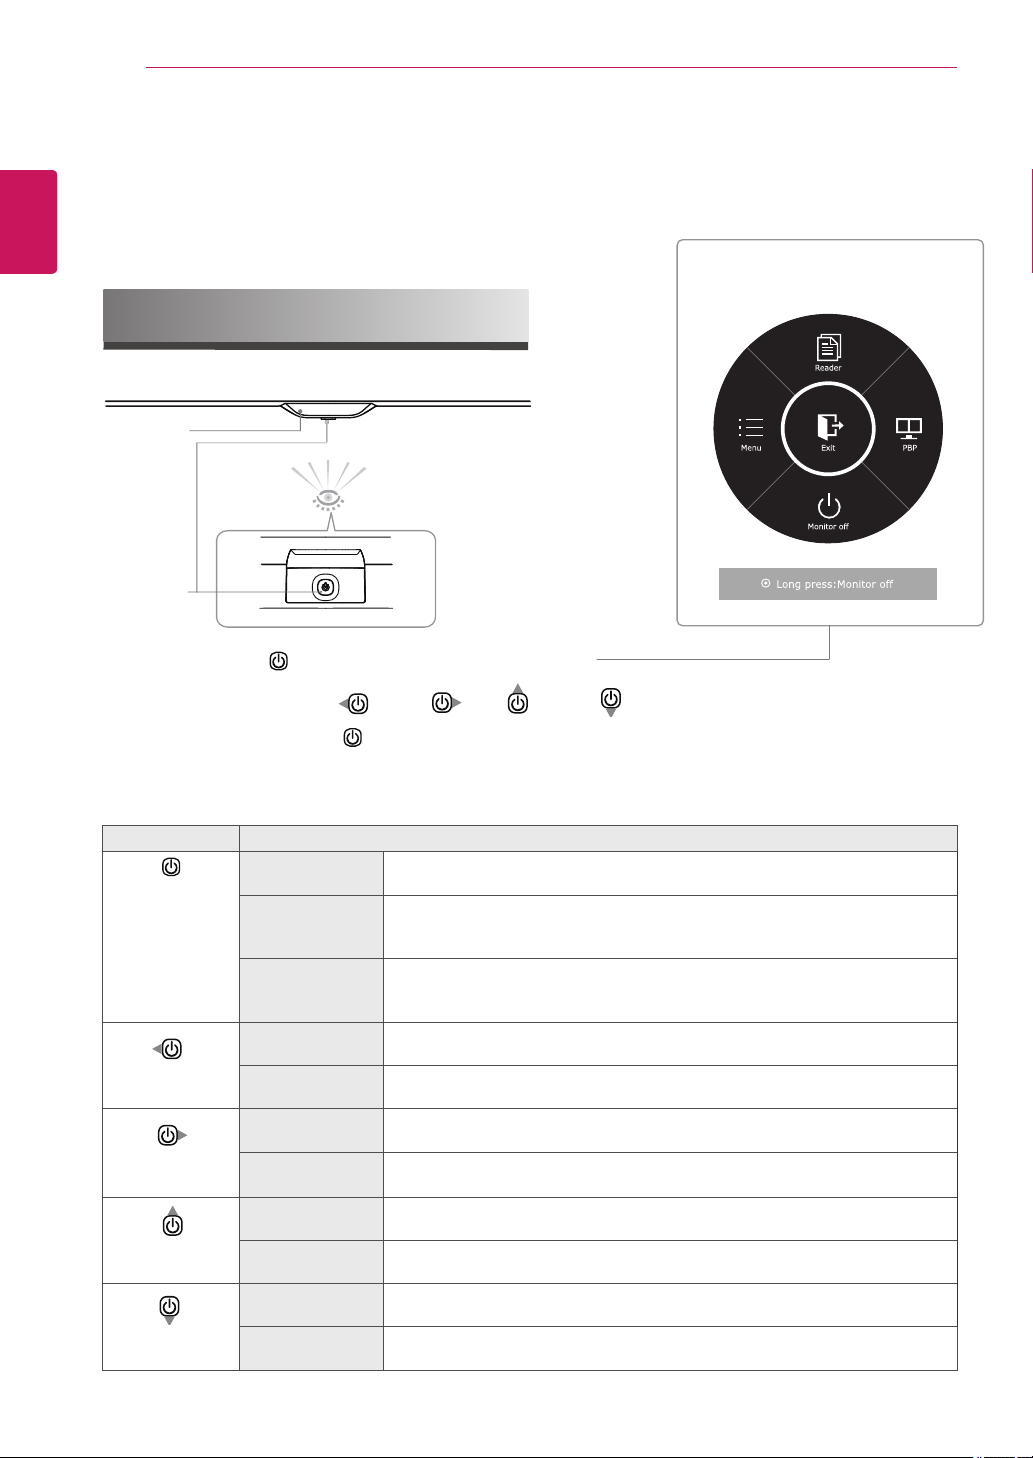
Activating the Main Menu
Button Description
Pressthepower
buttoncenter.
If the menu is
disabled
EnablesthenavigationOSD.
If the menu is
enabled
ClosethenavigationOSD.
(LongpressMonitoroff,Thisturnoffmethodcanworkinanycondition.Even
thoughOSDOff.)
Power Indicator Whenthemonitorisinoperatingmode,thepowerindicatorwillturnon.(powered
on).
Whenthemonitorisinpower-savingmode,thepowerindicatorwillblinking.
Jogthepower
buttonleft.
If the menu is
disabled
Adjuststhevolumelevelofthemonitor.
If the menu is
enabled
EntertoMenuOSD.Innosyncmode,enterInputchangeOSD.
Jogthepower
buttonright.
If the menu is
disabled
Adjuststhevolumelevelofthemonitor.
If the menu is
enabled
EntertoPBPOSD.
Jogthepower
buttonup.
If the menu is
disabled
EnablesthenavigationOSD.
If the menu is
enabled
EntertoReaderOSD.
Jogthepower
buttondown.
If the menu is
disabled
EnablesthenavigationOSD.
If the menu is
enabled
TurntheMinitoroff.
Navigation OSD
1
PressthePower( )button,thenavigationOSDappear.
2
JogthePowerbuttonleft(
),right(
),up(
),down(
)toadjusttheoptions.
3
PressandholdthePower( )buttontoexittheOSDmenu.
Power Indicator
Power buttons

25
ENG
ENGLISH
CUSTOMIZING SETTINGS
Eachoptionisdescribedbelow.
Customizing settings
Menu Settings
-Easy control
1
ToviewthenavigationOSD,pressthePowerbuttoncenter( ).
2
JogPowerbuttonleft(
)togoto
Menu
OSD.
3
PressPowerbuttoncenter( )orJogPowerbuttonright(
)
toselect
Easy control
.
4
Settheoptionsfollowuptheinstructionappearonrightbottomof
thescreen.
5
Toreturntotheuppermenuorsetothermenuitems,Jogthe
Powerleft(
).
Menu > Easy control Description
Brightness
Adjuststhecolorcontrastandbrightnessofthescreen.
Contrast
Volume Adjuststhevolume.
NOTE
JogPowerbuttondown(
)intheVolumemenuwillenable/disablethe
Mutefunction.
Input Selectsthecurrentinputmode.
Ratio Adjuststhescreenratio.
Wide Displaysthevideoinwide-screen,regardlessofthevideosignalinput.
Original Displaysavideoaccordingtotheinputvideosignalaspectratio.
Cinema 1
Enlargesthescreenwithanaspectratioof21:9.(at1080p)
Cinema 2 Enlargesthescreenwithanaspectratioof21:9includingtheblackboxarea
atthebottomforsubtitles.(at1080p)
1:1 Theaspectratioisnotadjustedfromtheoriginal.
NOTE
ThedisplaymaylookthesameforWide,Originaland1:1optionsattherecommendedresolution
(2560x1080).
Theratioisdisabledintheinterlacedsignal.
26
ENG
ENGLISH
CUSTOMIZING SETTINGS
Eachoptionisdescribedbelow.
-Function
1
ToviewthenavigationOSD,pressthePowerbutton
center( ).
2
JogPowerbuttonleft(
)togoto
Menu
OSD.
3
Jogthepowerbuttonup(
)ordown(
)togo
to
Function
.
4
PressPowerbuttoncenter( )orJogPowerbutton
right(
)toselect
Function
.
5
Settheoptionsfollowuptheinstructionappearon
rightbottomofthescreen.
6
Toreturntotheuppermenuorsetothermenuitems,
JogthePowerleft(
).
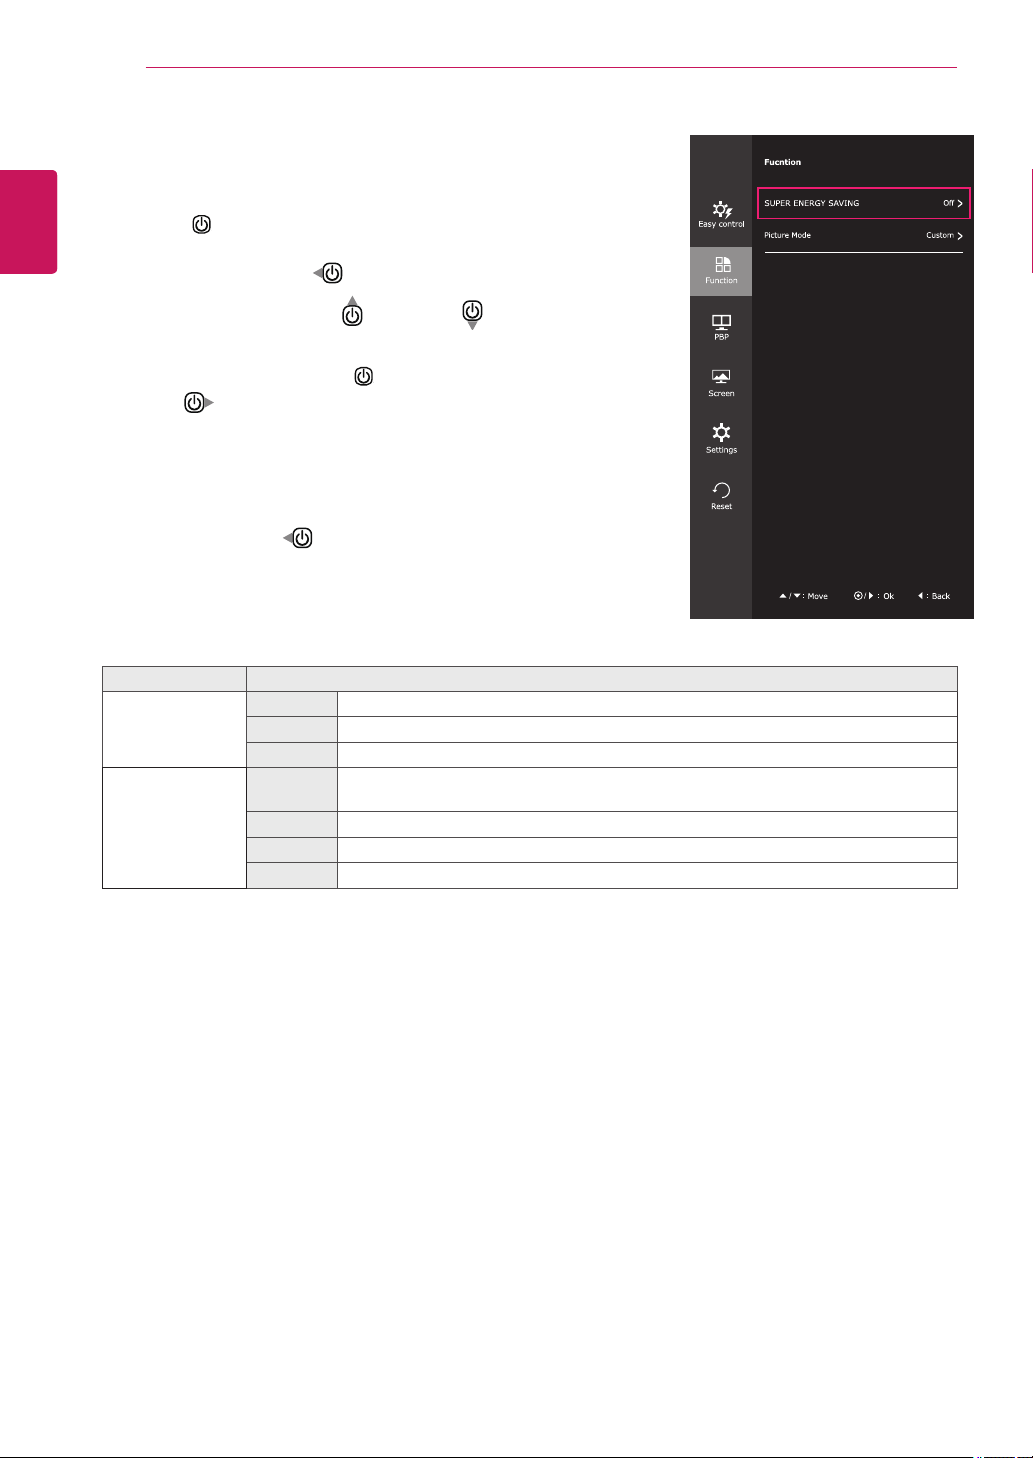
Menu > Func. Description
SUPER ENERGY
SAVING
High
Savesenergybyusingthehigh-efficiencySUPERENERGYSAVINGfunction.
Low
Savesenergybyusingthelow-efficiencySUPERENERGYSAVINGfunction.
Off
DisablestheSUPERENERGYSAVINGfunction.
Picture Mode Custom Allowstheusertoadjusteachelement.Thecolormodeofthemainmenucanbead-
justed.
Photo Optimizesthescreentoviewphotos.
Cinema Optimizesthescreentoimprovethevisualeffectsofavideo.
Game Optimizesthescreenforgameplay.
27
ENG
ENGLISH
CUSTOMIZING SETTINGS
-PBP
1
ToviewthenavigationOSD,pressthePowerbutton
center( ).
2
JogPowerbuttonleft(
)togoto
Menu
OSD.
3
Jogthepowerbuttonup(
)ordown(
)togo
to
PBP
.
4
PressPowerbuttoncenter( )orJogPowerbutton
right(
)toselect
PBP
.
5
Settheoptionsfollowuptheinstructionappearon
rightbottomofthescreen.
6
Toreturntotheuppermenuorsetothermenuitems,
JogthePowerleft(
).
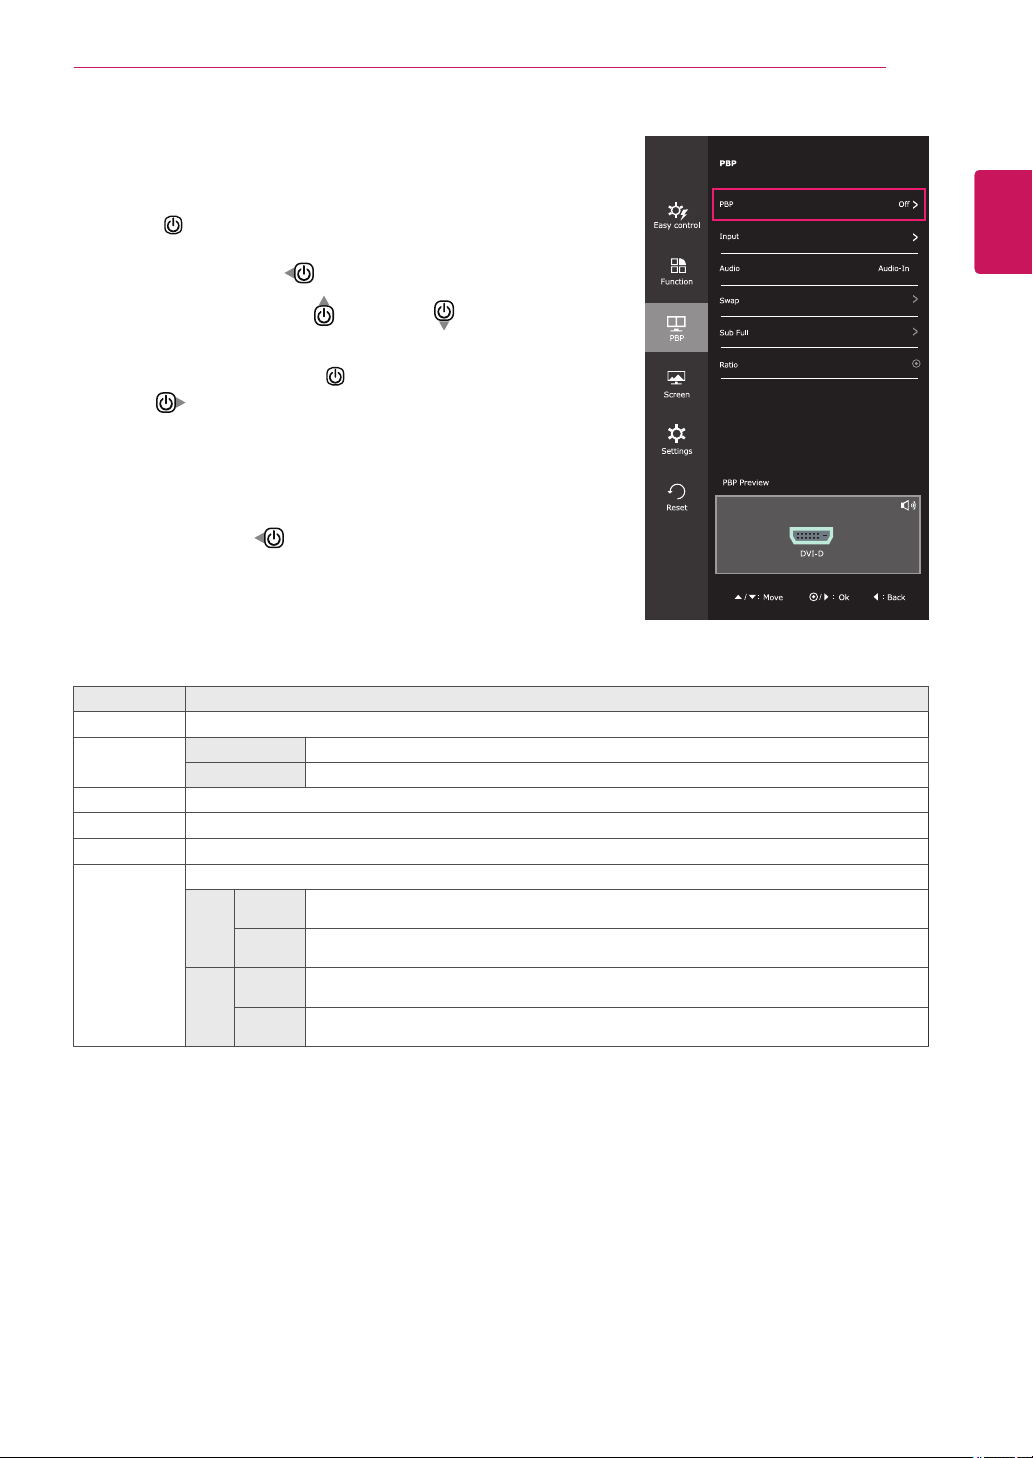
Menu > PBP Description
PBP Displaysthescreensoftwoinputmodesononemonitor.
Input Main Displaysthevideoinwide-screen,regardlessofthevideosignalinput.
Sub Displaysavideoaccordingtotheinputvideosignalaspectratio.
Audio ChangestheaudiooutputinPBPmode.
Swap TogglesbetweenthemainscreenandsubscreeninPBPmode.
Sub Full ConvertsthesubscreenofPBPmodetothewidescreen.
Ratio Adjuststheaspectratioofthemainscreenorsubscreen.
Main Wide
DisplaysthevideotofittheMainscreen,regardlessofthevideosignalinput.
Original
DisplaysthevideointheinputvideosignalaspectratioontheMainscreen.
Sub Wide
DisplaysthevideotofittheSubscreen,regardlessofthevideosignalinput.
Original
DisplaysthevideointheinputvideosignalaspectratioontheSubscreen.
28
ENG
ENGLISH
CUSTOMIZING SETTINGS
Eachoptionisdescribedbelow.
-Screen
1
ToviewthenavigationOSD,pressthePowerbutton
center( ).
2
JogPowerbuttonleft(
)togoto
Menu
OSD.
3
Jogthepowerbuttonup(
)ordown(
)togo
to
Screen
.
4
PressPowerbuttoncenter( )orJogPowerbutton
right(
)toselect
Screen
.
5
Settheoptionsfollowuptheinstructionappearon
rightbottomofthescreen.
6
Toreturntotheuppermenuorsetothermenuitems,
JogthePowerleft(
).
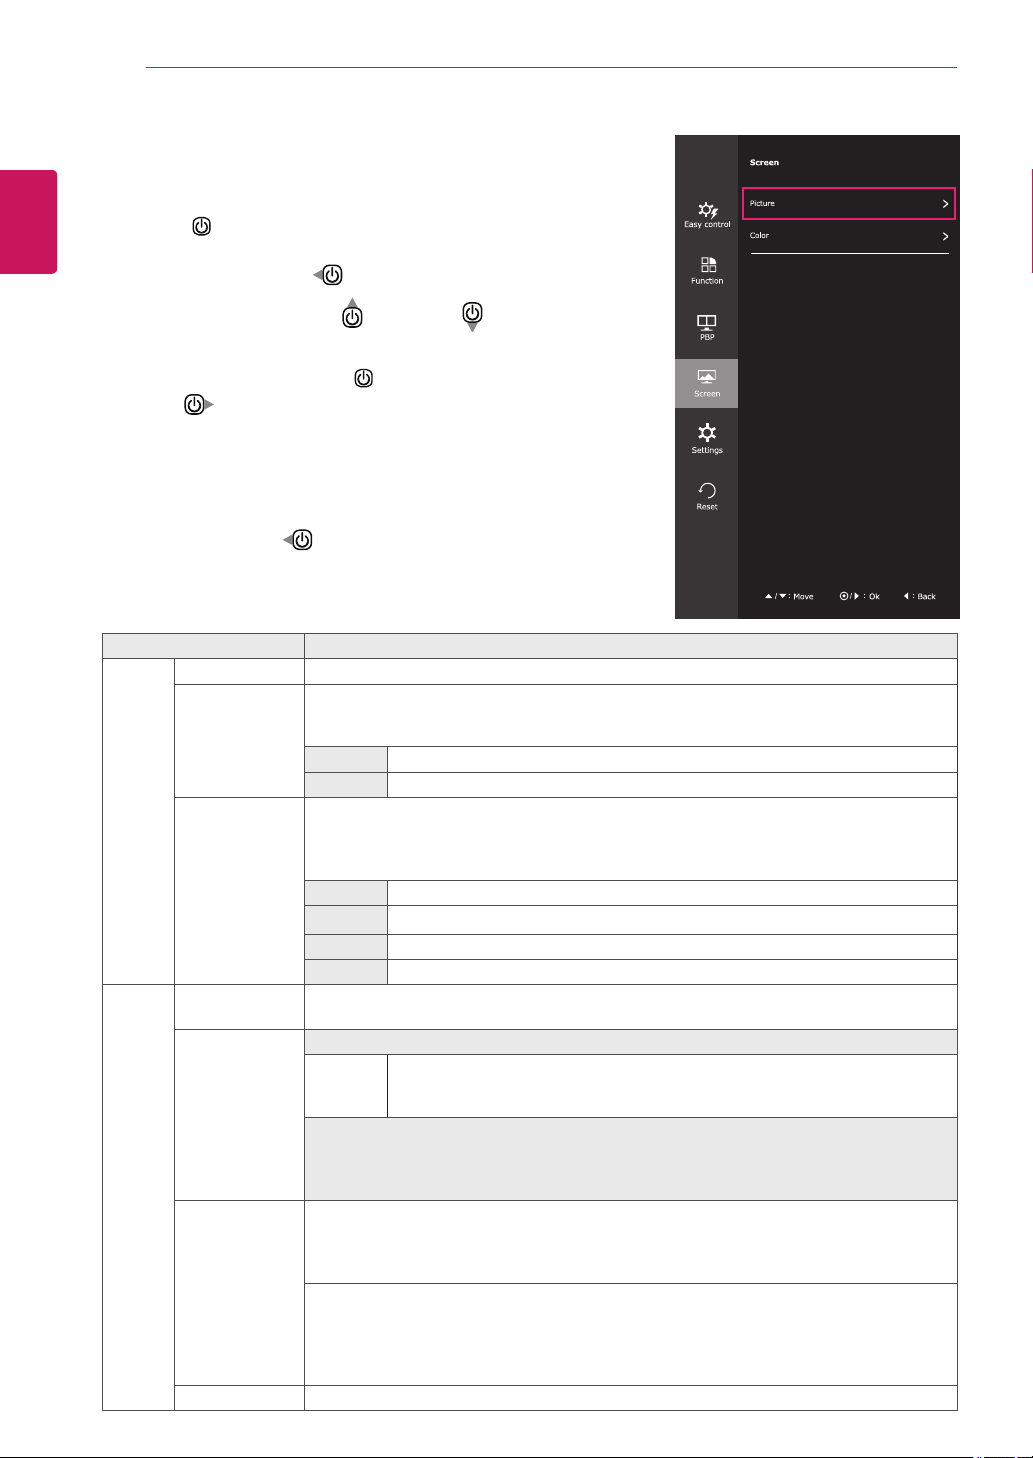
Menu > Screen Description
Picture Sharpness Adjuststhesharpnessofthescreen.
Black Level Setstheoffsetlevel(forHDMIonly).
Offset:
asareferenceforavideosignal,thisisthedarkestcolorthemonitorcan
display.
High
Thepictureofthescreengetsbrighter.
Low
Thepictureofthescreengetsdarker.
Response Time Setsaresponsetimefordisplayedpicturesbasedonthespeedofthescreen.Foranor-
malenvironment,itisrecommendedthatyouuseNormal.Forafast-movingpicture,itis
recommendedthatyouuseHigh.
SettingtoHighmaycauseimagesticking.
High
SetstheresponsetimetoHigh.
Middle
SetstheresponsetimetoMiddle.
Low
SetstheresponsetimetoLow.
Off
SetstheresponsetimetoOff.
Color Gamma Customgammasetting:Whenusingthegamma0,gamma1,andgamma2monitorset-
tings,highergammasettingsmeanabrighterimageisdisplayedandviceversa.
Color Temp Custom
Red
Green
Blue
YoucancustomizethepicturecolorusingRed,Green,andBluecolors.
Selectsthefactorydefaultpicturecolor.
Warm:
Setsthescreencolortoareddishtone.
Medium:
Setsthescreencolorbetweenaredandbluetone.
Cool:
Setsthescreencolortoabluishtone.
Six Color Meetstheuserrequirementsforcolorsthroughadjustingthecolorandsaturationofthesix
colors(
red_Hue, red_Saturation, green_Hue, green_Saturation, blue_Hue, blue_Satu-
ration, cyan_Hue, cyan_Saturation, magenta_Hue, magenta_Saturation, yellow_Hue,
yellow_Saturation
)andsavingthesettings.
*Hue:Adjuststoneofthescreen.
*Saturation:Adjuststhesaturationofthescreencolors.Thelowerthevalue,lesssatu-
ratedandbrightthecolorsbecome.Thehigherthevalue,themoresaturatedanddarkthe
colorsbecome.
*Reset:Returnsthecolorsettingstothedefaultsettings.
Reset Returnsthecolorsettingstothedefaultsettings.
29
ENG
ENGLISH
CUSTOMIZING SETTINGS
-Settings
1
ToviewthenavigationOSD,pressthePowerbuttoncenter( ).
2
JogPowerbuttonleft(
)togoto
Menu
OSD.
3
Jogthepowerbuttonup(
)ordown(
)togoto
Settings
.
4
PressPowerbuttoncenter( )orJogPowerbuttonright(
)
toselect
Settings
.
5
Settheoptionsfollowuptheinstructionappearonrightbottomof
thescreen.
6
Toreturntotheuppermenuorsetothermenuitems,Jogthe
Powerleft(
).
Eachoptionisdescribedbelow.
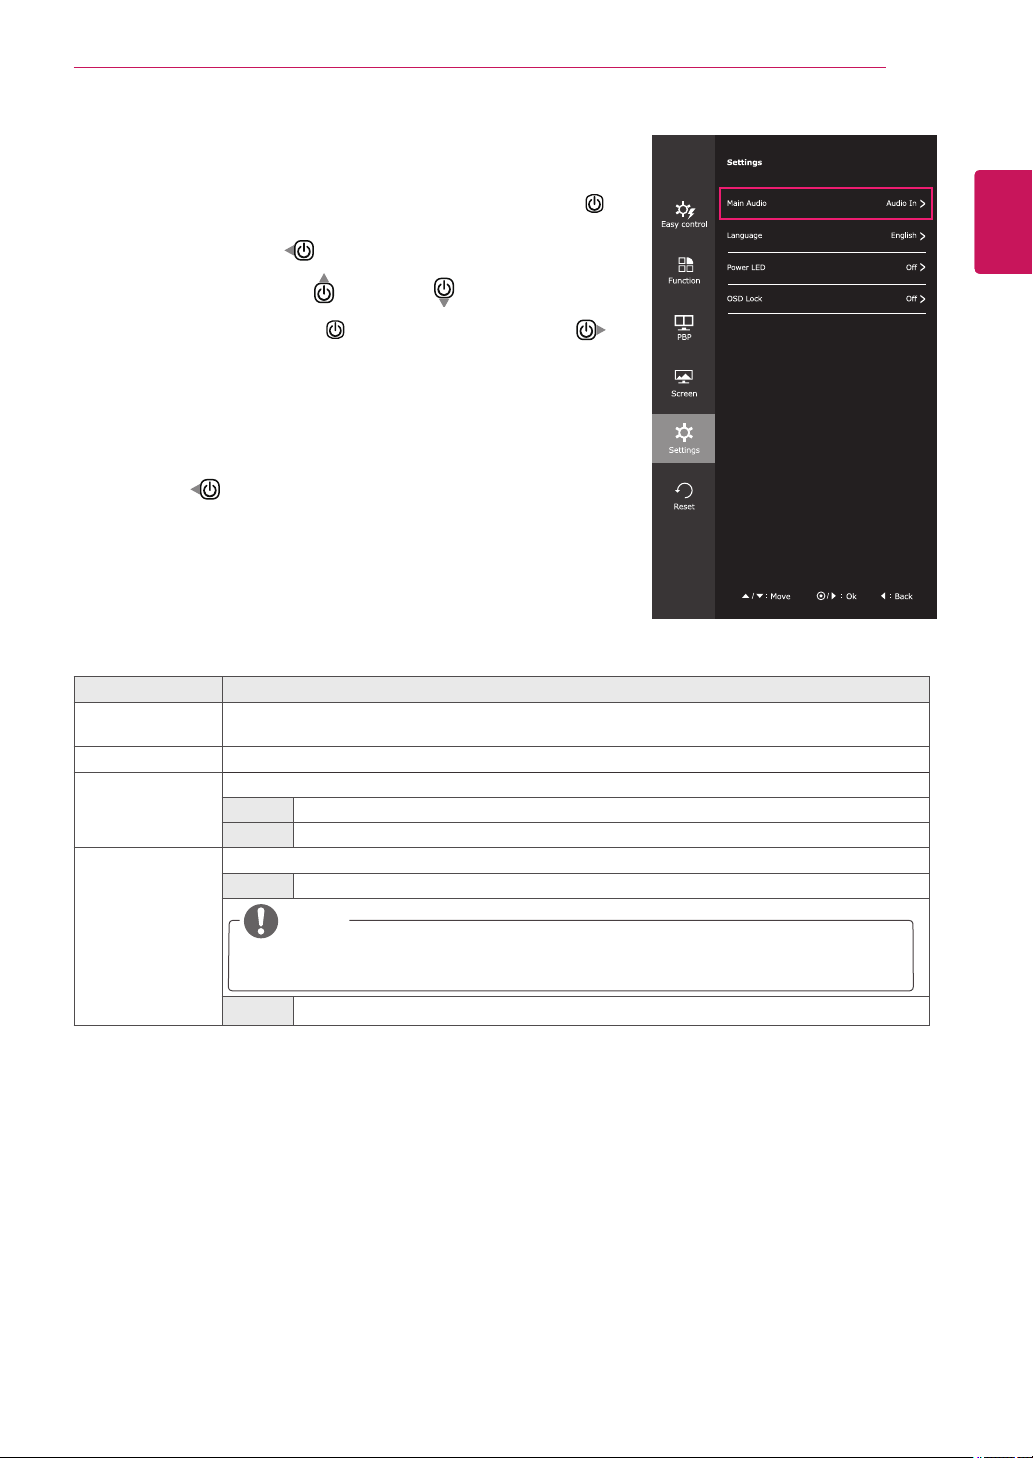
Menu > Settings Description
Main Audio Mainaudiohavefouroptions.HDMI1,HDMI2,DP,Audio-In.
IfuserselectAudio-in,thensoundcomesfromstereocablesource.
Language Setsthemenuscreentothedesiredlanguage.
Power LED Turnsthepowerindicatoronthefrontsideofthemonitoron/off.
On Thepowerindicatorisautomaticallyturnedon.
Off Thepowerindicatoristurnedoff.
OSD Lock Preventsincorrectkeyinput.
On Keyinputisdisabled.
NOTE
AllfunctionsexceptfortheOSDLockmodeandtheExitbuttonforBrightness,Contrast,
Volume,Input,andSettingsaredisabled.
Off Keyinputisenabled.
30
ENG
ENGLISH
CUSTOMIZING SETTINGS
-Reset
1
ToviewthenavigationOSD,pressthePowerbutton
center( ).
2
JogPowerbuttonleft(
)togoto
Menu
OSD.
3
Jogthepowerbuttonup(
)ordown(
)togo
to
Reset
.
4
PressPowerbuttoncenter( )orJogPowerbutton
right(
)toselect
Reset
.
5
Settheoptionsfollowuptheinstructionappearon
rightbottomofthescreen.
6
Toreturntotheuppermenuorsetothermenuitems,
JogthePowerleft(
).
Eachoptionisdescribedbelow.
Menu > Reset Description
Do you want to reset your settings?
Reset Returnstothedefaultsettings.
Cancel Canceltheselect.
31
ENG
ENGLISH
CUSTOMIZING SETTINGS
Reader Settings
1
ToviewthenavigationOSD,pressthePowerbuttoncenter( ).
2
JogPowerbuttonup(
)togoto
Reader
OSD.
3
Settheoptionsfollowuptheinstructionappearonbottomofthe
screen.
Reader Mode
Description
Reader 1 Itisamodethatthescreenisadjustedtothebestforthenewspaper.Ifyou
wantscreenmorebright,youcancontrolbrightnessinMenuOSD.
Reader 2 Itisamodethatthescreenisadjustedtothebestforthecartoon.Ifyouwant
screenmorebright,youcancontrolbrightnessinMenuOSD.
Reader Off Itisamodethatreadermodeisoff.
Eachoptionisdescribedbelow.
32
ENG
ENGLISH
TROUBLESHOOTING
TROUBLESHOOTING
Nothing is displayed on the screen.
Isthemonitor'spowercordplugged
in?
Checkifthepowercordiscorrectlypluggedintothepoweroutlet.
Isthepowerindicatoron?
Checkthepowercableconnectionandpressthepowerbutton.
Isthepowerindicatordisplaying?
Checkthattheconnectedinputisenabled(Menu-Input).
Isthepowerindicatorblinking?
Ifthemonitorisinpower-savingmode,movethemouseorpressany
keyonthekeyboardtoswitchthedisplayon.
Checkifthecomputeristurnedon.
Isthe"OUTOFRANGE"message
displayed?
ThisoccurswhensignalstransferredfromthePC(videocard)areout
ofthehorizontalorverticalfrequencyrangeofthemonitor.Pleasesee
the"ProductSpecification"sectionofthismanualtosettheappropri-
atefrequency.
Isthe"CHECKSIGNALCONNEC-
TION"messageisdisplayed?
ThisisdisplayedwhenthesignalcablebetweenthePCandthemoni-
torismissingordisconnected.Checkthecableandreconnect.
The screen retains an image.
Doesimagestickingoccureven
whenthemonitoristurnedoff?
Displayingastillimageforaprolongedtimemaycausedamagetothe
screen,resultingintheretentionoftheimage.
Useascreensavertoprotectthescreenwhenusingthemonitorfora
prolongedperiodoftime.
Vertical Frequency:
Inordertodisplayanimage,thescreenmustberefresheddozensoftimesper
secondlikeafluorescentlamp.
Thenumberoftimesthescreenisrefreshedpersecondiscalledverticalfrequencyorrefreshrate
andisrepresentedbyHz.
Horizontal Frequency:
Thetimeittakestodisplayonehorizontallineiscalledthehorizontalcycle.
Thenumberofhorizontallinesdisplayedinonesecondcanbecalculatedbydividingonebythehori-
zontalcycle.ThisiscalledhorizontalfrequencyandisrepresentedbykHz.
NOTE
The screen is flickering.
Didyouselecttherecommended
resolution?
IftheselectedresolutionisHDMI1080i60/50Hz,thescreen
maybeflickering.Changetheresolutiontotherecommended
resolution1080P.
33
ENG
ENGLISH
TROUBLESHOOTING
Checkifthevideocard'sresolutionorfrequencyiswithintherangeallowedbythemonitorandsetto
therecommended(optimal)resolutionin
Control Panel > Display > Settings
.
Failingtosetthevideocardtotherecommended(optimal)resolutionmayresultinblurredtext,a
dimmedscreen,atruncateddisplayareaormisalignmentofthedisplay.
Theconfigurationproceduremaydifferdependingonyourcomputerand/oroperatingsystem.Also,
somevideocardsmaynotsupportcertainresolutions.Ifthisisthecase,contactthemanufacturerof
thecomputerorvideocardforassistance.
Somevideocardsmaynotsupportthe2560x1080resolution.
Iftheresolutioncannotbedisplayed,contactthemanufacturerofyourvideocard.
NOTE
The display color is abnormal.
Doesthedisplayappeardiscolored
(16color)?
Setthecolorto24bit(truecolor)orhigher.InWindows,gotoControl
Panel>Display>Settings>ColorQuality.
Doesthedisplaycolorappearun-
stableorinmonochrome?
Checkifthesignalcableisconnectedproperly.Reconnectthecable
orreinsertthePC'svideocard.
Aretherespotsonthescreen?
Whenusingthemonitor,pixilatedspots(red,green,blue,whiteor
black)mayappearonthescreen.ThisisnormalfortheLCDscreen.
Itisnotanerrornorisitrelatedtothemonitor'sperformance.
34
ENG
ENGLISH
SPECIFICATIONS
SPECIFICATIONS
29UM65 29UB65
LCDScreen Type 73.025cmTFT(ThinFilmTransistor)
LCD(LiquidCrystalDisplay)Screen
Diagonallengthofthescreen:73.025cm
PixelPitch 0.0876mmx0.2628mm
Resolution MaximumResolution 2560x1080@60Hz
RecommendedResolution 2560x1080@60Hz
VideoSignal
HorizontalFrequency 30kHzto90kHz
VerticalFrequency
DVI/DP:50Hzto75HzHDMI:25Hzto60Hz
Synchronization SeparateSync.
InputConnector
DVI-DIN,HDMIIN1,HDMIIN2,DisplayPort,AudioIn(PC),H/P
Power Voltage
19V 2.4A
Powerconsumption(Typ.)
Onmode:31W(ENERGYSTAR®standard)
*
PowerSavingMode≤0.5W
OffMode≤0.5W
AC/DCadaptor
DA-48F19type,AsianPowerDevicesInc.production,
OrLCAP35type,LIENCHANGELECTRONICENTERPRISEproduction.
Output:19V 2.53A
Environmental
Conditions
OperatingCondition Temperature:10°Cto35°C;Humidity:10%to80%
StoringCondition Temperature:-20°Cto60°C;Humidity:5%to90%
SpeakerWattage 7W+7W
29UM65
StandAngle
Adjustment
Forwards/Backwards:-5°to20°(Head)
Dimension MonitorSize(WidthxHeightxDepth)
WithStand
703.0mmx418.0mmx181.0mm
WithoutStand
703.0mmx328.0mmx64.0mm
Weight(Without
Packaging)
6.2kg
29UB65
StandAngle
Adjustment
Forwards/Backwards:-5°to15°(Head)
Dimension MonitorSize(WidthxHeightxDepth)
WithStand
703.0mmx425.0mmx225.0mm
WithoutStand
703.0mmx418.0mmx124.0mm
Weight(Without
Packaging)
6.8kg
Thespecificationsaresubjecttochangewithoutnotice.
*Thepowerconsumptionlevelcanbedifferentbyoperatingconditionandmonitorsetting.
*TheOnmodepowerconsumptionismeasuredwithENERGYSTAR
®
teststandard.
*ENERGYSTAR
®
isaUSregisteredmarkoftheUnitedStatesEnvironmentalProtectionAgency.
35
ENG
ENGLISH
SPECIFICATIONS
Factory support mode
(Preset Mode, DVI-D/HDMI/PC DisplayPort)
Preset Mode
Horizontal Frequency
(kHz)
Vertical Frequency
(Hz)
Polarity (H/V) Remarks
720x400 31.468 70.08 -/+
640x480 31.469 59.94 -/-
640x480 37.5 75 -/-
800x600 37.879 60.317 +/+
800x600 46.875 75 +/+
1024x768 48.363 60 -/-
1024x768 60.123 75.029 +/+
1152x864 67.5 75 +/+
1280x720 45 60 +/+
1280x1024 63.981 60.02 +/+
1280x1024 79.976 75.025 +/+
1600x900 60 60 +/+
1680x1050 65.290 59.954 -/+
1920x1080 67.5 60 +/-
2560x1080 66.7 60 -/+
HDMI Timing (Video)
Preset Mode
Horizontal
Frequency (kHz)
Vertical
Frequency (Hz)
Remarks
480P 31.50 60
576P 31.25 50
720P 37.50 50
720P 45.00 60
1080P 56.25 50
1080P 67.50 60
Power Indicator
Mode LED Color
OnMode
LightOn
Power-saving
Blinking
OffMode Off

36
ENG
ENGLISH
PROPER POSTURE
PROPER POSTURE
Proper Posture for Using the Monitor
Adjustthescreensothatyoucancomfortablyviewataslightdownwardanglefromyournaturaleyelevel.
Takeabreakforapproximatelytenminuteseveryhourtoreduceanyfatiguecausedbylong-time
usage.
Thestandofthetouchmonitorallowstheproducttobeusedintheoptimumposition.
Adjustthestandangletoobtainthebestviewofthescreen.
Youshouldbelooking
slightlydownatthescreen.
Placeyourhandsgentlyon
thekeyboard,keepingyour
armsbentattheelbowsand
extendedhorizontallyinfront
ofyou.
Adjusttheangle
Sothatthereisnoreflection
orglarefromthescreen.

MakesuretoreadtheSafetyPrecautions
beforeusingtheproduct.
KeeptheOwner'sManual(CD)inan
accessibleplaceforfuturereference.
ThemodelandserialnumberoftheSET
islocatedonthebackandonesideofthe
SET.Recorditbelowshouldyoueverneed
service.
MODEL
SERIAL
Declaration of Conformity
Trade Name: LG
Model : 29UM65D,29UB65D
Responsible Party: LG Electronics Inc.
Address : 1000 Sylvan Ave. Englewood Cliffs
NJ 07632 U.S.A
TEL: 201-266-2534
*above information is only for USA FCC Regulatory


