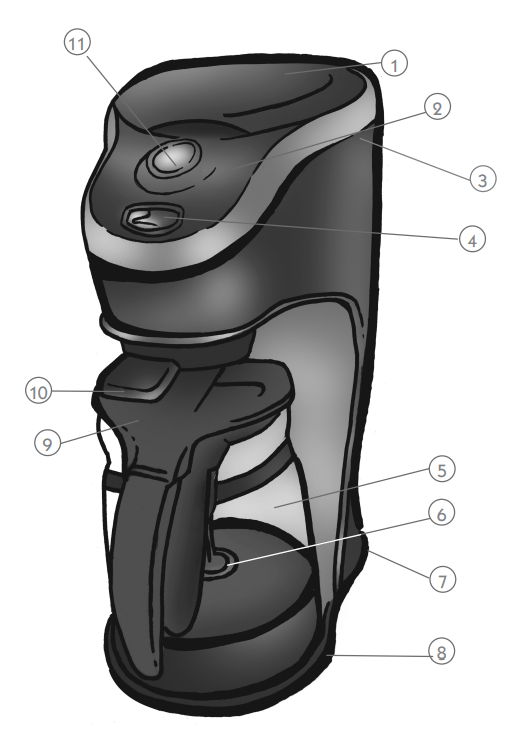
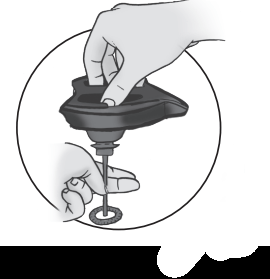
A. Remove whisk from brew basket and snap into place on the inside of the lid.
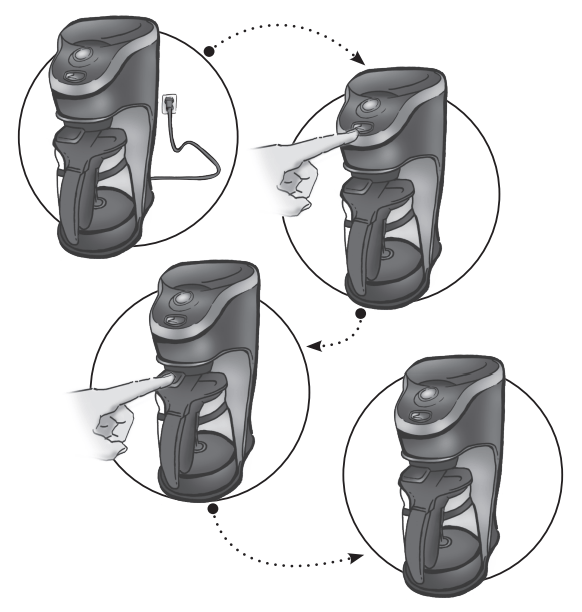
Just Add Water and Coffee
A. Lift the brew basket lid up and put a paper filter into the brew basket along with ground espresso or coffee. (3 TBSP Single, 6 TBSP Double)
B. Add cold water into the reservoir up to desired water level marking, single ( 4 oz) or double serving ( 8 oz).
Now add ingredients to the latte pitcher
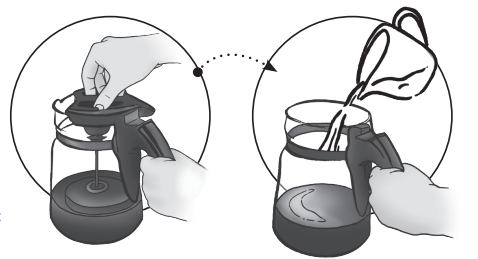
A. Remove the pitcher from its base and remove the lid by twisting counter clockwise.
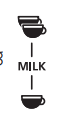
B. Add milk to the desired level marking, single or double serving (should correspond to the water level used in the reservoir).
C. Add any other ingredients per the recipe book.
D. Secure the lid onto the pitcher, by twisting clockwise, and place the pitcher back onto the base with the pitcher handle facing out.
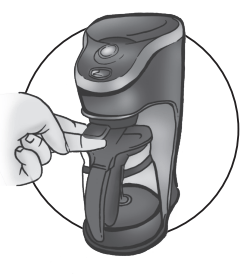
Easy to use controls
A. Make sure the appliance is plugged in.
B. Push the selector switch up to the latte function.
For heat/froth only, push down (NOTE: This will not activate the brewing feature).
C. Lower the on/off lever to turn the appliance on.
D. The power light will illuminate while the cycle is active and turn off when complete.
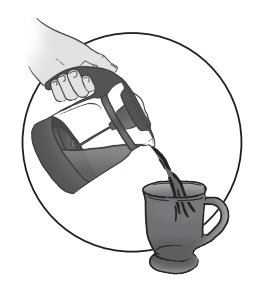
Ready to serve
A. Raise the on/off lever and remove the latte pitcher from the base.
B. Pour latte into serving glasses and spoon any additional foam desired to complete your latte.
Pour & Enjoy
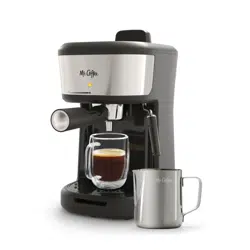
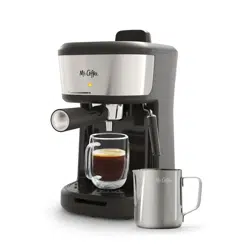
USING YOUR CAFÉ LATTE
CLEAN YOUR APPLIANCE BEFORE USING THE FIRST TIME
Make sure your first latte is as good as can be by cleaning your MR. COFFEE® Café Latte before its first use. Just follow these simple steps:
Wash latte pitcher and lid using a mild, non-abrasive detergent and water with a soft cloth. IMPORTANT! Do not immerse your pitcher/lid in water or place in a dishwasher. This may permanently damage the product and void the warranty.
Replace the pitcher onto the appliance and run a cycle with water only, without adding coffee or coffee filter. Fill the water reservoir to the single serving level and fill the latte pitcher to the single serving level.
When cycle is complete, turn your appliance off, discard the water in the pitcher and wash by sponge or soft damp cloth.
Your appliance is now ready to use. Enjoy it!
CLEAN YOUR LATTE PITCHER AFTER EVERY USE
The MR. COFFEE® Café Latte should be cleaned after every use.
Pour out remaining liquids from the latte pitcher.
Remove the lid and wipe with damp sponge or cloth.
Wash the pitcher by pouring a combination of a mild detergent and water into the pitcher and wipe clean with a soft damp cloth. Do not use any abrasive detergents or scouring pads, as this will scratch the glass and heating element of the pitcher. IMPORTANT! Do not immerse your pitcher/lid in water or place in a dishwasher. This may permanently damage the product and void the warranty.
Wipe the exterior of the machine with a damp cloth.
MAKING LATTES
Just Add Water and Coffee.
Lift the brew basket lid up and put a paper filter into the brew basket along with ground espresso or coffee.
Add cold water into the reservoir up to desired water level marking, single or double serving .
Now add ingredients to the latte pitcher.
Remove the pitcher from its base and remove the lid by twisting counter clockwise.
Add milk to the desired level marking, single or double serving (should correspond to the water level used in the reservoir).
Add any other ingredients per the recipe book.
Secure the lid onto the pitcher, by twisting clockwise, and place the pitcher back onto the base with the pitcher handle facing out. NOTE: Do not exceed the max fill line as it could cause liquid to enter the motor located in the pitcher lid and permanently damage the frothing function.
Easy to use controls.
Make sure the appliance is plugged in.
Push the selector switch up to the latte function.
Lower the on/off lever to turn the appliance on.
The power light will illuminate while the cycle is active and turn off when complete.
Ready to serve.
Raise the on/off lever and remove the latte pitcher from the base.
Pour latte into serving glasses and spoon any additional foam desired to complete your latte.
MAKING HOT CHOCOLATE
Add ingredients to the latte pitcher.
Remove the pitcher from its base and remove the lid by twisting counter clockwise.
Add milk to the desired level marking single or double serving .
Add any other ingredients per the recipe book.
Secure the lid onto the pitcher, by twisting clockwise, and place the pitcher back onto the base with the pitcher handle facing out.
Easy to use controls.
Make sure the appliance is plugged in.
Push the selector switch down to the heat/froth function. (NOTE: This will not activate the brewing feature during the cycle.)
Lower the on/off lever to turn the appliance on.
The power light will illuminate while the cycle is active and turn off when complete.
Easy to serve.
Raise the on/off lever and remove the latte pitcher from the base.
Pour hot chocolate into serving glasses and spoon any additional foam desired to complete your drink.
REGULAR CLEANING AND MAINTENANCE
Minerals (calcium/limestone) found in water will leave deposits in your latte maker and affect its performance. It’s recommended that you remove the deposits using vinegar or a coffee cleaning solution once a month or every 30–40 cycles.
Pour 1 cup or 8 fluid ounces of undiluted, white household vinegar into the water reservoir. NOTE: If using a cleaning solution please follow the package instructions
Place an empty paper filter or permanent filter into the brew basket and secure the brew basket into place.
Place the latte pitcher onto the base with the lid assembled and water filled to the single serving level.
Lower the Power Lever to turn the appliance on.
Allow the Latte Maker to run the complete cycle and allow it to shut off automatically.
Lift the Power Lever to allow clearance for removing the latte pitcher.
Discard the cleaning solution and rinse the inside of the latte pitcher with clean water. The outside of the latte pitcher can be wiped with a damp sponge or cloth.
Fill the water reservoir with 1 cup / 8 ounces of fresh, clean water.
Assemble and place the latte pitcher back onto the base with fresh water filled to the single serving marking.
Discard the paper filter from the brew basket or thoroughly rinse the permanent filter that was used during the brew cycle.
Begin brewing and allow the full brew cycle to complete.
Repeat steps 7–11 one more time before making your next latte.
FREQUENTLY ASKED QUESTIONS
Should I use espresso grounds or coffee grounds when making Lattes?
Our recipes recommend using espresso grounds to closely reflect the tastes of commercially sold latte beverages. However, it is perfectly acceptable to use coffee grounds and still create a great tasting latte.
Why isn’t my Café Latte brewing coffee?
Make sure the appliance is plugged into a working 120V electrical outlet. Make sure the selector switch is raised to the latte function. Make sure the power lever is turned on. And that the water reservoir has water in it.
Where do I pour the water when I use my Café Latte?
The water is to be poured in the reservoir located directly behind the brew basket.
Water should be filled to the desired serving step that is marked. Please refer to instruction manual and/or quick start guide.
What type of filter can I use for my Café Latte?
A 4 cup basket filter (Paper or Permanent) can be used with your café latte. A standard 12 cup also fits but could lead to less than optimal brewing if the sides interfere with the water dripping.
My latte maker turns on, but why doesn’t the frother rotate?
Make sure the on/off lever is fully lowered so contact occurs with the lid of the latte pitcher. Ensure the frothing whisk is inserted properly into the connector.
Why does the frothing action make strange sounds?
If the frothing attachment is dropped or mishandled than it could possibly bend and lead to less than optimal performance. A replacement frothing attachment can be ordered from our website or through our 1-800 customer service center.
Why is my drink coming out too weak or too strong?
The following items can all affect the consistency of your drink: (1) Too much or not enough water being poured into the water reservoir prior to brewing. (2) The selection of milk ranging from skim to whole. (3) The amount and strength of the coffee used. (4) This could also be affected by type of coffee. i.e light roast vs espresso. It is important to note that each user can customize their latte by making slight adjustments to the ratio of ingredients recommended in the recipe book.
How do I control the froth volume?
Froth volume will vary with the type of milk used. For Soy, Almond, or Non-fat milk, use less milk to avoid pitcher overflow. For whole milk, expect less froth.
TROUBLESHOOTING YOUR CAFÉ LATTE
Your MR. COFFEE® Coffeemaker has been carefully designed to give you many years of trouble-free service. In the unlikely event that your new coffeemaker does not operate satisfactorily, please review the following potential problems and try the steps recommended BEFORE you call an Authorized Sunbeam Service Center.
PROBLEM
POSSIBLE CAUSE
SOLUTION
COFFEE IS LEAKING FROM THE APPLIANCE.
The brew basket is not positioned properly
Make sure the brew basket is inserted properly.
WATER IS LEAKING FROM THE APPLIANCE.
Too much water was poured into the water reservoir.
Pour only 1 cup of water into the reservoir and do not exceed the overfill hole located in the back of the reservoir.
THE LATTE PITCHER DOES NOT FIT INTO THE BASE.
The orientation of the latte pitcher is not correct.
The pitcher must be secured onto the power connector with the pitcher handle facing outwards.
The on/off lever is lowered blocking the entry.
Make sure the on/off lever is raised into the off position to allow proper clearance for the pitcher.
THE COFFEE DOES NOT DISPENSE FROM THE CHAMBER.
The selector switch is lowered to the heat/froth option.
Lift the selector switch for latte function.
Do you still have questions? You can call us toll-free at the MR. COFFEE® Products Consumer Service Department, 1-800-MR COFFEE (1-800-672-6333) or you can visit website mrcoffeelatte.com.
SERVICE AND MAINTENANCE
Replacement Parts
Coffee Filters – For better tasting coffee, we recommend that you use a MR. COFFEE® brand 4 cup basket-style paper filter or a MR. COFFEE® brand permanent filter. These filters are available at most grocery stores.
Latte Pitcher, Pitcher Lid, Frothing Attachment and Removable Brew Basket – Call 1-800-MR COFFEE (1-800-672-6333) in the U.S. or 1-800-667-8623 in Canada.
Repairs
If your Café Latte requires service, do not return it to the store where you purchased it. All repairs and replacements must be made by Sunbeam or by an authorized MR. COFFEE® Products Service Center.
IMPORTANT SAFEGUARDS
To reduce the risk of fire, electric shock and/or injury to persons, basic safety precautions should always be followed when using electrical appliances, including the following:
READ ALL INSTRUCTIONS BEFORE USING THE COFFEEMAKER.
Turn the appliance off and unplug the power cord from the power source when the appliance is not in use and before cleaning. Allow the appliance parts to cool before putting on or taking off parts and before cleaning the appliance.
Do not touch the appliance’s hot surfaces. Use handles or knobs.
To protect against electric shock, do not immerse the power cord, power plug or appliance in water or any other liquid.
Close adult supervision is necessary when this appliance is used by or near children.
Do not operate any appliance with a damaged power cord or power plug, or operate it after the appliance malfunctions, or has been damaged in any manner. Return this appliance only to the nearest Authorized Service Center for examination, repair, or adjustment.
The use of accessory attachments other than MR. COFFEE® brand products may cause hazards or injuries.
Do not use the appliance outdoors.
Do not let the power cord hang over the edge of table or counter, or allow it to come into contact with hot surfaces.
Do not place this appliance on or near a hot gas stove or electric burner or in a heated oven.
To disconnect the appliance, turn it OFF, then remove the power plug from the power supply.
Place the appliance on a hard, flat level surface to avoid interruption or airflow underneath the appliance.
To protect against electric shock, do not immerse this appliance including power base, in water or any other liquid.
Unplug the power base from the power outlet when not in use, before repositioning and before cleaning. Allow to cool before putting on or taking off parts, and before cleaning the appliance
Do not attempt to remove the pitcher from the power base until it is switched off manually.
This appliance is designed for household use only.
Do not use appliance for other than intended use.
Only operate with the pitcher in the base.
Avoid getting liquid in the connector.
Scalding may occur if the lid is opened during the brewing cycles.
Decanter Use and Care
Follow the instructions below to reduce or eliminate the chance of breaking the glass pitcher:
This pitcher is designed for use with your MR. COFFEE® Café Latte and therefore must never be used on a range top or in any oven, including a microwave oven.
Do not use a cracked pitcher or a pitcher having a loose or weakened handle.
Do not clean the pitcher with abrasive cleaners, steel wool pads or other abrasive materials.
Protect the pitcher from sharp blows, scratches or rough handling.
WARNING! To reduce the risk of fire or electric shock, do not remove any service covers. There are no user serviceable parts inside the Café Latte. Only authorized personnel should repair the Café Latte.
Please read ALL of the instructions in this manual carefully before you begin to use this appliance. Proper care and maintenance will ensure a long life and a trouble-free operation for this appliance. Please save these instructions and refer to them for cleaning and care tips.
 4 oz) or double serving (
 8 oz).
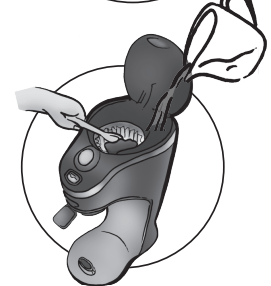
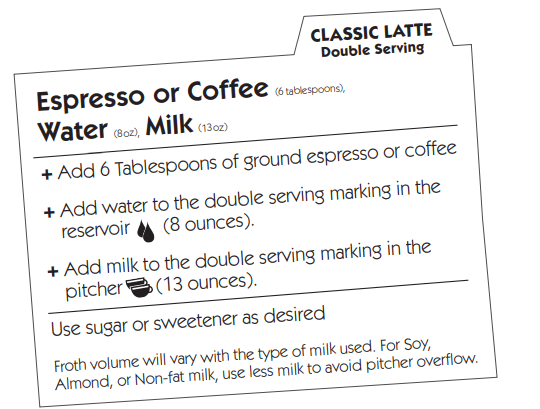
 or double serving
  (should correspond to the water level used in the reservoir).