

the Kitchen Wizz
‰
15 Pro
Instruction Book - BFP800

2
BREVILLE
RECOMMENDS
SAFETY FIRST
At Breville we are very safety
conscious. We design and
manufacture consumer
products with the safety of you,
our valued customer, foremost
in mind. In addition we ask
that you exercise a degree of
care when using any electrical
appliance and adhere to the
following precautions.
IMPORTANT
SAFEGUARDS
READ ALL INSTRUCTIONS
BEFORE USE AND SAVE
FOR FUTURE REFERENCE
• Remove any packaging
material and promotional
labels before using the food
processor for the first time.
• Do not place the food processor
near the edge of a bench or
table during operation. Ensure
the surface is level, clean and
free of water, flour, etc. Vibration
during operation may cause
the appliance to move.
• Handle the food processor
and attachments with care -
remember the blades and discs
are razor-sharp and should be
kept out of reach of children.
• Care shall be taken when
handling the sharp cutting
blades, emptying the bowl and
during cleaning.
• Always make sure the food
processor is completely
assembled before operating.
The appliance will not operate
unless properly assembled.
• Ensure the OFF button has been
pressed, and the food processor
is switched off at the power
outlet and unplugged before
attaching the Quad blade,
dough blade, disc or
processing lid.
• Always secure the processing
bowl onto the motor base
before attaching the Quad
blade, dough blade or discs.
• Always operate the food
processor with the processing
lid securely in position.
• Do not push food into the feed
chute with your fingers or
other utensils. Always use
the food pusher provided.
• Keep hands, knives and other
utensils away from moving
Quad blade, dough blade
or discs.

3
• Do not place hands or fingers in
the bowl of the food processor
unless the motor, Quad blade,
dough blade or discs have come
to a complete stop.
• Ensure the OFF button has
been pressed to switch the
motor off and the appliance
is switched off at the power
outlet and unplugged before
removing the lid from the bowl.
• Do not use attachments other
than those provided with the
food processor.
• Do not attempt to operate the
food processor by any method
other than those described in
this booklet.
• Ensure the motor, blades or
discs have completely stopped
before disassembling. Ensure
the OFF button has been
pressed and the appliance is
switched off at the power outlet
and unplugged when not in
use, if left unattended and
before disassembling,
cleaning or storing.
• Care should be taken when
removing the food from the
processing bowl by ensuring
the motor, Quad blade, dough
blade or disc, have completely
stopped before disassembling.
Ensure the OFF button has been
pressed to switch the motor
off; the appliance is switched
off at the power outlet and
unplugged, before removing
the lid from the bowl. The
processing bowl should then
be unlocked from the motor
body and the Quad blade,
dough blade or discs carefully
removed before attempting to
remove the processed food.
• Please do not crush ICE in the
large or small processing bowls.
This will cause damage to the
blades (Quad or mini blade).
We recommend that you use
a blender for ice crushing.
• Some stiff mixtures, such
as dough may cause the
processing blade to rotate
more slowly than normal.
If this happens, do not process
for longer than 1 minute.
• Do not process hot or boiling
liquids - allow liquids to cool
before placing into the
processing bowl.
• Do not use the food processor
on slippery, unstable or
uneven surfaces such as a sink
drain board.
• To protect against electric
shock do not immerse power
cord, plug or motor base in
water or any other liquid.
• Do not move the food
processor whilst in operation.

4
• Do not leave the food processor
unattended when in use.
• Do not place any part of the
food processor in the microwave
oven.
• Do not fill bowl above marked
liquid levels or 11 cup dry level
(shredding). Always add drier
or thicker ingredients to the
processing bowl prior to
adding fluids.
• Never remove the lid while
the processor is operating.
Always use the POWER/OFF
button to stop the machine
before removing the lid.
• Keep the appliance clean.
Follow the cleaning instructions
provided in this book.
IMPORTANT
SAFEGUARDS
FOR ALL
ELECTRICAL
APPLIANCES
• Unwind the power cord fully
before use.
• Do not let the power cord
hang over the edge of a table,
counter, touch hot surfaces or
become knotted.
• Cleaning and user maintenance
shall not be made by children
without supervision.
• This appliance shall not be used
by children. Keep the appliance
and its cord out of reach of
children.
• Children shall not play with
the appliance.
• Appliances can be used by
persons with reduced physical,
sensory or mental capabilities
or lack of experience and
knowledge if they have been
given supervision or instruction
concerning use of the appliance
in a safe way and understand
the hazards involved.
• It is recommended to regularly
inspect the appliance. Do not
use the appliance if power
supply cord, plug or appliance
becomes damaged in any way.
Return the entire appliance
to the nearest authorised
Breville Service Centre for
examination and/or repair.
• This appliance is for household
use only. Do not use this
appliance for anything other
than its intended use. Do not
use in moving vehicles or
boats. Do not use outdoors.

5
WARNING
• To avoid possible malfunction
of the processing bowl’s
auto switch, do not place the
processing lid in the locked
position when the appliance is
not in use.
• The processing blades and discs
are extremely sharp, handle with
care at all times. Do not place
hands, knives or other utensils
into the feed chute. Always use
the food pusher to push the
food down the feed chute.
• The installation of a residual
current device (safety switch)
is recommended to provide
additional safety protection
when using electrical appliances.
It is advisable that a safety
switch with a rated residual
operating current not exceeding
30mA be installed in the
electrical circuit supplying the
appliance. See your electrician
for professional advice.
• All maintenance (other
than cleaning) is to be
done by an authorised
Breville Service Centre.
• Authorised Breville Service
Centres can be found on our
website www.Breville.com.au
Alternatively, you can contact
the Breville Customer Care
Centre by phone on
1300 273 845 or email
AskUs@breville.com.au
FOR HOUSEHOLD USE ONLY
SAVE THESE INSTRUCTIONS
6
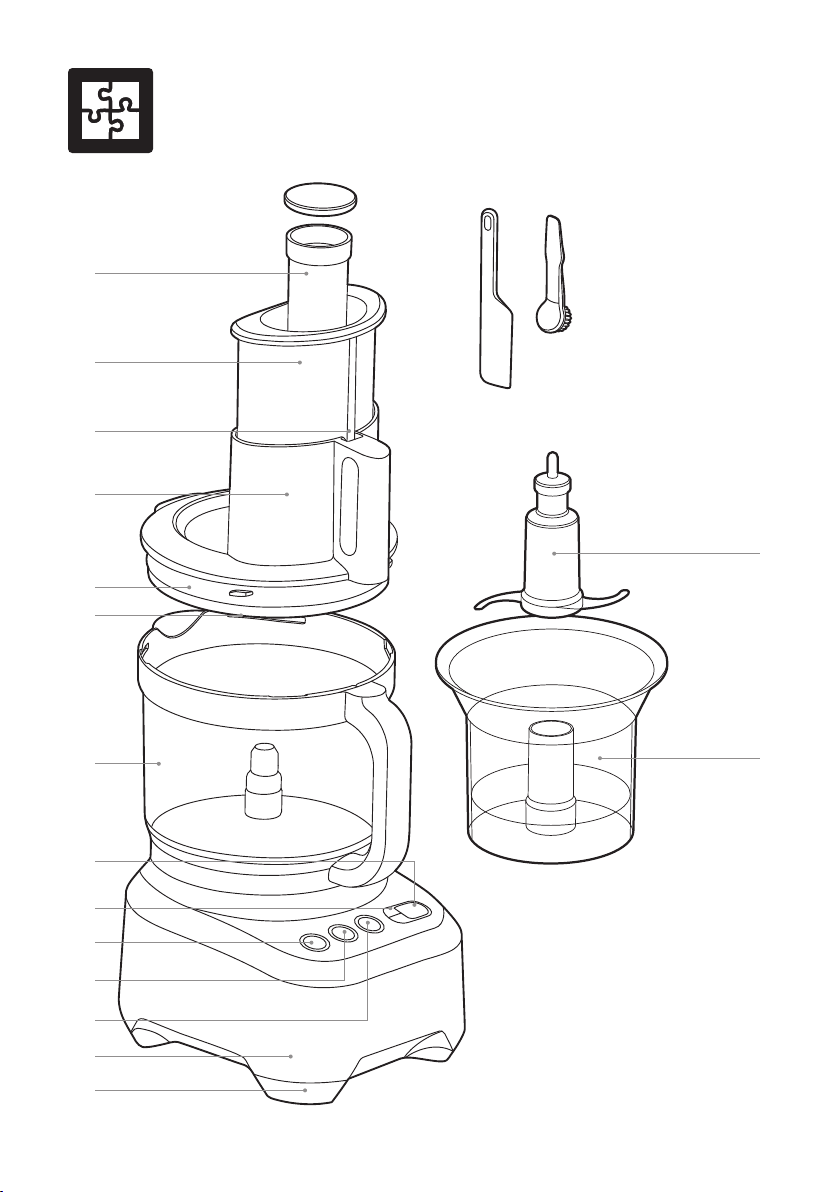
Components
A
B
C
D
E
F
G
J
N
O P
I
K
H
L
M
Mini
processing
blade
Mini
processing
bowl
7
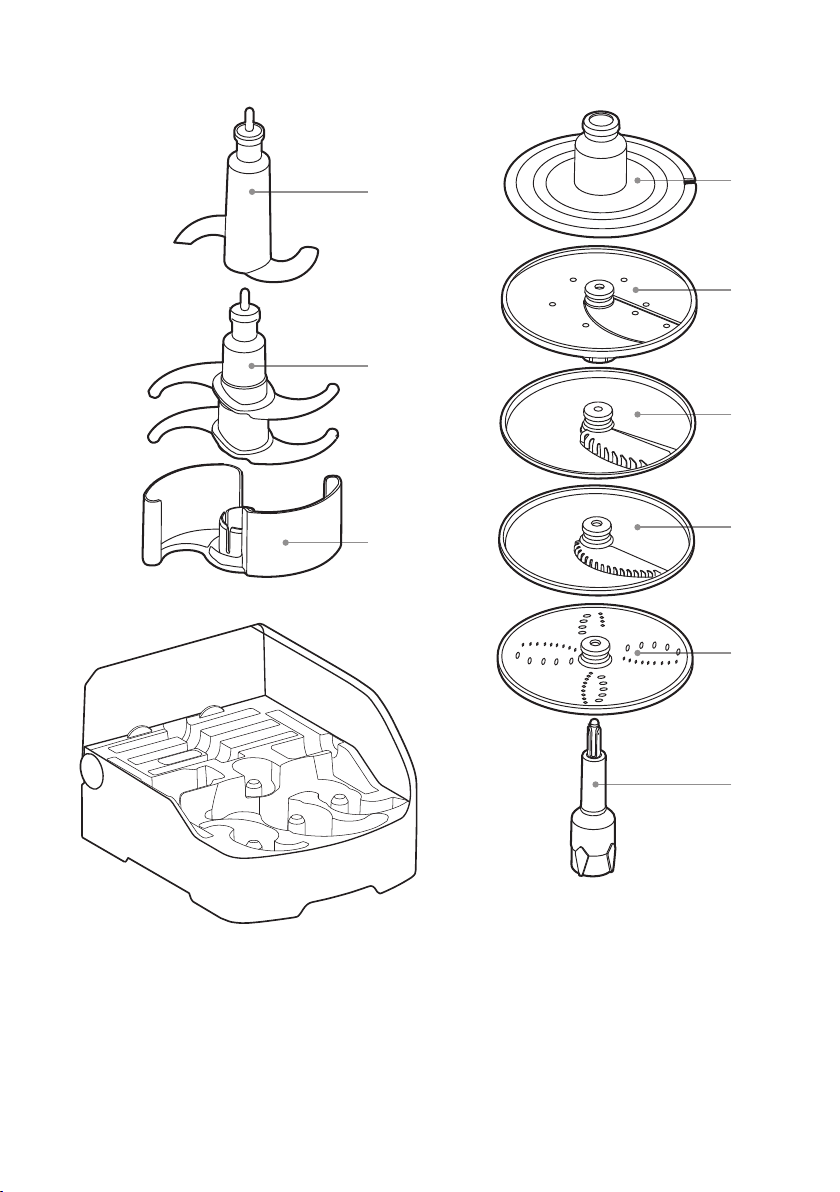
Storage case
S
U
Q
T
R
V
W
X
Y
Tools with integrated spindle Tools with removable spindle

8
A. Small food pusher
For improved processing control of smaller
ingredients. It also doubles as a measuring
cup for adding/measuring ingredients.
The food processor will run continually
whether the small pusher is in or out.
B. Large food pusher
For pushing food down the feed chute.
The food processor will not start unless the
large pusher is correctly in place.
C. Feed chute safety system
Prevents the motor from operating unless the
bowl and lid are correctly locked in position,
and large feed pusher is inserted.
D. Extra wide 14cm chute
For larger ingredients.
E. Processing lid
Locks onto the processing bowl.
F. Silicone seal
Reduces the chance of leakage while
processing large volumes of liquid
ingredients.
G. Processing bowl with handle
15 cup bowl for dry ingredients and 10 cups
for liquid (thick, wet ingredients e.g. soups).
The processing bowl locks onto the
motor base.
H. LCD display
Displays the timing function.
I. Count up & count down timer
Used to set desired time required for
processing. Can count up or down, stopping
the processor once the time is reached in
count down mode.
J. POWER|OFF button
K. START|PAUSE button
L. PULSE button
Press down and hold briefly for short bursts
of power. The motor will automatically stop
after the PULSE button has been released.
M. Direct drive motor base
2000W induction motor with safety braking
system.
N. Non-skid rubber feet
For added safety and stability.
O. Plastic spatula
For scraping the sides of the bowl helping to
process ingredients evenly.
P. Cleaning brush
For cleaning the processor bowl, blades and
discs. The flat end is designed as a scraper to
remove food from crevices.
Q. Dough blade
Blunt blade designed for a softer action of
combining dough ingredients.
R. Quad
‰
processing blade
Swift action for chopping, mixing, whipping
and blending a variety of ingredients.
S. Quad
®
blade cover
T. Whisk/emulsifying disc
Use this attachment for whisking of eggs
and cream.
U. Adjustable slicer
Use this disc for slicing ingredients.
Able to slice from 0.3mm – 8.0mm thick.
V. French fries cutter
Use this disc for cutting vegetables to make
french fries.
W. Julienne disc
Use this disc for julienning vegetables.
X. Reversible shredder
Use one side for small/thin shredding and
the other side for coarse shredding.
Y. Disc spindle
Use with the reversible shredder, julienne,
chip cutting, whisk and adjustable slicing
discs in position.

9
Assembly
BEFORE FIRST USE
• Before using your food processor for the
first time, remove any packaging material
and promotional labels. Ensure the POWER
button is OFF and the food processor is
unplugged.
• Be careful when handling the blades and
discs as they are extremely sharp.
• Wash the processing bowl, processing lid
and all attachments in warm soapy water
with a soft cloth. Rinse and dry thoroughly.
The attachments may be washed in the
dishwasher.
• When first using your food processor, you
may notice an odour coming from the motor.
This is normal and will dissipate with use.
• Always use the food processor on a dry, level
work surface.
ASSEMBLY
1. Position the processing bowl onto the
motor base with the handle in line with
the ALIGN HANDLE graphic on the
motor base.
2. Turn the bowl clockwise until the handle
locks to the front. The processing bowl
should now be securely locked into position.
The food processor will not operate unless
the bowl is locked into position correctly.
3. The spindle is required when using
ALL discs, including the adjustable slicer,
reversible shredder, julienne, and french
fries cutter. Failing to use the spindle will
damage the parts, and incorrect use this
way may cause the parts to fuse together.

10
4. Before placing the lid onto the processing
bowl, position the spindle over the coupling
in the center of the processing bowl. Then
position your chosen cutting attachment
over the spindle.
5. Place lid onto the processing bowl so that
the ALIGN | LOCK graphics on the lid and
handle align. To LOCK the lid, hold the
chute and turn clockwise so that the handle
parts align. Locking the lid correctly will
engage the interlocking safety catch on the
handle, and allow the motor to run.
MINI PROCESSING BOWL
• The mini processing bowl fits inside the
main bowl.
• The mini processing blades give you
maximum control for small quantities.
• Do not use the spindle, or the processing
discs.
• Use only the mini processing blades in the
mini bowl. Please note that the mini blades
cannot be used in the main processing bowl.

11
Functions
OPERATION
Assembly
The food processor will only operate when
the processing bowl, lid and large pusher are
correctly assembled. This engages the safety
interlock, and allows the motor to run.
The chute has a MAX CHUTE FILL graphic
to indicate the maximum volume of food
that can be placed in the chute for the
pusher to activate the safety locking catch.
After processing, wait until the blades/discs
have stopped moving before unlocking the
lid. To ensure safe handling, turn off at the
POWER button and unplug at the power
outlet before handling the blades. When
removing blades/discs, lift by carefully grip
the plastic hub in the centre.
Control buttons
The POWER button illuminates red when
the machine is connected to power and is
ready to run.
The START button allows the motor to run
continuously until pressed again. If the lid,
bowl or large pusher are removed while the
motor is running, the button will flash. The
motor will resume running when the bowl,
lid and large pusher are assembled and the
safety interlock is engaged, the button light
will be solid (no longer flashing).
The momentary PULSE button is ideal for
processing foods that need sudden bursts
of power. It also encourages ingredients to
move around the bowl. PULSE is also best
when processing foods that only require
processing for a short period of time.
Use a combination of the START and
PULSE buttons for control when processing
food.
Timer
If the timer isn’t set, the food processor
timer counts up in seconds. When using
the timer this way, the processor will stop
after 10 minutes (9:59), or you can cancel
it manually.
The alternative to running in count-up mode
is to use the arrow buttons to set the timer
before starting.
Overload protection system
The food processor has an overload
protection system to prevent damage to
the motor.
If activated, the food processor will go into
STANDBY mode, and the buttons will flash.
Unplug and allow to cool for 30 minutes.
Once cooled, you will be able to use the food
processor as usual again.
Note that some stiff mixtures (such as bread
dough) may cause the blade to rotate more
slowly than normal. If this happens, do not
process for more than 1 minute.
If the blades or discs jam with food while
processing, immediately unplug from the
power outlet before clearing the wedged
food. If this happens more than once, the
bowl may be overloaded. Try processing in
smaller batches.

12
CHOPPING WITH THE QUAD
®
BLADE
The micro-serrated Quad blade chops raw
and cooked food to the consistency required,
from coarsely chopped to minced. The blades
process very efficiently, and may take less time
than expected to process many large tasks.
Always remember to place the spindle and
Quad
blade into the processing bowl before
adding the food.
Avoid over-processing by checking the
consistency frequently. For many tasks, we
recommend using the PULSE button, as it may
only take a few seconds to fully process food to
your desired consistency.
If necessary, turn the POWER off and use a
spatula to scrape down the sides of the bowl to
encourage even processing.
Raw vegetables, fruit and cooked meats
Trim and cut food into 2.5cm cubes. Process
no more than 7 cups at a time using the
PULSE button at 1–2 second intervals until
chopped to desired size or consistency.
Raw meat, chicken and fish
Trim excess fat and cut food into 2.5cm cubes.
Ensure all bones are removed. Chill well in
freezer until firm as this will help to cut through
the food more readily. Process no more than
4 cups (600g) of raw meat at a time. At this
capacity the motor should run for no more than
30 seconds at a time. Use a combination of the
START and the PULSE button until chopped
or minced to the desired consistency.
Garlic, chilli and ginger
Peel garlic cloves and process them whole.
Leave chillies whole, or remove seeds for
milder chilli. Peel and cut ginger into
2.5cm cubes.
For other solid herbs like lemongrass or
galangal, peel and cut into cubes or pieces
between 1 and 2cm in size.
Size should be made smaller for harder or
more dense herbs.
Process using the PULSE button at
1–2 second intervals until chopped to the
desired consistency.
If adding garlic, chilli or ginger to other
ingredients, drop whole pieces down the
small feed chute while the motor is running.
Leafy herbs
Wash and dry herbs thoroughly. Remove
any coarse stems. Process no more than
3 bunches of herbs (approx. 5½ cups) at a
time using the PULSE button at 1–2 second
intervals until chopped to the desired
consistency.
Use leafy herbs immediately for the most
aromatic results in your recipe.
Nuts
Process no more than 5 cups of shelled nuts
at a time using the PULSE button at
1–2 second intervals until chopped to the
desired consistency.
Nut butters
Process no more than 5 cups of shelled
roasted nuts at a time using the START
button until chopped to the desired
consistency.
The volume of nuts reduces after processing,
for example 2 cups of nuts will make around
1 cup of nut butter.
Natural nut butter (without using
stabilisers) will separate on standing, and
needs to be stirred before use.
For a smoother nut butter, add a little
vegetable oil. This can improve the texture
of nuts with a lower oil content, like roasted
almonds.

13
Dried fruit
Dried fruit can be sticky, and may stick
to the blades during processing.
We recommend putting dried fruit in
the freezer for about 10 minutes before
processing. Process no more than 2 cups
at a time using the PULSE button at
1–2 second intervals until chopped to the
desired consistency.
If chopping fruit to add to cake mixture,
process the fruit before making the cake
mix. Add a little flour (from the quantity
of flour in the recipe) to prevent fruit from
sticking to the Quad blade.
For dates and other larger dried fruits,
remove pits and cut into quarters before
processing. Process no more than 1 cup at
a time.
Soft breadcrumbs
Break stale bread into chunks (fresh bread
will stick to blades). Process no more than
6–8 slices at a time using the PULSE button
at 1–2 second intervals until crumbed to
desired consistency.
Dried breadcrumbs
Tear bread into chunks and toast in oven
until golden and crisp. Do not over brown.
Process no more than 6–8 slices at a time
using the PULSE button at 1–2 second
intervals.
Biscuit crumbs
Break biscuits into quarters, and weigh
a maximum of 500g (2 standard packets).
Process using the PULSE button at
1–2 second intervals until chopped to the
desired consistency. Sweet or savoury
biscuit crumbs can be used as an alternative
to pastry for sweet or savoury pies.
Do not process very hard biscuits (for
example gingernut biscuits) as this may
damage the blades.
PURÉEING WITH THE QUAD
®
BLADE
The micro-serrated Quad blade purees raw
and cooked food to the consistency required,
including baby food. The blades process very
efficiently, and cut the time needed to puree
many tasks.
Always remember to place the Quad blade into
the processing bowl before adding the food.
Carefully remove the Quad blade after pureeing
food and use a spatula to scrape food adhering
to the blade and bowl.
Baby food
Trim and cut vegetables and meat into 2.5cm
cubes. Cook vegetables and meat before
processing. Process no more than
7½ cups at a time using the START | PAUSE
button in intervals until the food is pureed to
a smooth and even consistency. Stock, milk
or gravy can be added through the small feed
chute if the mixture becomes
too thick.
Excess baby food can be frozen in ice-cube
trays, and packed in single serve freezer bags
ready for use.

14
MIXING WITH THE QUAD
®
BLADE
The Quad blade mixes ingredients for cakes,
batters, and cookie doughs.
The Quad blade can also emulsify egg-based
sauces such as mayonnaise.
Always remember to place the spindle and
Quad blade into the processing bowl before
adding the food.
Butter cake and biscuit dough
Place softened, chopped butter and sugar
into the processing bowl. Process using the
START | PAUSE button until the mixture is
lightly creamed. With the motor running,
add eggs one at a time through the small
feed chute, mixing well after each egg is
added. Take lid off and add liquid and dry
ingredients to the mixture. Process using the
PULSE button until folded evenly. Scrape
down sides of bowl as needed. Do not
over-process.
Add choc chips, nuts, dried fruit, etc
after the main mixture is done. Use the
PULSE button in very short bursts until
the additions are combined. Do not over-
process, as these larger ingredients will
break down quickly.
Quick-mix cakes and batters
Place all ingredients in the bowl, starting
with liquids, and being careful not to
exceed the MAX LIQUID level. Process
using the PULSE button until folded evenly.
Scrape down sides of bowl as needed.
Do not over-process.
This method can also be used for melt ’n’
mix cakes, packet cake mixes and crepe
batters.
Pastry dough
Place flour and chilled, cubed butter into the
processing bowl.
Do not process more than 3L cups (500g)
of flour using the START | PAUSE button in
intervals until the butter is absorbed into
the flour.
Steadily add liquid through the small feed
chute with the motor still running. Process
until the mixture forms a ball.
KNEADING WITH THE
DOUGH BLADE
Always remember to place the spindle
and dough blade into the processing bowl
before adding the food. The edges of the
plastic dough blade create a softer action for
combining dough ingredients.
The dough blade encourages the gluten
strands to be stretched rather than cut, and
should be used for all yeast doughs, and any
other doughs that require kneading.
Bread or pizza dough
Place flour and dry ingredients into the
processing bowl, including instant active
dry yeast.
Do not process more than 3 cups (450g)
of flour or using the START | PAUSE button
in intervals.
Steadily add liquid (including oil, if
applicable) through the small feed chute
with the motor still running. Process until
the mixture until it forms a soft, elastic
dough ball.
Transfer dough ball to a lightly floured
surface and knead for a further 5 minutes if
necessary until soft and pliable.
If processing more than two batches of
dough (450g each), allow the motor base
to cool for an extended period before
subsequent kneading to prevent the motor
from overloading.
Place dough into a large, greased mixing
bowl and cover. Stand in a warm place until
it has doubled in size. Turn the dough out
onto a lightly floured surface and knead
again until smooth and elastic. Shape the
dough then allow to rise in a warm area
before baking.

15
SLICING, GRATING AND SHREDDING
Important: The spindle must be used
with both the adjustable slicer and
the reversible shredder/grater.
Adjustable slicer
The adjustable slicer will slice food to an
even and consistent thickness. It can be
adjusted to 24 settings, from very fine
(0.3mm) to thick (8.0mm). To adjust the
slicing thickness, hold the adjustable slicing
disc by the outer edge with one hand, and
turn the adjustment dial on the underside
with the other hand. An arrow graphic
indicates the thickness of the slice you
have chosen.
Reversible grater and shredder
This disc has an array of small blades on
both sides of the disc. Align the disc so
larger holes face up for courser textured
results, or with the smaller holes facing
up for finer results. The discs are labelled
showing which side faces up.
CONTROLLING THE INGREDIENTS
It is important to position the food in
the chute to gain maximum control and
best results.
Smaller ingredients
For long thin foods such as carrots,
cucumbers, zucchini, etc., use the small feed
chute. This will avoid the ingredient from
tipping over during slicing.
Larger ingredients
The wide feed chute is 14cm wide, and can
fit ingredients up to this size. The chute
can be packed to fill the width of the chute.
The food should fit snugly so it is supported
in an upright position in the chute, but not
so tight that it could prevent the food from
moving down the chute.
Take care not to overfill the chute, as the
pusher will not activate the interlock safety
catch if the chute is too full. Do not fill over
the MAX CHUTE FILL graphic.
Pressure
When processing, never force the food down
the chute as this can damage the discs.
Apply light, even pressure for soft foods
such as tomatoes and bananas.
Apply medium, even pressure for firmer
foods such as potatoes and apples.
Apply firm, even pressure for hard foods
such as parmesan cheese and deli meats
such as salami.
Round fruit and vegetables
Prepare fruit or vegetables by washing and
peeling (if necessary).
Small fruit and vegetables should be
trimmed on one end so the food sits flat
inside the feed chute.
Large fruit and vegetables may need to be
cut in half to fit in the chute.
Long fruit and vegetables
Prepare fruit or vegetables by washing and
peeling (if necessary).
Ingredients can be cut cross-sectionally to
create circular results. Use the small and
medium feed chute, or pack ingredients
vertically in the large feed chute.
Ingredients can be cut lengthwise to create
ribbons. Use the large feed chute, and trim
ingredients if necessary to encourage them
to sit flat in the feed chute when the disc
starts. Pack the large feed chute horizontally.
Leafy vegetables
Cut cabbage into wedges to fit the feed
chute. For lettuce, separate leaves, then roll
up and pack vertically in the feed chute.

16
Cheese
Caution should be taken when processing
cheese in a food processor. For soft cheese
such as mozzarella, partially freeze it
until firm. This will help prevent jamming
the disc.
Round cheeses such as mozzarella should be
trimmed at one end to encourage them to sit
flat in the feed chute with the disc starts.
Hard cheeses such as parmesan must be
checked first to ensure they are not too
hard (to avoid damaging blade edges).
The cheese should slice easily with a sharp
knife and remove the rind before processing.
Wedged shaped cheeses such as parmesan
can be packed side by side to form
a rectangular shape in the chute.
Deli meats
Cut in lengths to fit the height of the feed
chute. The length must not be higher than
MAX CHUTE FILL graphic. Pack with the
cut side facing down.
For hard cured sausages like salami and
pepperoni trim on one end and process
one sausage at a time through the small or
medium feed chute, depending on size.
Chocolate
Break a block of chocolate into small pieces,
and chill until firm. Pack into the small feed
chute, and then shred.
MINI BOWL AND BLADE
The mini processing bowl is used inside
the main processing bowl. It is for better
control when processing small quantities of
food, or herb/spice mixes. It can be used for
chopping, mixing and blending a variety of
ingredients.
The mini blade can not be used inside the
main processing bowl.
The main processing attachments will not fit
inside the mini bowl.

17
Food Processing Guide
For more information about preparation of food and how to process, refer to basic
processing techniques. For specific recipes, refer to the recipe section.
FOOD BLADE TYPE ADJUSTABLE SLICING
DISC THICKNESS
RECOMMENDED
DISC TYPE
Avocado
Quad blade or mini
Use: Guacamole
2–5
Beetroot
(cooked)
2–5
Shredder
Use: Salad
Butternut
Pumpkin
Quad blade
Use: Butternut pumpkin
soup
Cabbage /
Lettuce
Thin 1–2 and med 2–3
Use: Accompaniment
Shredder
Use: Salad
Carrot
Quad blade or mini
Use: Vegetable soup
0–5
Shredder
Use: Salad
Cauliflower
(cooked)
Quad blade or mini
Use: Cauliflower soup
Celery
Quad blade or mini
Use: Vegetable soup
Thin 1–2 med 2–3
Use: Salad
Eggplant
Quad blade or mini
Use: Accompaniment,
soups
2–5
Use: Grilled eggplant
Herbs
Quad blade or mini
Use: Seasoning or pesto
Leeks
Quad blade or mini
Use: Cooked for soups
2–5
Use: Vegetable soup
Onion
Quad blade or mini
Use: Soups, sauces
0–5
Use: Salad
Potatoes
0.3–6
Use: Potato au Gratin
Shredder
Use: Hash browns
Potatoes
(cooked)
Quad blade or mini
Use: Mash potato
Tomatoes
Quad blade or mini
Use: Salsa
2–5
Use: Sandwich filling,
caprese salad, tomato
relish

18
FOOD BLADE TYPE ADJUSTABLE SLICING
DISC THICKNESS
RECOMMENDED
DISC TYPE
Apple / Pear
Quad blade or mini
Use: Apple sauce
2–5
Use: Apple pie
Apple / Pear
(cooked)
Quad blade or mini
Use: Baby food
4–6
Use: Fruit salad
Dried Fruit
Quad blade
Use: Fruit salad, dessert
sauce
Batters
Quad blade
Use: Cakes, pancake,
waffle batter
Breadcrumbs
Quad blade
Use: Coatings,
breadcrumb stuffing
Cheese
2–5
Use: Garnish,
sandwich fillings
Shredder - coarse or fine
Use: Grated cheese for
pizza
Chocolate
Quad blade
Use: Chocolate ganache
Shredder - coarse or fine
Use: Dessert decoration
Cream
Whisk
Use: the PULSE function to
avoid over whipping.
Doughs
Dough blade
Use: Bread, pizza
Pastry Quad blade
Eggs (whole
or yolks)
Quad blade or mini
(for mayonnaise)
Whisk
Use: Whole egg foams
Egg Whites
Whisk
Use: Egg white foams
Meat (raw)
Quad blade
Use: Meatloaf, burgers,
meatballs
Use: PULSE function
Meat
(cooked)
Quad blade
Use: Sandwich fillings,
pate, baby food
Use: PULSE function
Meat (deli)
1–6
Use: Sandwiches,
antipasto, pizza toppings

19
Care & Cleaning
Remove the power cord from the power
outlet after use for safety reasons.
Processing bowl and lid
Due to the interlock components, we do not
recommend immersing the bowl in water for
long periods.
To keep your bowl and lid clean, and to avoid
food drying on, follow these steps as soon as
possible after use:
• Rinse most of the ingredients off the bowl
and lid.
• Hand wash in clean warm, soapy water using
a mild liquid detergent and non-abrasive
sponge.
Motor base
To clean the motor base, wipe with a soft,
damp cloth then dry thoroughly. Wipe any
excess food particles from the power cord.
Cleaning agents
Do not use abrasive scouring pads or
cleansers on either the motor base or the jug,
as they may scratch the surface. Use only
warm soap water with a soft cloth.
Dishwasher
The processing bowl and lid may
occasionally be washed in the dishwasher
(top shelf only), however washing in the
dishwasher is not recommended on a regular
basis, as prolonged exposure to harsh
detergents, hot water and pressure will
damage and shorten the life of the plastic
and the interlock components.
Stubborn food stains and odours
Strong smelling foods such as garlic, fish and
some vegetables such as carrots may leave an
odour or stain the bowl or lid.
To remove, pour warm soapy water and fill to
the MAX LIQUID mark. Set aside to soak for
5 minutes, without immersing the whole bowl.
Then wash with a mild detergent and warm
water, rise well and dry thoroughly. Store the
bowl with the lid off.
Storage
Place the large food pusher (with medium
and small pushers inserted) into the feed
chute for storage.
Store your food processor upright, with the
bowl and lid resting in position, but not
locked. Locking the bowl and lid can put
unnecessary strain on the safety interlock.
All accessories should be kept in the storage
container and out of the reach of children to
avoid accidental cuts. It is not recommended
to store the discs in a drawer with other
utensils.
Do not place anything else on top of your
food processor during storage.

20
Troubleshooting
PROBLEM EASY SOLUTION
Food is unevenly
processed
•
Ingredients should be cut evenly into 2.5cm pieces before processing.
•
Ingredients should be processed in batches to avoid overloading.
Slices are slanted
or uneven
•
Place evenly cut food into the feed chute.
•
Apply even pressure on the pusher.
Food falls over in
the feed chute
•
The large feed chute must be packed full for best results.
If processing smaller quantities, place items to the far left in the feed chute,
or use the small feed chute, depending on the food size.
Frenchs fries cutter
•
Always clear any blocked potato before processing more potatoes.
Some food remains
on top of the disc
after processing
•
It is normal for small pieces to remain after processing.
Motor slows
down when
kneading dough
•
Amount of dough may exceed maximum capacity.
Remove half and process in two batches.
•
Dough may be too wet (see next page). If motor speeds up, continue processing.
If not, add more flour, 1 tablespoon at a time until the motor speeds up. Process
until dough cleans the side of the processing bowl.
Dough doesn’t
clean inside of the
processing bowl
•
Amount of dough may exceed food processor maximum capacity.
Remove half and process in two batches.
•
Dough may be too dry.
Dough nub forms on
top of dough blade and
dough does not become
uniformly kneaded
•
Stop machine, carefully remove dough, divide it into 3 pieces and redistribute
them evenly in the processing bowl.
Dough feels tough
after kneading
•
Divide dough into 2 or 3 pieces and redistribute evenly in processing bowl.
Process 10 seconds or until uniformly soft and pliable. Allowing dough to rest
allows the gluten strands to relax and become more pliable.
Dough is too dry
•
While machine is running, add water through the small feed chute,
1 tablespoon at a time until dough cleans the inside of the processing bowl.
Dough is too wet
•
While machine is running, add flour through the small feed chute,
1 tablespoon at a time until dough cleans the inside of the processing bowl.

21
PROBLEM EASY SOLUTION
The motor does
not start
•
There is a safety interlock switch to prevent the motor from starting if it is not
properly assembled. Make sure the processing bowl and lid are securely locked
into position.
•
If you are slicing or shredding and the above solution does not work, make sure
that the food contents in the feed chute are cut below the maximum fill line so
that the activation rod can engage the motor.
•
Make sure the large food pusher is inserted in the feed chute low enough to
engage safety interlock switch.
•
If the motor still will not start, check the power cord and power outlet.
The food processor
shuts off during
operation
•
The lid may have become unlocked; check to make sure it is securely in position.
•
If the motor overloads, the 'OVERLOAD' icon in the LCD will start to flash.
Switch off by pressing the POWER | OFF button and unplug the power cord.
Allow the food processor to cool for 20–30 minutes before resuming.
The motor
slowed down
during operation
•
This is normal as some heavier loads (e.g. slicing/shredding cheese) may
require the motor to work harder. Reposition the food in the feed chute and
continue processing.
•
The maximum load capacity may have been exceeded. Remove some of the
ingredients and continue processing.
The food processor
vibrates/moves
during processing
•
Make sure the rubber feet at the bottom of the unit are clean and dry. Also make
sure that the maximum load capacity is not being exceeded.
•
This is normal as some heavier loads may require the motor to work harder.
INSERT PUSHER
flashing
•
Make sure that food does not exceed the max line in the food chute.
•
If pusher is fully inserted and this warning flashes on the screen, check that the
bowl and lid are assembled correctly. Bowl handle should be facing the front of
the unit.

22
Recipes
Eggplant Dip
Prep 10 minutes / Cook 50 minutes
Makes approx 2 cups
2 large eggplants
2 cloves garlic
1 tablespoon lemon juice
2 tablespoons olive oil
1 teaspoon sea salt
½ teaspoon ground cumin
2 tablespoons chopped fresh parsley
Freshly ground black pepper
Fresh or toasted Lebanese bread
1. Preheat oven to 200°C. Rub whole eggplants all
over with a little oil. Place into a baking dish and
bake for about 40 minutes or until skin is begins
to darken.
2. Add garlic to baking dish and continue baking
eggplant and garlic until garlic is softened and
eggplants are blackened and blistered all over.
Remove from oven.
3. Place eggplants into a plastic bag and set aside
until cool enough to handle.
4. Remove skin from eggplants and discard,
roughly chop the flesh. Insert Quad blade into
processor bowl and add eggplant into the food
processor bowl with garlic, lemon juice, olive oil,
salt and cumin. Place lid on bowl.
5. Process until mixture is almost smooth, scraping
down the sides of processor bowl if necessary.
6. Pour into bowl and stir through parsley and
season with black pepper.
Serve dip with fresh or toasted Lebanese bread.
Roasted Beetroot Dip
Prep 20 minutes
+
cooling / Cook 50 minutes
Makes approx 2 cups
4 medium (700g) beetroot
1 garlic bulb
2 teaspoons lemon juice
1 tablespoon horseradish
¼ cup (60ml) light olive oil
Salt and freshly ground black pepper
Turkish bread to serve
1. Preheat oven to 200°C. Wash beetroot well and
pat dry. Cut top off garlic and place beetroot
and garlic onto a baking tray and drizzle with
oil. Bake for 30 minutes then remove garlic and
turn beetroot over and cook beetroot for a further
15–20 minutes or until the beetroot is tender. Set
aside to cool completely.
2. Once beetroot is cool peel off skin and cut into
quarters. Squeeze garlic out of skin.
3. Insert Quad blade into processor bowl; add
beetroot and garlic and remaining ingredients.
Place lid on bowl. Process until combined,
scraping sides if necessary. Transfer to a bowl,
cover and place into the fridge until well chilled.
Serve dip chilled with Turkish bread.

23
Spinach, Parmesan and
Cashew Dip
Prep 20 minutes
Makes approximately 1 cup
75g baby spinach leaves
1 clove garlic
75g parmesan, grated
L cup (50g) unsalted toasted cashews
L cup (80ml) olive oil
2 teaspoons lemon juice
Salt and freshly ground black pepper, to taste
Crackers, to serve
1. Assemble food processor with the mini
processing bowl and mini blade inserted.
2. Add ingredients, except salt and pepper, into
the processing bowl in the order listed. Place lid
on bowl.
3. Pulse mixture until all the ingredients are
chopped as desired; scrape down side if
necessary. Do not over process, it should be
slightly chunky.
Season to taste and serve with crackers.
TIPS
Dip will keep fresh for 1 day.
Hummus
Prep 10 minutes
Makes approximately 2½ cups
2 x 400g can chickpeas, rinsed and drained
2 cloves garlic
L cup (80ml) warm water
¼ cup tahini
¼ cup (60ml) lemon juice
1 teaspoon ground cumin
Salt and freshly ground black pepper, to taste
Extra virgin olive oil, to serve
Fresh Turkish or Lebanese bread to serve
1. Insert Quad blade into the processor bowl;
add chickpeas, garlic, water, tahini, lemon juice
and cumin. Place lid on processor bowl.
2. Process until mixture is smooth, scraping down
sides during processing if necessary.
Season to taste and serve with Turkish or
Lebanese bread.

24
Thai Sweet Potato Soup
with Coriander Pesto
Prep 25 minutes / Cook 35 minutes
Serves 6
400ml can coconut milk
1.5kg sweet potato, peeled and cut into 5cm pieces
1½ litres chicken stock
Fish sauce, to taste
Mixed leaf salad, to serve
Red Curry Paste
1 teaspoon shrimp paste (belacan), optional
10 dried long red chillies, seeds removed
2 cm piece galangal, peeled, thinly sliced
1 lemongrass, white part only, roughly sliced
6–7 coriander roots, scraped
6 kaffir lime leaves, stems removed and sliced thinly
2 red shallots, halved
6 cloves garlic
1 teaspoon salt
1–2 tablespoons vegetable oil
Corriander Pesto
1 cup coriander leaves (approximately 2 bunches)
¼ cup blanched almonds
1 small red shallot
2 teaspoons lime juice
2 tablespoons olive or vegetable oil
Salt, to taste
1. To make the curry paste: Wrap shrimp paste in
a piece of aluminium foil. Cook under a hot grill
and cook for 1–2 minutes each side. Place chillies
in a heatproof bowl and cover with boiling water;
soak for approximately 15 minutes or until
softened. Assemble food processor with the
mini processing bowl and mini blade inserted.
Combine shrimp paste, chillies and remaining
red curry paste ingredients into the mini bowl
and process until finely chopped.
2. Open can of coconut milk without shaking;
spoon the firm coconut into a large saucepan
and cook, stirring over a medium high heat until
the coconut milk separates. Add the curry paste
to the pan and cook, stirring, until the paste
becomes fragrant.
TIPS
If you can’t buy coconut milk that has a firm top omit
this step and use 1 tablespoon oil and add all coconut
milk in step 5.
3. Add sweet potato and stock to the pan and bring
to the boil. Reduce heat and simmer for about
20 minutes or until the sweet potato is soft.
4. Meanwhile, combine the coriander pesto
ingredients into the mini processing bowl and
process until combined. Season to taste.
5. Once the sweet potato is soft, add remaining
coconut milk to the saucepan and allow soup
to cool.
6. Insert Quad blade into the processor bowl;
carefully spoon soup into bowl. Place lid on
processor. Process soup until smooth; scrape
down sides if necessary. Return pureed soup to
saucepan to reheat; adjust the salt levels of the
soup with fish sauce to taste.
7. To serve ladle soup into bowls and spoon
coriander pesto into the soup. Stir through and
squeeze fresh lime to taste.
Serve with mixed leaf salad.

25
Leek and Potato Soup
Prep 15 minutes / Cook 25 minutes
Serves 4
2 leeks, white part only
40g butter
1 tablespoon olive oil
750g potatoes, peeled, roughly chopped
1 litre chicken stock
Salt and white pepper, to taste
Chopped chives, for garnish
1. Assemble the processor with the spindle and the
variable slicer set to setting 3–4. Slice leeks.
2. Heat butter and oil in a large saucepan over
medium heat, add leeks and cook, stirring, for
3–4 minutes until softened. Add potatoes and
stock. Cover, bring to the boil then simmer for
15-20 minutes until potatoes are soft. Allow the
soup to cool.
3. Insert Quad blade into the processor bowl;
carefully ladle soup into bowl. Place lid on
processor. Process soup until smooth; scrape
down sides if necessary. If soup becomes too
thick when cooking or blending add a little extra
stock or water.
4. Return pureed soup to saucepan to heat through.
Season to taste.
Serve soup topped with fresh chopped chives.
Chicken, Corn and
Ginger Soup
Prep 20 minutes / Cook 25 minutes
Serves 4
1 tablespoon peanut oil
4 green onions, thinly sliced
5cm piece fresh ginger, finely chopped
3 cups fresh or frozen corn kernels
1 litre chicken stock
2 cups (500ml) water
2 tablespoons soy sauce
1 tablespoon shao xing cooking wine
½ teaspoon sesame oil
2 large chicken breast fillets, thinly sliced
¼ cup roughly chopped fresh coriander leaves
Ground white pepper, to taste
1. Heat oil in a large saucepan, add onions and
ginger and cook, stirring, for 2 minutes.
Add corn and cook, stirring occasionally,
for a further 3–4 minutes.
2. Add stock and water and bring to the boil; reduce
heat and simmer for 10 minutes. Remove from
heat and allow to cool slightly.
3. Insert Quad blade into the processor bowl;
transfer half of the mixture and process for
10–20 seconds. Return pureed soup to remaining
soup in saucepan with soy, wine, sesame and
chicken. Cook on a medium high heat until
soup starts to simmer and chicken is just
cooked through.
Season to taste with white pepper and serve
garnished with freshly chopped coriander leaves.

26
Hawker Style Thai
Fish cakes
Prep 20 minutes / Cook 15 minutes
Serves 6–8 as part of an appetiser
600g white fish fillets, such as red fish fillets or
snapper
2 tablespoons Thai red curry paste
2 tablespoons fish sauce
2 teaspoons white sugar
1 egg white
2 kaffir lime leaves, spine removed, finely shredded
80g green beans, trimmed, thinly sliced
Peanut oil for deep frying
Dipping Sauce
½ cup (110g) sugar
L cup (80ml) white vinegar
1 tablespoon fish sauce
½ Lebanese cucumber, seeded, finely chopped
1 long red chilli, finely chopped
1. To make the dipping sauce, combine sugar,
vinegar and 2 tablespoons cold water into a small
saucepan. Stir over medium high heat until sugar
has dissolved, increase heat and bring to the boil.
Stir in fish sauce. Set aside to cool completely.
Just before serving, stir through cucumber
and chilli.
2. Assemble the processing bowl using the Quad
blade. Cut fish into large cubes and place into
the processing bowl along with curry paste, fish
sauce, white sugar and egg white. Place lid on
bowl. Pulse until ingredients are combined.
3. Carefully remove Quad blade and mix through
kaffir lime leaves and green beans.
4. Heat oil in a deep fryer or wok.
5. Drop tablespoonful amounts in the hot oil in
batches and cook for 1–2 minutes each side or
until fish cakes are golden brown. Remove and
drain on paper towel. Repeat with remaining
fish cakes.
Serve with dipping sauce and lime wedges.
Herb Crusted Lamb Racks
Prep 15 minutes / Cook 35 minutes
Serves 6
4–5 slices day old white bread, crusts removed
2 tablespoons roughly chopped parsley
1 tablespoon roughly chopped rosemary
2 cloves garlic
1 teaspoon finely grated lemon rind
Salt and freshly ground black pepper.
¼ cup Dijon mustard
6 lamb racks (4 cutlets on each rack)
2 tablespoons olive oil
1. Preheat oven to 180°C. Insert Quad blade into
food processor. Add bread, herbs and garlic and
rind. Place lid on bowl and process until bread
becomes crumbs. Season with salt and pepper.
2. Spread the top of each lamb rack with mustard
and press bread crumb mixture over the top.
3. Place racks of lamb in a baking dish with olive
oil, crust side down. Roast for 10 minutes or until
golden. Turn racks over, and roast for a further
15–25 minutes or until cooked as desired.
4. Remove from pan, cover loosely with foil and
allow to stand for 10 minutes before carving.

27
Basic Pizza Dough
Prep 40 minutes
Makes enough for four 30cm thin crust pizzas
or two 30cm thicker crust pizzas
3 cups (450g) bakers flour
3 teaspoons dry yeast
3 teaspoons sugar
3 teaspoons salt
1 tablespoon olive oil
1 cup (250ml) lukewarm water
1. Assemble the food processor using the
dough blade.
2. Add flour yeast, sugar, salt, olive oil and water
to the bowl. With the motor running, slowly add
the water through the food chute. Process until
dough forms into a ball. Do not over process.
3. Remove dough and knead on a lightly flour
dusted surface to smooth. Place dough ball into
a lightly oiled bowl, cover and rest in a warm
drought free place for 30 minutes or until dough
has doubled in size. Turn dough out on a floured
surface and knock back (punch) the dough to
remove excess air, lightly knead.
4. For thin crust, divide dough into 4 x 170g dough
balls and set aside until required.
5. For thicker crust, divide dough into 2 even dough
balls and set aside until required.
Margherita Pizza
Prep 10 minutes / Cook 15 minutes
Serves 4
170g pizza dough for thin crust (or one half of the
dough for thicker crust)
¼ cup (60ml) pizza sauce
½ cup shredded mozzarella cheese
6 cherry tomatoes, quartered
L cup basil leaves, torn.
4 drained bocconcini balls, thinly sliced
Salt and freshly ground black pepper
Fresh basil leaves, to serve
1. Preheat oven to 200°C no fan.
2. Roll out dough ball on a lightly floured surface
until pizza is to your desired thickness. Place onto
a floured pizza tray and prick evenly with a fork.
3. Spread tomato sauce over pizza base; sprinkle
evenly with mozzarella cheese, cherry tomatoes,
basil and bocconcini.
4. Season with salt and pepper.
5. Bake for 10–15 minutes or until base is cooked
and crisp and topping is golden and melted.
Serve topped with torn fresh basil leaves.

28
Slow Cooked Indonesian
Beef Curry
Prep 5 minutes / Cook 8 hours
Serves 8–10
Curry paste
8 cloves garlic
6 eshallots, roughly chopped
6cm piece ginger, sliced
6 long red chillies, trimmed, roughly chopped
1 tablespoon ground coriander
1 tablespoon ground cumin
½ teaspoon freshly ground black pepper
2 teaspoons salt
2 tablespoons vegetable oil
Dipping Sauce
2–3 tablespoons vegetable oil
3kg chuck steak (or gravy beef), cut into 5cm pieces
6 cardamom pods
2 cinnamon sticks
1 cup (250ml) water
1 small (500g) sweet potato, cut into 5cm pieces
2 medium (500g) potatoes, cut into quarters
2 x 270ml cans coconut milk
L cup tamarind paste
1 bunch fresh coriander leaves and stems,
roughly chopped
1. For the curry paste, assemble food processor
with the mini processing bowl and mini blade
inserted. Place all ingredients except oil into
the mini bowl and process until finely chopped.
Pour in oil and process until smooth; set aside.
2. Heat 1 tablespoon of the oil in a non stick frying
pan over medium high heat. Add one quarter of
the beef and cook, stirring, until browned; transfer
meat to slow cooker pan. Repeat with remaining
oil and beef.
3. Reduce heat to medium and stir in curry paste.
Cook 2–3 minutes or until fragrant. Place slow
cooker pan into housing; add curry paste and
stir to coat meat in curry paste Add cardamom,
cinnamon, water and potatoes. Cover and cook
on High 4–5 hours or Low 7–8 hours.
4. In the last hour of cooking stir through coconut
milk, tamarind and coriander. Taste and adjust
seasoning with salt or extra tamarind.
TIPS
Recipe can be cooked in oven at 170°C for
2½ – 3 hours.

29
Goats Cheese and
Leek Tart
Prep 30 minutes / Cook 1 hour
Serves 6–8
2 leek, white part only
80g butter
1 tablespoon olive oil
1 tablespoon chopped fresh thyme, plus extra sprigs
to garnish
Salt and freshly ground black pepper
80g goats’ cheese
300ml cream
4 eggs
Pastry
250g plain flour
135g chilled butter, chopped
1 egg
1–2 teaspoons cold water
1. To make the pastry, assemble the food processor
using the Quad blade.
2. Place flour and butter into the processing bowl.
Process ingredients until mixture resembles a
fine crumble. Add egg and water and process
until mixture forms a ball. Do not over process.
TIPS
Add the water gradually as you may not need it all.
3. Lightly knead dough by hand until smooth and
shape into a disc. Cover with plastic wrap and
refrigerate for 20 minutes.
4. Preheat oven to 180°C. Lightly grease a 25cm x
3cm loose base round flan tin.
5. Assemble the processor with the spindle and the
variable slicer set to setting 3–4. Slice leeks.
6. Heat butter and oil in a frying pan over a medium
heat; add leeks and cook, stirring, until the leeks
have softened. Add the chopped thyme and cook
for a further minute. Season with salt and pepper
and set aside.
7. Roll dough between two sheets of baking paper
large enough to line tin; line flan tin with pastry.
Using a fork press several holes around the
middle of the pastry. Line tin with baking paper
and fill with baking beads or uncooked rice. Bake
in oven for 15 minutes; remove beads and paper
and bake for a further 5 minutes.
8. Spread leeks over the base of the pastry and
sprinkle with goats’ cheese and top with extra
sprigs of thyme. Whisk together cream, eggs,
salt and pepper; pour over egg mixture. Bake in
preheated oven for 30 minutes or until set.
Allow to cool for 30 minutes before serving.

30
Spicy Chicken Patties
Prep 15 minutes / Cook 20 minutes
Serves 6–8 as part of an appetiser
2 long red chillies, seeds removed, halved
2 stalks lemongrass, white part only, roughly
chopped
2 cloves garlic
5cm knob ginger, peeled, sliced
800g chicken breast, chopped into large pieces
½ cup fresh coriander leaves
¼ cup fish sauce
2 teaspoons sesame oil
Vegetable oil for shallow frying
Sweet chilli sauce
1 cup (250ml) rice wine vinegar
¾ cup (165g) white sugar
2 large red chillies, seeds removed, finely chopped
1. To make the dipping sauce: Combine the vinegar,
sugar and salt in a small saucepan. Cook, stirring
over a low heat until the sugar has dissolved.
Increase heat to high and cook for about 5
minutes or until the liquid has reduced and is
syrupy. Remove from heat; stir in chillies and set
aside until cool.
2. Place chillies, lemongrass, garlic and ginger
into the small chopper bowl and process until
finely chopped. Transfer to large processor bowl
with the Quad blade inserted and add chicken,
coriander, fish sauce and sesame oil. Process
until meat is finely minced and paste is evenly
distributed – about 5 seconds.
3. Wet hands with cold water and form chicken
into small patties. Cook patties, in batches, in
vegetable oil over medium heat for 4–5 minutes
or until golden on the outside and cooked
through.
Serve with sweet chilli sauce.
Homemade Butter
Prep 15 minutes
Makes about 1 cup
600ml good quality pure cream
Fine salt (optional)
1. Assemble food processor with the
emulsifying disc.
2. Pour cream into bowl and process for
2–3 minutes or until the butterfat separates from
the buttermilk. Pour out buttermilk and add
about 1½ cups chilled water to the processor
bowl. Process again for 2–3 seconds. This rinses
the buttermilk from the butter. Strain into a piece
of muslin and gently squeeze to remove any
excess water.
3. For salted butter; place butter into the small bowl
of the food processor and add salt. Process for
3–4 seconds to combine.
4. Place in a container and refrigerate. Will keep
refrigerated for 1–2 weeks.
Variations
Add fresh crushed garlic for garlic butter or add
some light olive oil to make a spreadable butter.
Recipe can be halved.

31
Basil Pesto
Prep 10 minutes
Makes approx 1½ cups
2 cups firmly packed basil leaves (approx 1 large
bunch basil)
2 cloves garlic
2 teaspoons lemon juice
L cup pine nuts, toasted
60g grated parmesan cheese
½ cup (125ml) olive oil
Salt and freshly ground black pepper
1. Insert Quad blade into processor bowl. Add all
ingredients in the order listed. Place lid on bowl.
Pulse until all ingredients are very finely chopped
and almost smooth. Scrape down sides of bowl
if necessary.
2. Spoon into an airtight container and chill until
ready to use.
TIPS
Pesto will keep in an airtight container in the
refrigerator for a few days. Pour a little extra oil over
the top of the pesto and place a piece of plastic
wrap on top of the pesto. This will prevent excess
browning.
Nasi Goreng
Prep 25 minutes / Cook 15 minutes
Serves 6
4 eggs
L cup (80ml) vegetable oil
1 onion, quartered
3 cloves garlic
2 long red chillies, thinly sliced
2 teaspoons shrimp paste (belacan)
1 teaspoon ground coriander
2 teaspoons sugar
2 small chicken breasts, thinly sliced
300g raw school prawns, peeled, deveined
¼ small Chinese cabbage, finely shredded
6 cups cold, cooked long grain rice
¼ cup (60ml) kecap manis
2 tablespoons soy sauce
4 green onions, sliced
Thinly sliced cucumber, carrot strips and crisp fried
Asian shallots, to garnish
1. Beat eggs together until well mixed and foamy.
Pour in heated, oiled, wok and tilt to spread
egg to form a thin omelette across the base of
pan. Cook 1–2 minutes, or until just set. Roll up
omelette to form a cylinder and remove to a plate.
Cool slightly and cut into thin strips. Set aside
to cool.
2. Assemble food processor with mini bowl and
mini blade. Add onion, garlic, chillies, shrimp
paste, coriander and sugar, process until it forms
a paste. You may need to add a little oil or water
to enable the ingredients to blend properly.
3. Heat remaining oil on a medium–high heat. Add
paste and cook for 1–2 minutes or until fragrant.
4. Add sliced chicken and stir fry for 2–3 minutes
to seal. Add prawns and cabbage and continue
cooking for a further 5 minutes.
5. Stir in cold rice, breaking up any lumps and cook,
stirring until the rice is heated through. Add
sauces and green onions, toss until combined.
Serve topped with cucumber, carrot strips and Asian
shallots.
TIPS
Shrimp paste is available in the Asian section of
your supermarket.

32
Apple Teacake
Prep 20 minutes / Cook 60 minutes
Serves 12
2 pink lady apples
3 x 50g eggs
1 cup (250ml) milk
1 teaspoon vanilla extract
180g butter, melted
1½ cups (330g) caster sugar
3 cups (450g) self raising flour
1½ tablespoons demerara sugar
2 tablespoons apricot jam, warmed, sieved
Double cream, to serve
1. Preheat oven to 160°C with fan. Grease and line a
25cm springform cake pan with baking paper.
2. Assemble the food processor using the variable
slicer set to a thin slice. Cut two sides from each
apple as close to the core as possible. Put the
halves together and place apples into large feed
shoot so that as they slice long thin slices will be
produced. Remove apples and set aside. Place
Quad blade into processor bowl.
3. Place eggs, milk, vanilla, melted butter, sugar and
flour in the order listed into the processor bowl.
4. Process mixture until just combined. Scrape
down any caught flour if needed.
5. Spoon mixture into prepared pan and use a
spatula to smooth top. Arrange apple slices over
cake making sure that each apple overlaps each
other. Sprinkle with 1 tablespoon of the sugar.
Bake in oven for about 60 minutes or until
a wooden skewer inserted comes out clean.
6. While cake is still in pan brush apples with
apricot jam and sprinkle with remaining sugar.
Allow to cool for 5 minutes then remove from
pan and allow to cool on a cooling rack.
TIPS
Have all your ingredients measured out to save time
and minimise the amount of time the apples have to
start browning.
Banana Cake with
Lemon Icing
Prep 15 minutes / Cook 60 minutes
Serves 10
200g butter, room temperature, chopped
1½ cups caster sugar
2 x 60g eggs
1½ cups (approx 3 large) very ripe mashed bananas
1 teaspoon vanilla extract
2¼ cups (335g) self raising flour
1 teaspoon ground cinnamon
½ cup (125ml) buttermilk
Lemon Icing
3 cups (480g) icing sugar mixture, sifted
1 teaspoon grated lemon rind
2 tablespoons lemon juice
100g butter, melted
1. Preheat oven to 180°C no fan (160°C with fan).
Grease and line base and sides of a 23cm
cake tin.
2. Place Quad blade into processor bowl. Combine
butter and sugar in bowl and process until well
combined. Add eggs, one at a time and pulse
until just combined. Add bananas and vanilla and
pulse again until combined.
3. Add dry ingredients and buttermilk and process
until just combined.
4. Spoon mixture into prepared tin and bake for
about 60 minutes or until cooked when tested
with a skewer.
5. Allow cake to cool in pan for 5 minutes before
transferring to a wire rack to cool completely.
To make Lemon Icing
1. Place icing sugar mixture and lemon rind into
the bowl of the electric mixer. While on speed
4–5 speed pour in lemon juice and butter.
Mix until combined.
2. Spread onto cooled cake.

33
Individual Sticky
Date Puddings with
Butterscotch Sauce
Prep 15 minutes / Cook 25 minutes
Makes 12
200g dried dates, coarsely chopped
1 teaspoon bicarbonate soda
1¼ cups (310ml) boiling water
60g butter, softened
1 cup (220g) firmly packed brown sugar
1 cup (150g) self raising flour
2 eggs lightly beaten
Butterscotch Sauce
1¼ cups (275g) firmly packed brown sugar
1 cup (250ml) pouring cream
125g butter
1. Preheat oven to 180°C. Grease 8 holes of a L cup
capacity muffin tray.
2. Place dates, bicarbonate soda and boiling water
into a heatproof bowl and stand for 5 minutes.
3. Insert Quad blade into processor bowl. Add date
mixture, butter and sugar and pulse 2–3 times.
Add remaining ingredients and pulse mixture
until just combined. Do not over process.
Scrape down sides of bowl if necessary.
4. Divide mixture evenly between 8 holes of the
muffin tray. Bake for about 25 minutes or until
cooked when tested with a wooden skewer.
Remove from oven and stand for 5 minutes
before turning out onto a wire rack. Serve warm.
Serve puddings with butterscotch sauce.
To make Butterscotch Sauce
Combine all ingredients in a saucepan and cook,
stirring, over a low heat until combined.
Lemon Tart
Prep 15 minutes + chilling / Cook 55 minutes
Serves 8
Sweet Shortcrust pastry
1½ cups (225g) plain flour
L cup (55g) icing sugar mixture
125g butter
1– ½ tablespoons iced water
Lemon filling
3 lemons
5 x 60g eggs
1 cup (220g) caster sugar
200ml cream
1. Insert Quad blade into processor bowl. Add flour,
icing sugar and butter. Place lid on bowl. Process
until well combined; add water, ½ tablespoon at
a time and process until mixture forms a ball.
2. Remove pastry from bowl onto a clean surface
and shape into a flat disk. Cover pastry and
refrigerate for 30 minutes.
3. Grease a 24cm round loose–based flan tin.
Roll pastry, between two sheets of baking paper,
large enough to line tin. Carefully lift pastry into
tin and press into sides; trim edges. Cover and
refrigerate for 30 minutes.
4. Preheat oven to 200°C. Place tin on oven tray;
line tin with baking paper then fill with baking
beans. Bake for 10 minutes then remove beans
and paper and cook in oven for a further
10 minutes or until pastry is lightly browned;
remove from oven and reduce heat to 160°C.
5. Remove rind from lemons; reserve. Juice lemons.
Combine rind, juice and remaining filling
ingredients and whisk until well combined.
Carefully pour into pastry case and bake for
about 35 minutes or until set. Cool completely
before serving.

34
Moist Carrot Cake with
Cream Cheese Frosting
Prep 15 minutes / Cook 40 minutes
Serves 10
3 carrots
250g butter, softened
1½ cups (330g) caster sugar
3 x 60 eggs
¾ cup (180ml) buttermilk
2 cups (300ml) self–raising flour
2 teaspoons ground cinnamon
1 teaspoon bicarbonate soda
1 cup desiccated coconut
1 x 440g can crushed canned pineapple in juice,
well drained
1 cup chopped walnuts
Cream Cheese Frosting
30g butter, softened
125g cream cheese, softened
½ teaspoon vanilla extract
1½ cups (240g) icing sugar, sifted
1. Preheat oven to 180°C no fan (160°C with fan).
Grease and line base and sides of 2 x 20cm cake
tins with baking paper.
2. Assemble the food processor using the coarse
shredding disc. Grate carrots and remove from
bowl; set aside.
3. Assemble food processor bowl with Quad blade.
Add butter, sugar, eggs and buttermilk and
process until well combined.
4. Add sifted flour, cinnamon, bicarbonate, coconut;
pulse until just combined. Pour mixture into a
large bowl and fold through 2 cups of shredded
carrot, pineapple and walnuts.
5. Spoon mixture into prepared tins and bake for
about 40 minutes or until cooked when tested
with a skewer.
6. Allow cakes to cool in pan for 5 minutes before
transferring to a wire rack to cool completely.
7. Once cakes are cool spread half of cream cheese
frosting on one cake then top with second cake
and top with remaining frosting.
To make Cream Cheese frosting
Combine cream cheese, butter and vanilla in a bowl
of an electric mixer. Beat on high speed until smooth;
reduce speed and gradually add the icing sugar; beat
until smooth. Spread over cooled cake.

Baked Raspberry
Cheesecake
Prep 15 minutes + chilling / Cook 1½ hours
Serves 8–10
250g packet plain sweet biscuits
125g unsalted butter, melted
300ml carton sour cream
1 cup (220g) caster sugar
1 tablespoon finely grated lemon rind
4 eggs
750g cream cheese, at room temperature, cut into
cubes
200g fresh or frozen raspberries
1. Preheat oven to 160°C no fan. Line the base of a
23cm (base measurement) springform pan with
non–stick baking paper.
2. Place Quad blade into processor bowl; add
biscuits. Place lid on bowl. Process until biscuits
are finely crushed. Place crumbs into a bowl, add
melted butter and mix well. Use a straight–sided
glass to spread and press the biscuit mixture
firmly over the base and sides of pan, leaving 1cm
at the top of the pan. Refrigerate 10 minutes.
3. Meanwhile clean bowl and insert Quad blade;
sour cream, sugar, rind and eggs into the
processor bowl. Place lid on bowl. Process until
smooth. Add cream cheese and process until
smooth. Do not overmix.
4. Pour the cream cheese mixture into the base.
Sprinkle raspberries over the top. Place the pan
on a baking tray and bake for 1¼ –1½ hours or
until just set in the centre. Turn oven off. Leave
the cheesecake in oven, with the door ajar, for
2 hours or until cooled completely (this will
prevent cheesecake from cracking). Refrigerate
until well chilled.
TIPS
If using frozen raspberries, thaw on paper towelling
first.
Choc chip, pecan &
oat cookies
Prep 15 minutes / Cook 12 minutes
Makes 28
125g butter, softened, chopped
½ cup (110g) caster sugar
½ cup (110g) firmly packed brown sugar
1 egg
2 teaspoons vanilla extract
1L cups (200g) self-raising flour
½ teaspoon salt
1 cup (190g) dark choc chips
½ cup (70g) pecan halves, chopped
¼ cup (25g) rolled oats
1. Preheat oven to 180°C no fan (160°C fan-forced).
Line 3 large baking trays with non-stick
baking paper.
2. Assemble food processor with spindle and
Quad
®
blade. Place butter, brown sugar, caster
sugar, egg and vanilla into bowl and secure
lid. Process for 10 seconds or until mixture is
smooth and combined. Add flour and salt to food
processor bowl and secure lid. Pulse 8–10 times
or until just combined. Add choc chips, nuts and
oats and secure lid. Pulse 5 times or until just
combined.
3. Place heaped tablespoons of mixture, 3–4cm
apart, on prepared trays. Bake for 10–12 minutes
or until golden. Set aside on trays for 5 minutes
to cool slightly. Use a spatula to transfer to a wire
rack to cool completely.

Breville is a registered trademark of Breville Pty. Ltd. A.B.N. 98 000 092 928.
Copyright Breville Pty. Ltd. 2015.
Due to continued product improvement, the products illustrated/photographed
in this booklet may vary slightly from the actual product.
BFP800 ANZ G15
Web: www.breville.co.nzWeb: www.breville.com.au
Australian Customers
Mail: Locked Bag 2000
Botany NSW 1455
AUSTRALIA
Phone: 1300 139 798
Fax: (02) 9700 1342
Email:
Customer Service:
as[email protected]om.au
New Zealand Customers
Mail: Private Bag 94411
Botany Manukau 2163
Auckland NEW ZEALAND
Phone:
0800 273 845
Fax: 0800 288 513
Email:
Customer Service:
as[email protected]o.nz
Breville Customer Service Centre