User manual Coffee Machine
Instructions
1. Introduction
Key information for the user:
Instructions
General information on this user manual, on safety and final disposal.
Description
Appliance description.
Use
Information on using your appliance.
Cleaning and care
Information for proper cleaning and maintenance of the appliance.
2. This user manual
This user manual is an integral part of the appliance and must therefore be kept in its entirety and in an accessible place for the whole working life of the appliance.
3. Intended use
The appliance can be used to prepare drip coffee. Every other use is considered improper. Do not use the appliance for anything other than its intended use.
1. The drip coffee machine must not be used inside a piece of furniture.
2. WARNING: Do not use the appliance if the surface is cracked.
4. General safety instructions
- The appliance must not be used by persons (including children) with reduced physical, sensory or mental capabilities or with a lack of experience and knowledge, unless appropriately supervised, or instructed on the safe use of the appliance by a person responsible for their safety.
- Children must be supervised at all times to ensure they do not play with the appliance.
- Cleaning and maintenance of the appliance must not be performed by children, unless closely supervised.
- Do not use the appliance outdoors
- Never submerge the appliance in water.
- Plug into an earthed 3-pin socket.
- Do not remove the earth pin.
- Do not use an adapter.
- Do not use an extension cord.
- Failure to observe these warnings can lead to fire, electrocution or even death.
- This appliance is intended for household use. Moreover, it cannot be used:
- In kitchen areas provided for employees in shops, offices and other working environments;
- In farms/farm stay facilities
- By guests in hotels, motels and residential environments;
- In bed and breakfasts.
- If the power cord is damaged, contact technical support to arrange for this to be replaced in order to avoid any possible hazards.
Only for European markets:
- This appliance may be used by children from the age of 8 provided they are supervised or instructed on the safe use of the appliance and they understand the associated risks.
- Cleaning and maintenance may be performed by children from the age of 8 as long as they are appropriately supervised.
- Keep the appliance and its cord out of reach of children under the age of 8 years.
- Children must never play with the appliance.
- The appliance may be used by people with reduced physical, sensory or mental capabilities or lack of experience and knowledge if they have been given supervision or instruction concerning use of the appliance in a safe way and if they understand the hazards involved.
- Disconnect the appliance from the power socket before assembly, disassembly and cleaning.
For this appliance
- Follow all safety instructions in order to use the appliance safely.
- Read this user manual carefully before using the appliance.
- Switch off the appliance immediately after use.
- Do not leave the coffee machine unattended during use.
- Always disconnect the drip coffee machine from the power socket before installing / removing components or cleaning it.
- Unplug the coffee machine before cleaning it and if you notice any fault.
- Allow the drip coffee machine cool down before cleaning it.
- Leave a space of 10 cm around the drip coffee machine.
- Do not use the drip coffee machine if there is no water in the tank.
- Use cold, preferably filtered, water. Do not use other liquids.
- Make sure that the lid is firmly closed.
- Danger of burns! Do not open the lid while the coffee is being brewed.
- Danger of burns! Do not touch hot surfaces with your hands: use the handles and buttons.
- Danger of burns! The keep Warm plate remains hot for a few minutes after the coffee has been brewed. Do not touch it.
- Danger of burns! The surface of the heating element remains hot after use. Do not touch it.
- Do not use the drip coffee machine or parts of it with parts or accessories made by other manufacturers.
- Only use original spare parts. The use of spare parts not approved by the manufacturer could lead to fires, electric shocks or personal injury.
- Only place the drip coffee machine on level and dry surfaces.
- Avoid getting the drip coffee machine wet and do not spray liquids onto it. In the event of contact with liquid, immediately switch off the power at the socket or main breaker and dry the appliance thoroughly: Electric shock hazard!
- Do not position the appliance near sinks or taps.
- Do not use harsh detergents or sharp objects to clean the drip coffee machine.
- Do not make any modifications to the appliance.
- Never try to put out a fire or flames with water: turn off the appliance and remove the plug from the socket, and smother the flames with a fire blanket or other appropriate cover.
- Prevent the power cord from coming into contact with sharp edges.
- Never position the appliance above or near gas or electric hob burners when they are hot or in use, inside an oven or near other heat sources.
- Make sure that the lid has been inserted firmly into the top of the jug.
- Do not place the jug on a hob or in a microwave oven.
- Do not place the hot jug on cold or wet surfaces.
- Do not use the jug if it is damaged or the handle is loose.
- Fill the water tank before putting the plug to the electrical outlet.
- Do not install the appliance in environments in which the temperature is 0°C or less.
5. Manufacturer liability
The manufacturer shall not be liable for injuries or property damage caused by:
- Use of the appliance other than that specified
- Failure to read the user manual
- Tampering with any part of the appliance
- Use of non-original spare parts
- Failure to observe the safety instructions
6.Identification plate
The identification plate bears the technical data, serial number and brand name of the appliance. Do not remove the identification plate for any reason.
7 Disposal
This appliance must be disposed of separately from other waste (Directive 2012/19/EU). The appliance does not contain substances in quantities sufficient to be considered hazardous to health and the environment, in accordance with current European directives.
- Old appliances do not belong in household waste! To comply with current legislation, old appliances, on reaching the end of their useful lives, should be taken to a disposal facility where they can be sorted. This allows precious materials from old appliances to be recycled and helps protect the environment. For further information, contact the relevant local authorities or your nearest waste recycling centre. Our appliances are packed in nonpolluting and recyclable materials.
- Take these packing materials to the appropriate recycling centre
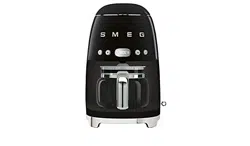
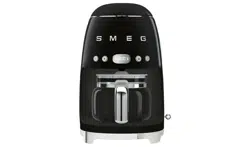
Description
Product description
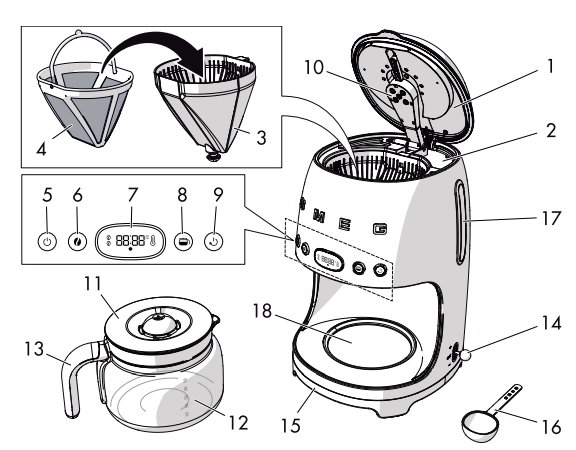
Drip coffee machine
1. Lid
2. Water tank (1.4 litres)
3. Filter holder with anti-drip system
4. Permanent filter
5. ON/OFF button
6. AROMA setting button
7. Time / settings display
8. 4 CUPS function button
9. AUTO START button
10. Boiler outlet
11. Jug lid
12. Jug (10 cups)
13. Jug handle
14. Time / timer setting lever
15. Base and non-slip feet
16. Scoop
17. Water tank level indicator (max. 1.4 litres)
18. Keep Warm plate
Use
Before first use
1. Remove any labels and stickers from the drip coffee machine.
2. Thoroughly wash and dry the components of the drip coffee machine (see ”4 Cleaning and maintenance”).
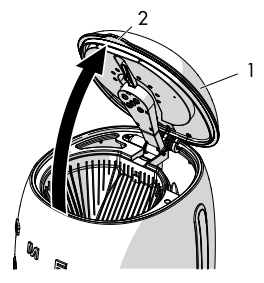
3. Lift the lid (1) by pulling the tab upwards (2).
4. Fill the tank (3) with fresh clean water, taking care not to exceed the maximum level shown on the level indicator (4) (1.4 litres).

First use
1. Plug the appliance into an electrical outlet.
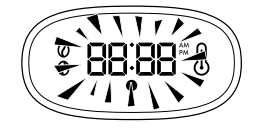
2. The symbols on the display flash.
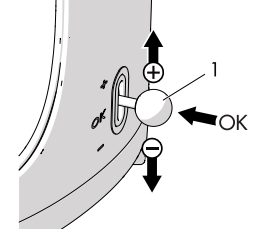
3. Set the time using the lever (1).
4. Set the time by moving the lever up (+) to increase the value or down (-) to decrease it.
5. Confirm the setting by placing the lever in the central position and press (OK).
6. Set the minutes following the same procedure.
7. After confirming the minutes setting, the appliance activates the CLOCK mode.
Accessing the settings menu
The appliance allows you to personalise some settings:
- SE01: Set the hour format
- SE02: Set the water hardness
- SE03: Enable / disable sounds
Access the settings menu by pressing the  and
and  buttons simultaneously for 3 seconds.
Press any button to exit from the settings menu.
Time format settings menu
The time format can be modified after the appliance has been switched on for the first time:
1. Access the settings menu and select SE01.
2. Move the lever to select the required format (12h or 24h).
3. Move the lever to the central position and press (OK) to confirm the setting. The format will flash for 2 seconds: the setting has been saved.
Modifying the time:
1. Make sure that the required format (12h or 24h) has been set as indicated in the previous section.
2. Keep the lever pressed in the central position for 3 seconds: the display starts to flash.
3. Modify the hours and minutes as indicated in the ”3.2 First use” section.
Water hardness settings menu
The water hardness can be set by selecting one of the 3 settings: HARD, MEDIUM and SOFT.
1. Access the settings menu and select SE02: The display indicates HA02 (medium hardness) by default.
2. Move the lever up (+) or down (-) to set the required setting: HA01 (soft), HA02 (medium) and HA03 (hard).
3. Move the lever to the central position and press (OK) to confirm the setting. The selection flashes for 2 seconds: the setting is saved.
Sounds settings menu
The sounds can be disabled as follows:
1. Access the settings menu and select SE03.
2. Move the lever up or down until OFF appears on the display.
3. Move the lever to the central position and press (OK) to confirm the setting. The selection flashes for 2 seconds: the setting is saved.
To re-enable the sounds:
1. Access the settings menu and select SE03.
2. Move the lever up or down until ON appears on the display.
3. Move the lever to the central position and press (OK) to confirm the setting. The selection flashes for 2 seconds: the setting is saved.
Rinsing of the internal circuits
Rinse the internal circuits after filling the tank:
1. Place the jug (6) on the Keep Warm plate (7) WITHOUT putting ground coffee into the filter.
2. Press the ON/OFF  button.
3. Wait for the cycle to finish and empty the jug.
4. Repeat the cycle: the appliance is now ready for use.
How to prepare the coffee
1. Fill the water tank as indicated in section ”3.1 Before first use”.
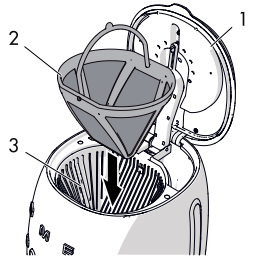
2. Lift the lid of the water tank (1) and insert the permanent filter (2) into the filter holder (3).
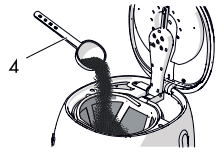
3. Fill with the amount of coffee required, according to the number of cups to be prepared, using the scoop (4) provided.
4. Close the lid (1) by lowering the tab.
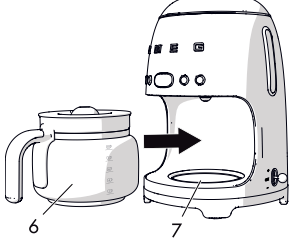
5. Place the jug (5) with the lid (6) on the Keep Warm plate (7). Make sure that the lid fits perfectly into the anti-drip valve (8).

6. Press the ON/OFF  button to enable the BREW mode: The LED on the ON/ OFF button lights up and flashes quickly for the entire time the coffee is being brewed
7. You can stop the coffee from being brewed at any time by pressing the ON/OFF button.
KEEP WARM mode
The KEEP WARM mode is activated automatically after the coffee has been brewed and keeps the Keep Warm plate on for 40 minutes.
In this way, the coffee will remain hot for 40 minutes after it has been brewed.
In the KEEP WARM mode, the LED of the ON/OFF  button flashes slowly and the KEEP WARM
  icon lights up on the display.
The ON/OFF button turns off automatically at the end of the KEEP WARM mode.
The KEEP WARM mode can be stopped manually at any time by pressing the ON/OFF  button: the LED of the ON/OFF
  button and the KEEP WARM
  icon turn off.
Setting the AROMA
This setting allows you to choose between two aroma intensity levels for your coffee: DELICATE or INTENSE.
The appliance is set by default to DELICATE: the LED of the aroma  button is off and on the display only the lower coffee bean of the icon
  appears selected.
To modify the setting:
1. Press the AROMA  button to select INTENSE: the LED of the AROMA
  button lights up and on the display both coffee beans of the
  icon appear selected.
2. Press the AROMA button again to select DELICATE: the LED of the AROMA  button turns off and the upper coffee bean from the
 icon appears unselected.
Using the 4 CUPS function
This function allows you to brew a small amount of coffee, corresponding to approximately 4 cups.
To select the 4 CUPS function:
1. Press the button to set it to ON: the LED of the 4 CUPS function button turns on.
2. Press the  button again to set this function to OFF: the LED of the button
 turns off.
Setting the time for the AUTO START mode
This setting allows the appliance to be programmed to switch on automatically to brew the drip coffee at a time selected by the user.
To set the time at which the appliance switches on automatically, proceed as follows:
1. Make sure that the time displayed is correct. Otherwise, set the correct time as described in section ”3.2 First use”.
2. Press and hold the  button for 3 seconds to set the automatic start time mode AUTO START: The LED of the
  button and the time display (HH:MM) start to flash.
3. Move the lever up (+) or down (-) to set the time.
4. Confirm the time by moving the lever to the central position and press (OK).
5. Once set, the time for the AUTO START function will be saved automatically and will be used until it is modified.
AUTO START mode
1. Press the AUTO START  button to start the AUTO START mode: the LED of the AUTO START
 button will light up and the hours and minutes of the set start time for brewing the coffee will flash for a few seconds on the display. Then the current time will then be displayed.
2. Press the AROMA button to select the intensity of the coffee required for the AUTO START mode. If necessary, depending on the quantity to be brewed in AUTO START mode, press the 4 CUPS
 function button to memorise the function.
3. The appliance remains in AUTO START mode until the pre-set time. The brewing cycle starts automatically.
4. Press the AUTO START button at any time to exit from the AUTO START mode.
Cleaning and care
Cleaning the drip coffee machine
To keep the outer surface of the coffee machine in good condition, it should be cleaned regularly after use. Let the appliance cool down first. Clean with a soft, damp cloth.
Cleaning the drip coffee machine components
Cleaning the permanent filter and the filter holder
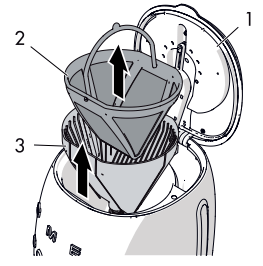
1. Lift the tab of the lid (1) and pull the permanent filter (2) upwards and then the filter holder (3).
2. Clean the permanent filter and the filter holder, removing any residues of coffee.
3. Rinse the filter and the filter holder under tap water and dry thoroughly.
Cleaning the jug
1. Empty the jug after each use to prevent staining caused by residues of coffee.
2. Wash the jug in hot, soapy water using a soft brush.
3. Rinse and dry thoroughly.
Descaling
Depending on the water hardness setting, the appliance automatically indicates when descaling has to be carried out.
The DESCALING icon starts to flash on the display to warn the user that a descaling cycle should be carried out.
To start the descaling cycle:
1. Pour water and the descaler into the water tank.
2. Press the ON/OFF and AUTO START buttons simultaneously for 5 seconds to start the DESCALING cycle: the LEDs of the ON/OFF
  and AUTO START buttons flash and the DESCALING icon flashes until the end of the cycle.
3. At the end of the cycle, the display reverts to CLOCK mode and the DESCALING icon disappears from the display
4. Rinse the appliance by operating it with just water for at least 2 cycles, filling the tank to its maximum limit (1.4 litres).
What to do if...
Coffee does not come out
- No water in tank.
- Scale build-up.
- Perform a descaling cycle
Coffee takes a long time to be dispensed
- Scale build-up.
- Perform a descaling cycle.
The coffee has an acidic taste
- Possible stagnation of coffee in the circuits.
- Rinse as described in section ”4.4 Descaling”.
The drip coffee machine overflows
- The filter is not positioned correctly.
- Insert the filter correctly in the filter holder.
- The jug is not positioned correctly on the base.
- Make sure that the jug is positioned correctly under the boiler outlet.
- There is no lid on the jug.
- Place the lid on the jug.
- Excessive amount of coffee.
- Place up to a maximum of 5 level scoops of ground coffee into the permanent filter.
- Coffee is too finely ground.
- Use ground coffee for drip coffee machines.
Only water comes out of the drip coffee machine
- No ground coffee in the filter.
- Put the required amount of ground coffee into the filter.