Documents: Go to download!
- Owner's manual - (English)
- Using the oven controls.
- Using the oven
- Using the clock and timer
- Using the timed baking and roasting features (on some models).
- Special features of your oven control.
- Using the Sabbath Feature (on some models).
- Using the self-cleaning oven.
- Care and cleaning of the range.
- Before you call for service…
Table of contents
User manual Gas Range
Using the oven controls.
Throughout this manual, features and appearance may vary from your model.
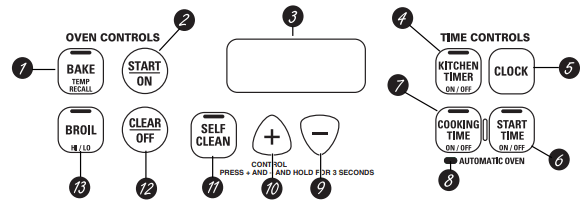
Oven Control, Clock and Timer Features and Settings
 BAKE/TEMP RECALL Pad
Touch this pad to select the bake function.
BAKE Light
Flashes while in edit mode—you can change the oven temperature at this point. Glows when the oven is in bake mode.
 START/ON Pad
Must be touched to start any cooking or cleaning function.
 Display
Shows the time of day, oven temperature, whether the oven is in the bake, broil or selfcleaning mode and the times set for the timer or automatic oven operations. The display will show “PrE” while preheating. When the oven reaches the selected temperature, the oven control will beep and the display will show the oven temperature.
Function Error Code
If “F– and a number or letter” flash in the display and the oven control signals, this indicates a function error code.
If the function error code appears during the selfcleaning cycle, check the oven door latch. The latch handle may have been moved, even if only slightly, from the latched position. Make sure the latch is moved to the right as far as it will go.
Touch the CLEAR/OFF pad. Allow the oven to cool for one hour. Put the oven back into operation. If the function error code repeats, disconnect the power to the range and call for service.
 KITCHEN TIMER ON/OFF Pad
Touch this pad to select the timer feature.
Then press + and – pads to adjust time.
TIMER Light
Flashes while in edit mode—you can change the set time at this point. Glows when the timer has been activated. Flashes again when the time has run out until the control is reset.
 CLOCK Pad
To set clock, touch this pad twice and then touch the + and – pads. The time of day will flash in display when oven is first turned on.
 START TIME Pad
Use along with the COOKING TIME or SELF CLEAN pads to set the oven to start and stop automatically at a time you set.
START TIME Time Light
Flashes while in edit mode—you can change the start time set time at this point. Glows when the function has been activated.
 COOKING TIME Pad
Touch this pad and then touch the + or – pads to set the amount of time you want your food to cook. The oven will shut off when the cooking time has run out.
COOKING TIME Light
Flashes while in edit mode—you can change set time at this point. Glows when function has been activated. Flashes again when the time has run out until the control is reset.
 AUTOMATIC OVEN Light
This lights anytime the oven has been programmed using the COOKING TIME or START TIME functions.
 – Pad
– Pad
Short taps to this pad will decrease the time or temperature by small amounts. Touch and hold the pad to decrease the time or temperature by larger amounts.
 – Pad
– Pad
Short taps to this pad will increase the time or temperature by small amounts. Touch and hold the pad to increase the time or temperature by larger amounts.
 SELF CLEAN Pad
Touch this pad to select the self-cleaning function. See the Using the self-cleaning oven section.
CLEAN Light
Flashes while in edit mode—you can change the length of time for the self-clean cycle at this point. Glows when the oven is in the self-clean cycle. After the self-clean cycle, the light will turn off. Unlatch the door.
 CLEAR/OFF Pad
Touch this pad to cancel ALL oven operations except the clock and timer.
 BROIL HI/LO Pad
Touch this pad to select the broil function.
BROIL Light
Flashes while in edit mode—you can switch from HI to LO BROIL at this point. Glows when the oven is in broil mode.
Indicator Lights (on some pads)
EDIT mode lasts several seconds after the last pad press. START TIME ON/OFF and COOKING TIME ON/OFF will be the only pads lit if either of these options is selected. (Example: START TIME is selected with BAKE—the START TIME pad will remain lit until the clock reaches the programmed time, at which point it will turn off and the BAKE/TEMP RECALL pad light will light up).
Control Lockout
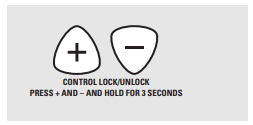
Your control will allow you to lock out the touch pads so they cannot be activated when touched.
To lock/unlock the controls:
- Touch the + and – pads at the same time for 3 seconds, until the display shows LOC ON.
- To unlock the control, touch the + and – pads at the same time for 3 seconds, until the display shows LOC OFF.
When this feature is on and the touch pads are touched, the control will beep and the display will show LOC ON.
- The control lockout mode affects all touch pads. No touch pads will work when this feature is activated.
- The adjustment will be retained in memory after a power failure.
Power Outage
CAUTION: Do not make any attempt to operate the electric ignition oven during an electrical power failure.
The oven or broiler cannot be lit during a power failure. Gas will not flow unless the glow bar is hot.
If the oven is in use when a power failure occurs, the oven burner shuts off and cannot be re-lit until power is restored. This is because the flow of gas is automatically stopped and will not resume when power is restored until the glow bar has reached operating temperature.
If a flashing time is in the display, electric power has been restored. Reset the clock.
If your oven was set for a timed oven operation and a power outage occurred, the clock and all programmed functions must be reset.
To reset the clock, touch the CLOCK pad. Enter the correct time of day by touching the + or – pads. Touch the START/ON pad.
Using the oven
To avoid possible burns, place the racks in the desired position before you turn the oven on.
Before you begin…
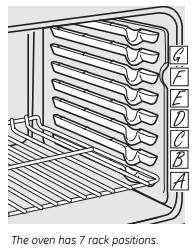
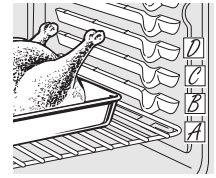
The racks have stops, so that when placed correctly on the supports, they will stop before coming completely out, and will not tilt.
When placing and removing cookware, pull the rack out until it stops.
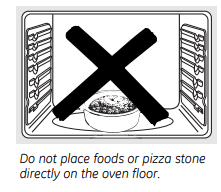
The bake burner is under the oven floor. Do not place foods on the oven bottom for cooking.
To remove a rack, pull it toward you, tilt the front end up and pull it out.
To replace, place the end of the rack (stoplocks) on the support, tilt up the front and push the rack in.
CAUTION: When you are using the rack in the lowest position (A), you will need to use caution when pulling the rack out. We recommend that you pull the rack out several inches and then, using two pot holders, pull the rack out by holding the sides of it. The rack is low and you could be burned if you place your hand in the middle of the rack and pull all the way out. Be very careful not to burn your hand on the door when using the rack in the lowest position (A).
How to Set the Oven for Baking or Roasting
1. Touch the BAKE pad.
2. Touch the + or – pads until the desired temperature is displayed.
3. Touch the START/ON pad.
The oven will start automatically. The display will show “PrE” while preheating. When the oven reaches the selected temperature, the oven control will beep several times and the display will show the oven temperature.
To change the oven temperature during BAKE cycle, touch the BAKE pad and then the + or – pads to get the new temperature.
4. Check food for doneness at minimum time on recipe. Cook longer if necessary.
5. Touch the CLEAR/OFF pad when baking is finished and then remove the food from the oven.
NOTE: A cooling fan will automatically turn on and off to cool internal parts. This is normal, and the fan may continue to run even after the oven in turned off.
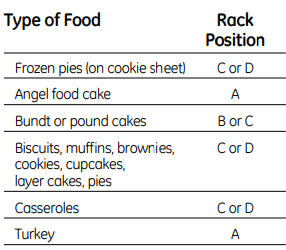
If baking four cake layers at the same time, place two layers on rack B and two layers on rack D. Stagger pans on the rack so one is not directly above the other.
Preheating and Pan Placement
Preheat the oven if the recipe calls for it. Preheating is necessary for good results when baking cakes, cookies, pastry and breads.
To preheat, set the oven at the correct temperature. The control will beep when the oven is preheated and the display will show your set temperature. The preheat time will vary depending on the temperature setting.
Baking results will be better if baking pans are centered in the oven as much as possible. If baking with more than one pan, place the pans so each has at least 1” to 11⁄2” of air space around it.
Aluminum Foil
Do not use aluminum foil to line oven bottoms. The foil will trap heat below and upset the performance of the oven. Foil can melt and permanently damage the oven bottom. Damage from improper use of aluminum foil is not covered by the product warranty.
Foil may be used to catch spills by placing a sheet on a lower rack, several inches below the food .Do not use more foil than necessary and never entirely cover an oven rack with aluminum foil. Keep foil at least 1-1/2” from oven walls to prevent poor heat circulation.
Oven Moisture
As your oven heats up, the temperature change of the air in the oven may cause water droplets to form on the door glass. These droplets are harmless and will evaporate as the oven continues to heat up
Oven Vent
Your oven is vented through the rear vent located through the cooktop under the vent grille. Do not block this vent when cooking in the oven—it is important that the flow of hot air from the oven and fresh air to the oven burner be uninterrupted. Avoid touching the vent openings or nearby surfaces during oven or broiler operation—they may become hot.
- Handles of pots and pans on the cooktop may become hot if left too close to the vent.
- Do not leave plastic items on the cooktop—they may melt if left too close to the vent.
- Do not leave any items on the cooktop. The hot air from the vent may ignite flammable items and will increase pressure in closed containers, which may cause them to burst.
- Metal items will become very hot if they are left on the cooktop, and could cause burns.
How to Set the Oven for Broiling
IMPORTANT: To avoid possible burns, place the racks in the desired position before you turn the oven on.
1. Place the meat or fish on a broiler grid in a broiler pan designed for broiling.
2. Follow suggested rack positions in the Broiling Guide.
3. The oven door must be closed during broiling.
4. Touch the BROIL HI/LO pad once for HI Broil.
To change to LO Broil, touch the BROIL HI/LO pad again.
Use LO Broil to cook foods such as poultry or thick cuts of meat thoroughly without over-browning them.
5. Touch the START/ON pad.
6. When broiling is finished, touch the CLEAR/OFF pad.
Serve the food immediately, and leave the pan outside the oven to cool during the meal for easiest cleaning.
Using the clock and timer
Not all features are on all models.
To Set the Clock
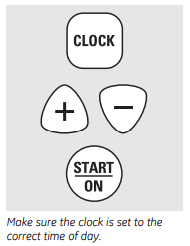
To Set the Clock The clock must be set to the correct time of day for the automatic oven timing functions to work properly. The time of day cannot be changed during a delayed cooking or a delayed self-cleaning cycle.
1. Touch the CLOCK pad twice.
2. Touch the + or – pads.
If the + or – pads are not touched within one minute after you touch the CLOCK pad, the display reverts to the original setting. If this happens, touch the CLOCK pad twice and reenter the time of day.
3. Touch the START/ON pad until the time of day shows in the display. This enters the time and starts the clock.
To check the time of day when the display is showing other information, simply touch the CLOCK pad. The time of day shows until another pad is touched.
To Turn Off the Clock Display
If you have several clocks in your kitchen, you may wish to turn off the time of day clock display on your range.
- Touch the CLOCK pad once to turn off the time of day display. Although you will not be able to see it, the clock maintains the correct time of day.
- Touch the CLOCK pad twice to recall the clock display.
To Set the Timer
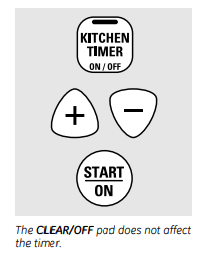
The timer does not control oven operations. The maximum setting on the timer is 9 hours and 59 minutes.
1. Touch the KITCHEN TIMER ON/OFF pad.
2. Touch the + or – pads until the amount of time you want shows in the display. The maximum time that can be entered in minutes is 59. Times more than 59 minutes should be changed to hours and minutes.
If you make a mistake, touch the KITCHEN TIMER ON/OFF pad and begin again.
3. Touch the START/ON pad. The time will start counting down, although the display does not change until one minute has passed.
4. When the timer reaches :00, the control will beep 3 times followed by one beep every 6 seconds until the KITCHEN TIMER ON/OFF pad is The CLEAR/OFF pad does no touched.
To Reset the Timer
If the display is still showing the time remaining, you may change it by touching the KITCHEN TIMER ON/OFF pad, then touching the + or – pads until the time you want appears in the display.
If the remaining time is not in the display (clock, start time set time or cooking time are in the display), recall the remaining time by touching the KITCHEN TIMER ON/OFF pad and then touching the + or – pads to enter the new time you want.
To Cancel the Timer
Touch the KITCHEN TIMER ON/OFF pad twice.
Using the timed baking and roasting features (on some models).
Do not lock the oven door with the latch during timed cooking. The latch is used for self-cleaning only.
NOTE: Foods that spoil easily—such as milk, eggs, fish, stuffings, poultry and pork—should not be allowed to sit for more than 1 hour before or after cooking. Room temperature promotes the growth of harmful bacteria. Be sure that the oven light is off because heat from the bulb will speed harmful bacteria growth.
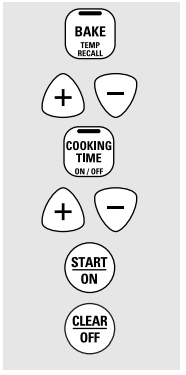
How to Set an Immediate Start and Automatic Stop
The oven will turn on immediately and cook for a selected length of time. At the end of the cooking time, the oven will turn off automatically.
1. Touch the BAKE pad.
2. Touch the + or – pads to set the oven temperature.
3. Touch the COOKING TIME pad.
NOTE: If your recipe requires preheating, you may need to add additional time to the length of the cooking time.
4. Touch the + or – pads to set the baking time.
The cooking time that you entered will be displayed. (If you select Cooking Time first and then adjust the Bake Temperature, the oven temperature will be displayed instead).
5. Touch the START/ON pad.
The display shows either the oven temperature that you set or the cooking time countdown. (The display starts with “PrE” if showing the oven temperature.)
The oven will continue to cook for the programmed amount of time, then turn off automatically.
6. Touch the CLEAR/OFF pad to clear the display if necessary.
Remove the food from the oven. Remember, even though the oven shuts off automatically, foods continue cooking after controls are off.
How to Set a Delayed Start and Automatic Stop

The oven will turn on at the time of day you set, cook for a specific length of time and then turn off automatically.
Make sure the clock shows the correct time of day.
- Touch the BAKE pad.
- Touch the + or – pads to set the oven temperature.
- Touch the COOKING TIME pad.
- Touch the + or – pads to set the desired length of cooking time.
- Touch the START TIME pad.
- Touch the + or – pads to set the time of day you want the oven to turn on and start cooking.
- Touch the START/ON pad.
NOTE: An attention tone will sound if you are using timed baking and do not touch the START/ON pad.
NOTE: If you would like to check the times you have set, touch the START TIME pad to check the start time set time you have set or touch the COOKING TIME pad to check the length of cooking time you have set.
When the oven turns on at the time of day you have set, the display will show “PrE” until it reaches the selected temperature, then it will display the oven temperature.
At the end of cooking time, the oven will turn off and the end-of-cycle tone will sound.
8. Touch the CLEAR/OFF pad to clear the display if necessary.
Remove the food from the oven. Remember, even though the oven shuts off automatically, foods continue cooking after controls are off.
Special features of your oven control.
Your new touch pad control has additional features that you may choose to use. The following are the features and how you may activate them.
The special feature modes can only be activated while the display is showing the time of day. They remain in the control’s memory until the steps are repeated.
When the display shows your choice, touch the START/ON pad. The special features will remain in memory after a power failure.
NOTE: The Sabbath feature and the Thermostat Adjustment feature are also Special Features, but they are addressed separately in the following sections.
12 Hour Shut-Off
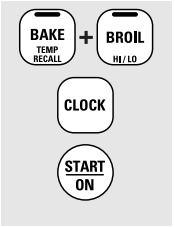
With this feature, should you forget and leave the oven on, the control will automatically turn off the oven after 12 hours during baking functions or after 3 hours during a broil function.
If you wish to turn OFF this feature, follow the steps below.
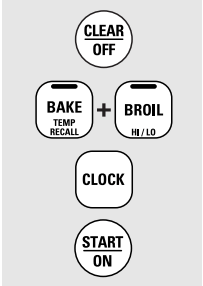
- Touch the BAKE and BROIL HI/LO pads at the same time for 3 seconds until the display shows SF.
- Touch the CLOCK pad. The display will show ON (12 hour shut-off). Touch the CLOCK pad repeatedly until the display shows OFF (no shut-off).
- Touch the START/ON pad to activate the no shut-off and leave the control set in this special features mode.
Using the Sabbath Feature (on some models).
The Sabbath feature can be used for baking/roasting only. It cannot be used for broiling, self-cleaning or Start Time cooking.
NOTE: The oven light comes on automatically (on some models) when the door is opened and goes off when the door is closed. The bulb may be removed. See the Oven Light Replacement section. On models with a light switch on the control panel, the oven light may be turned on and left on.
How to Set for Regular Baking/Roasting
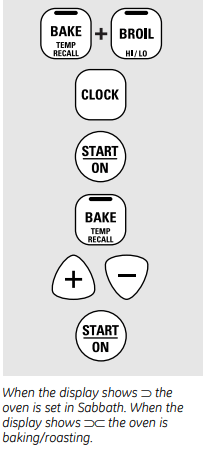
NOTE: To understand how the oven control works, practice using regular baking (nonSabbath) before entering Sabbath mode.
Make sure the clock shows the correct time of day and the oven is off.
- Touch and hold both the BAKE and BROIL HI/LO pads, at the same time, until the display shows SF.
- Tap the CLOCK pad until SAb appears in the display.
- Touch the START/ON pad and
 will appear in the display.
 - Touch the BAKE pad. No signal will be given.
- The preset starting temperature will automatically be set to 350.° Tap the + or – pads to increase or decrease the temperature in 5° increments. The temperature can be set between 170° and 550.° No signal or temperature will be given.
- Touch the START/ON pad.
- After a random delay period of approximately 30 seconds to 1 minute,
 will appear in the display indicating that the oven is baking/roasting. If
  doesn’t appear in the display, start again at Step 4.
To adjust the oven temperature, touch the BAKE pad and tap the + or – pads to increase or decrease the temperature in 5° increments. Touch the START/ON pad.
NOTE: The CLEAR/OFF and COOKING TIME pads are active during the Sabbath feature.
To exit Sabbath feature see next page.
How to Set for Timed Baking/Roasting—Immediate Start and Automatic Stop
NOTE: To understand how the oven control works, practice using regular (non-Sabbath) Immediate Start and Automatic Stop before entering the Sabbath mode.
Make sure the clock shows the correct time of day and the oven is off.
- Touch and hold both the BAKE and BROIL HI/LO pads, at the same time, until the display shows SF.
- Tap the CLOCK pad until SAb appears in the display.
- Touch the START/ON pad and
 will appear in the display.
 - Touch the COOKING TIME pad.
- Touch the + or – pads to set the desired length of cooking time between 1 minute and 9 hours and 59 minutes. The cooking time that you entered will be displayed.
- Touch the START/ON pad.
- Touch the BAKE pad. No signal will be given.
- The preset starting temperature will automatically be set to 350.° Tap the + or – pads to increase or decrease the temperature in 5° increments. The temperature can be set between 170° and 550.° No signal or temperature will be given.
- Touch the START/ON pad.
- After a random delay period of approximately 30 seconds to 1 minute,
 will appear in the display indicating that the oven is baking/roasting. If
  doesn’t appear in the display, start again at Step 7.
To adjust the oven temperature, touch the BAKE pad and tap the + or – pads to increase or decrease the temperature in 5° increments. Touch the START/ON pad.
When cooking is finished, the display will change from  to
to  indicating that the oven has turned OFF but is still set in Sabbath. Remove the cooked food.
How to Exit the Sabbath Feature
- Touch the CLEAR/OFF pad.
- If the oven is cooking, wait for a random delay period of approximately 30 seconds to 1 minute, until only
 is in the display.
 - Touch and hold both the BAKE and BROIL HI/LO pads, at the same time, until the display shows SF.
- Tap the CLOCK pad until ON or OFF appears in the display. ON indicates that the oven will automatically turn off after 12 hours. OFF indicates that the oven will not automatically turn off. See the Special Features section for an explanation of the 12 Hour Shut-Off feature.
- Touch the START/ON pad.
NOTE: If a power outage occurred while the oven was in Sabbath, the oven will automatically turn off and stay off even when the power returns. The oven control must be reset.
Using the self-cleaning oven.
Never force the latch handle. Forcing the handle will damage the door lock mechanism.
Before a Clean Cycle
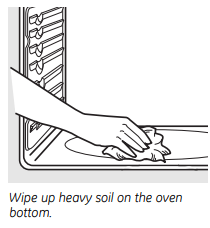
We recommend venting your kitchen with an open window or using a ventilation fan or hood during the first self-clean cycle.
Remove racks, broiler pan, broiler grid, all cookware and any aluminum foil from the oven.
The shiny, silver-colored oven racks (on some models) can be self-cleaned, but they will darken, lose their luster and become hard to slide.
Soil on the front frame of the range and outside the gasket on the door will need to be cleaned by hand. Clean these areas with hot water, soap-filled steel wool pads or cleansers such as Soft Scrub®. Rinse well with clean water and dry.
Do not clean the gasket. The fiberglass material of the oven door gasket cannot withstand abrasion. It is essential for the gasket to remain intact. If you notice it becoming worn or frayed, replace it.
Wipe up any heavy spillovers on the oven bottom.
Make sure the oven light bulb cover is in place and the oven light is off.
IMPORTANT: The health of some birds is extremely sensitive to the fumes given off during the self-cleaning cycle of any range. Move birds to another well-ventilated room.
How to Set the Oven for Cleaning
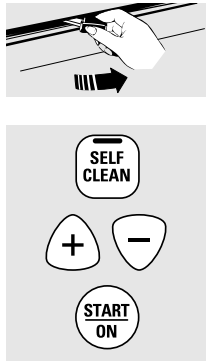
Follow the directions in the Before a Clean Cycle section.
1. Latch the door.
2. Touch the SELF CLEAN pad.
3. Touch the + or – pads until the desired Clean Time is displayed.
The Clean Time is normally 4 hours. You can change the Clean Time to any time between 3 and 5 hours, depending on the amount of soil in your oven.
4. Touch the START/ON pad.
The self-clean cycle will automatically begin after CLEAN is displayed and the time countdown appears in the display.
While the oven is self-cleaning, you can touch the CLOCK pad to display the time of day. To return to the clean countdown, touch the SELF CLEAN pad.
The oven shuts off automatically when the clean cycle is complete, and 0:00 will flash in the display.
5. Slide the latch handle to the left as far as it will go and open the door.
It will not be possible to unlatch the oven door until the temperature drops below the lock temperature and the clean light goes off.
When the clean light is off, unlatch the door.
How to Delay the Start of Cleaning
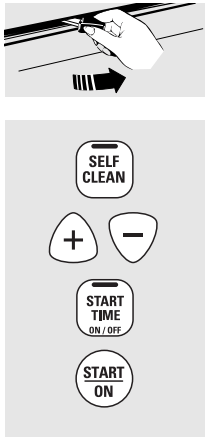
Make sure the clock shows the correct time of day.
1. Latch the door.
2. Touch the SELF CLEAN pad.
3. Using the + or – pads, enter the desired clean time.
The Clean Time is normally 4 hours. You can change the Clean Time to any time between 3 and 5 hours, depending on the amount of soil in your oven.
4. Touch the START TIME pad. The earliest start time you can set will appear in the display.
5. Using the + or – pads, enter the time of day you want the clean cycle to start.
6. Touch the START/ON pad.
The display will show the start time set time. It will not be possible to unlatch the oven door until the temperature drops below the lock temperature and the clean light goes off.
When the clean light is off, unlatch the door.
To Stop a Clean Cycle
Touch the CLEAR/OFF pad.
Wait until the oven has cooled below the locking temperature to unlatch the door. You will not be able to open the door right away unless the oven has cooled below the locking temperature.
After a Clean Cycle
You may notice some white ash in the oven. Wipe it up with a damp cloth after the oven cools.
If white spots remain, remove them with a soap-filled scouring pad and rinse thoroughly with a vinegar and water mixture.
These deposits are usually a salt residue that cannot be removed by the clean cycle.
If the oven is not clean after one clean cycle, repeat the cycle.
- You cannot set the oven for cooking until the oven is cool enough for the door to be unlatched.
- While the oven is self-cleaning, you can touch the CLOCK pad to display the time of day. To return to the clean countdown, touch the COOKING TIME pad.
- Apply a small amount of vegetable oil to a paper towel and wipe the edges of the oven racks with the paper towel. Do not spray with Pam® or other lubricant sprays.
Care and cleaning of the range.
Be sure all controls are off and all surfaces are cool before cleaning any part of the range.

WARNING: If your range is removed for cleaning, servicing or any reason, be sure the anti-tip device is reengaged properly when the range is replaced. Failure to take this precaution could result in tipping of the range and cause injury.
How to Remove Protective Shipping Film and Packaging Tape
Carefully grasp a corner of the protective shipping film with your fingers and slowly peel it from the appliance surface. Do not use any sharp items to remove the film. Remove all of the film before using the appliance for the first time.
To assure no damage is done to the finish of the product, the safest way to remove the adhesive from packaging tape on new appliances is an application of a household liquid dishwashing detergent. Apply with a soft cloth and allow to soak.
NOTE: The adhesive must be removed from all parts. It cannot be removed if it is baked on.
Control Knobs
The control knobs may be removed for easier cleaning.
Make sure the knobs are in the OFF positions and pull them straight off the stems for cleaning.
The knobs can be cleaned in a dishwasher or they may also be washed with soap and water. Make sure the insides of the knobs are dry before replacing.
Replace the knobs in the OFF position to ensure proper placement.
Oven Light Bulbs (if included)
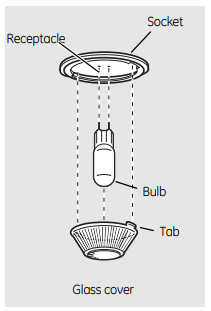
NOTE: The glass cover should be removed only when cold. Wearing latex gloves may offer a better grip.
CAUTION: Before replacing your oven light bulb, disconnect the electrical power to the oven at the main fuse or circuit breaker panel.
Be sure to let the light cover and bulb cool completely
For your safety, do not touch a hot bulb with bare hands or a damp cloth.
To remove:
- Turn the glass cover counterclockwise 1/4 turn until the tabs of the glass cover clear the grooves of the socket.
- Using gloves or a dry cloth, remove the bulb by pulling it straight out.
To replace:
- Use a new 130-volt halogen bulb, not to exceed 50 watts.
- Using gloves or a dry cloth, remove the bulb from its packaging. Do not touch the bulb with bare fingers.
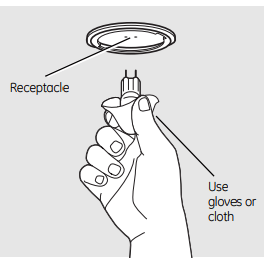
3. Push the bulb straight into the receptacle all the way.
4. Place the tabs of the glass cover into the grooves of the socket. Turn the glass cover clockwise 1/4 turn to engage.
For improved lighting inside the oven, clean the glass cover frequently using a wet cloth. This should be done when the oven is completely cool.
5. Reconnect electrical power to the oven.
Cleaning the Oven Door
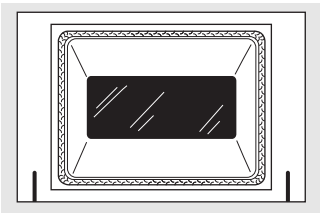
Do not rub or clean the door gasket— it has an extremely low resistance to abrasion.
If you notice the gasket becoming worn, frayed or damaged in any way or if it has become displaced on the door, you should have it replaced.
To clean the inside of the door:
- Because the area inside the gasket is cleaned during the self-clean cycle, you do not need to clean this by hand.
- The area outside the gasket and the door liner can be cleaned with a soap-filled or plastic scouring pad, hot water and detergent. Rinse well with a vinegar and water solution.
To clean the outside of the door:
- Use soap and water to thoroughly clean the top, sides and front of the oven door. Rinse well. You may also use a glass cleaner to clean the glass on the outside of the door. Do not let water drip into the vent openings.
- If any stain on the door vent trim is persistent, use a soft abrasive cleaner and a sponge-scrubber for best results.
- Spillage of marinades, fruit juices, tomato sauces and basting materials containing acids may cause discoloration and should be wiped up immediately. When surface is cool, clean and rinse.
- Do not use oven cleaners, cleaning powders or harsh abrasives on the outside of the door.
Lift-Off Oven Door
The door is very heavy. Be careful when removing and lifting the door.
Do not lift the door by the handle.
To remove the door:
1. Fully open the door.
2. Pull the hinge locks down toward the door frame, to the unlocked position. A tool, such as a small flat-blade screwdriver, may be required.
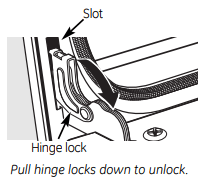
3. Firmly grasp both sides of the door at the top.
4. Close door to the door removal position, which is halfway between the broil stop position and fully closed.
5. Lift door up and out until the hinge arm is clear of the slot.
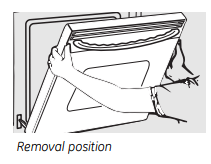
To replace the door:
1. Firmly grasp both sides of the door at the top.
2. With the door at the same angle as the removal position, seat the indentation of the hinge arm into the bottom edge of the hinge slot. The notch in the hinge arm must be fully seated into the bottom of the slot.
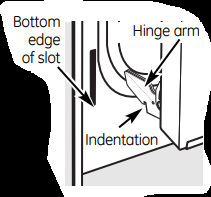
3. Fully open the door. If the door will not fully open, the indentation is not seated correctly in the bottom edge of the slot.
4. Push the hinge locks up against the front frame of the oven cavity to the locked position.
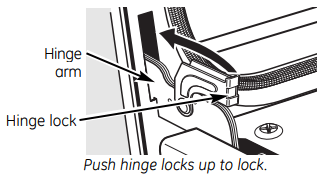
5. Close the oven door.
Before you call for service…
Troubleshooting Tips
Save time and money! Review the charts on the following pages first and you may not need to call for service.
Problem | Possible Causes | What To Do |
| Burners have yellow or yellow-tipped flames | The combustion quality of burner flames needs to be determined visually. | Use the illustrations below to determine if your burner flames are normal. If burner flames look like A, call for service. Normal burner flames should look like B or C, depending on the type of gas you use. With LP gas, some yellow tipping on outer cones is normal.
|
| Control knobs will not turn | Knob isn’t pushed down. | To turn from the OFF position, push the knob in and then turn. |
| Burners do not light | Plug on range is not completely inserted in the electrical outlet. | Make sure electrical plug is plugged into a live, properly grounded outlet. |
| Gas supply not connected or turned on. | See the Installation Instructions that came with your range. | |
| A fuse in your home may be blown or the circuit breaker tripped. | Replace the fuse or reset the circuit breaker. | |
| Burner parts not replaced correctly. | See the Care and cleaning of the range section. | |
| Control Lockout feature is activated | If LOC ON appears in the display, the oven control is locked. Turn this feature off to use the oven. See the Control Lockout section. | |
| Ticking sound of spark igniter persists after burner lights | Control knob is still | Turn the knob out of the LITE position to the desired setting. Turn the burner off and relight. If ticking is still present, call for service. |
| Burner flames very large or yellow | Improper air to gas ratio. | If range is connected to LP gas, check all steps in the Installation Instructions that came with your range. |
| Oven light does not work | Light bulb is loose or defective. | Tighten or replace the bulb. |
| Switch operating light is broken. | Call for service. | |
| Oven will not work | Plug on range is not completely inserted in the electrical outlet. | Make sure electrical plug is plugged into a live, properly grounded outlet. |
| A fuse in your home may be blown or the circuit breaker tripped. | Replace the fuse or reset the circuit breaker. | |
| Oven controls improperly set | See the Using the oven section. | |
| Door left in the locked position. | If necessary, allow the oven to cool; then unlock the door. | |
| Clock and timer do not work | Plug on range is not completely inserted in the electrical outlet. | Make sure electrical plug is plugged into a live, properly grounded outlet. |
| A fuse in your home may be blown or the circuit breaker tripped. | Replace the fuse or reset the circuit breaker. | |
| Oven controls improperly set. | See the Using the clock and timer section. | |
| Oven will not self-clean | Oven controls improperly set. | See the Using the self-cleaning oven section. |
| Oven door is not in the locked position. | Make sure you move the door latch handle all the way to the right. | |
| “Crackling” or “popping” sound | This is the sound of the metal heating and cooling during both the cooking and cleaning functions. | This is normal. |
| Excessive smoking during a clean cycle | Excessive soil | Touch the CLEAR/OFF pad. Open the windows to rid the room of smoke. Wait until the light on the SELF CLEAN pad goes off. Wipe up the excess soil and reset the clean cycle. |
| Oven door will not open after a clean cycle | Oven too hot. | Allow the oven to cool below locking temperature. |
| Oven not clean after a clean cycle | Oven controls not properly set. | See the Using the self-cleaning oven section. |
| Oven was heavily soiled. | Clean up heavy spillovers before starting the clean cycle. Heavily soiled ovens may need to self-clean again or for a longer period of time. | |
| “F—and a number or letter” flash in the display | You have a function error code. | Touch the CLEAR/OFF pad. Put the oven back into operation. |
| If the function code repeats. | Disconnect all power to the range for at least 30 seconds and then reconnect power. If the function error code repeats, call for service. If a function error code appears during the selfcleaning cycle, check the oven door latch. The latch may have been moved, if only slightly, from the locked position. Make sure the latch is moved to the right as far as it will go. Touch the CLEAR/OFF pad. Allow the oven to cool for one hour. Put the oven back into operation. |
Display flashes "bAd" then "linE" with a loud tone | The installed connection from the house to the unit is miswired. | Contact installer or electrician to correct miswire. |
Control signals after entering cooking time or start time | You forgot to enter a bake temperature or cleaning time. | Touch the BAKE pad and desired temperature or the SELF CLEAN pad and desired clean time. |
Display goes blank | A fuse in your home may be blown or the circuit breaker tripped. | Replace the fuse or reset the circuit breaker. |
The clock is in black-out mode. | See the Using the clock and timer section. | |
Display flashes | Power failure. | Reset the clock. |
Unable to get the display to show "SF" | Oven control pads were not touched properly. | The BROIL HI/LO and BAKE pads must be touched at the same time and held for 3 seconds. |
Power outage, clock flashes | Power outage or surge. | Reset the clock. If the oven was in use, you must reset it by touching the CLEAR/OFF pad, setting the clock and resetting any cooking function. |
"Burning" or "oily" odor emitting from the vent | This is normal in a new oven and will disappear in time. | To speed the process, set a self-clean cycle for a minimum of 3 hours. See the Using the self-cleaning oven section. |
Strong odor | An odor from the insulation around the inside of the oven is normal for the first few times the oven is used. | This is temporary. |
Fan noise | A cooling fan may automatically turn on and off. | This is normal. The cooling fan will turn off and on to cool internal parts. It may run after the oven is turned OFF. |
See other models: PSA2200RBB03 P2B930SET2SS WDRR2500K4WW PGB911EEJ3ES GTH18ABTZRWW
