Contents
Contents
How to Control the Online Manual 1
How to Print Out the Online Manual 1
Outline of the Printer Driver 2
What is the Printer Driver?
Starting the Printer Driver 3
Starting the Printer Driver using the "Start" Button
Starting the Printer Driver through an Application
Printer Driver Functions 5
"Main" Tab Settings 6
"Paper" Tab Settings 9
"Advanced" Tab Settings 13
"Output Quality" Settings 15
"Watermark" Tab Settings 16
"Version" Tab Settings 18
Printing Overview 19
Basic Printing 20
Printing a Watermark 22
How to Print a Watermark
Enlarge/Reduce the Printed Image 23
Automatic Zooming to the Loaded Paper
Printing Multiple Pages on One Page 24
"2-Up" Printing
"4-Up" Printing
Printing a Photograph 25
Outline of the Print Status Window 26
What is the Print Status Window?
Starting the Print Status Window
Print Status Window Functions 27
Understanding Error Messages 28
Understanding the Status and Program Icon
"Maintenance" Tab 29
"Options" Tab 30
Sharing the Printer using Windows Networking 31
Shared Printer Settings 32
Client Settings 33
Time to Change the Ink Tank 34
Changing Ink Tank 35
Test Print Head 38
Cleaning the Print Head 39
Changing the Print Head 40
Aligning the Print Head 43
Keeping the Printer Clean 45
Identifying Printer Problems 46
Failed to Install the USB Driver (Windows 98) 47
Paper is not Fed into the Printer 48
Paper Jam 50
Printer Inoperative 51
Nothing Prints 52
Uninstalling the Printer Driver
Faint, Uneven or Smeared Print Output 55
Characters or Graphics are not Printed in Correct Position
56
Printed Lines are not Straight, or Have Blank Spaces 57
Unit does not Print in Color 58
Printing is too Slow 59
How to Use the Online Manual
Printer Properties
Print
Print Status Window
Sharing Printer
Maintenance
Troubleshooting
1
How to Use the
Online Manual
Printer Properties Print
Print Status
Window
Sharing Printer Maintenance Troubleshooting
How to Use the Online Manual
How to Use the Online Manual
This Online Manual provides instruction for the operation of your new printer. It is designed to assist you in the
operation of the Online Manual and provide you with all relevant information.
For more information about computers, operating systems and Acrobat Reader, please refer to the relevant
manual or help file.
How to Control the Online Manual
How to Print Out the Online Manual
In order to print out a hard copy of the Online Manual for your reference, go to Acrobat Reader, click the "File" menu,
and select "Print". After specifying the printer setting, click the "OK" button to print.
How to use the
Online Manual
Printer Properties Print
Print Status
Window
Sharing Printer Maintenance Troubleshooting
1
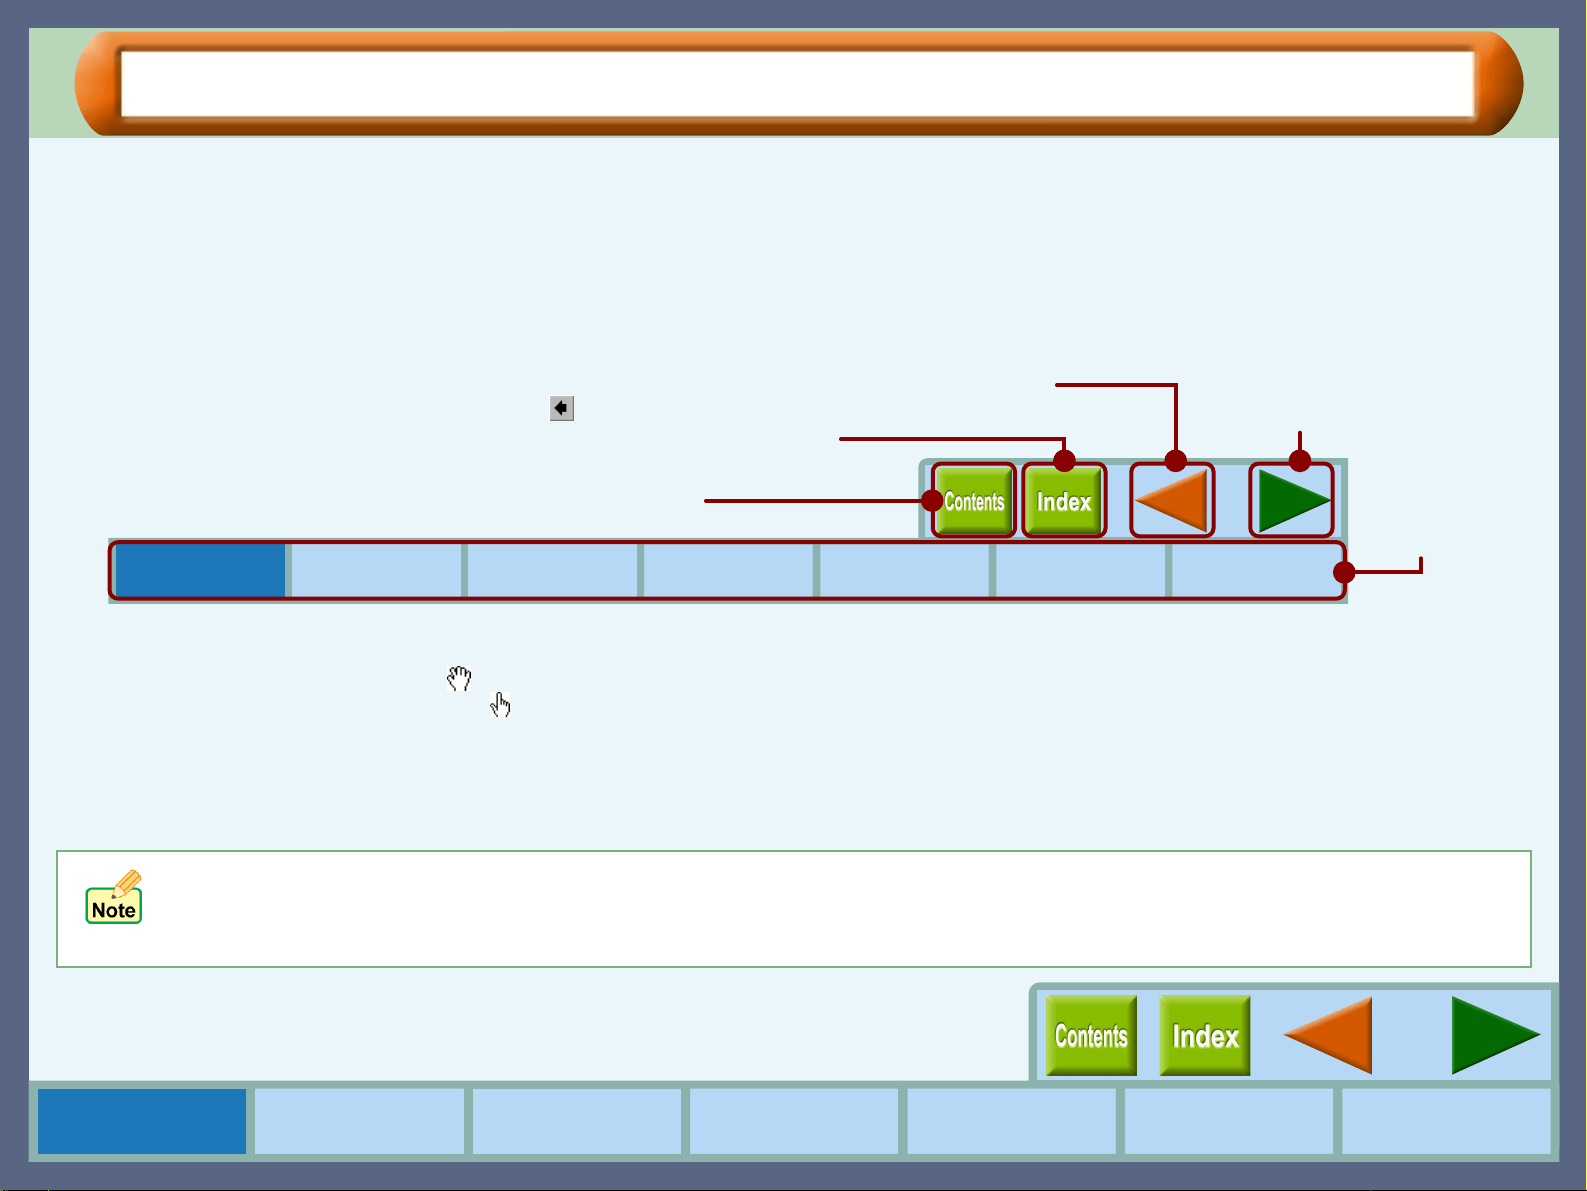
Click the listed
items to display
the header of
that section.
Click this button to display the Table of Contents of the Online Manual.
From the Table of Contents you can jump to various pages.
Click this button to display the Index of the Online Manual. From the Index you
can jump to various pages.
Takes you back page by page. To return to the previously viewed page from the page displayed
by clicking a reference topic, click the ( ) button on the menu bar of the Acrobat Reader.
Takes you forward page by page.
Following links
Links can connect parts of a document to other parts for further information. In this document, green colored letters are linked area.
To follow a link, select the hand tool ( ), a zoom tool, or a selection tool. Position the pointer over the linked area on the page until the pointer
changes to a hand with a pointing finger ( ). Then click the link.
In this online manual, screen images and operating procedures are mainly for Windows 98. With other versions of Windows,
some screen images may be different from those in this manual.
In this manual, the contents of each screen image are those of AJ-1800. Please refer to the corresponding contents when using
AJ-2000.
2
How to Use the
Online Manual
Printer Properties Print
Print Status
Window
Maintenance TroubleshootingSharing Printer
Printer Properties
Outline of the Printer Driver
What is the Printer Driver?
A printer driver is a program designed to convert print data from any application into data understandable by the printer
so that the printer can quickly and efficiently print out the data.
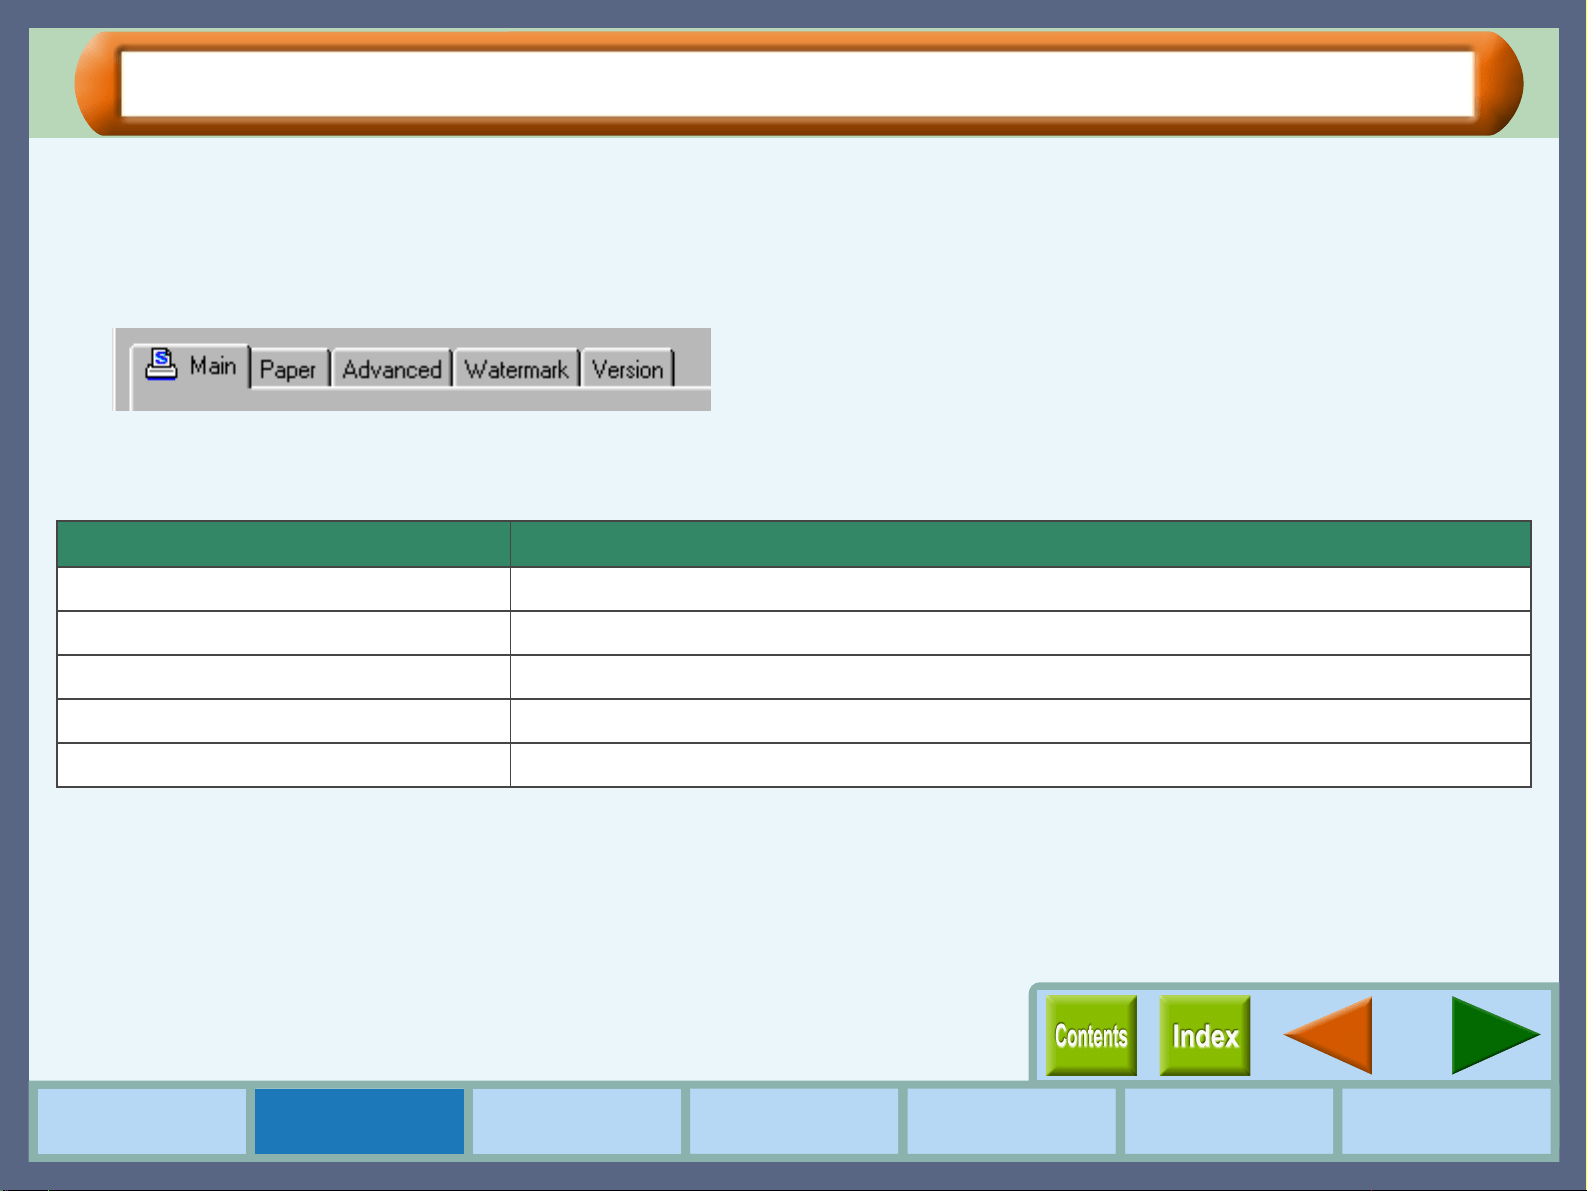
The five tabs of this printer driver are shown below.
By clicking the tabs displayed above, you will jump to detailed description.
The items shown below can be setup on each tab.
Tab Name Setup Items
Main Orientation, Copies, Order, N-Up Printing, Current Settings
Paper Paper Selection, Custom Paper, Paper Size, Fit To Paper Size, Zoom[%]
Advanced Output Type, Print Quality, Media Type, Maintenance
Watermark Watermark, Size, Angle, Edit Color, Edit Fonts
Version About
3
Printer Properties
How to Use the
Online Manual
Printer Properties Print
Print Status
Window
Maintenance TroubleshootingSharing Printer
Starting the Printer Driver (part 1)
Open the printer driver setup screen (properties dialog box) by either of the methods shown below.
Reference:
Starting the Printer Driver through an Application
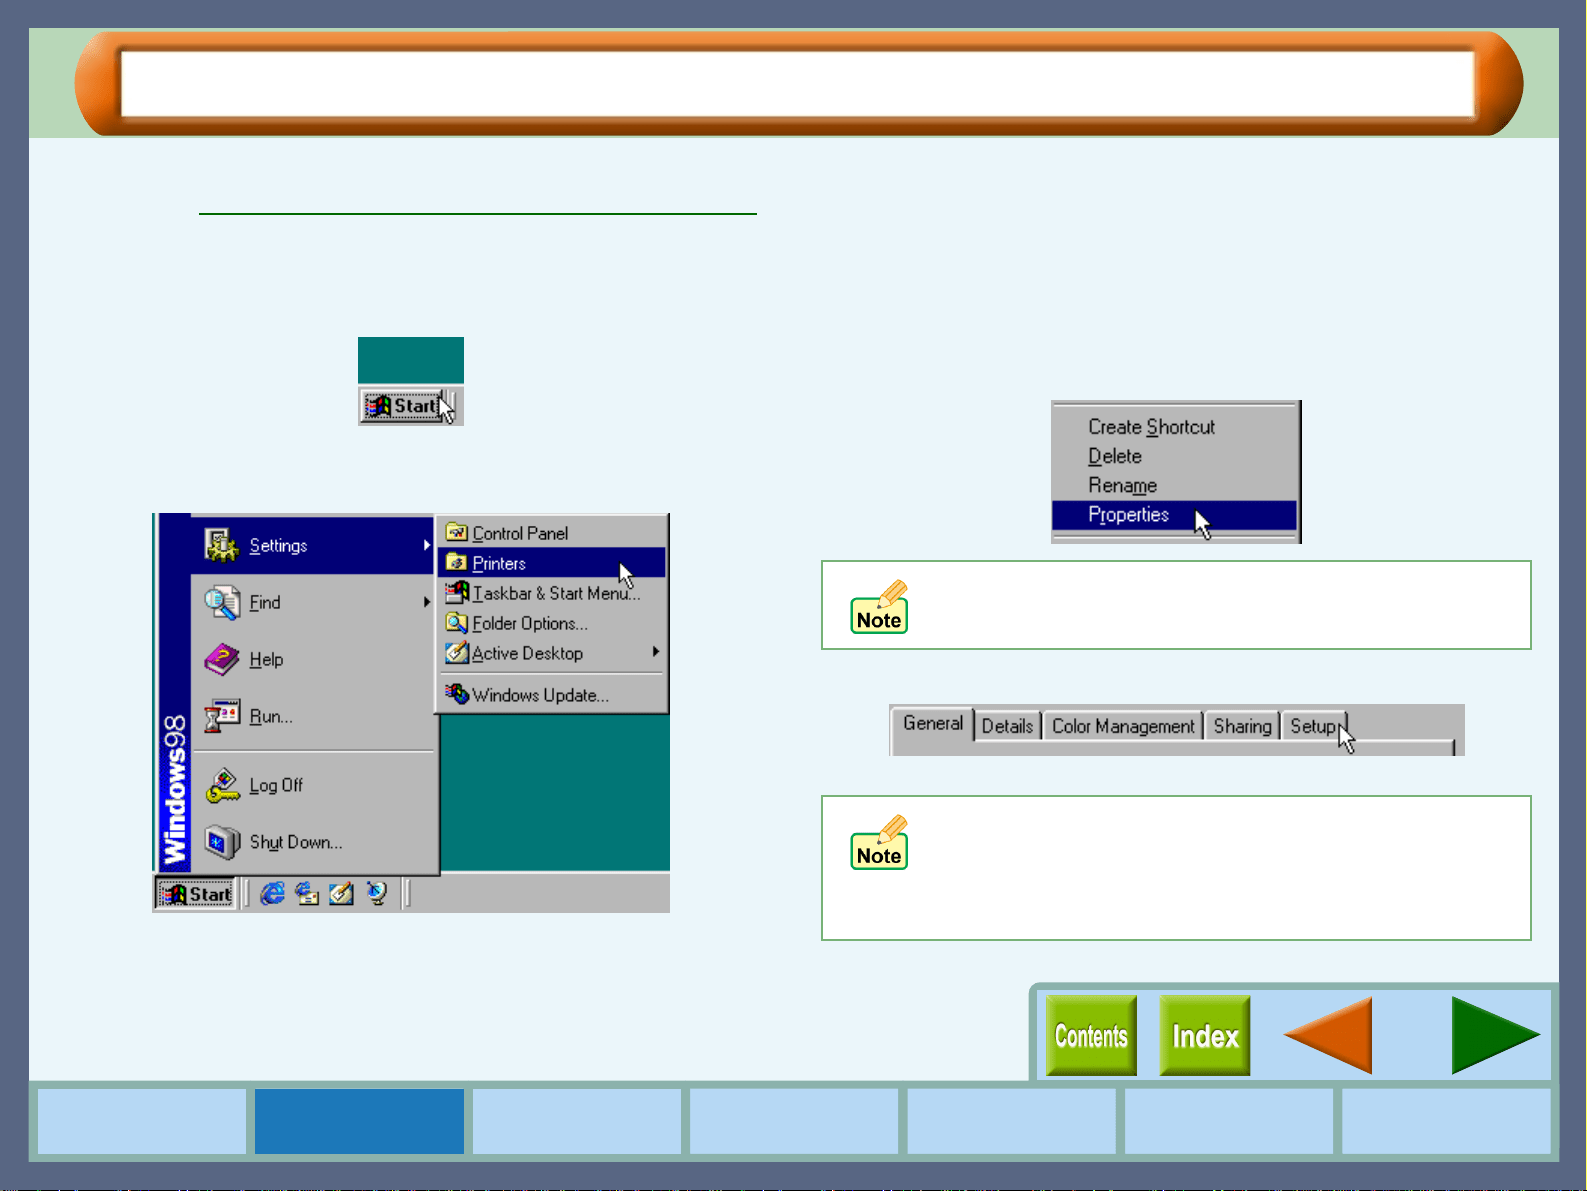
Starting the Printer Driver using the "Start" Button
1
11
1
Click the "Start" button.
2
22
2
Select "Settings" and click "Printers".
3
33
3
Click the "SHARP AJ-1800" or "SHARP AJ-2000"
printer driver icon in the "Printers" window and
from the "File" menu select "Properties".
4
44
4
Click the "Setup" tab.
The properties dialog box will appear.
The printer driver setup screen will appear when
"Printing Preferences" of Windows 2000 or "Document
Defaults" of Windows NT 4.0 is selected.
By setting the printer properties using the "Start"
button, all applications will be affected. Refer to the
Windows manual or help file for more information on
the "General" tab, "Details" tab, "Color Management"
tab and "Sharing" tab.
4
Printer Properties
How to Use the
Online Manual
Printer Properties Print
Print Status
Window
Maintenance TroubleshootingSharing Printer
Starting the Printer Driver (part 2)
Starting the Printer Driver through an Application
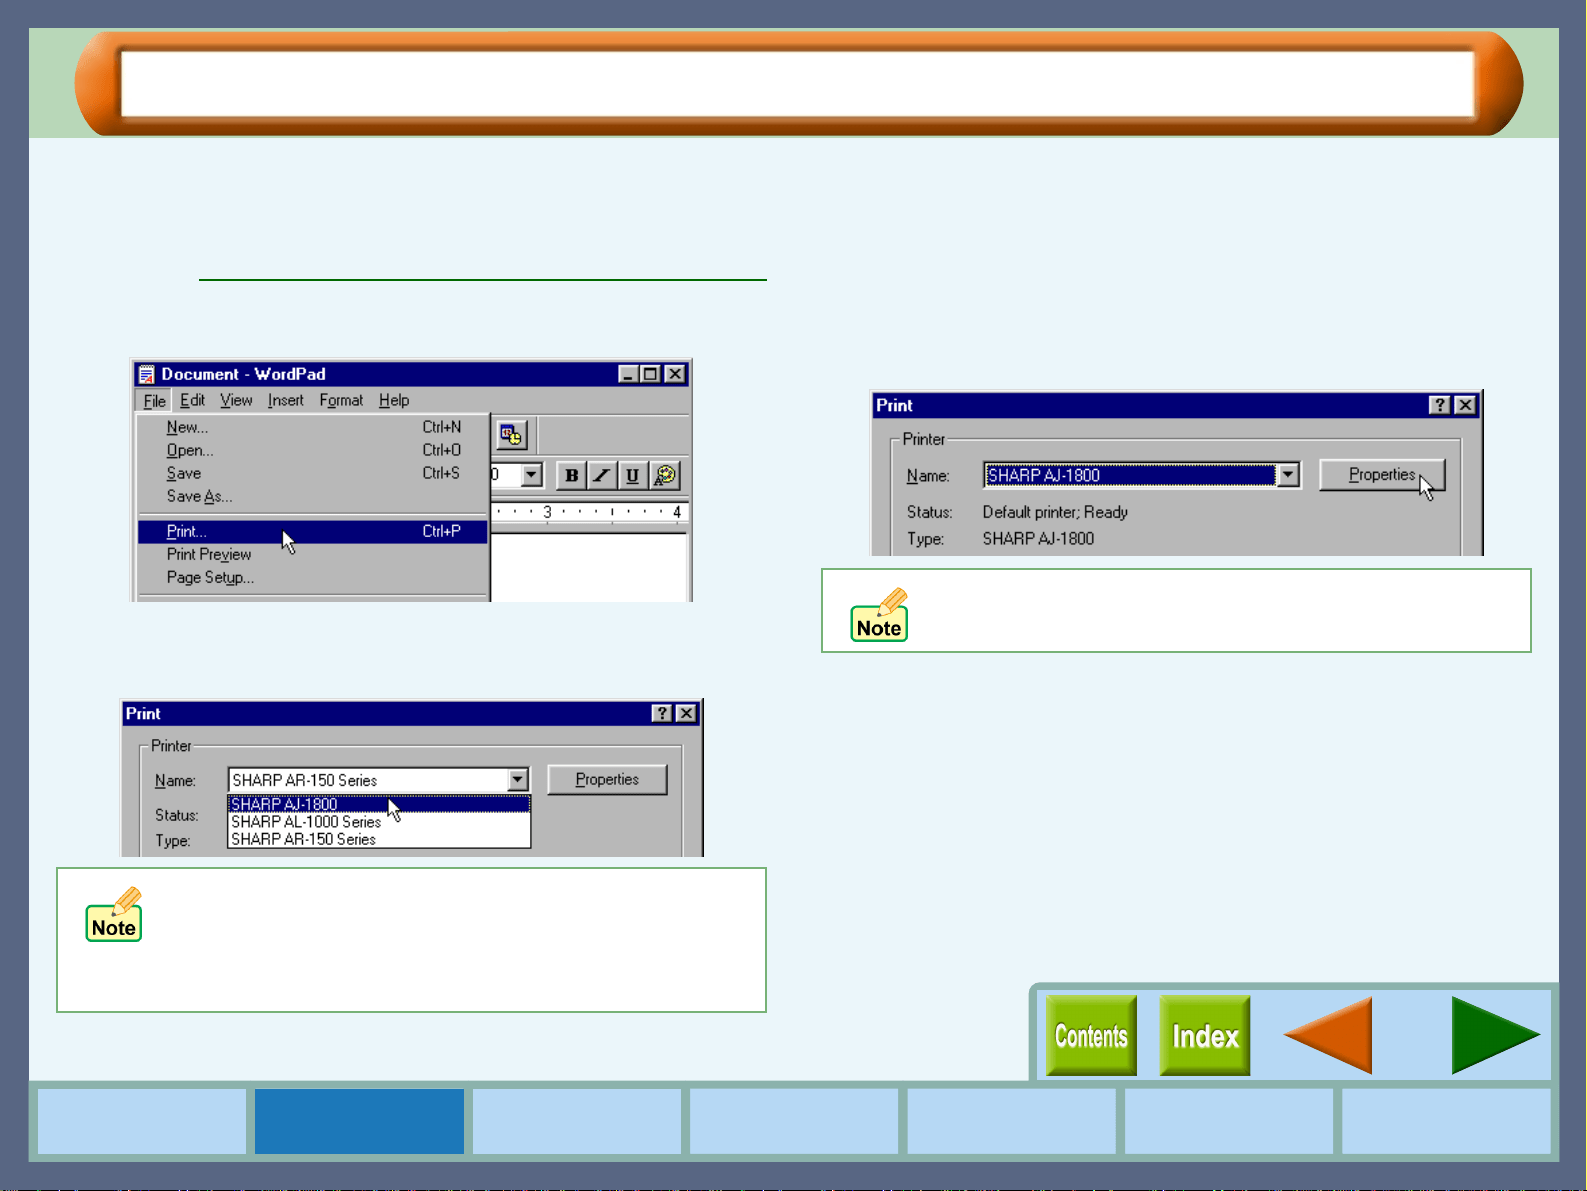
Follow the steps shown below to open the printer driver setup screen (properties dialog box) through WordPad. First,
activate WordPad. (Click the "Start" button, select "Programs", select "Accessories" and then click "WordPad".)
Reference:
Starting the Printer Driver using the "Start" Button
1
11
1
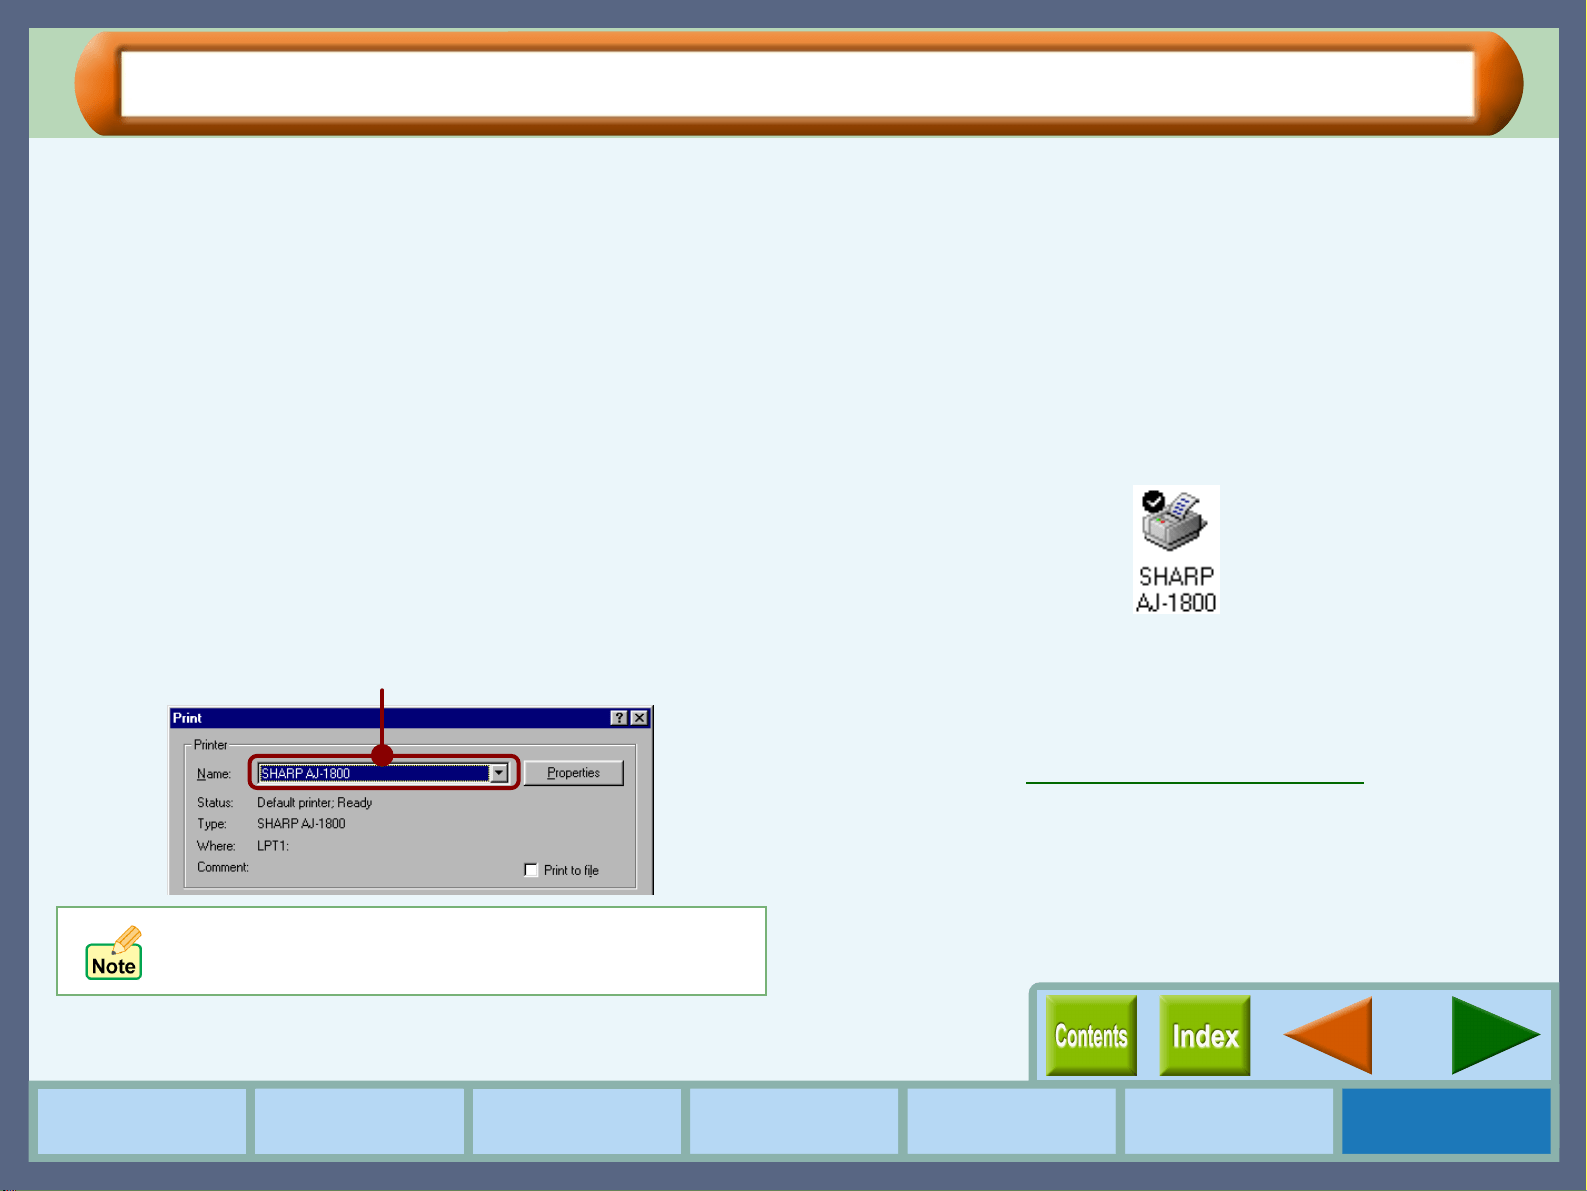
Go to "File" menu in WordPad, and select "Print".
2
22
2
Select "SHARP AJ-1800" or "SHARP AJ-2000" from
the Printer Name drop-down list.
3
33
3
Click the "Properties" button to open the
properties dialog box.
On Windows 2000, select "SHARP AJ-1800" or
"SHARP AJ-2000" printer driver icon from "Select
Printer" area. You can setup the preferences for the
printer driver through the five tabs of "Main", "Paper",
"Advanced", "Watermark", and "Version".
If the dialog box is setup through an application, all
settings will be void when you quit the application.
5
Printer Properties
How to Use the
Online Manual
Printer Properties Print
Print Status
Window
Maintenance TroubleshootingSharing Printer
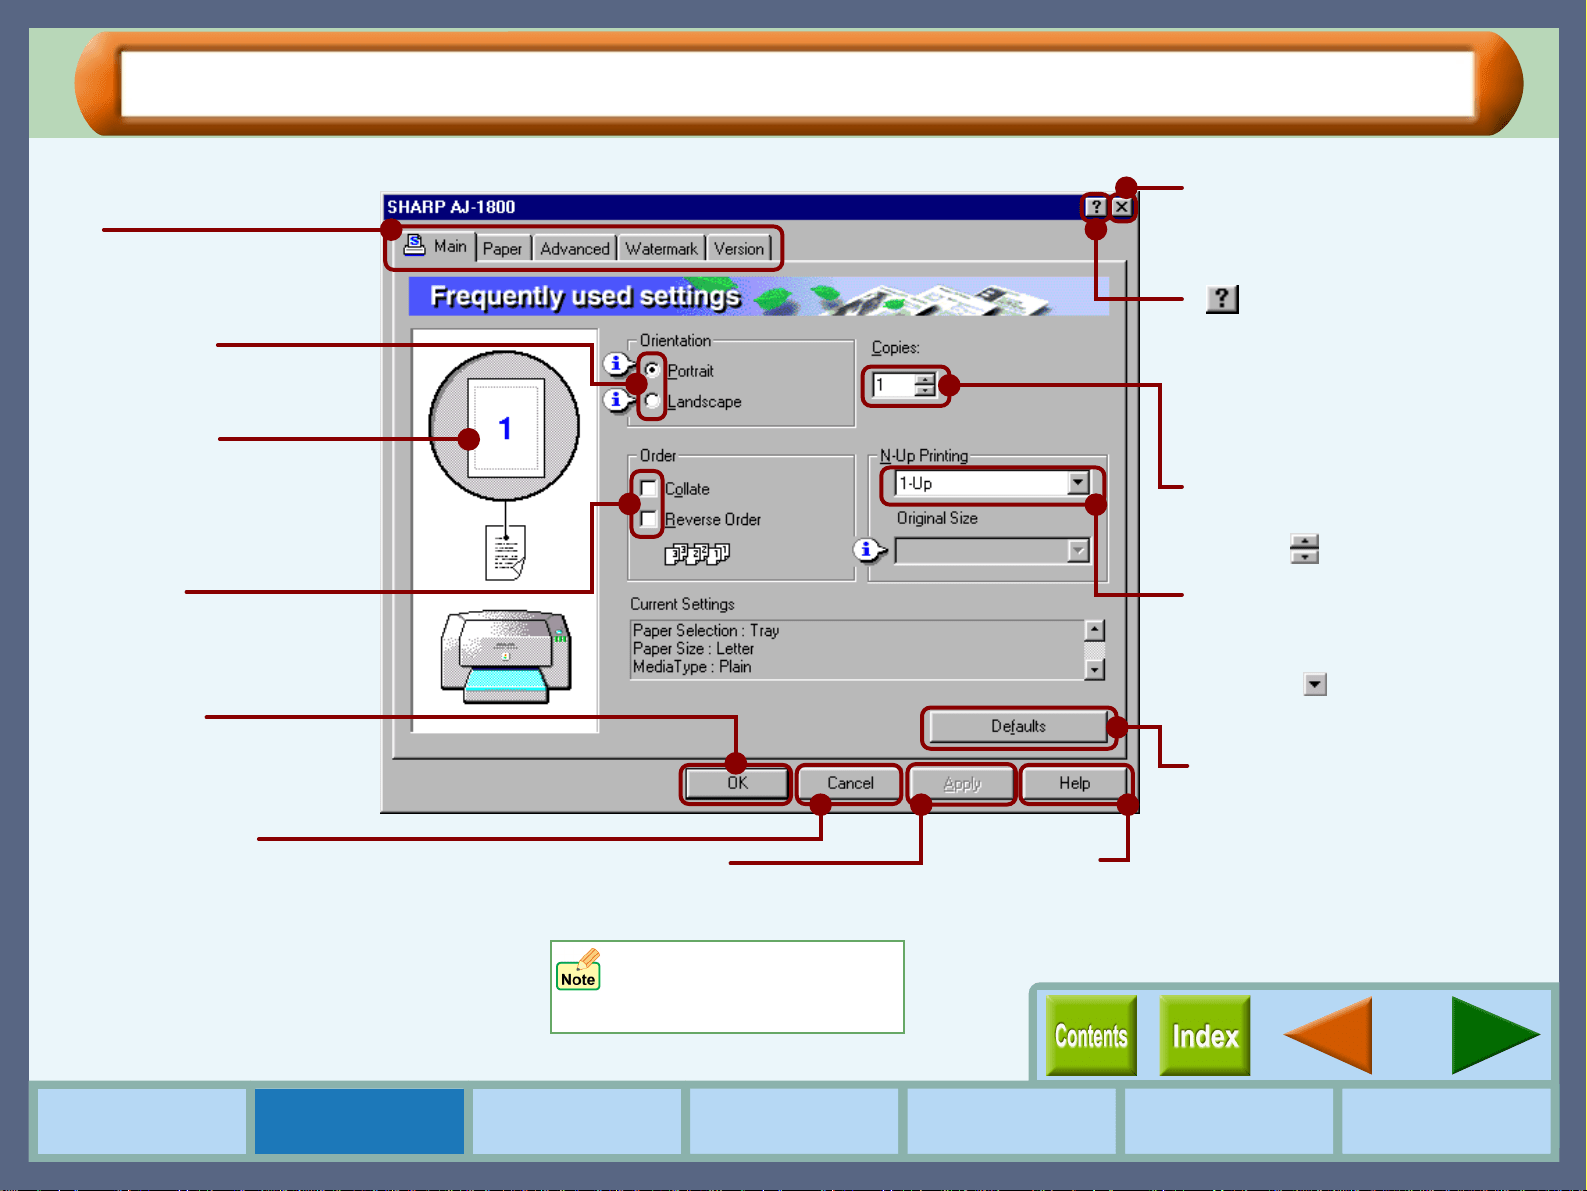
Printer Driver Functions
Tab
Index which allows you to
switch between the various
setup screens.
( ) button
After clicking this button, click
the preference located in the
dialog box you want to know
more about, and receive a
basic explanation.
Check button
Allows you to select one
item from a list of options.
Output Image
The settings you made at
"Orientation" and "N-Up
Printing" are shown in this
image.
"OK" button
Click this button to save
your settings, and exit the
dialog box.
"Cancel" button
Click this button to exit the dialog box
without making any changes to the settings.
"Apply" button
Click to save your settings
without closing the dialog box.
Check box
Click this option to
activate/deactivate each
function.
Quit button
Click this button to quit the
properties dialog box.
"Defaults" button
Returns settings to default
mode of the tab. Refer to the
information page for each tab
to check the values of the
default settings.
"Help" button
Click this button to
display the help file
for this driver.
Drop-down list
Allows you to make one
selection from a list of choices.
Click the ( ) button to display
your choices.
Spin box
Enter the number directly or
use the ( ) buttons.
Windows NT 4.0 does not
have the "Apply" button on
each screen.
6
Printer Properties
How to Use the
Online Manual
Printer Properties Print
Print Status
Window
Maintenance TroubleshootingSharing Printer
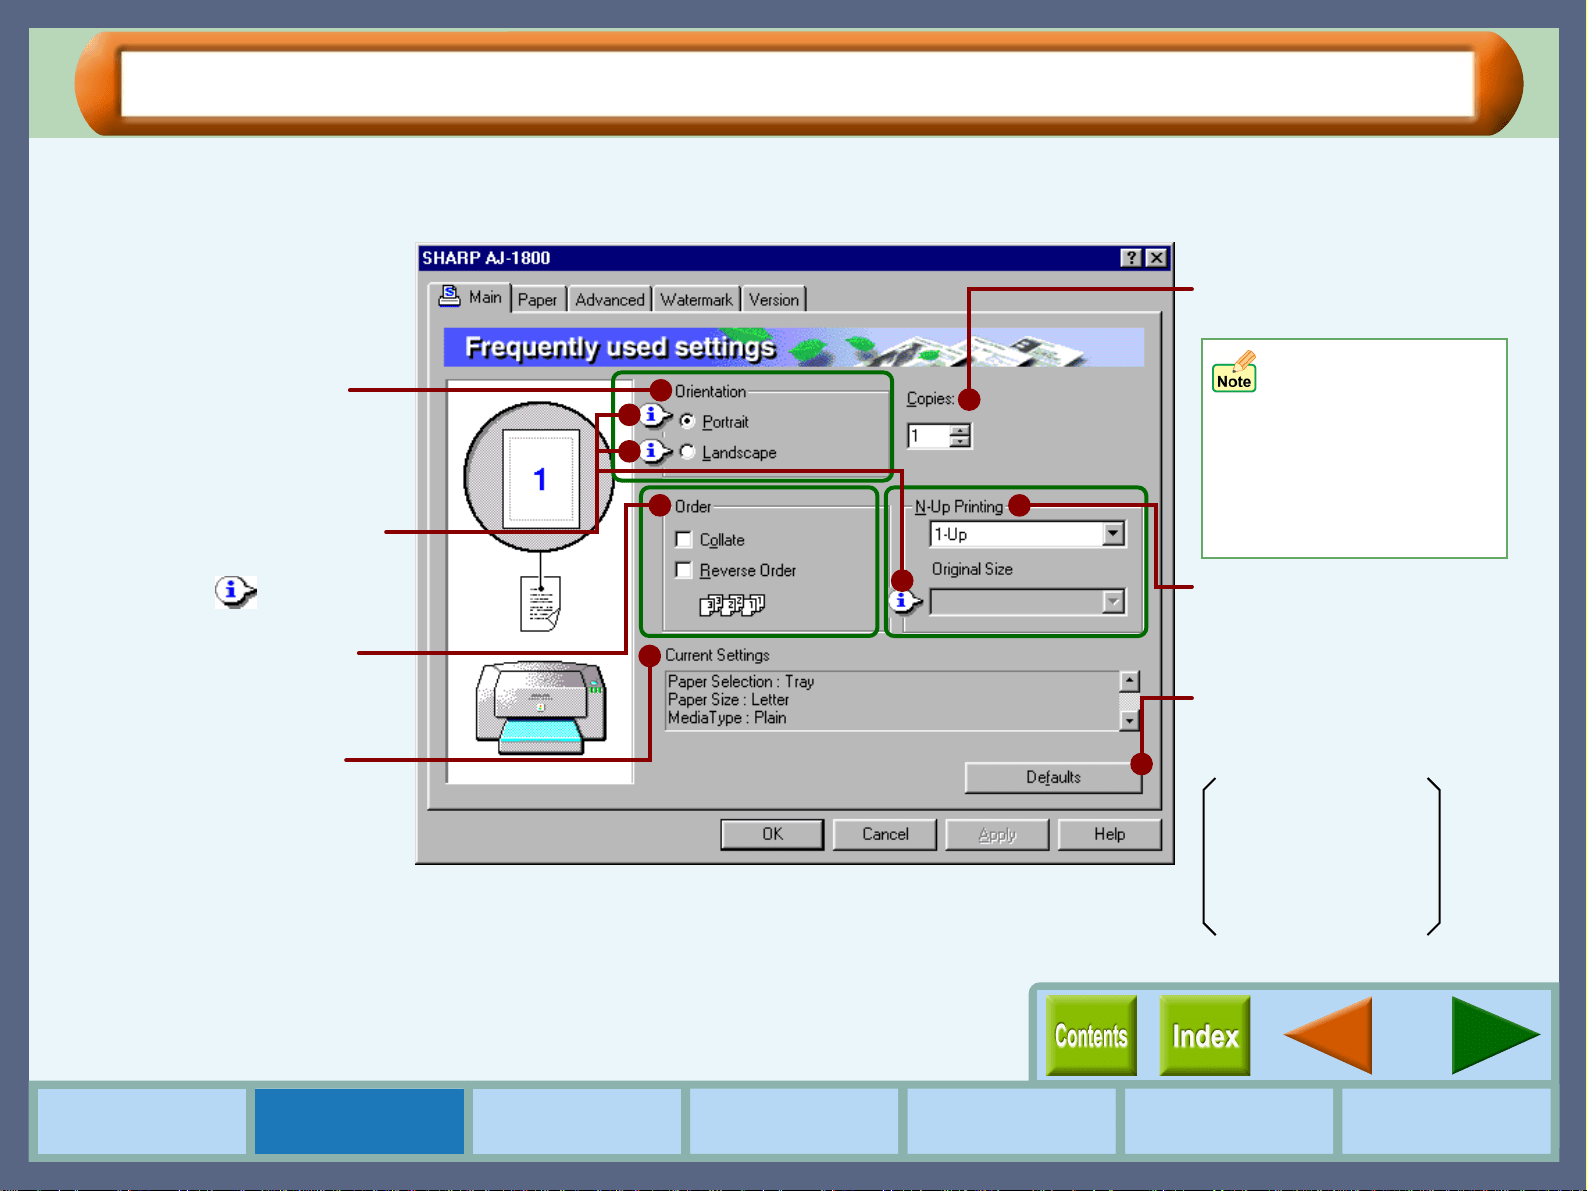
"Main" Tab Settings (part 1)
Basic print options, including orientation and the number of copies, are controlled through this dialog box. You
can usually print simply by adjusting and confirming the printer options listed in this dialog box.
When either of
"Banner A4", or
"Banner Letter" is
selected for "Paper
Size", you cannot
specify any value for
"Copies" setting.
Allows you to set "N-Up
Printing" option.
Set the number of copies
between 1 - 50.
On the above screen, click on options shown in the green boxes
to make additional changes.
Select the orientation for
your documents.
Displays important print
settings. Use the scroll bar
to check these settings.
When multiple copies are
printed, this setting allows
you to set the order.
Returns all user modified
settings back to default
settings of this tab.
Orientation: Portrait
Copies: 1
Collate: Off
Reverse Order: Off
N-Up Printing: 1-Up
Further information on each
option is available by
clicking the ( ) button.
7
Printer Properties
How to Use the
Online Manual
Printer Properties Print
Print Status
Window
Maintenance TroubleshootingSharing Printer
"Main" Tab Settings (part 2)
Orientation
Set the orientation for your documents either to "Portrait" or
"Landscape".
Portrait
Check this setting to print your documents vertically.
Landscape
Check this setting to print your documents horizontally.
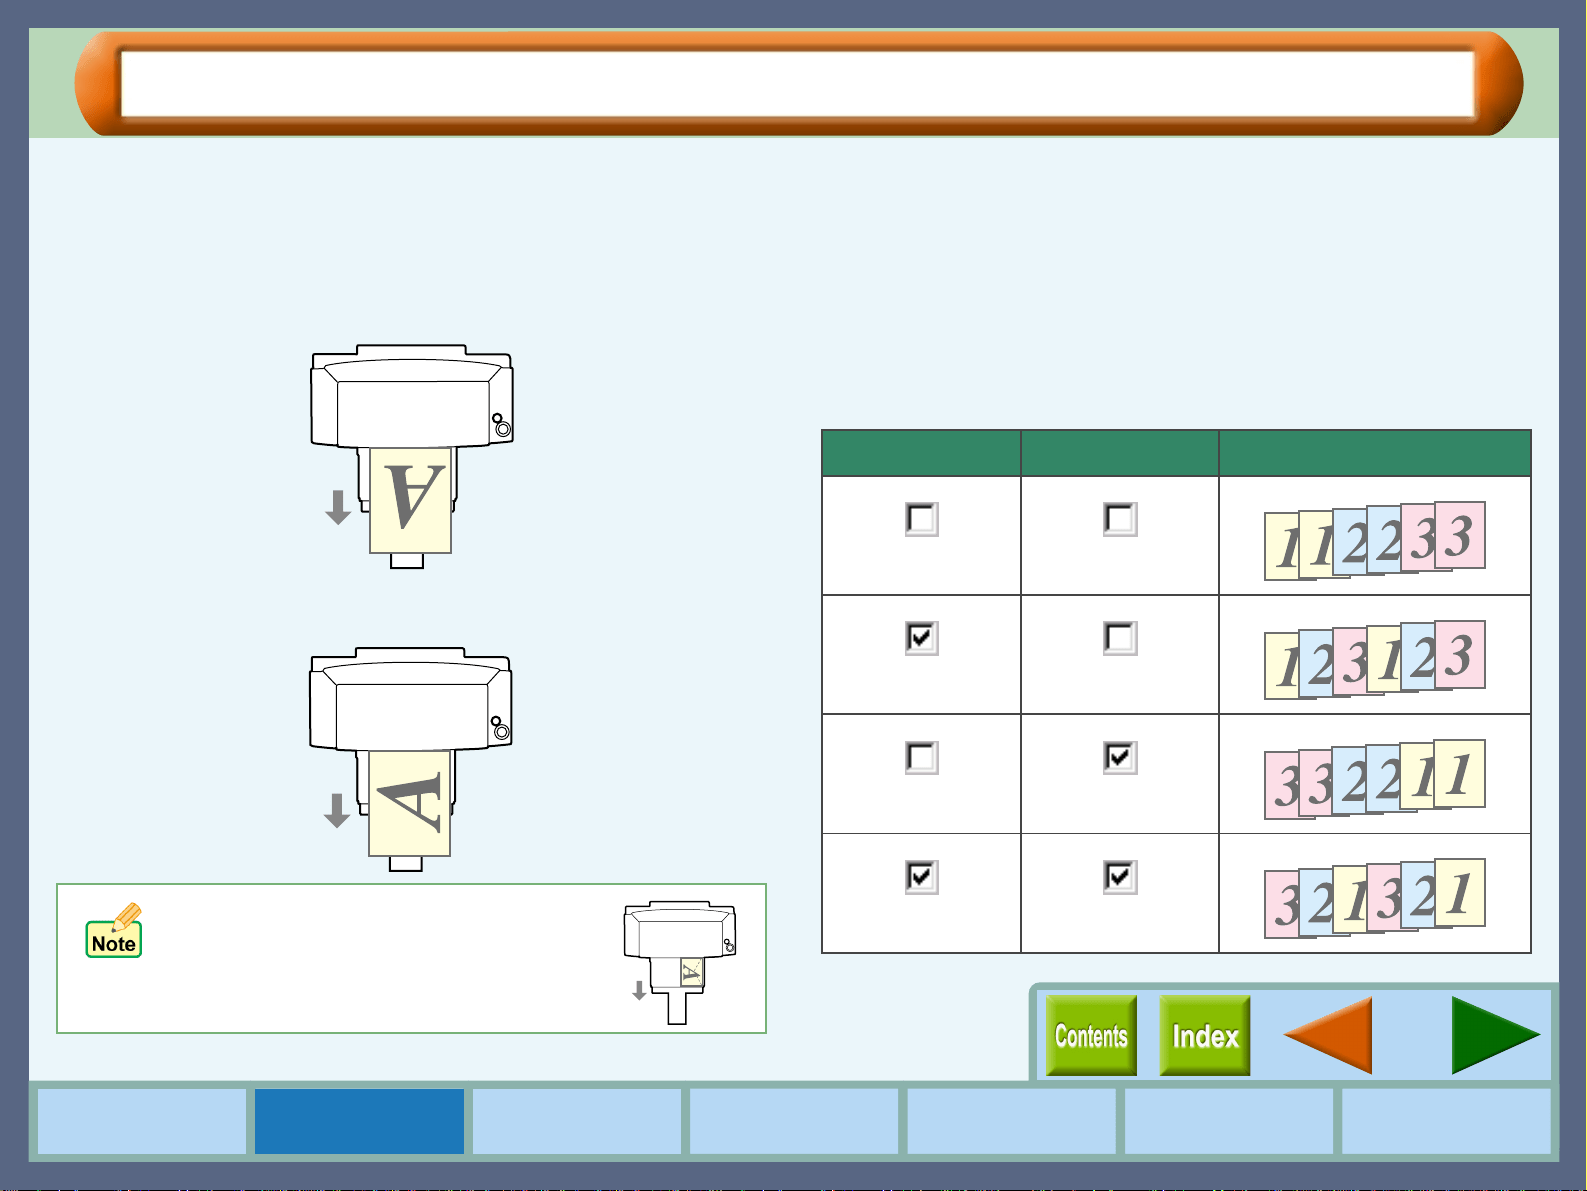
Order
Allows you to change the print out order of your documents.
Collate
When multiple copies are printed, this setting places each copy
in numerical order.
Reverse Order
Check this box to print documents in reverse order.
For more detailed information, refer to the table below.
Example:
When printing out two copies of a three-page document.
If "Com10", "DL", "C6", or "Invitation
A2" is selected for the "Paper Size"
setting and set to "Landscape", the
paper will be output in the orientation
shown in the right illustration.
Collate Reverse Order Output Result
8
Printer Properties
How to Use the
Online Manual
Printer Properties Print
Print Status
Window
Maintenance TroubleshootingSharing Printer
"Main" Tab Settings (part 3)
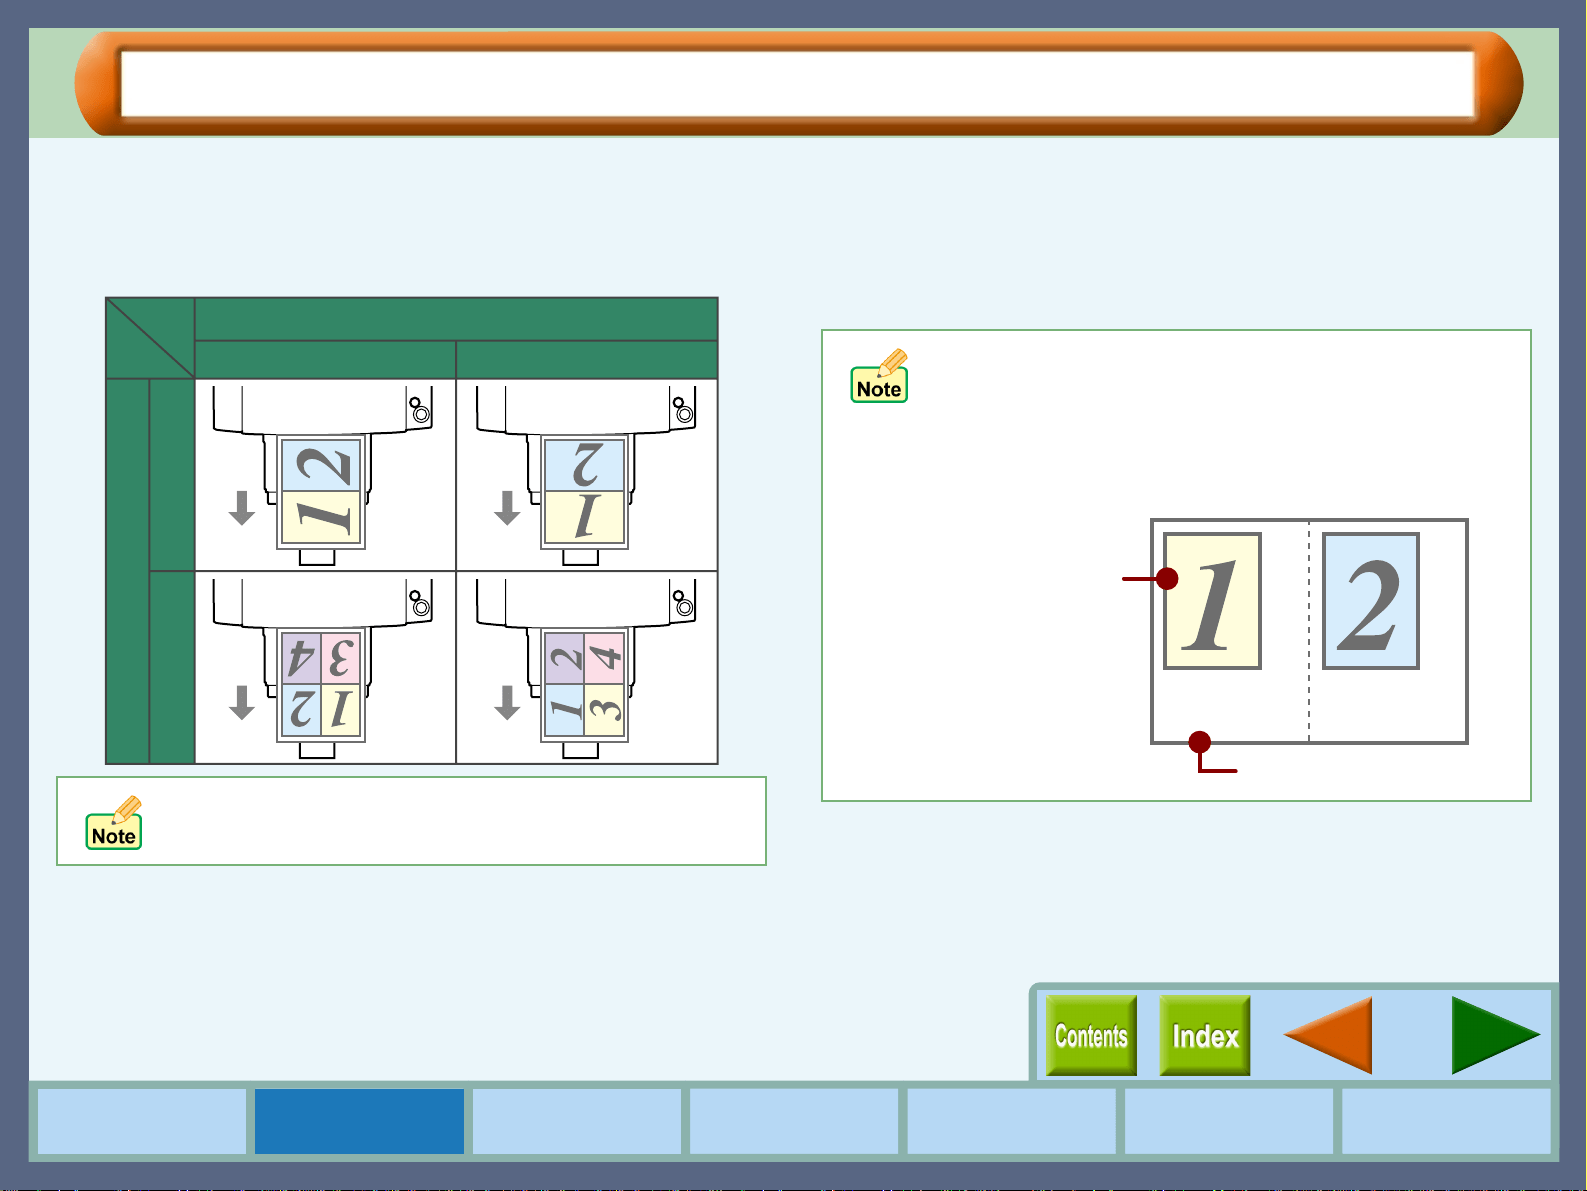
N-Up Printing
Set this feature to place multiple reduced pages onto a single
page. Select the "2-Up" option to copy two pages or the "4- Up"
option to copy four pages onto a single printed page.
Original Size
Set the original size when you select "2-Up" or "4-Up" for "N-Up
Printing". Select the document size specified through your
application from "Letter", "Legal", "Executive", "A4", "A5", "A6",
"B5", "Index card 3" x 5", "Index card 4" x 6", or "Index card 5" x
8".
The illustrations above assume that the "Original Size"
is set to the same size as the document size of your
application.
Orientation
Portrait Landscape
N-Up Printing
4-Up 2-Up
If "Original Size" is not set to the same size as the
document size of your application, the output will not fit
exactly on the paper.
Example:
When the document size of your application is smaller than
"Original Size".
Original Size
Document size of
your application.
9
Printer Properties
How to Use the
Online Manual
Printer Properties Print
Print Status
Window
Maintenance TroubleshootingSharing Printer
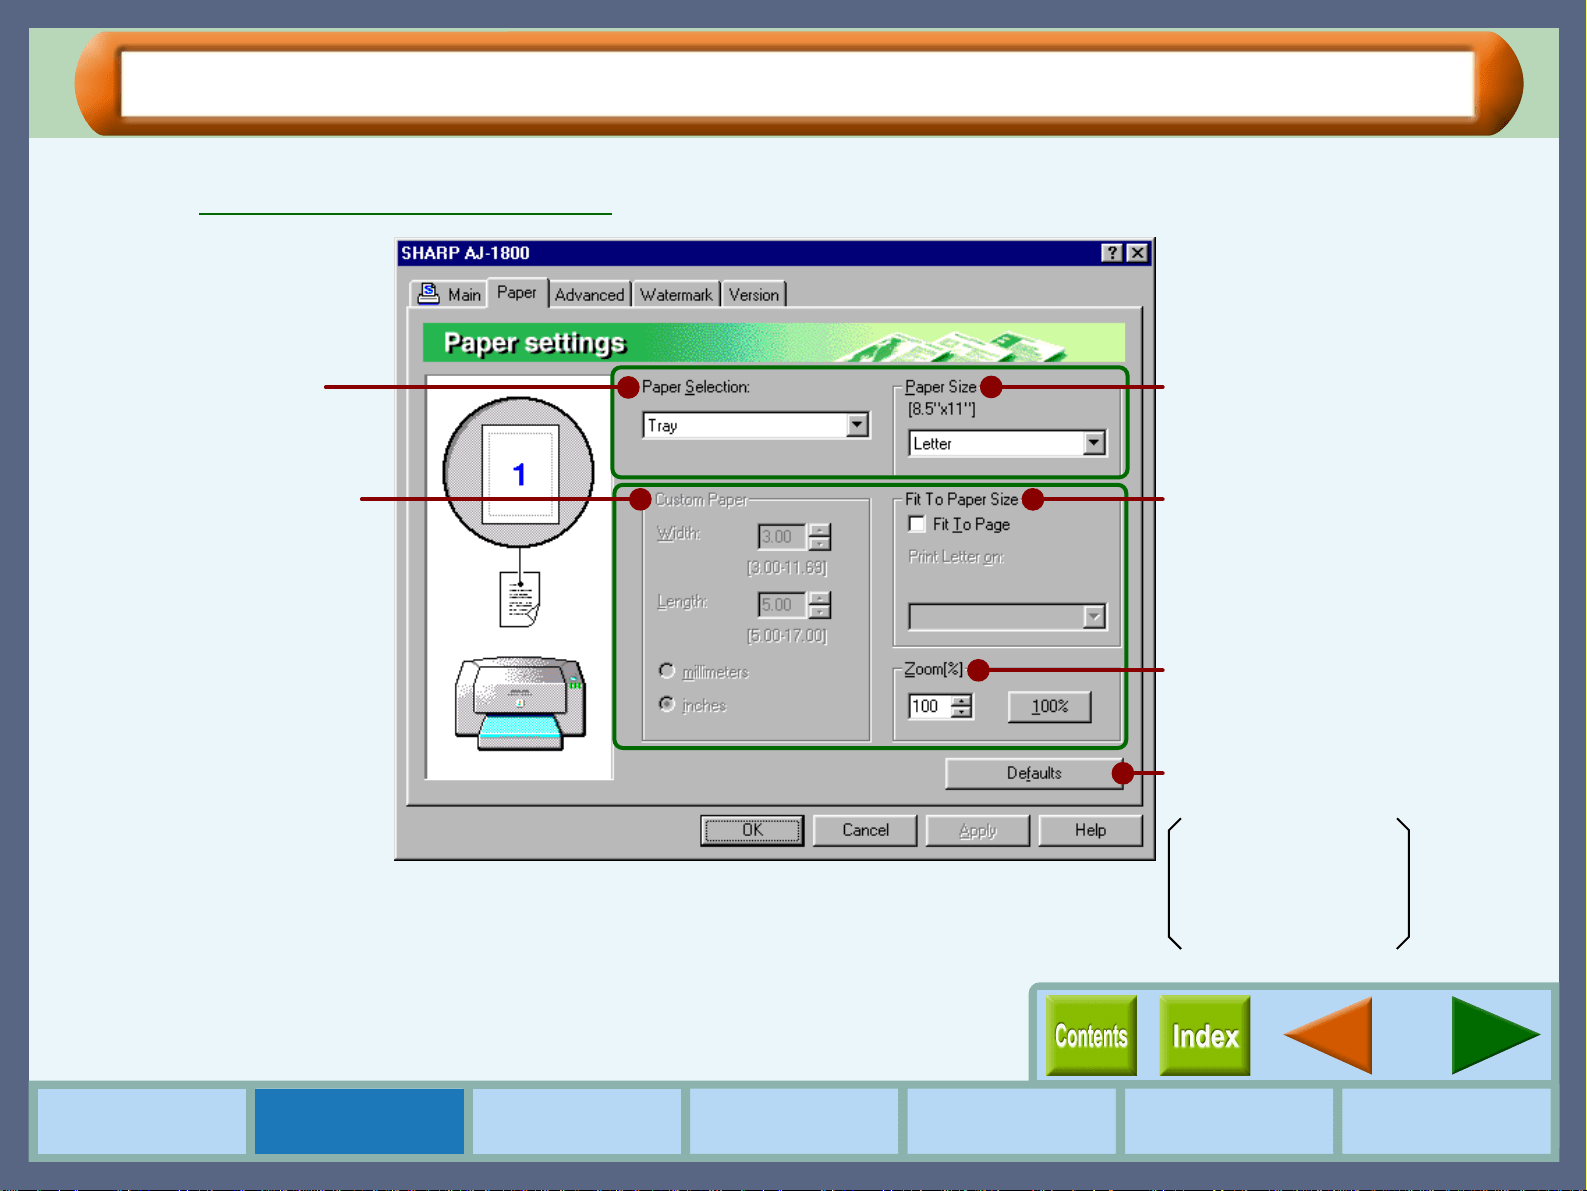
"Paper" Tab Settings (part 1)
Use this screen to select the paper size, tray and zoom.
Reference:
Guaranteed area and printable area
Select the paper size for your
document.
Select the paper source.
Allows you to customize the
size of the paper.
Enlarges/reduces the image to fit
to the size of paper in the printer.
Allows you to reduce or enlarge
the size of the print.
Returns all user modified settings
back to default settings of this tab.
Paper Selection: Tray
Paper Size: Letter
Fit To Page: Off
Zoom[%]: 100%
On the above screen, click on options shown in the green boxes
to make additional changes.
10
Printer Properties
How to Use the
Online Manual
Printer Properties Print
Print Status
Window
Maintenance TroubleshootingSharing Printer
"Paper" Tab Settings (part 2)
Paper Size
Select an appropriate paper size for your document from drop-down
list.
Paper Selection
Select "Tray" or "Bypass" for your print job.
Tray
Paper is fed to the printer from the paper tray.
Bypass
Paper will be fed to the printer from the bypass tray. Only one sheet can
be loaded into the bypass tray. To load paper into the bypass, place the
paper into the tray against the guide and press the paper button.
When printing one page:
Load paper into the bypass then start printing from your computer. If
paper is not loaded before printing is started, the paper lamp on the
printer will blink and the message "Please set a sheet of paper on
bypass" will appear on the screen of the computer.
When printing more than one page:
Repeat as above for each page.
!
The document size must be smaller than the selected
(loaded) paper. If not, printing will occur over the edge of
the paper causing the machine to become internally dirty.
!
Ledger, A3, or B4 sized paper can not be loaded in this
printer. The print image should be reduced by the "Fit To
Paper Size" or "Zoom[%]" setting.
"N-Up Printing", "Fit To Page", and "Zoom[%]" settings are
not available when you select "COM10", "DL", "C6",
"Invitation A2", "Japanese Hagaki", "Banner Letter", or
"Banner A4" sized paper.
Size
8.5" x 11"
8.5" x 14"
7.25" x 10.5"
210mm x 297mm
148mm x 210mm
8.5" x 11"
210mm x 297mm
4.125" x 9.5"
4.375" x 5.75"
110mm x 220mm
114mm x 162mm
3" x 5"
4" x 6"
5" x 8"
105mm x 148mm
100mm x 148mm
Min. : 3.00" x 5.00" (76.2mm x 127.0mm)
Max. : 11.69" x 17.00" (297.0mm x 431.8mm)
Paper
Letter
11" x 17"
Ledger
Legal
Executive
297mm x 420mmA3
A4
A5
257mm x 364mm B4
182mm x 257mm B5
Banner Letter
Banner A4
COM10
Invitation A2
DL
C6
Index card 3" x 5"
Index card 4" x 6"
Index card 5" x 8"
A6
Japanese Hagaki
Custom
If the "Tray" is selected from this tab and paper is placed in
the bypass tray, the paper in the bypass tray will be fed first,
and then paper will be fed from the paper tray.
Make sure to insert "Banner Letter" and "Banner A4"
through the bypass tray. Max. 5 sheets of banner paper can
be set to the bypass tray. Make sure that your application
supports Banners when you intend to print onto Banners.
11
Printer Properties
How to Use the
Online Manual
Printer Properties Print
Print Status
Window
Maintenance TroubleshootingSharing Printer
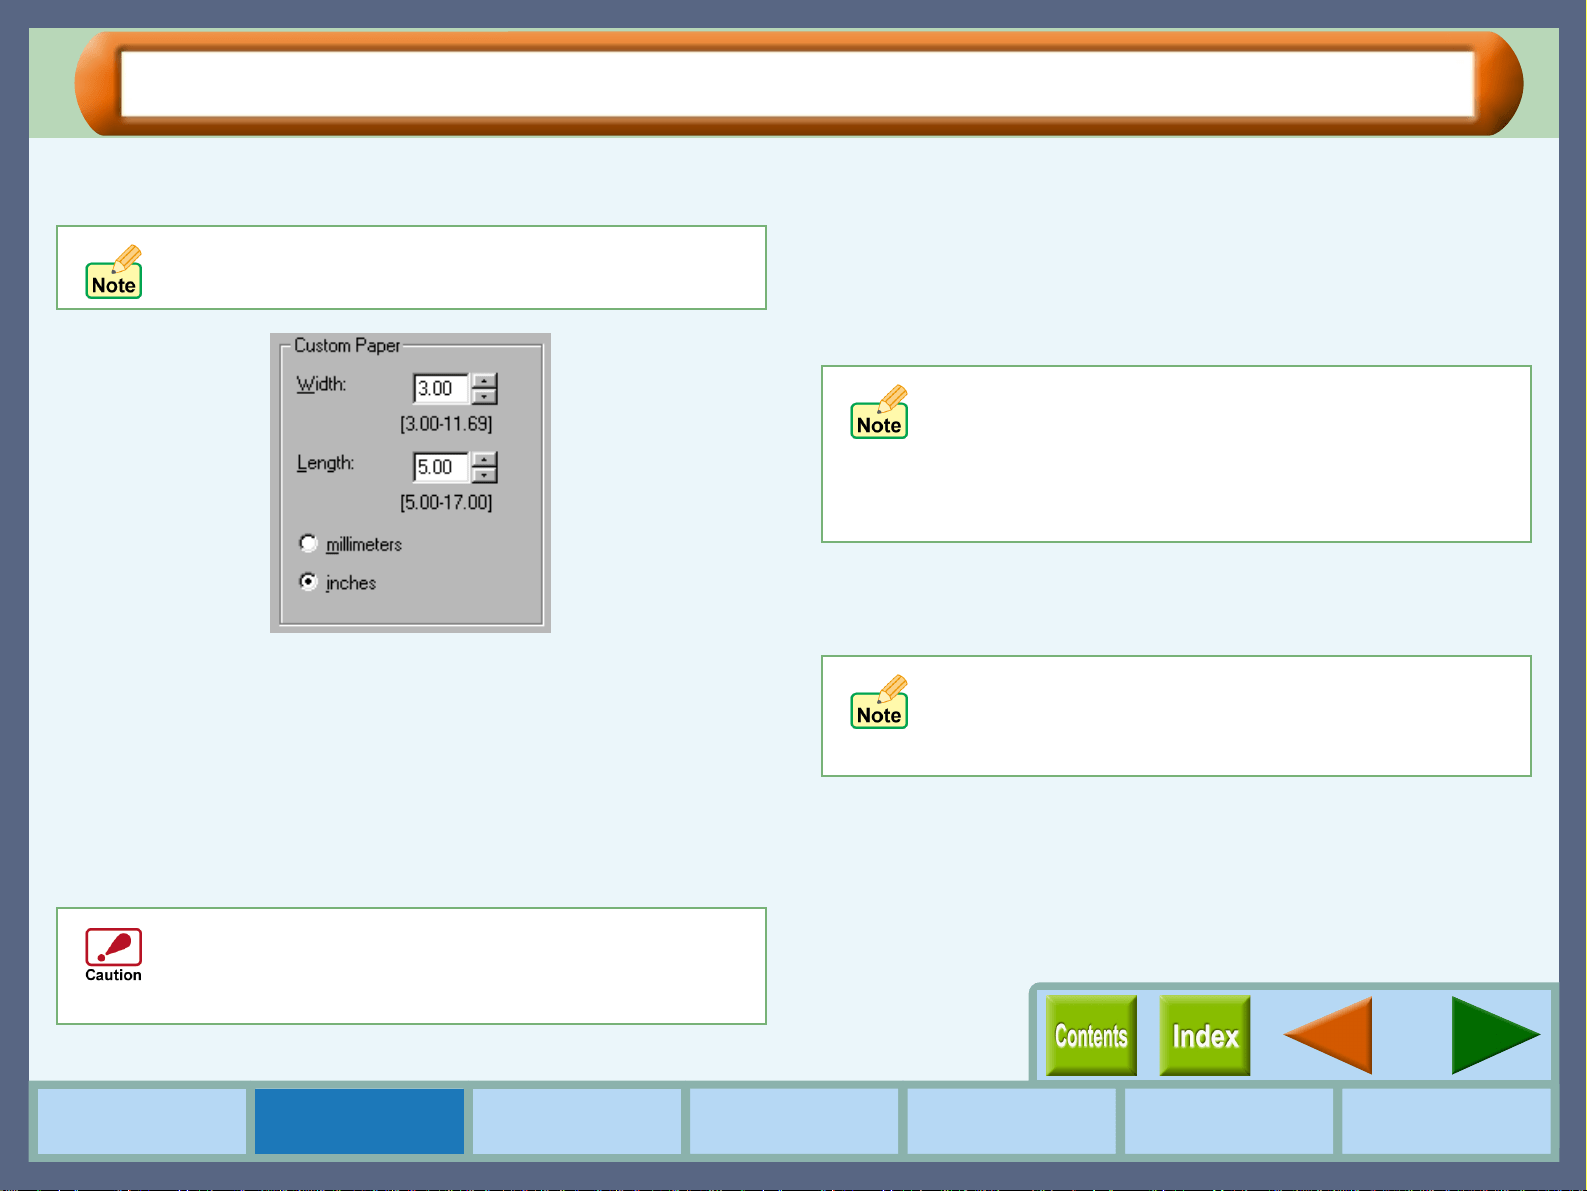
"Paper" Tab Settings (part 3)
Custom Paper
Use custom paper sizes for your document.
Width
Click the up and down arrows of the spin box, or enter a number
to customize the width to the custom paper you wish to use.
Length
Click the up and down arrows of the spin box, or enter a number
to customize the length to the custom paper you wish to use.
millimeters / inches
Select the units of measurement for paper size settings: either
"millimeters" or "inches".
Fit To Paper Size
Fit To Page
Check this box to fit the image to the paper size. If this function is
selected, you can fit the paper size specified for "Paper Size"
setting to the size listed on the drop-down options of "Fit To
Paper Size".
Example
"Print Letter on:" Index card 5" x 8"
Zoom[%]
Allows you to reduce or enlarge the size of the print from 25%
to 200% in 1% increments.
"100%" button
Click to return to 100% (default setting).
To utilize this option, the "Paper Size" option
must be
set
to "Custom".
Paper sized larger than 8.5" x 14" (215.9mm x
355.6mm) cannot be used in this printer. You can print
the image by using the reduction feature of the
"Zoom[%]" setting.
! When "COM10", "DL", "C6", "Invitation A2", "Banner
Letter", or "Banner A4" is selected for "Paper Size",
this function
is disabled
.
! The "Fit To Paper Size" option
cannot
be utilized
when the "N-Up Printing" option in the "Main" tab is
selected.
! The "Zoom[%]" option
cannot
be utilized when the
"N-Up Printing" option in the "Main" tab is selected.
! If "Fit To Page" is checked, you
cannot
specify any
value for "Zoom[%]" settings.
12
Printer Properties
How to Use the
Online Manual
Printer Properties Print
Print Status
Window
Maintenance TroubleshootingSharing Printer
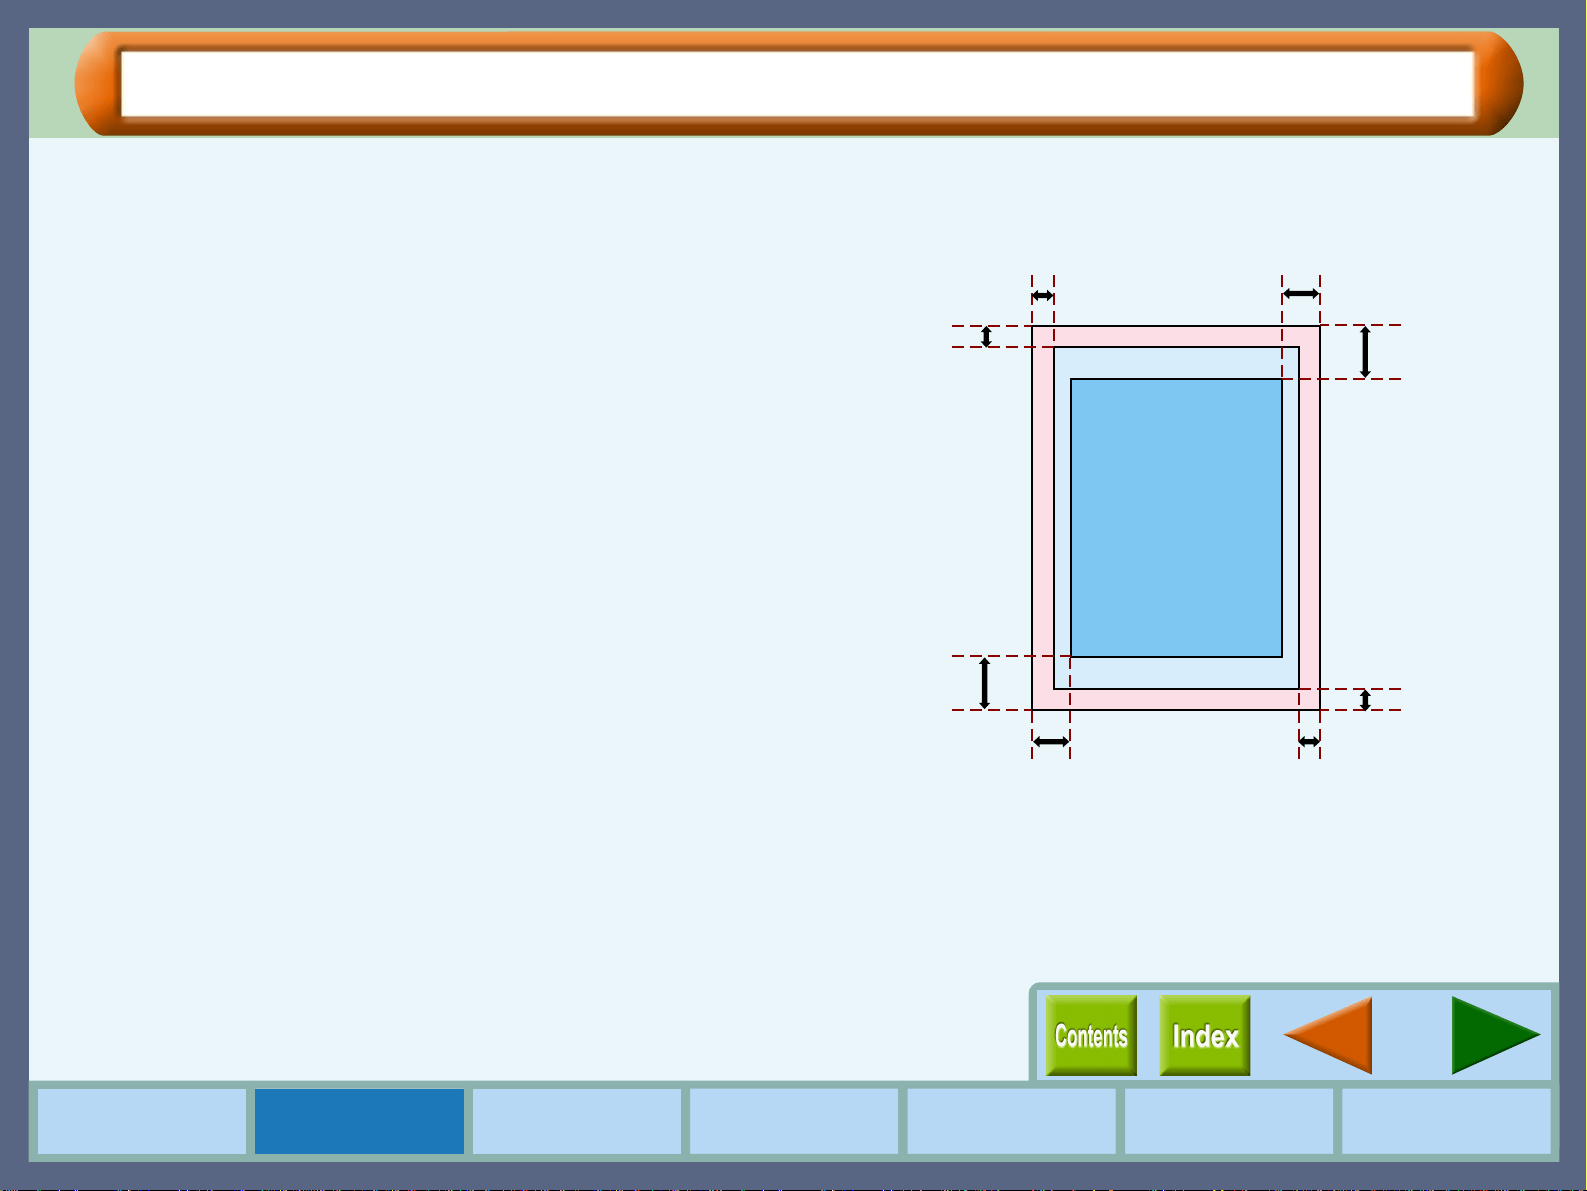
"Paper" Tab Settings (part 4)
Guaranteed area and printable area
This printer can print onto the following area of the paper. It is
recommended that you specify margins from your application
to fit within the quality guaranteed area.
Quality guaranteed area
Guaranteed area is inside 0.75" (19mm) from the top / bottom
edge of the paper, and 0.39" (10mm) from the right / left edge of
the paper.
Printable area
The void area of the printer driver is 0.12" (3mm) from the paper
edges. The print quality may be degraded outside the guaranteed
area according to the contents of your document.
0.75"
(19mm)
Quality
guaranteed area
Printable area
Printable area
0.12"
(3mm)
0.12"
(3mm)
0.12"
(3mm)
0.12"
(3mm)
0.75"
(19mm)
0.39"
(10mm)
0.39"
(10mm)
13
Printer Properties
How to Use the
Online Manual
Printer Properties Print
Print Status
Window
Maintenance TroubleshootingSharing Printer
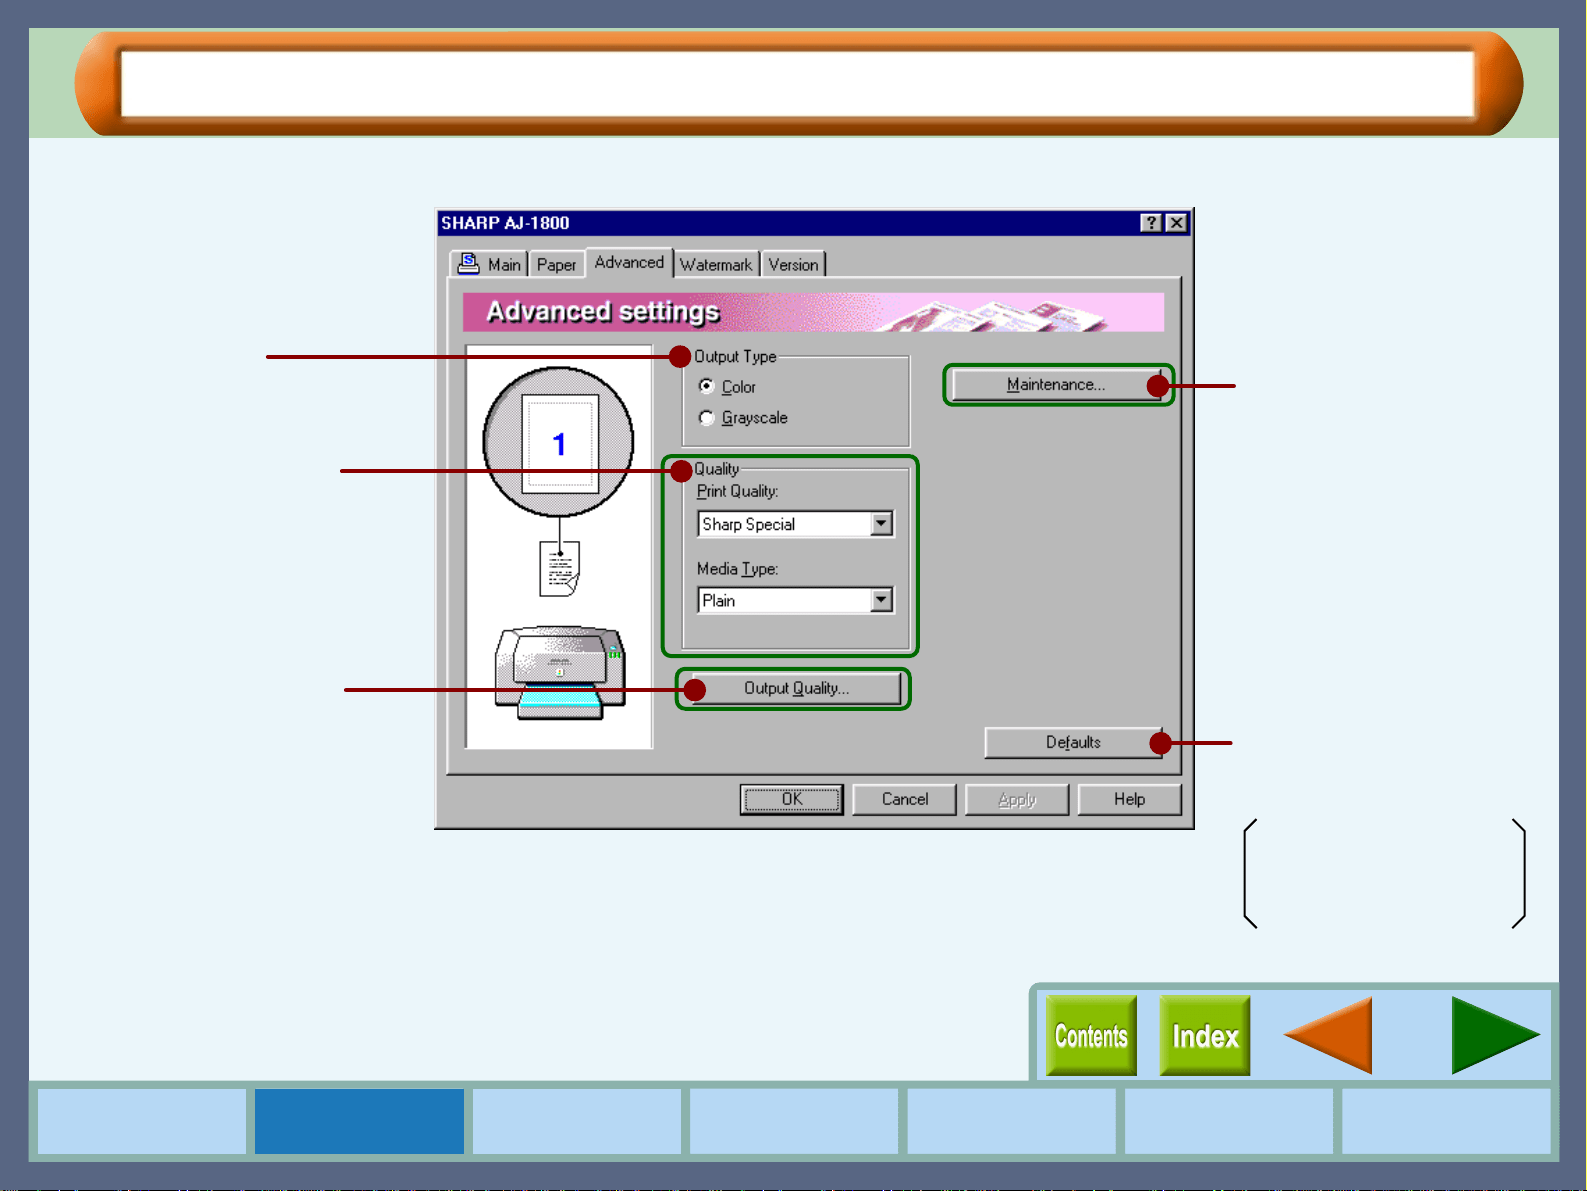
"Advanced" Tab Settings (part 1)
Set your color and quality preferences for printing using this screen.
Set printer output
preferences to color or
grayscale.
Click to access
maintenance options.
Returns all user modified
settings back to default
settings of this tab.
Output Type: Color
Print Quality: Sharp Special
Media Type: Plain
Customize printer output
quality to suit your needs.
Open to set output quality
and adjust colors.
On the above screen, click on options shown in the green boxes
to make additional changes.
14
Printer Properties
How to Use the
Online Manual
Printer Properties Print
Print Status
Window
Maintenance TroubleshootingSharing Printer
"Advanced" Tab Settings (part 2)
Quality
Set the printer output quality settings below.
Print Quality
This option sets printing speed and quality. You can trade off
speed for quality. "Draft" is the fastest and lowest quality, "Best"
is the slowest and best quality.
Media Type
Select the type of paper to be used. Select from "Plain", "Coated",
"Photo", "Transparency", "T-shirt transfer", and "Card Stock".
Insert the paper that was selected into the tray.
For more information on various paper types, refer to the
following table.
! If lines are broken when printing with "Draft", change
the setting to any other option.
! Some of the settings may be disabled depending on
the selected "Media Type".
Draft
Sharp Special
Normal
Best
Select this option when you want to print text data
with high speed. If you print graphics, illustrations, or
lines with this option, the print quality is low.
Select this option when you want to print a document
containing graphics or illustrations with high speed.
This option provides a little rougher print quality than
"Normal" or "Best".
This option offers you normal print quality with normal
print speed.
Select this option when you want to get high print
quality for photographs or images.
* The print quality also depends on the specified (loaded) paper type.
Media Type Description Media Usage
Plain Normal office paper
(copier paper and high
quality paper)
Corporate documents
Coated The print side of coated
paper is whiter.
Graphics, Images
Photo The print side of photo
paper is glossy.
Photographs
Transparency Overhead presentation on
clear film. The print side of
transparency film is
rougher.
Overhead
presentations
T-shirt transfer This media is to be
transferred to cloth
materials by an iron.
T-shirt, Place mat
Card Stock Thick plain paper Card printing
! Be sure to use only Sharp recommended OHP films
when you select "Transparency".
!
If you select "T-shirt transfer", the original image will
be reversed on the printed media to make a proper
image on the T-shirt.
!
When "Card Stock" is selected, be sure to turn the
paper knob to ( ) direction to feed the thicker card
stock.
15
Printer Properties
How to Use the
Online Manual
Printer Properties Print
Print Status
Window
Maintenance TroubleshootingSharing Printer
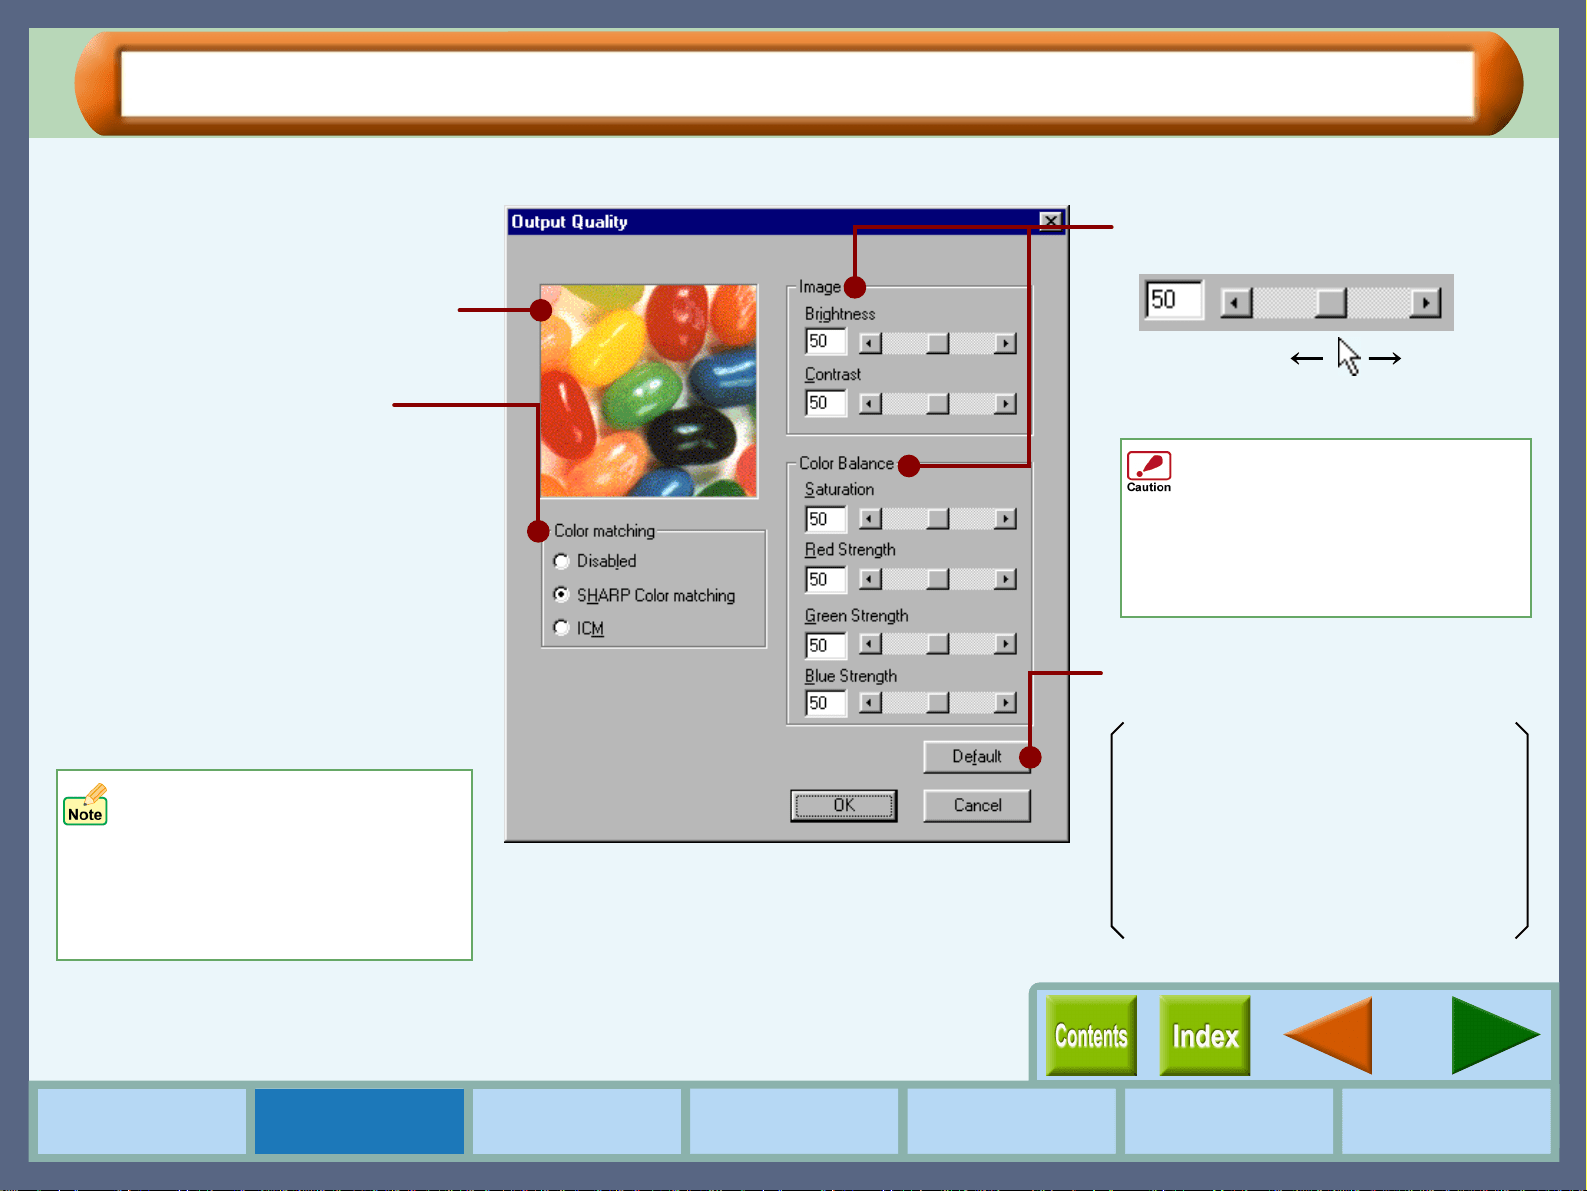
"Output Quality" Settings
Set the color matching as well as the brightness, contrast and color balance of an image.
Check your color image preferences
using this screen.
Set the brightness, contrast and color
balance level of your print job here.
Directly enter the figure or move the
scroll bar.
0% 100%
Returns all user modified settings back
to default settings of this dialog box.
Color matching:
SHARP Color matching
Brightness: 50%
Contrast: 50%
Saturation: 50%
Red Strength: 50%
Green Strength: 50%
Blue Strength: 50%
• By selecting "ICM", both the
"Image" and "Color Balance"
options become disabled.
• The "ICM" setting is
unavailable with Windows 95
or NT 4.0.
To print a document containing text
data, make sure to keep the values
of "Red Strength", "Green Strength"
and "Blue Strength" above 50. When
set under 50, background of
characters in your document may be
printed in a different color.
Allows you to select the Color
Management System.
The Color Management System
enables you to adjust the image color
on your display to the result of print
job.
SHARP Color matching
Select this option to utilize SHARP's
original Color Management System.
ICM
Select this option to utilize Windows
standard Color Management System.
16
Printer Properties
How to Use the
Online Manual
Printer Properties Print
Print Status
Window
Maintenance TroubleshootingSharing Printer
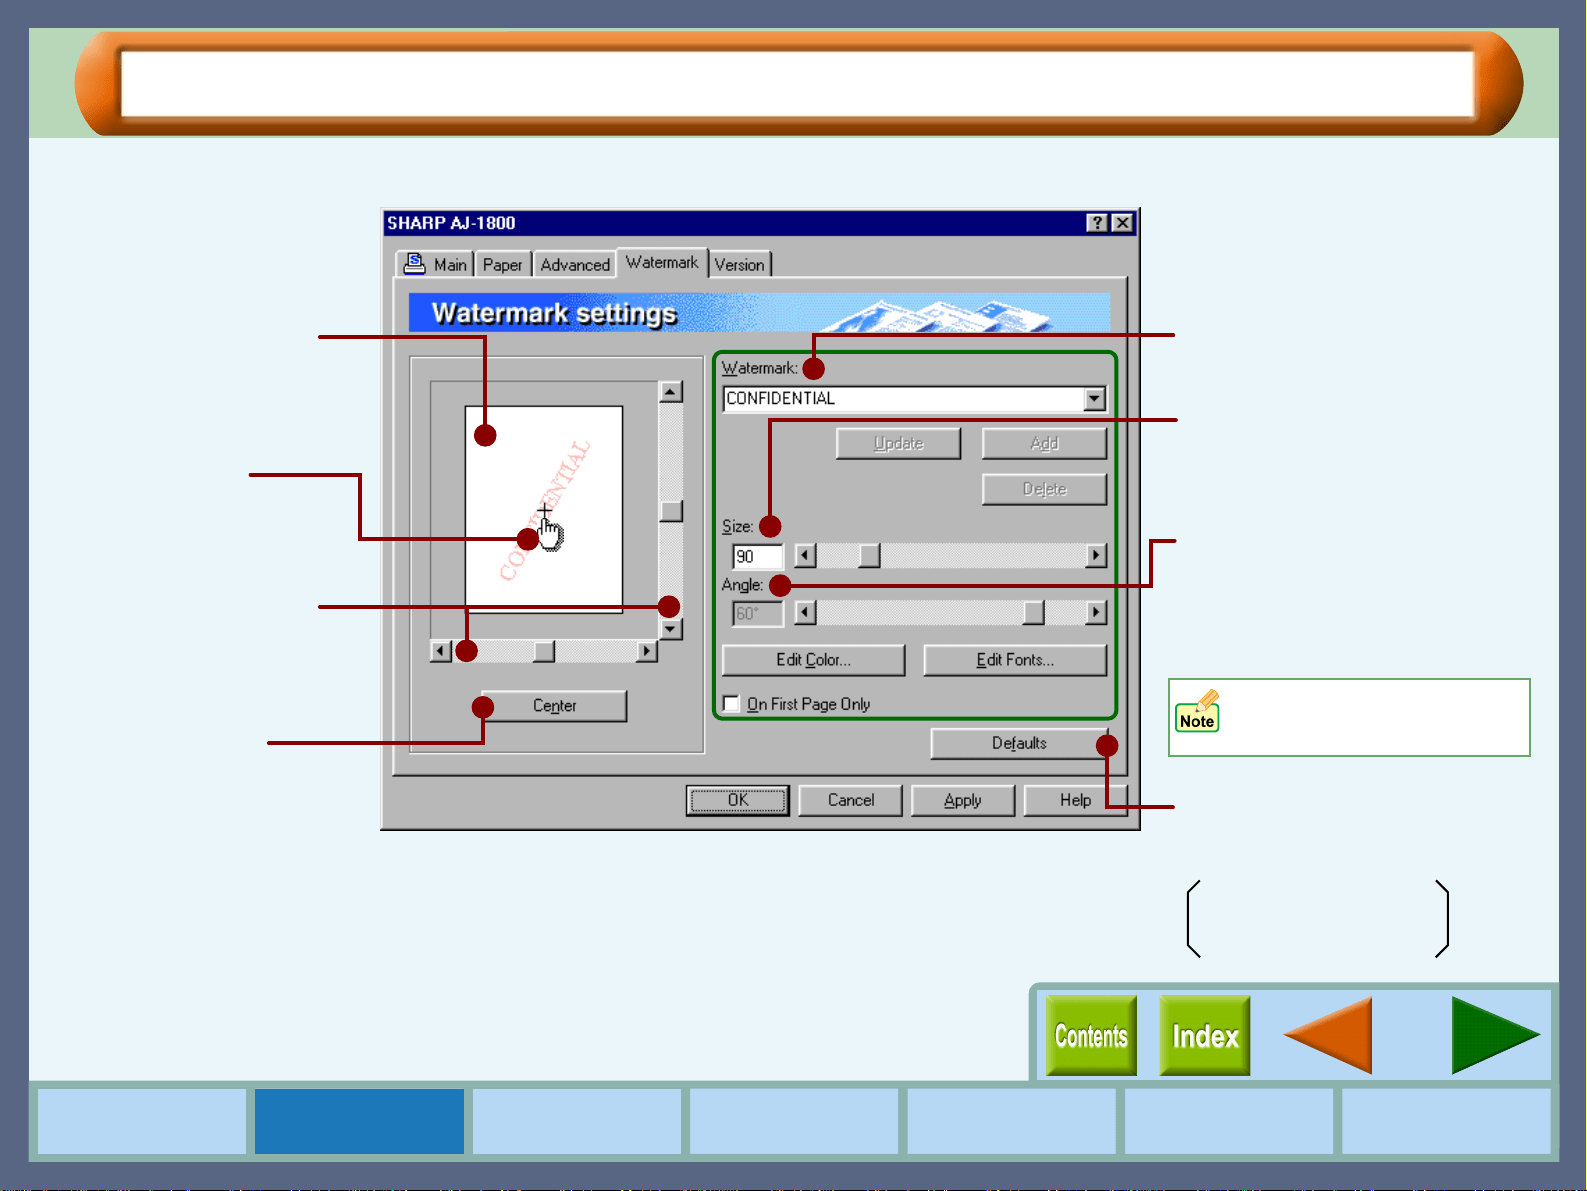
"Watermark" Tab Settings (part 1)
Use this screen to set watermarks.
Use this screen to view
how the watermark will
appear on your
document.
You can drag the
watermark to your
favorite place by using
the mouse.
Select the type of watermark.
Use the scroll bar or enter a
figure to set the font size of a
watermark from 6 to 500 points.
Use the scroll bar to set the
print angle of a watermark from
-90˚ to 90˚.
(The angle can be set in 15˚
multiples.)
Returns all user modified
settings back to default settings
of this tab.
Watermark: (None)
On First Page Only: Off
Move the location of the
watermark using the
scroll bar.
Click this button to
center a watermark in
the middle of the
document.
You cannot type the desired
angle value in this field.
On the above screen, click on options shown in the green boxes
to make additional changes.

17
Printer Properties
How to Use the
Online Manual
Printer Properties Print
Print Status
Window
Maintenance TroubleshootingSharing Printer
"Watermark" Tab Settings (part 2)
Watermark
Select a watermark from the drop-down list. Select from "TOP
SECRET", "CONFIDENTIAL", "DRAFT", "ORIGINAL" and
"COPY". No watermark will appear on the document if
"(None)" is selected. You can also create and input your
original watermarks.
"Update" button
Select your original watermark from the drop-down list. After
adjusting the size and angle to suit your preferences, click the
"Update" button to save.
"Add" button
Enter your text over the currently displayed text and click this
button to add a new watermark.
After selecting a watermark from the drop-down list and setting its
size and angle, click this button to add new changes.
"Delete" button
To remove your original watermark from the drop-down list,
select it and click this button.
"Edit Color" button
For setting the color of a watermark, click this button to display
the "Color" dialog box.
For more information on this dialog box, click the ( ) button, and
then point and click on the item that you want information on.
"Edit Fonts" button
To adjust the font style of a watermark, click this button to display
the "Font" dialog box.
For more information on this dialog box, click the ( ) button, and
then point and click on the item that you want information on.
On First Page Only
Check this box to ensure a watermark is printed only on the first
page of the document. By leaving this box unchecked, the
watermark will appear on every page of the printed document.
You cannot save changes to the size and angle of a
default watermark using this button. Save all new
changes using the "Add" button.
Default watermarks cannot be deleted.
18
Printer Properties
How to Use the
Online Manual
Printer Properties Print
Print Status
Window
Maintenance TroubleshootingSharing Printer
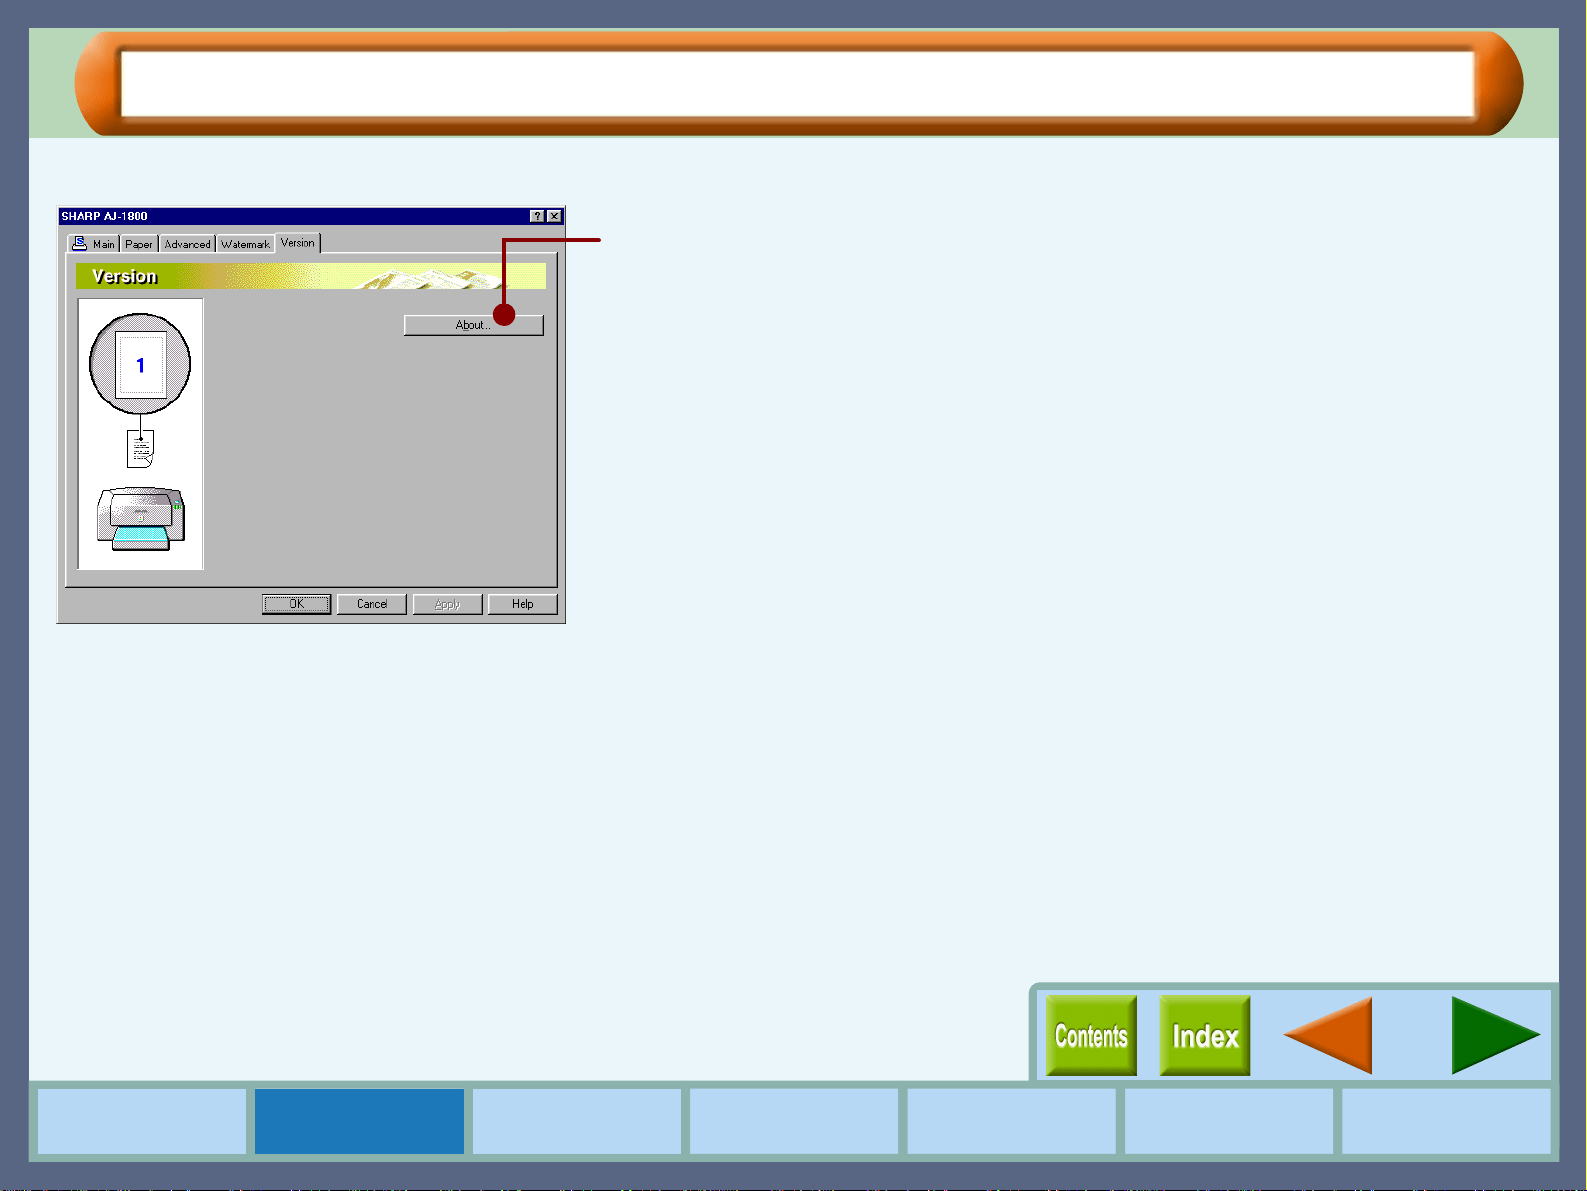
"Version" Tab Settings
Information about the printer driver version is shown on this screen.
"About" button
Click this button to display the "About" dialog box for information on the driver
name and version.
19
How to Use the
Online Manual
Printer Properties Print
Print Status
Window
Maintenance TroubleshootingSharing Printer
Print
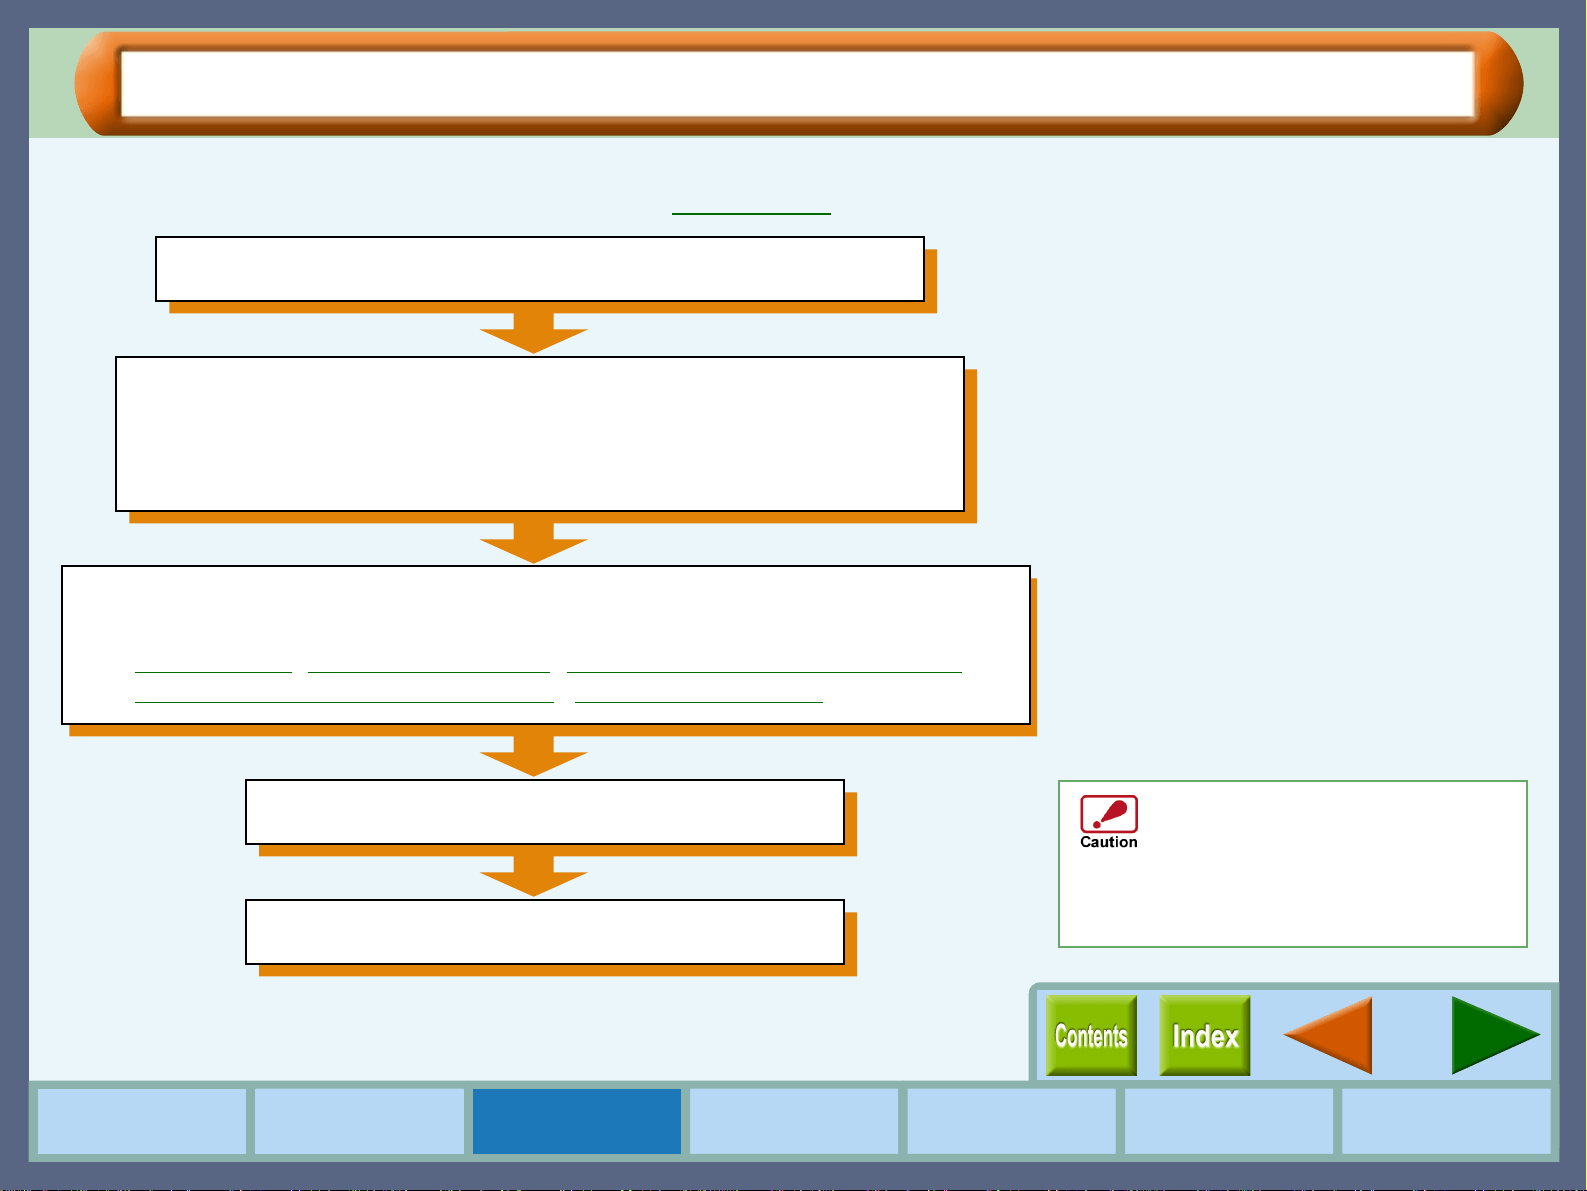
Printing Overview
The flow chart shown below provides printing overview.
Reference:
For more information on printing, refer to Basic Printing.
Prepare the document you intend to print
Initiate printing
Exit printing
Load paper
Reference:
For loading paper, refer to the "LOADING PAPER" in the
Setup Guide and Operation Manual.
Open the printer driver setup screen and set the print preferences
Reference:
Basic Printing, Printing a Watermark, Enlarge/Reduce the Printed Image,
Printing Multiple Pages on One Page, Printing a Photograph
Ensure printing has been
completed before turning the
power off. Do not remove the
power cord before turning the
printer off.
20
Print
How to Use the
Online Manual
Printer Properties Print
Print Status
Window
Maintenance TroubleshootingSharing Printer
Basic Printing (part 1)
This is a printing example using WordPad to print a document onto letter size paper.
1
11
1
Start WordPad, make a new file, and enter the text
you intend to print.
2
22
2
Select "Print" from the application's "File" menu.
Make sure that either of "SHARP AJ-1800" or
"SHARP AJ-2000" is selected as the current
printer, and then click the "Properties" button.
The properties dialog box will open.
Reference:
See the Starting the Printer Driver through
an Application for details on how to open the
properties dialog box.
3
33
3
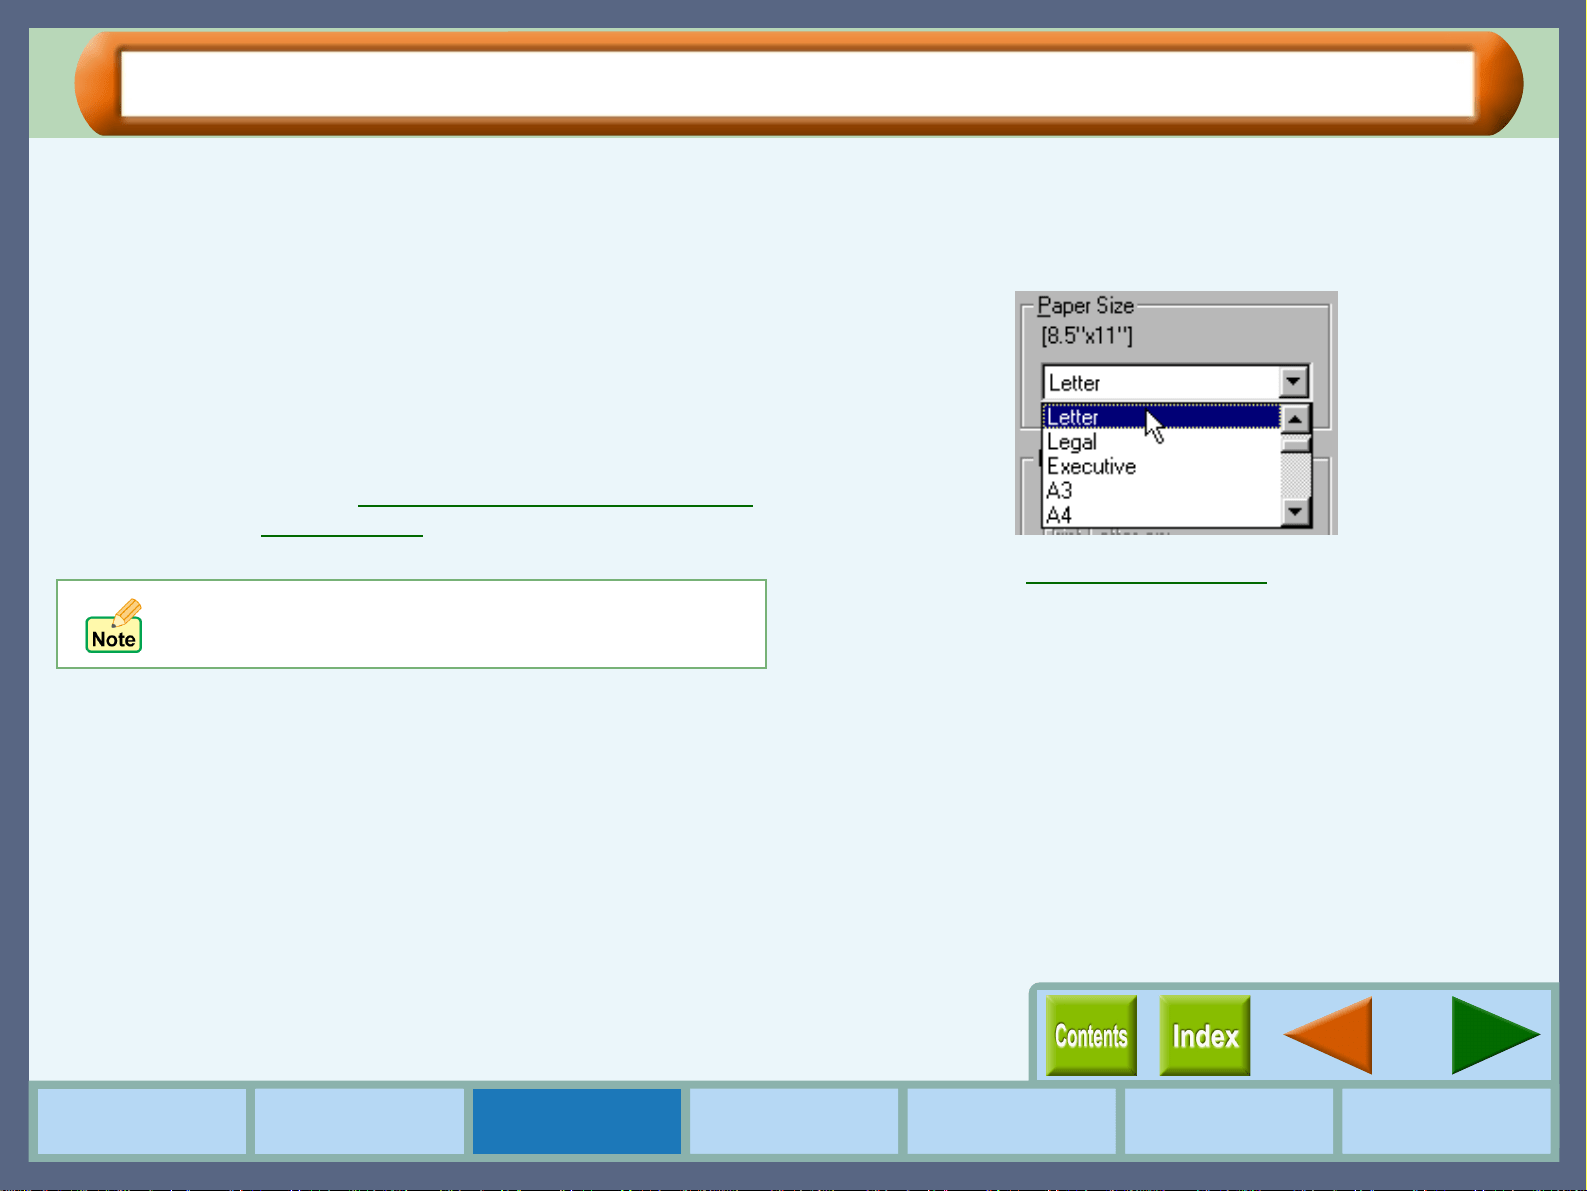
Click the "Paper" tab, and select "Letter" from the
"Paper Size" drop-down list.
Reference:
"Paper" Tab Settings
Windows 2000 does not have the "Properties" button
on this dialog box. Switch to the desired tab by clicking
it to specify printer settings.
21
Print
How to Use the
Online Manual
Printer Properties Print
Print Status
Window
Maintenance TroubleshootingSharing Printer
Basic Printing (part 2)
4
44
4
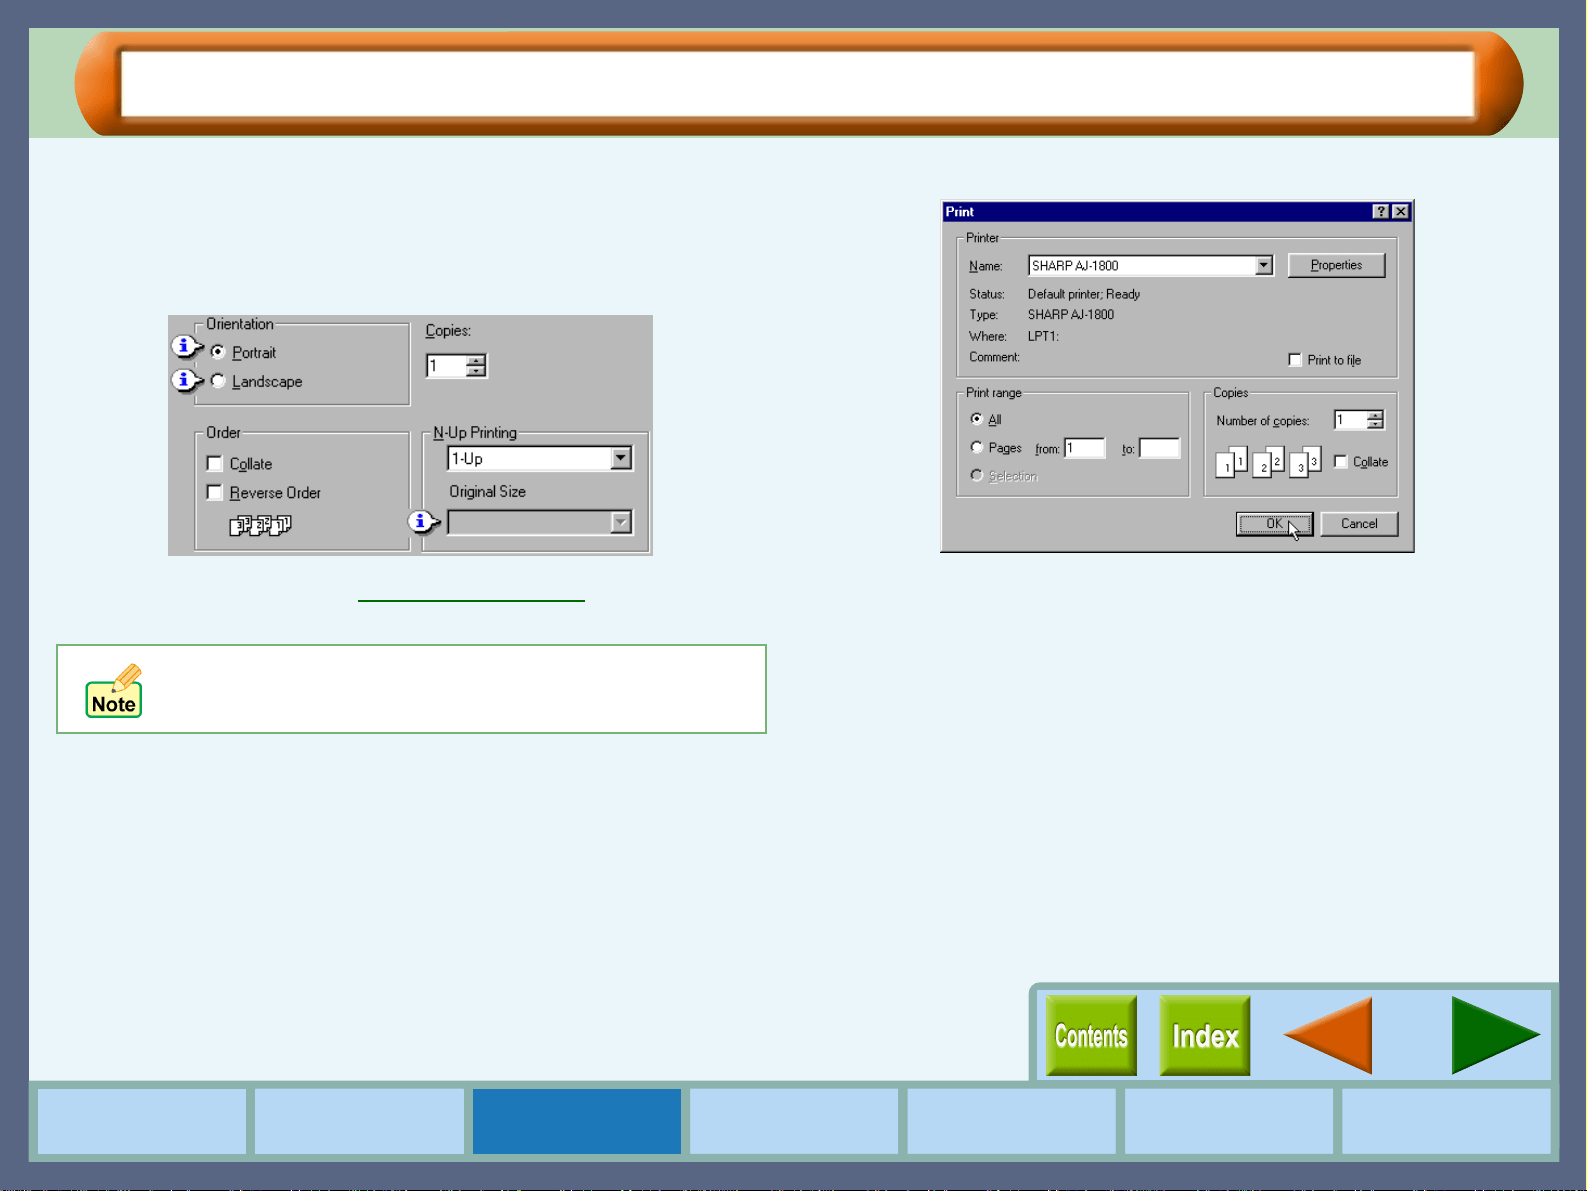
Click the "Main" tab. After setting your
preferences, click the "OK" button.
To print a single copy of a document in portrait orientation,
confirm the "Portrait" option in the "Orientation", and "1" in
the "Copies" box.
Reference:
See the "Main" Tab Settings for information
on setting preferences.
5
55
5
Click the "OK" button in the "Print" dialog box.
Printing starts according to your preferences.
On Windows 2000, setup the preferences on the
"Main" tab, and then click the "Print" button. Printing
starts according to your preferences.
22
Print
How to Use the
Online Manual
Printer Properties Print
Print Status
Window
Maintenance TroubleshootingSharing Printer
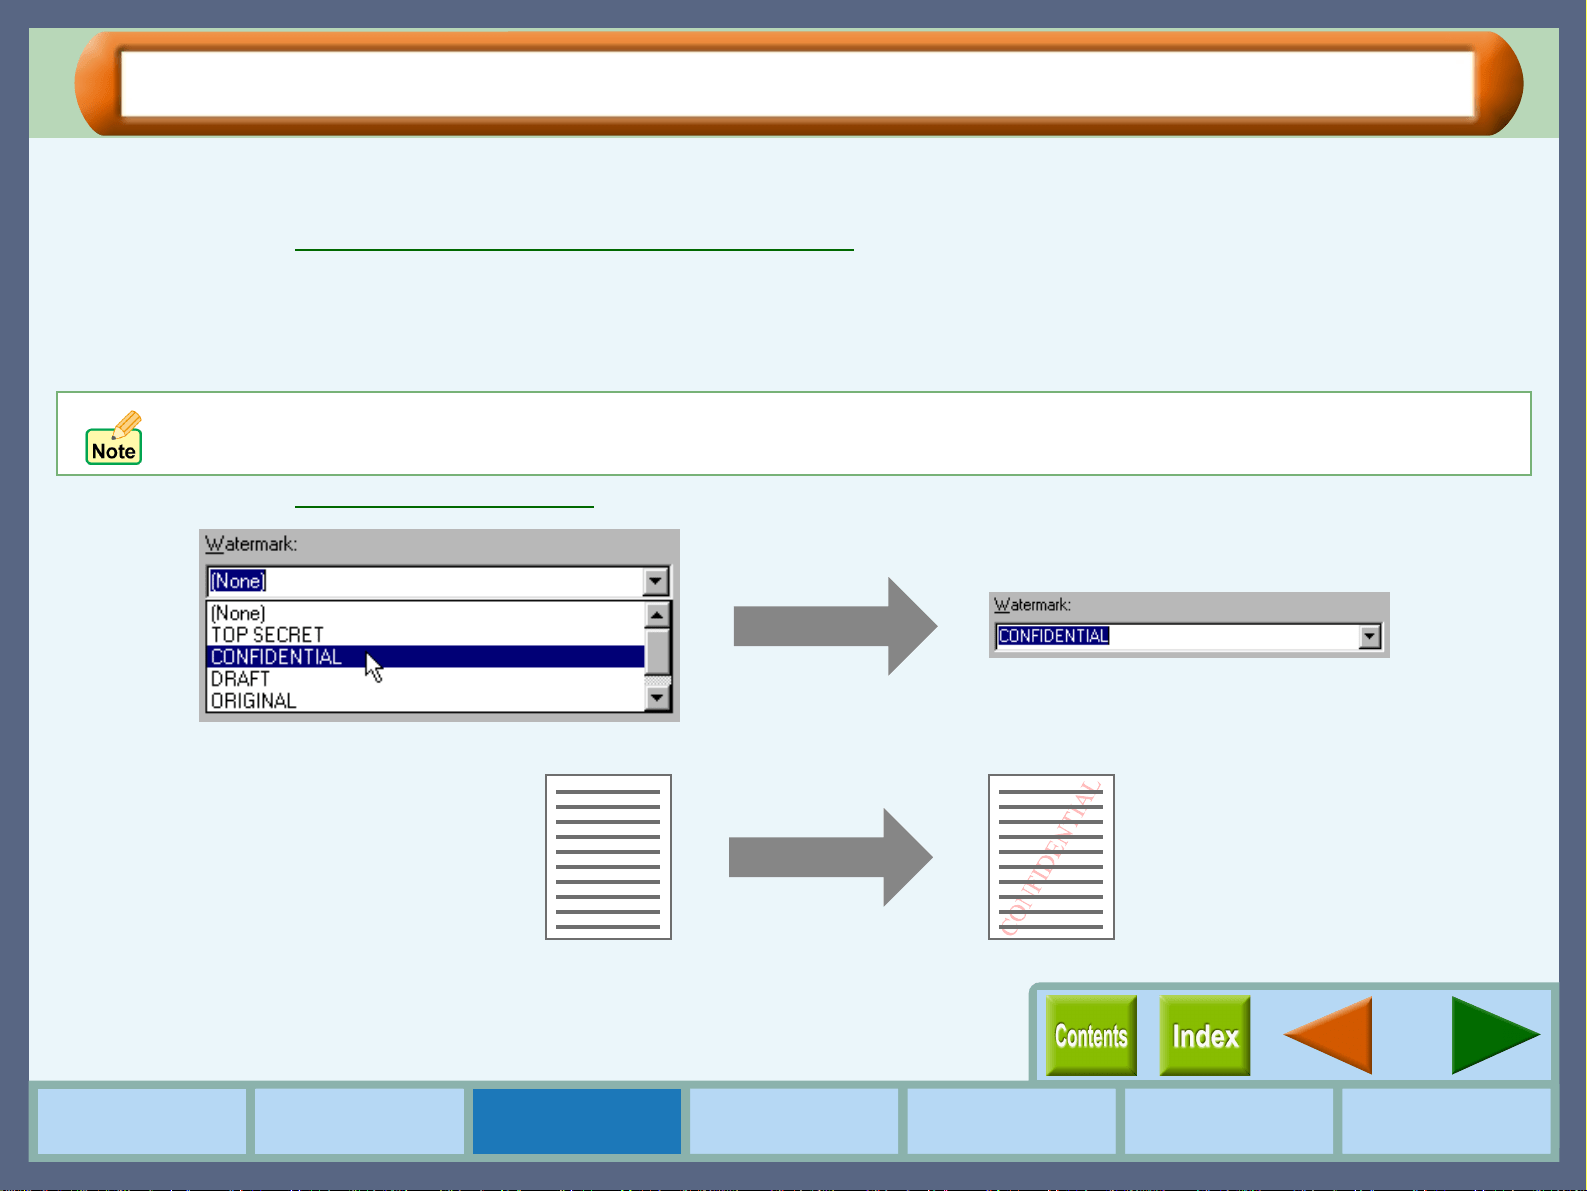
Printing a Watermark
To print a watermark, for example "CONFIDENTIAL", on your document, refer to the following steps. Open the
printer driver and click the "Watermark" tab.
Reference:
See the Starting the Printer Driver through an Application for details on how to open the printer driver.
How to Print a Watermark
From the "Watermark" drop-down list, select the watermark, for example "CONFIDENTIAL", you wish to print on your
document, and click the "OK" button.
Reference:
See the "Watermark" Tab Settings for details on how to create your own watermarks.
On Windows 2000, click the "Print" button after setting the preferences for your watermark.
Print sample
23
Print
How to Use the
Online Manual
Printer Properties Print
Print Status
Window
Maintenance TroubleshootingSharing Printer
Enlarge/Reduce the Printed Image
You can enlarge or reduce the size of your document from 25% to 200% in 1% increments.
To use this option, open the properties dialog box, select the "Paper" tab, and type a percentage, or click the
arrows in the "Zoom[%]" box to change the setting.
Reference:
See the "Paper" Tab Settings for details on "Zoom[%]" option.
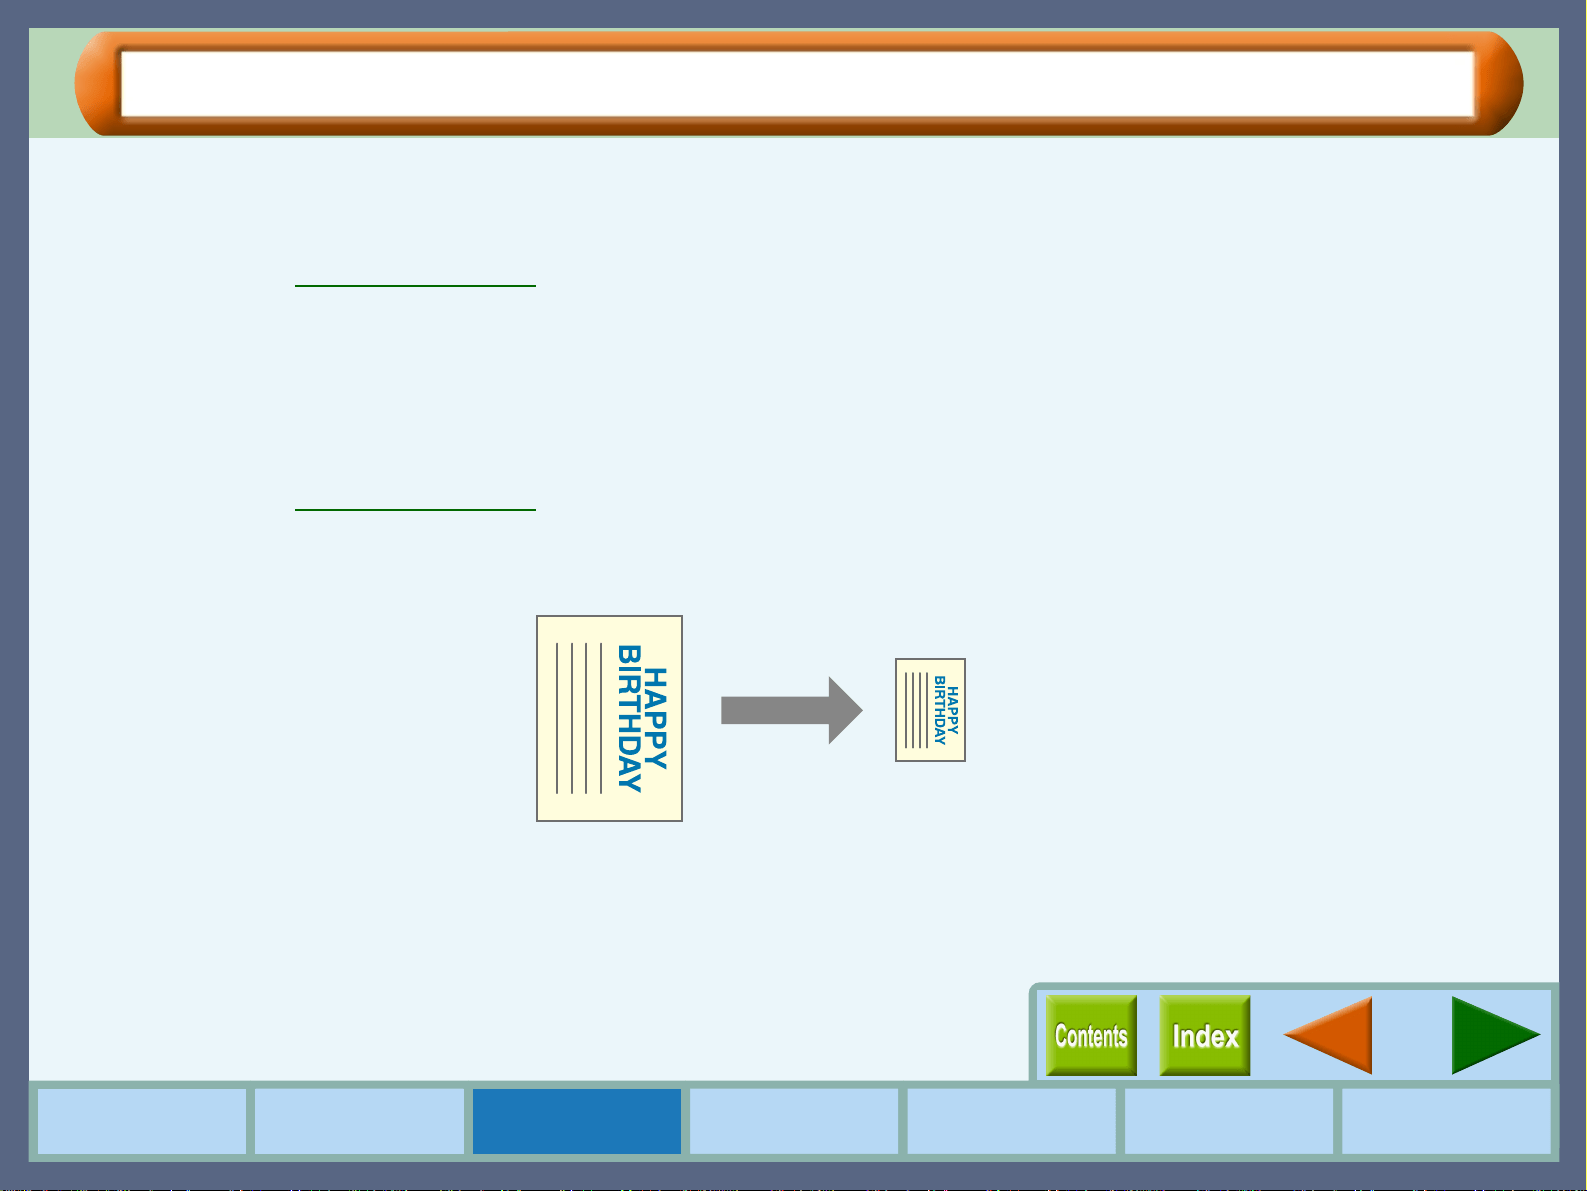
Automatic Zooming to the Loaded Paper
This printer driver can adjust the zoom ratio for printing according to the paper loaded in the printer.
To use this function, select the "Paper" tab from the properties dialog box of the printer driver, check the "Fit To Page"
selection box, and then select the document "Paper Size" from the drop-down list. Set the currently loaded paper size as
indicated under the "Fit To Paper Size" setting drop-down list.
Reference:
See the "Paper" Tab Settings for information on the "Fit To Page" setting.
"Print Letter on:" Index card 3" x 5"
Letter size document
(Paper Size)
Index card 3" x 5" size paper
(Fit To Paper Size)
Example: Printing a Letter size document on Index card 3" x 5" size paper.
24
Print
How to Use the
Online Manual
Printer Properties Print
Print Status
Window
Maintenance TroubleshootingSharing Printer
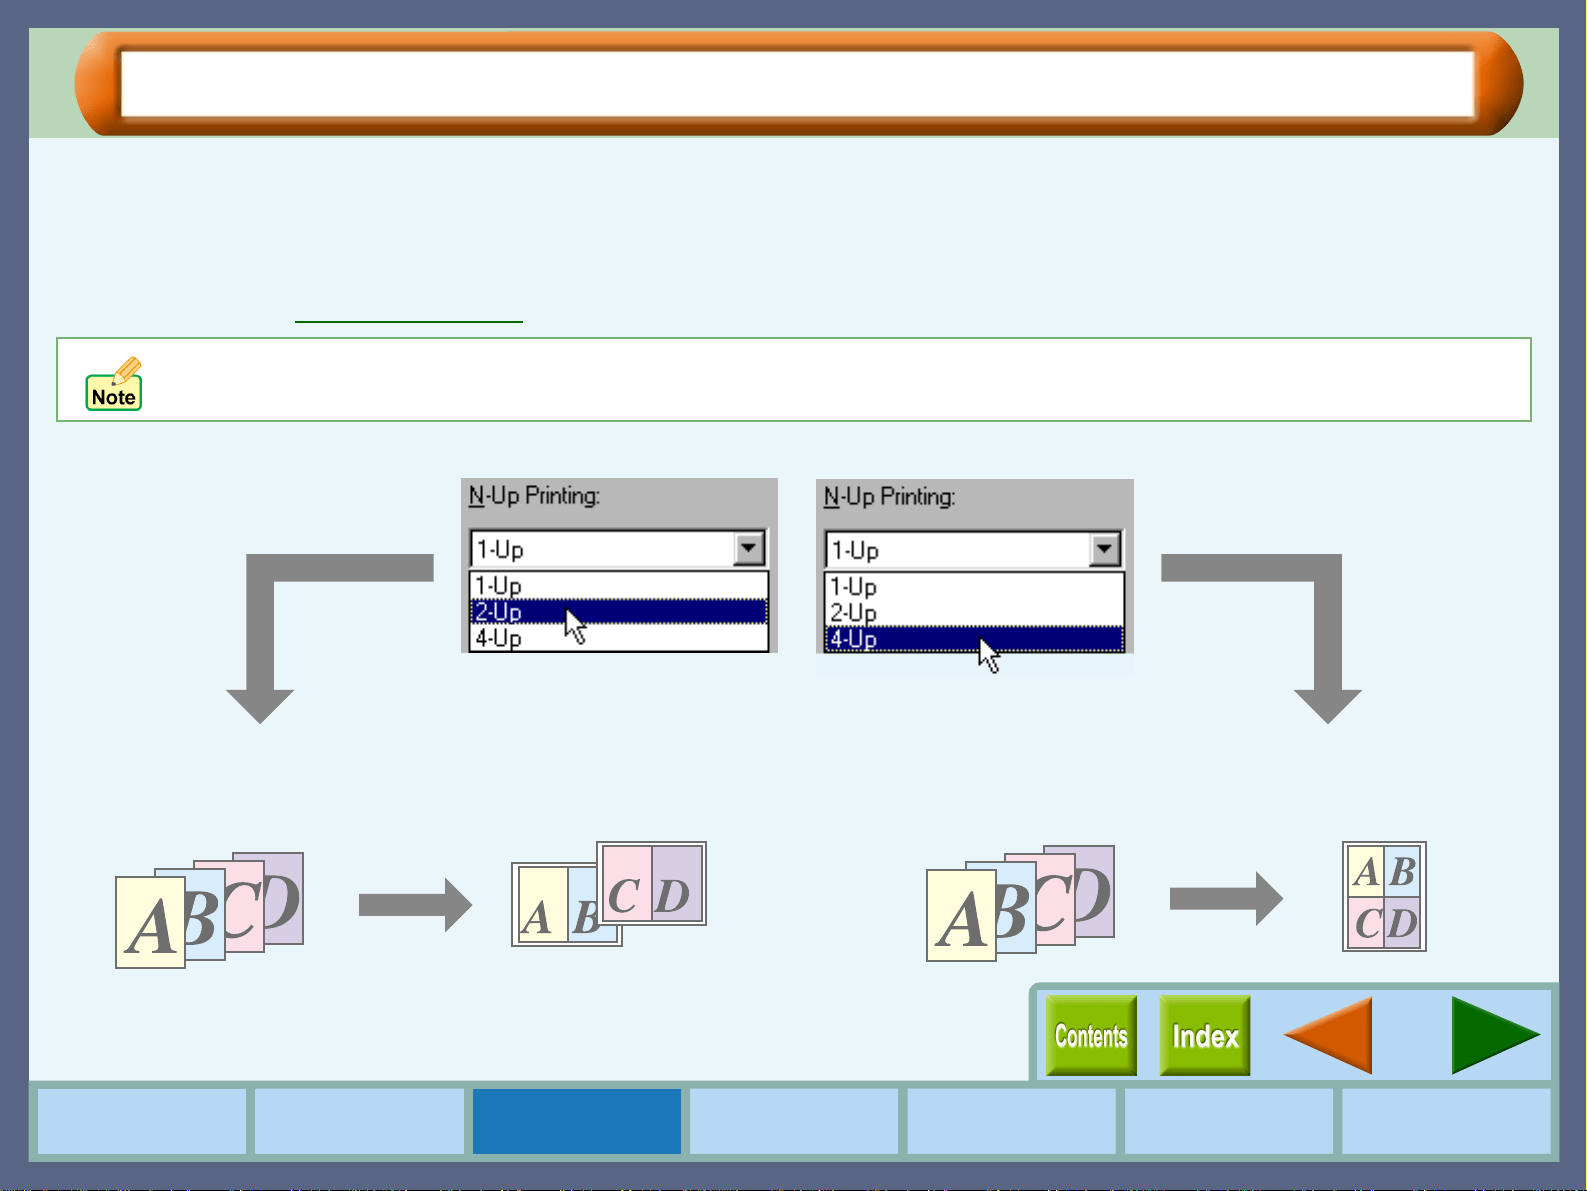
Printing Multiple Pages on One Page
This feature allows you to print two or four document pages onto a single page. To use this function, open the
properties dialog box, select "2-Up" or "4-Up" for "N-Up Printing" on the "Main" tab, and then select the same
paper size from the drop-down list of "Original Size" setting that has been selected for the document size
specified through your application.
Reference:
See the "Main" Tab Settings for details on the "N-Up Printing" option.
"2-Up" Printing
"2-Up" printing places two pages of the document stack onto a
single printed page.
"4-Up" Printing
"4-Up" printing places four pages of the document stack onto
a single printed page.
By selecting the "N-Up Printing" option, the "Zoom[%]" function becomes disabled.
For "2-Up" printing For "4-Up" printing
25
Print
How to Use the
Online Manual
Printer Properties Print
Print Status
Window
Maintenance TroubleshootingSharing Printer
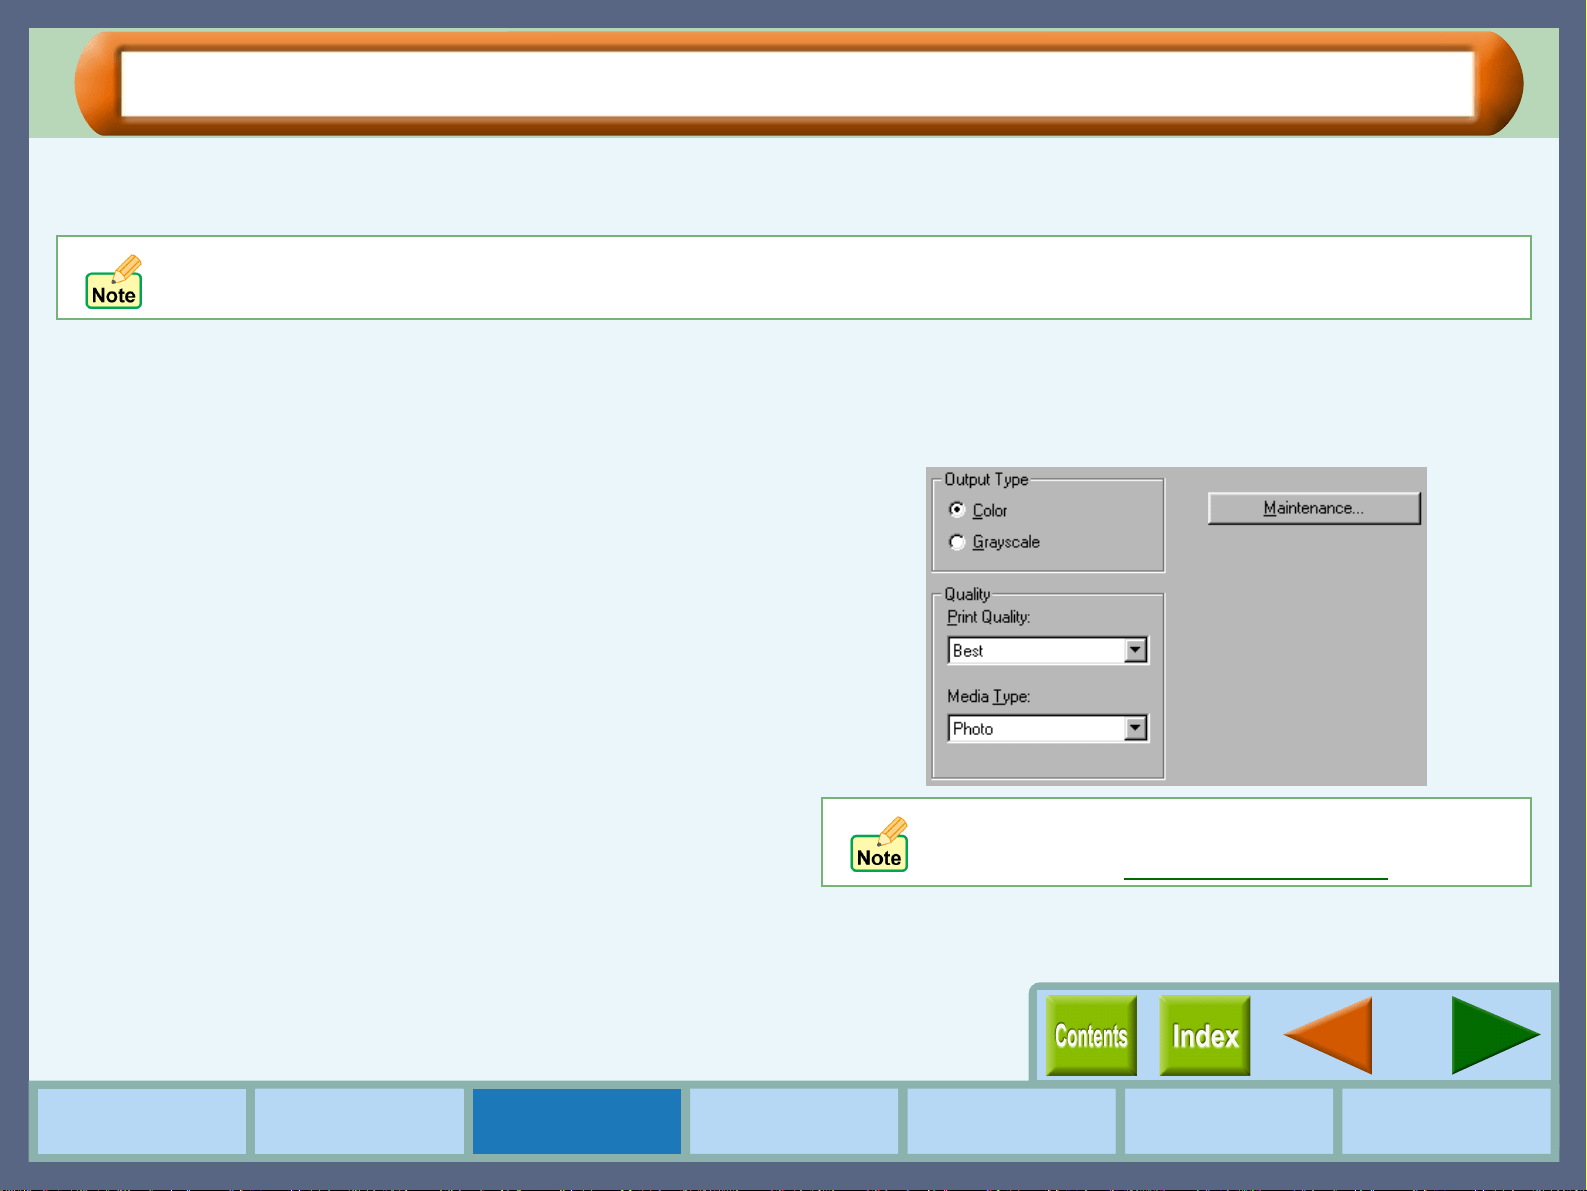
Printing a Photograph
To ensure pictures taken with a digital camera are printed clearly, use quality photo paper and follow the
instructions below.
1
11
1
Click the "Advanced" tab in the properties dialog
box, and check if the "Output Type" option is set to
"Color".
2
22
2
In the "Quality" area, set the "Print Quality" option
to "Best".
3
33
3
In the "Quality" area, set the "Media Type" option to
"Photo".
The result of setting the preferences as shown from Step 1 to
Step 3 are displayed below.
When loading photo paper into the paper tray, insert the glossy side face down. When loading photo paper into the bypass tray,
insert the glossy side face up.
If required, you may adjust the image or color balance
through clicking the "Output Quality" button. For
details, view the "Output Quality" Settings.
26
How to Use the
Online Manual
Printer Properties Print
Print Status
Window
Maintenance TroubleshootingSharing Printer
Print Status Window
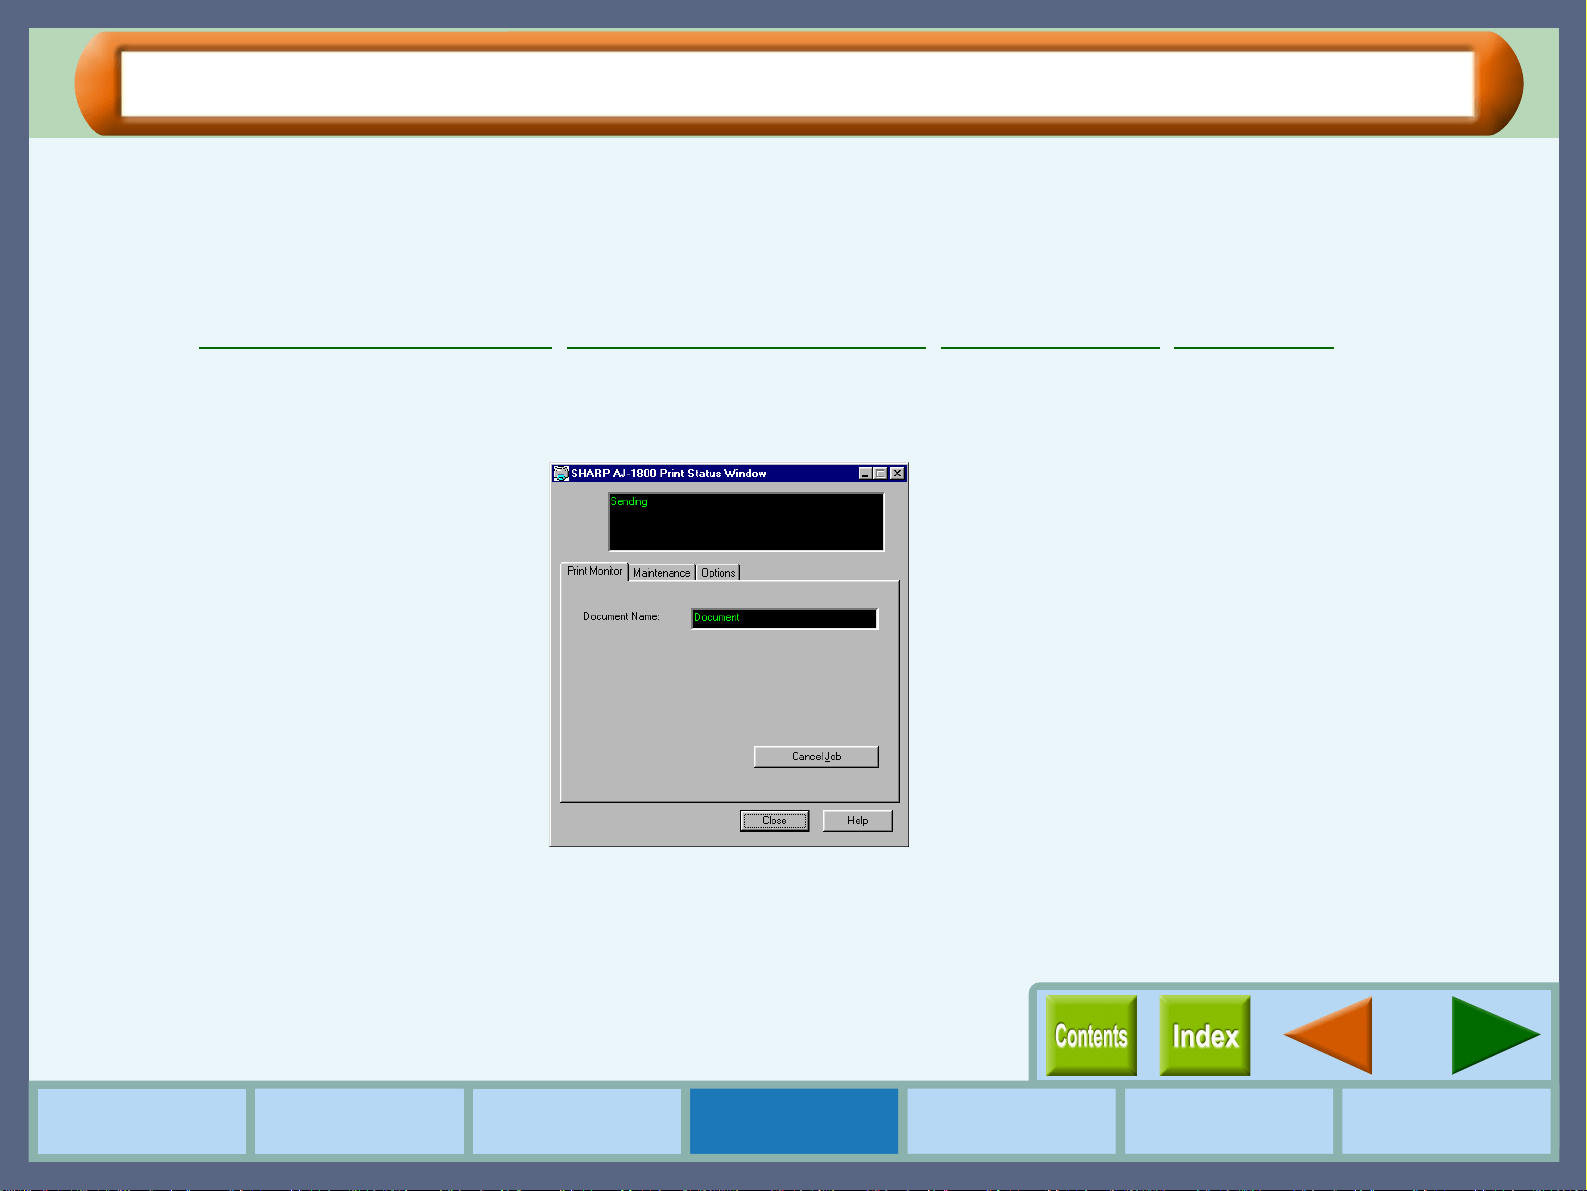
Outline of the Print Status Window
What is the Print Status Window?
The print status window is a program designed to show the remaining ink levels and current printer status including the
document name printing and error messages. It also controls head cleaning and head position adjustment.
The print status window contains status window and three tabs. The status window displays Normal, Warning and Fault
types of messages.
Reference:
Print Status Window Functions, Understanding Error Messages, "Maintenance" Tab, "Options" Tab
Starting the Print Status Window
The default setting of the print status window is to open automatically when printing starts.
To open the print status window while the printer is not working, select "Advanced" tab from the printer driver properties
dialog box, and then click the "Maintenance" button.
27
Print Status Window
How to Use the
Online Manual
Printer Properties Print
Print Status
Window
Maintenance TroubleshootingSharing Printer
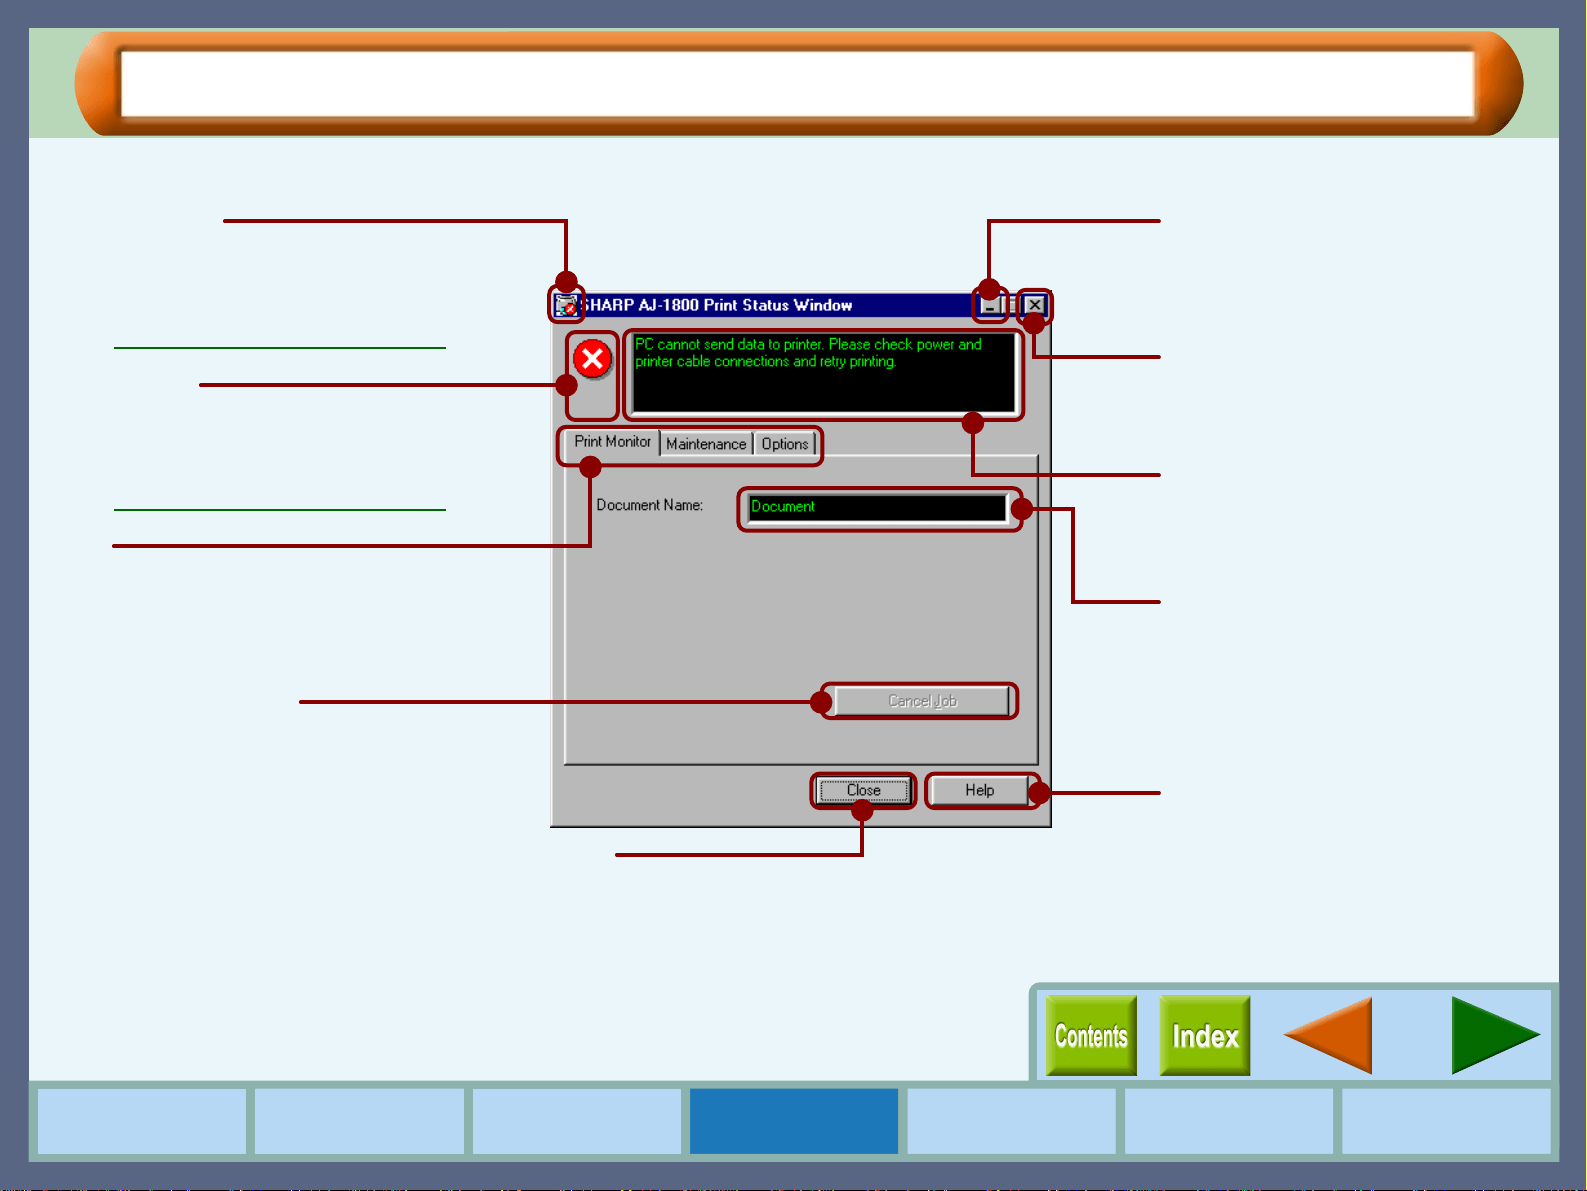
Print Status Window Functions
The functions of the print status window are shown below.
Program icon
This icon informs you of the print
status.
Reference:
Understanding Error Messages
Minimize button
Click this button to minimize the
print status window into the task
bar.
Quit button
Click this button to quit the print
status window.
Status window
Provides details on the current
status of the print job.
Document Name
Displays the name of the active
print job.
"Help" button
Click this button to display help
file for the print status window.
Status icon
This icon informs you of the print
status.
Reference:
Understanding Error Messages
Tab
Index which allows you to switch
between the three setup screens.
"Cancel Job" button
Click this button during printing to
cancel the job that is currently being
executed.
"Close" button
Click this button to close the print
status window.
28
Print Status Window
How to Use the
Online Manual
Printer Properties Print
Print Status
Window
Maintenance TroubleshootingSharing Printer
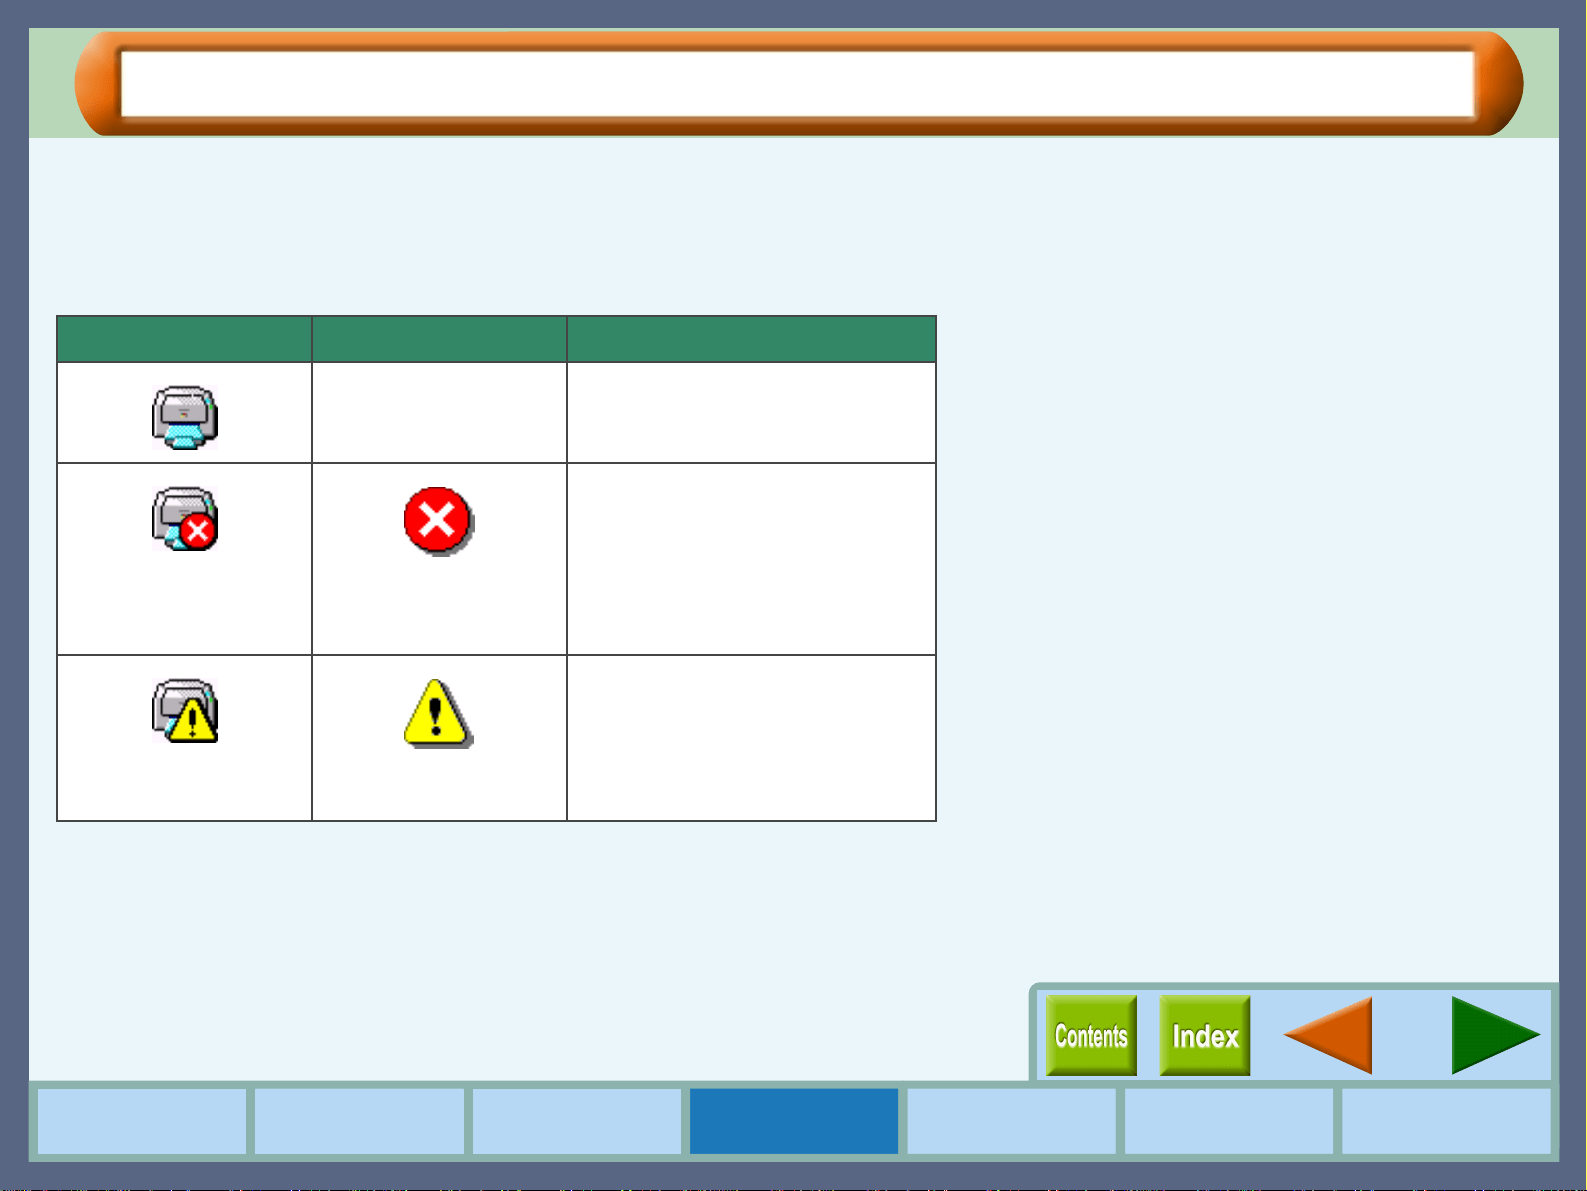
Understanding Error Messages
The status icon and program icon provide you with information on printer status.
Understanding the Status and Program Icon
Refer to the table below for an explanation of the printer condition.
Program icon Status icon Condition
None Normal
Fault
Printing has stopped because of a
problem.
Follow the instruction on the status
window to solve the problem
immediately.
Warning
A problem requires your attention.
Follow the instruction on the status
window to solve the problem as
soon as possible.
29
Print Status Window
How to Use the
Online Manual
Printer Properties Print
Print Status
Window
Maintenance TroubleshootingSharing Printer
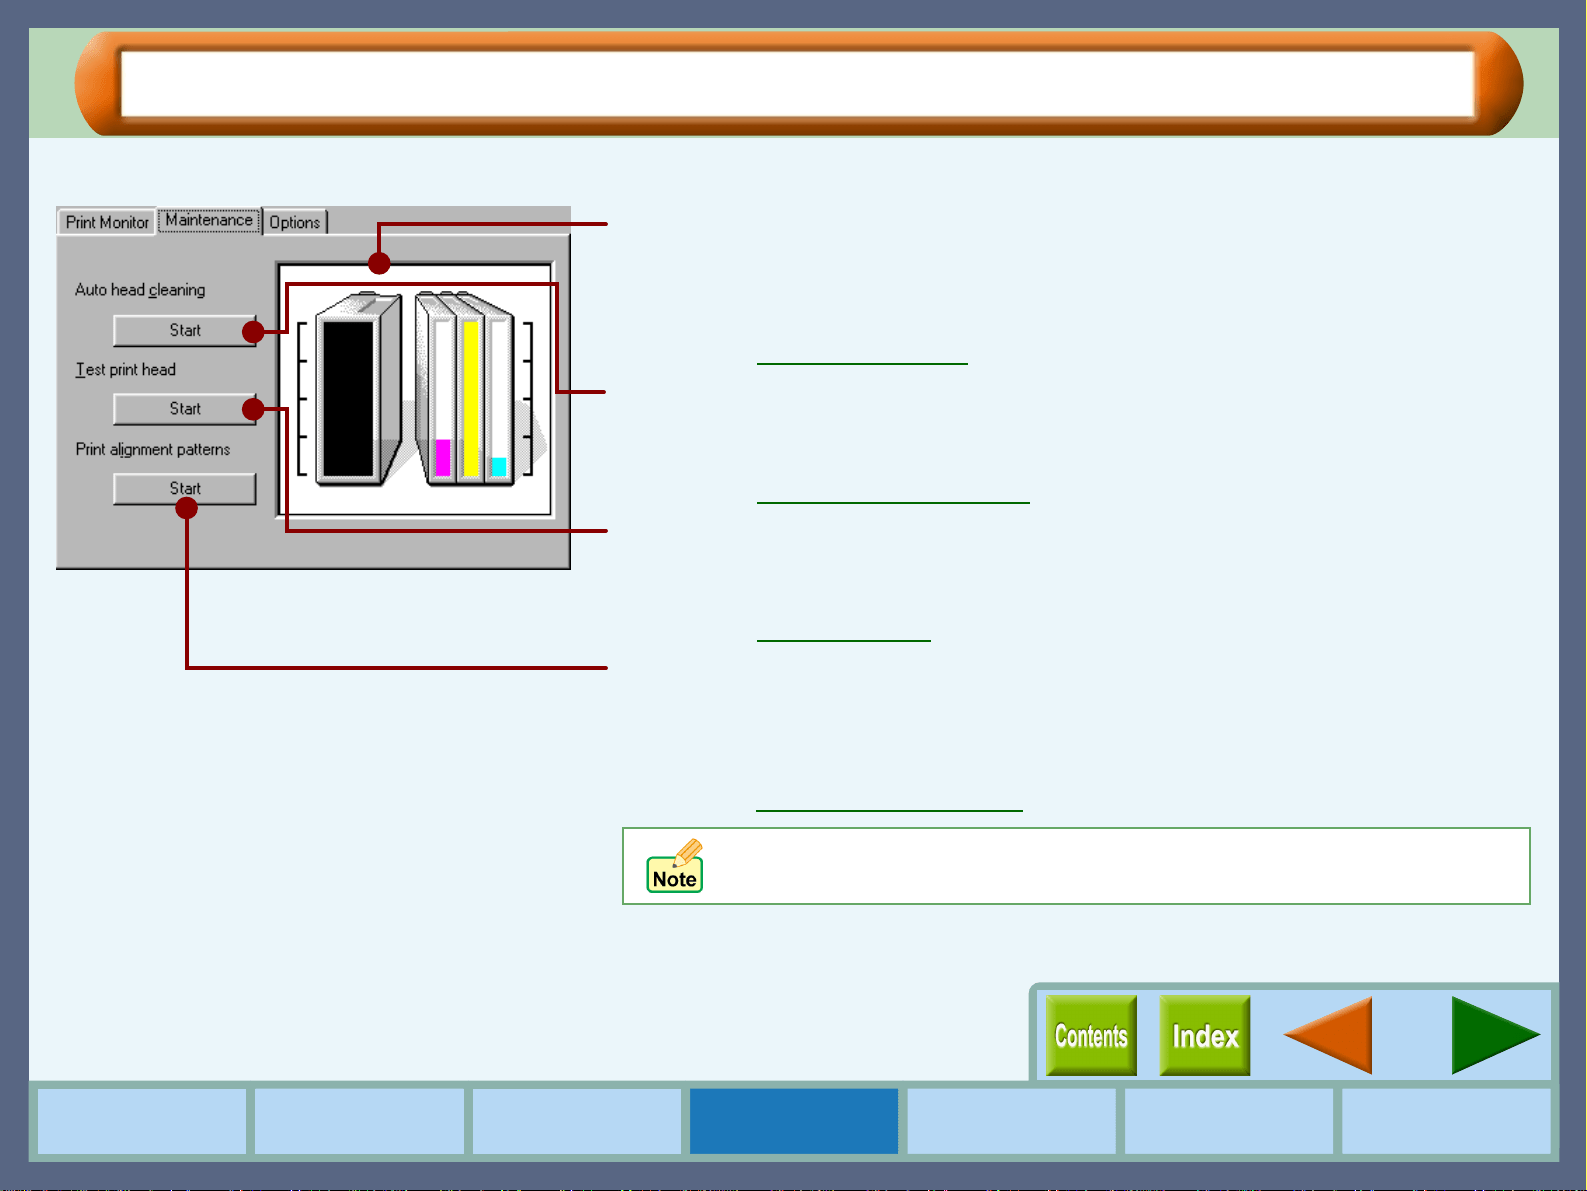
"Maintenance" Tab
Click this tab to conduct print head maintenance, and to check the amount of available ink.
Remaining ink indicator window
This window indicates the level of ink remaining in the printer. A message
appears when the ink tank is nearly empty. Prepare a new ink tank and replace
it when required.
Reference: Changing Ink Tank
Auto head cleaning
Click the "Start" button to initiate cleaning of the print head. After the dialog box
for selecting which print head to clean appears, click the "OK" button.
Reference: Cleaning the Print Head
Test print head
Click the "Start" button to print a test page which lets you check the print
quality. After the confirmation dialog box appears, click the "OK" button.
Reference: Test Print Head
Print alignment patterns
Click the "Start" button to print a test chart to align the print head. After the
confirmation dialog box appears, click the "OK" button. The "Align print head"
dialog box opens and a test chart is printed.
Reference: Aligning the Print Head
When cleaning and aligning the print head, the printer cannot perform
other operations.
30
Print Status Window
How to Use the
Online Manual
Printer Properties Print
Print Status
Window
Maintenance TroubleshootingSharing Printer
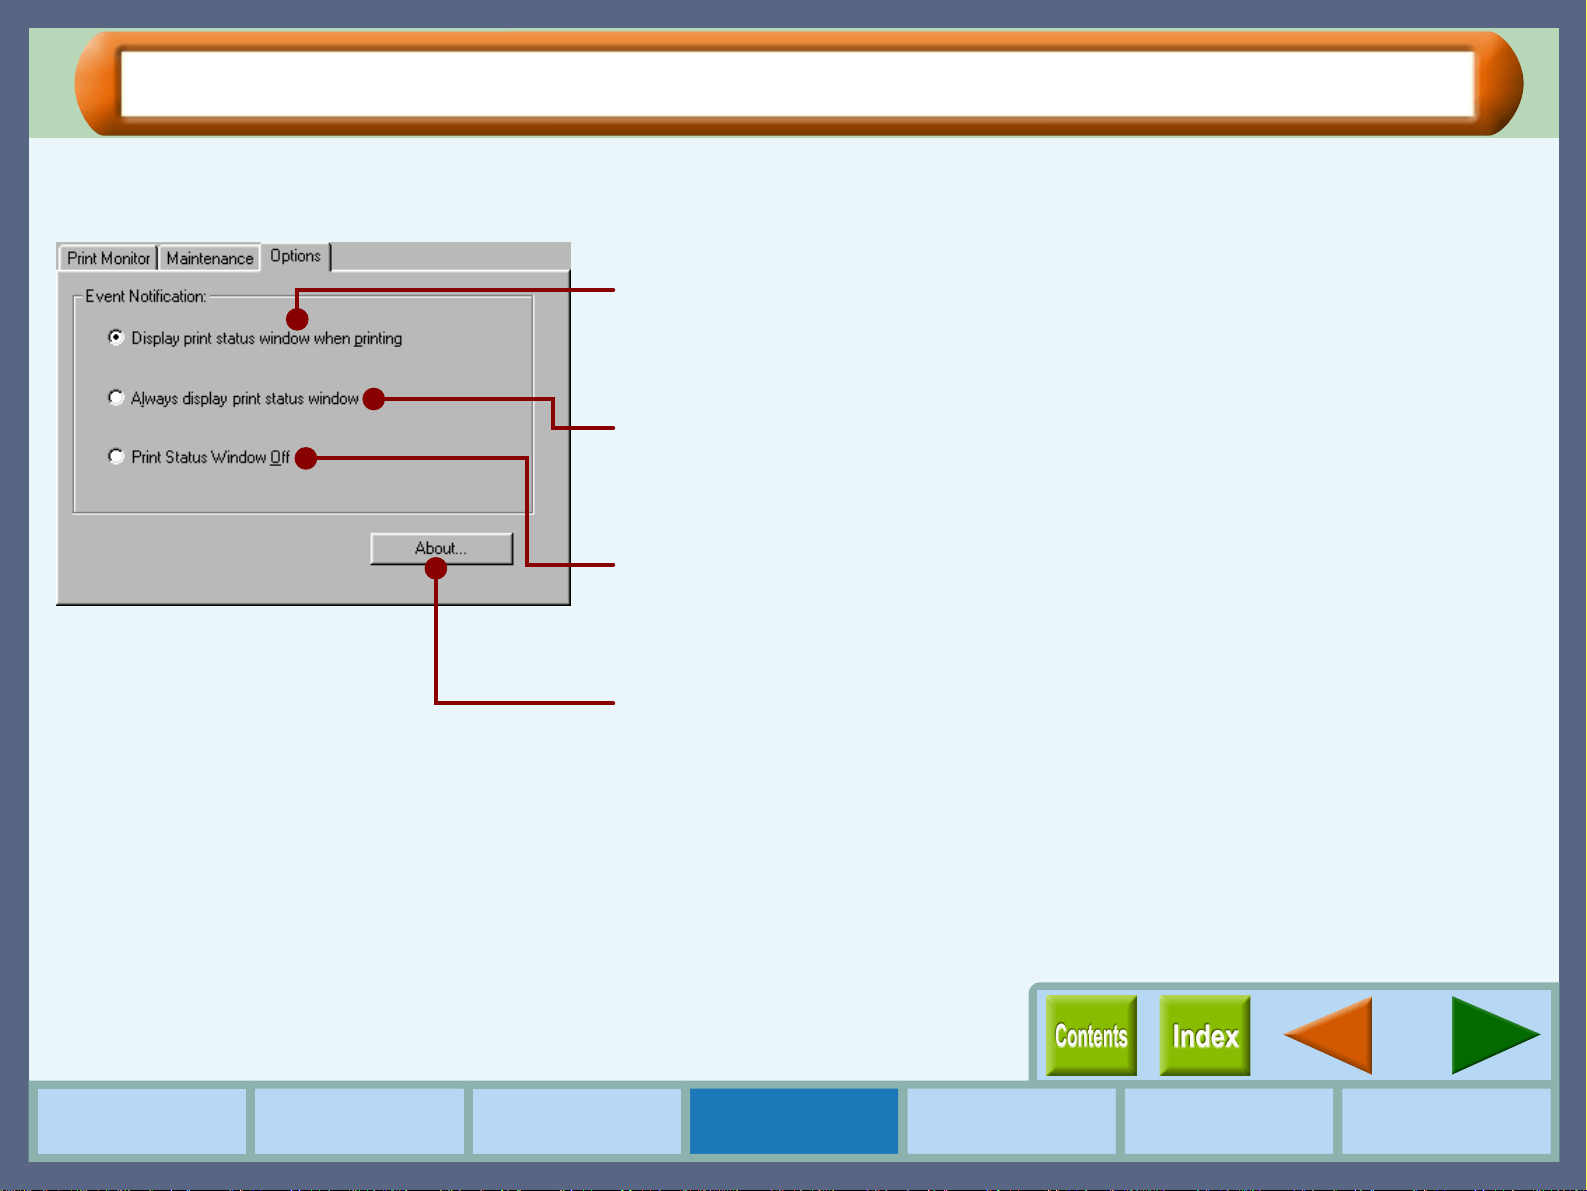
"Options" Tab
Allows you to select when to display the print status window.
Select one option from the three shown below.
Display print status window when printing
The print status window will be displayed automatically at the start of the print
job. It will close automatically when the print job is finished.
Always display print status window
The print status window will be displayed all the time. It will stay open even
after the print job is finished.
Print Status Window Off
The print status window will not be displayed even while printing if this option is
selected.
"About" button
Click for details on the version of the print status window.
31
How to Use the
Online Manual
Printer Properties Print
Print Status
Window
Maintenance TroubleshootingSharing Printer
Sharing Printer
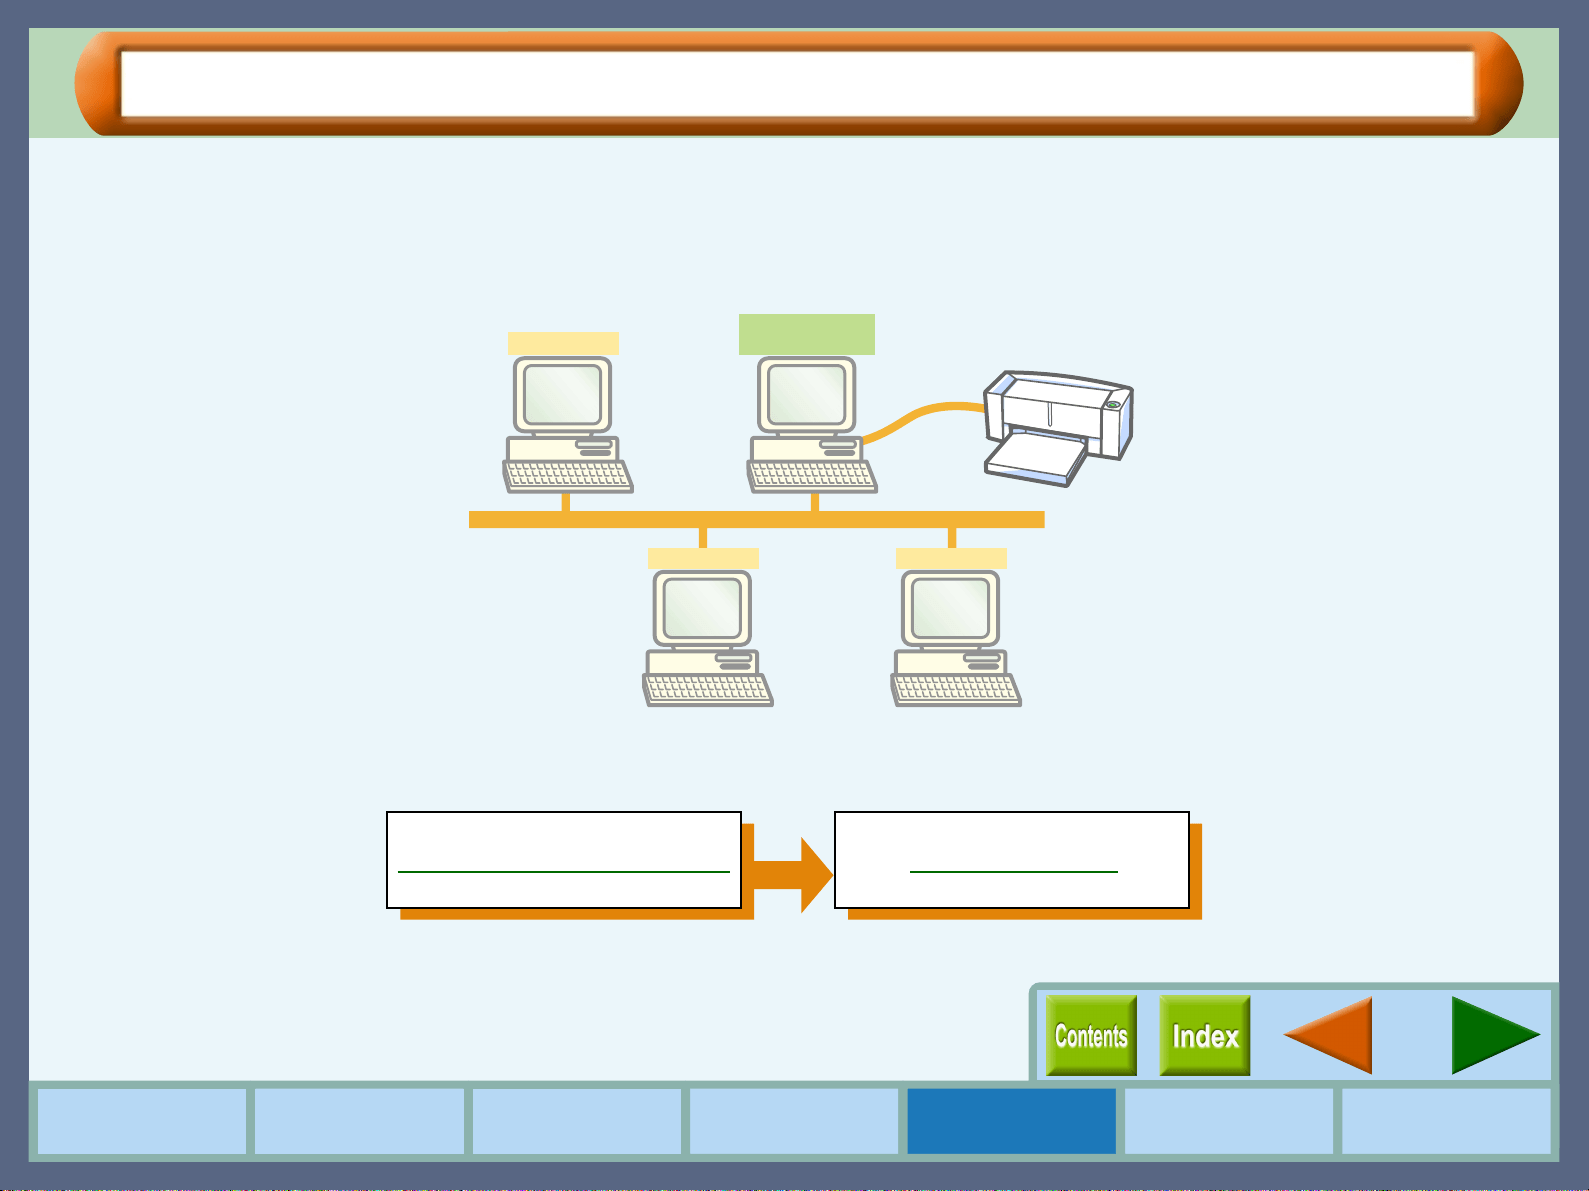
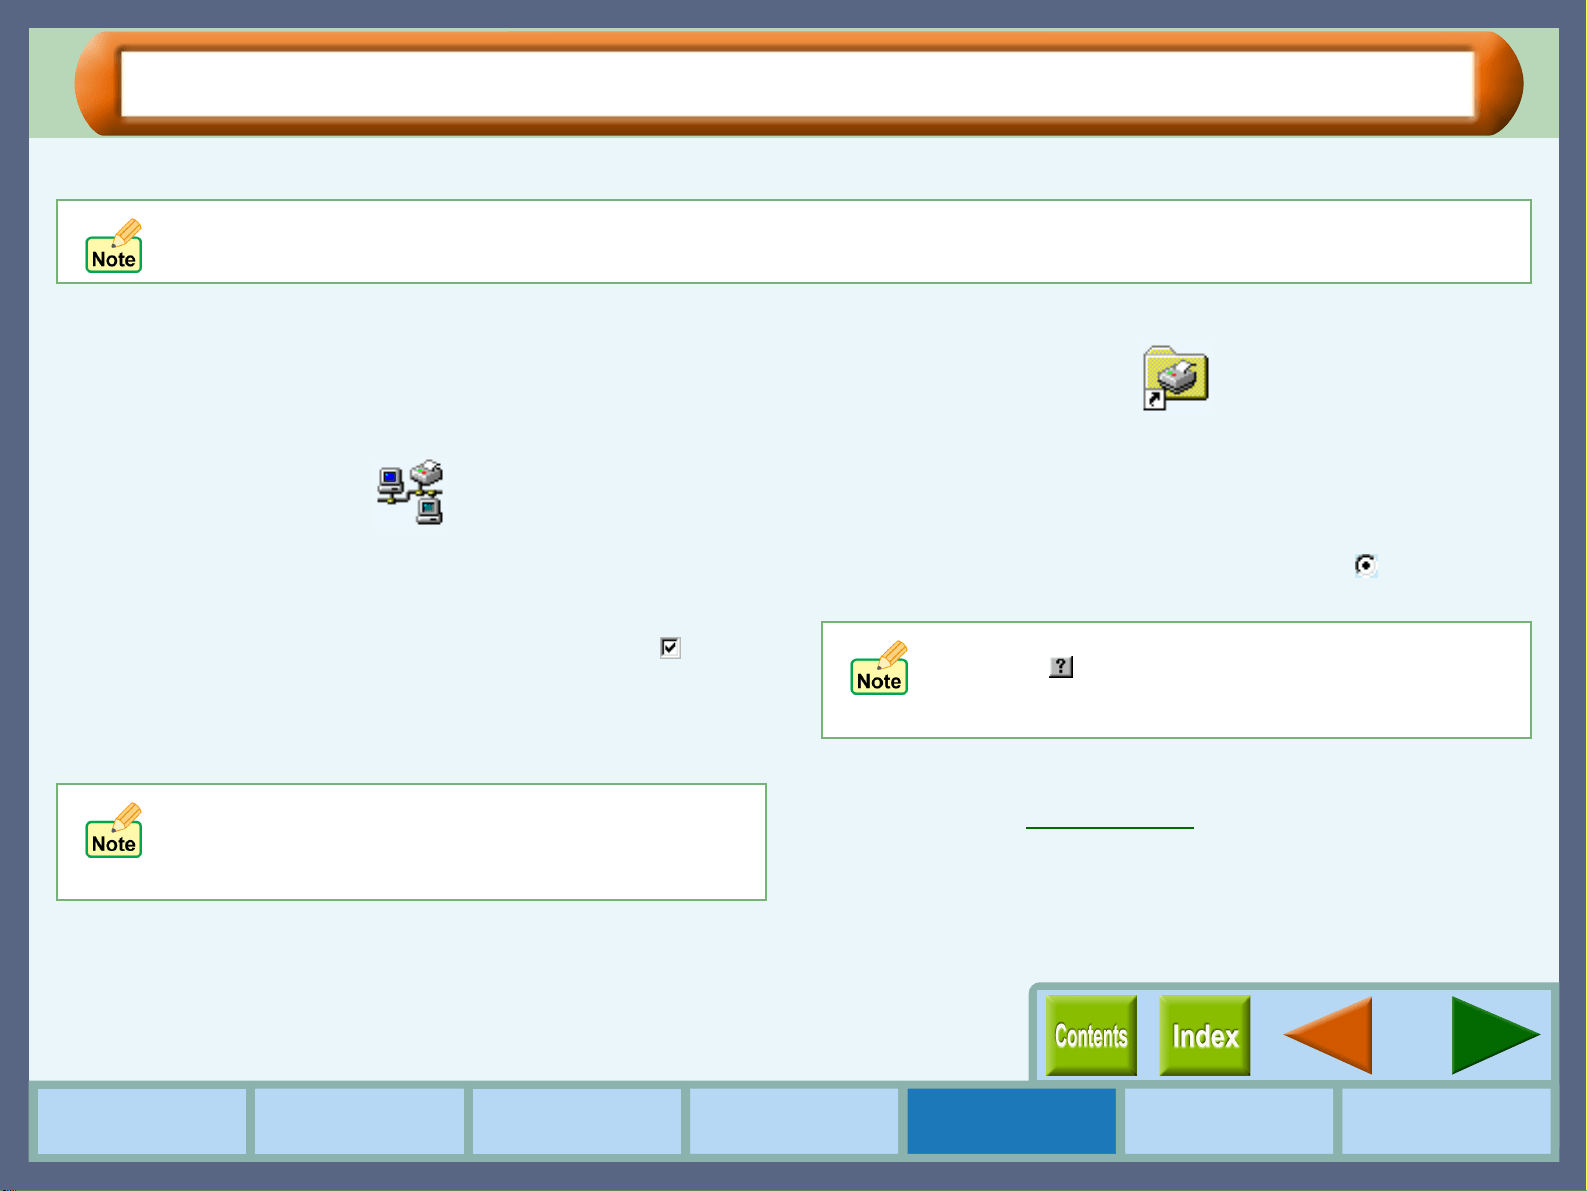
Sharing the Printer using Windows Networking
Using Windows networking, it is very easy to share the printer.
Rather than using a network server, we will explain how to connect the printer using a Peer To Peer connection.
Our explanation, shown below, is based on the following assumptions; there is an established network in place.
This works with Windows 95, 98, NT and 2000.
With Peer To Peer connections, the print server is a client to which a printer is directly connected, and a "Client"
is any computer, which is connected to the same network.
Shared printer
Client
Client Client
Client with
shared printer
Shared Printer Settings Client Settings
32
Sharing Printer
How to Use the
Online Manual
Printer Properties Print
Print Status
Window
Maintenance TroubleshootingSharing Printer
Shared Printer Settings
For sharing a printer on a Windows operating system, follow the setup procedures below.
1
11
1
Click the "Start" button, select "Settings", and then
click "Control Panel".
2
22
2
Double-click the "Network" icon.
The "Network" dialog box will appear.
3
33
3
Click the "File and Print Sharing" button.
4
44
4
Enable "I want to be able to allow others to print to
my printer(s)." by clicking the check box ( ), and
then click "OK" button.
5
55
5
Click the "OK" button in the "Network" dialog box.
6
66
6
Double-click the printer icon in the control panel.
7
77
7
Right-click the "SHARP AJ-1800" or "SHARP AJ-
2000" printer driver icon, and select "Sharing" from
the pop-up menu.
8
88
8
Enable the check button for sharing ( ), input your
preferences, and click "OK" button.
You have completed the setup procedures for the shared
printer.
Reference:
Client Settings
If your operating system is Windows 95/98, start from the step 1 to setup the network. If your operating system is Windows 2000
or Windows NT 4.0, open the control panel, and then start from the step 6.
If a message appears asking you to restart the
computer, click the "Yes" button and restart the
computer. Then, open the printer folder and continue
the setup procedures from Step 6.
For information on the various preferences available,
click the ( ) button located at the top-right of the
dialog box. Then, click the option you want to know
more about, for a pop-up explanation to appear.
33
Sharing Printer
How to Use the
Online Manual
Printer Properties Print
Print Status
Window
Maintenance TroubleshootingSharing Printer
Client Settings
After installing the printer driver on the client computer, follow the setup procedures below. For details on
installing the printer driver, refer to "INSTALLING THE PRINTER DRIVER" in the Setup Guide and Operation
Manual.
1
11
1
Click the "Start" button, select "Settings", and then
click "Printers".
2
22
2
Right-click the "SHARP AJ-1800" or "SHARP AJ-
2000" printer driver icon, and select "Properties"
from the pop-up menu.
3
33
3
Click the "Details" tab, and click the "Add Port"
button.
4
44
4
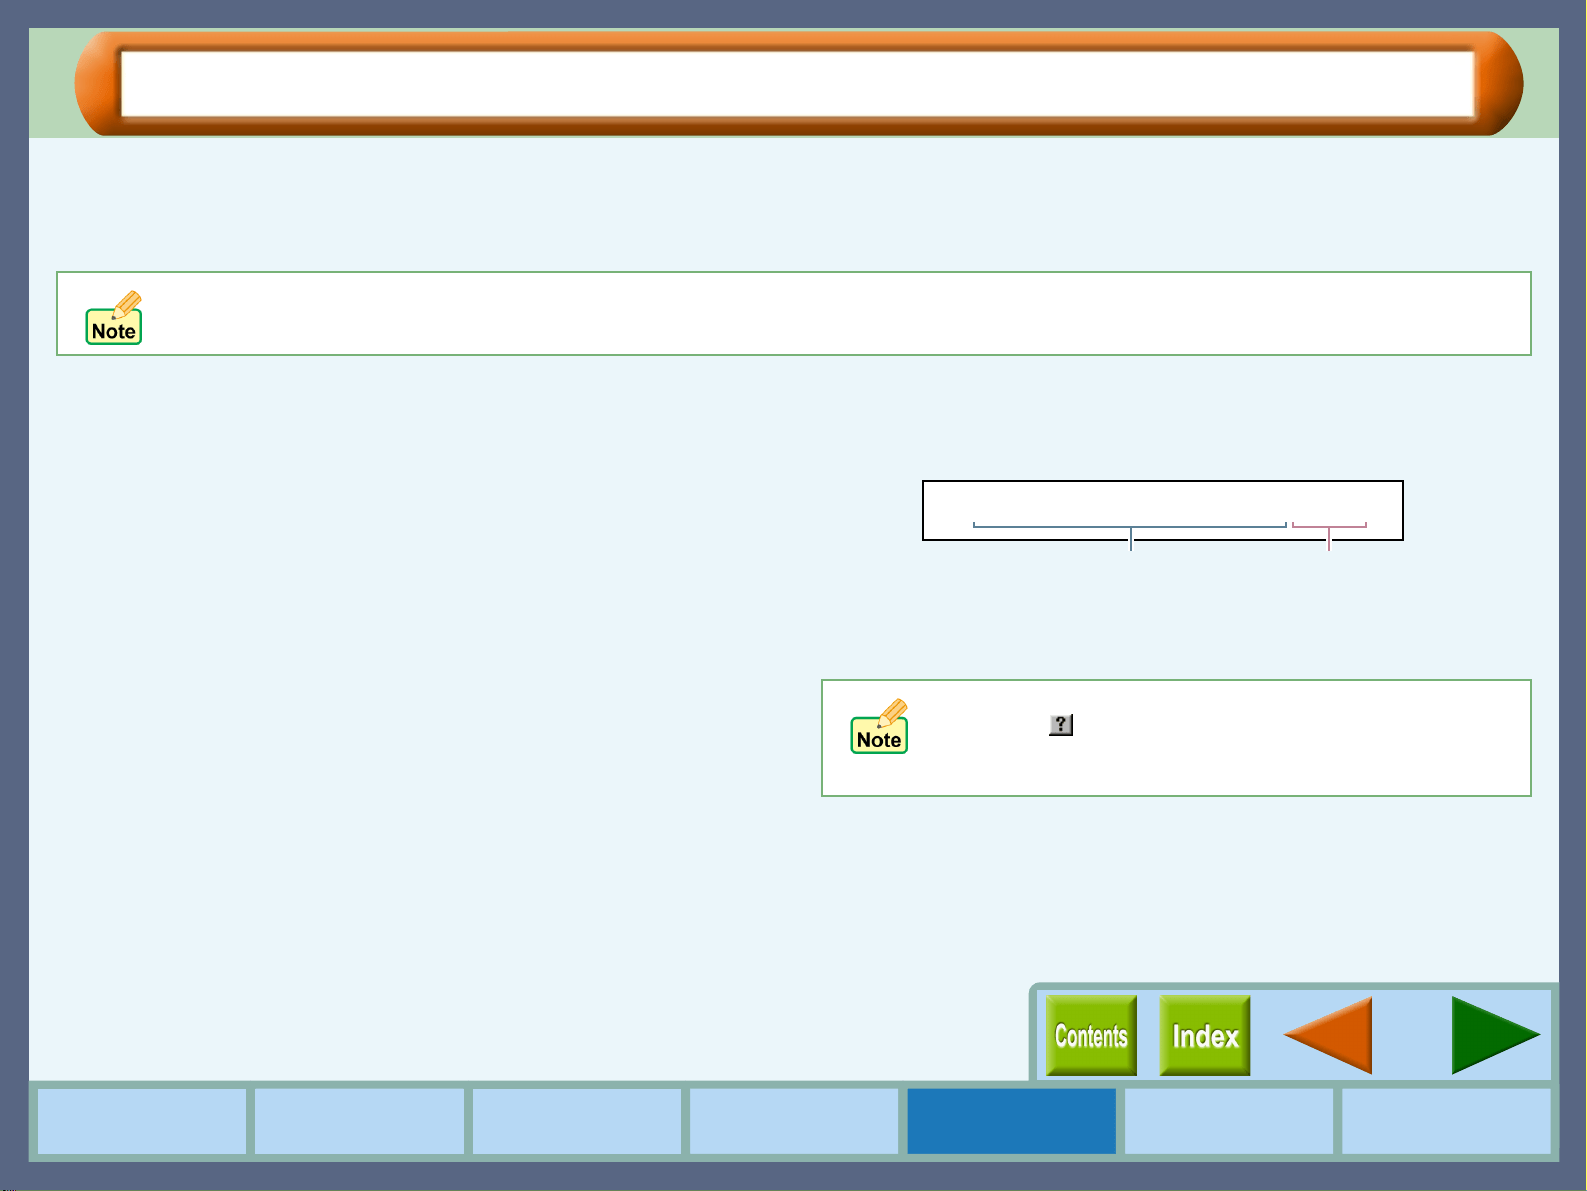
Type the port name as shown below or click
"Browse" button and double-click Server's
computer name and then click "Sharp".
5
55
5
Input your options, and click the "OK" button.
This page provides steps for Windows 95/98 users only. If your operating system is Windows 2000 or Windows NT 4.0, refer to
the operation manual or the help file of your operating system.
For information on the various preferences available,
click the ( ) button located at the top-right of the
dialog box. Then, click the option you want to know
more about, for a pop-up explanation to appear.
\\Client with shared printer\Sharp
Computer name
Printer name
34
How to Use the
Online Manual
Printer Properties Print
Print Status
Window
Maintenance TroubleshootingSharing Printer
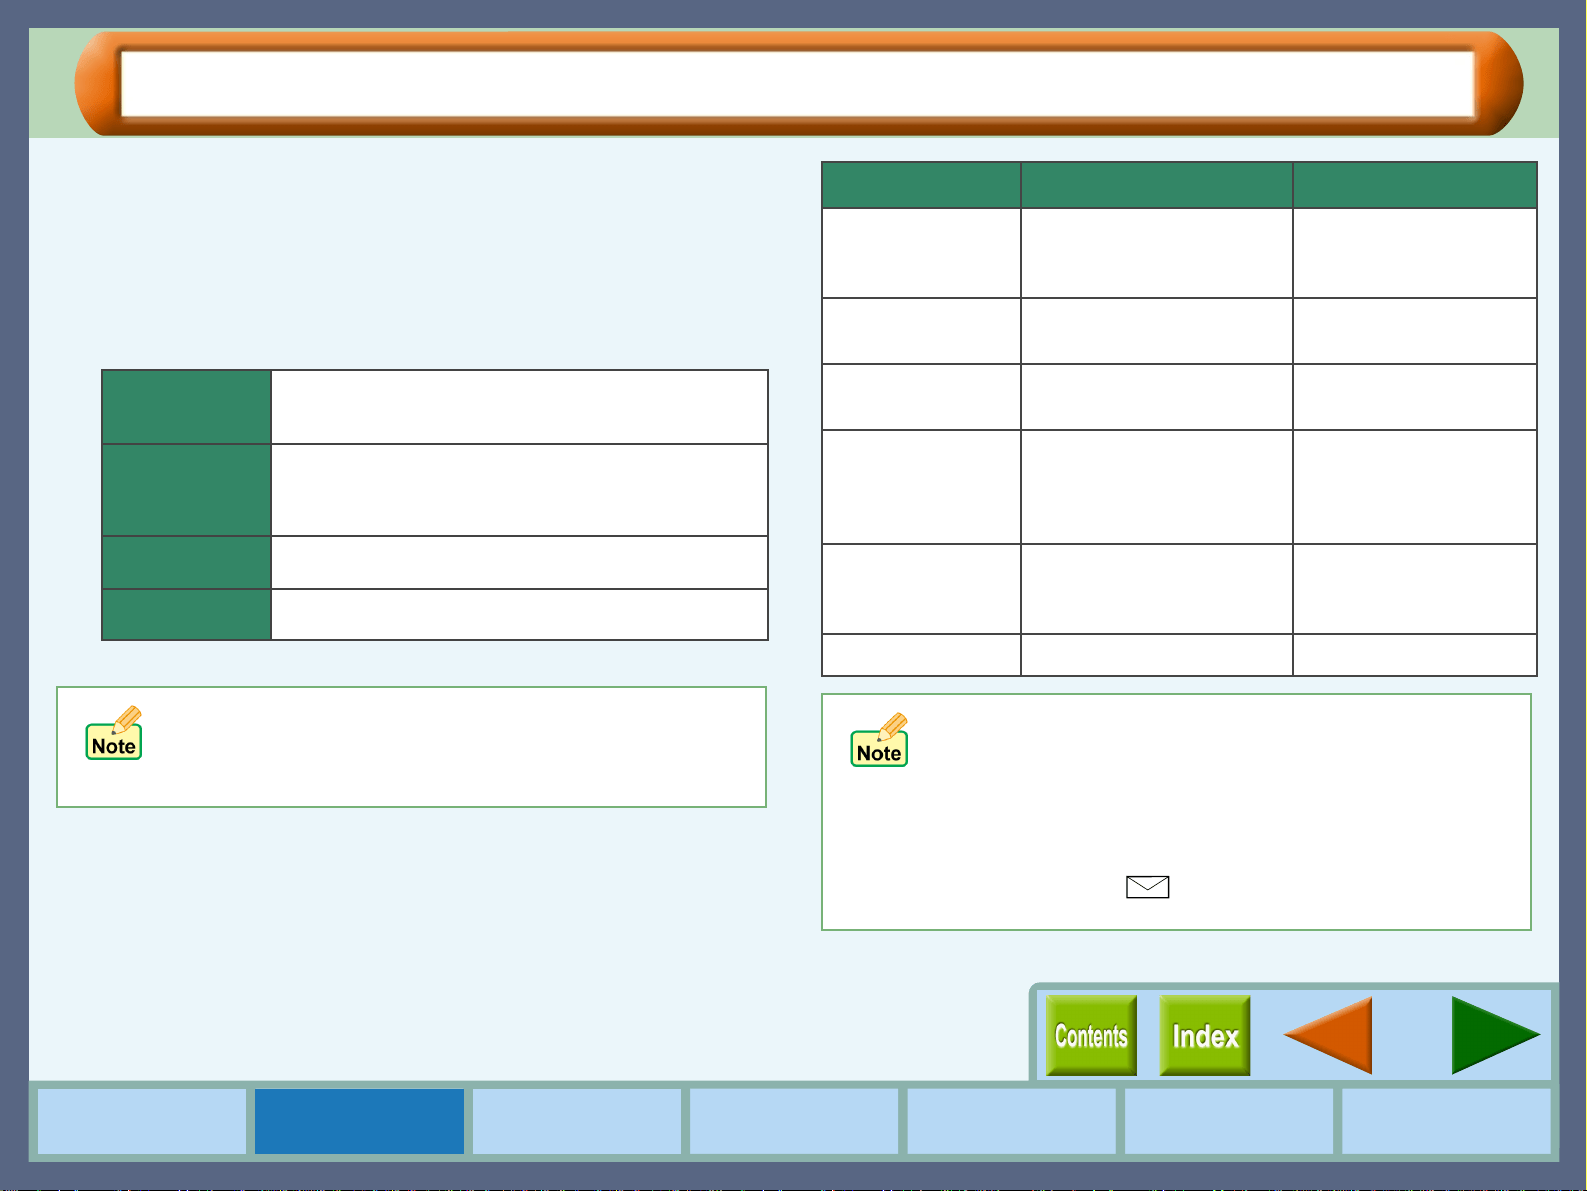
Maintenance
Time to Change the Ink Tank
For each of the situations shown below, check which color ink tank is low on ink before changing the tank. Click
the "Maintenance" tab of the print status window to open the "Maintenance" dialog box. Use this dialog box to
check the color of the ink tank you should change.
Reference:
Changing Ink Tank
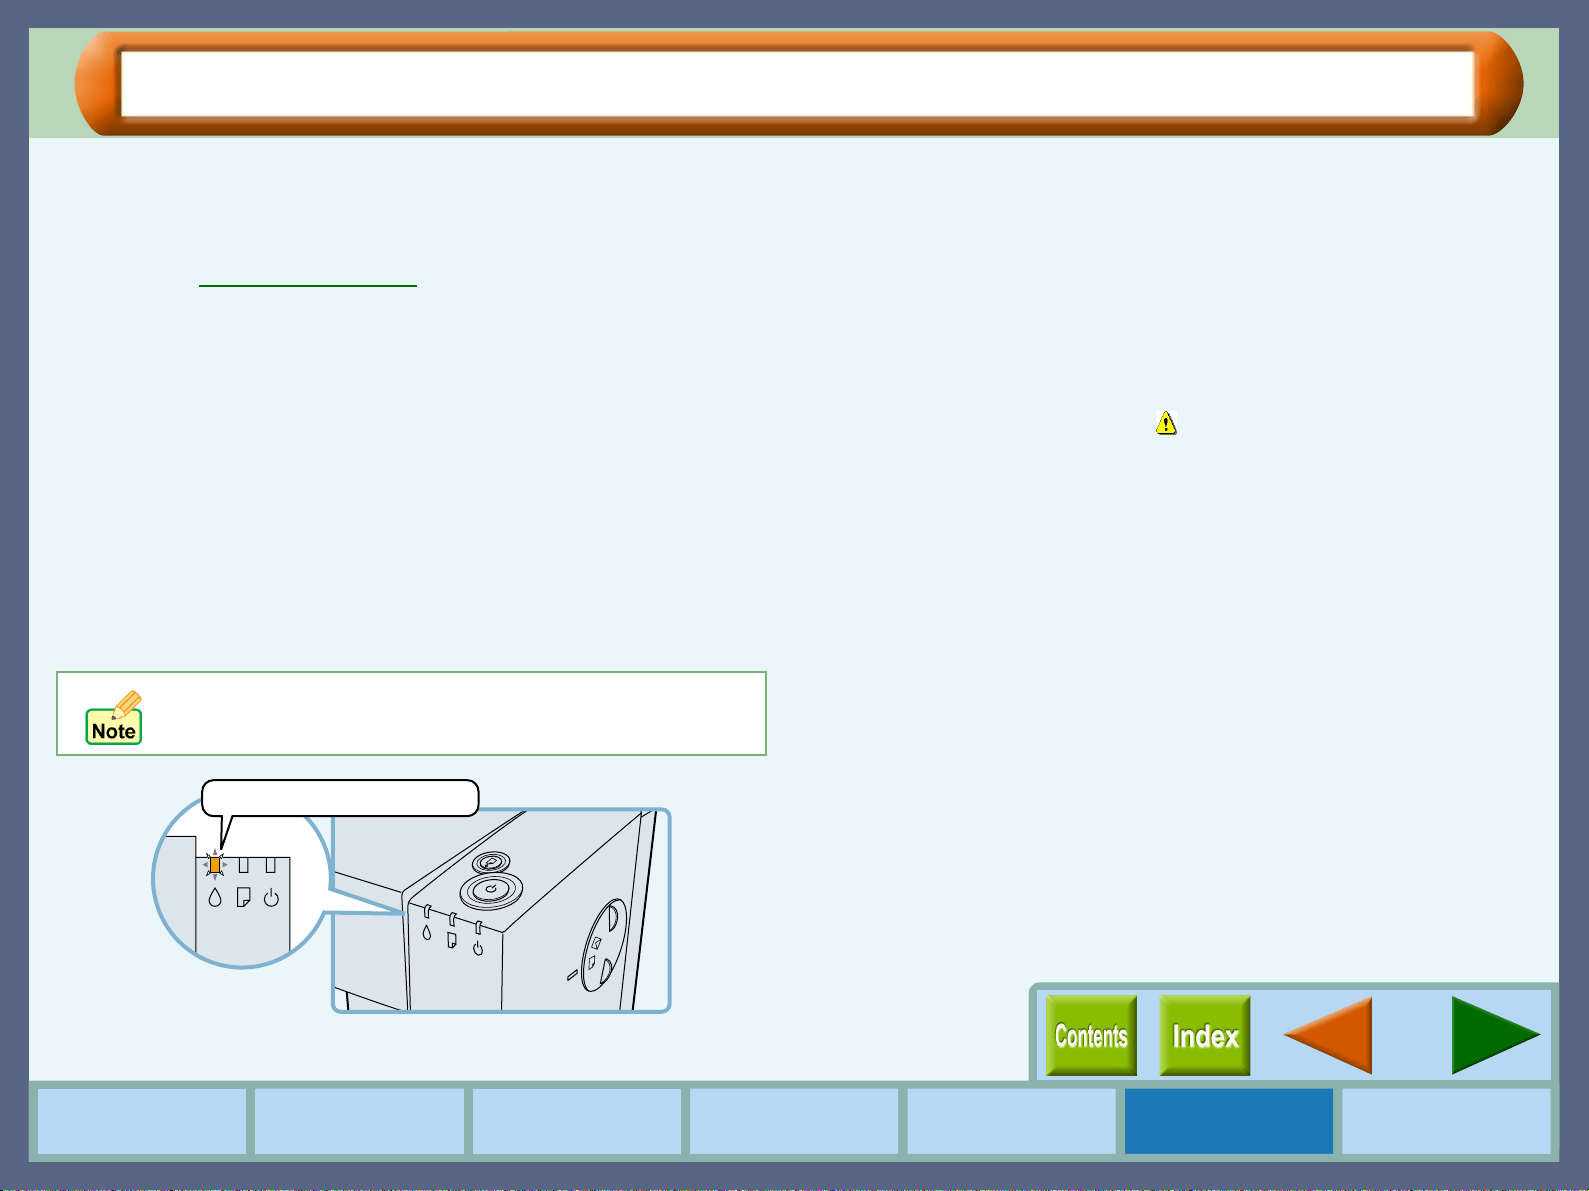
The ink lamp on the printer blinks fast, and the "Out of
ink" error message is displayed on the print status
window.
When the remaining ink is empty, the ink lamp on the printer blinks
rapidly. If the
"Out of ink"
error message appears on the print
status window, more than two of the ink tanks are out of ink. Check
the ink indicators to find the empty ones, and then immediately
replace them with new ones. If the error message indicates the color
of the empty ink tank (see sample message below), replace the ink
tank indicated in the message.
"Out of ink - xxxx"
- One of the ink colors including cyan, yellow,
magenta, and black is displayed as "xxxx" in this message.
The "Ink low" error message is displayed on the print
status window.
When the remaining ink is near empty, the status icon on the print
status window is changed into ( ). If the
"Ink low"
error message
appears, more than two of the ink tanks are near empty. Check the
ink indicators to find the ones which are near empty, and replace
them with new ones as soon as possible. If the error message
indicates the color of the near-empty ink tank (see sample message
below), replace the ink tank indicated in the message.
"Ink low - xxxx"
- One of the ink colors including cyan, yellow,
magenta, and black is displayed as "xxxx" in this message.
If the correct ink tank is not inserted, the ink lamp will also
blink fast.
This lamp will blink fast.
35
Maintenance
How to Use the
Online Manual
Printer Properties Print
Print Status
Window
Maintenance TroubleshootingSharing Printer
Changing Ink Tank (part 1)
Ensure the printer is turned on before following the steps below on how to change the ink tank.
1
11
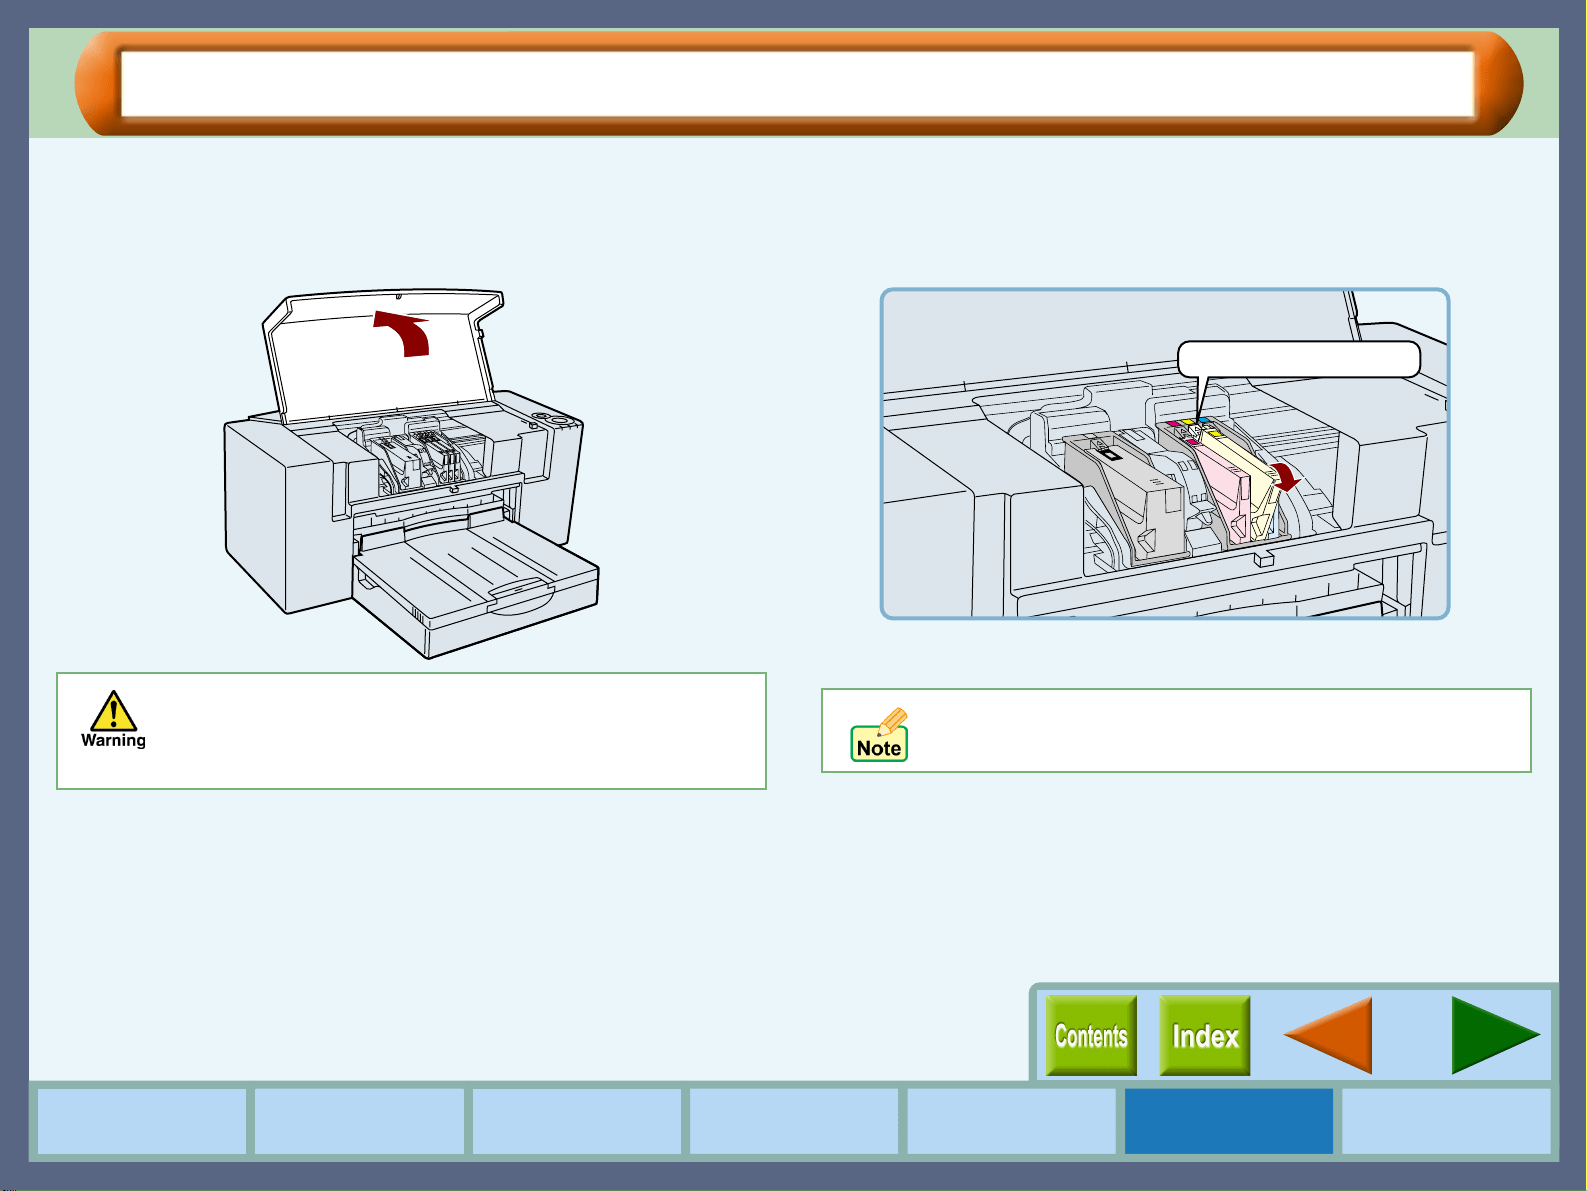
1
Open the front cover.
The carriage will automatically move to the center position.
2
22
2
Remove the old ink tank.
While pressing the tab forward, remove the ink tank.
Do not put your hands into the printer until the carriage
stops at the center position. Doing so may hurt your
hands. Do not try to move the carriage manually by
force, you may damage the printer.
Do not lift the print head latch to replace the ink tank.
Press the tab forward.
Example for the yellow ink tank
36
Maintenance
How to Use the
Online Manual
Printer Properties Print
Print Status
Window
Maintenance TroubleshootingSharing Printer
Changing Ink Tank (part 2)
3
33
3
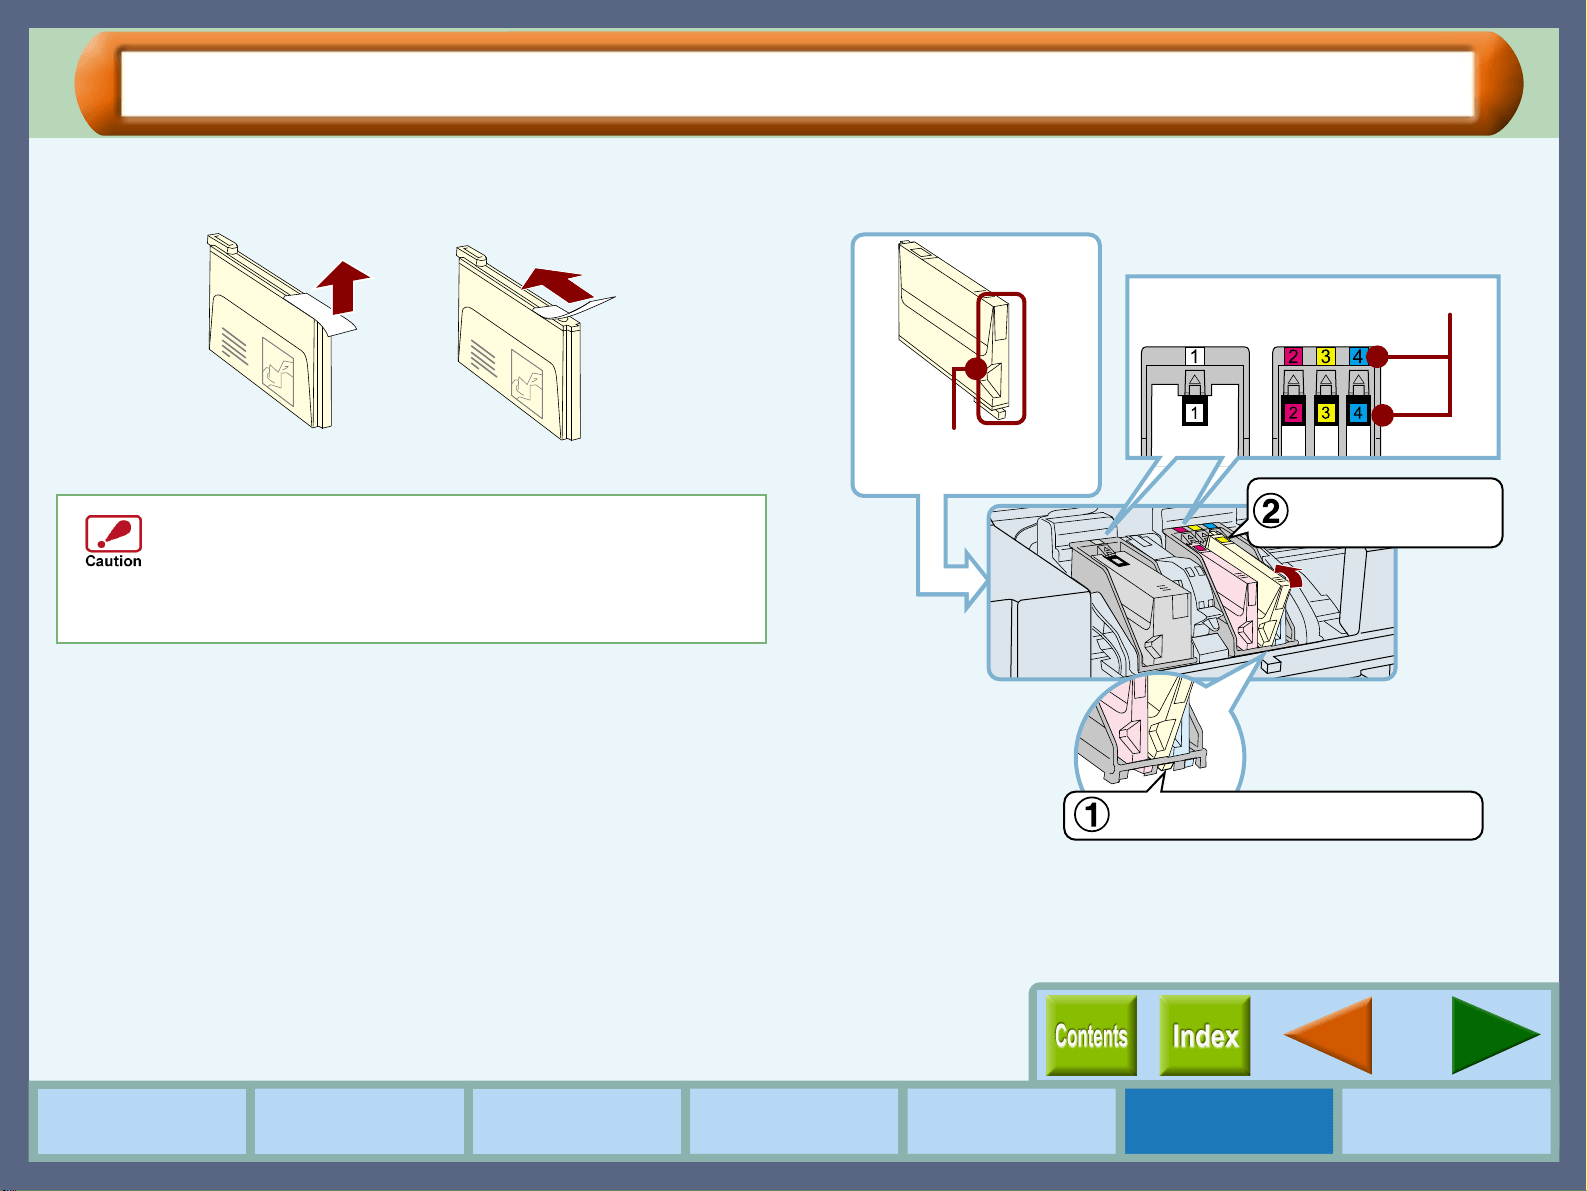
Unpack the ink tank from its protective wrapping
and slowly remove the tape.
4
44
4
Turn the ink upside down, and then immediately
insert it to the print head of corresponding number.
! Hold the tank upright when removing the tape. Do
not touch the uncovered opening on the ink tank, as
ink will get on your hands.
! Ensure that there are no pieces of tape remaining on
the ink tank.
Example for the yellow ink tank
Make sure that each tab
securely fixes the ink
tank by pressing here.
Example for the yellow ink tank
Properly align the tab when inserting.
Match the ink tank number to the
print head number.
Do not touch this area.
The printer may not print
if it is dirty.

37
Maintenance
How to Use the
Online Manual
Printer Properties Print
Print Status
Window
Maintenance TroubleshootingSharing Printer
Changing Ink Tank (part 3)
5
55
5
Close the front cover.
The carriage will return to its home position, and the ink will
be fed to the print head.
6
66
6
Confirm the ink lamp is not blinking.
If the ink lamp continues to blink, open the front cover and
confirm that all the ink tanks are properly inserted.
7
77
7
Print a test page to check if the unit prints properly.
Click the "Start" button of "Test print head" found in the
"Maintenance" dialog box of the print status window to print
out a test page.
If print quality is poor, return to step 4 and follow the
procedures once more.
Check this lamp.
If print quality is poor after correctly inserting the ink
tank, clean the Print Head.
38
Maintenance
How to Use the
Online Manual
Printer Properties Print
Print Status
Window
Maintenance TroubleshootingSharing Printer
Test Print Head
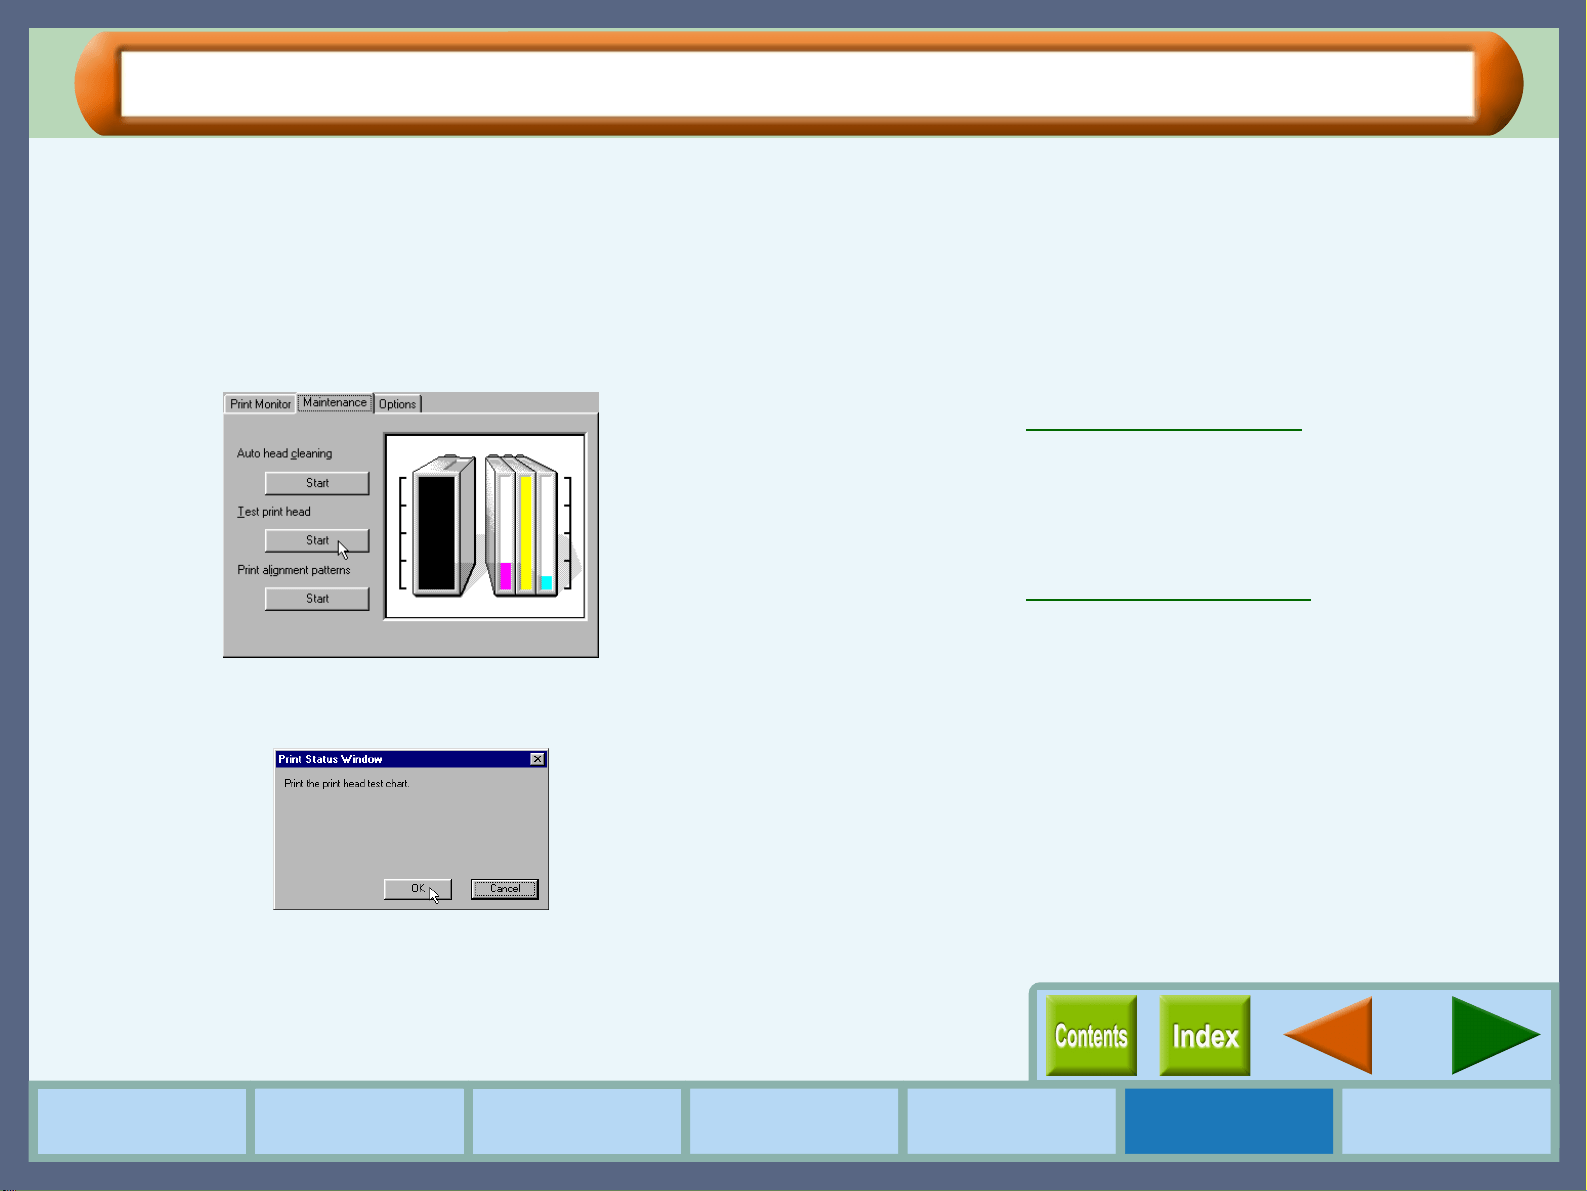
If you are not satisfied with the print quality, print a test page following the steps shown below.
1
11
1
Make sure that Letter sized paper is set in the tray.
2
22
2
Click the "Advanced" tab in the properties dialog
box, and then click "Maintenance" button.
3
33
3
Click the "Start" button of "Test print head".
4
44
4
Click the "OK" button.
A test page will be printed.
5
55
5
Check the result of the test page.
If the print quality is poor, go to the next step.
6
66
6
Click the "Start" button of "Auto head cleaning" to
clean the print heads.
If you cannot get a good result printing a test page even after
cleaning the print head five times, change the print head.
Reference:
Cleaning the Print Head
7
77
7
Change the print head.
Replace the black print head if white lines appear in the black
portion of your test page. If you find white lines in portions
of colors except black, replace the color print head.
Reference:
Changing the Print Head
39
Maintenance
How to Use the
Online Manual
Printer Properties Print
Print Status
Window
Maintenance TroubleshootingSharing Printer
Cleaning the Print Head
If the test page from "Test print head" is faint or uneven, confirm that you are printing on the correct side of the
paper, and the driver setting and ink levels are correct. If these items are OK, then follow the steps below to clean
the print head.
1
11
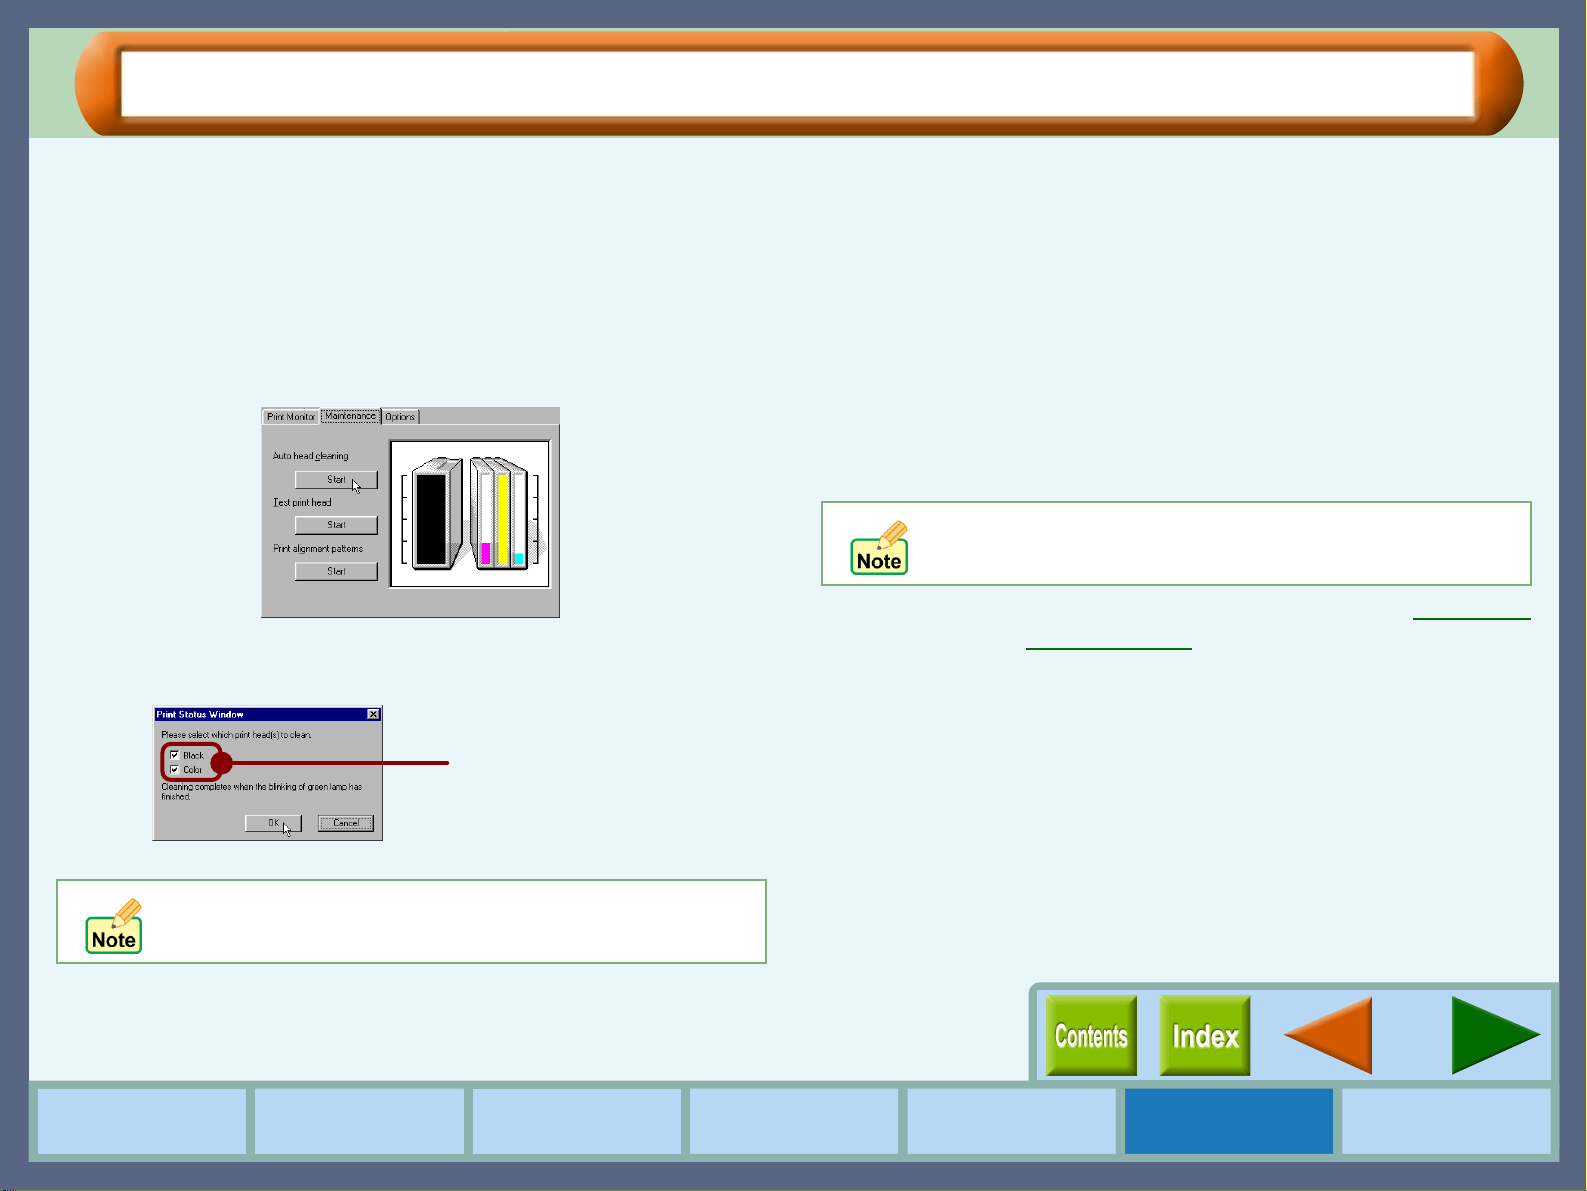
1
Click the "Advanced" tab in the properties dialog
box, and then click "Maintenance" button.
2
22
2
Click the "Start" button of "Auto head cleaning".
3
33
3
Click the "OK" button to clean both the black print head
and the color print head.
Cleaning the print head will begin.
4
44
4
Click the "Start" button of "Test print head", and
then click "OK" button on the confirmation dialog
box to print a test page.
5
55
5
Check if the test page was printed cleanly.
If print quality is poor, return to step 2 and follow the
procedures again.
Reference:
If print quality is still poor, refer to Changing
the Print Head.
The printer cannot perform other operations while
cleaning the print head.
You can save the ink
consumption by checking the
box for the print head which
has poorer print result.
Do not clean the print head more than five times.
Excessive cleaning of the print head wastes ink.
40
Maintenance
How to Use the
Online Manual
Printer Properties Print
Print Status
Window
Maintenance TroubleshootingSharing Printer
Changing the Print Head (part 1)
If print quality is poor, after cleaning the print head 5 times, the print head may be worn.
Ensure the printer is turned on before following the steps below on how to change the print head.
1
11
1
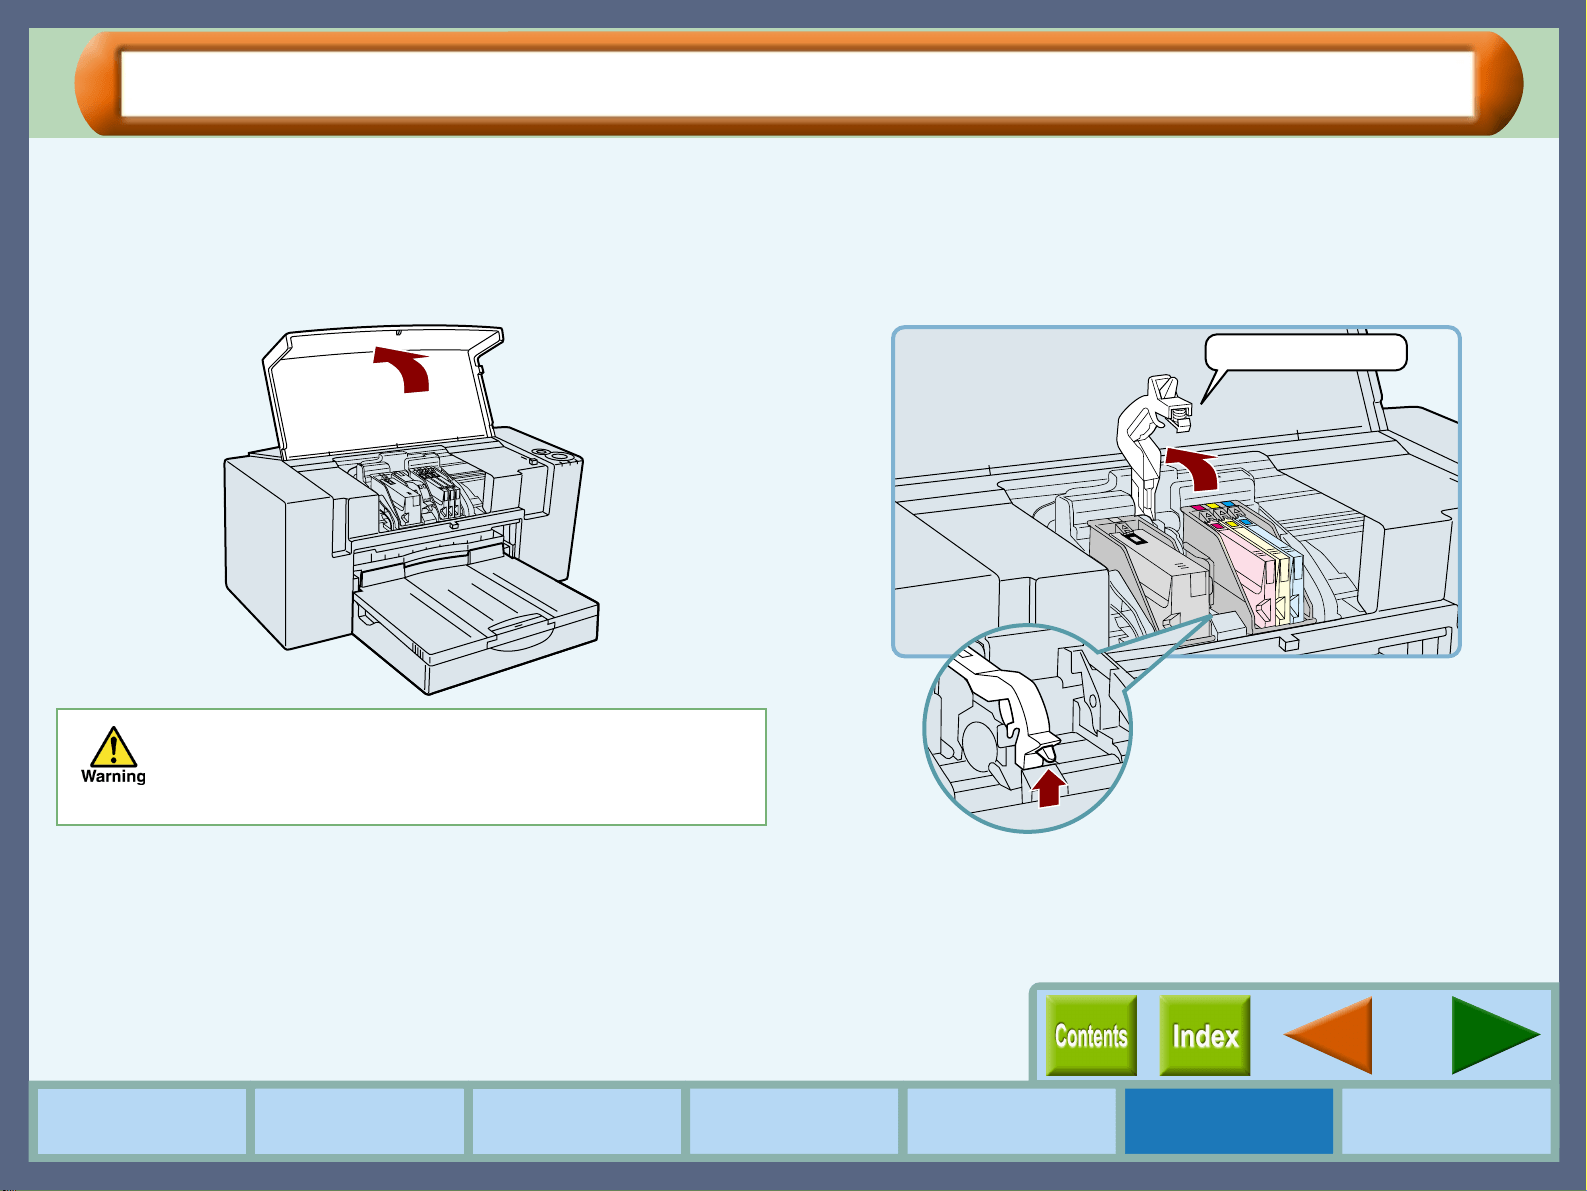
Open the front cover.
The carriage will automatically move to the center position.
2
22
2
Raise the print head latch.
Raise the latch until it comes to a complete halt.
Do not put your hands into the printer until the carriage
stops at the center position. Doing so may hurt your
hands. Do not try to move the carriage manually by
force, you may damage the printer.
Raise this lever.
41
Maintenance
How to Use the
Online Manual
Printer Properties Print
Print Status
Window
Maintenance TroubleshootingSharing Printer
Changing the Print Head (part 2)
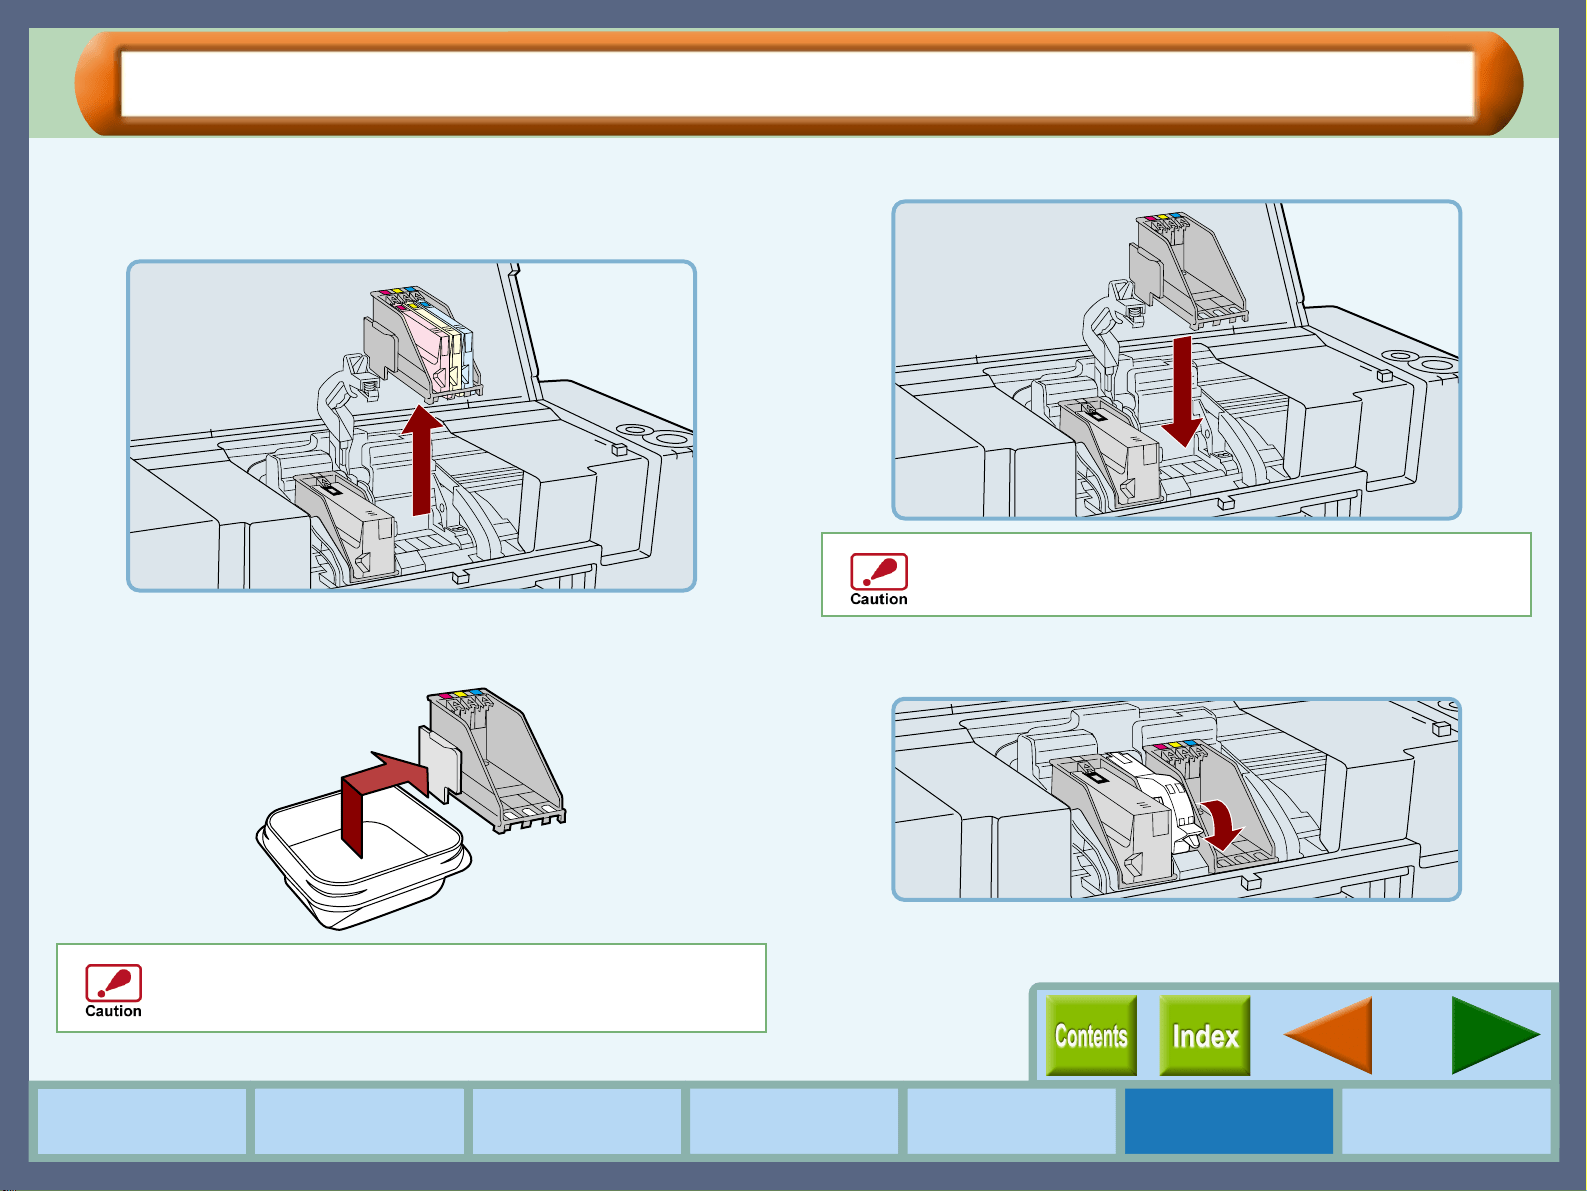
3
33
3
Remove the old black or color print head with the
ink tank still inserted.
Lift it straight up to remove.
4
44
4
Remove the new print head from its protective
case.
5
55
5
Insert the new print head.
6
66
6
Lower the print head latch.
Lower the latch until it is properly fixed into position.
Do not touch the metal portion of the print head
directly. Doing so may lead to improper printing or
damage to the printer.
Be careful not to damage the print head. If any part is
damaged, the printer may not work properly.
42
Maintenance
How to Use the
Online Manual
Printer Properties Print
Print Status
Window
Maintenance TroubleshootingSharing Printer
Changing the Print Head (part 3)
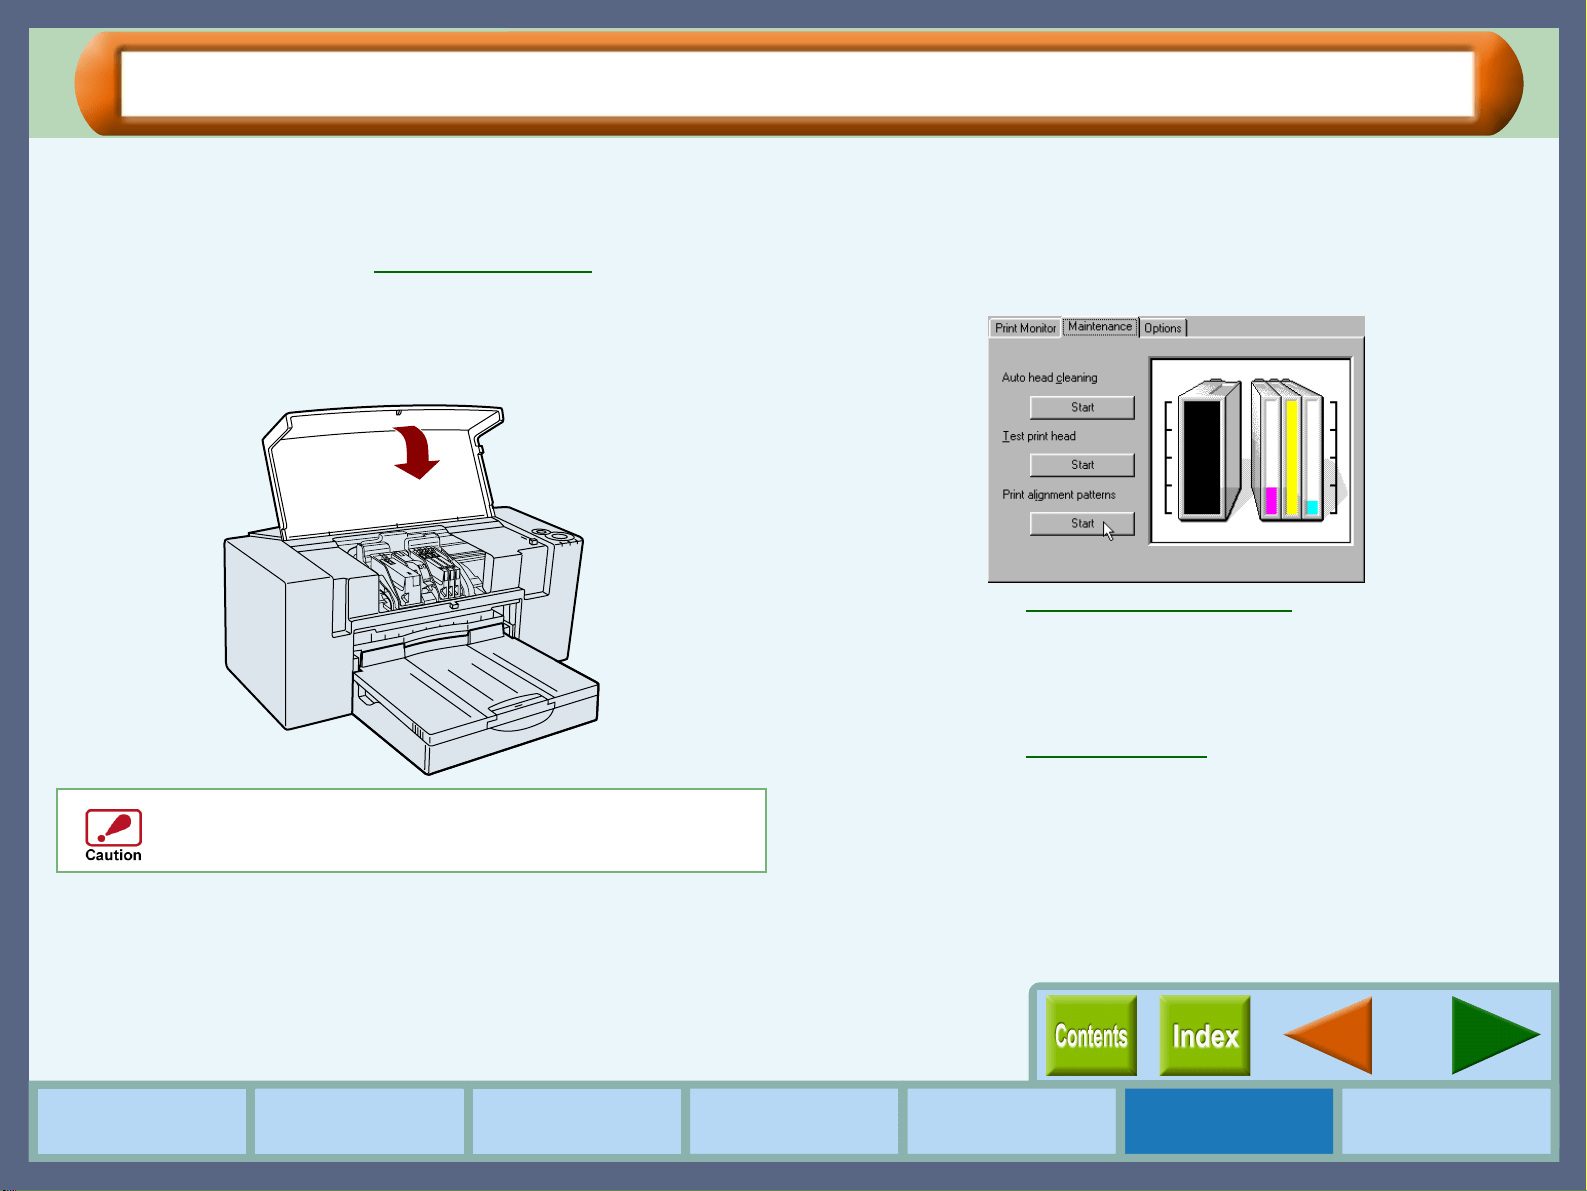
7
77
7
Remove the ink tank(s) from the old print head and
insert into the new print head.
Reference:
For details on inserting and removing the ink
tank, see Changing Ink Tank
.
8
88
8
Close the front cover.
The carriage will return to its home position, and the ink will
be fed to the print head.
9
99
9
To maintain print quality after changing the print
head, always align the print head.
Click the "Start" button of "Print alignment patterns" located
in the "Maintenance" dialog box of the print status window
to align the print head.
Reference:
Aligning the Print Head
10
1010
10
Print a test page by clicking the "Start" button of
"Test print head".
Make sure that the test page was printed clearly.
Reference:
Test Print Head
To keep good print quality, keep all the ink tanks
installed to the corresponding print head.
43
Maintenance
How to Use the
Online Manual
Printer Properties Print
Print Status
Window
Maintenance TroubleshootingSharing Printer
Aligning the Print Head (part 1)
Align the print head after installing or changing the print head, or if printed lines are not straight, or have blank
spaces. Follow the steps below to align the print head.
1
11
1
Make sure that Letter sized paper is set in the tray.
2
22
2
Click the "Advanced" tab in the properties dialog
box, and then click "Maintenance" button.
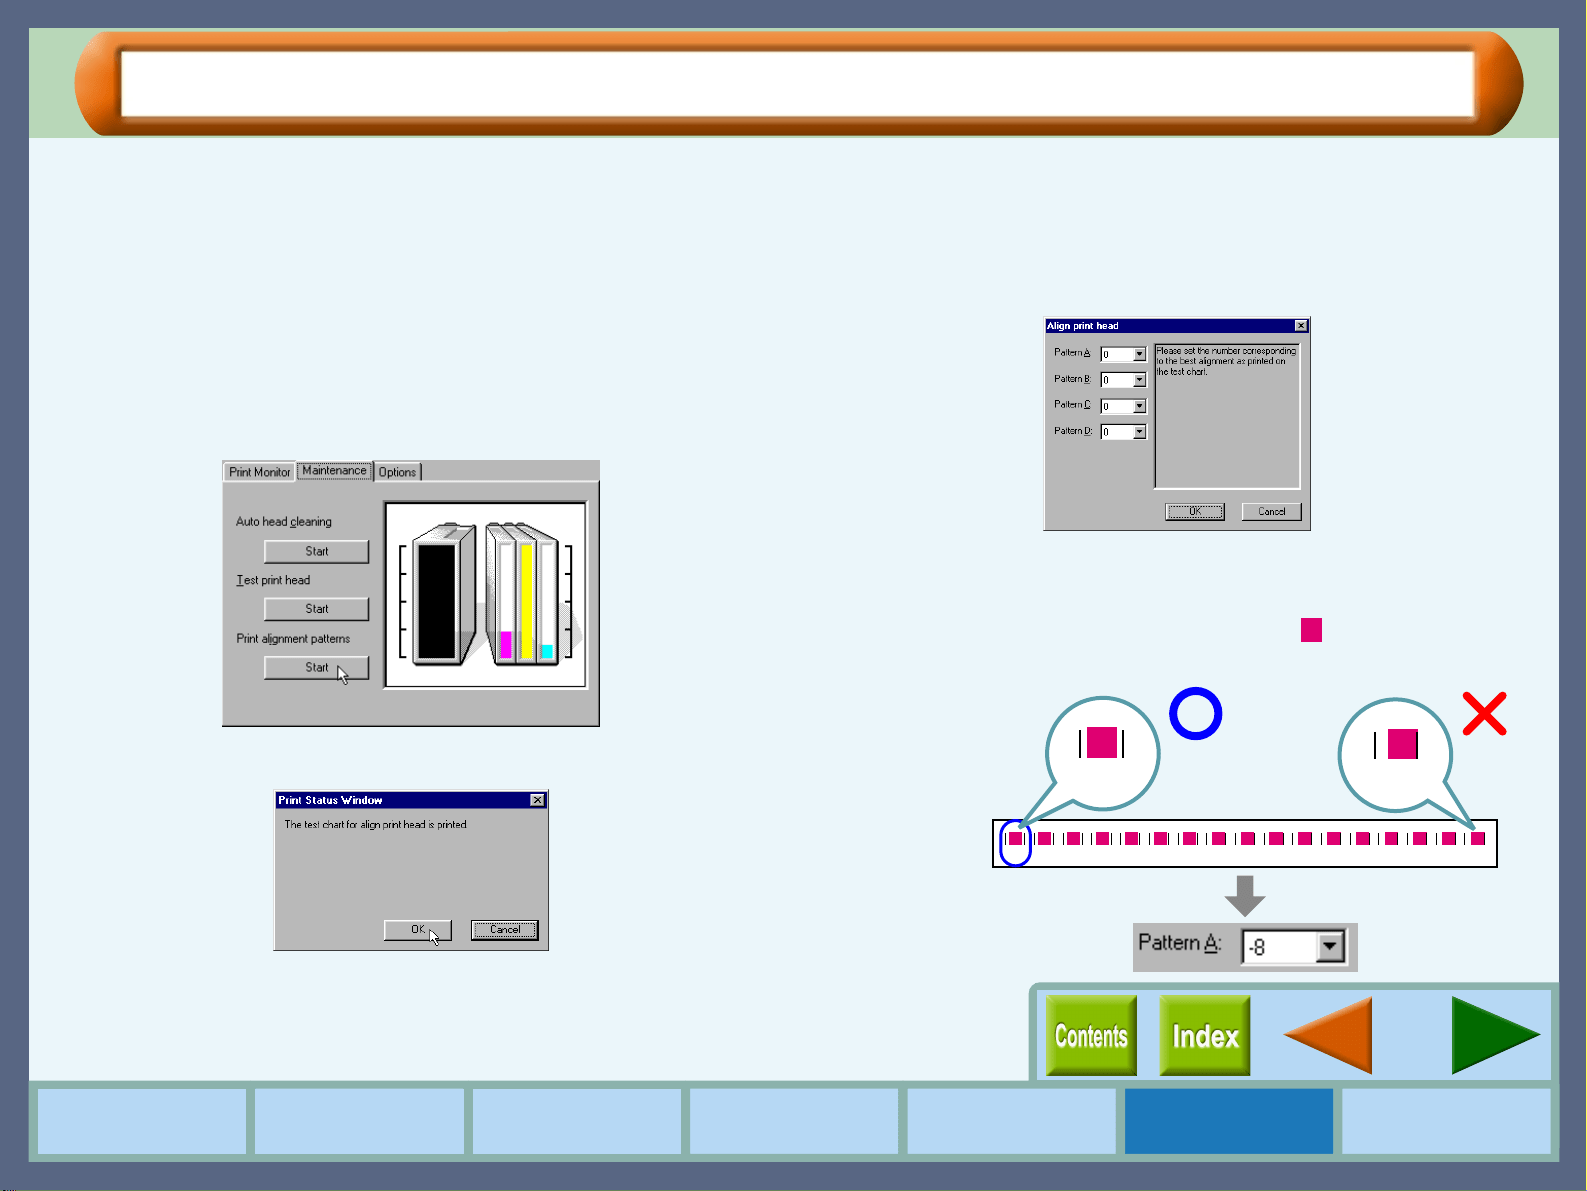
3
33
3
Click the "Start" button of "Print alignment
patterns".
4
44
4
Click the "OK" button.
The "Align print head" dialog box will appear, and a test
chart will be printed.
5
55
5
Check the test chart results, and change the
preferences to the best setting for each pattern.
1
11
1
Select a pattern sample for "Pattern A".
Look at the chart A on your test chart. Select the number
under the pattern sample, in which is located the closest
to the center of the two vertically parallel lines.
-8 -7 -6 -5 -4 -3 -2 -1 0 +1 +2 +3 +4 +5 +6 +7 +8
-8
+8
Example:
44
Maintenance
How to Use the
Online Manual
Printer Properties Print
Print Status
Window
Maintenance TroubleshootingSharing Printer
Aligning the Print Head (part 2)
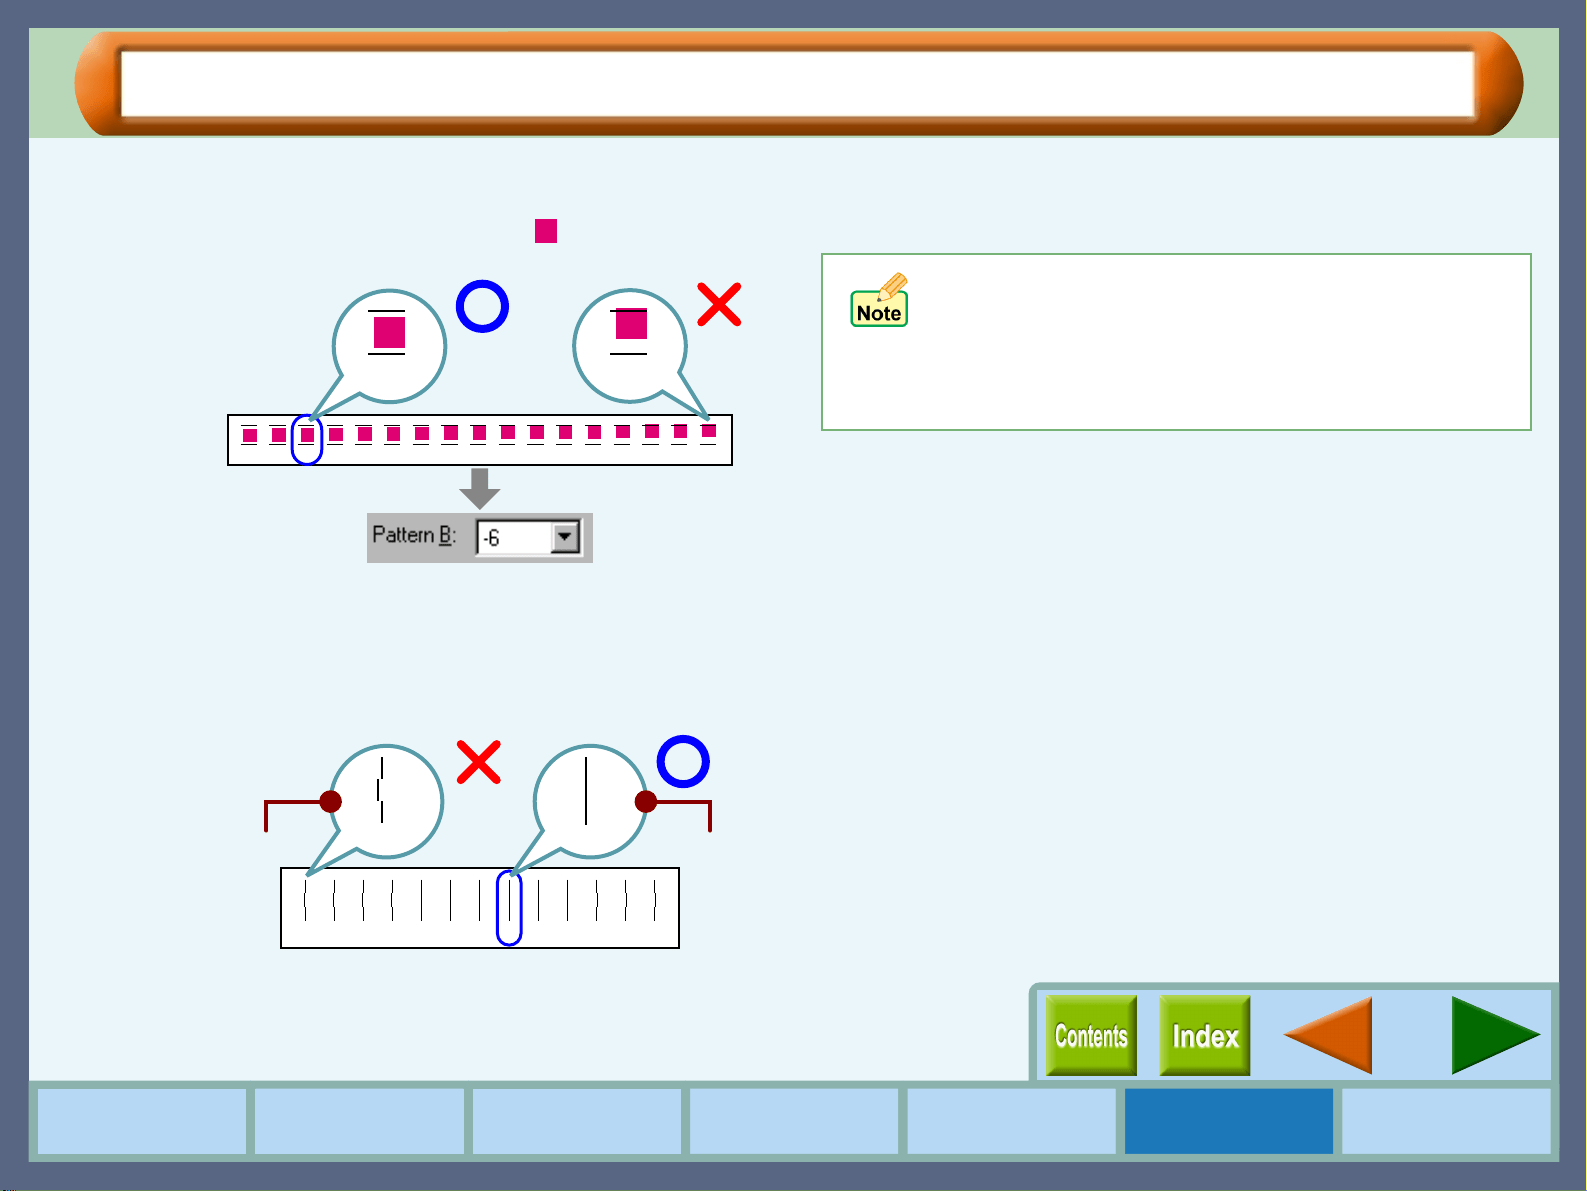
2
22
2
Select a pattern sample for "Pattern B".
Look at the chart B on your test chart. Select the number
under the pattern sample, in which is located the closest
to the center of the two horizontally parallel lines.
3
33
3
Select pattern samples for "Pattern C" and
"Pattern D" respectively.
Look at the chart C and D on your test chart. Select the
numbers under the pattern samples, which have the
straightest lines.
6
66
6
Click the "OK" button in the "Align print head"
dialog box.
The print head will align itself.
-8 -7 -6 -5 -4 -3 -2 -1 0 +1 +2 +3 +4 +5 +6 +7 +8
Example:
-6 +8
-6 -5 -4 -3 -2 -1 0 +1 +2 +3 +4 +5 +6
-6
Example:
+1
Straight lineCracked line
! If you cannot find any satisfactory pattern sample for
each of "Pattern A" to "Pattern D" settings, select the
best ones among the printed pattern samples, and
then go back to step 3.
! The printer cannot perform other operations while
aligning the print head.
45
Maintenance
How to Use the
Online Manual
Printer Properties Print
Print Status
Window
Maintenance TroubleshootingSharing Printer
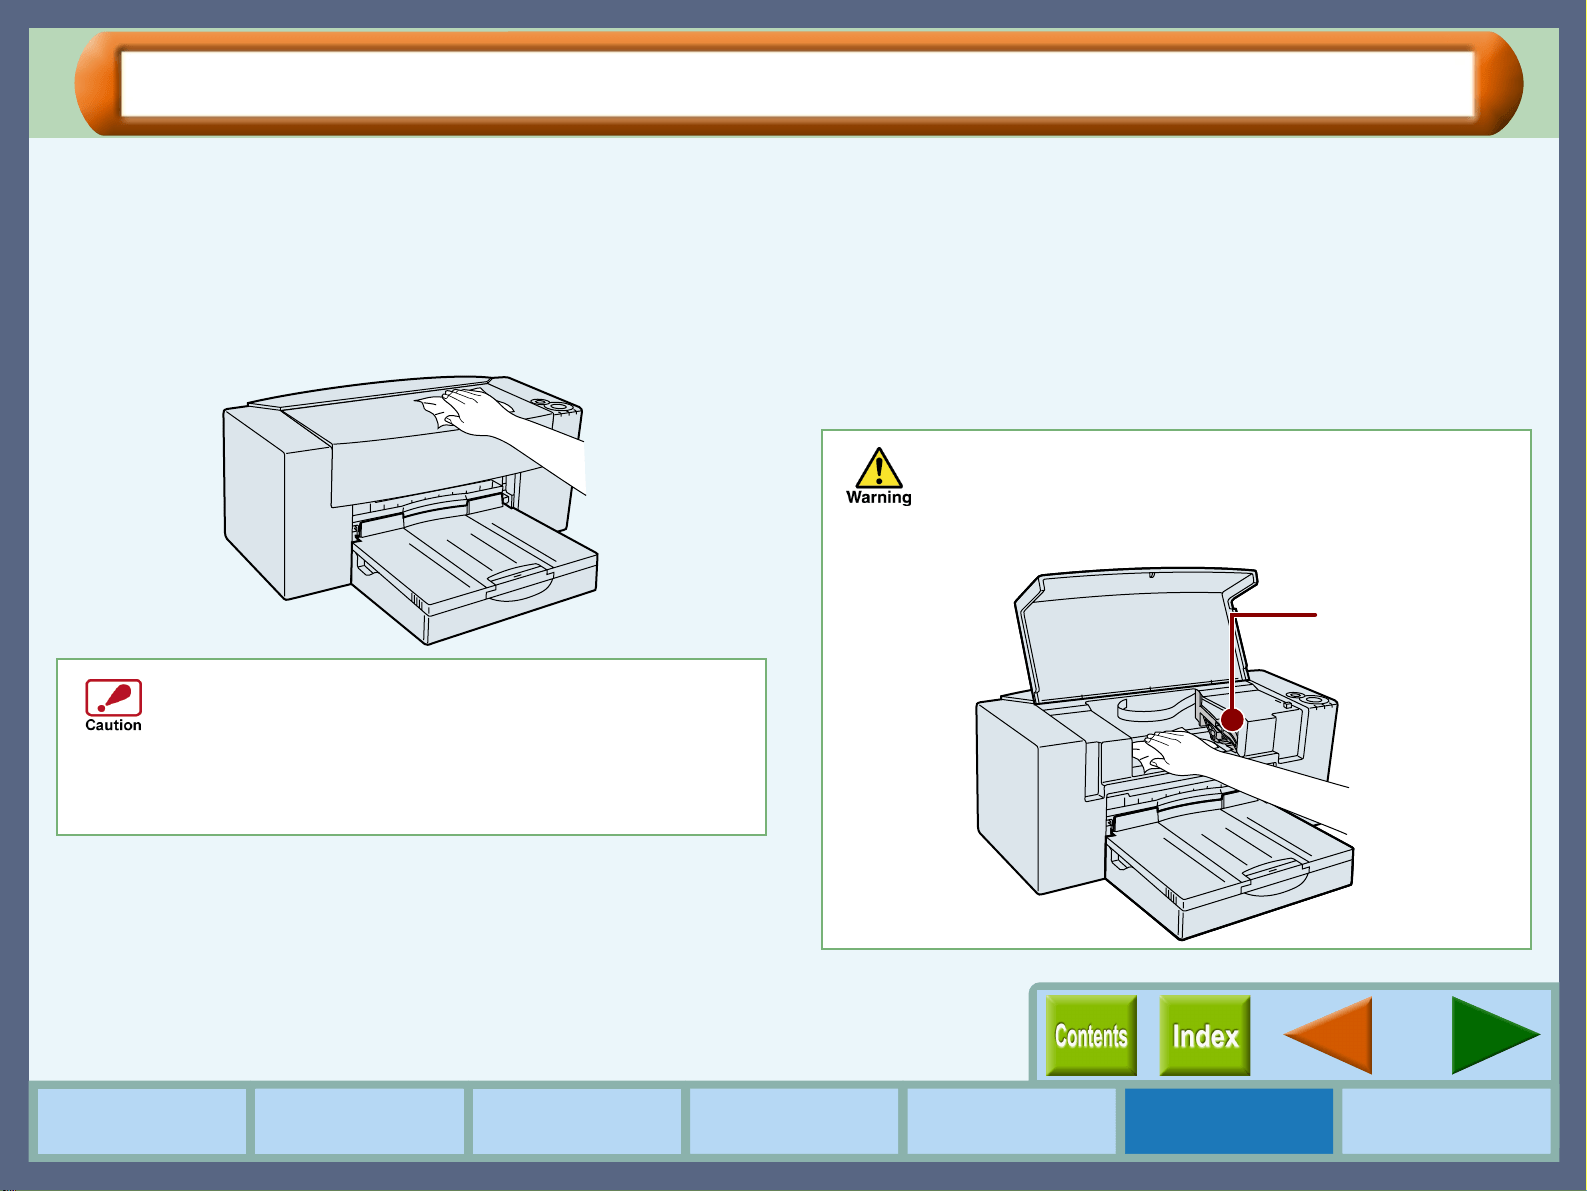
Keeping the Printer Clean
Here are a few points and cautions on cleaning the printer. Take the time to read this page before cleaning.
1
11
1
Turn off the power using the power button, then
unplug the power cord.
2
22
2
Wipe the surface of the printer and the output tray.
Wipe with a soft clean cloth without any loose threads.
3
33
3
Open the front cover.
4
44
4
Check the inside of the printer. If you find stains of
splashed ink, paper dust or dirt, wipe them out with
a soft cloth.
If the dirt is sticky and hard to remove, wipe the dirt away
with a firmly squeezed wet cloth after soaking it in water.
! When wiping the surface of the printer, keep the front
cover closed.
! Do not use cleaning agents containing ammonia,
benzene, or thinner. Cleaning the printer with these
substances will distort, degenerate or discolor the
surfaces.
! When wiping inside the printer, be careful not to hurt
yourself on projections inside it.
! Never wipe the portion around the print heads in the
printer. Doing so will damage the print heads.
Never wipe the
portion around the
print heads.
46
How to Use the
Online Manual
Printer Properties Print
Print Status
Window
Maintenance TroubleshootingSharing Printer
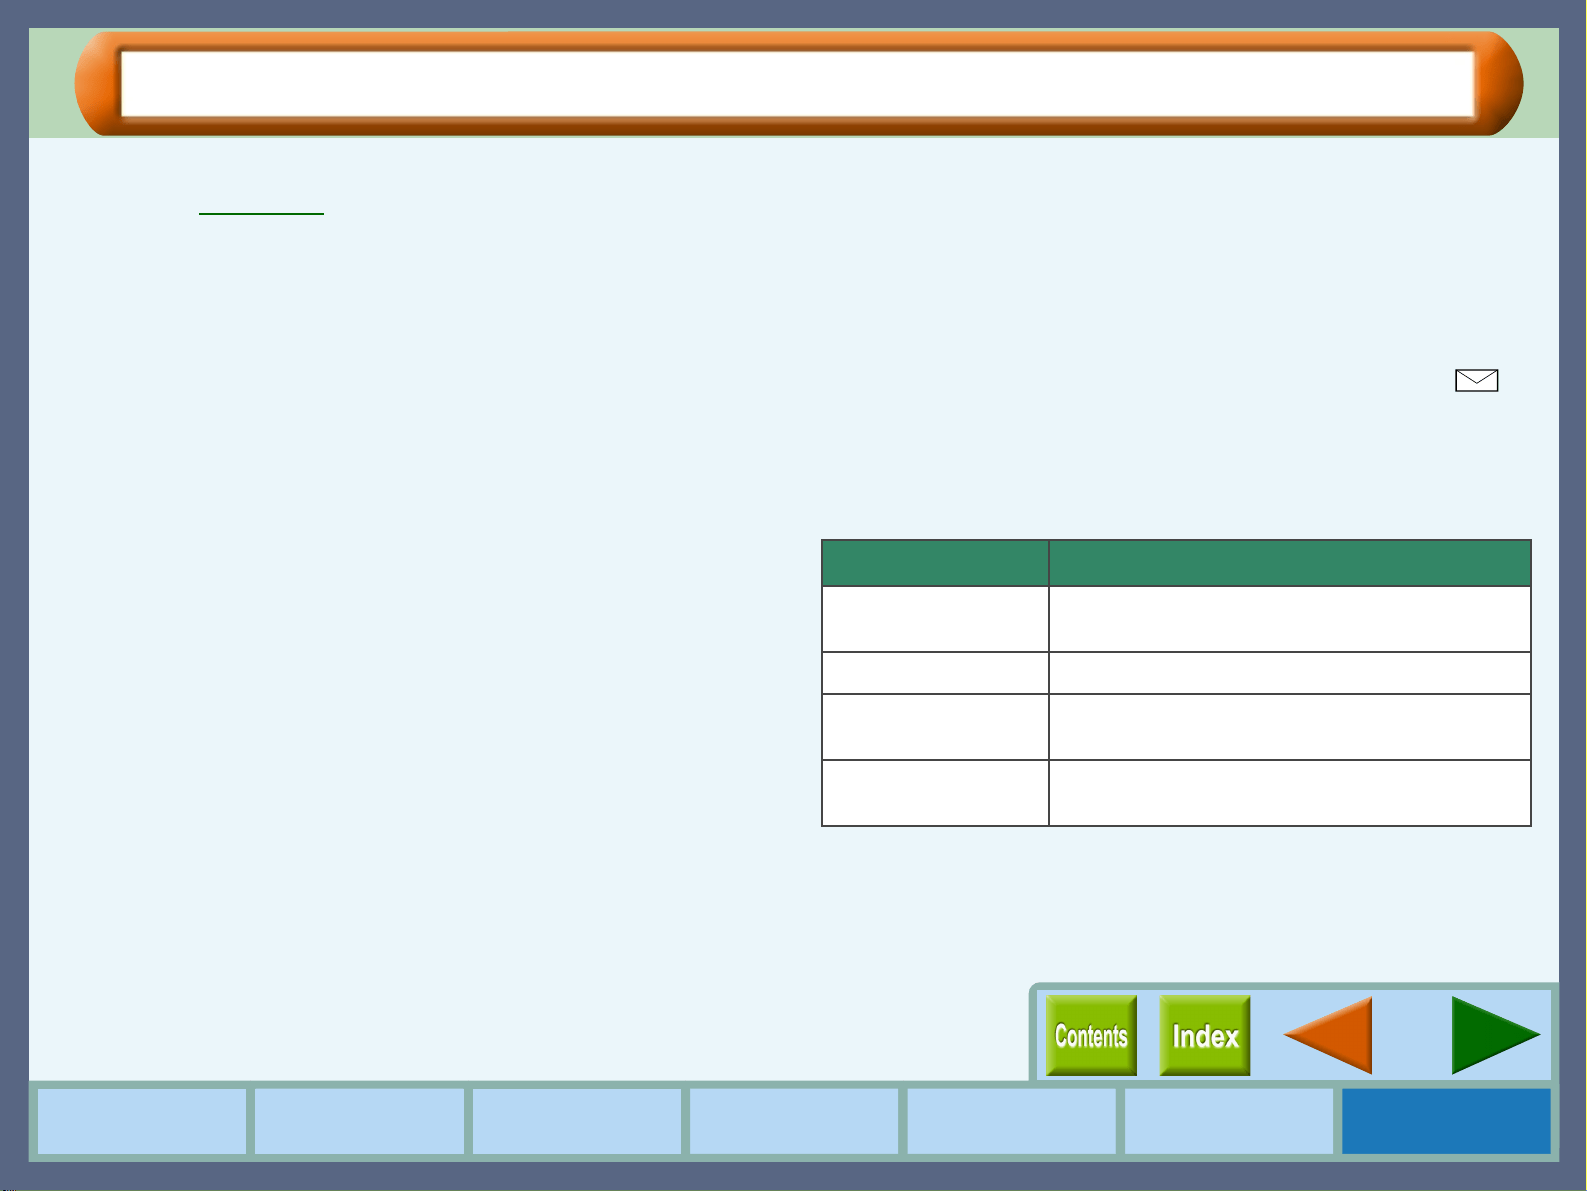
Troubleshooting
Identifying Printer Problems
Click the headings listed below to get information for your printer problem. If you cannot solve your problem after
checking everything on the list, please call 1-800-BE-SHARP.
Paper is not Fed into the Printer
Failed to Install the USB Driver (Windows 98)
Characters or Graphics are not Printed in Correct
Position
Paper Jam
Printer Inoperative
Nothing Prints
Uninstalling the Printer Driver
Faint, Uneven or Smeared Print Output
Unit does not Print in Color
Printing is too Slow
Printed Lines are not Straight, or Have Blank Spaces
47
Troubleshooting
How to Use the
Online Manual
Printer Properties Print
Print Status
Window
Maintenance TroubleshootingSharing Printer
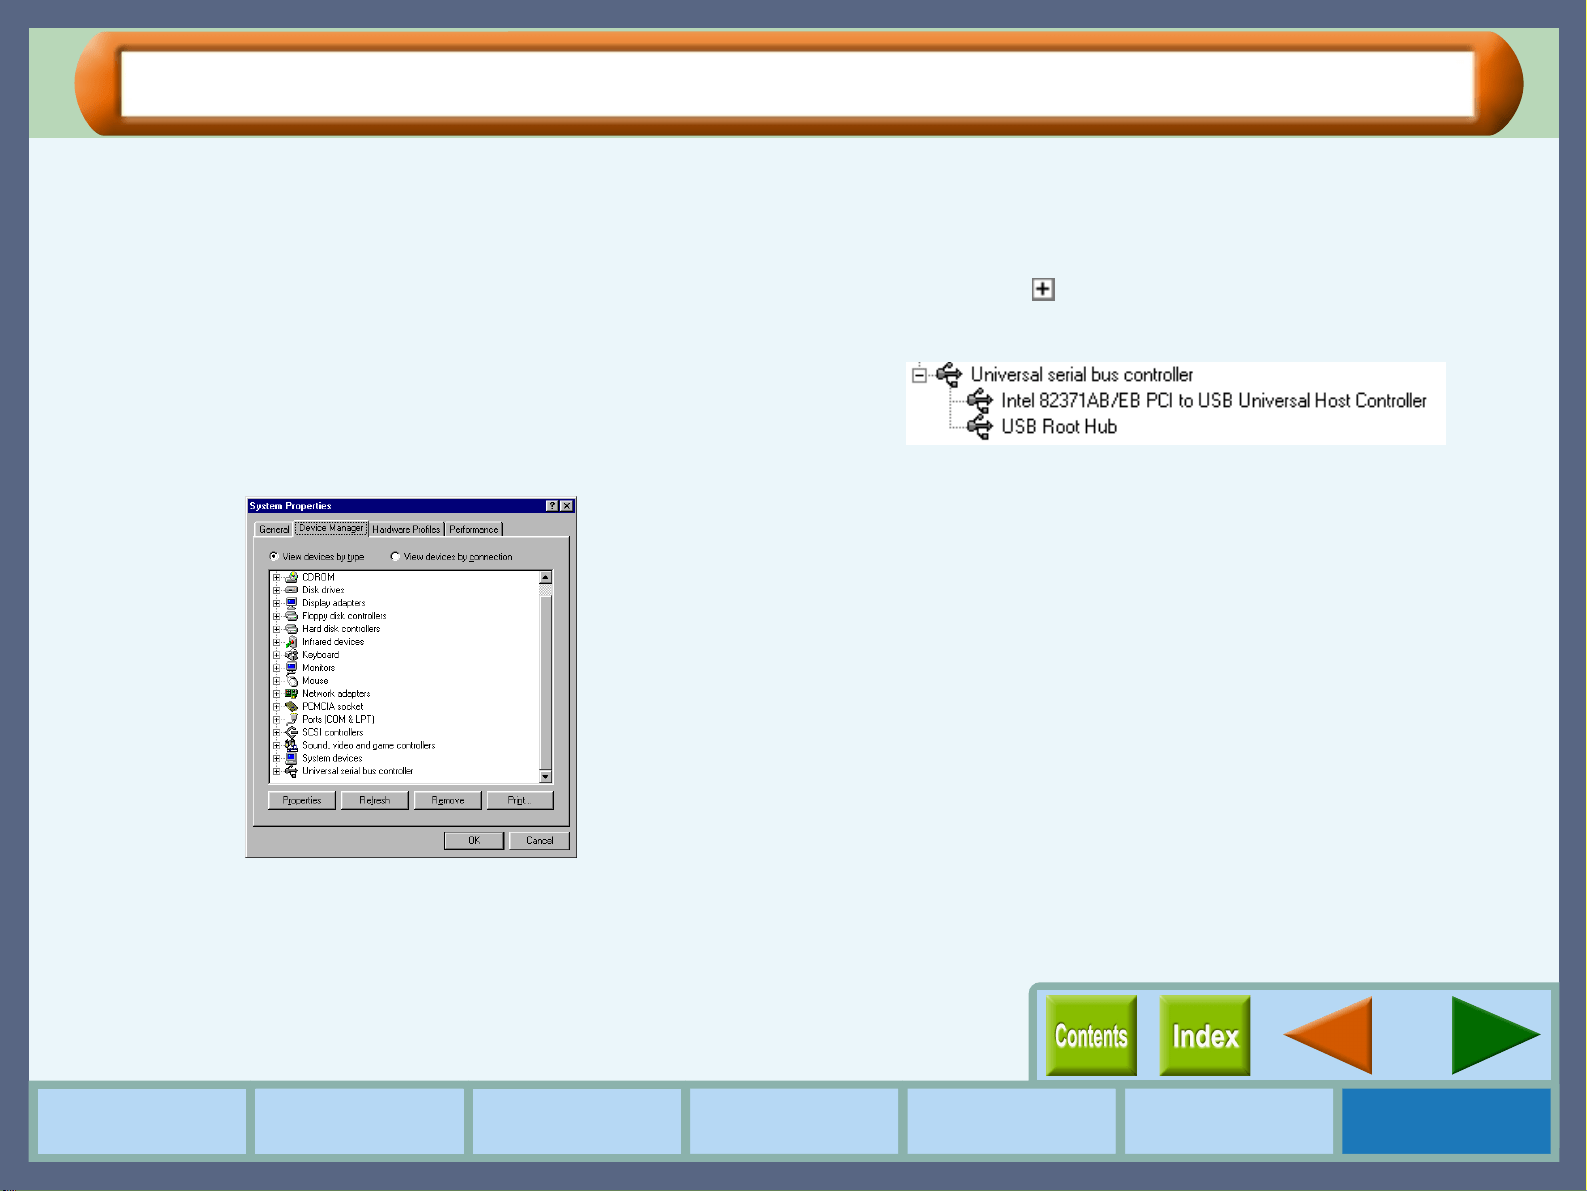
Failed to Install the USB Driver (Windows 98)
If the printer is connected to your computer by USB cable, you must install the USB driver.
If the "Add New Hardware Wizard" window does not appear while the printer and your computer are connected
to each other and both powered on, confirm that the USB port is available following the steps below.
1
11
1
Click the "Start" button, select "Settings", and then
click "Control Panel".
2
22
2
Double-click the "System" icon and click the
"Device Manager" tab.
The last item listed in the Device Manager should be
"Universal serial bus controller".
3
33
3
Click the ( ) icon beside the "Universal serial bus
controller".
Two items will display, your Controller chipset type and
Root Hub. If these items appear, you can use USB port. If the
"Universal serial bus controller" shows a yellow
exclamation point or does not appear, you must check your
computer manual for USB troubleshooting or contact your
computer manufacture.
4
44
4
After the USB port becomes available, install USB
driver referring to "INSTALLING THE USB DRIVER
(Windows 98)" in the Setup Guide and Operation
Manual.
48
Troubleshooting
How to Use the
Online Manual
Printer Properties Print
Print Status
Window
Maintenance TroubleshootingSharing Printer
Paper is not Fed into the Printer (part 1)
If you encounter paper loading problems, refer to the check list below.
Reference:
Paper Jam
CHECK1 Is there too much paper in the paper tray?
Paper tray can hold up to 150 sheets of 20 lbs. (75g/m
2
)
plain paper. Be sure to keep total thickness of the
loaded paper stack below 0.59" (15mm). The bypass
tray can hold 1 sheet of paper only. If too much paper
is loaded into the paper tray, paper supply problems
will occur. Remove some of the paper from the paper
tray.
CHECK2 Is the top of the following paper fed into the
printer?
If overlapping pieces of paper are supplied to the
printer, paper supply problems will occur. Fan the
paper before loading into the printer.
CHECK3 Is the paper guide correctly adjusted to fit
the paper?
If the width of the guide is set too narrow, a paper
supply problem will occur. If the width of the guide is
set too wide, printout will be skewed. Ensure that the
guide is adjusted correctly to the paper.
CHECK4 Is the bypass tray and the paper knob set
to the appropriate position for thick paper?
When loading thick paper through the bypass tray,
open the bypass tray until it reaches position 2 (the tray
has two positions), and turn the paper knob to ( )
direction.
CHECK5 Is the loaded paper too thick or too thin?
Use only paper that meets SHARP specifications for
weight as shown below.
CHECK6 Trouble feeding stiff envelope or heavy
paper?
Feed them one at a time through the bypass.
Type Specifications
Paper 16 lbs. to 110 lbs. index
(60
g
/m
2
to 200
g
/m
2
)
Banner 20 lbs. (75
g
/m
2
)
Envelope 20 lbs. to 24 lbs.
(75
g
/m
2
to 90
g
/m
2
)
Card 110 lbs. index (110
g
/m
2
to 200
g
/m
2
)
Max. thickness: 0.012" (0.3mm)

49
Troubleshooting
How to Use the
Online Manual
Printer Properties Print
Print Status
Window
Maintenance TroubleshootingSharing Printer
Paper is not Fed into the Printer (part 2)
CHECK7 Is the printer on a flat surface?
The printer will not operate correctly when placed on
an uneven surface. Use the printer on a flat surface.
CHECK8 Is the paper curled or folded?
Using curled or old paper may cause paper supply
problems. The use of new paper is recommended.
CHECK9 Did you fan the paper before placing into
the paper tray?
Fan the paper, and tap the edge against a flat surface to
even the stack before loading into the printer.
CHECK10 Is the setting for printing cards or envelops
correct?
When printing onto a card or envelope, insert it in
portrait direction and make sure the correct side will be
printed. When printing onto an envelope, be sure to
turn the paper knob to ( ) direction to adjust the
setting to fit the thickness.
Reference:
See "LOADING PAPER" in the Setup Guide
and Operation Manual for details on
inserting cards and envelopes.
50
Troubleshooting
How to Use the
Online Manual
Printer Properties Print
Print Status
Window
Maintenance TroubleshootingSharing Printer
Paper Jam
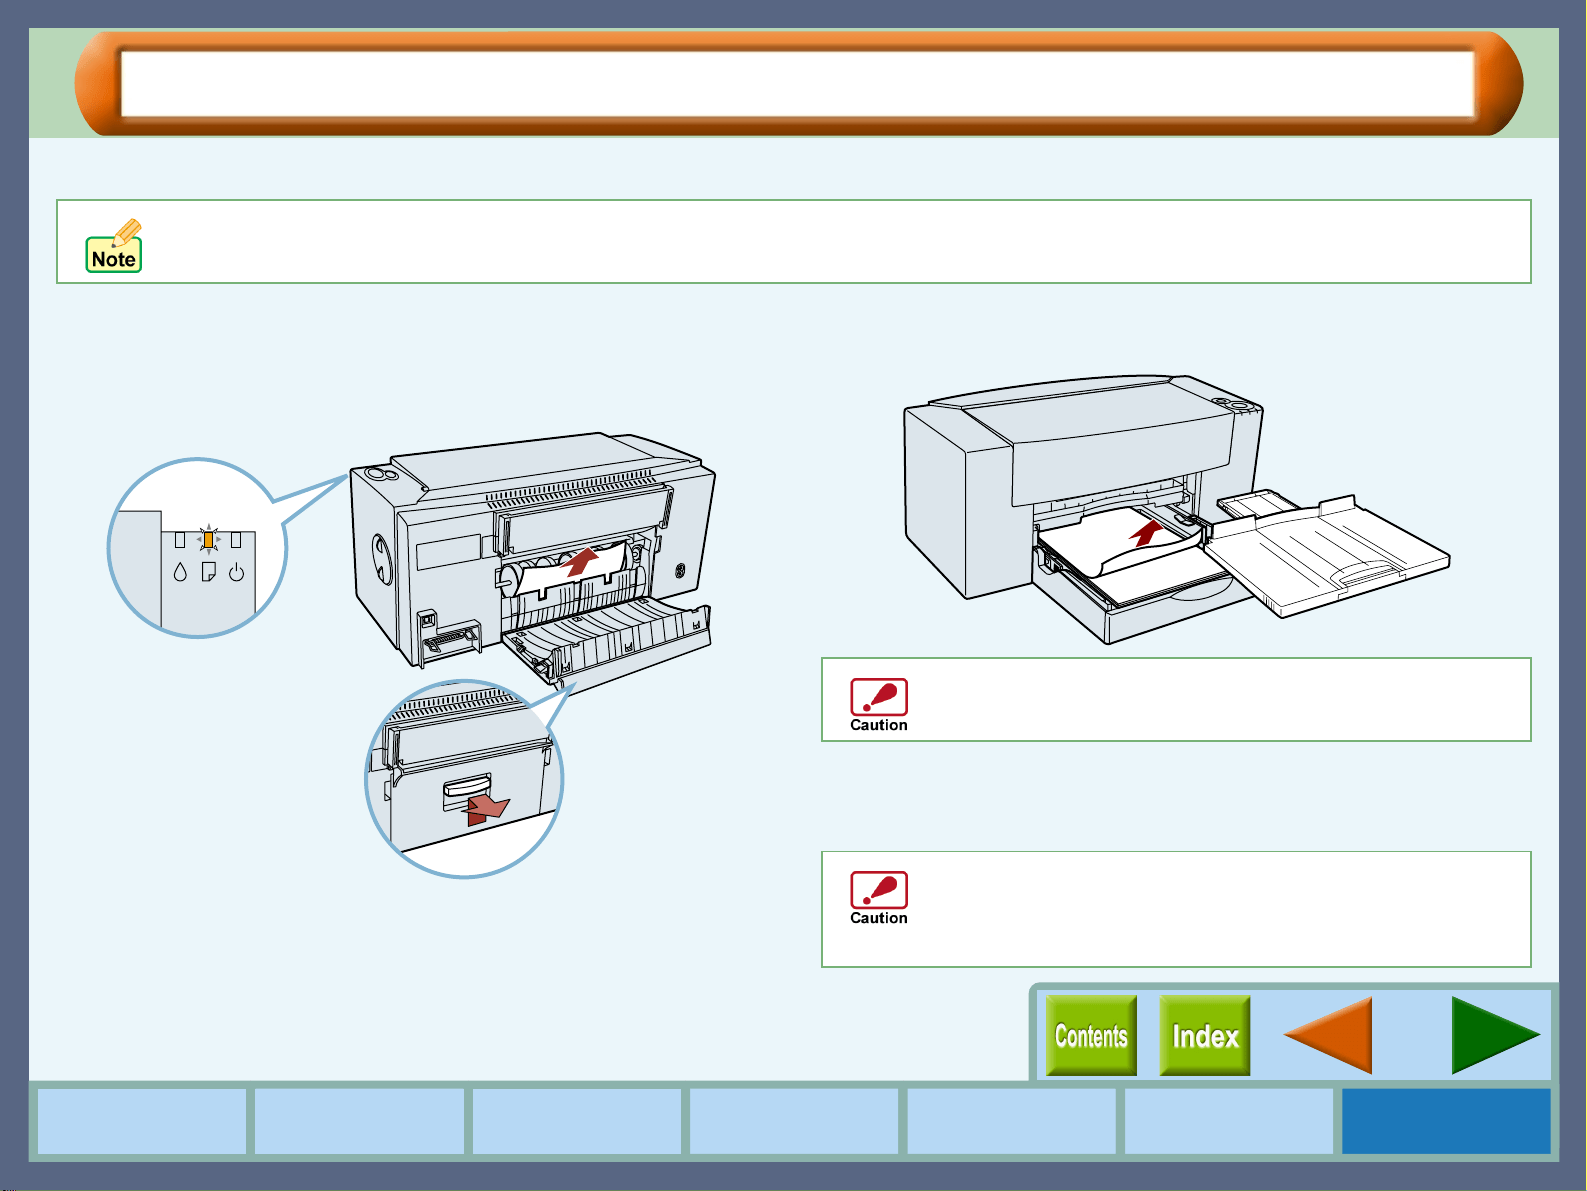
If a paper jam occurs, refer to the steps below to remove the paper.
1
11
1
Open the jam cover located on the rear of the
printer to remove the jammed paper.
Gently pull the jammed paper upward by holding both edges
of the paper.
If you cannot remove the jammed paper from the jam cover,
refer to the next step.
2
22
2
Take off the output tray to remove the jammed
paper.
3
33
3
Close the jam cover, insert the output tray and
press the paper button.
Make sure the paper lamp is not blinking.
When paper is jammed, the paper lamp will blink fast.
After removing the jammed paper, be sure to align the
paper guide to the paper in the paper tray.
If the jammed paper will not come out easily, try pulling
in the opposite direction. Do not pull too hard as this
may damage the printer mechanism. Do not re-use
any sheets of paper that have jammed.

51
Troubleshooting
How to Use the
Online Manual
Printer Properties Print
Print Status
Window
Maintenance TroubleshootingSharing Printer
Printer Inoperative
If the power lamp of the printer does not light up after being turned on, or all of the lamps keep blinking for a long
time, refer to the steps below.
CHECK1 Is the power cord connected?
Securely plug the power cord into the power connector
of the printer and the electrical outlet. The power cord
might not be inserted correctly. After firmly plugging
in the printer, verify whether or not the power lamp has
come on.
Reference:
For details on connecting the printer to an
electrical outlet, see "CONNECTING THE
POWER CORD", in the Setup Guide and
Operation Manual.
CHECK2 Is the printer plugged into a working
electrical outlet?
Connect some other appliance to the electrical outlet to
verify whether the power source is supplying power.
If all the lamps keep blinking
If all the lamps including the power lamp, the ink lamp, and the
paper lamp are blinking, unplug the power cord from the
printer, and then plug it again. If your printer still does not work,
please call 1-800-BE-SHARP.

52
Troubleshooting
How to Use the
Online Manual
Printer Properties Print
Print Status
Window
Maintenance TroubleshootingSharing Printer
Nothing Prints (part 1)
If nothing prints even when the power lamp is lit, please wait a few moments. The printer needs a longer time to
process multicolored or intricate data. If the unit still does not print, refer to the check list below.
Check the connection between the printer and
computer.
CHECK1 Are the interface cables compatible with
the printer and computer?
Interface cables compatible with this printer are USB
and parallel interface cables. If you are using any other
type of interface cable, please change it to the
recommended cable. Check if either type of interface is
supported by your computer.
CHECK2 Is the interface cable connected securely?
Check if the interface cable is securely plugged into the
connectors of the printer and computer. It is also
advisable to ensure that the connector pins are not bent.
Reference:
See "CONNECTING THE INTERFACE
CABLE" in the Setup Guide and Operation
Manual for more details on interface
connection.
CHECK3 Are any other USB peripherals being
connected along with the printer?
If other USB peripherals are connected through the
same hub, disconnect them to see if the problem still
exists.
Check your printer.
CHECK4 Is the front cover properly closed?
Check if the front cover of the printer is securely
closed.
CHECK5 Are the ink tanks and the print heads
installed properly?
Make sure the ink tanks and the print heads are
installed properly.
Reference:
See "INSTALLING THE PRINT HEADS
AND INK TANKS" in the Setup Guide and
Operation Manual for more details on
inserting the ink tank or print head.
CHECK6 Has a paper jam occurred?
Open the jam cover and remove the jammed paper.
Reference:
See Paper Jam, for more information on how
to remove a paper jam.
CHECK7 Can you print a test page?
Depress the paper button on the printer for a few
seconds to print a test page. If you can print a test page,
there may be a problem not with the printer but with the
computer or interface cable.
53
Troubleshooting
How to Use the
Online Manual
Printer Properties Print
Print Status
Window
Maintenance TroubleshootingSharing Printer
Nothing Prints (part 2)
Check your computer.
CHECK8 Is there enough computer memory or hard
disk space?
To use this printer, you must have an adequate amount
of hard disk space. If there is insufficient hard disk
space, delete unnecessary files to increase the free
space of the hard disk. If there is insufficient memory,
close unnecessary applications to increase memory
available for printing. If you are still unable to print,
install more memory into your computer.
CHECK9 Is your printer selected correctly in the
current application for the print job?
When choosing "Print" from the "File" menu located in
applications, be sure you have selected the "SHARP
AJ-1800" or "SHARP AJ-2000" displayed in the
"Print" dialog box.
CHECK10 Has the printer driver been installed
properly?
Check if the printer driver has been installed, following
the steps listed below.
1
11
1
Click the "Start" button, select "Settings" and then
click "Printers".
2
22
2
Check if the "SHARP AJ-1800" or "SHARP AJ-
2000" printer driver icon is shown in the "Printers"
window.
If you still cannot print after confirming the "SHARP
AJ-1800" or "SHARP AJ-2000" printer driver icon, the
printer driver may not have been installed correctly. In
this case, you must uninstall the printer driver and
install the printer driver again.
Reference:
Uninstalling the Printer Driver
If your operating system is Windows 2000, make sure
that either of "SHARP AJ-1800" or "SHARP AJ-2000"
printer driver icon is selected as the current printer.
Check here
54
Troubleshooting
How to Use the
Online Manual
Printer Properties Print
Print Status
Window
Maintenance TroubleshootingSharing Printer
Uninstalling the Printer Driver
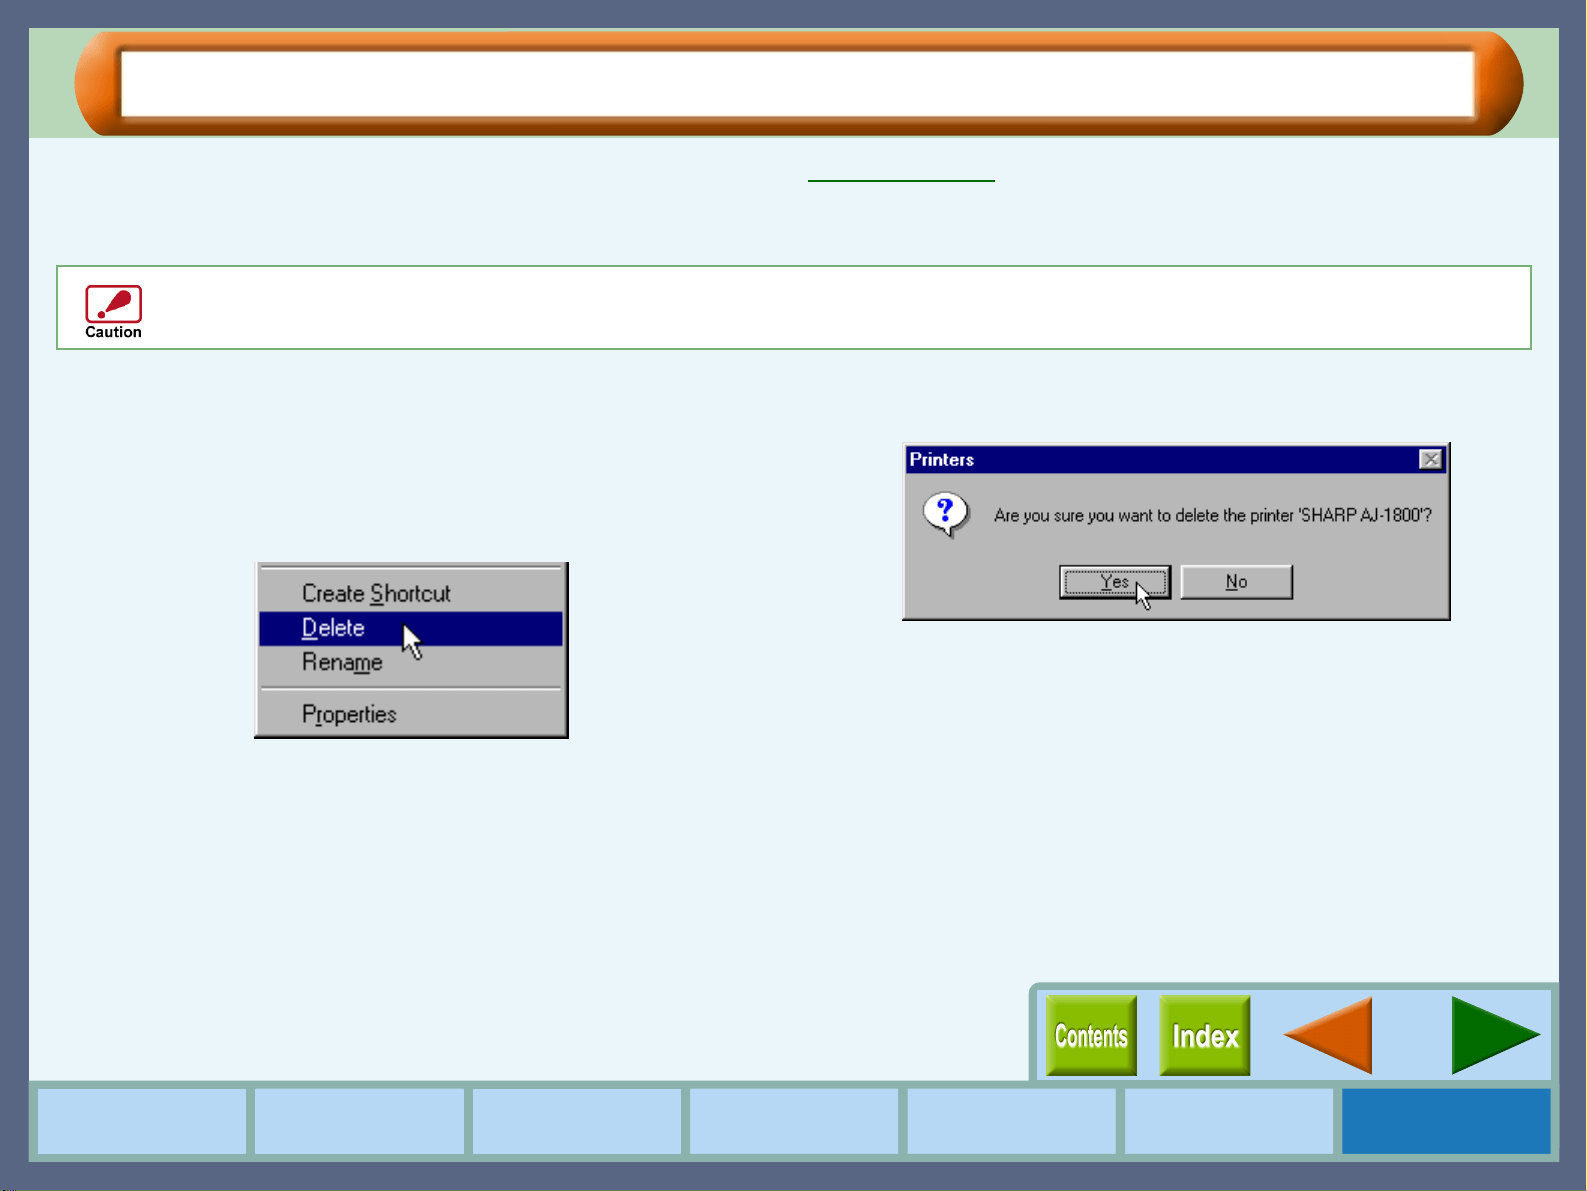
If you cannot print even after following the steps shown in Nothing Prints, you must uninstall the printer driver and
install the printer driver again.
Reference:
See "INSTALLING THE PRINTER DRIVER" in the Setup Guide and Operation Manual.
1
11
1
Click the "Start" button, select "Settings", and then
click "Printers".
2
22
2
Right-click the "SHARP AJ-1800" or "SHARP AJ-
2000" printer driver icon, and select "Delete" from
the pop-up menu.
3
33
3
Click the "Yes" button in the confirmation dialog
box.
You have successfully completed uninstalling the printer
driver.
Before uninstalling the printer driver, close all applications.
55
Troubleshooting
How to Use the
Online Manual
Printer Properties Print
Print Status
Window
Maintenance TroubleshootingSharing Printer
Faint, Uneven or Smeared Print Output
If the print output is faint or uneven
If print output is faint or uneven, refer to checks 1 to 3 below for
possible remedies.
CHECK1 Has the paper been inserted into the printer
with the print side facing the right way?
Some types of paper have only one printable side. Print
quality will suffer if paper is loaded in the tray with the
print side facing the wrong way.
CHECK2 Has the printer driver been specified to suit
both paper and the print job?
Open the properties dialog box, and follow the steps
listed below.
1
11
1
Is the paper specified in the properties dialog box the
same as that loaded in the tray?
Click the "Advanced" tab, and check if the "Media Type"
setting matches the paper inserted in the tray.
2
22
2
Is the print quality setting in the properties dialog box
set to "Draft"?
If the "Print Quality" setting in the "Advanced" tab is set to
"Draft", you can print at higher speed but print quality may
suffer as a result. Specify another setting, and then print
again.
CHECK3 Did you get a clear result for your test
page?
Print a test page to check the print quality. To print a
test page, click the "Start" button of "Test print head"
on the "Maintenance" tab of the print status window.
Reference:
Test Print Head
If the print output is smeared
First turn the paper knob to the ( ) direction and print again.
If the print output is still smeared,
CHECK1 Is the paper too thick or too thin?
Only paper weighing from 16 lbs. to 110 lbs. index
(60g/m
2
to 200g/m
2
) can be used for printing.
CHECK2 Did you set sufficient margins in the paper
settings of your application?
If the margins are set outside of the quality guaranteed
area, smudges or smears may appear at the upper and
lower edges of the paper.
Set margins from your application to fit within the
quality guaranteed area.
Reference:
Quality guaranteed area

56
Troubleshooting
How to Use the
Online Manual
Printer Properties Print
Print Status
Window
Maintenance TroubleshootingSharing Printer
Characters or Graphics are not Printed in Correct Position
If a document is printed skewed or partly off the paper, follow the steps listed below.
CHECK1 Is the paper size loaded in the tray the
same as that specified in the printer driver?
Click the "Paper" tab in the properties dialog box, and
check if the "Paper Size" options suit the size of the
paper loaded in the tray. If the "Fit To Page" setting is
activated, make sure that the paper size selected from
the drop-down list of the "Print xxx on:" option is the
same to the size of the loaded paper.
Example "Print Letter on:" Index card 5" x 8"
CHECK2 Is the orientation of document setting
correct?
Click the "Main" tab in the properties dialog box, and
verify if the "Orientation" option is set to your
requirements.
CHECK3 Did you correctly select the desired value
for "N-Up Printing"?
Confirm the selected value for "Original Size" when
"2-Up" or "4-Up" has been selected for "N-Up
Printing". If you have selected a smaller paper size than
the document size of your application, the image
outside the printable area is not printed.
CHECK4 Is the paper loaded correctly?
If a document is physically damaged as it is output or
the image is skewed on the paper discard the jammed
sheet, reinsert the paper supply and print again. Insert
the paper so that there is no visible space between the
paper and the paper guides.
Reference:
See "LOADING PAPER" in the Setup Guide
and Operation Manual for more details on
inserting paper.
CHECK5 Did you correctly specify the margins for
the application in use?
Check the layout of the document margins and the
paper size settings for the application you are using.
Also check if the print settings are specified correctly
to suit the paper size.
Reference:
Quality guaranteed area
57
Troubleshooting
How to Use the
Online Manual
Printer Properties Print
Print Status
Window
Maintenance TroubleshootingSharing Printer
Printed Lines are not Straight, or Have Blank Spaces
When printed lines are not straight, or have blank spaces, follow the steps listed below.
1
11
1
Specify the print quality setting in the printer
driver.
Click the "Advanced" tab located in the properties dialog
box, and check if the "Print Quality" option is set to "Sharp
Special", "Normal" or "Best".
If you change the setting from "Draft" to any other option
and printed lines are still poor, go to step 2.
Reference:
"Advanced" Tab Settings
2
22
2
Align the print head.
Click the "Maintenance" tab of the print status window and
then click "Start" button of "Print alignment patterns" to
align the print head.
Reference:
Aligning the Print Head

58
Troubleshooting
How to Use the
Online Manual
Printer Properties Print
Print Status
Window
Maintenance TroubleshootingSharing Printer
Unit does not Print in Color
If you are unable to print a document in color, refer to the check list below.
CHECK1 Is the printer driver set to the color print
option?
Click the "Advanced" tab in the properties dialog box,
and change the "Output Type" setting to "Color".
Reference:
"Advanced" Tab Settings
CHECK2 Does the application you are using support
color printing?
Some applications may not support color printing. Use
an application that supports color printing.
For more information, see your application's manual or
help file.

59
Troubleshooting
How to Use the
Online Manual
Printer Properties Print
Print Status
Window
Maintenance TroubleshootingSharing Printer
Printing is too Slow
When execution time of a print job is slow, refer to the check list below.
CHECK1 Does your computer have sufficient
memory?
If you are using a number of applications, memory may
not have enough space to process the print job. Try
closing all other applications to increase the amount of
memory available for printing. If printing is still
excessively slow, you may have to add more memory
into your computer.
CHECK2 Is your hard disk fragmented?
When data is frequently stored/deleted, the hard disk
may become fragmented causing a reduction in
printing speed. In this case it is recommended to
defragment your hard disk. You may use the Windows
tools or a commercially available hard disk
defragmenting tool.
CHECK3 Is the size of the print job too large?
It is recommended to reduce the size of the file by
lowering the resolution of the print data.
Index
Index
"100%" button 11
2-Up 8
"2-Up" Printing 24
4-Up 8
"4-Up" Printing 24
A
"Advanced" Tab Settings 13
Aligning the Print Head 43
Always display print status window 30
Auto head cleaning 29
B
Basic Printing 20
Brightness 15
Bypass 10
C
Changing Ink Tank 35
Changing the Print Head 40
Cleaning the Print Head 39
Client Settings 33
Collate 7
Color 13
Color Balance 15
Color matching 15
Contrast 15
Copies 6
Current Settings 6
Custom Paper 11
D
Display print status window when printing
30
Document Name 27
E
Enlarge/Reduce the Printed Image 23
F
Fit To Page 11
Fit To Paper Size 11
G
Grayscale 13
Guaranteed area 12
H
How to Use the Online Manual 1
I
ICM 15
Identifying Printer Problems 46
inches 11
Ink tank
Indicator window 29
Changing 35
K
Keeping the Printer Clean 45
L
Landscape 7
Length 11
M
"Main" Tab Settings 6
Maintenance 34
"Maintenance" Tab 29
Media Type 14
millimeters 11
N
N-Up Printing 8
O
"Options" Tab 30
Order 7
Orientation 7
"Output Quality" Settings 15
P
Paper Jam 50
Paper Selection 10
Paper Size 10
"Paper" Tab Settings 9
Paper tray 10
Portrait 7
Print 19
Print alignment patterns 29
Print head
Alignment 43
Changing 40
Cleaning 39
Print Quality 14
Print Status Window 26
Print Status Window Off 30
Printable area 12
Printer Problems 46
Printer Properties 2
Printing a Photograph 25
Printing a Watermark 22
Printing Overview 19
Program icon 27
Q
Quality 14
R
Remaining ink indicator window 29
Reverse Order 7
S
Shared Printer Settings 32
Sharing Printer 31
Sharp Color matching 15
Starting the Printer Driver 3
Status icon 27
Status window 27
T
Test Print Head 38
Troubleshooting 46
U
Uninstalling the Printer Driver 54
V
"Version" Tab Settings 18
W
Watermark 17
"Watermark" Tab Settings 16
Width 11
Z
Zoom[%] 11