Documents: Go to download!
User Manual
- Owner's manual - (English)
- User Guide - (English)
- Quick Setup Guide - (English)
- Preparing
- Wall Mounting Bracket
- Lifting and moving the TV
- Mounting on the Table
- Securing TV to the Wall
- Mounting to the Wall
- Using Button
- Adjusting the menu
- Using Remote Control
- Troubleshooting
Table of contents
Preparing
- When theTV is turnedon for the first timeafterbeingshipped from thefactory, initialization of theTV maytakeapproximately one minute.
- Imageshown maydiffer from yourTV.
- YourTV’s OSD (On Screen Display) maydiffer slightlyfrom that shown in this manual.
- Theavailable menusandoptions maydiffer from theinput source orproduct model thatyouareusing.
- New features maybeaddedtothisTV in thefuture.
- Thedevice mustbeeasilyaccessedtoalocation outlet near the access.Somedevicesare not madebyturningon /off button, turningoff thedeviceandunpluggingthepower cord.
- Theitems supplied with yourproduct mayvarydependingupon the model.
- Product specificationsor contentsof this manual maybechanged withoutprior noticeduetoupgradeofproduct functions.
- Foran optimal connection, HDMI cablesand USB devices should havebezels less than 10 mm (0.39inches) thickand18 mm (0.7 inches) width.
- Usean extension cablethat supports USB 2.0if the USB cableor USB flash drivedoes not fit intoyourTV’s USB port.
- Useacertifiedcable with the HDMI logoattached. Ifyoudo notuse acertified HDMI cable, thescreen may notdisplayoraconnection error mayoccur.
- Recommended HDMI cabletypes (3 m (9.84feet)or less)
- Ultra High Speed HDMI cable®/™
-88284.png)
Wall Mounting Bracket
(Dependingupon model)
Makesuretousescrewsand wall mountbracket that meet the VESA standard.Standarddimensions for the wall mountkitsaredescribedin thefollowingtable.
-491059.png)
-896923.png)
Lifting and moving the TV
When movingor liftingtheTV, readthefollowingtoprevent theTV from beingscratchedordamagedandfor safetransportation regardless of its typeandsize.
- It is recommendedto movetheTV in theboxorpacking material that theTV originallycamein.
- Before movingor liftingtheTV,disconnect thepower cordand all cables.
- When holdingtheTV, thescreen shouldfaceawayfrom youto avoiddamage.
-373251.png)
- Holdthetopandbottom of theTV frame firmly. Makesure not to holdthetransparentpart, speaker,or speakergrillearea.
-813715.png)
- Useat least twopeopleto movealargeTV.
- When transportingtheTV by hand, holdtheTV as shown in the followingillustration.
-697156.png)
-884758.png)
- When transportingtheTV,do notexposetheTV tojoltsor excessivevibration.
- When transportingtheTV,keeptheTV upright; never turn theTV on its sideor tilt towards theleftor right.
- When handlingtheTV,becareful not todamagetheprotruding buttons.
- Avoidtouchingthescreen atall times,as this mayresult in damagetothescreen.
- Do notplacetheproducton the floor with its front facing down withoutpadding.Failuretodoso mayresult in damagetothescreen.
- When attachingthestandtotheTV set,placethescreen facingdown on acushionedtableor flat surfacetoprotect thescreen from scratches.
Mounting on the Table
1 Liftandtilt theTV intoitsuprightposition on atable.
• Leavea minimum of10cm (4inches) spacefrom the wall for properventilation.
-384179.png)
2 Connect thepower cordtoa walloutle
-884758.png)
- Do notapplyforeign substances (oils, lubricants,etc.) to thescrew parts when assemblingtheproduct.
- Doingso maydamagetheproduct.)
- Ifyouinstall theTV on astand,you needtotakeactions toprevent theproduct from overturning. Otherwise, the product mayfallover, which maycauseinjury.
- Do notuseanyunapproveditems toensurethesafetyand product lifespan.
- Anydamageor injuries causedbyusingunapproveditems are not coveredbythe warranty.
- Makesurethat thescrewsarefastenedtightly. (If they are not fastenedsecurelyenough, theTV maytilt forward afterbeinginstalled.)
- Do not fasten thescrews with excessiveforceotherwise they maystripandbecomeloose.
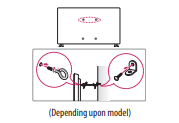
Securing TV to the Wall

- Insertandtighten theeye-bolts,orTV bracketsandboltson theback of theTV.
- If therearebolts insertedat theeye-boltsposition, removethe bolts first.
- Mount the wallbrackets with thebolts tothe wall. Match the location of the wallbracketandtheeye-boltson therearof theTV.
- Connect theeye-boltsand wallbrackets tightly with asturdyrope. Make sure to keep the rope horizontal with the flat surface.
- Use a plat form or cabinet that is strong and large enough to support the TV securely.
- Brackets, bolts and ropes are not provided. You can obtain additional accessories from your local dealer
Mounting to the Wall
An optional wall mount can beused with yourLG Television.Consult with your localdealer fora wall mount that supports the VESA standardusedbyyourTV model.Carefullyattach the wall mount bracketat therearof theTV. Install the wall mountbracketon asolid wallperpendicular tothe floor. IfyouareattachingtheTV toother building materials,pleasecontactqualifiedpersonnel toinstall the wall mount. Detailedinstructions willbeincluded with the wall mount. Werecommendthatyouusean LG brand wall mount.TheLG wall mount iseasytoadjustor toconnect thecables.When youdo notuse LG’s wall mountbracket,usea wall mountbracket wherethedeviceis adequatelysecuredtothe wall with enough spacetoallow connectivity toexternaldevices. Ifyouareusinga non-adjustable mount,attach the mount tothe wall. Attach thecables totheTV first, then attach theTV tothe mount.
-70639.png)
-884758.png)
- RemovethestandbeforeinstallingtheTV on a wall mountbyperformingthestandattachment in reverse.
- For moreinformation of screwsand wall mountbracket, refer totheSeparatepurchase.
- Ifyouintendto mount theproduct toa wall,attach VESA standard mountinginterface(optionalparts) totheback of theproduct.When youinstall theset tousethe wall mountingbracket (optionalparts), fixit carefullysoas not todrop.
- When mountingaTV on the wall, makesure not toinstall theTV by hangingthepowerandsignal cableson the backof theTV.
- Do not install thisproducton a wall if it couldbeexposed tooiloroil mist.This maydamagetheproductandcause it tofall.
- When installingthe wall mountingbracket, it is recommendedto cover thestand holeusingtape, in order toprevent theinfluxof dustandinsects, (Dependingupon model).
-846571.png)
Antenna/Cable
Connectan antenna, cable,or cableboxto watch TV whilereferringto thefollowing.Theillustrations maydiffer from theactual itemsandan RFcableisoptional.
- Makesure not tobendthecopper wireof the RFcable
-128342.png)
- Complete all connections between devices, and then connect the power cord to the power outlet to prevent damage to your TV.
- Use a signal splitter touse2TVsor more.
- DTV Audio Supported Codec: MPEG, Dolby Digital
- This TV cannot receive ULTRA HD (3840x2160pixels)broadcasts directly because there lated standards have not been confirmed.
External Devices
- Supported external devices are: Blu-rayplayer, HD receivers, DVD players, VCRs,audiosystems, USB storage devices,PC,gaming devices, and other external devices.For more information on external device’s connection, refer tothe manual provided with each device.
- IfyourecordaTV program on a Blu-ray/DVD recorderor VCR, make suretoconnect theTV signal input cabletotheTV through a DVD recorderor VCR.For more information about recording, refer to the manual provided with the connected device.
- The external device connections shown may differ slightly from illustrations in a manual.
- Connect external devices totheTV regar dless about the order of the TV port.
- IfyouconnectagamingdevicetotheTV,usethecablesupplied with thegamingdevice.
- Refer totheexternalequipment’s manual foroperating instructions.
- In PC mode, there maybe noiseassociated with theresolution, verticalpattern, contrastorbrightness. If noiseispresent, change thePCoutput toanother resolution, changetherefresh rateto another rateoradjust thebrightnessandcontraston the[Picture] menuuntil thepictureis clear. Dependingupon thegraphics card, someresolution settings may notallow theimagetobepositioned on thescreen properly.
- Some USB Hubs may not work. Ifa USB deviceconnectedthrough a USB Hubis notdetected, connect itdirectlytothe USB porton theTV.
- When connectingviaa wiredLAN, it is recommendedtouseaCAT 7cable.
- TheTV maybecapableofoperating withoutaset-top-boxfrom a multichannelvideoprogrammingdistributor (MVPD).
Using Button
You can simply operate theTV functions,using the button
-904472.png)
Basic functions
-232976.png)
1 All runningapps will close.
2 You can access and adjust the menu by pressing the button when TV ison.
3 You can use the unction when you access menu control.
Adjusting the menu
When the TV is turned on, press the button one time.You can adjust the Menu items using the button.
-216162.png)
Using Remote Control
(Dependingupon model)
The descriptions in this manualarebasedon the buttons on the remote control. Please read this manual carefullyandusetheTV correctly. Toinstallbatteries, open the battery cover, replace batteries (1.5 V AAA) matching the -346085.png) and
and -218948.png) ends to the label inside the compartment, and close the battery cover. To remove the batteries, perform the installation actions in reverse. This remote uses infrared light. When in use, it should be pointed in the direction of the TV’s remote sensor. Make sure to point the remote control toward the remote control sensor on the TV.
ends to the label inside the compartment, and close the battery cover. To remove the batteries, perform the installation actions in reverse. This remote uses infrared light. When in use, it should be pointed in the direction of the TV’s remote sensor. Make sure to point the remote control toward the remote control sensor on the TV.
-472915.png)
-563876.png)
-957254.png)
Using Magic Remote Control
(Dependingupon model)
The descriptions in this manual are based on the buttons on the remote control. Please read this manual carefully and use the TV correctly. When the message [ Magic remote battery is low. Please change the battery.] is displayed, replace the batteries.
To install batteries, open the battery cover, replace batteries (1.5 V AA) matching the -346085.png) and
and -218948.png) ends to the label inside the compartment, and close the battery cover. Be sure to point the magic remote toward the remote control sensor on the TV. To remove the batteries, perform the installation actions in reverse. This remote uses infrared light. When in use, it should be pointed in the direction of the TV ’s remote sensor.
ends to the label inside the compartment, and close the battery cover. Be sure to point the magic remote toward the remote control sensor on the TV. To remove the batteries, perform the installation actions in reverse. This remote uses infrared light. When in use, it should be pointed in the direction of the TV ’s remote sensor.
-152549.png)
-937509.png)
-618087.png)
Troubleshooting
Cannot control the TV with the remote control.
- Check if anything such as tape has been placed over the receiver.
- Check if thereisanyobstaclebetween the product and the remote control.
- Replace the batteries with new fresh ones.
Noimagedisplayand nosoundisproduced.
- Check if the product is turned on.
- Check if the power cord is connected to a wall outlet.
- Check if there is a problem in the wall outletbyconnectingother products.
The TV turns off suddenly.
- Check the power control settings. The power supply may be interrupted.
- Checkif the auto-off function is activated in the settings menu.
- If there is no signal while the TV is on, the TV will turn off automaticallyafter15 minutes of inactivity
Abnormal Display
- If theTV feels cold to the touch, there may be a small flicker when it is turned on. This is normal; there is nothing wrong with TV. Some minute dot defects may be visible on the screen, appearing as tinyred,green,orbluespots. However, they have noadverse effecton theTV’sperformance. AvoidtouchingtheLCD screen or holding your finger(s)against it for long periods of time. Doing so may producesometemporarydistortion effectson the screen.
- Thispanel isan advancedproduct that contains millions of pixels. In a very few cases, you could see fine dots on thescreen while you’reviewingtheTV.Thosedotsaredeactivatedpixelsanddo not affect theperformanceandreliabilityof the TV.
- Displayingastill imageforaprolongedperiodof time maycause an imagesticking. Avoiddisplayinga fixedimageon theTV screen foraextendedlength of time.
Generated Sound
- Cracking noise A cracking noise that occurs when watching or turning off the TV isgeneratedbyplastic thermal contraction due totemperatureand humidity.This noiseis common forproducts wherethermaldeformation is required.
- Electrical circuit humming/panel buzzing A low level noise isgeneratedfrom a high-speed switchingcircuit, which suppliesa largeamountof current to operate a product. It varies depending upon the product.This generated sound does not affect the performance and reliabilityof theproduct.
-797239.png)
When cleaning the product,becareful not toallow any liquidor foreign objects toenter thegapbetween the upper, leftor right sideof thepanelandtheguidepanel, (Dependingupon model).
• Make sure to wring any excess water or cleaner from the cloth.
• Do not spray water or cleanerdirectly on to theTV screen.
• Make sure to spray just enough of wateror cleaner on to a dry cloth to wipe the screen.
See other models: LGD803 DLGX2902V 49UK6470PLC 55SJ950V 50LA6205

