User Manual Electric Cooktop
IMPORTANT SAFETY INSTRUCTIONS
WARNING: To reduce the risk of fire, electrical shock, injury to persons, or damage when using the cooktop, follow basic precautions, including the following:
- CAUTION: Do not store items of interest to children in cabinets above a cooktop – Children climbing on the cooktop to reach items could be seriously injured.
- Proper Installation – Be sure your cooktop is properly installed and grounded by a qualified technician.
- Never Use Your Cooktop for Warming or Heating the Room.
- Do Not Leave Children Alone – Children should not be left alone or unattended in area where cooktop is in use. They should never be allowed to sit or stand on any part of the cooktop.
- Wear Proper Apparel – Loose-fitting or hanging garments should never be worn while using the cooktop.
- User Servicing – Do not repair or replace any part of the cooktop unless specifically recommended in the manual. All other servicing should be referred to a qualified technician.
- Storage on Cooktop – Flammable materials should not be stored near surface units.
- Do Not Use Water on Grease Fires – Smother fire or flame or use dry chemical or foam-type extinguisher.
- Use Only Dry Potholders – Moist or damp potholders on hot surfaces may result in burns from steam. Do not let potholder touch hot heating elements. Do not use a towel or other bulky cloth.
- DO NOT TOUCH SURFACE UNITS OR AREAS NEAR UNITS – Surface units may be hot even though they are dark in color. Areas near surface units may become hot enough to cause burns. During and after use, do not touch, or let clothing or other flammable materials contact surface units or areas near units until they have had sufficient time to cool. Among those areas are the cooktop and surfaces facing the cooktop.
- Use Proper Pan Size – This cooktop is equipped with one or more surface units of different size. Select utensils having flat bottoms large enough to cover the surface unit heating element. The use of undersized utensils will expose a portion of the heating element to direct contact and may result in ignition of clothing. Proper relationship of utensil to burner will also improve efficiency
- Never Leave Surface Units Unattended at High Heat Settings – Boilover causes smoking and greasy spillovers that may ignite.
- Glazed Cooking Utensils – Only certain types of glass, glass/ceramic, ceramic, earthenware, or other glazed utensils are suitable for cooktop service without breaking due to the sudden change in temperature.
- Utensil Handles Should Be Turned Inward and Not Extend Over Adjacent Surface Units – To reduce the risk of burns, ignition of flammable materials, and spillage due to unintentional contact with the utensil, the handle of a utensil should be positioned so that it is turned inward, and does not extend over adjacent surface units.
- Do Not Cook on Broken Cooktop – If cooktop should break, cleaning solutions and spillovers may penetrate the broken cooktop and create a risk of electric shock. Contact a qualified technician immediately.
- Clean Cooktop With Caution – If a wet sponge or cloth is used to wipe spills on a hot cooking area, be careful to avoid steam burn. Some cleaners can produce noxious fumes if applied to a hot surface. For units with ventilating hood
- Clean Ventilating Hoods Frequently – Grease should not be allowed to accumulate on hood or filter.
- When flaming foods under the hood, turn the fan on. For units with coil elements –
- Make Sure Reflector Pans or Drip Bowls Are in Place – Absence of these pans or bowls during cooking may subject wiring or components underneath to damage.
- Protective Liners – Do not use aluminum foil to line surface unit drip bowls, except as suggested in the manual. Improper installation of these liners may result in a risk of electric shock, or fire.
- Do Not Soak Removable Heating Elements - Heating elements should never be immersed in water.
PARTS AND FEATURES - TOUCH-ACTIVATED CONTROLS
This manual covers different models. The cooktop you have purchased may have some or all of the items listed. The locations and appearances of the features shown here may not match those of your model.
Control Panels
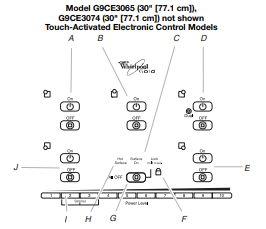
A. Left rear touch control
B. Center rear touch control (warming function)
C. ON surface indicator
D. Right rear touch control
E. Right front touch control (dual-size element)
F. Control lock indicator
G. All off (hold 3 seconds)
H. Hot surface indicator
I. Increase/decrease temperature touch control
J. Left front touch control
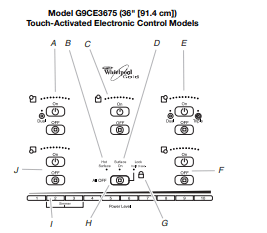
A. Left rear touch control (dual-size element)
B. Hot surface indicator
C. Center rear touch control
D. ON surface indicator
E. Right rear touch control (dual/triple-size element)
F. Right front touch control
G. Control lock indicator
H. All off (hold 3 seconds)
I. Increase/decrease temperature touch control
J. Left front touch control
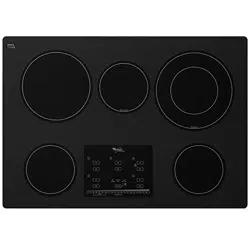
Cooktop
30" (78.4 cm) Model G9CE3065 Touch-Activated Electronic Control Model shown
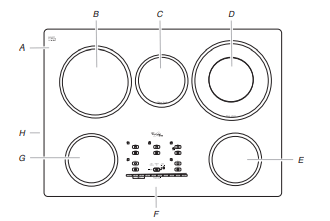
A. Ceramic glass cooktop
B. Left rear surface cooking area
C. Center rear warming zone
D. Right rear surface cooking area (with dual-size element)
E. Right front surface cooking area
F. Control panel
G. Left front surface cooking area
H. Model and serial number plate (located underneath cooktop on metal cabinet)
COOKTOP CONTROLS - TOUCH-ACTIVATED CONTROLS
The electronic touch controls offer a variety of heat settings for optimal cooking results. When you are melting foods such as chocolate or butter, or when proofing bread, the surface cooking area can be set to Power Level 1 for minimal element operation. For maximum element operation, all cooktop touch controls can be set to High when bringing liquids to a fast and rapid boil. Touch Power Level 10 to immediately reach the highest setting.
To Use:
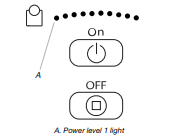
1.Touch the ON keypad for the desired element. The Power Level 1 light will blink.
2. While the Power Level 1 light is blinking, touch the desired power level on the Power Level selector bar.
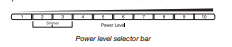
A beep will sound each time a pad is touched. The lights for the selected temperature setting and all lower temperatures will glow.
NOTE: If a power level setting is not selected within approximately 10 seconds, the element will automatically shut off.
3. To change the temperature setting while cooking, touch the ON keypad for the desired element and select a new Power Level temperature on the Power Level selector bar while the Power Level 1 light is blinking.
4. When finished cooking, touch OFF to turn off surface cooking area(s) individually or ALL OFF/LOCK to turn off all surface cooking areas at once.
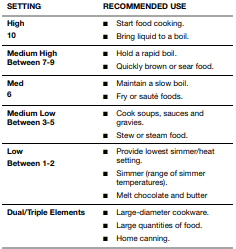
Use the following chart as a guide when setting heat levels:
REMEMBER: When cooktop is in use, the entire cooktop area may become hot.
Hot Surface Indicator Light
The Hot Surface Indicator Light is located in the central area of the control panel, above the Power Level selector bar. The Hot Surface Indicator Light will glow as long as any surface cooking area is too hot to touch, even after the surface cooking area(s) is turned off.
If the cooktop is on when a power failure occurs, the Hot Surface Indicator Light will remain on up to 45 minutes after the power is restored to the cooktop.
Component Temperature Management
The cooktop regulates the temperature of the internal components during use. The cooktop automatically reduces the power of all the elements in use to keep the internal components from overheating. To resume optimal cooking performance, allow the cooktop to cool down for 30 minutes.
Surface On Indicator Light
The control panel has a Surface On indicator light. When any of the elements are on, the light will glow. The power level 1 light next to an element will glow when that element is on.
Dual/Triple Element
The dual and triple elements offer flexibility depending on the size of the cookware. Single size can be used in the same way as a regular element. The dual and triple sizes combine single, dual and outer elements, and are recommended for larger cookware, large quantities of food, and home canning.
Triple Element (on some models)
A. Single size
B. Dual size
C. Triple size
Dual Element

A. Single element
B. Dual element
To Use DUAL and TRIPLE:
1. When ON is touched, all heating zones will be active. To reduce the number of heating zones being used, touch ON again. Power Level 1, the dual, or the dual and triple indicators will glow to indicate if the burner will use 1, 2, or 3 zones respectively

2. While the Power Level 1 light is blinking, touch the desired Power Level on the Power Level selector bar.

A beep will sound each time a pad is touched. The lights for the selected temperature setting, and all lower temperatures, will glow.
NOTE: If a power level setting is not selected within approximately 10 seconds, the element will automatically shut off.
3. To change the temperature setting while cooking, touch the ON pad for the desired element, and select a new temperature on the Power Level Selector Bar while the Power Level 1 light is blinking.
4. To change the burner zones being used while cooking, touch ON once then again while the Power Level 1 light is blinking.
5. When finished cooking, touch OFF to turn off surface cooking area(s) individually or ALL OFF/LOCK to turn off all surface cooking areas at once.
NOTE: The dual and triple elements will remember the setting from the last time it was used and those burner areas will automatically activate the next time ON is touched. To change the activated burner zones, touch ON once while the Power Level 1 light is blinking.
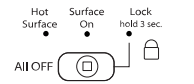
All Off/Lock
The ALL OFF cooktop touch control turns off the downdraft exhaust system and all surface cooking areas that are in use at the same time. The LOCK cooktop touch control avoids unintended use of the surface cooking areas. When the cooktop is locked out, the surface cooking areas cannot be turned on by the cooktop touch controls.
To Lock Cooktop:
Touch and hold the ALL OFF/LOCK keypad for 3 seconds. After 3 seconds, ALL OFF/LOCK will glow red, indicating that the cooktop controls are in the lockout position.
To Unlock Cooktop:
Touch and hold the ALL OFF/LOCK keypad for 3 seconds.
Keep Warm
The Keep Warm surface cooking area can be used to keep cooked foods warm, and may be used whether or not the other surface cooking zones are in use. One hour is the recommended maximum time to maintain food quality. It is not recommended for heating cold foods. When the Keep Warm function is in use, it will not glow red like the cooking zones, but the indicator light will glow on the control panel. Use only cookware and dishes recommended for oven and cooktop use, and those that have flat bottoms to make direct contact with the cooktop surface. Use pot holders or oven mitts to remove cookware
Cover all foods with a lid or aluminum foil. Do not use plastic wrap to cover food, as it may melt onto the cooktop surface. When warming baked goods, allow a small opening in the cover for moisture to escape. Food quality may deteriorate if food is kept on the Keep Warm function for an extended period of time. For best results, keep food warm for no longer than 30 to 45 minutes. A separate Keep Warm surface cooking area is available on some models.
To Use the Keep Warm Surface Cooking Area (on some models):
1. Touch ON keypad for the Keep Warm Surface cooking area. Power Level 1 light will blink.
2. While the Power Level 1 light is blinking, touch the desired power level on the Power Level selector bar.

3. When finished cooking, touch OFF to turn off surface cooking area.
PARTS AND FEATURES - KNOB CONTROLS
This manual covers different models. The cooktop you have purchased may have some or all of the items listed. The locations and appearances of the features shown here may not match those of your model.
Control Panels
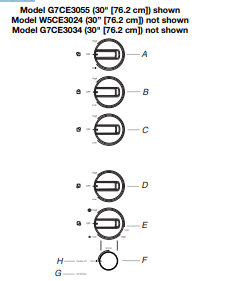
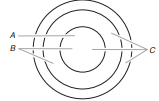
A. Left rear control knob
B. Center rear control knob
C. Right rear control knob (keep warm element)
D. Left front control knob
E. Right front control knob (dual-zone burner)
F. ACCUSIMMER® control knob
G. Hot surface indicator light
H. Cooktop on indicator light
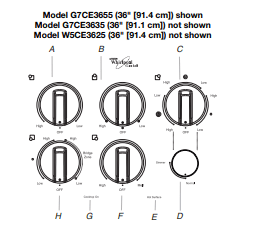
A. Left rear control knob
B. Center rear control knob (keep warm element)
C. Right rear control knob (with triple-size element)
D. ACCUSIMMER® control knob
E. Hot surface indicator light
F. Right front control knob
G. Cooktop on indicator light
H. Left front control knob (dual-size bridge element)
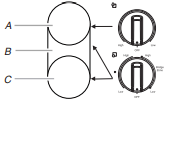
Cooktops
Model G7CE 3655 (36" [91.4 cm]) shown
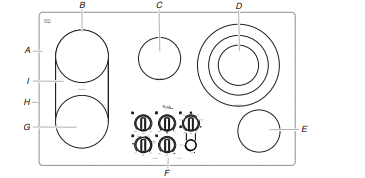
A. Ceramic glass cooktop
B. Left rear single surface cooking area
C. Center rear warming zone
D. Right rear surface cooking area (with triple-size element)
E. Right front surface cooking area
F. Control panel
G. Left front surface cooking area (dual-size bridge burner)
H. Model and serial number plate (located underneath cooktop on metal cabinet)
I. Bridge element
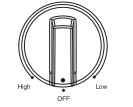
COOKTOP CONTROLS - KNOB CONTROLS
The controls can be set to anywhere between HIGH and LOW
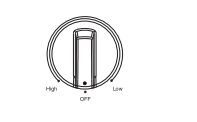
To Use:
1. Push in and turn knob to desired heat setting. Use the following chart as a guide when setting heat levels.
REMEMBER: When cooktop is in use, the entire cooktop area may become hot.
Hot Surface Indicator Lights (on Standard Control models)
The Hot Surface Indicator Lights will glow as long as any surface cooking area is too hot to touch, even after the surface cooking area(s) is turned off
If the cooktop is on when a power failure occurs, the Hot Surface Indicator Lights will remain on after the power is restored to the cooktop. They will remain on until the cooktop has cooled completely.
Power Light
Each cooktop has a Power On light. The light will glow when any burner is on.
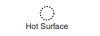
Dual/Triple-Circuit Element (on some models)
The dual-size and triple-size elements offer flexibility depending on the size of the cookware. Single size can be used in the same way as a regular element. The dual and triple sizes combine single, dual and outer element and are recommended for larger cookware, large quantities of food, and home canning.
Triple Element (on some models)
A. Single size
B. Dual size
C. Triple size
Dual Element

A. Single size
B. Dual size
A. Triple zone
B. Dual zone
C. Single zone
To Use SINGLE:
- Push in and turn knob from the OFF position to the SINGLE zone anywhere between Low and High.
- Turn knob to OFF when finished.
To Use DUAL and TRIPLE:
- Push in and turn knob from the OFF position to the DUAL or TRIPLE zone anywhere between Low and High.
- Turn knob to OFF when finished.
Bridge Element (on some models)
The bridge element allows flexibility in the left side cooking area.
Use the bridge area to create an oblong heated area to cook with large cookware.
A. Single size
B. Bridge area
C. Single size
Use the bridge element to create an oblong heated area to cook with oblong pans.
To use SINGLE (C):
- Push in and turn front left knob from OFF position to the SINGLE zone anywhere between Low and High.
- Turn knob to OFF when finished.
To use SINGLE and BRIDGE area (C + B):
- Push in and turn front left knob from OFF position to the BRIDGE zone anywhere between Low and High.
- Turn knob to OFF when finished.
To use SINGLE (A):
- Push in and turn rear left knob from OFF position anywhere between Low and High.
- Turn knob to OFF when finished.
To use both Single elements and Bridge (A + B + C):
- Turn on Single and Bridge (C + B).
- Turn on Single (A).
- Turn knobs to OFF when finished.
Warm Zone Ement (leon some models)
The Warm Zone feature can be used to keep cooked foods warm. One hour is the recommended maximum time to maintain food quality.
Do not use it to heat cold foods.
When the Keep Warm function is in use, it will not glow red like the cooking zones, but the indicator light will glow on the control panel.
The Warm Zone feature can be used alone or when any of the other surface cooking areas are being used, and can be set from Low to High for different levels of heating.
The Warm Zone Element area will not glow red when cycling on. However, the hot surface indicator light will glow as long as the Warm Zone Element area is too hot to touch.
- Use only cookware and dishes recommended for oven and cooktop use.
- Cover all foods with a lid or aluminum foil. When warming baked goods, allow a small opening in the cover for moisture to escape.
- Do not use plastic wrap to cover food. Plastic wrap may melt.
- Use pot holders or oven mitts to remove food.
To Use:
- Push in and turn Warm Zone knob to desired setting.
- Turn knob to OFF when finished
ACCUSIMMER® Feature (on some models)
The ACCUSIMMER® feature setting is an adjustable heat setting for more precise simmering.
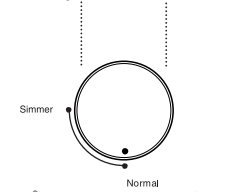
The ACCUSIMMER® control knob has two settings: Simmer and Normal. When the control is set on Normal, the element will function as a single, a dual, or a triple element. When the ACCUSIMMER control knob is set on Simmer, the cooking area will not glow red. This is normal. Only the outer heating ring will glow red on the triple circuit element when medium or high simmer is selected.
To Use:
- Turn the ACCUSIMMER® control knob to the SIMMER position.
- Push in and turn control knob to a setting between Low and High setting. Select Low for a low simmer or when using lids and medium for a high simmer or when not using lids. Select either the Single, Dual, or Triple Zone setting. Increase heat as necessary to achieve desired simmer. (See “Dual/TripleCircuit Element” section.)
- Turn the ACCUSIMMER® control knob back to the NORMAL setting when finished cooking.
COOKTOP USE
Ceramic Glass (on some models)
The surface cooking area will glow red when an element is on. Some parts of the surface cooking area may not glow red when an element is on. This is normal operation. The burner will cycle on and off to maintain the selected heat level. It will also randomly cycle off and back on again, even while on High, to keep the cooktop from extreme temperatures. It is normal for the surface of light colored ceramic glass to appear to change color when surface cooking areas are hot. As the glass cools, it will return to its original color. Cleaning off the cooktop before and after each use will help keep it free from stains and provide the most even heating. On cooktops with light colored ceramic glass, soils and stains may be more visible, and may require more cleaning and attention. Cooktop cleaner and a cooktop scraper are recommended. For more information, see “General Cleaning” section.
- Avoid storing jars or cans above the cooktop. Dropping a heavy or hard object onto the cooktop could crack the cooktop.
- To avoid damage to the cooktop, do not leave a hot lid on the cooktop. As the cooktop cools, air can become trapped between the lid and the cooktop, and the ceramic glass could break when the lid is removed.
- For foods containing sugar in any form, clean up all spills and soils as soon as possible. Allow the cooktop to cool down slightly. Then, while wearing oven mitts, remove the spills using a scraper while the surface is still warm. If sugary spills are allowed to cool down, they can adhere to the cooktop and can cause pitting and permanent marks
- To avoid scratches, do not slide cookware or bakeware across the cooktop. Aluminum or copper bottoms and rough finishes on cookware or bakeware could leave scratches or marks on the cooktop.
- Do not cook popcorn in prepackaged aluminum containers on the cooktop. They could leave aluminum marks that cannot be removed completely.
- To avoid damage to the cooktop, do not allow objects that could melt, such as plastic or aluminum foil, to touch any part of the entire cooktop.
- To avoid damage to the cooktop, do not use the cooktop as a cutting board.
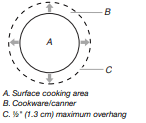
- Use cookware about the same size as the surface cooking area. Cookware should not extend more than ½" (1.3 cm) outside the area.
- Use flat-bottomed cookware for best heat conduction and energy efficiency. Cookware with rounded, warped, ribbed or dented bottoms could cause uneven heating and poor cooking results.
- Determine flatness by placing the straight edge of a ruler across the bottom of the cookware. While you rotate the ruler, no space or light should be visible between it and the cookware.
- Cookware designed with slightly indented bottoms or small expansion channels can be used.
- Make sure the bottoms of pots and pans are clean and dry before using them. Residue and water can leave deposits when heated.
- To avoid damage to the cooktop, do not cook foods directly on the cooktop.
Home Canning
When canning for long periods, alternate the use of surface cooking areas, elements or surface burners between batches. This allows time for the most recently used areas to cool.
- Center the canner on the grate or largest surface cooking area or element. On electric cooktops, canners should not extend more than ½" (1.3 cm) beyond the surface cooking area or element.
- Do not place canner on 2 surface cooking areas, elements or surface burners at the same time.
- On ceramic glass models, use only flat-bottomed canners.
- On coil element models, the installation of a Canning Unit Kit is recommended. If a kit is not installed, the life of the coil element will be shortened. See “Assistance or Service” for instructions on how to order.
- For more information, contact your local agricultural department. Companies that manufacture home canning products can also offer assistance.
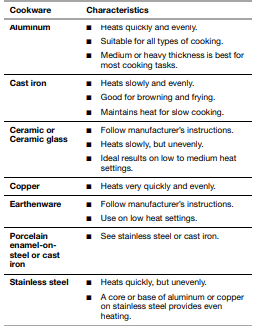
Cookware
IMPORTANT: Do not leave empty cookware on a hot surface cooking area, element or surface burner. Ideal cookware should have a flat bottom, straight sides, and a well-fitting lid and the material should be of medium-to-heavy thickness.
Rough finishes may scratch the cooktop. Aluminum and copper may be used as a core or base in cookware. However, when used as a base they can leave permanent marks on the cooktop or grates.
Cookware material is a factor in how quickly and evenly heat is transferred, which affects cooking results. A nonstick finish has the same characteristics as its base material.
For example, aluminum cookware with a nonstick finish will take on the properties of aluminum.
Use the following chart as a guide for cookware material characteristics.
COOKTOP CARE
General Cleaning
IMPORTANT: Before cleaning, make sure all controls are off and the cooktop is cool. Always follow label instructions on cleaning products. Soap, water and a soft cloth or sponge are suggested first unless otherwise noted. When cleaning the cooktop with electronic controls, lock the controls. See “Control Lock” section.
STAINLESS STEEL (on some models)
To avoid damage to stainless steel surfaces, do not use soapfilled scouring pads, abrasive cleaners, Cooktop Cleaner, steelwool pads, gritty washcloths or abrasive paper towels.
Cleaning Method:
Rub in direction of grain to avoid damaging.
- affresh® Stainless Steel Cleaner and Polish (Part Number W10355016B) (not included): See “Assistance or Service” section to order.
- Liquid detergent or all-purpose cleaner: Rinse with clean water and dry with soft, lint-free cloth.
- Vinegar for hard water spots.
COOKTOP CONTROLS
To avoid damage to the cooktop controls, do not use steel wool, abrasive cleansers or oven cleaner. To avoid damage, do not soak knobs. When replacing knobs, make sure knobs are in the Off position. Do not remove seals under knobs.
Cleaning Method:
- Soap and water: Pull knobs straight away from control panel to remove.
- Do not place knobs in dishwasher
CERAMIC GLASS
To avoid damage to the cooktop, do not use steel wool, abrasive powder cleansers, chlorine bleach, rust remover or ammonia.
Cleaning Method:
Always wipe with a clean, wet cloth or sponge and dry thoroughly to avoid streaking and staining. affresh® Cooktop Cleaner (Part Number W10355051B) is recommended for regular use to help avoid scratches, pitting and abrasions, and to condition the cooktop. It may be ordered as an accessory. See “Assistance or Service” section to order. Cooktop Scraper is also recommended for stubborn soils, and can be ordered as an accessory. See “Assistance or Service” section to order. The Cooktop Scraper uses razor blades. Store razor blades out of the reach of children.
Light to moderate soil
- Paper towels or clean damp sponge: Clean while the cooktop is still warm. You may want to wear oven mitts while doing so.
Sugary spills (jellies, candy, syrup)
- Cooktop Scraper: Clean while the cooktop is still warm. You may want to wear oven mitts while doing so.
- affresh® Cooktop Cleaner and clean damp paper towel: Clean as soon as cooktop has cooled down. Rub creme into surface with a damp paper towel or soft cloth. Continue rubbing until white film disappears.
Heavy soil, dark streaks, specks and discoloration
- affresh® Cooktop Cleaner or nonabrasive cleanser: Rub product into soil with a damp paper towel or soft cloth. Continue rubbing until white film disappears.
Burned-on soil
- affresh® Cooktop Cleaner and Cooktop Scraper: Rub creme into soil with damp paper towel. Hold scraper as flat as possible on surface and scrape. Repeat for stubborn spots. Polish entire cooktop with creme and paper towel.
Metal marks from aluminum and copper
- affresh® Cooktop Cleaner: Clean as soon as cooktop has cooled down. Rub creme into surface with a damp paper towel or soft cloth. Continue rubbing until white film disappears. The marks will not totally disappear but after many cleanings become less noticeable.
Tiny scratches and abrasions
- affresh® Cooktop Cleaner: Rub creme into surface with a damp paper towel or soft cloth. Continue rubbing until white film disappears. Scratches and abrasions do not affect cooking performance and after many cleanings become less noticeable.
Do not use steel wool, abrasive powder cleansers, chlorine bleach, rust remover or ammonia because damage may occur
TROUBLESHOOTING
Nothing will operate :
- Has a household fuse blown, or has a circuit breaker tripped?
- Replace the fuse or reset the circuit breaker. If the problem continues, call an electrician.
- Is the appliance wired properly?
- See Installation Instructions.
Cooktop will not operate
- Is the control knob set correctly?
- Push in knob before turning to a setting.
- Is the “All Off Lock” cooktop lockout set?
- See “All Off Lock” section
- Is the cooktop beeping continuously?
- Wipe debris from the control panel surface
- Has one or more burners stopped working during use?
- Allow the cooktop to cool down for 30 minutes then turn the burner on again.
Excessive heat around cookware on cooktop
- Is the cookware the proper size?
- Use cookware about the same size as the surface cooking area, element or surface burner. Cookware should not extend more than ½" (1.3 cm) outside the cooking area.
- Do cooktop surfaces become hot?
- REMEMBER: When cooktop is in use, the entire cooktop area may become hot.
Cooktop has flashing lights
- Are the lights on the cooktop flashing on and off?
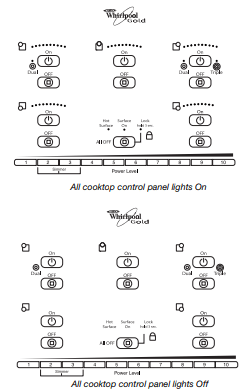
- All cooktop control panel lights flash on and off, indicating that one or more keys are permanently pressed. Follow the steps below.
- Make sure the cooktop controls are OFF.
- Clean the cooktop touch control panel thoroughly. See “General Cleaning” section.
- If the cooktop lights continue to flash, disconnect power or unplug the cooktop.
- After 1 minute, reconnect power or plug in the cooktop.
- If the lights continue to blink on and off, call for service.
Cooktop cooking results not what expected
- Is the proper cookware being used?
- Is the control knob set to the proper heat level?
- See “Cooktop Controls” section.
- Is the appliance level?
- Level the appliance. See the Installation Instructions.
- Does it appear to take longer to cook food at a certain power level than usual or some power levels do not perform as well as usual.
- The cooktop regulates the temperature of the internal components and automatically reduces the power of all the elements in use without any visual or audible feedback. Allow the cooktop to cool down for 30 minutes to resume normal cooking performance. See “To Use” in the “Cooktop Controls” section.
Cooktop element is warm but does not glow red
- Is the Accusimmer® control knob set to Simmer?
- See “Accusimmer® Feature” section.