_@HTENT$
SAFETY
USe AND CARE
Your Rangeand Its Features..................................... 6
Cool(top Cooking .................................................... 7-9
Oven Control ....................................................... 10, 11
Oven Cooking .................................,...............9,10, 11
To Set Bake ...............................................................10
Broiling ..................................................................... 11
To Se! Broil ................................................................11
Clesnlng Tips ............................................................12
Removal of PackagingTape .......................................5
Removable Parts ................................................13_14
SERVICE
Before Calling For Ser'_Ice ......................................15
Thermostat Adjustments ......................................... 16
Customer Servlce Numbers .................................... 17
_AR_AN_
91165
nrnore
0
_N_2_2°1 (SR'10194)
t
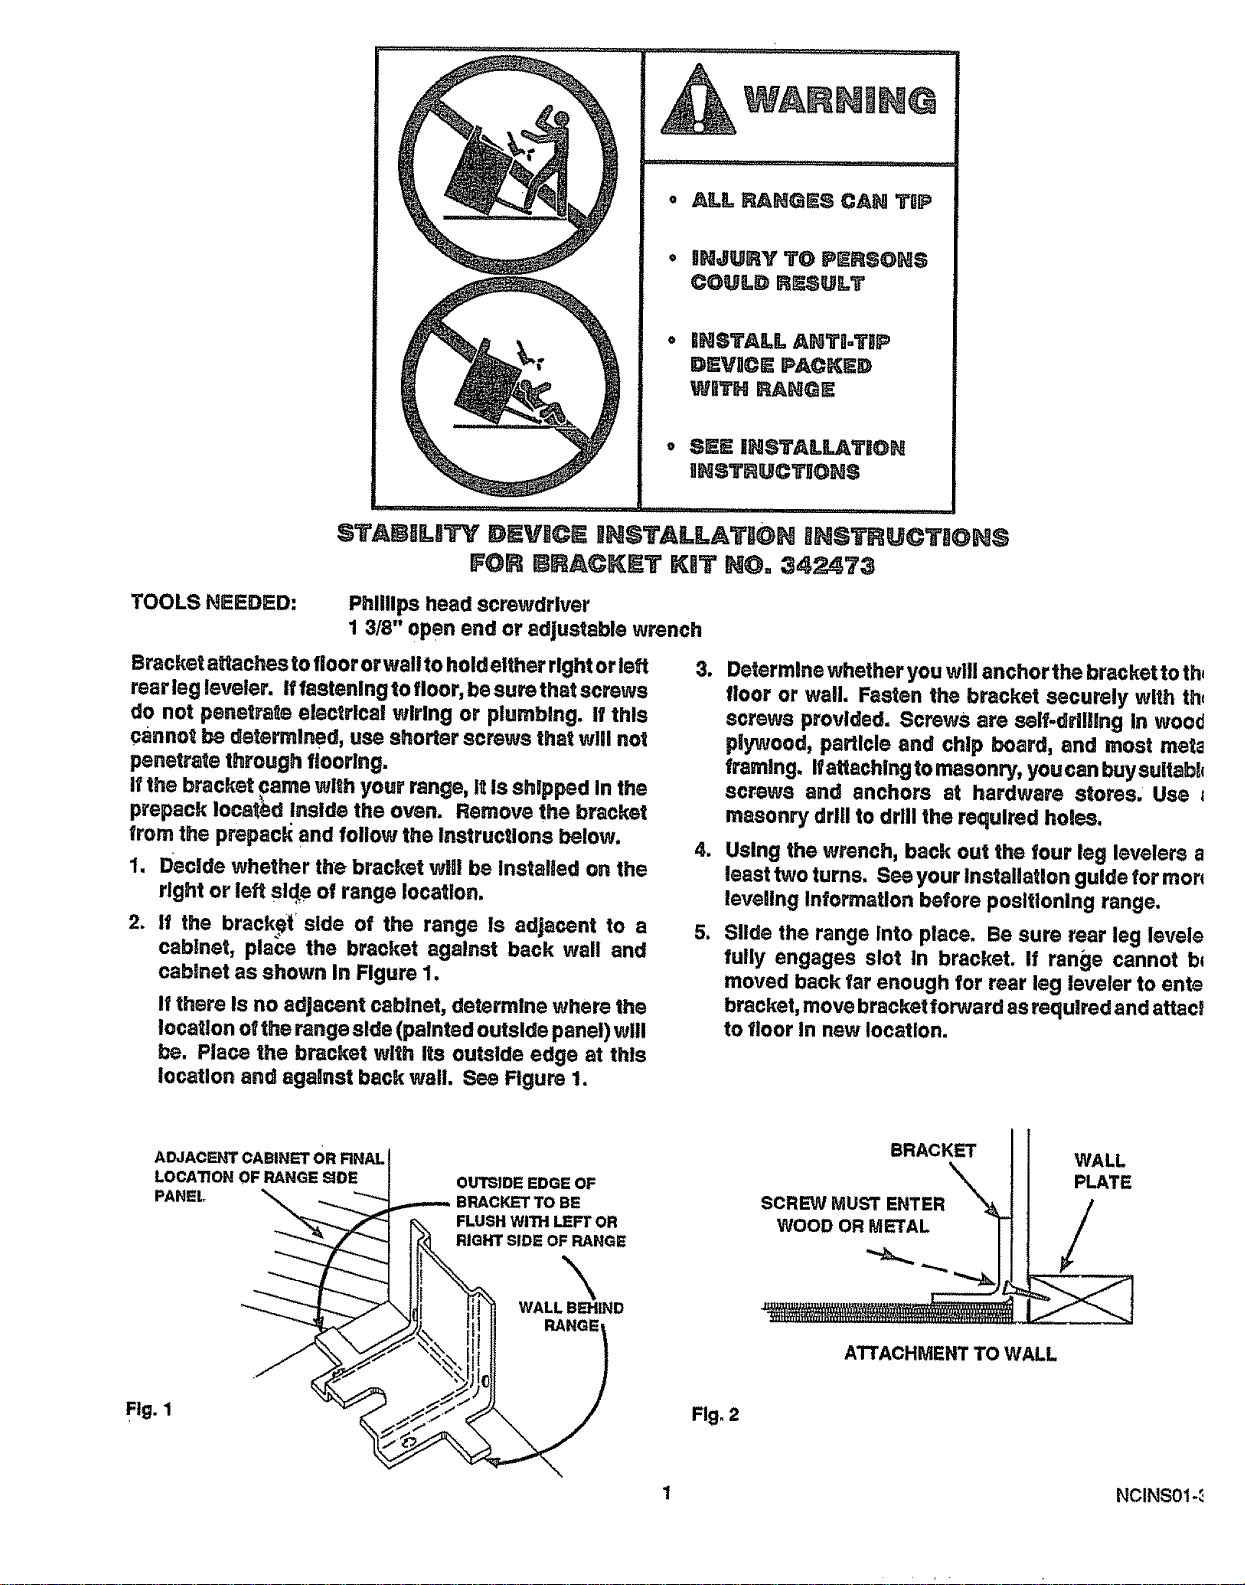
TOOLS NEEDED:
Phillips head screwdriver
1 3/8" open end or adjustable wrench
Bracket affaches to floor or wall to hold either right or left
rear leg leveler, if feetening to floor, be sure that screws
do not penetrate electrical wiring or plumbing, if this
cannot be determined, use shorter screws that will not
penetrate through flooring.
if the bracket came with your range, it Is shipped in the
prepack located Inside the oven. Remove the bracket
from the prepacl{ and follow the lnstrucUons below.
1. Decide whether the bracket wi!l be Installed on the
right or left sl_e of range location.
2. if the bracket' side of the range Is adjacent to a
cablnet, place the bracket against back wall and
cabinet as shown In Rgure 1.
if there Is no adjacent cabinet, determine where the
location of the range side (painted outside panel) will
be. Place the bracket with Its outside edge at this
location and against back wail. See Figure 1.
3_
4w
1
Determine whether you will anchor the bracket to th,
floor or wall. Fasten the bracket securely with the
screws provided. Screws are self.drilling In woo(l
plywood, particle and chip board, and most meta
framing. Ifattaching to masonry, youcan buysu|tabl_
screws and anchors at hardware stores. Use
masonry drill to drill the required holes.
Using the wrench, back out the four leg levelers a
least two turns. See your installation guide for mon
leveling Information before positioning range.
Slide the range Into place. Be sure rear leg levele
fully engages slot in bracket, if range cannot ba
moved back far enough for rear leg leveler to eats
bracket, move bracket forward as required and attacl
to floor in new location.
ADJACENT CABINET OR RNAL
LOCATION OF RANGE SIDE
PANEl,,
OUTSIDE EDGE OF
BRACKET TO BE
FLUSH WITH LEFT OR
RIGHT SIDE OF RANGE
-\
WALL BI_HtND
RANGE
BRACKET
SCREWMUST ENTER
WOOD ORMETAL
--.....
WALL
PLATE
/
ATTACHMENT TO WALL
Ftg. 1
Fig. 2
1 NCINS01-_

INSTR
UR SAFETY
SAVE THESE iNSTRUCTIONS
Read aH instruc|ions befot'e usRng this appliance. When using e_ectricaJ
appliances, basic safety precautions should be foilowedD including the following:
';'each children not to play with range
knobs or any other part of the range.
Never leave children alone or unat-
tended where a range Is in use.
CAUTION:
Iltems of lln|erest to children
should not be stored in cabinets
above the range or on the
backsplash of the range. (:hll.
dren climbing on the range to
reach Items could be seriously
injured.
Never let anyone climb, sit or stand
on the open door or any other part of
the range, Their weight may make
the range tip over.
Never leave t heoven door open when
you are not watching the range.
2 NESAF08-5
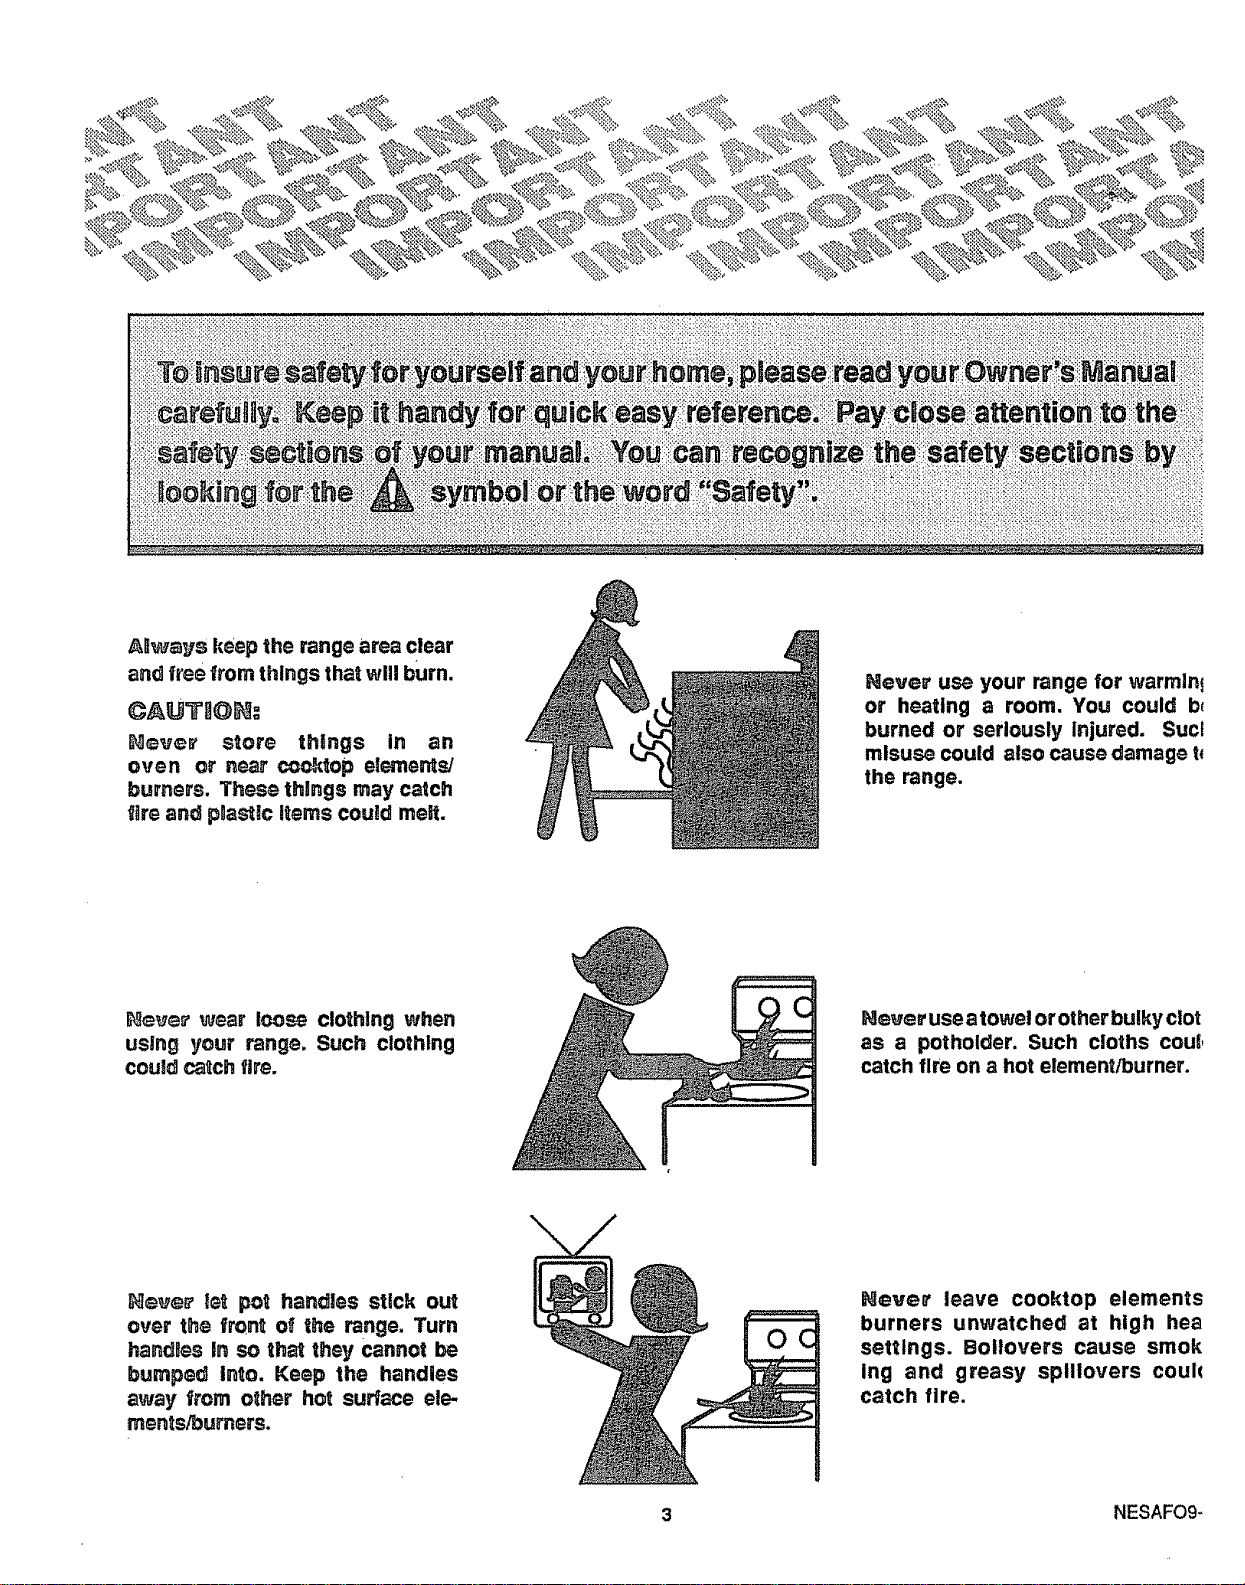
Airways keep the range area clear
and free from things that will burn.
_]eve_' store things in an
oven or near c_e_op elerne_s/
burners. These things may catch
fire and p_as_tc Items coutd melt.
Never use your range for warmln_
or heating a room. You could b_
burned or seriously Injured. Suct
misuse could also cause damage t,
the range.
_ve_' wear loose clothtng when
using your range. Such clothing
could catch fire.
Never use a towel or other bulky clot
as a potholder. Such cloths couP,
catch fire on a hot element/burner.
IReve_' let pot handles stick out
over the fr_r_ of the range. Turn
handles In so that they cannot be
bumped into. Keep the handles
away from ether hot surface ele-
ments!burners.
Never leave cooktop elements
burners unwatched at high hea
settings. Believers cause smok
Ing and greasy splllovers coul(
catch fire.
3 NESAF09-
BASSC SAFETY PHUCAUTIONS
Keep this book for later use.
Be sure your range Is Installed and grounded properly
by a qualified technician.
Always use dry potholders when removing pans from
the oven or cooktop. Moist or damp potholders can
cause steam burns.
AJways follow cleaning Instructions in this book.
Always keep the range and oven clean. Food and
grease are easy to Ignite. Clean the range, oven and
vents regularly.
Cllea. Only Parts Listed In Manual.
CAU'rlON: Do not stere items of interest to
chBBdre. J. cabinets above a range or on the
backguard of a range. Chilidren climbing or= a
range to reach items cougd be seriously injured.
Always keep combustible wall coverings, curtains, or
drapes a safe distance away from your range.
Agways keep dish towels, dish cloths, potholders and
other linens a sate distance away from your range.
Never store such Items on your range.
Agways keep the appliance area clear and free from
things that wtl! burn (gasoline and other flammable
vapors and liquids).
Hayer try to repair or replace any part of the range
unless instructions are given In this book. All other
work should be done by a quallfled technician.
Never heat unopened food containers. Pressure
buildup may make contalner burst and cause Injury.
Never leave jars or cans of fat or drlpplngs on or near
the range. Neverlet grease build up on your range. You
can keep grease fires from starting if you clean up
grease and spills alter each range use.
Never try to move a pan of hot fat, especially a deep fat
fryer. Wait unttl the fat has cooled.
Never touch surface units, heating elements, or tnterlor
surfaces of the oven. They may be hot even though they
appear dark In color.
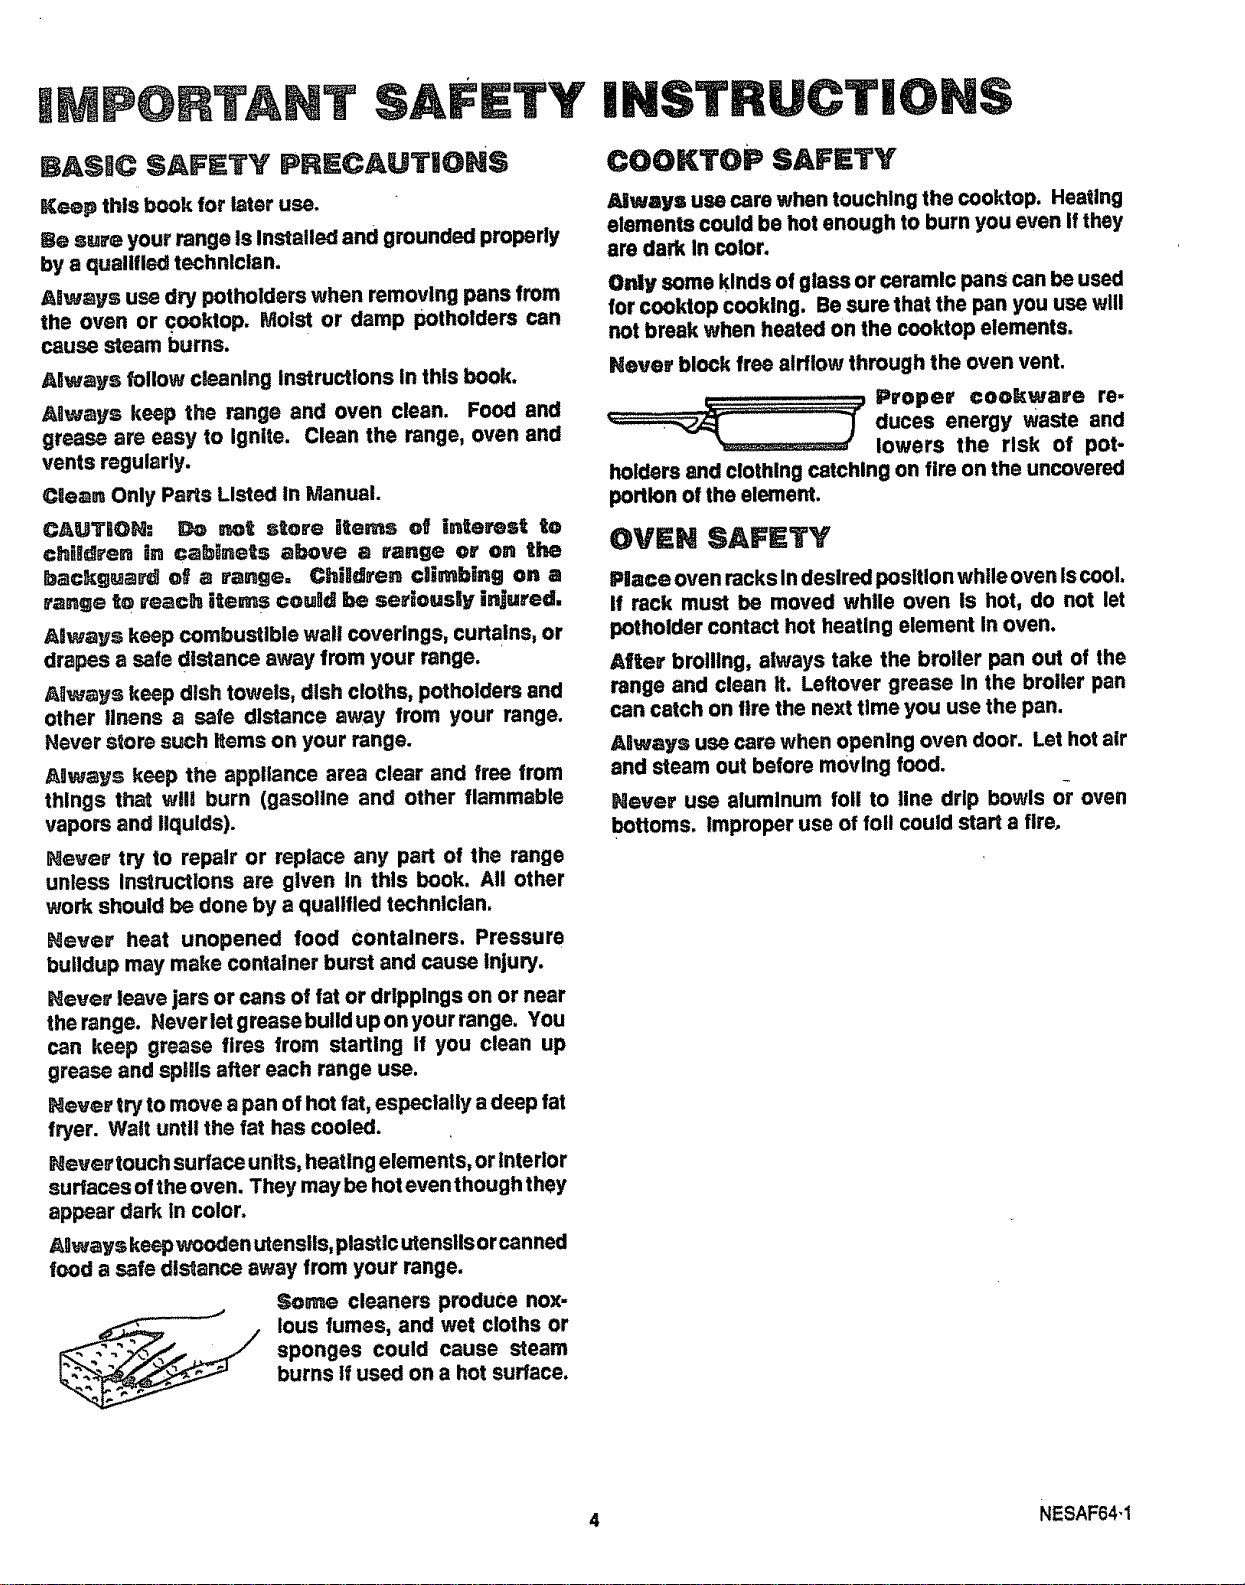
Always keepwooden utensils, plastic utensils orcanned
food a sate distance away from your range.
Some cleaners produce nox-
Ious fumes, and wet cloths or
sponges could cause steam
burns if used on a hot surface,
COOKTOIP SAFETY
Ailways use cam when touching the cooktop. Heating
elements could be hot enough to burn you even Ifthey
are dark In color.
Only some kinds of glass or ceramic pans can be used
for cooktop cooking. Be sure that the pan you use will
not break when heated on the cooktop elements.
Never block free airflow through the oven vent.
.............. Proper cookware re-
duces energy waste and
lowers the risk of pot-
holders and clothing catching on fire on the uncovered
portion of the element.
OVKN SAFETY
Place oven racks In desired position while oven Iscool.
If rack must be moved white oven Is hot, do not let
potholder contact hot heaUng element In oven.
After broiling, always take the broiler pan out of the
range and clean It. Leftover grease in the broiler pan
can catch on fire the next time you use the pan.
AUways use care when opening oven door. Let hot air
and steam out before moving food.
Never use aluminum foil to line drip bowls or oven
bottoms, Improper use of foil could start a fire,
4 NESAF64,1
I IiI!II) IIIi) ILIIIII)IIIIIT NIII
T£I$ IIIII@£1111!ITI@II II{)W!
$£_ulI yo_ ever need iI_ you will
nol h_ve li_e lot reading°
Iii® s_® ®v®rIon® in your ho_e
l_n_s _h_l Io _1o i_ c_se of life°
ii _ilI o_II sp_'ead the ila_eso
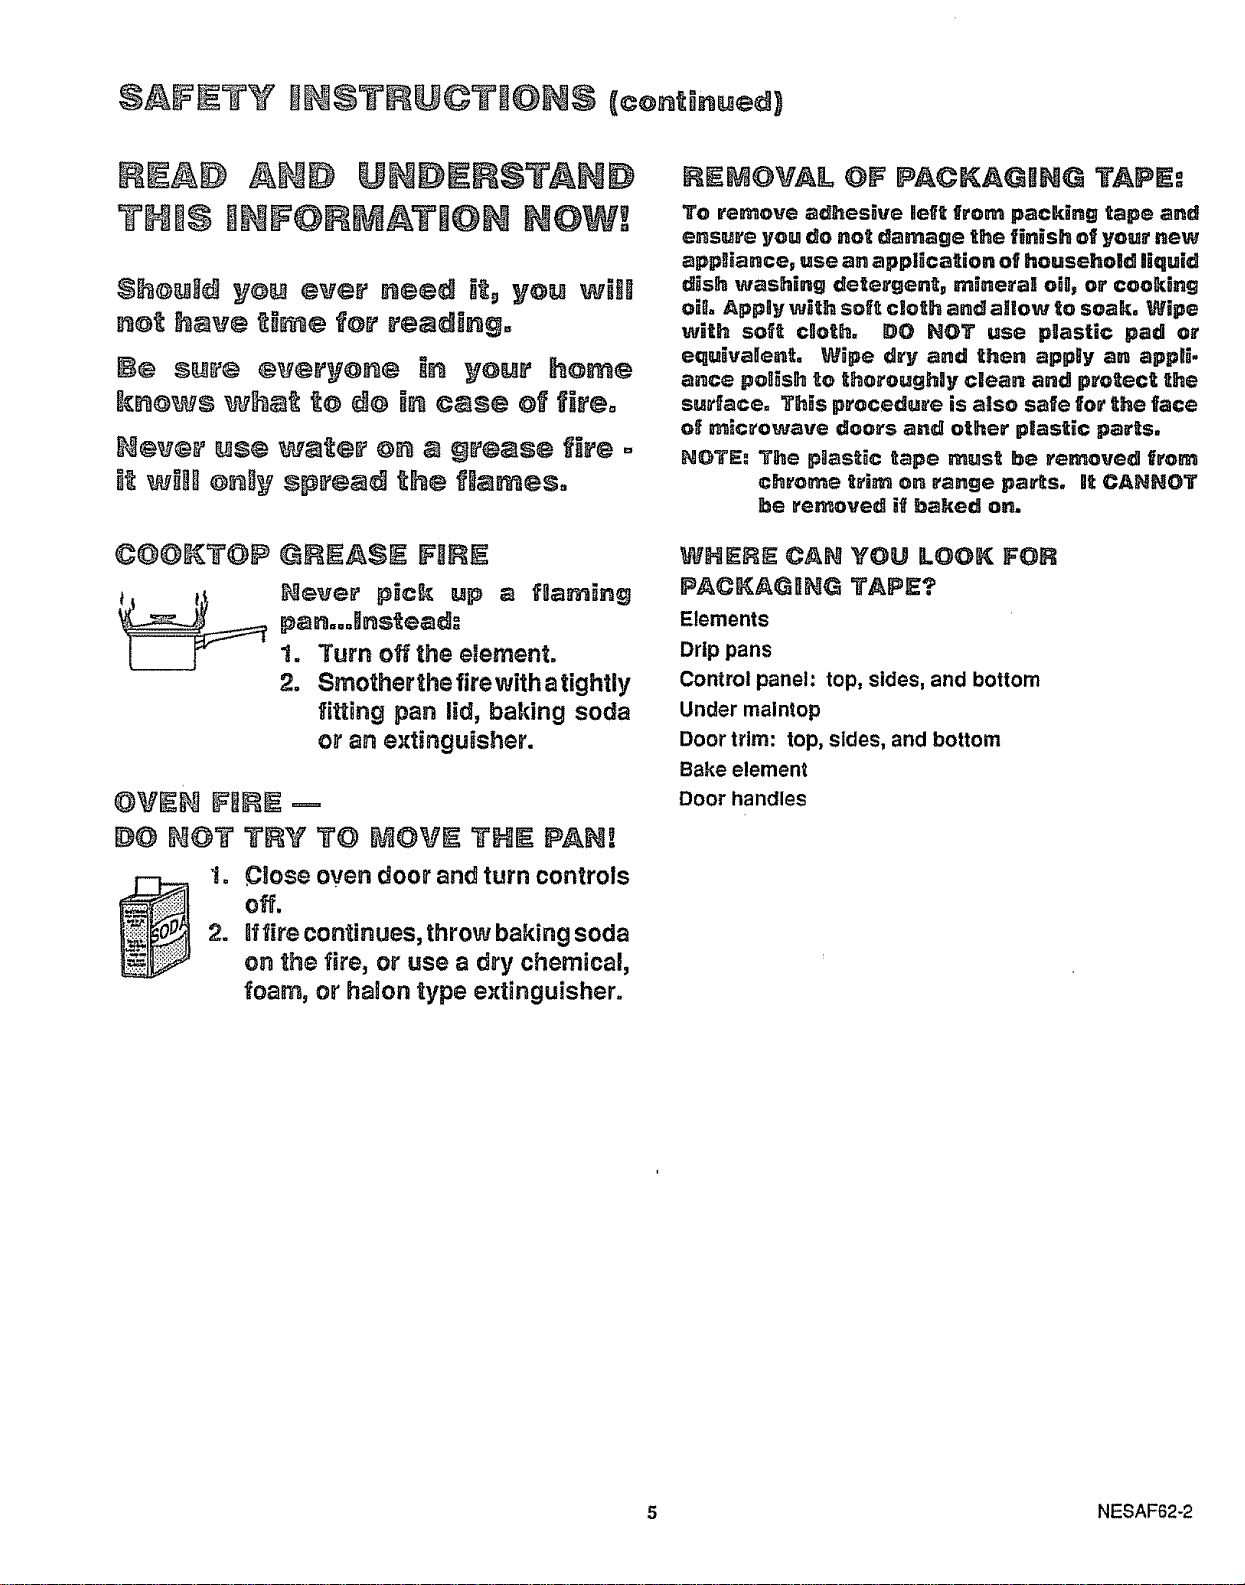
{_@@_[T@P @I11!_t,$1 FI!III
lever pick up a fl_ming
1. Turn off the eiemento
2. Smother the fire with atightly
fitting pan lid, baking soda
or an extinguisher.
1. Close oven door and turn controls
2. tl_'e continues, throw baking soda
on the l_e, or use a dry chemical,
_oam, or halon type e_tinguisher.
RII_@WAL OF F_@KAGI_ TAPE:
To Yemove adhesive llef_ I_om packing Iape and
e.su_'e you do noi damage the finish of your new
applia.ce, use an application of household liquid
dish washing de_e_'gen_ mir_eral oil, or cooking
oil= Apply wi_h sof_ cloth and allow to soak. Wipe
with sof_ cloth. DO NOT use pgastic pad or
equiva[len_. Wipe dry and then applty a. applli.
a_ce polsh _o _oroughly clean and pro_ec_ =he
su_ace° This procedure is also safe fo_ _he face
of mic_'owave doors and o_he="plastic par_s.
NOTE: The plastic Iape mus_ be _emoved I_om
chrome _rim o. _ange pa_s. It CANNOT
_e removed if baked on.
WHER_ CAH YO_ LOOK FOR
PACK_G I I_I_ TAP _?
Elements
Drip pans
Control panel: top, sides, and bottom
Under maintop
Door trim: top, sides, and bottom
Bake element
Door handles
5 NESAF62-2
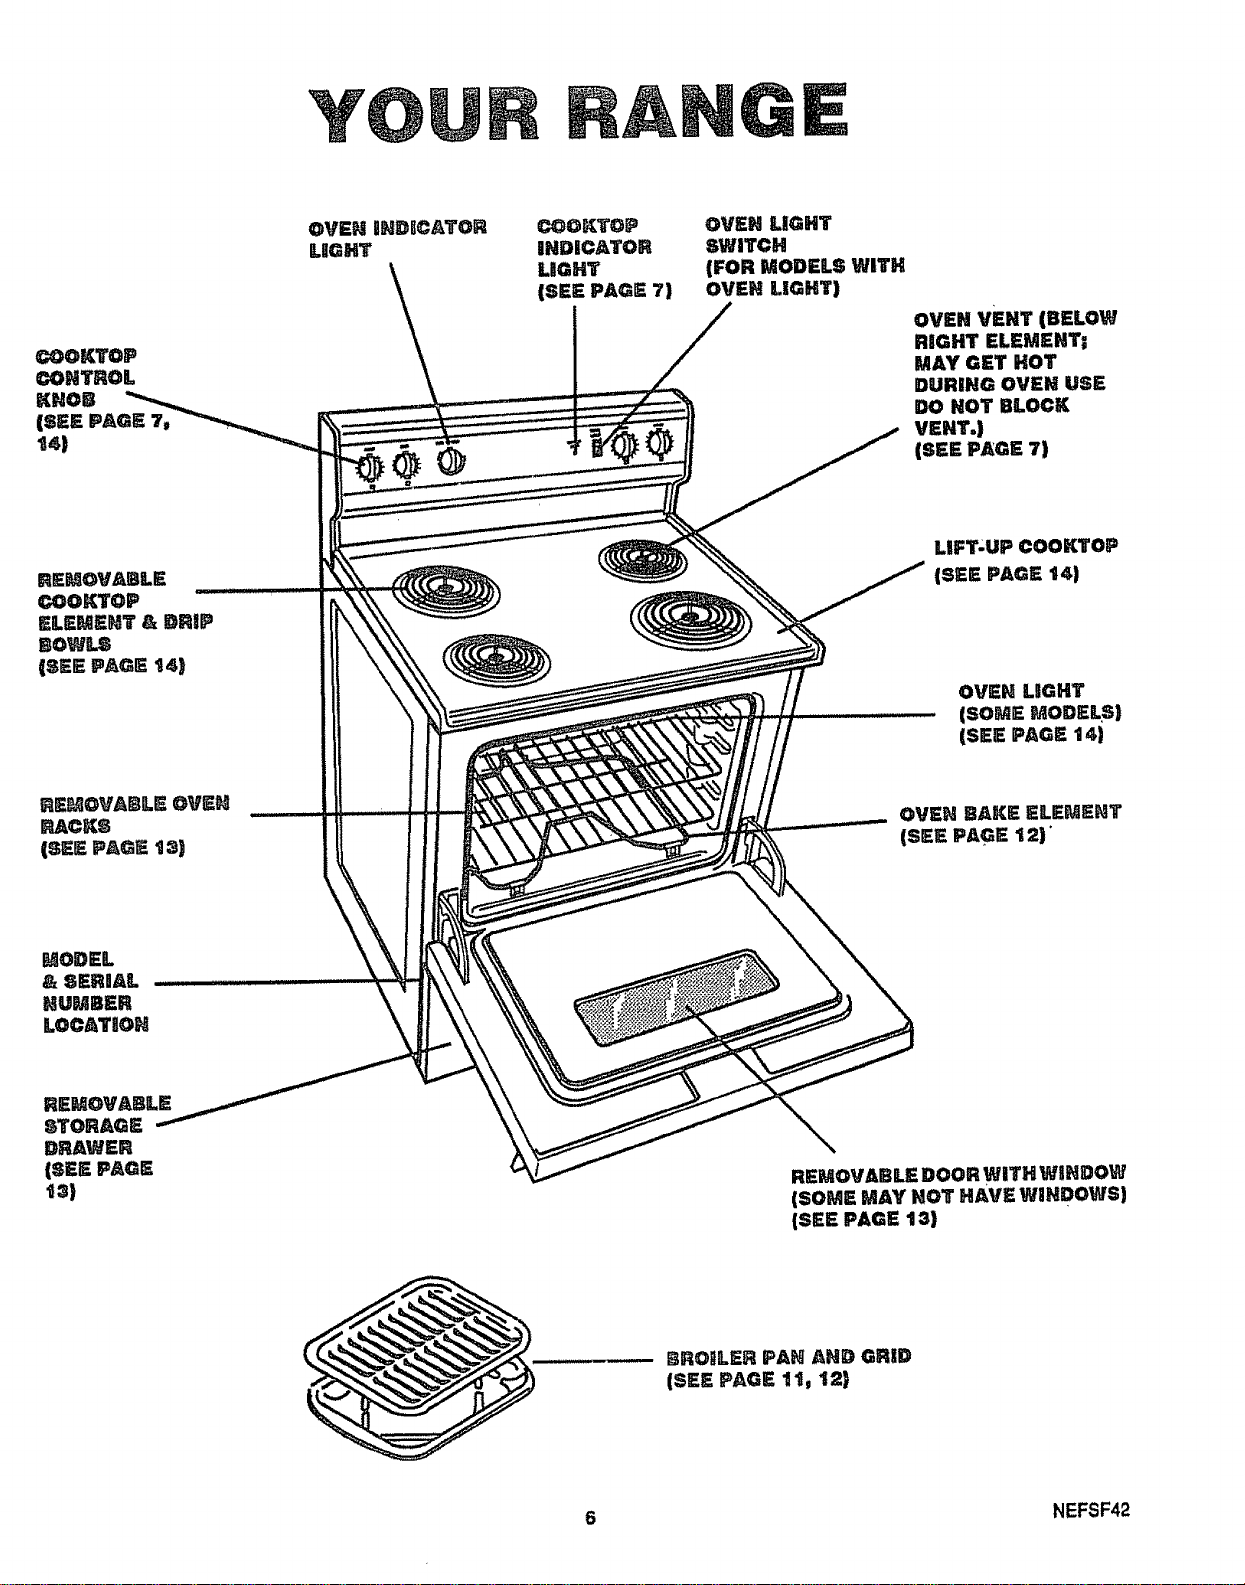
OVEN LIGHT
SWITCH
(FOR MODELS WITH
OVEN LIGHT)
OVEN VENT (BELOW
niGHTELEMENT;
MAY GET HOT
DURING OVEN USE
DO NOT BLOCK
VENT.)
(SEE PAGE 7)
LIFT'UP COOKTOP
(SEE PAGE 14)
REHOVABLE
STORAGE
DRAWER
(SEE PAGE
REMOVABLE DOOR WiTH WINDOW
(SOME MAY NOT HAVE WINDOWS)
(SEE PAGE t 3)
BROnLER PAN AND GRID
(SEE PAGE tl, 12)
6 NEFSF42

T@ IW I T TIIIINIIII ©O@I{IHIII
©@@I_T@P ©@@111311111
Before you use the cooktop for the first time, take a few
moments to famllarize yourself with the elements and
the k_ob used to turn on each element.
COOKTOP ELEMENTS
ClORTOP GUIDE TO BASIC SETTI_IG, _
"HI"
Used for quick starts, such as
bringing water to a boil.
"llll!iD.II _
Used for frying and rapid boiling.
The sHgn near each cooktop controa knob shows which
element asturned on by that knob.
O0 @0 O@ O0
O0 O0 O@
Let Left Right Right
Fron_ Rear Rear Front
==_=====_1
1. Push to lurn. _ X_,,.
=MED"
Used for slow boll and sautdlng.
"MSD.LO"
Used for cooking foods In small
amounts of water.
%.0"
Used for steaming foods or keep-
Ing foods at serving temperature.
2_ Se_ eL or between
ma_s for desired
heal
The Indicator tight wll glow when any heating element
is actvated.
OVEN VENT
(Area may get hot
during oven use. DO
NOT block vent.)
7 NEMTC58.1
To Start Things Cooking (co.t.)
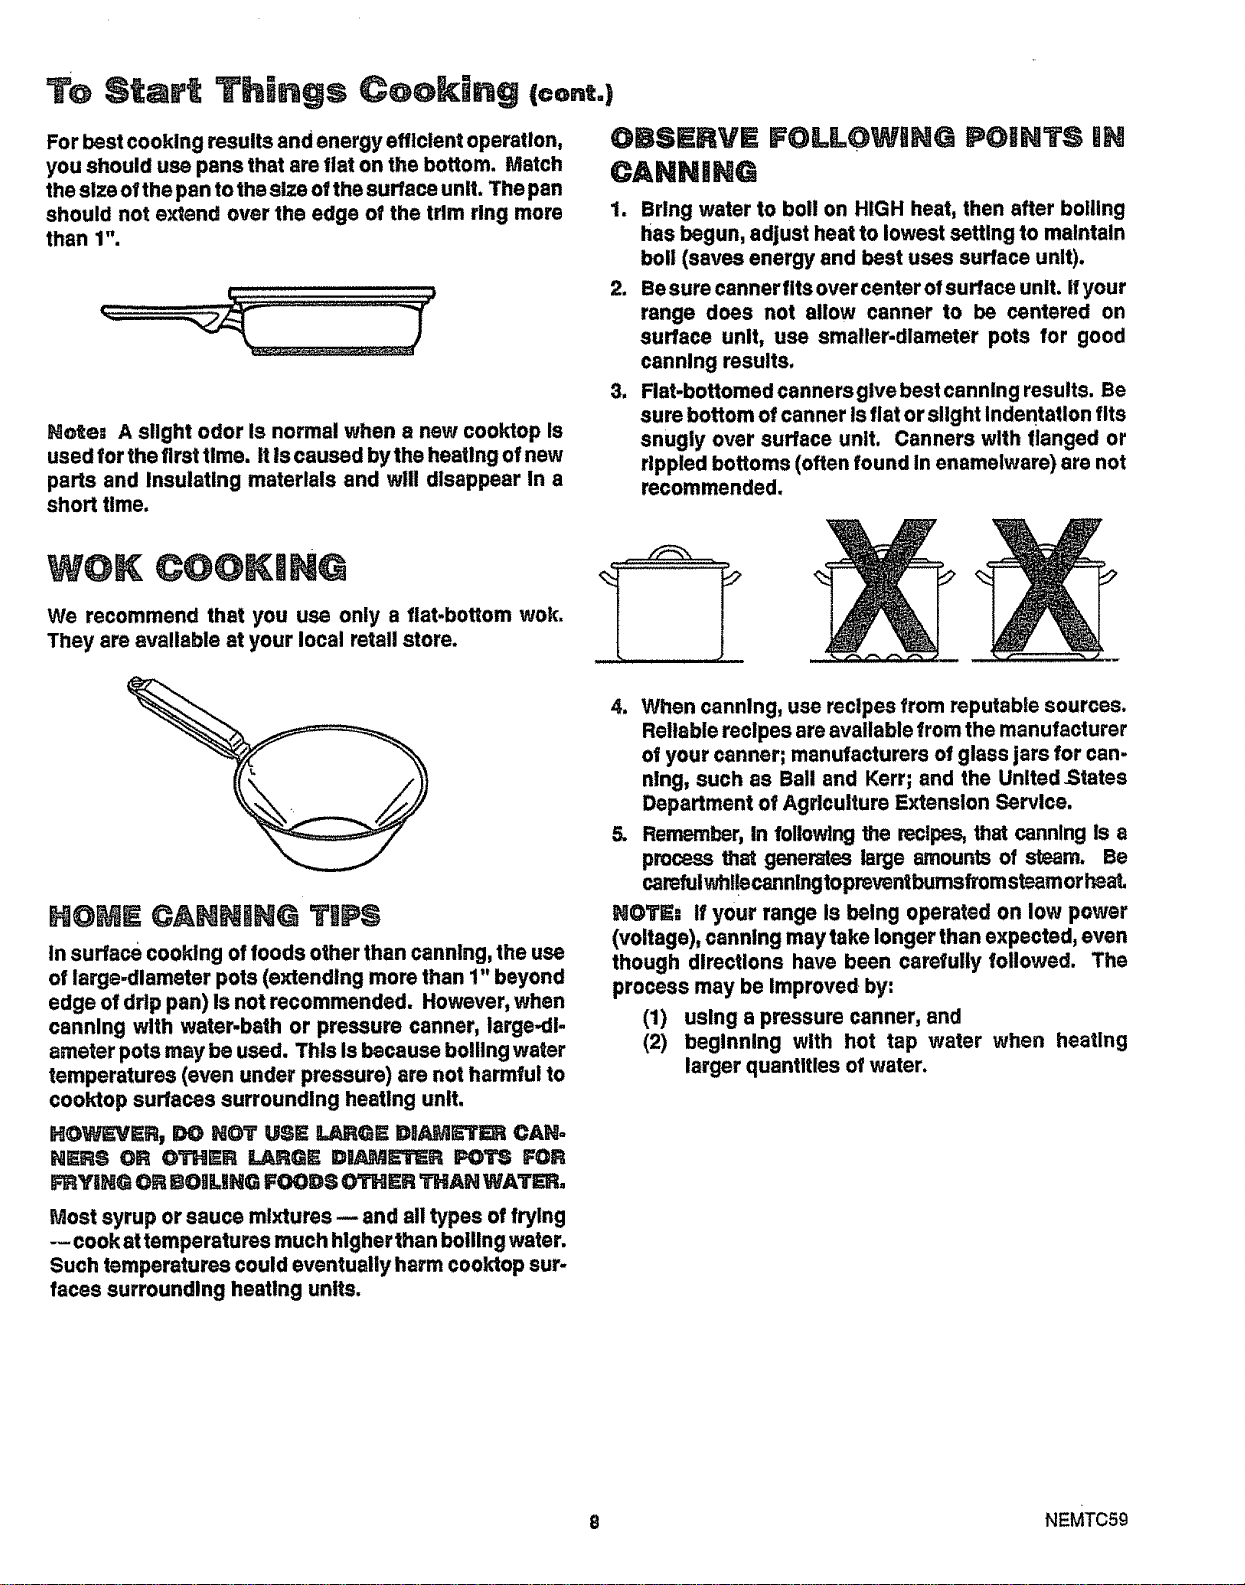
For best cooking results and energy efficient operation,
you should use pans that are flat on the bottom. Match
the size ofthe pan to the size of the surface unit. The pan
should not extend over the edge of the trim ring more
than 1".
Note_ A slight odor Is normal when a new cooktop Is
used for the first time. it is caused by the heating of new
parts and Insulating materials and wIU disappear In a
short time.
OBSRRVE FOLLOWBNG POINTS UN
CANNING
1. Bring water to boll on HIGH heat, then after boiling
has begun, adjust heat to lowest setting to maintain
boll (saves energy and best uses surface unit).
2. Be sure canner fits over center of surface unit. ifyour
range does not allow canner to be centered on
surface unit, use smaller-dlameter pots for good
canning results.
3. Flat-bottomed canners give best canning results. Be
sure bottom of canner Isflat or slight Indentation fits
snugly over surface unit. Canners with flanged or
rippled bottoms (often found In enamelware) are not
recommended.
WCK ¢@@KmNG
We recommend that you use only a flat-bottom wok.
They are available et your local retail store.
He)ME CANHmNG TIPS
in surface cooking of foods other than canning, the use
of large-diameter pots (extending more than 1" beyond
edge of drip pan) Is not recommended. However, when
canning with water-bath or pressure canner, large-di-
ameter pots may be used. Thts Is because boiling water
temperatures (even under pressure) ere not harmful to
cooktop surfaces surrounding heating unit.
HO_:VE_, DO K(_r USE L_;_GE DI_ER CAN.
NERS OR OTHER LARGE DI_B31R F_3 FOR
FRYING OR BOJUNG FOODS OTHER TNAN WATER.
Most syrup or sauce mixtures -- and all types of frying
-- cook at temperatures much higher than boiling water.
Such temperatures could eventually harm cooldop sur-
faces surroundlng heatlng units.
4. When canning, use recipes from reputable sources.
Reliable recipes are available from the manufacturer
of your canner; manufacturers of glass jars for can-
ning, such as Ball end Kerr; and the United States
Department of Agriculture Extension Service.
5. Remember, In following the recipe.s,that canning is a
process that generates large _Lmounts of .s_m. Be
carefuIwhliec_ningtopreventbumsfroms_amorhs_
NOTE: If your range Is being operated on low power
(voltage), canning may take longer than expected, even
though directions have been carefully followed. The
process may be Improved by:
(1) using a pressure canner, and
(2) beginning with hot tap water when heating
larger quantifies of water.
8 NEMTC59
QU $Tt@ $ & ANSW'E $
O. Can Iuse speclal cooking equipment, like an oriental
wok, on any of the cootdng elements?
A. We recommend that you use only fiat bottomed
woks. Cookware without flat surfaces Is not recom-
mended.
Q. May i can foods and preserves on my maintop cook-
Ing elements?
A. Yes, but only use cookware designed for canning
purposes. Check the manufacturer's Instructions
and recipes for preservlng foods. Be sure canner Is
flat-bottomed and fits over the center of the cooking
element selected. Canning generates large amounts
of steam; be careful to avoid burns.
Q. Why am I not getting the heat Ineed from my selected
cooking element even though the knob is on the right
setting?
A. Use cookware with flat bottoms and center the cook-
ware on the coils of the cooking element selected.
Metal cookware will conduct heat best.
OVIN IIIQOIIHQ
GI!III!II_I. _161-!i$
• When cooking a food for the first time In your new
oven, use time given on recipes as a guide.
Your new oven has been set correctly at the factory
and Is more apt to be accurate than the oven it
replaced.
After you have used your oven for awhile, if you feel
your oven should be hotter or cooler, you can adjust
it yourself. See TEmPeRATURE AIDJ USTMEHTS
In this manual.
= NO PEEKING-- Opening the door too oftento check
food during baking will allow heat loss and may
cause poor baiting results.
, There may be some odor when the oven Isfirst used.
This Is caused by the heating of new parts and
insulation.
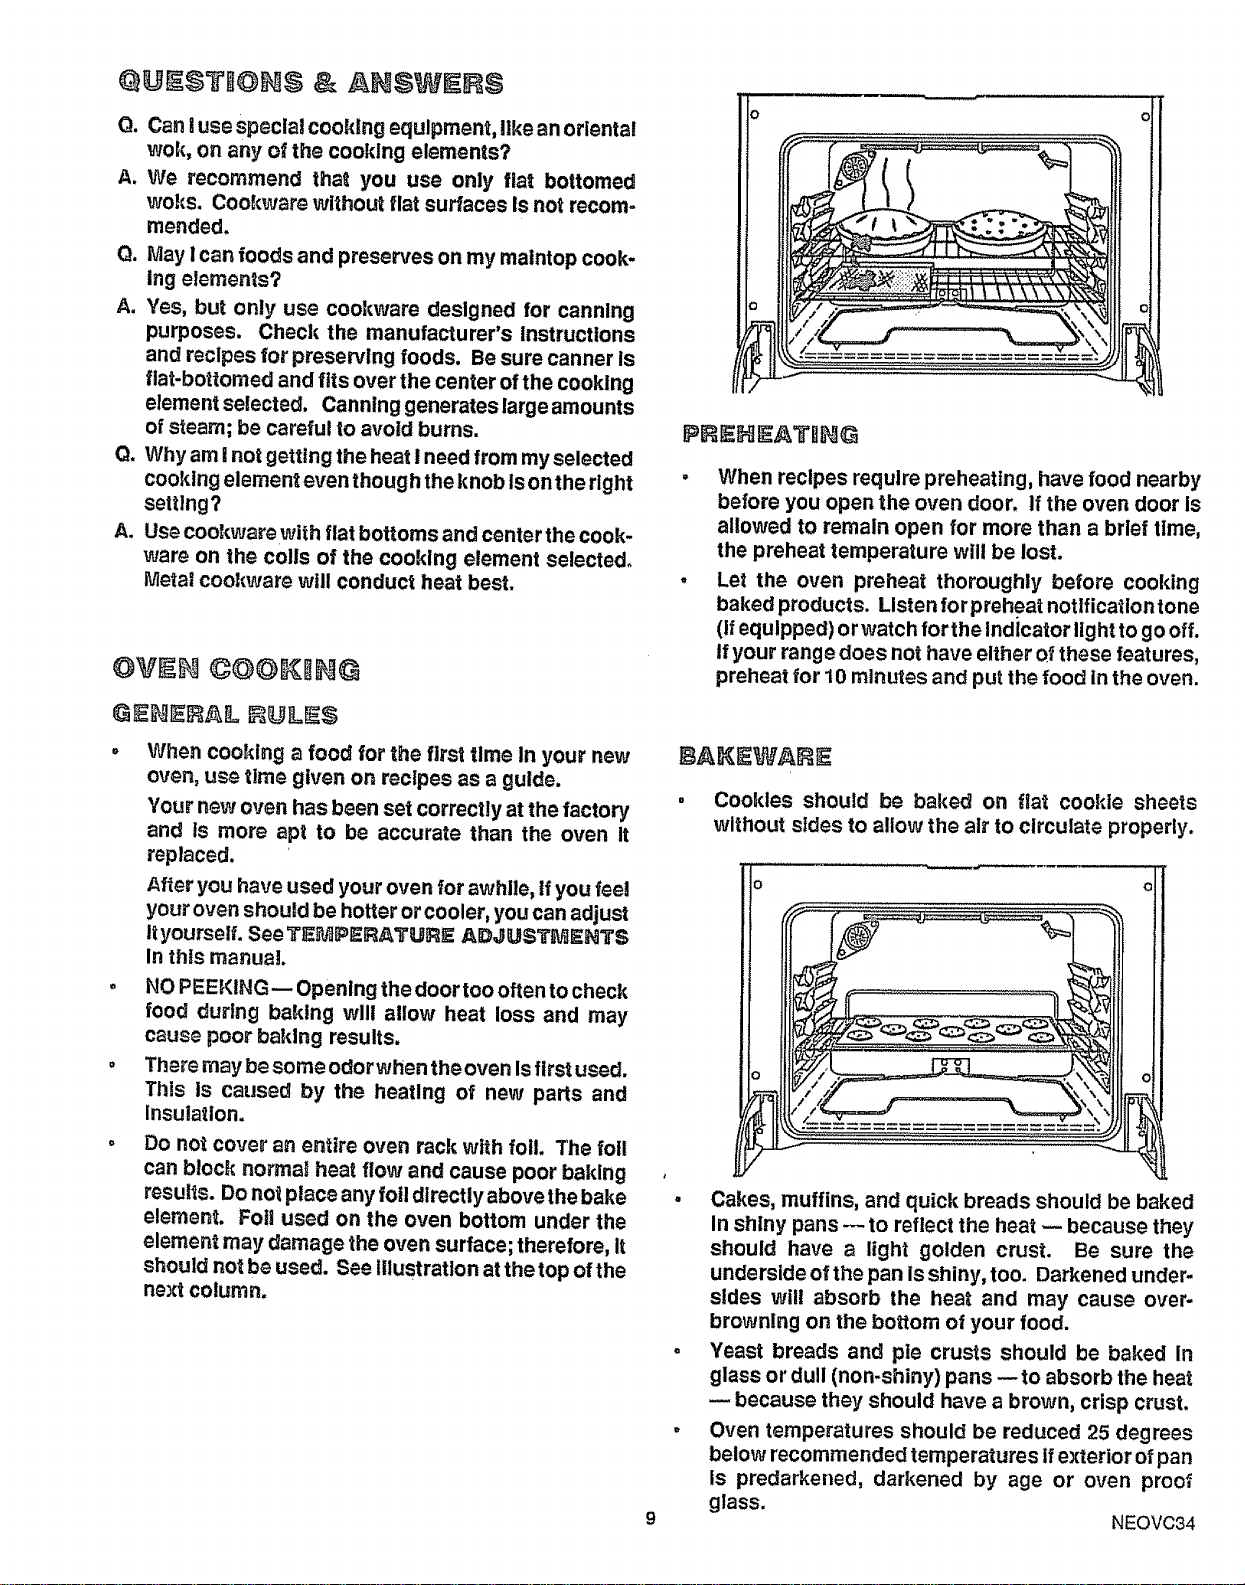
o Do not cover an entire oven rack with foil. The foil
can block normal heat flow and cause poor baking
results. Do not place any foil directly above the bake
element. Foll used on the oven bottom under the
element may damage the oven surface; therefore, It
should not be used. See ltlustration at thetop of the
next column.
PRIilPtlIATIItlII
When recipes require preheating, have food nearby
before you open the oven door. if the oven door is
allowed to remain open for more than a brief time,
the preheat temperature will be lost.
Let the oven preheat thoroughly before cooking
baked products. Listen forpreheat notlficationtone
(if equipped) or watch for the indicator light to go off.
If your range does not have either of these features,
preheat for 10 minutes and put the food in the oven.
_AKEWA_IE
, Cookies should be baked on flat cookie sheets
without sides to allow the air to circulate properly.
, Cakes, muffins, and quick breads should be baked
In shiny pans --to reflect the heat -- because they
should have a light golden crust. Be sure the
underside of the pan Is shiny, too. Darkened under-
sides will absorb the hea_ and may cause over-
browning on the bottom of your food.
, Yeast breads and pie crusts should be baked in
glass or dull (non-shiny) pans --to absorb the heat
because they should have a brown, crisp crust.
. Oven temperatures should be reduced 25 degrees
below recommended temperatures if exterior of pan
Is predarkened, darkened by age or oven proo_
glass. NEOVC34
OVEN CONTROLS (©on i.u®d)
BAKinG
. Always follow recipe carefu!ly.
° Me3sure Ingredients properly.
. Usa proper pan and rack placement to obtain the
best cooking results.
NOTE_
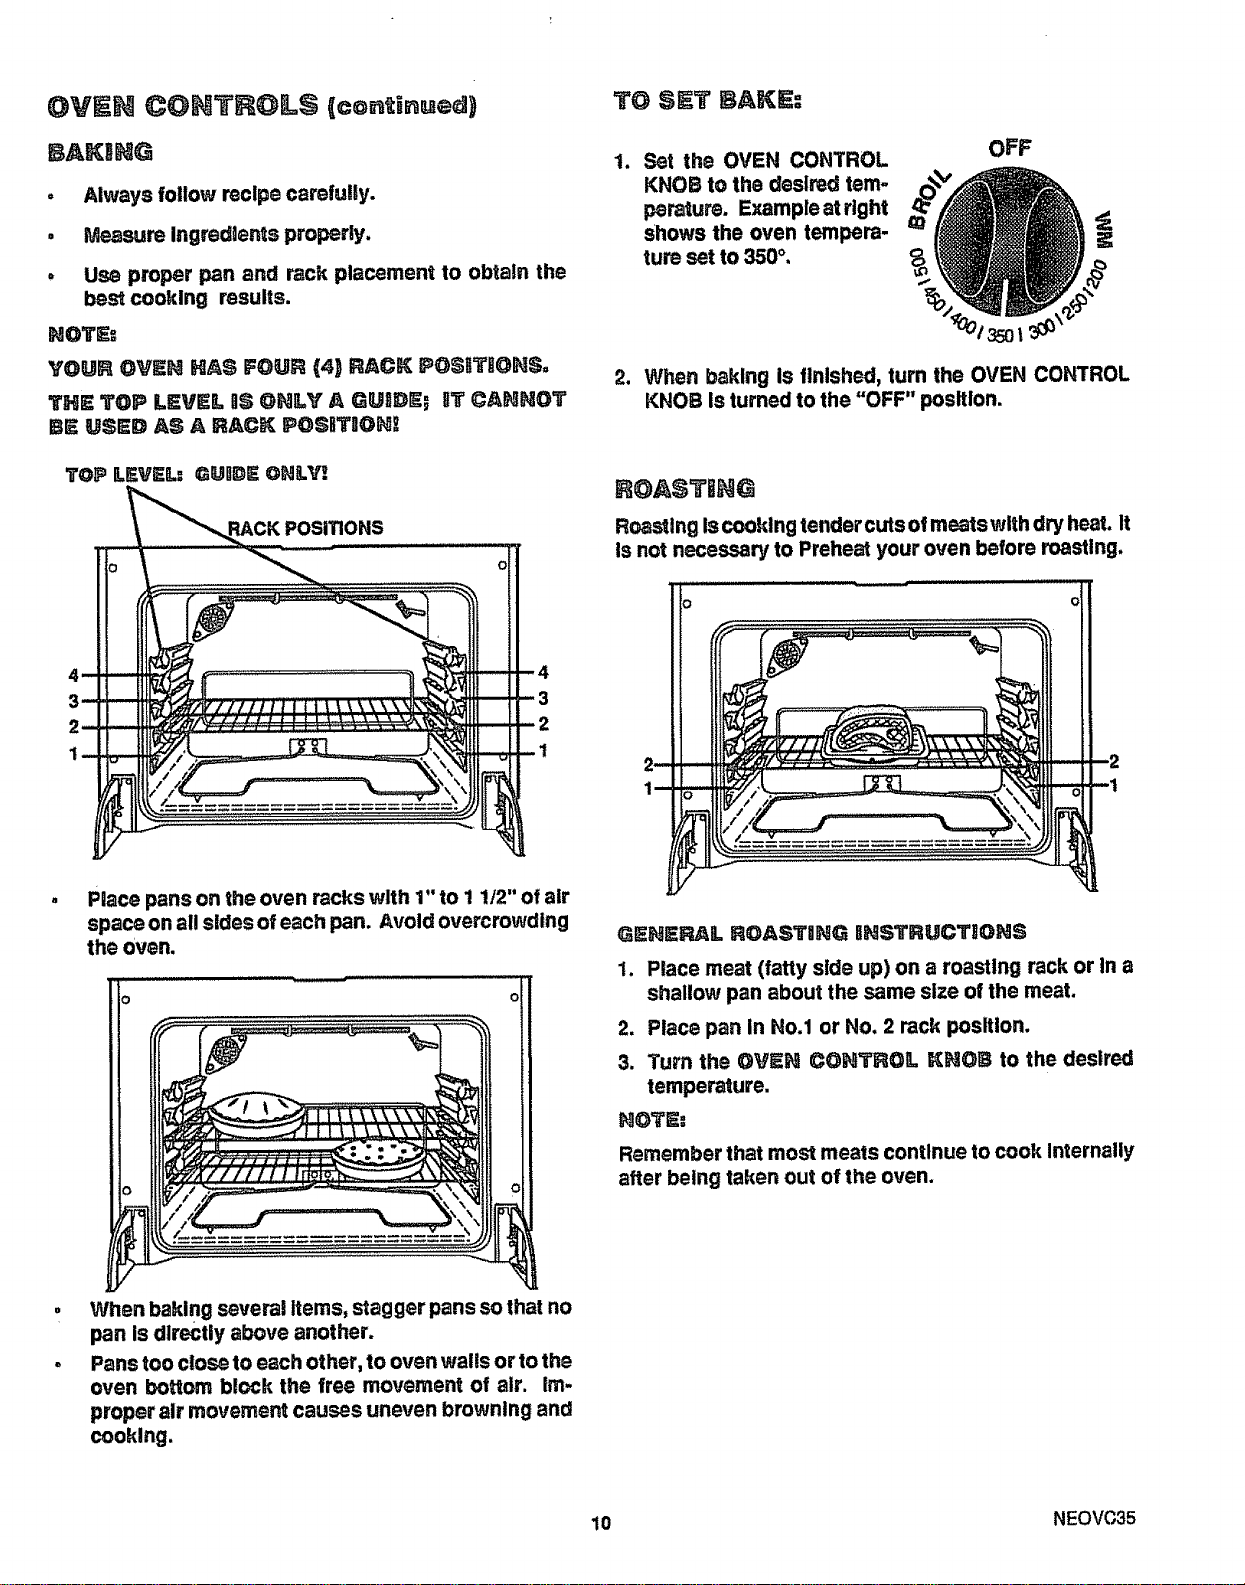
YGUR OVEN HAS FOUR (4) RACK POSnTHOHS,
THE TOP LEVEL IS ONLY A GUaD_; IT CANNOT
BE USED AS A RACK POSITION!
TOP LEVEL: GUIIDE ONLY!
POSITIONS
O
4
3
2
-1
TO SET BAKE:
Set the OVEN CONTROL
KNOB to the desired tem-
peratura. Example at right
shows the oven tempera-
ture set to 350 °,
OFF
.
When baking is finished, turn the OVEN CONTROL
KNOB Is turned to the "OFF" position.
ROASTB_IG
Roasting Iscooking tender cuts ot m_'-ts with dry heat. it
is not necessary to Preheat your oven before roasting.
Place pans on the oven racks with 1" to 1 !/2" of air
space on all sides of each pan. Avoid overcrowding
the oven.
GENE_L ROASTI]NG BNSTIRUCTIONS
1. Place meat (fatty side up) on a masting rack or In a
shallow pan about the same size of the meat.
2. Place pan In No.1 or No. 2 rack position.
3. Turn the OVEN CONTRG1L KN(_B to the desired
temperature.
NOTE:
Remember that most meats continue to cook Internally
after being taken out of the oven.
When baking several Items, stagger pans so that no
pan Is directly above another.
Pans too close to each other, to oven wafts or to the
oven bottom block the free movement of air. Im-
proper air movement causes uneven browning and
cooking.
10 NEOVC35
II£011111
il£1)ilLl lI!iI lllP$_
V_)_ _ve_ _Ioo_, should
o Use otlty the brolerpan and grid that came with your
range for brollng. They are designed for proper
dralr_ag9 of fa_ and IquJds and help prevent spatter,
smoke or fire.
, @e _e_ lp_'ehea_ _,_Jhenbro_lin_= For even broiling
on both sides, start the food on a cold pan.
o Trim the outer layer of fat from steaks and chops. Slit
the faly edges to keep the meat from curling.
- For m'_dmurn juiciness, salt the first side just before
turnang the meat. Salt the second side just before
se_JIng.
. Brush chicken and fish with butter several times as
they broil When broiling fish, grease the grid to
prevent slcklng. Broil chicken with sktn side down.
i iS nol necessary 1o turn fish.
o _eve_ leave a soiled l_oiler pan in the range.
Grease In the pan may smoke or burn the next time
the oven Is used.
= Be sure you know _he correct procedure for putting
eu_ a grease fire. See the section ea safe_y.
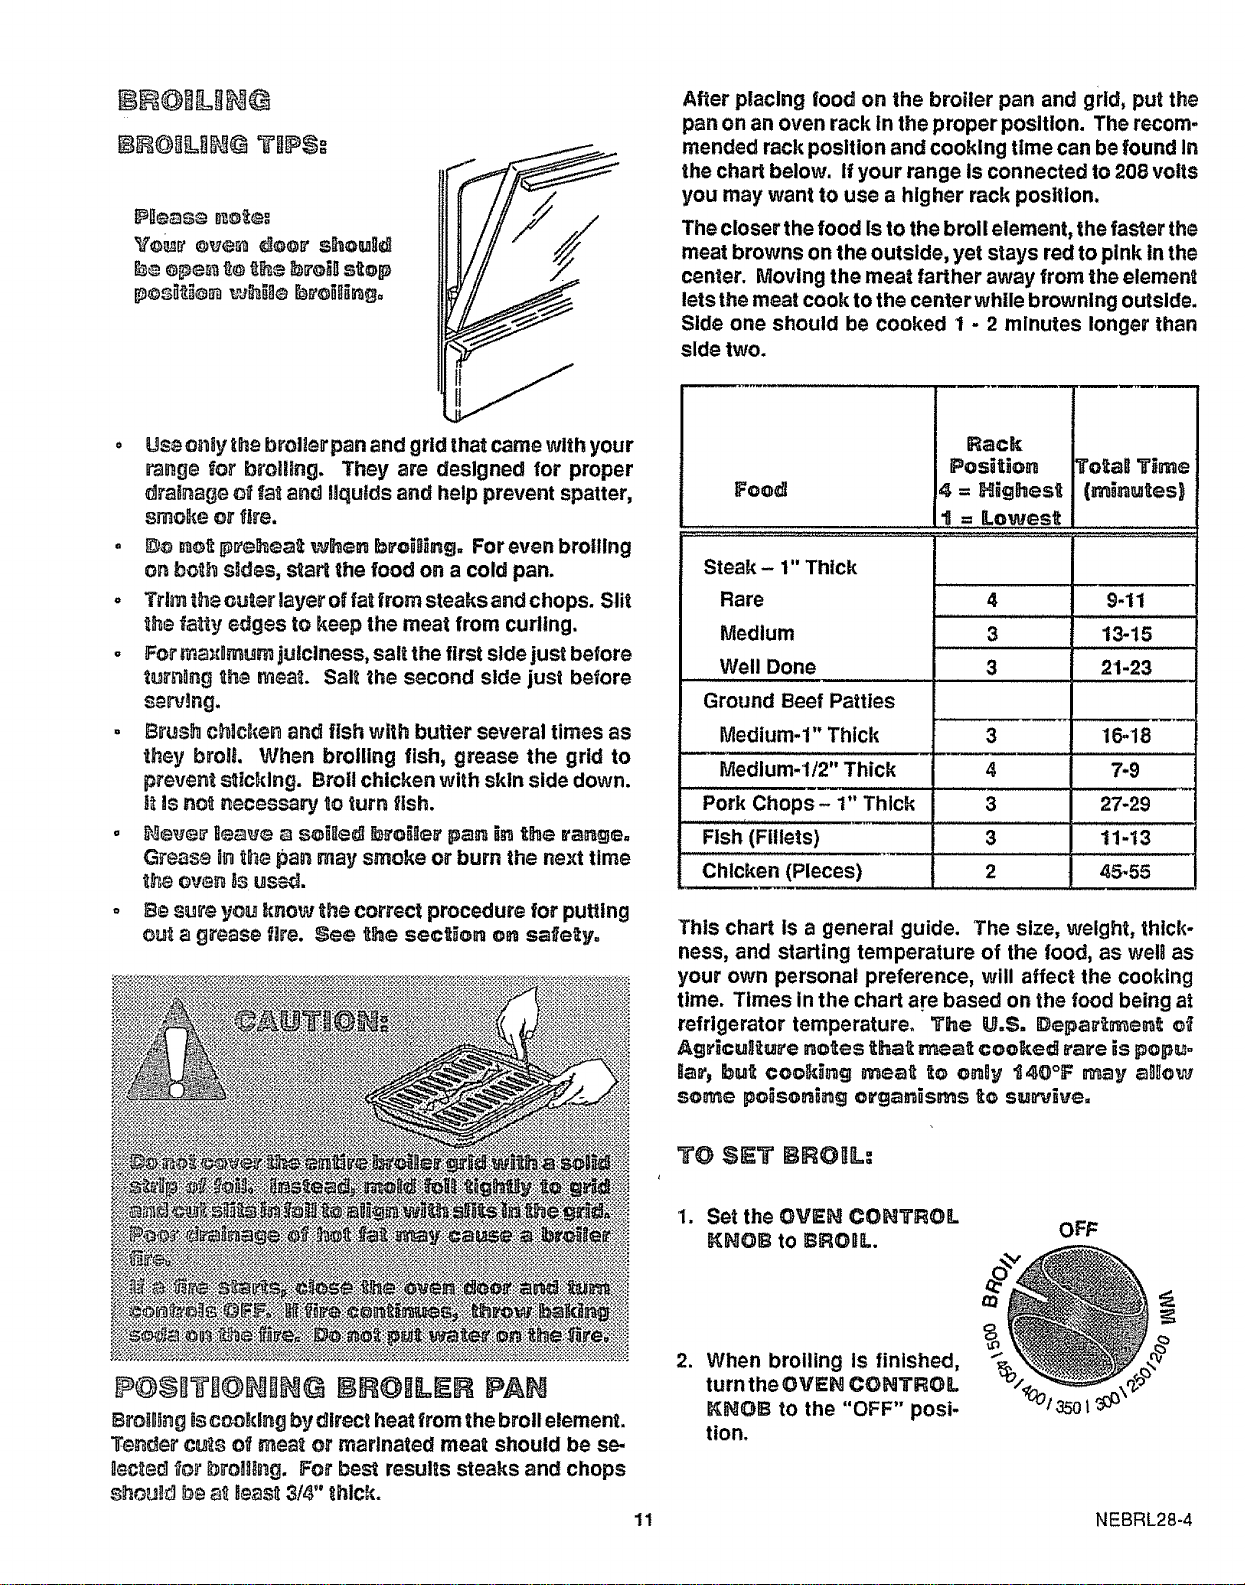
After placing food on the broiler pan and grid, put the
pan on an oven rack in the proper position. The recom-
mended rack position and cooking time can be found In
the chart below. If your range Is connected to 208 volts
you may want to use a higher rack posttlon.
The closer the food is to the broil element, the faster the
meat browns on the outside, yet stays red to pink In the
center. Moving the meat farther away from the elemen_
lets the meat cook to the center while browning outside.
Side one should be cooked I - 2 minutes longer than
side two.
Foo_
Steak- 1" Thick
Rare
Medium
Well Done
Ground Beef Patties
IVledium.1" Thick
Medium-I/2" Thick
Pork Chops- 1" Thick
Fish (Fillets)
Rack
Posi_io. To_al T_me
= Highes_ (_i.u_es)
1 = Lowes_
4 9-11
3 13-15
3 21-23
3
4
3
3
16-18
7-9
27-29
11-13
Chicken (Pieces) 2 45.55
This chart is a general guide. The size, weight, thick-
ness, and starting temperature of the food, as wel as
your own personal preference, will affect the cooking
time. Times in the chart are based on the food being at
refrigerator temperature_ The _.S. Depa_er_ o_
Agricul_u_,e ne_es _ha_ mea_ cooked rare is pop_-
Ila_'_Ibu_ coo_ieg mea_; 1o o_ly _40°F _r_ay allow
sere poiso.i_g organisms 1_osu_ive.
TO $_T BROIL:
1. Set the OVEN CONTROL
_HOB to BROIL. OFF
PI$1TIIIIIIG lllilli)lllill PAI I
8roll_g is co#king by direct heat from the broil element.
T_n_er c_._ of meat or marinated meat should be se-
g_c_edfor broth_g. For best resuls steaks and chops
should be al leas_ 3/4" _hlck.
,
11
When broiling is finished,
turn the _VIEH CONTROL
_NOI_ to the "OFF" posi-
tion.
NEBRL28-4
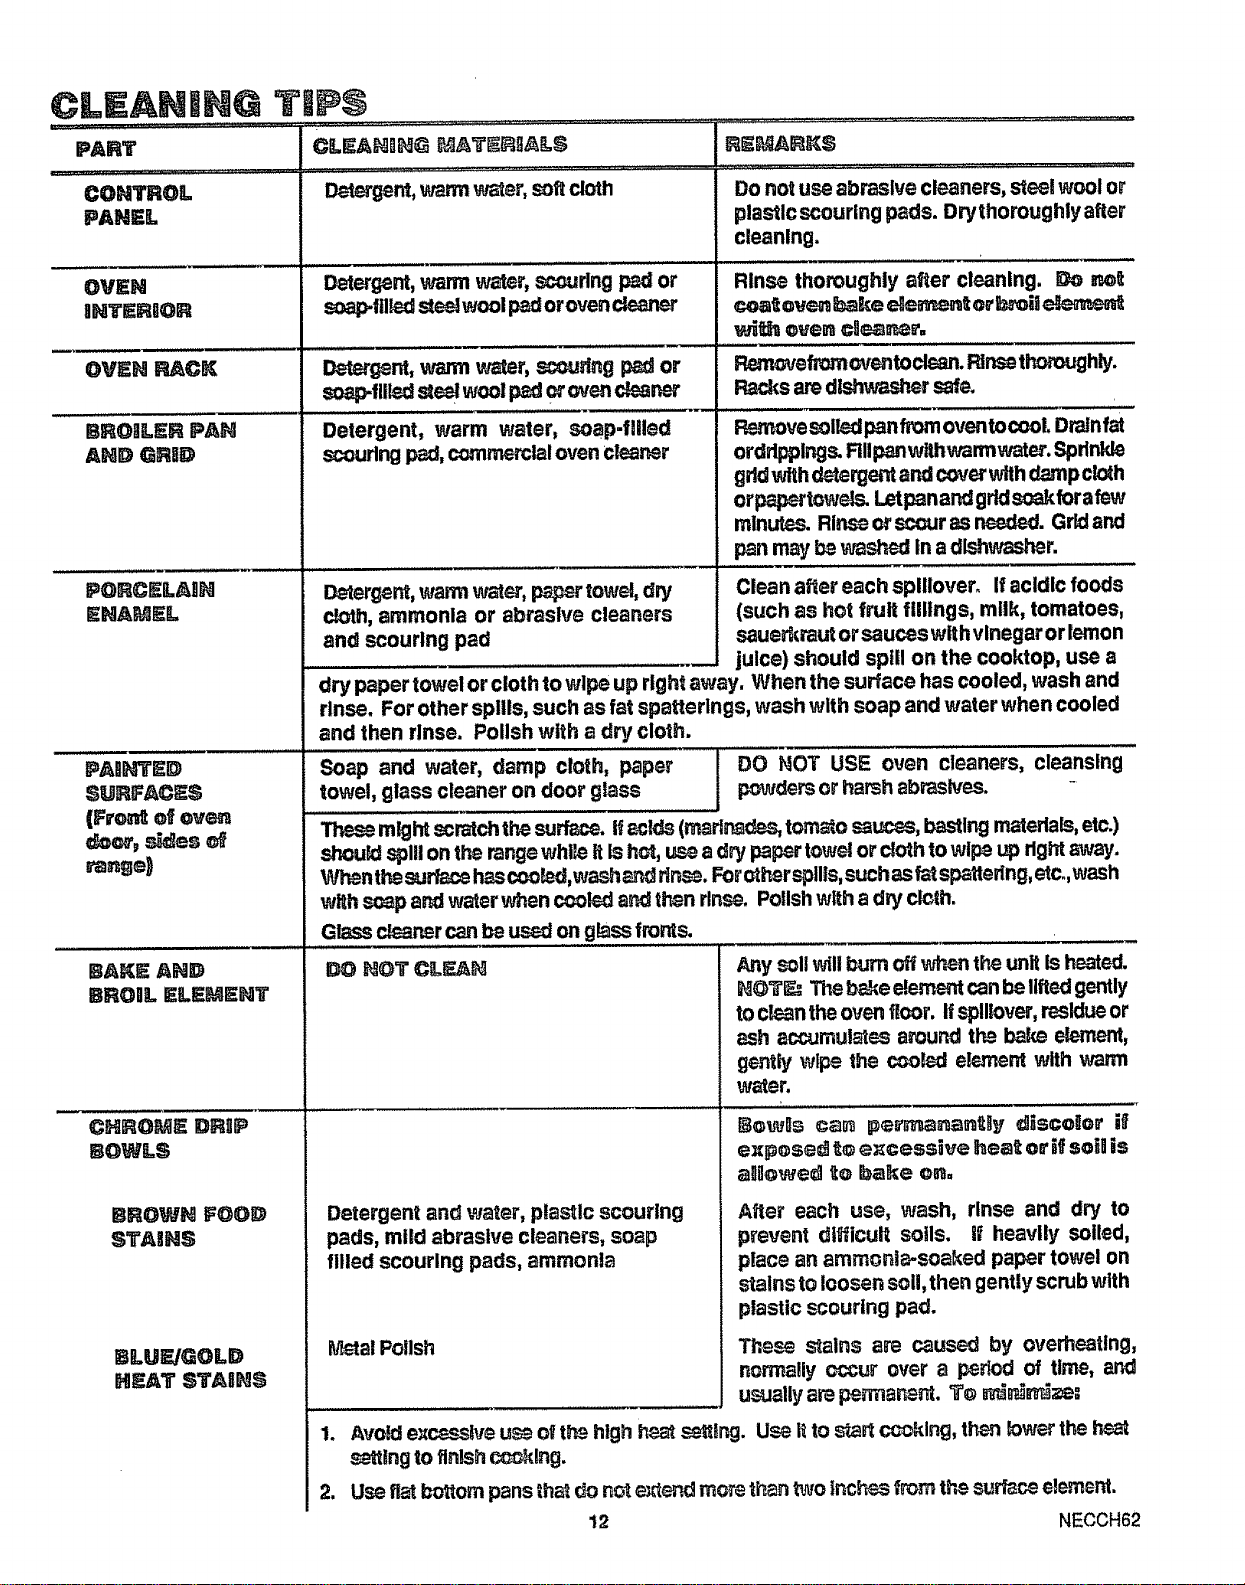
CLKANtNG TIP
PART
........... J'J_ ........... dU_u:r rr
CLI_ANIN@ _,_ATI_#,LS
D_gent, warm w_er, soft cloth
Detergent,warmwater,scoutingpador
fllh_dsteelwoolpadoroven
Detergent, warm water, scouring pad or
soap-tilled s=eelwool pad or oven cleaner
Detergent, warm water, soap-tiffed
sc_jrlng pad, commercial oven cleaner
Detergent, wa._ water, p._pertowel, dry
cloth, ammonia or abrasive cleaners
REMARH:_
.... ", ' _ .................... ,_._- , ............ , ....... ,",
Do not u._ abrasive cleaners, steel wool or
plastic scouring pads. Drythoroughly after
cleaning.
Rinse thoroughly after cleaning. Do not
coa_oven _ke der_tor_i! __
w_h oven c_r,
_efronloventoclean. Rlnsethoroughly.
Racks are dishwasher safe.
R_rmvesolLedpan from oventocooL Dralnfat
ordrlpplngs. RIIpanwithwannwater. Spdnkle
grid with detergent and cover with damp ck_h
orp_p_tow_s. Letpanand gridsoakforafew
minutes. Rinse or scour as needed. Gridand
pan may bewashed in a dlshwa_'mr.
Clean after each splllovero If acidic foods
(such as hot fruit fillings, milk, tomatoes,
and scouring pad sauer=_rautorsauceswlthvlnegarorlemon
juice) should spill on the cooktop, use a
dry paper towel or cloth to wipe up right away. When the surface has cooled, wash and
rinse. For other spills, such as fat spatterlngs, wash with soap and water when cooled
and then rinse. Polish with a dry cloth.
Soap and water, damp cloth, paper ! DO NOT USE oven cleaners, cleansing
towel, glass cleaner on door g_ass j powders or harsh abrasives. -
Thes_ might scratch the surfaz_, if_:lds (r_ri_dss, tomato sauces, basting materials, etc.)
should spill on the range while itIs hot, use a dry paper towel or cloth to wipa up fight e_vay.
WhenthesurPs_:e hascooL-_J,wash_nd rinse. Foro_herspllls, suchas Patspattering,etc, wash
wl_hsoap and water when cooled and then rinse. Polish with a dry cloth.
Glass cleaner can be used on glass fronts.
t'_OT CL_J_ Any ,pollwill bum off when the unit Is heated.
_T_ The b_,e element canbe lifted gently
to clean the oven floor. Ifsplliover, residue or
ash accumu!ates around the bake element,
gentiy wipe the COO_sdelement with warm
water.
_o,._s c_n pee'm_n;_n_.l]V _isco]or i_
e_pesed _¢_e;_cess_e heat or _fsoi! is
a_g_w_l _to babe on,
Detergent and water, plastic scouring After each use, wash, rinse and dry to
pads, mtld abrasive cleaners, soap prevent difficult soils. If heavily .Polled,
filled scouring pads, ammonia place an ammoni_-soaked paper towel on
stains to loosen sell, then gently scrub with
plastic scouring pad.
Mstal Poflsh Thes_ stains are caused by overheating,
normally occur over a period of time, and
usually are permar_nt. T_ __:
1. Av(dd e_.cssstveuso of th_ high heat s_ng. Use itto s_artcalking, then to_er the heat
seatingto finish c_lng.
2. Use fl_ bottom pans th_ do not e_end m_'_ then hr_oinchs_ f_ the surface element.
12 NECCH62
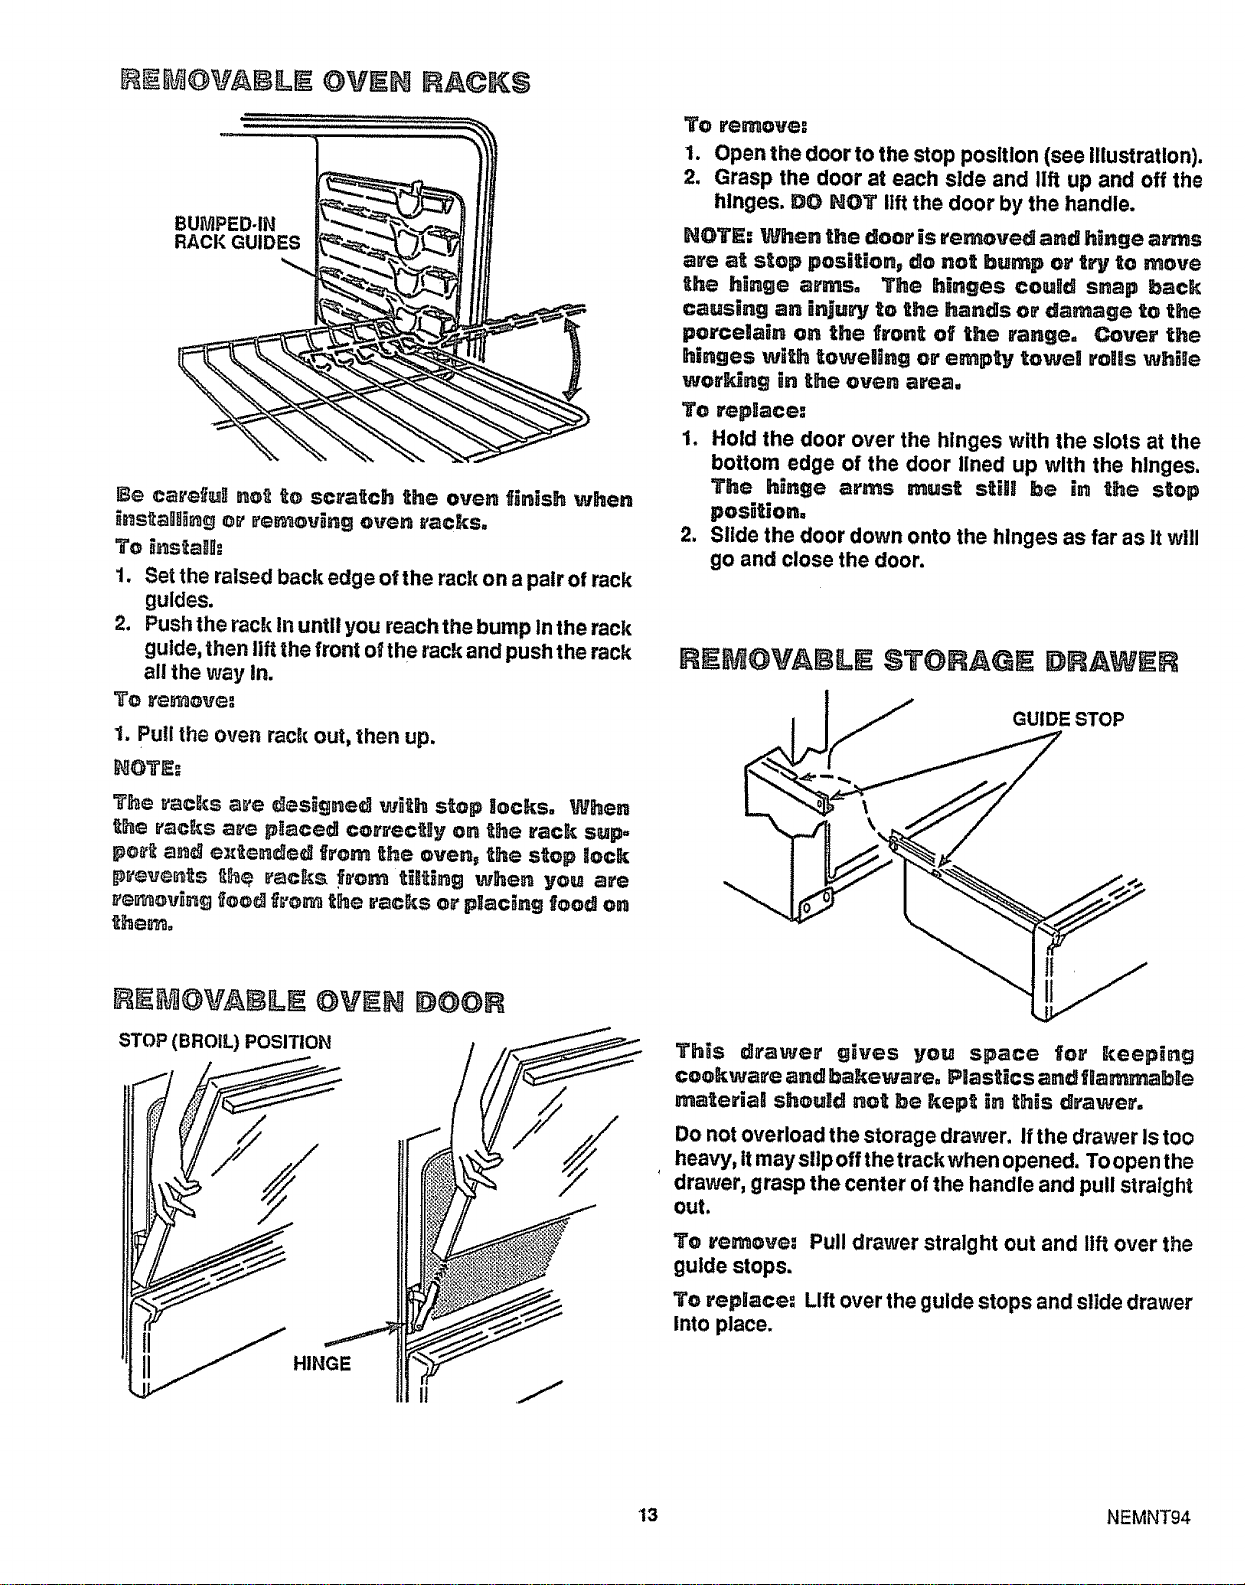
@VEN RACKS
BUMPED-IN
RACK GUIDES
_e care_u_ not _o sc_tatch the oven _inish when
installing or removing oven racks.
To instaBll="
1. Set the raised back edge of the rack on a paw of rack
guides.
2. Push the rack In until you reach the bump in the rack
guide, then lift the front of the rack and push the rack
all the way In.
TO YG_ove:
1. Pull the oven rack out, then up.
The tracks a_'e dles_g,ed w_th stop Ilocks. When
_he rac_s are p_aced correctly o, the rack sup-
po_t_arid ez[_e_ded _rom _he oven= the stop Rock
pr_eve_s _h_ racks _a'om titt_ing when you are
_'emov_ng good _'e_ the racks o_ p_ac_ng _eod on
_hem=
STOP (BROIL) POSITION
TO Yemove:
1. Open the door to the stop position (see illustration).
2. Grasp the door at each slde and lift up and off the
hinges. DO HOT lift the door by the handle.
NOTE: When the door is removed and hinge arms
are at stop posi_ion_ do no_ bump or try _o move
the hinge arms° The hinges could snap back
causing an inju_J. _o _he hands or damage to _he
porcelain on the fron_ of the range, Cove_ the
hinges wi_h _oweling o_ empty _owe] rollls while
wor_ng in the oven area.
Te replace:
1. Hold the door over the hinges with the slots at the
bottom edge of the door ,ned up with the hinges.
The h_nge re'ms mus_ s_iH be in the stop
position,
2. Slide the door down onto the hinges as far as It will
go and close the door.
STCRAG
!(,,/_.,/_ GUIDE STOP
Th_s drawe_' g_ves you space for keeping
coekwm'e and bakeware= Plastics and flamrr_ab]e
ma_eria! should not he kep_ _n th_s drawer.
Do not overload the storage drawer. If the drawer Is too
heavy, it maysttpoff thetrackwhen opened. Toopenthe
drawer, grasp the center of the handle and pull straight
out.
To _,emeve- Pull drawer straight out and llft over the
guide stops.
To repiace: Lift over the guide stops and slide drawer
Into place.
13 NEMNT94
HE @VA LE
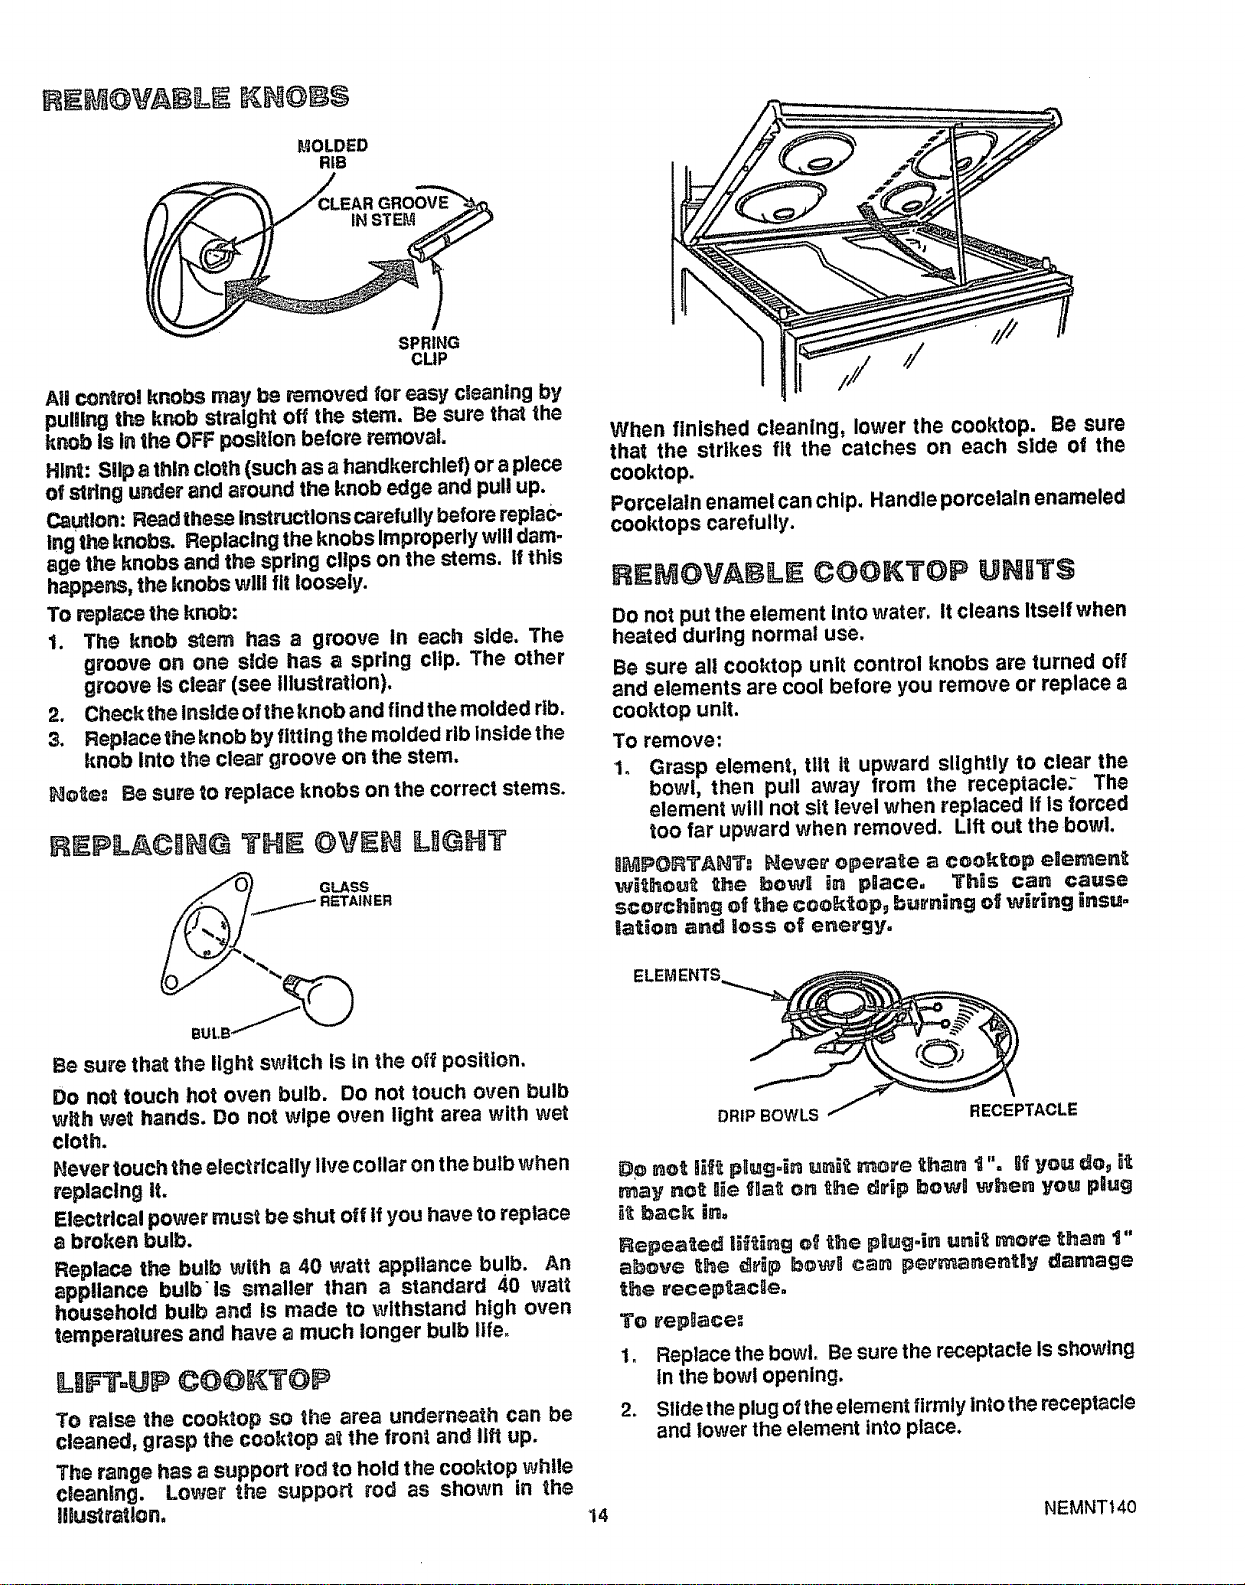
MOLDED
RiB
\ "_CLEA R GROO-'V_'O"
SPRING
CLIP
All control knobs may be removed for easy cleaning by
pulling the knob straight off the stem. Be sure that the
knob Is In the OFF position before removal.
Hlnt: Slip a thin cloth (such as a handkerchief) or a piece
of strlng under and around the knob edge and pull up.
Ca_lon: Read these instrucUons carefully before raplac-
ing the knobs. Replacing the knobs Improperly will dam-
age the knobs and the spring clips on the stems. If this
happens, the knobs will fit loosely.
To replace the knob:
1. The knob stem has a groove in each side. The
groove on one side has a spring clip. The other
groove Is clear (see illustration).
2. Check the Inside of the knob and find the molded rib.
3. Replace the knob by fitting the molded rib inside the
knob Into the clear groove on the stem.
Be sure to replace knobs on the correct stems.
HEP1LAC[IN@ THE L @HT
Be sure that the light switch is In the off position.
Do not touch hot oven bulb. Do not touch oven bulb
with wet hands. Do not wipe oven light area with wet
cloth.
Never touch the electrically live collar on the bulb when
replacing It.
Electrical power must be shut off If you have to replace
a broken bulb.
Replace the bulb with a 40 watt appliance bulb. An
appliance buibls smaller than a standard 40 watt
household bulb and is made to withstand high oven
temperatures and have a much longer bulb life.
LBFToUP COO TOP
To raise the cook_op so the area underneath can be
cleaned, grasp the cooktop a_ the fron; and lift up.
The range has a support rod to hold the cooktop while
cleaning. Lower the support rod as shown in the
lUust_tlon,
When finished cleaning, lower the cooktop. Be sure
that the strikes fit the catches on each side of the
cooktop.
Porcelain enamel can chip. Handle porcelain enameled
cooktops carefully.
HEMOVABL[ COOKTOP UHI TS
Do not put the element into water. It cleans Itself when
heated during normal use,
Be sure all cooktop unit control knobs are turned off
and elements are cool before you remove or replace a
cooktop unit.
To remove:
1. Grasp element, tilt it upward slightly to clear the
bowl, then pull away from the receptacle: The
element will not sit level when replaced if Is forced
too far upward when removed. Lift out the bowl.
It_PORTA_',_T." IHevee' operate a cooktop elemen_
wi_heu_ the _owl in paace, This can cause
scorching of the co_op_ burning of wiring insuo
tarpon and loss o_ energy.
DRIP BOWLS RECEPTACLE
_o ne_: _H_p_ug.i_ u_ r_oe'e _han _ % _f you do_ _
may no_ _e _a_ on _he drip bow_ when ye_ p_ug
_ _ack in,
Repea_ed li_r_g of _te plug.in uni_ more _;ha_ _"
alcove t_he _]_p b_w_ can p_rmanen_y damage
_he _ecep_acgeo
To e'ep_ace. =
1. Replace the bowl. Be sure the receptacle Is showing
tn the bowl opening.
2. Slide the plug o_the element firmly intothe receptacle
and lower the element into place.
14
NEMNT14O
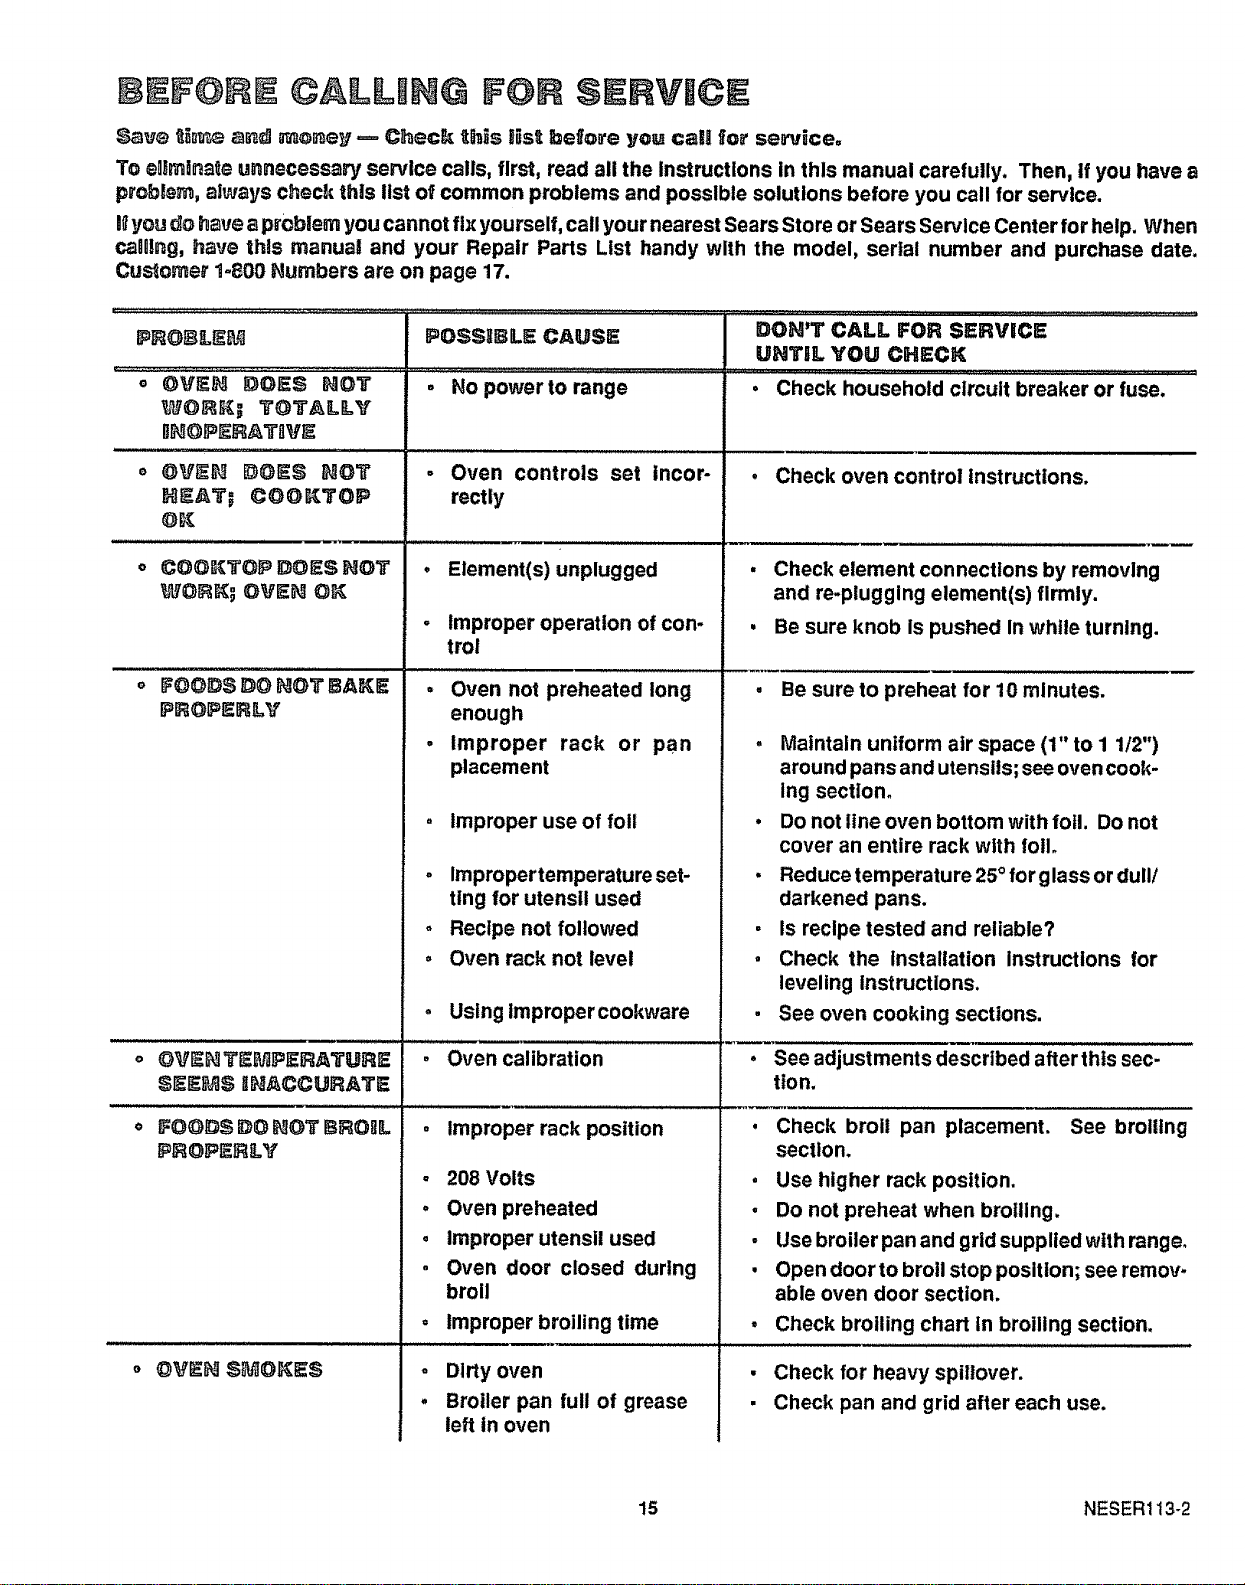
To ®Urninate unnecessaPj service calls, first, read all the instructions in this manual carefully. Then, if you have a
problem, always check this list of common problems and posslble solutions before you call for service.
l_you do h_ve a problem you cannot fix yourself, call your nearest Sears Store or Sears Service Center for help. When
calling, have this manual and your Repair Parts List handy with the model, serial number and purchase date.
Custorner 1-800 Numbers are on page 17.
PRO_LE_
° OVE_ DOSS NOT
_OR_; TOTALLY
BNGPER_,TtiVE
o OVi_N DOES _OT
HEAT_ _OOKTOP
o COOKTGPDOES HOT
o FOO_$ D_ HOTBA_E
PROPER_Y
POSS_BLS CAUSe=
° No power to range
FOO_)$ _O I_GT BRG_IL
PRGP_RLY
° Oven controls set incor-
rectly
o Element(s) unplugged
o Improper operation of con-
trol
° Oven not preheated long
enough
o Improper rack or pan
placement
° Improper use of foil
ss.vlcs ...............
UNTIL YOU CHEC_
• Check household clrcult breaker or fuse.
, Check oven control instructions.
• Check element connections by removing
and re-plugging element(s) firmly.
, Be sure knob is pushed in while turning,
. Impropertemperatureset-
ting for utensil used
o Recipe not followed
o Oven rack not level
• Be sure to preheat for 10 minutes.
• Maintain uniform air space (1" to I 1/2")
around pans and utensils; see oven cook-
ing section.
• Do not line oven bottom with foil. Do not
cover an entire rack with lotlo
. Reduce temperature 25° for glass or dull/
darkened pans.
, Is recipe tested and reliable?
• Check the installation instructions for
leveling Instructions.
See oven cooking sections.
Check broil pan placement. See broiling
section.
• Use higher rack position.
• Do not preheat when brotllng.
, Use broiler pan and grid supplied with range.
• Open doorto broil stop position; see remov-
able oven door section.
• Check broiling chart in broiling section.
. Using impropercookware
o _V_I_TE_PIERATUR_ , Oven calibration , Seeadjustmentsdescrtbedafterthtssec.
_$ HIP_ACCURATE tion.
= Improper rack position ,
- 208 Volts
, Oven preheated
° Improper utensil used
° Oven door closed during
broil
= Improper broiling time
- Dirty oven
° Broiler pan full of grease
left in oven
• Check for heavy spillover.
• Check pan and grid after each use.
15 NESER113-2
You may feel that your new oven cooks differently than
the oven it replaced. We recommend that you use your
new oven a few weeks to become more familiar with It,
following the times given In your recipes as a guide.
If you think your new oven Is too hot (burning foods) or
not hot enough (foods are undercooked) you can adjust
the temperature yourself. The appearance and texture
of foods are better indicators of oven accuracy than an
Inexpensive oven thermometer. We do not recommend
the use of Inexpensive thermometers, such as those
found in grocery stores, to check the temperature set-
ring of your new oven. These thermometers can vary by
20-40 degrees. In addition, the oven door must be
opened to read these thermometers. Opening the door
will change the temperature of the oven.
To decide how much to change the temperature, set the
oven temperature 25°F higher (If foods are undercooked)
or 25°F lower (if foods are burning) than the temperature
In your recipe, then bake. The results of this "test"
should give you an idea of how much the temperature
should be changed.
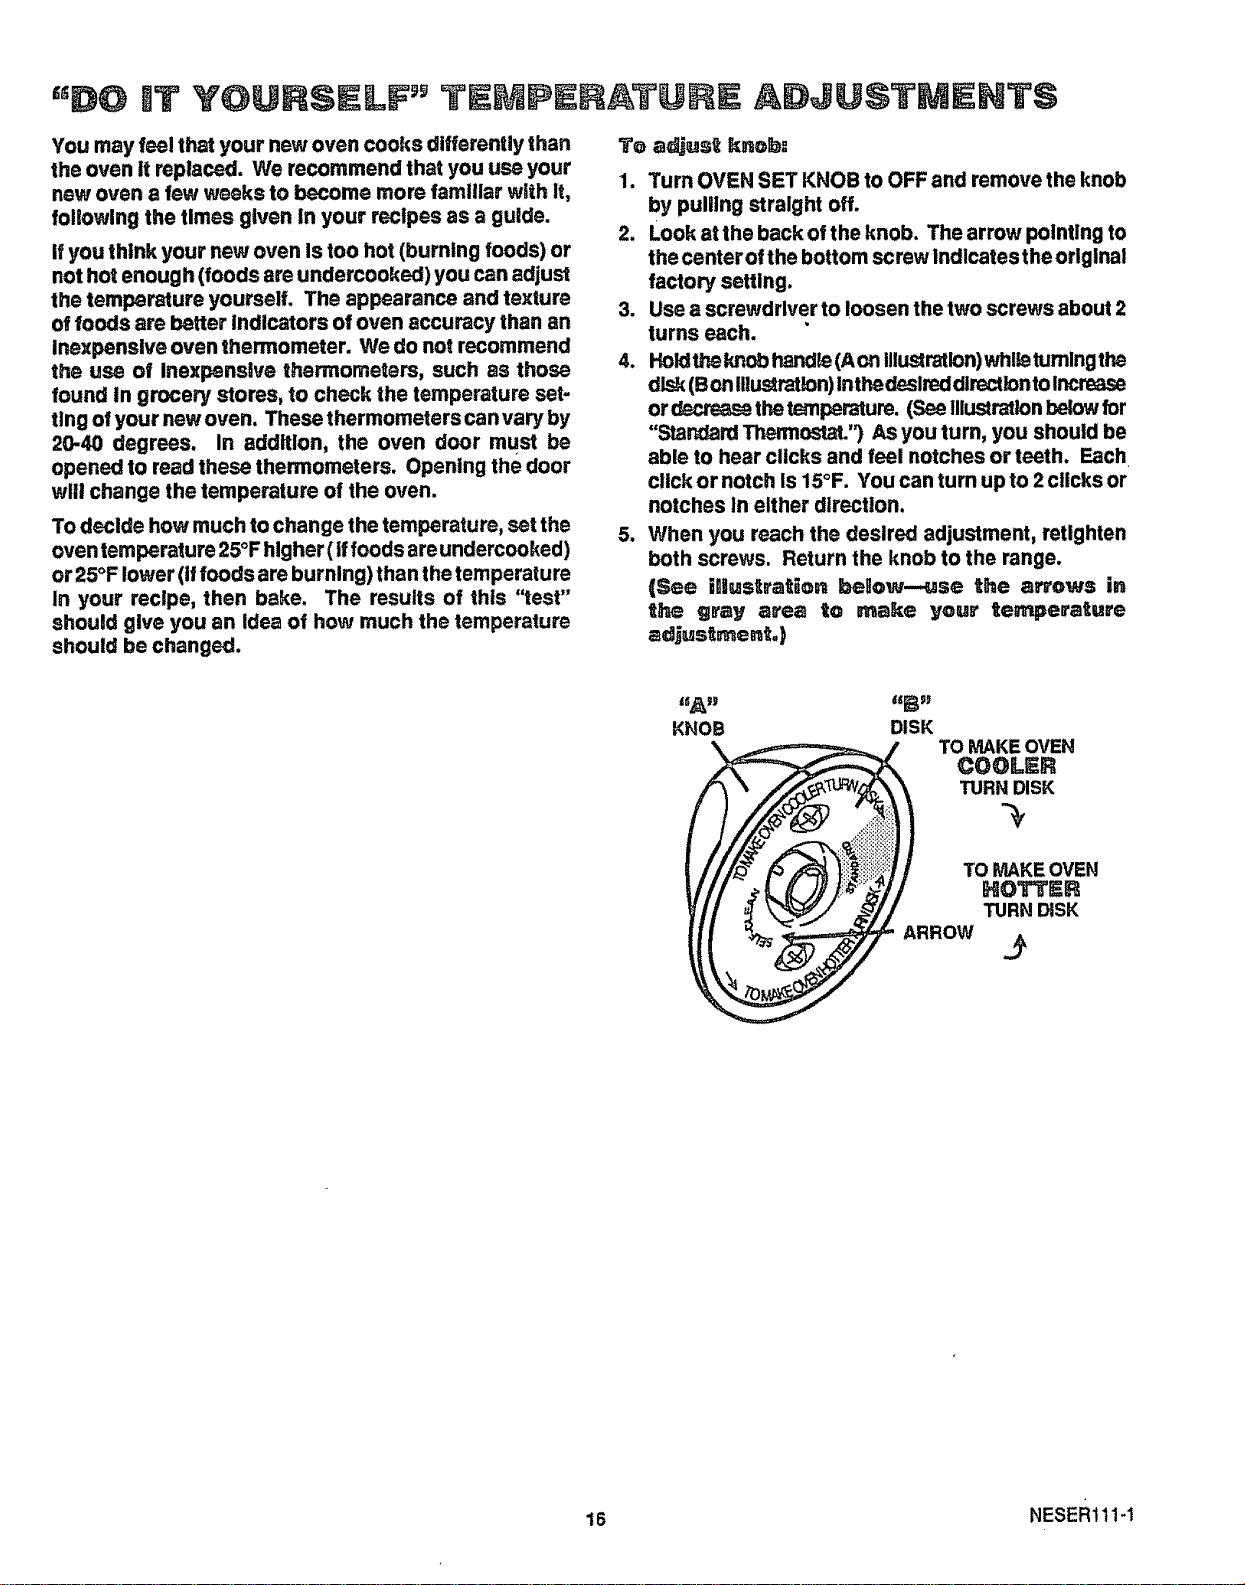
To a_ust knob:
1. Turn OVEN SET KNOB to OFF and remove the knob
by pulling straight off.
2. Look at the back of the knob. The arrow polntlng to
the center of the bottom screw Indlcates the original
factory setting.
3. Use a screwdriver to loosen the two screws about 2
turns each. "
4. Holdthe knob h_uldle(Aon illustration)whlie turningthe
disk (Bon Illustration) inthedesired directionto Increase
or_thetsmperature. (See illustration below for
"Standard Thermostat.'_ As you turn, you should be
able to hear clicks and feel notches or teeth. Each
click or notch Is 15°F. You can turn up to 2 clicks or
notches In either direction.
5. When you reach the desired adjustment, retlghten
both screws. Return the knob to the range.
(See il]|ustrat_oR bellow--use the a_ows in
the g_'ay area to make yore' temperature
adjustmento)
TO MAKEOVEN
COOL=R
TURN DISK
TO MAKEOVEN
HO_ER
TURN DISK
ARROW .._
16 NEsER111-1
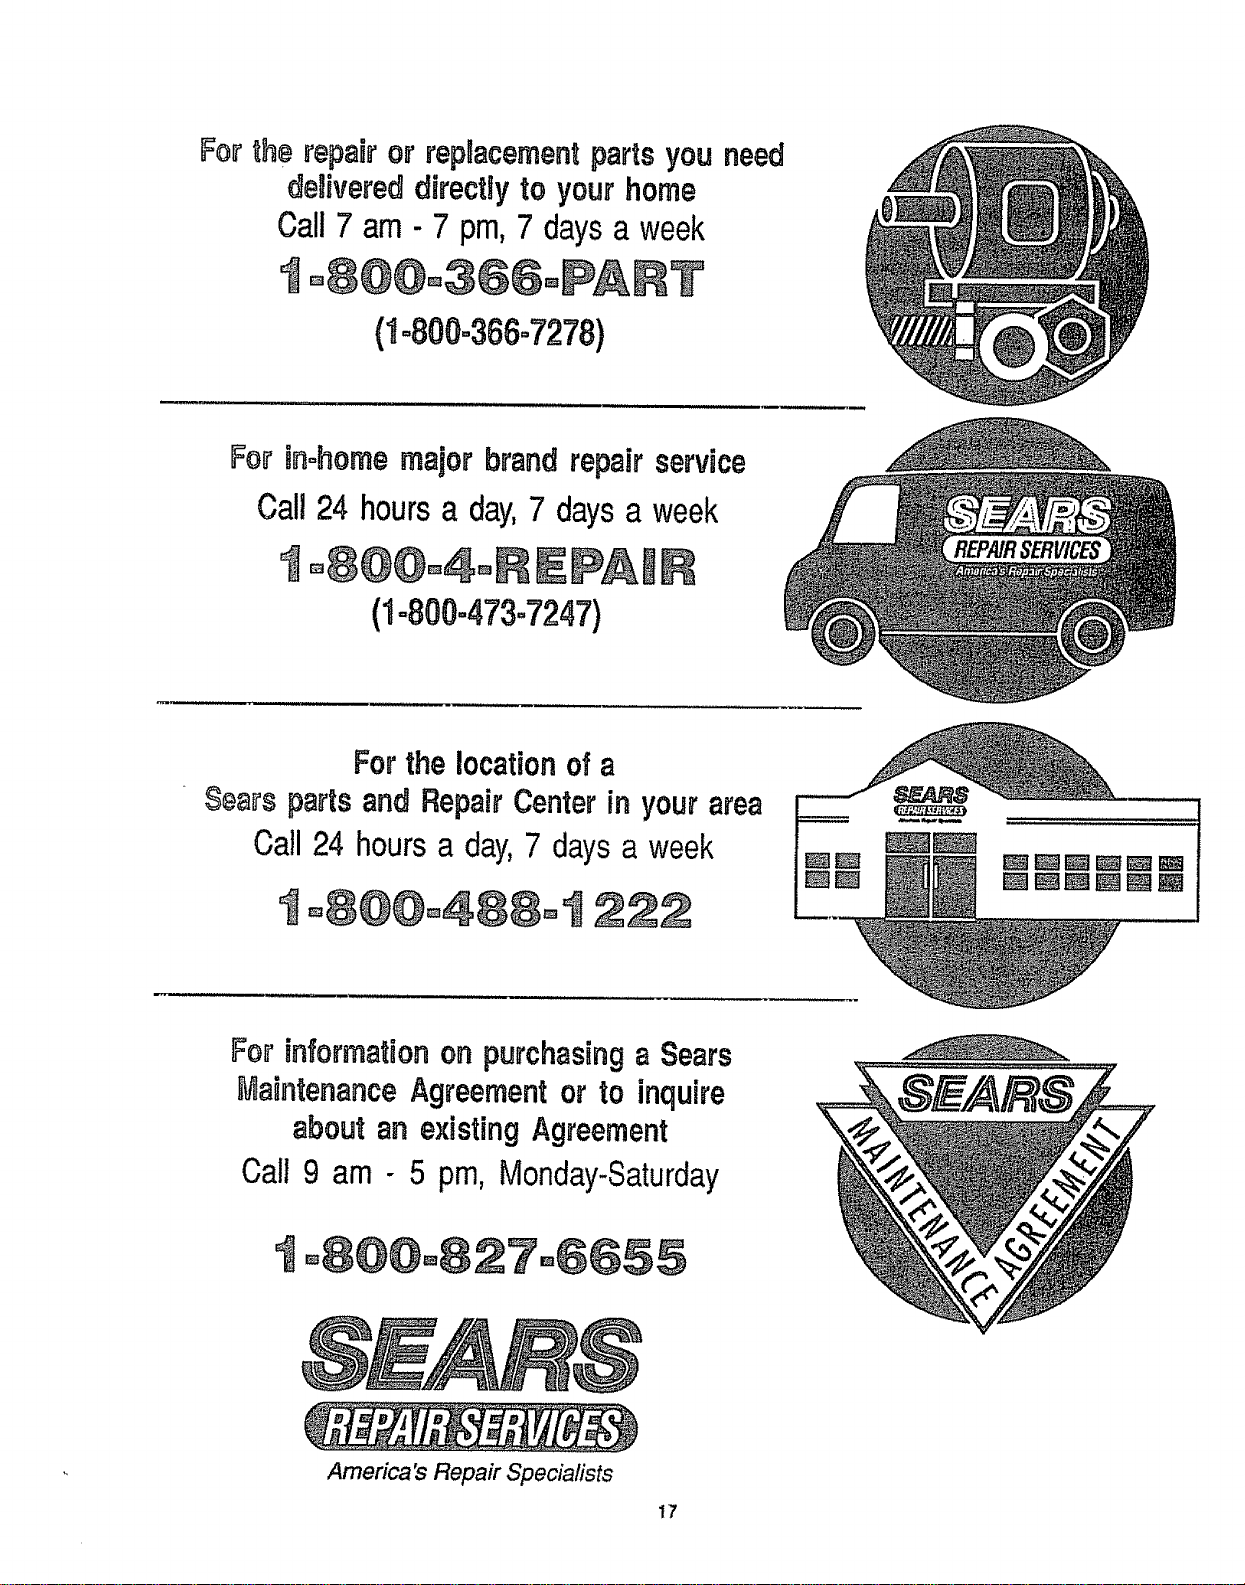
For the repair or replacementpartsyouneed
delivereddirecUyto yourhome
Call 7 am - 7 pm, 7 days a week
(1°800°368°7278)
For in=homemajor brand repairservice
Call24 hours a day,7 daysa week
°8@@°4°
(1-800-473-7247)
Forthe location ofa
Searspartsand RepairCenterin your area
Call 24 hoursa day,7 daysa week
o8@@o488o
For informationan purchasinga Sears
MaintenanceAgreementor to inquire
about an existingAgreement
Call 9 am- 5 pm, Monday-Saturday
°8@0°8: 7°@655
America's Repair Specialists
17

ALE©TAt© AH@E A RANTY
r
Dear Customer:
Ourconstant efforts are di-
rected toward making sure
your new Kenmore Range
will arrive at your home in
perfect condition and will
give you proper perform-
ance, As part of these ef-
iorts, we feel It is our re-
sponsibility to provide you
with this warranty for your
range.
FULL {}HE YEAR WARRANTY ON THE FUNCTIOHglRG OF ALL
PARTS EXCEPT GLASS PARTS
if, within one year from the date of installatlon, any part, other than a glass
part, fails to function properly due to a defect in material or workmanship,
Sears will repair or replace it, free of charge.
FULL 30-DAV WARRAHTY ON GLASS PARTS AND FiNiSH OF PORCE-
LA6N ENAMEL_ PAIIHTED OR ERaGHT tJtETAL FRNISHED PARTS
If, within 30 days from the date of installation, any glass part or the finish
on any porcelain enamel, painted or bright metal part is defective in
material or workmanship, Sears will replace the part, free of charge.
FULL 90.DAY WARRANTY OH _ECHANICAL ADJUSTMEHTS
For 90 days from the date of installation, Sears will provide, free of charge,
any mechanical adjustments necessary for proper operation of the range,
except for normal maintenance.
If the range is subjected to other than private family use, the above
warranty coverage is effective for only 90 days.
WARRANTY SERVICE RSAVAILAISLE BY CONTACTIHG THE
NEAREST SEARS SERVICE CEHTER/DEPARTMEHT IH THE
UHITED STATES
This warranty applies only while this product is in use in the Unted States,
This warranty gives you specific legal rights, and you may also have other
rights which vary from state to state. SEARS, ROEBUCR and CO.
Dep_;. 72OPSO
3333 Beverly Read
Hoffm . E,tat , =LSO179
WI SEIVI©I WH T WI ELL
"We Service What We Sel" is our assurance to you that you can depend on Sears for service because Sears
service is nationwide.
Your Kenmore Range has added value when you consider that Sears has a service unit near you staffed by
Sears trained technicians.., professional technicians specifically trained on Sears appliances, having the
parts, tools and equipment to ensure that we meet our pledge to you -- "We Service What We Sell!"
TO FURTHER ADD TO THE VALUE OF YOUR RANGE, BUY A SEARS MAINTENANCE AGREEMENT,
KenmoreRangesare designed,manufactured and
testedfor yearsofdependable operation. Vet,any
modern appliance may requireservice from time
to time. The SearsWarranty plusthe SearsMain-
tenance Agreement provides protection from un-
expected repair bills and assures you ofenjoying
maximum range efficiency.
Here's a comparative warranty and Maintenance
Agreement chart showing you the benefits of a
Sears Range Maintenance Agreement.
Years of Ownership Coverage
Replacement of Defective
Parts other than Porcelain
or Glass
2 Mechanical Ad_ueilment
3 Porcelain and Glass Parts
Annual Preventive Matnten,,
_3
ance Check at your request
90 DAYS I
W INA
30 DAYS I
W
NAI NA
W ,, W,',_ranty
.... '"'1
3rdYear !
MA
MA
MA
MA., Matn_ntmce Agreement
CONTACT YOUR SEARS SALESPERSOH OR LOCAL SEARS SERVICE
CEHTER TODAY AND PURCHA_ A SEARS _AINTF.NANCE AGREEMENT.
101t ty IEAR$_ i_OEIUCt _li CO. Iollman Eslates_ IL IO179
-- P_inted in LaFayet_:e_ Geo_'gia --,
mND_CE
SEGUR_DAD
US@ Y CUiDADO
Su estufa y au=+caracted=+ticas ................................. 6
Controlea de la cublefla ......................................... 7-9
Controles del homo ................................................. 10
C6mo coclnar al horno ...................................... 10, 11
Cdmo homear ........................................................... 10
Ideas pare a=+ar......................................................... 11
C6mo aider ................................................................. 11
It+me per,, i= ilmpleza ........................................ 12,13
C6mo _r la clnta de empaque ............................. 5
smmmc,o
Qde hacer ante=+de sollcitar un servlclo ......... 16,17
AdJu=+les de temperature ......................................... 18
Ndmeros de Servlclo pare el Cllenle ...................... 19
GARANTMA
MODELOS
62441, 91141,
91165
KenmoPe
0 0
++++
P_pslRm_idado
P_N+_,_262='+(SR'!O++94)
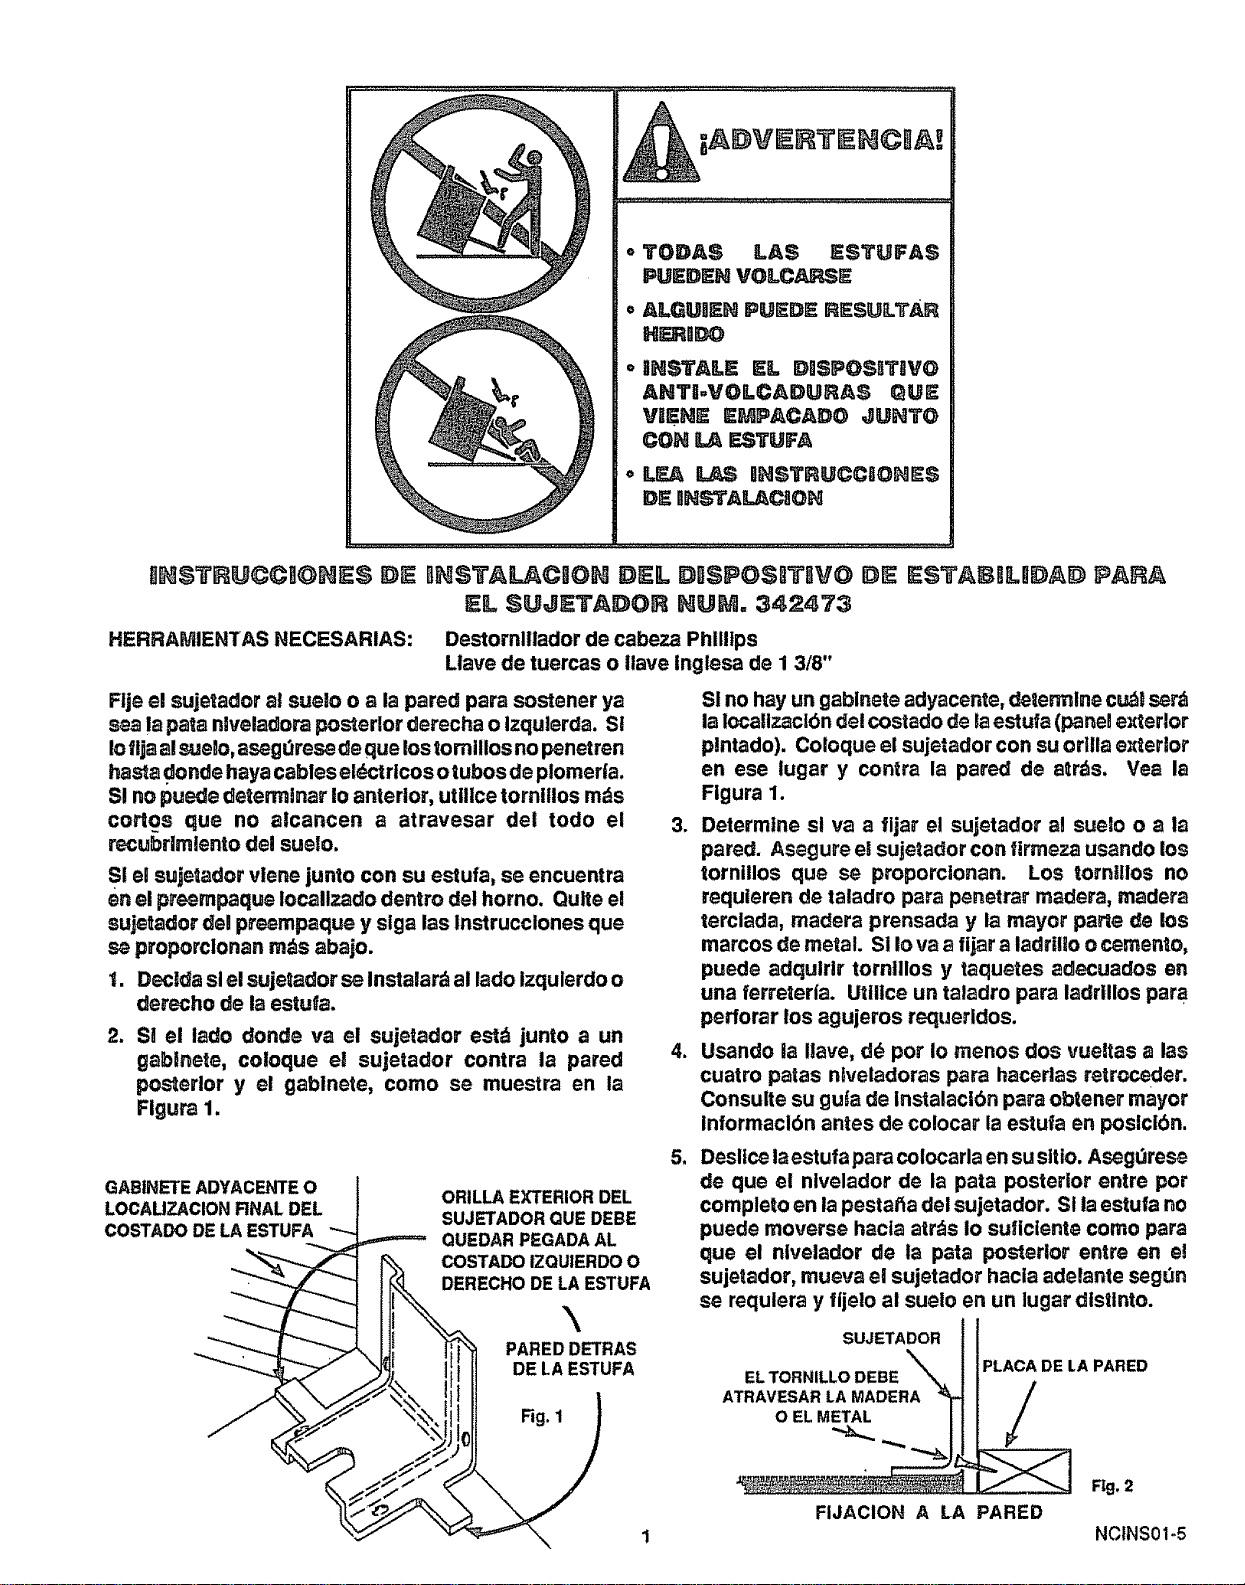
mNSTRUCC_I@HE$ DE I]NSTALACION DEL DL!SPOS_T_VO DE ESTABIIL_DAD t_ARA
IEL SUJEI"ADOR NUM. 342473
HERRAMIENTAS NECESARIAS: Destornlllador de cabeza Phillips
Llave de tuercas o llave Inglesa de 1 3/8"
Flje el sujetador al suelo o a la pared para sostener ya
!a pata nlveladora pos'lerlor derecha o izqulerda. S!
Io flja al sueno,asegdresede que los tomillos no penetren
hasta donde haya cables el_=ctrtcosotubos de plomerfa.
SI no puede determlnar Io anterior, utilice torniilos rods
cortos que no alcancen a atravesar del todo el
recubrlmlento del suelo.
SI e! suje_ador vlene junto con su estufa, se encuentra
en el preempaque Iocallzado dentro del horno. Quite el
sujetador del preempaque y slga las lnstrucclones que
se proporclonan m_s abajo.
1. Dsc|da sl el sujetador se Instalar_ al lado izqulerdo o
derecho de la estufa.
2. S| el lado donde va el suje2ador est_ junto a un
gablnete, coloque el sujetador contra la pared
poster!or y el gablnete, como se muestra en la
Flgura 1.
GABINETE ADYACENTE O
LOCAUZACION RNAL DEL
COSTADO DE LA ESTUFA
ORILLA EXTERIOR DEL
SUJE'TADOR OUE DEBE
OUEDAR PEGADA AL
COSTADO IZQU|ERDO O
DERECHO DE LA ESTUFA
\
PARED DETRAS
DE LA ESTUFA
Fig. 1
SI no hay un gablnete adyacente, deten_nlne cud! ser_
la Iocaitzacibn de| costado de la estufa (paneDexterior
plntado). Coloque el sujetador con su orllla exterior
en ese lugar y contra la pared de atrds. Vea la
Figura 1.
3. Determine sl va a fljar el sujetador al suelo o a la
pared. Asegure el sujetador con firmeza usando los
tornillos que se proporcionan. Los torniilos no
requleren de taladro para penetrar madera, madera
terclada, madera prensada y la mayor par_e de los
marcos de metal. Si Io va a fijar a ladrilio o cemento,
puede adquirir tornillos y taquetes adecuados en
una ferreterfa. Uttllce un taladro para ladrlllos para
perforar !os agujeros requeridos.
4. Usando la ,ave, d_ por Io menos dos vueltas alas
cuatro patas n|veladoras para hacerlas retrcw.eder.
Consulte su gula de instalacibn para o_tener mayor
informaclbn antes de colocar la estufa en posicibn.
5. Deslice laestufaparacolocarla en susitio. Aseg0rese
de que el nivelador de la pata posterior entre pot
comple_o en ia pestatta del sujetador. Si laestufa no
puede moverse hacla arras Io sufictente como para
que el nlveledor de la pata posterior entre an e_
sujetador, mueva el sujetador hacta adelante segdn
se requlera y fljelo al suelo en un lugar dlstinto.
SUJETADOR
O EL METAL
PLACA DE LA PARED
/
_ Rg, 2
FIJAClON A LA PARED
\ 1 NCINS01-5
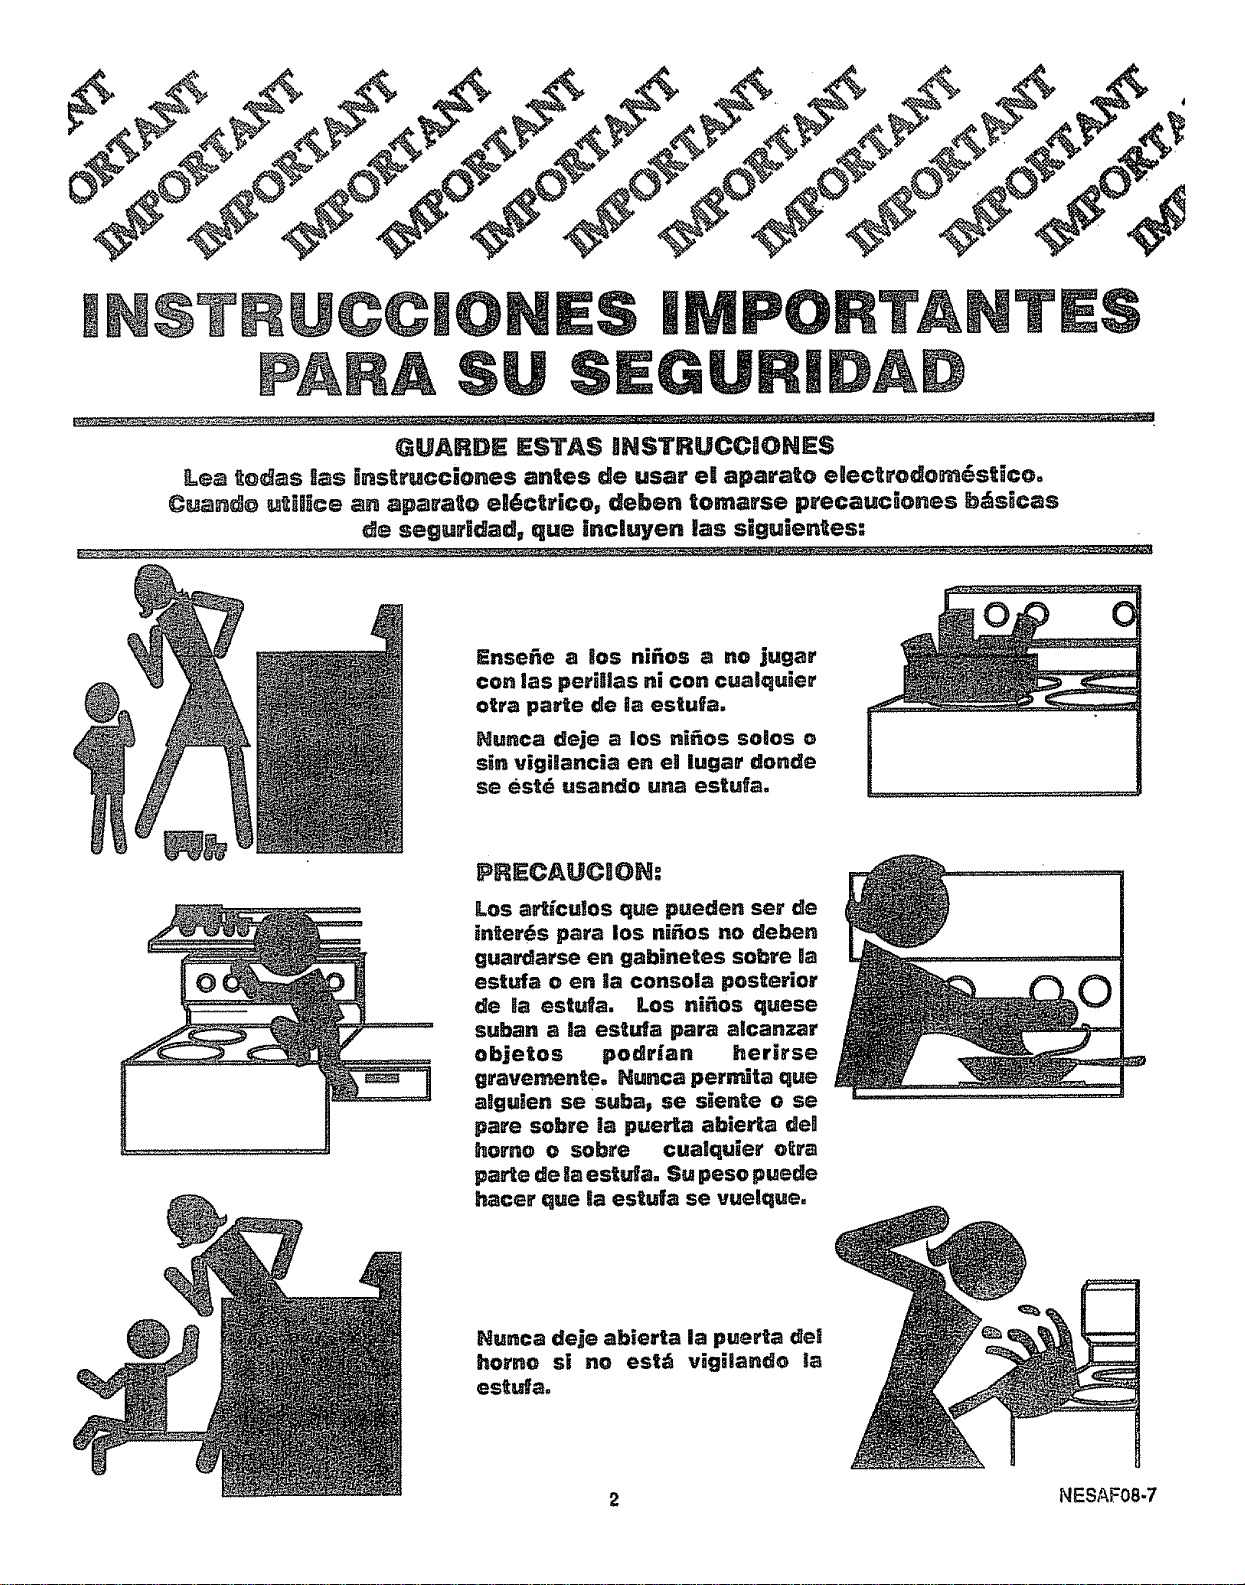
GUARE)E ESTAS aNSTRUCCIONES
Leg rod.s Sas i,struccio,es antes de usar e! aparato electrodom_stico°
Cua_do u_ilice a, aparato el6©trico, deben tomarse precauciones b_sic_s
de segurBdad, que incluyen las siguie,!tes:
Ense_e a Sos ni_os 8 no jugar
con las peril|as ni con cua|©juier
otra parte de i_ estufa.
Nunca deje _ los ni_os solos o
sin vigilancia e. e! !ugar _on_e
se es_ usando una es_ufa.
LOS a_[CU_OS que pueden set de
in_e_s par_ los ni_os no deben
gua_arse en gabinetes sobre _a
estufa o en !a conso!a posterior
de !a estufa. Los n!_os quese
suban a !a es_u_a para aicanzar
objetos po_r/an herirse
g_avemen_e. Hunca pem_ta que
a!gu!en se suba_ se s_en_e o se
pa_e sob_e !a pue_a abier_ _e|
homo o sob_e cua!quie_ o_
p_e _e !a es_ufa. Su peso pue_e
hace_ que _a es_uf_ se _uel_ue.
Hunca deje abierta la pue_a _e!
homo si no est_ v[g_lan_o !a
estuf_.
2 NESAFO8-7
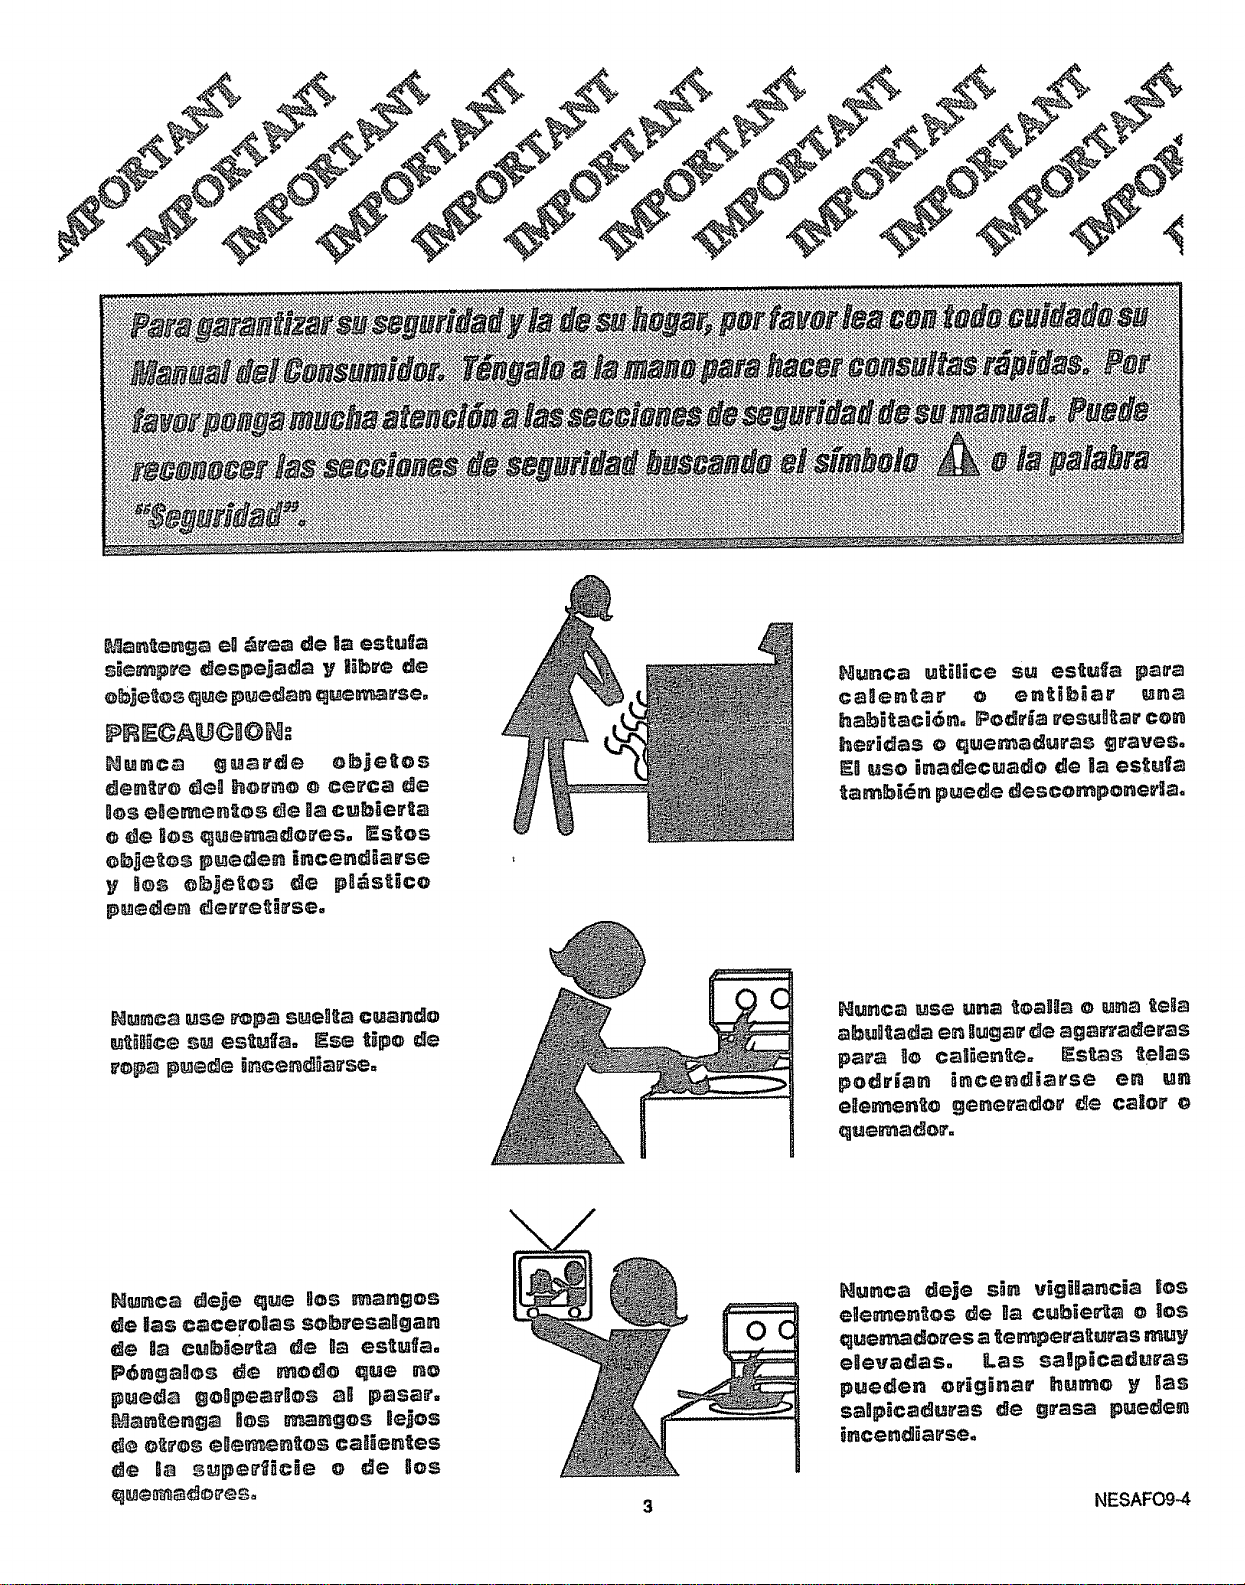
_an_enga eU_rea de la estu_a
s_e_p_e despej_d_ y W_brede
e_je_os _e p_ed_n que_rseo
Hunca u_8[ce su es_u_ p_
cz;_e_ar o en_i_ar ur_
E_ uso in_decu_d]o _e la es_
_am_)_n pue_e _escompone_a°
_ur_c_ us® _p_ sue,_ cu_m_o
e_emen_e ge_erador _e cabot o
_e I_esc_cere_as so_,'es_gan
P_os _e mo_e _ue .o
_e e_e$ e_ee_ee_es ca_e._es
NESAF09.4

IMPORTANTES DE
PRECAUCI@NES BASICAS DS
Guarde este llbm para un uso future.
CerclOrese de que su es_ufa haya sldo Inslalade y
aterrl_da correctamente por un t_,cnlco callflcado.
Siempre use agarraderas secas cuando quits ollas del
homo o de la cublerta. Las agarraderas hdmedas o
rnojadas pueden causar quemaduras por vapor.
Slempre alga las Instmcclones de llmpleza que vlenen
en este llbro.
Mantenga Ilmplas slempre la estufa y el horno. La
cornlda y la grasa se Incendlan con facllldad. Llmple Is
estufa, el homo y las rejlllas de ventilacldn de manera
regular.
Llmple sb!o !as partes qua se enumeran en este Manual.
PRECAUCnON: No guarde artlculos de Interns para los
nltios en gablnetes sobre Ia estufa o en la consola de la
estufa. Los nitros qua trepan a la estufa para alcanzar
dlchos articulos p_lr|an resultar herldos de gravedad.
Slernpre mantenga a una dlstancla segura de la estufa
el papal taplz de las parades, las cortlnas o colgaduras
qua sean combustibles. Nunca guards dlchos artfculos
en su es_ufa.
Conserve slernpre el _rea que rodea la estufa libra de
cosas qua pus<Janquemarse (gasolina y otros Iiquldos
y gases inflarnables).
jamdsintente repararoreemplazarcualqulerpartedela
estuta a menosqua seden Instrucclonesal respectoen
esteitbro.Todos losdemdstrabajosdebenserreallzados
por untdcnlco capacitado.
Nunca calients reclplentes con comlda que estdn
tapados. El aumento de la presidn Interna puede
ocastonar qua el reclplente estaile y cause leslones.
Nunca deje frascos o latas de grasa o goteaduras sobre
o cerca de la estufa. Jamds permita qua la grasa se
acumule en su estufa. Puede evitar Incendlos pot grasa
sl limpla la grasa y cualquler derrarne cada vez qua
termlne de usar la estufa.
Nunca trate de mover una olla con grasa callente, en
especial sl es una freldora. Espere a que la grasa se
haya enfrlado.
Nuncatoque las unldades de la spjperficle, los elementos
g_res de ca_r o ias superficies Irderloms del homo.
Pueden estar caltentes aunque su color sea oscuro.
Mantenga slempre los utenslllos de madera, los
utensI!!os de pl_s_lco o alirnentos enlatados a una
dlsiancia segura de su estufa.
SIEGURIE)AE) E)e LA CUBUE TA
LA ESTUFA
Slempmtongaculdadocuando toque lasuperflclede la
estufa. Los elementos generadores de calor p_dr(an
estar Io auflclenternente callentes para causarle
quemaduras aunque se vean de color oscuro.
SOlo pueden utlllzarse clertos tlpos de ollas de vldr_o o
cerdmlca para coclnar sobre la superflcle. Asegdrese
de que la olla que use no se tampa slse callenta sobre
los quemadores.
Nunca obstruya el libra flujo de alre a travOs de la rejilla
de ventllaclbn del homo.
_ EIIja ollas y sartenes con _ondo
piano, Io suflclenternente
grandes como para eubrlr por
cornpleto el elemento generador de calor. Esto lrnpedlr_
el rlesgo de que se lncendlen las agarraderas o la ropa
sl el elernento generador de calor es_uviera descublerto
y se desperdlclar_ menos energfao
Coloque la parrllla del homo en la poslclbn deseada
mlentras dste se encuentre frio. SI ttene qua mover I_
parrlllacuando elhorno estdcallente, nopermlta quala
agarradera o guante entre en contacto con el elemen_o
generador de calor del homo.
Despu_s de asar, slempre saque del homo la fuente
paraasary Idvela. Lassobras degrasa enla_uentepara
asar pueden Incendlarse la prbxirna vez qua u_lflcela
fuente.
Sfempmtengaculdado cuando abra la puer_ _i homo.
Permita que el elre callente y el vapor sa_gan P_es d_
mover los allmentos.
Nunca use papal de alumlnlo para torrar !_s _uen_es de
escurrlmlento o el fondo del homo. Et uso tncorrecto
dot papel de alumlnlo podrla causar un _ncer_d_o.
Y ©@MPRENDA ESTA
I FOR ©ION AH@RA!
$_al]gun_ vez lia necesita, no 1:endle'_
tie_po para_ [eeJ'Ja=
CercH6rese de que todios en su
begat sepa- qu_ hacer en case de
i.cend_°
c_us_ I_ g_s_ y_ que es_ s6_o
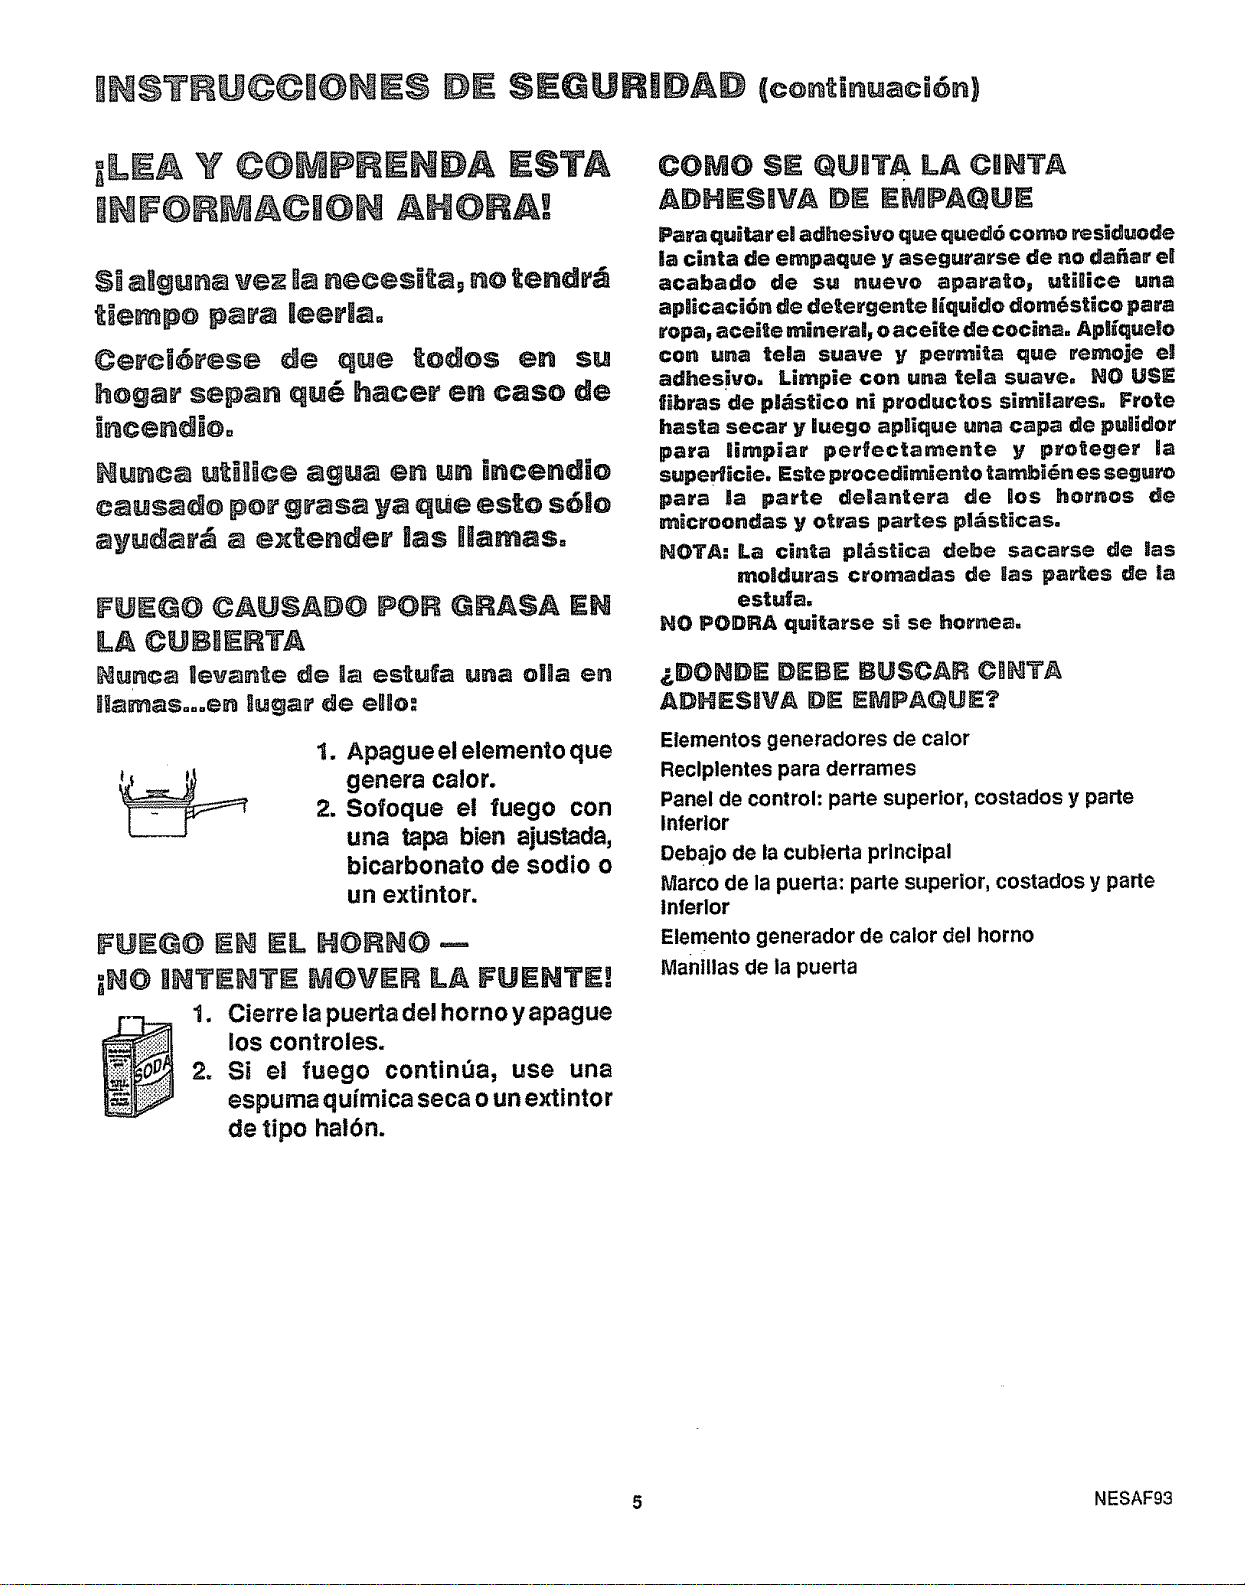
ILA CU_E_T_
IRunc_ llev_n_e _e _ es_u{a un_ o_na en
1. Apague el elemento que
genera calor.
2. Sofoque el fuego con
una tapa bien ajustada,
bicarbonate de sodio o
un extintor.
FU_@O _H] EL HORNO ==
1. Cierre lapuerta del homo y apague
los controles.
2. SH el {uego continua, use una
espurna qu/mica seca o un extintor
de ripe halbn.
COMe $_ QUOTA LA CI_TA
Para qu_tar e! adhesive que qued5 come res_duode
la cinta de empaque y asegurarse de no da_ar eB
acabado de su nueve apara_o, u_l_ice una
ap_cac_6n de detergence l_qu_do dern_stico para
ropa, ace_e rnine_all, oacei_e de coc_na= Apll_que_o
con una telia suave !/ pe_rni_a que _ernoje eg
adhesive, Lirnpie con una telia suave, He US _=
fibras de pl_s_ico n_ p_oductes similares, Frote
hasta seca_ y liuego apBique una capa de puHdor
para Itirnp_ar perfectarnente y p_e_eger Ila
super_c_e, Es_e procedirnien_to _am_i_n es segure
para lia par_e delan_era de lies homes de
mic_oondas y e_ras partes p_&s_cas,
HOTA: La cin_a pll&sHca de_e sacarse de gas
rno_duras crornadas de _as pa_es de _a
estu_a,
NO PODRA qui_arse s_ se _omea,
_,DO_DI_ D_E B_SCAR C_IRTA
ADHESI]VA DE E_PA_?
Elementos generadores de calor
Reclplentes para derrames
Panel de control: parte superior, costados y parte
Infertor
Debajo de la cubierta principal
Marco de la puerta: parte superior, costados y parte
inferior
Elemento generador de calor del homo
Mantllas de ia puerta
5 NESAF93
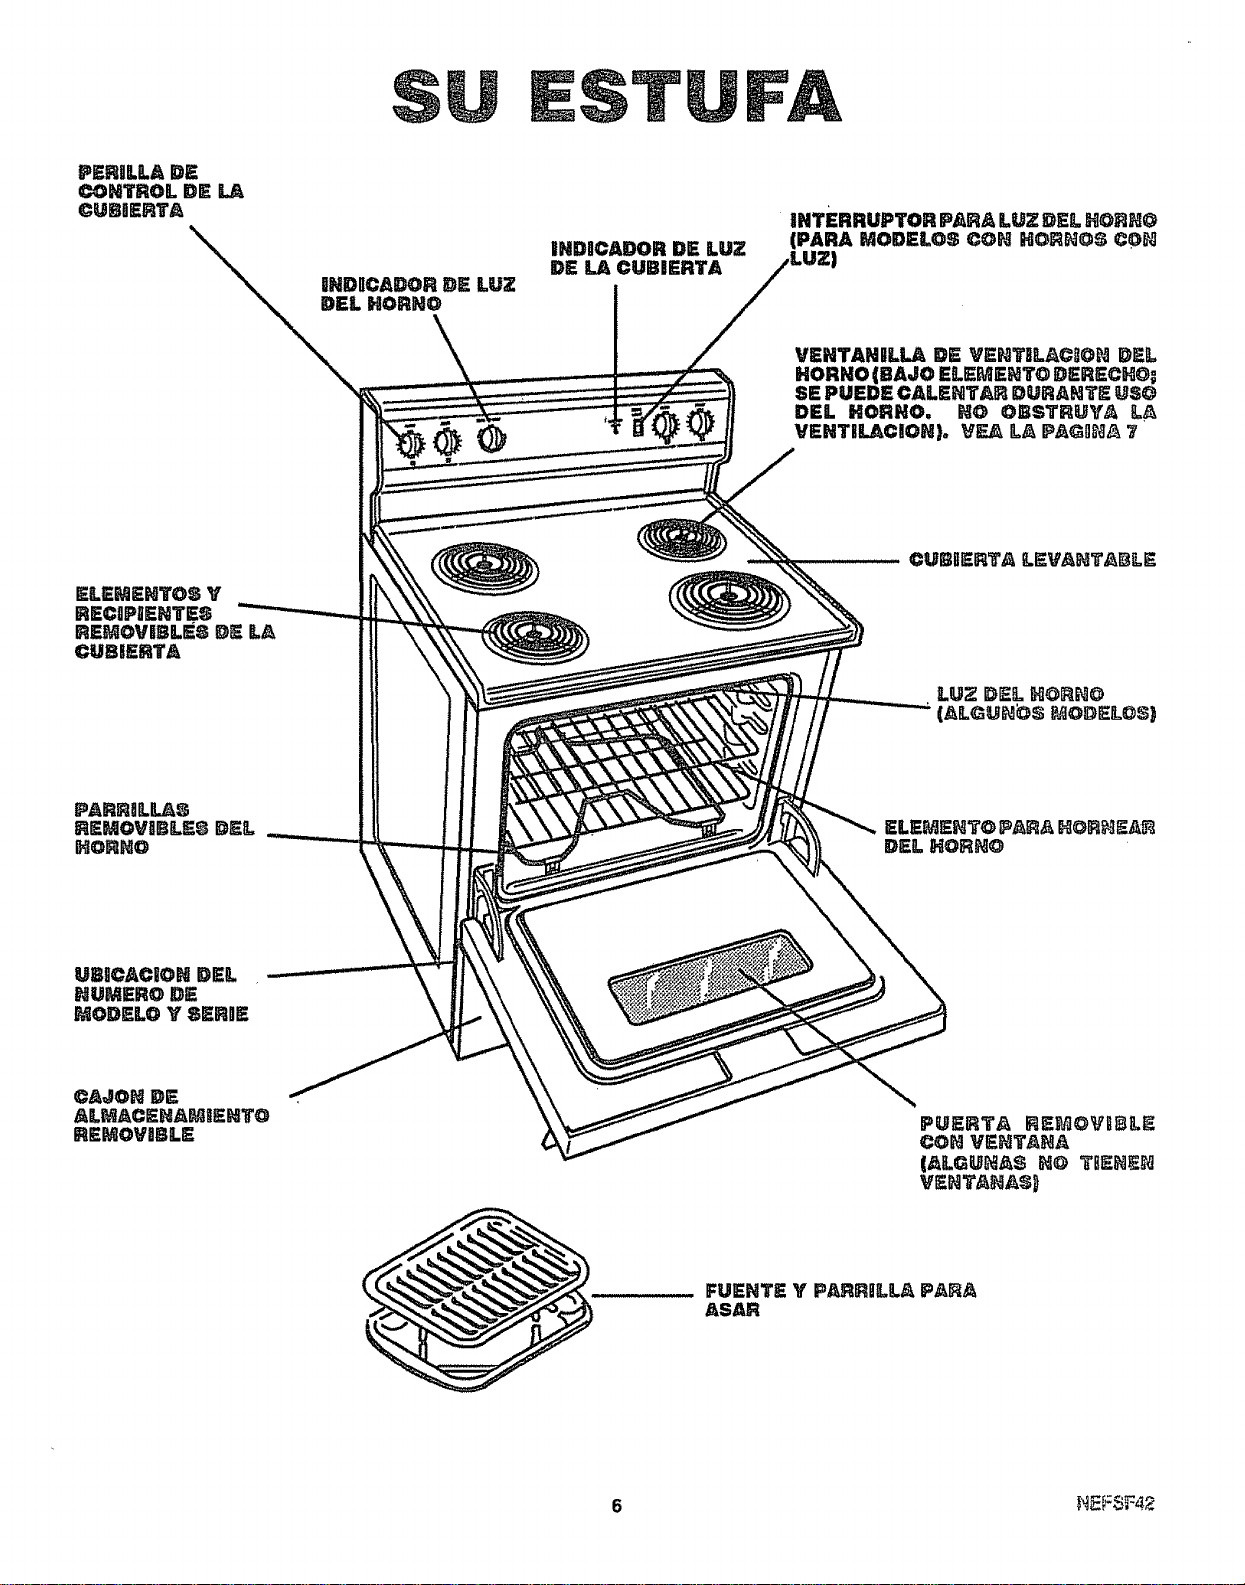
$
FUENTE Y P_R_LL_ P_
_S_R
Ei PEZAII A ©@©nNAR
_@CWN_ t_] ILA CUBtlERTA
Antes de que utlflce la cublsrta por primera vez, tome
unos momentos para famillarizarse con los elementos y
la peri,a qus se usa para encender cada uno de los
elementos.
ELEMENTOS DE LA CUBIERTA
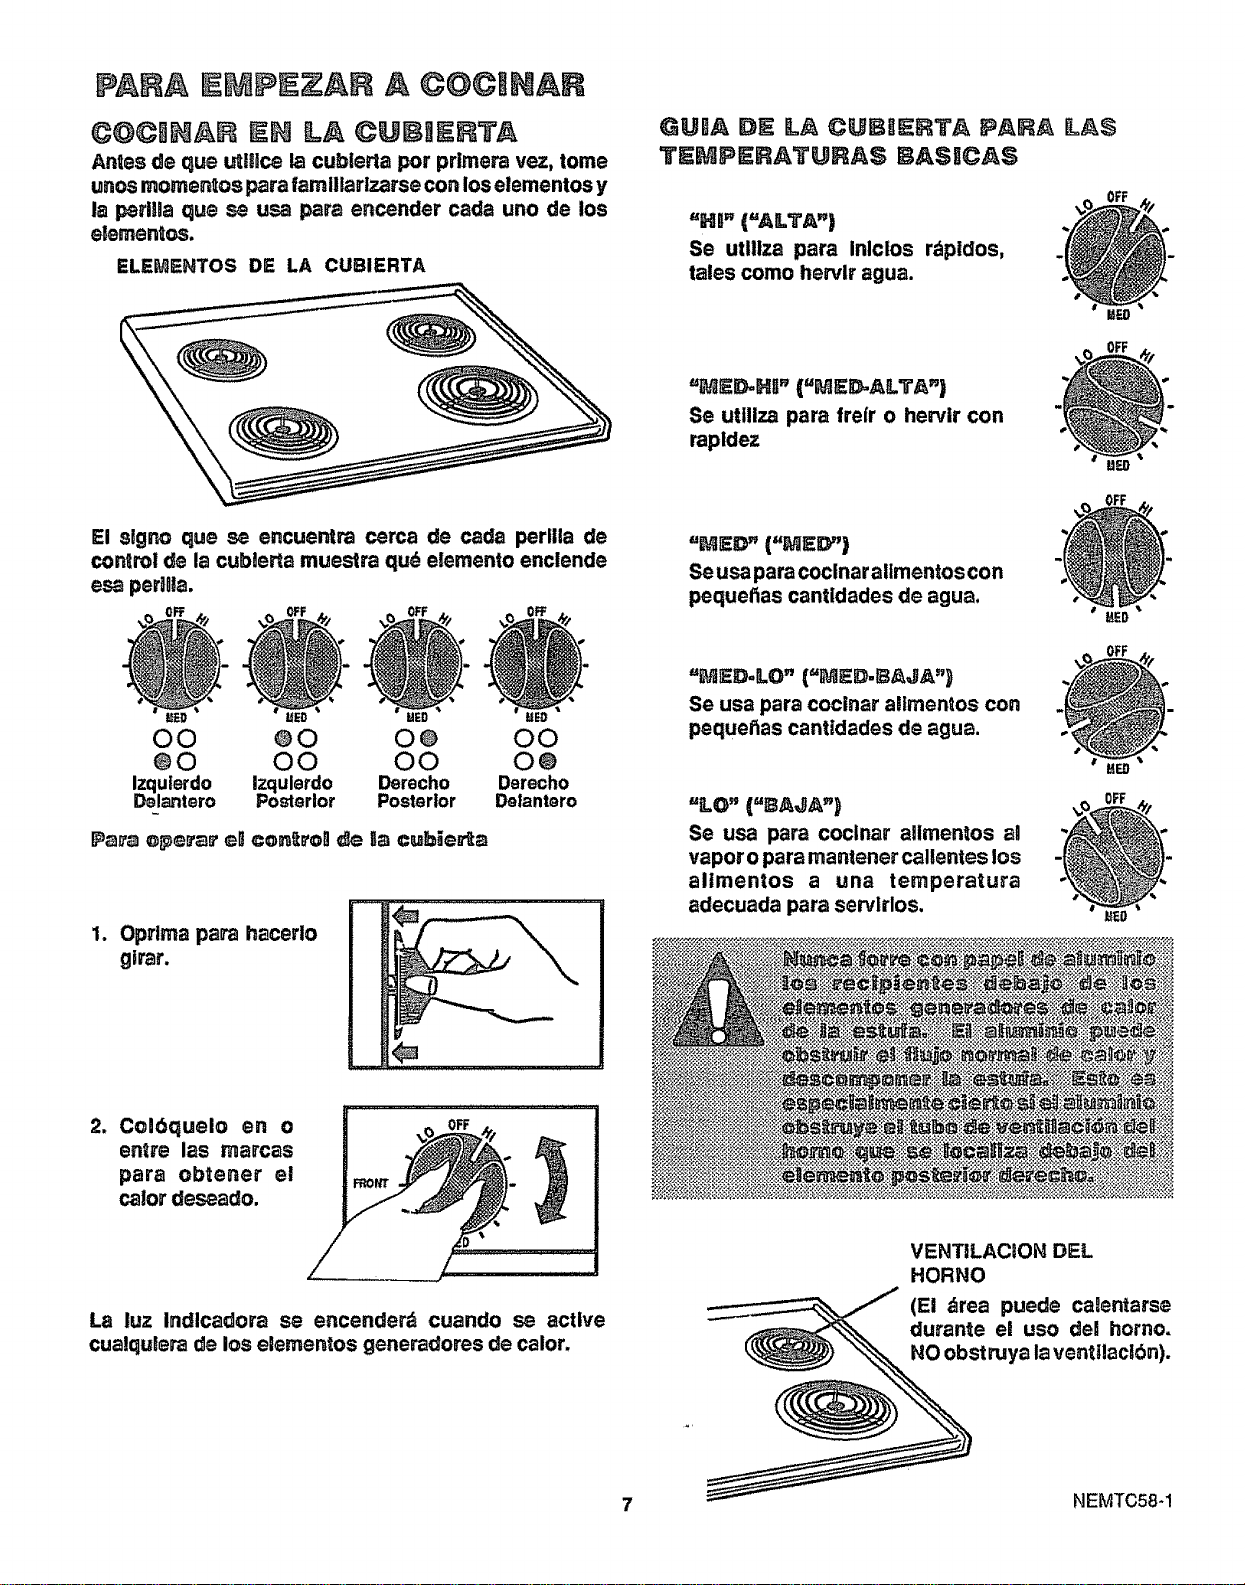
GUBA DE LA CUBIERTA PARA LA$
TEMPERATURAS BASICAS
"Hg" ("AILTA')
Se utlllza para Inlclos rdpidos,
tales como hervlr agua.
_'_E_Ha" ('ME_ALTA")
Se uttllza para fre{r o hervir con
rapldez
El signo que se encuentra cerca de cada perlila de
control de la cubJerta muestra qu_ elemento enclende
esa per, ta.
"MED" ('ME_')
Seusaparacoclnaralimentoscon
pequetias cantldades de agua.
O0 @0 O@ O0
O0 O0 O®
I_ulerdo Izqule_o Derecho Der_ho
Del_tero Po_erior Posterior _iantero
Pa_Z_epe_'m' e{! con_roU de la cub[e_a
1. Optima para hacerlo
girar.
"MED-LO" ("MED-E,_JA')
Se usa para cocinar a.rnen_os con
pequetlas cantidades de agua.
"%0" ("BAaA')
Se usa para coclnar ailmentos an
vapor o para mantener callentes los
alimentos a una temperatura
adecuada para servlrlos.
2, Colbquelo en o
entre las marcas
para obtener el
catordeseado.
La luz Indlcadora se encenderd cuando se active
cualqulera de los elementos generadores de calor.
VENTILACION DEL
HORNO
(El _rea puede caBentarse
durante el uso del homo.
NO obst ruya la ventHacl0n).
7 NEMTC58-1
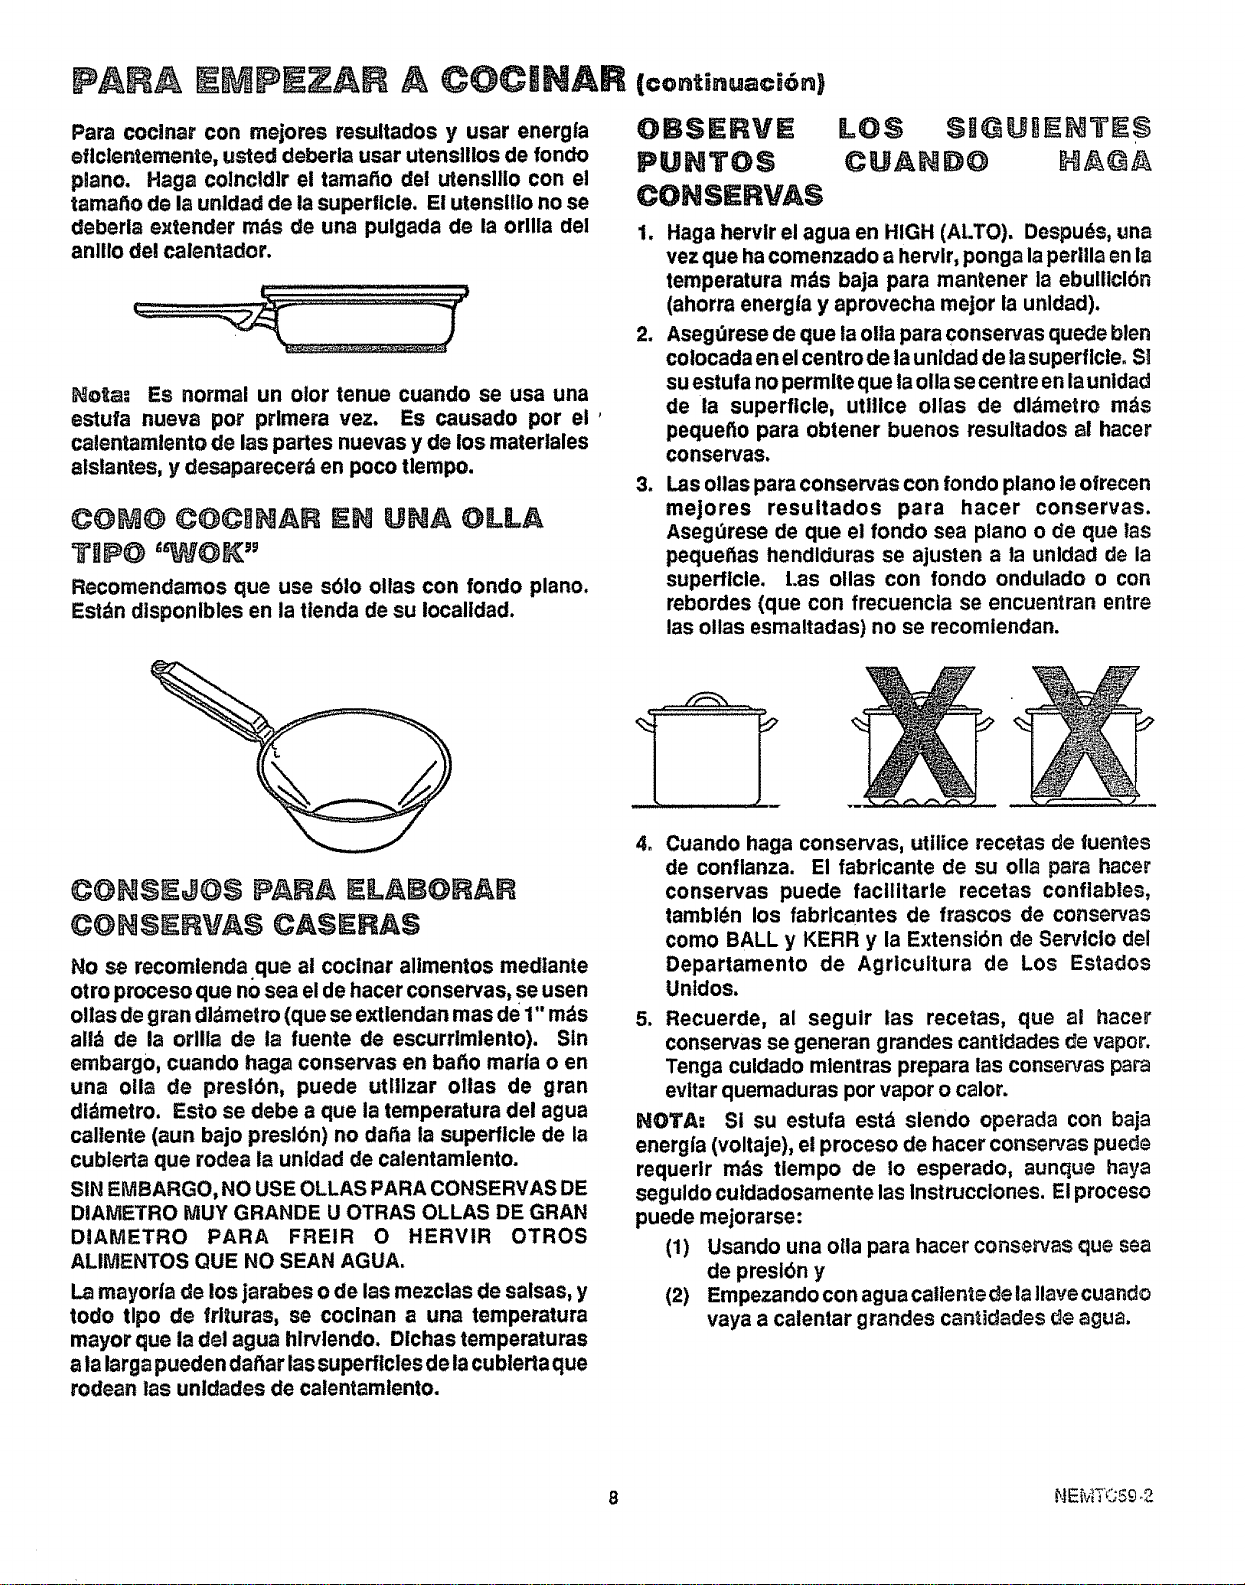
Para cocinar con mejores resultados y usar energfa
eflclentemente, usted deberla usar utensllios de rondo
piano. Haga colncldlr el tamatio del utensllio con el
tamatio de la unldad de la suparflcle. El utenslllo no se
deberla extender m_s de una pulgada de la orllla del
anlllo del calentador.
Nora: Es normal un olor tenue cuando se usa una
estufa nueva pot prlmera vez. Es causado por el'
calentamlento de las partes nuevas y de los materlales
alslantes, y desaparecer_ en poco tlernpo.
C@M@ @OCINAR EN UNA OLLA
TiP@
Recomendamos que use sblo ollas con fondo piano.
Estdn disponlbles en la ttenda de su Iocalidad.
OBSERVE
PUNTOS
CONSI IRVA$
III$ $I@IIIII ITIII$
CUAN#O
2_
3_
Haga hervir el agua en HIGH (At.TO). Despuds, una
vez que ha comenzado a hervlr, ponga laperilla en la
temperatura rods baja para mantener la ebullicl6n
(ahorra energta y aprovecha mejor la unldad).
Asegdrese de que la ola para conservas quede blen
colocada en el centro de la unidad de la superflcie. Sl
su estufa no permlte que laolla se centre en la unldad
de la superficle, utlllce ollas de dl_metro rods
pequetto para obtener buenos resuitados a! hacer
conservas.
Las ollas para conservas con fondo piano le ofrecen
mejores resultados para hacer conservas.
Asegdrese de que el fondo sea piano o de que las
pequetias hendlduras se ajusten a la unldad de la
superficle. [.as ollas con fondo ondulado o con
rebordes (que con frecuencla se encuentran entre
las ollas esmaltadas) no se recomiendan.
CONSEJ@S PAISA EtI=ABORAR
CONSERVA$ CASERAS
No se recomlenda que al cocinar alimentos medlante
otro proceso que no sea el de hacer conservas, se usen
ollas de gran di_metro (que se extlendan mas de 1" m_s
aid de la orilla de la fuente de escurrimlento). Sin
embargo, cuando haga conservas en batio maria o en
una olla de presl6n, puede utllizar oitas de gran
di_metro. Esto se debe a que la temperatura del agua
caliente (aun bajo preslbn) no dafta ta superflcle de la
cublerta que rodea la unidad de calentamlento.
SIN EMBARGO, NO USE OLLAS PARA CONSERVAS DE
DIAIVIETRO MUY GRANDE U OTRAS OLLAS DE GRAN
DIAMETRO PARA FREIR O HERVIR OTROS
ALIMENTOS QUE NO SEAN AGUA.
La mayorta de los jarabes o de las mezclas de salsas, y
todo tlpo de frituras, se cocinan a una temperatura
mayor que la del agua hlrvlendo. Dlchas temperaturas
a la larga pueden dafiar lassuperlcles de lacublerta que
rodean las untdades de calentamlento.
4. Cuando haga conservas, utilice recetas de fuentes
de conflanza. El fabrlcante de su olla para hacer
conservas puede facilitarle recetas confiables,
tambl_n los fabricantes de frascos de conservas
como BALL y KERR y la Extensi6n de ServIcio del
Departamento de Agrlcuitura de Los Estados
Unidos.
5. Recuerde, al seguir las recetas, que al hace_"
conservas se generan grandes canttdades de vapor,
Tenga culdado mlentras prepara las conservas para
evltar quemaduras por vapor o calor.
NOTA; Si su estufa est_ slendo operada con baja
energ|a (voltaje), el proceso de hacer conservas puede
requerlr m_s tlempo de !o esperado, aunque haya
seguido culdadosamente las Instrucciones. El proceso
puede mejorarse:
(1) Usando una ola para hacer conservas que sea
de preslbn y
(2) Empezando con agua calten_8 de la lave cuando
vaya a calentar grandes canldades d_ agu&
8 NEMT059_2
PRE@U TA Y RESPUESTA$
P. &Puedo usar equlpo especial de coclnar, como un
wok oriental, sobre cualqulera de los elementos de
coclnar?
R. Recomendamos que use sblo woks de fondo piano.
Utenslilos para cocinar sin supedlcles planas no se
recomlendan.
P. &Puedo envasar allmentos y hacer conservas sobre
los elementos de ia cublerta principal?
R. Si, pero usando sblo utenslllos deslgnados para el
propbsito de envasar_ Consulte las Instrucciones y
recetas del fabricante para hacer conservas.
Asegdrese que el envasador tlene rondo piano y que
calza sobre el centro del elemento de coclnar
selecclonado. Envasar genera grandes cantidades
de vapor; tonga culdado para evitar quemaddras.
P. /..Pot qu_ no estoy obtenlendo el Calor que necesito
de ml elemento de coclnar sellecctonado aunque
tengo la perilla en la posicibn correcta?
R. Use utensllios con rondos pianos y cdntrelos en los
esplrales del elemento de coclnar selecclonados.
Los utensilios de metal conduclrdn el color mejor.
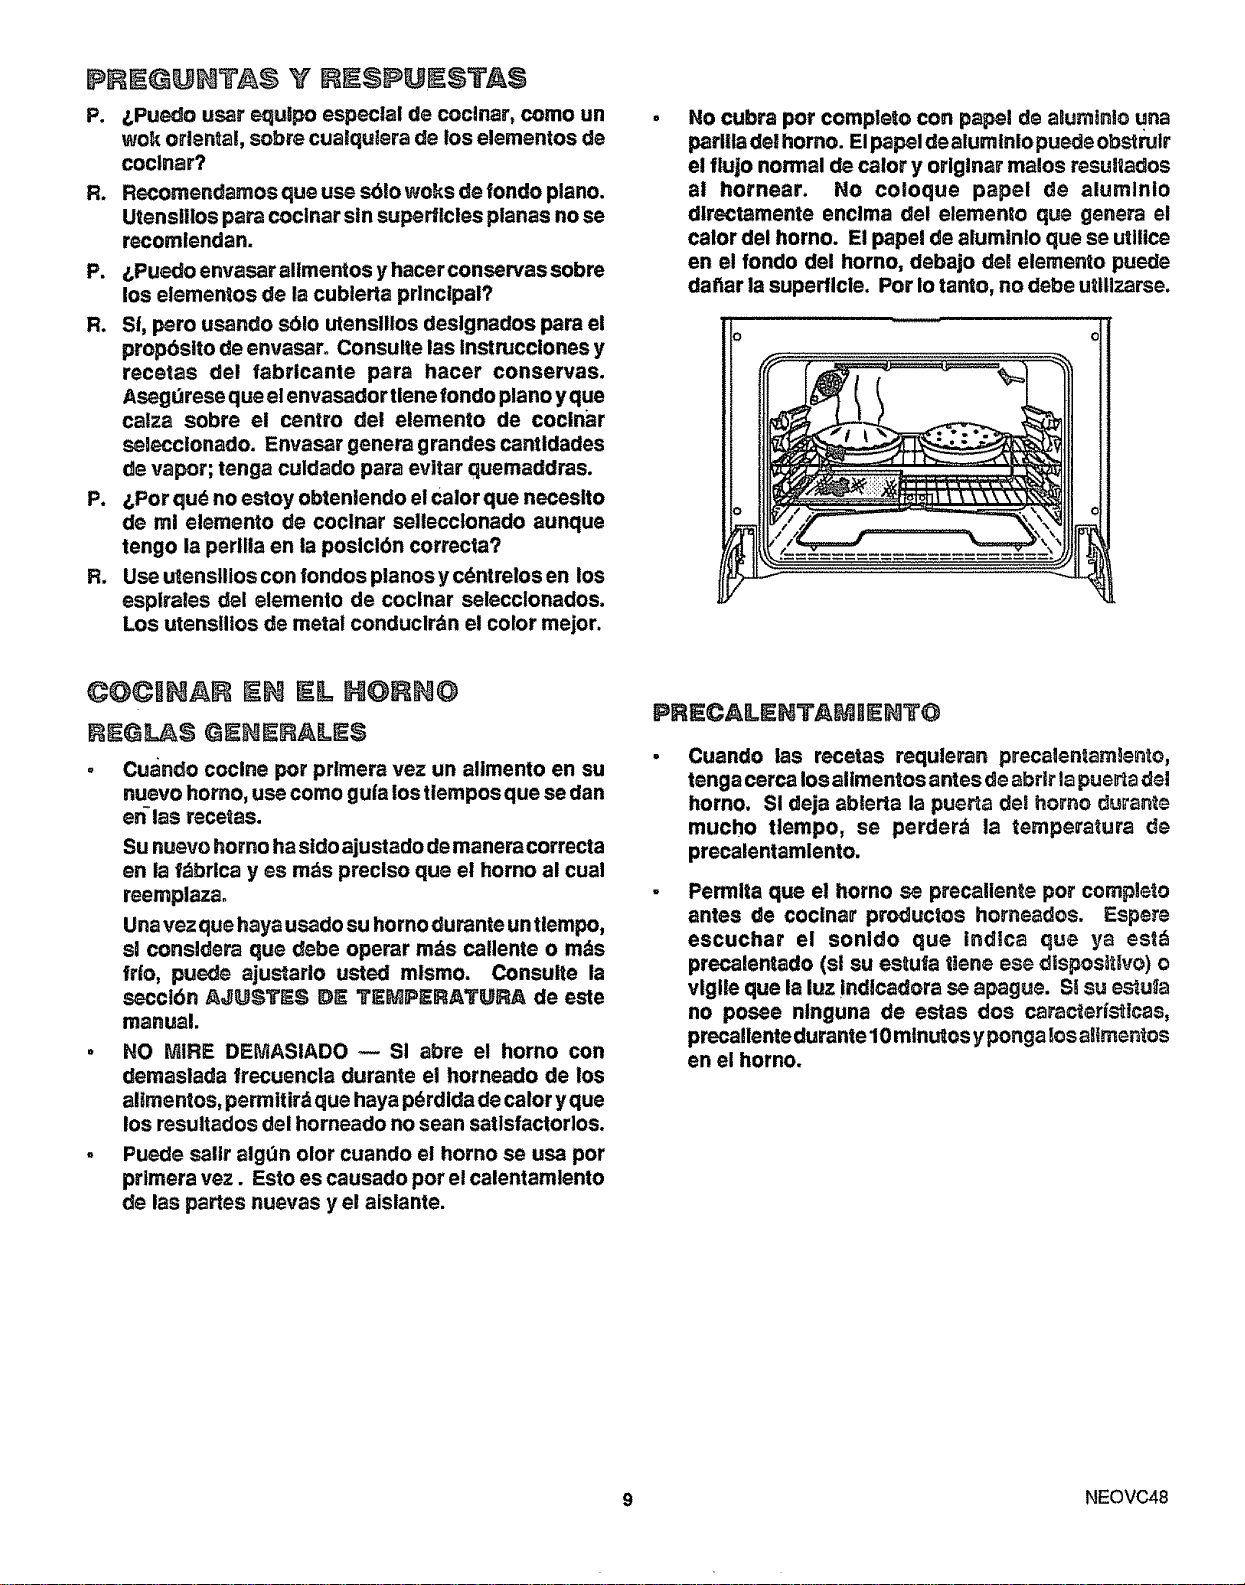
No cubra pot complete con papel de aBumanlouna
parllta del homo. Elpapel de alumlnlo puede obst_Ir
el flujo normal de calory origlnar malos resuitados
al hornear. No coloque papel de alumlnlo
dlrectamente enclma del elemen;o que genera el
calor del homo. El papel de aluminlo que se utilice
en el rondo del homo, debajo del elemento puede
dafiar la superflcle. Pot Io tanto, no debe utllizarse.
©OCg ;A EL HORN@
I EGL $ GENERAILE$
. Cuando coclne por primera vez un alimento en su
nuevo homo, use como gu|a los tlempos que se dan
en-las recetas.
Su nuevo homo ha sldo ajustado de manera correcta
en la fdbrica yes rods preciso que el homo al cual
reemplazao
Una vez que haya usado su homodurante un tlempo,
sl consldera que debe operar robs callente o robs
fr|o, puede ajustarlo usted mlsmo. Consuite la
secclbn AJUSTES DE; TEMPERATURA de este
manual.
, NO MIRE DEMASIADO -- SI abre el homo con
demaslada trecuencta durante el horneado de los
allmentos, permitird que haya p_rdida de calory que
los resultados del horneado no sean satlsfactorlos.
. Puede salir algdn olor cuando el homo se usa por
prlmera vez. Esto es causado pot el calentamtento
de las partes nuevas y el aislante.
PRIECAL_HTAMItE_]TO
Cuando las recetas requleran precaaentarn]ento,
tonga cerca los altmentos antes de abrir la puerta del
homo. SI deja ablerta la puerta del homo durante
mucho tlempo, se perderd la temperatura de
precalentamlento.
Permlta que el homo se precallente pot compJeto
antes de coclnar productos horneados. Espere
escuchar el sonldo que indica que ya est_
precalentado (sl su estufa tlene ese dlspos]tivo) e
vlglle que la luz !ndlcadora se apague. Si su estu_a
no posee nlnguna de estas dos caracterf_lcas,
preca,ente durante 10 minutos yponga los aitrnentos
en el homo.
9 NEOVC48

BAND_JA$ PARA H@RNEAR
l.as galletas debsn hornearse en bandejas planas
para hornear galletas, que no tengan orlllas que
Impldan la lnbre y adecuada circulaclbn del alre.
• Las tortas, paneclllos y panes rdpldos deben
hornearseen moldes brlllantes-que reflejen elcalor-
ya que deben toner una corteza de tono dorado
claro. As_gdrese de que la parle de abajo del molde
tambldn sea brillante. Los_ondos opacosabsorberdn
el ca|or y podrfan produclr que la parte de abajo de
su con;Ida se dore demaslado.
o La temperatura del homo debe reducirse 25 grados
F por debajo de las temperatura recomendada sl el
exterior dei molde es oscuro, se ha oscurecido con
el paso del tlempo o es de vldrlo refractarlo.
HORNEADO
POSICIONES DE LAS PARRILLAS
° Coloque los moldes en las parrWas dejando de 1 a
1 1/2" de espacto alrededor de tedo el molde. Evtte
sobrelnenar el homo.
COMO HORN_AR:
1. Ponga la perilla de con-
trol del homo a la
temperatura deseade.
2. Cuando termlne de
hornear, ponga laperilla
de control del homo en
la poslclbn de apagado
(OFF).
Cuando horneavarlosarticulos, ecomode Iosmoldes
demodo que no quede nlngunodlrectamente enclma
de otto.
LOSmoldes que est_n demaslado cerca uno de otro,
de las paredes del homo o del fondo del homo
obstruyen el llbremovimlentodelalre. E!movlmlento
Inadecuado del alre causa dorados desparejos y
cocclones tambidn poco uniformes.
OFF
3501
ASAR AL FUEGO O _AL@P_ D_RECT_)
Asar al fuego o calor dlreclo es coclnar cortes tiernos de
came con calor seco. No es necesarlo precalentar antes
de asar.
IINSTRUCCliONES GEH_RAL_S PA_ ,_$_1_
1. Coloque la came (con e! lado grasoso hacla arrlba)
sobre la p_rllia para asar o en un_ fuente poco
profunda que sea apro_lrnadamen_e de, mlsmo
tamario que la came.
2. Coloque la fuente en la poslcl_)n ndm _ o ndm 2 d_
la parrllla.
3. HagaglrarlaP_R_LA _ COHTP_O_. D_. H@_@
hasta H_P,_AP_ pa_ p_r h_cerlo.
t0
NEOVC31 -I
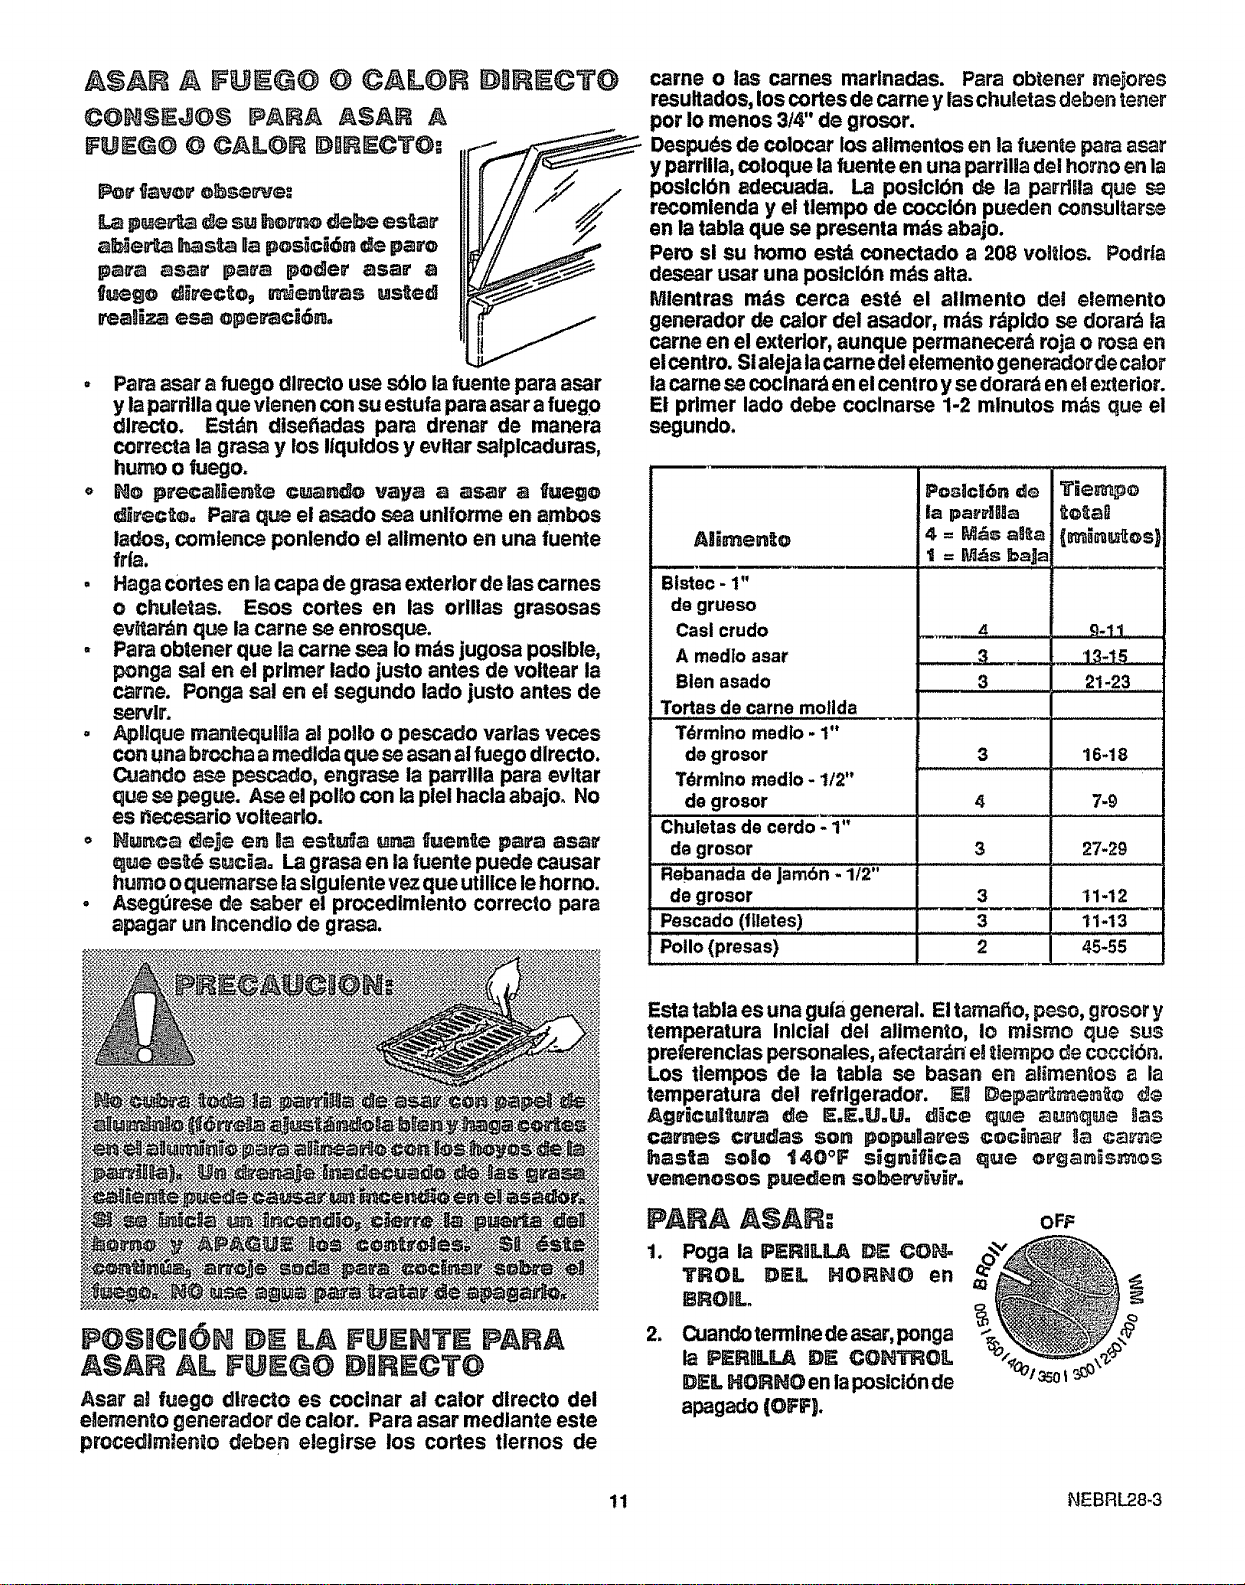
ASA FUEG@ @ OAL@R DIiRECTO
P_RA ASAR A
FUE@O O _A]LO_ DBRECTO==
Para sear a fuego dlrecto use sblo la _Jente para asar
y laparrlUa que vienen con su estufa para asar a fuego
dlrecto. Estdn diset_adas para drenar de mar=era
correcta la grasa y los liquldos y evitar salplcaduras,
humo o fuego.
No p_'_a_l_e_e cu_ndo vaya a asar a _uege
€]_r_c_o= Para que el asado sea unlforme en ambos
lades, comlence ponlendo el alimento en una fuente
ida.
Haga cortes en la capa de grasa exterior de ias carnes
e chuletas, Esos cortes en las orlllas grasosas
ev_tardn que la came se enmsque.
Para obtener que la came sea Io m_s jugosa poslble,
p_nga sal en el primer lado justo antes de voltear la
came. Ponga sal en el segundo lado justo antes de
s_rvlr.
Ap_ique man_equEia al polio o pescado varlas veces
con una brocha a medlda que se asan alfuego dlrecto.
Cuando ase pescado, engrase la parrllla para evltar
que se pegue. Ase el polSocon la plel hacla abajoo No
es _=c_.'._rio vo8_earlo.
Nunc_ d_j_ en _ es_u_ una _uen_e para asar
que es_d suc_a° La grasa en la tuente puede causar
humo o quemarse lasigulente vez que uUlice is homo.
Asegdrese de saber el prc_edimlento correcto para
apagar un lncendlo de grasa.
PO$ CI I LA PARA
ASA AlL DIIRECT
Asar at fuego dlrecto es coclnar al calor dlrecto del
elemento generador de caior. Para asar medlante este
procedlmienio deben elegirse los cortes tlernos de
came o las carnes martnadas. Para obtener mejores
resuitados, los cortes de came y laschuletas deben tenor
por !o menos 3/4" de grosor.
Despuds de colocar los alimentos en la fuen_e para asar
y pard,a, coloque la fuente en una parrilla del homo en la
posIclbn adecuada. La poslcibn de la parrl[la que s_
recomlenda y el tlempo de coccibn pueden consultarse
en la tabla que se presenta rods abajo.
Pero sl su homo estd conectado a 208 volflos. Podrta
dessar usar una poslcibn rods alta.
Mientras rods coroa estd el allmento de! elemento
generador de calor del asador, rods rdpldo se dorar_ la
came en el exterior, aunque permanecerd roja o rosa en
elcentro. SIaleja lacame del elemento generadorde calor
la came se coclnar_ en elcentro y se dorar_ enel e_erior.
Et primer lado debe coclnarse 1-2 mlnutos m_s que el
segundo.
P©_c_6n do Tie_o
la pan,Ilia _:o_:_1]
Alli_en_o 4 = _s a_l_a (m_.u_s)
..... _ = _s _aja
Btstec- 1"
de grueso
Casl crudo .... -_ 9,11
A medIo asar _ __13_1.5
Bien asado 3 21-23
Tortas decarne mollda .........................................
Tdrmino medto- 1"
de grosor
TOrmlnomed]o- 1/2"
de grosor
Chuletas de cerdo- 1"
de grosor
aebanbda de Jambn: i/2"
de grosor
Pescado (flletes)
Polio(presas)
3 16-18
4 7-9
3 27-29
3 11-12
3 11-13
Esta tab8aes una gula general. Eltamatto, peso, grosor y
temperatura Inlclal del alimento, Io mismo que sus
preferenclas personales, at'ectar_n el _iempo _e cocctbn.
LOS tlempos de la tabla se basan en alimen_os a la
tem peratura del refrtgerador. _ I_ep__o ¢_
Agr,cu_ura de I_.E._.U= d_ce que au_ue _
carnes c_rudas son popu_a_'es coc_a_r _ ca_'_
basra solo _40°F s_gn_ca _ue e_'g_s_es
venenosos pueden sobe_v_v_.
PARA A AR:
1. Poga la PER_g.LA D_ COIk_
TROL DEL NORNO en
BROIL
1
Cuando termine de asar, ponga
la PERIflLLA DIE COH_ROIL
DEE.HOR_O en laposlctbn de
apagado (OFF).
OFF
11 NEBRL28-3
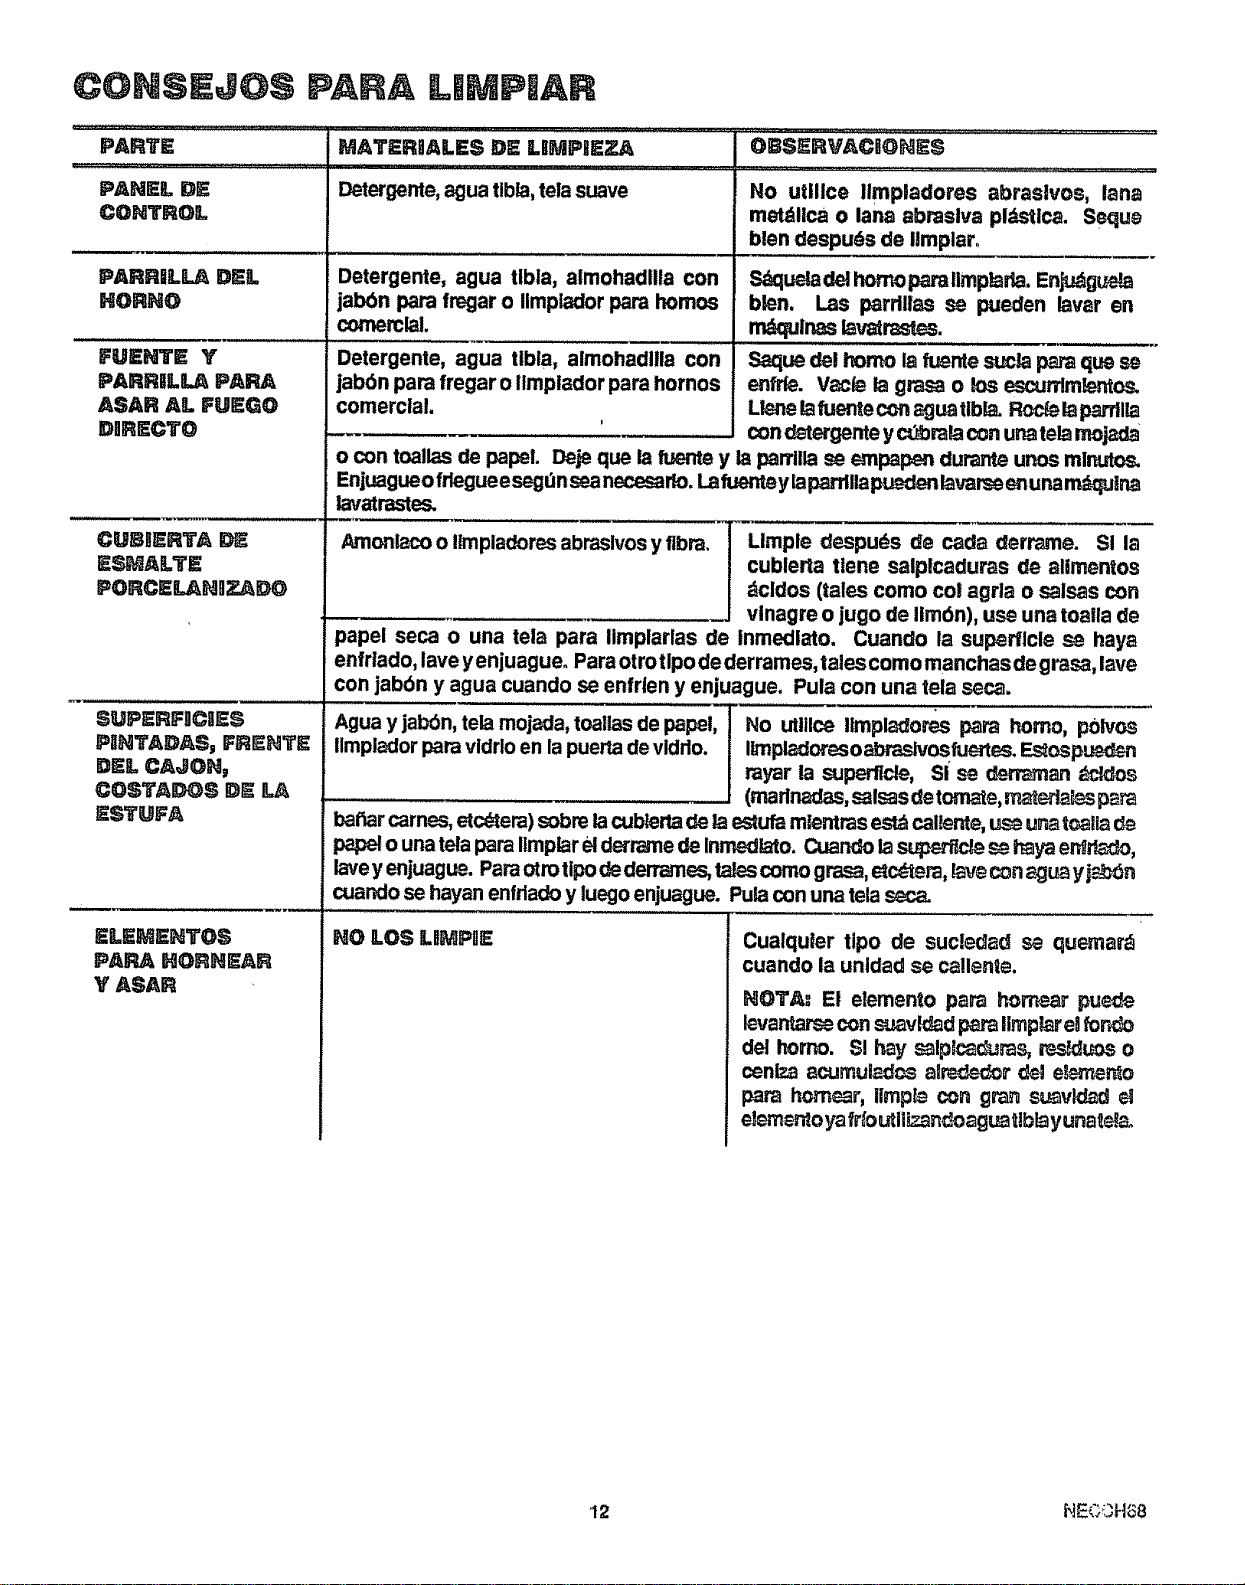
( ONSEJOS PARA UMPIAR
PARTE
PANEL DE
CONTROL
MATERDALE$ DE LRMPIEZA
Detergente, agua tibia, teia suave
PARRIL_ DEL
HORNO
FUENTE Y
PARRIL_ PARA
ASAR AL FUEGO
DnRECTO
CUBIERTA DE
E,_ALTE
PORCE_NnZADO
EUPERFgCgES
PaNTADASj FRENTE
DEL CAJC)N,
COSTAEX)S DE
ESTUFA
ELEMENTOS
PARA HORNEAR
Y ASAR
Detergente, agua tibla, aimohadlila con
jabdn pare fmgar o Ilmplador para homes
comerclal.
Detergente, agua tibia, almohadllia con
jabbn para fregar o ilmplador para homes
comerclal.
i
.................. ,,L
OBSERVACBONES
No utlllce Ilmpladores abraslvos, lana
metdllca o lana abraslva pldsUca. Sequ_
blen despuds de Ilmplar.
Sdqu_a del homo para Ilmpiada. EnpJdg_
blen. I.as parrlllas se pueden lavar en
mdqulneslavalr_u_,_.
Saque del homo Ia fuerde sucla para que se
enfrfe. Vac_ la grasa o los escurrlmientos.
Llenela fuentecon aguatibla. Roc_lapardlia
con _ergente y c_raa con una tela mojada
o con toalias de papal. Deje que Ia fuente y Ia pan'ilia se empapen durante unos ml_
Enjuagueo frlegueesegdnsea necosarlo. Lafuentey Iapatdlia _ lavarse enunamdqulna
Iavatrastes.
Amoniaco o !Impladores abrasives y flbra. Llmple de.spuds de cade derrame. Si la
cublerta ttene salplcaduras de allmentos
_cldos (tales come col agrla o salsas con
vinagre o jugo de Iimbn), use una toalla de
papal seca o una tela para Ilmplarlas de inmedlato. Cuando la suparflcle se haya
eniriado, lave yenjuagueo Para otrotipo dederrames, talescomo manchas de grasa, lave
con jabbn y agua cuando se enfrlen y enjuague. Pula con una tela seca.
Agua y jab6n, teia mojada, toalias de papal, No utlilce Ilmpladores para homo, p01vos
Ilmpiador pare vidrlo en la puer',ade vidrlo. Ilmpladoresoabraslvosfuc-ttes. Es_os_
myar ia superflcle, SI se den_Taan ;_cl_os
(matlnadas, salsasdetomate, n_t_,rk_spa_
bahar carries, etc_era) sobre Iacublerta de ia estufa mlentras est_ cal!ente, us_ u_ t_ila de
papal o una teia para limpiaret derrame de Inmsdiato. Cuar_ ia supstflcJes_ haya en_tt_do,
lavey enjuagu_. Pareotto tipo dederr_es, talescome grasa, _cdtera, _"vecon _gua y _:v_n
cuando se hayan enfriado y luego enjuague. Puia con una tela seca.
NO LOS Ll_P_E
Cualquler tlpo de sucled_d s_ quema_
cuando la unidad se callente.
NOTA: El e/emento para hornear puede
l_var_rse con s,Javk_d pa_ Iirnp_r e_rondo
del homo. S! h_y s_lplc_ams, rs.s_uos o
cenlza _curnui_f_ a_r_r _ e_n_n_e
pare h_rn_r, Ilmp_ con gran s_vld_ el
e]emen_oya_r_oL_il-_._n_oagu_tlblayuna_
12 NEC_H88
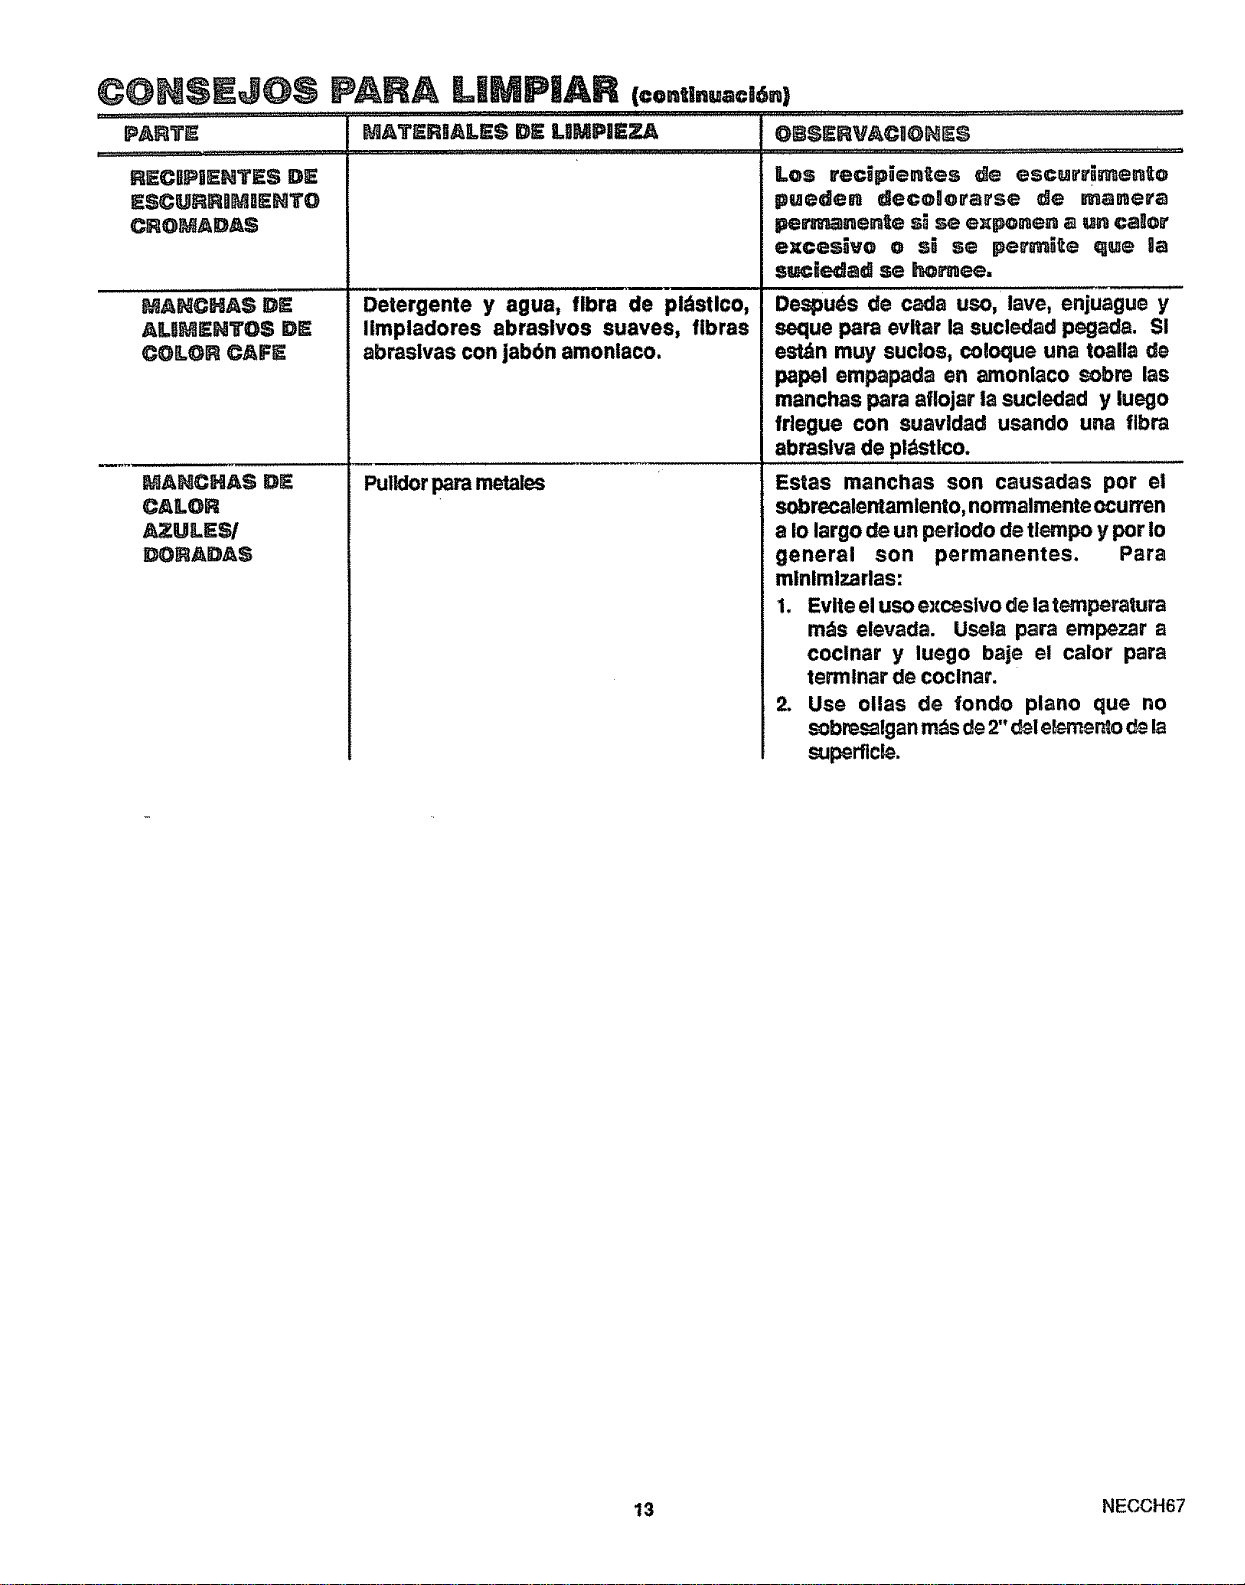
©@NSEJO$ FARA UMP|AR
IPARTE MATERilALE$ DE LgMP_EZ#.
RECRPIiENTE$ DE
ESCURRUMIENTO
CROMADAS
MANCHAS DE
AUMENTOS DE
COLOR CAFE
MANCHAS DE
CALOR
AZULE_
DORADAS
Deiergente y agua, fibra de pi_stlco,
limpiadores 8braslvos suaves, fibras
abraslvas con jab6n amonlaco.
Pulidor para rnetales
OBSERVAG_O_ES
Los recJpJen_es de escurr_men_o
puede, decollorarse die manera
pemsa,ente s_ se exiponen _ un cano_"
e;cesivo o sS se perr_H_e que la
suciedlad s® ho_.
Despu_s de c_:18 uso, lave, enjuague y
seque para evitar 18sucledad pegads. SI
est4n muy suclos, coloque un8 toalla de
papel empapada en amonlaco sobm las
manchas para aflojar 18sucledad y luego
frlegue con susvldad usando una flbra
abrastv8 de pl_L,_Ico.
Estas manchas son causadas pot el
sobrecalentamlento, normalmente ocurren
8 Io largo de un periodo de tlsmpo y por Io
general son permanentes. Para
mlnlmlzarlas:
1. Evlte eluso excesivo de latemperatura
m_s elevada. Us_la para empezar a
coclnar y luego baje el calor para
termlnar de cocinar.
2. Use ollas de rondo piano que no
sobres_lgan m_s de 2" (:_1e_er_o d_ la
superficle.
13 NECCH67
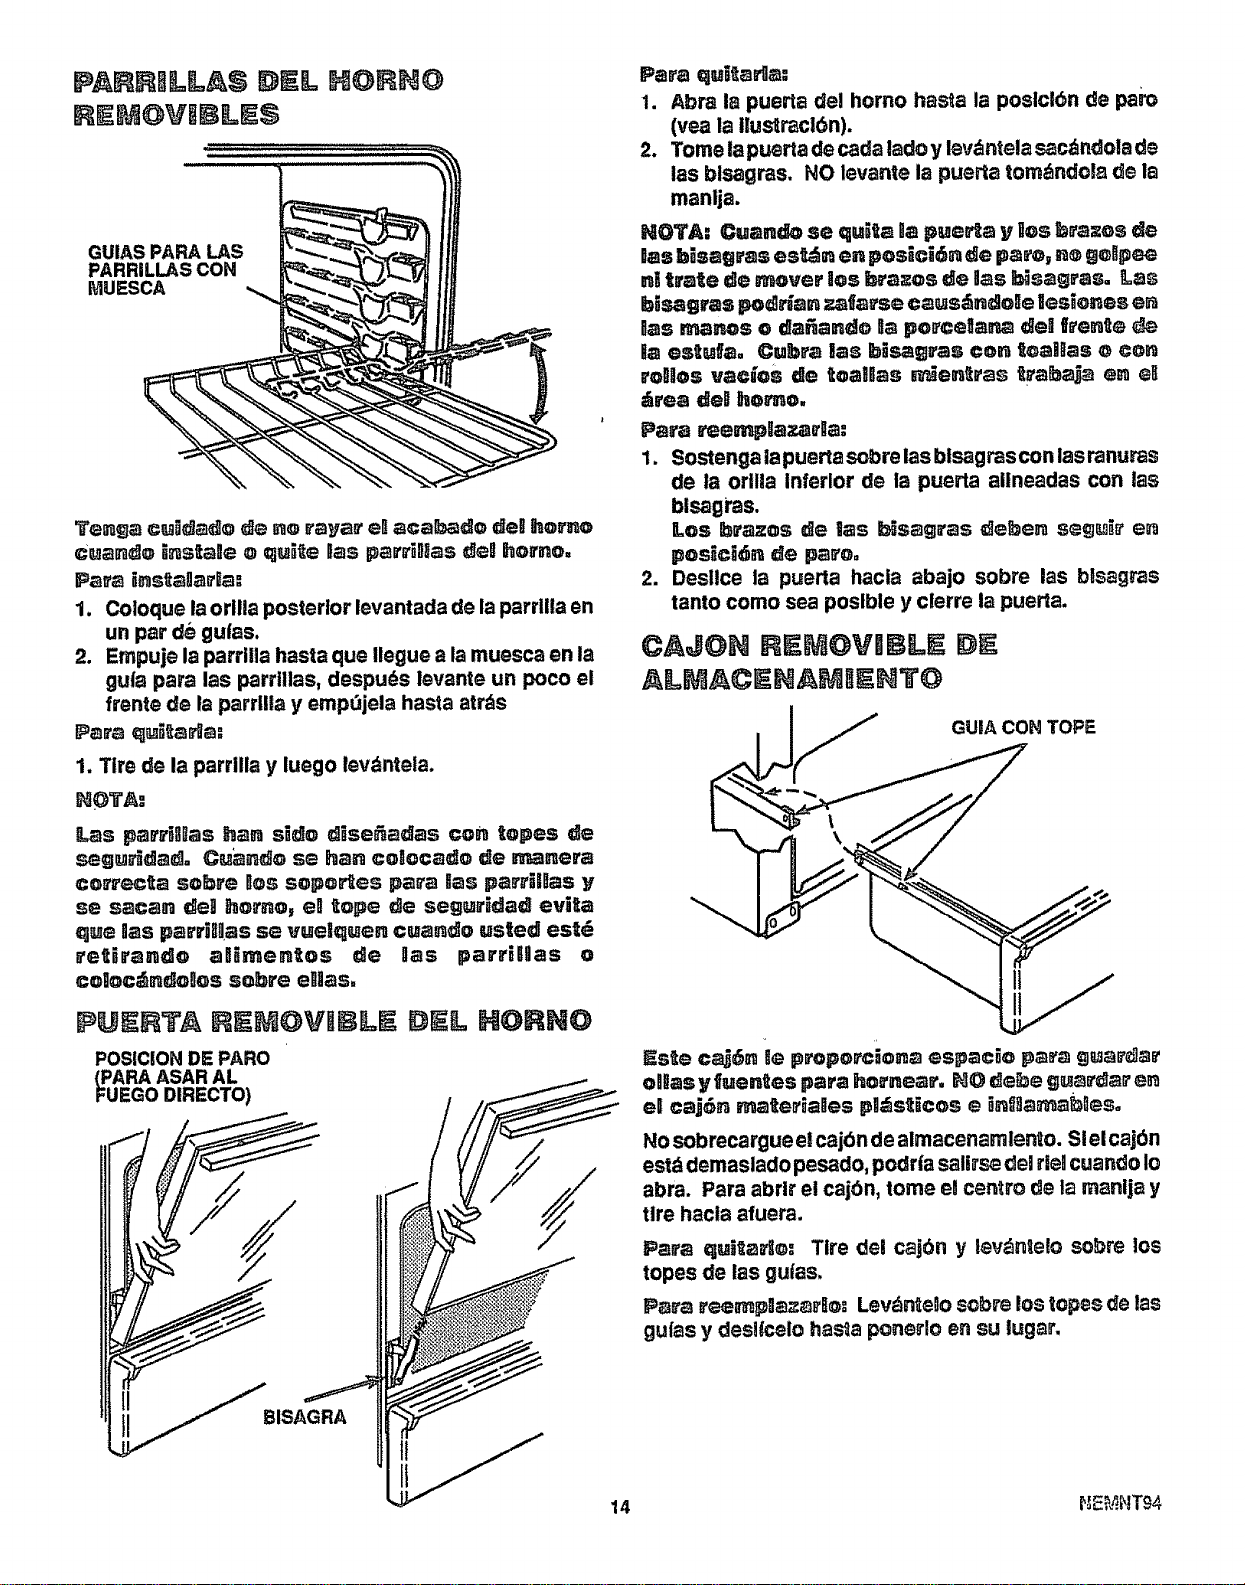
PARRILLAS DEL HOI N@
REM@VHBLE$
GUIAS PARA LAS
PARRILLAS CON
MUESCA
Tonga cuJdl_do de no raym' eli aca_do tier homo
caando instage o quite lizs parril_lias dell home=
Para instaliarlia. =
1. Coloque la orilia posterior levantada de la parrllla en
un par db gulas.
2. Empuje la parrilla basra que Ilegue a la muesca en la
gula para las parriilas, despu_s levante un poco el
frente de la parrllla y ernpdjela hasta atrds
IPm'a qu_ta_la:
1. Tire de la parrilla y luego levdntela.
NOTA"
Las paa'_lilias hart sJdo dJse_adas con topes de
segu_dad. Cuando se hart colocado de manera
correcta sobre lios sopo_es papa ias pa_iBlias y
se sacan dell homo, eli tope de seguridad evita
que ooaspart, Has se vueiiquen cuando usted est_
ret_rando aliimentos die lias parrililias o
coloc_ndogos sob,'e eRlias,
PUERTA REMOWBLE DElL HORNO
POSlCION DE PARO
_PjARAASAR AL
EGO DIRECTO)
Para quit_a:
1. Abra la puerta de! homo has_a la poslcl6n die paro
(vea la ilus_raclOn).
2. Tome la puerta de cada lado y levdntela s_c_ndola de
las blsagras. NO levante la puerta tomdndole de la
rnanlja.
NO_A: Cuando se quita lia pue_a V los b_a=os de
lias b_sa_i_as es_dn e. pos_ci_n de p_o, n_ golip_
ni t_'a_e de move_ lios i_az_s de _as lidsa_ras. Las
_isagras pocg_an _a_a_se caus_ndelie _esi_nes ®_
lias manos o da_ando Bape,'ce_arm de_ _e_te
lia estufa. Cub_a las b_sag_as con _oaiggas o c_
roHIos vac_eS de teal, as m_entras t_'albaj_ e_ s_
:_rea dell homo.
Pm'a reempliaza_lia:
1, Sostenga la puerta sebre las blsagras con las ranur_s
de la orilla Inferior de la puerta a!Ineadas con las
bisagras.
Los b='a=os de las b_s_g,'z_s de_e_ s_,' e_
pos_cid_ de pa_o=
2. Desllce la puerta hacla abajo sobre las bis_gras
tanto corno sea poslble y clerre la puerta.
RE V|BL
AL A¢ NAM E T
____ GUIA CON TOPE
No sobrecargue el cajbn de alrnacenamlento. Si elcajOn
estd demaslado pesado, podrla salirse del rlel cuando Io
abra. Para abrir el cajbn, tome e_centro de la manlja y
tire hacla afuera.
Pm'a qui_a_o: Tire del cajbn y levdn;elo sobre los
topes de ias guias.
Papa r®®mpli_=_,'lio== Lev_nte0o s_bre los t_pes de las
gulas y desi_celo has_a ponerlo en su lugar.
14
F_E_NT94
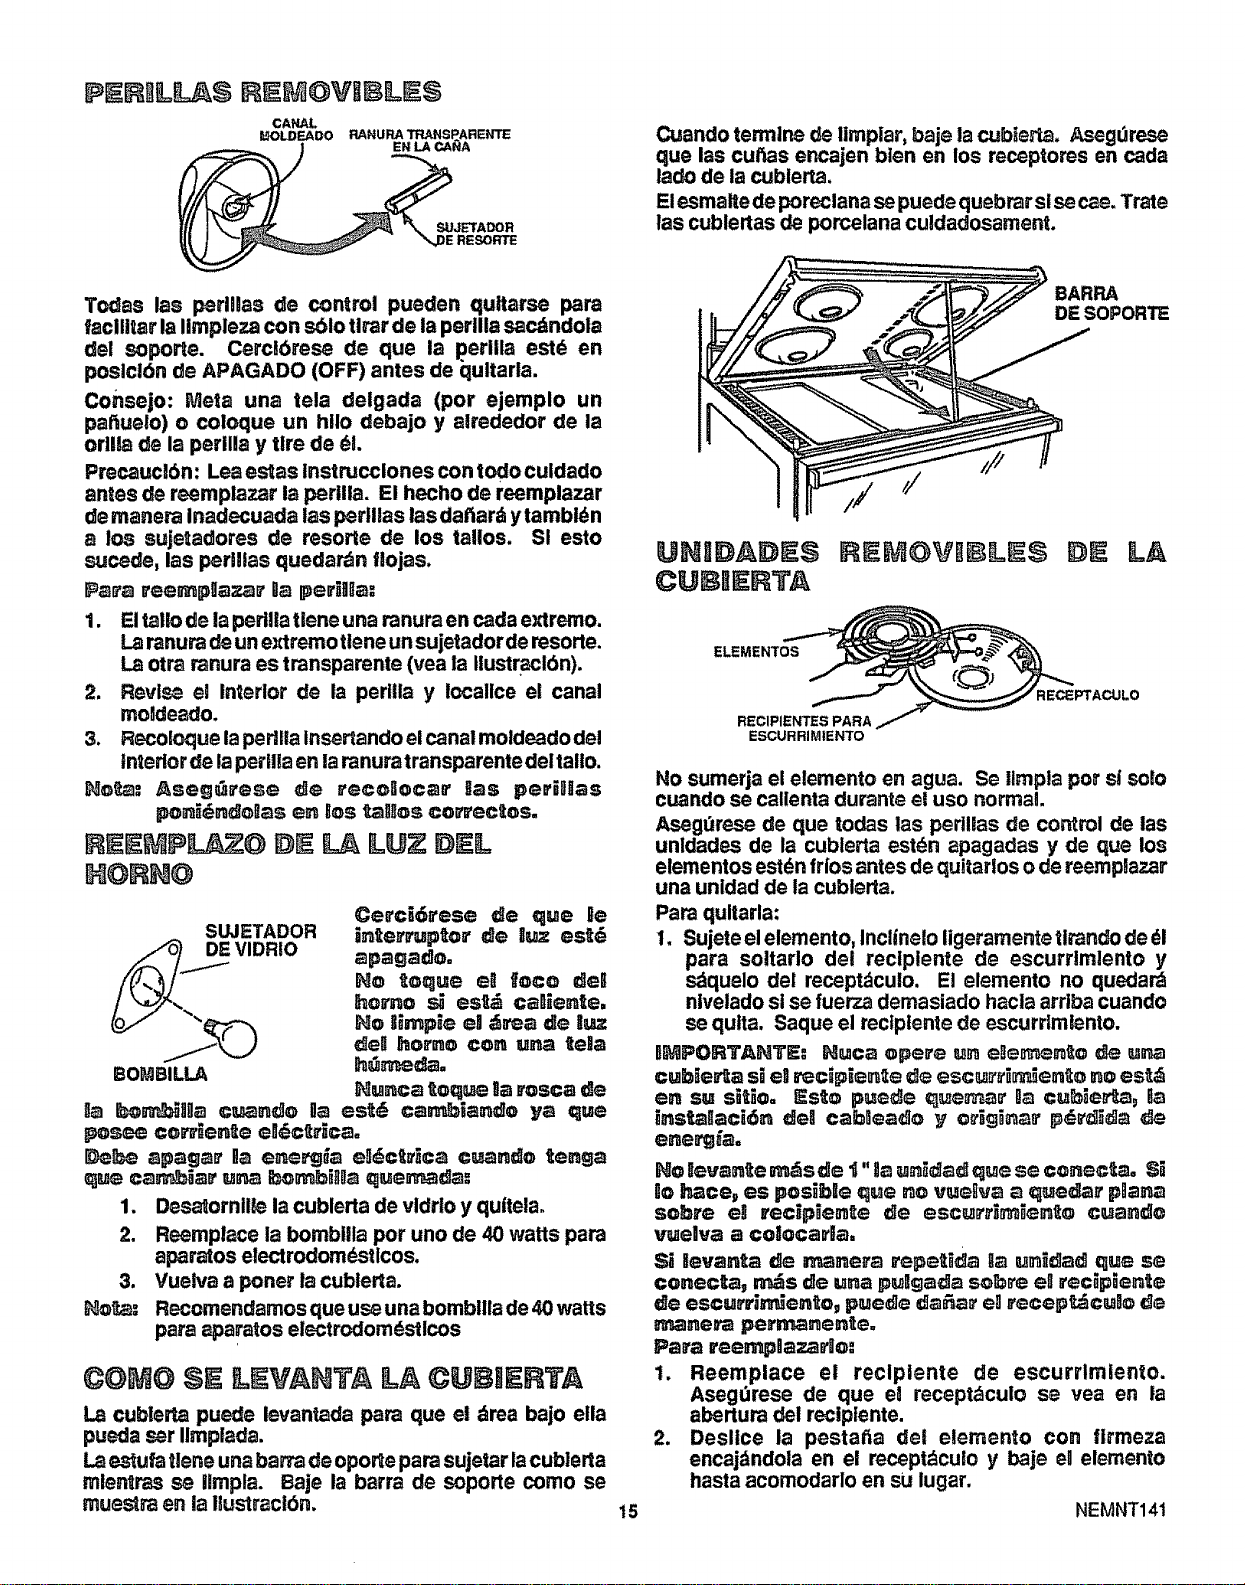
PER LL $ F E OVg LES
CANAL
MOLDEADO RANURA TRANSP.ARENTE
EN LA CANA
_E RESORTE
Todas las perWas de control pueden qultarse para
tacllliar la Iimpleza con sbio tlrar de la perllla sacdndola
del sopor_e. Cerclbrese de que la perllla estd en
poslclbn de APAGADO (OFF) antes de qultarla.
Consejo: Meta una tela delgada (per ejemplo un
pafluelo) o coloque un bile debajo y alrededor de la
orllla de la perilla y tire de _l,
Precaucl6n: Lea es_as Instrucclones con todo culdado
antes de reemplazar la perilla. El hecho de reemplazar
de manera Inadecuada las pertllas las dafiar_ y tambi0n
a los suje_adores de resorte de los tallos. SI esto
sucede, las per, las queder_n flojas.
P_a _ee_pga_r "a periHa:
1. Eltallo de la psriUa tlene una ranura en cada e_rerno.
Laranura de un e_remo ttene un sujetador de resorte.
La otra ranura es transparente (vea la Ilust(aclbn).
2. Revise el Interior de la perilla y locallce el canal
mondeado.
3. Recoloque la perllla insertando el canal moldeado del
interior de la perilia en laranuratransparente deltallo.
No_: Aseg_rese de recoloc_r Bas periHas
_rd_ndioElas en los _]]_os con'ectos.
II EE PL O LA [L=UZDEL
HORNO
SE L VA TA [LAC I IiERTA
La cubleP.apuede levantada para que el drea bajo ella
puedaser Ilrnplada.
Lae._uPaflene unaban'adeopor_eparasujetarlacublerta
mlentras se ilmpla. Baje la barra de soporte come se
enues_raen la Ilustraclbn.
15
Cuando ten'nine de limpiar, baje la cubierta. Asegdrese
que las cuttas encajen bten en los receptores en cada
lack) de la cublerta.
El esmalte de poreclana se puede quebrar si se cae. Trade
las cublertas de porcelana culdadosament.
BARRA
DESOPORTE
ELEMENTOS
RECIPIENTES PARA
ESCURRIMtENTO
RECEPTACULO
He sumerja el elemento en agua. Se llmpla per si solo
cuando se callenta durante el use normal
Asegdrese de que todas las perillas de control de las
unldedes de la cublerta estdn _pagadas y de que los
elementos estdn fr|os antes de quitados o de reempiazar
una unidad de la cublerta.
Para qultarla:
1. Sujete el elemento, lnclinelo ligeramen_e tirando de dl
para soltarlo del reclplente de escurrlmlento y
sdquelo del recept_culo. Et elemento no quedar_
nivelado sl se fuerza dernasiado hacla arriba cuando
se qulta, Saque el recipients de escurrtmiento.
B_PORTA_'r_= _uc_ eper_ un e_ee_'_n_o de u_
cubte_a si e_ recip_en_e d_ escu0'_i_en_o no es_
en su si_io= I_s_e puede queue, ga cu_ie_= i_
ir_s_l;aci_ de0 czbl_eado y o_'llgina_"pd_'c_d]a de
enee_a.
He I_evzn_e m_s die _"la un_diad que se conec_. Si
6o hace_ es posiblle _us no vuetiva a quedia_' pBana
sebre e_ rec_p_en_e die escun,_en_o cuandle
vuelva a co]ocar_a,
Si _evanta de mane_a relpe_id_ Ila un_dadl que se
conecta_ rnds de una pu_gada so, re e_ _ec_pien_e
die escu_rinden_o, puede da_a_ eOrecep_cu_o d_
ev_nera perrnanente,
Pars reemp_aza_o==
1. Reemplace el reciplente de escurrlmlento.
AsegOrese de que e_ recept_culo se yea en la
abertura del reciptente.
2. Deslice la pestafla det elemento con flrmeza
encaj_ndola en el recept_cuio y baje e_ elemento
hasta acomodarlo en su lugar.
NEMNT141
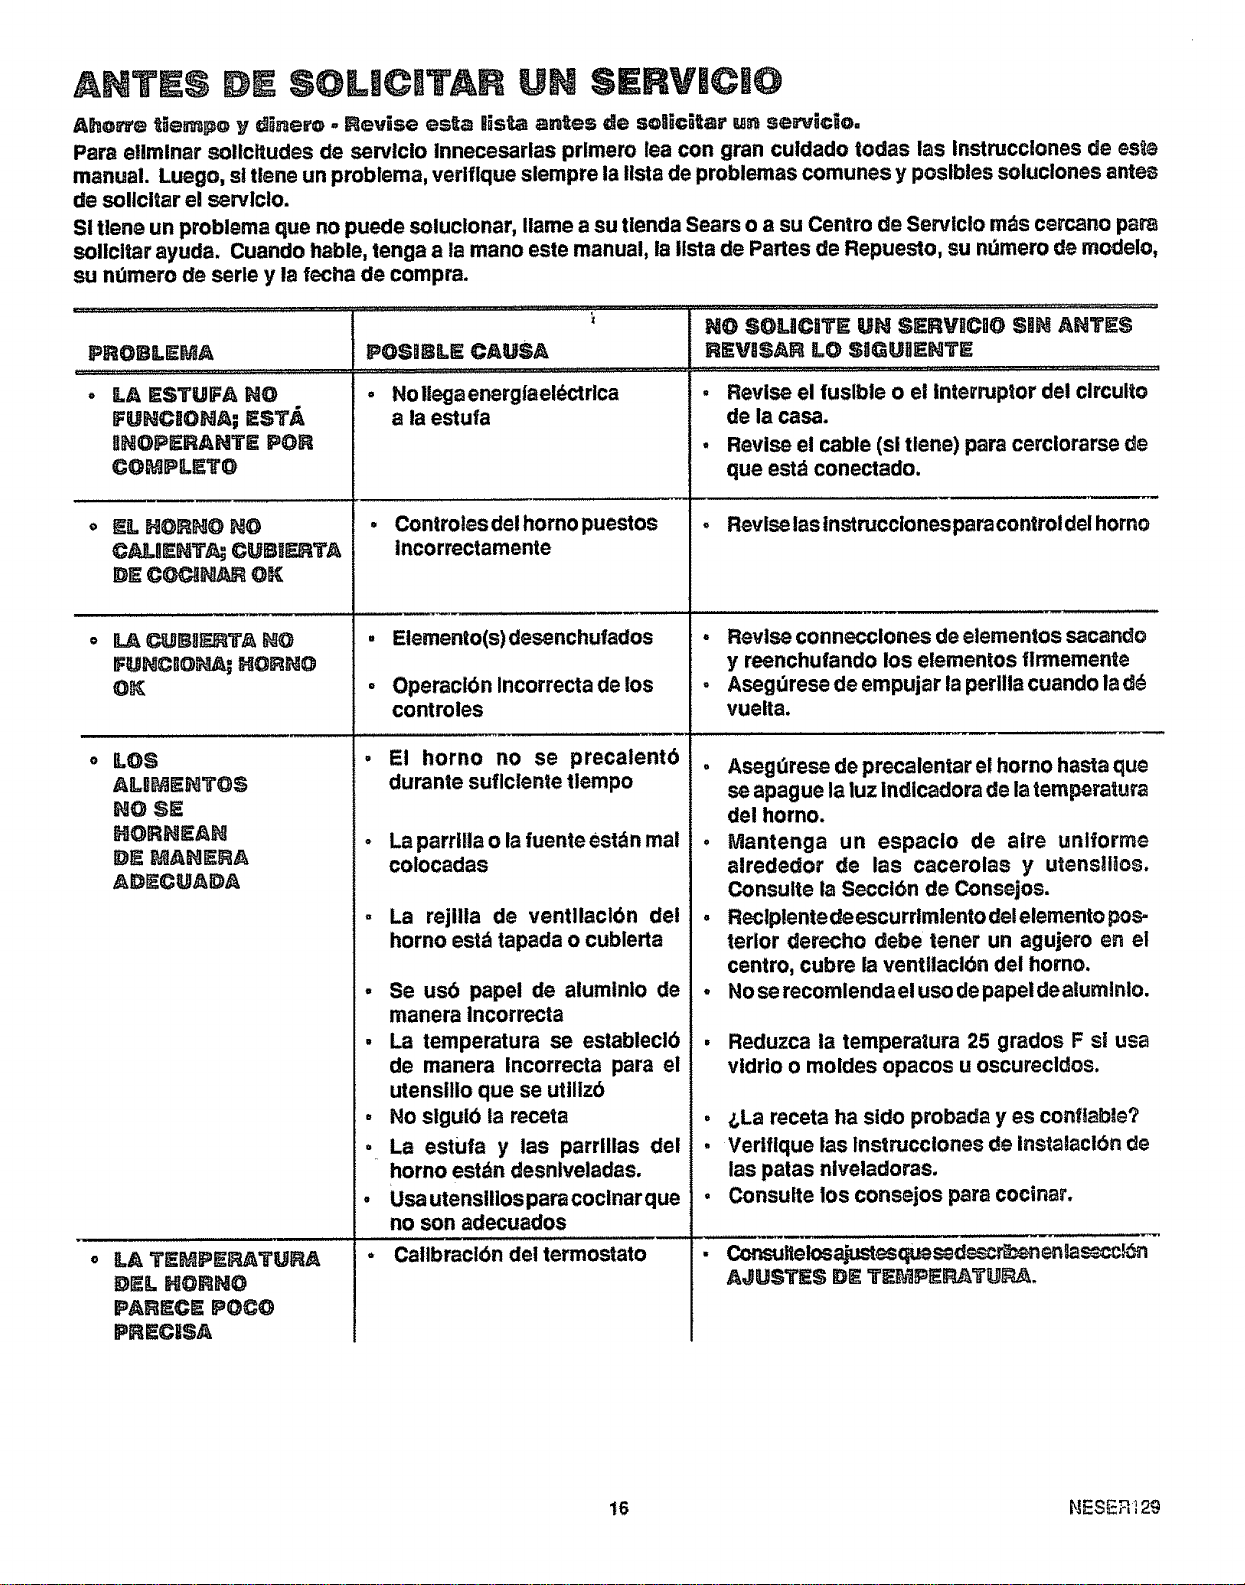
ANTES $OLilCBTAR UN SEIRVIICIIO
Aho_e tiempo y d_nero - Revise es_a ItJs_ antes de so]_©_tm' un sorvicio.
Para e,mlnar sollckudes de servlcio lnnecesarlas prlmero lea con gran culdado todas las Instrucclones de es;e
manual. Luego, sl tlene un problema, veriftque slempre la Iista de problemas comunes y poslbles seluclones antes
de sollcitar el servlclo.
SI tlene un problema que no puede soluclonar, Ilame a su tlenda Sears o a su Centro de Servlclo m_s cercano para
sollcltar ayuda. Cuando hable, tenga a la mano este manual, la Ilsta de Partes de Repuesto, su ndmero de modelo,
PROBLEMA
° LA ESTUFA NO
FUNCIIONA; ESTb.
su nOmero de serle y la fecha de compra.
Z
POS,BILE CAUSA
.... _, .......... ,, ,,,,,,,,................................ _.
• Nollegaenerg|aeld_trica
a la estufa
IINOPERANTZ POR
COMIPLETO
EL HORNO NO
CALIIENT_ CUBtlERTA
DE C(_NAR OK
LA _B_I_TA _O
FUNCK)_ .ORNO
OK
LOS
ALBi_IENTOS
NO $_
HORNEAN
DE MANERA
ADIECUADA
LA Tt£MPERATUIRA
DE_. HORNO
PAR_CS POCO
PRECISA
, Controlesdel homopuestos
Incorrectamente
, Eiemento(s)desenchufados
, Operaclbn Incorrecta de los
controles
, El horno no se precalentb
durante suflclente tlempo
o La parri,a o la fuente estdn mal
colocadas
- La rejilla de ventllacl0n del
horno estd tapada o cublerta
- Se usb papel de alumlnlo de
manera Incorrecta
• La temperatura se estableclb
de manera Incorrecta para el
utensilio que se utilizb
• No slguib la receta
, La estufa y las parrlllas del
homo estdn desnlveladas.
• Usa utensiilosparacoclnarque
no son adecuados
• Callbraclbn del termostato
NO SOUCIITiL_ UN SERVIICI]O SlIN ANTICS
Rt_V_SAR LO SIIQUtI_N_I_
• Revise el fusible o el Interruptor del clrculto
de la casa.
, Revise el cable (sl tlene) para cerciorarse de
que estd conectado.
o Revlselasinstruccionesparacontroldel homo
, Revise connecclones de elementos sacando
y reenchulando los elementos flrmemente
= Asegdrese de empujar la perllla cuando la d_
vuelta.
, Asegdrese de precalentar el horno hasta que
se apague la luz Indlcadora de la temperatura
del homo.
, Mantenga un espaclo de alre unlforme
alrededor de las cacerolas y utensl,os.
Consulte la Secclbn de Consejos.
• Reclplente de escurrlmlent° de!element° P°s"
terlor derecho debe tenet un agujero en el
centro, cubre la ventllaclbn del homo.
° No se recomlenda el uso de papel de alumlnlo.
Reduzca ia temperatura 25 grados F si usa
vidrlo o moldes opacos u oscurecldos.
, _La receta ha sido probada yes confiable?
, Veriflque ias lnstrucciones de insta_aclbn de
las patas niveladoras.
• Consulte los consejos para cocinar.
• Co_su_telosajus_esquesed_u_ _as_.c_
AJUSTE$ _ TF_P_P_T_#,.
16 HESse's,29
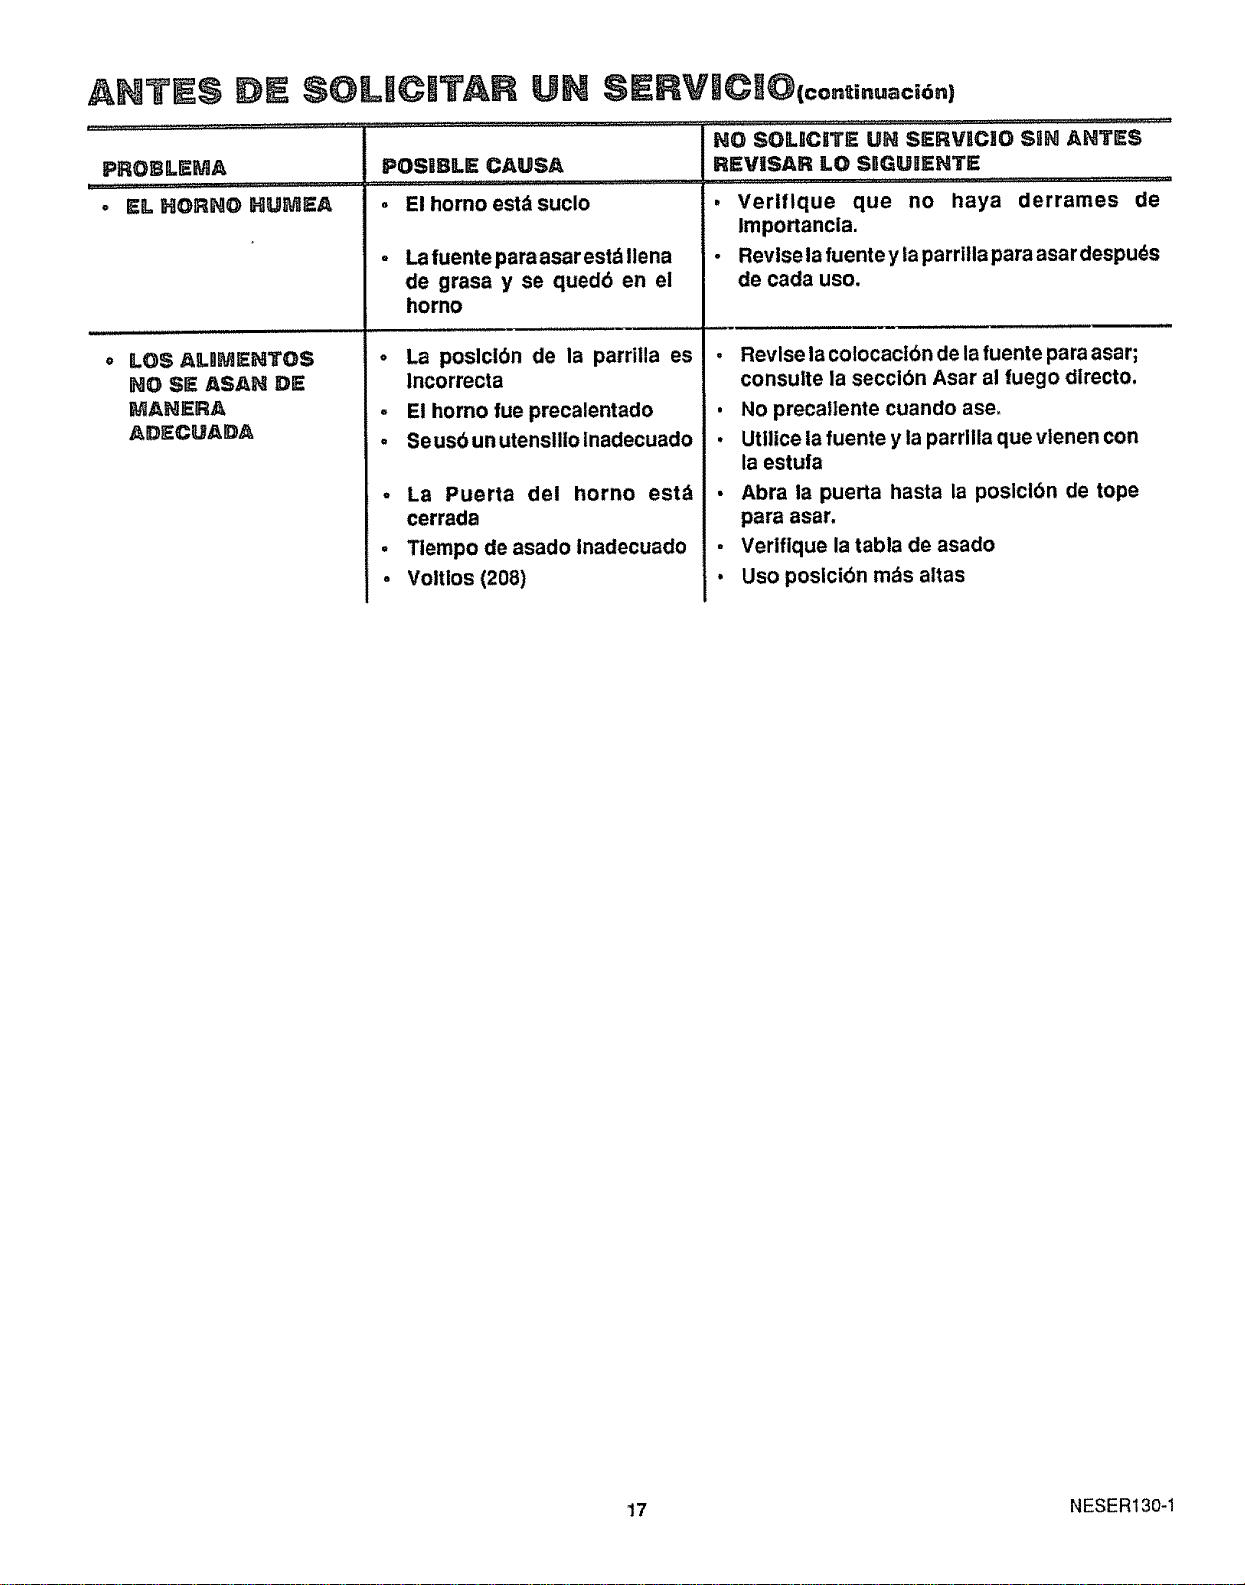
ANTES DE $@L_CITAFI
PROBLEMA
• EL HORNO HUMEA
POSIBLE CAUSA
• El homo estd suclo
LOS AUMEHTOS
H@ SE ASAH DE
MAHERA
ADECUADA
UN SERVlCi@(co...._cu_.)
........ Nos0UCSTS,. .........
REwsARLOS_aU_E.Ts
............... • ..................................... :................... ,,,
, Veriflque que no haya derrames de
Importancla.
• Revisela fuente y la parriila para asar despuds
de cada uso.
, Revise la colocact6n de la fuente para asar;
consulte la secclbn Asar al fuego dlrecto.
• No precaliente cuando ase_
• Utllice la fuente y la parriila que vlenen con
la estufa
• Abra la puerta hasta la posicibn de tope
para asar.
, Verifique la tabla de asado
• Uso poslcibn mds altas
Lafuente para asar estd Ilena
de grasa y se quedb en el
homo
o La poslclbn de la parrilla es
lncorrecta
= El homo rue precalentado
° Seusbunutensilioinadecuado
, La Puerta dei horno estd
cerrada
° Tiempo de asado inadecuado
, Voltios (208)
17 NESER130-1
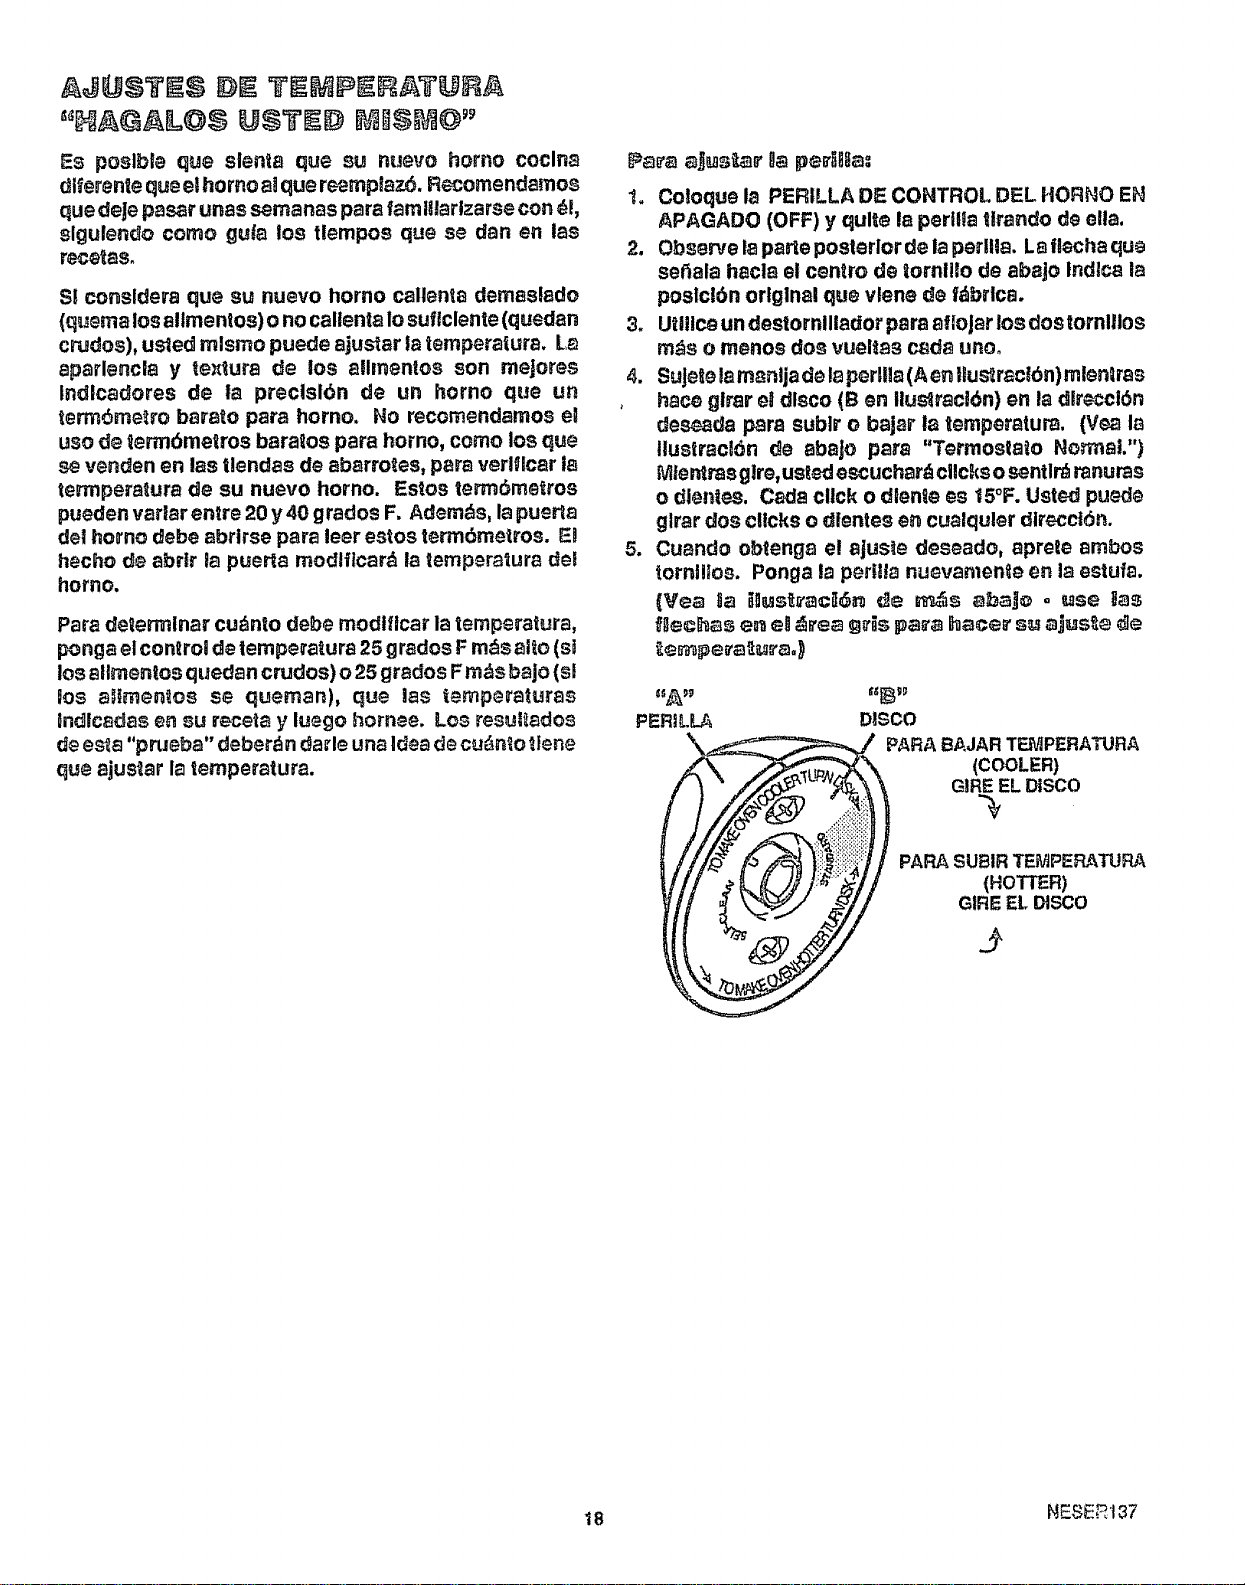
!14@$TI$ iiiiiiiTIIItlPIIIIIATUI
"HAQ L@I @$TI!@ IIII$III@"
Es poslble que slenta que su nuevo horno coclna
dlerenie que el homo al que reemplaz6. Recomendamos
que deJepasar unas semanas para tamllartzarss con 4_!,
slgulendo como guia los tlempos que se dan en las
recetas.
S! consldera que su nuevo horno callenta demaslado
(quema los alimentos) o no callenta 1osuflclente (quedan
cPJdos), usled mlsmo puede ajustar la temperatura. L_
ap_rlencla y iextur_ de los almentos son mejores
Indlcadores de ta preclslbn de un homo que un
terrn_metro baralo para home. No recomendamos e_
uso de lerm6metros baralos para homo, como los que
s_ venden en las tlendas de abarro_es, para verlflcar i_
termperatura de su nuevo horno. Estos term6metros
pueden varlar entre 20 y40 grados F. Ademds, la puerta
del homo debe abrtrse para leer estos term6metros. EP
hecho de abrir la puerta modlflcard la tempera_ura det
homo.
Para determinar cudnto debe modiflcar la temperatura,
ponga el control de temperatura 25 grados F m_s alto (sl
los alimentos quedan crudos) o 25 grados Fm_s b_jo (el
los allmen_os se queman), que ias temp_raturas
lndtc_das en su r_ceta y luego homes. Los resui_dos
de es-_a"prueba" deber_tn darle una Idea de cu_n_o 11eRe
que ajustar la temperatura.
t Coloque la PERILLA DE CONTROL DEL HORNO EN
APAGADO (OFF) y qute la perilla tlrando de ella,
2. Observe la parte posterior de la perllla. La fiecha que
se6ala hacla el centro de tornillo de abajo Indlca la
poslclbn original que vlene de fdbrlca.
3. Utlllce un destornlllador para afloJar los dos tornlllos
rn_s o menos dos vueffss c_da unoo
4. SuJeRelamanijade laperlla (Aen tus_mc_n) mlentras
0 hsce glrar el disco (Ben ilustraci4m) en la dkeccl_n
deseada para sublr o bajar la temperatura. (Vea la
Ilustrac_On de abaJo para "Termostato N_nnst.")
t,ltentras glre, us_edescuchard cllc_¢sosentlrd ranuras
o dientes. C_la click o dienle es 15°F. Usted puede
glrar dos clicks o dlentes e_ cualquler dlreccl6n.
5. Cuando obtenga el ajus_e deseado, aprete ambos
tornilos. Ponga la pertla nuevamen_e en la estufa.
(Yea ta ilusI_'acl£_ Ie _s alzaj_ . use tat
flechas e_ el£_e8 g_ispa_ hace_ su aiusIede
PERILLA DISCO
P_,RA BAJAR TF-MPERATURA
(COOLER)
GIR£ EL DISCO
PAR_susm TE_P_R,_TUP_
(HOTTER)
GIRE EL DISCO
18 NESER137
Parapartesde reparacioneso de
reemplazoque necesita
Llamede 7 am - 7 pm,7 dfas a la semana
1oS@@o366oPART
(1-800=366°7278)
Parareparacionesy serviciode rnarcas
rnayoresensu casa
Llame 24 horas al dfa, 7 dfas a la semana
o8@@o4oR
(1°800°473°7247)
Paraubicar un Centrode Servicio de
Reparacionesen su drea
Llame 24 horas al dta, 7 dfas a la semana
o8@@o488o
Parainforrnacionesacercade Contratos
de Mantenci6nSearso parapreguntas
acercade un Contratoexistente
Llamede 9 am - 5 pm,Lunes- S&bado
1o8@@o827o6655
LosespecialistasdereparacionesdeAmerica
19

Estimado cllente:
Nuestros esfuerzos
constantes estdn
dirlgidos a asegurar que
su nueva Estufa Kenmore
Ilegue a su hogar en
perfectas condiciones y
le d_ el servicto
adecuado. Como parte
de estos esfuerzos,
sentimos que es
responsabtlldad nuestra
proporclonarle esta
garantia para su estufa.
UN A_O DE GARANTBA COMPLETA PARA LAS FUNC_ONES
TODAS LAS PARTES EXCEPTO ILAS DE VlIDRltO
SI, dentro del lapso de un a=5oa partir de la fecha de instalach_n, cualquter paste
que no sea de vldrio, funciona mal debido a un defecto en el material oen lamano
de obra, Sears la reparard o la reemplazard, sin costo aigunoo
GARANTIA TOTAL DE 30 DIAS PAPA LAS PARTE$ DE V]DRIO Y EL
ACABADO DE ESMALTE PORCELANIZ_DO, PARTES DE _TAL
PiBNTADO O BRllLLANTE
SI, dentro de los trelnta dfas posterlores a la instalaci6n, cualquier parte de vidrio
o el acabado de cualquler esmalte porcelanizado o parts de metal plntado o
brillante tlene defectos en el material o mano deobra, Sears reemplazard laparts,
sin costo alguno.
GAPANTJlA TOTAL DE 90 DIAS E_'_AJUST_-S MECAH_COS
Durante 90 dtas a partir de lafecha de lnstalach_n, Sears proporcionard, sin costo
alguno, cualquler aJuste mecdnico necesario para la correcta operaci6n de la
estufa, exceptuando el mantenimlento normal.
SI la estufa estd suJetaa otro uso que no sea el privado familiar, la cobertura de
la garantfa menclonada arrlba serd efectlva sblo durante 90 d/as.
EL SERVICIO DE GARANTIA ESTA DISPONIBLE COH SOLO
PONERSE EN CONTACTO CON EL CENTRO 0 DEPARTA_ENTO DE
SERVBCIO SEARS MAS CERCANO EN LOS ESTADOS UNDDO_.
Esta garantfa se aplica s61ocuando este producto se use en los Estados Unidos.
Esta garantfa le brlnda derechos legales espectficos, y tambi_n puede tener
otros derechos que vaHan de un estado a otto.
SEARS, ROEBUC_ _ CO.
Dept. 720PSO
3333 Beverly Road
Hoffrnan Estat_es, gL 60t79
"Le damos servlclo a io que vendemos" es la manera de asegurarle que puede depender de Sears pare el servicio
porque el servicio Sears se oirece en todo el pats.
Su Estuia Kenmore tiene un valor agregado cuando usted considera que Sears posee una unidad de servicio
cerca deusted, que cuenta con un equlpo Sears det_cnicos capacitados., ,t_cnicos profesionales especiflcamente
entrenados pare manejar los aparatos Sears, y que tlenen acceso alas partes, herramientas y equipo para
esegurar que cumplamos nuestro compromtso con usted: "iLe damos servicio a Io que vendemos!"
PARA A_PLI_AR EL VALOR DE SU ESTUFA, COMPRE UN CONTRATO DE tVtANTEt'_E_'_TO S_IRS.
LasestufasKenmore estdndisel_adas,fabrlcadas
y probadas para brindarle a_os de operaci6n
conflable. Sin embargo, cualquier aparato
modernopuede requerir de algOn servtctodevez
encuando. Lagarantia Sears,ademdsdeicontrato
de Mantenimlento Sears le brlndan proteccl_n
contra cuentas de reparaclones tnesperadas y le
aseguran que dlsfrute de la m_xlma eflclencla en
estufas.
He aqutuna garantla comparativa y una tabla del
contrato de Mantenlmtento que le muestra los
beneficlos de un contrato Mantenlmtento Sears
para Estufas.
A_os de cobertura de la proptodad ler ai_o 20 a_o 3or a;3o
qua no sean de porcelana o vidrlo
90 DAYS
G
30 DAYS
13
2 At,,,,o,-oo ,ioo AM
RevisiOn anua] de manten|mlento
preventtvo a solicltud d_ ustad AM A_J_ A_
G - G=rantt_ A M - Contralo d_ M,_nt_nlml_lo
PONGASE EN CONTACTO CON SU VENDEDOR DE SEARS O CON EL CENTRO DE SERV_C_O SEARS DE L_t
LOCAUDAD HOY M_SMO Y COMPRE UN CONTRATO DE MANTEN_MIENTO SEARS.
_{'_{"_Or_®lLa rnarca de apara_os e_ec_='odorn_s_icos de mayor venue .n _m_r,ca
Vend_da por SEARS, ROEBUCN AND CO., Ho_fman Estates, IlL _0_ 79
_mpreso en LaFayett:e, Ge_rgia

