User Manual for Microwave Oven
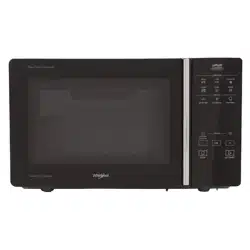
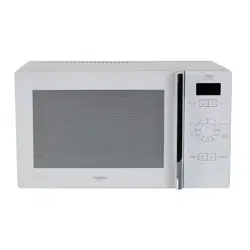
CONTROL PANEL

|
|
- Microwave button
- Grill button
- Combi (Combi Grill / Combi Air) button
- Jet Reheat Menu button
- Jet Defrost Menu button
- Display
- Auto clean / Clock button
- Minus button
- Stop button
- OK button
- Forced Air button
- Steam button
- Crisp button
- Chef menu button
- Stop Turntable button
- Plus button
- Jet Start button
|
 |
|
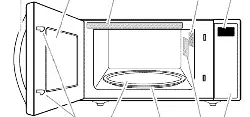
18. Grill icon
19. Jet Defrost Menu icon
20. Chef Menu icon
21. Auto Clean icon
22. Stop Turntable icon
23. Pre-heat icon
24. Microwave icon
25. Forced Air icon
26. Crisp icon
27. Jet Reheat Menu icon
28. Steam Menu function icon
29. Low rack icon
30. High rack icon
31. Seconds icon
32. Temperature icon
33. Weight / Portions selection
34. Microwave power (Watt)
35. Food Type selection
36. Clock setting / Time selection
|
GENERAL USE
 STAND-BY mode
The oven is in Stand-by mode when the clock is displayed (or, if the clock has not been set, when the display will show “:”).
 START PROTECTION / CHILD LOCK
This automatic safety function is activated one minute after the oven has returned to “Stand-by mode”. When the safety function is active the door must be opened and closed in order to start the cooking, otherwise the display will show “door”.

 PAUSE OR STOP COOKING
To pause cooking: The cooking can be paused to check, turn or stir the food by opening the door. The setting will be maintained for 5 minutes.
To continue cooking: Close the door and press the Jet Start button ONCE. The cooking is resumed from where it was paused.
If you don’t want to continue cooking you can: Remove the food, close the door and press the Stop button.
When the cooking is finished: The display will show the text “End”. An acoustic beep will signal once a minute for 10 minutes, this is normal behaviour intended for cooling the product.
Depending on the product, the cooling fan or the internal lamp may continue to operate. If desired, simply press the STOP button or open the door to cancel the signal and stop the cooling time. Please note that reducing or stopping this programmed cooling cycle will not have a negative impact on the functioning of the product.
Note: The oven will only hold the settings for 60 seconds if the door is opened and then closed after the cooking is finished.
 ADD / STIR / TURN FOOD
Depending on the selected function, it could be needed to stir / turn food during cooking. In these cases the oven will pause cooking and it will ask you to perform the needed action. When required, you should:
- Open the door.
- Add / Stir / Turn the food (depending on the required action).
- Close the door and restart by pressing the Jet Start button.
Note: if the door is not opened within 2 minutes since the request to Stir or Turn the food, the oven will continue the cooking process (in this case the final results may not be the optimal ones).
 CLOCK
CLOCK

|
|
To set the Clock of your appliance:
- Press & hold the Auto Clean/Clock button for 3 second.
- Press the Plus/Minus buttons to set the hours.
- Press the OK/Jet Start. The minutes will start blinking.
- Press the Plus/Minus buttons to set the minutes.
- Press the OK/Jet Start button.The clock is set.
Note: The first time the appliance is plugged in (or after a power failure), the prodct will automatically enter the Clock Setting mode; in this case, please follow the above procedure starting from step No.2.
|
Tips and suggestions:
• If the clock has not been set after plug in, the clock will shows “12:00”.
• During the setting of the clock, if you press the Stop button or if the setting is not completed after a long time, the oven will exit from setting mode and the setting will be invalid, display will shows “:”.
 JET START

|
|
This function allows to start the Microwave function at maximum power (800 watt) for 30 seconds, simply pressing the Jet Start button. It is suggested for quick reheating of food with a high water content such as clear soups, coffee or tea.
- Press the Jet Start Button.
Pressing the Jet Start button the Microwave function will start at maximum microwave power (800 Watt) for 30 seconds.
Each additional pressing will increase the cooking time of 30 seconds.
If you have already selected a cooking function (e.g.: Grill), press Jet Start to start the selected function.
|
Tips and suggestions:
- It is possible to change the power level and the duration time even after the cooking process has been already started. To adjust the power level, simply press the Microwave button repeatedly. To change the duration time, please press the Plus/Minus buttons, or press the Jet Start button to increase the duration time of 30 seconds.
 MICROWAVE

|
|
Microwave function allows to quickly cook or reheat food and beverages.
Suggested Accessory:
 Plate Cover (sold separately) Plate Cover (sold separately)
- Press the Microwave button. The maximum power level (800 W) will be shown on the display and the watt icons starts blinking.
- Press Plus/Minus buttons to set the power.
- Press the OK button to confirm.
- Press Plus/Minus buttons to set the cooking time.
- Press the OK/Jet Start button. The function will start.
Once the cooking process has been started:
- To adjust the power: press the Microwave button then press the Plus/Minus button to adjust the value.
- To increase time/decrease time: press the Plus/Minus buttons, or press Jet Start button to increase the cooking time of 30 seconds.
|
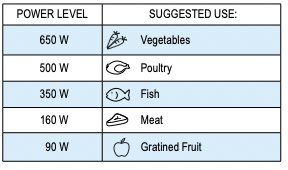
| Power |
Suggested use: |
| 800 W |
Reheating of beverages, water, clear soups, coffee, tea or other food with a high water content. If the food contains egg or cream choose a lower power. |
| 650 W |
Cooking of fish, meat, vegetables etc |
| 500 W |
More careful cooking e.g. high protein sauces, cheese and egg dishes and to finish cooking casseroles. |
| 350 W |
Simmering stews, melting butter. |
| 160 W |
Defrosting. |
| 90 W |
Softening ice cream, butter and cheeses. keep warming. |
 Grill
Grill

|
|
This function uses a powerful quartz grill to brown foods, creating a grill or a gratin effect.
Grill function allows to brown foods like cheese toast, hot sandwiches, potato croquettes, sausages, vegetables.
Dedicated accessory: High Rack High Rack
- Press the Grill button.
- Press Plus/Minus buttons to set the cooking time.
- Press the OK/Jet Start button. The function will start.
|
Tips and suggestions:
- For food like cheese, toast, steaks and sausages, place food on the high Wire Rack.
- Ensure that the utensils used are heat resistant when you use this function.
- Do not use plastic utensils when grilling. They will melt. Items of wood or paper are not suitable either.
- Be careful, not to touch the ceiling beneath the grill element.
 Combi grill (Microwave + GRILL)
 |
|
This function combines Microwave and Grill heating, allowing you to cook gratin in less time.
Dedicated accessory: High Rack High Rack
- Press the Combi button.
- Press the Plus/Minus buttons to select “1“ and press the OK Button to confirm.
- Press Plus/Minus buttons to set the Microwave power (see the table below).
- Press the OK button to confirm.
- Press Plus/Minus buttons to set the cooking time.
- Press the OK/Jet Start button. The function will start.
Once the cooking process has been started:
- To adjust the power: press the Microwave button then press the Plus/Minus button to adjust the value.
- To increase time/decrease time: press the Plus/Minus buttons, or press Jet Start button to increase the cooking time of 30 seconds.
|
Tips and suggestions:
- Do not leave the oven door open for long periods when the Grill is in operation, as this will cause a drop in temperature.
- If you cook large gratins which require stopped turntable rotation, then turn the dish after approximately half the cooking time. This is necessary for getting colour on the whole top surface.
- Ensure that the utensils used are microwave safe and heat resistant when you use this function.
- Do not use plastic utensils when grilling. They will melt. Items of wood or paper are not suitable either.
- Be careful, not to touch the ceiling beneath the grill element.
- If you cook large food such as poultry, please use microwave and oven safe dish, put the dish on turntable directly
 Forced air

|
|
This function allows you to obtain oven-baked dishes. Using a powerful heat element and fan, the cooking cycle is just like that of a traditional oven. Use this function to cook meringues, pastry, cakes, soufflés, poultry and roast meats.
Dedicated accessory: Low Rack Low Rack
- Press the Forced Air button.
- Press Plus/Minus buttons to set the temperature.
- Press the OK button to confirm.
- Press Plus/Minus buttons to set the cooking time.
- Press the OK/Jet Start button. The function will start. The Forced Air icon will blink as soon as the set temperature will be reached.
|
Once the cooking process has been started:
- To adjust the temperature: press the Forced Air button then press the Plus/Minus buttons to adjust value.
- To increase time/decrease time: press the Plus/Minus buttons, or press Jet Start button to increase the cooking time of 30 seconds.
Tips and suggestions:
- Use the low Wire Rack to put food on to allow the air to circulate properly around the food.
- Ensure that the utensils used are ovenproof when you use this function.
- You can use the Crisp Plate as a Baking Plate when you bake small items like cookies and muffins. Place the plate on the low Wire Rack.
 Combi Air (Microwave + Forced Air)
 |
|
This function combines Microwave and Forced Air cooking, allowing you to prepare oven-baked dishes in less time. Combi Air allows you to cook dishes like roast meat, poultry, jacket potatoes, precooked frozen foods, fish, cakes and pastry.
Dedicated accessory: Low Rack Low Rack
- Press the Combi button.
- Press the Plus/Minus buttons to select “2“ and press the OK button to confirm.
- Press the Plus/Minus buttons to set the temperature and press the OK button to confirm.
- Press the Plus/Minus buttons to set the Microwave power (see the table below) and press the OK button to confirm.
- Press the Plus/Minus buttons to set the time.
- Press the OK/Jet Start button. The function will start.
| Power LEVEL |
Suggested use: |
| 350 W |
Poultry, Jacket potatoes, Lasagne & Fish |
| 160 W |
Roast meat & Fruit cakes |
| 90 W |
Cakes & Pastry |
|
Once the cooking process has been started:
- To increase time/decrease time: press the Plus/Minus buttons, or press Jet Start button to increase the cooking time of 30 seconds.
Tips and suggestions:
- Use the low Wire Rack to put food on to allow the air to circulate properly around the food.
- Ensure that the utensils used are microwave safe and ovenproof when you use this function.
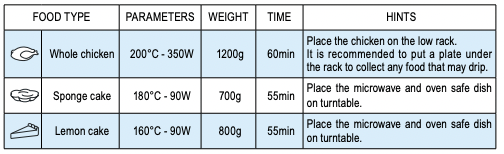
- The below table shows some recipes you can prepare using the Combi Air function:
 Crisp
Crisp
 |
|
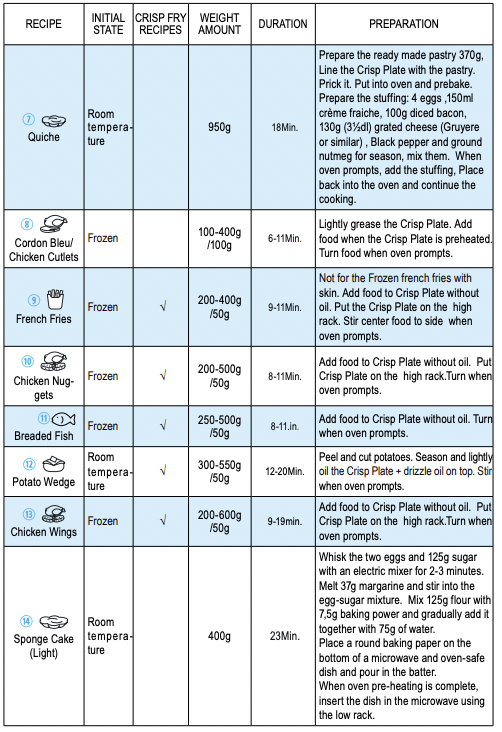
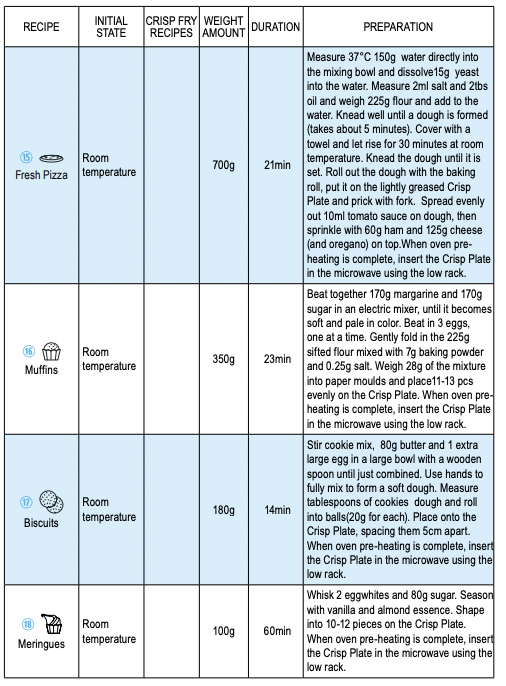
This exclusive Whirlpool function allows for perfectly golden brown results both on the top and bottom surfaces of the food. Using both Microwave and Grill cooking, the Crisp Plate will rapidly reach the right temperature and begin to brown and crisp the food.
The following accessories are designed to be used with the Crisp function:
- the Crisp Plate
- the Crisp Handle (sold separately) to manage the hot Crisp Plate.
Use this function to reheat and cook pizzas, quiches, and other dough based food. It is also good for frying bacon and eggs, sausages, potatoes, french fries, hamburgers and other meats etc. without adding oil (or by adding only a very limited quantity of oil).
Dedicated accessories:
 Crisp Plate Crisp Plate  Crisp Handle Crisp Handle
- Press the Crisp button.
- Press the Plus/Minus buttons to set the cooking time.
- Press the OK/Jet Start button. The function will start.
Use only the provided Crisp Plate with this function. Other available Crisp Plates on the market will not give the correct result when using this function.
|
Tips and suggestions:
- Ensure that the Crisp Plate is correctly placed in the middle of the Glass Turntable.
- The oven and the Crisp Plate become very hot when using this function.
- Do not place the hot Crisp Plate on any surface susceptible to heat.
- Be careful, not to touch the ceiling beneath the Grill element.
- Use oven mittens or the Crisp Handle when removing the hot Crisp Plate.
- Before cooking food that does not require a long cooking time (pizza, cakes…), we recommend to pre-heat the Crisp Plate 2-3 minutes in advance.
 JET REheat menu
 |
|
This function allows you to automatically reheat your dishes. Use this function to reheat: soup, sauce, chilled pizza, plated meal, beverage.
Suggested Accessory: Plate Cover (sold separately) Plate Cover (sold separately)
- Press the Jet Reheat Menu button.
- Press the Plus/Minus buttons to set the food class (see the below table) and press the OK button to confirm.
- Press Plus/Minus buttons to set the food weight.
- Press the OK/Jet Start button. The reheating cycle will start. The duration of the function will be automatically calculated on the basis of the selected food and weight.
Note: after a certain time, the display could ask you to add / stir / turn the food for a better reheat. See “Add / Stir / Turn food” chapter on page 10.
|
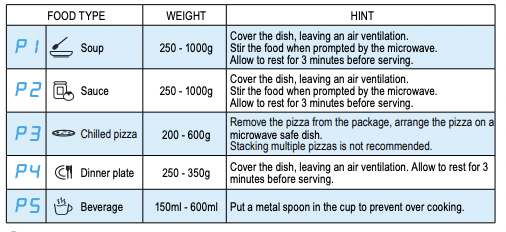
Tips and suggestions:
- Arrange the thicker, denser food to the center of the plate and the thinner or less dense food the outside of the plate.
- Place thin slices of meat on top of each other or interlace them.
- Due to food variability, the cooking duration is set on an average shape, we always recommend to check the internal doneness of food and in case prolong the cooking time to achieve proper doneness.
- Waiting 1-2 minutes before serving the reheated food will improve the results, especially for frozen food.
- Plastic foil should be scored or pricked with a fork, to relieve the pressure and to prevent bursting, as steam builds-up during cooking.
- Place food onto a microwave safe and heatproof dinner plate or dish.
 JET DEFROST menu
 |
|
This function allows you to quickly defrost food automatically. Use this function to defrost Meat, Poultry, Fish, Vegetables and Bread.
- Press the Jet Defrost Menu button.
- Press the Plus/Minus buttons to set the food type (see the below table) and press the OK button to confirm.
- Press Plus/Minus buttons to set the food weight.
- Press the OK/Jet Start button. The defrosting cycle will start. The duration of the function will be automatically calculated on the basis of the selected food and weight.
In order to achieve the best possible results the product will ask you to turn/ stir the food when needed. See “Add / Stir/ Turn food” chapter on page 10.
|

Tips and suggestions:
- Arrange the thicker, denser food to the center of the plate and the thinner or less dense food the outside of the plate. Place thin slices of meat on top of each other or interlace them.
- For food not listed in this table and if the weight is less or more than recommended weight, you should choose manual function with lower microwave power (like microwave 160W).
- Due to food variability, the cooking duration is set on an average shape, we always recommend to check the internal doneness of food and in case prolong the cooking time to achieve proper doneness.
- Waiting 1-2 minutes before serving the reheated food will improve the results, especially for frozen food.
- Plastic foil should be scored or pricked with a fork, to relieve the pressure and to prevent bursting, as steam builds-up during cooking.
- Place food onto a microwave safe and heatproof dinner plate or dish.
 Steam MENU
 |
|
This function allows you to obtain healthy and natural tasting dishes by cooking with steam. Use this function to steam cook food such as pasta, rice, vegetables and fish.
The provided steamer accessory must always be used with this function. You will be asked to set the boiling time for the rice and pasta according to your food package recommendation.
To cook pasta (P1) or rice (P2):
Dedicated Accessory: Steamer without the grid Steamer without the grid

|
Follow the process below (Example for pasta):
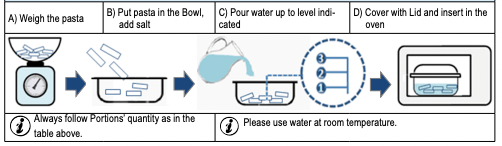
Set the function on the control panel:
- Press the Steam menu button.
- Press Plus/Minus buttons to set the food type (see the table below) and press the OK button to confirm.
- Press Plus/Minus buttons to set the level (according to the portions table above).
- Press the OK/Jet Start button. The function will start.

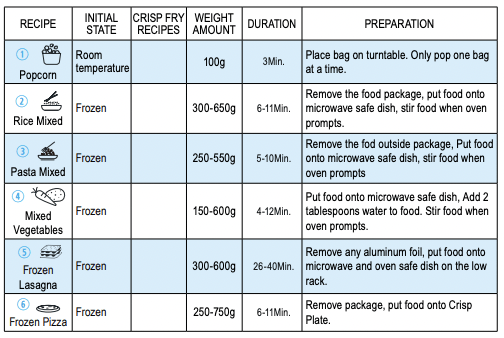
 Chef menu
 |
|
A selection of automatic recipes with pre-set cooking parameters values to offer optimal cooking results.
- Press the Chef Menu button.
- Press and hold Plus/Minus buttons to select the food type (see the below table).
- Press the OK button to confirm.
- Depending on the food class, the display could ask you to set the Weight. Use the Plus/Minus buttons to set the asked values.
- Press the OK/Jet Start button. The function will start
The duration of the function will be automatically calculated on the basis of the selected food and weight.
Tips and suggestions:
- For large amounts/pieces of food like roasts and oven baked fish a standing time of 8 - 10 minutes is recommended.
- For food like vegetables, hot dogs and steamed fish recommended standing time is 2 - 3 minutes.
- For details requested to add/stir/turn food, see table in page 10.
|
 STOP TURNTABLE
To get the best possible results with this particular microwave, the Glass Turntable has to rotate while cooking. However, in case you need to use very large dishes that could not turn freely in the oven, it is possible to stop the rotation of the Glass Turntable using the Stop Turntable function,
This function works only with the following cooking functions:
- Forced Air
- Combi Grill (Microwave + Grill)
- Combi Air (Microwave + Forced Air)
 Auto CLEAN
This automatic cleaning cycle will help you to to clean the microwave oven cavity and to remove unpleasant odors.
 |
|
BEFORE STARTING THE CYCLE:
- Put 235ml water into a container (see our recommendations in the below section “Tips and suggestions”).
- Place the container directly on the middle of Glass Turntable.
TO START THE CYCLE:
3. Press the Auto Clean button, the cleaning cycle duration will be visible on the display.
4. Press the OK/Jet Start button to start the function
WHEN THE CYCLE IS FINISHED,a beep will signal once every 10 seconds for 10 minutes when the cleaning cycle is finished:
5. Press the Stop button or open the door to cancel the signal.
6. Remove the container.
7. Use a soft cloth or a paper towel with mild detergent to clean the interior surfaces.
|
Tips and suggestions:
- For a better cleaning result, it is recommended to use a container with a diameter of 17- 20cm, and a height that is lower than 6.5cm.
- It is recommended to use a container of light plastic material that is suitable for the microwave.
- As the container will be hot after the cleaning cycle is complete, it is recommended to use a heat resistant glove when removing the container from the microwave.
- For a better cleaning effect and removal of unpleasant odors, add some lemon juice to the water.
- The Grill element does not need cleaning since the intense heat will burn off any splashes, but the ceiling beneath it may need regular cleaning. This should be done with a soft and damp cloth with mild detergent.
- If the Grill is not used regularly, it should be run for 10 minutes a month to burn off any splashes, in order to reduce the risk of fire.
TROUBLE SHOOTING GUIDE
If the oven does not work, do not make a service call until you have made the following checks:
- The Turntable and Turntable Support is in place.
- The Plug is properly inserted in the wall socket.
- The Door is properly closed.
- Check your Fuses and ensure that there is power available.
- Check that the oven has ample ventilation.
- Wait for 10 minutes, then try to operate the oven once more.
- Open and then close the door before you try again.
- This is to avoid unnecessary calls for which you will be charged.
When calling for Service, please give the serial number and type number of the oven (see Service label). Consult your warranty booklet for further advice
If the mains cord needs replacing it should be replaced by the original mains cord, which is available via our service organization. The mains cord must only be replaced by a trained service technician.
WARNING: Service only to be carried out by a trained service technician. It is hazardous for anyone other than a trained person to carry out any service or repair operation, Which involves the removal of any cover, which gives protection against exposure to microwave energy. Do not remove any cover.
CAUTION: Hot surface.
MAINTENANCE & CLEANING
Failure to maintain the oven in a clean condition could lead to deterioration of the surface that could adversely affect the life of the appliance and possibly result in a hazardous situation.
Do not use metal scouring pads, abrasive cleansers, steel-wool pads, gritty washcloths, etc. which can damage the control panel, and the interior and exterior oven surfaces. Use a cloth with a mild detergent or a paper towel with spray glass cleaner. Apply spray glass cleaner to a paper towel.
At regular intervals, especially if spill overs have occurred, remove the turntable, the Turntable Support and wipe the base of the oven clean
Use a soft and damp cloth with mild detergent to clean the interior surfaces, front and rear of the door and the door opening.
Do not use steam cleaning appliances when cleaning your microwave oven.
The oven should be cleaned regularly and any food deposits removed.
Cleaning is the only maintenance normally required. It must be carried out with the microwave oven disconnected.
Do not spray directly on the oven.
This oven is designed to operate with the turntable in place.
Do not operate the microwave oven when the turntable has been removed for cleaning.
Do not allow grease or food particles to build up around the door.For stubborn stains, boil a cup of water in the oven for 2 or 3 minutes. Steam will soften the marks.
This product offers an AUTO CLEAN function, which allows for easy cleaning of the microwave cavity. For more details, please refer to the AUTO CLEAN section on page 26.
The Grill element does not need cleaning since the intense heat will burn off any splashes, but the ceiling beneath it may need regular cleaning. This should be done with a soft and damp cloth with mild detergent. If the Grill is not used regularly, it should be run for 10 minutes a month to burn off any splashes, in order to reduce the risk of fire.
CAREFUL CLEANING:
The Crisp Plate should be cleaned in mild, detergent water. Heavily soiled areas can be cleaned with a scouring cloth and a mild cleanser.
Always let the Crisp Plate cool off before cleaning.
Do not immerse or rinse with water while the Crisp Plate is hot. Quick cooling may damage it.
Do not use steel-wool pads. This will scratch the surface.
Dishwasher safe:
• Turntable Support
• Wire Rack
• Crisp Handle (accessory sold separately)
• Glass Turntable
• Steam Accessory