User Manual
FEATURES

IMPORTANT
Cleaning your Appliance
Remove tape and glue residue from surfaces before turning on the unit. Rub a small amount of liquid dish soap over the adhesive with your fingers. Rinse with warm water and dry with a soft cloth.
Do not use sharp instruments, rubbing alcohol, flammable fluids, or abrasive cleaners to remove tape or glue. These products can damage the surface of your appliance.
After you remove all of the package materials, clean the inside of your unit before using it. See the “Care & Cleaning” section in this manual.
See important information about cleaning glass shelves and covers in the “Optional Features” section of this manual.
IMPORTANT
Moving your Appliance
Your unit is heavy. When moving the appliance for cleaning or service, be sure to cover the floor with cardboard or hardboard to avoid floor damage. Always pull the unit straight out when moving it. Do not wiggle or “walk” the appliance when trying to move it as floor dam- age could occur.
INSTALLATION
This Use & Care Guide provides general operating instructions for your model. Use the unit only as instructed in this Use & Care Guide. Before starting the unit, follow these important first steps.
Location
Choose a place that is near a grounded electrical outlet.
If possible, place the appliance out of direct sunlight and away from the range, dishwasher or other heat sources.
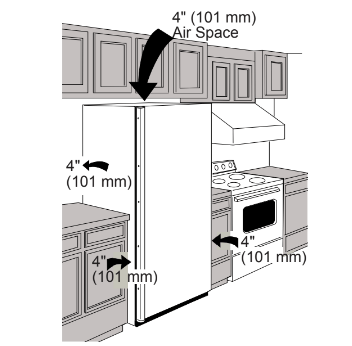
Allow space around the unit for good air circulation. Leave a 4 inch (101 mm) space on all sides of the unit for adequate circulation.
NOTE: The exterior walls of the unit may become quite warm as the compressor works to transfer heat from the inside. Temperatures as much as 30° F warmer than room temperature can be expected. For this reason it is particularly important in hotter climates to allow enough space for air circulation around your appliance.
Leveling
The appliance must have all bottom corners resting firmly on a solid floor. The floor must be strong enough to support a fully loaded unit.
NOTE: It is VERY IMPORTANT for your appliance to be level in order to function properly. If the unit is not leveled during installation, the door may be misaligned and not close or seal properly, causing cooling, frost or moisture problems.
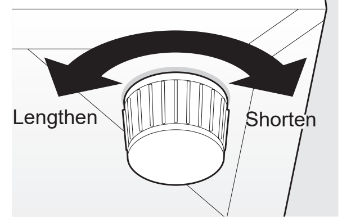
To level: Adjust the bottom feet by turning counterclockwise to lengthen and clockwise to shorten. Use a carpenter’s level to level the appliance from front to back. Adjust the leveling feet in front, 1⁄2 bubble higher, so the door closes easily.
CAUTION: To allow door to close and seal properly, DO NOT let food packages extend past the front of shelves.
DOOR REVERSAL
IMPORTANT: Before you begin, turn the appliance tem- perature control to “off” and remove the electrical power cord from the wall outlet. Remove any food from door shelves.
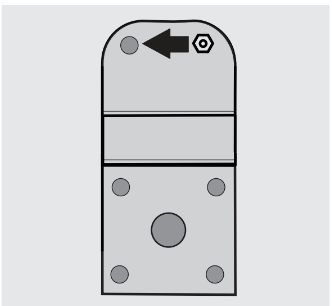
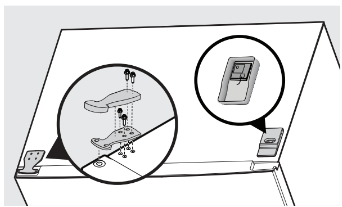
1. Using an 8 mm socket with a ratchet (not supplied), remove the right top hinge cover and unsnap the alarm board; leave the alarm board and wiring attached to the unit. Remove the top hinge from the right side. Remove the decorative hinge on the left side.
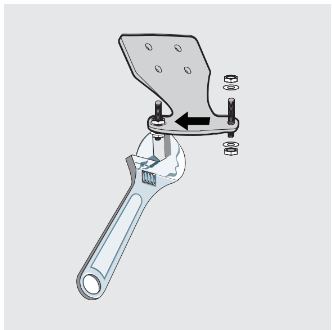
2. Remove the hinge pin from the right side hole and reinstall it on the left side hole on the top hinge using an adjustable wrench.
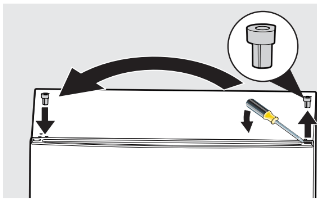
3. With a flat head screwdriver gently pry upward on hinge pin bearing to remove from the door. Reinstall on the opposite side of the door.
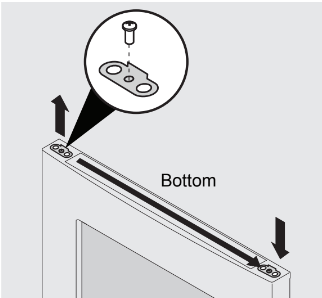
4. Remove the door and lay flat on a pad- ded surface. Remove the door stop plate at the bottom of the door, and reinstall on the opposite side of door.
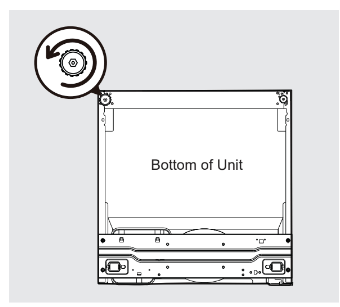
5 . Lay freezer on its back on a padded surface.
6. Unscrew the right adjustable leveling foot (A). Remove the 4 screws (B) hold- ing the bottom hinge (C) to the cabinet with an 8 mm socket with ratchet. Screw the adjustable leveling foot back into the cabinet hole (D).
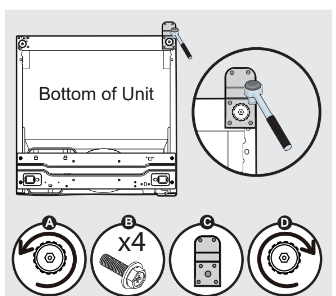
7. Unscrew and insert the hinge pin on the opposite side of the bottom hinge using an adjustable wrench.
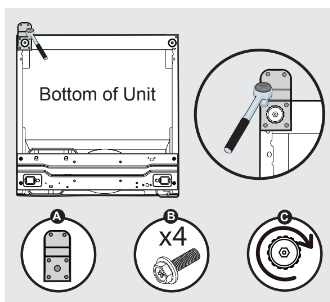
8. Unscrew the left adjustable leveling foot.
9. Attach the bottom hinge (A) with 4 screws (B) and adjustable leveling foot (C) on the left side of cabinet.
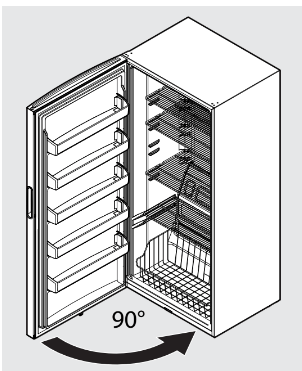
10. Carefully stand the freezer up. Place the door on the bottom hinge pin at 90° and rotate to the closed position.
11. Attach the top hinge and hinge cover on the left side. Attach the alarm board to the decorative cover, then attach cover to the unit. make sure not to pinch the wires on the alarm board.
12. Plug in the electrical power cord.
CONTROLS AND SETTINGS
Cool Down Period
- For safe food storage, allow 4 hours for the appliance to cool down completely. The unit will run continuously for the first sev- eral hours. Foods that are already frozen may be placed in the unit after the first few hours of operation. Unfrozen foods should NOT be loaded into freezer until freezer has operated for 4 hours.
- When loading freezer, freeze only 3 pounds of fresh food per cubic foot of freezer space at one time. Distribute packages to be frozen evenly throughout the freezer. It is not necessary to turn control knob to a colder setting while freezing food.
Temperature Control
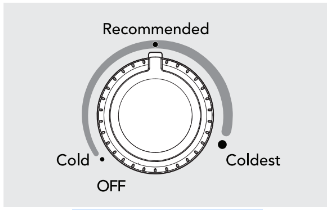
The temperature control is located inside the freezer on the back wall. The temperature is factory preset to “Recommended” to pro- vide satisfactory food storage temperatures. However, the temperature control is adjustable to provide a range of temperatures for your personal satisfaction. If a colder temperature is desired, turn the temperature control knob toward COLDEST and allow several hours for temperatures to stabilize between adjustments. Temperature Range: -10 to +10oF
Door Ajar Alert
If your door has been left open for 5 minutes or more the audible alert will sound until the door is closed.
Power On Light
The Power On Light indicates the appliance is properly connected to electrical power. The light glows even when the temperature control is turned to OFF. If the light goes out, refer to "Appliance does not run” in the TROUBLE- SHOOTING section. A flashing light with an audible alert indicates a high temp condition (see “ Temperature Too warm” in the TROU- BLESHOOTING section.
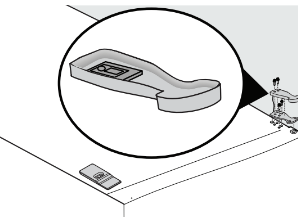
High Temp Alert
If the temperature inside the cabinet exceeds 21°F (-6°C), the LED light at the bottom of the cabinet will flash and the alarm will sound. The alarm can be reset by opening and then closing the door. The LED will continue to flash until the cabinet temperature is below 21°F (-6°C).
STORAGE FEATURES
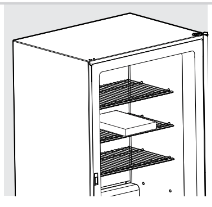
Shelf Adjustment
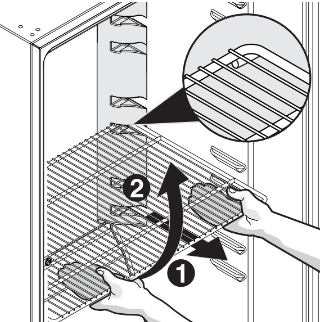
Appliance shelves are easily adjusted to suit individual needs. Before adjusting the shelves, remove all food.
To adjust sliding shelves, remove shelf by pulling forward.
To replace shelf, rest side edges on any pair of shelf rails and carefully push shelf back into position. Make sure the 2 stops at the rear corners of the shelf securely fit into the notches at rear of the liner.
Fixed Door Bin
The fixed door bin is especially designed to hold large containers or freezer bags.

SAVING ENERGY

- The appliance should be located in the coolest area of the room, away from heat producing appliances or heating ducts, and out of direct sunlight.
- Let hot foods cool to room temperature before placing in the unit. Overloading the appliance forces the compressor to run longer. Foods that freeze too slowly may lose quality or spoil.
- Be sure to wrap foods properly and wipe containers dry before placing them in the unit. This cuts down on frost build-up inside the unit.
- Shelves and baskets should not be lined with aluminum foil, wax paper, or paper toweling.
- Liners interfere with cold air circulation, making the freezer less efficient.
- Organize and label food to reduce door openings and extended searches. Remove as many items as needed at one time, and close door as soon as possible.
CARE AND CLEANING
CAUTION: Damp objects stick to cold metal surfaces. Do not touch interior metal surfaces with wet or damp hands.
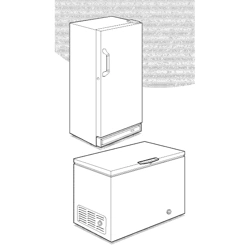
Some upright freezers are frost-free and defrost automatically, but should be cleaned occasionally.
Cleaning the Inside
Wash inside surfaces of the unit with a solution of 2 tbsp. (25 g) of baking soda in 1 qt. (1 l) warm water. Rinse and dry. Wring excess water out of the sponge or cloth when cleaning in the area of the controls, or any electrical parts.
Cleaning the Outside
Wash the cabinet with warm water and mild liquid detergent. Rinse well and wipe dry with a clean soft cloth. Replace parts and food.
Do not use razor blades or other sharp instruments, which can scratch the appliance surface when removing adhesive labels. Any glue left from the tape can be removed with a mixture of warm water and mild detergent, or touch the residue with the sticky side of the tape already removed. DO NOT REMOVE THE SERIAL PLATE.
WARNING: If leaving door open while on vacation, make certain that children cannot get into the appliance and become entrapped.
WARING: Do not wash removable parts in a dishwasher.
Vacation and Moving Tips
Short Vacations: Leave the appliance operating during vacations of less than 3 weeks.
Long Vacations: If the unit will not be used for several months, remove all food and unplug the power cord. Clean and dry the interior thoroughly. Leave the freezer door open slightly, blocking it open if necessary, to prevent odor and mold growth.
Moving: Disconnect the power cord plug from the wall outlet. Remove food, defrost, and then clean the appliance. Secure all loose items such as base panel, baskets, and shelves by taping them securely in place to prevent damage. In the moving vehicle, secure the unit in an upright position, and secure to prevent movement. Also protect outside of unit with a blanket, or similar item.
TROUBLESHOOTING
APPLIANCE OPERATION
Appliance does not run.
- Appliance is plugged into a circuit that has a ground fault interrupt.
- Use another circuit. If you are unsure about the outlet, have it checked by a certified technician.
- Temperature Control is in the OFF position or POWER OFF position.
- See Setting the Temperature Control section.
- Appliance may not be plugged in or plug is loose.
- Ensure plug is tightly pushed into outlet
- Hose fuse blown or tripped circuit breaker.
- Check/replace fuse with a 15-amp time- delay fuse. Reset circuit breaker.
- Power outage
- Check house lights. Call local electric company.
Appliance runs too much or too long.
- Room or outside weather is hot.
- It’s normal for the appliance to work lon- ger under these conditions.
- Appliance has recently been disconnected for a period of time.
- It takes 4 hours for the appliance to cool down completely.
- Large amounts of warm or hot food have been stored recently.
- Warm food will cause appliance to run more until the desired temperature is reached.
- Door is opened too fre- quently or too long.
- Warm air entering the appliance causes it to run more. Open door less often.
- Door may be slightly open.
- Ensure door is tightly closed.
- Temperature control is set too low.
- Turn control knob to a warmer setting. Allow several hours for the temperature to stabilize.
- Gasket is dirty, worn, cracked, or poorly fitted.
- Clean or change gasket. Leaks in door seal will cause appliance to run longer in order to maintain desired temperatures.
APPLIANCE TEMPERATURES
Interior tem- perature is too cold.
- Control is set too low.
- Set control to a warmer setting. Allow sev- eral hours for temperature to stabilize.
Temperature inside appli- ance is too warm.
- Control is set too warm.
- Set fresh food control to a colder setting. Al- low several hours for temperature to stabilize.
- Door is opened too fre- quently or too long.
- Warm air entering the appliance causes it to run more Open door less often.
- Door may not be seating properly.
- See “DOOR PROBLEMS” section.
- Large amounts of warm or hot food has been stored recently.
- Warm food will cause appliance to run more until the desired temperature is reached.
- Appliance has recently been disconnected for a period of time.
- Appliance requires 4 hours to cool down completely.
External tem- perature is too warm.
- The external walls can be as much as 30oF warmer than room temperature.
- This is normal while the compressor works to transfer heat from inside the cabinet.
SOUND AND NOISE
Louder sound levels when appliance is on.
- Modern appliances have increased storage capacity and more stable tempera- tures. They require a high efficiency compressor.
- This is normal. When the surrounding noise is low, you might hear the compres- sor running while it cools the interior.
Longer sound levels when compressor comes on.
- Appliance operates at higher pressures during the start of the ON cycle.
- This is normal. Sound will level off or dis- appear as appliance continues to run.
Popping or cracking sound when compres- sor comes on.
- Metal parts undergo ex- pansion and contraction, as in hot water pipes.
- This is normal. Sound will level off or dis- appear as the appliance continues to run.
Bubbling or gur- gling sound, like water boiling.
- Refrigerant (used to cool the appliance) is circulating throughout the system.
Vibrating or rattling noise.
- Appliance is not level. It rocks on the floor when it is moved slightly.
- Level the unit. Refer to ”Leveling” in the INSTALLATION Section.
- Floor is uneven or weak. Appliance rocks on floor when it is moved slightly.
- Ensure floor can adequately support the ap- pliance. Level the appliance by putting wood or metal shims under part of the appliance.
- Appliance is touching the wall.
- Re-level or move the appliance slightly. Refer to “Leveling” in the INSTALLATION Section.
WATER/MOISTURE/FROST INSIDE APPLIANCE
Moisture forms on inside walls.
- Weather is hot and humid.
- The rate of frost buildup and internal sweating increases. This is normal.
- Door may not be seating properly.
- Door is opened too often or too long.
WATER/MOISTURE/FROST OUTSIDE APPLIANCE
Moisture forms on outside.
- Door may not be seating properly, causing cold air from inside to meet warm air from outside.
ODOR IN APPLIANCE
Odor in appliance.
- Interior needs to be cleaned.
- Clean interior with sponge, warm water, and baking soda.
- Foods with strong odors are in the appliance.
DOOR PROBLEMS
Door will not close.
- Appliance is not level. It rocks on the floor when it is moved slightly.
- This condition can force the cabinet out of square and misalign the door. Refer to "Leveling” in the INSTALLATION Section.
- Floor is uneven or weak. Appliance rocks on floor when it is moved slightly.
- Level the floor by using wood or metal shims under the appliance or brace floor supporting the appliance.
LIGHT BULB IS NOT ON
Power Avail- able Light is not on
- LED may be burned out.
- Contact a qualified service dealer.
- No electric current is reaching the appliance.
- See “Appliance does not run” in "APPLIANCE OPERATION”.
- The door has been left open for more than 5 minutes.